

Page 1

S
ERVICE
M
ANUAL
& PARTS LIST
MODULE NO.
QW-4791
REF. NO. S/M-998
AUG. 2007
LWQ-160DE
LWQ-160LE
Ver.1 : May. 2008
(WITHOUT PRICE)
Page 2

CONTENTS
Page
1. SPECIFICATIONS: MODULE QW-4791 ..................................................... 1
2. DRAWINGS: MODULE QW-4791
2-1. CHECKING TERMINALS AND COMPONENTS ............................................ 2
3. EXPLODED VIEW: MODULE QW-4791 ..................................................... 3
4. PARTS LIST: MODULE QW-4791 ............................................................... 4
5. PRECAUTIONS FOR REPAIR: MODULE QW-4791
5-1. AC (ALL CLEAR) AND REMOVING OF MODULE ....................................... 6
5-2. MEASURING CURRENT CONSUMPTION ................................................... 6
5-3. ACCURACY CHECKING ............................................................................... 7
5-4. TIME CALIBRATION SIGNAL TEST MODE .................................................. 8
APPENDIX
Operation Guide 4791
Page 3
1. SPECIFICATIONS: MODULE QW-4791
Item Detail
Battery
Battery life
Current consumption
Alarm system
Accuracy
Accuracy setting system
Accuracy checking
Functions:
ESR920W
Approx. 2 years
0.24 µA maximum:µA maximum
See page 6
-
±20 sec./month
Chip capacitor selection
See page 7
• Time calibration signal reception
Auto receive
Manual receive
• Time Calibration Signal
Receivable Time Calibration Signals
Fort Collins, Colorado (Call Sign: WWVD, Frequency : 60kHz)
Rugby, England (Call Sign: MSF, Frequency: 60kHz)
Mainflingen, Germany (Call Sign: DCF77, Frequency: 77.5kHz)
Fukushima, Japan (Call Sign: JJY, Frequency: 40kHz)
Fukuoka/Saga, Japan (Call Sign: JJY, Frequency: 60kHz)
• Regular timekeeping:
Analog: 3 hands (Hour, minutes, seconds)
— 1 —
Page 4
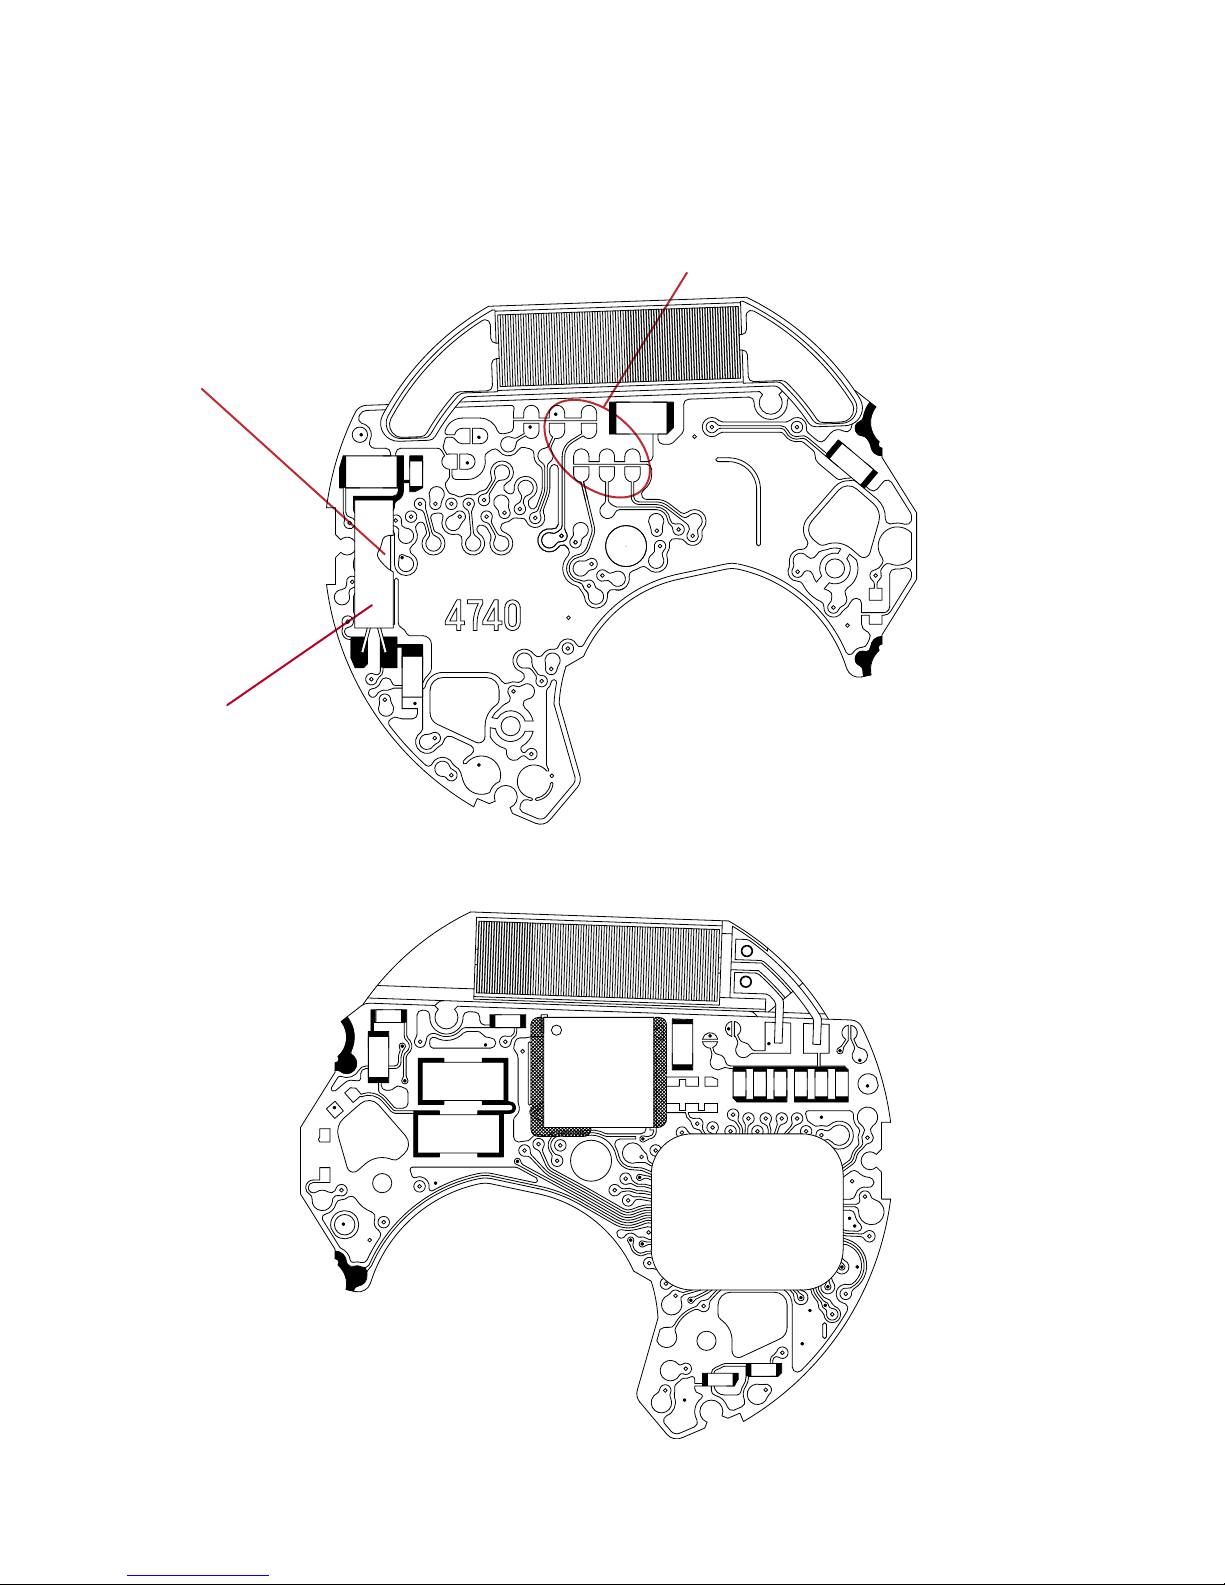
2. DRAWINGS: MODULE QW-4791
R1
R3
DIO13
DIO7
DIO6
XT
VOSC
GND
XT
XT
XTB
VCH GND
VOSC
GND
VDD2
GND
GND
T4
T3
AC
O6
PM_RES
DIO4
O5
O3
VDD2
O4
VCH
T1
DIO3
DIO13
R1
R2
T2
DIO7
O1
O2
SCR
R2
R3
GND
DIO5
VSC
DIO2
DIO1
SCIN
VCC
GND
VSC
GND
GND
GND
GND
GND
DIO14
GND
GND
GND
GNDB
P2'
FET-D
P2
GNDB
GND
GND
VOSC
AC
VDD2
DIO4
O6
P2'
P1' P1'
FET-S'
P1'
P2'
P2
FET-S
VCC
VSC
P1'
FET-S'
VDD2
DIO1
SCIN
GND
GND
SCR
DIO2
P5
P7
P7
P4
GND
Ccp
Ccp
P9
P7
P5
VSC
VDD2
O5
O1
O4
P1
DIO12
DIO3
VCH
PM_RES
GND
SCIN
SCI
N
OSCILLATOR/CRYSTAL
2. PCB ASS'Y
(76410798)
TAPE/ADHESIVE 2306
Short pad for switching modules
D1014-GND: Open (No Soldering)
D1013-GND: Short (Soldering)
2-1. CHECKING TERMINALS AND COMPONENTS
— 2 —
Page 5
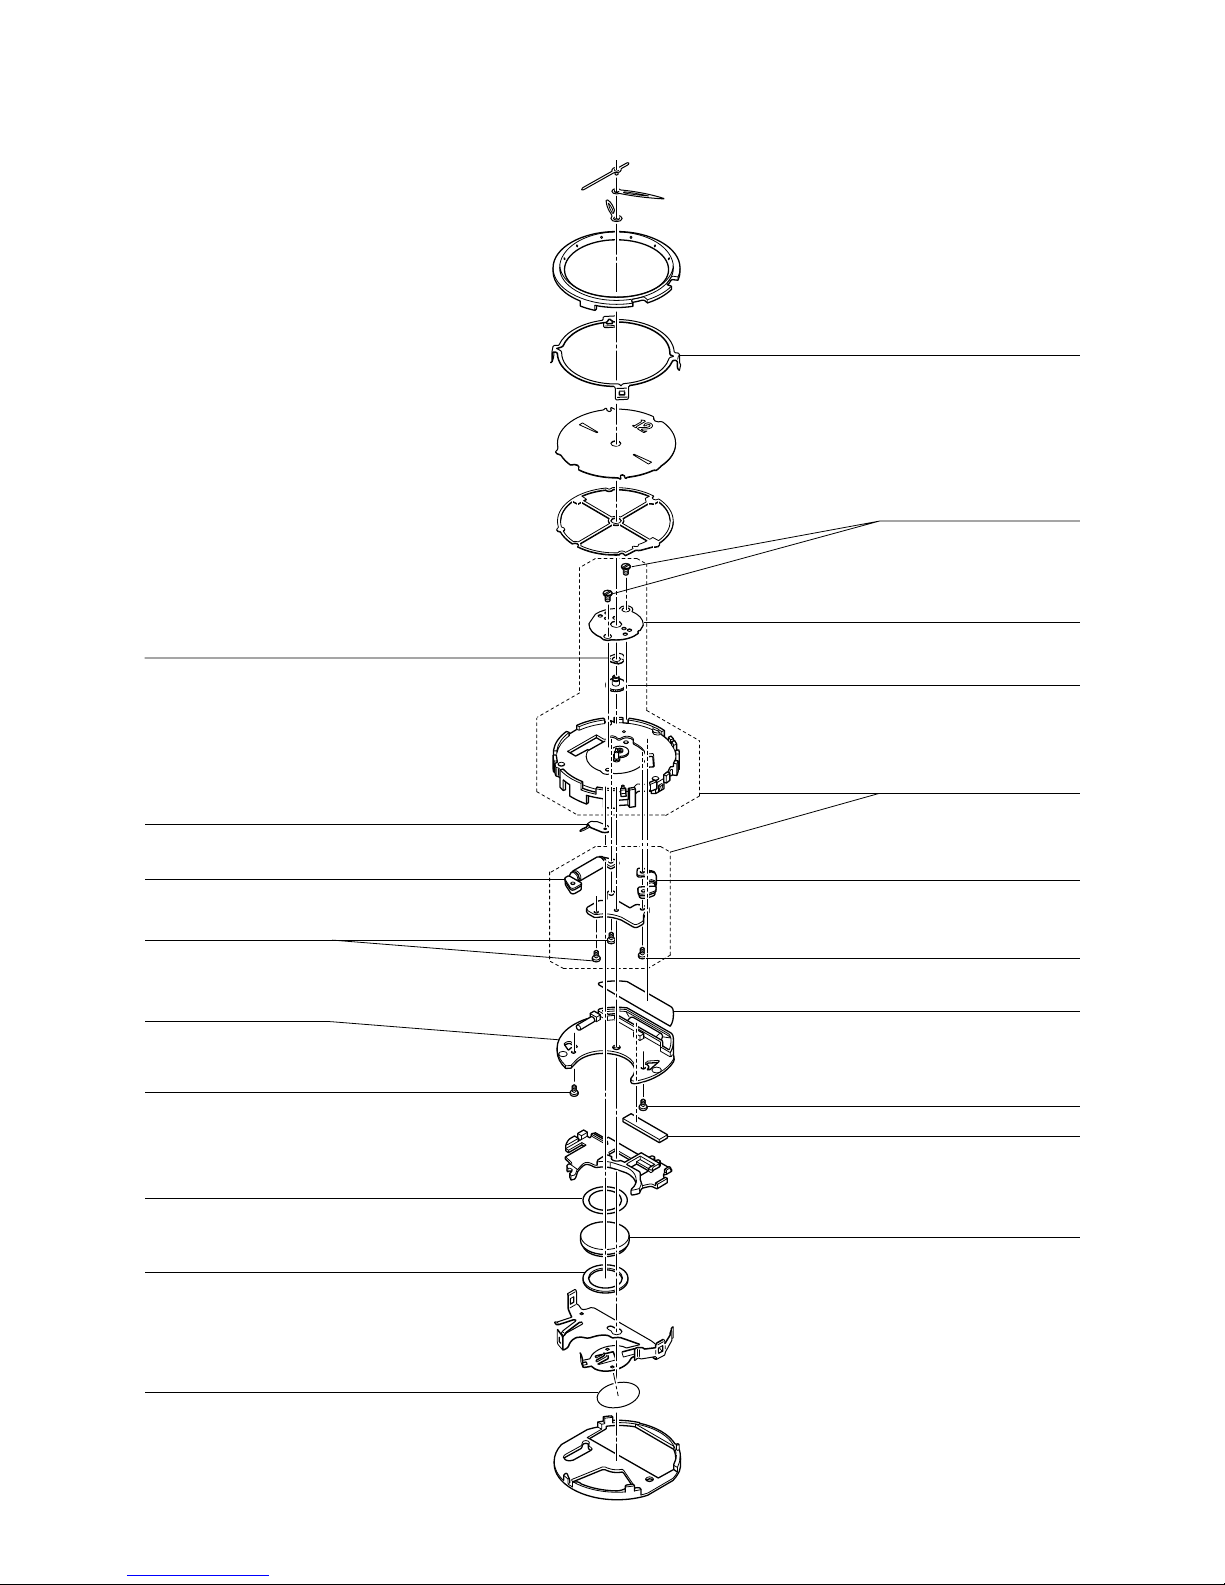
3. EXPLODED VIEW: MODULE QW-4791
17 (72270294)
2 (76410798)
PCB ass'y
8 (10212747)
9 (10209123)
18 (10209118)
1 (76409228)
12 (10209124)
11 (10009244)
15 (10212751)
13 (10234346)
6 (10212752)
3 (19101199)
Battery storage (ESR920W)
5 (10209109)
16 (10212748)
13 (10234346)
7 (10237097)
14 (10212750)
10 (10140782)
4 (10209108)
11 (10009244)
— 3 —
Page 6

4. PARTS LIST: MODULE QW-4791
Q
T
p
A
-
p
p
pply
A
p
p
p
p
A
A
(
)
Y
A
p
(+)
p
W-4791A
1QW-4791AT-01
Note: 1. Prices and specifications are subject to change without prior notice.
2. S
are parts are classified as follows according to their importance in after-sales service.
Rank -----------------------------------------Important
C Rank ----------------------------------------
3. Batteries in Bulk
Batteries in Blister
4. As for order/su
ttention to order
1. The most of normal re
2. Minor
3. Main
similar models.
MAIN PARTS
Item Code No. Parts Name S
arts should be ordered carefully in consideration of the actual usage of your repair and your technical skills.
arts should be ordered and stocked appropriately in consideration of your parts usage anre repair usage for
76410781 MODULE/WITH MOVEMENT QW-4791AT-01TK 1
1 76409228ANALOG BLOCK QW-4323MV-82TK 1
ack on the tray will be supplied from our Overseas Spare Parts Section under charge basis.
ack will be supplied from our Sales Department.
of spare parts, refer to the separate publication "GUIDE BOOK for spare parts supply".
air or initial repair within 1year since released month can be done by main parts.
RJQ528359*001V01
Not Important
ecification Q'TY R
1
2 76410798 PCB ASS'
MINOR PARTS
Item Code No. Parts Name S
3 19101199 BATTERY/STORAGE ESR920W 1 C
4 10209108 COIL ASS'Y 4323-1 RJQ526939*001V02 1 C
5 10209109 COIL ASS'Y 4323-2 RJQ526940*001V02 1 C
6 10212752 CUSHION 4323-1 RJQ527451-001V01 1 C
7 10237097 CUSHION 4323-2 RJQ527452-001V02 1 C
8 10212747 HOLDER 4323 RJQ527417-001V01 1 C
9 10209123 HOLDER RJQ526931-001V01 1 C
/HOUR WHEEL 4323
10 10140782 LABEL 2815 RJQ517198-001V02 1 C
11 10009244 SCREW 2323 Q465649-1 3 C
12 10209124 SCREW 4323 RJQ526942-001V01 2 C
RJQ538072*001V01TK 1
ecification Q'TY R
1
13 10234346 SCREW 4329 RJQ532242-001V01 2 C
14 10212750 SHEET/INSULATION 4323-2 RJQ527449-001V01 1 C
15 10212751 TAPE/ADHESIVE 4323 RJQ527454-001V01 1 C
16 10212748 TERMINAL/BATTERY
Notes: R - Rank
A: Important
C: Not Im
ortant
4323 RJQ527422-001V01 1 C
— 4 —
Page 7

Item Code No. Parts Name Specification Q'TY R
p
1
17 72270294 WASHER 745 Q436294A-1 1 C
18 10209118 WHEEL/HOUR 4323 RJQ527219-001V01 1 C
For the prices and minimum order/supply quantities of the above parts, refer to the Parts Price List P.P.L.-645.
.
Notes: R - Rank
A: Important
C: Not Im
ortant
— 5 —
Page 8

5. PRECAUTIONS FOR REPAIR: MODULE QW-4791
5-1. AC (ALL CLEAR) AND REMOVING OF MODULE
1. Perform AC (ALL CLEAR) when inserting a new battery, or else the memories and/ or counters
may give erratic displays.
Touch the AC contact and the main plate with the metallic tweezers.
The contact should be made for about two seconds.
2. On removing of the module from the case, please insert the precision screw driver between the
module and the case pointed by an arrows.
Note:
hand home position adjustment mode at the home position adjustment mode.
After performing AC(ALL CLEAR), the mode is switched to the second hand and the indicator
Metallic tweezers
5-2. MEASURING CURRENT CONSUMPTION
This model starts correct positioning of the second hand in the H-SET mode immediately after AC.
When it is functioning, the value of consumption current would be a little higher as the internal circuit
operation would be different from the usual status.
To measure a correct consumption current value, operate as follows.
Hold down and turn on the AC, and then let go.
* After the operation above is finished, measure within one minute.
* Supply voltage is 1.5V.
— 6 —
Page 9

5-3. ACCURACY CHECKING
B
B
A
A
B
B
Timekeeping Mode
Press A once, and then press B twice while
holding down A.
TEST MODE
Accuracy Checking Mode
4 o'clock
position
4 o'clock
position
Indicated the last
receiving stationis
Signal Receiving
Te
st Mode
* While displaying the reception result
in the test mode, press the A button.
Module confirmation Mode
(units digit)
Module confirmation Mode
(tens place digit)
Indicated with the
second hand.
B
× 2
1. Module confirmation mode
1) Press the button in the Normal Timekeeping Mode to display the result of the signal receiving test.
2) In the Signal Receiving Test Result Mode, press the button twice while holding down the
button to display the version of the Accuracy Checking Mode.
3) The version is indicated with the second hand. Press the button once to display the tens
place digit of the version; press it once more to display the units digits of the version.
QW-4791: “44”
1) Press button at the module confirmation mode to enter the accuracy checking mode.
2) Second hand shows performing to test the rate of clock.
3) Press button at the Accuracy checking mode to go back to the normal timekeeping mode.
2. Accuracy checking mode
— 7 —
Page 10

5-4. TIME CALIBRATION SIGNAL TEST MODE
1) In the Accuracy Checking Mode, press the button twice to switch to the signal receiving standby
state.
(The last receiving station is indicated with the second hand.)
If the last receiving station is reset with the [All Clear] function, the station to first receive the signal
is indicated.
(JJY40:4sec, JJY60:6sec, WWVB:8sec, MSF:14sec, DCFF:16sec)
2) Press the button to switch to the Signal Receiving Sensitivity Test Mode.
3) Press the button to select the receiving station, and then press the button to start receiving
the signal.
The second hand will move to the READY (33-second) position.
4) The result of the signal reception will be indicated after a while.
Signal recieving department
JJY40 1 o’clock 11 o’clock
JJY60 2 o’clock 10 o’clock
WWVD 3 o’clock 9 o’clock
DCF77 4 o’clock 8 o’clock
MSF 5 o’clock 7 o’clock
The result of the signal reception
Success failure
— 8 —
Page 11

Operation Guide 4791
1
MO0705-EA
Getting Acquainted
Congratulations upon your selection of this CASIO watch. To get the most out of your
purchase, be sure to read this manual carefully.
If all the analog hands are stopped at 12 o’clock...
To conserve battery power, the watch is shipped from the
factory with its functions disabled. All the watch’s analog
hands are stopped at 12 o’clock. To activate the watch’s
functions, press either of the two buttons. This will cause
the analog hands to move to the current time setting.
About This Manual
• Button operations are indicated using the letters shown
in the illustration.
• Each section of this manual provides you with the
information you need to perform operations in each
mode. Further details and technical information can be
found in the “Reference” section.
Hour hand
Minute hand
Second hand
General Guide
• This watch is designed so the function of a button is executed when you release the
button, not when you press it.
• Use A and B to change from mode to mode as shown below.
Press A.
▲
Timekeeping Mode
Receive Result Mode
Home Position
Adjustment Mode
▲
▲
▲
Press A twice.
Hold down A and B
for about five seconds.
Manual Receive
Press any
button.
▲
Hold down A for about two
seconds.
▲
Radio-controlled Timekeeping
This watch receives a time calibration signal and updates its time setting accordingly.
The time calibration signal includes both Standard Time and Daylight Saving Time
(summer time) data.
• This watch switches automatically between Standard Time and Daylight Saving Time
in accordance with the time calibration signal it receives. There is no indicator
showing whether the time currently shown by the watch is Standard Time or Daylight
Saving Time.
• This watch is designed to pick up the time calibration signal transmitted in Germany
(Mainflingen) and England (Rugby).
• See the information under “Signal Reception Troubleshooting” if you experience
problems with time calibration signal reception.
Current Time Setting
This watch adjusts its time setting automatically in accordance with a time calibration
signal. You also can perform a manual procedure to set the time, when necessary.
• The first thing you should do after purchasing this watch is to specify a GMT
differential, which is the time differential between GMT and the location where
you normally will use the watch. For more information, see “To specify a GMT
differential” below.
• When using the watch outside the range of the Germany and England time signal
transmitters, you have to adjust the current time setting manually as required. See
“Timekeeping” for more infor mation about manual time settings.
To specify a GMT differential
1. In the Timekeeping Mode, hold down B for about five
seconds until the second hand moves to the currently
selected GMT differential setting and stops. This is the
setting mode.
• The GMT differential value indicates the time
difference in hours from Greenwich Mean Time.
2. Use A to move the second hand to the GMT
differential setting you want to use.
GMT +0 (12 o’clock): London
GMT +1 (1 o’clock): Paris, Berlin, Milan, Rome,
Amsterdam, Hamburg, Frankfurt, Vienna,
Barcelona, Madrid
GMT +2 (2 o’clock): Athens
3. Press B to exit the setting mode.
• The watch also will return to the Timekeeping Mode if
you do not perform any operation for about two or three
minutes.
GMT
differential
value (+0)
GMT
differential
value (+1)
GMT
differential
value (+2)
• Normally, your watch should show the correct time as soon as you select a GMT
differential. If it does not, it should adjust automatically after the next auto receive
operation (in the middle of the night). You can also perform manual receive or you
can set the time manually.
• Even if the time calibration signal is received correctly, there are some times when
the analog hands may not indicate the correct time. If this happens, use the
procedures under “Adjusting the Home Positions” to check the home positions of the
hands, and make adjustments as required.
• The watch will receive the time calibration signal automatically from the applicable
transmitter (in the middle of the night) and update its settings accordingly. For
information about the relationship between GMT differential values and transmitters,
see “Transmitters”.
• See the maps under “Reception Ranges” for infor mation about the reception ranges
of the watch.
Time Calibration Signal Reception
There are two different methods you can use to receive the time calibration signal:
auto receive and manual receive.
• Auto Receive
With auto receive, the watch receives the time calibration signal automatically up to six
times a day. When any auto receive is successful, the remaining auto receive
operations are not performed. For more infor mation, see “About Auto Receive”.
• Manual Receive
Manual receive lets you start a time calibration receive operation with the press of a
button. For more infor mation, see “To perform manual receive”.
Important!
• When getting ready to receive the time calibration signal, position the watch as
shown in the nearby illustration, with its 12 o’clock side facing towards a window.
Make sure there are no metal objects nearby.
12 o’clock
or
• Make sure the watch is facing the right way.
• Proper signal reception can be difficult or even impossible under the conditions listed
below.
• Signal reception normally is better at night than during the day.
• Time calibration signal reception takes from two to seven minutes, but in some
cases it can take as long as 14 minutes. Take care that you do not perform any
button operations or move the watch during this time.
Inside or
among
buildings
Inside a
vehicle
Near a
construction
site, airport, or
other sources
of electrical
noise
Near hightension
power lines
Among or
behind
mountains
Near
household
appliances,
office
equipment,
or a mobile
phone
• When within range of the applicable transmitter, this watch can receive either the
Germany (Mainflingen) or England (Rugby) time calibration signals. See
“Transmitters” for more information.
Reception Ranges
Rugby
Mainflingen
1,500 kilometers
500 kilometers
• At distances further than about 500 kilometers from a transmitter, signal reception
may not be possible during certain times of year or times of day. Radio interference
also may cause problems with reception.
• Even when the watch is within the reception range of the transmitter, signal
reception will be impossible if the signal is blocked by mountains or other geological
formations between the watch and signal source.
• Signal reception is affected by weather, atmospheric conditions, and seasonal
changes.
Page 12

Operation Guide 4791
2
About Auto Receive
The watch receives the time calibration signal automatically up to six times a day.
When any auto receive is successful, the remaining auto receive operations are not
performed. The reception schedule (calibration times) depends on the currently
selected GMT differential, and whether standard time or Daylight Saving Time is
selected for it.
GMT Differential Auto Receive Start Times
123456
GMT +0 Standard Time 1:00 am 2:00 am 3:00 am 4:00 am 5:00 am Midnight
Daylight 2:00 am 3:00 am 4:00 am 5:00 am Midnight 1:00 am
Saving Time next day
GMT +1 Standard Time 2:00 am 3:00 am 4:00 am 5:00 am Midnight 1:00 am
next day
Daylight 3:00 am 4:00 am 5:00 am Midnight 1:00 am 2:00 am
Saving Time next day next day
GMT +2 Standard Time 3:00 am 4:00 am 5:00 am Midnight 1:00 am 2:00 am
next day next day
Daylight 4:00 am 5:00 am Midnight 1:00 am 2:00 am 3:00 am
Saving Time next day next day next day
Note
• The auto receive operation is performed only if the watch is in the Timekeeping
Mode when one of the calibration times is reached. It is not performed if a calibration
time is reached while you are configuring settings.
• Auto receipt of the calibration signal is designed to be performed early in the
morning, while you sleep (provided that the Timekeeping Mode time is set correctly).
Before going to bed for the night, remove the watch from your wr ist, and put it in a
location where it can receive the signal easily.
• The watch receives the calibration signal for two to seven minutes everyday when
the time in the Timekeeping Mode reaches each of the calibration times. Do not
perform any button operation within seven minutes before or after any one of the
calibration times. Doing so can interfere with correct calibration.
• Remember that reception of the calibration signal depends on the current time in the
Timekeeping Mode. The receive operation will be performed whenever the display
shows any one of the calibration times, regardless of whether or not the displayed
time actually is the correct time.
To perform manual receive
1. Place the watch on a stable surface so its 12 o’clock
side is facing towards a window.
2. In any mode, hold down A for about two seconds until
the second hand moves to READY (R).
• This indicates that the watch is getting ready to receive
the time calibration signal.
• The second hand will move to WORK (W) and stay there
while actual reception is in progress.
• The hour and minute hands continue to keep time
normally.
• Time calibration signal reception takes from two to
seven minutes, but in some cases it can take up to 14
minutes. Take care that you do not perform any button
operations or move the watch during this time.
• If reception is successful, the second hand will move to
Y (YES). One or two minutes later, the hands will move
to the correct time.
WORK
READY
Y
N
Note
• To interrupt a receive operation and return to the Timekeeping Mode, press any
button.
• If reception is not successful, the second hand will move to N (NO). One or two
minutes later, the second hand will resume normal operation, without any
adjustment of the hand setting.
• If the second hand is pointing to Y (YES) or N (NO), you can return to the
Timekeeping Mode by pressing any button.
Viewing the Latest Signal Reception Results
You can use the Receive Result Mode to check if signal reception was performed
correctly.
To check the latest signal reception results
Enter the Receive Result Mode.
• If the watch was able to perform a successful signal
receive operation since midnight, the second hand will
move to Y (YES). If the watch has been unable to
receive any signal successfully, the second hand will
move to N (NO).
• To return to the Timekeeping Mode, press A.
• The current receive result is cleared when the first auto
receive operation is performed on the following day. This
means Y (YES) indicates successful signal reception
since the start of the current day.
• If you have adjusted the time setting manually, the
second hand will indicate N (NO) here.
Y
N
Signal Reception Troubleshooting
Check the following points whenever you experience problems with signal reception.
•
You changed the time setting manually.
•
Manual signal reception failed for some
reason.
•
The watch was not in the Timekeeping
Mode, or you performed some button
operation during the auto receive operation.
•
Signal reception results are reset at
midnight each day.
• The GMT differential setting is not
correct for the area where you are
using the watch.
The second
hand is
pointing at
N (NO).
Time setting is
incorrect
following signal
reception.
• Perform manual signal
receive or wait until the
next auto signal receive
operation is performed.
• Check to make sure the
watch is in a location
where it can receive the
signal.
• Select the correct GMT
differential.
What you should doProblem Probable Cause
• For further information, see “Important!” under “Time Calibration Signal Reception”
and “Radio-controlled Timekeeping Precautions”.
Adjusting the Home Positions
If the time settings are wrong even after the time calibration signal is received
normally, use the following procedure to adjust their home positions.
To adjust the home positions
1. Enter the Home Position Adjustment Mode.
• If the home position of the second hand currently is
correct, it will move to the 12 o’clock position.
• The analog hands do not keep time during home
position adjustment.
2. Check the position of the second hand.
• The second hand home position is correct if it is
pointing at 12 o’clock.
• If the second hand is not pointing at 12 o’clock, it
means that its home position is off. If this happens,
press B to move the second hand clockwise in onesecond steps, until it points at 12 o’clock.
3. Press A to advance to hour and minute hand home
position adjustment.
12 o’clock
Correct second hand
home position
• If current hour and minute hand alignment is correct,
they will both move to 12 o’clock.
4. Check the position of the hour and minute hands.
• If the hour and minute hands are not pointing at 12
o’clock, it means that their home position is off. If this
happens, press B to move the hour and minute
hands clockwise in 10-second steps, until they point
at 12 o’clock.
5. Press A to exit home position adjustment.
• This will cause the watch to return to the Timekeeping
Mode. The hour, minute and second hands will indicate
the current time.
• Note that all button operations are disabled while the
hour and minute hands are moving.
• After you complete the home position adjustment procedure, place the watch in a
location that allows good time calibration signal reception, and then perform a
manual receive operation. See “To perform manual receive” for more infor mation.
Correct hour
and minute hand
home position
12 o’clock
Timekeeping
Use the Timekeeping Mode to set and view the current
time. This section also explains how to set the current time
manually.
• If you become confused and lose your way during the
following procedures, simply put the watch down and do
not perform any button operation for two or three
minutes. This will cause the watch to enter the
Timekeeping Mode (indicated by normal one-second
movement of the second hand) automatically. After that,
you can try performing the manual setting procedure
again from the beginning.
Hour hand
Minute hand
Second hand
To adjust the time setting manually
1. In the Timekeeping Mode, hold down A for about five
seconds.
• This operation causes the second hand to move to AM or
PM in accordance with the current time setting. This is the
setting mode.
• The hour and minute hands do not move in the setting
mode.
2. Press B to move the time setting forward by one minute.
• Holding down B for about two seconds starts high-speed
hand movement. High-speed hand movement will continue
until the hands complete a 12-hour cycle, or until you stop
them by pressing B.
• If you exit the setting mode after changing the time
setting, the second hand will restart timing from 12
o’clock (0 seconds) automatically.
• The AM/PM setting will not change even if you move the
hour hand past 12 o’clock in step 2. Use step 3 below to
switch between AM and PM.
AM
PM
3. Press A to advance to AM/PM switching.
• This will cause the second hand to perform one full rotation starting from its
current position (either AM or PM), and then stop at its original current position.
4. Press B to toggle the second hand between AM and PM.
5. Coordinating with a time signal on the radio or TV, press A to restart nor mal
timekeeping. The second hand will move to 12 o’clock (zero seconds) at the start of
timekeeping.
• If you press A without changing the time setting (hour, minute, AM/PM), the second
hand will move to the current time position and timekeeping will resume from there.
• This watch normally receives a time calibration signal late at night. However, if you
configure the wrong AM/PM setting in step 3 of the above procedure, the watch will
start signal reception automatically during the afternoon. Signal reception during the
day is not as good as nighttime reception, so a wrong AM/PM setting can cause
signal reception problems.
Reference
This section contains more detailed and technical information about watch operation.
It also contains important precautions and notes about the various features and
functions of this watch.
Auto Return Features
• If you leave the watch in the Home Position Adjustment Mode and Receive Result
Mode for two or three minutes without performing any operation, it will return to the
Timekeeping Mode automatically.
• If you do not perform any operation for about two or three minutes while a setting
mode is selected, the watch will exit the setting mode automatically.
High-speed Hand Movement
• The B button is used to change the hand setting in various setting modes. In most
cases, holding down the B button will start high-speed movement of the applicable
hand(s).
• High-speed movement of the hands will continue until it completes a 12-hour cycle,
or until you press any button to stop it.
Page 13

Operation Guide 4791
3
Radio-controlled Timekeeping Precautions
• Strong electrostatic charge can result in the wrong time being set.
• The time calibration signal bounces off the ionosphere. Because of this, such factors
as changes in the reflectivity of the ionosphere, as well as movement of the
ionosphere to higher altitudes due to seasonal atmospheric changes or the time of
day may change the reception range of the signal and make reception temporarily
impossible.
• Even if the time calibration signal is received properly, cer tain conditions can cause
the time setting to be off by up to one second.
• The current time setting in accordance with the time calibration signal takes priority
over any time settings you make manually.
• If you are in an area where proper time calibration signal reception is impossible, the
watch keeps time within ±20 seconds a month at normal temperature.
• If you have problems with proper time calibration signal reception or if the time
setting is wrong after signal reception, check the GMT differential setting.
The initial factory default GMT differential setting is GMT +1.
Transmitters
This watch is able to receive time calibration signals transmitted in Germany
(Mainflingen) and England (Rugby). The following explains how the watch determines
which transmitter it should check first.
When GMT differential GMT+1 or GMT+2 is selected:
In this case:
The first signal search
operation after the GMT
differential setting has been
changed
The second and subsequent
signal searches
The watch does this:
1. Checks the Mainflingen signal first.
2. If the Mainflingen signal cannot be received,
checks the Rugby signal.
1. Checks the signal of the transmitter of the first
receive operation (Rugby or Mainflingen).
2. If the checked signal cannot be received, checks
the other signal.
In this case:
The first signal search
operation after the GMT
differential setting has been
changed
The second and subsequent
signal searches
The watch does this:
1. Checks the Rugby signal first.
2. If the Rugby signal cannot be received, checks
the Mainflingen signal.
1. Checks the signal of the transmitter of the first
receive operation (Rugby or Mainflingen).
2. If the checked signal cannot be received, checks
the other signal.
When GMT differential GMT+0 is selected:
Timekeeping
• The current time in the Timekeeping Mode is calculated in accordance with the
current Greenwich Mean Time (GMT) differential setting.
• GMT differential is calculated by this watch based on Universal Time Coordinated
(UTC*) data.
* UTC is the world-wide scientific standard of timekeeping. It is based upon
carefully maintained atomic (cesium) clocks that keep time accurately to within
microseconds. Leap seconds are added or subtracted as necessary to keep UTC
in sync with the Earth’s rotation. The reference point for UTC is Greenwich,
England.
Page 14

Ver. 1 : May. 2008
Correction of pages 1 and 6
CASIO COMPUTER CO.,LTD.
Overseas Service Division
Shibuya-ku, Tokyo 151-8543, Japan
6-2, Hon-machi 1-Chome
 Loading...