

Page 1

Page 2

Important Customer Information
Data Plans and Features:
Content and Internet Access
Many services and applications offered through your device may
be provided by third parties. Before you use, link to or download
a service provided by a third party, or an application such as a
non-Verizon Wireless location-based GPS type service, chat room,
marketplace or social network from your device, you should review
the terms of such service or application and applicable privacy
policy. Personal information you submit may be read, collected or
used by the service or application provider and/or other users of
those forums.
Verizon Wireless is not responsible for any information, content or
services you access, download or use from the Internet.
You are responsible for maintaining virus and other Internet security
protections when accessing service. For additional information, visit
the Verizon Content Policy at
responsibility.verizon.com/contentpolicy.
Your Verizon Wireless Customer Agreement terms and conditions
and certain other specially identified terms govern your use of any
Verizon Wireless products and services.
Page 3

Contents
1
Getting Started with Your Phone ............................ 7
Phone overview ...........................................................................7
Featur
e overview .......................................................................11
Installing and removing the battery ...........................................13
Removing and installing a microSD card ..................................16
Charging the battery ..................................................................21
Touchscreen operations ............................................................22
Turning the phone on and off .....................................................25
Initial setup ................................................................................25
Basics ......................................................................
28
Turning the screen on and off ....................................................28
Getting to know the Home screen .............................................29
Monitoring your phone’s status ..................................................31
Managing notifications ..............................................................33
Opening and switching applications .........................................35
Customizing the Home screen ..................................................40
Working with widgets .................................................................42
Working with menus...................................................................48
Quickly connecting to your contacts .........................................49
Placing your phone in Silent mode ............................................50
Placing your phone in Airplane mode .......................................51
Personalizing your phone ..........................................................51
Locking your screen ..................................................................52
Optimizing battery life ................................................................53
Updating your phone’s system software ...................................54
Receiving a notice to update your system software ..................55
Checking for phone system software updates manually...........55
Entering and editing text ....................................... 56
Entering text ...............................................................................
56
Editing text .................................................................................61
Phone ...................................................................... 64
Placing a call .............................................................................64
Answering a call
........................................................................66
Operation during a call ..............................................................67
Managing multiple calls .............................................................69
Working with the Call log ...........................................................70
Page 4

Contents
2
Dialing by voice .........................................................................71
Using voicemail .........................................................................72
Using Visual Voice Mail..............................................................73
Contacts ..................................................................
80
Opening your contacts ..............................................................80
Adding a new contact
...............................................................82
Editing contact details ...............................................................83
Deleting a contact .....................................................................86
Communicating with your contacts ...........................................87
Changing which contacts are displayed ...................................88
Joining or separating contact information .................................89
Importing, exporting, and sharing contacts ..............................90
Working with Groups .................................................................92
Working with Favorites ...............................................................94
Configuring Backup Assistant
SM
................................................95
Connecting to networks......................................... 98
Connecting to mobile networks .................................................98
Connecting to vir
tual private networks ....................................102
Working with secure certificates ..............................................104
Connecting to devices ......................................... 106
Connecting to a Headset .........................................................
106
Connecting to a PC via USB ....................................................107
Connecting to Bluetooth
®
devices ...........................................109
Sharing your phone’s mobile data connection ........................112
Accounts and sync ................................................114
Adding and removing accounts ..............................................114
Configuring account sync settings
..........................................116
Email ...................................................................... 119
Opening Email .........................................................................119
Opening the Accounts scr
een and your Inbox........................119
Reading your messages ..........................................................121
Responding to a message ......................................................122
Page 5

3
Starring messages ...................................................................123
Searching your messages .......................................................123
Working with message in batches ...........................................123
Composing and sending email ...............................................124
Working with account folders ..................................................125
Adding and editing email accounts ........................................125
Mes saging ..............................................................130
Checking sent and received messages ..................................130
Sending a message .................................................................
133
Changing Messaging settings .................................................135
Mobile IM ................................................................
137
Signing in and out ....................................................................137
Conversation ............................................................................139
Changing preferences .............................................................141
Browser ..................................................................143
Opening Browser .....................................................................143
V
iewing a web page ................................................................145
Navigating between web pages ..............................................147
Working with bookmarks..........................................................149
Downloading files ....................................................................151
Working with multiple Browser windows ..................................152
Changing Browser settings .....................................................153
Camer a ...................................................................157
Opening Camera .....................................................................157
T
aking pictures and shooting videos .......................................158
Changing Camera settings ......................................................160
Gal ler y ................................................................... 163
Opening Gallery and viewing your albums .............................163
W
orking with albums................................................................164
Working with pictures ..............................................................167
Working with videos .................................................................170
Page 6

Contents
4
Music ......................................................................173
Copying music files to the phone’s microSD card ...................173
Opening Music and working with your librar
y .........................175
Playing music ..........................................................................177
Working with playlists ..............................................................179
Using V CAST Media Manager ................................................182
Calendar ................................................................
183
Viewing your calendar and events ..........................................183
Creating an event ....................................................................190
Editing or deleting an event .....................................................191
Setting an event reminder........................................................192
Responding to an event reminder ...........................................193
Displaying and synchronizing calendars ................................193
Changing Calendar settings ....................................................195
V CAST Apps Store ............................................... 196
Opening V CAST Apps Store...................................................196
V CAST Music with Rhapsody
®
.............................197
Opening V CAST Music with Rhapsody ..................................197
Purchasing songs with your phone .........................................197
Transferring music from a PC ..................................................198
V CAST Tones ....................................................... 201
Opening V CAST Tones ...........................................................201
V CAST Videos ...................................................... 202
Opening V CAST Videos..........................................................202
V
iewing a video clip .................................................................202
Downloading a video clip ........................................................202
VZ Navigator
®
....................................................... 204
Opening VZ Navigator .............................................................205
Finding a location ....................................................................205
Getting directions ....................................................................206
Sharing your location ...............................................................206
Page 7

5
My Verizon Mobile ................................................ 207
Opening My Verizon Mobile ....................................................207
G’zGEAR
®
............................................................... 208
Opening G’zGEAR ...................................................................
208
Earth Compass ........................................................................209
Walking Counter ......................................................................213
Adventure Training ...................................................................215
Trip Memory .............................................................................218
Thermometer ...........................................................................220
Tides ........................................................................................221
Sun/Moon .................................................................................223
Star Gazer ................................................................................224
Configuring G’zGEAR ..............................................................227
Widgets in G’zGEAR ................................................................228
More Applications ................................................ 230
Bing™ ......................................................................................230
Bing™ Maps
............................................................................230
Android Market ........................................................................232
YouTube ...................................................................................236
Gmail .......................................................................................239
Google Talk ..............................................................................241
City ID
®
....................................................................................242
Social Beat ..............................................................................242
Skype Mobile™ ........................................................................243
News and Weather ..................................................................243
Slacker Radio ..........................................................................244
NFL Mobile ..............................................................................244
Document Viewer.....................................................................245
Alarm Clock .............................................................................245
Calculator ................................................................................248
Sound Recorder ......................................................................248
Voice Control ...........................................................................249
Desk Cradle .............................................................................251
Car Mode .................................................................................252
Page 8

Contents
6
Settings ................................................................. 255
Opening Settings .....................................................................255
Personalization ........................................................................
255
Wireless & network settings .....................................................256
Call settings .............................................................................259
Sound settings .........................................................................260
Display settings .......................................................................261
Location & security settings ....................................................262
Applications settings ...............................................................265
Tutorial settings ........................................................................267
Accounts & sync settings ........................................................268
Privacy settings .......................................................................269
SD card & phone storage settings ..........................................270
USB settings ............................................................................271
Language & keyboard settings ...............................................271
Voice input & output settings ...................................................273
Accessibility settings ...............................................................274
Date & time settings ................................................................274
About phone ............................................................................275
Safety .................................................................... 276
TIA Safety Information .............................................................276
Safety Infor
mation for FCC RF Exposure .................................279
FDA Information .......................................................................282
Emergency Calls .....................................................................290
Compliance with Other FCC Regulations ................................292
General Safety .........................................................................292
Games .....................................................................................298
Camera ....................................................................................299
Accessibility .............................................................................299
RECYCLE YOUR CELL PHONE! .............................................303
12 MONTH LIMITED WARRANTY ......................... 305
Inde
x ...................................................................... 309
Page 9
7
Getting Started with Your Phone
Getting Started with Your Phone
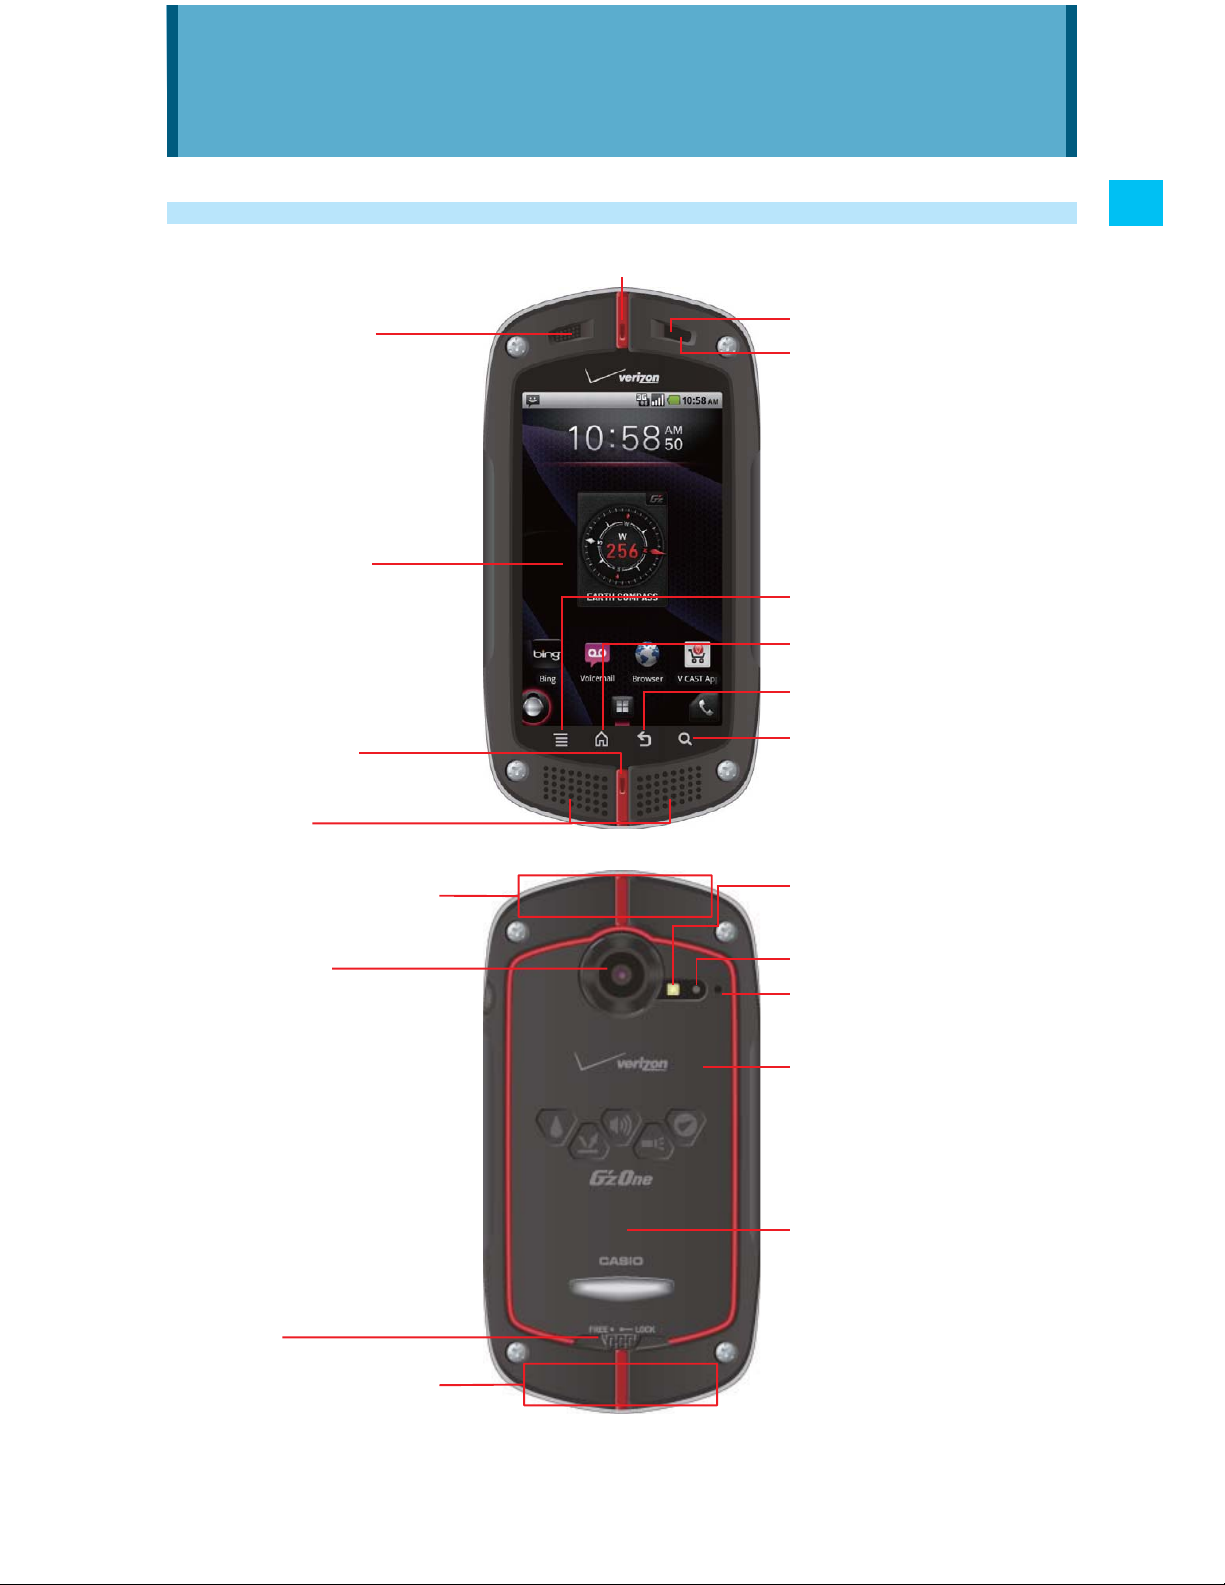
Phone overview
1. Earpiece
2. Temperature
Sensor
3. Touchscreen
4. Microphone
5. Speaker
6. Light Sensor
7. Proximity Sensor
8. Menu Key
9. Home Key
10. Back Key
11. Search Key
12. Internal Antenna
Area*
13. Camera/
Camcorder Lens
14. Battery Cover
Lock
12. Internal Antenna
Area*
15. Camera Flash/
Flashlight
16. Camera Indicator
17. Secondary
Microphone
18. microSD Card
Slot (under the
battery)
19. Battery Cover
* For best performance, do not touch these areas when using your phone.
Page 10
8
Getting Started with Your Phone
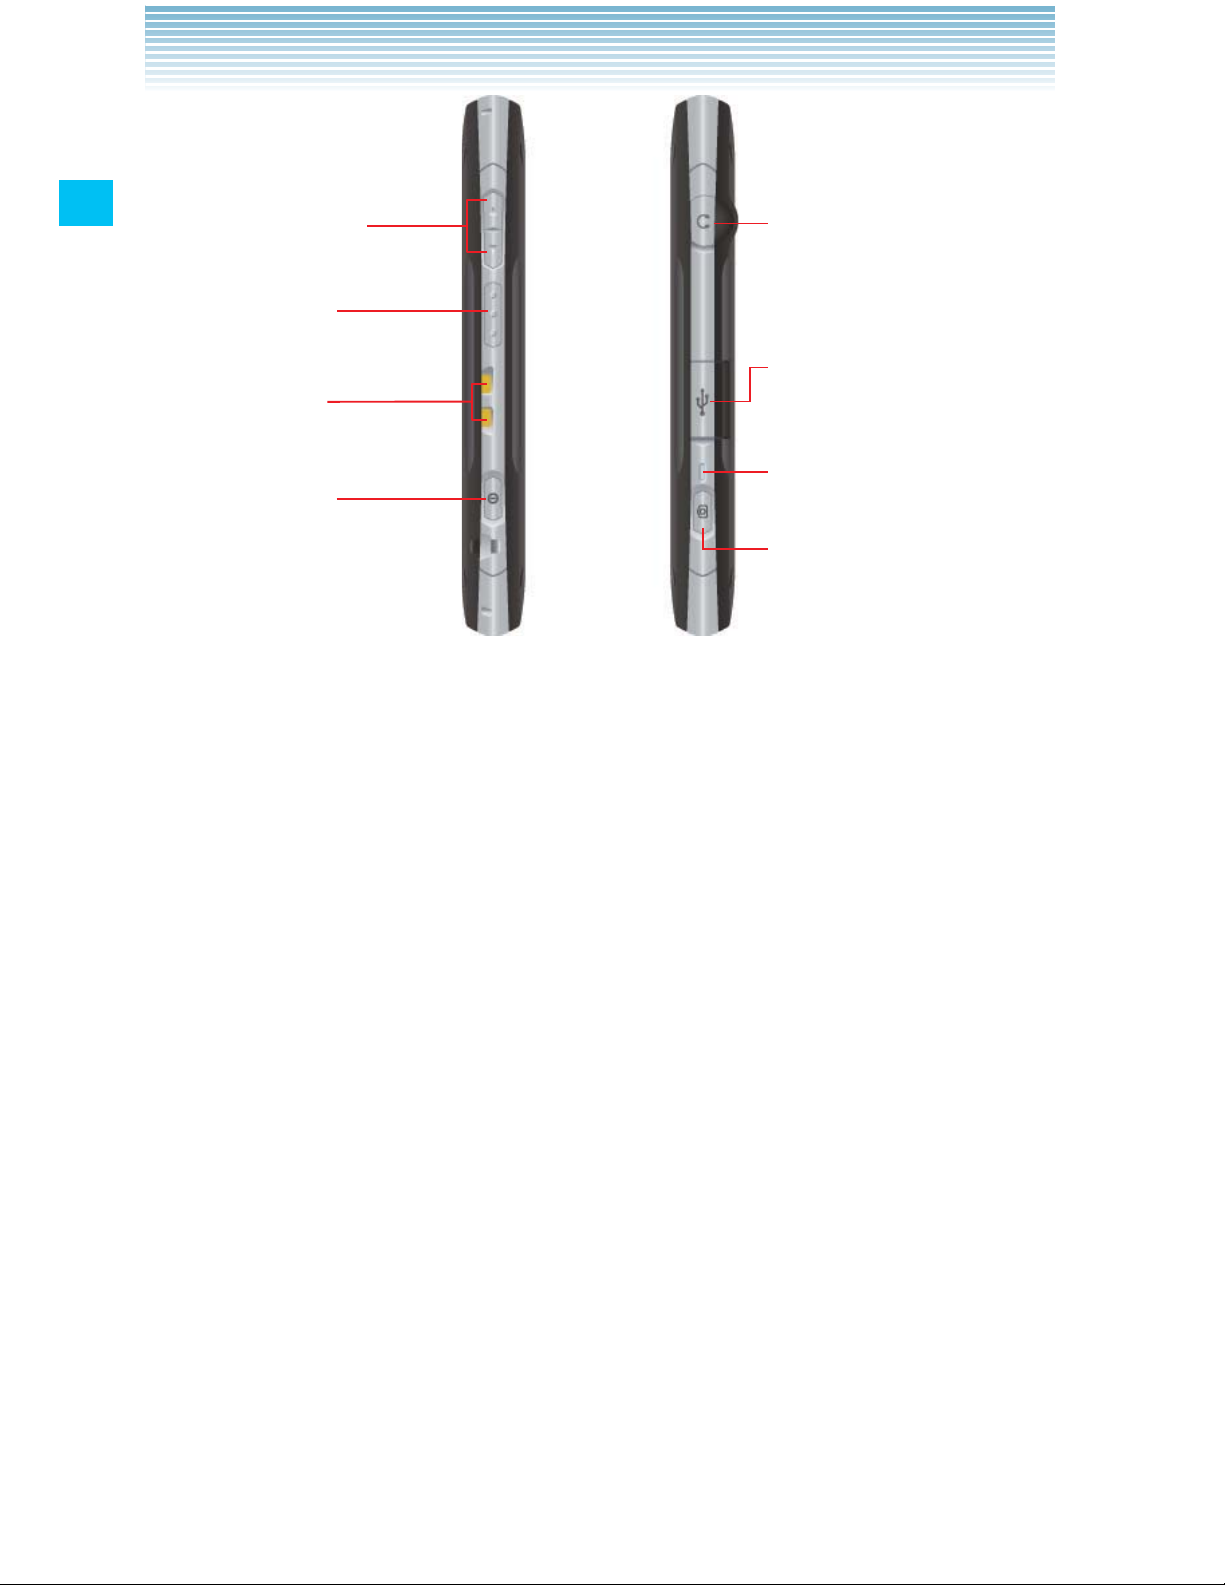
20. Volume Keys
21. Tactile Key
22. Charging
Terminals
23. Power Key
24. 3.5mm Headset
Jack
25. Charging/Data
Port
26. Notification
Indicator
27. Camera Key
1. Earpiece
2. Temperature Sensor
3. Touchscreen
You can operate your phone by touching the screen.
4. Microphone
5. Speaker
6. Light Sensor
Senses the ambient light and the phone will automatically adjust
the brightness of the display accordingly (applicable when
Automatic brightness is enabled).
7. Proximity Sensor
8. M Menu Key
Touch to open the menu for the current screen or application.
9. H Home Key
Touch to return to the Home screen while viewing an application.
If you are viewing a Home screen extension panel, touching this
key returns you to the central panel.
Page 11

9
Getting Started with Your Phone
Touch and hold to display up to eight icons of recently used
applications.
10. B Back Key
Touch to return to the previous screen. When a pop-up screen, such
as menu or a dialog box, is displayed touching this key will close it.
11. K Search Key
On the Home screen, touch to open Bing™ search box to search
data in the phone and on the web.
In many applications, you can touch this key to search within that
application.
Touch and hold to open Bing search by voice.
12. Internal Antenna Area
For best performance, do not touch these areas when using your
phone.
13. Camera/Camcorder Lens
14. Battery Cover Lock
15. Camera Flash/Flashlight
16. Camera Indicator
Blinks green when the Camera or Camcorder application is
opened. Lights up in red when the shutter is pressed or recording
is in progress.
17. Secondary Microphone
Used when the speakerphone is turned on.
18. microSD Card Slot (under the battery)
A microSD card should be inserted in the phone in order to use
multimedia functions such as the camera, and for downloading
and playing music and videos.
The phone comes with a pre-installed 8GB microSD card.
19. Battery Cover
20. _ Volume Keys
Press to adjust the volume of ringtone, receiving voice during a
call, or the playback volume of music or video.
Page 12
10
Getting Started with Your Phone
21. , Tactile Key
Press to open the application selected in the Tactile key setting of
Personalization in advance. By default, G’zGEAR
®
opens.
22. Charging Terminals
The terminals used to charge the phone when it is placed on the
cradle (sold separately).
23. P Power Key
Press and hold to open the pop-up menu to turn off the phone, or
to switch On/Off the Silent and Airplane modes.
Press to turn off the screen display and lock the Touchscreen.
To restart phone operation, press this key again to turn on the
screen display and unlock the Touchscreen.
24. 3.5mm Headset Jack
3.5mm connector port
25. Charging/Data Port
Plug in the USB Cable here (included in box).
26. Notification Indicator
Indicates as follows:
State Lighting pattern
Charging Lights up in red.
Notification is present or a
call is being placed, when the
screen is turned off.
Blinks green every three
seconds.
27. S Camera Key
Press to open the Camera application.
While in Camera application, press to take a picture. Press halfway
to adjust and lock focus without activating the shutter.
While in Camcorder application, press to start/stop recording.
Page 13
11
Getting Started with Your Phone
NOTES
Descriptions and instructions in this manual are based on •
the software version and default settings of the phone when
purchased. Operations may differ when any settings are changed
or software version is updated.
Screen images in this manual are shown as the reference purpose •
and may differ from the actual images.
Feature overview
Water resistance
The CASIO G’zOne Commando™ is water resistant. It provides
reliable performance for outdoor activities, and in wet conditions such
as driving rain or high humidity.
The tested device meets the requirements of the MIL-STD-810G (Rain
& immersion 1m, 30min) standard.
Warning!
The Water Resistance feature does not guarantee protection
against the usage of this device underwater. Do not use the phone
underwater.
NOTE
To maintain water resistance:
Securely close the Charging/Data Port cover and the Headset •
Jack cover.
Completely close the battery cover and slide the battery cover •
lock to the LOCK position.
Page 14
12
Getting Started with Your Phone
Shock resistance
The rugged construction of the Commando™ provides outstanding
shock and vibration resistance. The tested device meets the
requirements of the MIL-STD-810G (Drop 1.5m) standard.
Warning!
The shock and vibration resistance features do not guarantee
protection against every type of shock and vibration. Your phone
may be damaged or malfunction depending on the severity of the
shock or vibration.
Dust resistance
For additional peace of mind, the Commando™ is also dust resistant.
The device was tested using silica flour at a temperature of 95°F and
meets the MIL-STD-810G (Dust) standard.
NOTES
Your phone can be rinsed with clean water when dirty. To ensure •
water resistance, make sure that all covers are securely closed
before rinsing.
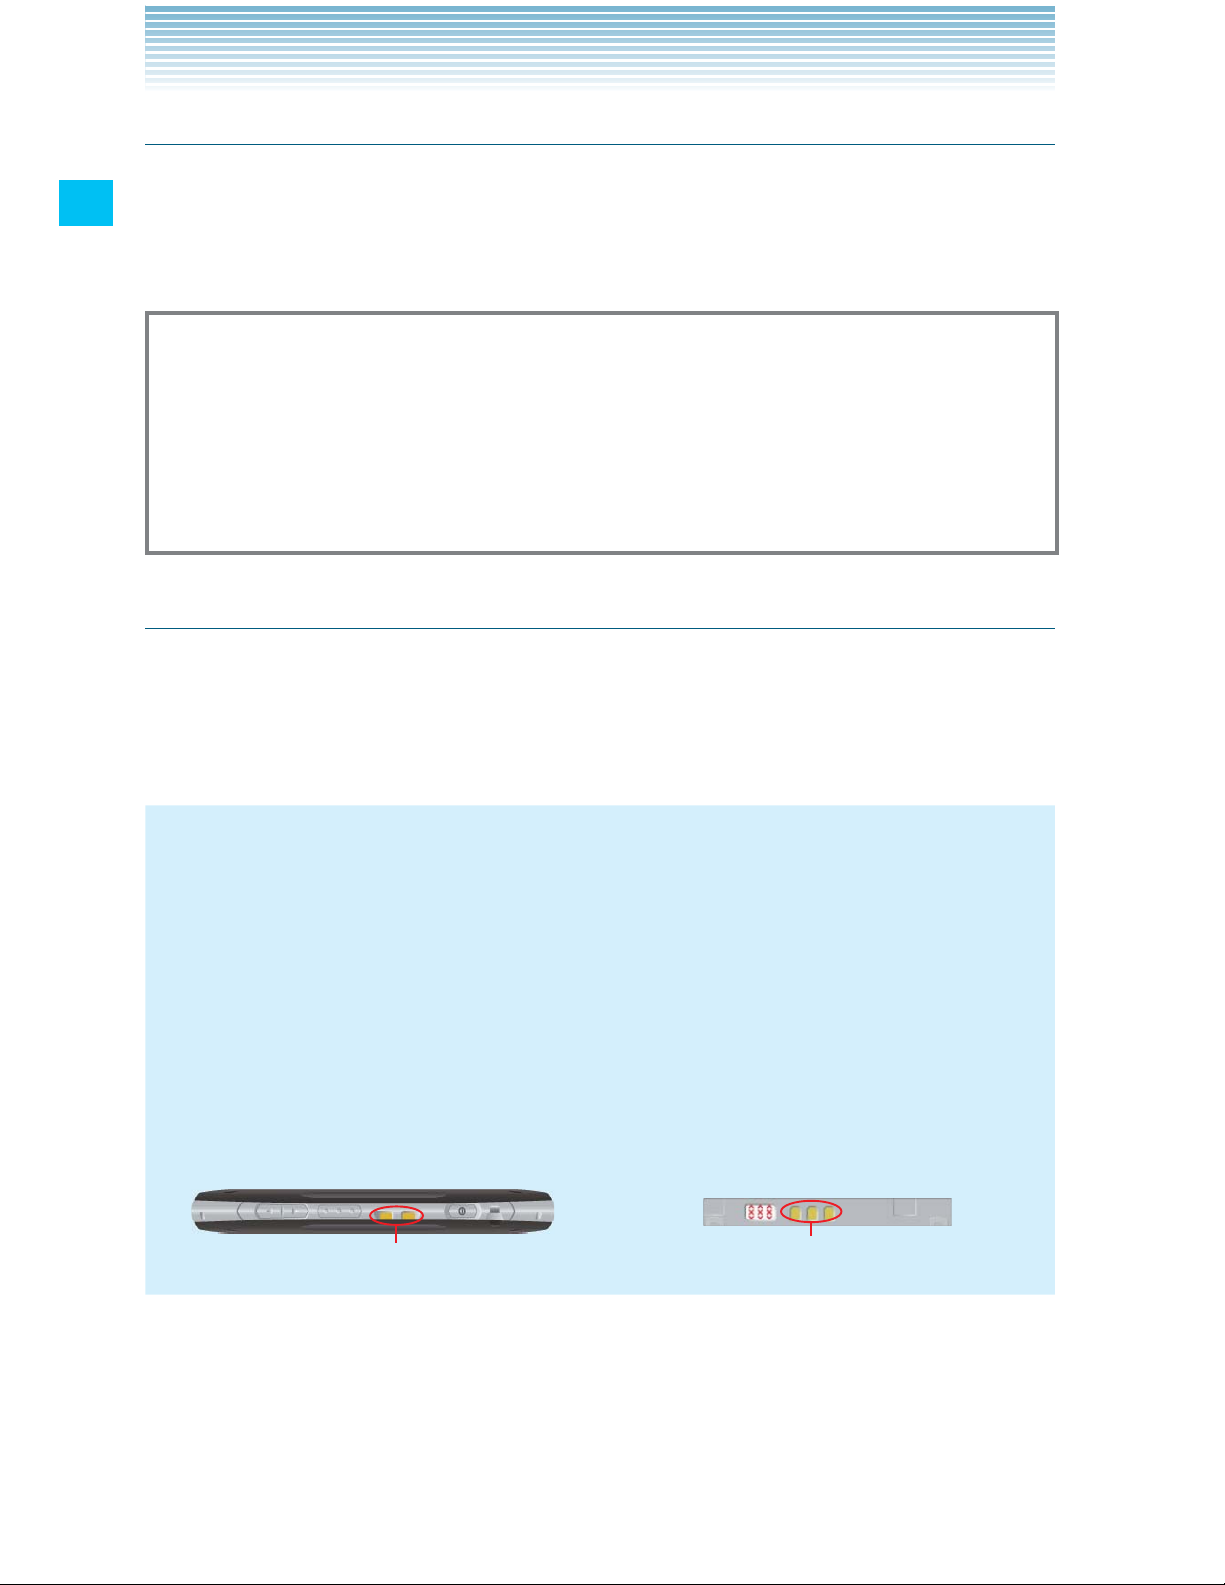
Periodically, clean the Charging Terminals and the Battery •
Terminals with a dry cloth or cotton swab. Dust may cause
electrical connection problems. Avoid wiping with excessive
force, which can damage the terminals.
Charging Terminals
Battery
Battery Terminals
Page 15
13
Getting Started with Your Phone
Warning!
Do not clean terminals inside the phone, or they may be •
damaged.
If mud or sand is adhered to the phone, do not use it until wiping •
completely.
Do not place the phone directly on sand. If sand gets into the •
Earpiece or Speaker, sounds may be difficult to hear.
Installing and removing the battery
The phone comes with a rechargeable battery.
Warning!
Use only approved batteries for the Commando™. Wipe your •
phone before opening the battery cover to prevent moisture or
dust from entering.
Failure to follow the directions below for installing/removing the •
battery could result in product failure.
Fully charge the battery before using the phone for the first time.•
Do not install the battery in humid places, like a bathroom, or •
places where water or liquid can come into contact with the
phone or battery. Doing this may cause electrical circuits shorts
or erode and cause the phone to malfunction.
Page 16
14
Getting Started with Your Phone
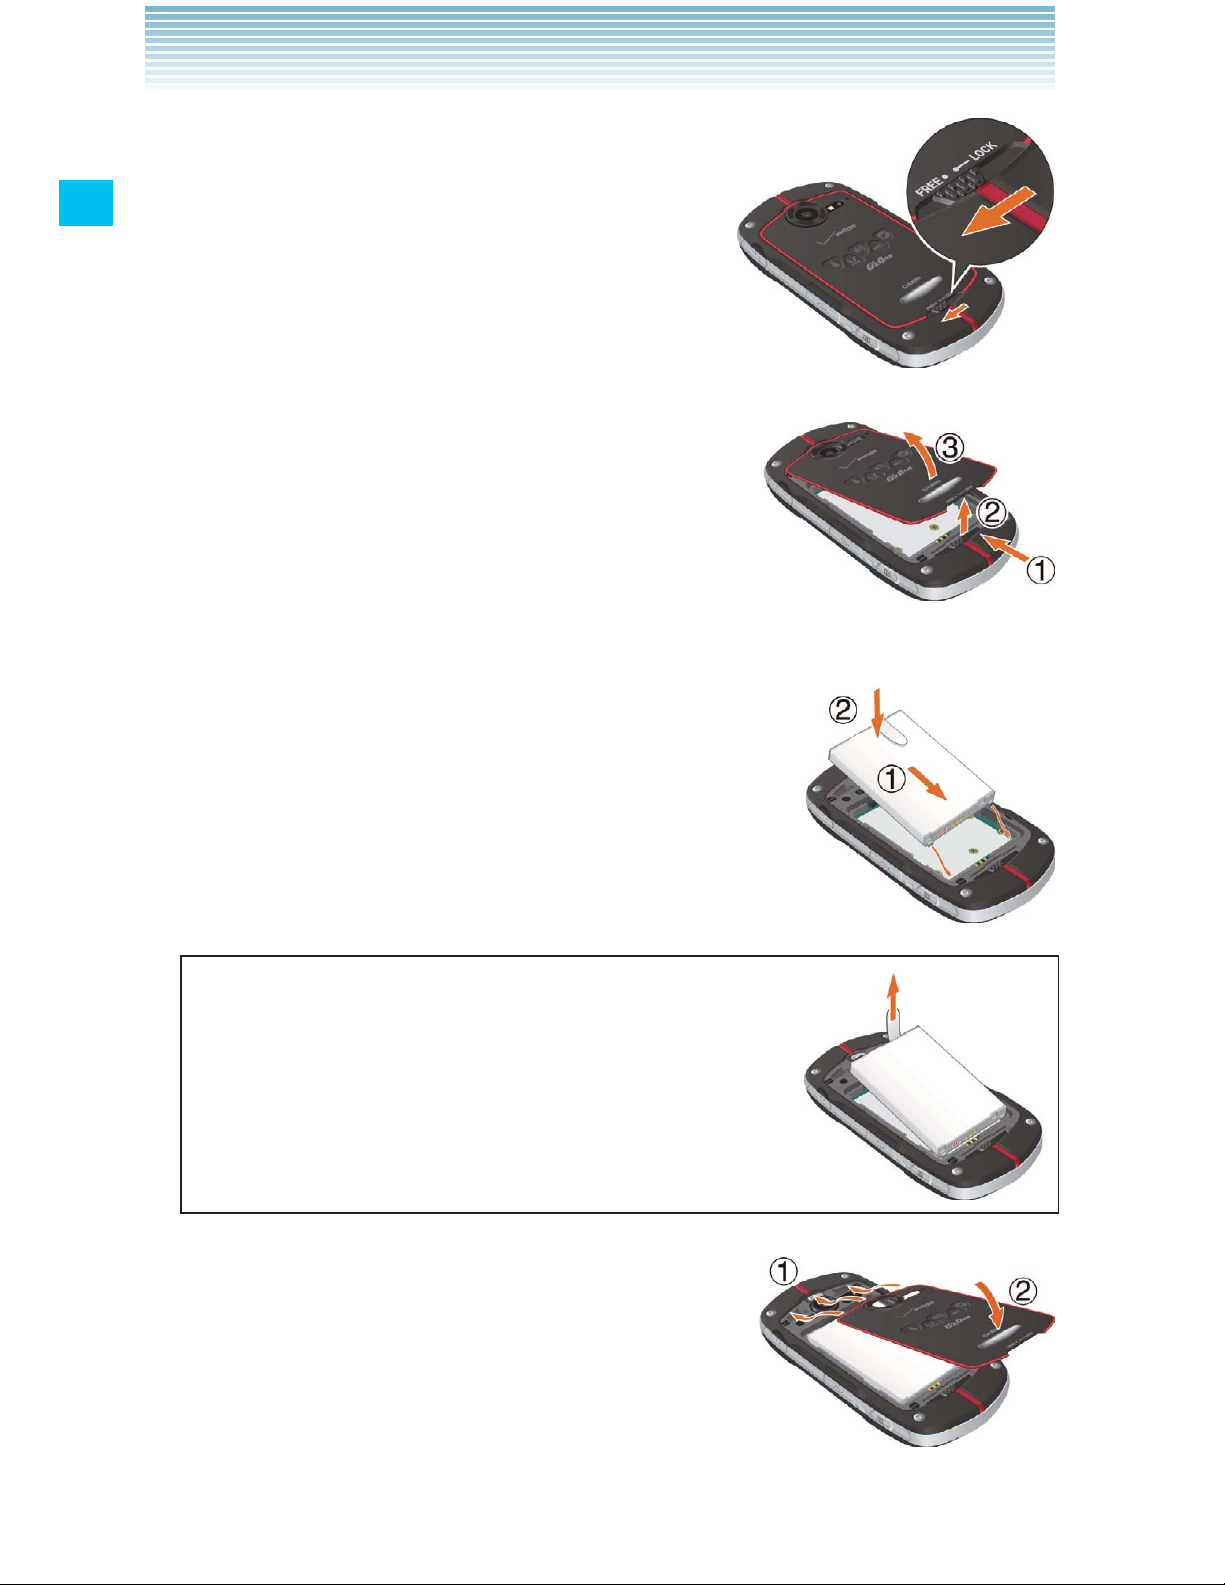
1. Slide the Battery Cover Lock to the left to
the FREE position, as shown in the
figure.
2. Insert your finger in the groove 1 and pull
up on the battery cover in the direction of
the arrow 2. When the battery cover is
disengaged, pull it up in the direction of the
arrow 3.
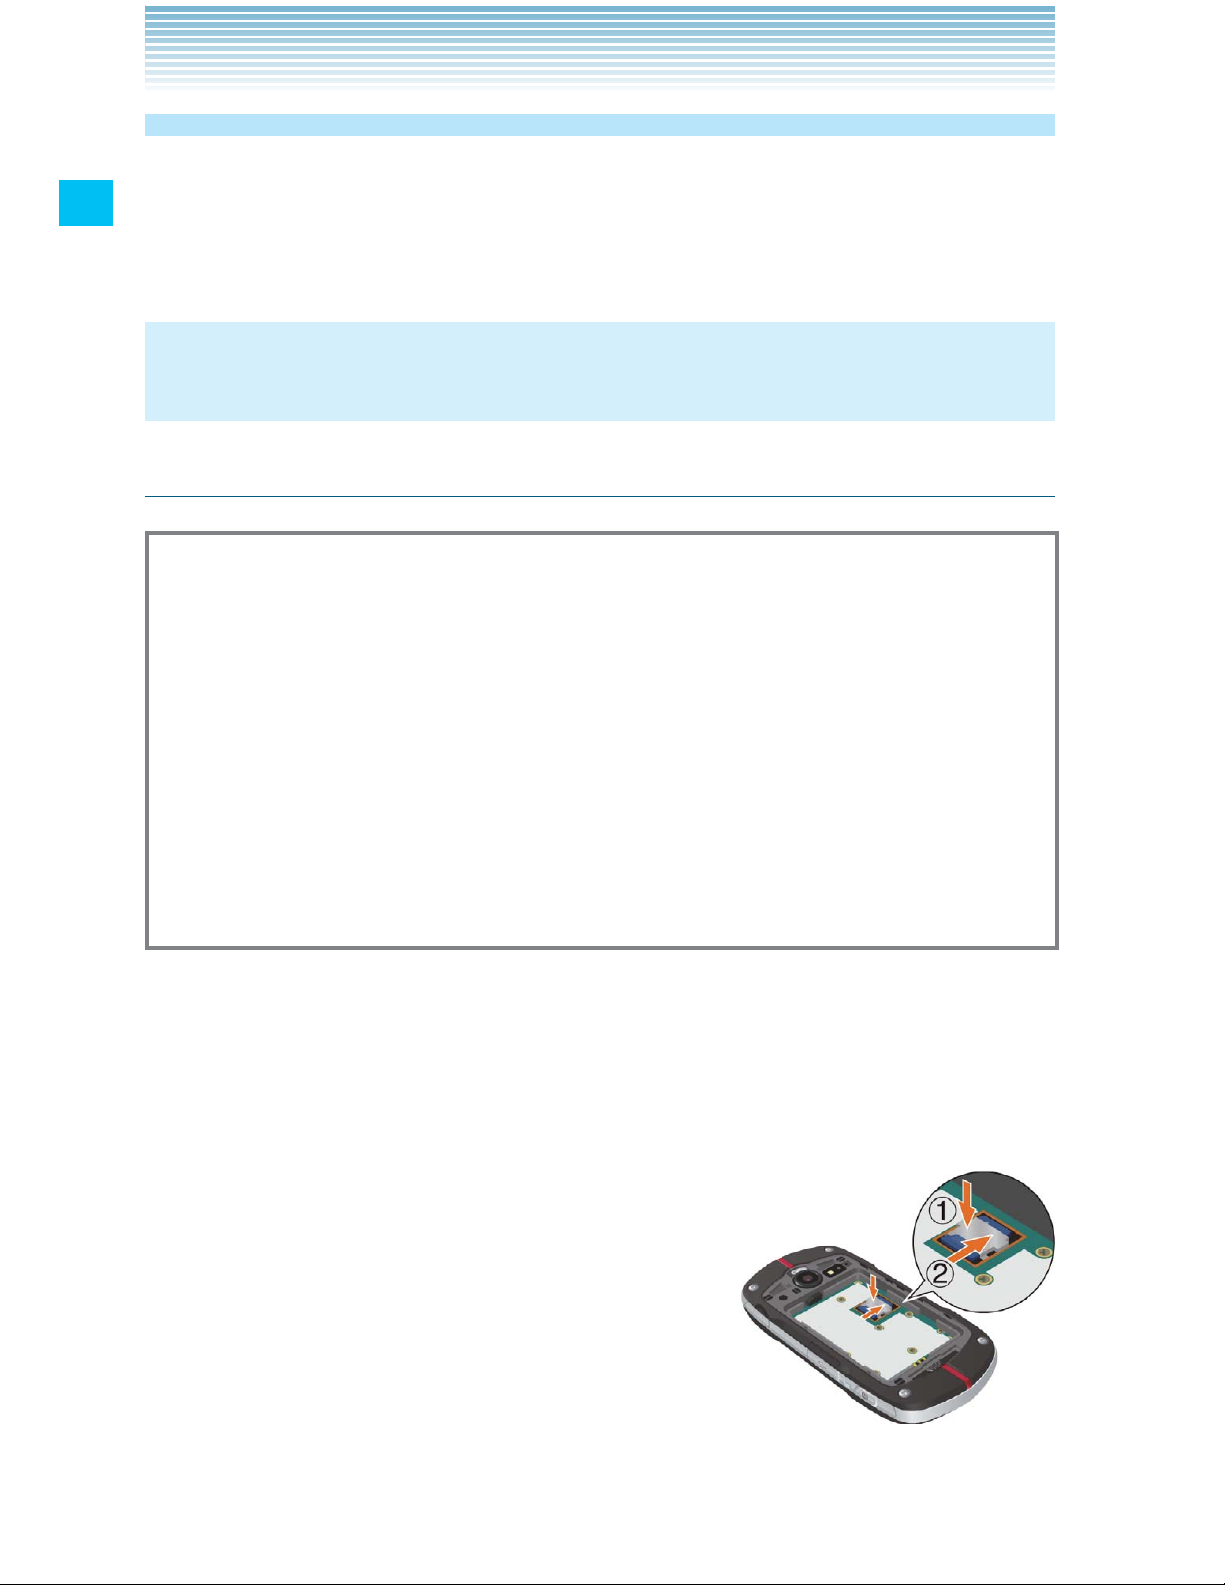
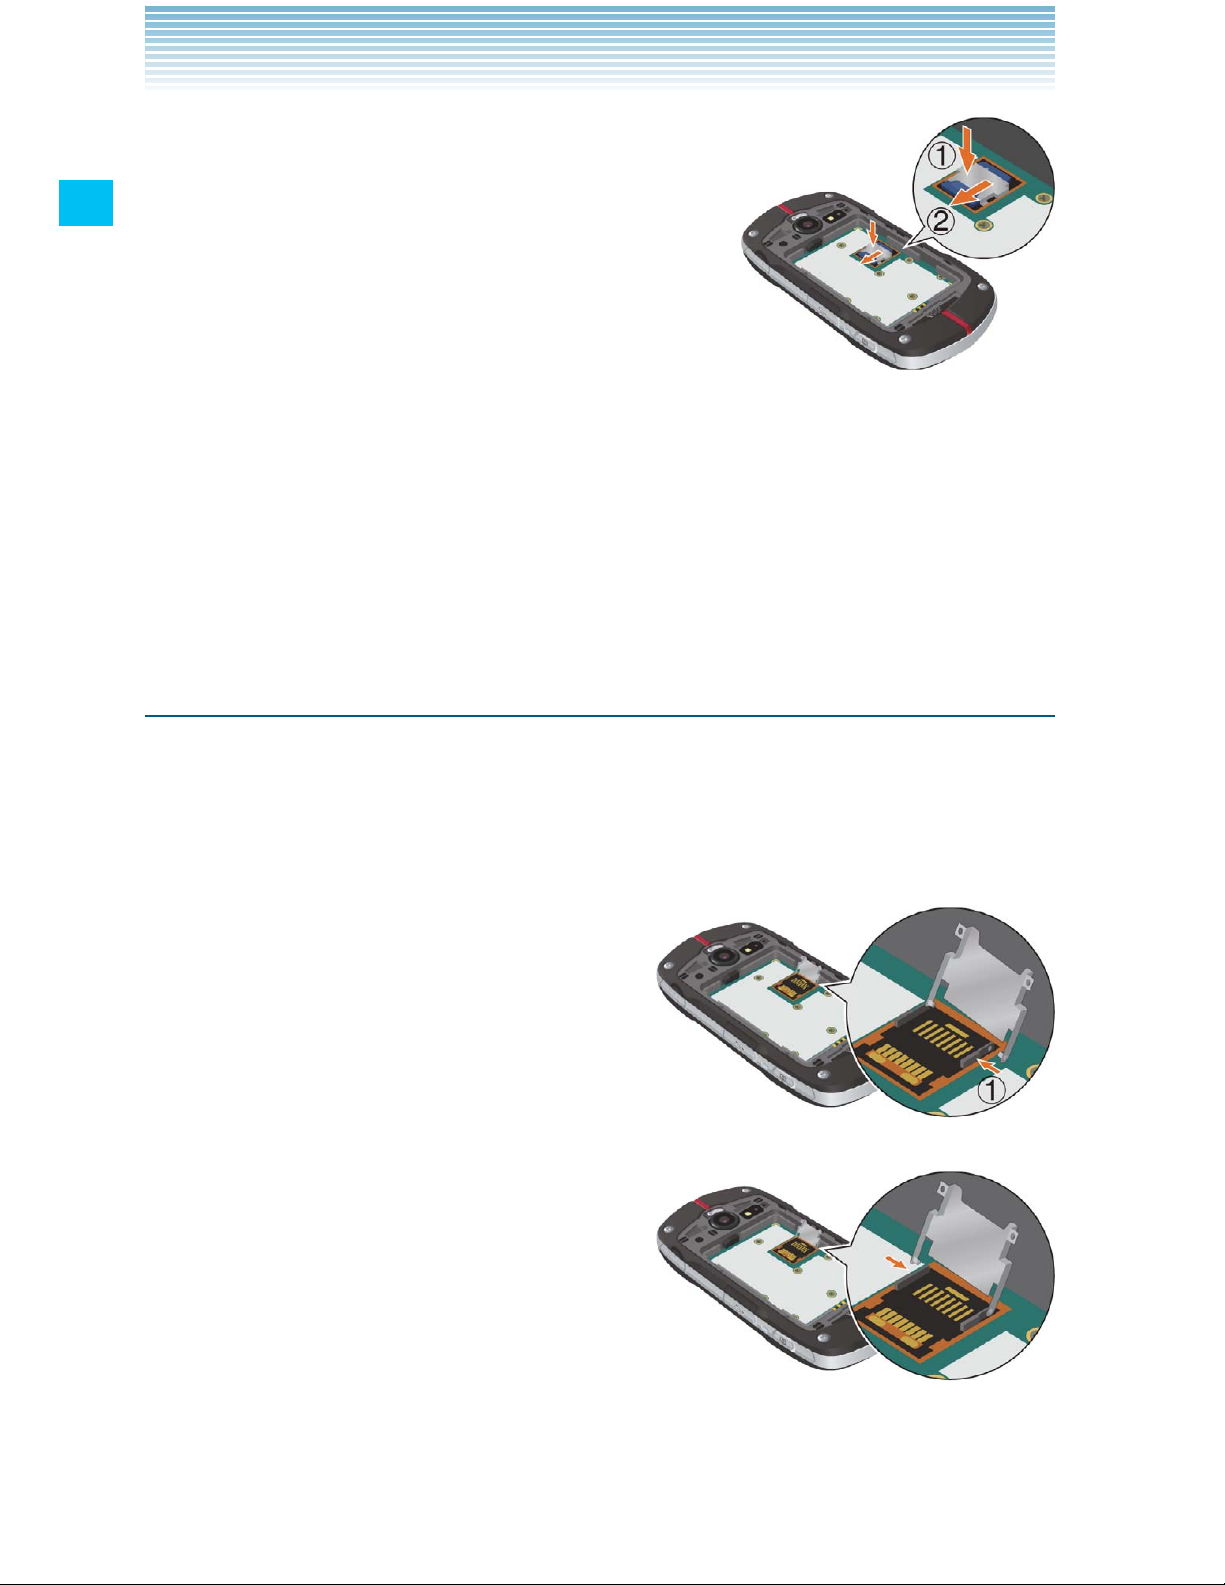
3. To install the battery, slide the battery into the
slot by aligning the contacts and tabs 1 and
press down 2 until it fits into place. Fold down
the battery tab toward the battery.
To remove the battery, pull up the tab.
4. Insert the battery cover tabs into the slots
1 and press the battery cover in the
direction of the arrow 2.
Page 17
15
Getting Started with Your Phone
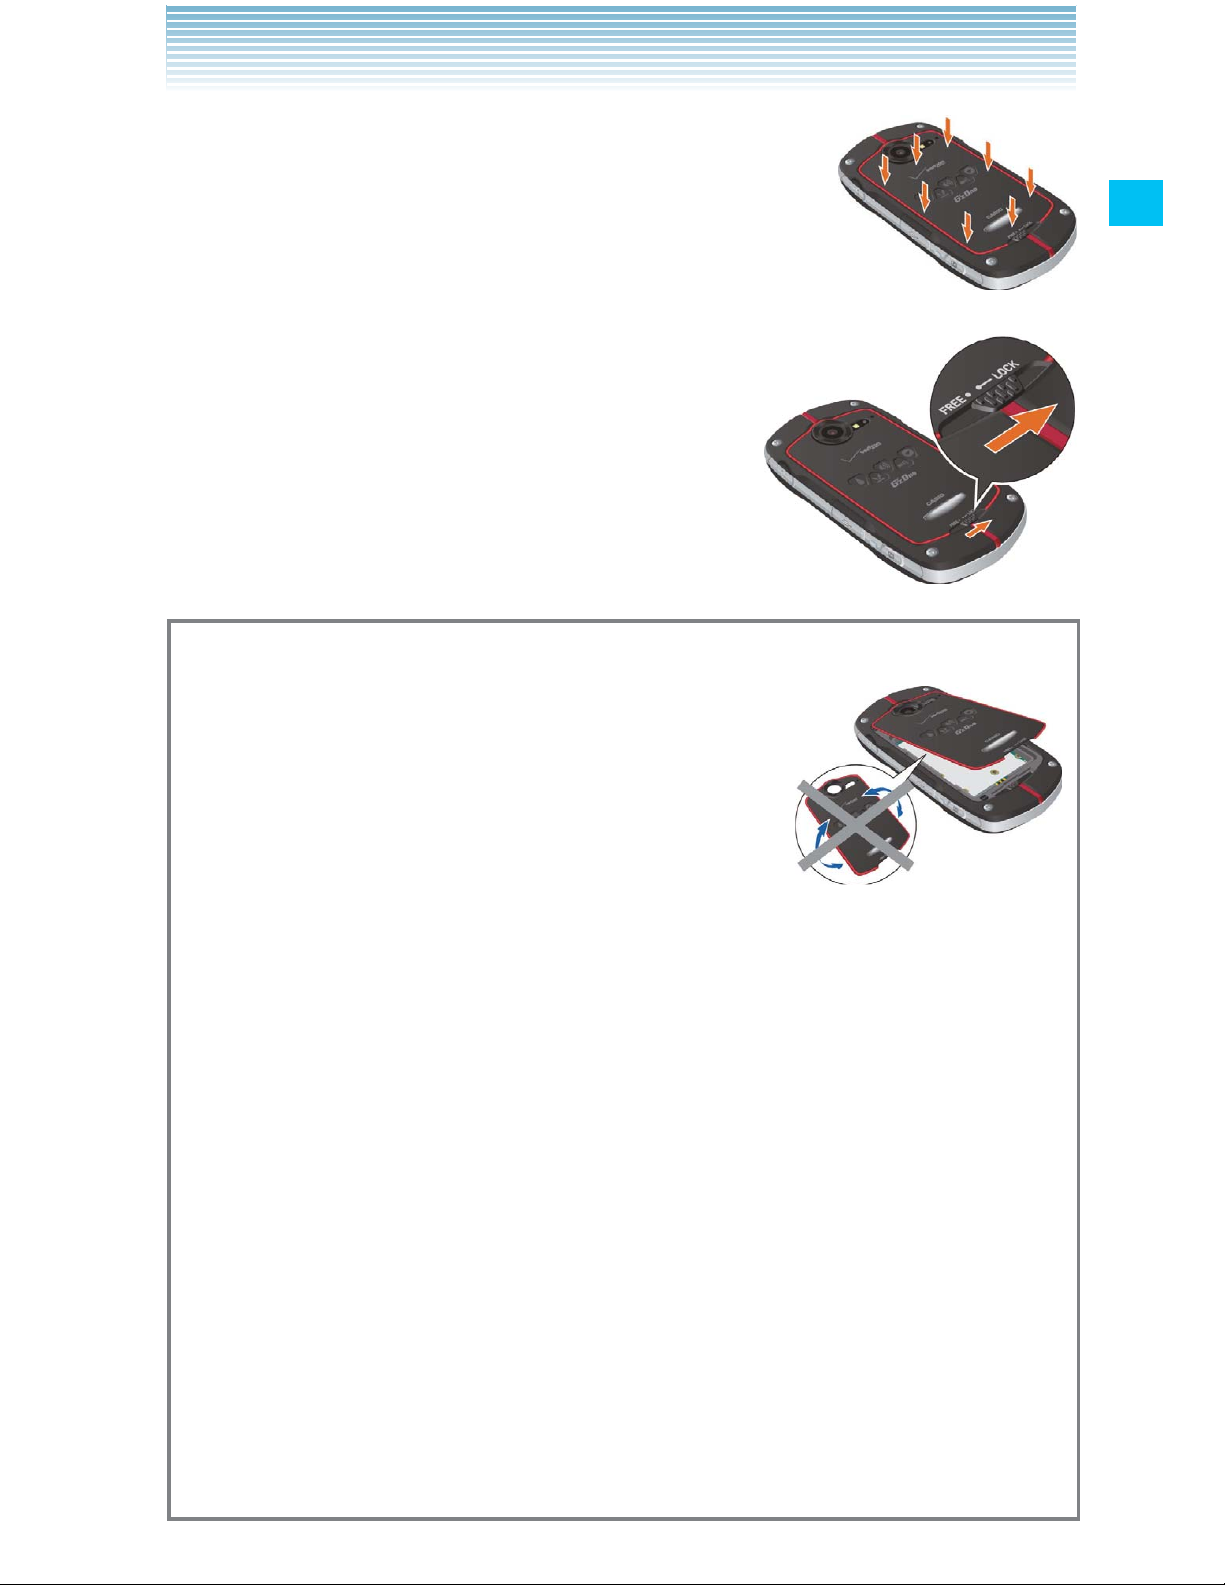
5. Press down firmly on all sides of the battery
cover at each arrow point, as shown in the right
figure.
6. Slide the Battery Cover Lock to the right to
the LOCK position, as shown in the
figure.
Warning!
• Do not twist the battery cover as shown in the
right figure. Doing so can damage the
phone and the battery cover.
Do not press hard on the battery cover •
if the tabs are not properly inserted into the slots of the phone.
Doing this may cause damage to the battery cover tabs.
Be careful not to get the tab of the battery caught between the •
edges of the battery cover and the phone. Failure of proper
battery installation will result in the loss of water resistance.
If you are using a wrist strap (sold separately), be careful not to •
get it caught between the battery cover and the phone. Failure of
proper battery installation will result in the loss of water resistance.
Do not leave the removed battery in direct sunlight, or near heat •
sources such as an open flame or stove. Doing this may cause
phone malfunction or cause a fire by the battery bursting or
igniting. Do not hit, or exert excessive shock on the battery, as it
may ignite or break.
Page 18
16
Getting Started with Your Phone
Removing and installing a microSD card
To use the multimedia functions such as the Camera application
and downloading/playing music or video, a microSD card should be
installed in the phone.
NOTE
The phone comes with a pre-installed 8GB microSD card.
Removing a microSD card
Warning!
Never remove a microSD card from the phone while it is being •
accessed. Doing so can damage the microSD card or the data
stored on it.
The microSD card is very small. Make sure you do not drop it.•
Failure to completely reseal the battery cover after removal may •
result in damage if the phone is exposed to water.
Do not touch a microSD card terminal with your finger or hand. It •
may contaminate a terminal to cause the contact failure.
1. Remove the battery cover and the battery.
For instructions on how to remove the battery cover and the battery,
refer to steps 1 through 3 of “Installing and removing the battery”
on page 13.
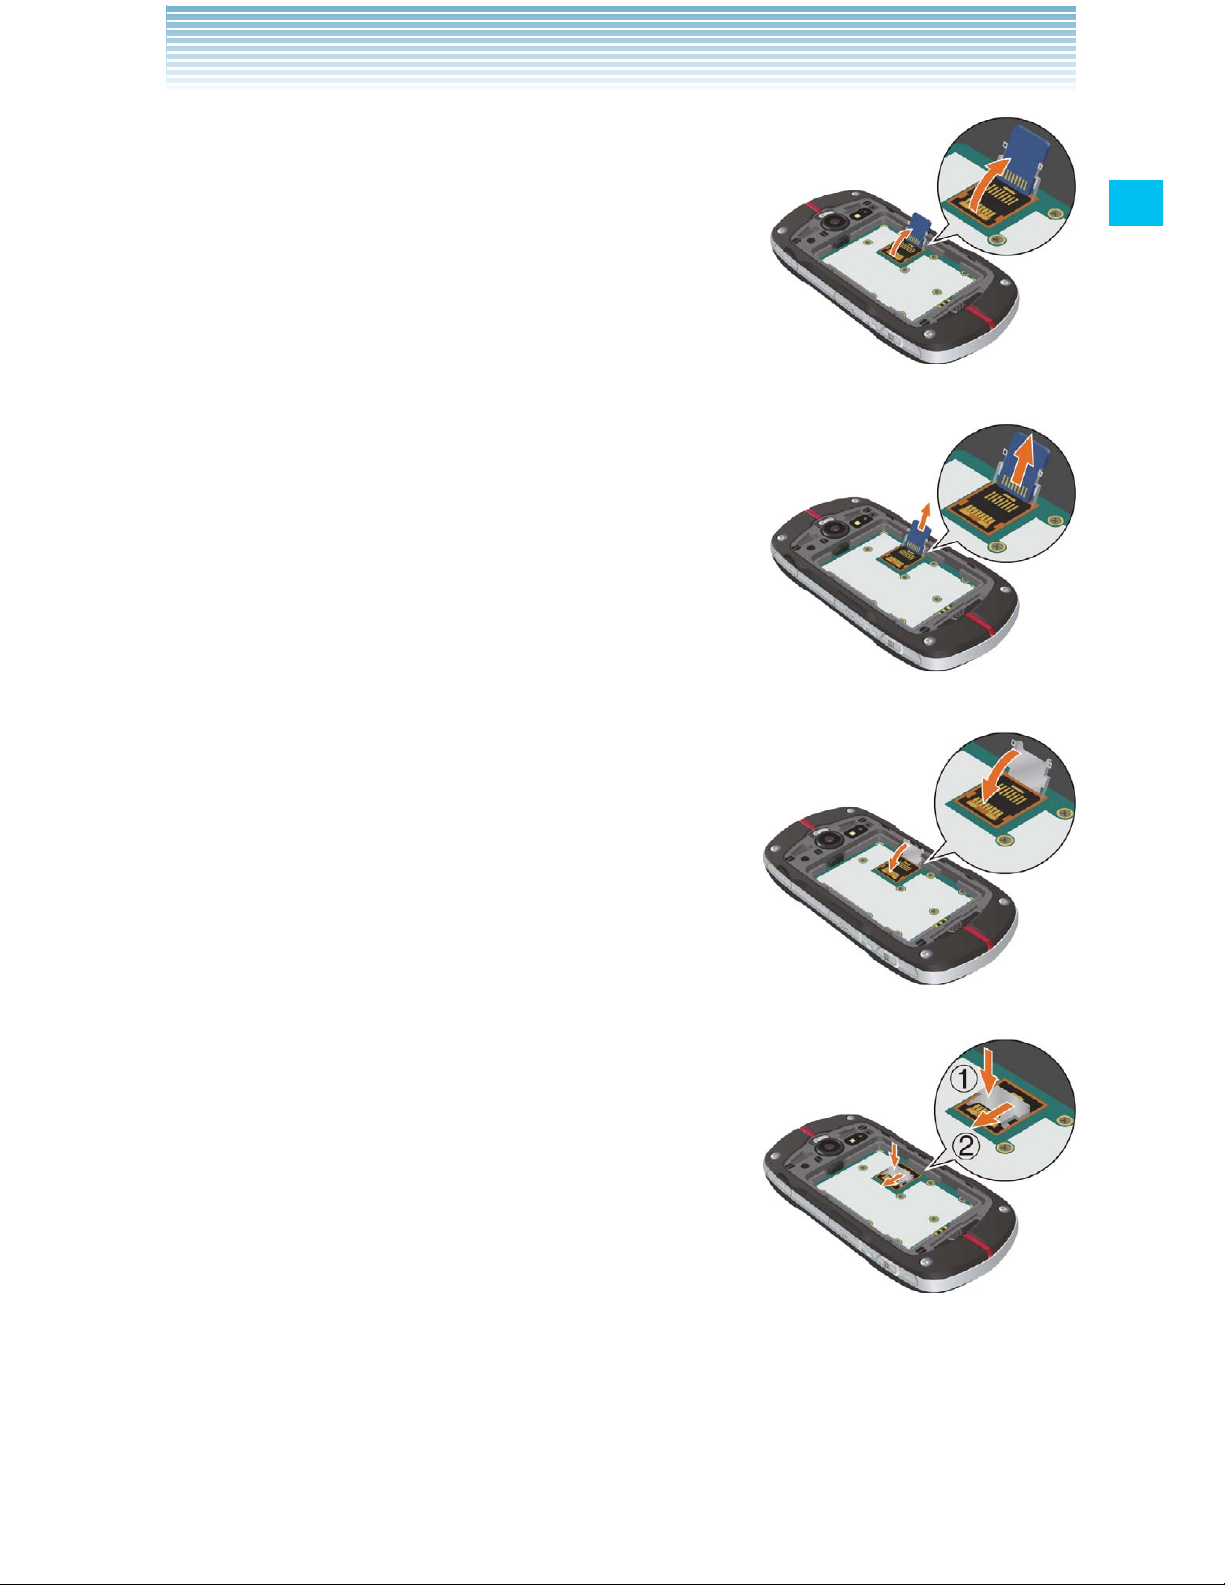
2. Lightly press and hold the microSD card cover
with your finger cushion 1, then unlock it
by sliding it in the direction of the arrow
2 as shown in the right figure.
The microSD card cover pops up with the
microSD card when unlocked.
ve
r
Page 19
17
Getting Started with Your Phone
3. Raise the microSD card cover by rotating it
in the direction of the arrow shown in the
right figure.
4. Remove the microSD card from the microSD
card cover as shown in the right figure.
5. Lower the microSD card cover by rotating it
in the direction of the arrow shown in the
right figure.
6. Lightly press and hold the microSD card
cover with your finger cushion 1, then
lock it by sliding it in the direction of the
arrow 2 as shown in the right figure.
7. Install the battery and replace the battery cover making sure to
slide the Battery Cover Lock to the LOCK position.
For instructions on how to install the battery and the battery cover, •
refer to steps 3 through 6 of “Installing and removing the battery”
on page 13.
Page 20
18
Getting Started with Your Phone
Installing a microSD card
Warning!
Whenever installing or removing a microSD card, make sure •
the phone is turned off and that the Wall/USB Charger is not
connected.
When installing or removing a microSD card, avoid touching the •
microSD card terminal to avoid damaging the microSD card,
causing malfunction or loss of data.
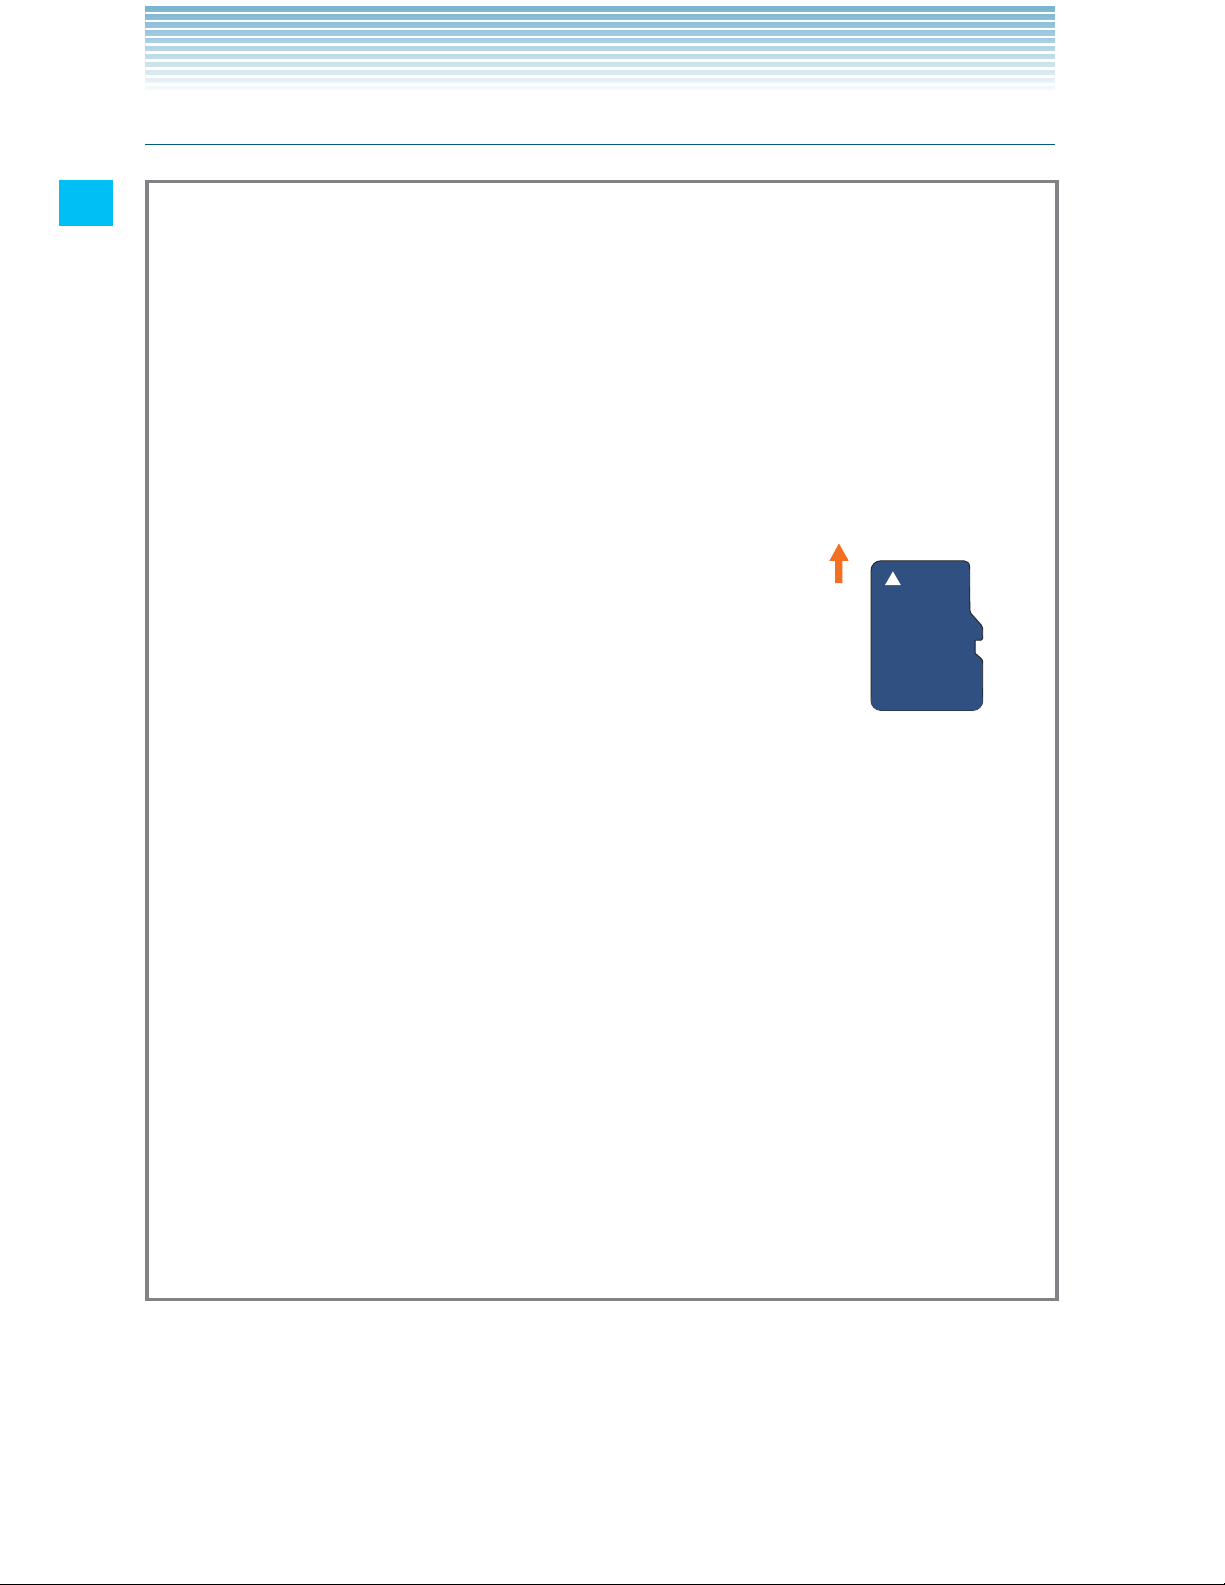
The front and the back of the microSD card •
look different. When inserting the memory
card, make sure that the terminals of the
phone and the microSD card are facing each
other. If not, the microSD card may not fit in
the microSD card socket, or the microSD
card and/or card cover may be damaged.
Insert like this.
Do not forcibly insert the microSD card into the microSD card •
cover. Hold the card so that the terminals of the phone and the
microSD card are facing each other, and carefully insert it.
To lock or unlock the microSD card cover, lightly press and hold •
it with your finger cushion, and slide it in the direction of lock or
unlock. Do not use your nail or like when sliding the microSD card
cover. Otherwise personal injury or damages on the microSD
card, microSD card cover, and/or phone may result.
Failure to completely reseal the battery cover after installing the •
memory card may result in damage if the phone is exposed to
water.
1. Remove the battery cover and the battery.
For instructions on how to remove the battery cover and the battery,
refer to steps 1 through 3 of “Installing and removing the battery”
on page 13.
Page 21
19
Getting Started with Your Phone
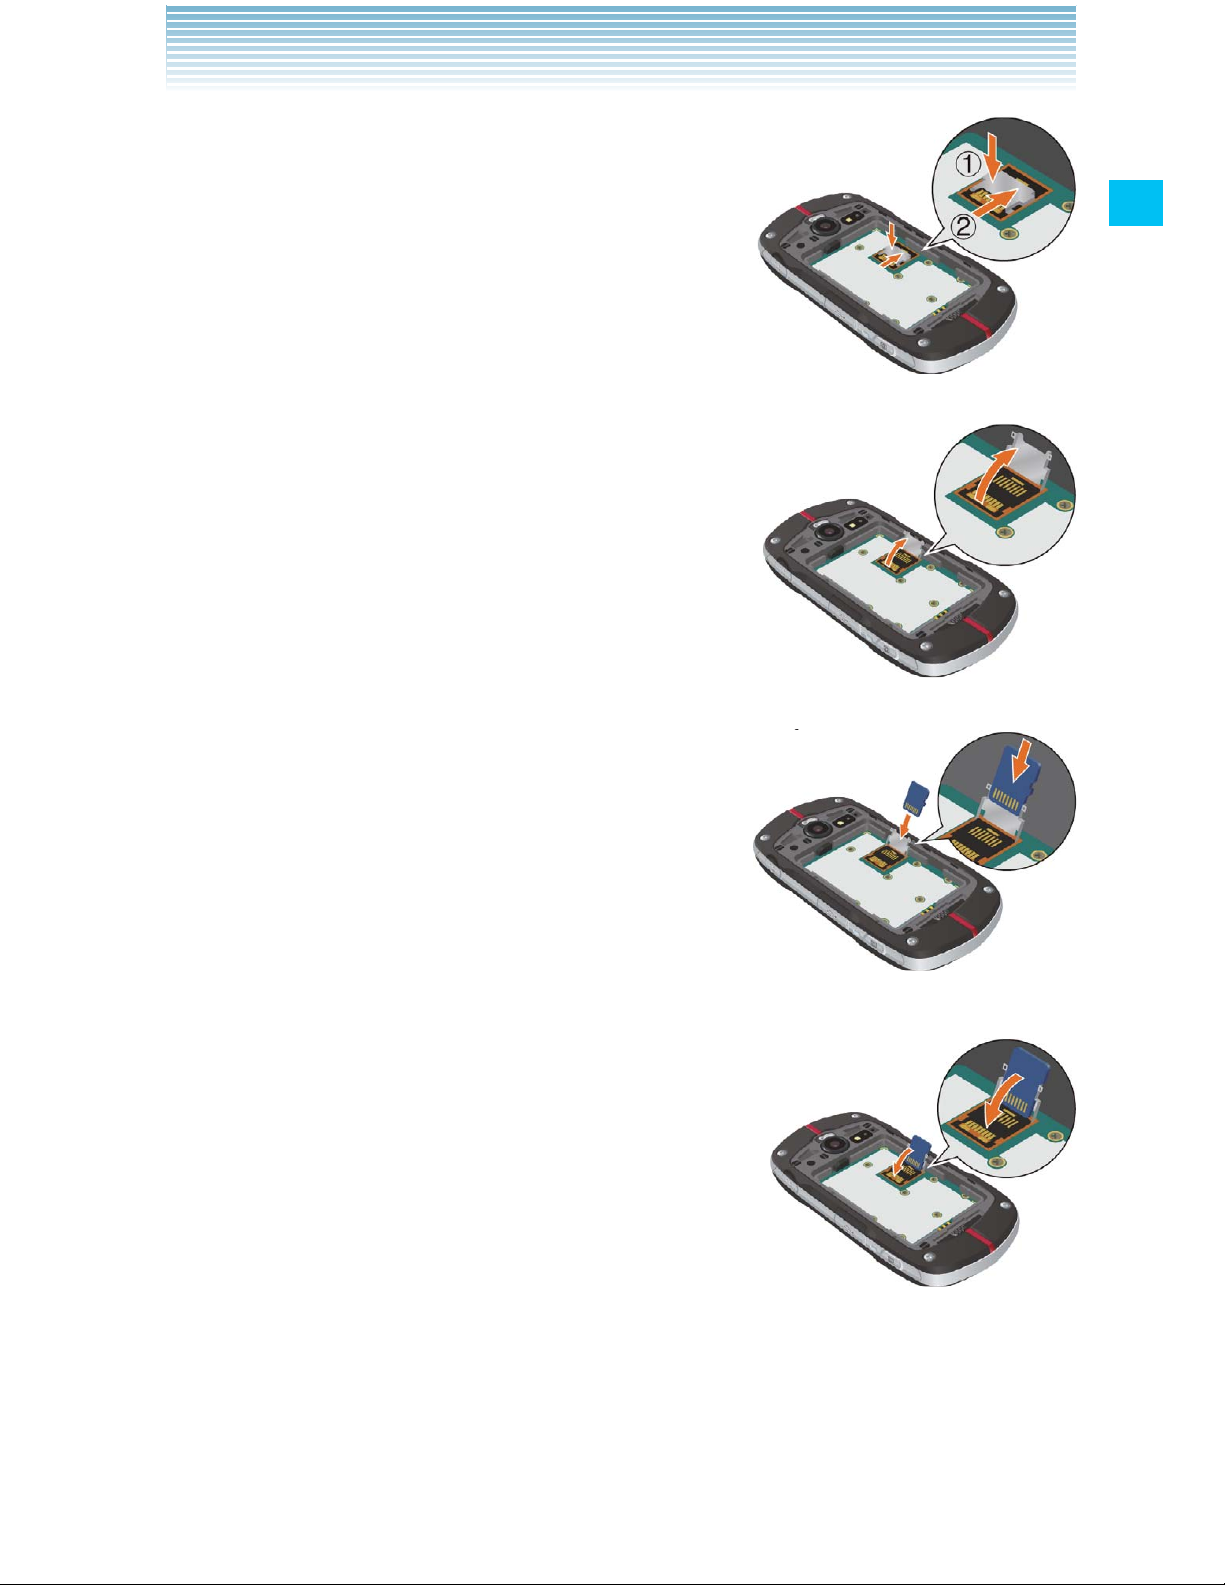
2. Lightly press and hold the microSD card cover
with your finger cushion 1, then unlock it
by sliding it in the direction of the arrow
2 as shown in the right figure.
3. Raise the microSD card cover by rotating it in
the direction of the arrow shown in the
right figure.
4. Hold the microSD card so that the terminals of
the phone and the microSD card are
facing each other, and carefully insert
the microSD card into the microSD card
cover, as shown in the right figure.
5. Lower the microSD card cover by rotating it in
the direction of the arrow shown in the
right figure.
ver
in
s of
in
Page 22
20
Getting Started with Your Phone
6. Lightly press and hold the microSD card cover
1, then lock it by sliding it in the direction
of the arrow 2 shown in the right figure.
7. Install the battery and replace the battery cover, making sure to
slide the Battery Cover Lock to the LOCK position.
For instructions on how to install the battery and the battery •
cover, refer to steps 3 through 6 of “Installing and removing the
battery” on page 13.
Installing the microSD card cover
If the microSD card cover comes off, install it using the following
procedure:
1. Make sure that rod for the microSD card cover is not deformed
before installation.
2. Hold the microSD card cover
vertically and insert one end of the
cover rod into position 1 as shown
in the right figure.
3. Insert another end of the rod into
the position as shown in the right
figure.
ve
r
Page 23
21
Getting Started with Your Phone
Charging the battery
To charge your battery:
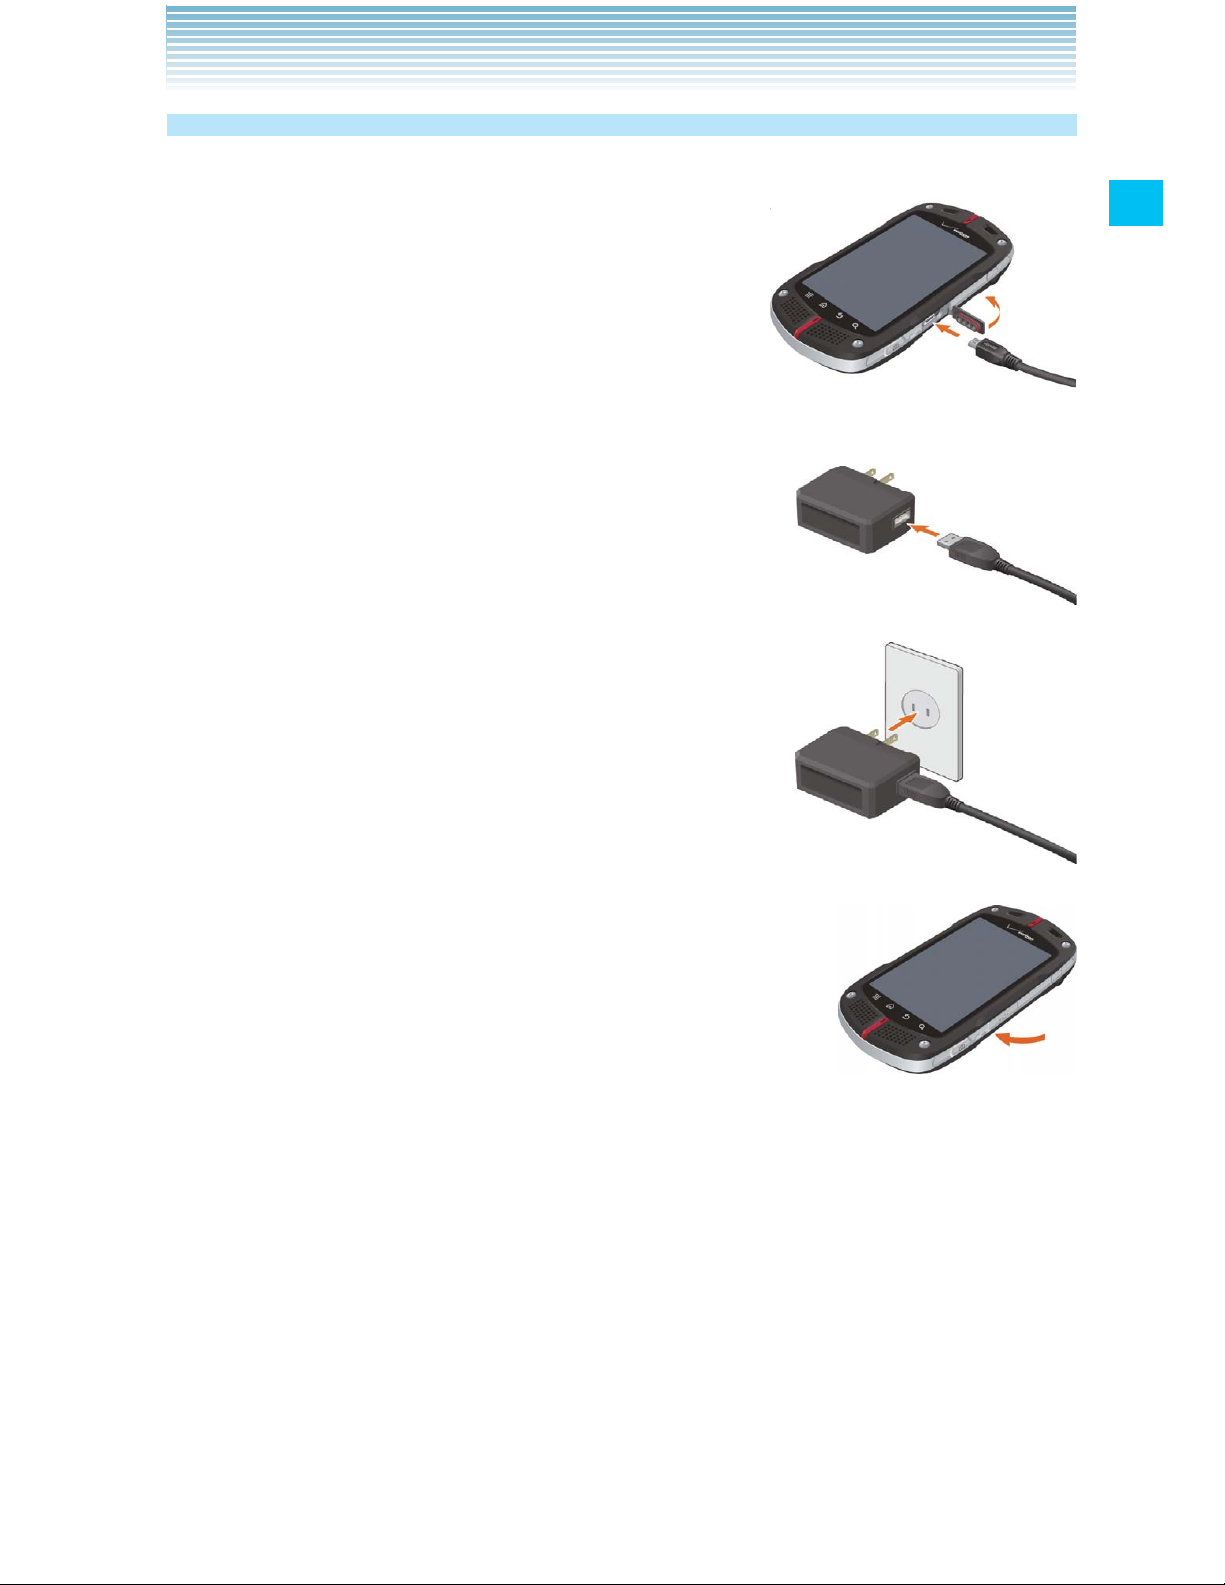
1. To open the Charging/Data Port cover, insert
your fingertip into the notch and open the
cover.
Then connect the USB Cable (included in
box) to the Charging/Data Port.
2. Connect the opposite end of the USB Cable
to the USB port on the Wall Charger
(included in box).
3. Plug the Wall Charger power plug into an
electrical outlet.
4. After the phone is completely charged, unplug
the USB Cable from the Charging/Data Port,
then close the port cover.
5. Make sure the port cover is completely closed.
Page 24
22
Getting Started with Your Phone
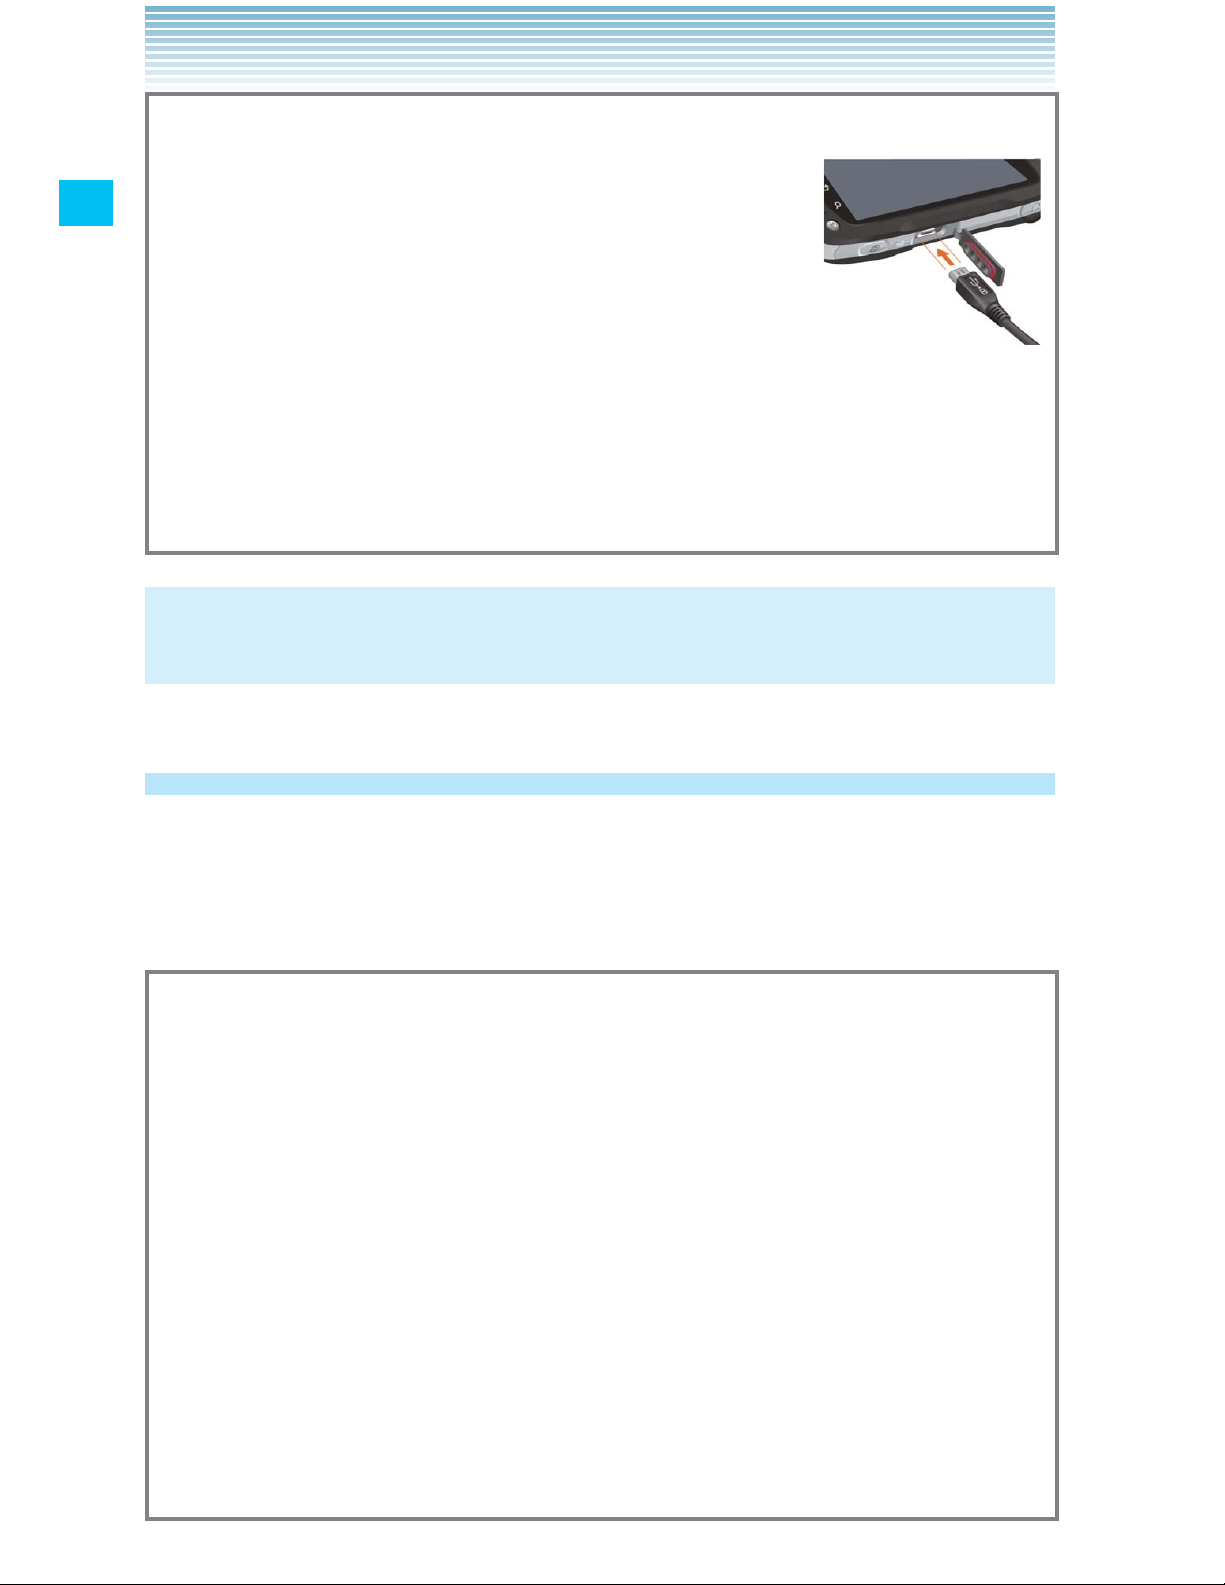
Warning!
• Hold the small connector with the USB mark
facing up.
When inserting the connector into the
Charging/Data port on the phone, hold the
connector straight against the port without
tilting it vertically or horizontally and insert it gently.
Failure to completely reseal the Charging/Data Port cover after •
charging may lead to water or other liquids entering the casing,
which may cause damage to the phone.
NOTE
Charging time varies depending upon the battery level.
Touchscreen operations
Most of the phone operations can be performed from the Touchscreen
by touching or dragging with your finger.
In this manual, the following terms are used for Touchscreen operations.
Warning!
Touch the Touchscreen lightly with your finger. Do not press it •
hard with your finger or a plastic pen, etc.
Any of the following operations may lead to the Touchscreen •
inoperable or malfunction.
Operation with gloves worn -
Operation with your nail tip -
Operation with foreign materials put on the Touchscreen -
Operation with protective sheet or sticker adhered on the -
Touchscreen
Operation in high-humidity environment or when the -
Touchscreen is wet.
Page 25

23
Getting Started with Your Phone
Touch
To select an item, touch the Touchscreen with your finger once.
You can select a menu item or icon, or enter text, by touching the
screen.
Touch and hold
To open the pop-up menu, touch and hold the Touchscreen with your
finger.
For example, if you touch and hold the empty area of the Home
screen, the pop-up menu to customize the Home screen will open.
Drag
To move an item such as an icon on the screen, touch and hold it with
your finger then keeping your finger on the icon move (drag) it.
For example, you can move an icon to a desired place by touching
and holding then dragging it.
Swipe or slide
To swipe or slide, move your finger quickly in a horizontal or vertical
direction on the Touchscreen.
For example, you can swipe the Home screen to view the left/right
Home screen extension panel, or slide the screen up or down to scroll
the Email list.
Double-tap
Double-tap is a finger action of quickly tapping the Touchscreen
twice.
For example, you can zoom in to the desired section of a web page by
double-tapping it.
Page 26
24
Getting Started with Your Phone
Pinch
In some applications (such as Browser, Maps, Gallery, and Document
Viewer), you can zoom in and out by placing two fingers on the screen
at once and spreading them apart (to zoom in) or pinching them
together (to zoom out).
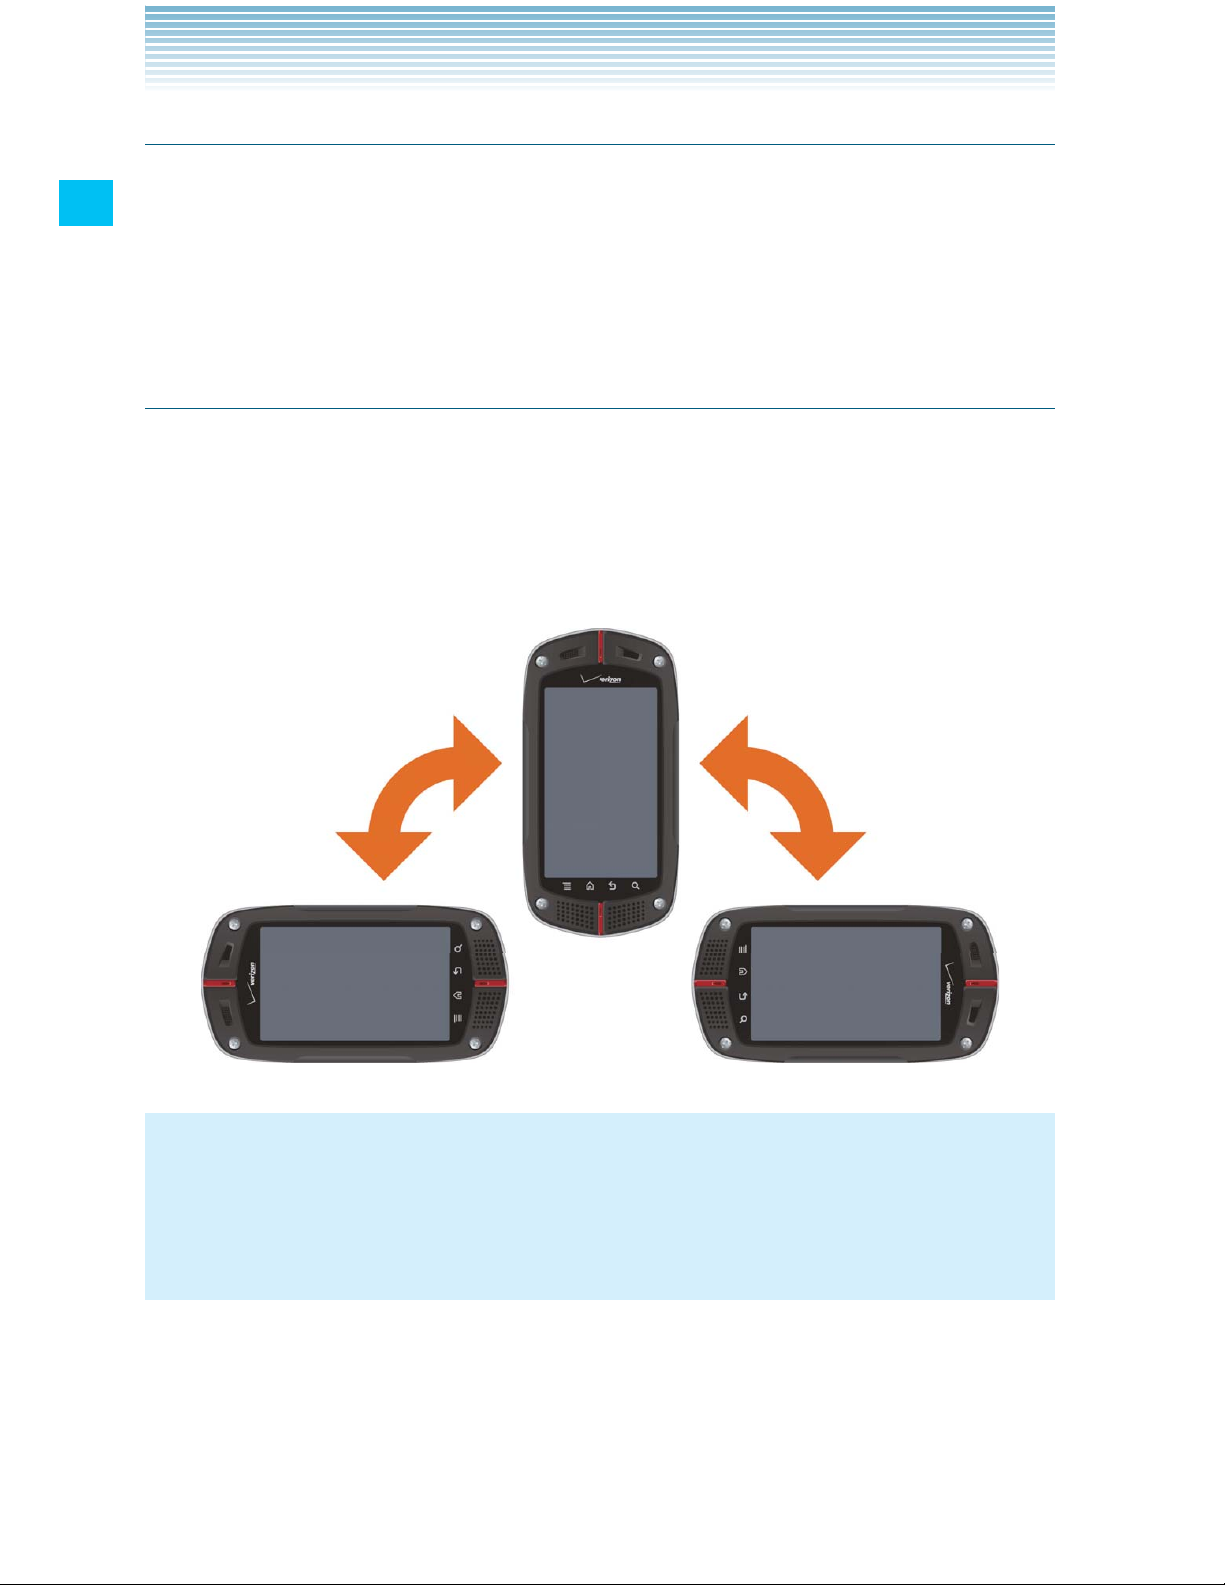
Rotate the screen
In many applications, turning the phone clockwise or counterclockwise
from upright to sideways rotates the orientation of the screen display.
Turning the phone from sideways to upright rotates the orientation of
screen display back again.
NOTE
The screen orientation rotating function is enabled by default. To
disable it, touch the Menu key M on the Home screen, then touch
Settings > Display and uncheck Auto-rotate screen.
Page 27

25
Getting Started with Your Phone
Turning the phone on and off
Turning the phone on
1. Press and hold the Power key P for at least two seconds.
NOTES
When you first turn on the phone, you are prompted to perform •
Initial setup. See “Initial setup” on page 25.
If your phone is left for a certain period of time without operation, •
the screen display will turn off and the Touchscreen will be
locked. To restart the phone operation, press the Power key P
to turn on the screen display and unlock the Touchscreen. See
“Turning the screen on and off” on page 28.
Avoid any unnecessary contact with the internal antenna area •
while your phone is on.
Turning the phone off
1. Press and hold the Power key P until the pop-up menu appears.
2. Touch Power Off > OK.
Initial setup
Initial setup should be performed when you turn on the phone for the
first time.
1. Press and hold the Power key P until the main display lights up.
2. Select the language to be used on the phone. Check that English
is selected and touch Next.
3. Touch Activate to activate the phone.
4. Set up the Backup Assistant.
Touch Create a Backup Assistant Account or Get Stored
Contacts to proceed to Backup Assistant setting. Follow the on-
screen instructions to set up Backup Assistant.
Touch Skip or No thanks to skip Backup Assistant setting.
Page 28

26
Getting Started with Your Phone
5. Set up the Google account.
Touch Set up > Next, then touch one of the following options:
Create: Enables you to create a new Google account. Follow the
on-screen instructions to enter information such as a user name.
Once the Google account is created, you can sign in to your
account by entering your username and password.
Sign in: If you already have your own Google account, you can
sign in to your account by entering your username and password.
Touch Skip to skip the Google account setting and exits the Initial
setup. You may set up a Google account later.
6. Set up Account settings.
Touch Set up > Email to proceed to Email settings. For instructions
on how to set up Email, see “Adding an email account” on page 126.
Touch Skip to skip Account Setup.
7. Specify whether to permit services such as VZW Location Services
to use your phone’s location information.
To permit, check the checkbox and touch Agree.
When finished, touch Next.
8. Touch one of the following options:
Start Video tutorial: Starts Video tutorial to learn how to use
functions on your phone. The video tutorial is stored on the pre-
installed microSD card.
Begin: Finishes the initial setup to use your phone.
NOTES
If • Emergency is touched in step 3, you can place an emergency
call without activating the phone.
You can also perform the same settings using the Setup Wizard •
later on, by touching the Launcher icon
on the Home screen,
then the Setup Wizard icon
.
Page 29

27
Getting Started with Your Phone
About Google account
To use Google services such as Gmail™, Google Talk™, Google
Calendar™, and other Google applications, or for backing up settings
to the Google server, you should sign in to your Google account.
When signed in, the phone will be synchronized with the data such as
Contacts, Gmail Messages, and Event Calendar that are registered in
the applications and services on the web.
Usage of some applications such as the Calendar may be limited
to the first account you created on the phone. If you want to use
several Google accounts on the phone, make sure to first sign into the
account that allows you to use the limited applications.
NOTES
If you have obtained a corporate account through a company or •
other organization, a special procedure may be required to sign in
to that account. Contact your IT department.
If you have not signed in to the Google account in the initial setup •
steps, you may be prompted to sign in or create a new account
when you try to use any application that requires you to sign in,
such as Gmail or Google Talk.
To restore the data backed up from another phone with Android •
release 2.0 or higher to this phone, you should sign in to the
specific Google account that was used for the backup in the
initial setup steps. Once the initial setup is complete, this type of
restoration is not possible.
Page 30
28
Basics
Basics
Turning the screen on and off
You can turn off the screen to conserve the battery. The touchscreen
is locked while the screen is off to prevent improper operation.
NOTE
The screen also turns off when the phone is not used for a certain
period of time.
You can set the time until the screen goes off with Screen timeout
of Display settings. See “Display settings screen” on page 261.
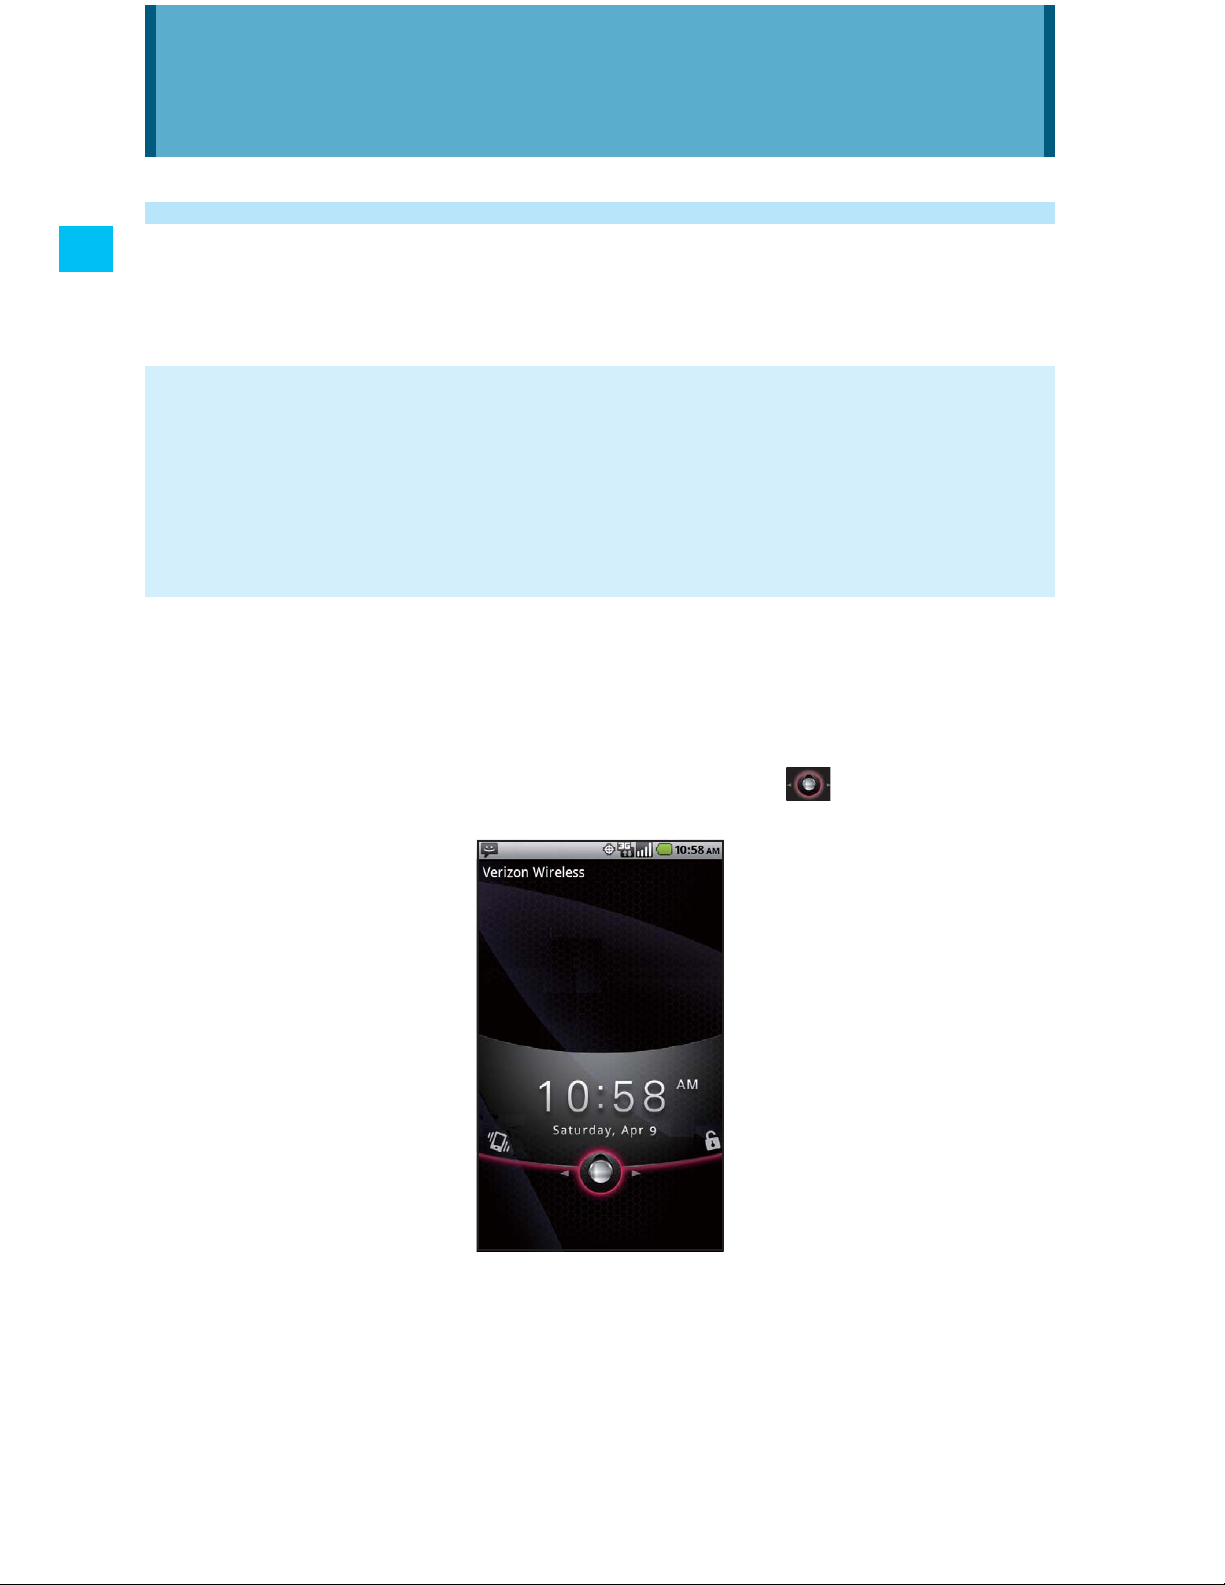
1. Press the Power key P to turn off the screen display and lock
the touchscreen.
2. Press the Power key P to turn on the screen display.
3. To unlock the touchscreen, drag the slide icon to the right.
4. The last screen you were working on opens.
Page 31

29
Basics
NOTES
Drag the slide icon •
left to set the phone to Silent mode. This
will cancel the Silent mode if the phone is already in Silent mode.
If you have locked your screen, you must draw an unlock pattern •
or enter a PIN or password to unlock it. See “Locking your screen”
on page 52.
Getting to know the Home screen
The Home screen is your starting point to access all the features on
your phone. It displays application icons, widgets, shortcuts, and
other features.
Widgets are applications that you
can use directly on the Home
screen.
Drag to the right and up to open
the Snap Out Menu.
The Status bar shows the time,
signal strength, battery status, and
other information. It also displays
notification icons.
Touch and hold an empty spot to
add a shortcut to an application, a
widget, and so on.
Touch items on the Home screen
to open them.
Touch to view recently used tabs in
Dialer, Call log, Contacts, Groups,
and Favorites.
Touch the Launcher icon to open the Launcher and view all your applications.
At the top of the screen, the Status bar displays the time, information •
about the status of your phone, and icons for notifications that you
have received. To learn more, see “Monitoring your phone’s status”
on page 31 and “Managing notifications” on page 33.
Page 32

30
Basics
You can customize the Home screen with different wallpaper and •
display the items you want. See “Customizing the Home screen” on
page 40.
Touch the Launcher icon •
at the bottom of the screen to view all
installed applications. See “Opening and switching applications” on
page 35.
Touch and hold the Launcher icon •
to view thumbnails of the
Home screen and its extensions, which you can touch to open.
Viewing other parts of the Home screen
Slide your finger left or right across the Home screen.
These extensions to the Home screen provide more space for
widgets, shortcuts, and other items.
Returning to the Home screen
1. Touch the Home key H at any time, in any application.
Page 33

31
Basics
Monitoring your phone’s status
The Status bar appears at the top of every screen. It displays icons
indicating that you have received notifications (on the left) and icons
indicating the phone’s status (on the right), along with the current time.
Notification icons Status icons
If you have more notifications than can fit in the status bar, a plus icon
prompts you to open the Notifications panel to view them all. See
“Managing notifications” on page 33.
Status icons
The following icons indicate the status of your phone.
Connected to 3G mobile
network
Roaming
3G in use No signal
Connected to 1x mobile
network
Silent mode
1x in use Ringer is silenced
Mobile network signal
strength
Phone microphone is mute
Connected to a Wi-Fi
network
Battery is very low
Bluetooth is on Battery is low
Connected to a Bluetooth
device
Battery is partially drained
Airplane mode Battery is full
Alarm is set Battery is charging
Speakerphone is on E911Only
Page 34

32
Basics
Location information is
available
Receiving location data
from GPS
GPS is on
Notification icons
The following icons indicate that you have received a notification.
See “Responding to a notification” on page 34 for information about
responding to these notifications. In addition to these icons, applications
you install on your phone may use their own notification icons.
New email
(Yahoo!
®
account)
New Google Talk message
New email
(Hotmail account)
New voicemail
New email
(Google account)
Upcoming event
New email
(AOL
®
account)
Data is syncing
New email
(Exchange account)
Problem with sign-in or sync
New email
(Verizon account)
Battery is charging and full
New email
(other accounts)
SD card is full
New Gmail message
An open Wi-Fi network is
available
New text or multimedia
message
Phone is connected via
USB cable
New instant message
Phone is sharing its data
connection as a Wi-Fi
hotspot (3G Mobile hotspot)
Problem with text or
multimedia message delivery
3 more notifications not
displayed
Page 35

33
Basics
Call in progress Download finished
Call in progress using a
Bluetooth headset
Connected to VPN
Missed call Disconnected from VPN
Call forwarding is on
Carrier data use threshold
approaching or exceeded
Song is playing
Application update
available
Uploading data System update available
Downloading data Car Mode is running
Managing notifications
Notification icons report the arrival of new messages, calendar events,
and alarms, as well as ongoing events, such as when call forwarding
is on or the current call status.
When you receive a notification, its icon appears in the Status bar,
along with a summary that appears only briefly.
Depending on your settings, when you receive a new notification
you may hear a notification sound, or the phone may vibrate. These
settings, as well as the sound volume adjustment and other general
notifications settings, are described in “Sound settings” on page 260.
You can open the Notifications panel to view a list of all your notifications.
NOTE
Applications whose activities produce notifications, such as Email
and Gmail, have their own settings, which you can use to configure
whether or not notifications are sent, and how they send the
notifications, such as whether they sound a ringtone, or vibrate, and
so on. See the sections on those applications for details.
Page 36

34
Basics
Opening the Notifications panel
1. Drag the Status bar down from the top of the screen.
The Notifications panel displays your wireless provider and a list of
your current notifications. Notifications about ongoing activities are
listed first, followed by Notifications about events, such as new mail
notifications or Calendar reminders.
Touch a notification to open it in its
application.
Drag this bar up to close the
Notifications panel.
NOTE
On the Home screen, you can also open the Notifications panel by
touching the Menu key M > Notifications.
Responding to a notification
1. Open the Notifications panel.
Your current notifications are listed in the panel, each with a brief
description.
2. Touch a notification to respond to it.
The Notifications panel will close, and the next step depends on
the notification.
For example, new email notifications will open your inbox, and
network disconnect notifications will open the list of configured
networks so you can reconnect.
Page 37

35
Basics
Clearing all notifications
1. Open the Notifications panel.
2. Touch Clear at the top right of the panel.
All event-based notifications are cleared; ongoing notifications
remain in the list.
Closing the Notifications panel
1. Drag the tab at the bottom of the Notifications panel to the top of
the screen.
Or, just touch the Back key B.
The panel also closes when you touch a notification to respond to
it.
Opening and switching applications
The Launcher, which you open from the Home screen, holds icons for
all of the applications on your phone, including any applications that
you downloaded and installed from Market or other sources.
When you open an application, the other applications you have been
using do not stop; they keep on running: playing music, rendering
web pages, and so on. You can quickly switch between your running
applications to work with several at once. The Android operating
system and applications work together to ensure that applications
that you are not using do not consume resources unnecessarily, by
stopping and starting them as needed. For this reason, there is no
need or facility for quitting applications.
NOTE
To learn how to discover and install additional applications and
games on your phone, see “Android Market” on page 232.
Page 38

36
Basics
Opening and closing the Launcher
1. Touch the Launcher icon on the Home screen.
The Launcher opens.
If you have more applications than can fit on the Launcher in one
view, you can slide the Launcher up or down to view more.
Touch to close the Launcher.
Touch an application to open it
Slide the Launcher up or down to
bring more icons into view.
You can add an application icon to the Home screen by touching •
and holding it on the Launcher until it vibrates, and then dragging
it to a location on the Home screen.
Touch the Home icon •
or the Home key H to close the
Launcher.
The Launcher closes automatically if you touch an icon to open •
its application, or if you move an icon from the Launcher to the
Home screen.
Opening an application
1. Touch an application’s icon on the Launcher.
Or, touch an application’s icon on the Home screen.
Page 39

37
Basics
Switching to a recently used application
1. Touch and hold the Home key H.
A small window opens, with icons of applications that you have
recently used.
2. Touch an icon to open its application.
Or, touch the Back key B to return to the current application.
Opening an application from the Snap Out Menu
You can quickly open applications using the Snap Out Menu.
1. On the Home screen, drag the Snap Out Menu icon at bottom
left of the screen diagonally up and right, drawing an arc.
The Snap Out Menu opens and shortcut icons appear along the
arc where the Snap Out Menu icon
was dragged.
Page 40

38
Basics
2. While touching the screen with your finger, drag back the Snap Out
Menu icon
to select a shortcut icon.
3. Lift your finger to open the application corresponding to the
selected shortcut icon.
NOTES
If you drag the Snap Out Menu icon •
that is at the bottom left of
the Home screen to the right and up, drawing an arc to the right
edge of the screen, and then lift your finger, the Snap Out Menu
remains displayed.
You can open an application by touching a shortcut icon in the •
Snap Out Menu.
If you touch somewhere other than an icon, the Snap Out Menu •
closes and the Home screen reappears.
If you drag down the Snap Out Menu icon •
on the Home
screen, the bottom edge of the screen turns red. If you keep
dragging the Snap Out Menu icon
to the opposite corner of the
screen, it remains there.
You can play the video tutorial for Snap Out Menu by touching the •
Menu key M > Tutorial on the Home screen. The video tutorial is
stored on the pre-installed microSD card.
Page 41

39
Basics
Deleting or adding a Snap Out Menu shortcut
The Snap Out Menu can contain up to five shortcuts. If you want to
add your favorite shortcuts, delete some shortcuts before adding.
The shortcuts that are available depend on the applications you have
installed.
1. Drag the Snap Out Menu icon that is at bottom left of the Home
screen to the right and up, drawing an arc to the left edge of the
screen, and then lift your finger.
The Snap Out Menu remains displayed.
2. Touch the edit icon .
The Snap Out Menu enters edit mode and the trash can icon
appears.
3. Drag the shortcut icon to the trash can icon .
4. When the trash can icon turns red, lift your finger.
Drag the shortcut icon to the trash
can icon and lift your finger to
delete the shortcut icon.
5. Touch the plus icon .
6. Touch a shortcut type from the displayed shortcut type list.
7. Touch an item in the displayed list to enter in the Snap Out Menu.
8. Touch the back icon to return to Snap Out Menu in normal
mode.
Page 42

40
Basics
Customizing the Home screen
You can add application icons, shortcuts, widgets, and other items to
any part of the Home screen. You can also change the wallpaper.
Adding an item to the Home screen
1. Open the Home screen where you want to add the item.
For an introduction to working with the Home screen, including how
to switch Home screens, see “Getting to know the Home screen”
on page 29.
2. Touch the Menu key M > Add.
Or just touch and hold an empty location on the Home screen.
3. Touch the type of item to add in the menu that opens.
You can add the following types of items to the Home screen:
Shortcuts: Add shortcuts to applications, a bookmarked web
page, a favorite contact, a Gmail label, a music playlist, G’zGEAR
®
tools, and many other items.
The shortcuts available depend on the applications you have
installed.
Widgets: Add any of a variety of miniature applications (widgets)
to your Home screen, including a clock, a music player, a picture
frame, a power manager, a calendar that shows upcoming
appointments, and a news widget. You can also download widgets
from Market.
Folders: Add a folder where you can organize Home screen
items, or folders that contain all your contacts, contacts with phone
numbers, or starred contacts. Your folders’ contents are kept up-to-
date automatically.
Wallpaper: See “Changing the Home screen wallpaper” on page
42.
Page 43

41
Basics
NOTE
If there are no empty spots on the Home screen, Add is dimmed;
you must delete or move an item before you can add another item,
or switch to another Home screen.
Moving an item on the Home screen
1. Touch and hold the item you want to move, until it vibrates. Do not
lift your finger.
2. Drag the item to a new location on the screen.
Pause at the edge of the screen to drag the item onto another
Home screen panel.
3. When the item is placed where you want it, lift your finger.
Removing an item from the Home screen
1. Touch and hold the item you want to remove, until it vibrates. Do not
lift your finger.
The Launcher icon
changes to the trash can icon .
2. Drag the item to the trash can icon .
3. When the icon turns red, lift your finger.
Renaming a folder
1. Touch the folder to open it.
2. Touch and hold the folder window’s title bar.
3. Enter a new name in the dialog that appears.
4. Touch OK.
Page 44

42
Basics
Changing the Home screen wallpaper
1. On the Home screen, touch the Menu key M > Wallpaper.
2. Touch one of the following wallpaper types:
Gallery: Allows you to use a picture that you have captured using
the camera, or copied to your phone as a wallpaper. You can crop
the picture before setting it as a wallpaper. Working with pictures is
described in “Gallery” on page 163.
Live wallpapers: Opens a scrolling list of animated wallpapers
installed on your phone. Some live wallpapers change according
to the time of day, in response to touching the screen, tell the time,
or offer other information. Some live wallpapers have a Settings
option.
Wallpapers: Opens a screen where you can view a sample of the
wallpaper images that come with the phone. Slide the miniature
images left and right to view the samples. Touch a sample to view
a larger version.
3. Touch Save or Set wallpaper.
NOTE
You can also change the Home screen wallpaper by touching
and holding an empty area of the Home screen and touching
Wallpapers in the menu that opens.
Working with widgets
This phone has various types of widgets pre-installed. You can also
download widgets from Market.
For instructions on how to add a widget to the Home screen, see
“Adding an item to the Home screen”.
Page 45

43
Basics
Bing™
Touch the text field of the Bing widget and enter the word(s) to
search for. As you type, search results from your phone, previously
chosen search results, and web search suggestions appear. Touch a
suggestion to open it.
Or, touch the microphone icon
to search using your voice.
Touch to enter the word (s)
you want to search for.
Touch to search using
your voice.
Touch the text field of the widget, then touch the Menu key M >
Settings to set searchable items or clear the search history.
Calendar
The Calendar widget displays upcoming Calendar events.
Touch the widget to open the Calendar application.
Clock
You can select the clock to display on the Home screen from eight
types of digital clocks and four types of analog clocks.
Data Usage
You can use the Data Usage widget to open My Verizon
Mobile to display the data usage overview.
Email
The Email widget displays the number of unread Emails.
Touch the widget to open the Email application.
Page 46

44
Basics
Flashlight
Touch the Flashlight widget to turn the Flashlight on or off.
G’zGEAR
®
With G’zGEAR, you can use six types of widgets: Compass, Moonrise
Moonset, Pedometer, Sunrise Sunset, Tide, and Virtual Trek.
See “Widgets in G’zGEAR” on page 228 for details.
Market
The Market widget displays recommended application one after
another. Touch the application to view its detail and install it.
Memo
You can use the Memo widget to keep a memo displayed on the
Home screen.
Touch to edit the memo.
Touch to scroll if the entire
text is not visible.
Messaging
The Messaging widget displays the number of unread
messages. Touch the widget to open the Messaging
application.
Mobile IM
The Mobile IM widget displays the number of new
conversations. Touch the widget to open the Mobile IM
application.
Page 47

45
Basics
Music
You can use the Music widget to control the playback of music from
the Home screen.
Touch to open the Music
application.
Touch to play the next
song.
Touch to play music. Touch while playing to stop playing.
News and Weather
The News and Weather widget displays the latest news and today’s
weather forecast for the current location.
Touch to open the News
and Weather application
with a summary of the
weather.
Touch to open the News
and Weather application
with a list of the top stories
in the news.
Picture frame
You can use the Picture frame widget to display a picture taken with
the camera, or an image copied to the phone, on the Home screen.
You can crop the picture before setting it as a wallpaper. Working with
pictures is described in “Gallery” on page 163.
Power control
You can use the Power control widget to turn Wi-Fi, Bluetooth, GPS, or
Auto-sync on or off. You can also adjust the brightness of the screen
from the Home screen.
Page 48

46
Basics
Read out
You can use the Read out widget to have the phone read
out the unread received messages with a synthetic voice.
The Read out widget displays the number of unread
messages. Touch the widget to start reading out unread
messages.
When the phone starts reading out a message, the
details of the message appear on the screen. Touch
Read again to have the phone read out the message
again or touch Next message to proceed to the next
message.
Search
Using the Google search widget, you can search for information on
your phone and on the web. Touch the left icon to change the target
of your search.
Touch to change the target
of your search.
Touch to enter the word
or phrase you want to
search for.
Slacker Radio
Touch the widget to open the Slacker Radio application.
Social Beat Companion
The Social Beat Companion widget displays your latest Feed events.
Touch the widget to open the Social Beat Companion application.
Page 49

47
Basics
Voice Memo
You can use the Voice Memo widget to record and save voice
recordings to the microSD card.
Touch to start recording.
Touch again to stop recording and save
to the microSD card.
Touch to display the list of voice
recordings and play.
Voicemail
The Voicemail widget displays the number of new
voicemails.
If you have not yet subscribed to Visual Voice Mail, you can
touch the widget to dial *86 to playback your voicemail.
If you have already subscribed to Visual Voice Mail, the
Visual Voice Mail screen appears when you touch the
widget.
Weather
The Weather widget displays today’s and tomorrow’s
weather forecasts for the current location.
Touch to display the Weather API screen.
Touch Refresh Now to update weather forecasts.
YouTube
The YouTube widget displays thumbnails and titles of videos one after
another in the order from the most frequently played. Touch a video to
play it.
Page 50

48
Basics
Working with menus
There are two kinds of Android menus: options menus and context
menus.
Options menus
Options menus contain tools that apply to the activities of the current
screen or application, not to any specific item on the screen. You
open options menus by touching the Menu key M. Not all screens
have options menus; if you touch the Menu key M on a screen that
has no options menu, nothing happens.
Some screens have more options menu items than can fit in the main
menu; touch More to open a menu of additional items.
Options menus contain items that
apply to the current screen or to
the application as a whole.
Touch to open more menu items.
Page 51

49
Basics
Context menus
Context menus contain tools that apply to a specific item on the
screen. You open a context menu by touching and holding an item on
the screen. Not all items have context menus. If you touch and hold an
item that has no context menu, nothing happens.
When you touch and hold some
items on a screen, a context menu
opens.
Quickly connecting to your contacts
As you build up your list of contacts on your phone, you can use
Quick Contact for Android in many applications to quickly start a chat,
email, or text message; to place a call; or to locate your contacts.
Quick Contact for Android is a special icon that you touch to open a
bubble with options for quickly initiating a connection to that contact.
1. Identify a Quick Contact icon by its frame.
Contacts that you can access with Quick Contact are displayed
differently in different applications, but usually with a picture frame
that looks like this:
Touch to open a bubble with icons.
Page 52

50
Basics
2. Touch a Quick Contact icon to open a bubble with icons for all the
ways you can communicate with the contact.
If there are more icons than can fit in the bubble, drag them left and
right to view them all.
Touch an icon to start communicating with the contact in
that application.
3. Touch an icon to open its application, so you can start
communicating with your contact right away.
You can also touch an icon to edit the contact’s information in
Contacts, to view the contact’s address in VZ Navigator
®
, and so
on, depending on which applications and accounts are configured
on your phone.
NOTE
You can add a shortcut for a contact to your Home screen, which
you can then touch to open Quick Contact for Android for that
contact. For more information about adding shortcuts to the Home
screen, see “Adding an item to the Home screen” on page 40.
Placing your phone in Silent mode
You can silence all sounds including call and notification ringtones by
placing your phone in Silent mode.
1. Press and hold the Power key P until the pop-up menu
appears.
2. Touch Silent mode.
In Silent mode, the Silent mode icon
appears in the Status bar.
Page 53

51
Basics
NOTES
Repeat the same operation in Silent mode to exit Silent mode. •
The audio from music, videos, and other media and any alarms •
you have set still sound in Silent mode. You must silence media
and alarms in their own applications.
Placing your phone in Airplane mode
Some locations may require you to turn off your phone’s mobile, Wi-Fi,
and Bluetooth wireless connections. You can turn off all these wireless
connections at once by placing your phone in Airplane mode.
1. Press and hold the Power key P until the pop-up menu appears.
2. Touch Airplane mode.
In Airplane mode, the Airplane mode icon
appears in the Status
bar.
NOTE
Repeat the same operation in Airplane mode to exit Airplane mode.
Personalizing your phone
You can change the application that opens when you press the Tactile
key , or change the ringtone that sounds when you receive a
call, to your favorite applications and ringtones.
Selecting an application to be opened by pressing the
Tactile key
1. On the Home screen, touch the Menu key M > Settings >
Personalization > Tactile key setting.
2. Touch a shortcut type from the displayed shortcut type list.
3. Touch the item you want to open when the Tactile key , is
pressed from the displayed list.
Page 54

52
Basics
Selecting a ringtone to sound when receiving a call
1. On the Home screen, touch the Menu key M > Settings >
Personalization > Phone ringtone.
2. In the scrolling list of ringtones that opens, touch the one to play
when you receive a phone call.
The ringtone plays a sample.
3. Touch OK.
NOTE
You can select a ringtone that comes with the phone, or one that
you saved as a ringtone by using the Music application. See “Using
a song as a ringtone” on page 179.
Locking your screen
You can lock your screen so that only you can unlock it to place calls,
access your data, buy applications, and so on.
1. On the Home screen, touch the Menu key M > Settings >
Location & security.
2. Touch Set up screen lock.
If you already have a screen lock configured, touch Change
screen lock to change how you lock your screen or to turn off
screen locking.
3. Touch Pattern, PIN, or Password.
If you touch Pattern, you will be guided to create a pattern you
must draw to unlock the screen. The first time you do this, a short
tutorial about creating an unlock pattern appears. You can touch
the Menu key M at any time for a refresher. Then you will be
prompted to draw and redraw your own pattern.
If you touch PIN or Password, you will be prompted to set a
numeric PIN or a password you must enter to unlock your screen.
Page 55

53
Basics
The next time you turn on your phone or wake up the screen, you
must draw your unlock pattern or enter your PIN or password to
unlock the screen.
NOTE
Even when the screen is locked, you can still place an emergency
call by touching Emergency call on the screen to draw an unlock
pattern or enter your PIN or password.
Optimizing battery life
You can extend your battery’s life by turning off unwanted features
and applications. You can also monitor how applications and system
resources consume battery power.
Extending the life of your battery
You can extend the life of your battery by performing the following
operations:
Turn off radios that you are not using. •
If you are not using Wi-Fi, Bluetooth, or GPS, use the Settings
application to turn them off. See “Wireless & network settings” on
page 256 and “Location & security settings” on page 262. (The GPS
receiver is only turned on when you are using an application that
makes use of it.)
Turn down screen brightness and set a shorter screen timeout. •
See “Display settings screen” on page 261.
If you do not need automatic syncing for Contacts, Calendar, Gmail, •
and other applications, turn them off.
See “Configuring account sync settings” on page 116.
Use the Power Control widget to check and control the status of •
radios, the display brightness, and syncing.
Adding widgets is described in “Adding an item to the Home
screen” on page 40.
Page 56

54
Basics
Checking the battery charge level
1. On the Home screen, touch the Menu key M > Settings > About
phone > Status.
The battery status (charging, discharging) and level (as a
percentage of full charge) are displayed at the top of the screen.
Monitoring and controlling what uses the battery
The Battery Use screen shows which applications consume the most
battery power.
You can also use it to turn off applications that you have downloaded,
if they are consuming too much power.
1. On the Home screen, touch the Menu key M > Settings > About
phone > Battery use.
The Battery Use screen lists the applications that have been using
the battery, from greatest to least battery use.
The top of the screen displays the time when the phone was last
connected to a charger. If connected, the amount of time the phone
was running on battery power before connected is displayed.
Then each application or service that used battery power during
that time is displayed, in order of the amount of power they used.
2. Touch an application to learn details about its power consumption.
Different applications offer different kinds of information. Some
applications include options that open screens with settings to
adjust power use.
Updating your phone’s system software
Your phone automatically checks for whether it can use system
software update for your phone.
You will be notified if system software update can be used. You can
download the update and install it on your phone.
Page 57

55
Basics
Warning!
Depending on the type of update, all your personal data and
customized settings may be erased, and applications and widgets
you installed may be deleted by performing the update.
Be sure to backup necessary files and information before
performing an update.
NOTE
Checking and downloading system software updates may incur
additional data transfer fees from Verizon Wireless.
Receiving a notice to update your system
software
1. When a system software update is available, a dialog prompting
you to install it appears.
2. Touch Install now > OK.
3. Wait until update completes. When update is completed, your
phone restarts automatically.
Checking for phone system software
updates manually
1. On the Home screen, touch the Menu key M > Settings > About
phone > System updates > Check new.
2. The System updates screen opens with reports on the availability
of system software updates. If no update is available the message
“Your system is currently up-to-date.” appears.
Page 58

56
Entering and editing text
Entering and editing text
Entering text
You can enter text using the onscreen keyboard. Some applications
open the keyboard automatically. In others, you touch a text field
where you want to enter text to open the keyboard.
1. Touch a text field.
The onscreen keyboard opens.
2. Touch the keys on the keyboard to type.
The characters you have entered appear in a selection list above
the keyboard, with suggestions for the word you are typing to the
right. Touch the left or right arrow in the selection list to view more
suggestions. You can also view more suggestions by sliding the
selection list left or right.
Touch to move the cursor to
the left.
Touch to open the Icon menu.
Touch once to capitalize the next
character you type. Touch and
hold for all caps.
Touch to move the cursor to
the right.
Touch to delete the preceding
character.
3. To enter the word as typed, touch the first word displayed in the
selection list.
To enter the blue bold word in the selection list, touch the Space
key
or that word.
To enter another suggested word, touch the word you want to enter.
4. When you are finished typing, touch and hold the Menu key M to
close the keyboard.
Page 59

57
Entering and editing text
NOTES
If you touch a suggested word that is not in the predictive text •
dictionary, it is automatically added to the dictionary.
Depending on a key, the list of relevant characters or symbols •
pops up when you touch and hold the key. You can enter a
character or symbol by touching it in the list.
You can enter words by tracing from key to key on the XT9 •
onscreen keyboard.
To hide the onscreen keyboard, touch and hold the Menu key • M.
To show the hidden keyboard, touch and hold the Menu key M
again.
Entering numbers, punctuations, and symbols
1. Touch the ?123 key on the onscreen keyboard.
The onscreen keyboard will switch to the keyboard with numbers,
punctuations and symbols. Touch the keys on the keyboard to type.
2. Touch the ALT key.
The onscreen keyboard will switch to the keyboard with other
symbols such as currencies and operators for expressions. Touch
the keys on the keyboard to type.
Touch the ALT key again to return to the previous keyboard with
numbers, punctuations and symbols.
3. Touch the ABC key to return to the keyboard to type alphabetical
characters.
Page 60

58
Entering and editing text
Changing the keyboard type
1. Touch the right arrow icon on the keyboard.
The icon menu will be displayed on the keyboard.
2. Type of keyboard will be switched every time you touch the
keyboard switch icon
in the icon menu.
You can switch between the following types of keyboards:
Keyboard: Full QWERTY keyboard same as that of PC. This
keyboard is displayed by default.
Reduced keyboard: The keyboard with two alphabetical
characters assigned to one key.
Phone keypad: Keypad same as regular cell phones.
Keyboard Reduced Keyboard Phone Keypad
3. Touch the left arrow icon to hide the icon menu.
NOTES
You can display the XT9 Text Input settings screen by touching •
the settings icon
in the icon menu. See “XT9 Text Input
settings screen” on page 271.
You can turn off the Trace Input feature by touching the T9 Trace •
icon
in the icon menu. To turn it on, touch the T9 Trace icon
again. For the Trace Input feature, see “Entering words using
Trace Input feature” on page 60.
Page 61

59
Entering and editing text
Keys with special functions
The following table describes the keys with special assigned
functions. Some keys are not displayed depending on types of
keyboards or applications.
Shift Case key
Touch once to capitalize the next
character you type.
Touch and hold for all caps.
?123 key
See “Entering numbers, punctuations,
and symbols” on page 57.
Delete key
Deletes the preceding character.
If Word Reselection of XT9 Text
Input settings is checked, by placing
the cursor at the end of the word and
touching the Delete key once, the word
is highlighted and the original selection
list is displayed.
Enter key
Accepts an entry or inserts a carriage
return.
Emoticons key
Single touch inserts default emoticon.
Touch and hold to open the popup menu
of common emoticons.
Smart Punctuation key
Enters a common punctuation mark by a
single key touch.
Touch and hold to open the popup menu
of common punctuations.
Page 62

60
Entering and editing text
XT9/ABC key
Switches between XT9 mode and ABC
(Multi-tap) mode.
XT9 mode uses a built-in-dictionary to
determine a word based on the entered
characters. A word is entered more
quickly because you only need to touch
each key once per character.
In ABC (Multi-tap) mode, you need to
touch each key repeatedly until the
desired character appears.
Next key Touch to proceed to the next text field.
Done key
Touch to finish entering text in the
current text field.
Search key Touch to start a search.
Entering words using Trace Input feature
On the Full QWERTY keyboard, you can enter a word by tracing from
key to key with your finger held on it. If, for example, you want to enter
“Word”, trace from W to D key on the keyboard as shown in the figure
below.
Page 63

61
Entering and editing text
Changing the keyboard orientation
When entering text, you can change the keyboard orientation to
horizontal by turning the phone sideways. You may feel the horizontal
keyboard is easier to use because the keys are displayed larger.
1. Turn the phone sideways.
The screen rotates to horizontal, and so does the keyboard.
NOTES
To rotate the screen to horizontal automatically as you turn the •
phone sideways, Auto-rotate screen of Display settings must
be checked. See “Display settings screen” on page 261.
The horizontal keyboard may not be available in some applications. •
Editing text
You can edit the text you entered in text fields. Use the menu
commands to cut, copy, and paste text, within or across applications.
NOTE
Some applications do not support editing of some or all of the text
displayed; others may offer their own editing function to work with
text.
Page 64

62
Entering and editing text
Selecting text
You select text that you want to cut or copy. Selected text is
highlighted in orange.
1. Touch the text field or other portion of the screen that contains the
text to select.
2. Touch in the text field to move the cursor to the beginning or end of
the text to select.
3. Touch and hold the text field.
A menu opens with options for cutting, copying, and performing
other tasks with the text field.
4. Touch Select text.
5. Touch in the text field to select the beginning or end of the text.
6. Touch and hold the text field again to open a menu you can use to
cut or copy the selected text, or stop selecting text.
NOTE
You can select all the text in the text field by touching and holding
the text field, then touching Select all from the menu that opens.
Cutting or copying text
1. Select the text to cut or copy.
2. Touch and hold the selected text.
3. Touch Cut or Copy in the menu that opens.
If you touch Cut, the selected text is removed from the text field. In
either case, the text is stored in a temporary area on the phone, so
that you can paste it into another text field.
NOTE
You can cut or copy all the text in the text field by touching and
holding the text field, then touching Cut all or Copy all from the
menu that opens.
Page 65

63
Entering and editing text
Pasting text
You can paste text that you cut or copied from one application into a
text field of another application.
1. Cut or copy the text to paste.
2. Touch the text field where you want to paste the text.
3. Touch in the text field to move the cursor to the location where you
want to paste the text.
4. Touch and hold the text field.
5. Touch Paste in the menu that opens.
The text is inserted at the cursor. The text that you pasted still
remains in a temporary area on the phone, so you can paste the
same text in another location.
Page 66

64
Phone
Phone
You can use the Phone application to place a call. You can dial an
incoming, outgoing, or missed call number recorded in the call log.
Placing a call
1. Touch the phone icon on the Home screen.
The Phone application opens.
Touch to call your voicemail.
Touch a tab to switch to Call log,
Contacts, Groups, or Favorites.
Touch to erase digits one by one.
Touch and hold to erase the entire
phone number.
Touch to open Voice Control.
Touch to place a call.
2. Enter a phone number by touching the dialpad on the screen
(include the area code if needed).
If you enter a wrong number, touch the delete icon •
to erase
digits one by one.
To erase the entire number, touch and hold the delete icon
.
To place an international call, touch and hold the • 0 key to enter
the plus symbol (+). Then enter the international prefix for the
country, followed by the full phone number.
Page 67

65
Phone
3. Touch the call icon to place a call.
The call in progress screen appears.
Name in Contacts or caller’s phone
number.
City ID
Touch to call another person.
Touch to switch between using
your Bluetooth headset or just
your phone.
ERI Banner
Call duration
Caller’s phone number
Touch to end a call.
Touch to display the dialpad for
sending a DTMF tone.
Touch to turn on the
speakerphone.
Touch to mute the microphone.
Press the Volume keys • _ to adjust the call volume.
4. Touch the end call icon to end a call.
When a call ends, the Call log screen appears.
5. Touch the Home key H to return to the Home screen.
NOTES
During a call, the screen will turn off and the touchscreen will lock •
when the phone is not used for other functions for 15 seconds.
Press the Power key P to turn the screen on and unlock the
touchscreen.
When the Proximity Sensor senses proximity towards other object •
such as your head, the icons on the call in progress screen will be
hidden temporarily.
You can also touch the Home key • H during a call to return to the
Home screen and open another application. Even when another
application is opened, the call in progress icon
appears on the
Status Bar.
Page 68

66
Phone
To end a call in progress when another application is opened, •
touch the phone icon
on the Home screen, touch Return to
call in progress, and then touch the end call icon
.
Answering a call
1. When there is an incoming call, the Incoming call screen opens.
Information such as the caller’s phone number or the caller’s name
is displayed if the phone number is already stored in Contacts.
Name in Contacts or caller’s phone
number.
City ID
Drag the slide icon to the left to
reject the call.
Caller’s phone number
Drag the slide icon to the right to
answer the call.
Press the Volume keys • _ when the phone is ringing to mute
the ringer.
2. Drag the slide icon to the right to answer a call.
NOTES
All incoming calls are recorded in the Call log. •
If there is an incoming call while another call is in progress, the •
first caller will be put on hold if you choose to answer the new call.
Page 69

67
Phone
Rejecting an incoming call
1. When there is an incoming call, the Incoming call screen opens.
Drag the slide icon
to the left to reject the incoming call.
2. The Send Message dialog appears prompting you to send a
message to a caller after you rejected an incoming call.
Touch OK to compose a message. See “Messaging” on page 130.
Touch Cancel to return to the Home screen.
NOTE
When you reject a call, the caller is sent directly to voicemail.
Operation during a call
Switching to the speakerphone
1. To turn on the speakerphone, touch the speaker icon on the
call in progress screen.
When the speakerphone is turned on, the speakerphone icon
appears on the Status bar.
2. To turn off the speakerphone, touch the speaker icon again on
the call in progress screen.
NOTES
When the speakerphone is turned on, Phone microphone •
functions as Secondary microphone.
The speakerphone turns off automatically when you end a call. •
Warning!
In order to prevent hearing damage, keep the phone away from
your ear while the speakerphone is on.
Page 70

68
Phone
Muting the microphone
1. To mute the microphone, touch the microphone icon on the
call in progress screen.
When you mute the microphone, the mute icon
appears on the
Status bar.
2. To un-mute the microphone, touch the microphone icon again
on the call in progress screen.
NOTE
The microphone un-mutes automatically when you end a call.
Switching between a Bluetooth headset and the phone
When a Bluetooth headset is connected to your mobile phone, you
can switch between using your Bluetooth headset or just your phone.
1. While placing a call using a Bluetooth headset, touch the Bluetooth
icon
on the call in progress screen to switch to using just your
phone.
2. Touch the Bluetooth icon on the call in progress screen to
switch to using the Bluetooth headset.
NOTES
When placing a call using the Bluetooth headset, the call in •
progress screen and the ongoing call notification icon
on the
status bar turn blue.
For instructions on how to pair a Bluetooth headset with your •
mobile phone, see “Pairing your phone with a Bluetooth device”
on page 110.
Page 71

69
Phone
Managing multiple calls
Switching between multiple calls
If you accept a new call when you are already on a call, you can
switch between the two calls.
1. When there is another incoming call while you are already on a call,
the Incoming call screen opens.
2. Drag the slide icon to the right to answer the new call.
When you answer the new call, the current call is placed on hold.
3. Touch the swap icon to put the current call on hold and connect
to another call.
4. Touch the end call icon to disconnect both calls at once.
Setting up a conference call
You can set up a conference call with multiple callers.
1. Touch the add call icon on the call in progress screen to call
another person.
Then, you can also touch the Call log, Groups or Favorites tab to
place a call from each list.
The first participant is put on hold while placing a call to the other
person.
2. Touch the merge calls icon on the call in progress screen to
merge the calls into a single conference call.
3. Touch the end call icon to disconnect both calls at once.
NOTE
After merging calls into a conference call, you can touch the end
last call icon
on the call in progress screen to end the second
participant’s call and talk privately with the first participant.
Page 72

70
Phone
Working with the Call log
The Call log is a list of all the calls you have placed, received, or missed.
Placing a call from the Call log
1. Touch the phone icon on the Home screen.
2. Touch the Call log tab.
The Call log screen opens. Calls are listed with the most recent call
at the top. Scroll to view earlier entries in the log.
: Missed call
: Dialed call
: Received call
Phone number or name in
Contacts.
Touch to place a call.
3. Touch a phone number or name.
The details of the Call log appear.
Touch to place a call.
Touch to send a text message.
If the phone number is not in
Contacts, Add to contacts is
displayed and you can touch
to add the phone number to
Contacts.
If the phone number is already
in Contacts, View contact is
displayed and you can touch to
open the details of the Contact.
Page 73

71
Phone
4. Touch Call phone number or name to place a call.
NOTES
Touch and hold a phone number or name on the Call log screen •
to access the following options:
Call phone number or name: Calls a number in the Call log.
View contact: Opens the details of the phone number in
Contacts. (Only applicable when the phone number is already in
your Contacts)
Edit number before call: Opens the Dialer tab containing the
phone number. You can edit the number and then place a call.
Send text message: Allows you to compose a text message
using the phone number as the recipient.
Add to contacts: Adds the phone number to Contacts. (Only
applicable when the phone number is not already in your
Contacts)
Remove from call log: Deletes an entry from the Call log.
If there is a missed call, a missed call icon •
is displayed in the
Status bar. Drag the Status bar down to open the Notification
panel and touch Missed call to check the Call log.
Clearing the entire Call log
1. On the Call log screen, touch the Menu key M > Clear call log.
Dialing by voice
You can use the Voice Dialer application to place a phone call by
speaking the name of a contact or a phone number.
1. Touch the Launcher icon on the Home screen.
The Launcher opens.
2. Touch the Voice Dialer icon .
The Voice Dialer opens, listening for your spoken instructions, and
displaying some hints for how to use it.
Page 74

72
Phone
3. Say “Call” followed by the name of the contact to call.
Or, follow one of the suggestions for dialing a number or controlling
your phone in other ways.
NOTE
If you have a Bluetooth headset that supports “voice-recognition”
or “voice dialing,” you may be able to open the Voice Dialer by
pressing your headset’s main button or in some other way, and dial
by voice using your headset. For details, see the documentation
that came with your headset.
Using voicemail
Setting up voicemail
You should set up your voicemail according to the tutorial you hear the
first time you call the voicemail.
1. Touch the Voicemail icon on the Home screen or in the
Launcher.
The Voicemail menu screen opens.
2. Touch Call Voicemail to dial *86.
3. The dialpad will automatically appear on the call in progress
screen. Follow the instructions and enter a number or the # sign as
requested.
4. Follow the tutorial to set the password of your voice mailbox and
record a voice signature and greeting.
Listening to your voicemail
1. Touch the Voicemail icon on the Home screen or in the
Launcher.
The Voicemail menu screen opens.
2. Touch Call Voicemail to dial *86.
Page 75

73
Phone
3. The dialpad will automatically appear on the call in progress
screen. Follow the instructions and enter a number or the # sign as
requested.
4. Follow the prompts to enter your password and retrieve your
messages.
NOTES
When you have a new voicemail message, the new voicemail •
icon
appears on the Status bar. Drag the status bar down to
open the Notification panel and touch New voicemail to open the
Voicemail menu screen.
If you have already subscribed to Visual Voice Mail, touch New
voicemails displayed in the Notification panel to open a Visual
Voice Mail.
You can also touch the Menu key • M > Voicemail on the Call log
screen to display the Voicemail menu screen.
If you have already subscribed to Visual Voice Mail, a Visual Voice
Mail opens when you touch Voicemail.
Using Visual Voice Mail
Visual Voice Mail is an application that allows subscribers to view
caller and voicemail information and listen to voicemail messages in
any order on their phones. Scroll through your messages, pick the
ones you want to listen to, and erase or archive them right from the
screen on your phone. You can call back, text, and add to contacts
directly from the Visual Voice Mail screen.
Subscribing to Visual Voice Mail
1. Touch the Voicemail icon on the Home screen or in the
Launcher.
The Voicemail menu screen opens.
Page 76

74
Phone
2. Touch Subscribe to Visual Voice Mail > Accept.
3. Touch OK > Subscribe > Accept > Accept > Exit.
Typical steps when you access the Visual Voice Mail for the first
time are described above. Steps may be different if you have
accessed it before. To subscribe, follow the on-screen instructions.
4. Wait 5 minutes before starting to use Visual Voice Mail.
NOTE
If you have already subscribed to Visual Voice Mail, a screen
for entering password will be displayed after step 3. Enter your
password and touch Login. When you log in, the Visual Voice Mail
screen will be displayed.
Logging in to Visual Voice Mail
1. Touch the Voicemail icon on the Home screen or in the
Launcher.
2. Touch the “Password” field and enter your password. Visual Voice
Mail uses the same password as your standard Voicemail system.
3. Touch Login.
The Visual Voice Mail screen is displayed when login is completed.
NOTE
Once you logged in, you need not login for subsequent operation to
open the Visual Voice Mail. You do need to login if you change your
password or perform Factory data reset.
Page 77

75
Phone
Listening to your voicemail
1. Touch the Voicemail icon on the Home screen or in the
Launcher.
The Visual Voice Mail screen opens.
An unheard voicemail
A heard voicemail
2. Touch the voicemail you want to listen to.
The Voicemail player screen is displayed.
Touch to display the previous
voicemail.
Touch to turn on the
speakerphone.
Touch to return a call to the sender
of voicemail.
Touch to display the next
voicemail.
Caller’s phone number, or both
name in Contacts and caller’s
phone number
Date and time when the Voicemail
system received a voicemail
Touch to play a voicemail.
Touch to delete a voicemail.
Touch to reply by voicemail, text message, or Email.
3. Touch the play icon to listen to your voicemail.
Press the Volume keys • _ to adjust the volume.
Page 78

76
Phone
NOTE
When you have a new voicemail message, a new voicemail icon
appears on the Status bar. If you have already subscribed to Visual
Voice Mail, drag the Status bar down to open the Notification panel
and touch New voicemails to open Visual Voice Mail.
Using the menu on the Visual Voice Mail screen
The following menu is available on the Visual Voice Mail screen.
Touch the Menu key • M to access the following options:
Select All: Selects all voicemails. See “Deleting multiple voicemails
or marking as “Heard”” on page 78.
Compose: Allows you to compose a voicemail. See “Composing
and sending a voicemail” on page 78.
Deselect All: Deselects all voicemails.
Refresh: Updates the list on the Visual Voice Mail screen.
Call Voicemail: Places a call to the voicemail.
Sort by: Allows you to sort the list by Caller, Date, Sensitivity,
Listened to, Priority, or Duration.
Logout: Logs out of Visual Voice Mail. (Touch More if this option is
not visible in the menu.)
More: See below.
Touch the Menu key • M > More to access the following options:
Preferences: Allows you to change the Visual Voice Mail settings.
See “Changing Visual Voice Mail settings” on page 79.
Select Lock/Unlock: Of the selected voicemails, locks all the
unlocked voicemails and unlock all the locked voicemails.
About: Displays the version of Visual Voice Mail.
Unsubscription: Cancels the Visual Voice Mail subscription.
Touch and hold a phone number or name to access the following •
options:
Lock (Unlock): Locks or unlocks the selected voicemail. Locked
voicemails cannot be deleted by the Select all function.
Page 79

77
Phone
Play: Plays your voicemail.
Mark as Heard: Marks the selected voicemail as heard.
Call Voicemail: Places a call to the voicemail. (Only applicable for
Voicemail system message)
Delete: Deletes a voicemail.
Call Back: Places a call to the sender of voicemail.
Reply: Sends a reply by voicemail, text message, or Email.
Add to Contacts: Adds the phone number to Contacts. (Only
applicable when the phone number is not already in your Contacts)
View Contact: Opens the details in Contacts, with the phone
number of the voicemail sender. (Only applicable when the phone
number is already stored in your Contacts)
Forward: Forwards the voicemail by voicemail, multimedia
message, or Email.
Save a copy: Saves your voicemail on a microSD card or the
internal storage.
Using the menu on the Voicemail player screen
The following menu is available on the Voicemail player screen:
Touch the Menu key • M to access the following options:
Add to contacts: Adds the phone number to Contacts. (Only
applicable when the phone number is not already in your Contacts)
View contact: Opens the details in Contacts, with the phone
number of the voicemail sender. (Only applicable when the phone
number is already in your Contacts)
Forward: Forwards the voicemail by voicemail, multimedia
message, or Email.
Save a copy: Saves the voicemail on a microSD card or the internal
storage.
Page 80

78
Phone
Deleting multiple voicemails or marking as “Heard”
1. From the Visual Voice Mail screen, touch the Menu key M >
Select All.
All voicemails will be check-marked. Touch a check-marked
voicemail to un-check it.
2. Touch Mark as Heard to mark all the check-marked voicemails as
heard.
Touch Delete > OK to delete the check-marked voicemails.
Composing and sending a voicemail
1. From the Visual Voice Mail screen, touch the Menu key M >
Compose.
The Compose Voice Message screen is displayed.
Touch and enter a phone number
or a contact’s name.
Touch to start recording.
Touch to turn on the speakerphone.
Send the voicemail.
Touch to play recorded voicemail.
Touch to stop recording or
playback.
Touch to cancel creating voicemail.
2. Touch the “To” field
3. Enter a phone number or a contact’s name. As you enter the
phone number or the contact’s name, the search function displays
suggestions.
4. You can touch a suggestion or continue entering the phone
number.
5. Touch the record icon to start recording a voicemail.
Page 81

79
Phone
6. Touch the stop icon to stop recording a voicemail. Even if you
don’t touch the stop icon
, recording stops after 3 minutes.
7. Touch Send to send a voicemail.
NOTE
Touch the Menu key M on the Voicemail composing screen to
access the following options:
Add from Contacts: Allows you to select and add a recipient from
Contacts.
Mark Urgent: Sets the status of the voicemail to urgent.
Mark Private: Sets the status of the voicemail to private.
Changing Visual Voice Mail settings
1. From the Visual Voice Mail screen, touch the Menu key M > More
> Preferences.
2. Change the following settings as necessary.
Save voicemail message to: Allows you to set the location where
the voicemails will be saved; either the phone (Internal storage) or
microSD card (External storage).
Select ringtone: Allows you to set the default notification ringtone
for when there is a new voicemail.
Vibrate: Check to have the phone vibrate when you receive a new
voicemail.
Page 82

80
Contacts
Contacts
The Contacts application gives you quick and easy access to the
people you want to reach. Information about your contacts is shared
with other applications, such as Email, Messaging, Gallery (for
sharing photos and videos), and so on.
Opening your contacts
Open Contacts to add, view, and communicate with your friends and
acquaintances.
Opening your contacts
1. Touch the phone icon on the Home screen.
2. Touch the Contacts tab.
All of your contacts are displayed alphabetically in a scrolling list.
Touch to view Groups.
Touch an icon to open Quick
Contact.
Touch to view only your favorite
contacts.
Touch a contact to view its details.
You can drag the list up or down to scroll it, or slide your finger •
up or down to scroll quickly. Either way, a tab briefly appears to
the right of the list, which you can drag up and down to scroll
very quickly, while displaying the letter of the alphabet for the
contacts you are scrolling past.
Page 83

81
Contacts
NOTE
If you have a new phone and haven’t added any contacts yet,
Contacts displays a message with hints on how to start adding
contacts to your phone.
Viewing details about a contact
1. Open your contacts.
2. Touch the contact whose details you want to view.
Entries for communicating with the contact are followed by details.
Touch to open Quick Contact.
Touch a contact method to start
communicating with the contact.
Touch an icon to call, email, text,
chat, map, and so on.
Touch an address to view it in VZ
Navigator
®
or Bing™ map.
Touch a communication method to start dialing, texting, or •
emailing the contact by using the listed number, address, and so
on.
You can edit the contact’s information by touching the Menu key •
M > Edit Contact. See “Editing contact details” on page 83.
Searching for a contact
You can search for a contact by name.
1. Open your contacts.
2. Touch the Search key K.
Page 84

82
Contacts
3. Start entering the name of the contact you are searching for.
As you type, contacts with matching names appear below the
search box.
4. Touch the matching contact in the list to open the Details screen,
or touch the search icon
to open a screen with a list of matching
contacts.
Adding a new contact
You can add contacts on your phone and synchronize them with
the contacts in your Google Account, Backup Assistant account,
Microsoft Exchange ActiveSync account, or other accounts that
support syncing contacts.
1. Open your contacts.
2. Touch the Menu key M > New contact.
3. If you have more than one account with contacts, touch the
account to which you want to add the contact.
The Edit contact screen opens.
Touch to select a picture.
Enter the contact’s name.
Touch to open a menu with preset
labels.
Touch to add more than one entry
for the category.
Touch to delete this entry.
4. Enter the contact’s name.
Page 85

83
Contacts
5. Touch a category of contact information, such as phone numbers
and email addresses, to enter that category of information about
your contact.
Scroll the page to view all categories.
6. Touch a category’s plus icon to add more than one entry for that
category—for example, to add both work and home numbers.
Touch the label to the left of the item of contact information to open
a menu with preset labels, such as Mobile and Work for a phone
number, or touch Custom in the menu to create your own label.
7. Touch the picture frame icon to take a photo or select a photo
from your Gallery to represent the contact.
8. When you are finished, touch Done.
NOTES
When you reply to or forward an email message to an email •
address that is not in Contacts, the email address is added as a
contact.
Contacts will try to join new addresses with existing contacts, •
to create a single entry. You can also manage that process
manually. See “Joining or separating contact information” on page
89.
Editing contact details
You can change or add details about your contacts. You can also set
the ringtone for when a specific contact calls, or divert all calls from a
contact to your voicemail.
Page 86

84
Contacts
NOTES
Some contact entries contain information from multiple sources: •
information that you added manually, information that Contacts
joined from multiple accounts to consolidate duplicates, and so
on. If you find duplicate entries in Contacts, you can join them
into a single entry, as described in “Joining contacts” on page 89.
If you find that information from unrelated contacts was joined in
error, you can separate them, as described in “Separating contact
information” on page 90.
Changes that you make to the information from one source do •
not affect the information from other sources. For example, if you
have information about a contact from a Google Account and an
Exchange ActiveSync account and both are configured to sync
contacts, edits to the information from the Google Account are
synced to that account on the web, but the information from the
Exchange ActiveSync account remains unchanged.
Editing contact details
1. Open your contacts.
2. Touch and hold the contact whose details you want to edit.
3. Touch Edit contact in the menu that opens.
4. Edit the contact information, using the same controls as when you
create a contact. See “Adding a new contact” on page 82.
5. Touch Done.
NOTE
You can also edit contact details by touching the Menu key M >
Edit contact while viewing a contact’s details.
Page 87

85
Contacts
Changing a contact’s default phone number
The default phone number is used when you initiate a call or send a
text message from the list by touching and holding a contact.
1. Open your contacts.
2. Touch the name of a contact in the list to view its details.
3. Touch and hold the phone number to use as the contact’s default
phone number.
4. Touch Make default number in the menu that opens.
Diverting all of a contact’s calls to your voicemail
1. Open your contacts.
2. Touch the name of a contact in the list to view its details.
3. Touch the Menu key M > Options.
4. Check Incoming calls.
5. Touch the Back key B.
When this contact calls you, your phone doesn’t ring and the caller
is sent directly to your voicemail.
Setting a ringtone for a contact
1. Open your contacts.
2. Touch the name of a contact in the list to view its details.
3. Touch the Menu key M > Options > Ringtone.
4. In the scrolling list of ringtones that opens, touch the one to play
when the contact calls.
The ringtone plays a sample.
5. Touch OK.
Page 88

86
Contacts
Setting a ringback tone for a contact
1. Open your contacts.
2. Touch the name of a contact in the list to view its details.
3. Touch the Menu key M > Options > Ringback tone.
4. In the scrolling list of ringback tones that opens, touch the one to
play when you call the contact.
The ringback tone plays a sample.
5. Touch OK.
Deleting a contact
1. Open your contacts.
2. Touch the name of a contact in the list to view its details.
3. Touch the Menu key M > Delete contact.
4. Touch OK to confirm that you want to delete the contact.
NOTES
If you delete a contact from Google Contacts (or another account •
with editable contacts), the contact is also deleted from Contacts
on the web the next time you sync your phone.
You cannot delete contacts from a read-only account. Instead, •
a dialog informs you that the contact will be hidden. To restore
hidden contacts from a read-only account, you must delete that
account from your phone and then add it again.
If the contact contains information from both editable accounts •
(such as Contacts) and from a read-only account, a dialog
informs you that the information from the read-only account will be
hidden, not deleted.
Page 89

87
Contacts
Communicating with your contacts
From the Contacts or Favorites tab, you can quickly call or send a
text (SMS) or multimedia message (MMS) to a contact’s default phone
number. You can also open details to view a list of all the ways you
can communicate with that contact.
Connecting by using Quick Contact for Android
1. Touch a contact’s picture to open Quick Contact for Android.
Touch a contact’s picture.
Then touch the icon for the way
you want to connect.
2. Touch the icon for the way you want to connect.
The icons available depend on the information you have for the
contact and the applications and accounts on your phone.
For more information, see “Quickly connecting to your contacts” on
page 49.
Communicating with a contact
1. Open your contacts.
2. Touch the contact with whom you want to communicate.
3. From the contact’s details screen, you can automatically call,
send a text message, or initiate other tasks by touching the
corresponding application icon.
Page 90

88
Contacts
Calling a contact’s default number
1. Open your contacts.
2. Touch and hold the entry for the contact to call.
3. Touch Call in the menu that opens.
The actual menu item depends on the default number you set for
your contact, so it may be Call Mobile, Call Work, and so on.
The Phone application is automatically activated when the number
is called.
NOTE
You can also call a contact’s default number by touching the call
icon
in the list of favorites.
Sending a text or multimedia message to a contact’s
default number
1. Open your contacts.
2. Touch and hold the entry for the contact to send a text or
multimedia message.
3. Touch Text contact in the menu that opens.
The Messaging application is automatically activated, with the
contact’s phone number entered in a new message. For more
information about sending text and multimedia messages, see
“Messaging” on page 130.
Changing which contacts are displayed
You can hide contacts that don’t have phone numbers. You can also
configure which account’s groups of contacts you want to display in
the Contacts list.
Page 91

89
Contacts
Displaying/hiding contacts without phone numbers
If you use your list of contacts only to call people, you can hide any
contacts that don’t have phone numbers.
1. Open your contacts.
2. Touch the Menu key M > Display options.
3. Check or uncheck Only contacts with phones.
Changing what account’s groups are displayed
1. Open your contacts.
2. Touch the Menu key M > Display options.
3. Touch an account to open its list of groups.
Account’s groups depend on the type of account.
4. Check or uncheck the groups whose contacts you want to view in
Contacts.
5. Touch Done.
A message appears while your changes are made. If your changes
affect many contacts, this will take a short while.
NOTE
This setting affects only the display of groups of contacts. Your
sync settings are not affected.
Joining or separating contact information
Joining contacts
When you add an account or add contacts in other ways, such as by
exchanging emails, Contacts attempts to avoid duplication by joining
any new contact information with existing contacts under a single
entry. You can also join contacts manually.
1. Open your contacts.
2. Touch the contact entry to which you want to add information.
This is the contact you will see in Contacts after the join.
Page 92

90
Contacts
3. Touch the Menu key M > Edit contact.
4. Touch the Menu key M > Join.
Likely contacts are displayed at the top of the screen. You can
touch Show all contacts to pick a contact from your full list of
contacts.
5. Touch the contact whose information you want to join with the first
contact.
The information from the second contact is added to the first
contact, and the second contact is no longer displayed in the
Contacts list.
Separating contact information
If contact information from different sources was joined in error, you
can separate the information back into individual contacts on your
phone.
1. Open your contacts.
2. Touch the contact entry whose information you want to separate.
3. Touch the Menu key M > Edit contact.
4. Touch the Menu key M > Separate.
The contact information is separated into individual contacts in the
list of contacts.
Importing, exporting, and sharing contacts
If you have contacts stored in vCard format on a microSD card,
you can import them into Contacts on your phone. You can export
contacts in vCard format onto a microSD card, to back them up to a
PC or other device. You can also send a contact in vCard format via
email.
Page 93

91
Contacts
Importing contacts from your microSD card
You can copy individual or group contacts in vCard format onto your
microSD card and then import them into one of your accounts on the
phone.
NOTES
For details about copying files to a microSD card from your PC, •
see “Connecting to a PC via USB” on page 107.
You may also have contacts stored on a microSD card from •
another device. Refer to the other device’s owner’s guide for
details about working with microSD cards.
1. Open your contacts.
2. Touch the Menu key M > Import/Export > Import from SD card.
3. If you have more than one account on your phone, touch the
account into which you want to import the contacts.
4. If you have more than one vCard file on the microSD card, touch
the option to import a single contact file, multiple contact files, or all
of the contact files on the microSD card.
The contacts are imported.
Exporting contacts to your microSD card
You can export all of the contacts on your phone to your microSD
card, as a group vCard file.
You can then copy this file to a PC or another device that can work
with files in this format, such as an address book application.
1. Open your contacts.
2. Touch the Menu key M > Import/Export > Export to SD card.
3. Touch OK to confirm.
Contacts creates a file with the .vcf extension on your microSD
card. This file contains all of your contacts.
Page 94

92
Contacts
Sharing a contact
You can share the contact in vCard format via Email, Messaging, or
Bluetooth connection.
1. Open your Contacts.
2. Open the contact you want to share.
3. Touch the Menu key M > Share.
4. In the menu that opens, touch the application to use for sharing the
contact.
The application you selected opens. See the section about that
application.
Working with Groups
Once you add contacts to a group, you can broadcast messages or
emails to all members of the group.
Adding a new group
1. Touch the phone icon on the Home screen.
2. Touch the Groups tab.
3. Touch the Menu key M > Add Group.
4. Enter the group name.
5. Touch the picture frame icon to select a picture to display next
to the name in your lists of groups.
6. When you are finished, touch Done.
Adding contacts to a group
1. Open the Groups tab.
2. Touch the group to which you want to add contacts.
3. Touch the Menu key M > Add contacts.
4. Check the contacts you want to add.
5. When you are finished, touch Done.
Page 95

93
Contacts
Sending messages or emails to group members
1. Open the Groups tab.
2. Touch the group for which you want to send a message.
3. Touch the Menu key M > Group Send SMS or Group Send
Email.
The Messaging or Email application is automatically activated. For
more information about sending a message, see “Messaging” on
page 130 and “Email” on page 119.
Editing a group
1. Open the Groups tab.
2. Touch the group you want to edit.
3. Touch the Menu key M > Edit group.
4. Edit the group name.
5. Touch the picture or the picture frame icon to select the picture.
6. When you are finished, touch Done.
Removing a contact from a group
1. Open the Groups tab.
2. Touch the group whose contact you want to remove.
3. Touch and hold the contact you want to remove.
4. Touch Remove contact in the menu that opens.
5. Touch OK.
Deleting a group
1. Open the Groups tab.
2. Touch the group you want to delete.
3. Touch the Menu key M > Delete group.
4. Touch OK.
Page 96

94
Contacts
Working with Favorites
The Favorites tab contains the contacts you have starred as favorites
followed by a short list of the contacts you communicate with most
frequently.
Adding a contact to your favorites
1. Touch the phone icon on the Home screen.
2. Touch the Contacts tab.
3. Touch a contact to view its details.
4. Touch the star to the right of the contact’s name.
The star turns gold
.
Opening a list of your favorite contacts
1. Touch the phone icon on the Home screen.
2. Touch the Favorites tab.
The Favorites tab lists the contacts you have added to the list,
followed by a list of your most frequently called contacts.
Removing a contact from your favorites list
1. Touch the phone icon on the Home screen.
2. Touch the Favorites tab.
3. Touch a contact to view its details.
4. Touch the gold star to the right of the contact’s name.
The star turns gray
and the contact is removed from your
favorites.
NOTE
You can also remove the contact from your favorites by touching the
gold star to the right of the contact’s name on the contact’s details
displayed on the Contacts tab.
Page 97

95
Contacts
Configuring Backup Assistant
SM
Backup Assistant safeguards your phone’s contacts and automatically
saves a copy of the names, phone numbers, email addresses, etc.,
stored in your phone. You can view, print, add, delete, or edit your
contacts online.
NOTES
Subject to specific terms of use. Results may vary based on •
backup schedule and other factors. See verizonwireless.com/
backupassistant for more details.
For more information about account administration or data sync, •
see “Accounts and sync” on page 114.
Configuring Backup Assistant
If you have not configured Backup Assistant settings by the
initialization when you first turned on your phone, configure the
settings using the following procedure:
1. Touch the phone icon on the Home screen.
2. Touch the Contacts tab.
3. Touch the Menu key M > Backup Assistant > Next.
4. Check the checkbox to agree with the terms of the license
agreement.
5. Touch Next.
6. If you are registering to Backup Assistant for the first time, enter
the desired 4 to 8 digit PIN (Personal identification number) in the
“Enter new PIN” field, then enter the same PIN in the “Confirm PIN”
field. Check the checkbox of “If I forget my PIN. I authorize Backup
Assistant to send it to my phone.” as needed.
If you have registered to Backup Assistant before, enter the PIN in
the “Enter old PIN” field.
7. Touch Next > OK.
Page 98

96
Contacts
NOTE
If you forgot or do not know the PIN code, touch Get PIN in step
5. Then, touch OK if you forgot the PIN code. The received PIN
code will be displayed. To use Backup Assistant as the new user,
touch New. In that case, the previously backed up contacts will be
discarded.
Syncing Contacts manually
You need to sync your Contacts manually, if you unchecked Auto-
sync of Account & Sync settings.
1. Touch the phone icon on the Home screen.
2. Touch the Contacts tab.
3. Touch the Menu key M > Backup Assistant.
4. Touch the Menu key M > Sync now.
Configuring auto-sync of Contacts
If you checked Auto-sync of Account & Sync settings, you can
configure whether sync Contacts by Backup Assistant should also be
auto-synced.
1. Touch the phone icon on the Home screen.
2. Touch the Contacts tab.
3. Touch the Menu key M > Backup Assistant.
4. Check Sync Contacts to make it auto-synced.
NOTE
The Sync Contacts checkbox will not be displayed, if you
unchecked Auto-sync of Account & Sync settings.
Page 99

97
Contacts
Changing schedule for auto-syncing
You can change the time to perform auto-syncing.
1. Touch the phone icon on the Home screen.
2. Touch the Contacts tab.
3. Touch the Menu key M > Backup Assistant.
4. Touch Account settings > Set Schedule.
5. Touch the time to perform syncing in the menu that opens.
6. Touch OK.
Changing PIN
1. Touch the phone icon on the Home screen.
2. Touch the Contacts tab.
3. Touch the Menu key M > Backup Assistant.
4. Touch Account settings > Change PIN.
5. Enter your current PIN in the “Enter old PIN” field and touch Next.
6. Enter your desired new 4 to 8 digit PIN in “Enter new PIN” field,
then enter the same PIN in “Confirm PIN” field and touch Next.
7. Touch OK.
Page 100

98
Connecting to networks
Connecting to networksConnecting to networks
Connecting to mobile networks
When you buy your phone and sign up for service, your phone is
configured to use your provider’s mobile networks for voice and data
communication.
The icons in the Status bar indicate which type of data network you
are connected to and the network signal strength.
Connected to the high-speed EVDO
Connected to the 1x data network
The more bars the stronger the wireless signal
Connected to another wireless service provider’s
network (roaming)
NOTE
When connected to slower networks, you may want to postpone
using your phone for data-intensive tasks until you are connected to
a faster network, or find a Wi-Fi network on which to connect.
Disabling data when roaming
You can prevent your phone from transmitting data over the carrier’s
mobile networks when you leave an area that is covered by your
carrier’s networks.
This is useful for controlling expenses if your phone’s service plan
doesn’t include data roaming.
1. On the Home screen, touch the Menu key M > Settings >
Wireless & networks > Mobile networks.
2. Touch Data roaming to uncheck it.
 Loading...