

Page 1

.
Model
GSW-H1000
User’s Guide
.
Before use, be sure to read “Safety Precautions”. Use the watch correctly.
You cannot use this product inside of China if it was sold outside of China.
© 2021 CASIO COMPUTER CO., LTD.
EN
Page 2

Watch Features
Shock resistance. 20BAR (200-meter) water resistance
G-SHOCK shock resistance makes it possible for your watch to withstand the
rough conditions encountered in extreme sports. Your watch is also the first
CASIO smartwatch to be 200-meter water resistant. This means you can wear
your watch while engaging in extreme sports, marine sports, and more.
Multiple Built-in Sensors
Your watch has GPS, a pressure sensor, an accelerometer, a gyrometer, a
magnetic sensor, and an optical sensor (heart rate) built in. A variety of
different types of data can be measured by your watch. Data measured
depends on the activity being measured.
Dual-layer Display for Improved Readability
A dual-layer display can produce visual feedback in either color or
monochrome. The high-resolution color display makes complex data easier
to understand, while the monochrome display provides lower power
consumption and easier readability when outdoors.
Using Your Watch
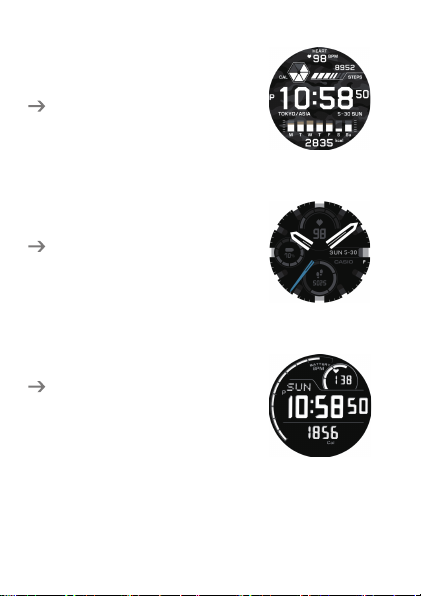
Changeable Watch Faces (Display Items, Design)
You can select either digital timekeeping or analog timekeeping to suit your
needs or lifestyle. You can even select what items you want to be displayed
on the watch face.
“Using a Different Watch Face”
EN-1
Page 3
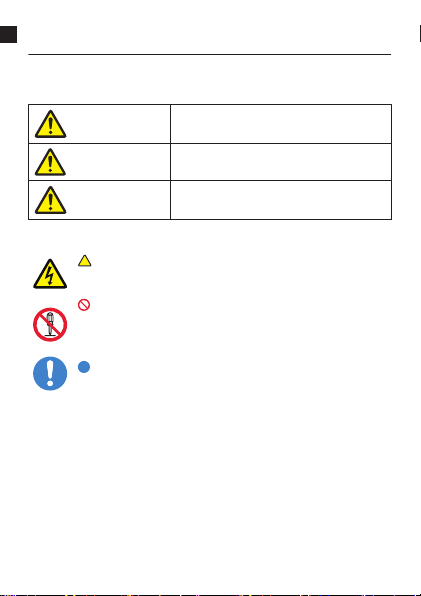
DIGITAL
Watch face for measuring fitness data
while engaged in activities, and to
measure calories burned, steps, and
other data during everyday life.
“Using the “DIGITAL” Watch Face”
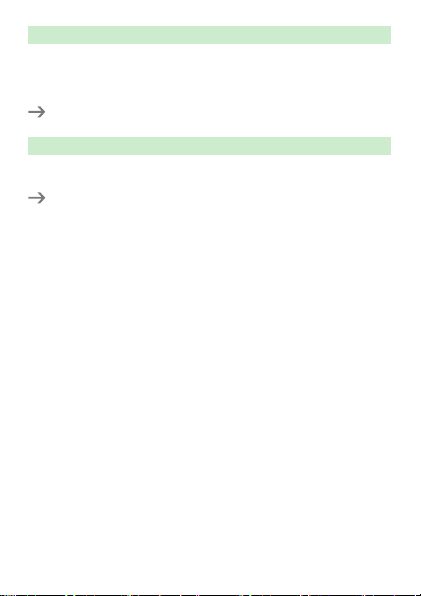
ANALOG
Analog watch face whose design you
can change in accordance with your
daily needs.
“Using the “ANALOG” CASIO Watch
Face”
2 Layers
Clean, easy-to-read watch face that
consumes less battery power.
“Using the “2 Layers” CASIO Watch
Face”
EN-2
Page 4
Checking Exercise Results After Engaging in an Activity
Data is measured and recorded by the watch’s sensors as you engage in
activities. Later you can view check and analyze the data using the “G-SHOCK
MOVE” phone app. This is true for a wide range of activities, from running, cycling
and other outdoor activities, to weight training and more.
“Selecting an Activity for Measurement”
Reducing Battery Power Consumption
You can reduce battery power consumption by turning off Wear OS by
GoogleTM.
“Reducing Power Consumption (Timepiece)”
EN-3
Page 5

Contents
Watch Features ................................................................................. EN-1
Using Your Watch ........................................................................ EN-1
Safety Precautions ........................................................................... EN-7
Introduction ..................................................................................... EN-20
Powered with Wear OS by Google ............................................. EN-21
Attention iPhone Owners! ........................................................... EN-21
Package Contents .......................................................................... EN-22
Component Names ......................................................................... EN-23
Getting Ready for First Use ........................................................... EN-24
STEP 1: Charge the watch ......................................................... EN-25
STEP 2: Pair the Watch with Your Smartphone .......................... EN-28
STEP 3: Update Your Apps to Their Latest Versions .................. EN-31
STEP 4: Install the CASIO “G-SHOCK MOVE” App on Your Phone
.................................................................................................... EN-32
Turning Power On or Off, and Restarting ..................................... EN-33
Turning Power On or Off ............................................................. EN-33
Restarting ................................................................................... EN-33
Initial Settings and Fastening the Watch to Your Wrist .............. EN-35
Configuring Initial Default Settings for Heart Rate Measurement EN-35
Fastening the Watch to Your Wrist ............................................. EN-36
Basic Button and Display (Touch Screen) Operations ............... EN-39
Restoring the Display Screen ..................................................... EN-39
Basic Button Operations ............................................................. EN-39
Basic Screen Operations (Swiping Up, Down, Left, and Right) .. EN-41
EN-4
Page 6

Basic Functions .............................................................................. EN-45
Adjusting the Current Time Setting ............................................. EN-45
Alarm, Timer, Stopwatch, etc. .................................................... EN-45
App Updates .............................................................................. EN-45
Using the “DIGITAL” Watch Face .................................................. EN-46
DIGITAL Display ......................................................................... EN-47
Changing DIGITAL Screen Items ............................................... EN-49
Using the Display Item Selection Menu ...................................... EN-50
Changing the DIGITAL Background ........................................... EN-53
DIGITAL Screen Item Example .................................................. EN-54
Quick Recall of Main Functions (CASIO's APPS) ........................ EN-58
Recalling Functions with CASIO's APPS .................................... EN-58
Selecting an Activity for Measurement ........................................ EN-62
Activity Measurement (Excluding Workouts) .............................. EN-63
Activity Measurement (Workouts) .............................................. EN-68
Activity Measurement Setting Menu ........................................... EN-78
Changing Screen Items Displayed During Activity Measurement EN-79
Download Map and Import Route ................................................. EN-80
Download Map ........................................................................... EN-80
Import Route ............................................................................... EN-83
Using a Different Watch Face ........................................................ EN-86
Changing to Another Watch Face .............................................. EN-86
Using the “ANALOG” CASIO Watch Face .................................. EN-87
Using the “2 Layers” CASIO Watch Face ................................... EN-93
EN-5
Page 7

Reducing Power Consumption (Timepiece) ................................ EN-96
Timepiece Screen Items ............................................................. EN-97
Changing to Timepiece .............................................................. EN-98
Reducing Timepiece Altitude and Barometric Pressure Measurement
Error ........................................................................................... EN-99
What you can do when not connected with a phone ................ EN-100
Troubleshooting ........................................................................... EN-101
Restoring Watch Operation ...................................................... EN-101
If you cannot pair after changing to another phone model ........ EN-101
Returning the Watch to Its Initial Factory Defaults .................... EN-103
Error Code and Error Message List .......................................... EN-104
Precautions During Use ............................................................... EN-106
Measurement Function Precautions ......................................... EN-109
Other Product Precautions ....................................................... EN-113
User Maintenance ......................................................................... EN-120
Other Precautions ........................................................................ EN-122
Chargeable Battery Handling (Please recycle!) ........................ EN-122
Personal Information Protection Precautions ............................ EN-122
IMPORTANT SAFETY INSTRUCTIONS .................................. EN-123
Main Specifications ...................................................................... EN-124
Supplementary Information ......................................................... EN-128
EN-6
Page 8
Safety Precautions
Danger
Warning
Caution
Before use, be sure to read these “Safety Precautions”. Use the watch
correctly.
Indicates information that warns against a
major risk of death or serious personal injury.
Indicates information that warns against a
risk of death or serious personal injury.
Indicates information that warns against a
risk of minor injury or material damage.
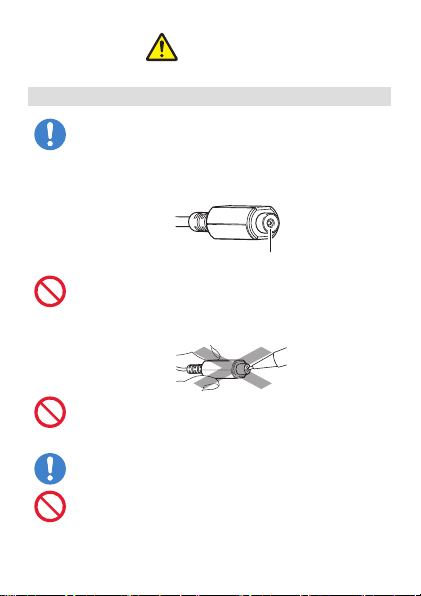
Icon Examples
indicates a situation against which you need to exercise
caution. The example shown here indicates you should take
precaution against electric shock.
indicates information about an action that you should not
perform. The specific action is indicated by the figure inside the
circle. The example shown here means disassembly is
prohibited.
indicates information about an action that you must perform.
The specific action is indicated by the figure inside the circle.
EN-7
Page 9
Danger
Use of the watch
Be sure to observe the points below when using this watch.
Failure to do so creates the risk of heat generation, fire, and
explosion.
●
Do not throw the watch into fire or expose it to heat.
●
Do not try to modify the watch, step on it or otherwise subject it
to strong impact.
●
Do not place the watch inside a microwave oven, drier,
pressurized container, etc.
●
Do not try to take the watch apart.
Do not use, charge, or store the watch near an air
conditioner, on an electric carpet, in a location exposed to
direct sunlight, in a motor vehicle parked in the sun, or any
other location subjected to high temperatures.
Doing so creates the risk of heat generation, fire, and explosion.
EN-8
Page 10
Danger
Charging
Use only the prescribed method for charging.
Use of a charging method other than the method specified for this
watch creates the risk of heat generation, fire, and explosion.
Rechargeable Battery
Do not try to remove the rechargeable battery from the
watch.
Doing so creates the risk of heat generation, fire, and explosion.
If the rechargeable battery is ever accidentally removed from the
watch, take care to ensure that it is not swallowed. Special care
is required when young children are present. Should a battery
ever be swallowed, contact a physician immediately. Swallowing
a battery can rapidly cause chemical burns, mucosal tissue
penetration, and other serious problems that create the risk of
death.
Always request rechargeable battery replacement from a
CASIO Service Center or your original retailer.
Use of a non-specified type of battery or improper replacement
creates the risk of battery overheating, fire, and rupture.
EN-9
Page 11

Warning
Use of the watch
Do not use this watch while scuba diving.
This watch is not a diving watch. Improper use of this watch can
lead to serious accident.
If radio wave interference or other problems are generated
in other equipment when using this watch, enter the watch
Airplane Mode or turn off the watch.
This watch may affect operation of or cause problems with the
other equipment, which creates the risk of accident.
In a medical facility or aircraft, be sure to obey instructions
provided by staff or flight personnel. Do not use this watch
in any area where its use is prohibited.
Electromagnetic waves and other signals emitted by this watch
may affect instrumentation, which may create the risk of accident.
People fitted with a cardiac pacemaker or any other
implantable medical device should keep this watch and
charger cable away from their body.
Radio waves and magnetism can affect the operation of cardiac
pacemakers and other medical devices. Should you or another
person ever start to feel any abnormality, immediately move the
watch and charger cable away and consult a physician.
EN-10
Page 12
Warning
Use of the watch
Enter the watch’s Airplane Mode or turn off the watch when
on a crowded train or in any other crowded location.
Failure to do so creates the risk of malfunction of a nearby cardiac
pacemaker or other medical device due to radio interference.
Continued use of the watch while it is smoking, emitting foul
odor, generating heat, or otherwise demonstrating
abnormal symptoms creates the risk of fire and electric
shock. Immediately take the actions below.
1. If a charging is in progress, unplug the USB cable from the
watch.
2. Turn off power.
3. Contact an authorized CASIO Service Center.
Regardless of the information displayed by the watch, be
sure to keep aware of your physical condition and keep
your exertion level within your own personal capabilities.
Whenever working out while using the watch to monitor your heart
rate or to perform any other type of training measurement, take
care that you do not over-exert yourself in order to achieve a
particular value or reading. Overexertion creates the risk of
unforeseen accident. Always keep your workouts well within your
physical capabilities.
Should you ever feel ill or otherwise sense a change in for physical
well-being, immediately consult a physician.
EN-11
Page 13

Warning
Charging
When charging with the USB-AC adaptor and charger cable,
be sure to observe the precautions below in order to avoid
the risk of heat generation, fire, explosion, and electric
shock.
●
Use only the charger cable that comes with the watch.
●
Never try to use the charger cable to charge another device.
●
Never use a USB-AC adaptor that does not meet the specified
adaptor specifications.
●
Do not use a power source that has a different voltage and/or
frequency from those specified for this watch.
●
Do not use a power outlet that is shared by multiple devices.
●
Do not use the watch while covered with bedding or a blanket,
and do not use it near a heater.
●
Do not place any heavy object on the USB-AC adaptor and/or
charger cable, and do not charge with the charger cable while
it is bundled.
●
Do not expose the USB-AC adaptor and/or charger cable to
heat, do not try to modify them, and do not allow them to become
damaged.
●
Do not subject the USB-AC adaptor and/or charger cable to
excessive bending, twisting, or pulling.
●
Always keep the charger cable connector and/or the USB-AC
adaptor power plug clean. Wipe away any dust that collects on
them.
●
Use a dry cloth to clean the USB-AC adaptor and charger cable.
Do not use detergent for cleaning.
EN-12
Page 14
Warning
Charging
●
Do not touch the USB-AC adaptor and/or charger cable while
your hands are wet.
●
Make sure no liquid (water, sports drink liquid, seawater, animal
urine, etc.) gets on the USB-AC adaptor and/or charger cable
during use.
●
Do not charge while the watch is wet.
●
Never touch the watch, USB-AC adaptor, or charger cable
during an electrical storm.
Should the watch, USB-AC adaptor, or charger cable
become damaged, immediately stop using them and
unplug the USB-AC adaptor from the power outlet. Next,
contact an authorized CASIO Service Center.
Continued use of a damaged item creates the risk of fire and
electric shock.
Do not charge the watch while wearing it on your wrist.
Doing so creates the risk of low-temperature burn injury.
EN-13
Page 15
Warning
Display
Do not press on the display with undue force or subject it
to strong impact.
Doing so can break the display glass.
Should the display glass break, do not directly touch the
liquid inside it.
Display liquid can cause skin irritation.
●
Should display liquid ever get into the mouth, consult a
physician immediately.
●
Should display liquid get in your eyes or on your skin, rinse with
clean water and then contact your physician.
EN-14
Page 16
Caution
Use of the watch
Make sure you are in a safe place before viewing the watch's
display.
Failure to do so creates the risk of personal injury and accident.
Looking at the watch while running or jogging on the open road,
while riding a bicycle, or operating a motor vehicle can lead to
accidents. Take care to avoid running into others.
Take care to avoid conditions that cause skin rash.
The watch and the band come into direct contact with the skin, so
the usage conditions below may cause skin rash.
●
Metal or leather allergies
●
Dirt, rust, or sweat on the watch or band
●
Poor physical condition, etc.
ー
A band that is snugly tightened for heart rate monitoring can
cause you to sweat and make it difficult for air to pass under
the band, which can lead to skin irritation. During normal
wear, when you do not need to monitor your heart rate, make
sure the band is loose enough to allow you to insert a finger
between it and your wrist.
ー
Should you ever notice any abnormality, immediately stop
using the watch and consult a physician.
EN-15
Page 17
Caution
Use of the watch
Remove the watch from your wrist before going to bed.
Failure to do so creates the risk of unexpected personal injury,
and/or allergic skin rash.
Be sure to keep the case and band clean at all times.
●
Wash the case and band with tap water or other clean water to
remove sweat and dirt, and then wipe dry with a soft cloth.
●
Sweat and/or dirt on the watch case or band can cause skin
rash or other problems. Should you ever notice any skin
abnormality, immediately stop using the watch and consult a
physician.
Before picking up or otherwise coming into contact with a
child, remove the watch from your wrist.
Failure to do so creates the risk of personal injury to children and/
or allergic skin rash.
Young children should be allowed to use this watch only
under the supervision and guidance of an adult. Store the
watch out of the reach of small children.
EN-16
Page 18
Caution
Use of the watch
Magnetic
Keep the charger cable away from magnetic cards (credit
cards, cash cards, prepaid cards, magnetic back tickets,
etc.)
The magnetic plug end tip of the charger cable can render a
magnetic card or recording medium unusable if they get too close
to each other.
Be sure to observe the precautions below when using the
charger cable.
Failure to do so creates the risk of malfunction.
●
Do not apply undue force to, insert items into the plug, or forcibly
push the plug in.
Do not leave keys, necklaces, paper clips, or other metal
items in close proximity to the charger cable plug.
Doing so can cause the metal to affix to the magnetic plug and
cause a short.
When not using the charger cable, unplug the AC adaptor
from the power outlet.
The sensor in the center of the back cover emits an LED
light. Avoid looking directly into the light.
EN-17
Page 19
Caution
Charging
When charging with the USB-AC adaptor and charger cable,
be sure to observe the precautions below in order to avoid
the risk of heat generation, fire, explosion, and electric
shock.
●
Plug the USB-AC adaptor into the power outlet as far as it will
go.
●
Unplug the USB-AC adaptor from the power outlet before
leaving it unattended for long periods, such as when going on
a trip, etc.
●
At least once a year, use a dry cloth to clear away any dust buildup between the prongs of the USB-AC adaptor plug.
●
Do not use or store the USB-AC adaptor and/or charger cable
in areas where large amounts of moisture or dust are present,
in food preparation areas or other areas where there is exposure
to oil smoke, or areas where temperatures are high.
If the watch does not charge within the normal charging
time, stop charging.
Continued charging creates the risk of heat generation, fire, and
explosion by the built-in battery.
●
For details about the charging time, see “Main Specifications”.
EN-18
Page 20

Caution
User Maintenance
Be sure to keep the case and band clean at all times.
A dirty or rusty case or band can soil the sleeve of your clothing.
Rust tends to form easily after the watch is exposed to seawater
and then left without cleaning.
EN-19
Page 21

Introduction
●
The contents of this manual are subject to change without notice.
●
Copying of this manual, either in part or its entirety, is forbidden. You are
allowed to use this manual for your own personal use. Any other use without
the permission of CASIO COMPUTER CO., LTD. is forbidden under
copyright laws.
●
CASIO COMPUTER CO., LTD. shall not be held liable for any lost profits
or claims from third parties arising out of the use of this product or this
manual.
●
CASIO COMPUTER CO., LTD. shall not be held liable for any loss or lost
profits due to loss of data caused by malfunction or maintenance of this
product, or any other reason.
●
The watch and sample screens depicted in the illustrations in this manual
may be different from the actual appearance of the watch.
EN-20
Page 22

Powered with Wear OS by Google
This watch can be used while paired with an Android™ or iOS phone. It also
has a large collection of standalone functions that can be used when not
paired with a phone. Supported functions depend on your platform and
country. For information about supported phones, visit the CASIO support
site below.
https://support.casio.com/gsw/en/GSW-H1000/
Wear OS by Google Functions
Powered with Wear OS by Google, this smartwatch has the following
capabilities:
●
Dictation and voice command
●
Messaging and incoming call notifications
●
Alarms, stopwatch, timer, agenda and translation
●
Core Google apps like Google Fit™ and Google Assistant
●
Download apps and watch faces using Google Play
●
Adjustable settings
This user’s guide does not contain any information about the above functions.
For details about these functions, visit the websites below.
https://support.google.com/wearos/
Attention iPhone Owners!
When using this watch while it is paired with an iPhone, be sure to have the
Wear OS by Google app open and running in the background. If the Wear OS
by Google app is not operating when using your device, functions that require
communication with the iPhone do not operate.
EN-21
Page 23
Package Contents
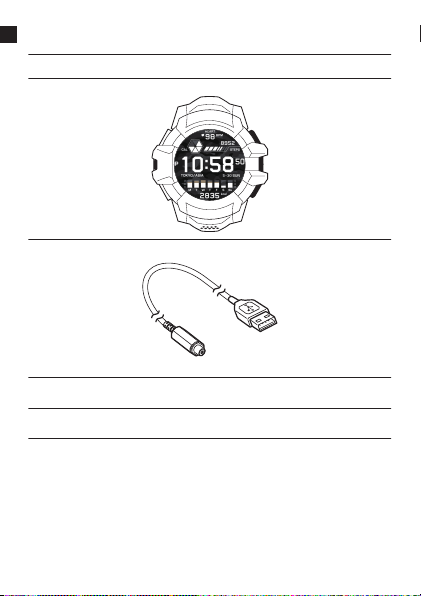
Watch
Charger Cable
“Read This First”
Warranty
EN-22
Page 24
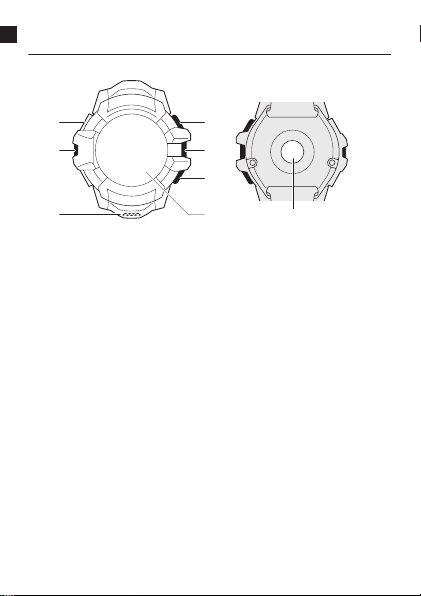
Component Names
A
D
E
F
GH
B
C
A
Charger terminal
B
Pressure sensor
C
Microphone
D
START button
(upper button)
EN-23
E
Power button
F
APP button
(lower button)
G
Touch screen
(display)
H
Optical sensor
(PPG Heart Rate)
Page 25
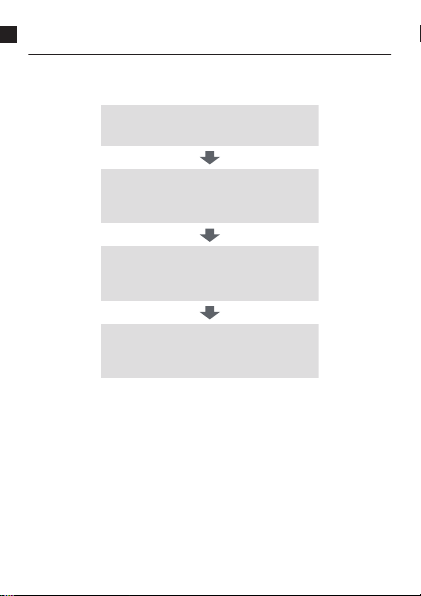
Getting Ready for First Use
Before using this watch for the first time, perform the steps below in sequence
to charge the watch and configure its settings.
“STEP 1: Charge the watch”
“STEP 2: Pair the Watch with Your
“STEP 3: Update Your Apps to Their Latest
“STEP 4: Install the CASIO “G-SHOCK
MOVE” App on Your Phone”
Smartphone”
Versions”
EN-24
Page 26
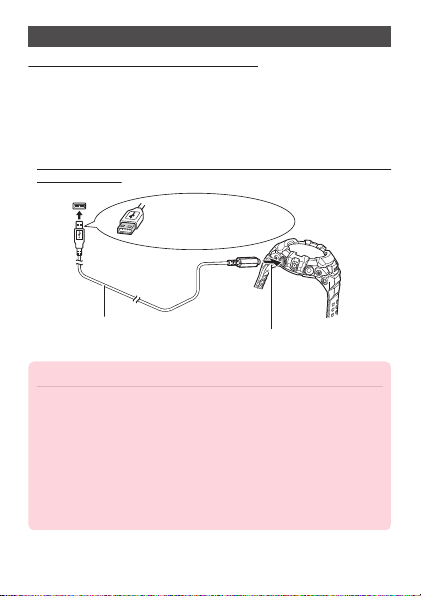
STEP 1: Charge the watch
Charger cable
(included with watch)
USB (Type A) port
Voltage: 5 V
Current: 0.5A min.
The connection is magnetic.
Be sure to charge the watch before using it.
Use the charger cable that comes with the watch to charge using a USB-AC
adaptor, or by connection to a computer or other device.
●
Note that the setup of a computer may not support charging from its USB
port.
Connect to a USB (Type A) port
●
Make sure the charger cable connector is oriented correctly when plugging
it into a USB port.
Important!
●
The USB-AC adaptor or other USB power supply device you use must
meet certain specifications. Do not use an inferior adaptor or device that
does not meet the required specifications. Doing so can cause
malfunction and breakdown of the watch and USB power supply device.
Also note that use of a USB-AC adaptor may be subject to local
standards imposed by the country where you are located. CASIO
COMPUTER CO., LTD. shall be held in no way liable for any malfunction
or break down of the watch and/or USB power supply device caused by
use of an inferior adaptor or device that does not meet the required
specifications.
EN-25
Page 27
Precautions When Charging
●
Make sure that the charger cable connector is oriented correctly when
connecting it to a USB port.
●
When using a computer for charging, connection to a USB2.0 or higher USB
(Type-A) port only is supported. Depending on the computer model,
connection environment and other factors, charging may take a long time
or may not be possible. Charging is not performed while a computer is
hibernating.
●
Operation on a custom computer or a computer that has been modified from
its original configuration is not guaranteed. Even in the case of an
unmodified commercially available computer, USB port specifications may
make charging impossible.
●
An error message may appear when the watch is connected to a computer
with the charger cable.
If this happens, disconnect the charger cable from the computer and then
re-connect it.
●
If you cannot charge using the above procedure, try a different USB port or
use a USB-AC adaptor.
Genuine CASIO USB-AC Adaptor
To obtain a genuine CASIO USB-AC adaptor, access the URL below and
then contact a CASIO Service Center in the country where you live.
https://s.casio.jp/w/10061en/
EN-26
Page 28

Charge Level Indication While Charging
●
The charge level indicator will appear after watch charging starts.
●
If the battery is dead when you start charging, the charge level indicator will
not appear until after the charge reaches a preset level.
●
Hold down the power button for at least two seconds to turn on the watch.
Other Charging Precautions
●
Charging time depends on the remaining battery capacity and your usage
environment.
●
Should water get onto the watch, the charger cable, or the USB power
supply device during charging, immediately disconnect the charger cable
and stop charging.
●
If an ongoing charging operation stops, disconnect the watch from the
charger cable. After checking for and eliminating problems, try charging
again.
●
In an area where it is extremely cold or hot, you may not be able to charge
the watch or the watch may not charge completely. Charge the watch in an
area where the ambient temperature is between 10°C and 35°C (50°F and
95°F).
●
Charging may cause radio and/or television interference. If this happens,
use a power outlet that is further away from the TV or radio for charging.
●
To help promote longer battery life, regular charging of the watch (about
once a month) is recommended even if you do not use it for a long time.
●
Charging may take longer or may not be possible at all if there is dirt or other
foreign matter on the charger terminal or on the charger cable connector.
Use a clean, dry cloth or cotton swab to occasionally wipe the charger
terminal and charger cable connector.
EN-27
Page 29

STEP 2: Pair the Watch with Your Smartphone
●
This procedure is current as of April 2021.
1. Use your phone settings to turn on Bluetooth
®
.
2. On your phone, install the Wear OS by Google app.
Android Phone Users
On your phone, open Google Play and install the Wear OS by Google
app.
iPhone Users
On your iPhone, open the App Store and install the Wear OS by Google
app.
3. If you don’t already have one, create your Google
Account.
A Google Account gives you access to a variety of different Google
services. Be sure to create a Google Account before using this watch.
●
If you already have a Google Account, have it's email and password
accessible.
●
If you are using an iPhone and don’t have a Google Account, follow the
instructions that appear on your phone’s screen during step 4 below to
acquire an account.
4. Pair the watch with your phone.
Important!
●
The pairing procedure you need to use depends on the version of
Wear OS by Google running on your watch and phone. For the latest
information on procedures, visit the website below.
https://support.casio.com/gsw/en/GSW-H1000/
●
When configuring pairing settings, it is recommended that you have the
phone and watch within one meter of each other.
●
A Wi-Fi environment is required to use an iPhone.
EN-28
Page 30

1. If the watch is turned off, hold down the power button for at least two
seconds to turn it on.
2. Tap the watch display. On the screen that appears, select a language.
3. Swipe the screen upwards to display the watch name (GSW-H1000).
4. On your phone, start up the Wear OS by Google app.
The term “watch” in the text below refers to a smartwatch powered with
Wear OS by Google.
5. If this is the first time you are pairing your phone and watch, start up
the Wear OS by Google app on your phone. Next, tap “Set it up”.
●
Now, follow the instructions that appear on your phone screen to
complete the pairing procedure.
If you are using an existing phone that is paired with a watch, you need to
perform one of the procedures below in place of step 5 above. The
procedure you should use depends on your phone type.
Android Phone Users
You can have multiple watches paired with an Android phone at the same
time.
In the upper left corner of the Wear OS by Google app screen, tap the
watch name. On the menu that appears, tap “Add a new watch”.
●
Now, follow the instructions that appear on your phone screen to
complete the pairing procedure.
EN-29
Page 31

iPhone Users
With an iPhone, you can have only one watch paired per phone. Use the
procedure below to unpair the currently paired watch from the iPhone so
you can pair with this watch.
1. On your iPhone home screen, tap the following in sequence:
“Settings” > “Bluetooth”.
2.
In the “MY DEVICES” list, tap the mark to the right of the name of
the currently connected Wear OS by Google watch.
3. Tap “Forget This Device”.
4. Start up the Wear OS by Google app.
5.
Tap the menu icon ( ) in the upper left corner of the screen. On the
menu that appears, tap “Set up a new watch”.
●
Now, follow the instructions that appear on your phone screen to
complete the pairing procedure.
Changing the Phone Model Paired with This Watch
(The information below also applies when changing from one paired phone
model to another.)
Only one phone can be paired with the watch at a time. If you want to pair the
watch with a different phone, you first need to unpair it from the existing phone.
To unpair from a phone, perform the procedure under “Returning the Watch
to Its Initial Factory Defaults”.
EN-30
Page 32

STEP 3: Update Your Apps to Their Latest Versions
In order to use all of the functionality provided by this watch, be sure to update
all of your apps to their latest versions before using your watch.
●
This procedure is current as of April 2021.
●
A Wi-Fi environment is required to use an iPhone.
1. While the watch is displaying a watch face (normal
timekeeping screen, not an app screen or setting
screen), short-press the power button to display the app
list.
2. Scroll the list of apps upwards or downwards until “Play
Store” is displayed, and then tap it.
3. Swipe the touch screen from top to bottom to display the
Play Store menu and then tap the “My Apps” (R) icon.
●
If the above operation does not work, swipe the touch screen from
bottom to top and then tap “My Apps”.
4. If there is any app for which an update is available, its
name will be shown under “Updates Available”. Tap
“Update all”.
EN-31
Page 33

STEP 4: Install the CASIO “G-SHOCK MOVE” App on Your Phone
You can use the CASIO app to view training logs.
●
You need to register a CASIO ID to use a CASIO app. Registering a CASIO
ID also lets you use other online services provided by the CASIO Group.
1. Install the “G-SHOCK MOVE” app on your smartphone.
Android Phone Users
On your Android smartphone, start up Google Play Store, search for the
“G-SHOCK MOVE” app, and then install it.
iPhone Users
On your iPhone, start up App Store, search for the “G-SHOCK MOVE”
app, and then install it.
After the “Getting Ready for First Use” procedure is complete, the “DIGITAL”
watch face will appear on the display. For details about DIGITAL, see “Using
the “DIGITAL” Watch Face”.
EN-32
Page 34

Turning Power On or Off, and Restarting
Turning Power On or Off
To turn power on
1. Hold down the power button for at least two seconds.
To turn power off
1. While a watch face is displayed swipe the screen from
top to bottom.
2. Tap in the following sequence D > “System” > “Power
off”. On the confirmation screen that appears, tap .
Restarting
You can re-start the watch using Wear OS by Google or by using a watch
button operation.
To re-start using Wear OS by Google
1. While a watch face is displayed swipe the screen from
top to bottom.
2. Tap in the following sequence D > “System” > “Restart”.
On the confirmation screen that appears, tap .
EN-33
Page 35

To force a re-start
Important!
●
Try using the procedure below only in the case of operational problems
such as watch screen freeze up. In other cases, we recommend using
the procedure under “To re-start using Wear OS by Google”.
1. Hold down the power button until the display goes white.
●
It takes up to 12 seconds for the screen to go white. The screen going
white indicates that the system is restarting, so you can remove your
finger from the power button.
EN-34
Page 36

Initial Settings and Fastening the Watch to Your Wrist
This section explains how to configure the initial settings of the watch, which
are necessary for activity measurement. We also explain how to fasten the
watch to your wrist for more accurate measurement.
Configuring Initial Default Settings for Heart Rate Measurement
This setting is essential for calculating performance, including your heart rate
zone and VO2Max.
1. While the “DIGITAL” watch face is displayed, hold down
your finger in the center of the touch screen for about
two seconds.
●
This shrinks the watch face and displays D below it.
2. Tap in the following in sequence: D > “Heart Rate
Setting”.
●
This displays the “Heart Rate Setting” menu.
3. Input the following in sequence: “Birth Day”, “Heart rate
at rest”, “Gender”, “Height”, and then “Weight”.
4. To quit the setting procedure and return to the watch
face display, press the power button.
EN-35
Page 37

Fastening the Watch to Your Wrist
How you wear the watch on your wrist affects the accuracy of heart rate
monitor values. Position the watch as described below.
1. With the watch fastened loosely on your wrist, place at
least one finger to the right of the power button.*
* If you wear the watch on your right wrist, place your finger(s) to the left
of the pressure sensor (left side of the watch).
●
If the watch covers the protruding bone of your wrist (your ulna, which
is circled in the nearby figure), keep adding fingers until it doesn’t
anymore.
●
The location and shape of this bone differ from person to person.
EN-36
Page 38

2. Position the watch so there is at least one finger width
between it and your wrist joint when you bend your hand
back.
3. After you determine the best wrist position, tighten the
band snugly so the watch does not slide on your wrist.
Important!
●
A band that is snugly tightened for heart rate measurement can make it
difficult for air to pass under the band and cause you to sweat, which
can lead to skin irritation. During normal wear, when you do not need to
monitor your heart rate, make sure to maintain enough band looseness
so you can insert a finger between it and your wrist.
●
Avoid using sunblock, hand cream, cosmetics, and other skin
applications on the wrist where you will wear the watch for heart rate
measurement. Such creams and gels can soil the sensor window of the
watch and reduce heart rate measurement accuracy. Avoid using such
agents on the wrist where you will wear the watch.
EN-37
Page 39

Caution
The data from each sensor is used to estimate whether the watch is worn
on the wrist, and your heart rate is measured when it is detected that the
watch is being worn. If you do not want to measure your heart rate while
you are wearing the watch, select “OFF” for the “Detect wear on the
wrist”* setting. Note, however, that if you are performing a measurement
operation using a CASIO activity app, measurement is performed
regardless of this setting.
* To display the “Detect wear on the wrist” setting, swipe the watch face
screen downwards. On the screen that appears, tap the following in
sequence: D > “Accessibility” > “Heart Rate Measurement”.
EN-38
Page 40

Basic Button and Display
A
B
C
(Touch Screen) Operations
Operations of this watch are performed using three side buttons and the
screen (touch screen).
Restoring the Display Screen
If the screen of this watch is dark, tap the screen or press the power button.
Wait until the screen lights up before performing operations.
Basic Button Operations
This section describes button operations you can perform while a watch face
is displayed.
A
START button (upper button)
B
Power button
C
APP button (lower button)
EN-39
Page 41

A
START button (upper button)
Pressing this button while the watch face is displayed starts activity
measurement and/or displays the START screen for selecting
measurement items.
For details, see “Selecting an Activity for Measurement”.
B
Power button
Pressing this button while a watch face is displayed will display
the Wear OS by Google app list. You can swipe the app list up or
down to scroll it. Tap on an app to select and start it up.
If an app screen, setting screen or any other screen besides a
watch face is displayed, pressing the power button returns to the
watch face.
C
APP button (lower button)
Pressing this button while a watch face is displayed displays the
CASIO's APPS screen, which you can use to quickly call up
various CASIO original functions.
For details, see “Quick Recall of Main Functions (CASIO's
APPS)”.
Important!
●
You can use Wear OS by Google to change the functions of the START
and APP buttons. However, when using the “DIGITAL” watch face, use
the default button operations without changing them.
In this user’s guide, operations are explained assuming that default
settings are being used.
EN-40
Page 42

Basic Screen Operations (Swiping Up, Down, Left, and Right)
While a watch face is displayed, you can access various Wear OS by Google
functions by swiping the screen up, down, left, and right.
Note
●
The procedure below is current as of April 2021. Note that the operations
described here are subject to change due to updates of Wear OS by
Google and other factors. For details about Wear OS by Google
operations, visit the website below.
https://support.google.com/wearos/
EN-41
Page 43

Swipe from top to bottom
A
B
E
H
I
C
D
F
G
J
This displays the Wear OS by Google setting screen.
A
Settings
B
Brightness
C
Battery Saver
D
Find my phone
E
Theater mode
F
Do Not Disturb
G
Airplane mode
H
Displayed
while there is a
Wi‑Fi connection.
I
Displayed
while there is a
Bluetooth
connection
between the watch
and a phone.
J
Remaining
battery charge
EN-42
Page 44

Swipe from bottom to top
This displays notifications.
●
You can display other notifications by swiping the notification screen from
bottom to top.
●
Swiping a notification to right or left will cause it to disappear.
Swipe from left to right
●
This operation displays the Google Assistant voice control buttons.
●
Swiping the Google Assistant screen from bottom to top displays
information from Google Assistant.
EN-43
Page 45

Swipe from right to left
Each swipe displays the next Tile*.
* Tiles make it easy to take quick actions and access important information
at a glance. Tiles include weather forecast, news, workout tracking,
guided breathing, and more. Select and edit the Tiles you want to have
on your watch.
EN-44
Page 46

Basic Functions
Adjusting the Current Time Setting
While there is a Bluetooth connection between the watch and a paired phone,
the watch’s current time will be synced with the time of the phone. You can
also adjust the watch’s current time setting manually.
Alarm, Timer, Stopwatch, etc.
These functions can be used by Wear OS by Google standard apps.
While a watch face is displayed, short press the power button. On the app list
that appears, tap the app you want.
For details about the above settings and how to use them, visit the
websites below.
https://support.google.com/wearos/
App Updates
Important!
To ensure that your watch can function at the high level for which it is
designed, be sure to keep all apps up to date. It is recommended that you
turn on the watch and keep it connected to your phone and Wi-Fi when
charging so app updating can be performed automatically. Also, if there
are any CASIO apps that can be updated in MyApps on Google Play, be
sure to update them. For details, visit the support site below.
https://support.casio.com/gsw/en/GSW-H1000/
EN-45
Page 47

Using the “DIGITAL” Watch Face
“DIGITAL” is the initial default watch face of this watch. In addition to being
useful for activity measurements, it is an important and essential watch face.
There are two major display formats, “daily” and “activity”. When you start a
measurement operation for running, skiing, strength training, or some other
activity, the display changes from the daily watch face to a design that shows
the optimum functions for the activity you are measuring. You can also change
the functions of the upper, middle, and lower display areas of the watch face.
In addition to functions, you can also select any one of a wide variety of face
designs.
The explanations in this chapter basically use the daily screen.
Important!
●
“DIGITAL” is an important watch face that functions as a starting point
for every operation of this watch. Though your watch comes with a
number of different watch faces built in, you should normally use this
watch face, especially when performing activity measurements.
EN-46
Page 48

DIGITAL Display
A
B
D
C
Daily screen
This is the normal screen for daily use when you are not performing activity
measurement.
A
Upper display area: Calories Burned / Step Count / Heart Rate
B
Middle display area: Clock
C
Lower display area: Calories Burned / Weekly Stats
D
Background
●
You can select from among various different variations for the upper,
middle, and lower display areas of the watch face. You can select from
among various different backgrounds, or you can use the map of your
current location as the background.
●
Even if another watch face is in use, the watch automatically switches to
the “DIGITAL” watch face when you start an activity measurement
operation, which remains displayed until the measurement operation is
complete. Items that are displayed depend on the activity measurement
operation you perform.
For details, see “Selecting an Activity for Measurement”.
EN-47
Page 49

Activity Measurement in Progress Screens
This is the screen when you are performing activity measurement.* Your
watch supports timing of dozens of activity and workout types, and lets you
switch to the appropriate information display for each stage.
For the “Running” and “Road Biking” sports activities, you can select from
among various different display items (upper area, middle area, lower
display areas) and background variations that are available for each of
these sports activities.
* For details about activity measurements, see “Selecting an Activity for
Measurement”.
Example screen when “Running” is selected
EN-48
Page 50

Changing DIGITAL Screen Items
DIGITAL daily screen
Display item selection screen
1. On the DIGITAL watch face, tap the display area (upper,
middle, and lower) whose display item you want to
change.
●
This displays a screen for changing the contents of the display area you
tapped.
2. Tap or to change the display items.
●
You cannot change display items by swiping left or right.
●
To display a menu of the selected display items, tap . You can use
the menu to change settings related to display contents and other
settings. For details, see “Using the Display Item Selection Menu”.
EN-49
Page 51

Using the Display Item Selection Menu
On the display switching screen, you can display a menu of the selected
display content. From there you can use functions related to the display
content and change settings.
1. On the DIGITAL watch face, tap one of the display areas
(upper, middle, or lower).
●
This displays a screen for selecting the display items of the area you
tapped.
Example: When “Calories Burned / Step Count / Heart Rate” is selected
for the upper display area
EN-50
Page 52

2. Tap .
A
A
B
C
●
This displays a menu.
A
Menu items
B
Tap (or swipe the screen from right to left) to display the next menu page.
C
Tap (or swipe the screen from left to right) to display the previous menu
page.
EN-51
Page 53

3. Tap a menu item.
●
For example, the menu items below are available on the “Calories
Burned / Step Count / Heart Rate” menu.
Menu items Description
Daily calories
burned target
Daily step count
target
Gauge Reset Resets the maximum value of currently displayed
Heart Rate Graph Displays a daily heart rate graph.
Daily Measurement Specifies recording of non-activity daily heart rate
Heart Rate Setting For configuring settings required for heart rate zone
Accurate heart rate
monitoring
Energy
Consumption Unit
Specifies a daily calories burned target.
Specifies a daily step count target.
step count or calories burned meter.
measurements.
and VO2Max. (See “Configuring Initial Default
Settings for Heart Rate Measurement”)
Displays tips on how to fasten the watch to your
wrist during heart rate measurements.
Specifies the calories burned unit.
4. To return to the watch face display, press the power
button.
EN-52
Page 54

Changing the DIGITAL Background
1. Press the APP button (lower button).
●
This displays a menu of main functions (CASIO's APPS screen).
2. Run your finger around the outer periphery of the display
to rotate through icons until the “Watch Face
Background” icon is displayed in the center of the
screen.
3. Tap the icon in the center of the screen.
●
This displays the watch face background selection screen.
4. Swipe the screen left or right and select a background.
EN-53
Page 55

DIGITAL Screen Item Example
A
B
C
This section explains some of the display items you can select for the DIGITAL
daily screen.
Upper display area example
This section explains “Calories Burned / Step Count / Heart Rate”. In addition,
you can also select “Heart Rate”, “Barometer / Fishing Time” and “Barometer /
Barometer Graph”.
Calories Burned / Step Count / Heart Rate (Initial Default)
A
The six segments of this indicator represent 100% of the daily
maximum calories burned value (starting from midnight to the
current time) that you specified on the watch. None of the indicator
segments are displayed if your daily calories burned value is less
than one sixth of the preset maximum, while all six segments are
displayed when it is greater than the preset maximum.*
B
Shows your current heart rate between 40 and 220 BPM.
C
Shows your daily step count (from midnight to the current time).
“----” is displayed in place of a value when measurement fails.*
* During an activity, this value shows the current calories burned or the
step count starting from the beginning of the activity.
EN-54
Page 56

Middle display area example
A
B
C
In this section explains about “Clock” and “Heart Rate”.
Clock (Initial Default)
A
Current time
B
Current location (time zone name)
C
Day, day of week
EN-55
Page 57

Heart Rate
A
B
C
D
A
10 segments that indicate heart rate zones. The displayed
segment shows the heart rate zone that corresponds to the value
shown by D.
B
Shows your Target Heart Rate Zone*.
C
This heart icon flashes while a heart rate measurement operation
is in progress. It does not flash when there is no heart rate
measurement. While this icon is flashing, D shows your current
heart rate. When it is not flashing, D shows the last measured
heart rate value.
D
Heart rates (current and last measured) are displayed within a
range of 40 and 220 BPM. “---” is displayed in place of a value if
the measurement is out of range or if measurement is not possible.
* “Target Heart Rate Zone” Settings can be configured using the
CASIO “G-SHOCK MOVE” app.
EN-56
Page 58

Lower display area example
A
B
This section explains “Calories Burned / Weekly Stats”. Besides this type of
display, you can also select “Heart Rate”, “Schedule”, “Altitude / Compass”
and “Altitude / Altitude Graph”.
Calories Burned / Weekly Stats (Initial Default)
A
The letters indicate days of the week. This graph shows your daily
energy consumption for the week that includes today. The bar on
the right shows today’s calories burned. The height of each graph
bar indicates the percentage of your preset maximum calories
burned value that you achieved each day. The preset maximum
energy value is 100%.
If you have set a “Daily calories burned target*1”, the part that
exceeds the target is displayed in the Theme Color*2.
B
Shows how many calories your burned today (since midnight).
“----” is displayed in place of a value when measurement fails.
*1 You can change the display items that appear here by tapping the
lower display area. Next, tap and then select the items you want
from the menu that appears.
*2 “Theme Color” is one of the setting items of this watch. It specifies
the color of specific characters and the design of the display.
EN-57
Page 59

Quick Recall of Main Functions (CASIO's APPS)
From the icon menu that appears when you press the APP (lower) button,
you can quickly access the main CASIO original functions installed on this
watch.
Recalling Functions with CASIO's APPS
1. While a watch face is displayed, press the APP button
(lower button).
●
This displays the CASIO's APPS screen.
2. Run your finger around the outer periphery of the display
to rotate through icons until the icon you want to recall
is displayed in the center of the screen.
EN-58
Page 60

3. Tap the icon in the center of the screen.
●
The table below shows the functions you can recall.
Function Description
Activity
Displays the START screen to start Activity
measurement.
If an Activity measurement is already in progress,
watch will return to the measurement screen that
was displayed before step 1 of this procedure.
Displays a history list of Activity measurement
results.
History
Watch Face
Background
Theme Color
Map
Selects the background image of the “DIGITAL”
watch face.
Tap to select a uniform theme color for the watch’s
screen. The color you select is used for icons and
cursors (CASIO apps only).
Displays a map using the full display area of the
watch.
EN-59
Page 61

Function Description
Heart Rate Graph
Sensor Overlay
Timepiece
Tide Graph
Altimeter
Displays your latest heart rate reading along with a
Heart Rate Graph of the previous 24 hours.
If an Activity is in progress, the display will show
your current heart rate and graph of your readings
during the current Activity.
Measures data during an Activity to overlay it on a
movie or still image shot during the Activity.
●
The “G-SHOCK MOVE” phone app is required to
overlay measurement data onto a movie or still
image.
Transition from Wear OS by Google to the
Timepiece mode.
Timepiece disables smart functionality and instead
displays only the monochrome time and sensor
operations in order to maximize the watch's battery.
Displays the current tide level and a Tide Graph of
the previous 12 hours and the next 12 hours. The
current tide level and the high and low tide levels of
the next 12 hours are displayed along with their
times.
●
You can select the port whose information you
want to display using the Tide Graph menu on the
lower display switching screen of the “DIGITAL”
watch face. For information about the procedure,
see “Changing DIGITAL Screen Items”.
Displays your current altitude and an altitude graph
of the previous 24 hours.
If an Activity is in progress, the display will show
your current altitude and an altitude graph of your
readings during the current Activity.
EN-60
Page 62

Function Description
Barometer
Displays your current barometric pressure and a
Barometric Pressure Graph of the previous 24
hours.
If an Activity is in progress, the display will show
your current barometric pressure and a barometric
pressure graph of your readings during the Activity.
Displays the compass (bearing indicator).
Compass
G-SHOCK MOVE
Connects to or disconnects from the “G-SHOCK
MOVE” phone app.
While connected to “G-SHOCK MOVE”, you can
use your phone to view Activity records and
configure phone settings.
EN-61
Page 63

Selecting an Activity for Measurement
Your watch supports measurement and recording of dozens of different
activities. The table below shows a partial list of supported activities.
Walking Arm curls*
Cycling Abdominal crunches*
Skiing Shoulder presses*
Sailing Squats*
Trail running Treadmill*
Trekking Push ups*
Fishing Planks*
Pool swimming Bench presses*
Mountain biking Leg presses*
Running Lower back*, etc.
Road biking, etc.
* Activities included in the “Workouts” item of the watch’s activity selection
screen. Operations for these activities are slightly different from operations
of other activities.
Important!
●
Note the precautions below to ensure correct heart rate measurement
by the watch.
ー
Before starting measurement, use the procedure under “Configuring
Initial Default Settings for Heart Rate Measurement” to enter your
birthday, gender, and other profile information.
ー
Be sure to properly fasten the watch to your wrist. (See “Fastening
the Watch to Your Wrist”.)
●
When you start measurement of an outdoor activity such as running, go
outdoors to an open space where the sky is visible.
EN-62
Page 64

Note
●
While the watch is connected with the “G-SHOCK MOVE” phone app,
you can use your phone to view Activity records.
ー
To connect to “G-SHOCK MOVE”, press the APP button on the watch
face (lower button). On the screen that appears, tap “G-SHOCK
MOVE” icon in the center of the screen.
For details, see “Quick Recall of Main Functions (CASIO's APPS)”.
Activity Measurement (Excluding Workouts)
This section describes the measurement operations for running and other
activities that are mainly performed outdoors.
For details about Workouts measurement, see “Activity Measurement
(Workouts)”.
Starting, Pausing, and Stopping an Activity Measurement
Starting an Activity Measurement Operation
Note
●
Display of the “DIGITAL” watch face is recommended when performing
step 1 of the procedure below.
●
Regardless of the type of watch face you have displayed, starting an
activity measurement operation switches to the “DIGITAL” activity
measurement in progress screen.
EN-63
Page 65

1. While a watch face is displayed, press the START button
(upper button).
●
This displays the activity measurement START screen, which shows
the currently selected activity.
●
To change the sports activity, go to step 2. To start measurement using
the currently selected sports activity, advance to step 4 of this
procedure.
2. Press the APP button (lower button) to display the
activity selection screen.
3. Swipe the screen up or down until you find the activity
you want, and then tap it.
EN-64
Page 66

4. To start measurement, press the START button.
●
If you are using an activity that records location information, the
message “Location info being acquired...” appears at this time. Move
outdoors to a location with an unobstructed view of the sky and wait
there without moving until location information can be acquired.
●
If a countdown appears, start the workout when the countdown reaches
zero. If you want to start without waiting until the countdown reaches
zero, press the START button.
●
For some activities (such as Skiing), the following message appears on
the display: “Standing by. To restart recording, press the GO button.”.
In this case, you can start measurement by pressing the START button.
●
When the measurement starts, the watch transitions to the “DIGITAL”
watch face’s activity measurement in progress screen.
For information about the screen items, see “Activity Measurement in
Progress Screen”.
EN-65
Example screen when “Running” is selected
Page 67

To pause or stop activity measurement
1. To pause a measurement operation, display the Activity
measurement in progress screen and then press the
START button (upper button).
●
This pauses measurement and displays the measurement paused
screen.
●
To restart measurement, press the START button.
2. To quit measurement, hold down the APP button (lower
button) for about two seconds.
3. This displays the message “Save history?”. Tap “Save
(upper button)” or press the START button.
●
To discard the measurement history, tap “Discard (lower button)” or
press the APP button.
●
Tapping “Save (upper button)” performs the save operation and then
displays the stats screen. You can scroll the stats screen contents by
swiping up or down.
●
To view saved statistical data later, select the CASIO's APPS option of
“History”.
Note
●
Changing the “Location Recording Frequency” setting from “MAX
(Every second)” (initial default) to “MID (Every 5 seconds)” or “LOW
(Every 120 seconds)” reduces battery power consumption, but it also
reduces the accuracy of various measurements, and disables Auto
Pause and other functions.
EN-66
Page 68

Activity Measurement in Progress Screen
A
B
C
D
This section explains how to interpret the contents of the activity
measurement screen. The “Running” screen is used as an example for this
explanation.
Example screen when “Running” is selected
A
The 10 segments of this ring represent 100% of your personal best
pace based on your history of past runs (10% each). The initial
default setting for the personal best pace is 4:00 minutes per
kilometer. As you run, segments are displayed to show what
percentage of your personal best your current pace is.
The items below are displayed near the ring.
●
PACE: Your current pace
●
MAX: You maximum pace measured so far
●
AVG: Your current measured average pace
B
Shows your Heart Rate. See “Heart Rate” under “Middle display
area example”.
C
Shows the current time, day of the week, and date.
D
A map around your current location and a track of your movements
are displayed as the background.
EN-67
Page 69

Activity Measurement (Workouts)
To ensure acquisition of effective Workouts measurements and recorded
data, determine your own personal training amounts and the goals for each
sports activity, and input the information on the watch.
Example:
Push ups
Reps: 20 Sets: 3
Interval between sets: 1 minute
Sit ups
Reps: 40 Sets: 3
Interval between sets: 1 minute
Planks
Hold Time: 30 seconds Sets: 3
Interval between sets: 30 seconds
EN-68
Page 70

Inputting Training Amounts, Goals, and Other Data on
Your Watch
Note
●
Display of the “DIGITAL” watch face is recommended when performing
step 1 of the procedure below.
●
Regardless of the type of watch face you have displayed, starting an
activity measurement operation switches to the “DIGITAL” activity
measurement in progress screen.
1. While a watch face is displayed, press the START button
(upper button).
●
This displays the activity measurement START screen, which shows
the currently selected activity.
2. Press the APP button (lower button) to display the
activity selection screen, and then tap “Workouts”.
3. On the workout activity selection screen, tap the item
whose training volume, goal, or other information you
want to input.
●
This returns to the activity measurement START screen, which shows
the activity you tapped.
●
If you swipe the screen from bottom to top here, the setting menu for
the displayed sports activity will appear. For details about menus, see
“Activity Measurement Setting Menu”.
EN-69
Page 71

4. Swipe the screen from bottom to top. On the menu that
appears, tap “Settings”.
●
This displays a setting menu in accordance with the workout activity
you selected in step 3.
5. Enter each of the setting items as required by the
workout activity.
●
The setting items that need to be input depend on the selected workout
activity.
6. After entering all the required items, perform the steps
below to return to the START screen.
1. Swipe the setting menu screen from left to right to return to the menu
screen displayed in step 4 of this procedure.
2. Swipe the screen from top to bottom.
7. If you want to enter information for another workout
activity, repeat steps 2 through 6 of this procedure.
EN-70
Page 72

Performing Measurements According to the Workouts
Type
The operations you need to perform when performing Workouts
measurements are slightly different depending on whether you are
performing strength training, Fat Burning training, or Core training. For details
about the Workouts category, see “Inputting Training Amounts, Goals, and
Other Data on Your Watch”.
To start strength training measurement
Note
●
Reps, Sets, Interval settings have an effect on strength training (Push
Ups, sit-ups, Bench Presses, etc.) measurements.
1. While a watch face is displayed, press the START button
(upper button).
2. Press the APP button (lower button) to display the
activity selection screen, and then tap “Workouts”.
●
This displays the workout selection screen for Workouts.
3. Tap the item for which you want to start measurement.
●
This returns to the START screen of the tapped item.
4. To start measurement, press the START button.
●
If you selected the first item for the start of an indoor workout, the
message “Obtaining sensor information” appears. Remain still, with the
watch in close contact with your skin for about 15 seconds.
●
The watch screen shows the Sets, Reps, and Weight settings (when
the workout includes such settings) for a few seconds.
●
Immediately after that, the screen switches to the “DIGITAL” watch face
activity measurement in progress screen, and measurement of the first
set starts. Start Workouts.
EN-71
Page 73

5. After completing the Reps setting, press the START
button.
●
This displays a confirmation screen.
6. On the confirmation screen, select one of the operations
described below.
To save the measurement data of this set and proceed to the next
set:
Tap “Save Sets”. Go to step 7.
To discard the measurement data of this set and proceed to the
next set:
Tap “Discard Sets”. On the confirmation screen that appears, tap the trash
icon and advance to step 7.
To save the measurement data of this set and quit the Workouts:
Tap “Save complete.”. Go to “Following Completion of One Workouts,
Selecting Whether to Continue with the Workouts or to Quit”.
To discard the measurement data of this set and quit the Workouts:
Tap “Discard and stop measurement”. Go to “Following Completion of
One Workouts, Selecting Whether to Continue with the Workouts or to
Quit”.
●
If you press the START button after completing the final set, the only
options that appear are “Save complete.” and “Discard Sets and Exit”.
EN-72
Page 74

7. On the interval screen that appears on the display, wait
until the countdown time reaches zero.
●
For example, if the Interval setting is 30 seconds, the countdown time
is 30 seconds. Take a break until the start of the next set.
●
To resume the Workouts without waiting for the countdown time to
reach zero, press the START button.
●
The countdown time reaching zero or pressing of the START button
causes measurement of the next set to start. Restart Workouts and go
back to step 5 of this procedure.
To start Core training measurement
Note
●
With Core training (Planks, etc.) measurement, the Hold Time, Sets,
and Interval settings affect operation when measurement is performed.
1. While a watch face is displayed, press the START button
(upper button).
2. Press the APP button (lower button) to display the
activity selection screen, and then tap “Workouts”.
●
This displays the workout selection screen for Workouts.
3. Tap the item for which you want to start measurement.
●
This returns to the START screen of the tapped item.
EN-73
Page 75

4. To start measurement, press the START button.
●
If you selected the first item for the start of an indoor workout, the
message “Obtaining sensor information” appears. Remain still, with the
watch in close contact with your skin for about 15 seconds.
●
The watch screen shows the Sets and Hold Time settings for a few
seconds.
●
Immediately after that, the screen switches to the “DIGITAL” watch face
activity measurement in progress screen, and measurement of the first
set starts. At this time, the display shows the countdown time to the Hold
Time that you set. Start Workouts.
5. After the Hold Time elapses and the countdown time
reaches zero, press the START button.
●
This displays a confirmation screen.
6. On the confirmation screen, select one of the operations
described below.
To save the measurement data of this set and proceed to the next
set:
Tap “Save Sets”. Go to step 7.
To discard the measurement data of this set and proceed to the
next set:
Tap “Discard Sets”. On the confirmation screen that appears, tap the trash
icon and advance to step 7.
To save the measurement data of this set and quit the Workouts:
Tap “Save complete.”. Go to “Following Completion of One Workouts,
Selecting Whether to Continue with the Workouts or to Quit”.
To discard the measurement data of this set and quit the Workouts:
Tap “Discard and stop measurement”. Go to “Following Completion of
One Workouts, Selecting Whether to Continue with the Workouts or to
Quit”.
●
If you press the START button after completing the final set, the only
options that appear are “Save complete.” and “Discard Sets and Exit”.
EN-74
Page 76

7. On the interval screen that appears on the display, wait
until the countdown time reaches zero.
●
Take a break until the start of the next set.
●
To resume the Workouts without waiting for the countdown time to
reach zero, press the START button.
●
The countdown time reaching zero or pressing of the START button
causes measurement of the next set to start. Restart Workouts and go
back to step 5 of this procedure.
To start Fat Burning training measurement
1. While a watch face is displayed, press the START button
(upper button).
2. Press the APP button (lower button) to display the
activity selection screen, and then tap “Workouts”.
●
This displays the workout selection screen for Workouts.
3. Tap the item for which you want to start measurement.
●
This returns to the START screen of the tapped item.
4. To start measurement, press the START button.
●
If you selected the first item for the start of an indoor workout, the
message “Obtaining sensor information” appears. Remain still, with the
watch in close contact with your skin for about 15 seconds.
●
The watch screen shows the Target Time and Target Calories settings
for a few seconds.
●
Immediately after that, the screen switches to the “DIGITAL” watch face
activity measurement in progress screen, and measurement of the first
set starts. At this time, the screen shows the elapsed time from the start
of measurement. Start Workouts.
EN-75
Page 77

5. To pause a measurement operation, display the Activity
measurement in progress screen and then press the
START button.
●
This pauses measurement and displays the measurement paused
screen.
●
To restart measurement, press the START button.
6. To quit measurement, hold down the APP button for
about two seconds.
●
This displays the running distance input screen.
7. On the running distance input screen, select one of the
operations described below.
To save the running distance and quit:
Input the running distance and then tap “Save the distance and exit”.
To quit without saving the running distance:
Tap “Exit without saving the distance”.
●
This saves measurement data other than the running distance.
To discard current measurement data and quit:
Tap “Discard the record and exit”. On the confirmation screen that
appears, tap the trash can icon.
8. Go to “Following Completion of One Workouts,
Selecting Whether to Continue with the Workouts or to
Quit”.
EN-76
Page 78

Following Completion of One Workouts, Selecting
Whether to Continue with the Workouts or to Quit
The procedure below should be performed after completing a Workouts
by performing the operation under “To start strength training
measurement”, “To start Core training measurement”, or “To start Fat
Burning training measurement”. It cannot be performed as a stand-alone
operation.
1. When the “Way to go!! Continue with another workout?”
message appears, perform one of the operations below.
To continue with another Workouts activity:
Tap “Yes. Continue.”.
●
This returns to the Workouts activity selection screen.
●
Next, select the workout activity you want to start in step 3 of “To start
strength training measurement”, “To start Core training
measurement”, or “To start Fat Burning training measurement”.
To quit Workouts:
Tap “No. Cancel.”.
●
This displays the history save confirmation screen. Tap “Save (upper
button)” or “Discard (lower button)”.
●
This displays a screen of statistics for of all the Workouts you have
completed. You can scroll the stats screen contents by swiping up or
down.
●
To return to the watch face that was displayed before you started
Workouts, press the power button.
●
To view saved statistical data later, select the CASIO's APPS option of
“History”.
EN-77
Page 79

Activity Measurement Setting Menu
Swiping the activity measurement START screen from bottom to top displays
a setup menu for the currently displayed activity.
Menu Item Description
History Displays a history list of activity measurement
Display Using the submenu that appears when you tap this
Download Map Download maps ahead of time while you have
Show map Displays a map using the full display area of the
Import Route This item lets you import route data saved in watch
Settings Displays a submenu that includes various setting
Cancel Cancels activity measurement and returns to the
* Your watch supports use of two types of maps: “Google Maps” and
“Mapbox”. Only Mapbox map data can be downloaded for use. In places
where network communication is possible, perform the following operation
in sequence: “Settings” (above)> “Map App”> “Map Type”. Next select
“Google Maps” or “Mapbox”.
results. The log provides a detailed, optimized view
of each workout activity.
item, you can customize the measurement in
progress display for the currently selected workout
activity.
“Display Item”... Selects the display items for the
upper, middle, and lower display areas.
“Background Image”... Selects a background.
internet connection, to ensure accessibility when
there is no network connection. The watch can have
data for up to five Mapbox* maps in watch memory
at a time.
watch.
memory as activity measurement history or
external route data (GPX or KML files) saved on
Google Drive, and display it as a reference route.
items that are common to all types of sports
activities.
watch face prior to the START screen.
EN-78
Page 80

Changing Screen Items Displayed During Activity Measurement
Since the activity measurement in progress screen is one of the display
formats of the “DIGITAL” watch face, you can use the same operations as
those for the DIGITAL daily screen to change the display items for the upper,
middle, and lower display areas. For information about the procedure, see
“Changing DIGITAL Screen Items”.
Note
●
The display item selection screen that appears when you tap the activity
measurement in progress screen has an on-screen pause button
( ). This is different from the screen that appears when you tap the
daily screen. Tap this button to pause measurement.
EN-79
Page 81

Download Map and Import Route
This section explains the operations below.
●
How to download maps in advance so you can display them even when the
watch is off-line
●
How to import route data for display on a map during an activity
measurement operation
Note
●
Your watch supports use of two types of maps: “Google Maps” and
“Mapbox”. Only Mapbox map data can be downloaded for use.
Download Map
If you are planning to go to a location where there is no net access but you
still want to use maps, you can download Mapbox maps ahead of time while
you still have net access.
EN-80
Page 82

Important!
●
Except when you want to cancel a download operation, do not perform
any watch operation until map downloading is complete. Performing an
operation may stop the download.
●
Map data is dense, so use of a Wi-Fi connection is recommended.
●
Zoom levels are limited while a downloaded map is displayed. The
smaller the area of the map you display in step 4 of the procedure below,
the greater the detail that will be shown when you enlarge the map. In
step 4, specifying the smallest map area you might possibly need is
recommended.
●
The watch can have up to five Mapbox maps in watch memory at a time.
If you attempt to download more map data while there are already five
maps memory, a message will appear prompting you to delete existing
downloaded map data. Delete map data you no longer need and try
downloading the new data again.
1. On the CASIO's APPS screen, tap “Map” to display a
map.
2. Tap the bottom of the screen. On the menu that appears,
tap “Download Map”.
●
This displays a map with your current location in the center.
3. Scroll the map so the location that you want to be in the
center of the map you download is in the center of the
watch screen.
●
You can use the APP button (lower button) to reduce the size of the map
and increase the display area, and then scroll the map on the display.
The area in circle in the center of the screen at this time shows the
maximum downloadable area.
EN-81
Page 83

4. Use the START button (upper button) and APP button
(lower button) to zoom in and out the map so the area
you want to download fills the screen.
●
The area that is displayed at this time is the approximate area that will
be downloaded.
5. Tap “Fix”.
●
This starts map downloading, with the download progress shown on
the display. To cancel the download, tap .
●
The downloaded map will appear on the display after download is
complete.
Changing the Map Type
In an environment where network communication is available, you can
perform the procedures in this section to download maps.
1. On the CASIO's APPS screen, tap “Map” and display a
map.
2. Tap the bottom of the screen. On the menu that appears,
tap the following items in sequence: “Map App” > “Map
Type”.
●
Each tap of “Map Type” toggles between “Google Maps” and
“Mapbox”.
Note
●
Maps displayed while “Mapbox” is selected use geographic information
from OpenStreetMap. OpenStreetMap geographic information can be
freely edited by anyone, which means that information displayed on a
map may not be correct.
●
Immediately following execution of a Download Map operation, the
watch will automatically switch to “Mapbox”.
EN-82
Page 84

Import Route
Use the operations in this section to import route data saved in watch memory
or external route data* saved on Google Drive, and display it as a reference
route during an activity measurement operation. Imported routes are
displayed as gray lines on the map during Activity measurement operations.
* KML and GPX format files are supported. However, depending on how a
file is created, format incompatibilities and import errors may occur.
Note
●
The watch has enough memory to store a single file of route data for
display on a map. The imported route data currently in memory is
overwritten if you import new route data.
To import route data from activity history and display it
on a map
1. On the CASIO's APPS screen, tap “Map” to display a
map.
2. Tap the bottom of the screen. On the menu that appears,
tap the following items in sequence: “Import Route” >
“History”.
●
This displays the activity measurement history list of dates, times, and
activity types.
3. Tap the history record whose route data you want to
import.
●
This displays the map screen for the history record you tapped, with the
route displayed on the map.
●
To import the route data for this map record, go to step 4 of this
procedure. If you want to view data for a different history record, swipe
the screen from bottom to top. On the menu that appears, tap “Return
to Date Selection”.
EN-83
Page 85

4. Swipe the screen from bottom to top. On the menu that
appears, tap “Import Route”> “Import” in sequence.
●
This starts the import operation. The progress of the operation will be
shown on the display. To cancel the import operation, tap .
●
After importing is complete, the watch will display a map screen with
the imported route data.
5. To return from the map to the watch face display, press
the power button.
To import route data to a map from Google Drive
1. On the CASIO's APPS screen, tap “Map” to display a
map.
2. Tap the bottom of the screen. On the menu that appears,
tap the following items in sequence: “Import Route” >
“Google Drive”.
●
This displays the Google Account selection screen.
3. Tap the name of the account you want to use.
●
This will display the file selection screen, which lists the files and folders
stored on Google Drive.
4. Tap the KML file or GPX file you want to import.
●
This displays the following confirmation message: “Browse this data?”.
To return to the file selection screen here, tap “Cancel”.
5. To import the file you tapped, tap “Import”.
●
This starts the import operation. The progress of the operation will be
shown on the display. To cancel the import operation, tap .
●
After importing is complete, the watch will display a map screen with
the imported route data.
6. To return from the map to the watch face display, press
the power button.
EN-84
Page 86

To show or hide route data
Note
●
By default, route data you import is displayed on the map. You can also
hide the route data, if you want. Use “View Routes Display” to toggle
between show and hide.
1. On the CASIO's APPS screen, tap “Map” to display a
map.
2. Tap the bottom of the screen. On the menu that appears,
tap the following items in sequence: “Settings” > “Map
App” > “View Routes Display”.
●
Each tap of “View Routes Display” toggles between “OFF” (hide route
data) and “ON” (show route data).
●
Even if you select “OFF”, the imported route data will remain in watch
memory.
EN-85
Page 87

Using a Different Watch Face
In addition to the watch’s initial default “DIGITAL” watch face, the Wear OS
by Google function can be used to select any one of a number of other
different watch faces. You can add CASIO, Google, and third-party watch
faces.
Important!
●
If you are using a non-CASIO watch face, you cannot return to it
following an activity measurement operation. If you want to return to a
non-CASIO watch face, long-press the screen and then re-select the
watch face .
●
Even if you change to another watch face, the watch face automatically
switches to “DIGITAL” during activity measurement operations.
Changing to Another Watch Face
1. While a watch face is displayed, hold your finger down
in the center of the screen for about two seconds.
●
This displays the watch face list.
2. Swipe the touch screen left or right to scroll though the
available watch faces. When the one you want is
displayed tap it.
●
For example, tap the “2 Layers” CASIO watch face. For details about
“2 Layers”, see “Using the “2 Layers” CASIO Watch Face”.
Note
●
You can tap “See more watch faces” on the watch face list that appears
in step 1 above and install other watch faces.
EN-86
Page 88

Using the “ANALOG” CASIO Watch Face
Current time Background information
The CASIO ANALOG watch face is an analog face that prioritizes readability.
The information displayed by this watch face changes automatically
according to your current location and activity.
ANALOG Screen Items
This screen enhances viewing of the current time, with the automatically
changing information in the background.
Tapping the display causes the background to become easy to view for about
5 seconds.
EN-87
Page 89

Background Information
Not exercising
Exercising
When you are within your
daily activity range
(A)
(B)
Not exercising
Exercising
When you are outside your
daily activity range
(C)
(D)
After you specify your Home Time Zone and “Daily Activity Range*”, the
screen's background information automatically switches in accordance with
your current location and activity.
* The “Daily Activity Range” is the area where you conduct your daily life. You
specify a range by setting a center point, like your home, and the radius of
a circle on a map displayed by the watch.
EN-88
Page 90

Background Information Details
This section explains the background information that changes automatically.
The example screens shown in this section are those that appear when you
tap the display to make the background information easy to view.
Screen (A)
This screen appears when you are not exercising and you are within your
Daily Activity Range. You can use it to check your heart rate, your daily step
count, etc.
Background Information Example
EN-89
Page 91

Screen (B)
While Screen (A) is displayed, continuing to walk, run, ride a bicycle, or
perform some other activity for some preset time causes this screen to
appear. With this screen, heart rate zones and your step count are enlarged,
making them easier to view.
Background Information Example
EN-90
Page 92

Screen (C)
Within Home Time Zone
Outside of Home Time Zone
Background Information Example Background Information Example
This screen appears when you are not exercising and you are outside of the
Daily Activity Range. The background of the watch face changes to a map.
●
If you move outside of your Home Time Zone, the watch display switches
to the current time in your current location, and the current time in your Home
Time Zone is shown in the lower display area.
●
If the time does not switch to the time at your current location, swipe the
watch face downwards. On the setting screen that appears, perform the
following steps: D > “System” > “Date & time”. Next, makes sure that “ON”
is selected for the “Automatic time zone” setting.
EN-91
Page 93

Screen (D)
Within Home Time Zone
Outside of Home Time Zone
Background Information Example Background Information Example
While Screen (C) is displayed, continuing to walk, run, ride a bicycle, or
perform some other activity for some preset time causes this screen to
appear. The background of the watch face change to a map that shows more
details of your current location.
EN-92
Page 94

Using the “2 Layers” CASIO Watch Face
Digital watch face that combines easy-to-read monochrome LCD and a color
LCD. You can customize the information that appears in the upper and lower
display areas of the display. While this watch face is displayed, tapping the
screen will start a manual heart rate measurement operation.
2 Layers Screen Items
With the 2 Layers watch face, you can combine the display information below
as required.
Upper display area: Date, barometric pressure, heart rate
Lower display area: Step count, battery level, altitude, Calories Burned
Display example
(Upper display area: heart rate,
Lower display area: Calories Burned)
The middle display area normally shows the day of the week and current time,
while the outer ring shows the remaining battery charge. For information
about the display during heart rate measurement, see “To measure your heart
rate manually”.
EN-93
Page 95

To change the 2 Layers watch face display items
1. While the “2 Layers” watch face is displayed, hold your
finger down in the center of the touch screen for about
two seconds.
●
This shrinks the watch face and displays D below it.
2. Tap in the following in sequence: D > “Display”.
3. Tap “Upper”. On the menu that appears, tap the item
(Date, Barometer, or Heart Rate) that you want to display
in the Upper display area.
4. Tap “Lower”. On the menu that appears, tap the item
(Steps, Battery Level, Altimeter, or Calories Burned) that
you want to display in the Lower display area.
5. To quit the setting procedure and return to the watch
face display, press the power button.
EN-94
Page 96

To measure your heart rate manually
1. While the “2 Layers” watch face is displayed, tap the
screen.
2. This displays the message “Start heart rate
measurement.”. Tap .
●
This starts a heart rate measurement operation. This returns to the
watch face display, with your heart rate shown in the middle display
area. The outer ring of the display shows your heart rate zone.*
●
Manual heart rate measurement stops automatically after the time you
set for “Manually Measured Heart Rate Time*2” (1 to 3 minutes). To
manually stop heart rate measurement part way through, tap the screen
again. If the message “End heart rate measurement.” appears, tap
.
*1 For this measurement, you need to use the procedure under
“Configuring Initial Default Settings for Heart Rate Measurement” to
enter your birthday, gender, and other profile information.
*2 You can change this setting by tapping the following operation in step
2 of the procedure under “To change the 2 Layers watch face display
items”: D > “Manually Measured Heart Rate Time”.
EN-95
1
Page 97

Reducing Power Consumption (Timepiece)
Timepiece is a watch mode that disables smart functionality and instead
displays minimal information in order to maximize the watch's battery. Only
watch and sensor operations are performed.
Use Timepiece to save power while sleeping, with no network connection,
etc.
Important!
●
With Timepiece, apps, location information, Wi-Fi, and phone linking
(notification reception, etc.) are all disabled.
●
With Timepiece, you will not be able to change any settings related to
the current time and date (time zone auto switching, phone time and
date sync, including summer time adjustment, etc.) To update the time
setting, every couple of days you should quit Timepiece and establish
a connection with a phone.
EN-96
Page 98

Timepiece Screen Items
With the Timepiece watch face, you can combine the display information
below as required.
Upper display area: Date, barometric pressure
Lower display area: Step count, battery level, altitude
(Upper display area: Barometric pressure,
●
The middle display area always shows the current time and day of the week.
The outer ring always shows the remaining battery level.
●
Assigning your step count to the lower display area shorten the battery
operating time.
Display example
Lower display area: Altitude)
EN-97
Page 99

Changing to Timepiece
1. On the CASIO's APPS screen, tap “Timepiece”.
●
This displays the Timepiece start screen.
2. Tap “Settings” and then configure the settings below as
required.
Monochrome
Display
Display Items Tap to display a sub-menu. The sub-menu can be used
Unit Select “Metric” or “Imperial”.
●
After settings are the way you want, swipe the screen from left to right
to return to the Timepiece start screen.
Selects either “Bright” (black text on a white
background) or “Dark” (white text on a black
background).
to select the display items for the upper and lower
display areas of the Timepiece screen.
●
This setting does not appear when TYO (Tokyo) is
selected as your Time Zone.
3. Tap “Start”.
●
This exits Wear OS by Google and transitions to Timepiece.
To quit Timepiece and return to normal function (start up
Wear OS by Google)
Hold down the power button for at least two seconds. This starts up Wear OS
by Google and returns to normal function.
EN-98
Page 100

Reducing Timepiece Altitude and Barometric Pressure Measurement Error
You need to manually correct the altitude and barometric pressure values
displayed by the watch’s Timepiece watch face with accurate elevation and
barometric pressure values in order to minimize reading errors. Use the
operation below to input altitude values based on elevation values from other
sources, and/or barometric pressure values measured using an accurate
barometer.
The procedure below applies when barometric pressure and altitude values
are both displayed on the Timepiece screen. When only one of these two
values is displayed, this procedure affects only the displayed value.
1. While Timepiece is displayed, hold down the START
button (upper button) for at least two seconds.
●
This will cause the “ALTI” (altitude) value in the lower display area to
flash.
2. Use the START button and APP button to increase or
decrease the value as desired.
3. Hold down the START button for at least two seconds.
●
This will cause the “BARO” (barometric pressure) value in the upper
display area to flash.
4. Use the START button and APP button to increase or
decrease the value as desired.
5. Hold down the START button for at least two seconds.
●
This exits the calibration mode and returns to normal operation.
EN-99
 Loading...