

Page 1

Digital Camera
User’s Guide
EN
Thank you for purchasing this CASIO product.
• Before using it, be sure to read the precautions contained in this User’s Guide.
• Keep the User’s Guide in a safe place for future reference.
• For the most up-to-date information about this product, visit the official EXILIM
Website at http://www.exilim.com/
Page 2
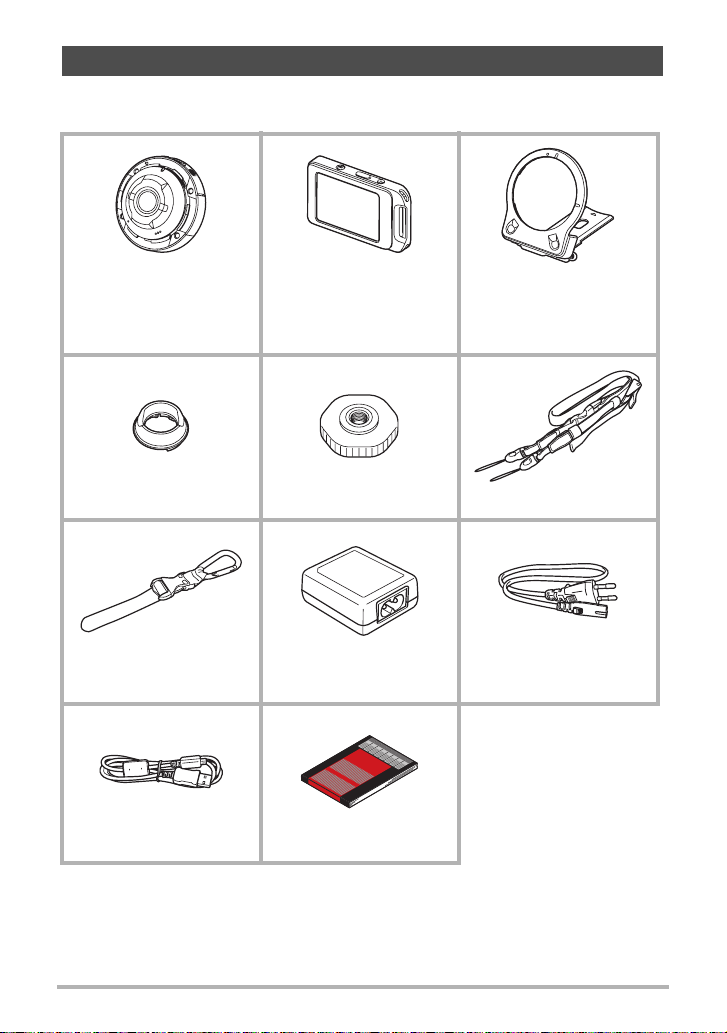
Accessories
As you unpack your camera, check to make sure that all accessories shown below
are included. If anything is missing, contact your original retailer.
Camera
(EX-FR10)
Lens hood Tripod nut Neck strap
Carabiner strap
Micro USB cable Basic Reference
Controller
(EX-FR10CT)
USB-AC adaptor
(AD-C53U)
Hinge Unit
• The hinge unit comes
pre-attached to the
camera.
Power cord*
* A power cord is included with the AD-C53U USB-AC adapter.
2
Page 3

Read this first!
• The contents of this manual are subject to change without notice.
• The contents of this manual have been checked at each step of the production
process. Feel free to contact us if you notice anything that is questionable,
erroneous, etc.
• Any copying of the contents of this User’s Guide, either in part or its entirety, is
forbidden. Except for your own personal use, any other use of the contents of this
manual without the permission of CASIO COMPUTER CO., LTD. is forbidden
under copyright laws.
• CASIO COMPUTER CO., LTD. shall not be held liable for any damages or lost
profits suffered by you or any third party due to the use or malfunction of this
product.
• CASIO COMPUTER CO., LTD. shall not be held liable for any damages, lost
profits, or claims by third parties arising out of the use of EXILIM Link.
• CASIO COMPUTER CO., LTD. shall not be held liable for any damages or lost
profits caused by loss of memory contents due to malfunction, repair, or any other
reason.
• Note that the example screens and product illustrations shown in this User’s Guide
may differ somewhat from the screens and configuration of the actual camera.
LCD Panel
The liquid crystal panel of the monitor screen uses high-precision technology that
provides a pixel yield in excess of 99.99%. This means that some very small number
of pixels may not light or may remain lit at all times. This is due to the characteristics
of the liquid crystal panel, and does not indicate malfunction.
Take test shots
Before shooting your final image, shoot a test shot to ensure that the camera is
recording correctly.
3
Page 4

Contents
Accessories . . . . . . . . . . . . . . . . . . . . . . . . . . . . . . . . . . . . . . . . . . . . . . . . . . . . 2
Read this first! . . . . . . . . . . . . . . . . . . . . . . . . . . . . . . . . . . . . . . . . . . . . . . . . . . 3
General Guide . . . . . . . . . . . . . . . . . . . . . . . . . . . . . . . . . . . . . . . . . . . . . . . . . . 7
Monitor Screen Contents and How to Change Them . . . . . . . . . . . . . . . . . . . . 8
]\
Quick Start Basics 10
What you can do with your CASIO camera . . . . . . . . . . . . . . . . . . . . . . . . . . . 10
Using the Attachment . . . . . . . . . . . . . . . . . . . . . . . . . . . . . . . . . . . . . . . . . . . 12
]
Controller . . . . . . . . . . . . . . . . . . . . . . . . . . . . . . . . . . . . . . . . . . . . . . . . . . . . . . 12
]
Hinge Unit . . . . . . . . . . . . . . . . . . . . . . . . . . . . . . . . . . . . . . . . . . . . . . . . . . . . . . 13
]
Lens hood . . . . . . . . . . . . . . . . . . . . . . . . . . . . . . . . . . . . . . . . . . . . . . . . . . . . . . 14
]
Tripod nut . . . . . . . . . . . . . . . . . . . . . . . . . . . . . . . . . . . . . . . . . . . . . . . . . . . . . . 14
]
Strap . . . . . . . . . . . . . . . . . . . . . . . . . . . . . . . . . . . . . . . . . . . . . . . . . . . . . . . . . . 15
Using the Touch Panel. . . . . . . . . . . . . . . . . . . . . . . . . . . . . . . . . . . . . . . . . . . 17
First, charge the battery prior to use.. . . . . . . . . . . . . . . . . . . . . . . . . . . . . . . . 18
Turning Power On and Off. . . . . . . . . . . . . . . . . . . . . . . . . . . . . . . . . . . . . . . . 24
]
Camera-Controller Wireless Connection (Bluetooth) . . . . . . . . . . . . . . . . . . . . . 26
Configuring Basic Settings the First Time You Turn On the Camera. . . . . . . . 26
Preparing a Memory Card . . . . . . . . . . . . . . . . . . . . . . . . . . . . . . . . . . . . . . . . 28
]
Supported Memory Cards. . . . . . . . . . . . . . . . . . . . . . . . . . . . . . . . . . . . . . . . . . 28
]
To load a memory card . . . . . . . . . . . . . . . . . . . . . . . . . . . . . . . . . . . . . . . . . . . . 29
]
To format (initialize) a new memory card . . . . . . . . . . . . . . . . . . . . . . . . . . . . . . 30
Shooting a Snapshot . . . . . . . . . . . . . . . . . . . . . . . . . . . . (Premium Auto) . . 31
Snapshot Shooting Precautions . . . . . . . . . . . . . . . . . . . . . . . . . . . . . . . . . . . 32
]\
Recording Images 33
REC Mode Screen. . . . . . . . . . . . . . . . . . . . . . . . . . . . . . . . . . . . . . . . . . . . . . 33
Shooting Multiple Images at a specified Interval . . . . (Interval Snapshot) . . 34
Self-shooting . . . . . . . . . . . . . . . . . . . . . . . . . . . . . . . . . . . . . . . . . .(Mirror) . . 36
Changing the Recording Mode . . . . . . . . . . . . . . . . . . . . . . . . . . . . . . . . . . . . 37
Using the Self-timer . . . . . . . . . . . . . . . . . . . . . . . . . . . . . . . . . (Self-timer) . . 38
Shooting with Zoom . . . . . . . . . . . . . . . . . . . . . . . . . . . . . . . . . . . . . . . . . . . . . 39
Recording a Movie. . . . . . . . . . . . . . . . . . . . . . . . . . . . . . . . . . . . . . . . . . . . . . 40
]\
Advanced Recording Settings 42
Recording Beautiful Portraits . . . . . . . . . . . . . . . . . . . . . . . . . . (Make-up) . . 43
Using Touch Shutter . . . . . . . . . . . . . . . . . . . . . . . . . . . . . (Touch Shutter) . . 43
Changing the Image Size . . . . . . . . . . . . . . . . . . . . . . . . . . . (Image Size) . . 43
Specifying the Maximum Movie Recording Time . . (Max Recording Time) . . 44
Shooting with Brightness Compensation . . . . . . . . . . . . . . . . . . (EV Shift) . . 45
Adjusting Hue when Shooting . . . . . . . . . . . . . . . . . . . . . . (White Balance) . . 46
Enabling Auto Rotation of Images to
Match Camera Orientation . . . . . . . . . . . . . . . . . . . . . . . . . . (Auto Rotate) . . 47
4
Contents
Page 5

]\
Viewing Snapshots and Movies 48
Play Mode Screen . . . . . . . . . . . . . . . . . . . . . . . . . . . . . . . . . . . . . . . . . . . . . . 48
Viewing Snapshots . . . . . . . . . . . . . . . . . . . . . . . . . . . . . . . . . . . . . . . . . . . . . 49
Viewing a Movie. . . . . . . . . . . . . . . . . . . . . . . . . . . . . . . . . . . . . . . . . . . . . . . . 50
Deleting Snapshots and Movies . . . . . . . . . . . . . . . . . . . . . . . . . . . . . . . . . . . 50
Zooming an On-screen Image . . . . . . . . . . . . . . . . . . . . . . . . . . . . . . . . . . . . . 51
Viewing the Image Menu . . . . . . . . . . . . . . . . . . . . . . . . . . . . . . . . . . . . . . . . . 52
Rotating an Image (Rotation). . . . . . . . . . . . . . . . . . . . . . . . . . . . . . . . . . . . . . 52
Creating a Collage of a Day’s Snapshots . . . . . . . . . . . . (Highlight Photo) . . 53
Creating a Movie of a Day’s Images . . . . . . . . . . . . . . . . (Highlight Movie) . . 54
Changing the Highlight Score of an Image . . . . . . . . . . . . . . . . . . . . . . . . . . . 55
]\
Connecting the Camera with a Smartphone
(Wireless LAN) 56
Controlling Your Camera with a Connected Smartphone . . . . . . . . . . . . . . . . 56
Establishing a Connection between a Smartphone and Your Camera . . . . . . 57
]
Installing the EXILIM Link App on Your Smartphone . . . . . . . . . . . . . . . . . . . . . 57
]
Configuring Wireless LAN Settings. . . . . . . . . . . . . . . . . . . . . . . . . . . . . . . . . . . 58
Using a Smartphone as a Camera Remote Controller . . . . . . . . . . . . . . . . . . 59
Sending a Snapshot or Movie File from Camera Memory to a Smartphone . . 60
Changing the Camera SSID and Password . . . . . . . . . . . . . . . . . . . . . . . . . . 61
]\
Other Settings (Set Up) 63
Configuring Camera Sound Settings . . . . . . . . . . . . . . . (Camera Sound) . . 63
Using the Vibration Function . . . . . . . . . . . . . . . . . . . . . . . . . . . (Vibration) . . 63
Controller Startup Using a Flick Operation . . . . . . . . . . . . . . . (Flick Start) . . 63
Setting the Camera’s Clock . . . . . . . . . . . . . . . . . . . . . . . . . . . . . (Adjust) . . 64
Specifying the Date Style . . . . . . . . . . . . . . . . . . . . . . . . . . . . (Date Style) . . 64
Specifying the Display Language . . . . . . . . . . . . . . . . . . . . . . (Language) . . 65
Formatting Built-in Memory or a Memory Card . . . . . . . . . . . . . . . (Format) . . 65
Resetting the Camera to Factory Defaults . . . . . . . . . . . . . . . . . . . (Reset) . . 66
]\
Printing 67
Printing with a Computer . . . . . . . . . . . . . . . . . . . . . . . . . . . . . . . . . . . . . . . . . 68
]\
Using the Camera with a Computer 69
Things you can do using a computer... . . . . . . . . . . . . . . . . . . . . . . . . . . . . . . 69
Using the Camera with a Windows Computer . . . . . . . . . . . . . . . . . . . . . . . . . 69
]
Viewing and Storing Images on a Computer. . . . . . . . . . . . . . . . . . . . . . . . . . . . 70
]
Playing Movies . . . . . . . . . . . . . . . . . . . . . . . . . . . . . . . . . . . . . . . . . . . . . . . . . . 72
Using the Camera with a Macintosh . . . . . . . . . . . . . . . . . . . . . . . . . . . . . . . . 73
]
Connecting the Camera to Your Computer and Saving Files . . . . . . . . . . . . . . . 73
]
Playing a Movie. . . . . . . . . . . . . . . . . . . . . . . . . . . . . . . . . . . . . . . . . . . . . . . . . . 75
5
Contents
Page 6

Files and Folders . . . . . . . . . . . . . . . . . . . . . . . . . . . . . . . . . . . . . . . . . . . . . . . 76
Memory Card Data . . . . . . . . . . . . . . . . . . . . . . . . . . . . . . . . . . . . . . . . . . . . . 76
]\
Appendix 78
Safety Precautions. . . . . . . . . . . . . . . . . . . . . . . . . . . . . . . . . . . . . . . . . . . . . . 78
Shock resistant, Waterproof, Dustproof. . . . . . . . . . . . . . . . . . . . . . . . . . . . . . 85
Precautions During Use. . . . . . . . . . . . . . . . . . . . . . . . . . . . . . . . . . . . . . . . . . 89
Power Supply. . . . . . . . . . . . . . . . . . . . . . . . . . . . . . . . . . . . . . . . . . . . . . . . . . 93
]
Charging . . . . . . . . . . . . . . . . . . . . . . . . . . . . . . . . . . . . . . . . . . . . . . . . . . . . . . . 93
]
Battery Precautions. . . . . . . . . . . . . . . . . . . . . . . . . . . . . . . . . . . . . . . . . . . . . . . 94
]
Using the Camera in another Country . . . . . . . . . . . . . . . . . . . . . . . . . . . . . . . . 94
Disposing of the Camera . . . . . . . . . . . . . . . . . . . . . . . . . . . . . . . . . . . . . . . . . 95
Using a Memory Card . . . . . . . . . . . . . . . . . . . . . . . . . . . . . . . . . . . . . . . . . . . 98
Reset Initial Default Settings . . . . . . . . . . . . . . . . . . . . . . . . . . . . . . . . . . . . . . 99
When things don’t go right... . . . . . . . . . . . . . . . . . . . . . . . . . . . . . . . . . . . . . 100
]
Troubleshooting . . . . . . . . . . . . . . . . . . . . . . . . . . . . . . . . . . . . . . . . . . . . . . . . 100
]
Display Messages. . . . . . . . . . . . . . . . . . . . . . . . . . . . . . . . . . . . . . . . . . . . . . . 104
Number of Snapshots/Movie Recording Time . . . . . . . . . . . . . . . . . . . . . . . . 106
Specifications. . . . . . . . . . . . . . . . . . . . . . . . . . . . . . . . . . . . . . . . . . . . . . . . . 107
6
Contents
Page 7

General Guide
The numbers in parentheses indicate the pages where each item is explained.
CameraController
bp 1 234
bq
cl
cm cn co 9 bk blcpck
bo bn bm
bt
Camera
[USB] cover
1
(pages 18, 20)
USB port
2
(pages 18, 20, 70, 74)
[FREE] lever (page 13)
3
[0] (Movie) (page 40)
4
Shutter button (page 31)
5
Operation lamp
6
(pages 16, 19, 22)
Lens (page 16)
7
Microphone
8
(pages 16, 41)
Speaker
9
Reset button (page 100)
bk
5678brbs
[p] (Power) (page 24)
bl
Memory card slot
bm
(page 29)
[CARD] cover (page 29)
bn
Strap holes (page 15)
bo
Controller
[USB] cover
bp
(pages 18, 20)
[RELEASE] button
bq
(page 12)
Reset button
br
(page 100)
USB port
bs
(pages 18, 20)
Carabiner strap
bt
attachment bar
(page 15)
Strap holes (page 15)
ck
[0] (Movie) (page 40)
cl
Shutter button
cm
(page 31)
Operation lamp
cn
(pages 19, 22)
[p] (Power) (page 24)
co
Hinge unit slot
cp
(page 12)
7
Page 8

Monitor Screen Contents and How to Change Them
The monitor screen uses various indicators, icons, and values to keep you informed
of the camera’s status.
• The sample screens in this section are intended to show you the locations of all the
indicators and figures that can appear on the monitor screen in various modes.
They do not represent screens that actually appear on the camera.
. Snapshot Recording
Zoom icon (page 39)
12 3
bp
bo
bn
bm
bl
89bk
. Movie Recording
1
Snapshot capacity (number of shots)
2
4
(page 106)
Snapshot image size (page 43)
3
5
Information icon (page 9)
4
Movie quality (page 40)
5
6
Movie capacity (recording time) (page 106)
6
PLAY mode icon (pages 25, 49)
7
7
Date/Time (pages 26, 64)
8
Camera battery level indicator (page 23)
9
Controller battery level indicator (page 23)
bk
Home icon (page 33)
bl
Recording mode (page 37)
bm
White balance (page 46)
bn
Exposure compensation (page 45)
bo
Digital zoom (page 39)
bp
Movie Recording time (page 40)
1
Time set with “Max Recording Time”
2
(page 40)
12
8
Page 9
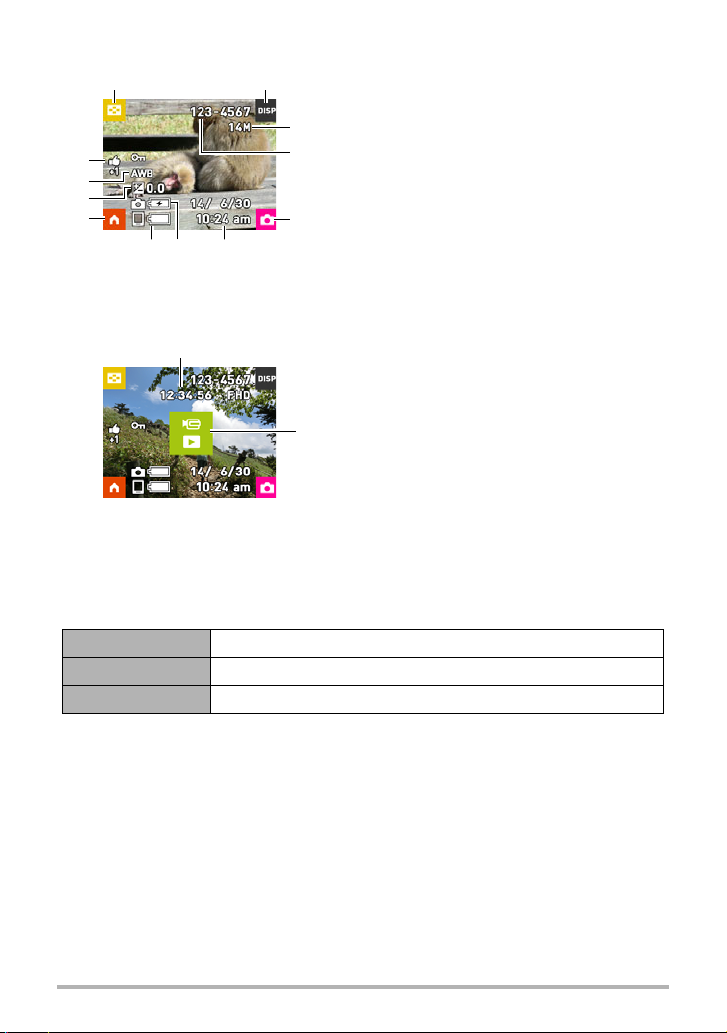
. Snapshot Viewing
1 2
bm
bl
bk
9
. Movie Playback
1
Image menu icon (p
1
Information icon (page 9)
2
Snapshot image size (page 43)
3
3
Folder name/file name (page 76)
4
REC mode icon (page 25)
5
4
Date/time (pages 26, 64)
6
Camera battery level indicator (page 23)
7
Controller battery level indicator (page 23)
8
5
Home icon (page 48)
9
68 7
Exposure compensation (page 45)
bk
White balance (page 46)
bl
Highlight Score (page 55)
bm
Movie recording time (page 50)
1
“6”
Movie play ico
2
age 52)
n (page 50)
2
. Selecting Display Information (DISP)
Each touch of “DISP” will cycle through settings that display or hide on-screen
information. You can configure separate settings for the REC mode and PLAY mode.
• Display information cannot be changed during movie recording.
Off No information displayed.
Information On Shows information about image settings, etc.
Status On Shows more detailed information about settings.
9
Page 10

Quick Start Basics
What you can do with your CASIO camera
Your CASIO camera is packed with a powerful selection of features and functions to
make recording of digital images easier, including the following main functions.
. Shooting
A variety of shooting styles
The camera connects to the controller using Bluetooth®
wireless technology (Bluetooth).
You can hang it from your neck, mount it on a tripod, and select
the shooting style that suits current conditions. The camera can
also be rotated 90 degrees, which means you can change the
orientation of a snapshot with little repositioning the camera.
*See page 12 for more information.
Interval Snapshot
Shoot snapshots and/or movies at fixed intervals. It’s a
great way to chronicle a day’s activities or changes
over time.
*See page 34 for more information.
ART SHOT
A variety of artistic effects help to make even common,
ordinary subjects become more novel and exciting.
*See page 37 for more information.
10
Quick Start Basics
Page 11

. Viewing
. Sharing
Highlight Photo
You can configure camera settings to automatically
select snapshot highlights and generate a collage of
them each day.
*See page 53 for more information.
Highlight Movie
You can configure camera settings to automatically
select snapshot and movie highlights, and create a
movie of them each day.
*See page 54 for more information.
Wireless LAN Connection
Turns your smartphone into a camera remote
controller and allows you to select one or more
snapshot and/or movie file in camera memory and
send a copy to a smartphone.
*See page 56 for more information.
11
Quick Start Basics
Page 12

Using the Attachment
You can configure the camera to suit your specific needs by attaching the hinge unit,
which enables attachment of the controller, and other included and optionally
available attachments. This way you can configure the camera to suit your specific
needs.
IMPORTANT!
• Do not apply strong pressure to the surface of the monitor screen. Doing so can
damage it.
• Never touch the lens with your fingers. Finger smudges, dirt, and other foreign
matter on the lens can interfere with proper operation of the camera. Use a blower
or other means to keep the lens and flash window free of dirt and dust, and wipe
gently with a soft, dry cloth.
Controller
You can attach the controller to the camera and use the camera as a normal camera.
. To attach the controller
1. With the camera lens pointed in the
same direction as the controller’s
monitor screen, slide the hinge unit into
the controller’s hinge unit slot.
2. Push the hinge unit in until you hear it
click into place.
Hinge unit slot
. To detach the controller
1. While holding down the controller’s
[RELEASE] button, pull it out of the
camera.
12
[RELEASE] button
Quick Start Basics
Page 13

Hinge Unit
. To use the hinge unit as a stand
. To change the shooting direction by 90 degrees
1. While pulling down on the camera’s [FREE]
lever, rotate the camera clockwise 90 degrees
until you hear a click.
• The white lines on the lens ring indicate the
horizontal orientation of the camera.
. To remove the hinge unit from the camera
1. While pulling down on the camera’s [FREE]
lever, rotate the camera counterclockwise
about 15 degrees until its operation lamp is
aligned with the A mark on the hinge unit.
White lines
A
2. Remove the hinge unit from the camera.
13
[FREE] lever
Quick Start Basics
Page 14

. To attach the hinge unit to the camera
1. Align the camera’s operation lamp with
the A mark on the hinge unit.
2. Rotate the camera clockwise about
15 degrees until its operation lamp is aligned
with the B mark on the hinge unit.
Lens hood
If unwanted light is shining on the lens, rotate Lens ring
counterclockwise to detach it, and then attach a lens
hood.
Tripod nut
1. Use the tripod nut to secure a tripod to the
hinge unit.
A
Detach
B
Attach
14
Quick Start Basics
Page 15
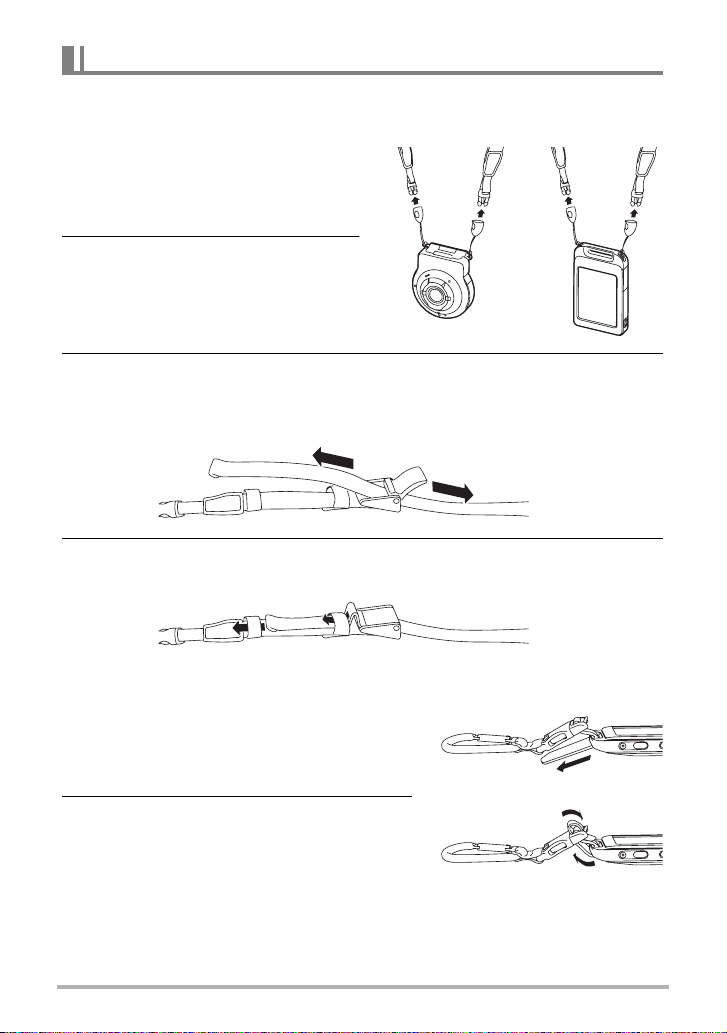
Strap
. Neck Strap
The neck strap can be attached to the camera or the controller.
1. Remove the buckles from the
strap and attach the strap to the
two strap holes on the camera
or controller.
2. Replace the buckles.
3. Use the adjusters to adjust the strap length and then fix the adjusters
on place.
Shorter
Longer
4. Pass the ends of the strap through the bands.
. Carabiner Strap
1. Pass the carabiner strap belt around
the controller’s carabiner strap
attachment bar.
2. Pass the belt through the buckle to
secure it.
15
Quick Start Basics
Page 16

NOTE
• When shooting hold the camera still. Carefully press the shutter button and take
care to avoid all movement as the shutter releases and for a few moments after it
releases.
• Take care that your fingers and the strap do not cover
any of the areas indicated in the illustration.
Operation lamp
• Never swing the camera around by its strap.
• The supplied strap is intended for use with this
camera only. Never use it for any other purpose.
Microphone
Lens
16
Quick Start Basics
Page 17
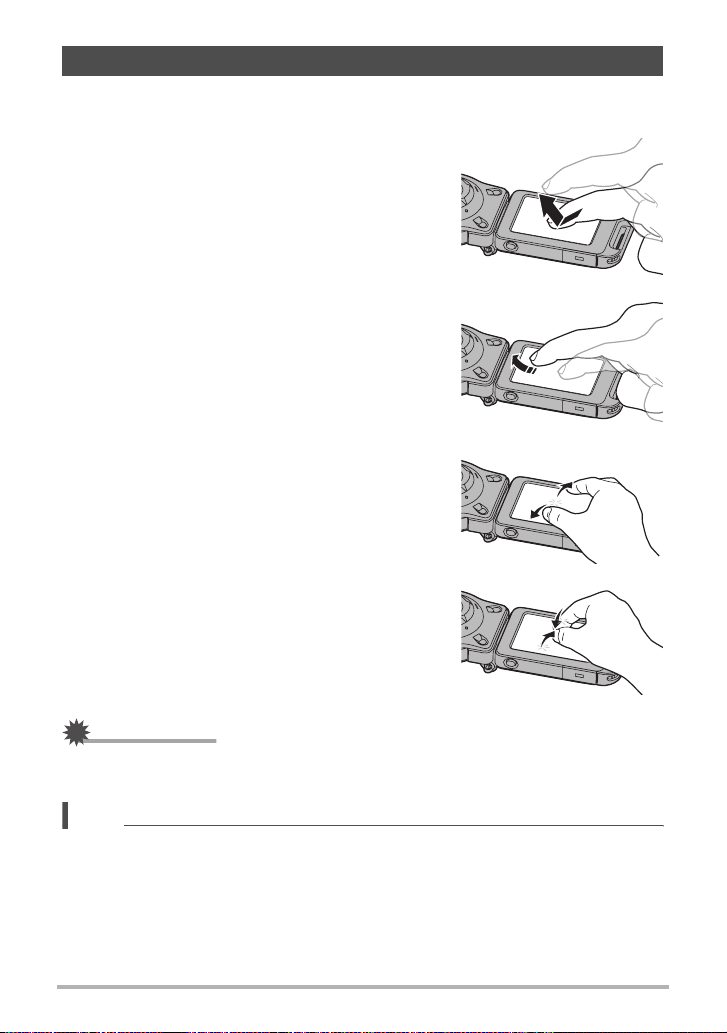
Using the Touch Panel
The monitor screen of the camera is a touch panel. This means you can perform the
following operations by touching the screen with your fingers.
Touch
Momentarily touching the screen with your finger.
Touch the screen to select an icon or menu item, and
to configure settings.
Flick
Holding your finger against the screen as you flick it
up, down, left, or right.
Use flick to scroll forward through images.
Spread
Holding your thumb and forefinger against the screen
as you spread them out.
Use spread to enlarge the screen image.
Squeeze
Holding your thumb and forefinger against the screen
as you bring them together.
Use squeeze to reduce the size of the screen image,
and to display multiple images.
IMPORTANT!
• Never use a pointed or hard object to perform screen operations. Doing so can
damage the screen.
NOTE
• Applying a commercially available LCD protective sheet will reduce the operation
sensitivity of the monitor screen.
17
Quick Start Basics
Page 18
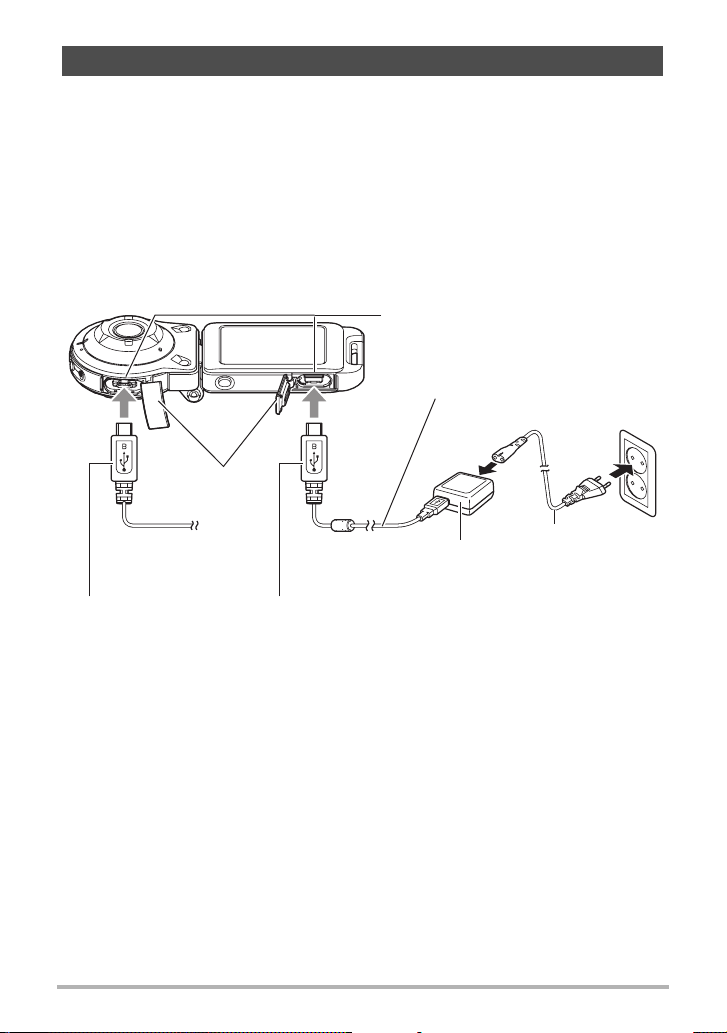
First, charge the battery prior to use.
The camera and the controller each have a built-in rechargeable lithium ion battery.
The batteries are not charged when you purchase the camera, so you will need to
charge both the camera and controller before using them.
You can use either of the two following methods to charge the batteries.
• USB-AC adaptor
• USB connection to a computer
. To charge with the USB-AC adaptor
While the camera and controller are turned off, connect in the sequence shown
below.
Charging time: Approximately XXX minutes
[USB] port
Micro USB cable
(included with camera)
33
[USB] cover
When plugging in the connectors, orient this marking as described below.
Camera : Towards the lens side
Controller: Towards the monitor screen side
• When disconnecting the USB-AC adaptor from the camera, be sure to disconnect
from the camera first.
1
USB-AC adaptor
(AD-C53U)
18
2
3
Power cord
Quick Start Basics
Page 19

IMPORTANT!
• A battery that has not been used for a long time, or ambient temperature extremes
can cause charging to take longer than normal. If charging takes longer than about
five hours, a timer will terminate it automatically, even if the battery is not fully
charged. This is indicated by the operation lamp flashing red. If the battery has not
been used for a very long time, charging of the controller may stop after about
60 minutes or charging of the camera may stop after about 40 minutes. In both
cases, the operation lamp will flash red. In either case, disconnect the USB cable
from the camera or controller and then reconnect it to resume charging.
• Turning on the camera or controller while it is being charged with the USB-AC
adapter results in one of the conditions described below.
Camera:
The camera will start up, using power from the USB-AC adaptor as its power
supply. Charging of the camera will stop, but will resume if the camera enters the
sleep mode.
Controller:
Charging continues and the controller turns on.
• The USB-AC adaptor will become warm during charging. This is normal and does
not indicate malfunction.
• The shape of the power plug depends on each country or geographic area.
Operation lamp Operation
Lamp Status Description
Operation lamp
Lit Red
(Slowly flashing red
Charging
and orange)
Flashing Red
(Quickly flashing red
and green)
Abnormal ambient temperature, USB-AC
adaptor problem, or battery problem (page
93), or charging terminated by the timer
Off (Flashing Green) Charging complete
• The information in parentheses in the above table shows the lamp status while the
camera and controller are in the sleep mode.
The operation lamp always initially light after charging starts. Even if the battery is
already fully charged, the lamp will light momentarily.
If the lamp does not light, check the orientation of the USB cable connector.
19
Quick Start Basics
Page 20

• Make sure that you insert the cable connector into the USB port until you feel it
click securely into place. Failure to insert the connector fully can result in poor
communication or malfunction.
• Note that even while the connector is fully inserted, you
still will be able to see the metal part of the connector as
shown in the illustration.
. To charge using a USB connection to a computer
While the camera and controller are turned off, connect in the sequence shown below
).
(
1, 2
[USB] port
USB port
Computer
(power turned on)
USB
11
[USB] cover
When plugging in the connectors, orient this marking as described below.
Camera : Towards the lens side
Controller: Towards the monitor screen side
• If the camera or controller is on, hold down [p] (Power) to turn it off before
connecting it to your computer.
Charging time: Approximately XXX minutes
Micro USB cable
(included with camera)
20
2
Quick Start Basics
Page 21

IMPORTANT!
• The first time you connect the camera or controller to your computer with the USB
cable, an error message may appear on your computer. If this happens, disconnect
and then reconnect the USB cable.
• A battery that has not been used for a long time, certain types of computers, and
connection conditions can cause charging to take more than approximately five
hours, which will trigger a timer that terminates charging automatically, even if the
battery is not fully charged. If this happens, disconnect and then reconnect the
USB cable to restart charging. To complete charging faster, use of the included
USB-AC adaptor is recommended.
• If the battery has not been used for a very long time, charging of the controller may
stop after about 60 minutes or charging of the camera may stop after about
40 minutes. In both cases, the operation lamp will flash red. In either case, use of
the USB-AC adaptor that comes with the camera is recommended.
• Turning on the camera or controller while it is being charged by a computer results
in one of the conditions described below. Though charging normally should
continue, certain types of computers or connection environments may stop
charging if supply power is low. This will be indicated by the camera’s operation
lamp lighting green.
Camera:
Charging continues, and a USB connection will be established between computer
and camera.
Controller:
Charging continues and the controller turns on.
• Charging is not performed while the connected computer is in the hibernate mode.
21
Quick Start Basics
Page 22
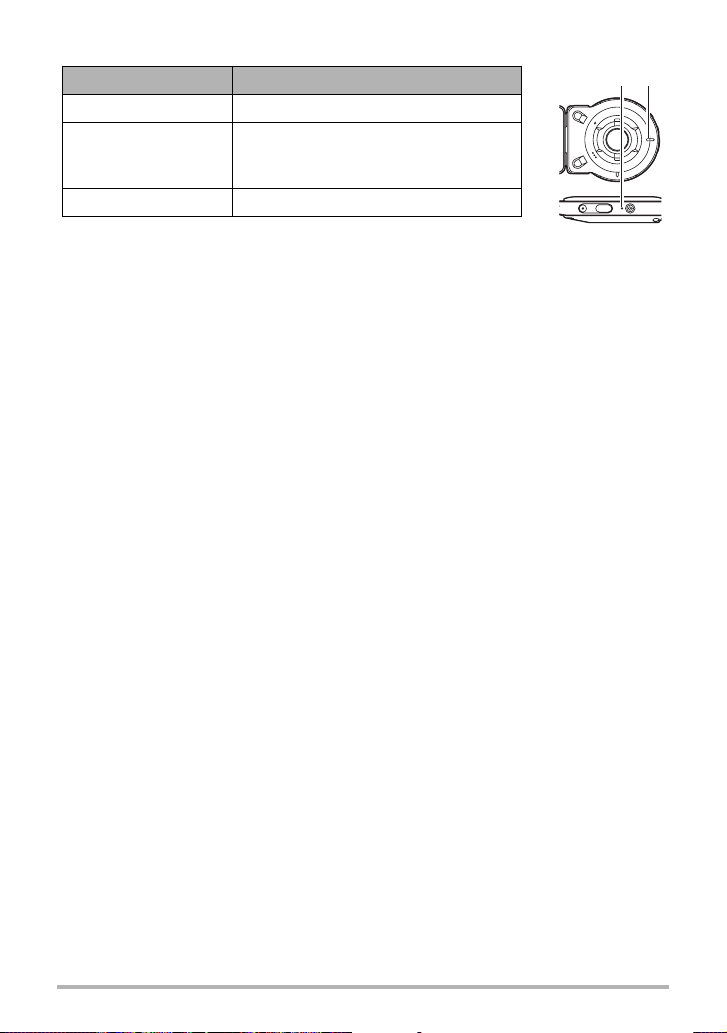
Operation lamp Operation
Lamp Status Description
Operation lamp
Lit Red, (Lit Amber) Charging
Flashing Red
(Quickly flashing red
and green)
Abnormal ambient temperature,
charging taking abnormally long, or
battery problem (page 93)
Off, (Lit Green) Charging complete
• The information in parentheses in the above table shows the
lamp status while the camera and controller are turned on during charging.
Other Charging Precautions
• With the two charging methods described above, you can charge the batteries.
Never use any other type of charger device. Attempting to use a different charger
can result in unexpected accident.
• This model can be charged only via from USB 2.0 specification USB port only.
• USB charging devices and power supply devices are subject to fixed standards.
Use of an inferior device or a device that is not up to standard can cause
malfunction and/or failure of your camera.
• Operation is not guaranteed in the case of a computer built or modified by you.
Even in the case of a commercially available computer, certain USB port
specifications may make it impossible to charge via the USB cable.
• A battery that is still warm immediately after normal use may not charge fully. Give
the battery time to cool before charging it.
• A battery discharges slightly while it is loaded in the camera or controller. Because
of this, it is recommended that you charge the battery immediately before you need
to use it.
• Charging the battery may cause interference with TV and radio reception. If this
happens, plug the USB-AC adaptor into an outlet that is further away from the TV
or radio.
• Actual charging time depends on current battery capacity and charging conditions.
• Do not use the USB-AC adaptor with any other device.
• Never use the power cord with another device.
• Use only the USB-AC adaptor and USB cable specified in this manual for charging.
Use of any other type of devices may result in improper charging.
22
Quick Start Basics
Page 23

Checking the Current Battery Level
As battery power is consumed, a battery indicator on the monitor screen indicates its
current level as shown below.
Level High Low
Battery
Indicator
Camera ***
Controller ***
Indicator Color White * White * Red * Red
indicates battery power is low. Charge the battery as soon as possible.
Recording is not possible when is indicated. Charge the battery immediately.
• The level shown by the battery indicator may change when you switch between the
REC mode and PLAY mode.
• Leaving the camera for about 30 days with no power supplied while the battery is
dead will cause its date and time settings to be cleared. A message telling you to
configure time and date settings will appear the next time you turn on the camera
after restoring power. When this happens, configure date and time settings (page
64).
• See page 109 for information about battery life and number of shots.
23
Quick Start Basics
Page 24
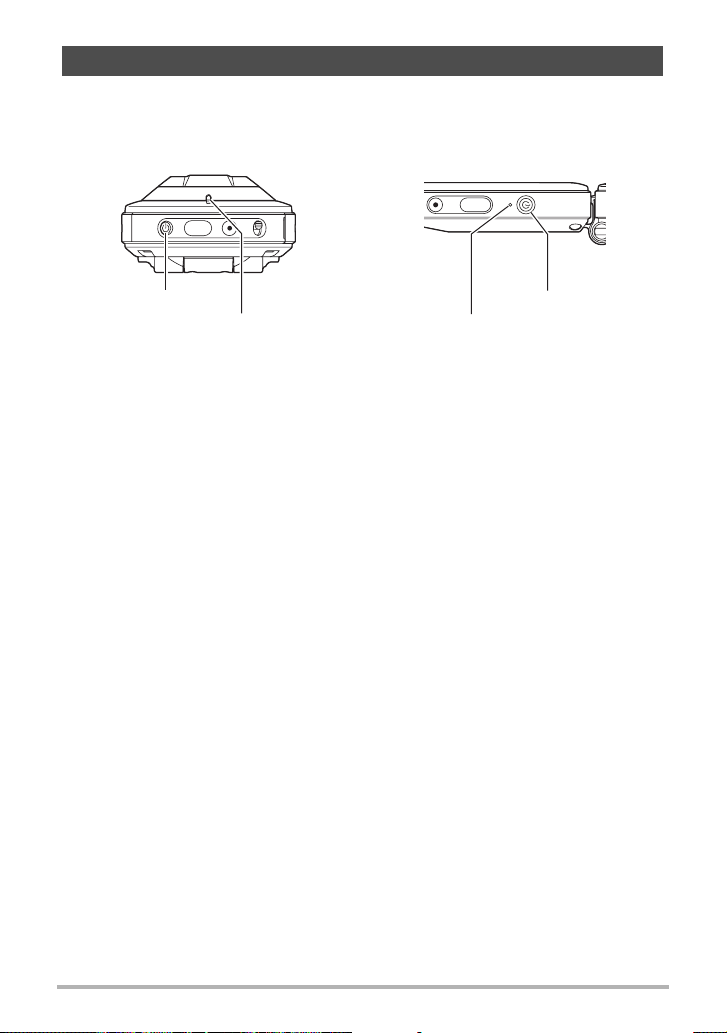
Turning Power On and Off
. To turn off power
Camera
Press [p] (Power).
Controller
Press [p] (Power).
[p] (Power)
Operation lamp
Operation lamp
[p] (Power)
• Turning on the camera causes the camera and controller operation lamps to light
green, and automatically starts an operation to establish a Bluetooth wireless
technology connection between the camera and controller. An image appears on
the controller and shooting is enabled.
• If you press [p] (Power) on the controller or if you do not perform any controller
operation for about 30 seconds while there is a Bluetooth wireless technology
connection between the camera and controller, the controller image will go blank,
and the camera and controller will enter a sleep mode. The operation lamp slowly
flashes green while the camera is in the sleep mode. To restore the controller
display, press the controller button. The Bluetooth wireless technology connection
between the camera and controller is maintained even while they are in the sleep
mode, so they can quickly recover when you press a button.
• The connection between the camera and controller is affected by their orientation
and by the distance between them.
• The controller operation lamp will flash green when the connection is poor. Camera
response may be slow if you perform an operation on the controller while
communication conditions are bad. If this happens, try adjusting the orientation and
the distance between the camera and controller.
• If the distance between the camera and controller becomes to great or if
communication conditions become bad while the camera is in the sleep mode, the
connection may be dropped between them.
24
Quick Start Basics
Page 25

Toggling Between the REC Mode and PLAY Mode
Touch the icon in the lower right corner of the screen or flick the screen upwards or
downwards to toggle between the REC mode and PLAY mode.
REC mode PLAY mode
“ ” (PLAY)
“”(REC)
NOTE
• If “ ” (PLAY) and/or “ ” (REC) is not displayed, touch “ ”.
. To turn off power
On the camera or the controller, hold down [p] (Power).
• Turning off the camera will cause the controller to turn off automatically after about
5 minutes.
25
Quick Start Basics
Page 26
Camera-Controller Wireless Connection (Bluetooth)
The camera and controller communicate over a
Bluetooth wireless technology connection. Once
you perform the “pairing” operation required for
Bluetooth wireless technology connection, the
camera and controller will automatically connect to each other whenever you turn
them on. Note that the connection will be lost of the distance between the camera and
controller becomes too great or if a wireless LAN connection is established between
the camera and a smartphone. The controller will turn off after a preset amount of
time after the Bluetooth wireless technology connection is lost. The camera will
remain on, so you can shoot images by pressing its shutter button.
IMPORTANT!
• Your camera has Bluetooth wireless technology communication functionality built
in. Avoid operating the camera (including camera standalone operations) inside of
aircraft or anywhere else where wireless data communication is restricted.
Configuring Basic Settings the First Time You Turn On the Camera
The first time you turn on the camera, a screen appears for configuring the display
language, date, and time settings. Failure to set the date and time correctly will cause
the wrong date and time data to be recorded with images.
IMPORTANT!
• Camera models sold in certain geographic areas may not support display language
selection.
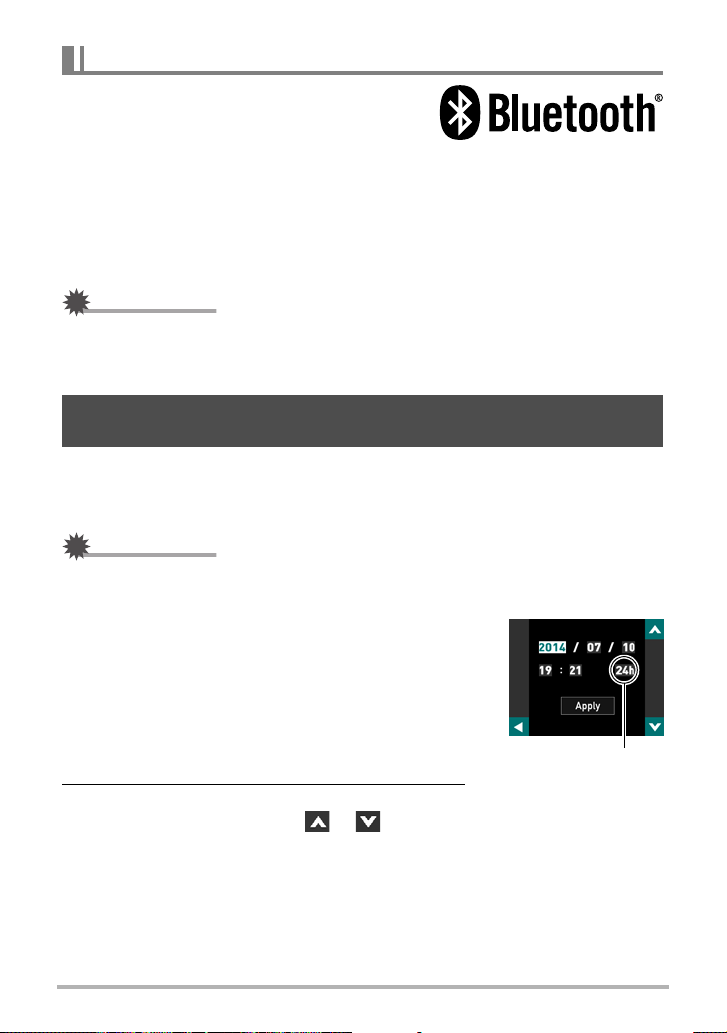
1. Turn on the camera and controller (page 24).
• If this is the first time you are turning on power,
the message “Make sure the camera is turned on”
will appear on the controller monitor screen for a
short while. Wait for a few moments until the
message disappears. If the message does not
disappear, check to make sure that the camera is
turned on.
12/24 hour switch icon
2. Flick (page 17) the controller screen upwards
and downwards or touch “ ”, “ ” until
you find the language you want, and then
touch to select it.
26
Quick Start Basics
Page 27

3. Touch the date display format you want.
Example: July 10, 2015
YY/MM/DD
DD/MM/YY
MM/DD/YY
* 15/7/10
* 10/7/15
* 7/10/15
4. Set the date and the time.
• Touch the value you want to change (year, month, day, hour, minute) and then
touch “ ”, “ ” to change it.
• To switch between 12-hour and 24-hour format, select “am (pm)”/“24h” and
then touch “ ”, “ ” to change the setting.
5. When the date and time settings are the way you want, touch “Apply”.
If you make a mistake configuring display language, date, or time settings with the
above procedure, refer to the following pages for information about how to correct
the settings.
– Display language: Page 65
– Date and time: Page 64
NOTE
• Each country controls its local time offset and the use of summer time, and so they
are subject to change.
27
Quick Start Basics
Page 28

Preparing a Memory Card
Though the camera has built-in memory that can be used to store images and
movies, you probably will want to purchase a commercially available memory card for
greater capacity. The camera does not come with a memory card. Images recorded
while a memory card is loaded are saved to the memory card. When no memory card
is loaded, images are saved to built-in memory.
• For information about memory card capacities, see page 106.
Supported Memory Cards
– microSD Memory Card
– microSDHC Memory Card
– microSDXC Memory Card
• The above are supported memory card types as of June 2014.
• This camera supports use of microSD memory cards of the
following types and capacities: microSD memory cards up to 2GB, microSDHC
memory cards from 2GB up to 32GB, microSDXC memory cards from 32GB up to
2TB. Note that the ability to use any particular card with this camera, even if it
satisfies the above capacity and type requirements, is not guaranteed.
Warning!
*
0 Memory cards are small and present a risk of accidentally being swallowed
by infants and young children. Keep memory cards out of the reach of
infants and young children. If a memory card is ever swallowed accidentally,
contact a physician immediately.
+
28
Quick Start Basics
Page 29
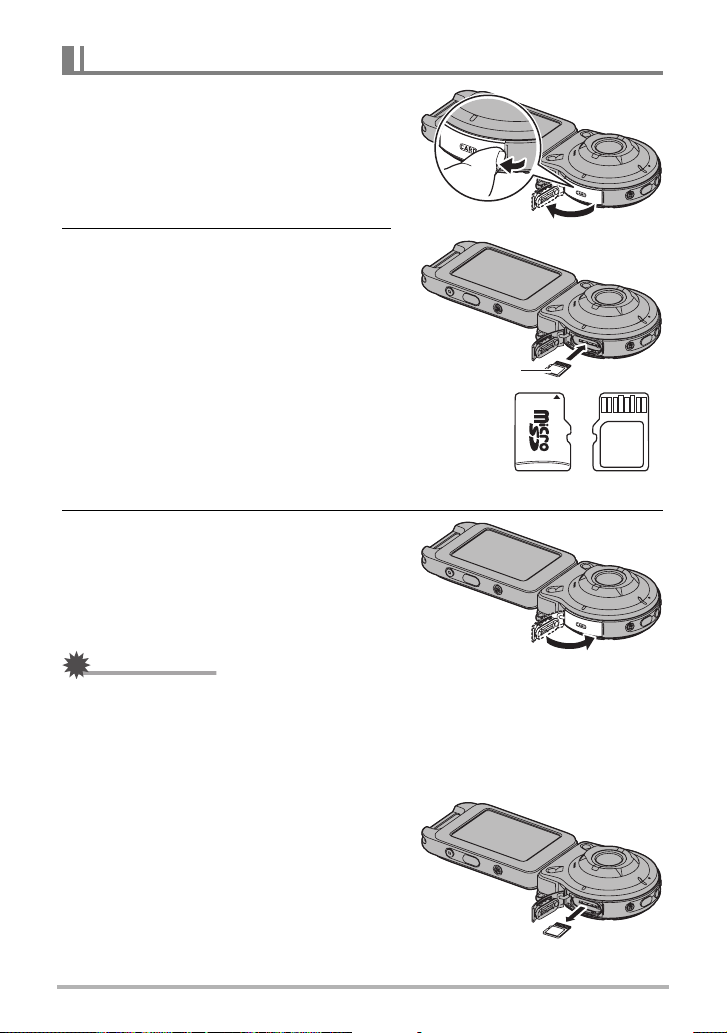
To load a memory card
1. Holding down camera’s [p]
(Power) to turn off the camera and
then open the [CARD] cover.
2. Load a memory card.
Positioning the memory card so its back
is facing upwards (towards the lens side
of the camera), slide it into the card slot
all the way in until you hear it click
securely into place.
3. Close the [CARD] cover.
Back
Front Back
IMPORTANT!
• Never insert anything besides a supported memory card (page 28) into the memory
card slot.
• Should water or any foreign object ever get into the card slot, immediately turn off
the camera, and contact your retailer or nearest CASIO authorized service center.
. To replace the memory card
Press the memory card and then release it.
This will cause it to pop out of the memory
card slot slightly. Pull the card out the rest of
the way and then insert another one.
• Never remove a card from the camera
while the operation lamp is flashing green.
Doing so can cause the image save
operation to fail and even damage the
memory card.
29
Quick Start Basics
Page 30
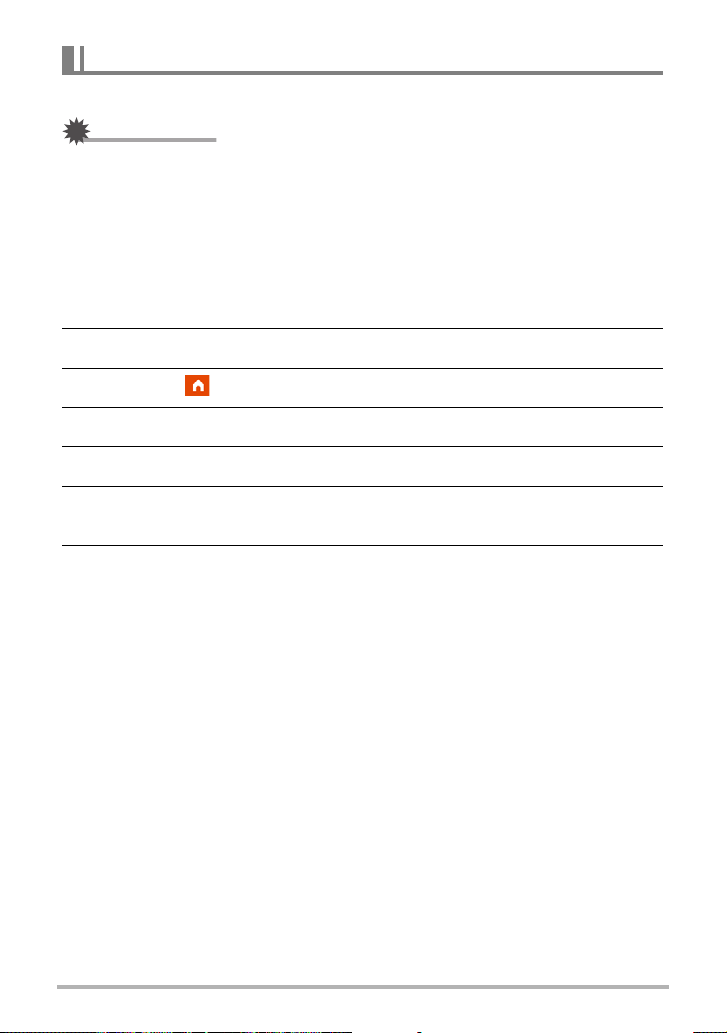
To format (initialize) a new memory card
Format a memory card on the camera before using it for the first time.
IMPORTANT!
• Formatting a memory card that already has snapshots or other files on it, will delete
its contents. Normally you do not need to format a memory card again. However, if
storing to a card has slowed down or if you notice any other abnormality, re-format
the card.
• Be sure to use the camera to format a memory card. Formatting a card on a
computer will result in a non-SD standard format, which can greatly slow down
processing time and cause compatibility, performance, and other problems.
1. Load a memory card (page 29).
2. Turn on the camera and controller (page 24).
3. Touch the “ ” (Home) icon.
4. Touch “MENU”.
5. Flick upwards and downwards until you find “Setup”, and then touch it.
6. Flick upwards and downwards until you find “Format”, and then touch
it.
7. Touch “Format” and then touch “Yes”.
This starts the memory card format operation.
30
Quick Start Basics
Page 31
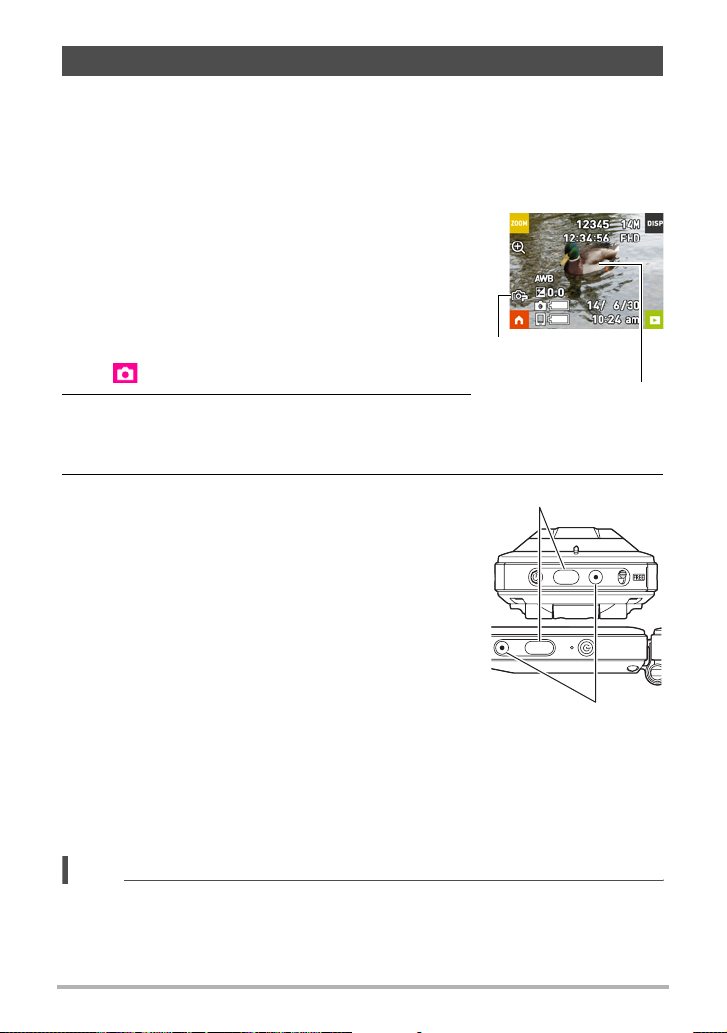
Shooting a Snapshot (Premium Auto)
Your camera has a variety of different recording modes to suit various shooting
conditions and objectives (page 37). This section explains general shooting
procedures using Premium Auto.
With Premium Auto recording, the camera automatically determines whether you are
shooting a subject or scenery, and other conditions. Premium Auto recording delivers
higher image.
1. Turn on the camera and controller (page 24).
This causes the camera and controller to start up on
the REC mode.
• The factory default recording mode when you
purchase the camera is “Premium Auto”. You can
use the procedure on page 37 to change the
recording mode.
• If the camera is in the PLAY mode, touch
“”(REC).
Premium Auto
icon
Focus frame
2. Point the camera at the subject.
• A focus frame will appear and the location where
the camera is focusing.
3. Press the camera or controller shutter button.
The camera will automatically adjust exposure and
focus, and then shoot the snapshot.
• Pressing the camera shutter button will shoot a
snapshot even if the controller is turned off, and
even if the camera and controller are in the sleep
mode (page 24).
Shutter button
[0] (Movie)
Shooting a Movie
Press [0] (Movie) on the camera or controller to start movie recording.
To stop movie recording, press [0] (Movie) again.
See page 40 for details.
NOTE
• You also can shoot a snapshot by touching a point on the monitor screen (page
43).
• You can specify the image size for snapshots. See page 43 for more information.
31
Quick Start Basics
Page 32

. Shooting with the Camera Alone
You can use the camera in a stand-alone configuration without turning on the
controller or otherwise establishing a connection between it and the camera.
• If an Interval Snapshot (page 34) operation is in progress, it will continue to shoot
images even when controller power is turned off.
. Shooting with Premium Auto
• In addition to shutter speed and ISO sensitivity, the camera automatically executes
the following operation as required when shooting with Premium Auto.
– Auto Focus is normally performed.
– The camera automatically determines the focus point on the screen and focuses
there.
– When shooting people, the face detection feature detects the faces of up to 12
individuals and adjusts focus and brightness accordingly.
Snapshot Shooting Precautions
Operation
• If unwanted light is shining onto the lens, shade the lens with your hand or attach
the lens hood (page 14) when shooting an image.
Monitor Screen when Shooting Snapshots
• Subject brightness conditions can cause monitor screen response to slow and can
cause digital noise in the monitor screen image.
• The image that appears on the monitor screen is for image composition. The actual
image will be recorded in accordance with the currently selected recording mode
(page 37).
Shooting Indoors under Fluorescent Lighting
• Minute flickering of fluorescent lighting can affect the brightness or color of an
image.
Other Precautions
• The slower the shutter speed, the greater the possibility that noticeable noise will
be generated in an image. Because of this, the camera automatically performs a
noise reduction at slow shutter speeds. The noise reduction process causes it to
take longer to record images at lower shutter speeds. The shutter speeds for which
noise reduction is performed depend on the camera setup and shooting conditions.
• Due to the characteristics of the imaging element used by the camera, very fast
moving objects in an image may appear distorted.
32
Quick Start Basics
Page 33
Recording Images
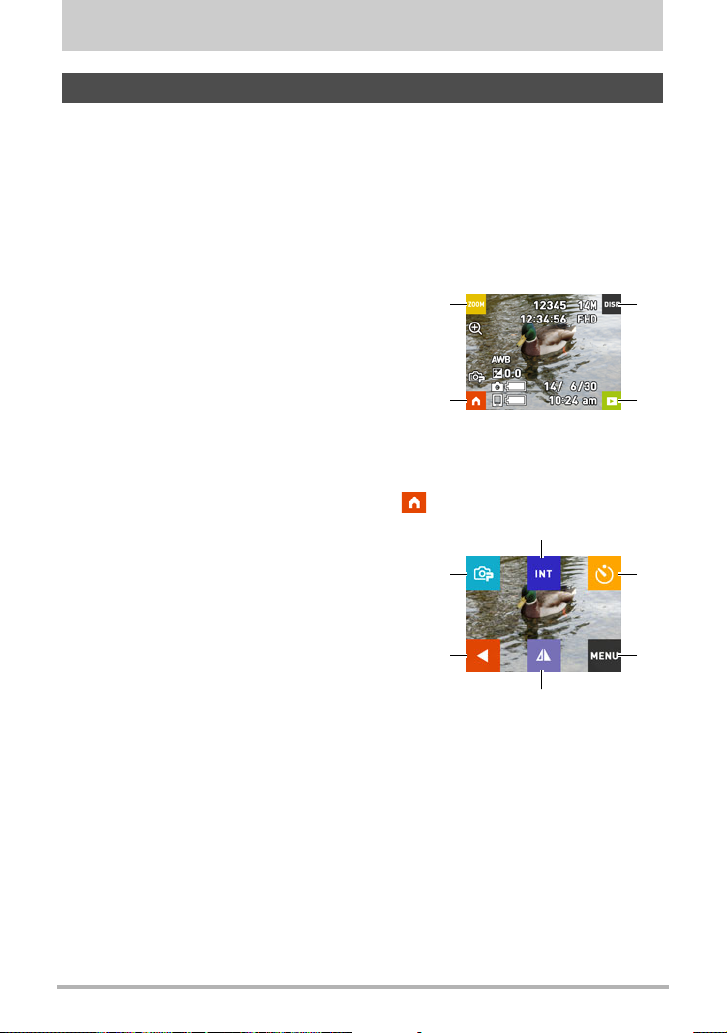
REC Mode Screen
This section explains the contents of the REC mode screens. While the REC mode
main screen or home screen is displayed, pressing the camera or controller shutter
button will shoot a snapshot.
. Main Screen
The main screen appears when you turn on the camera or when you enter the REC
mode from the PLAY mode.
Zoom (page 39)
1
Information (page 9)
2
Go to PLAY mode (page 25)
3
Go to home screen
4
1
2
4
. Home Screen
The home screen appears when you touch the “ ” icon on the main screen.
Recording mode (page 37)
1
Interval Snapshot (page 34)
2
Self-timer (page 38)
3
Menu (page 42)
4
Display mirror image (page 36)
5
Go to main screen
6
1
2
6
5
3
3
4
33
Recording Images
Page 34

Shooting Multiple Images at a specified Interval (Interval Snapshot)
You can use Interval Snapshot to shoot snapshots and movies automatically at a
specified interval.
. To start an Interval Snapshot operation
1. On the REC mode main screen, touch the “ ” (Home) icon.
2. On the home screen, touch the “ ” (Interval Snapshot) icon.
3. Touch the “¥” (Interval Setting) icon.
4. Touch “Interval” or “Shooting Style” and configure the settings as
desired.
Interval Specifies the shooting interval.
Snapshot Only: Shoots a snapshot.
Movie Only:
Shooting Style
Shoots a five-second movie. Audio is also recorded with
this setting.
Snapshot + Movie:
Shoots five snapshots followed by a five-second movie.
5. Touch the “ ” (Back) icon.
6. Touch “Start”.
This starts the Interval Snapshot operation.
• Starting an Interval Snapshot operation causes the camera and controller to
enter a sleep state and standby for recording of the images. This will be
indicated by the camera’s operation lamp flashing green.
. To stop an Interval Snapshot operation
1. On the controller, press any button to recover from the sleep state.
2. Touch “Exit”.
This stops the Interval Snapshot operation.
34
Recording Images
Page 35

. To shoot images manually during an Interval Snapshot operation
Pressing the shutter button on the camera during an Interval Snapshot operation will
shoot a snapshot. Pressing [0] (Movie) on the camera will record a five-second
movie.
NOTE
• Nothing is displayed on the monitor screen during an Interval Snapshot operation.
• Interval Snapshot images are shot using Auto Focus.
• Camera anti-shake is applied during movie recording by an Interval Snapshot
operation. However, image anti-shake is not applied.
• The current shooting setup, including zoom, cannot be changed while an Interval
Snapshot operation is in progress. A snapshot can be recorded with camera
operations only, and not by operating the controller.
• If the camera battery goes dead during an Interval Snapshot operation, the
operation will terminate. The controller battery going dead does not affect an
ongoing Interval Snapshot operation. To stop the Interval Snapshot operation in
this case, hold down [p] (Power) on the camera.
• If you are performing manual camera operations when the Interval Snapshot
operation reaches a shooting interval, Interval Snapshot recording for that interval
will be skipped.
35
Recording Images
Page 36
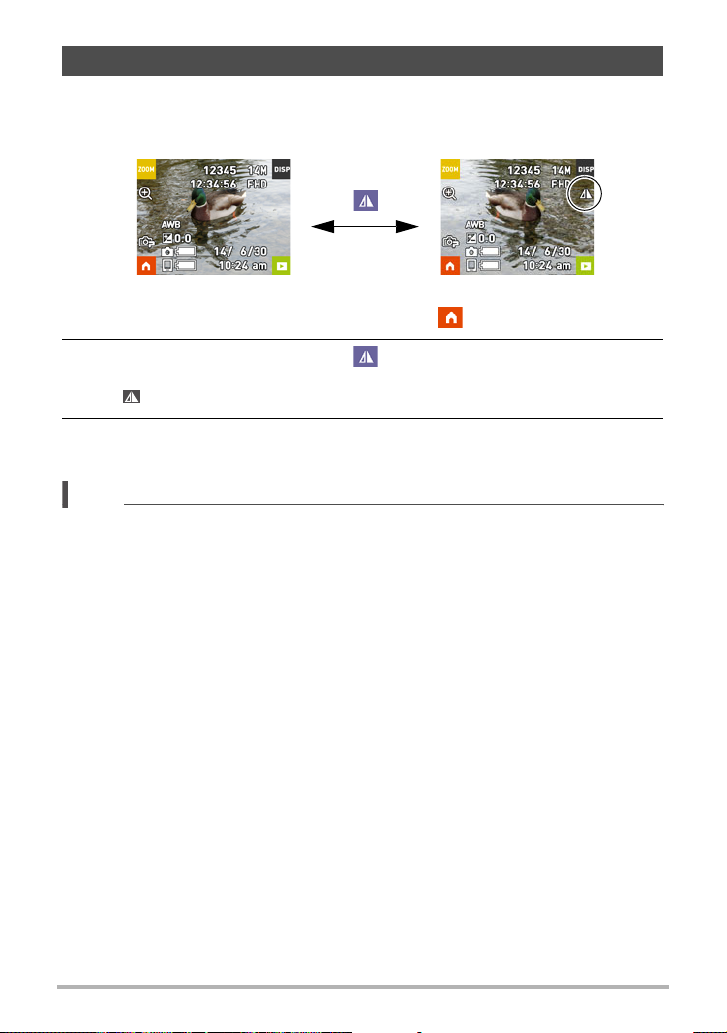
Self-shooting (Mirror)
You can use this function to display a mirror image of controller display. This comes
in handy when using the controller to compose self-shot images.
Normal image Mirrored image
“”
1. On the REC mode main screen, touch the “ ” (Home) icon.
2. On the home screen, touch the “ ” (Mirror) icon.
This displays a mirror image of the controller screen.
• A indicator appears on the monitor screen while a mirror image is displayed.
3. Compose the image on the controller and then press the shutter button
to shoot.
NOTE
• You can change an image displayed on the main screen to a mirror image by
flicking the image.
36
Recording Images
Page 37
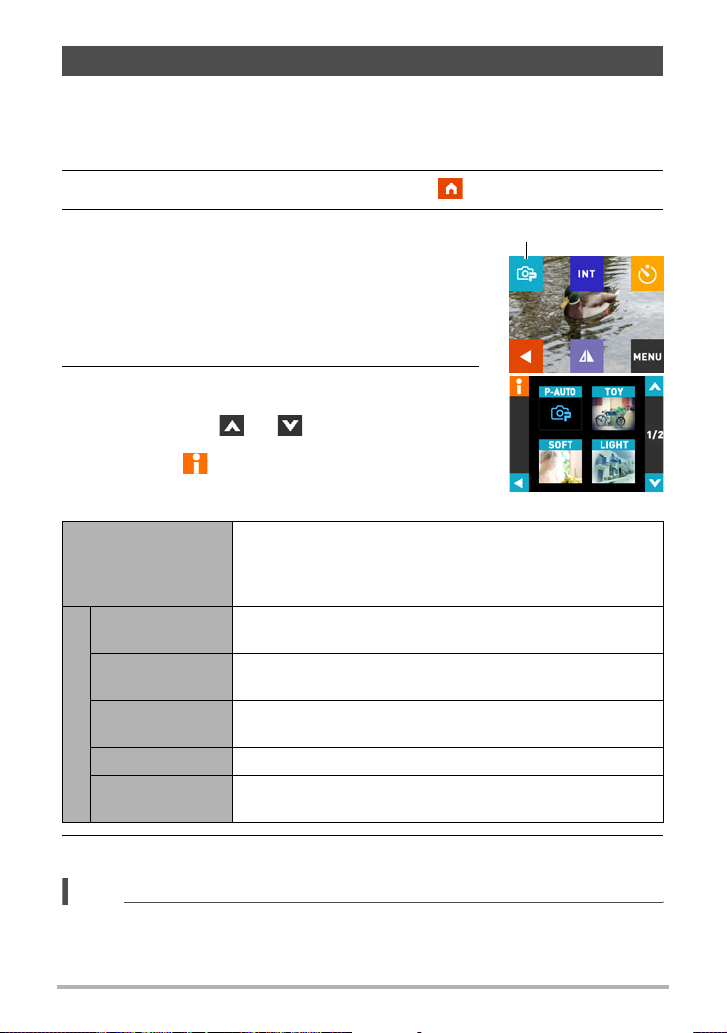
Changing the Recording Mode
In addition to Premium Auto, your camera lets you select from among five ART SHOT
scenes that apply different effects to your photos.
1. Turn on the camera and controller (page 24).
2. On the REC mode main screen, touch the “ ” (Home) icon.
3. On the home screen, touch the recording
mode icon in the upper left corner of the
screen.
4. Touch the icon of the recording mode you
want to use.
• You can touch “ ” or “ ” to scroll the screen
and view other available modes.
• Touching “ ” in the upper left corner of the
screen and then touching a recording mode icon
will display detailed information about the mode.
P-AUTO
(Premium Auto)
TOY
(Toy Camera)
SOFT
(Soft Focus)
LIGHT
(Light Tone)
ART SHOT
SEPIA (Sepia) Sepia tones create a decidedly retro look.
MONO
(Monochrome)
The camera automatically determines whether you are
shooting a subject or scenery, and other conditions.
Premium Auto recording delivers high image quality (page
31).
Dark edges and altered hues for toy camera effect.
Overall blurring for a soft, romantic effect.
Weak contrast for a feeling of airy refinement.
The strong contrast and graininess of black and white.
Recording mode icon
5. Press the shutter button to shoot.
NOTE
• Selecting an ART SHOT scene will automatically enable auto focus.
• Movie recording is disabled while shooting with ART SHOT.
37
Recording Images
Page 38

. Auto Focus Restrictions
• Any of the following can make proper focus impossible.
– Solid color wall or other very low contrast subject
– Strongly back lit subject
– Very shiny subject
– Blinds or other subject with a repeating horizontal pattern
– Multiple subjects at varying distances from the camera
– Subject in a dark location
– Camera movement while shooting
– Fast-moving subject
– Subjects outside the focus range of the camera
Using the Self-timer (Self-timer)
You can use the procedure below to configure the camera to shoot a snapshot
automatically five seconds after the self-timer icon is touched.
1. In the REC mode main screen, touch the “ ” (Home) icon.
2. On the home screen, touch the “r” (Self-timer) icon.
The camera will shoot an image in 5 seconds.
38
Recording Images
Page 39
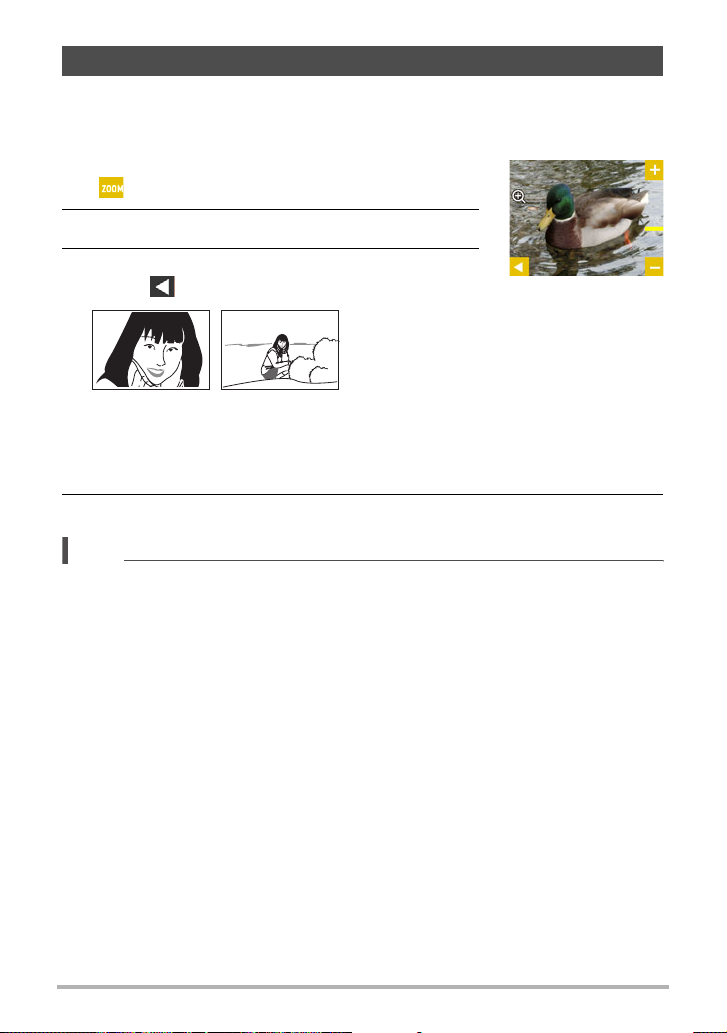
Shooting with Zoom
Your camera is equipped with digital zoom, that lets you zoom an image up to 4X.
Note that a digital process is used to enlarge the center of the image, so there is
deterioration of image quality.
1. In the REC mode main screen, touch the
“ ” (Zoom) icon.
2. Touch “+”, “–” to zoom.
3. After the zoom factor is the way you want,
touch “ ”.
+ (Telephoto) – (Wide Angle)
+ (Telephoto) : Enlarges the subject and narrows the range.
– (Wide Angle) : Reduces the size of the subject and broadens the range.
4. Press the shutter button to shoot the image.
NOTE
• Telephoto images are prone to blurring caused by camera movement when you
press the shutter button. Because of this, stabilizing the camera by placing it on a
level surface, etc. is recommended.
• Zoom operations are disabled during Interval Snapshot shooting.
•“Ù” is displayed on the monitor screen while digital zoom is being used.
39
Recording Images
Page 40
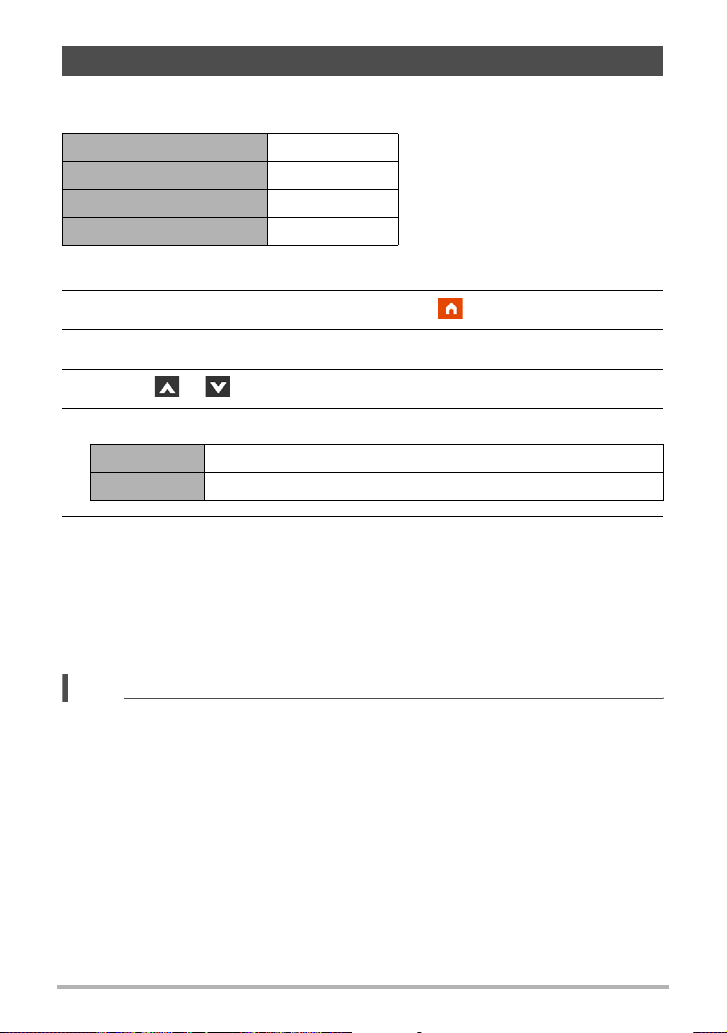
Recording a Movie
Your camera lets you record Full HD movies. Movie quality details are shown in the
table below.
Movie Quality Full HD
Frame Rate 30fps
Image Size (Pixels) 1920x1080
Aspect Ratio 16:9
1. Select “Premium Auto” as the recording mode.
2. On the REC mode main screen, touch the “ ” (Home) icon.
3. On the home screen, touch “MENU”.
4. Touch “ ”, “ ” to display “Max Recording Time”.
5. Touch the recording time you want to select.
15 sec Movie recording automatically stops after 15 seconds.
OFF Movie recording can continue up to 29 minutes.
6. Press [0] (Movie).
This starts movie recording.
• To stop an ongoing movie recording operation, press [0] (Movie).
• Each movie can be up to 29 minutes long. If you select “OFF” in step 5, movie
recording stops automatically after 29 minutes of recording. Movie recording
also will stop automatically if memory becomes full before you stop movie
recording by pressing [0] (Movie) again.
NOTE
• Movie recording is disabled while shooting with ART SHOT.
Minimizing the Effects of Camera Movement during Movie Recording
You can configure the camera to minimize the effects of camera movement. Note,
however, that this does not prevent image blur due to subject movement.
40
Recording Images
Page 41

IMPORTANT!
• Spending a long time using movie recording will cause the camera to become
slightly warm to the touch. This is normal and does not indicate malfunction.
• The camera also records audio along with movies. Note the
following points when shooting a movie.
Microphone
– Take care that the microphone is not blocked by your
fingers, etc.
– Good audio recording results are not possible when the
camera is too far away from what you are trying to
record.
• Shooting movies for long periods in areas where
temperature is relatively high can cause digital noise (dots of light) to appear in the
movie image. A rise in the camera’s internal temperature also may force movie
recording to stop automatically. If this happens, stop recording and allow the
camera to cool down, which should cause normal operation to resume.
• Using the camera’s built-in memory or certain types of memory cards can slow
down processing speed. Whenever possible use an Ultra High-Speed Type
memory card. Note, however, that not all operations can be guaranteed even if an
Ultra High-Speed Type memory card is used. An operation that requires time to
record data can result in breaks in the image and/or audio.
NOTE
• Zoom operations are disabled during movie recording. To use zoom, perform the
zoom operation before you press [0] (Movie) to start recording.
41
Recording Images
Page 42
Advanced Recording Settings
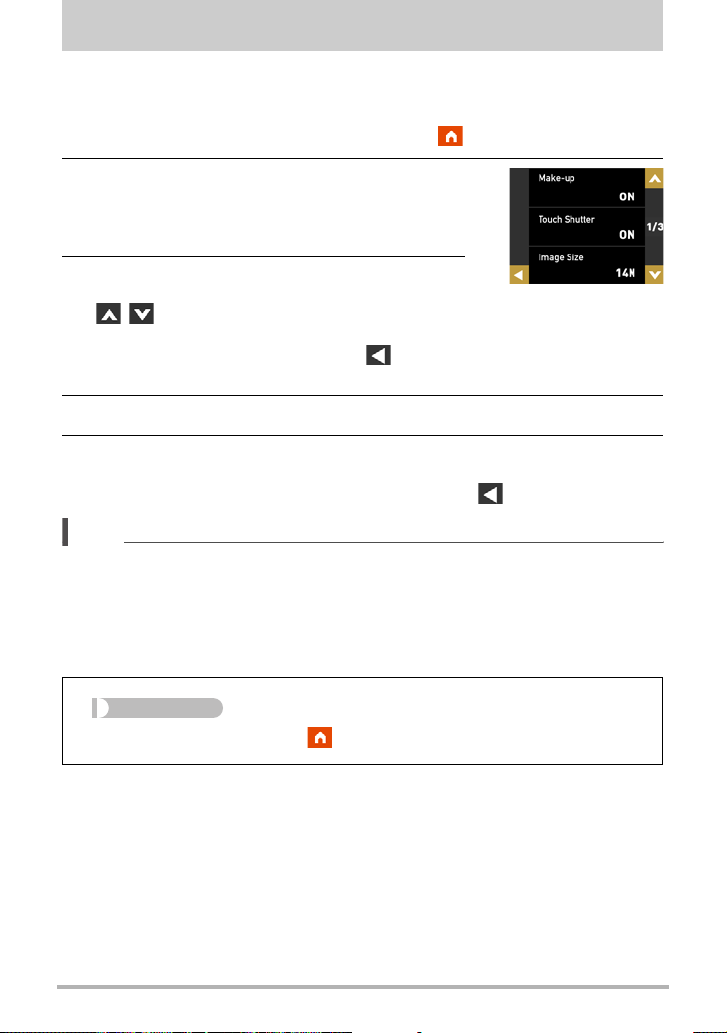
The following are menu operations you can use to configure various camera settings.
. Example Menu Screen Operation
1. On the REC mode main screen, touch the “ ” (Home) icon.
2. On the home screen, touch “MENU”.
This will display the menu screen.
• Menu contents are different in the REC mode
and PLAY mode.
3. Flick the screen image upwards or
downwards or touch the up/down arrows
( , ) to scroll through items until the one
whose setting you want to change is displayed.
• To cancel and exit the menu, touch “ ” or press the controller’s shutter
button.
4. Touch the item.
5. Configure the setting of the item in accordance with the screen
contents.
• To navigate back to the previous menu level, touch “ ”.
NOTE
• Some menu items may not be available, depending on the recording mode being
use.
. Menu Operations in This Manual
Menu operations are represented in this manual as shown below. Touch the indicated
icons and items, and perform operations as they are indicated, from left to right.
Procedure
Enter the “REC Mode” * * MENU * Touch Shutter
42
Advanced Recording Settings
Page 43
Recording Beautiful Portraits (Make-up)
Procedure
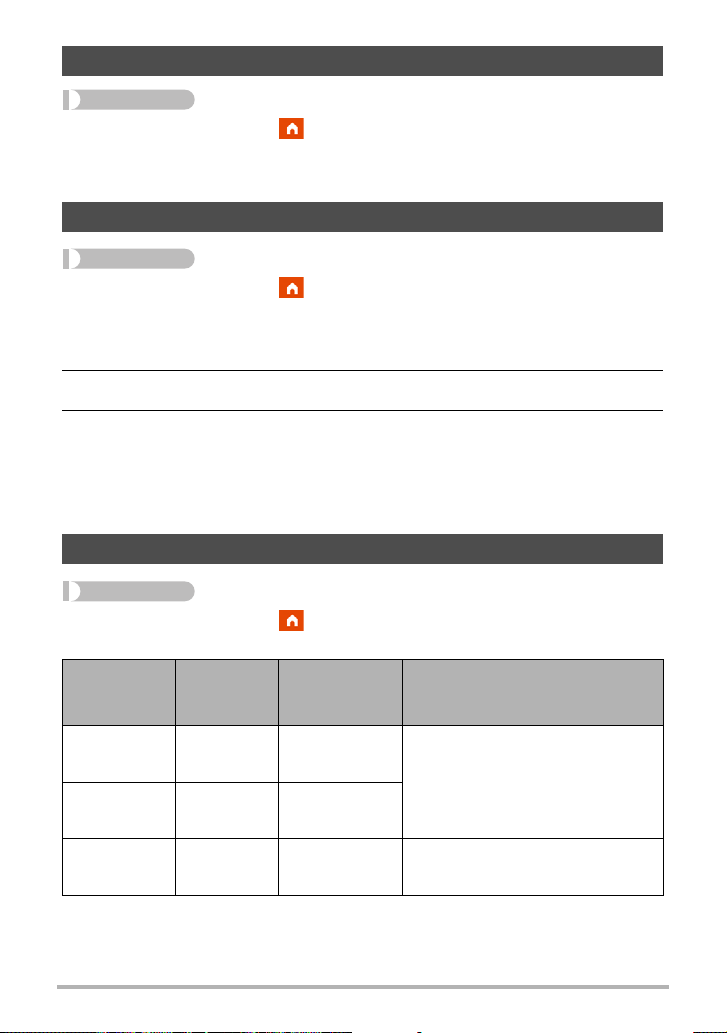
Enter the “REC Mode” * * MENU * Make-up
When turned on, Make-up smoothes the skin texture of the subject and softens facial
shadows caused by harsh sunlight for better looking portraits.
Using Touch Shutter (Touch Shutter)
Procedure
Enter the “REC Mode” * * MENU * Touch Shutter
You can use the procedure below to shoot a snapshot.
1. Touch “ON”.
2. Point the camera at the subject.
3. When you want to shoot, touch the monitor screen.
The camera automatically comes into focus and then shoots.
• You can still use the shutter button to shoot even when “ON” is selected for
Touch Shutter.
Changing the Image Size (Image Size)
Procedure
Enter the “REC Mode” * * MENU * Image Size
This setting can be used to configure snapshot image size.
Image Size
(Pixels)
14M
x
3240)
(4320
16:9
x
2432)
(4320
REC Screen
Icon Display
14M Poster Print
16:9 Poster Print
Suggested
Print Size and
Application
Description
Good detail for better clarity even
for images cropped from the
original on a computer, etc.
5M
x
1920)
(2560
• The initial factory default image size setting is 14M (14 million pixels).
• You should regard the print paper sizes suggested here as guidelines only (200 dpi
print resolution).
5M A4 Print Good detail
43
Advanced Recording Settings
Page 44
. Pixels and image size
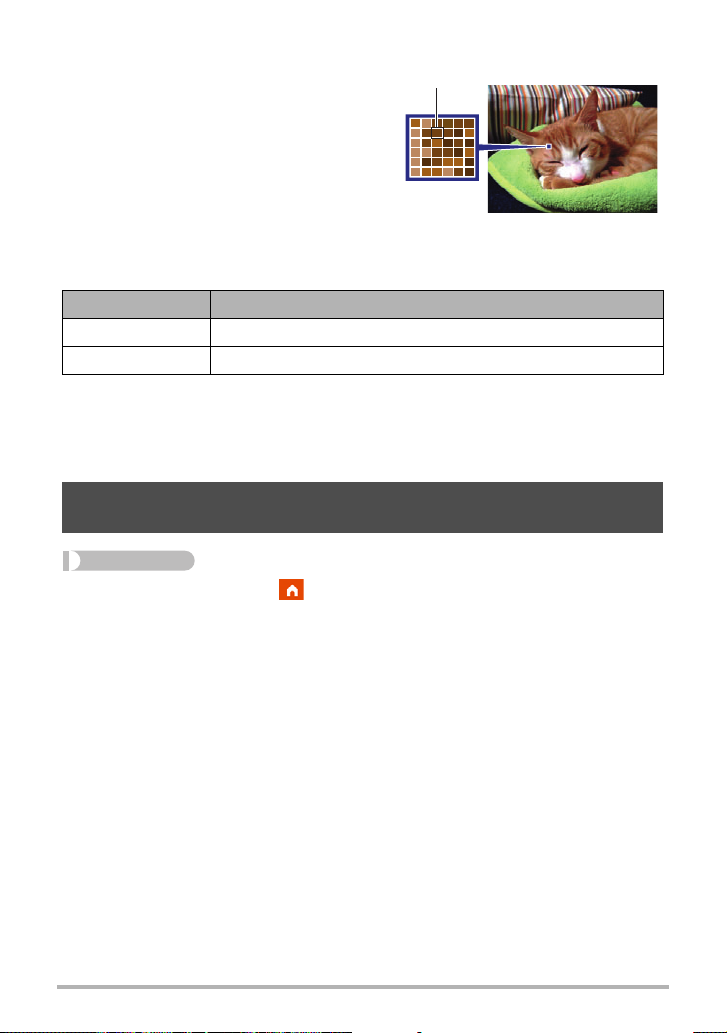
A digital camera image is a collection of small
dots called “pixels”. The more pixels there are
in an image, the more detail there will be.
However, you generally can do with fewer
pixels when printing an image (L size)
through a print service, attaching an image to
e-mail, when viewing the image on a
computer, etc.
The size of an image indicates how many
pixels it contains, and is expressed as horizontal pixels
Pixel
x
vertical pixels.
Example:
Image size pixels
x
14M 4320
5M 2560
3240 (Approximately 14 million pixels)
x
1920 (Approximately 5 million pixels)
• Note that larger images have more pixels, so they take up more memory space.
• For information about image size and number of images that can be stored, see
page 106.
• For information about movie image size, see page 106.
Specifying the Maximum Movie Recording Time (Max Recording Time)
Procedure
Enter the “REC Mode” * * MENU * Max Recording Time
See page 40 for details.
44
Advanced Recording Settings
Page 45
Shooting with Brightness Compensation (EV Shift)
Procedure
Enter the “REC Mode” * * MENU * EV Shift
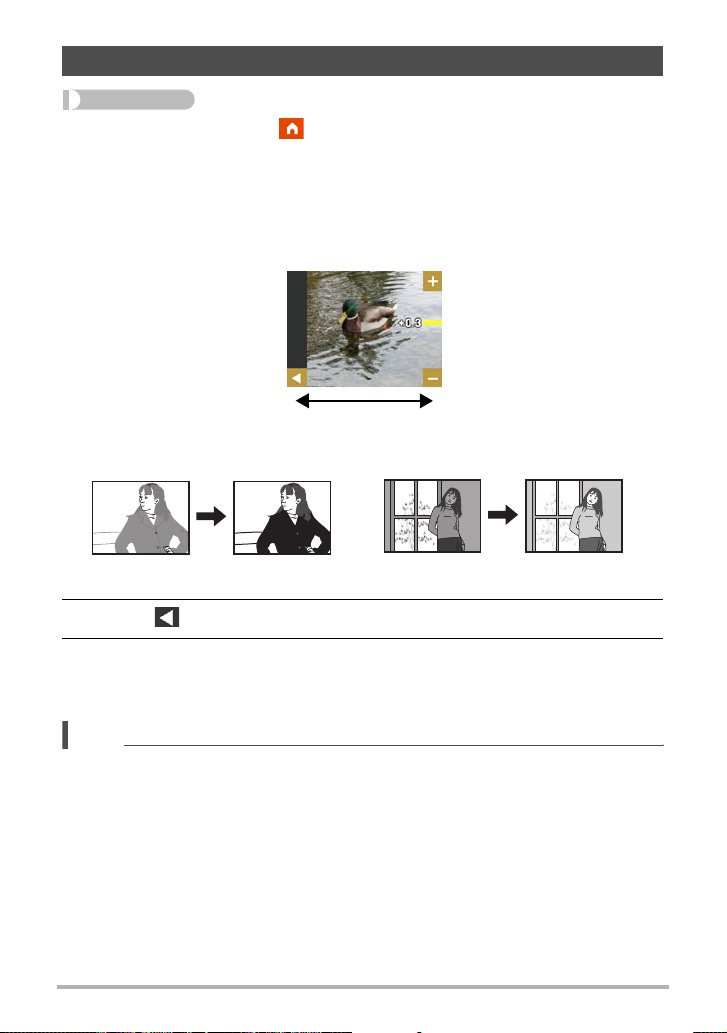
You can manually adjust an image’s exposure value (EV value) before shooting it.
• Exposure Compensation Range: –2.0 EV to +2.0 EV
• Unit: 1/3 EV
1. Touch “+”, “–” to adjust the exposure compensation value.
• To cancel exposure compensation, change the EV value to 0.0.
–2.0 +2.0
Decreases the EV value. A lower EV
value is best for dark-color subjects and
for shooting outdoors on a clear day.
Increases the EV value. A higher EV
value is best for light-colored subjects
and backlit subjects.
2. Touch “ ” (Back) to go back to the home screen.
3. Press the shutter button to shoot.
The exposure compensation value you set remains in effect until you change it or
turn off the camera (which causes it to revert to “0.0”).
NOTE
• When shooting under very dark or very bright conditions, you may not be able to
obtain satisfactory results even after performing exposure compensation.
45
Advanced Recording Settings
Page 46
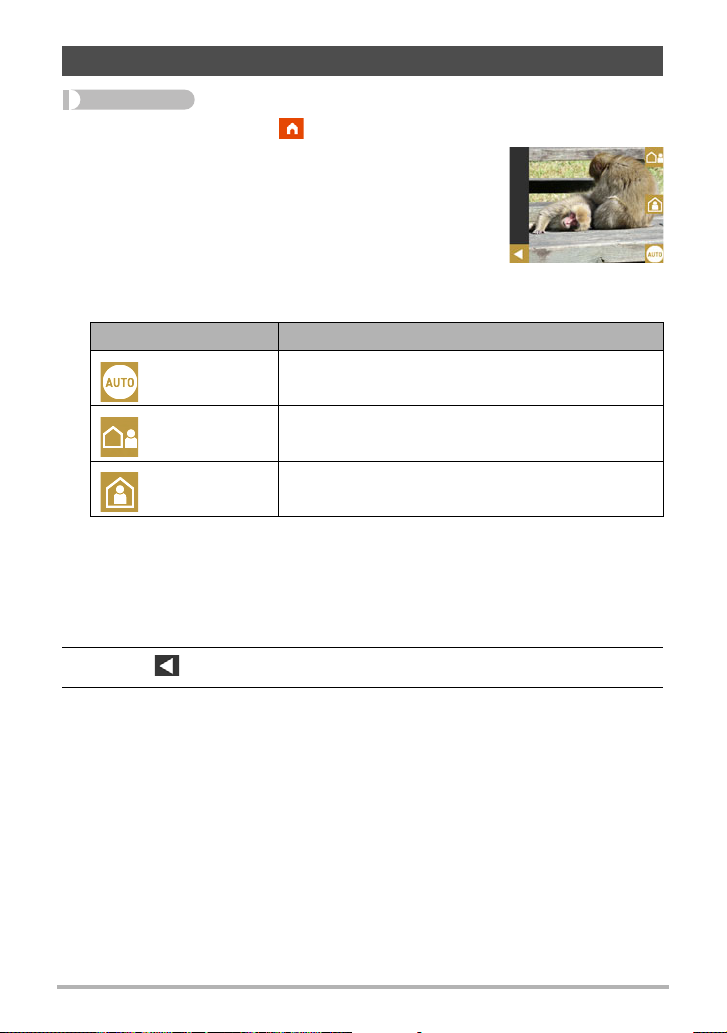
Adjusting Hue when Shooting (White Balance)
Procedure
Enter the “REC Mode” * * MENU * White Balance
You can adjust white balance to match the source of
light available where you are shooting and avoid the
blue cast that results when shooting outdoors and the
green cast that results when shooting indoors.
1. Touch the type of white balance you want to
select.
You can see the affect of the white balance setting
you select on the monitor screen.
Setting Description
Auto
Outdoors For shooting outdoors
Indoors For shooting indoors
• When “Auto” is selected for the white balance setting, the camera automatically
determines the white point of the subject. Certain subject colors and light
source conditions can cause problems when the camera tries to determine the
white point, which makes proper white balance adjustment impossible. If this
happens, select the white balance setting that matches your shooting
conditions.
Configures the camera to adjust white balance
automatically
2. Touch “ ” (Back) to go back to the home screen.
3. Press the shutter button to shoot.
46
Advanced Recording Settings
Page 47

Enabling Auto Rotation of Images to Match Camera Orientation (Auto Rotate)
Procedure
Enter the “REC Mode” * * MENU * Auto Rotate
Selecting “ON” for this function will cause displayed images to rotate automatically in
accordance with camera orientation during recording and viewing.
47
Advanced Recording Settings
Page 48
Viewing Snapshots and Movies
Play Mode Screen
While in the PLAY mode, you can use the controller screen to view images your have
recorded. You can also press the camera’s shutter button or [0] (Movie) button to
record new images.
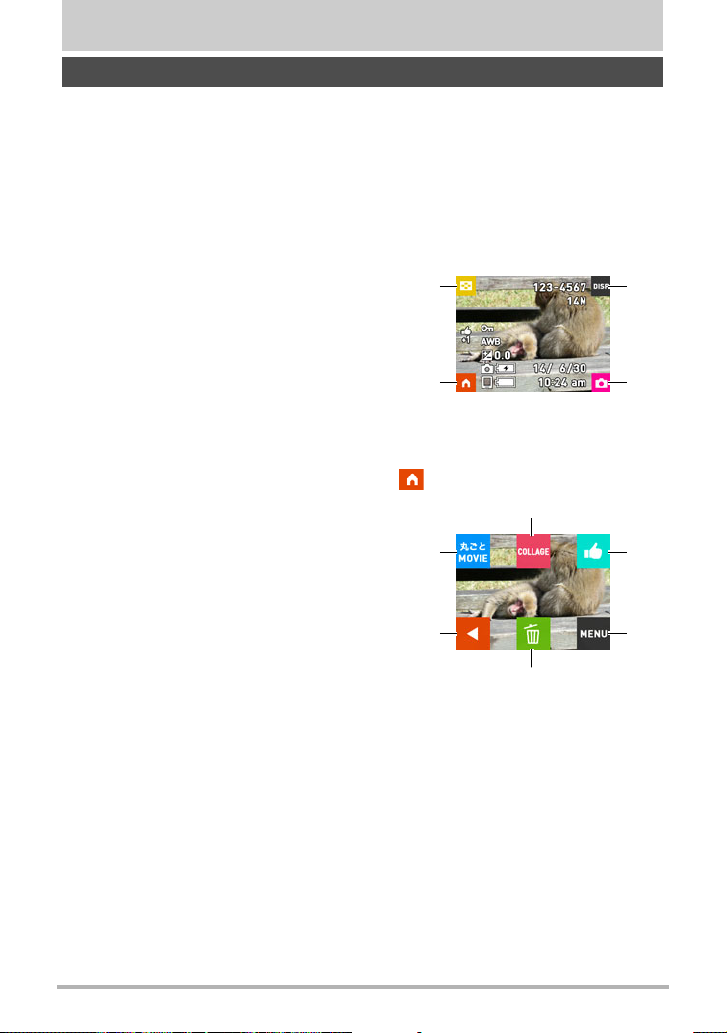
. Main Screen
The main screen appears whenever you switch from the REC mode to the PLAY
mode.
Image Menu (page 52)
1
Information (page 9)
2
Go to REC mode (page 25)
3
Go to home screen
4
1
2
4
. Home Screen
The home screen appears when you touch the “ ” (Home) icon on the main screen.
Highlight Movie (page 54)
1
Highlight Photo (page 53)
2
Highlight Score (page 55)
3
Menu (page 42)
4
Delete (page 50)
5
Go to main screen
6
1
2
6
3
3
4
5
48
Viewing Snapshots and Movies
Page 49
Viewing Snapshots
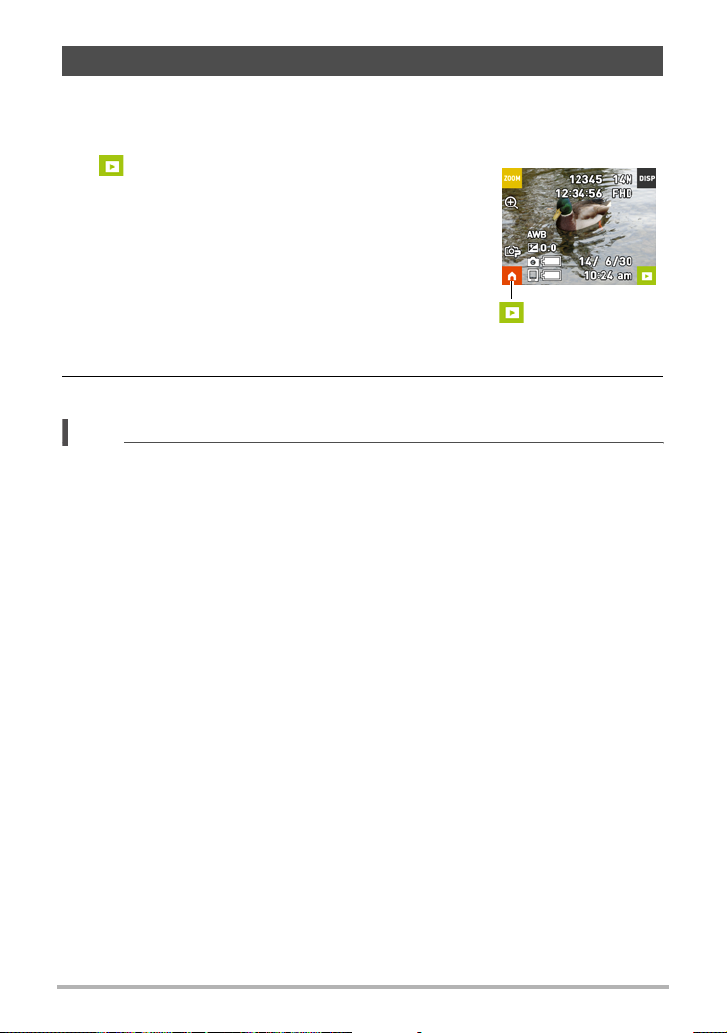
Use the following procedure to view snapshots on the camera’s monitor screen.
• For information about how to play back movies, see page 50.
1. On the REC mode main screen, touch the
REC mode main screen
“ ” (PLAY) icon or flick the screen
upwards or downwards to enter the PLAY
mode.
This will display one of the snapshots currently
stored in memory.
• Information about the displayed snapshot also is
included (page 9).
• You also can clear the information to view only
the snapshot (page 9).
• You can zoom the screen image by touching the
monitor screen (page 51).
“”(PLAY)
2. Flick the screen to the left or right to scroll through the snapshots.
NOTE
• Pressing the controller’s shutter button while in the PLAY mode or while a menu
screen is displayed will switch directly to the REC mode.
• A question mark (?) will be displayed for images that cannot be displayed for some
reason.
49
Viewing Snapshots and Movies
Page 50
Viewing a Movie
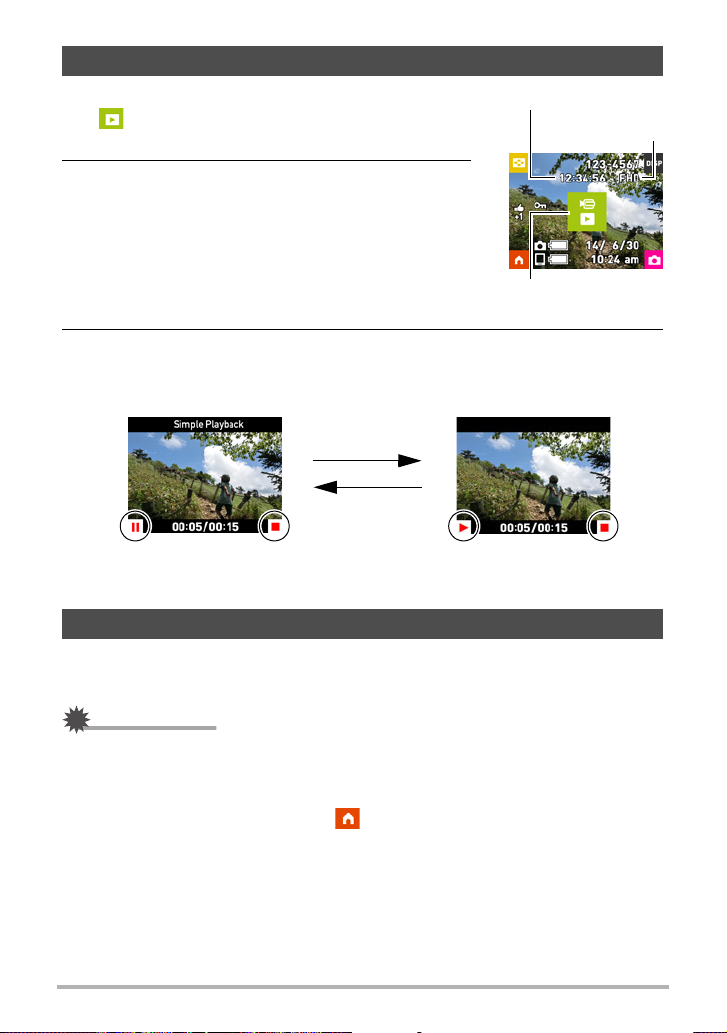
1. On the REC mode main screen, touch the
“ ” (PLAY) icon or flick the screen upwards
or downwards to enter the PLAY mode.
Movie recording time
Image quality
2. Flick the screen to the left or right to scroll
through the movies until the one you want is
displayed.
Movie icon: 6
3. Touch “6” (Movie) to start playback.
• To stop the playback, touch “.”.
Playback in progress Playback paused
Touch “|”.
Touch “6”.
• Attempting to play back a movie will result in playback at a low frame rate and no
audio playback. Play back movies on your smartphone.
Deleting Snapshots and Movies
If memory becomes full, you can delete snapshots and movies you no longer need in
order to free up storage and record more images.
IMPORTANT!
• Remember that a file (image) delete operation cannot be undone.
. To delete a single file
1. In the PLAY mode, touch the “ ” (Home) icon.
50
Viewing Snapshots and Movies
Page 51
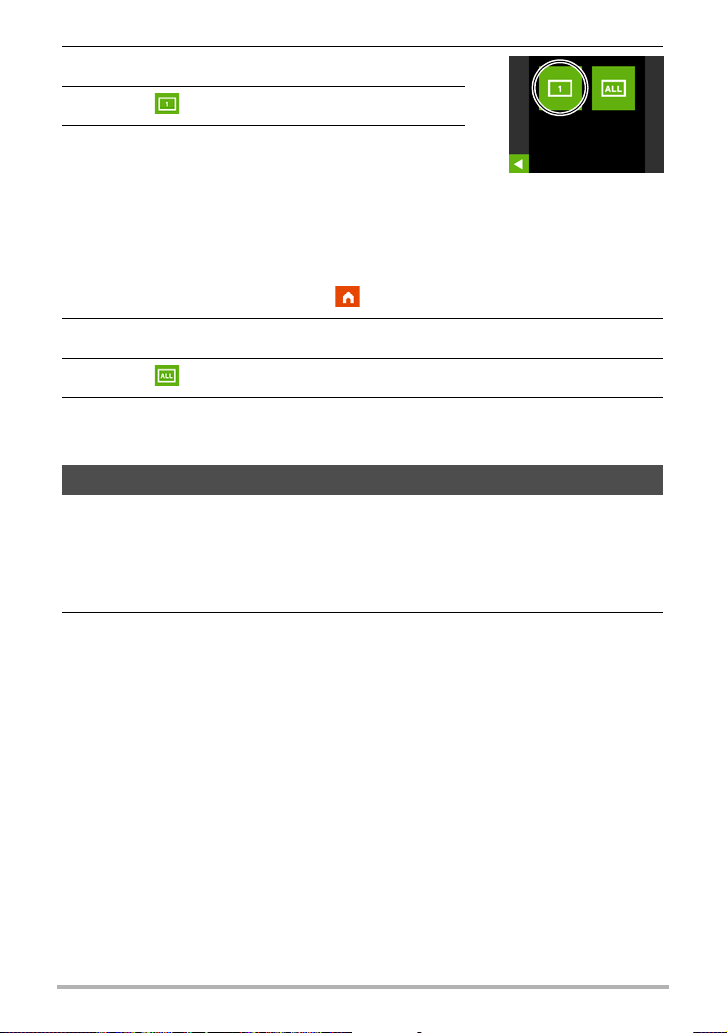
2. Touch the “t” (Delete) icon.
3. Touch “ ” (Delete 1 File).
4. Flick the screen to the left or right to scroll
through the files until the one you want to
delete is displayed, and then touch
“t” (Delete).
This will delete the selected file.
. To delete all files
1. In the PLAY mode, touch the “ ” (Home) icon.
2. Touch “t” (Delete).
3. Touch “ ” (All).
4. Touch “Delete”.
This will cause the message “There are no files.” to appear.
Zooming an On-screen Image
Snapshots can be zoomed on the monitor screen up to 2X.
• The actual available zoom factors depend on the size of the original image.
1. On the PLAY mode main screen, flick the screen to the left or right to
scroll through images until the one you want is displayed.
2. Spread your thumb and forefinger (page 17) on the displayed image to
enlarge it.
• Flicking an enlarged screen image will change the part of the image that is
displayed.
• Squeezing your thumb and forefinger (page 17) on the displayed image will
reduce it in size.
51
Viewing Snapshots and Movies
Page 52
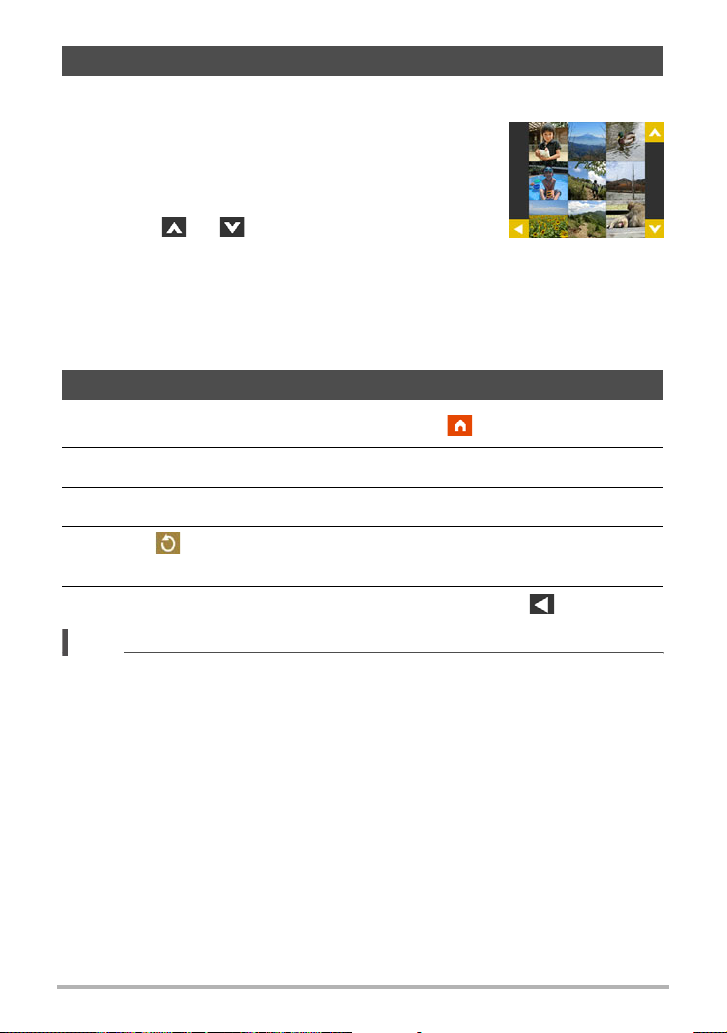
Viewing the Image Menu
The image menu shows multiple images on a single screen.
1. On the PLAY mode main screen, touch “]”.
This displays the image menu.
• While the main screen is displayed, spread (to
enlarge) or squeeze (to reduce) your fingers on
the screen to zoom the displayed image.
• Touch “ ” or “ ” or flick upwards or
downwards to scroll to the next page of images.
• To view the normal (single image) display mode,
touch the image your want to view.
• In the case of a movie, the first image in the movie is displayed.
• A question mark (?) will be displayed for images that cannot be displayed for
some reason.
Rotating an Image (Rotation)
1. On the PLAY mode main screen, touch the “ ” (Home) icon.
2. On the home screen, touch “MENU”.
3. Touch “Rotation”.
4. Touch “ ”.
This will rotate the image 90 degrees to the left.
5. When the image is in the orientation you want, touch “ ”.
NOTE
• For information about menu operations, see page 42.
52
Viewing Snapshots and Movies
Page 53
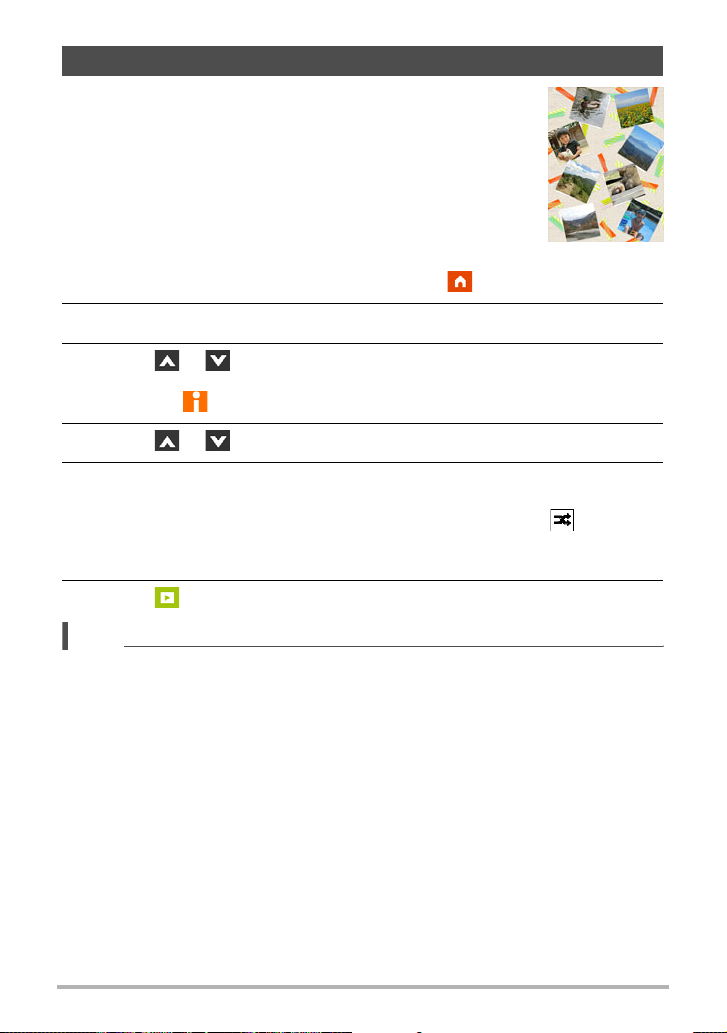
Creating a Collage of a Day’s Snapshots (Highlight Photo)
You can configure camera settings to automatically select
snapshot highlights and generate a collage of them each day.
The snapshots included in a Highlight Photo are selected
automatically based on their high light scores and shooting
condition information recorded along with the snapshots.
• You can use the Highlight Score function (page 55) to
change the highlight score of a snapshot.
1. On the PLAY mode main screen, touch the “ ” (Home) icon.
2. On the home screen, touch “COLLAGE”.
3. Touch “ ”, “ ” to select the date for which you want to create a
Highlight Photo.
• Touching “ ” will display an explanation of this function.
4. Touch “ ”, “ ” to display the layout you want to use.
5. Touch “Apply”.
This displays the Highlight Photo and saves it in camera memory.
• The screen that appears after the images is saved includes a “ ” (Shuffle)
icon. Touch this icon to have the camera re-select snapshots, and generate
and save another Highlight Photo.
6. Touch “ ” (PLAY) to exit Highlight Photo.
NOTE
• An image whose highlight score is “-1” is never included in a Highlight Photo.
• A Highlight Movie generation operation cannot be stopped part way through once it
is started.
53
Viewing Snapshots and Movies
Page 54
Creating a Movie of a Day’s Images (Highlight Movie)
You can configure camera settings to automatically select snapshot and movie
highlights, and create a movie of them each day. Images included in a Highlight
Movie are selected based on their high light scores and shooting condition
information recorded along with the images.
• You can use the Highlight Score function (page 55) to change the highlight score of
a snapshot.
• The playback time and effects applied to the Highlight Movie are automatically
determined based on the shooting condition information recorded along with the
images included in the movie and their highlight score (+1 or 0).
• Generation of a Highlight Movie may take some time, so make sure that the
camera battery is sufficiently charged before starting Highlight Movie creation.
1. On the PLAY mode main screen, touch the “ ” (Home) icon.
2. On the home screen, touch “Movie Highlights”.
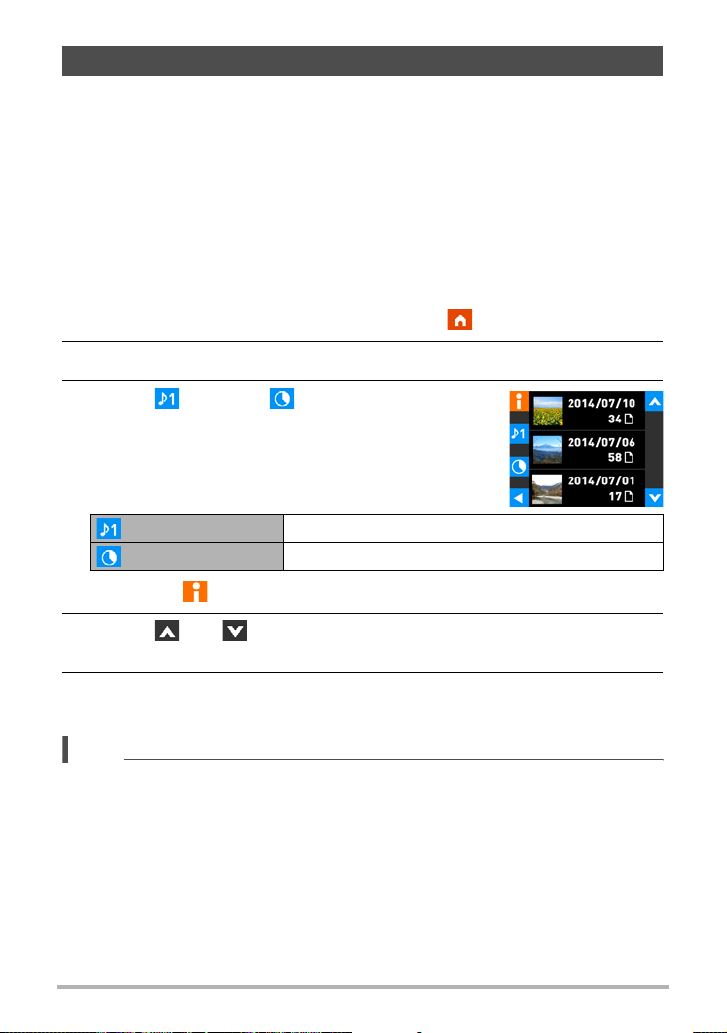
3. Touch “ ” (Music), “ ” (Play time) and
configure their settings as desired.
(Music) Select the background music you want to use.
(Play time) Specify the playback time of the Highlight Movie.
• Touching “ ” will display an explanation of this function.
4. Touch “ ” or “ ” to select the date for which you want to create a
Highlight Movie.
5. Touch “Yes”.
This creates and save the Highlight Movie, and displays it on the monitor screen.
NOTE
• A Highlight Movie generation operation cannot be stopped part way through once it
is started.
• An image whose highlight score is “–1” is never included in a Highlight Movie.
• A Highlight Movie is FHD movie quality, with an aspect ratio of 16:9. If an image
with an aspect ratio that is not 16:9 is incorporated into a Highlight Move, the top
and bottom of the image will be cropped as required.
• If a portrait orientation image is incorporated in to a Highlight Movie, there will be
black bands on the left and right of the image.
54
Viewing Snapshots and Movies
Page 55
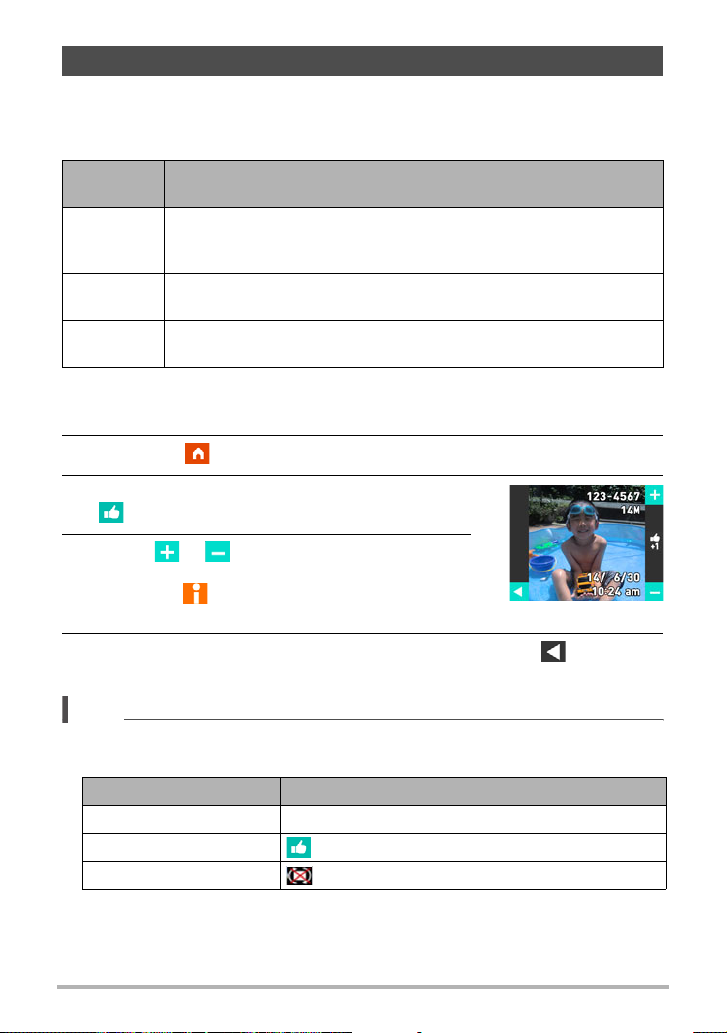
Changing the Highlight Score of an Image
You can use the procedure below to change the highlight score of a snapshot or
movie. The highlight score of an image is used when performing the operations
described in the table below.
Highlight
Score
0
+1
–1
• No score assigned (default)
• An image with this score may be selected for a Highlight Snapshot
or Highlight Movie.
• An image with this score is given priority for Highlight Snapshot or
Highlight Movie selection.
• An image with this score is never selected for a Highlight Snapshot
or Highlight Movie.
Description
1. On the PLAY mode main screen, display an image whose highlight
score you want to change.
2. Touch the “ ” (Home) icon.
3. On the Home Screen, touch the
“ ” (Highlight Score) icon.
4. Touch “ ”, “ ” to change the score of the
displayed image.
• Touching “ ” will display an explanation of this
function.
5. After changing the highlight score of the image, touch “ ” to return
to the home screen.
NOTE
• An image’s current highlight score is indicated as described below when the image
is displayed on the monitor screen.
Highlight Score Indicator
0No indicator
+1
–1
55
Viewing Snapshots and Movies
Page 56
Connecting the Camera with a Smartphone (Wireless LAN)
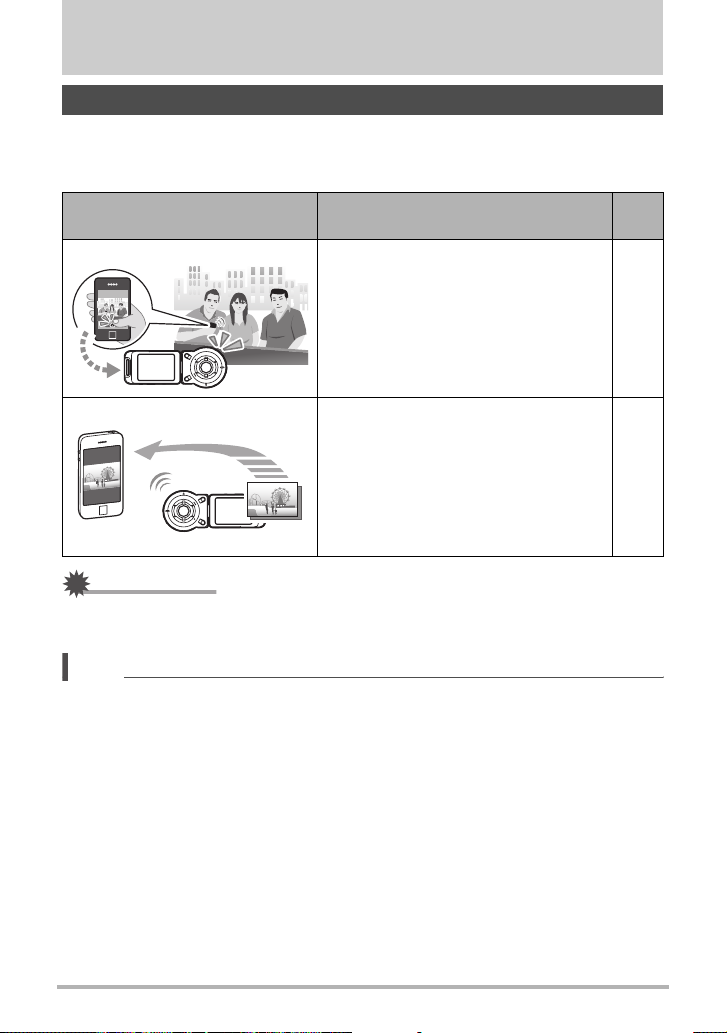
Controlling Your Camera with a Connected Smartphone
Establishing a wireless LAN connection between the camera and a smartphone (or
tablet computer) enables the functions described below. This operation requires
installation of the EXILIM Link app on your smartphone.
With this function: You can do this:
Remote Capture
Remotely control and shoot with the
camera using a smartphone.
Send to phone
You can select one more snapshot and/or
movie file in camera memory and send a
copy to a smartphone.
IMPORTANT!
• Never use wireless LAN functions inside an aircraft or anywhere else where such
operation is restricted.
NOTE
• Note that using wireless LAN functions requires more battery power usage than
normal. Make sure that the camera battery is sufficiently charged before starting a
wireless LAN operation.
• The operating range depends on the local communication environment and on the
type of smartphone you are connected to.
See
page:
59
60
Connecting the Camera with a Smartphone (Wireless
56
LAN)
Page 57

Establishing a Connection between a Smartphone and Your Camera
Installing the EXILIM Link Smartphone app on your smartphone makes it possible to
remotely control the camera from your smartphone and to send images recorded with
the camera to your smartphone. Search the EXILIM Link app on Google Play or the
App Store and install it on your smartphone.
. App operation guarantees
No guarantees are made concerning the ability to operate the EXILIM Link app on
any particular smartphone or tablet.
Installing the EXILIM Link App on Your Smartphone
. Android terminal (Supported Versions: Android 4.0 or later)
1. Open “Google Play”.
2. In the search field, type “EXILIM Link”.
3. Install EXILIM Link.
. iPhone (Supported Versions: iOS 6.0 or later)
1. Open “App Store”.
2. In the search field, type “EXILIM Link”.
3. Install EXILIM Link.
Connecting the Camera with a Smartphone (Wireless
57
LAN)
Page 58

Configuring Wireless LAN Settings
Use the procedure below to establish a wireless LAN connection between the camera
and a smartphone for the first time. This operation is required for the first connection
only.
1. If the camera is on, hold down [p] (Power) to turn it off.
2. On the camera, hold down [0] (Movie) as you hold down [p] (Power)
until the camera’s operation lamp flashes green.
This will enable connection with a smartphone.
• While the camera is connected with a smartphone, its shutter button and [
(Movie) button are disabled.
0]
3. For the smartphone Wi-Fi setting, input the camera SSID and
password.
This will connect the smartphone to the camera, which is indicated by the
camera’s operation lamp lighting green.
• The initial default SSID and password settings are shown below.
SSID:
* * * *
Password:
• The SSID and password can be changed from a smartphone that has the
EXILIM Link app installed.
• What you need to do to establish a wireless LAN connection depends on the
type of smartphone you are using. For details about how to establish a wireless
LAN connection see the user documentation that comes with your smartphone.
IMPORTANT!
• Note that the wireless LAN connection between the camera and smartphone is
maintained even while the EXILIM Link app is not running on the smartphone or
when the app is running in the background. Leaving a wireless LAN connection in
effect will shorten camera battery life and cause the camera to become warm. Shut
down the EXILIM Link app and turn off the camera to terminate the wireless LAN
connection whenever you are not using it.
• Terminating a wireless LAN connection will cause the camera to enter connection
standby. If no connection is established within three minutes, the camera will shut
off automatically.
* * * *
Connecting the Camera with a Smartphone (Wireless
58
LAN)
Page 59
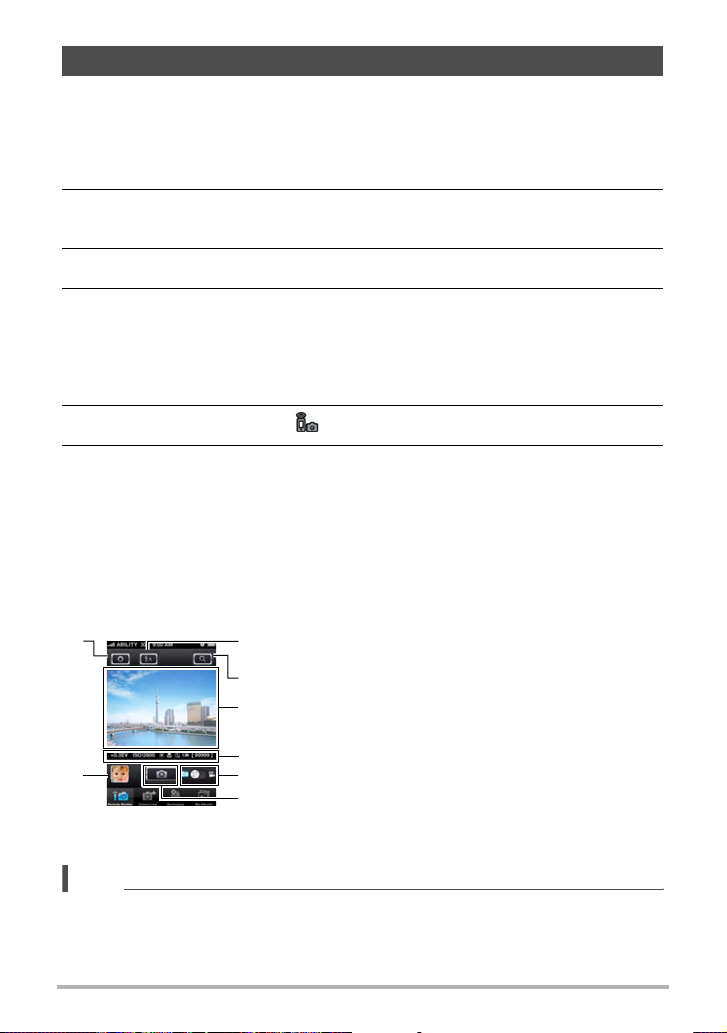
Using a Smartphone as a Camera Remote Controller
This function lets you remotely shoot a snapshot or movie with the camera using a
smartphone (Remote Capture). You also can perform remote zoom, self-timer, and
other operations as well.
1. If the camera is on, hold down [p] (Power) to turn it off.
2. On the camera, hold down [0] (Movie) as you hold down [p] (Power)
until the camera’s operation lamp flashes green.
3. On your smartphone, start up the EXILIM Link app.
4. On the smartphone, tap “Connect”.
This will connect the smartphone to the camera, which is indicated by the
camera’s operation lamp lighting green.
• If this is the first time you started up the app, its terms of use will appear on the
smartphone screen. Read the terms and then tap “I agree”.
5. On the smartphone, tap “ ”.
6. Compose the image on your smartphone’s screen as you shoot.
• After you are finished using Remote Capture exit the app on your smartphone.
. Controlling Your Camera with a Smartphone
During Remote Capture shooting, you can use the EXILIM Link app to control the
camera from a smartphone. This manual explains EXILIM Link operations based on
screens that appear using the iPhone version. Some operations may differ depending
on your smartphone type.
Configures REC settings.
1
8
2
3
4
5
6
1
Flips the screen image horizontally.
2
Performs a zoom operation.
3
Displays what is being picked up by the camera’s
4
lens.
Displays current settings.
5
Toggles between snapshot and movie shooting.
6
Shoots an image.
7
Shows the image that was just shot.
8
7
NOTE
• Images shot with Remote Capture can also be stored on the smartphone at the
time when the image is shot. To do so, tap
then select “On”.
, select “Synchronous Save”, and
1
Connecting the Camera with a Smartphone (Wireless
59
LAN)
Page 60
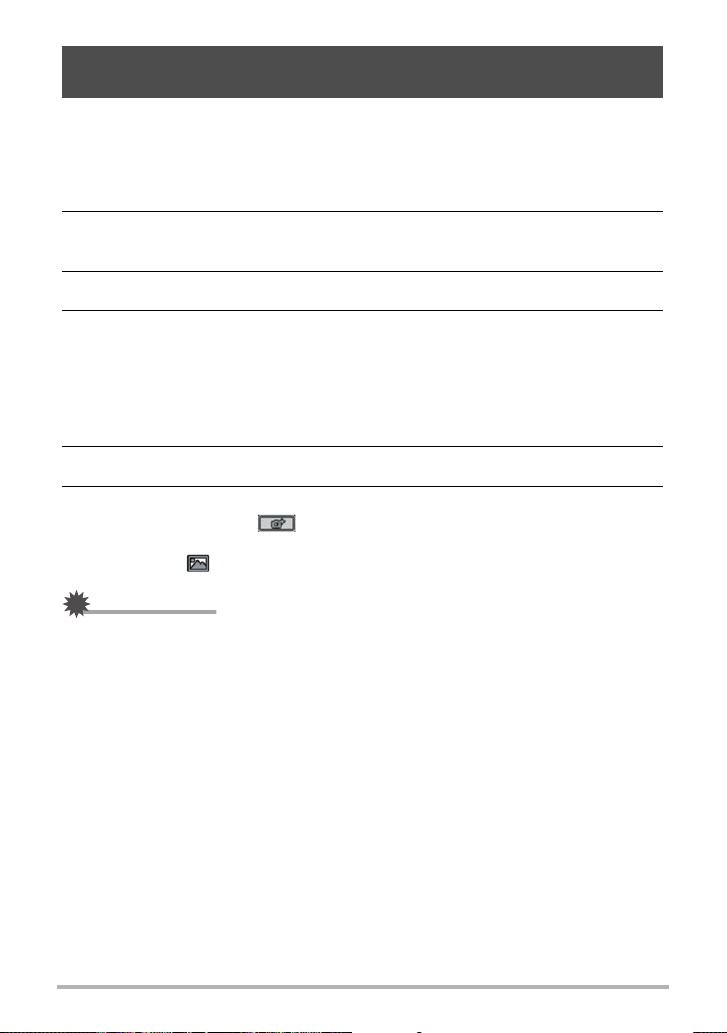
Sending a Snapshot or Movie File from Camera Memory to a Smartphone
You can select one or more snapshot and/or movie file in camera memory and send it
to a smartphone. You can select up to 99 files, totaling no more than 1500MB for a
single send.
1. If the camera is on, hold down [p] (Power) to turn it off.
2. On the camera, hold down [0] (Movie) as you hold down [p] (Power)
until the camera’s operation lamp flashes green.
3. On your smartphone, start up the EXILIM Link app.
4. On the smartphone, tap “Connect”.
This will connect the smartphone to the camera, which is indicated by the
camera’s operation lamp lighting green. The smartphone display shows a list of
images stored in camera memory.
• If this is the first time you started up the app, its terms of use will appear on the
smartphone screen. Read the terms and then tap “I agree”.
5. Tap the images of the files you want to have sent to the smartphone.
6. After selecting the images of all of the files you want to send to the
smartphone, touch “ ”.
This will send the images you selected to the smartphone. You can view the sent
images with “ ”.
IMPORTANT!
• Some smartphone models may not be able to play back movie files.
• Depending on your smartphone model, its operating system version, and/or its
remaining storage capacity can cause failure of a movie or snapshot save
operation. After send operation, perform the required operation on your
smartphone to ensure that the movie or snapshot was saved properly.
• Viewing a movie received on an Android terminal:
Note that movies are not displayed by Gallery. Movies are stored in a folder named
“EXILIM Link”. A separate movie player is required to playback movies (whose files
have the file name extension MOV). Depending on your movie player, you may not
be able to playback movies and/or audio.
Connecting the Camera with a Smartphone (Wireless
60
LAN)
Page 61
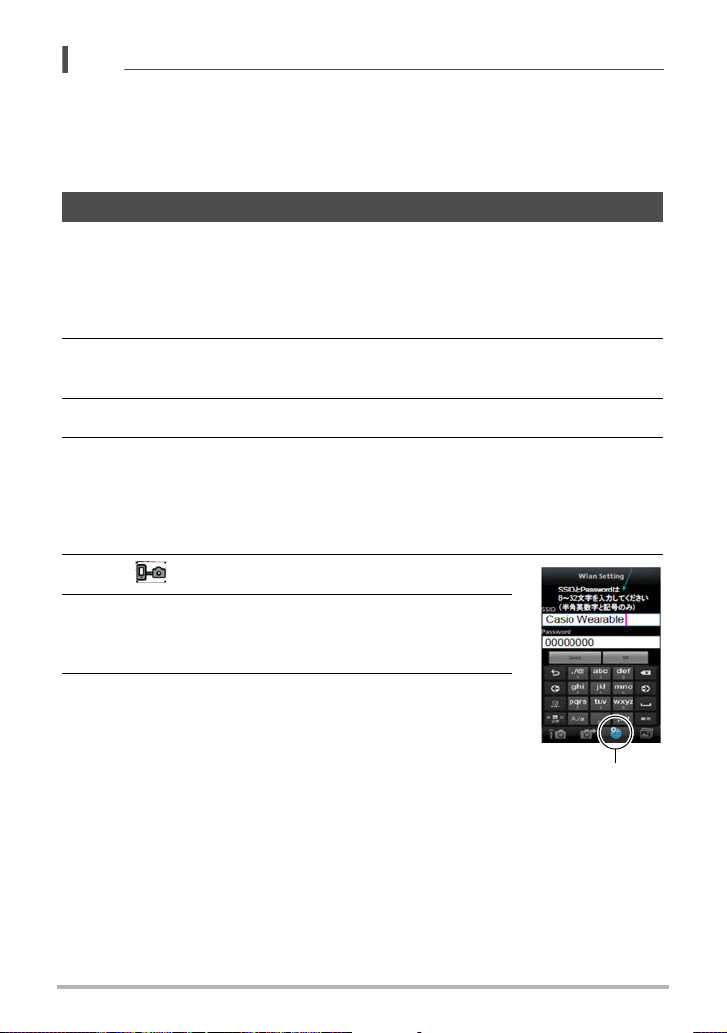
NOTE
• You can use the smartphone apps below to view snapshots after sending them.
– iPhone: Camera Roll
– Android terminal: Gallery or another photo browser app
• In the case of an iPhone, sent snapshots cannot be deleted with the EXILIM Link
app. To delete an image, use Camera Roll.
Changing the Camera SSID and Password
Use the procedure below to change the SSID and password you use when
establishing a wireless LAN connection between the camera and a smartphone.
1. If the camera is on, hold down [p] (Power) to turn it off.
2. On the camera, hold down [0] (Movie) as you hold down [p] (Power)
until the camera’s operation lamp flashes green.
3. On your smartphone, start up the EXILIM Link app.
4. On the smartphone, tap “Connect”.
This will connect the smartphone to the camera, which is indicated by the
camera’s operation lamp lighting green.
• If this is the first time you started up the app, its terms of use will appear on
your smartphone. Read the terms and then tap “I agree”.
5. Tap “ ”
6. Enter the new SSID and password.
• For the SSID and password, enter from eight to
32 single-byte characters and symbols.
7. Tap “OK”.
The new SSID and password will become effective the
next time you turn on the camera.
Connecting the Camera with a Smartphone (Wireless
61
SSID
LAN)
Page 62

NOTE
• Note that after changing the SSID and password on the camera, you will also need
to change the Wi-Fi settings of the smartphone.
• If you forget your camera SSID and password, you can perform the procedure
below to return them to their initial defaults.
Turn off the camera.
1
While holding down [0] (Movie) and the shutter button on the camera, hold
2
down [p] (Power) for about six seconds.
Connecting the Camera with a Smartphone (Wireless
62
LAN)
Page 63

Other Settings (Set Up)
This section explains menu items that you can use to configure settings and perform
other operations in both the REC mode and PLAY mode.
For information about menu operations, see page 42.
Configuring Camera Sound Settings (Camera Sound)
Procedure
* MENU * Setup * Camera Sound
When “ON” is selected for this function, a sound is emitted whenever you turn on the
camera or shoot an image, and when an error occurs. The volume level of the sound
is fixed and cannot be adjusted.
Using the Vibration Function (Vibration)
Procedure
* MENU * Setup * Vibration
While “ON” is selected for this function, the controller will vibrate whenever any one of
the events described below occurs.
• When a preview of an image that what just shot appears on the controller screen
• When movie recording ends
• When communication between the camera and controller is lost
• When an error occurs
Controller Startup Using a Flick Operation (Flick Start)
Procedure
* MENU * Setup * Flick Start
While “ON” is selected for this function, flicking the screen of the controller while it is
in the sleep mode will restore controller operation.
63
Other Settings (Set Up)
Page 64
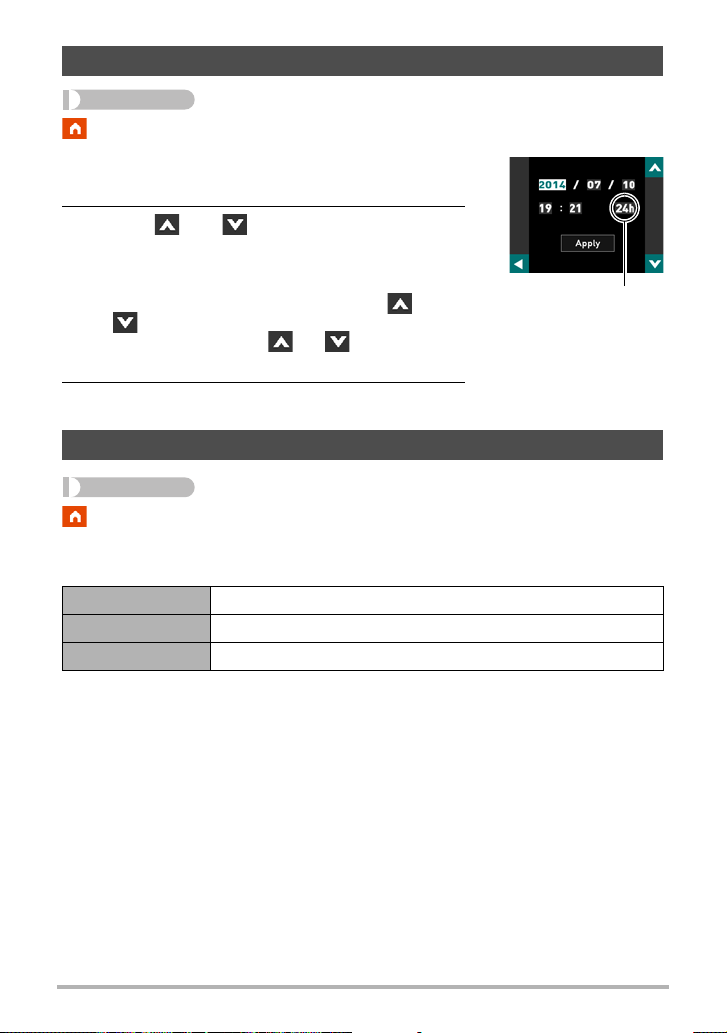
Setting the Camera’s Clock (Adjust)
Procedure
* MENU * Setup * Adjust
1. Touch the value you want to change (year,
month, day, hour, minute).
2. Touch “ ” or “ ” to change the currently
selected value.
• You can specify a date from 2001 to 2049.
• To switch between 12-hour and 24-hour format,
touch “am (pm)”/“24h”, and then touch “ ” or
“”.
• Touching and holding “ ” or “ ” scrolls at high
speed.
3. Touch “Apply”.
Specifying the Date Style (Date Style)
Procedure
* MENU * Setup * Date Style
You can select from among three different styles for the date.
Example: July 10, 2015
YY/MM/DD 15/7/10
DD/MM/YY 10/7/15
MM/DD/YY 7/10/15
12/24 hour switch icon
64
Other Settings (Set Up)
Page 65
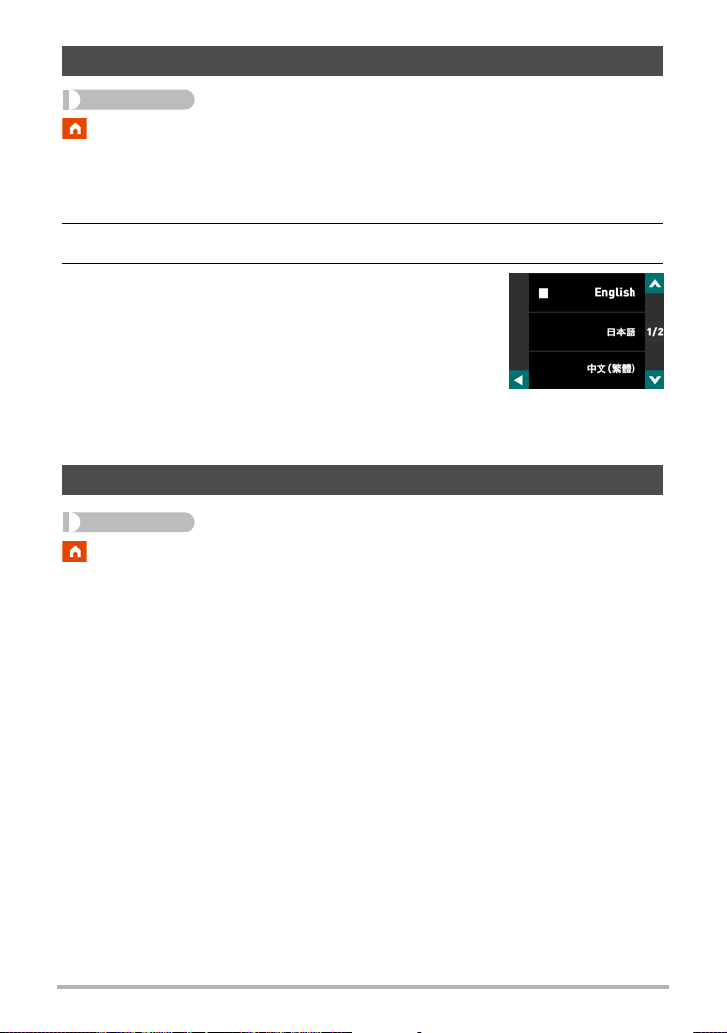
Specifying the Display Language (Language)
Procedure
* MENU * Setup * Language
. Specify the display language you want.
1. On the menu screen, touch “Setup”.
2. Touch “Language”.
3. Flick upwards and downwards until you find
the language you want, and then touch to
select it.
• Camera models sold in certain geographic areas may not support display language
selection.
Formatting Built-in Memory or a Memory Card (Format)
Procedure
* MENU * Setup * Format
If a memory card is loaded in the camera, this operation will format the memory card.
It will format built-in memory if no memory card is loaded.
• The format operation will delete all contents on the memory card or in built-in
memory. It cannot be undone. Make sure you do not need any data currently on
the card or in built-in memory before you format it.
• Formatting built-in memory or a memory card will delete all protected images
stored there.
• Check the battery level before starting a format operation and make sure it is not
too low. Formatting may not be performed correctly and the camera may stop
operating normally if the camera powers down while formatting is in progress.
65
Other Settings (Set Up)
Page 66

Resetting the Camera to Factory Defaults (Reset)
Procedure
* MENU * Setup * Reset
See page 99 for details about the camera’s factory default settings.
The settings below are not reset.
clock settings, date style, screen language
66
Other Settings (Set Up)
Page 67
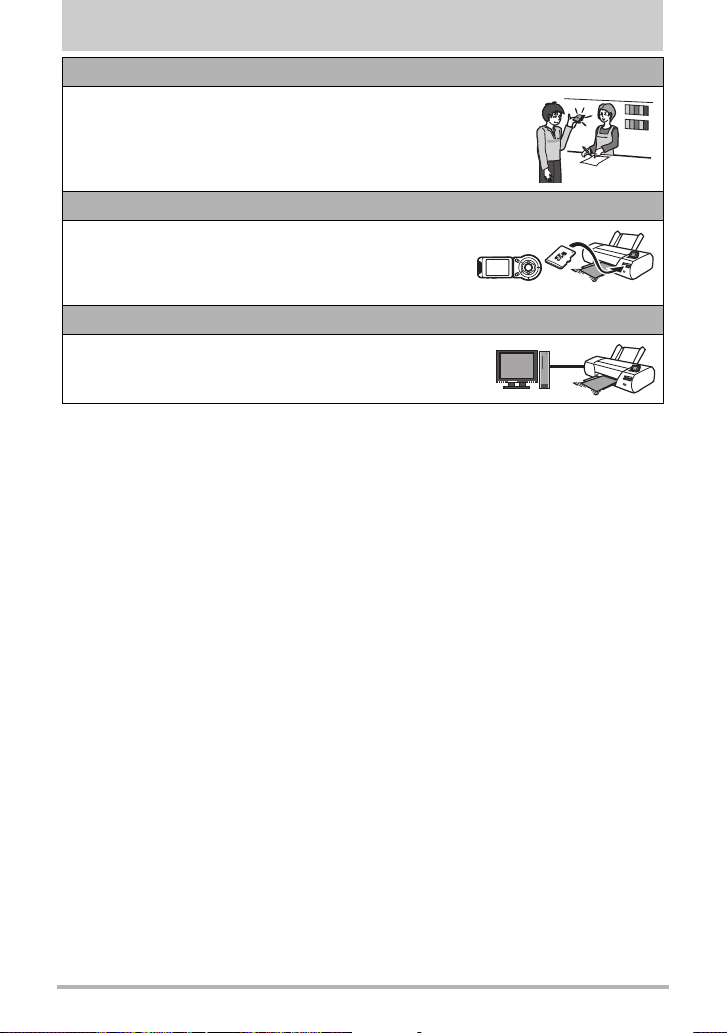
Printing
Professional Print Service
You can take a memory card that contains the images you want
to print to a professional print service and have them printed.
Printing on a Home Printer
You can use a printer equipped with a memory card slot
to print images directly from a memory card. For details,
see the user documentation that comes with your
printer.
Printing with a Computer
After transferring the images to your computer, use
commercially available software to print.
67
Printing
Page 68

Printing with a Computer
There are a variety of different ways to print images stored on a computer. This
section shows one standard printing example.
. Printing on a Windows Computer
1. Use the procedure under “Viewing and Storing Images on a Computer”
(page 70) to store the image you want to print, and then display the
image on your computer screen.
2. Click “Print” and then “Print”.
3. Configure the desired print settings and then click “Print”.
This will print the selected images.
. Printing on a Macintosh
1. Use the procedure under “Connecting the Camera to Your Computer
and Saving Files” (page 73) to store the image you want to print, and
then display the image on your Macintosh screen.
2. Click “File” and then “Print”.
3. Configure print settings and then click “Print”.
This will print the selected image.
68
Printing
Page 69
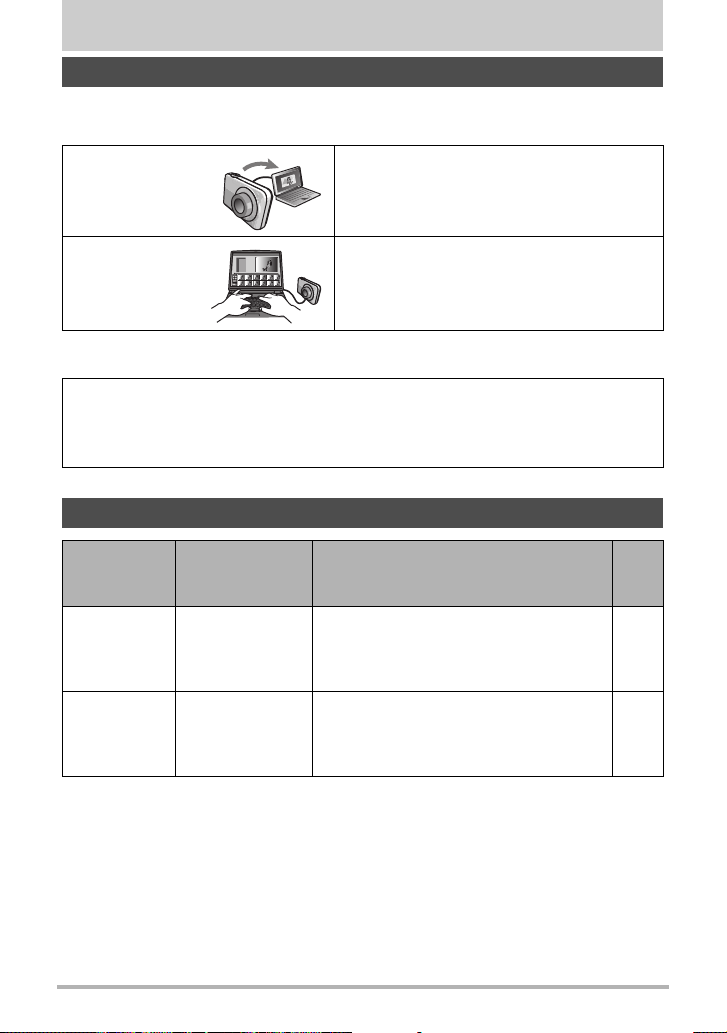
Using the Camera with a Computer
Things you can do using a computer...
You can perform the operations described below while the camera is connected to a
computer.
Save images to a
computer and
view them there
Play back and
edit movies
The procedures you need to perform are different for Windows and the Macintosh.
• Windows users should refer to “Using the Camera with a Windows Computer”
on page 69.
• Macintosh users should refer to “Using the Camera with a Macintosh” on page
73.
• Save images and view them manually
(USB connection) (pages 70, 73).
• You can play back movies (pages 72, 75).
• To edit movies, use commercially
available software as required.
Using the Camera with a Windows Computer
When you
want to do
this:
Save images
to a computer
and view them
there manually
Play movies
Operating
System Version
Windows 8.1,
Windows 8,
Windows 7,
Windows Vista
Windows 8.1,
Windows 8,
Windows 7,
Windows Vista
Required Software
Installation not required.
QuickTime 7 or higher
• You need to download QuickTime 7 on
the Web if you want to use it.
See
page:
70
72
69
Using the Camera with a Computer
Page 70
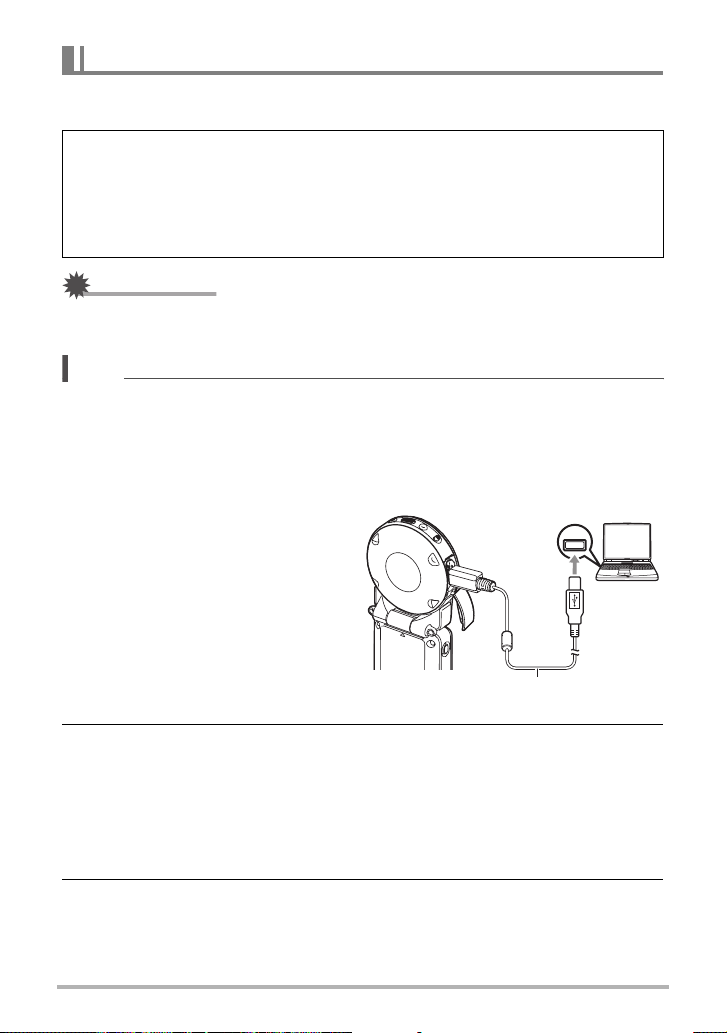
Viewing and Storing Images on a Computer
You can connect the camera to your computer in order to view and store images
(snapshot and movie files).
Never use your computer to modify, delete, move, or rename any image files
that are in the camera’s built-in memory or on its memory card.
Doing so can cause problems with the camera’s image management data, which
will make it impossible to play back images on the camera and can drastically alter
remaining memory capacity. Whenever you want to modify, delete, move, or
rename an image, do so only on images that are stored on your computer.
IMPORTANT!
• Never unplug the USB cable, or operate the camera while viewing or storing
images. Doing so can cause data to become corrupted.
NOTE
• You also can use your computer’s card slot (if it has one) or a commercially
available card reader to access image files directly from the camera’s memory
card. For details, see the user documentation that comes with your computer.
. To connect the camera to your computer and save files
1. Turn off the camera and then
use the micro USB cable that
comes with the camera to
[USB] port
USB
connect it to your computer.
• For details about connecting to
the camera and precautions
when connecting, see page 20.
Micro USB cable
(included with camera)
2. Press [p] (Power) to turn on the camera.
When you turn on the camera, check to make sure that the color of its operation
lamp changes from red to green or amber (page 22). Note that in this case the
monitor screen will remain blank.
• The first time you connect the camera to your computer with the USB cable, an
error message may appear on your computer. If this happens, disconnect and
then reconnect the USB cable.
3. Windows 8.1, Windows 8 users: Click “Desktop” and then “Explorer”.
Windows 7, Windows Vista users: Click “Start” and then “Computer”.
70
Using the Camera with a Computer
Page 71

4. Double-click “Removable Disk”.
• Your computer recognizes the memory card loaded in the camera (or built-in
memory if there is no card) as a removable disk.
5. Right-click the “DCIM” folder.
6. On the shortcut menu that appears, click “Copy”.
7. Windows 8.1, Windows 8 users: Click “Documents”.
Windows 7, Windows Vista users: Click “Start” and then “Documents”.
• If you already have a “DCIM” folder in “Documents”, the next step will overwrite
it. If you want to keep the existing “DCIM” folder, you need to change its name
or move it to a different location before performing the next step.
8. Windows 8.1, Windows 8 users: On the “Documents” menus, click
“Home” and then “Paste”.
Windows 7 users: On the “Documents” “Organize” menu, select
“Paste”.
Windows Vista users: On the “Documents” “Edit” menu, select
“Paste”.
This will paste the “DCIM” folder (and all the image files it contains) into your
“Documents” folder. You now have a copy of the files that are in camera memory
on your computer.
9. After you finish copying images, disconnect the camera from the
computer.
After confirming that the operation lamp is not flashing red, disconnect the USB
cable.
. To view images you copied to your computer
1. Double-click the copied “DCIM” folder to open it.
2. Double-click the folder that contains the images you want to view.
3. Double-click the image file you want to view.
• For information about file names, see “Memory Folder Structure” on page 77.
• An image that was rotated on the camera will be displayed on your computer
screen in its original (unrotated) orientation.
• Viewing CS and interval shot images on a computer will individually display the
component images in the group. CS and interval shot images cannot be
viewed as a group on a computer.
71
Using the Camera with a Computer
Page 72

Playing Movies
To play back a movie, first copy it to your computer and then double-click the movie
file. Some operating systems may not be able to play back movies. If this happens,
you need to install separately available software.
• If you are unable to play back movies, go to the URL below to download
QuickTime 7 and install it on your computer.
http://www.apple.com/quicktime/
. Minimum Computer System Requirements for Movie Playback
The minimum system requirements described below are necessary to play back
movies recorded with this camera on a computer.
Operating System : Windows 8.1, Windows 8, Windows 7, Windows Vista
CPU : Core 2 Duo 3.0GHz or higher
Required Software: QuickTime 7 or higher
• The above are recommended system environments. Configuring one of these
environments does not guarantee proper operation.
• Certain settings and other installed software may interfere with proper playback of
movies.
. Movie Playback Precautions
• Be sure to move the movie data to the hard disk of your computer before trying to
play it. Proper movie playback may not be possible for data accessed over a
network, from a memory card, etc.
• Proper movie playback may not be possible on some computers. If you experience
problems, try the following.
– Quit any other applications you have running, and stop resident applications.
72
Using the Camera with a Computer
Page 73
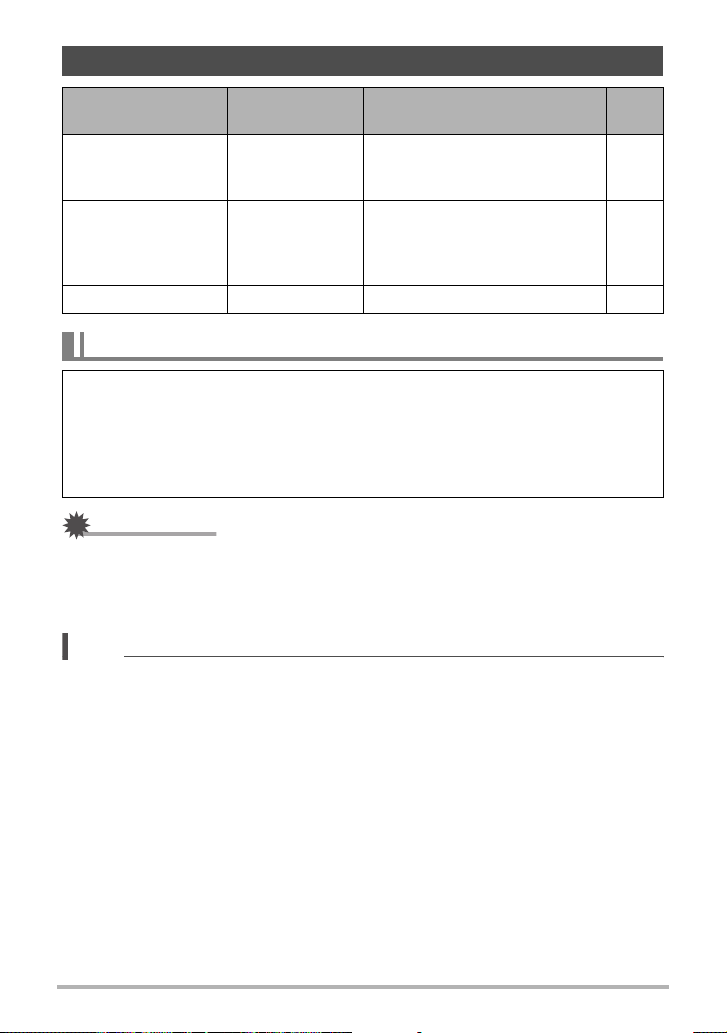
Using the Camera with a Macintosh
When you want to
do this:
Save images to your
Macintosh and view
them there manually
Save images to your
Macintosh
automatically/
Manage images
Play movies OS X QuickTime 7.7 or higher 75
Operating
System Version
OS X Installation not required. 73
OS X
Required Software
iPhoto, which comes bundled
with some Macintosh products.
See
page:
–
Connecting the Camera to Your Computer and Saving Files
Never use your computer to modify, delete, move, or rename any image files
that are in the camera’s built-in memory or on its memory card.
Doing so can cause problems with the camera’s image management data, which
will make it impossible to play back images on the camera and can drastically alter
remaining memory capacity. Whenever you want to modify, delete, move, or
rename an image, do so only on images that are stored on your computer.
IMPORTANT!
• Never unplug the USB cable, or operate the camera while viewing or storing
images. Doing so can cause data to become corrupted.
• The camera does not support operation with Mac OS X 10.0 to 10.4. Operation is
supported with Mac OS 10.5 to 10.9 (using the OS standard USB driver) only.
NOTE
• You also can use your computer’s card slot (if it has one) or a commercially
available card reader to access image files directly from the camera’s memory
card. For details, see the user documentation that comes with your computer.
73
Using the Camera with a Computer
Page 74

. To connect the camera to your computer and save files
1. Turn off the camera and then
use the micro USB cable that
comes with the camera to
[USB] port
USB
connect it to your Macintosh.
• For details about connecting to
the camera and precautions
when connecting, see page 20.
Micro USB cable
(included with camera)
2. Press [p] (Power) to turn on the camera.
When you turn on the camera, check to make sure that the color of its operation
lamp changes from red to green or amber (page 22). Note that in this case the
monitor screen will remain blank.
In this mode, your Macintosh recognizes the memory card loaded in the camera
(or the camera’s built-in memory if it does not have a memory card loaded) as a
drive. The appearance of the drive icon depends on the Mac OS version you are
using.
• The first time you connect the camera to your Macintosh with the USB cable,
an error message may appear on your computer. If this happens, disconnect
and then reconnect the USB cable.
3. Double-click the camera’s drive icon.
4. Drag the “DCIM” folder to the folder to which you want to copy it.
5. After the copy operation is complete, drag the drive icon to Trash.
6. Disconnect the camera from the computer.
After confirming that the operation lamp is not flashing red, disconnect the USB
cable.
74
Using the Camera with a Computer
Page 75
. To view copied images
1. Double-click the camera’s drive icon.
2. Double-click the “DCIM” folder to open it.
3. Double-click the folder that contains the images you want to view.
4. Double-click the image file you want to view.
• For information about file names, see “Memory Folder Structure” on page 77.
• An image that was rotated on the camera will be displayed on your Macintosh
screen in its original (unrotated) orientation.
Playing a Movie
You can use QuickTime, which comes bundled with your operating system, to play
back movies on a Macintosh. To play back a movie, first copy it to your Macintosh
and then double-click the movie file.
. Minimum Computer System Requirements for Movie Playback
The minimum system requirements described below are necessary to play back
movies recorded with this camera on a computer.
Operating System : Mac OS X 10.5 or higher
Required Software: QuickTime 7.7 or higher
• The above are recommended system environments. Configuring one of these
environments does not guarantee proper operation.
• Certain settings and other installed software may interfere with proper playback of
movies.
. Movie Playback Precautions
Proper movie playback may not be possible on some Macintosh models. If you
experience problems, try the following.
– Upgrade to the latest version of QuickTime.
– Shut down other applications that are running.
IMPORTANT!
• Be sure to move the movie data to the hard disk of your Macintosh before trying to
play it. Proper movie playback may not be possible for data accessed over a
network, from a memory card, etc.
75
Using the Camera with a Computer
Page 76
Files and Folders
The camera creates a file each time you shoot a snapshot, record a movie, or
perform any other operation that stores data. Files are grouped by storing them in
folders. Each file and folder has its own unique name.
• For details about how folders are organized in memory, see “Memory Folder
Structure” (page 77).
Name and Maximum Number Allowed Example
File
Each folder can contain up to 9999 files named
CIMG0001 through CIMG9999. The extension
on the file name depends on the file type.
Folders
Folders are named from 100CASIO to
999CASIO.
There can be up to 900 folders in memory.
• You can view folder and file names on your computer. For details about how file
names are displayed on the camera’s monitor screen, see page 9.
• The total number of folders and files allowed depends on the image size and
quality, and capacity of the memory card being used for storage.
26th file name:
CIMG0026.JPG
Extension
Serial number (4 digits)
100th folder name:
100CASIO
Serial number (3 digits)
Memory Card Data
The camera stores images you shoot in accordance with the Design Rule for Camera
File System (DCF).
. About DCF
The following operations are supported for DCF-compliant images. Note, however,
that CASIO makes no performance guarantees concerning these operations.
• Transferring this camera’s DCF-compliant images to another manufacturer’s
camera and view them.
• Printing this camera’s DCF-compliant images on another manufacturer’s printer.
• Transferring another camera’s DCF-compliant images to this camera and view
them.
76
Using the Camera with a Computer
Page 77

. Memory Folder Structure
DCIM
100CASIO
CIMG0001.JPG
CIMG0002.MOV
101CASIO
102CASIO
DCIM Folder
Recording Folder
Image File
Movie File
Recording Folder
Recording Folder
. Supported Image Files
• Image files shot with this camera
• DCF-compliant image files
This camera may not be able to display an image, even if it is DCF-compliant. When
displaying an image recorded on another camera, it may take a long time for the
image to appear on this camera’s monitor screen.
. Built-in Memory and Memory Card Data Handling Precautions
• Whenever copying memory contents to your computer, you should copy the DCIM
folder and all of its contents. A good way to keep track of multiple DCIM folders it to
change their names to dates or something similar after you copy them to your
computer. If you later decided to return a DCIM folder to the camera, however, be
sure to change its name back to DCIM. The camera is designed to recognize only a
root file with the name DCIM. Note the camera also will not be able to recognize the
folders inside the DCIM folder unless they have the names they originally had
when you copied them from the camera to your computer.
• Folders and files must be stored in accordance with the “Memory Folder Structure”
shown on page 77 in order for the camera to be able to recognize them correctly.
77
Using the Camera with a Computer
Page 78

Appendix
Safety Precautions
DANGER
*
This symbol indicates information that, if ignored or applied incorrectly, creates the
danger of death or serious personal injury.
WARNING
*
This indication stipulates matters that have the risk of causing death or serious injury
if the product is operated incorrectly while ignoring this indication.
CAUTION
*
This indication stipulates matters that have the risk of causing injury as well as
matters for which there is the likelihood of occurrence of physical damage only if the
product is operated incorrectly while ignoring this indication.
Symbol Examples
This circle with a line through it (-) means that the indicated action must not
be performed. Indications within or nearby this symbol are specifically
!
prohibited. (The example at left indicates that disassembly is prohibited.)
The black dot (0) means that the indicated action must be performed.
Indications within this symbol are actions that are specifically instructed to be
$
performed. (The example at left indicates that the power plug must be
unplugged from the electrical socket.)
DANGER
*
. Built-in Rechargeable Battery
• To charge the battery, use only the method specifically described in this
manual. Attempting to charge the battery by an unauthorized means
creates the risk of battery overheating, fire, and explosion.
• Do not expose or immerse the battery in fresh water or salt water. Doing
so can damage the battery, and cause deterioration of its performance
and loss of service life.
• The battery is intended for use with a CASIO Digital Camera only. Use
with any other device creates the risk of the battery damage, or
deterioration of battery performance and service life.
+
%
+
78
Appendix
Page 79

DANGER
*
• Failure to observe any of the following precautions creates the risk of battery
overheating, fire, and explosion.
– Never use or leave the battery near open flame.
– Do not expose the battery to heat or fire.
– Make sure the battery is oriented correctly when charging it.
– Never carry or store the battery together with items that can conduct electricity
(necklaces, pencil lead, etc.).
– Never disassemble the battery, pierce it with a needle, or expose it to strong
impact (hit it with a hammer, step on it, etc.), and never apply solder to it.
Never place the battery into a microwave oven, dehumidifier, high-pressure
generating device, etc.
– Never remove the outer sticker from the battery.
• Do not use or leave the battery under direct sunlight, in an automobile
parked in the sun, or in any other area subject to high temperatures.
Doing so can damage the battery, and cause deterioration of its
performance and loss of service life. Also, these conditions can cause the
battery to swell to the point that you may not be able to remove it.
• Battery fluid can damage your eyes. Should battery fluid get into your
eyes accidentally, immediately rinse them with clean tap water and then
consult a physician.
-
-
+
79
Appendix
Page 80

WARNING
*
. Smoke, abnormal odor, overheating, and other abnormalities
• Continued use of the camera while it is emitting smoke or strange odor,
or while it is overheating creates the risk of fire and electric shock.
Immediately perform the following steps whenever any of the above
symptoms are present.
1. Turn off the camera.
* If the camera will not turn off for some reason, press the reset button (page
7).
2. If you are using the USB-AC adapter to power the camera, unplug the power
plug from the power outlet.
3. Contact your retailer or nearest CASIO authorized service center.
. Keep Away From Fire
• Never expose the camera to fire, which can cause it to explode and
creates the risk of fire and personal injury.
. Avoid Use While In Motion
• Never use the camera to record or play back images while operating an
automobile or other vehicle, or while walking. Looking at the monitor
while in motion creates the risk of serious accident.
. USB-AC Adapter
• Misuse of USB-AC adapter creates the risk of fire and electric shock. Be sure to
observe the following precautions.
– Use only the specified USB-AC adapter.
– Never use the USB-AC adapter with another device.
– Use a power outlet that matches the power supply specified for the
USB-AC adapter.
– Never plug the USB-AC adapter or power cord into a wall outlet that is shared
by other devices, or into a shared extension cord.
– Never locate the USB-AC adapter near a stove or other heating device.
• Misuse of the USB-AC adapter can cause them to become damaged, creating
the risk of fire and electric shock. Be sure to observe the following precautions.
– Never place heavy objects on the USB-AC adapter or subject it to
direct heat.
– Do not modify the USB-AC adapter, allow it to become damaged, or
forcibly bend it.
– Do not twist or pull on the power cord.
– When in use, locate the cord where it will not be tripped over.
$
-
-
-
-
80
Appendix
Page 81

WARNING
*
• Never touch the power plug while your hands are wet. Doing so creates
the risk of electric shock.
• Should the power cord or power plug become damage, contact your
retailer or nearest CASIO authorized service center.
• Do not use the USB-AC adapter in areas where liquids
them. Liquids create the risk of fire and electric shock.
* Liquids: Water, sports drinks, seawater, animal or pet urine, etc.
• Do not place a flower vase or any other liquid container on top of the
USB-AC adapter. Water creates the risk of fire and electric shock.
• Do not touch the camera or USB-AC adapter during lightning storms.
If a power cord was included with your camera
• The power cord that comes with the camera is designed for use in the
country where the camera was purchased. If you use the camera in
another country, be sure to use a power cord that conforms to that
country’s ratings and power supply voltage. Use of an improper power cord
creates the risk of fire and electric shock.
• Before going out, be sure to unplug the USB-AC adapter from the power
outlet and put in a place away from objects used by animals and pets.
An animal or pet chewing on the power cord can cause it short, leading
to the risk of fire.
. Water and Foreign Matter
• Water, other liquids, or foreign matter (especially metal) getting inside
the camera creates the risk of fire and electric shock. Immediately
perform the following steps whenever any of the above symptoms are
present. Particular care is required when using the camera where it is raining or
snowing, near the ocean or other body of water, or in a bathroom.
1. Turn off the camera.
* If the camera will not turn off for some reason, press the reset button (page
7).
2. If you are using the USB-AC adapter to power the camera, unplug the power
plug from the power outlet.
3. Contact your retailer or nearest CASIO authorized service center.
. Disassembly and Modification
• Except when disposing of the camera, never try to take it apart or modify
it in any way. Doing so creates the risk of electric shock, burn injury, and
other personal injury. Be sure to leave all internal inspection,
maintenance, and repair up to your retailer or nearest CASIO authorized service
center.
* might spill on
"
+
-
%
1
+
+
%
!
81
Appendix
Page 82

WARNING
*
. Dropping and Rough Treatment
• Continued use of the camera after it is damaged by dropping or other
rough treatment creates the risk of fire and electric shock. Immediately
perform the following steps whenever any of the above symptoms are
present.
1. Turn off the camera.
* If the camera will not turn off for some reason, press the reset button (page
7).
2. If you are using the USB-AC adapter to power the camera, unplug the power
plug from the power outlet.
3. Contact your retailer or nearest CASIO authorized service center.
. Memory Cards
• Memory cards are small and present a risk of accidentally being
swallowed by infants and young children. Keep memory cards out of the
reach of infants and young children. If a memory card is ever swallowed
accidentally, contact a physician immediately.
. Precaution when Camera is On
• Do not touch the camera for long periods while it is on. The camera
becomes warm when on, and long term contact creates the risk of lowtemperature burns.
. Interference with other digital devices
• Should you notice radio interference or other problems on other devices
is being caused while using this product, do not use the wireless
functions of this product. Use of wireless functions creates the risk of
radio interference and abnormal operation of other devices.
• When in a medical facility or aircraft, comply with instructions of
personnel in charge. Electromagnetic waves and other signals emitted
by the camera’s wireless function create the risk of accident.
• Do not use the camera’s wireless function while in the vicinity of high
precision digital devices or digital devices that use weak signals. Doing
so can interfere with proper operation of such digital devices and create
the risk of accident.
• When using the camera’s wireless function, keep it away from any
person wearing a pacemaker. Magnetism emitted by the camera may
affect cardiac pacemakers and other medical devices. Should you ever
notice any abnormality, immediately move away from the product and contact a
physician.
• On a crowded train or any other crowded location where there is the
possibility of being in the vicinity of a person wearing a cardiac
pacemaker, turn off the camera’s wireless function or turn off the
camera. Radio waves emitted by the camera’s wireless function may affect
pacemaker operation.
-
+
+
-
+
-
+
+
82
Appendix
Page 83

CAUTION
*
. USB-AC Adapter
• Misuse of the USB-AC adapter creates the risk of fire and electric shock. Make
sure you observe the following precautions.
– Never cover the USB-AC adapter or power cord with a quilt, blanket,
or other cover while it is in use, and do not use it near a heater. Doing
so can interfere with heat radiation and cause the area around them
to become hot.
– Do not use detergent when cleaning the power cord, the USB-AC adapter, or
the USB cable (especially the plugs and jacks).
– Insert the power plug into the wall outlet as far as it will go.
– Unplug the power plug from the wall outlet before leaving the camera
unattended for long periods, such as when leaving on a trip, etc.
– At least once a year, use a cloth or vacuum cleaner to clean any dust build up
on the prongs of the power plug and in the area around them.
– (Power cord included with your camera) When unplugging from the wall outlet,
never pull on the power cord. Grasp the power plug and pull.
. Built-in Rechargeable Battery
• If battery charging does not end normally within the specified charging
time, stop charging anyway and contact your local CASIO authorized
service center. Continued charging creates the risk of battery
overheating, fire, and explosion.
• Be sure to read the user documentation that comes with the camera
before using or charging the battery.
• Store batteries in a location that cannot be reached by infants and young
children. When using a battery where infants and young children are
present, be on guard to ensure that they do not have the chance to
remove the battery from the camera.
• Do not leave batteries near areas used by pets. A pet chewing on a
battery can lead to accidents caused by the battery leaking, overheating,
or exploding.
• Should fluid from a battery accidentally get onto clothing or your skin,
immediately rinse it off with clean tap water. Prolonged contact with
battery fluid can cause skin irritation.
. Connections
• Never plug any devices that are not specified for use with this camera
into connectors. Connecting a non-specified device creates the risk of
fire and electric shock.
. Unstable Locations
• Never place the camera on an unstable surface, on a high shelf, etc.
Doing so can cause the camera to fall, creating the risk of personal
injury.
-
+
+
+
+
-
+
-
-
83
Appendix
Page 84

CAUTION
*
. Locations To Be Avoided
• Never leave the camera in any of the following types of locations. Doing so
creates the risk of fire and electric shock.
– Areas subject to large amounts of humidity or dust
– Food preparation areas or other locations where oil smoke is present
– Near heaters, on a heated carpet, in areas exposed to direct sunlight,
in a closed vehicle parked in the sun, or other areas subject to very high
temperatures
. Monitor Screen
• Do not apply strong pressure to the LCD panel surface or subject it to
strong impact. Doing so can cause the display panel glass to crack and
lead to personal injury.
• Should the monitor screen ever become cracked, never touch any of the
liquid inside the monitor screen. Doing so creates the risk of skin
inflammation.
• Should monitor screen liquid ever get into your mouth, immediately rinse
your mouth out and contact your physician.
• Should monitor screen liquid ever get into your eyes or onto your skin,
immediately rinse with clean water for at least 15 minutes and contact
your physician.
. Backing Up Important Data
• Always keep backup copies of important data in camera memory by
transferring it to a computer or other storage device. Note that data can
be deleted in the case of camera malfunction, repair, etc.
. Memory Protection
• Whenever replacing the battery, be sure to follow the correct procedure
as described in the documentation that comes with the camera.
Incorrectly replacing the battery can result in corruption or loss of data in
camera memory.
-
-
1
+
+
+
+
84
Appendix
Page 85

Shock resistant, Waterproof, Dustproof
This camera is designed to be shock resistant, waterproof, and dustproof as
described below.
0 Shock resistant:
This camera has passed drop testing from a height of 2.13 meters/7 feet* onto a
plywood (lauan material)*
* Based on CASIO test equivalent to MIL-Standard 810F Method 516.5-Shock.
(6 faces, 8 corners, 12 edges: Total of 26 drops.)
0 Waterproof:
Corresponds to IEC/JIS Protection Class 7 (IPX7)*
equivalent waterproofing that allows immersion up to 3.0 meters for 60 minutes and
protection against jet spray from all directions.*
0 Dustproof:
Corresponds to IEC/JIS Protection Class 6 (IP6X) dustproofing.
*1 Though the camera is designed to withstand the effects of impact occurring during
normal daily use, very strong impact due to very rough handling such as throwing the
camera or dropping it from excessive heights can result in serious damage. Even if a
drop does not result in functional problems, it can cause scratching and other cosmetic
damage to the camera.
*2 Signifies underwater use when immersed for a duration and at a pressure specified by
CASIO.
*3 Test conditions defined by CASIO. Does not include cases where battery life is
shortened due to use conditions.
IMPORTANT!
• The shock resistance, waterproofing, and dustproofing of this product are based on
CASIO test results, and do not constitute any guarantee that the product will
perform, will not be damaged, or will not malfunction under such conditions.
. Precautions before Underwater Use
This camera can be used to shoot images underwater up to a depth of 3.0 meters.
However, the following precautions should be kept in mind before using the camera
underwater.
• Check the contact surfaces of the [CARD] cover and [USB] cover gaskets for dirt,
sand, and any other foreign matter. Clean contact surfaces by wiping them with a
soft, clean, dry cloth. Note that a single strand of hair or a single grain of sand can
allow water to leak into the camera.
• Check the [CARD] cover and [USB] cover waterproofing gaskets are free of cracks,
scratches, and other damage.
• Close the [CARD] cover and [USB] cover securely into place.
• Never open or close the [CARD] cover or [USB] cover while near water or in an
area exposed to sea breezes. Also avoid opening or closing the covers while your
hands are wet.
1
.
2
and Protection Class 5 (IPX5)
3
85
Appendix
Page 86

• This camera will sink if dropped underwater. Use the strap or some other means to
avoid dropping.
• The waterproofing of this camera protects it against salt water and fresh water only.
Protection is not provided against hot spring water.
• Never leave the camera for long periods in a location subjected to very low
temperatures or very high temperatures in excess of 40
°C. In particular, avoid
leaving the camera in areas exposed to strong direct sunlight, in a motor vehicle on
a hot day, etc. Any of these conditions can result in a deterioration of
waterproofing.
. Precautions during Underwater Use
• The camera is designed for use at depths no greater than 3.0 meters and at water
temperatures within the range of 0
• Do not leave the camera submerged for longer than 60 minutes.
• When repeatedly immersing the camera for underwater user, allow at least
15 minutes to elapse between immersions.
• Never open the [CARD] cover or [USB] cover while the camera is submerged.
• Do not dive into water while holding the camera. Also, do not use the camera in
rapids, under a waterfall, or in any other rough water condition. Exposing the
camera to strong water pressure can cause leaking and malfunction.
• Take care that you do not drop the camera into water or allow it to strike the
surface of the water. Doing so can cause leaking.
°C to 40°C.
. Precautions after Underwater Use
• Before opening the [CARD] cover and [USB] cover, use a clean, dry, soft cloth to
wipe the camera free of all moisture and dirt.
• If you open the [CARD] cover and [USB] cover while the camera is wet, be sure to
wipe its inside surfaces free of all moisture before closing it.
86
Appendix
Page 87

. Cleaning Your Camera after Use
Perform the following steps to clean the camera after using it under water or after it
becomes soiled with sand, dirt, or mud. Note that the [CARD] cover and [USB] cover
must be closed securely when performing these steps.
1. Immerse the camera in fresh water.
• Fill a bucket or other container with tap water or other fresh
water, and immerse the camera for about 10 minutes.
Gently wipe dust, dirt, sand, and other matter from the
camera with your fingers.
• Do not rub the lens surface or monitor screen while dirty.
2. Wipe the camera dry.
• Use a clean, dry, soft cloth to wipe off the camera, and leave it in a shady place
to dry.
IMPORTANT!
• The temperature of the water used to wash the camera should be no greater than
°C. Never use detergent, hot water, or strongly running water to clean the
30
camera. Doing so creates the risk of leaking and malfunction.
• Never swing the camera around to remove water, and never use a dryer or other
intense heat to dry it.
• Never place the camera in a washing machine to wash it.
. Precautions after Use
• Do not leave the camera in an area exposed to extreme heat (40°C or greater) or
–10°C or lower). Doing so can cause loss of waterproofing.
cold (
• Never use chemical agents for the purpose of cleaning, rust proofing, moisture
proofing, etc. Doing so can cause loss of waterproofing.
• Use fresh water to clean the camera within 60 minutes after using it underwater.
Failure to do so can cause deterioration of the exterior finish and waterproofing
properties.
• In order to maintain waterproofing, replacement of the camera’s gaskets is
recommended once each year. Note that you will be charged for gasket
replacement. Contact a CASIO authorized service center or your original retailer
for gasket replacement.
87
Appendix
Page 88

. Other Precautions
• The accessories that come with the camera are not waterproof.
• Subjecting the camera to extreme impact can cause loss of waterproofing.
• Moisture on the camera can freeze in very cold environments. Ice left on the
camera can lead to malfunction. Do not allow moisture to remain on the camera
under cold conditions.
• Should water ever leak into the camera and cause malfunction due to improper
use, CASIO COMPUTER CO., LTD. will not be held liable for any damage to
internal components (battery, recording media, etc.), loss of recorded data, or any
expenses incurred to shoot lost images.
• CASIO COMPUTER CO., LTD. shall not be held liable for any accident that may
occur while the camera is being used underwater.
• CASIO COMPUTER CO., LTD. shall not be held liable for any damages or for any
accident (personal injury, etc.) that occurs while using the camera underwater.
88
Appendix
Page 89

Precautions During Use
. Data Error Precautions
Your digital camera is manufactured using precision digital components. Any of the
following creates the risk of corruption of data in camera memory.
– Removing the memory card while the camera is performing some operation
– Removing the memory card while the operation lamp is flashing green after turning
off the camera
– Disconnecting the USB cable while communication is in progress
– Other abnormal operations
Any of the above conditions can cause an error message to appear on the monitor
screen (page 104). Perform the action indicated by the message that appears.
. Operating Environment
• Operating Temperature Requirements: –10 to 40°C (14 to 104°F)
• Operating Humidity: 10 to 85% (non condensation)
• Do not place the camera in any of the following locations.
– In an area exposed to direct sunlight, or large amounts of moisture, dust, or sand
– Near heating or cooling devices, or in other areas subjected to extreme changes
in temperature or humidity
– Inside of a motor vehicle on a hot day, or in an area subjected to strong vibration
. Condensation
Sudden and extreme temperature changes, such as when the camera is moved from
the outdoors on a cold winter day into a warm room, can cause water droplets called
“condensation” to form on the interior and the exterior of the camera, which creates
the risk of malfunction. To prevent condensation from forming seal the camera in a
plastic bag before changing locations. Then leave the bag sealed to allow the air
inside to naturally change to the same temperature as the air in the new location.
After that, remove the camera from the bag for a few hours.
89
Appendix
Page 90

. Lens
• Never apply too much force when cleaning the surface of the lens. Doing so can
scratch the lens surface and cause malfunction.
• You may sometimes notice some distortion in certain types of images, such as a
slight bend in lines that should be straight. This is due to the characteristics of
lenses, and does not indicate malfunction of the camera.
. Caring for your camera
• Never touch the lens with your fingers. Finger smudges, dirt, and other foreign
matter on the lens can interfere with proper operation of the camera. Use a blower
or other means to keep the lens and flash window free of dirt and dust, and wipe
gently with a soft, dry cloth.
• To clean the camera, wipe it with a soft, dry cloth.
. Discarding or Transferring Ownership of a Memory Card or the
Camera
The format and delete functions of the camera do not actually delete files from the
memory card. The original data remains on the card. Note that responsibility for the
data on a memory card lies with you. The following procedures are recommended
whenever you discard a memory card or the camera, or if you transfer ownership to
another party.
• When discarding a memory card, either physically destroy the memory card or use
commercially available data delete software to completely delete the data on the
memory card.
• When transferring ownership of a memory card to another party, use commercially
available data deletion software to completely delete the data on it.
• Use the format function (page 65) to completely delete the data in built-in memory
before discarding or transferring ownership of the camera.
90
Appendix
Page 91

. Precautions During Wireless Function (Wireless LAN, Bluetooth
Wireless Technology) Use
Operation of this product may affect or may be affected by nearby devices that use
wireless functionality.
Radio transmission interception
The radio waves that are used to send and receive data can be intercepted by third
parties.
Unauthorized access
CASIO COMPUTER CO., LTD. shall be held in no way liable for any unauthorized
access and/or use of the access point equipped on this product if the product is ever
lost or stolen.
Use as a wireless device
Use the wireless functions of this product only as specifically described in this
manual. Any other use is unintended use, and CASIO COMPUTER CO., LTD. shall
be held in no way liable for any damages arising out of unintended use.
Magnetism, electrostatic charge, and radio interference
Do not use this product hear a microwave oven or any other area where magnetism,
electrostatic charge, or radio interference is generated. Radio wave reception may be
poor in certain environments.
Also note that other devices using the same 2.4GHz band used by this product may
cause reduced processing speeds in both devices.
Connection to a public LAN
This product does not support wireless LAN connection over a public wireless LAN
environment.
Intended Areas of Use
1)The wireless LAN functions of this camera are provided for use in the countries and
geographic areas below.
Hong Kong, Singapore, Thailand, The United Arab Emirates (UAE), Paraguay,
Venezuela, Panama, Germany, Austria, France, The Netherlands, Spain, Italy, Sweden,
Denmark, Slovakia, Poland, and Norway
2)Approval for use under radio regulations in the countries and geographic areas below is
granted only when the camera is purchased within that particular country or geographic
area.
Taiwan, Indonesia, Malaysia, and South Korea
. Other Precautions
The camera becomes slightly warm during use. This is normal and does not indicate
malfunction.
91
Appendix
Page 92

. Copyrights
Except for your own personal enjoyment, unauthorized use of snapshots or movies of
images whose rights belong to others, without the permission of the right holder, is
forbidden by copyright laws. In some cases, shooting of public performances, shows,
exhibitions, etc. may be restricted entirely, even if it is for your own personal
enjoyment. Regardless of whether such files are purchased by you or obtained for
free, posting them on a website, a file sharing site, or any other Internet site, or
otherwise distributing them to third parties without the permission of the copyright
holder is strictly prohibited by copyright laws and international treaties. For example,
uploading or distributing on the Internet images of TV programs, live concerts, music
videos, etc. that were photographed or recorded by you may infringe upon the rights
of others. Note that CASIO COMPUTER CO., LTD. shall not be held liable for use of
this product in any way that infringes on the copyrights of others or that violates
copyright laws.
The following terms, which are used in this manual, are registered trademarks or
trademarks of their respective owners.
Note that trademark
™ and registered trademark
manual.
• microSDXC Logo is a trademark of SD-3C, LLC.
• Microsoft, Windows, Windows Vista, Windows 7, Windows 8, and Windows 8.1 are
registered trademarks or trademarks of Microsoft Corporation in the United States
and other countries.
• Macintosh, Mac OS, QuickTime, iPhoto, and iPhone are trademarks of Apple Inc.
• App Store is a service mark of Apple Inc.
• Android and Google Play are trademarks or registered trademarks of Google Inc.
• iOS is a trademark or registered trademark of Cisco Systems, Inc. of the United
States.
• Wi-Fi is a registered trademark of the Wi-Fi Alliance.
• The Bluetooth
®
word mark and logos are registered trademarks owned by
Bluetooth SIG, Inc. and any use of such marks by CASIO COMPUTER CO., LTD.
is under license. Other trademarks and trade names are those of their respective
owners.
• EXILIM and EXILIM Link are registered trademarks or trademarks of CASIO
COMPUTER CO., LTD.
• All other company or product names mentioned herein are registered trademarks
or trademarks of their respective companies.
Any and all unauthorized copying, distribution, and transfer for commercial purposes
of the software provided by CASIO for this product are prohibited.
®
are not used within the text of this
92
Appendix
Page 93
Power Supply
Charging
. If the camera or controller operation lamp starts flashing red...
If the camera or controller operation lamp starts flashing red during charging, it
means that further charging is not possible for one of the reasons below. Perform the
actions described below to correct the problem and then try charging again.
Ambient temperature or the temperature of the battery is abnormally high
or low
Unplug the USB cable from the camera and wait for a while until the camera is within
the temperature range of 15°C to 35°C (59°F to 95°F), and then try charging again.
Safety timer activated
A battery that has not been used for a long time, certain types of computers, and
connection conditions can cause charging to take longer than normal. If charging
takes longer than about five hours, a safety timer will terminate it automatically, even
if the battery is not fully charged. If the battery has not been used for a very long time,
charging may terminate automatically after only about 60 minutes.
1) Using a battery that has not been used for a long time.
Disconnect and then reconnect the USB cable to resume charging.
2) Insufficient power supply when connected to computer
The camera can be charged only via a USB 2.0 standard USB port. Connect
directly to a USB port what supplies a current of 500mA.
For details about the power supply capacity of a computer’s USB port, contact the
manufacturer of the computer. Though disconnecting and then reconnecting the USB
cable will resume charging, you may need to do so repeatedly if the power supply
capacity of the computer is low.
If problems persist after you perform the above steps or if the battery fails to
charge after 5 hours, it could mean that the battery is faulty. Contact your nearest
CASIO authorized service center.
93
Appendix
Page 94

Battery Precautions
. Precautions during Use
• Operation provided by a battery under cold conditions is always less than operation
under normal temperatures. This is due to the characteristics of the battery, not the
camera.
• Charge the battery in an area where the temperature is within the range of 15°C to
35°C (59°F to 95°F). Outside this temperature range charging can take longer than
normal or even fail.
. Storage Precautions
• Storing the battery for a long time while it is charged can cause deterioration of
battery characteristics. If you do not plan to use a battery for some time, fully use
up its charge before storing it.
• To prevent over discharging of an unused battery, fully charge it, and then load it in
the camera and fully use up the charge about once every six months.
Using the Camera in another Country
. Precautions during Use
• The bundled USB-AC adaptor is designed for operation with any power supply in
the range of 100V to 240V AC, 50/60Hz. Note, however, that the shape of the
power plug depends on each country or geographic area. Before taking the camera
and USB-AC adaptor along on a trip, check with travel agent about the power
supply requirements in your destination(s).
• Do not connect the USB-AC adaptor to a power supply through a voltage converter
or similar device. Doing so can lead to malfunction.
94
Appendix
Page 95
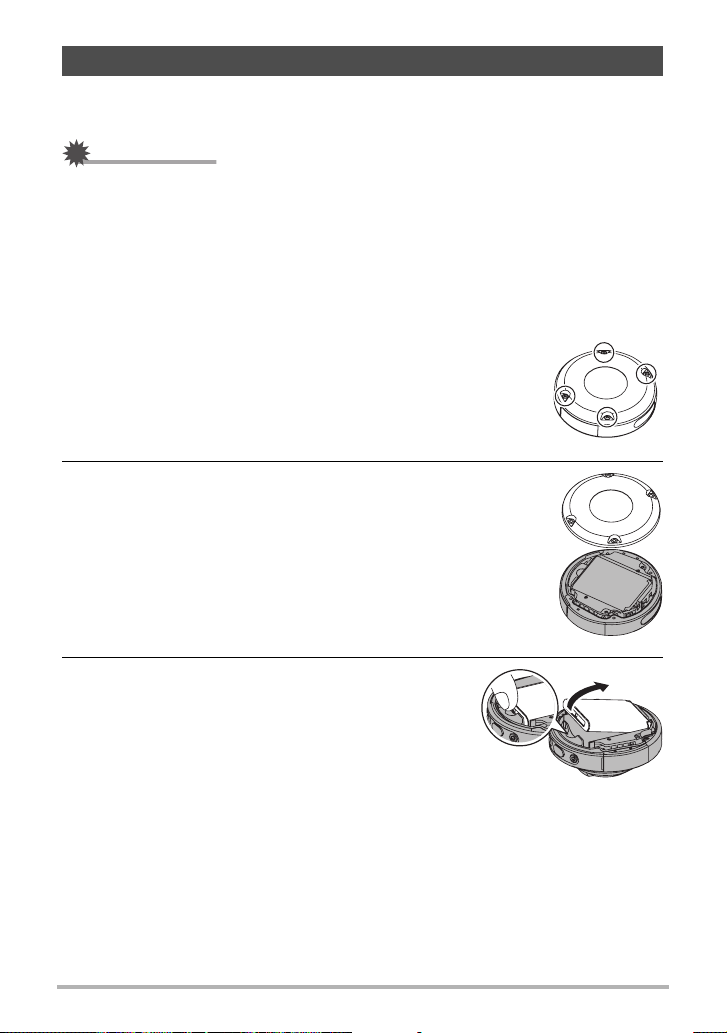
Disposing of the Camera
When disposing of the camera, be sure to first remove its built-in lithium ion battery
and send it in for recycling.
IMPORTANT!
• The battery of this camera is built-in and cannot be replaced by you. Contact your
retailer or a CASIO authorized service center to have the battery replaced.
• Make sure that the camera is turned off before removing the battery.
• The edges of the back cover are sharp. Take care not to cut your fingers when
removing it.
• When removing screws, use a precision Phillips tip screwdriver.
. Camera
1. Remove the four screws that secure the back of the
camera.
2. Remove the back cover.
3. Hook your fingertip at the location indicated
in the illustration and remove the battery.
95
Appendix
Page 96
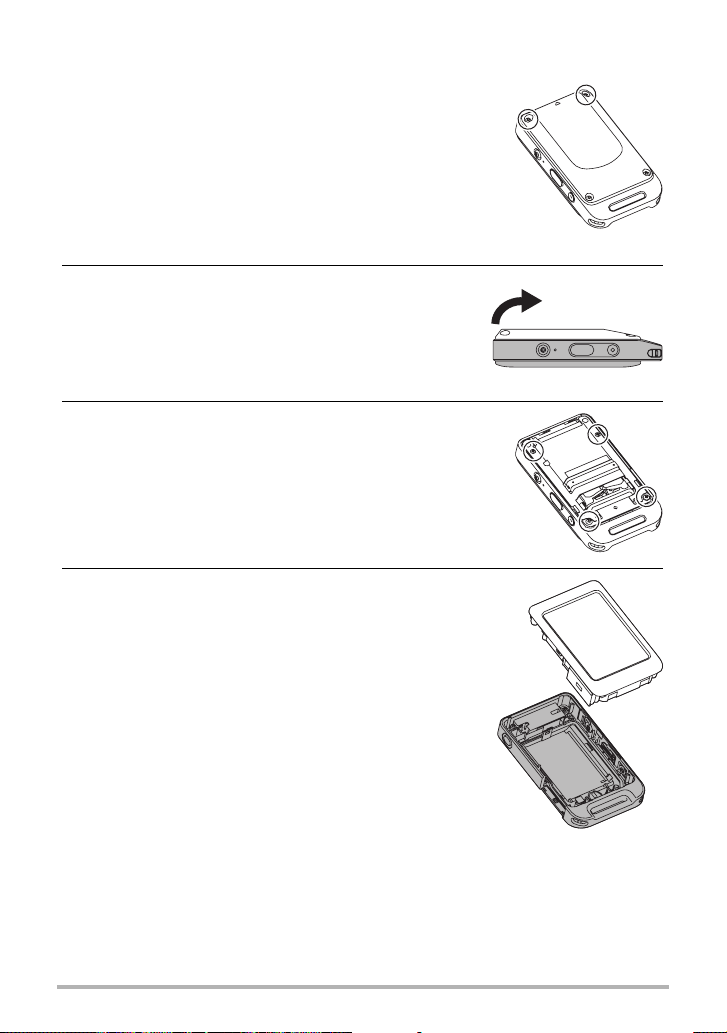
. Controller
1. Remove the two screws that secure the back
of the controller.
2. Swing the back cover open in the direction
indicated by the arrow.
3. Remove the four screws that secure the back
of the controller.
4. Remove the monitor screen.
96
Appendix
Page 97
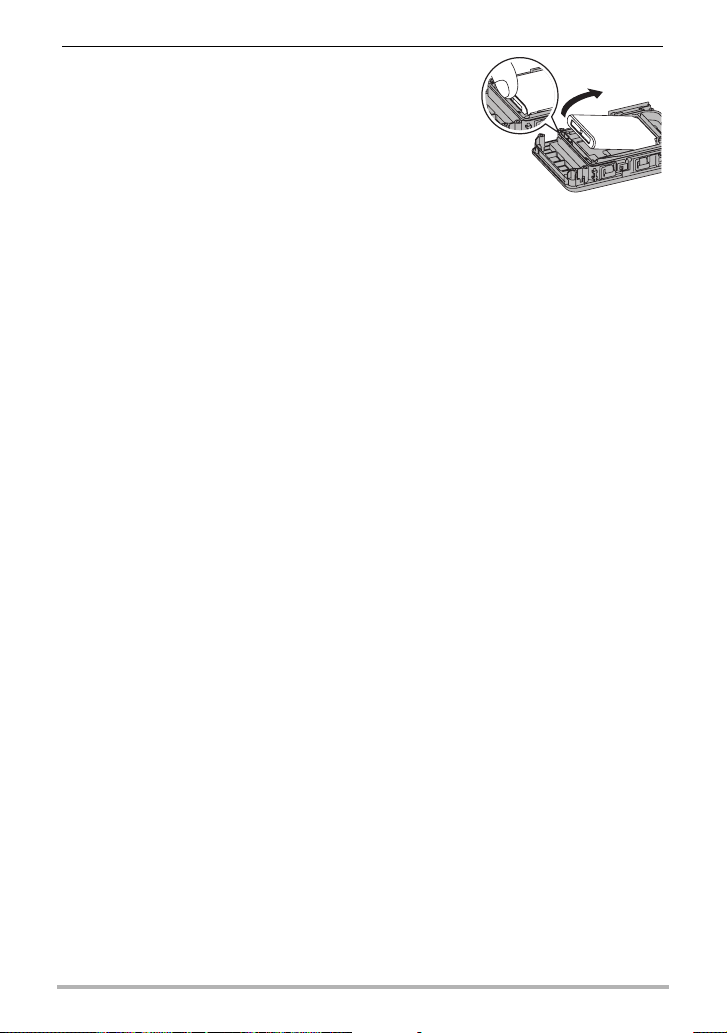
5. Hook your fingertip at the location indicated
in the illustration and lift the battery up to
remove it.
. Old Rechargeable Battery Handling Precautions
• Insulate the positive and negative terminals with tape, etc.
• Do not peel the covering off of the battery.
• Do not try to take the battery apart.
97
Appendix
Page 98

Using a Memory Card
See page 28 for information about supported memory cards and how to load a
memory card.
. Using a Memory Card
• If a memory card starts to behave abnormally during image playback, you can
restore normal operation by reformatting it (page 65). However, it is recommended
that you always take along multiple memory cards whenever using the camera far
away from the home or office.
• As you record data to and delete data from a memory card a number of times, it
loses its ability to retain data. Because of this, periodic re-formatting of a memory
card is recommended.
• Electrostatic charge, electrical noise, and other phenomena can cause data to
become corrupted or even lost. Make sure that you always back up important data
on other media (CD-R, CD-RW, hard disk, etc.).
. Memory Card Handling Precautions
Certain types of memory cards can slow down processing speed. Whenever possible
use an Ultra High-Speed Type memory card. Note, however, that not all operations
can be guaranteed even if an Ultra High-Speed Type memory card is used. Certain
movie quality settings can result in too much time being required to record data,
which can result in breaks in the image and/or audio during playback. If this happens,
the movie icon will turn yellow on the monitor screen.
98
Appendix
Page 99
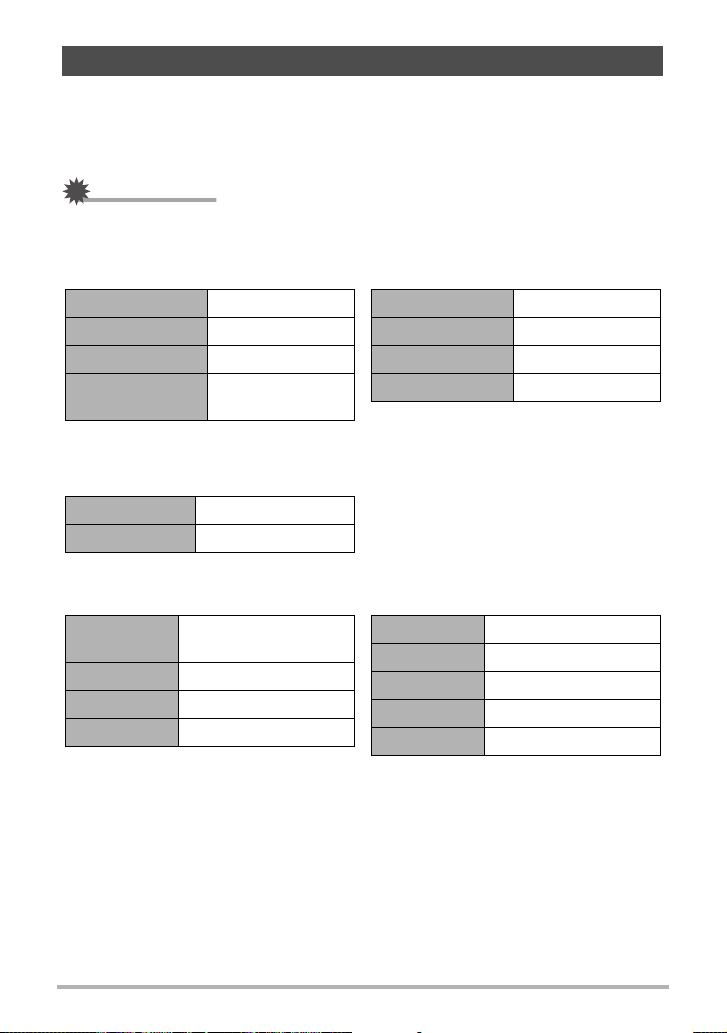
Reset Initial Default Settings
The tables in this section show the initial default settings on menus that appear in the
REC mode and PLAY mode when you reset the camera (page 66).
• A dash (–) indicates an item whose setting is not reset or an item for which there is
no reset setting.
IMPORTANT!
• Some menu items may not be available, depending on the recording mode being
use.
. REC Menu
Make-up OFF
Touch Shutter ON
Image Size 14M
Max Recording
Time
OFF
* Default setting depends on country or geographic region.
. PLAY Menu
Rotation –
Setup * See below.
. Setup Menu
Camera
Sound
Vibration ON
Flick Start ON
Adjust –
ON
EV Shift 0.0
White Balance Auto
Auto Rotate ON
Setup * See below.
Date Style –
Language –
Format –
Reset –
Version –
99
Appendix
Page 100
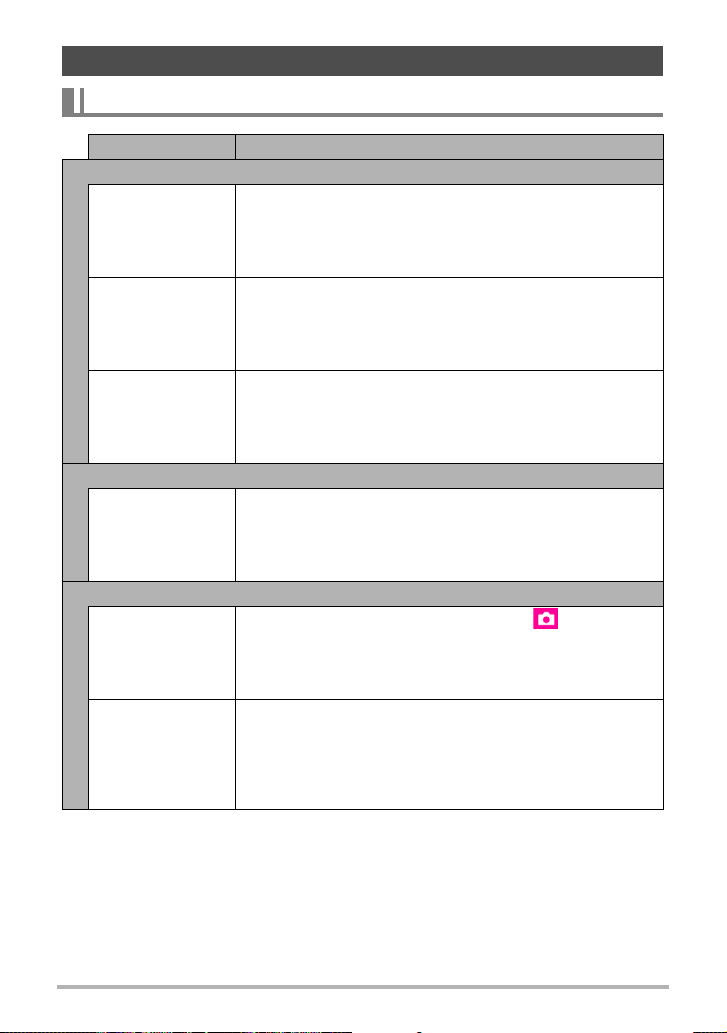
When things don’t go right...
Troubleshooting
Problem Possible Cause and Recommended Action
Power Supply
Power does not turn
on.
The camera
suddenly powers
down.
Power will not turn
off. Nothing
happens when a
button is pressed.
Charging
The operation lamp
does not light red
and the battery
won’t charge.
Image Recording
Image is not
recorded when the
shutter button is
pressed.
Images are out of
focus.
1)The battery of new camera is not charged. Charge the
battery before using the camera.
2)The camera battery may be dead. Charge the battery (page
18). If this does not resolve the problem, contact your retailer
or a CASIO authorized service center.
1)The battery may be dead. Charge the battery (page 18).
2)The camera’s protection function may have activated
because camera temperature is too high. Turn off the
camera and wait until it cools down before trying to use it
again.
Use a thin object to press the reset buttons (page 7) near the
camera’s memory card slot and controller’s [USB] port to turn
the camera off and then turn on the camera again. Unlike the
reset operation (page 66), pressing the reset button near the
memory card slot does not initialize camera settings.
1)Unplug the USB cable from the camera and controller, and
then plug it back in again.
2)Make sure the camera and controller are turned off when you
connect the USB cable. Charging will not start if you connect
the USB cable while power is turned on.
1)If the camera is in the PLAY mode, touch “ ” (REC) on the
main screen to enter the REC mode.
2)If the message “Memory Full” appears, transfer images to
your computer, delete images you no longer need, or use a
different memory card.
1)If the lens is dirty, clean it off.
2)The subject may not be in the center of the focus frame when
you compose the image.
3)You may be moving the camera when shooting. When
shooting, place the camera on a tabletop or some other
stable surface, or find some way to fix the camera in place.
100
Appendix
 Loading...