

Page 1
MA1510-EA
© 2016 CASIO COMPUTER CO., LTD.
Operation Guide 5479
About This Manual
x Depending on the model of your watch, display text
appears either as dark fi gures on a light background, or
light fi gures on a dark background. All sample displays
in this manual are shown using dark fi gures on a light
background.
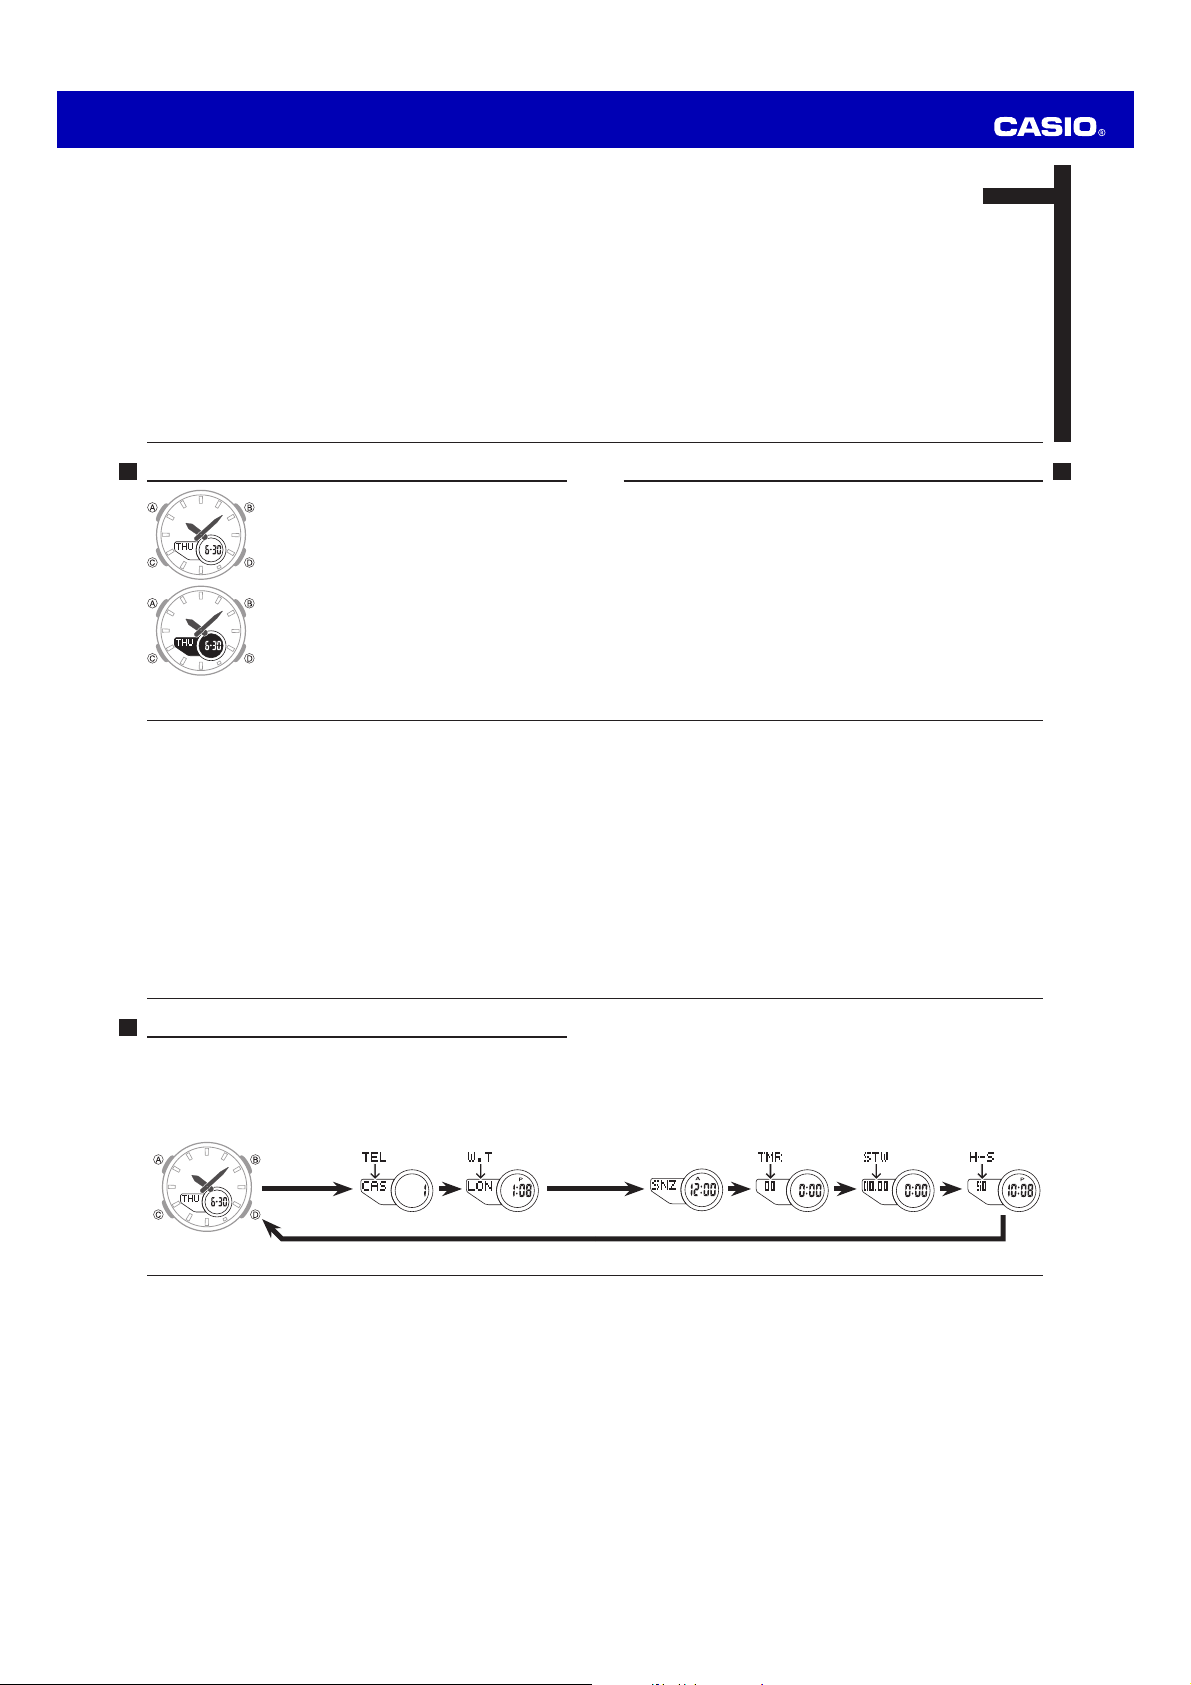
x Button operations are indicated using the letters shown in
the illustration.
x Note that the product illustrations in this manual are
intended for reference only, and so the actual product may
appear somewhat different than depicted by an illustration.
E-2
World Time . . . . . . . . . . . . . . . . . . . . . . . . . . . . . . . . . . . . . . . . . . . . . . . . . . . . .E-25
To set the World Time . . . . . . . . . . . . . . . . . . . . . . . . . . . . . . . . . . . . . . . . . . E-26
To view the time in another city code . . . . . . . . . . . . . . . . . . . . . . . . . . . . . . . E-27
To toggle a city code time between Standard Time and Daylight Saving Time E-28
Alarms . . . . . . . . . . . . . . . . . . . . . . . . . . . . . . . . . . . . . . . . . . . . . . . . . . . . . . . . . E-29
To set an alarm time . . . . . . . . . . . . . . . . . . . . . . . . . . . . . . . . . . . . . . . . . . . E-30
To test the alarm . . . . . . . . . . . . . . . . . . . . . . . . . . . . . . . . . . . . . . . . . . . . . . E-32
To turn an alarm and the Hourly Time Signal on and off . . . . . . . . . . . . . . . . . E-32
Countdown Timer . . . . . . . . . . . . . . . . . . . . . . . . . . . . . . . . . . . . . . . . . . . . . . .E-34
To set the countdown start time . . . . . . . . . . . . . . . . . . . . . . . . . . . . . . . . . . E-34
To use the countdown timer . . . . . . . . . . . . . . . . . . . . . . . . . . . . . . . . . . . . . E-35
Stopwatch . . . . . . . . . . . . . . . . . . . . . . . . . . . . . . . . . . . . . . . . . . . . . . . . . . . . .E-36
To measure times with the stopwatch . . . . . . . . . . . . . . . . . . . . . . . . . . . . . . E-37
Specifi cations. . . . . . . . . . . . . . . . . . . . . . . . . . . . . . . . . . . . . . . . . . . . . . . . . . . E-38
Congratulations upon your selection of this CASIO watch.
Contents
About This Manual . . . . . . . . . . . . . . . . . . . . . . . . . . . . . . . . . . . . . . . . . . . . . . . . E-2
General Guide . . . . . . . . . . . . . . . . . . . . . . . . . . . . . . . . . . . . . . . . . . . . . . . . . . .E-6
Timekeeping . . . . . . . . . . . . . . . . . . . . . . . . . . . . . . . . . . . . . . . . . . . . . . . . . . . . E-10
To set the digital time and date . . . . . . . . . . . . . . . . . . . . . . . . . . . . . . . . . . . E-11
To toggle between 12-hour and 24-hour timekeeping . . . . . . . . . . . . . . . . . . E-14
To toggle the Timekeeping Mode digital time between
DST and Standard Time . . . . . . . . . . . . . . . . . . . . . . . . . . . . . . . . . . . . . . . E-15
To adjust the analog time . . . . . . . . . . . . . . . . . . . . . . . . . . . . . . . . . . . . . . . . E-16
Telememo . . . . . . . . . . . . . . . . . . . . . . . . . . . . . . . . . . . . . . . . . . . . . . . . . . . . . . E-17
To create a new Telememo record . . . . . . . . . . . . . . . . . . . . . . . . . . . . . . . . . E-18
To recall Telememo records . . . . . . . . . . . . . . . . . . . . . . . . . . . . . . . . . . . . . . E-22
To edit a Telememo record . . . . . . . . . . . . . . . . . . . . . . . . . . . . . . . . . . . . . . E-23
To delete a Telememo record . . . . . . . . . . . . . . . . . . . . . . . . . . . . . . . . . . . . E-23
ENGLISH
E-1
E-3
E-5E-4
General Guide
x Press C to change from mode to mode. After you perform an operation (except
for B) in any mode, pressing C returns to the Timekeeping Mode.
x To return to the Timekeeping Mode from any other mode, hold down C for about
one second.
Timekeeping Mode World Time Mode Telememo Mode
C CC
E-6
Auto Return Feature
x The watch automatically returns to the Timekeeping Mode if you do not perform
any button operation for two or three minutes in the Telememo, Alarm, or Hand
Setting Mode.
x If you leave a screen with fl ashing digits or a cursor on the display for two or three
minutes without performing any operation, the watch automatically exits the setting
screen.
x Holding down C for about one second in any mode jumps directly to the
Timekeeping Mode. This operation does not work while a setting screen is on the
display.
Scrolling
x The B and
through data on the display. In most cases, holding down these buttons during a
scroll operation scrolls through the data at high speed.
E-8
D buttons are used in various modes and setting screens to scroll
Alarm Mode Countdown Timer
Initial Screens
x When you enter the Telememo, World Time, or Alarm Mode, the data you were
viewing when you last exited the mode appears fi rst.
Mode
C C C
Stopwatch Mode Hand Setting Mode
C
E-7
E-9
Page 2

Operation Guide 5479
Timekeeping
This watch features separate digital and analog timekeeping. The procedures for
setting the digital time (page E-11) and analog time (page E-15) are different.
x In the Timekeeping Mode, press A to toggle the display between the date screen
and the time screen.
Date Screen
Hour
Day of week
E-10
3. When the setting you want to change is fl ashing, use B and D to change it as
described below.
Screen To do this: Do this:
Reset the seconds to 00.
Toggle between Daylight Saving Time (ON)
and Standard Time (OFF).
Change the hour or minute.
Change the year.
Change the month or day.
E-12
To toggle between 12-hour and 24-hour timekeeping
In the Timekeeping Mode, press D to toggle between 12-hour timekeeping
(indicated by A or P on the display), or 24-hour timekeeping.
x With the 12-hour format, the P (PM) indicator appears on the display for times in
the range of noon to 11:59 p.m. and the A (AM) indicator appears for times in the
range of midnight to 11:59 a.m.
x With the 24-hour format, times are displayed in the range of 0:00 to 23:59, without
any indicator.
x The 12-hour/24-hour timekeeping format you select in the Timekeeping Mode is
applied in all modes.
Digital Time Daylight Saving Time (DST) Setting
Daylight Saving Time (summer time) advances the digital time setting by one hour
from Standard Time. Remember that not all countries or even local areas use
Daylight Saving Time.
Minutes
A
Month – Day
Time Screen
PM indicator
Seconds
Hour : Minutes
Press D.
Press D.
Use D (+) and B (–).
Digital Time and Date
Use the Timekeeping Mode to set and view a digital display of the current time and
date. When setting the digital time, you can also confi gure settings for summer time
(Daylight Saving time or DST).
To set the digital time and date
Seconds
C
4. Press A to exit the setting screen.
x Resetting the seconds only (without changing the hour, minute, or DST setting)
causes the analog minute hand setting to be adjusted automatically. If you
change the hour, minute, or DST setting, you should also use the procedure
under “To adjust the analog time” (page E-16) to adjust the analog hands
accordingly.
x See “Digital Time Daylight Saving Time (DST) Setting” (page E-14) for details about
the DST setting.
x Resetting the seconds to 00 while the current count is in the range of 30 to
59causes the minutes to be increased by 1. In the range of 00 to 29, the
seconds are reset to 00 without changing the minutes.
x The day of the week is automatically displayed in accordance with the date
(year, month, and day) settings.
x The year can be set in the range of 2000 to 2099.
x The watch’s built-in full automatic calendar makes allowances for different
month lengths and leap years. Once you set the date, there should be no reason
to change it except after you have the watch’s battery replaced.
To toggle the Timekeeping Mode digital time between DST and Standard Time
Setting the Analog Time
Perform the procedure below when the time indicated by the analog hands does
not match the time of the digital display.
1. In the Timekeeping Mode, hold down A until the
seconds start to fl ash, which indicates the setting
screen.
2. Press C to move the fl ashing in the sequence shown
below to select the other settings.
C C C
DST
Day
1. In the Timekeeping Mode, hold down A until the
seconds start to fl ash, which indicates the setting
screen.
Hour
Month
Minutes
C
Year
CC
2. Press C once to display the DST setting screen.
3. Press D to toggle between Daylight Saving Time
(ONdisplayed) and Standard Time (OFF displayed).
4. Press A to exit the setting screen.
x The DST indicator appears on the Timekeeping,
Alarm, and Hand Setting Mode to indicate that
Daylight Saving Time is turned on.
E-11
E-13
E-14
To adjust the analog time
x If you need to advance the analog time a long way, press D and
same time. This locks the high speed hand movement, so you can release the
two buttons. High-speed hand movement continues until you press any button.
It will also stop automatically after the time advances 12hours or if an alarm
(daily alarm, Hourly Time Signal, or countdown alarm) starts to sound.
4. Press A to exit the setting screen.
x To return to the Timekeeping Mode, press C.
E-16
To create a new Telememo record
New Data Screen
E-18
1. In the Timekeeping Mode, press C six times to enter
the Hand Setting Mode (page E-7).
2. Hold down A until the current digital time starts to
fl ash, which indicates the analog setting screen.
3. Press D to advance the analog time setting by
20seconds.
x Holding down D advances the analog time setting
at high speed.
B at the
1. In the Telememo Mode, press B and D at the same
time to display the new data screen.
x The new data screen shows ———, which indicates
that there is no text in the name fi eld.
x If the new data screen does not appear, it means that
memory is full. To store another record, you will fi
have to delete some of the records stored in memory.
2. Hold down A until the fl ashing cursor (—) appears
in the name fi eld of the display, which indicates the
setting screen.
3. Use D and B to change the character at the cursor
position in the name fi eld. The character changes in
the following sequence.
E-15
Telememo
Remaining memory
Name
rst
Record number
Number
D
(space)
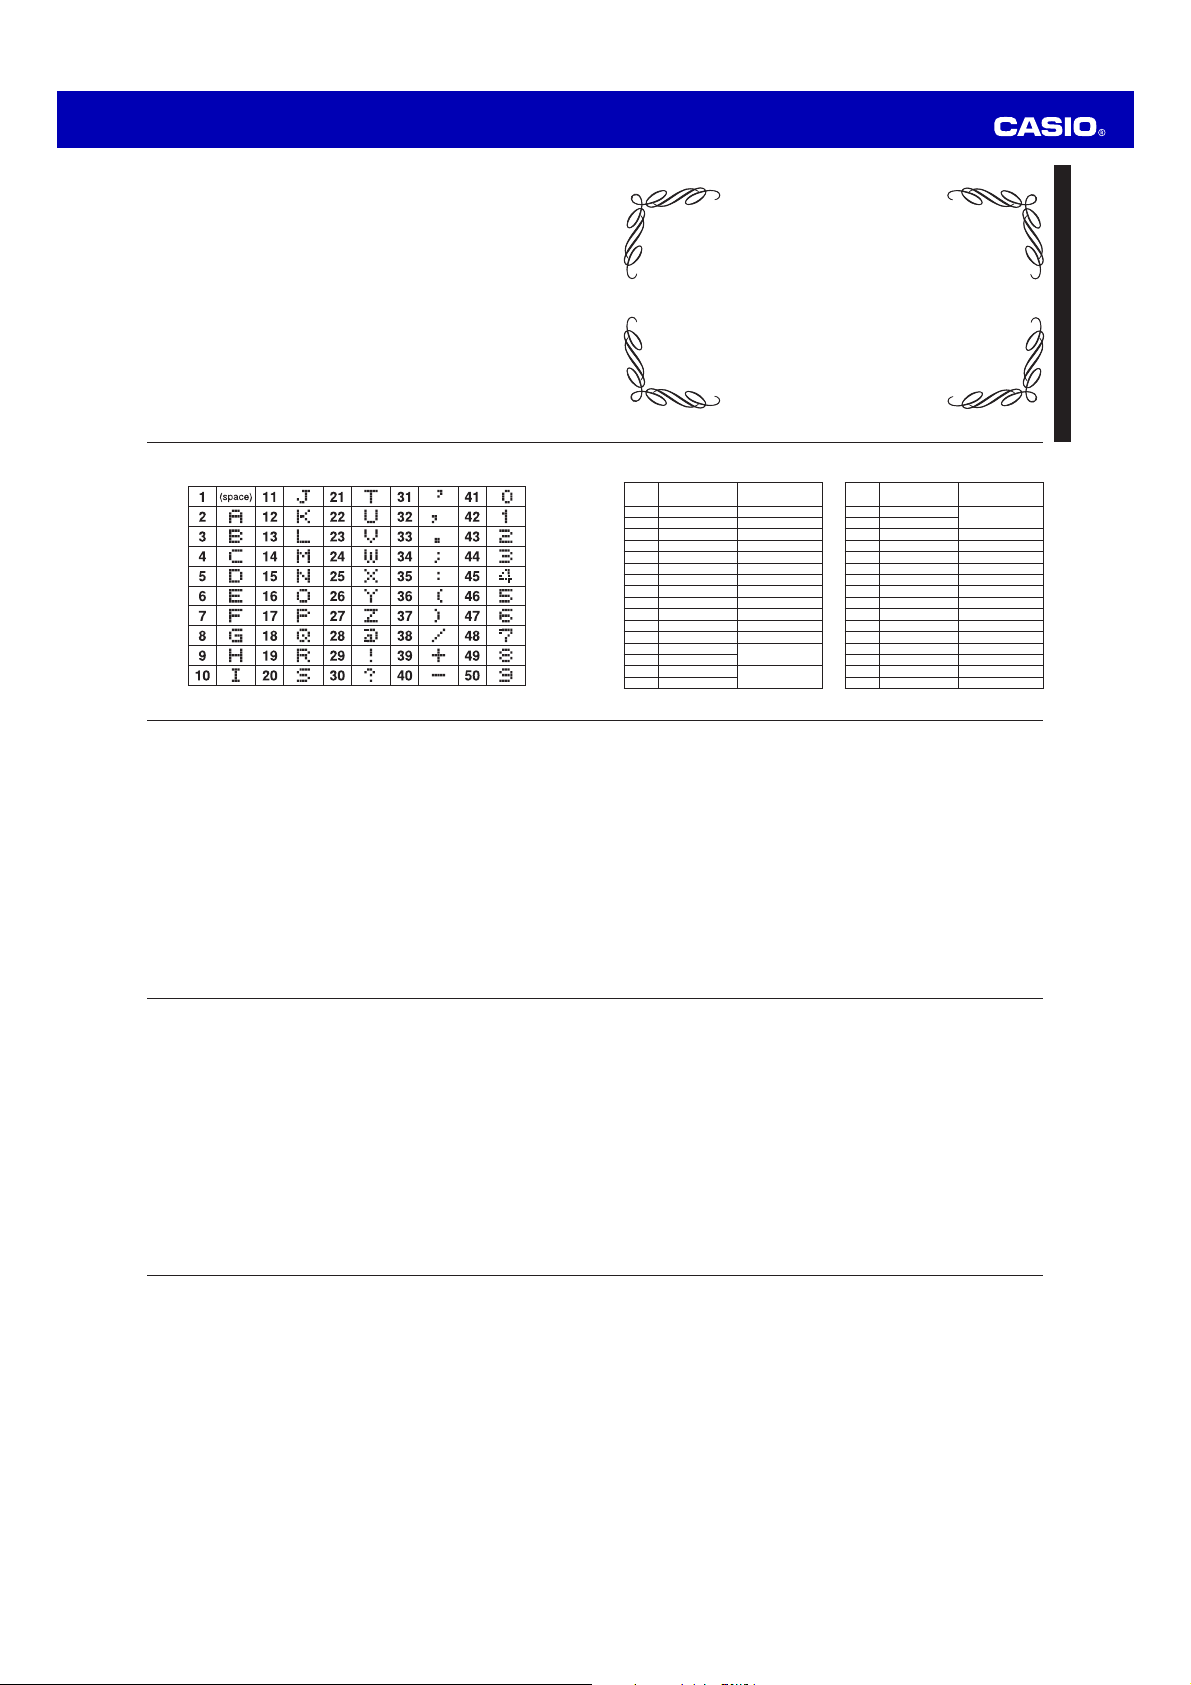
x You can input spaces, alpha characters, symbols, and numbers in a name. For
details, see the “Character List” at the back of this manual.
4. When the character you want is at the cursor position, press C to move the
cursor to the right.
5. Repeat steps 3 and 4 until the name is complete.
x You can input up to eight characters for the name.
Telememo lets you store up to 30records, each
containing name and telephone number data. Records
are automatically sorted based on the characters of the
name. You can recall records by scrolling through them
on the display.
x A Telememo Mode record has a name fi eld and a
eld.
number fi
x See “Character List” at the back of this manual for
details on how the watch sorts records.
x All of the operations in this section are performed in
the Telememo Mode, which you enter by pressing C
(page E-6).
E-17
DDD
A to Z
BBB
to —
@
0 to 9
B
6. After you input the name, press C as many times as
necessary to move the cursor to the number fi eld.
x You tell when you are in the name fi
the long cursor (—). The number fi
cursor (
).
–
eld because of
eld has a short
E-19
Page 3

Operation Guide 5479
x The name fi eld has spaces for eight characters, so you must press C to move
the past the 8th character in order to get to the number fi eld.
x The number fi eld has spaces for 16 digits. Pressing C until the cursor moves
past the 16th digit causes it to jump back to the fi
7. Use D and B to change the character at the cursor position in the number
fi eld. The character changes in the following sequence.
D
8. When the character you want is at the cursor position, press C to move the
cursor to the right.
9. Repeat steps 7 and 8 until you complete number input.
x You can input up to 16 digits for the number.
E-20
To recall Telememo records
In the Telememo Mode, press D (+) to scroll through Telememo records on the
display.
x Only name data appears when you scroll through Telememo records.
x Press A to toggle the screen between the name and number fi
x The name and number scroll from right to left on the display. A separator (s) is
inserted between the last character and fi rst character of the data.
x Pressing D while the last Telememo record is on the display causes the new data
screen to appear.
E-22
3. Press B and D at the same time to delete the record.
x CLR appears to indicate that the record is being deleted. After the record is
deleted, the cursor appears on the display, ready for input.
4. Input data or press A to return to the Telememo record screen.
DD DDD
(space) 0 to 9 (
BB BBB
Name
rst character of the name fi eld.
)
Number
A
+
–
B
elds.
10. Press A to store your data and return to the Telememo record screen (without
the cursor).
x After you press A to store data, the name fl
indicate that records are being sorted.
x Note that a record must have something input in the name fi eld, otherwise you
will not be able to store it.
To edit a Telememo record
1. In the Telememo Mode, use D to scroll through the records and display the one
you want to edit.
2. Hold down A until the fl ashing cursor appears on the display.
3. Use C to move the fl ashing to the character you want to change.
4. Use B and D to change the character.
x For details on inputting characters, see “To create a new Telememo record”
(step 3 for name input and 7 for number input).
5. After making the changes that you want, press A to store them and return to the
Telememo record screen.
To delete a Telememo record
1.
In the Telememo Mode, use D to scroll through the records and display the one
you want to delete.
2. Hold down A until the fl ashing cursor appears on the display.
ashes for about one second to
E-21
E-23
World Time
City code
Current time for the
selected city code
x Whenever you change the time setting for any city in the World Time Mode, the
settings of all other cities are changed accordingly.
World Time digitally displays the current time in 30cities
(29time zones) around the world.
x All of the operations in this section are performed in
the World Time Mode, which you enter by pressing C
(page E-6).
World Time
The time settings of the Timekeeping Mode and the
World Time Mode are independent of each other, so
you must make separate settings for each. This watch
is preset with a number of city codes, each of which
represents the time zone where that city is located.
E-24
x If your location is not included in the preset city codes, select the preset city code
that is in the same time zone as your location.
x For full information on city codes, see the “City Code Table” at the back of this
manual.
To set the World Time
E-26
To toggle a city code time between Standard Time and Daylight Saving Time
4. Press A to exit the setting screen.
E-28
C
x The DST indicator appears on the World Time Mode display to indicate that
Daylight Saving Time is turned on.
x The above operation toggles all World Time city codes between Daylight Saving
Time and Standard Time. Note that you cannot make settings for individual city
codes.
1. In the World Time Mode, press D to scroll through
city codes.
Hold down A until the DST On/Off setting of the
2.
world time starts to fl ash, which indicates the setting
screen.
3. Press C to move the fl ashing in the sequence shown
below to select the other settings.
DST Hour Minutes
CC
1. In the World Time Mode, use D to display the city
code whose Standard Time/Daylight Saving Time
setting you want to change.
2. Hold down A until the DST On/Off setting of the world
time starts to fl ash, which indicates the setting screen.
3. Press D to toggle between Daylight Saving Time (ON
displayed) and Standard Time (OFF displayed).
E-25
4. While a setting is fl ashing, use D and B to change it.
x Pressing D and B at the same time while any World Time setting is fl
causes the displayed time to change to the same setting as the current
Timekeeping Mode time.
x While DST On/Off setting is selected (fl ashing), press D to toggle between
Daylight Saving Time (ON
x While the hour or minutes setting is selected (fl ashing), use D (+) and B (–) to
change it.
Press A to exit the setting screen.
5.
To view the time in another city code
In the World Time Mode, press D to scroll through city codes.
) and Standard Time (OFF).
ashing
E-27
Alarms
AM indicator
Alarm time
(Hour : Minutes)
You can set three independent Daily Alarms. When an
alarm is turned on, the alarm tone sounds when the alarm
time is reached. One of the alarms is a snooze alarm,
while the other two are one-time alarms.
You can turn on an Hourly Time Signal that causes the
watch to beep twice every hour on the hour.
x There are four screens in the Alarm Mode. Two are for
one-time alarms (indicated by numbers AL1 and AL2),
one is for a snooze alarm (indicated by SNZ
for the Hourly Time Signal (indicated by SIG).
x All of the operations in this section are performed in the
Alarm Mode, which you enter by pressing C (page E-7).
), and one is
E-29
Page 4

Operation Guide 5479
To set an alarm time
x To set a one-time alarm, display one of the screens indicated by an alarm
number AL1 or AL2. To set the snooze alarm, display the screen indicated by
SNZ.
x The snooze alarm repeats every fi ve minutes.
2. After you select an alarm, hold down A until the hour setting of the alarm time
ash, which indicates the setting screen.
starts to fl
x This operation automatically turns on the alarm.
3. Press C to move the fl ashing between the hour and minute settings.
E-30
To test the alarm
In the Alarm Mode, hold down D to sound the alarm.
To turn an alarm and the Hourly Time Signal on and off
1. In the Alarm Mode, use D to select an alarm or the Hourly Time Signal.
2. Press A to toggle it on and off.
x The indicators shown below appear on the display when the daily alarm
and Hourly Time Signal are turned on. Each indicator disappears when the
corresponding function is turned off.
E-32
1. In the Alarm Mode, use D to scroll through the alarm
screens until the one whose time you want to set is
displayed.
DDD
SNZ AL2AL1 SIG
D
Alarm 1 on indicator
Alarm 2 on indicator
Snooze alarm on indicator
Hourly time signal on indicator
Countdown Timer
The countdown timer can be set within a range of
Minutes
Hours
Seconds
2. Press C to move the fl ashing between the hour and minute settings.
3. While a setting is fl ashing, use D (+) and B (–) to change it.
x To set the starting value of the countdown time to 24hours, set 0:00.
4. Press A to exit the setting screen.
E-34
one minute to 24hours. An alarm sounds when the
countdown reaches zero.
x All of the operations in this section are performed in the
Countdown Timer Mode, which you enter by pressing
C (page E-7).
To set the countdown start time
In the Countdown Timer Mode, hold down A until the
1.
hour setting of the countdown start time starts to fl ash,
which indicates the setting screen.
4. While a setting is fl ashing, use D (+) and B (–) to change it.
x When setting the alarm time using the 12-hour format, take care to set the time
correctly as a.m. (A indicator) or p.m. (P indicator).
5. Press A to exit the setting screen.
Alarm Operation
The alarm sounds at the preset time for about 10seconds, regardless of the mode
the watch is in. In the case of the snooze alarm, the alarm operation is performed a
total of seven times, every fi ve minutes, or until you turn the alarm off (page E-32).
x Alarm and Hourly Time Signal operations are performed in accordance with the
Timekeeping Mode digital time.
x To stop the alarm tone after it starts to sound, press any button.
x Performing any one of the following operations during a 5-minute interval between
snooze alarms cancels the current snooze alarm operation.
− Displaying the Timekeeping Mode setting screen (page E-6)
− Displaying the SNZ setting screen (page E-30)
E-31
x The above on indicators appear on the display in all modes.
x An on indicator on the display fl ashes while its corresponding alarm operation
is sounding.
x The snooze alarm on indicator fl ashes during the 5-minute intervals between
alarms.
E-33
To use the countdown timer
x Press D while a countdown operation is in progress to pause it. Press D again to
resume the countdown.
x To completely stop a countdown operation, fi
then press A. This returns the countdown time to its starting value.
x The countdown timer measurement operation continues even if you exit the
Countdown Timer Mode.
Press D while in the Countdown Timer Mode to start the
countdown timer.
x When the end of the countdown is reached, the alarm
sounds for 10seconds or until you stop it by pressing
any button. The countdown time is automatically reset to
its starting value after the alarm stops.
rst pause it (by pressing D), and
E-35
Stopwatch
The stopwatch lets you measure elapsed time, split
Minutes
Hours
1/100 second
Seconds
E-36
times, and two fi nishes.
x The display range of the stopwatch is 23hours,
59minutes, 59.99seconds.
x The stopwatch continues to run, restarting from zero
after it reaches its limit, until you stop it.
x The stopwatch measurement operation continues even if
you exit the Stopwatch Mode.
x Exiting the Stopwatch Mode while a split time is frozen
on the display clears the split time and returns to
elapsed time measurement.
x All of the operations in this section are performed in
the Stopwatch Mode, which you enter by pressing C
(page E-7).
Specifi cations
Accuracy at normal temperature: ± 30 seconds a month
Timekeeping: Hour, minutes, seconds, a.m. (A)/p.m. (P), month, day, day of the
Time format: 12-hour and 24-hour
Calendar system: Full Auto-calendar pre-programmed from the year 2000 to
Other: 2 screen formats (Date, Time); Daylight Saving Time (summer time)/
Telememo:
Memory capacity: Up to 30 records, each including a name (8 characters) and
Other: Remaining memory screen; Auto sort
World Time: 30 cities (29 time zones)
Other: Daylight Saving Time/Standard Time
Alarms: 3 daily alarms (2 one-time alarms: 1 snooze alarm); Hourly Time Signal
E-38
week
2099
Standard Time
telephone number (16 digits)
To measure times with the stopwatch
Elapsed Time
D
Start Stop Resume Stop Reset
Split Time
D
Start Split Split release Stop Reset
Two Finishes
D
Start Split
Countdown Timer:
Measuring unit: 1 second
Input range: 1 minute to 24 hours (1-minute increments and 1-hour increments)
Stopwatch:
Measuring unit: 1/100 of a second
Measuring capacity: 23:59'59.99"
Measuring modes: Elapsed time, split time, two fi nishes
Other: 2 analog hands: hour, minutes (hand moves every 20seconds)
Battery: One lithium battery (Type: CR2025)
Approximately 10 years on type CR2025 (assuming alarm operation 10 sec./day)
D D D A
A A D A
A D A A
First runner fi nishes.
Display time of fi rst
runner.
Stop
Second runner
fi nishes.
Split release
Display time of
second runner.
Reset
E-37
E-39
Page 5
Operation Guide 5479
Character List
City Code Table
L-1
Character List
L-2
x
Above table data is current as of July 2015.
* This watch does not refl
to –4.5. For Caracas, Venezuela, please use the –4.0 offset time zone.
x
This table shows the city codes of this watch.
x
The rules governing global times (UTC offset and GMT differential) and summer
time are determined by each individual country.
L-4
ect the change in the Caracas, Venezuela (CCS) time offset
City Code Table
City
City
Code
PPG PAGO PAGO –11
HNL HONOLULU –10
ANC ANCHORAGE –9
LAX LOS ANGELES –8
DEN DENVER –7
CHI CHICAGO –6
NYC NEW YORK –5
CCS* CARACAS –4
RIO
RIO DE JANEIRO
– – – –2
– – – –1
LON LONDON 0
PAR PARIS
BER BERLIN
CAI CAIRO
JRS JERUSALEM
UTC Offset/
GMT Differential
City
Code
MOW MOSCOW
–3
+1
+2
City
JED JEDDAH
THR TEHRAN +3.5
DXB DUBAI +4
KBL KABUL +4.5
KHI KARACHI +5
DEL DELHI +5.5
DAC DHAKA +6
RGN YANGON +6.5
BKK BANGKOK +7
HKG HONG KONG +8
TYO TOKYO +9
ADL ADELAIDE +9.5
SYD SYDNEY +10
NOU NOUMEA +11
WLG WELLINGTON +12
UTC Offset/
GMT Differential
+3
L-3
 Loading...