

Page 1
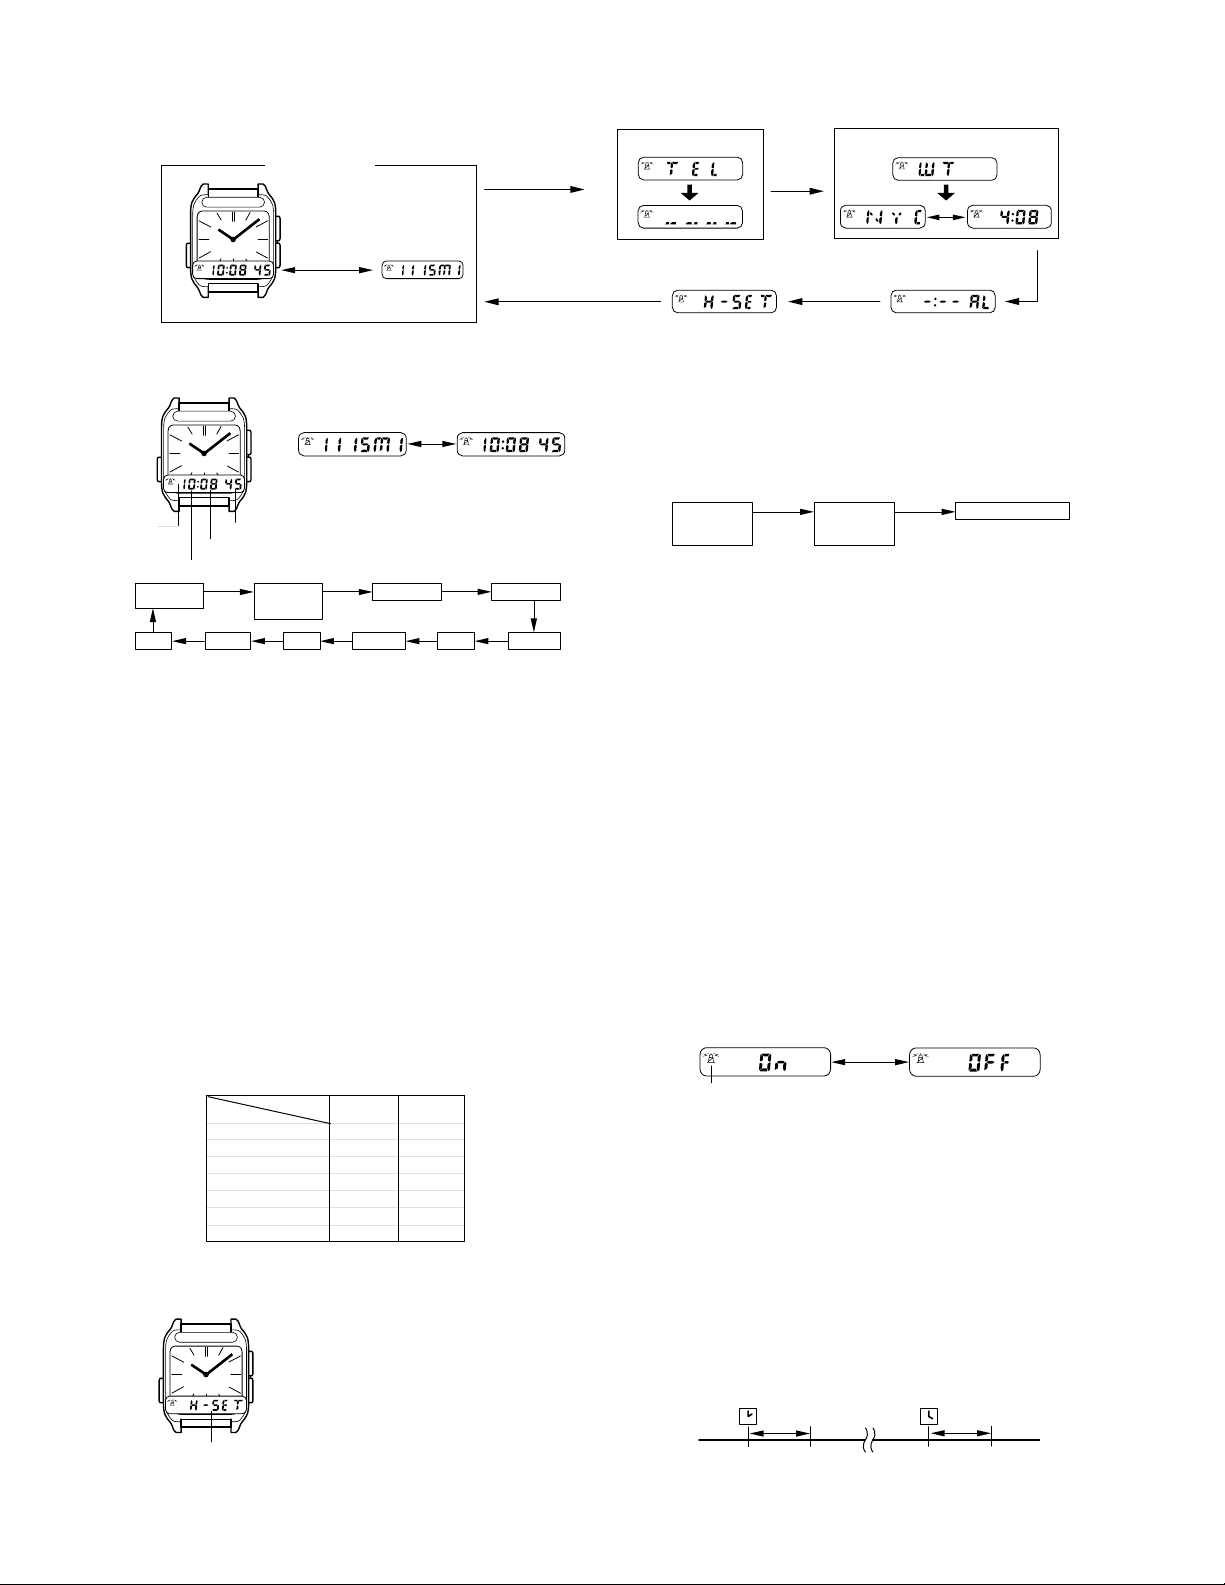
OPERATION CHART:MODULE QW-785
• Press B to change from mode to mode.
GENERAL GUIDE
Timekeeping Mode
A
B
P
Time
C
Press
C
Date
B
B
TIMEKEEPING MODE
• In the Timekeeping Mode, press C to switch between time and date displays.
P
C
B
PM
indicator
A
Seconds
Minutes
C
To set the digital time and date
1. In the Timekeeping Mode, hold down A until the
“On” or “OFF” message appears on the display.
2. Press B to change the selection in the following
sequence.
P
press
Hour
Month
Language
(English or
German)
Year Minute Hour Second
12/24-hour D.S.T. on/off
Auto Receive
on/off
Date
• See “Time Calibration Signal” for details on auto receive.
3. Press C to switch the day of the week display between English (E) and German (D).
• See the table titled “Day of the week abbreviations” for the meanings of the indicators that appear on the display.
4. While the 12/24-hour setting is selected, press C to switch between the two formats.
5. While the D.S.T.(daylight saving time) on/off setting is selected, press C to switch
between daylight saving time and standard time.
• The display shows “On” and the indicator “DST” appears on the display when daylight
saving time is switched on.
6. While the seconds digits are selected (flashing), press C to reset the seconds to “00”.
If you press C while the seconds count is in the range of 30 to 59, the seconds are
reset to “00” and 1 is added to the minutes. If the seconds count is in the range of 00
to 29, the minutes count is unchanged.
7. While the hour, minutes, year, month and date digits (besides seconds) are selected
(flashing), press C to increase the number. Holding down C changes the current
number at high speed.
8. After you finish making all the settings you want, press A to return to normal timekeeping.
• If you do not operate any button for a few minutes while a selection is flashing, the
flashing stops and the watch goes back to the normal timekeeping automatically.
• The day of the week is automatically set in accordance with the date.
• The date can be set within the range of January 1, 1995 to December 31, 2039.
• When you use the above procedure to set the time on the digital display, the hands of
the analog timepiece normally adjust according to your setting. If, for any reason, the
analog time does not match the digital time, use the procedure described under Hand
Setting Mode to match the analog setting with the digital display.
About daylight saving time
With daylight saving time (summer time), clocks are set one hour later in order to better
take advantage of daylight hours during the summer, when days are longer. Whether or
not daylight saving time is used depends on the country you are in.
Day of the week abbreviations
Day of week
Sunday
Monday
Tuesday
Wednesday
Thursday
Friday
Saturday
Language
English
SU
MO
TU
WE
TH
FR
SA
German
SO
MO
DI
MI
DO
FR
SA
HAND SETTING MODE
Use this mode to make corrections when the time shown
on the digital display does not match the time indicated
by the analog hands.
A
Important:
Before performing the time calibration operation, be
B
Mode indicator
sure to synchronize the digital time with the analog
C
time using the procedures described below. If not, the
setting of the hands could result in being different from
the digital time which is changed by the calibration
signal.
— 1 —
Telememo Mode
B
Hand Setting Mode Alarm Mode
B
World Time Mode
P
B
To set the analog time
1. Hold down A while in the Hand Setting Mode until the digits start to flash on the
display.
2. Hold down B or C to move the hands of the analog timepiece.
3. After you set the analog time, press A to return to the Hand Setting Mode (the
flashing stops).
The following shows how the display automatically changes if you do not operate any
button for a few minutes while in the Hand Setting Mode.
Hand time
setting
(flashing)
A few
minutes
Normal Hand
Setting Mode
(not flashing)
A few
minutes
Timekeeping display
TIME CALIBRATION SIGNAL
This watch is designed to receive the time calibration signal transmitted from Frankfurt,
Germany. It automatically adjusts its current time setting in accordance with the signal it
receives. There are two different methods you can use for signal receipt. With auto
receive, the watch automatically receives the calibration signal twice each day and
makes appropriate adjustments. You can also use manual receive, where you perform
a specific button operation to receive the calibration signal.
• The current time setting in accordance with the calibration signal takes priority over
any time settings you make.
• The watch is designed to automatically update the date and day of the week for the
period January 1, 1995 to December 31, 2039. Setting of the date by the calibration
signal cannot be performed starting from January 1. 2040.
This watch can receive signals that differentiate between leap years and non-leap years.
•
How the analog hands react on the time calibration
After the watch successfully receives time calibration signal data, it automatically changes
the settings of its hands. Before performing the time calibration operation, be sure to
synchronize the digital time with the analog time using the procedures described under
“Hand Setting Mode”. If not, the setting of the hands could result in being different from
the digital time which is changed by the calibration signal.
Auto receive
When auto receive is switched on, the watch automatically receives the calibration signal
starting from when the digital time reaches 2:00 AM and 4:00 AM each day. Calibration
is performed regardless of what mode the watch is in, except when you are performing a
data input or time setting operation (indicated by the flashing display). Use the following
procedure to switch auto receive on and off.
To switch auto receive on and off
1. In the Timekeeping Mode, hold down A until the “On” or “OFF” message appears on
the display.
2. Press C to switch auto receive on and off.
Press
Receive indicator
Flashes when calibration signal is being received.
3. Press A to return to the Timekeeping display.
• Auto receipt of the calibration signal is designed to be performed early in the morning,
while you sleep (provided that the digital time is set correctly). Before going to bed for
the night, remove the watch from your wrist, and put it in a location where it can easily
receive the signal. You should also orient the watch properly for best reception. See
“Tips for ensuring best reception” for details.
• Auto receive is switched on when the watch is shipped from the factory.
• The receive indicator appears on the display when the calibration signal is received
successfully. It disappears from the display when the watch is unable to receive the
signal for some reason. You can tell whether the last time the watch tried to receive
the calibration signal was successful or not by checking the receive indicator.
How the auto receive time calibration is performed
• When auto receive is switched on, the watch receives the calibration signal for two to
six minutes each day when the digital time reaches 2:00 AM and 4:00 AM (calibration
times). Make sure you do not try to operate any of the watch’s buttons while the
calibration signal is being received. Doing so can interfere with correct calibration.
• Remember that receipt of the calibration signal depends on the time shown on the
digital display. The receive operation will be performed whenever the digital display
shows 2:00 AM and 4:00 AM, regardless of whether or not that is actually the correct
time.
2:00 AM 4:00 AM
2 to 6 minutes
< First receipt >
• When both receipts are successful, the watch uses the data of the second receipt for
calibration. When only one receipt is successful, the watch uses the data of the
successful receipt.
C
< Second receipt >
2 to 6 minutes
Page 2
Manual receipt
While in the Timekeeping Mode, hold down C for three
or four seconds.
• When performing reception of the calibration signal,
make sure that the antenna located at the 12 o’clock
Signal being received
• The normal timekeeping display should appear within two to six minutes, which is how
long it takes for a signal receive operation. If a problem occurs during the operation,
the message “Err” appears on the display for about five seconds before the watch
returns to normal timekeeping.
• The receive indicator appears on the display when the receive operation is concluded
successfully.
• You can interrupt a receive operation at any time by pressing C. If you do, the watch
returns to normal timekeeping, without the receive indicator on the display.
edge of the watch is facing in the proper direction.
See “Tips for ensuring best reception” for de-
tails.
Last signal receipt display
Holding down B for a few seconds in any mode displays the date and time of the last
successful receipt. Press any button to return to normal timekeeping. The watch automatically changes back to normal timekeeping if you do not press any button for about 10
seconds.
Month
Date Day of week
Hour Minutes
Tips for ensuring best reception
< Location >
• Reception of the calibration signal is difficult when the watch is located indoors. Move
the watch so it is as near to a window as possible.
• The followings are locations where reception is bad.
Nearby TVs, refrigerators, computers, or other household appliances
Far away from broadcasting stations, among ferro-concrete structures or near mountains
Underground, in tunnels or in ferro-concrete buildings
Near high-tension wires, neon signs, or radio stations whose frequencies interfere
Near railroads, highways or airports
In trains or cars
< Orientation >
This watch is designed to receive a signal emitted from Mainflingen, which is located 25
kilometers southwest of Frankfurt, Germany. This means that reception is best when the
antenna built into the 12 o’clock edge of the watch is facing towards Mainflingen. Note,
however, that moving the watch while the calibration signal receive operation is taking
place will make stable reception impossible.
Antenna built in here
P
Point towards Mainflingen
Reception range
This watch is able to receive the calibration signal within
the area represented by a circle (left figure) with a
radius of 700 ~ 800 kilometers, centered on Mainflingen.
• Signal reception is affected by weather, atmospheric
conditions, and seasonal changes.
Note
• Even when the watch is within the reception range,
calibration signal reception will be impossible if the
signal is blocked by mountains or other geological
formations between the watch and signal source.
• At long distances that are out of the line of sight of
Frankfurt
this, such factors as changes in the reflectivity of the ionosphere, as well as movement
of the ionosphere to higher altitudes due to seasonal atmospheric changes or the time
of day may change the reception range of the signal and make reception temporarily
impossible.
the calibration signal transmitter, the calibration signal is bounced off of the ionosphere. Because of
TELEMEMO MODE
The following causes all data stored in memory to be deleted. Be sure to always keep separate
written copies of all important data.
• Malfunction or repairs
• Dead battery
• Battery replacement
In no event will CASIO be liable for loss of data or any damages arising out of such loss.
Mode indicator
BC
• If the new data display does not appear, it means that memory is full. To store more
data, you first have to delete some of the data.
2. Hold down A until the flashing cursor appears on the display.
3. Press B to move the flashing cursor in the following sequence.
Name
(up to 4 characters)
The Telememo Mode lets you store up to 30 pairs of
name and telephone number data. Data is automatically sorted into alphabetic order based on the name
data.
A
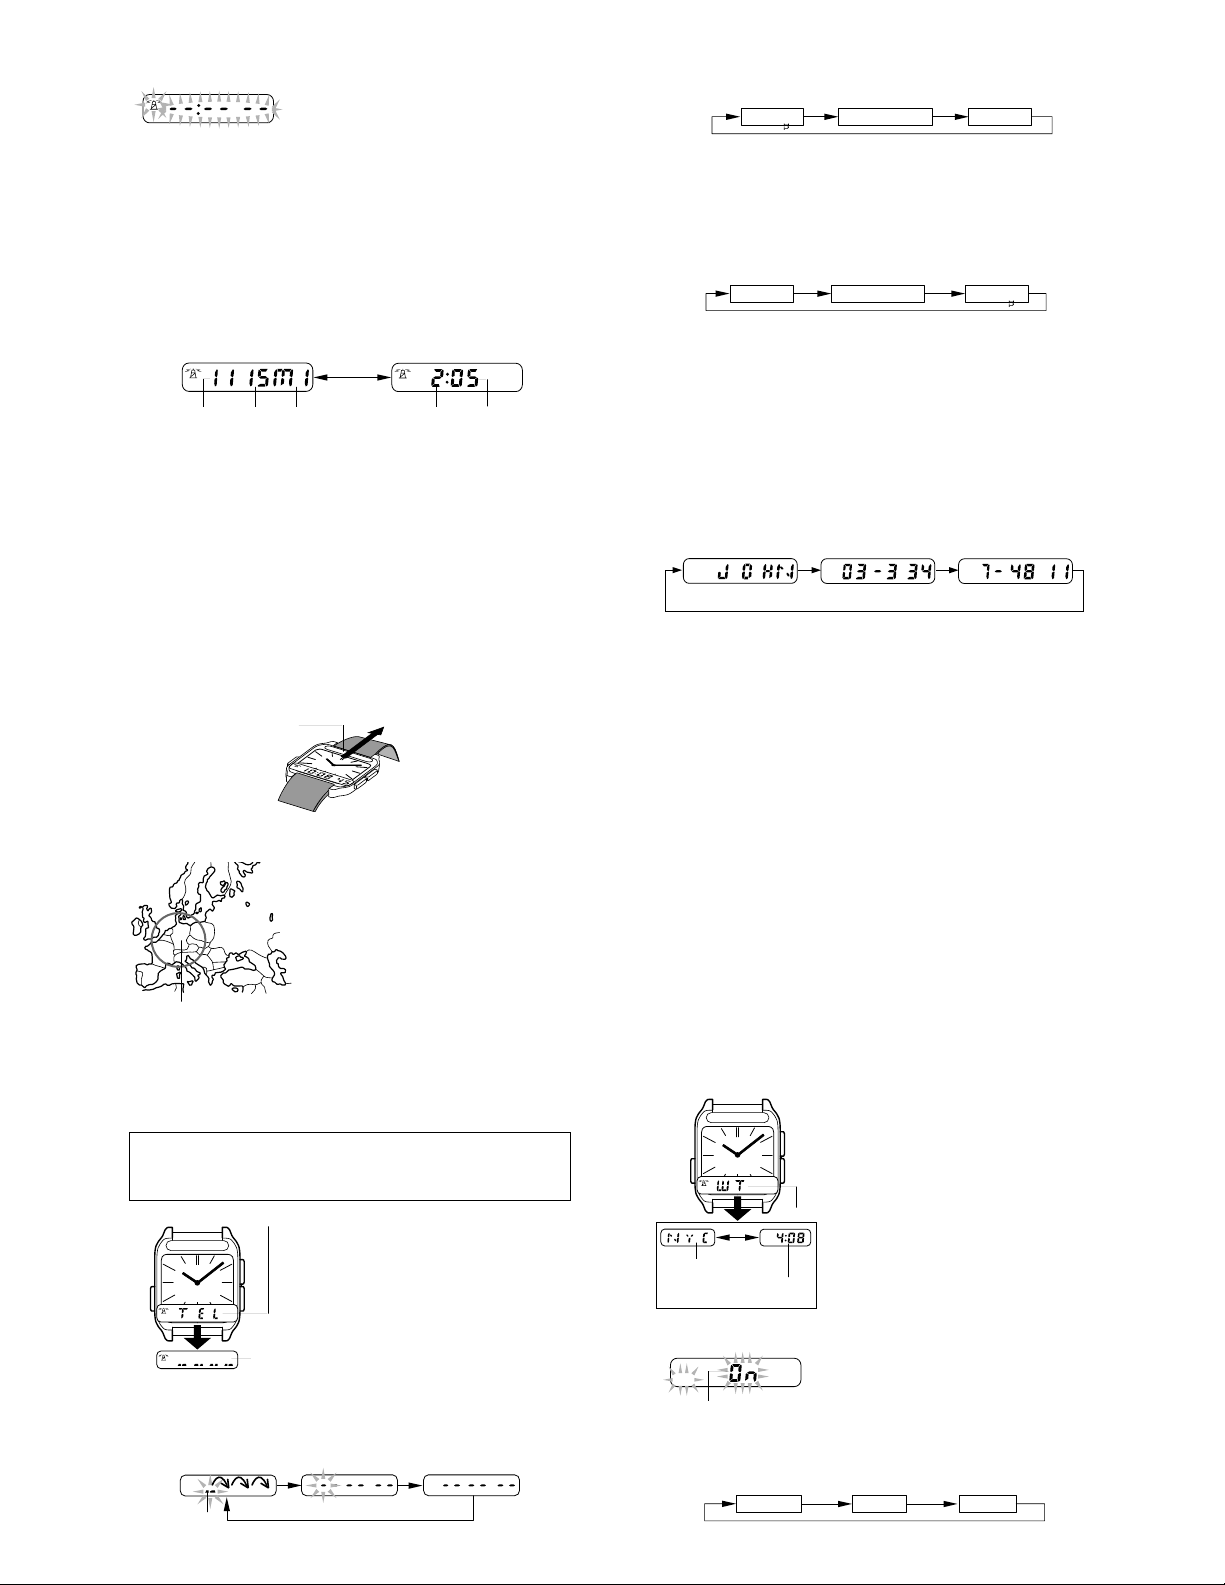
To input Telememo data
1. In the Telememo Mode, press C until the new data
display appears (left figure).
• If there is no Telememo data stored in memory yet,
the new data display appears as soon as you enter
New data
display
the Telememo Mode.
First 6 telephone
number digits
Last 6 telephone
number digits
4. While the cursor is flashing in the name display, use C to input letters. Each press of
C changes the character at the cursor location in the following sequence.
Press
Space(@ )
n
Letters (A to Z)
C
Press
5. When the character you want to input is at the cursor location, press B to move the
cursor to the right.
6. Repeat steps 4 and 5 to input all the characters of the name.
• The name can be up to 4 characters long.
7. After you input the name, move the cursor to the number display.
8. Use the same procedure as in steps 4 and 5 above to input the telephone number.
• In this case, each press of C changes the character at the cursor in the following
sequence.
Press
Hyphen (–)
C
Numbers (0 to 9)
Press
• The telephone number can be up to 12 digits long.
9. After inputting all the data you want, press A to store it.
• The message “SORT” appears for about three seconds to indicate that data is being
sorted into alphabetical order according to the names. After the sort operation is
complete, the display returns to the normal Telememo Mode display.
• All of the Telememo data for each item cannot appear on the display at one time. For
details on how data appears on the display, see “How the Telememo Mode displays
data.”
• If you do not operate any button for a few minutes while the cursor is flashing on the
display, the watch automatically returns to the normal Telememo Mode display (without a cursor).
Press
C
Hyphen (–)
C
Press
C
n
Space(@ )
C
How the Telememo Mode displays data
All of the Telememo data for each item cannot appear on the display at one time, so the
display automatically changes in the following sequence.
Name
To scroll through Telememo data
In the Telememo Mode, press C to scroll forward through stored data.
• If the new data display does not appear, it means that memory is full.
• The data item that is displayed when you exit the Telememo Mode will be the first data
to appear when you enter the Telememo Mode again.
First 6 telephone
number digits
Last 6 telephone
number digits
To edit Telememo data
1. In the Telememo Mode, scroll through the data items and display the one you want to
edit.
2. Hold down A until the flashing cursor appears on the display.
3. Use B to move the cursor to the character you want to change.
4. Use C to select the character you want.
• See steps 4 through 8 under “To input Telememo data” for details.
5. After editing the data, press A to store it.
• The message “SORT” appears for about three seconds to indicate that data is being
sorted into alphabetical order according to the names. After the sort operation is
complete, the display returns to the normal Telememo Mode display.
• If you do not operate any button for a few minutes while the cursor is flashing on the
display, the watch automatically returns to the normal Telememo Mode display (without a cursor).
To delete a Telememo item
1. In the Telememo Mode, scroll through the data items and display the one you want to
delete.
2. Hold down A until the cursor appears on the display.
3. Hold down B and C until the message “CLR” appears on the display.
• “CLR” indicates that the item is deleted. Next, the new data display appears, without a
cursor.
• If you want to input more data, start from step 2 under “To input Telememo data”.
WORLD TIME MODE
Use the World Time Mode to find out the current time
in any one of 26 time zones around the world.
When you set the time for any time zone, all other
zones are adjusted accordingly.
A
• In the World Time Mode, the display automatically
switches between the city code and the time in that
B
City code
Current time in New York
whose city code is "NYC".
To set the World Time
T
S
D
Indicates daylight saving
time is on.
2. Hold down A until the DST on/off indicator (“On” = on / “OFF” = off) begins to flash on
the display because it is selected.
3. Press B to change the selection in the following sequence.
C
Mode indicator
P
zone.
• For full information on city codes, see the “City Code
Table” at the end of this manual.
1. In the World Time Mode, scroll through the World
Time Zones by pressing C to find the time zone
whose time you want to set.
• The time zone that is displayed when you leave the
World Time Mode will still be displayed when you
enter the World Time Mode again.
Cursor
— 2 —
DSTon/off
Hour
Minutes
Page 3

4. While the DST (daylight saving time) on/off setting is selected, press C to switch
between daylight saving time (summer time) and standard time.
• The display shows “On” and the indicator “DST” appears on the display when daylight
saving time is switched on.
• Note that the daylight saving time / standard time setting affects only the currently
displayed World Time zone. Other time zones are not affected.
5. While the hour or minutes digits are selected (flashing), press C to increase the
number. Holding down C increases the number at high speed.
6. After you set the time, press A to return to the normal World Time Mode.
• If you do not operate any button for a few minutes while the DST on/off, hour or
minutes selection is flashing, the display automatically goes back to the normal World
Time Mode.
World Time Mode and the time calibration signal
• Whenever the current time is changed based on time calibration signal data that is
received, the times for the World Time zones are also adjusted.
ALARM MODE
When the Daily Alarm is switched on, the alarm sounds
for 20 seconds at the preset time each day. Press any
button to stop the alarm after it starts to sound.
When the Hourly Time Signal is switched on, the watch
A
beeps every hour on the hour.
Note that the Daily Alarm and the Hourly Time Signal
CB
operate based on the digital time setting.
To set the alarm time and switch the Hourly
Hour
Minutes
Mode indicator
Hour
3. Press C to increase the selected hour or minutes digits. Holding down C changes
the number at high speed.
• The format (12-hour and 24-hour ) of the alarm time matches the format you select for
normal timekeeping.
• When setting the alarm time using the 12-hour format, take care to set the time
correctly as morning (am) or afternoon (pm).
4. While the Hourly Time Signal setting is selected, press C to switch the hourly time
signal on and off.
Time Signal on and off
1. Hold down A while in the Alarm Mode until the hour
digits start to flash on the display. The hour digits
flash because they are selected. At this time the
Daily Alarm is switched on automatically.
2. Press B to change the selection in the following
sequence.
Minutes
Hourly Time Signal setting
CITY CODE TABLE
Difference
between GMT
City
code
-10 HNL HONOLULU PAPEETE
-09 ANC ANCHORAGE NOME
-08 LAX LOS ANGELES SAN FRANCISCO, LAS VEGAS, VANCOUVER, SEATTLE,
-07 DEN DENVER EL PASO, EDMONTON
-06 CHI CHICAGO HOUSTON,DALLAS, NEW ORLEANS, MEXICO CITY,
-05 NYC NEW YORK MONTREAL, DETROIT, MIAMI, BOSTON, PANAMA CITY,
-04 CCS CARACAS LA PAZ, SANTIAGO, PORT OF SPAIN
-03 RIO RIO DE JANEIRO SAO PAULO, BUENOS AIRES, BRASILIA, MONTEVIDEO
+00 LON LONDON DUBLIN, CASABLANCA, DAKAR, ABIDJAN
+01 BER BERLIN
+02 CAI CAIRO ATHENS, HELSINKI, ISTANBUL, BEIRUT, DAMASCUS,
JRS JERUSALEM CAPE TOWN
+03 JED JEDDAH KUWAIT, RIYADH, ADEN, ADDIS ABABA, NAIROBI
+3.5 THR TEHRAN SHIRAZ
+04 DXB DUBAI ABU DHABI, MUSCAT
+4.5 KBL KABUL
+05 KHI KARACHI
+5.5 DEL DELHI BOMBAY, CALCUTTA, COLOMBO
+06 DAC DHAKA
+6.5 RGN YANGON
+07 BKK BANGKOK JAKARTA, PHNOM-PENH, HANOI, VIENTIANE
+08 HKG HONG KONG SINGAPORE, KUALA LUMPUR, BEIJING, TAIPEI, MANILA,
+09 TYO TOKYO SEOUL, PYONGYANG
+9.5 ADL ADELAIDE DARWIN
+10 SYD SYDNEY MELBOURNE, GUAM, RABAUL
+11 NOU NOUMEA PORT VILA
+12 WLG WELLINGTON CHIRISTCHURCH, SUVA, NAURU ISLAND
City
Other major city in same time zone
DAWSON CITY
WINNIPEG, FORT WORTH
HAVANA, LIMA, BOGOTA
MILAN, ROME, MADRID, AMSTERDAM, ALGIERS, HAMBURG,
FRANKFURT, VIENNA, STOCKHOLM, PARIS, LISBON
PERTH, ULAN BATOR
On
Off
5. After you set the alarm time, press A to return to the normal Alarm Mode.
The following shows how the display automatically changes if you do not operate any
button for a few minutes while in the Alarm Mode.
Alarm time
setting
(flashing)
To switch the Daily Alarm on and off
While in the Alarm Mode, press C to switch the Daily Alarm on and off.
Alarm time set for 6:30
To test the alarm
Hold down C while in the Alarm Mode to sound the alarm. Note that pressing C also
switches the Daily Alarm on and off.
A few
minutes
Normal Alarm
Mode
(not flashing)
Press
C
A few
minutes
No alarm time set
Timekeeping display
— 3 —
Page 4

BETRIEBSTABELLE:MODUL QW-785
ALLGEMEINE ANLEITUNG
• Knopf B drücken, um von Modus auf Modus umzuschalten.
Zeitnehmungs-Modus
A
Knopf
C
B
P
Zeit
C
drücken.
Datum
B
B
ZEITNEHMUNGS-MODUS
• In dem Zeitnehmungs-Modus den Knopf C drücken, um zwischen der Zeit- und Datumsanzeige umzuschalten.
A
BC
P
PMAnzeige
(zweite
Tageshälfte)
Sekunden
Minuten
Stunden
Automatischer
Eimpfang Ein/Aus
Datum
• Für Einzelheiten über den automatischen Empfang siehe “Zeitkalibrierungssignal”.
3. Knopf C drücken, um die Wochentag anzeige zwischen Englisch (E) und Deutsch (D)
umzuschalten.
• Für die Bedeutung der im Display angezeigten Abkürzungen siehe die Tabelle mit
dem Titel “Abkürzungen der Wochentage”.
4. Während die 12/24-Stunden-Einstellung gewählt ist, Knopf C drücken, um zwischen
diesen beiden Formaten umzuschalten.
5. Während die Sommerzeit-Ein/Aus-Einstellung gewählt ist, Knopf C drücken, um zwischen der Sommerzeit und der Standardzeit umzuschalten.
• Das Display zeigt “On” und die Anzeige “DST” (Daylight Saving Time = Sommerzeit)
erscheint im Display, wenn die Sommerzeit eingeschaltet ist.
6. Während die Sekundenstellen angewählt sind (blinken), Knopf C drücken, um die
Sekunden auf “00” zurückzustellen. Falls Sie Knopf C bei einer Sekundenzählung im
Bereich von 30 bis 59 drücken, werden die Sekunden auf “00” zurückgestellt, wobei 1
zu den Minuten addiert wird. Bei einer Sekundenzählung im Bereich von 00 bis 29
verbleibt die Minutenzählung unverändert.
7. Während die Stunden-, Minuten-, Monats- oder Datumsstellen (außer Sekundenstellen)
angewählt sind (blinken), Knopf C drücken, um die angezeigte Zahl zu erhöhen. Den
Knopf C gedrückt halten, um die angezeigte Zahl schnell zu ändern.
8. Nachdem Sie alle gewünschten Einstellungen ausgeführt haben, Knopf A drücken,
um an die normale Zeitnehmung zurückzukehren.
• Falls sie keine der Tasten für einige Minuten drücken, während die angewählten
Stellen blinken, wird das Blinken eingestellt und die Armbanduhr kehrt automatisch an
die normale Zeitnehmung zurück.
• Der Wochentag wird automatisch gemäß Datum eingestellt.
• Das Datum kann innerhalb des Bereichs vom 1. Januar 1995 bis zum 31. Dezember
2039 eingestellt werden.
• Wenn Sie den obigen Vorgang für die Einstellung der Zeit im Digital-Display verwenden, werden die Zeiger des Analog-Zeitnehmers normalerweise entsprechend eingestellt. Falls aus irgend einem Grund die Analog-Zeit nicht mit der Digital-Zeit übereinstimmt, den unter Zeigereinstell-Modus beschriebenen Vorgang verwenden, um die
Analog-Einstellung an die Digital-Einstellung anzupassen.
Über die Sommerzeit
Bei Verwendung der Sommerzeit werden die Uhren um eine Stunde zurückgestellt, um
die Tagesstuden im Sommer, wenn die Tage länger sind, nützlicher verwenden zu können. Ob die Sommerzeit verwendet wird oder nicht, hängt von dem Land ab, in dem Sie
sich befinden.
Monat
Einstellen von Zeit und Datum
1. In dem Zeitnehmungs-Modus den Knopf A gedrückt
halten, bis die Meldung “On” oder “OFF” im Display
erscheint.
2. Knopf B drücken, um die angewählten Stellen in
der folgenden Reihenfolge umzuschalten.
Sprache
(Englisch
oder Deutsch)
Jahr Minuten Stunden Sekunden
Knopf
drücken.
12/24-Stunden
Abkürzungen der Wochentage
Sprache
Wochentag
Sonntag
Montag
Dienstag
Mittwoch
Donnerstag
Freitag
Samstag
Englisch
Deutsch
SU
MO
TU
WE
TH
FR
SA
SO
MO
DO
FR
SA
P
C
Sommerzeit
Ein/Aus
DI
MI
Telememo-Modus
Zeigereinstell-Modus
B
B
Weltzeitmodus
Alarm-Modus
P
B
ZEIGEREINSTELL-MODUS
Diesen Modus verwenden, um Berichtigungen vorzunehmen, wenn die im Digital-Display angezeigte Zeit
nicht mit der durch die Analog-Zeiger angezeigten Zeit
übereinstimmt.
A
BC
Modusanzeige
Wichtig:
Bevor Sie die Zeitkalibrierungsoperation durchführen,
unbedingt die Digital-Zeit mit der Analog-Zeit synchronisieren, indem die nachfolgend beschriebenen Vorgänge befolgt werden. Anderenfalls kann die Einstellung der Zeiger von der Digital-Zeit abweichen, die
durch das Kalibrierungssignal geändert wird.
Einstellen der Analog-Zeit
1. Knopf A in dem Zeigereinstell-Modus gedrückt halten, bis die Stellen im Display zu
blinken beginnen.
2. Knopf B oder C gedrückt halten, um die Zeiger des Analog-Zeitnehmers zu verstellen.
3. Nachdem Sie die Analog-Zeit eingestellt haben, Knopf A drücken, um in den Zeigereinstell-Modus zurückzukehren.
Nachfolgend ist gezeigt, wie das Display automatisch ändert, wenn Sie keinen der Knöpfe für einige Minuten im Zeigereinstell-Modus drücken.
Zeigerzeit-
Einstellung
(blinkt)
Einige
Minuten
Normaler
Zeigereinstell-
Modus
(kein Blinken)
Einige
Minuten
Zeitnehmungs-
Display
ZEITKALIBRIERUNGSSIGNAL
Diese Armbanduhr ist für den Empfang des aus Frankfurt, Deutschland, ausgestrahlten
Zeitkalibrierungssignals ausgelegt. Die Zeit wird automatisch in Abhängigkeit von dem
empfangenen Signal eingestellt. Es gibt zwei verschiedene Methoden für den Empfang
dieses Signals. Mit dem automatischen Empfang empfängt die Armbanduhr das
Kalibrierungssignal automatisch zweimal pro Tag und nimmt die entsprechenden Einstellungen vor. Sie können auch den manuellen Empfang verwenden, indem eine bestimmte Knopfbetätigung für den Empfang des Kalibrierungssignals ausgeführt wird.
• Die derzeitige Zeiteinstellung gemäß Kalibrierungssignal hat Vorrang über jede Zeiteinstellung, die Sie durchführen.
• Die Armbanduhr ist so ausgelegt, daß das Datum und der Wochentag für die Periode
vom 1. Januar 1995 bis zum 31. Dezember 2039 automatisch aktualisiert werden.
Eine Einstellung des Datums anhand des Kalibrierungssignals ist ab dem 1. Januar
2040 nicht mehr möglich.
• Diese Armbanduhr kann Signale empfangen, die zwischen Schaltjahren und normalen
Jahren unterscheiden.
Wie die Analog-Zeiger auf die Zeitkalibrierung reagieren
Nachdem die Armbanduhr die Zeitkalibrierungssignaldaten erfolgreich empfangen hat,
ändert sie automatisch die Einstellungen der Zeiger. Vor der Durchführung der
Zeitkalibrierungsoperation unbedingt die Digital-Zeit mit der Analog-Zeit synchronisieren,
indem die unter “Zeigereinstell-Modus” beschriebenen Vorgänge eingehalten werden.
Anderenfalls kann die Einstellung der Zeiger zu einer Abweichung von der Digital-Zeit
führen, die durch das Kalibrierungssignal geändert wird.
Automatischer Empfang
Wenn der automatische Empfang eingeschaltet ist, empfängt die Armbanduhr automatisch das Zeitkalibrierungssignal, sobald die Digital-Zeit 2:00 AM (morgens) und 4:00 AM
(morgens) jeden Tag erreicht. Die Kalibrierung wird unabhängig von dem Modus ausgeführt, in dem sich die Armbanduhr befindet, ausgenommen wenn Sie eine Dateneingabeoder Zeiteinstell operation (angezeigt durch ein blinkendes Display) ausführen. Den
folgenden Vorgang verwenden, um den automatischen Empfang ein- oder auszuschalten.
Ein- oder Ausschalten des automatischen Empfangs
1. In dem Zeitnehmungs-Modus den Knopf A gedrückt halten, bis die Meldung “On”
oder “OFF” am Display erscheint.
2. Knopf C drücken, um den automatischen Empfang ein- oder auszuschalten.
Knopf
C
Empfangsanzeige
Blinkt, wenn das Kalibrierungssignal empfangen wird.
drücken.
— 4 —
Page 5

3. Knopf A drücken, um an die Zeitnehmungsanzeige zurückzukehren.
• Der automatische Empfang des Kalibrierungssignals ist so ausgelegt, daß er früh am
Morgen erfolgt, während Sie noch schlafen (vorausgesetzt, daß die Digital-Zeit richtig
eingestellt ist). Bevor Sie am Abend schlafen gehen, die Armbanduhr vom Handgelenk abnehmen und an einem Ort ablegen, an dem sie das Signal einfach empfangen
kann. Sie sollten die Armbanduhr auch für besten Empfang ausrichten. Für Einzelheiten siehe “Tips für besten Empfang”.
• Der automatische Empfang ist eingeschaltet, wenn die Armbanduhr ab Werk ausgeliefert wird.
• Die Empfangsanzeige erscheint am Display, wenn das Kalibrierungssignal erfolgreich
empfangen wird. Sie verschwindet aus dem Display, wenn die Armbanduhr aus irgendeinem Grund das Signal nicht empfangen kann. Durch Kontrolle der Empfangsanzeige können Sie feststellen, ob die Armbanduhr das letzte Mal das
Kalibrierungssignal erfolgreich empfangen hat oder nicht.
Wie die Zeitkalibrierung mittels automatischem Empfang ausgeführt wird
• Wenn der automatische Empfang eingeschaltet ist, empfängt die Armbanduhr täglich
das Kalibrierungssignal für zwei bis sechs Minuten, sobald die Digital-Zeit 2:00 AM
(morgens) und 4:00 AM (morgens) erreicht. Achten Sie darauf, daß keiner der Knöpfe
der Armbanduhr während des Empfangs des Kalibrierungssignals betätigt wird. Anderenfalls ist richtige Kalibrierung nicht möglich.
• Erinnern Sie sich daran, daß der Empfang des Kalibrierungssignals von der im DigitalDisplay angezeigten Zeit abhängt. Die Empfangsoperation wird immer dann ausgeführt, wenn das Digital-Display 2:00 Uhr AM und 4:00 Uhr AM anzeigt, unabhängig
davon, ob dies tatsächlich die richtige Zeit ist oder nicht.
2:00 AM 4:00 AM
(morgens)
(morgens)
Empfangsbereich
Diese Armbanduhr kann das Kalibrierungssignal in einem Bereich empfangen, der (in der linken Abbildung)
durch einen Kreis mit einem Radius von 700~800 Kilometern rund um Mainflingen dargestellt ist.
• Der Signalempfang wird durch das Wetter, die atmosphärischen Bedingungen und saisonbedingte
Änderungen beeinträchtigt.
Frankfurt
Hinweise
• Auch wenn sich die Armbanduhr innerhalb des Empfangsbereichs befindet, ist der
Empfang des Kalibrierungssignals nicht möglich, wenn das Signal von Bergen oder
anderen geologischen Formationen zwischen der Armbanduhr und der Signalquelle
blockiert ist.
• In großen Entfernungen, die außerhalb der Sichtweite des Senders des
Kalibrierungssignals liegen, wird das Kalibrierungssignal von der Ionosphäre reflektiert.
Daher können Änderungen der Reflexion der Ionosphäre, sowie Verlagerung der
Ionosphäre auf eine größere Höhe aufgrund von saisonbedingten atmosphärischen
Änderungen oder aufgrund der Tageszeit den Empfangsbereich des Signals ändern
und den Empfang vorübergehend unmöglich machen.
2 bis 6 Minuten
< Erster Empfang >
• Wenn beide Empfänge erfolgreich sind, verwendet die Armbanduhr die Daten des
zweiten Empfangs für die Kalibrierung. Wenn nur ein Empfang erfolgreich ist, verwendet die Armbanduhr die Daten des erfolgreichen Empfangs.
2 bis 6 Minuten
< Zweiter Empfang >
Manueller Empfang
In dem Zeitnehmungs-Modus den Knopf C für drei
oder vier Sekunden gedrückt halten.
• Wenn der Empfang des Kalibrierungssignals ausgeführt wird, darauf achten, daß die an der 12-Uhr-
Signal wird empfangen
• Die normale Zeitnehmungsanzeige sollte innerhalb von zwei bis sechs Minuten (erforderliche Zeitspanne für eine Signalempfangsoperation) erscheinen. Falls es während
dieser Operation zu einem Problem kommt, erscheint die Meldung “Err” für fünf Sekunden im Display, bevor die Armbanduhr an die normale Zeitnehmung zurückkehrt.
• Die Empfangsanzeige erscheint am Display, wenn die Empfangsoperation erfolgreich
ausgeführt wurde.
• Sie können eine Empfangsoperation jederzeit unterbrechen, indem Sie Knopf C drücken. In diesem Fall kehrt die Armbanduhr auf die normale Zeitnehmung zurück, ohne
daß die Empfangsanzeige am Display angezeigt wird.
Kante der Armbanduhr angebrachte Antenne in die
richtige Richtung weist. Für Einzelheiten siehe unter
“Tips für besten Empfang”.
Anzeige des letzten Signalempfangs
Durch Niederhalten des Knopfes B für einige Sekunden in einem beliebigen Modus
werden das Datum und die Uhrzeit des letzten erfolgreichen Empfangs angezeigt. Einen
beliebigen Knopf drücken, um an die normale Zeitnehmung zurückzukehren. Die Armbanduhr kehrt automatisch an die normale Zeitnehmung zurück, wenn Sie für etwa 10
Sekunden keinen der Knöpfe drücken.
Monat
Datum
Wochentag
Stunden
Minuten
Tips für besten Empfang
< Anordnung >
• Der Empfang des Kalibrierungssignals ist schwierig, wenn die Armbanduhr in Räumen
abgelegt ist. Daher die Armbanduhr möglichst nahe an einem Fenster anordnen.
• An den nachfolgenden Anordnungsorten ist der Empfang schlecht.
In der Nähe von Fernsehgeräten, Kühlschränken, Computern oder anderen elektrischen Haushaltsgeräten
Weit entfernt von den Sendestationen, in der Nähe von Stahlbeton-Strukturen oder in
der Nähe von Bergen
Unter der Erde, in Tunnels oder in Stahlbeton-Gebäuden
In der Nähe von Hochspannungsleitungen, Neonzeichen oder Rundfunkstationen, deren Frequenzen zu Interferenzen führen
In der Nähe von Eisenbahnschienen, Autobahnen oder Flughäfen
In Zügen oder Kraftfahrzeugen
< Ausrichtung >
Diese Armbanduhr ist so ausgelegt, daß sie ein in Mainflingen (25 km südwestlich von
Frankfurt, Dautschland) ausgestrahltes Signal empfangen kann. Dies bedeutet, daß bester Empfang gewährleistet ist, wenn die in der 12-Uhr-Kante der Armbanduhr eingebaute Antenne auf Mainflingen ausgerichtet ist. Achten Sie jedoch darauf, daß stabiler Empfang unmöglich ist, falls die Armbanduhr während der Kalibrierungssignal-Empfangsoperation bewegt wird.
Antenne hier eingebaut
P
Auf Mainflingen ausrichten
— 5 —
TELEMEMO-MODUS
Durch die nachfolgenden Vorgange werden alle im Speicher gespeicherten Daten
geloscht. Ferligen Sie daher schriftliche Kopien aller wichtigen Daten an.
• Fehlbetrieb oder Reparaturen/Verbrauchte Batterie/Austauschen der Batterie Unter
keinen Umständen kenn CASIO für den Verlust von Daten und den daraus entstehenden Schöden verantwortlich gemacht werden.
Modusanzeige
B
Anzeige für neue Daten
2. Knopf A gedrückt halten, bis ein blinkender Cursor im Display erscheint.
3. Knopf B drücken, um den blinkenden Cursor in der folgenden Reihenfolge zu verschieben.
Name
(bis zu 4 Zeichen)
Cursor
4. Während der Cursor im Namen-Display blinkt, den Knopf C für die Eingabe von
Buchstaben verwenden. Mit jedem Drücken des Knopfes C wird der Buchstabe an
der Position des Cursors in der folgenden Reihenfolge geändert.
n
Leerstelle ( )
5. Wenn sich das gewünschte Zeichen an der Position des Cursors befindet, Knopf B
drücken, um den Cursor nach rechts zu verschieben.
6. Die Schritte 4 und 5 wiederholen, bis alle Zeichen für den Namen eingegeben sind.
• Der Namen kann bis zu 4 Zeichen lang sein.
7. Nachdem Sie den Namen eingegeben haben, den Cursor in das Nummern-Display
verschieben.
8. Den gleichen Vorgang wie in den obigen Schritten 4 und 5 verwenden, um die Telefonnummer einzugeben.
• In diesem Fall wird mit jedem Drücken des Knopfes C das Zeichen an der CursorPosition in der folgenden Reihenfolge geändert.
Bindestrich (–)
• Die Telefonnummer kann bis zu 12 Stellen lang sein.
9. Nachdem Sie alle gewünschten Daten eingegeben haben, Knopf A drücken, um
diese Daten abzuspeichern.
• Die Meldung “SORT” erscheint für einige Sekunden, um damit anzuzeigen, daß die
Daten in alphabetischer Reihenfolge in Abhängigkeit vom Namen sortiert werden.
Sobald die Sortierungsoperation beendet ist, kehrt das Display auf das normale
Zeitnehmungs-Display zurück.
• Die gesamten Telememo-Daten eines Datensatzes können nicht gleichzeitig am Display angezeigt werden. Für Einzelheiten über das Anzeigen der Daten am Display
siehe “Wie die Daten im Telememo-Modus angezeigt werden”.
Falls Sie bei blinkendem Cursor keinen der Knöpfe für einige Minuten drücken, kehrt
•
die Armbanduhr automatisch in den normalen Telememo-Modus (ohne Cursor) zurück.
In dem Telememo-Modus können Sie bis zu 30 Datensätze, bestehend jeweils aus Namen und Telefonnummer, abspeichern. Die Daten werden automatisch in
alphabetischer Reihenfolge der Namen sortiert.
A
Eingabe von Telememo-Daten
1. In dem Telememo-Modus den Knopf C drücken,
C
bis die Anzeige für neue Daten (linke Abbildung)
erscheint.
• Falls noch keine Telememo-Daten abgespeichert
sind, erscheint die Anzeige für neue Daten sobald
Sie den Telememo-Modus aufrufen.
• Falls die Anzeige für neue Daten nicht erscheint,
dann bedeutet dies, daß der Speicher voll ist. Um in
diesem Fall weitere Daten abspeichern zu können,
müssen Sie zuerst einige der vorhandenen Daten
löschen.
Ersten 6 Stellen
der Telefonnummer
Knopf
C
drücken.
Knopf
C
drücken.
Knopf
Knopf
Buchstaben
(A bis Z)
C
drücken.
Ziffern
(0 bis 9)
C
drücken.
Letzten 6 Stellen
der Telefonnummer
Knopf
C
drücken.
Knopf
C
drücken.
Bindestrich (–)
Leerstelle ( )
n
Page 6

Wie die Daten im Telememo-Modus angezeigt werden
Die gesamten Telememo-Daten eines Datensatzes können nicht gleichzeitig im Display
angezeigt werden, so daß das Display automatisch in der folgenden Reihenfolge ändert.
Name
Ersten 6 Stellen der
Telefonnummer
Letzten 6 Stellen der
Telefonnummer
Durchsehen der Telememo-Daten
In dem Telememo-Modus den Knopf C drücken, um die gespeicherten Daten durchzusehen.
• Falls die Anzeige für neue Daten nicht erscheint, dann ist der Speicher voll.
• Der Datensatz, der angezeigt wird, wenn Sie den Telememo-Modus verlassen, wird
wiederum angezeigt, wenn Sie erneut den Telememo-Modus aufrufen.
Editieren von Telememo-Daten
1. In dem Telememo-Modus die Datensätze durchsehen, um den Datensatz aufzufinden,
den Sie editieren möchten.
2. Knopf A gedrückt halten, bis der blinkende Cursor im Display erscheint.
3. Knopf B verwenden, um den Cursor an das Zeichen zu bringen, das Sie ändern
möchten.
4. Knopf C verwenden, um das gewünschte Zeichen zu wählen.
• Für Einzelheiten siehe die Schritte 4 bis 8 unter “Eingabe der Telememo-Daten”.
5. Nach dem Editieren der Daten, Knopf A drücken, um die Daten zu speichern.
• Die Meldung “SORT” erscheint für etwa drei Sekunden im Display, um damit anzuzeigen, daß die Daten in alphabetischer Reihenfolge des Namens sortiert werden. Sobald die Sortieroperation beendet ist, kehrt das Display auf die normale Anzeige des
Telememo-Modus zurück.
• Falls Sie keinen der Knöpfe für einige Minuten drücken, während der Cursor im
Display blinkt, kehrt die Armbanduhr automatisch in den normalen Telememo-Modus
(ohne Cursor) zurück.
Löschen eines Telememo-Datensatzes
1. In dem Telememo-Modus die Datensätze durchsehen und den Datensatz anzeigen,
den Sie löschen möchten.
2. Knopf A gedrückt halten, bis der Cursor im Display erscheint.
3. Die Knöpfe B und C gedrückt halten, bis die Meldung “CLR” im Display erscheint.
• “CLR” zeigt an, daß der Datensatz gelöscht wurde. Danach erscheint die Anzeige für
neue Daten ohne Cursor.
• Falls Sie weitere Daten eingeben möchten, ab Schritt 2 unter “Eingabe von Telememo-
Daten” fortsetzen.
WELTZEIT-MODUS MODUSANZEIGE
Modusanzeige
B C
P
Stadtcode
Derzeitige Zeit in New York,
deren Stadtcode “NYC” ist.
Einstellen der Weltzeit
T
S
D
Zeigt an, daß die Sommerzeit
eingeschaltet ist.
2. Knopf A gedrückt halten, bis die DST-Ein/Aus-Anzeige (“On” = Ein/”OFF” = Aus) im
Display zu blinken beginnt, da sie angewählt ist.
3. Knopf B drücken, um die angewählten Stellen in der folgenden Reihenfolge zu ändern.
DST-Ein/Aus
4. Während die DST-Ein/Aus-Einstellung (Daylight Saving Time = Sommerzeit) gewählt
ist, Knopf C drücken, um zwischen Sommerzeit und Standardzeit umzuschalten.
• Das Display zeigt “On” und die Anzeige “DST” verschwindet aus dem Display, wenn
die Sommerzeit eingeschaltet ist.
• Achten Sie darauf, daß die Sommerzeit/Standardzeit-Einstellung nur die derzeitig angezeigte Weltzeitzone betrifft. Andere Zeitzonen werden dadurch nicht betroffen.
5. Während die Stunden- oder Minutenstellen angewählt sind (blinken), Knopf C drücken, um die Zahl zu erhöhen. Knopf C gedrückt halten, um die Zahl schnell zu
erhöhen.
6. Nachdem Sie die Zeit eingestellt haben, Knopf A drücken, um in den normalen
Weltzeit-Modus zurückzukehren.
• Falls Sie keinen der Knöpfe für einige Minuten drücken, während die DST-Ein/Aus-,
Stunden- oder Minutenstellen blinken, kehrt die Armbanduhr automatisch in den normalen Weltzeit-Modus zurück.
Weltzeit-Modus und Zeitkalibrierungssignal
• Wann immer die derzeitige Zeit anhand der empfangenen Zeitkalibrierungssignaldaten
geändert wird, werden auch die Zeiten der Weltzeitzonen eingestellt.
Verwenden Sie den Weltzeit-Modus, um die derzeitige
Zeit in eine beliebigen der 26 Zeitzonen rund um die
Welt aufzufinden. Wenn Sie die Zeit für eine Zeitzone
einstellen, werden alle anderen Zonen entsprechend
eingestellt.
A
• In dem Weltzeit-Modus schaltet das Display automatisch zwischen dem Stadtcode und der Zeit in
dieser Zone um.
• Für vollständige Informationen über die Stadtcode,
siehe die “Tabelle der Stadtcode (City Code Table)”
am Ende dieser Anleitung.
1. In dem Weltzeit-Modus die Weltzeitzonen durch
Drücken des Knopfes C durchsehen, um die Zeitzone aufzufinden, deren Zeit Sie sehen möchten.
• Die Zeitzone, die angezeigt wird, wenn Sie den Weltzeit-Modus verlassen, wird wiederum angezeigt, sobald Sie den Weltzeit-Modus erneut aufrufen.
Stunden
Minuten
ALARM-MODUS
Wenn der tägliche Alarm eingeschaltet ist, ertönt der
Alarm täglich zur voreingestellten Zeit für 20 Sekunden. Sobald der Alarm ertönt, einen beliebigen Knopf
drücken, um den Alarm zu stoppen.
A
Wenn das stündliche Zeitsignal eingeschaltet ist, gibt
die Armbanduhr zu jeder vollen Stunde einen Piepton
CB
aus.
Achten Sie darauf, daß der tägliche Alarm und das
stündliche Zeitsignal anhand der Digital-Zeiteinstellung
Stunden
Minuten
Modusanzeige
2. Knopf B drücken, um die angewählten Stellen in der folgenden Reihenfolge zu ändern.
Stunden
3. Knopf C drücken, um die angewählten Stunden- oder Minutenstellen zu erhöhen.
Knopf C gedrückt halten, um die Zahl schnell zu ändern.
• Das Format (12-Stunden oder 24-Stunden) der Alarmzeit stimmt mit dem von Ihnen
für die normale Zeitnehmung gewählten Format überein.
• Wenn die Alarmzeit im 12-Stunden-Format eingestellt wird, darauf achten, daß die
Einstellung richtig für die erste (AM) oder zweite (PM) Tageshälfte erfolgt.
4. Während die Einstellung des stündlichen Zeitsignals angewählt ist, Knopf C drücken,
um das stündliche Zeitsignal ein- oder auszuschalten.
arbeiten.
Einstellen der Alarmzeit und Ein- und Ausschal-
ten des stündlichen Zeitsignals
1. Knopf A im Alarm-Modus gedrückt halten, bis die
Stundenstellen im Display zu blinken beginnen. Die
Stundenstellen blinken, da sie angewählt sind. Zu
diesem Zeitpunkt wird der tägliche Alarm automatisch eingeschaltet.
Minuten
Einstellung des
stündlichen Zeitsignals
Ein Aus
5. Nachdem Sie die Alarmzeit eingestellt haben, Knopf A drücken, um in den normalen
Alarm-Modus zurückzukehren.
Nachfolgend ist gezeigt, wie das Display automatisch ändert, wenn Sie keinen der Knöpfe für einige Minuten im Alarm-Modus drücken.
Alarmzeit-
Einstellung
(blinkt)
Einige
Minuten
Normaler
Alarm-Modus
(keinBlinken)
Einige
Minuten
Zeitnehmungs-
Display
Ein- und Ausschalten des täglichen Alarms
In dem Alarm-Modus den Knopf C drücken, um den täglichen Alarm ein- oder auszuschalten.
Knopf
C
drücken.
Alarmzeit auf 6:30 Uhr
eingestellt.
Keine Alarmzeit eingestelt.
Prüfen des Alarms
Knopf C im Alarm-Modus gedrückt halten, um den Alarm ertönen zu lassen. Achten Sie
darauf, daß durch das Drücken des Knopfes C der tägliche Alarm auch ein- und ausgeschaltet wird.
CITY CODE TABLE
Difference
between GMT
City
code
-10 HNL HONOLULU PAPEETE
-09 ANC ANCHORAGE NOME
-08 LAX LOS ANGELES SAN FRANCISCO, LAS VEGAS, VANCOUVER, SEATTLE,
-07 DEN DENVER EL PASO, EDMONTON
-06 CHI CHICAGO HOUSTON,DALLAS, NEW ORLEANS, MEXICO CITY,
-05 NYC NEW YORK MONTREAL, DETROIT, MIAMI, BOSTON, PANAMA CITY,
-04 CCS CARACAS LA PAZ, SANTIAGO, PORT OF SPAIN
-03 RIO RIO DE JANEIRO SAO PAULO, BUENOS AIRES, BRASILIA, MONTEVIDEO
+00 LON LONDON DUBLIN, CASABLANCA, DAKAR, ABIDJAN
+01 BER BERLIN
+02 CAI CAIRO ATHENS, HELSINKI, ISTANBUL, BEIRUT, DAMASCUS,
JRS JERUSALEM CAPE TOWN
+03 JED JEDDAH KUWAIT, RIYADH, ADEN, ADDIS ABABA, NAIROBI
+3.5 THR TEHRAN SHIRAZ
+04 DXB DUBAI ABU DHABI, MUSCAT
+4.5 KBL KABUL
+05 KHI KARACHI
+5.5 DEL DELHI BOMBAY, CALCUTTA, COLOMBO
+06 DAC DHAKA
+6.5 RGN YANGON
+07 BKK BANGKOK JAKARTA, PHNOM-PENH, HANOI, VIENTIANE
+08 HKG HONG KONG SINGAPORE, KUALA LUMPUR, BEIJING, TAIPEI, MANILA,
+09 TYO TOKYO SEOUL, PYONGYANG
+9.5 ADL ADELAIDE DARWIN
+10 SYD SYDNEY MELBOURNE, GUAM, RABAUL
+11 NOU NOUMEA PORT VILA
+12 WLG WELLINGTON CHIRISTCHURCH, SUVA, NAURU ISLAND
City
Other major city in same time zone
DAWSON CITY
WINNIPEG, FORT WORTH
HAVANA, LIMA, BOGOTA
MILAN, ROME, MADRID, AMSTERDAM, ALGIERS, HAMBURG,
FRANKFURT, VIENNA, STOCKHOLM, PARIS, LISBON
PERTH, ULAN BATOR
— 6 —
 Loading...