

Casio 765, 1305 Owner's Manual
60
30
0
20
10
5
0
30
40
50
60
60
30
0
20
10
5
0
30
40
50
60
60
30
0
20
10
5
0
30
40
50
60
Module No.765/1305
GENERAL GUIDE
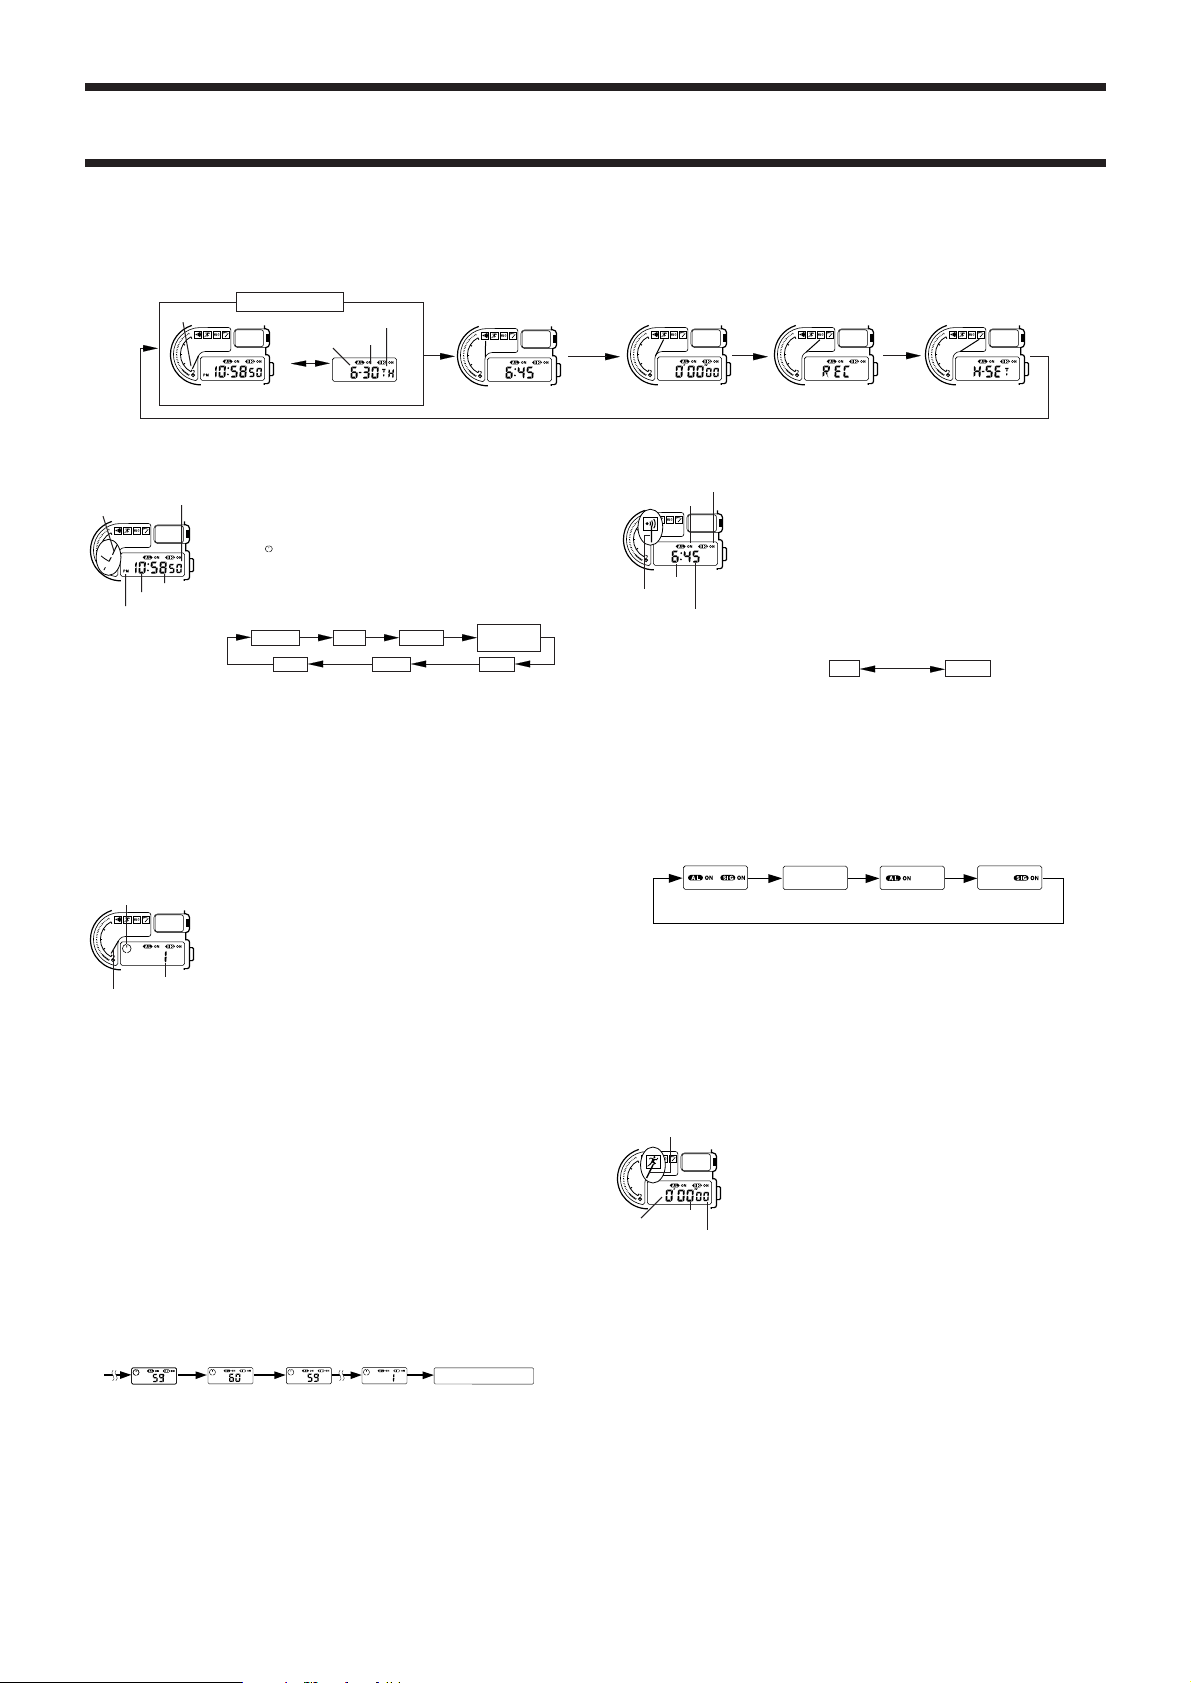
• Press C to change from mode to mode. Each mode is explained in detail on the following pages.
• You can use the timer function in the Timekeeping Mode. See Using One-Touch Timer Function
for details.
• Whenever you change modes, the hand indicator moves to indicate the corresponding mode
symbol.
765/1305-1
Hand indicator
60
50
60
40
30
30
20
10
0
5
0
Timekeeping Mode
AB
C
Press A.
Month
Day of week
Date
Alarm Mode
60
50
60
40
30
30
20
10
0
5
0
Time Date
TIMEKEEPING MODE
• In the Timekeeping Mode, press A to switch between time and date
Hand indicator
60
50
60
40
30
30
20
10
0
0
5
0
Hour
PM indicator
Seconds
A
Minutes
displays.
To set the time and date
B
You cannot set the time and date while the One-Touch Timer is operating
(while " " is shown on the digital display). In such a case, stop the OneTouch Timer operation first (see "To clear the One-Touch Timer").
C
1. Press B while in the Timekeeping Mode. The seconds digits flash on
the display because they are
2. Press C to change the selection in the following sequence.
selected
MinutesHourSeconds
.
12/24-Hour
Format
YearMonthDate
3. While the seconds digits are selected (flashing), press A to reset the seconds to “00”. If you press
A while the seconds count is in the range of 30 to 59, the seconds are reset to “00” and 1 is added
to the minutes. If the seconds count is in the range of 00 to 29, the minutes count is unchanged.
4. While any other digits (besides seconds) are selected (flashing), press A to increase the number.
Holding down A changes the current selection at high speed.
While the 12/24-hour setting is selected, press A to switch between the two formats.
5. After you set the time and date, press B to return to the Timekeeping Mode.
• The day of the week is automatically set in accordance with the date.
• The date can be set within the range of January 1, 1990 to December 31, 2029.
• If you do not operate any button for a few minutes while a selection is flashing, the flashing stops
and the watch goes back to the Timekeeping Mode automatically.
USING THE ONE-TOUCH TIMER FUNCTION
Graphic timer indicator
60
A
50
60
40
30
30
20
10
0
5
0
Hand indicator
1. While in the Timekeeping Mode, hold down A until the display shows “1” (which indicates the Timer
• The timer is automatically set to one minute whenever you enter the Timer Setting Mode. The
2. Each time you press A again, the timer advances by one minute. Holding down A advances the
• The hand indicator moves to indicate the timer time as it changes.
• Once the countdown starts (after you release A), the digital display automatically returns to the
• Whenever a timer operation is in progress, a hand rotates inside of the graphic timer indicator on
Timer precautions
• Whenever a timer operation is in progress, pressing A does not switch between the time and date
• You cannot set the current time and date while a timer operation is in progress.
• The hand indicator is not meant to be a precise indicator, and so it may not align exactly with the
To clear the One-Touch Timer
1. While a One-Touch Timer operation is in progress, press A.
• At this time, the amount of time remaining appears on the digital display.
2. Keep pressing A until the timer changes to the current time or date display.
• As shown in the above illustration, the timer time advances up to 60, and then goes back down to
Timer time
To use the One-Touch Timer
Setting Mode).
countdown starts from one minute as soon as you release A.
time at high speed. The countdown starts as soon as you release A.
Timekeeping Display. You can find out how much time remains by looking at the hand indicator.
the display. This indicator remains on the display no matter what mode the watch is in.
display as it normally does. Instead, it changes the timer time.
numbers on the scales. If the hand indicator does not align properly with "0" when a measurement
operation is complete, perform the adjustment procedure described for the Hand Setting Mode.
1, which is followed by the current time or date display.
The One-Touch Timer function lets you quickly and easily set a
countdown timer. When the end of the countdown is reached, the alarm
B
sounds for 10 seconds and the graphic timer indicator flashes on the
display. To stop the alarm press any button. When the alarm stops, the
timer time is cleared automatically.
C
• You can set the One-Touch Timer time within the range of 1 to 60
minutes.
Time or Date Display
Stopwatch Mode Data Recall Mode Hand Setting Mode
60
50
60
40
30
30
20
10
0
5
0
60
50
60
40
30
30
20
10
0
5
0
ALARM MODE
Hourly time signal on indicator
Alarm on indicator
AB
Hour
Hand indicator
Minutes
3. Press A to increase the selected digits. Holding down A changes the selection at high speed.
• The format (12-hour and 24-hour) of the alarm time matches the format you select for normal
timekeeping.
• When setting the alarm time using the 12-hour format, take care to set the time correctly as morning
or afternoon (PM).
4. After you set the alarm time, press B to return to the Alarm Mode.
To switch the Daily Alarm and Hourly Time Signal on and off
Press A while in the Alarm Mode to change the status of the Daily Alarm and Hourly Time Signal in
the following sequence.
Both ON
To test the alarm
Hold down C in any mode to sound the alarm. Note that pressing C also changes the mode.
To change the alarm sounds
You can choose one of two different alarm sounds: high or low
1. Use C to enter the Timekeeping Mode.
2. Hold down C to sound the alarm.
3. While the alarm is sounding (while you are holding down C), press A to change the alarm sound.
The sound last produced when you press A is the one used for the alarm.
When the Daily Alarm is switched on, the alarm sounds for 20 seconds
at the preset time each day. Press any button to stop the alarm after
it starts to sound.
When the Hourly Time Signal is switched on, the watch beeps every
hour on the hour.
• If you do not operate any button for a few minutes in the Alarm Mode,
C
the watch automatically returns to the Timekeeping Mode.
To set the alarm time
1. Press B while in the Alarm Mode. The hour digits flash on the
display because they are
• At this time the Daily Alarm is switched on automatically.
2. Press C to change the selection in the following sequence.
selected.
Hour Minutes
[Alarm ON Indicator/Hourly Time Signal ON Indicator]
Both OFF Daily Alarm
Only
Hourly Time
Signal only
STOPWATCH MODE
Hand indicator
A
Seconds
Minutes
1/100 second
To measure cumulative elapsed time
1. Press A to start the stopwatch.
2. Press A to stop the stopwatch.
3. Press A again to resume timing from the time shown on the display.
• You can repeat steps 2 and 3 as many times as you like.
4. Hold down A until the stopwatch is cleared to 0'00" 00.
About time memories
Whenever you clear the stopwatch to all zeros, the time that was shown on the display is automatically
stored into memory. After 30 time data are present, the next time data automatically replaces the
oldest data currently in memory. Use the Data Recall Mode to view data stored in memory.
The Stopwatch Mode lets you measure elapsed time and cumulative
elapsed time. The range of the stopwatch is 59 minutes, 59.99 seconds.
Measured times are automatically stored into memory when they are
B
cleared to all zeros.
• If you do not operate any button for a few minutes while the display
C
shows all zeros in the Stopwatch Mode, the watch automatically
returns to the Timekeeping Mode.
To measure elapsed time
1. While in the Stopwatch Mode, press A to start the stopwatch.
2. Press A to stop the stopwatch.
3. Hold down A until the stopwatch is cleared to 0'00" 00.

DATA RECALL MODE
Time (minutes, seconds,
1/100 seconds)
60
50
60
40
30
30
20
10
0
5
0
Hand
indicator
Memory number
To delete data from memory
Caution!
The following operation deletes
1. While in the Data Recall Mode, press B and the display shows “CLEAR”.
2. Press A to clear all data stored in memory and return to the Data Recall Mode.
Use this mode to view and delete data stored by Stopwatch Mode
operation.
• If you do not operate any button for a few minutes in the Data Recall
A
Mode, the watch automatically returns to the Timekeeping Mode.
B
To recall data from memory
C
1. While in the Data Recall Mode, press A to recall the oldest time stored
in memory.
• First the memory number appears on the display, followed by the time
display. Memory numbers are assigned automatically by the watch as
data is stored. REC 1 is always the oldest data stored in memory.
2. Press A to scroll forward through the data.
• If you press A while the newest data is shown, the oldest data
reappears on the display.
ALL data stored in memory and cannot be undone!
HAND SETTING MODE
Hand indicator
60
A
50
60
40
30
30
20
10
0
5
0
To adjust the hand indicator
1. Press B while in the Hand Setting Mode.
• At this time, the digital display shows the message “0-SET” and the hand indicator moves to the
vicinity of the “0” marking.
2. Press A and C to move the hand indicator up and down until it correctly points to the zero marking.
3. After you finish adjusting the hand indicator, press B to return to the Hand Setting Mode.
Perform the following operation whenever the hand indicator does not
align properly with "0" when a One-Touch Timer operation is complete in
the Timekeeping Mode.
B
• Note that the hand indicator is not meant to be a precise indicator, and
so it may not align exactly with all the numbers on the scales.
• If you do not operate any button for a few minutes in the Hand Setting
C
Mode, the watch automatically returns to the Timekeeping Mode.
765/1305-2
 Loading...