

Page 1
MA1305-EB
© 2013 CASIO COMPUTER CO., LTD.
Operation Guide 5351
About This Manual
Operations are performed using the watch’s crown, and
+6*@>B
the three buttons indicated by the letters A, B and C in
this manual.
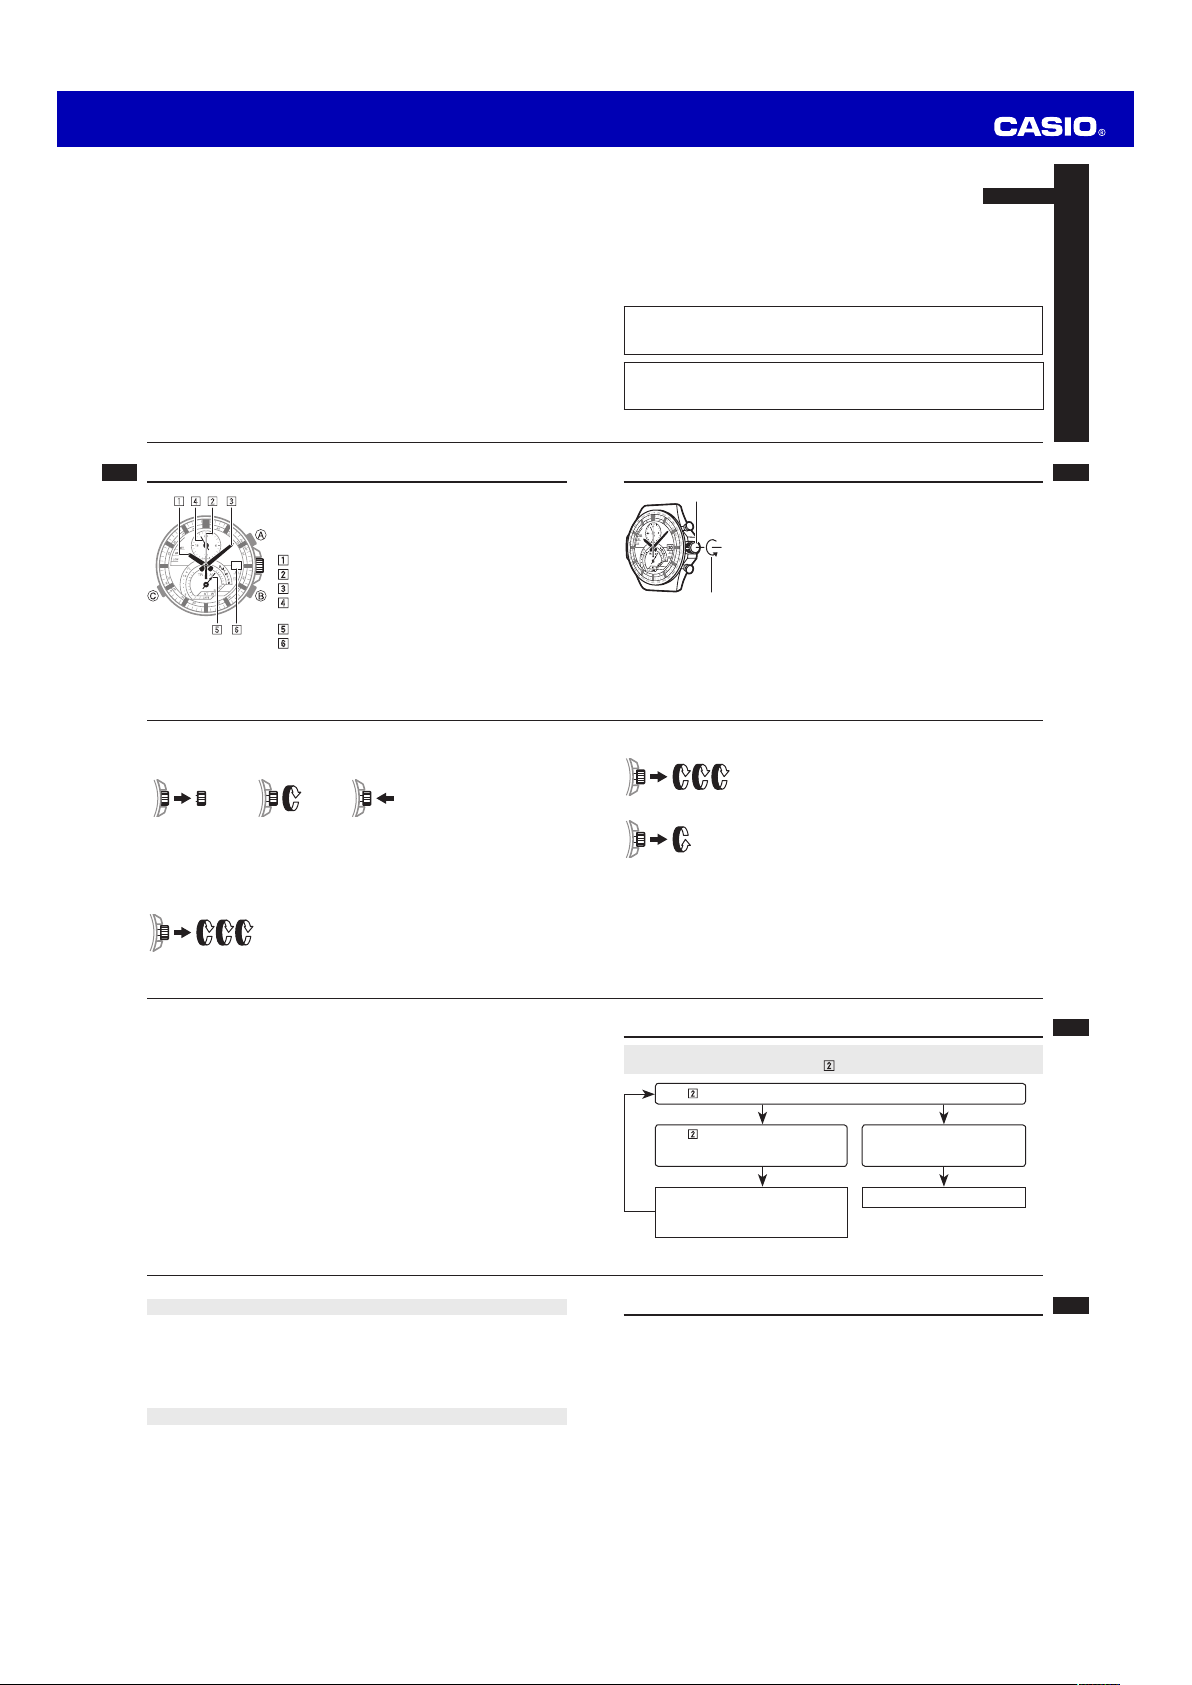
Hands and Indicators
z Hour Hand
x Second Hand
c Minute Hand
v Upper Dial Hand: Indicates a time, in 24-hour format,
b Lower Dial Hand: Points to the day of the week.
n Day Indicator
This User’s Guide uses numbers shown above to identify
watch hands and indicator.
E-2
The illustrations below show the different crown operations.
Pull out Rotate Push in
depending on the current mode.
Congratulations upon your selection of this CASIO watch.
To ensure that this watch provides you with the years of service for which it is
designed, carefully read and follow the instructions in this manual, especially the
information under “Operating Precautions” and “User Maintenance”.
Be sure to keep all user documentation handy for future reference.
• Note that the product illustrations in this manual are intended for reference only, and so
the actual product may appear somewhat different than depicted by an illustration.
This watch does not have a city code that corresponds to the UTC offset of –3.5
hours. Because of this, the radio-controlled atomic timekeeping function will not
display the correct time for Newfoundland, Canada.
Note that CASIO COMPUTER CO., LTD. assumes no responsibility for any
damage or loss suffered by you or any third party arising through the use of this
product or its malfunction.
Crown Operations
Crown
The crown of this watch is a screw in lock crown. Before using
the crown, you must fi rst rotate it towards you to loosen it.
Important!
• To maintain water resistance and avoid impact damage
to the crown, be sure to screw it back in when you are not
using it.
• When pulling out the crown, avoid using undue force,
which creates the risk of personal injury to your fi ngers and
Loosen
fi ngernails, and of watch malfunction.
ENGLISH
High-speed 2
After starting the High-speed 1 operation, rotate the crown
rapidly away from you three more times.
E-1
E-3
High-speed Movement
When rotating the crown to move the hands of the watch, you can use the operations
described below to move the hands at high speed. There are two high-speed hand
movement speeds. High-speed 2 is the fastest.
High-speed 1
E-4
• High-speed hand movement is forward only. There is no high-speed backward
hand movement.
• Button operations become disabled after you perform a crown operation. If this
happens, rotate the crown slightly. This should restore button operations.
E-6
2. Check the Home City.
Use the procedure under “To confi gure Home City settings” (page E-37) to confi gure your
Home City.
Important!
• Proper time calibration signal reception depends on correct Home City, time, and
day settings in the Timekeeping Mode. Make sure you confi gure these settings
correctly.
3. Set the current time.
• To set the time using a time calibration signal
See “To get ready for a receive operation” (page E-26).
• To set the time manually
See “Confi guring Current Time and Day Settings Manually” (page E-42).
The watch is now ready for use.
• For details about the watch’s radio controlled timekeeping feature, see “Radio
Controlled Atomic Timekeeping” (page E-21).
E-8
With the crown pulled out, rotate it rapidly away from you
three times.
High-speed Cancel
Note
• If you do not perform any operation for more than two minutes after pulling out the
crown, crown operations will become disabled automatically. If this happens, push
the crown back in and then pull it out again to re-enable crown operations.
• You can use high-speed hand movement when confi guring time settings in the
Timekeeping Mode or Alarm Mode.
Rotate the crown towards you or press any button.
Things to check before using the watch
1. Hold down C at least two seconds to enter the Timekeeping Mode, and
then observe the movement of the x
Is the x Second Hand moving smoothly at one-second intervals?
Is the x Second Hand moving at
two-second intervals or is it stopped
completely?
Power is low. Charge the watch by
placing it in a location where it is
exposed to light. For details, see
“Charging the Watch” (page E-13).
NO
YES
Second Hand.
The watch is charged. For details
about charging, see “Charging
the Watch” (page E-13).
Go to step 2.
YES
NEXT
Contents
E-2 About This Manual
E-3 Crown Operations
E-7 Things to check before using the watch
E-13 Charging the Watch
E-15 To check the current power level
E-20 To recover from the sleep state
E-21 Radio Controlled Atomic Timekeeping
E-26 To get ready for a receive operation
E-29 To perform manual receive
E-30 To check the result of the latest receive operation
E-31 To turn auto receive on and off
E-5
E-7
E-9
Page 2
Operation Guide 5351
E-33 Mode Reference Guide
E-34 To determine the watch’s current mode
E-34 To return to the Timekeeping Mode from any other mode
E-35 To select a mode
E-36 Timekeeping
E-37 Confi guring Home City Settings
E-37 To confi gure Home City settings
E-40 To switch between standard time and summer time manually
E-42 Confi guring Current Time and Day Settings Manually
E-42 To change the current time setting manually
E-45 To change the current day setting manually
E-49 Checking the Current Time in a Different Time Zone
E-50 To view the time in another time zone
E-53 To swap your Home City and World Time City
E-10
E-70 Troubleshooting
E-79 Specifi cations
E-12
Warning!
Leaving the watch in bright light for charging can cause it to become quite hot.
Take care when handling the watch to avoid burn injury. The watch can become
particularly hot when exposed to the following conditions for long periods.
• On the dashboard of a car parked in direct sunlight
• Too close to an incandescent lamp
• Under direct sunlight
Important!
• Keep the watch in an area normally exposed to bright light when storing it for long
periods. This helps to ensure that power does not run down.
• Storing the watch for long periods in an area where there is no light or wearing it in
such a way that it is blocked from exposure to light can cause power to run down.
Make sure that the watch is exposed to bright light whenever possible.
E-54 Using the Stopwatch
E-55 To enter and exit the Stopwatch Mode
E-55 To perform an elapsed time operation
E-56 To perform lap time measurement
E-57 To recall lap data
E-58 Using the Countdown Timer
E-59 To specify the countdown start time
E-60 To perform a countdown timer operation
E-60 To stop the alarm
E-61 Using the Alarm
E-62 To change the alarm time setting
E-64 To turn the alarm on or off
E-64 To stop the alarm
E-65 Adjusting Home Positions
E-67 To adjust home positions manually
E-11
Charging the Watch
The face of the watch is a solar panel that generates power from light. The generated
power charges a built-in rechargeable battery, which powers watch operations. The
watch charges whenever it is exposed to light.
Charging Guide
Checking the Current Power Level
You can use the procedure below to determine the watch’s current power level.
Certain functions will be disabled when the power level is low. If the power level is
low, leave the watch in a location where its face (solar panel) is exposed to light.
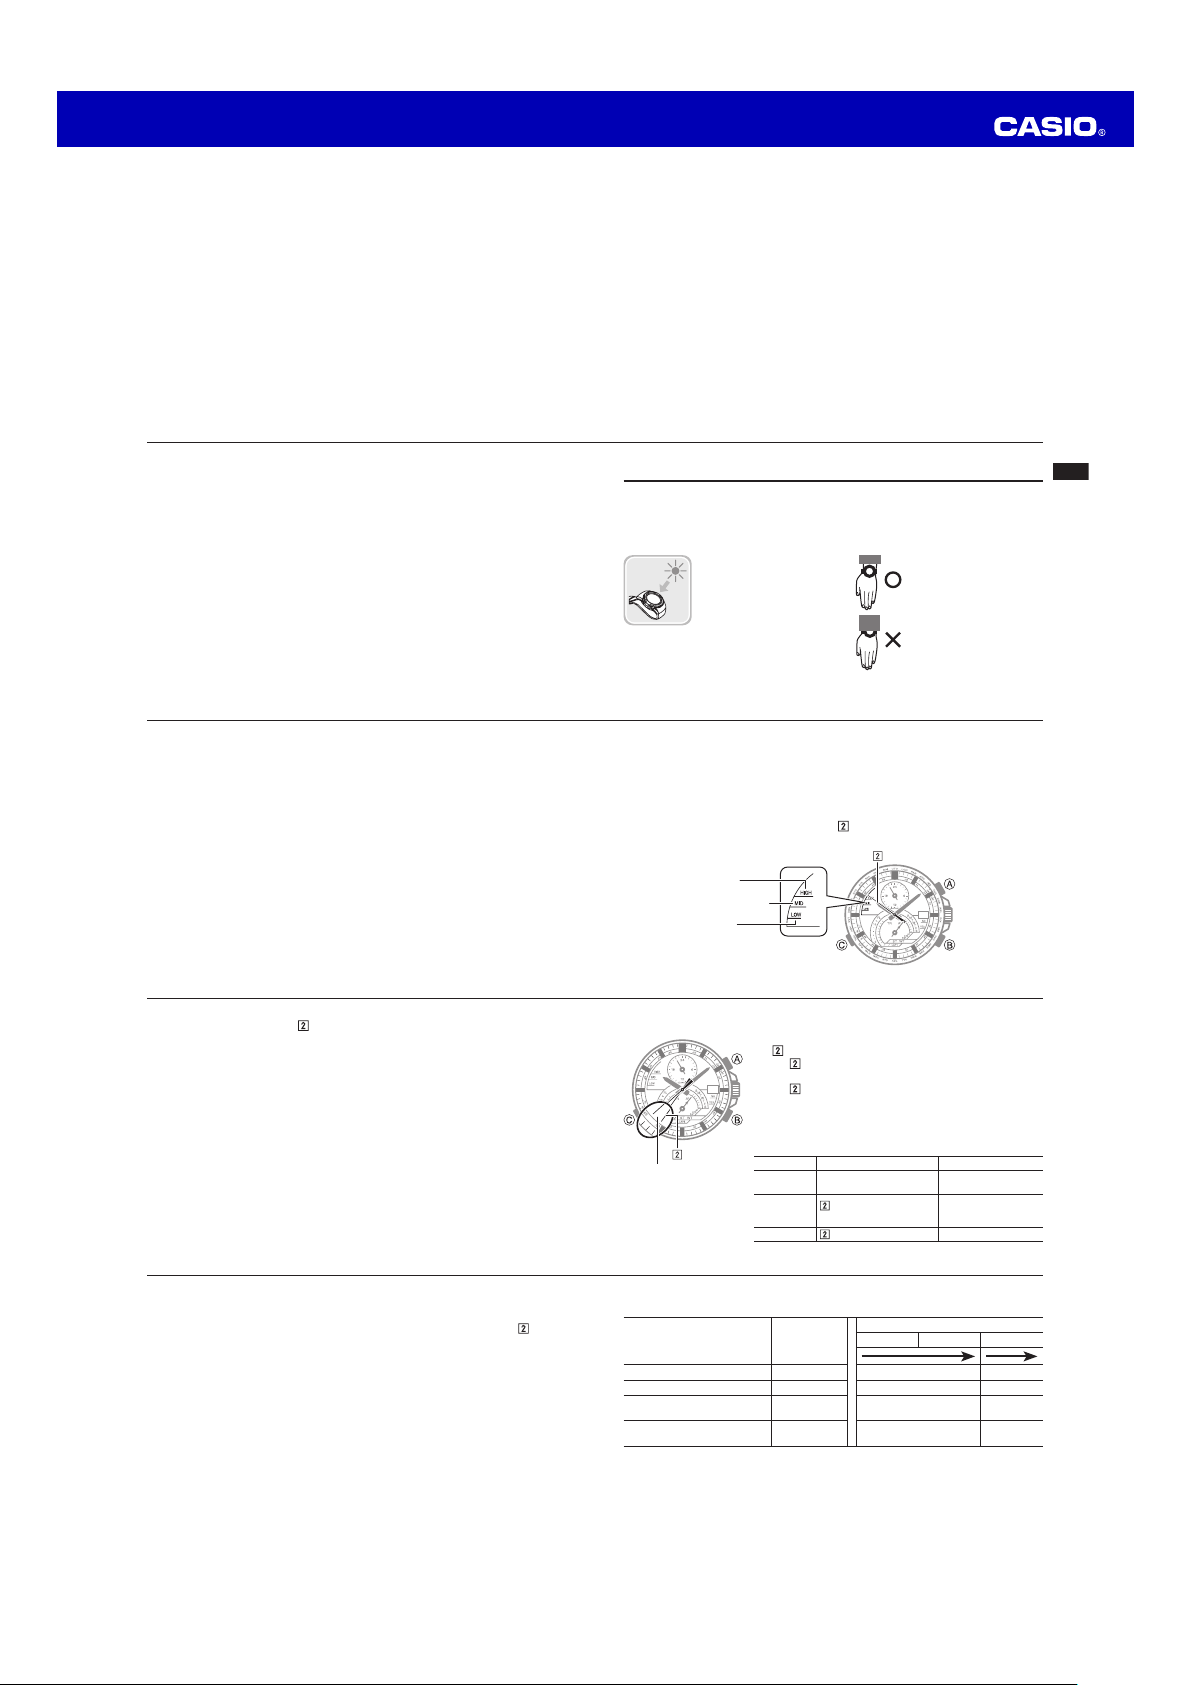
To check the current power level
1. In the Timekeeping Mode, press B. The x
MID (Middle), or LOW to indicate the power level.
Whenever you are not
wearing the watch, be sure
to leave it in a location
where it is exposed to light.
• Best charging
performance is achieved
by exposing the watch to
light that is as strong as
possible.
HIGH
MID: Middle
LOW
When wearing the watch,
make sure that its face is
not blocked from light by
the sleeve of your clothing.
• The watch may enter a
sleep state (page E-20) if its
face is blocked by your
sleeve even only partially.
Second Hand will move to HIGH,
@
E-13
E-14
2. After about one second, the x Second Hand will then move to the latest time
calibration signal receive operation result.
• See “To check the result of the latest receive operation” (page E-30).
3. Press B to return to regular timekeeping.
• The watch will also return to regular timekeeping if you do not perform any
operation for about 10 seconds.
E-16
• When power drops to Level 3, all settings (including timekeeping) will be cleared.
Recharging the battery will reset all settings to their initial factory defaults.
• When the watch is at Level 3, exposing it to light for a while will cause the x
Hand to move to the position of second 57. This indicates that charging has started.
Power Recovery Mode
The watch is designed to go into a power recovery mode that stops hand operation
temporarily whenever power suddenly drops below a certain level due to continuous
signal reception or other operations over a short period. Note that all operations are
disabled while the watch is in the power recovery mode.
The hands will move to the correct positions and the watch will resume normal
operation after power recovers (in about 15 minutes). Putting the watch in a location
where it is exposed to light will help power to recover sooner.
E-18
Second
Low Power
@
Moves at two-second
intervals.
Low power conditions are indicated by the movement of
the x Second Hand in the Timekeeping Mode.
Second Hand is moving normally at one-second
• If the x
intervals, power is at Level 1.
Second Hand is moving at two-second intervals,
• If the x
power is at Level 2, which is quite low. Expose the watch
to light as soon as possible so it can charge.
Low Battery Alert (Hand Movement and Function
Status)
Level Hand Movement Function Status
1
(HIGH, MID)
Normal. All functions enabled
2
x
Second Hand moves at
(LOW)
two-second intervals.
3
x Second Hand stopped.
Beeper and time
calibration signal
reception disabled.
All functions disabled
Charging Times
Exposure Level (Brightness)
Outdoor sunlight (50,000 lux) 8 minutes 3 hours 28 hours
Window sunlight (10,000 lux) 30 minutes 7 hours 107 hours
Window sunlight on cloudy day
(5,000 lux)
Indoor fl uorescent lighting
(500 lux)
* 1 Approximate exposure required each day to generate power for normal daily
operation.
* 2 Approximate exposure required to take power up one level.
• The above times are for reference only. Actual times depend on lighting conditions.
• For details about the operating time and daily operating conditions, see the “Power
Supply” section of the Specifi cations (page E-80).
Daily
Operation *1
48 minutes 10 hours 172 hours
8 hours 116 hours – – –
Level Change *2
Level 3 Level 2 Level 1
E-15
E-17
E-19
Page 3
Operation Guide 5351
Power Saving
Power Saving enters a sleep state (second hand sleep or function sleep) whenever
the watch is left for a certain period in an area where it is dark.
Elapsed Time in Dark Operation
60 to 70 minutes
(second hand sleep)
6 or 7 days
(function sleep)
• The watch will not enter a sleep state between 6:00 AM and 9:59 PM. If the watch is
already in a sleep state when 6:00 AM arrives, however, it will remain there.
• The watch will not enter a sleep state while it is in the Stopwatch Mode or
Countdown Timer Mode.
To recover from the sleep state
Move the watch to a well-lit area or press any button.
E-20
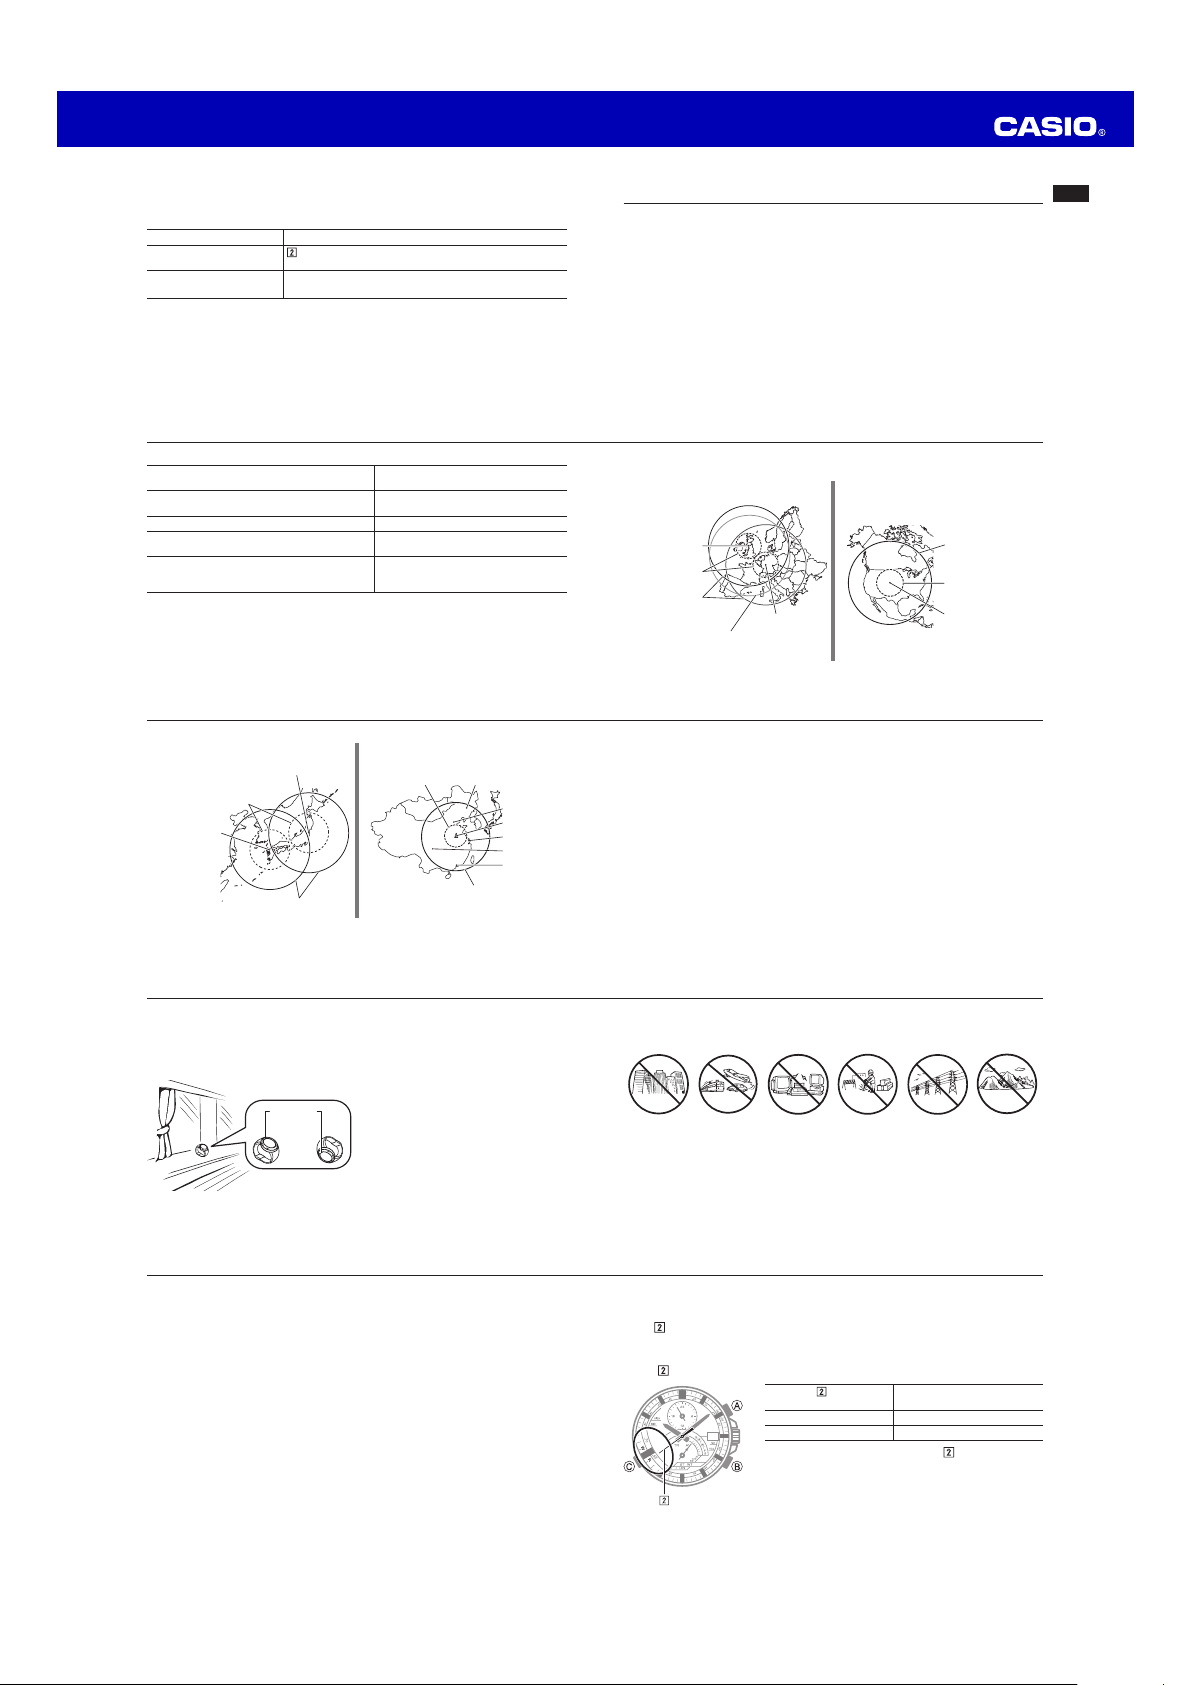
If your Home City Code setting is this:
LON (LONDON), PAR (PARIS), ATH (ATHENS)
HKG (HONG KONG) Shangqiu City (China)
TYO (TOKYO)
HNL (HONOLULU), ANC (ANCHORAGE),
LAX (LOS ANGELES), DEN (DENVER),
CHI (CHICAGO), NYC (NEW YORK)
Important!
• The areas covered by HNL (HONOLULU) and ANC (ANCHORAGE) are quite far
from the calibration signal transmitters, so certain conditions may cause reception
problems.
E-22
Japanese Signals Chinese Signal
500 kilometers
Fukuoka/Saga
Second Hand only stopped at 12 o’clock, all other functions
x
enabled
• All functions, including analog timekeeping, disabled
• Internal timekeeping maintained
The watch can receive the signal from
the transmitters located here:
Anthorn (England),
Mainfl ingen (Germany)
Fukushima (Japan),
Fukuoka/Saga (Japan)
Fort Collins, Colorado (United States)
Fukushima
1,000 kilometers
Changchun500 kilometers
1,500 kilometers
Beijing
Shangqiu
Shanghai
Chengdu
Hong Kong
Radio Controlled Atomic Timekeeping
This watch receives a time calibration signal and updates its time setting accordingly.
However, when using the watch outside of areas covered by time calibration signals,
you will have to adjust the settings manually as required. See “Confi guring Current
Time and Day Settings Manually” (page E-42) for more information.
This section explains how the watch updates its time settings when the city code
selected as the Home City is in Japan, North America, Europe, or China, and is one
that supports time calibration signal reception.
E-21
Approximate Reception Ranges
UK and German Signals North American Signal
Anthorn
500 kilometers
1,500 kilometers
The Anthorn signal is receivable
within this area.
• Signal reception may not be possible at the distances noted below during certain times
of the year or day. Radio interference may also cause problems with reception.
− Mainfl ingen (Germany) or Anthorn (England) transmitters: 500 kilometers
(310 miles)
− Fort Collins (United States) transmitter: 600 miles (1,000 kilometers)
− Fukushima or Fukuoka/Saga (Japan) transmitters: 500 kilometers (310 miles)
− Shangqiu (China) transmitter: 500 kilometers (310 miles)
• As of December 2012, China does not use Daylight Saving Time (DST). If China
does go to the Daylight Saving Time system in the future, some functions of this
watch may no longer operate correctly.
• Using this watch in a country covered by a time calibration signal that is different
from the countries it supports may result in incorrect time indication due to local
application of daylight saving time (summer time), etc.
Mainfl ingen
2,000 miles
(3,000 kilometers)
600 miles
(1,000 kilometers)
Fort Collins
E-23
E-24
To get ready for a receive operation
1. Confi rm that the watch is in the Timekeeping Mode. If it isn’t, hold down C for at
least two seconds to enter the Timekeeping Mode.
2. Place the watch in a location where signal reception is good.
12 o’clock
or
E-26
3. What you should do next depends on whether you are using Auto Receive or
Manual Receive.
• Auto Receive: Leave the watch over night in the location you selected in step 2.
See “Auto Receive” on page E-28 for details.
• Manual Receive: Perform the operation under “To perform manual receive” on
page E-29.
Auto Receive
• With Auto Receive, the watch performs the receive operation each day
automatically up to six times (up to fi ve times for the Chinese calibration signal)
between the hours of midnight and 5 a.m. (according to the Timekeeping Mode
time). When any receive operation is successful, none of the other receive
operations for that day are performed.
• When a calibration time is reached, the watch will perform the receive operation
only if it is in the Timekeeping Mode. The receive operation is not performed if a
calibration time is reached while you are confi guring settings.
E-28
• Position the watch as shown in the
nearby illustration, with 12 o’clock
pointed towards a window. Make
sure there are no metal objects
nearby.
• Signal reception normally is better
at night.
• The receive operation takes from
two to seven minutes, but in some
cases it can take as long as
14 minutes. Take care that you do
not perform any button operation or
move the watch during this time.
E-25
• Signal reception may be diffi cult or even impossible under the conditions
described below.
Inside or
among
buildings
To perform manual receive
1. In the Timekeeping Mode (page E-36), keep B depressed (for about two seconds) as
the x
• Moves to HIGH, MID, or LOW to indicate the power level and then moves to
2. The x
Inside a
vehicle
Near
household
appliances,
offi ce
equipment,
or a mobile
phone
Near a
construction
site, airport,
or other
sources of
electrical
noise
Near
high-tension
power lines
Second Hand goes through the following sequence.
R (READY).
Second Hand indicates the operations the watch is currently performing.
When the x Second Hand
is pointed here:
R (READY)
W (WORK) Reception is in progress.
@
• If signal reception is unstable, the x Second Hand
may move between W (WORK) and R (READY).
• When the receive operation is successful, the watch
adjusts the time setting accordingly, and then
resumes regular timekeeping. It does not adjust the
setting if the operation failed.
It means this:
Watch is setting up for reception.
Among
or behind
mountains
E-27
E-29
Page 4

Operation Guide 5351
• Signal reception is not performed when the power level is LOW.
Note
• To interrupt a receive operation and return to the Timekeeping Mode, press any
button.
To check the result of the latest receive operation
Second Hand
E-30
In the Timekeeping Mode, press B. The x
will move to HIGH, MID, or LOW to indicate the power
level, and then it will indicate the latest time calibration
signal receive operation result.
Second Hand will move to YES (Y) if the latest
• The x
receive operation was successful, or NO (N) if it was not.
After about 10 seconds, regular timekeeping will resume.
• Press B to return to regular timekeeping. The watch will
also return to regular timekeeping if you do not perform
@
any operation for about 10 seconds.
4. Push the crown back in to return to the Timekeeping Mode.
Radio-controlled Atomic Timekeeping Precautions
• Strong electrostatic charge can result in the wrong time setting.
• Even if a receive operation is successful, certain conditions can cause the time
setting to be off by up to one second.
• The watch is designed to update its day setting automatically for the period from
January 1, 2000 to December 31, 2099. Updating of the day setting by signal
reception will no longer be performed starting from January 1, 2100.
• If you are in an area where signal reception is not possible, the watch keeps time
with the precision noted in “Specifi cations” (page E-79).
• The receive operation is disabled under any of the following conditions.
− While power is at Level 2 or lower (page E-17)
− While the watch is in the power recovery mode (page E-18)
− While the watch is in the function sleep state (power saving, page E-20)
− While the watch is in the World Time Mode (page E-49)
− While a countdown timer operation is in progress (page E-60)
• A receive operation is cancelled if an alarm sounds while it is being performed.
E-32
Selecting a Mode
With this watch, everything starts from the Timekeeping Mode.
To determine the watch’s current mode
E-34
Check what the b
under “To select a mode” (page E-35).
To return to the Timekeeping Mode from any other
mode
Hold down C for at least two seconds.
*
Lower Dial Hand is indicating as shown
Note
• The x
Second Hand will indicate NO (N) if you have adjusted the time or day
setting manually since the latest receive operation.
To turn auto receive on and off
1. In the Timekeeping Mode, press B. The x
NO (N)
@
YES (Y)
Hand will move to HIGH, MID, or LOW to indicate the
power level, and then it will indicate the latest time
calibration signal receive operation result.
2. Pull out the crown.
The x Second Hand will perform one full revolution and
then stop at the current on/off setting.
3. Rotate the crown to move the x
setting you want.
• To turn on auto receive, select YES (Y).
• To turn off auto receive, select NO (N).
Second
Second Hand to the
E-31
Mode Reference Guide
Your watch has fi ve “modes”. The mode you should select depends on what you want
to do.
To do this: Enter this mode: See:
• Confi gure Home City and DST (daylight saving time) settings
• Perform a time calibration signal receive operation
• Change the Auto Receive on/off setting
• Confi gure time and day settings manually
• Check the current power level
• View the current time in one of 29 cities around the globe
• Confi gure World Time City and summer time settings
• Swap the Home City and World Time City
Measure elapsed time and lap times, and recall lap times Stopwatch Mode E-54
Use the countdown timer
• Set an alarm time
• Turn the alarm ON or OFF
To select a mode
Each press of C will cycle between modes. The currently selected mode is indicated
by the b
Lower Dial Hand.
Timekeeping Mode World Time Mode
C
Alarm Mode Countdown Timer Mode
*
C
C
Timekeeping Mode E-36
C
C
E-49
E-50
E-53
E-58
E-61
E-64
World Time Mode
Countdown Timer
Mode
Alarm Mode
Stopwatch Mode
E-33
E-35
Timekeeping
To enter the Timekeeping Mode, hold down C at least two seconds.
Hands and Indicators
+6*@>B
z Hour Hand
x Second Hand
c Minute Hand
v Upper Dial Hand: Indicates the current hour in the
b Lower Dial Hand: Points to the day of the week.
n Day Indicator
E-36
• If you do not perform any operation with the crown for about two minutes after
pulling it out, crown operations will become disabled and the hand will not move
when you rotate the crown. If this happens, push the crown back in and then pull
it out again.
• For details about city codes, see the “City Code Table” at the back of this
manual.
E-38
B
@+6
2. Rotate the crown to move the x
code you want to select as your Home City.
• Each time you select a city code, the z
Minute Hand and n Day Indicator move to the
c
current time and day for that city code.
3. Push the crown back in to return to the Timekeeping
Mode.
Home City time in 24-hour format.
Second Hand to the city
Hour Hand,
Confi guring Home City Settings
The Home City is location where you will normally use the watch. You can choose
from a selection of city codes that represent 29 cities around the globe.
To confi gure Home City settings
Note
• This watch does not have a city code that
@
TYO (TOKYO)
STD/DST Switching
You can select summer time or standard time independently for each city. The initial
default setting for all cities is AT (AUTO).
Normally you should use the AT (AUTO) setting because it automatically switches
between summer time and standard time. You should change the setting to STD
(standard time) or DST (summer time) in the following cases.
− When using a time of a location that is not included in the watch’s list of 29 cities
− When the preset AUTO standard time/summer time timing is incorrect for some
reason
Daylight Saving Time (DST)
Daylight Saving Time (summer time) advances the time setting by one hour from
Standard Time. Remember that not all countries or even local areas use Daylight
Saving Time.
• Note that you cannot switch between STD (standard time) and DST (daylight
saving time) while UTC* is selected as your Home City.
* Coordinated Universal Time, the world-wide scientifi c standard of timekeeping. The
reference point for UTC is Greenwich, England.
corresponds to Newfoundland.
1. Pull out the crown.
• This will cause the x
city code of the currently selected Home City.
• This indicates the city code setting mode.
Second Hand to move to the
E-37
E-39
Page 5

Operation Guide 5351
To switch between standard time and summer time manually
1. Perform steps 1 and 2 under “To confi gure Home City settings” (page E-37).
• Selecting a city code will cause the z
Upper Dial Hand to move automatically to the current time for the selected
v
city code.
• If you will use the watch in a city that is not included in the city code list, select a
city code that is in the same time zone as your city.
• Displaying the Home City Settings screen will cause the b
move to AT (auto switching), STD (standard time), or DST (daylight saving time).
The watch automatically switches between standard time and daylight
AT (AUTO)
saving time in accordance with its calendar.
STD The watch always shows standard time.
DST The watch always shows daylight saving time.
E-40
Hour Hand, c Minute Hand, and
Lower Dial Hand to
Confi guring Current Time and Day Settings Manually
You can confi gure current time and day settings manually when the watch is unable to
receive a time calibration signal.
To change the current time setting manually
1. Pull out the crown.
• This will cause the x
@
TYO (TOKYO)
E-42
4. Rotate the crown to adjust the time (hour and minute) setting.
• See “Crown Operations” (page E-3) for information about high-speed hand
movement.
Upper Dial Hand is synchronized with the z Hour Hand.
• The v
• When adjusting the setting, check to make sure that the v
correctly indicates an a.m. time or p.m. time.
• If you want to change the day setting at this time, press C and perform the
procedure starting from step 3 under “To change the current day setting
manually” (page E-45).
5. After the settings are the way you want, push the crown back in to return to the
Timekeeping Mode.
• This causes timekeeping to resume with the x
12 o’clock.
city code of the currently selected Home City.
• If you do not perform any operation with the crown
for about two minutes after pulling it out, crown
operations will become disabled and the hand
will not move when you rotate the crown. If this
happens, push the crown back in and then pull it
out again.
Second Hand to move to the
Upper Dial Hand
Second Hand starting from
2. Hold down A for about one second to cycle through the
summer time settings as shown below.
A A
AT (AUTO) STD DST
*
Home city/DST
3. After the setting is way you want, push the crown back in.
+@>B
2. Change the Home City settings, if you want.
• For details about these settings, see steps 2 and 3
under “To confi gure Home City settings” (page E-37).
3. Hold down C for about one second until the watch
beeps and the x
• This indicates the manual time setting mode.
• In the following steps, each press of C cycles
between settings as shown below.
C
Hour/Minute Hour
A
Second Hand moves to 12 o’clock.
C
C C
Year DayMonth
To change the current day setting manually
@
1. Pull out the crown.
• This will cause the x
code of the currently selected Home City.
2. Hold down C for about one second until the watch
beeps and the x
6
• This indicates the manual time setting mode.
3. Press C twice. This will enter the day setting mode.
• The n
Day Indicator will move slightly to indicate the
setting mode.
4. Rotate the crown to adjust the day setting.
Second Hand to move to the city
Second Hand moves to 12 o’clock.
E-41
CC
E-43
E-44
Dec
Nov
Oct
Sep
Aug
Jul May
Setting the month
E-46
9. After the settings are the way you want, push the crown back in to return to the
Timekeeping Mode.
• This causes timekeeping to resume with the x
12 o’clock.
Note
• The watch’s built-in full automatic calendar makes allowances for different month
lengths and leap years. Once you set the day, there should be no reason to change
it except after you have the watch’s rechargeable battery replaced or after power
drops to Level 3.
E-48
Jun
Jan
@
5. After the n Day Indicator stops moving, press
C. This will enter the month setting mode.
Feb
Mar
Apr
Second Hand will move to the
• The x
currently selected month.
6. Rotate the crown to adjust the month setting.
7. Press C. This will enter the year setting
mode.
• The z
Hour Hand will move to the number
that represents the tens digit of the year
Minute Hand will move to the
and the c
number that represents the ones digit. The
Second Hand will move to 12 o’clock and
x
stop there.
Second Hand starting from
8. Rotate the crown to adjust the year setting.
• If you want to change the time setting at this time, press C and then perform
the procedure starting from step 4 under “To change the current time setting
manually” (page E-42).
+
0
9
8
6
Year setting (ones digit)
1
2
3
4
57
B
90
80
Year setting (tens digit)
00
10
20
30
40
5070
60
Checking the Current Time in a Different Time Zone
You can use World Time to view the current time in one of 29 time zones around the
globe. The currently selected city is called the “World Time City”.
NYC (NEW YORK)
@
Hands and Indicators
z Hour Hand: Indicates the hour of the current time in the
+
x Second Hand: Indicates the current World Time City
c Minute Hand
b Lower Dial Hand: Points to WT.
n Day Indicator
• Pressing A causes the x
current World Time City for about three seconds.
6B *
World Time City.
for about three seconds after the World
Time mode is entered.
Second Hand to move to the
E-45
E-47
E-49
Page 6

Operation Guide 5351
Important!
• Time calibration signal reception is disabled while the watch is in the World Time
Mode.
To view the time in another time zone
1. In the Timekeeping Mode, press C once to enter the World Time Mode.
• The b
Lower Dial Hand will move to WT.
• To select the UTC zone as your World Time, simply hold down B for about three
seconds. No other operation is required.
2. Pull out the crown.
• The x
Second Hand points to the currently selected World Time city code.
• The b Lower Dial Hand will indicate AT (AUTO), STD (standard time) or DST
(daylight saving time), which indicates the current daylight saving time setting.
• If you do not perform any operation with the crown for about two minutes after
pulling it out, crown operations will become disabled and the watch hands will no
longer move when you rotate the crown. If this happens, push the crown back in
and then pull it out again.
E-50
5. After selecting the city you want, push the crown back in to return to the World
Time Mode.
Swapping your Home City and World Time City
You can use the procedure below to swap your Home City and World Time City. This
capability can come in handy when you frequently travel between two locations in
different time zones.
@
E-52
The following example shows what happens when the
Home City and World Time City are swapped while the
Home City originally is TYO (Tokyo) and the World Time
City is NYC (New York).
Before
swapping
After
swapping
Home City World Time City
Tokyo
10:08 p.m.
(Standard time)
New York
9:08 a.m.
(Daylight saving time)
New York
9:08 a.m.
(Daylight saving time)
Tokyo
10:08 p.m.
(Standard time)
Using the Stopwatch
You can use the Stopwatch Mode to measure elapsed time and lap times, and to
recall lap times. Up to 10 lap times can be stored in memory. There is also memory
to record the fastest lap time. Though no more lap times are stored after 10 times are
in memory, the fastest lap time continues to be updated as required. Starting a new
elapsed time operation clears all of the memories (including fastest lap time).
What is a lap time?
A lap time is the time elapsed over a specifi c segment of a race.
Example: Car race on an oval track
Lap 1
Start
E-54
Lap 2
Lap 3
3. Rotate the crown to move the x Second Hand to the city code you want to select
as the World Time City.
• Each time you select a city code, the z
Indicator move to the current time and day for that city code. For details about
city codes, see the “City Code Table” at the back of this manual.
• If you think that the time indicated for the selected World Time City is not correct,
it probably means that there is something wrong with your Home City settings.
Use the procedure under “To confi gure Home City settings” (page E-37) to correct
the Home City settings.
4. Hold down A for about one second to cycle through the summer time settings as
shown below.
Hour Hand, c Minute Hand, and n Day
A A
AT (AUTO) STD DST
A
To swap your Home City and World Time City
In the World Time Mode, hold down A for about three
seconds until the watch beeps.
• This indicates that your Home City and World Time City
have been swapped.
@
B+ @
• After swapping the Home City and World Time City, the
watch will stay in the World Time Mode. The x
Hand will point to your new World Time City (TYO in this
example).
Note
• If your current World Time City supports time calibration
signal reception, making it your Home City enables
calibration signal reception for that city.
Hands and Indicators
z Hour Hand: Indicates the stopwatch minute count
x Second Hand: Indicates the 1/20 (0.05)-second count
c Minute Hand: Indicates the stopwatch seconds count.
b Lower Dial Hand: Indicates the current lap.
To enter and exit the Stopwatch Mode
In the Timekeeping Mode, press C twice to enter the
Stopwatch Mode.
*
• The b
(1 revolution = 60 minutes).
during stopwatch operation.
Lower Dial Hand will move to LAP 1.
Second
To perform an elapsed time operation
A
Start Stop (Restart) (Stop) Reset
A A A B
E-51
E-53
E-55
To perform lap time measurement
A
Start Lap (LAP1) Lap (LAP2) Stop Reset
• Each press of B records a lap time. You can record up to 10 lap times. After that,
• After 10 lap times are recorded, the b
• If you perform a lap time operation that is not recorded (because 10 times are
• Performing a new elapsed time operation after resetting the stopwatch will delete
• An ongoing elapsed time measurement operation is not affected by pulling out the
E-56
B B
you can still perform lap time operations, but they will not be recorded.
This indicates that no more lap times will be recorded.
already in memory) and that lap is the fastest lap, it will be recorded as the fastest
lap.
previously recorded lap times.
crown.
. . . . . .
A B
Lower Dial Hand will point to the mark.
Using the Countdown Timer
The countdown timer can be confi gured within a range of one minute to 60 minutes.
An alarm sounds for about 10 seconds when the timer reaches zero.
+@
Hands and Indicators
E-58
x Second Hand: Indicates countdown or elapsed
c Minute Hand: Indicates countdown or elapsed minutes.
b Lower Dial Hand: Points to TR.
• All hands move counterclockwise during a countdown.
*
seconds.
• The x Second Hand, which indicates the 1/20 (0.05)-second count during
stopwatch operation, moves only 30 seconds after an elapsed time measurement
operation is started or restarted, or after a lap time is cleared. After that, the
Second Hand stops.
x
• When elapsed time passes 60 minutes, the z
will perform one full rotation.
To recall lap data
1. While in the Stopwatch Mode, pull out the crown to enter the Data Recall Mode.
2. Rotate the crown to select other laps.
• The b
Lower Dial Hand will indicate the lap number of currently shown time.
Lower Dial Hand will indicate FL (fastest lap) when the fastest lap time
• The b
is shown.
Hour Hand and v Upper Dial Hand
3. To return to the Stopwatch Mode, push the crown back in.
To specify the countdown start time
1. In the Timekeeping Mode, press C three times to enter
+*@
the Countdown Timer Mode.
Lower Dial Hand will move to TR.
• The b
2. In the Countdown Timer Mode, pull out the crown. This
enters the countdown start time setting mode.
• If you do not perform any operation with the crown for
about two minutes after pulling it out, crown operations
will become disabled and the hand will not move
when you rotate the crown. If this happens, push the
crown back in and then pull it out again.
3. Rotate the crown to set the countdown start time.
• The maximum countdown start time setting is
60 minutes. To set a countdown start time of
60 minutes, move the c
• See “Crown Operations” (page E-3) for information about
high-speed hand movement.
Minute Hand to 12 o’clock.
E-57
E-59
Page 7

Operation Guide 5351
To perform a countdown timer operation
A
Start Stop Zero Reset
• A time-up alert sounds for 10 seconds when the countdown reaches 0, and then
the timer displays the start time.
• The alarm will not sound if battery power is low.
• Pulling out the crown while a countdown is in progress will stop the countdown and
enter the countdown start time setting mode.
Important!
• Time calibration signal reception is disabled while the watch is in the Countdown
Timer Mode.
To stop the alarm
Press any button.
E-60
To change the alarm time setting
1. In the Timekeeping Mode, press C four times to enter the Alarm Mode.
• The b
Lower Dial hand will move to AL.
2. Pull out the crown to enter the alarm setting mode.
• If you do not perform any operation with the crown for about two minutes after
pulling it out, crown operations will become disabled and the watch hands will no
longer move when you rotate the crown. If this happens, push the crown back in
and then pull it out again.
• You can toggle between the hour and minute setting mode, and the hour only
setting mode by pressing C.
E-62
6. After the setting is the way you want, push the crown back in to exit the alarm
setting mode.
• The alarm always works based on the time kept in the Timekeeping Mode.
• The watch will return to the Timekeeping Mode automatically if you do not
perform any operation in the Alarm Mode for about two or three minutes.
To turn the alarm on or off
In the Alarm Mode, press A to toggle the alarm between on and off. The x
Hand will indicate the current ON/OFF setting.
Note
• The alarm will not sound if battery power is low.
• The alarm will not sound if the watch is in the Power Saving sleep state.
To stop the alarm
Press any button.
A B
Hour/Minute
C
Hour
Second
Using the Alarm
When the alarm is turned on, an alarm will sound for about 10 seconds each day
when the time in the Timekeeping Mode reaches the preset alarm time. This is true
even if the watch is not in the Timekeeping Mode.
+ > @
*B
3. Rotate the crown to set the alarm time.
Hour Hand will also move.
• The z
• See “Crown Operations” (page E-3) for information about high-speed hand
movement.
4. Press C to switch to the hour setting mode.
• The z
Hour Hand will move slightly left and right to indicate the z Hour Hand
setting mode.
• Check the 24-hour time indicated by the v
setting is a.m. or p.m.
5. Rotate the crown to adjust the hour setting only.
• See “Crown Operations” (page E-3) for information about high-speed hand
movement.
Hands and Indicators
z Hour Hand: Indicates the currently set alarm time hour.
x Second Hand: Indicates the current alarm ON/OFF
c Minute Hand: Indicates the currently set alarm time
v Upper Dial Hand: Indicates the hour setting of the
b Lower Dial Hand: Points to AL.
setting.
minute.
current alarm time in 24-hour format.
Upper Dial Hand to see if the current
E-61
E-63
Adjusting Home Positions
Strong magnetism or impact can cause the hands and/or day setting to be off, even if
the watch is able to perform the signal receive operation.
Auto Home Position Adjustment
Auto correction of hand home positions corrects the hand position automatically.
• Auto correction is performed in the Timekeeping Mode only.
• Auto correction corrects the positions of all hands. For the n
must perform the manual adjustment procedure under “To adjust home positions
manually” (page E-67).
Upper Dial Hand is 12 hours off of the current correct time, correct the
• If the v
setting using the procedure under “To adjust home positions manually” (page E-67).
• Auto correction of the b
the night, while the watch is in the sleep state (page E-20).
Lower Dial Hand is performed once a day in the middle of
Day Indicator, you
E-64
Manual Home Position Adjustment
Perform the procedure in this section if auto home position adjustment is not possible
for some reason.
• Hand home position adjustment is not required if the time and day settings are
correct.
Note
• Any time after you enter the home position adjustment mode in step 2 of the
following procedure, you can return to the Timekeeping Mode by pushing the
crown back in. In this case, any adjustments you made before the watch returned
to the Timekeeping Mode will be applied.
• If you do not perform any operation with the crown for about two minutes after
pulling it out, crown operations will become disabled and hands will not move when
you rotate the crown. If this happens, push the crown back in and then pull it out
again.
E-66
• Home position adjustment is complete when all hands are at 12 o’clock.
Upper Dial Hand is not pointing at 24, which is its home position, hold
• If the v
down A for about two seconds to move it there.
• To exit the home position adjustment operation and return to the Timekeeping
Mode, push the crown back in.
E-68
6
4. Press C.
• This enters the n
adjustment mode.
5. Check the n
is its home position.
• If the 1 is not in the center of the n
rotate the crown to center it.
• Rotating the crown three full consecutive turns
clockwise will cause the n
changing in a forward direction (increment).
• To stop n
Day Indicator home position
Day Indicator to confi rm that it is 1, which
Day Indicator,
Day Indicator to start
Day Indicator movement, press any button.
To adjust home positions manually
@>
6. Push the crown back in to return to the Timekeeping Mode.
• This will cause the hands to return to their normal positions and resume regular
timekeeping. Wait until everything stops moving before performing any other
operation.
1. Hold down C at least two seconds to enter the
Timekeeping Mode.
2. Pull out the crown.
3. Keep B depressed for more than seven seconds.
6
This will cause the x
revolution.
• After about two seconds, the x
move to 12 o’clock. After about seven seconds,
Second Hand will start performing one full
the x
revolution. Keep B depressed until the x
Hand completes one full revolution.
• After the x
release B. When you do, home position adjustment
of all of the hands (but not the n
start automatically.
Second Hand to perform one full
Second Hand completes its full revolution,
Second Hand will
Second
Day Indicator) will
E-65
E-67
E-69
Page 8

Operation Guide 5351
Troubleshooting
Hand Movement and Position
■ I lost track of what mode the watch is in.
Refer to “Mode Reference Guide” (page E-33). To return directly to the Timekeeping
Mode, hold down C at least two seconds.
Second Hand is moving at two-second intervals.
■ The x
■ All the watch’s hands are stopped at 12 o’clock and none of the buttons work
Second Hand stopped at 57, 58, 59, or 00).
(x
Power may be low. Expose the watch to light until the x
normally, at one-second intervals (page E-17).
■ The hands of the watch suddenly start moving at high speed, even when I do
not perform any operation.
This could be due to any one of the following causes. In all cases, the hand movement
does not indicate malfunction, and should stop shortly.
• The watch is recovering from a sleep state (page E-20).
E-70
• The period when summer time is applied in the location where you are using the
watch may be different from the period set for your currently selected Home City.
Use the procedure under “To switch between standard time and summer time
manually” (page E-40) to switch from AT (AUTO) to STD (for standard time) or DST (for
summer time).
■ The time and date settings are off.
This could indicate that the watch has been exposed to magnetism or strong impact,
which has caused problems with proper hand and day indicator alignment. Adjust the
watch’s hand and day indicator home position alignment (page E-65).
E-72
■ The x Second Hand indicates NO (N) when I check the result of the latest
receive operation.
Possible Cause Remedy Page
• You are wearing or moving the watch,
or performing a button operation
during time calibration signal receive
operation.
• The watch is in an area with poor
reception conditions.
You are in an area where signal reception
is not possible for some reason.
The alarm time was reached during time
calibration signal reception.
The calibration signal is not being
transmitted for some reason.
E-74
Keep the watch in an area where
reception conditions are good while time
calibration signal receive operation is
being performed.
See “Approximate Reception Ranges”. E-23
The alarm sounded during time
calibration signal reception, causing
reception to be canceled.
• Check the website of the organization
that maintains the time calibration
signal in your area for information about
its down times.
• Try again later.
Second Hand starts moving
E-26
—
—
• The time setting is being adjusted following a successful auto time calibration
signal receive operation (page E-21).
■ Hands suddenly stop moving. Button operation also is disabled.
The watch may be in the power recovery mode (page E-18). Do not perform any operation
until the hands return to their normal positions (in about 15 minutes). The hands
should return to their correct positions when normal operation returns. To help power
recover, leave the watch in a location where it is exposed to light.
■ The current time setting is off by hours.
• Your Home City setting may be wrong. Check your Home City setting and correct it,
if necessary (page E-37).
■ The current time setting is off by one hour.
• If you are using the watch in an area where time calibration signal reception is
possible, see “To confi gure Home City settings” (page E-37).
E-71
Charging
■ The watch does not resume operation after I expose it to light.
This can happen after the power level drops to Level 3 (page E-17). Continue exposing
the watch to light until the x
intervals).
Second Hand starts to move at one-second intervals, but then suddenly
■ The x
returns to moving at two-second intervals.
The watch probably is not suffi ciently charged yet. Continue keeping it exposed to
light.
Second Hand starts moving normally (at one-second
Time Calibration Signal
The information in this section applies only when LONDON (LON), PARIS (PAR),
ATHENS (ATH), HONOLULU (HNL), ANCHORAGE (ANC), LOS ANGELES (LAX),
DENVER (DEN), CHICAGO (CHI), NEW YORK (NYC), HONG KONG (HKG), or
TOKYO (TYO) is selected as the Home City. You need to adjust the current time
manually when any other city is selected as the Home City.
E-73
■ The current time setting changes after I set it manually.
You may have the watch confi gured for Auto Receive of the time calibration signal
(page E-28), which will cause the time to be adjusted automatically according to your
currently selected Home City. If this results in the wrong time setting, check your
Home City setting and correct it, if necessary (page E-37).
■ The current time setting is off by one hour.
Possible Cause Remedy Page
The period when summer time is applied
in the location where you are using the
watch may be different from the period
set for your currently selected Home City.
Use the procedure under “To switch
between standard time and summer time
manually” to switch from AT (AUTO)
to STD (for standard time) or DST (for
summer time).
E-40
E-75
■ Auto Receive is not performed or I cannot perform Manual Receive.
Possible Cause Remedy Page
The watch is not in the Timekeeping
Mode.
Your Home City setting is wrong.
Auto time calibration signal reception
is OFF.
A countdown timer operation is in
progress.
There is not enough power for signal
reception.
E-76
World Time
■ The indicated World Time is wrong.
There is a problem with your Home City settings.
Check your Home City settings.
See “To confi gure Home City settings” (page E-37).
■ The indicated World Time is one hour off.
The daylight saving time (summer time) setting for the World Time city is wrong.
See “To view the time in another time zone” (page E-50).
Alarm
■ The alarm does not sound.
• Power may be low. Expose the watch to light until the x
normally, at one-second intervals (page E-17).
• The time setting is wrong in terms of a.m. and p.m.
• The crown may be pulled out. Push the crown back in.
E-78
Hold down C at least two seconds to
enter the Timekeeping Mode.
Check your Home City setting and
correct it, if necessary.
Check the auto time calibration signal
reception setting.
In the Countdown Timer Mode, stop the
timer operation and then return to the
Timekeeping Mode.
Expose the watch to light to charge it. E-13
Second Hand starts moving
E-28
E-34
E-21
E-37
E-31
E-60
■ Signal reception is being performed successfully, but the time and/or day is
wrong.
Possible Cause Remedy Page
Your Home City setting is wrong.
The watch may have been exposed to
magnetism or strong impact, which has
caused problems with proper hand and
day indicator alignment.
Check your Home City setting and
correct it, if necessary.
Adjust the watch’s hand and day
indicator home positions.
E-21
E-37
E-65
Specifi cations
Accuracy at normal temperature: ±15 seconds a month (with no signal calibration)
Timekeeping: Hour, minutes (hand moves every 10 seconds), seconds, day, day of
Calendar system: Full Auto-calendar pre-programmed from the year 2000 to 2099
Other: Home City code (can be assigned one of 29 city codes and Coordinated
Time Calibration Signal Reception: Auto receive up to six times a day (5 times a
Receivable Time Calibration Signals:
the week
Universal Time); Daylight Saving Time (summer time) auto switching /
Standard time
day for the Chinese calibration signal; Remaining auto receives
cancelled as soon as one is successful); Manual receive
Mainfl ingen, Germany (Call Sign: DCF77, Frequency: 77.5 kHz);
Anthorn, England (Call Sign: MSF, Frequency: 60.0 kHz); Fukushima,
Japan (Call Sign: JJY, Frequency: 40.0 kHz); Fukuoka/Saga, Japan
(Call Sign: JJY, Frequency: 60.0 kHz); Fort Collins, Colorado, the
United States (Call Sign: WWVB, Frequency: 60.0 kHz); Shangqiu City,
Henan Province, China (Call Sign: BPC, Frequency: 68.5 kHz)
E-77
E-79
Page 9

Operation Guide 5351
World Time: 29 cities (29 time zones) and Coordinated Universal Time
Other: Daylight Saving Time (summer time) / Standard Time; Home City/World
Time City swapping
Stopwatch: Measuring capacity: 59'59.95"
Countdown Timer:
Alarm: Daily alarm
Other: Power Saving; Battery level indication; Auto Correction of Hand Home
Power Supply: Solar panel and one rechargeable battery
E-80
Measuring unit: 1/20 (0.05) seconds
Measuring mode: Elapsed time
Lap time (Memories: 10, Fastest lap memory)
Measuring unit: 1 second
Input range: 1 to 60 minutes (1-minute increments)
Positions
Approximate battery operating time: 6 months (no exposure to light after a
full charge; 10 seconds alarm beeper operation and one signal reception of
approximately 4 minutes per day)
City Code Table
L-1
City Code Table
Summer Time Period
Summer Time Start Summer Time End
None None
02:00, second
Sunday in March
24:00, second
Saturday in October
0:00, third Sunday
in October
Summer Time Start Summer Time End
None None
02:00, fi rst Sunday
in October
02:00, last Sunday
in September
02:00, fi rst Sunday
in November
24:00, second
Saturday in March
0:00, third Sunday
in February or 0:00,
fourth Sunday in
February
Summer Time Period
03:00, fi rst Sunday
in April
03:00, fi rst Sunday
in April
Rio De
Janeiro
UTC Offset/
GMT Differential
–3
UTC Offset/
GMT Differential
City Code City
PAGO PAGO (P PG ) Pago Pago –11
HONOLULU (H NL) Honolulu –10
ANCHORAGE (A NC) Anchorage –9
LOS
ANGELES
DENVER ( DEN) Denver –7
CHICAGO ( CH I) Chicago –6
NEW YORK ( NYC) New York –5
SANTIAGO (S CL ) Santiago –4
RIO
L-2
DUBAI (D XB) Dubai +4
KABUL ( KBL ) Kabul +4.5
KARACHI ( KH I ) Karachi +5
DELHI ( DE L) Delhi +5.5
DHAKA (D AC ) Dhaka +6
YANGON ( RGN) Yangon +6.5
BANGKOK (B KK) Bangkok +7
HONG KONG ( HKG) Hong Kong +8
TOKYO ( TYO ) Tokyo +9
ADELAIDE (A DL ) Adelaide +9.5
SYDNEY ( SYD ) Sydney +10
NOUMEA (N OU) Noumea +11 None None
WELLINGTON (WLG) Wellington +12
L-4
(L AX ) Los Angeles –8
City Code City
City Code City
F. DE NORONHA
PRAIA ( RA I ) Praia –1
UTC
LONDON (L ON ) London
PARIS (P AR) Paris +1
ATHENS (A TH) Athens +2
JEDDAH ( JE D) Jeddah +3 None None
TEHRAN ( THR ) Tehran +3.5
•
Based on data as of December 2012.
•
The rules governing global times (UTC offset and GMT differential) and summer
time are determined by each individual country.
•
The summer time periods in this table are applicable to specifi c cities. For cities not
included in the list, select the list city that is in the same time zone as the desired city
and perform STD/DST settings manually.
(F EN)
Fernando
de Noronha
UTC Offset/
GMT Differential
–2
0
Summer Time Period
Summer Time Start Summer Time End
None None
01:00, last Sunday
in March
02:00, last Sunday
in March
03:00, last Sunday
in March
0:00, March 22 or
0:00, March 21
02:00, last Sunday
in October
03:00, last Sunday
in October
04:00, last Sunday
in October
0:00, September 22 or
0:00, September 21
L-3
L-5
 Loading...