

Page 1
MO1207-EB
© 2012 CASIO COMPUTER CO., LTD.
Operation Guide 5266
ENGLISH
Congratulations upon your selection of this CASIO watch.
About This Manual
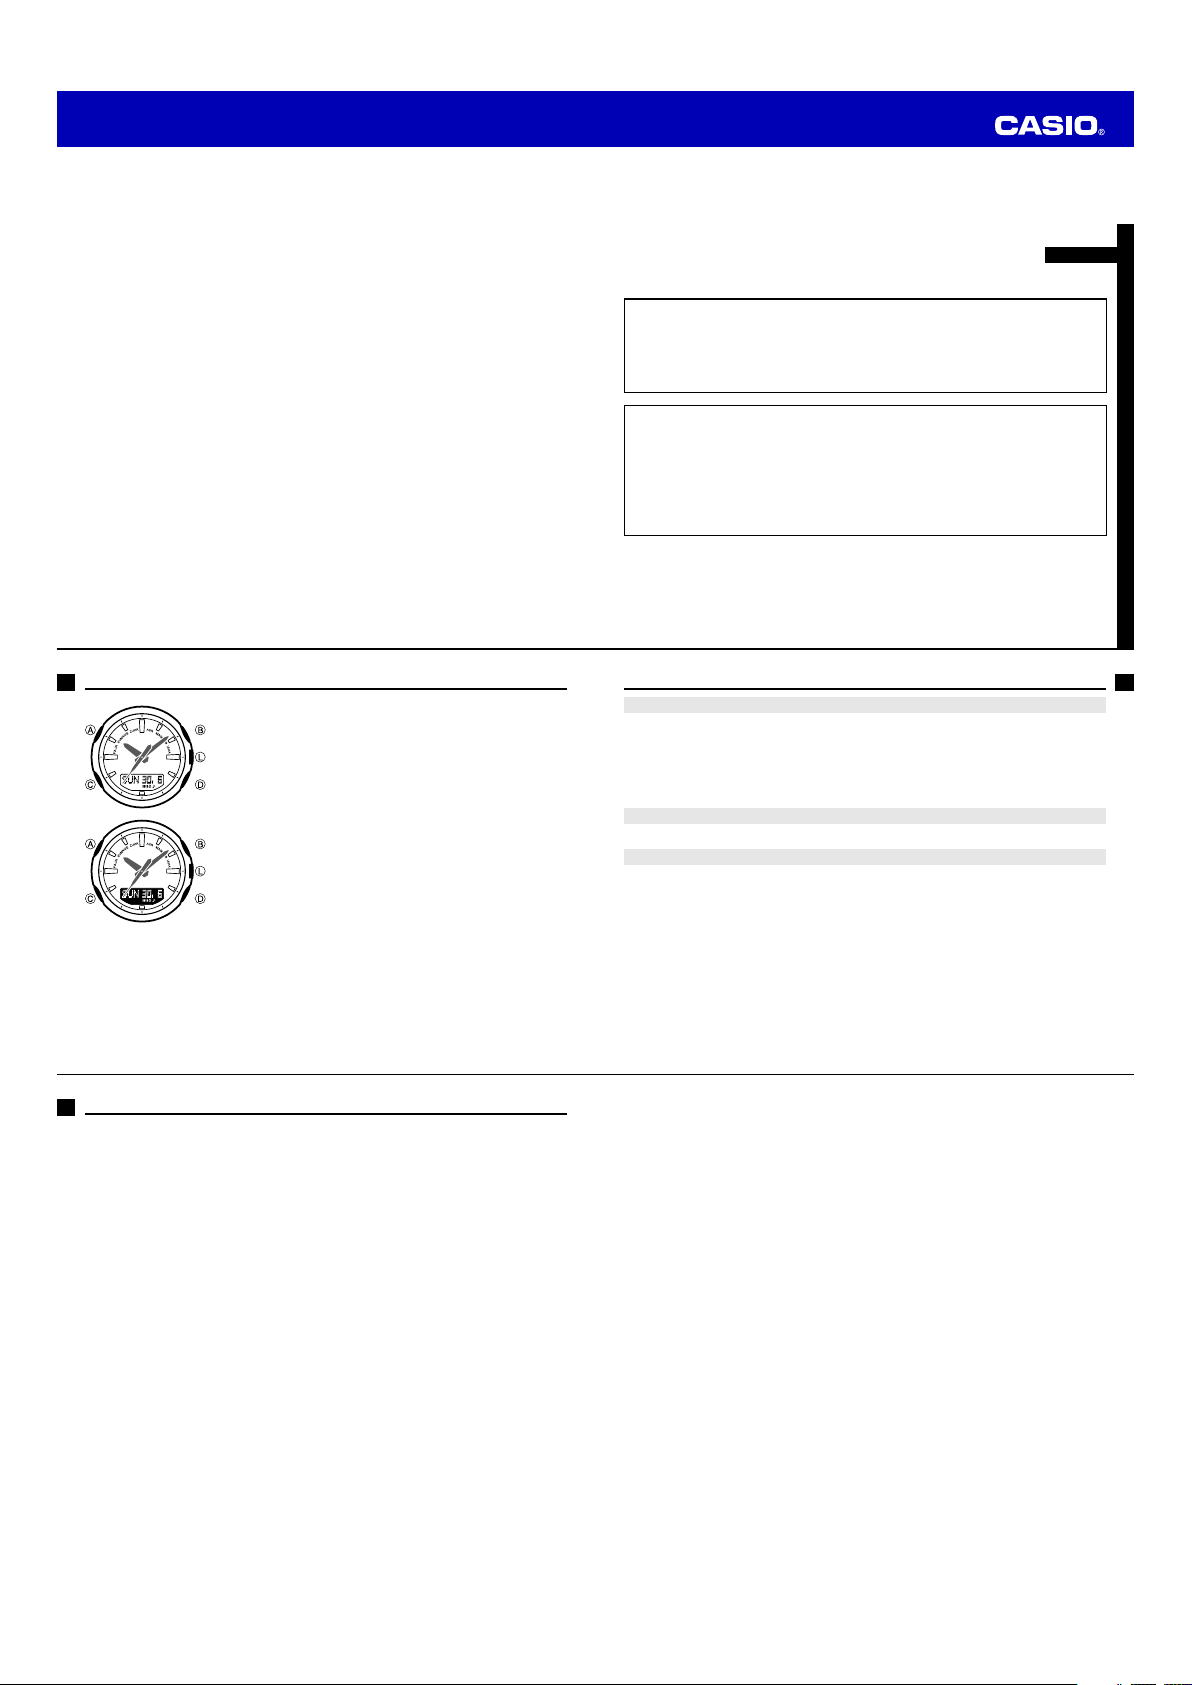
• Depending on the model of your watch, digital display text appears
either as dark fi gures on a light background, or light fi gures on a
dark background. All sample displays in this manual are shown
using dark fi gures on a light background.
• Button operations are indicated using the letters shown in the
illustration.
• Note that the product illustrations in this manual are intended for
reference only, and so the actual product may appear somewhat
different than depicted by an illustration.
•
The measurement functions built into this watch are not intended for taking measurements
that require professional or industrial precision. Values produced by this watch should be
considered as reasonable representations only.
• Note that CASIO COMPUTER CO., LTD. assumes no responsibility for any damage or loss
suffered by you or any third party arising through the use of this product or its malfunction.
•
To ensure correct direction readings by this watch, be sure to perform bidirectional
calibration before using it. The watch may produce incorrect direction readings if you do not
perform bidirectional calibration. For more information, see “To perform bidirectional
calibration” (page E-24).
•
Keep the watch away from audio speakers, magnetic necklace, cell phone, and other
devices that generate strong magnetism. Exposure to strong magnetism can magnetize the
watch and cause incorrect direction readings. If incorrect readings continue even after you
perform bidirectional calibration, it could mean that your watch has been magnetized. If this
happens, contact your original retailer or an authorized CASIO Service Center.
Warning !
Things to check before using the watch
1. Check the Home City and the daylight saving time (DST) setting.
Use the procedure under “To confi gure Home City settings” (page E-12) to confi gure your Home
City and daylight saving time settings.
Important!
Proper Hijri calendar, Prayer Time Mode, and Moon Age Mode data depend on correct Home
City, time, and date settings in the Timekeeping Mode. Make sure you confi gure these settings
correctly.
2. Confi gure latitude and longitude settings for your current location.
See “To select a Home City by confi guring latitude and longitude settings” (page E-14).
3. Set the current time.
See “Confi guring Current Time and Date Settings” (page E-15).
The watch is now ready for use.
E-1
E-2
Contents
E-2 About This Manual
E-3 Things to check before using the watch
E-7 Mode Reference Guide
E-11 Timekeeping
E-12 Confi guring Home City Settings
E-12 To confi gure Home City settings
E-13 To change the Daylight Saving Time (summer time) setting
E-14 Confi gure latitude and longitude settings for your current location
E-14 To select a Home City by confi guring latitude and longitude settings
E-15 Confi guring Current Time and Date Settings
E-15 To change the current time and date settings
E-17 To specify a Hijri date offset
E-19 Hand Home Position Adjustment
E-19 To adjust home positions
E-20 Determining the Direction to Qibla
E-20 To determine Qibla
E-22 To take a direction reading
E-24 To perform bidirectional calibration
E-26 To perform magnetic declination correction
E-4
E-28 Viewing Prayer Names and Prayer Times
E-29 To display today’s prayer times
E-30 To view prayer times on a specifi c date
E-31 To turn a prayer alarm on or off
E-32 To stop a sounding prayer alarm
E-33 To select a prayer time calculation method (FAJR, ISHA)
E-36 Using Moon Data
E-36 To look up the Moon age on a specifi c date
E-37 Thermometer
E-37 To enter and exit the Thermometer Mode
E-38 To correct the temperature value
E-40 Specifying Temperature Unit
E-40 To specify the temperature unit
E-41 Using the Alarm
E-41 To enter the Alarm Mode
E-42 To set an alarm time
E-42 To test the alarm
E-43 To turn an alarm and the Hourly Time Signal on and off
E-43 To stop the alarm
E-44 Using the Stopwatch
E-44 To enter the Stopwatch Mode
E-44 To perform an elapsed time operation
E-44 To pause at a split time
E-3
E-5
Page 2
Operation Guide 5266
E-45 Using the Countdown Timer
E-45 To enter the Countdown Timer Mode
E-45 To specify the countdown start time
E-46 To perform a countdown timer operation
E-46 To stop the alarm
E-47 Illumination
E-47 To turn on illumination
E-47 To change the illumination duration
E-49 Button Operation Tone
E-49 To turn the button operation tone on and off
E-50 Troubleshooting
E-53 Specifi cations
E-6
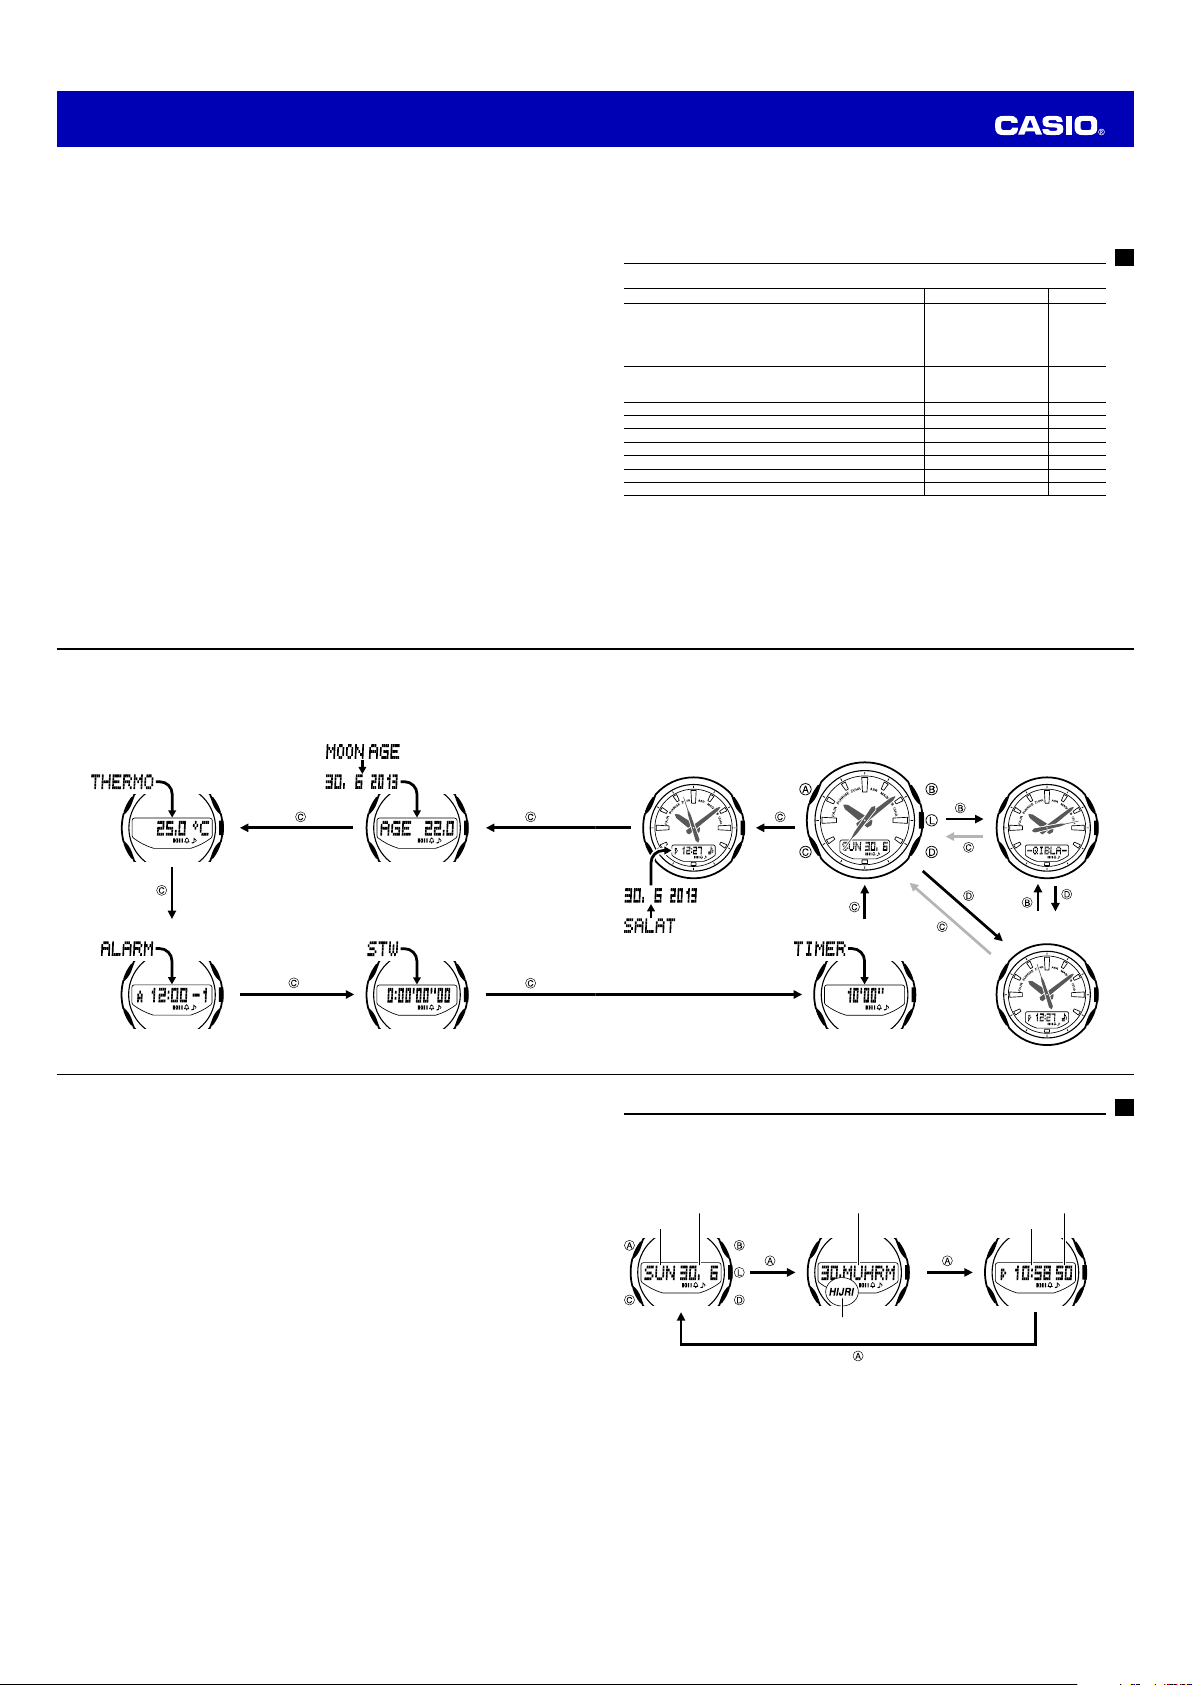
Selecting a Mode
• The illustration below shows which buttons you need to press to navigate between modes.
• To return to the Timekeeping Mode from any other mode, hold down C for about two seconds.
• In any mode, press L to illuminate the display.
Thermometer Mode
Moon Age Mode
Mode Reference Guide
Your watch has 9 “modes”. The mode you should select depends on what you want to do.
To do this: Enter this mode: See:
• View the current time and date in the Home City
• Confi gure Home City and daylight saving time (DST) settings
• Confi gure current location latitude and longitude settings
• Confi gure time and date settings
• Specify the Hijri calendar offset
• View the Qibla
• Take direction readings and display one of 16 direction
indicators and the angle relative to magnetic north
View today’s prayer name and prayer times Today’s Salat Time Screen E-28
View the prayer name and prayer times for a specifi ed date SALAT Time Search Mode E-28
Determine a Moon age value Moon Age Mode E-36
Determine the temperature at your current location Thermometer Mode E-37
Set an alarm time Alarm Mode E-41
Use the stopwatch to measure elapsed time Stopwatch Mode E-44
Use the countdown timer
• You also can take digital compass readings in the Qibla Mode (page E-22).
SALAT Time Search Mode Timekeeping Mode Qibla Mode
Timekeeping Mode E-11
Qibla Mode E-20
Countdown Timer Mode
E-45
E-7
Stopwatch ModeAlarm Mode
E-8
General Functions (All Modes)
The functions and operations described in this section can be used in all of the modes.
Auto Return Features
• If you do not perform any button operation for two or three minutes in the Salat Search Mode,
Moon Age Mode, or Alarm Mode, the watch will automatically return to the Timekeeping Mode.
• If you do not perform any button operation for one or two minutes in the Thermometer Mode or
Qibla Mode, the watch will automatically return to the Timekeeping Mode.
• If you leave a screen with fl ashing digits on the digital display for two or three minutes without
performing any operation, the watch exits the setting screen automatically.
Initial Screens
When you enter the Alarm Mode, the data you were viewing when you last exited the mode
appears fi rst.
Scrolling
TheB and D buttons are used on the setting screen to scroll through data on the digital display.
In most cases, holding down these buttons during a scroll operation scrolls through the data at high
speed.
E-10
Countdown Timer Mode
Today’s Salat
Time Screen
Timekeeping
Use the Timekeeping Mode to set and view the current time and date.
• Each press of A in the Timekeeping Mode cycles the digital display between the current
Gregorian calendar date, the current Hijri calendar date, and the current time.
• The HIJRI indicator on the digital display indicates that the Hijri calendar date is displayed.
Date screen (Gregorian) Date screen (Hijri) Regular timekeeping
Day Month Day Month
Day of week
HIJRI indicator
screen
Seconds
Hour : Minutes
E-9
E-11
Page 3
Operation Guide 5266
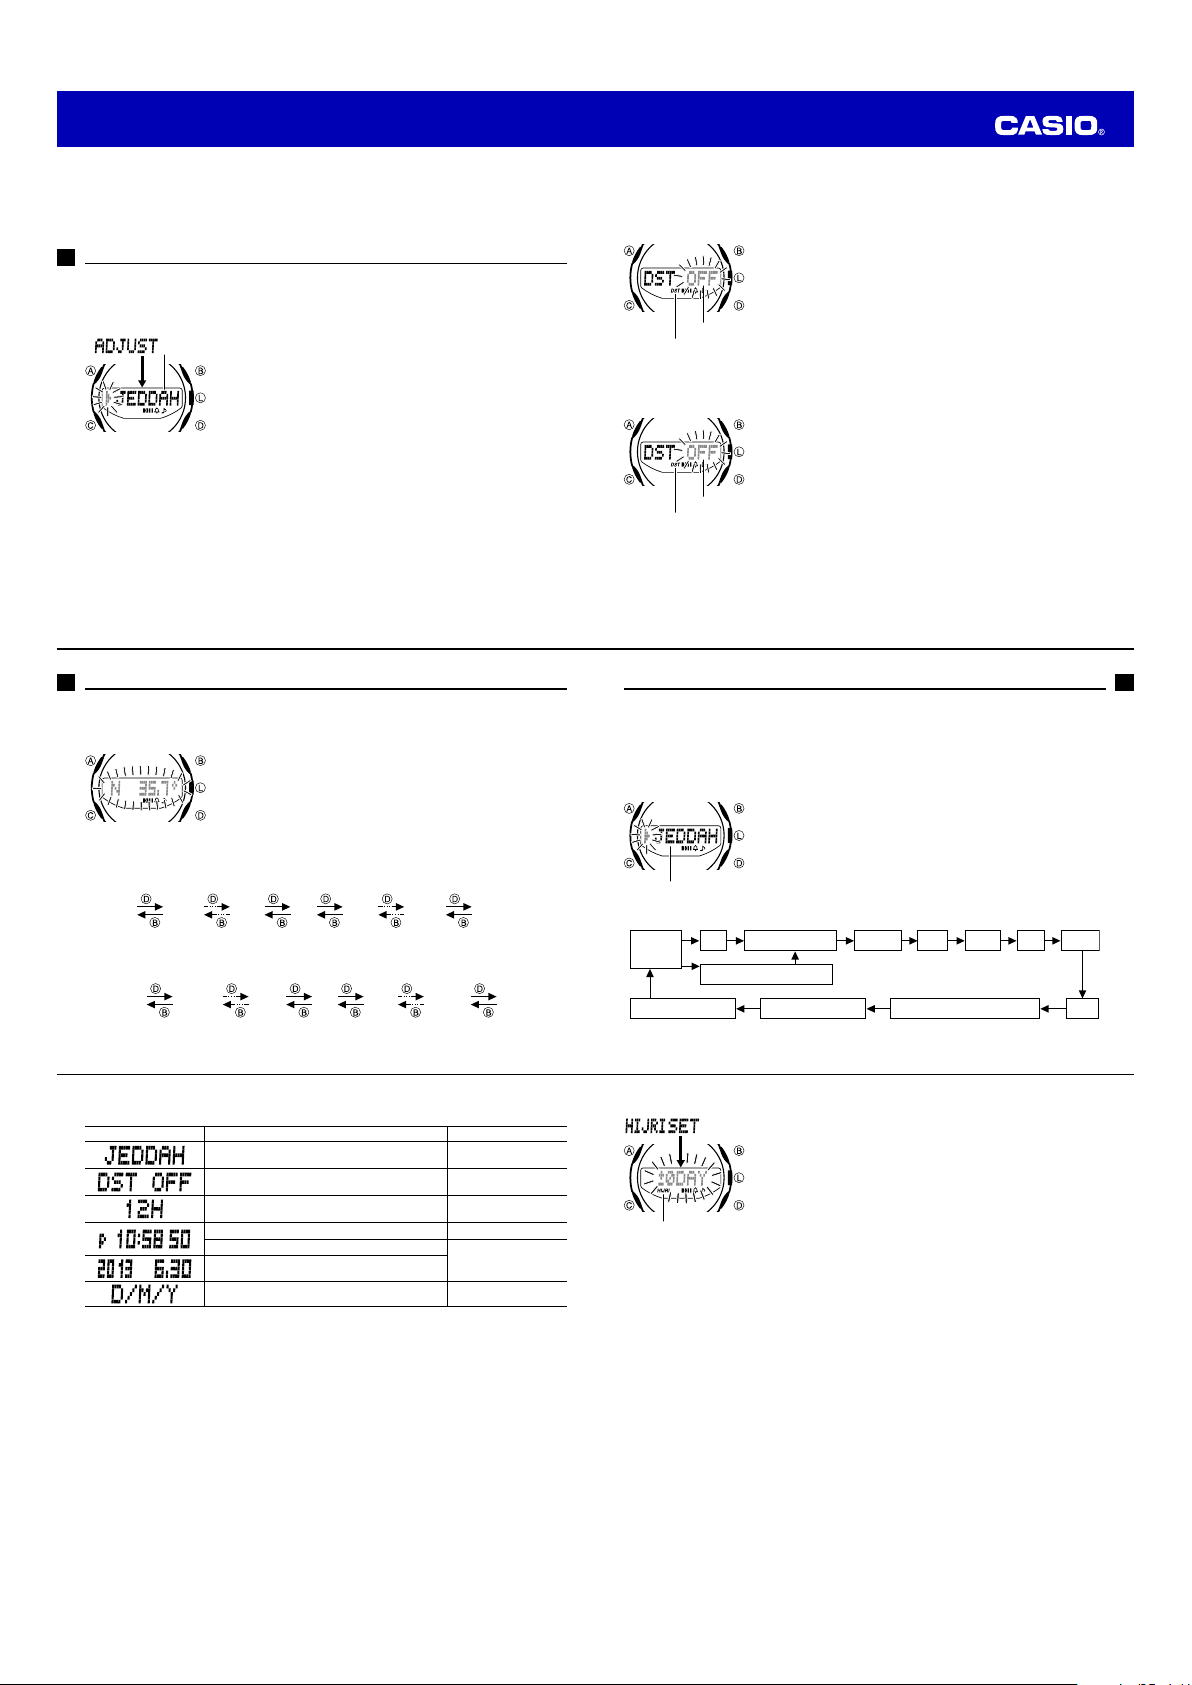
Confi guring Home City Settings
There are two methods you can use to confi gure Home City settings: selecting a Home City and
then selecting standard time or daylight saving time (DST), or selecting
specifying an UTC offset.
To confi gure Home City settings
City Name
2. Press D (East) and B (West) to scroll through city names until the one you want to use as your
Home City data is displayed.
• If you selected CUSTOM in place of a Home C ity, press C here to display the UTC offset
setting sc reen. Use D (+) and B (–) change the U TC differenti al value in 15- minute
increments . When you sel ect CUSTOM, the stand ard time/daylig ht saving time s election
screen does not appear. Jump to ste p 5 of this procedu re.
1. In the Timekeeping Mode, hold down A for at least two seconds
ADJUST
until
mode. Release A after
• The city na me of the curren tly selected H ome City data will
• The watch will exi t the settin g mode automa tically if you do n ot
• For details about city d ata, see the “ City Data Table” at th e back
appears on the digital display. This is the setting
ADJUST
appear on th e digital display w ith an arrow (
left.
perform a ny operation fo r about two o r three minutes .
of this manual.
3. Press C to display the DST setting screen.
4. Press D to toggle between Daylight Saving Time (
• Note that you c annot switch between sta ndard time and day light saving tim e (DST) whi le
CUSTOM is selected as you r Home Cit y.
E-12
DST ON
CUSTOM
appears.
▲
) fl ashing to the
) and Standard Time (
and then
DST OFF
).
Confi gure latitude and longitude settings for your current location
You can ensure correct display of Qibla, prayer times, and moon ages by confi guring latitude and
longitude settings for your current location.
To select a Home City by confi guring latitude and longitude settings
3. Use D (+) and B (–) to change the fl ashing value in 0.1° increments.
• Holding do wn D or B while the lati tude or longi tude setti ng screen is displ ayed will scroll
the value to the left of the deci mal point (the valu e to the right doe s not change) at high
speed.
S 62.0° S 61.9° S 0.1° N 0° N 0.1° N 61.9° N 62.0°
4. When the latitude is the value you want, press C to display the longitude setting screen with the
current longitude setting fl ashing.
5. Use D (+) and B (–) to change the fl ashing value in 0.1° increments.
W 179.9° W 179.8° W 0.1° E 0° E 0.1° E 179.9° E 180°
6. When the settings are the way you want, press A to return to the Timekeeping Mode.
E-14
1. In the Timekeeping Mode, hold down A for at least two seconds
ADJUST
until
mode. Release A after
• Your current Hom e City data will appear on the d igital display
2. Press A to display to the latitude setting screen with the current
latitude setting fl ashing.
appears on the digital display. This is the setting
ADJUST
appears.
with an arrow (
▲
) fl ashing to the lef t.
5. When the setting is the way you want, press A twice to return to the
Timekeeping Mode.
• The DST indicator ap pears to indicate that Daylight Saving Time
is turned on.
Note
Setting
DST indicator
• After you sp ecify cit y data, the watch w ill use UTC* of fsets to
calculate the c urrent time for ot her time zone s based on the
current time in your Home Ci ty.
* Coordinated Universal Time, the world-wide scientifi c standard
of timekeeping.
The reference point for UTC is Greenwich, England.
To change the Daylight Saving Time (summer time) setting
1. In the Timekeeping Mode, hold down A for at least two seconds
ADJUST
Setting
DST indicator
until
ADJUST
• The name of t he city curren tly selected as yo ur Home Cit y will
2. Press C to display the DST setting screen.
3. Press D to toggle between Daylight Saving Time (
Standard Time (
4. When the setting is the way you want, press A twice to return to the
Timekeeping Mode.
• The DST indicator ap pears to indicate that Daylight Saving Time
• Note that you c annot switch be tween standard time and daylight
appears on the digital display. Release A after
appears.
appear on th e digital display w ith an arrow (
left.
DST OFF
).
▲
) fl ashing to the
DST ON
) and
is turned on.
saving time (D ST) while CUSTOM is selected as your H ome
City.
E-13
Confi guring Current Time and Date Settings
You can use the procedure below to adjust the current time and date settings if they are off.
Changing the digital Home City data should cause the analog time setting to change accordingly. If
the analog time does not indicate the digital time, check the home positions of the hands and make
adjustments if necessary (page E-19).
This watch displays Hijri calendar months and days. The watch normally calculates and displays
Hijri calendar dates automatically. If necessary, you can correct the displayed data by ±3 days.
To change the current time and date settings
City name
3.
PressC to move the fl ashing in the sequence shown below to select the other settings.
City data
CUSTOM
Date Display Format
• The followi ng steps explain h ow to confi gure tim ekeeping set tings only.
1. In the Timekeeping Mode, hold down A for at least two seconds
ADJUST
until
mode. Release A after
•
2. Use D and B to select the city data you want.
• Select you r Home Cit y data before chan ging any other se tting.
• For full infor mation on cit y data, see the “City Dat a Table” at the
DST
12/24-Hour Format
UTC Offset/GMT Differential
Illumination Duration Button Operation Tone On/Off
appears on the digital display. This is the setting
ADJUST
The name of t he city curren tly selected as yo ur Home Cit y will
appear on th e digital display w ith an arrow (
appears.
back of this manual.
Seconds Hour Minute Year Month
▲
) fl ashing to the le ft.
Day
E-15
4. When the timekeeping setting you want to change is fl ashing, use B and/or D to change it as
described below.
Screen To do this: Do this:
Change the city name
Toggle between Daylight Saving Time (
Standard Time (
Toggle between 12-hour (
timekeeping.
Reset the seconds to
Change the hour or minute
Change the year, month, or day
Select the date display format (DMY, YMD, MDY) Press D.
DST OFF
00
).
12H
DST ON
) and 24-hour (
24H
) and
)
UseD (East) and
(West).
PressD.
PressD.
PressD.
UseD (+) and B (–).
B
5. When the settings are the way you want, press A twice to return to the Timekeeping Mode.
Note
• For information about selecting a Home City and confi guring the DST setting, see “Confi guring
Home City Settings” (page E-12).
• The watch’s built-in full automatic calendar makes allowances for different month lengths and
leap years. Once you set the date, there should be no reason to change it except after you have
the watch’s battery replaced.
• Changing your Home City setting will cause all of the following settings to become initialized:
latitude and longitude (to the location of the Home City), the prayer calculation method (Fajr,
Isha, Asr), and the Qibla declination (in accordance with the selected Home City). Note that
these settings are not initialized when
E-16
CUSTOM
is selected for the Home City setting.
To specify a Hijri date offset
HIJRI indicator
Note
• The Hijri offset setting is temporary. At the end of each month, the watch automatically corrects
the Hijri date and returns the Hijri offset to
• Note that the Hijri offset also returns to
date setting or the latitude and/or longitude settings.
• Changing the watch’s Gregorian date setting can cause an error in the displayed Hijri until the
watch performs automatic Hijri date correction at the end of the month (on the 29th or 30th day
of the month). If the Hijri date display is wrong, adjust it by changing the Hijri date offset.
Hijri Calendar Precautions
Hijri dates displayed by this calculator are the results of calculations. Actual Hijri dates may be
determined by religious authorities based on observations of a New Moon following sundown. This
can result in dates calculated by the watch being different from actual Hijri dates.
1. In the Timekeeping Mode, hold down A for at least four seconds
HIJRI SET
until
mode. Release A after
• Releasing A will cause the current Hijri date offset to fl ash on the
digital display.
2. Use D (+) and B (–) to change the offset within a range of ±3
days.
3. When the setting is the way you want, press A.
• This will display the corrected Hijri date.
appears on the digital display. This is the setting
HIJRI SET
appears.
±0DAY
.
±0DAY
whenever you change the watch’s Gregorian
E-17
Page 4

Operation Guide 5266
Hijri Calendar Months
This watch displays Hijri calendar months and days using the abbreviations below.
MUHRM
: First month
SAFAR
: Second month
RABI1
: Third month
RABI2
: Fourth month
JUMD1
: Fifth month
JUMD2
: Sixth month
RAJAB
: Seventh month
SHABN
: Eighth month
RAMDN
: Ninth month
SHWAL
: Tenth month
D.QDH
: Eleventh month
D.HJH
: Twelfth month
E-18
Determining the Direction to Qibla
This part of the manual tells you how to determine Qibla, which is the direction of the Kaaba in
Makkah. It also explains how to determine magnetic north, and display one of 16 direction indicators
along with the angle between magnetic north and the direction that the watch’s 12 o’clock position is
facing.
Important!
Be sure to keep this watch away from any sources of strong magnetism whenever using the digital
compass to determining directions or Qibla. Also note that proper digital compass operation is
impossible while inside a motor vehicle. For details, see “Digital Compass Precautions” on page
E-27 of this manual.
To determine Qibla
Second hand
1. Confi gure your current Home City settings. See “Confi guring Home
City Settings” (page E-12).
2. Place the watch on fl at surface or (if you wearing the watch), make
sure that your wrist horizontal (in relation to the horizon).
•
Trying to take a Qibla direction reading while the watch i s not
horizontal c an produce er roneous resu lts.
3. In the Timekeeping Mode or while the Today’s Salat Time Screen is
displayed, press B.
• This enters th e Qibla Mode.
-QIBLA-
•
appears on t he digital disp lay and the seco nd hand
points to 12 o’clock. N ext, Qibla read ings start .
• The watch will t ake readings ever y second for ab out 20
seconds, a nd the second hand will point toward s Qibla.
Hand Home Position Adjustment
The hour, minute, and second hands of this watch can be put out of position by strong magnetism
or strong impact. When this happens, you can use the procedure below to adjust the hand
positions.
To adjust home positions
Second hand
Hour and minute hands
Correct hour and
minute hand positions
• If the watch’s current l atitude and lo ngitude set ting is in the vic inity of Mak kah (21.4° north
latitude, 3 9.8° east lo ngitude), MAKKAH will appea r on the digita l display and the se cond
hand will poin t to 12 o’clock.
• - - - appears on t he digital displ ay after measu rement is com plete.
• After Qibl a readings are com plete, press C to return to the Ti mekeeping M ode. To perform
measurement again, press B.
• If you do not per form any operation for one o r two minutes , the watch will auto matically
return to the Ti mekeeping M ode or the Today’s S alat Time Sc reen.
About the Qibla angle
The Qibla angle represents the clockwise angle formed between a line starting from your current
location extending to magnetic north, and a line starting from your current location extending to
Makkah. When you are near Makkah, moving to a different location can cause a major change in
the Qibla angle, even if the move is a short distance.
1. In the Timekeeping Mode, hold down A for at least six seconds
HAND SET
until
mode. Release A after
• This will cau se SEC 00 to fl ash on the digital display, indicating
the second h and adjustm ent mode.
2. Check the position of the second hand.
• If the secon d hand is pointi ng to 12 o’clock, it is in the c orrect
home posi tion. If it isn’ t, use D (forward) and B (back) to adjust
the second hand position so it points to 12 o’clock.
• Holding do wn either but ton will caus e the second hand to move
at high speed.
3. Press C. This will cause
indicating the hour and minute adjustment mode.
4. Check the positions of the hour and minute hands.
• The hands are i n the correct ho me positio ns if they are poin ting
to 12 o’clock. If they aren’ t, use D (forward) and B (back) to
adjust their positions.
• Holding do wn either but ton will caus e the hour and minute
hands to move at hig h speed.
5. Press A to exit the setting screen.
• This will cause the hour and m inute hands to move to the current
Timekeeping Mode time.
Magnetic
north
Makkah
Your current location
appears on the digital display. This is the setting
HAND SET
appears.
0:00
to fl ash on the digital display,
True north
7˚ (Magnetic
Declination)
293˚ (Qibla angle)
E-19
E-20
To take a direction reading
12 o’clock position
North pointer
Direction
indicator
270
E-22
W
WSW
WNW
SW
Angle value
(in degrees)
0
NNW
N
NW
NNE
NE
ENE
E
90
SSW
180
ESE
SE
S
SSE
In the Qibla Mode, point the 12 o’clock position of the watch in the
direction you want to determine, and then press A.
-NORTH-
•
will appear on the digital display and the second
hand will move to 12 o’clock.
• After about one second, a direction reading operation will start.
• The second hand will move to magnetic north, and one of 16
direction indicators will appear on the digital display along with
an angle value that indicates the angle between magnetic north
and the direction that the 12 o’clock position of the watch is
pointing.
• See “Digital Compass Readings” on page E-23 for information
about what appears on the digital display.
• The watch will continue to take direction readings every second
for 20 seconds.
• - - - appears on the digital display after measurement is
complete.
• Press A to return to the Qibla Mode.
E-21
Digital Compass Readings
•
The following table shows the meanings of each of the direction abbreviations that appear on the digital
display.
Direction Meaning Direction Meaning Direction Meaning Direction Meaning
N
North
E
East
S
South
W
Calibrating the Bearing Sensor Reading
You should calibrate the bearing sensor whenever you feel that the direction readings being
produced by the watch are off. Bearing sensor calibration is performed using bidirectional
calibration. After calibration the sensor, you can also manually perform magnetic declination
correction.
Bidirectional Calibration
•
Bidirectional calibration calibrates the bearing sensor in relation to magnetic north. Use
bidirectional calibration when you want to take readings within an area exposed to magnetic force.
This type of calibration should be used if the watch becomes magnetized for any reason.
West
WNW
NNE
ESE
SSW
North-
northeast
East-
southeast
South-
southwest
West-
northwest
NW
NE
SE
SW
Northeast
Southeast
Southwest
Northwest
ENE
SSE
WSW
NNW
East-
northeast
South-
southeast
West-
southwest
North-
northwest
E-23
Page 5

Operation Guide 5266
Important!
• To ensure correct direction readings by this watch, be sure to perform bidirectional calibration
before using it. The watch may produce incorrect direction readings if you do not perform
bidirectional calibration.
• Keep the watch away from audio speakers, magnetic necklace, cell phone, and other devices
that generate strong magnetism. Exposure to strong magnetism can magnetize the watch and
cause incorrect direction readings. If incorrect readings continue even after you perform
bidirectional calibration, it could mean that your watch has been magnetized. If this happens,
contact your original retailer or an authorized CASIO Service Center.
Precautions about bidirectional calibration
• You can use any two opposing directions for bidirectional calibration. You must, however, make
sure that they are 180 degrees opposite each other. Remember that if you perform the
procedure incorrectly, you will get wrong bearing sensor readings.
• Do not move the watch while calibration of either direction is in progress.
• You should perform bidirectional calibration in an environment that is the same as that where
you plan to be taking direction readings. If you plan to take direction readings in an open fi eld,
for example, calibrate in an open fi eld.
To perform bidirectional calibration
E-24
To perform magnetic declination correction
Magnetic declination
angle direction value
(E, W, or OFF)
Magnetic declination
angle value
E-26
1. In the Qibla Mode, hold down A for two seconds.
• This will cause the bidirectional calibration screen to appear on
the digital display.
• The secon d hand will move to 12 o’clock . This causes a n arrow
(
) symbol to fl ash o n the left sid e of the digital dis play and -1-
to be displayed to indi cate that the watch is re ady for calibrati on
of the fi rst direction.
1. In the Qibla Mode, hold down A for two seconds.
• This will cau se the bidirecti onal calibrat ion screen to app ear on
the digital display.
2. Press C to display the Qibla magnetic declination setting screen
Q.DEC
(
).
• Pressing C again will disp lay the north erly magneti c declinatio n
setting sc reen (N.DEC).
• This will cau se the current mag netic declina tion angle set ting to
fl ash on the digital display.
3. Use D (East) and B (West) to change the settings.
•
The following explains mag netic declina tion angle dire ction
settings.
OFF
: No magnetic declination correction performed. The default
setting for each city will be used for the Qibla magnetic
declination. The northerly magnetic declination setting
N.DEC
(
E
W
• You can select a value w ithin the rang e of W 90° to E 9 0° with
these set tings.
• You can turn off (OFF) ma gnetic declin ation correc tion by
pressing D and B at the same ti me.
• Pressing D and B at the same ti me will cause th e Qibla
magnetic declination co rrection value (Q.DEC) to change to t he
initial defaul t setting of th e currently sele cted Home Cit y, and
the nort herly magnet ic declinatio n setting (N.DEC) to change to
OFF (0˚).
) will be 0°.
: When magnetic north is to the east (east declination)
: When magnetic north is to the west (west declination)
2. Place the watch on a level surface facing any direction you want,
and press B to calibrate the fi rst direction.
• - - - will remain on the digital dis play while calib ration is in
progress. OK will appear when fi rst di rection calib ration is
complete. Ab out one sec ond after that, the fl ashing arro w will
change to poin t downwards (
means that t he watch is ready for ca libration of th e second
direction.
4. Press B again to calibrate the second direction.
• - - - will remain on the digital dis play while calib ration is in progress. OK will appear when
second dire ction calibrat ion is compl ete.
• If ERR appears on the di gital display, press B again to restar t calibratio n.
Magnetic Declination Correction
•
With magnetic declination correction, you input a magnetic declination angle (difference between
magnetic north and true north), which allows the watch to indicate true north. You can perform this
procedure when the magnetic declination angle is indicated on the map you are using. Note that
you can input the declination angle in whole degree units only, so you may need to round off the
value specifi ed on the map. If your map indicates the declination angle as 7.4°, you should input
7°. In the case of 7.6° input 8°, for 7.5° you can input 7° or 8°.
• The illustration, for example, shows the valu e you should in put and the dire ction setti ng you
should sel ect when the ma p shows a magne tic declination of 7° West.
4. When the setting is the way you want, press A to exit the setting screen.
Digital Compass Precautions
This watch features a built-in magnetic bearing sensor that detects terrestrial magnetism. This
means that north indicated by this watch is magnetic north, which is somewhat different from true
polar north. The magnetic north pole is located in northern Canada, while the magnetic south pole
is in southern Australia. Note that the difference between magnetic north and true north as
measured with all magnetic compasses tends to be greater as one gets closer to either of the
magnetic poles. You should also remember that some maps indicate true north (instead of
magnetic north), and so you should make allowances when using such maps with this watch.
Location
• Taking a direction reading when you are near a source of strong magnetism can cause large
errors in readings. Because of this, you should avoid taking direction readings while in the
vicinity of the following types of objects: permanent magnets (magnetic necklaces, etc.),
concentrations of metal (metal doors, lockers, etc.), high tension wires, aerial wires, household
appliances (TVs, personal computers, washing machines, freezers, etc.).
• Accurate direction readings are impossible while in a train, boat, air plane, etc.
• Accurate readings are also impossible indoors, especially inside ferroconcrete structures. This
is because the metal framework of such structures picks up magnetism from appliances, etc.
Storage
• The precision of the bearing sensor may deteriorate if the watch becomes magnetized. Because
of this, you should store the watch away from magnets or any other sources of strong
magnetism, including: permanent magnets (magnetic necklaces, etc.) and household
appliances (TVs, personal computers, washing machines, freezers, etc.).
• Whenever you suspect that the watch may have become magnetized, perform the procedure
under “To perform bidirectional calibration” (page E-24).
3. Rotate the watch 180 degrees.
) and -2- will be displaye d. This
E-25
E-27
Viewing Prayer Names and Prayer Times
This watch is designed so its second hand points to prayer names on the face, and displays prayer
times. The Today’s Salat Time Screen shows prayer times and elapsed prayer time. The SALAT
time search mode can be used to view the prayer times for a specifi c date. A Prayer Time Alarm
(which can be switched on and off) sounds for 10 seconds when each prayer time arrives. Press
any button to stop the alarm after it starts to sound.
About prayer times
Prayer times are calculated automatically in accordance with the time, date, city data, and prayer
time calculation method you set in the Timekeeping Mode. This, of course, means that you should
always make sure that your Timekeeping Mode settings are confi gured correctly.
Prayer Indicator Prayer Time
FAJR Fajr start time
SUNRISE Sunrise time
ZUHR Zuhr start time
ASR Asr start time
MAGHRIB Maghrib start time
ISHA Isha start time
E-28
To display today’s prayer times
Current alarm on
indicator (currently
display alarm on)
Prayer time alarm on
indicator (at least one
alarm on)
1. In the Timekeeping Mode, press D.
• This displays the Today’s Salat Time Screen.
• The secon d hand will move to th e name of the nex t prayer
• The digital display will show t he start tim e of the prayer indic ated
2. Use A to move the second hand sequentially to the other prayer
names. The digital display will show the start time of the prayer
indicated by the second hand.
FAJR
• If you do not pres s A for about on e or two minute s after movin g
•
• Press C to return to the Ti mekeeping M ode.
scheduled af ter the current time.
by the secon d hand.
SUNRISE
the second h and, it will move ba ck to the next sch eduled prayer
automatically.
Pressing D returns to the next prayer time sc reen.
ASR MAGHRIB ISHA
ZUHR
E-29
Page 6

Operation Guide 5266
Displaying Elapsed Prayer Time
Elapsed prayer time
To view prayer times on a specifi c date
Current alarm on
indicator (currently
display alarm on)
Prayer time alarm on indicator
(at least one alarm on)
E-30
To stop a sounding prayer alarm
Press any button.
About prayer time calculation methods
Methods that are used to determine prayer times (especially Fajr, Asr, and Isha) differ somewhat
between countries and regions. This watch comes with a total of fi ve built-in prayer time calculation
methods that conform with various geographical areas around the world. In addition, you can also
set your own calculation method for calculation of Fajr, Asr, and Isha.
While the Today’s Salat Time Screen is displayed, the digital display
will show the time elapsed for up to 30 minutes after the start of the
prayer. The second hand will remain pointing to the name of the
ongoing prayer. Elapsed prayer time is shown only while Today’s Salat
Time Screen is displayed.
• After the 31st minute of elapsed timing, the digital display will
change to show the start time of the next prayer, and the second
hand will move to the name of the next prayer time.
•
During the time after ISHA,
• While elapsed time is displayed, you can press D or A to display
the next prayer time.
• PressB to enter the Qibla Mode. Press C to enter the Timekeeping
Mode.
1. In the Timekeeping Mode, press C.
• This enters th e SALAT Tim e Search Mod e.
• SALAT will appear on the d igital display fo r about one se cond.
After that t he current year, month, and day appears fo r about
one second.
• Next, CALC will appear on the digi tal display indicating that
prayer time cal culation is in progress. Af ter calculatio n is
complete, th e second hand w ill move to the prayer na me that
was indicated t he last time you ex ited the SAL AT T ime Search
Mode. The d igital display wi ll show the prayer ti me for that
prayer.
the second hand will move to FAJR.
Prayer Time Calculation Methods
Method Organization Method
Umm al-Qura University,
Makkah
Muslim World League MWL 18.0° 17.0°
Islamic Society of North
America (ISNA)
University Of Islamic
Sciences, Karachi
Egyptian General Authority of
Survey
CUSTOM CUSTOM 10-20.0°, 90 minutes before
(Abbreviation)
MAKKAH 18.5° 90 minutes after
ISNA 15.0° 15.0°
KARACHI 18.0° 18.0°
EGYPT 19.5° 17.5°
Angle of the sun under
the Horizon (Fajr)
sunrise
Angle of the sun under
the Horizon (Isha)
Maghrib/120 minutes
(during Ramadan only)
10-20.0°,90 minutes after
Maghrib, 120 minutes
(during Ramadan only)
2. Use the D (+) and B (–) buttons to scroll from day to day.
• Scrolling to an other day will cau se CALC to appear o n the digital disp lay for one seco nd
indicating that prayer time cal culation is in progress. Af ter calculatio n is complete, t he
second han d will move to the prayer name that was ind icated the last t ime you exited th e
SALAT Tim e Search Mod e. The digital d isplay will show t he prayer time for th at prayer.
3. Use A to move the second hand sequentially to the other prayer names. The digital display will
show the start time of the prayer indicated by the second hand.
4. Hold down C for about two seconds to return to the Timekeeping Mode.
To turn a prayer alarm on or off
1. In the Timekeeping Mode, press D to display the Today’s Salat
Time screen. The prayer time on/off setting can be changed only
while the Today’s Salat Time screen is displayed.
2. Use A to move the second hand between prayer names until it is
pointed at the one whose setting you want to change. The prayer
time will appear on the digital display.
3. Hold down A for about two seconds until
appears on the digital display.
• This indicato r shows the cur rent alarm on/off setting .
• The current al arm on indicato r ( ) will appea r to the right of a
displayed prayer ti me if its alarm is t urned on. No i ndicator is
shown if the d isplayed alarm is t urned off.
ALM OFF
or
ALM ON
4. Press D to toggle the display alarm between on and off.
5. After the settings are the way you want, press A.
• This returns to p rayer name indic ation and the Today ’s Salat Time S creen.
E-31
To select a prayer time calculation method (FAJR, ISHA)
Important!
See “Prayer Time Calculation Methods” on page E-32 before confi guring the setting below.
1. In the Timekeeping Mode, press D to display the Today’s Salat
Time Screen. The prayer time calculation method can be selected
only while Today’s Salat Time Screen is displayed.
2. Use A to move the second hand between prayer names until it is
pointed at the one whose calculation method you want to set. The
prayer time appears on the digital display.
3. Hold down A for about two seconds to display the setting screen.
• This displays t he prayer alarm se tting scree n on the digital
display.
4. Press C to display the prayer time setting screen.
• This will caus e the current prayer t ime calculat ion method to
fl ash on the digi tal display.
• Use C to scroll throug h the setting s until [Prayer Time
Calculatio n Methods] is disp layed.
Alarm
Prayer Time Calculation Methods
FAJR SettingISHA Setting
ASR Setting
E-32
5. Use the D and B buttons to select a prayer time calculation method as shown below.
MAKKAH
CUSTOM
6. After selecting the prayer time calculation method you want, press C.
• This will disp lay the [ASR] set ting screen.
7. Press D to toggle the [ASR] setting between
STD:
Sun position when the length of the shadow of an object is equal to the length of its
shadow at noon plus the length of the object
HANAFI:
Sun position when the length of the shadow of an object is equal to the length of its
8. When the ASR setting is the way you want, press C.
9. Use the D and B buttons to scroll through the FAJR settings on the digital display as shown
shadow at noon plus twice the length of the object
• This will disp lay the [FAJR] s etting scree n. This setting can be con fi gured only if yo u select
CUSTOM for the prayer time c alculation m ethod, above. If y ou select any me thod other
than CUSTOM, a default FAJR set ting is applied .
below.
MWL
EGYPT
STD
(STANDARD) and
ISNA
KARACHI
HANAFI
.
FAJR10.0° FAJR20.0° FAJR-1.5H
• Scrolling from FAJR10.0° to FAJR20.0° is in units of 0.5°.
FAJR -1.5H: 90 minutes before sunrise
E-34
10. When the FAJR setting is the way you want, press C.
• This will disp lay the [ISHA] s etting scree n. This sett ing can be con fi gured only if you s elect
CUSTOM for the prayer time c alculation m ethod, above. If yo u select any method other
than CUSTOM, a default ISHA s etting is appl ied.
11. Use the D and B buttons to scroll through the ISHA settings on the digital display as shown
below.
ISHA10.0° ISHA20.0° ISHA+1.5H ISHA+1.5/2
• Scrolling from ISHA 10.0° to ISHA 20.0° is in units of 0.5°.
ISHA+1.5H: 90 minu tes after M aghrib
ISHA+1.5/2: 90 minutes a fter Mag hrib/120 minu tes (during R amadan on ly)
12. After the settings are the way you want, press A.
• This will caus e the second h and to move to a prayer nam e in accordanc e with your set tings.
The digital d isplay will show t he prayer time for th at prayer.
Prayer Time Precautions
• When you move from one region to another, be sure that you correctly confi gure Timekeeping
Mode settings (city data, prayer time calculation method, and current time) for the region you
are moving into. Remember that if you fail to confi gure these settings correctly, prayer times
cannot be calculated and displayed properly.
E-33
E-35
Page 7

Operation Guide 5266
Using Moon Data
The Moon Age Mode displays a value that indicates the current date’s Moon age. The value
indicates the Moon age at sunset on the current date.
To look up the Moon age on a specifi c date
Moon age
Moon Data
The Moon age information that appears when you enter the Moon Age Mode is for sunset on the
current date as kept in the Timekeeping Mode in accordance with your Home City setting. After
that, you can scroll to another date and check the Moon age on that date.
• If the Moon data is not correct, check your Timekeeping Mode settings and correct them if
necessary.
E-36
Temperature Sensor Calibration
The watch’s temperature sensor is calibrated at the factory and normally requires no further
adjustment. If you notice serious errors in the temperature readings produced by the watch, you
can calibrate the sensor to correct the errors.
Important!
• Incorrectly calibrating the temperature sensor can result in incorrect readings.
Carefully read the following before doing anything.
– Compare the readings produced by the watch with those of another reliable and accurate
thermometer.
– If adjustment is required, remove the watch from your wrist and wait for 20 or 30 minutes to
give the temperature of the watch time to stabilize.
To correct the temperature value
4. Use D (+) and B (–) to calibrate the temperature value with the reading of another instrument.
• Each press of a bu tton chang es the tempera ture value in units o f 0.1°C (0.2°F ).
• To return the currentl y fl ashing value to its i nitial factor y default setti ng, press B and D at
the same ti me. OFF will appear at th e fl ashing locat ion for about o ne second, fo llowed by
the initial defa ult value.
5. Press A to return to the Thermometer Mode.
1. In the Timekeeping Mode, press C twice to enter Moon Age Mode.
• This will caus e MOON AGE to appear on the digital di splay for
about one s econd. Af ter that the curre nt year, month, and day
appears for ab out one sec ond.
• Next, CALC will appear on the digi tal display indic ating that
Moon age ca lculation is i n progress. Af ter the calcu lation is
complete, th e Moon age valu e for the current date w ill appear.
2. While a Moon age value is displayed you can use the D (+) and
B
(–) buttons to scroll from day to day.
•
Scrolling to an other day will ca use CALC to appear o n the digital
display for one s econd indic ating that Mo on age calculat ion is in
progress. T he Moon age fo r the selected da ta will appear w hen
calculatio n is complete.
•
Hold down C for two sec onds to return to the T imekeepin g Mode.
Note
• Moon age is calculated to an accuracy of ±1 day.
1. You can correct the temperature readings displayed by the watch in
accordance with another measuring instrument for more accurate
readings.
2. In the Timekeeping Mode, press C three times to enter
Thermometer Mode.
3. Hold down A until the current temperature value fl ashes on the
digital display. This is the setting screen.
Thermometer
This watch uses a temperature sensor to take temperature readings.
To enter and exit the Thermometer Mode
Temperature
Temperature
• Temperature is displayed in units of 0.1°C (or 0.2°F).
• The displayed temperature value changes to
outside the range of –10.0°C to 60.0°C (14.0°F to 140.0°F). The temperature value will reappear
as soon as the measured temperature is within the allowable range.
Display Units
You can select either Celsius (°C) or Fahrenheit (°F) for the displayed temperature value. See “To
specify temperature unit” (page E-40) for more information.
Thermometer Precautions
• Temperature measurements are affected by your body temperature (while you are wearing the
watch), direct sunlight, and moisture. To achieve a more accurate temperature measurement,
remove the watch from your wrist, place it in a well ventilated location out of direct sunlight, and
wipe all moisture from the case. It takes approximately 20 to 30 minutes for the case of the
watch to reach the actual surrounding temperature.
• When taking temperature readings, it is best to remove the watch from your wrist in order to
eliminate the effects of body heat. Remove the watch from your wrist and allow it to hang freely
from your bag or in another location where it is not exposed to direct sunlight.
1. In the Timekeeping Mode, press C three times to enter
Thermometer Mode.
• This will cau se THERMO to appear on the dig ital display for
about one s econd indic ating that temp erature readings a re
being taken . After that, t he measurem ent result will a ppear.
• The watch will t ake a temperature re ading every fi ve sec onds for
one or two m inutes.
2. Hold down C for about two seconds to return to the Timekeeping
Mode.
• If you do not per form any button operati on for one or t wo
minutes af ter temperature m easurement is c omplete, the watc h
will automat ically return to t he Timekeep ing Mode.
--.-
°C (or °F) if a measured temperature falls
E-37
E-38
Specifying Temperature Unit
Use the procedure below to specify the temperature unit to be used in the Thermometer Mode.
Important!
TOKYO
E-40
When
set automatically to Celsius (°C). These settings cannot be changed.
To specify the temperature unit
1. Enter the Thermometer Mode and then hold down A for about two
2. Press C to display the temperature unit setting screen with either
3. Press D to toggle the temperature unit between °C (Celsius) and
4. After the setting is the way you want, press A to exit the setting
is selected as the Home City, the temperature unit is
seconds until the current temperature value fl ashes on the digital
display. This is the setting screen.
°C
or °F (the current unit setting) will be fl ashing.
(Fahrenheit).
screen.
E-39
Using the Alarm
Alarm
number
Alarm time
(Hour : Minutes) or SIG
Alternates
°F
(1 second)
You can set fi ve independent daily alarms. When a daily alarm is
turned on, an alarm tone will sound for about 10 seconds each day
when the time in the Timekeeping Mode reaches the preset alarm time.
This is true even if the watch is not in the Timekeeping Mode.
You can also turn on an Hourly Time Signal, which will cause the
watch to beep twice every hour on the hour.
To enter the Alarm Mode
UseC to select the Alarm Mode (
ALARM
will appear on the digital display for about one second.
•
After that, the digital display will show the current alarm time and
alarm number (–1 to –5), or the hourly time signal setting. In the
case of an alarm, the digital display alternates at one-second
intervals between the alarm number and the on/off setting screen.
• The alarm number indicates an alarm screen.
the Hourly Time Signal screen is on the digital display.
• When you enter the Alarm Mode, the data you were viewing when
you last exited the mode appears fi rst.
ALARM
) as shown on page E-8.
SIG
is shown when
E-41
Page 8

Operation Guide 5266
To set an alarm time
1. In the Alarm Mode, use D and B to scroll through the alarm
screens until the one whose time you want to set is displayed.
−1 −2 −3
SIG −5 −4
2. Hold down A until the alarm time starts to fl ash. This is the setting
screen.
3. Press C to move the fl ashing between the hour and minute
settings.
4. While a setting is fl ashing, use D (+) and B (–) to change it.
• When set ting the alarm t ime using the 12- hour forma t, take care
to set the time c orrectly as a.m. or p.m.
5. Press A to exit the setting screen.
To test the alarm
In the Alarm Mode, hold down D to sound the alarm.
E-42
Using the Stopwatch
The stopwatch measures elapsed time and split times.
To enter the Stopwatch Mode
Hours
Minutes
1/100 second
UseC to select the Stopwatch Mode (
Seconds
STW
will appear on the digital display for about one second. Next,
•
the digital display will change to show the stopwatch time.
To perform an elapsed time operation
D
Start Stop (Restart) (Stop) Reset
To pause at a split time
D
Start Split Split release Stop Reset
• Digital display alternates between
at one-second intervals.
Note
• The Stopwatch Mode can indicate elapsed time up to 23 hours, 59
minutes, 59.99 seconds.
• Once started, stopwatch timing continues until you press B to reset
it, even if you exit the Stopwatch Mode to another mode and even if
timing reaches the stopwatch limit defi ned above.
• Exiting the Stopwatch Mode while a split time is frozen on the digital
display clears the split time and returns to elapsed time
measurement.
D D D B
B B D B
STW
) as shown on page E-8.
SPL
and the 1/100-second value
To turn an alarm and the Hourly Time Signal on and off
Hourly time signal
on indicator
Alarm on indicator
To stop the alarm
Press any button.
1. In the Alarm Mode, use D and B to select an alarm or the Hourly
Time Signal.
2. When the alarm or the Hourly Time Signal you want is selected,
pressA to toggle it between on and off.
• The alarm o n indicator (whe n any alarm is on) and th e Hour ly
Time Signa l on indicator (wh en the Hourl y Time Signa l is on) are
shown on th e digital display i n all modes.
E-43
Using the Countdown Timer
The countdown timer can be confi gured to start at a preset time and sound an alarm when the end
of the countdown is reached.
To enter the Countdown Timer Mode
UseC to select the Countdown Timer Mode (
page E-9.
TIMER
•
will appear on the digital display for about one second. Next,
the digital display will change to show the countdown time.
To specify the countdown start time
1. Enter the Countdown Timer Mode.
Countdown time
(Minutes, seconds)
2. Hold down A until the minute setting of the current countdown start time starts to fl ash. This is
the setting screen.
3. Press C to move the fl ashing between the minute and second settings.
4. Use D (+) and B (–) to change the fl ashing item.
• To set the startin g value of the cou ntdown time to 10 0 minutes, set 00'00".
5. Press A to exit the setting screen.
• If a countdow n is in progress (indicated by the sec onds
counting down), press D to stop it and the n press B to reset to
the current co untdown sta rt time.
• If a countdown i s paused, press B to reset to the curre nt
countdow n start tim e.
TIMER
) as shown on
E-44
To perform a countdown timer operation
D
Start Stop (Restart) (Stop) Reset
• Before starting a countdown timer operation, check to make sure that a countdown operation is
not already in progress (indicated by the seconds counting down). If it is, press D to stop it and
thenB to reset to the countdown start time.
• An alarm sounds for ten seconds when the end of the countdown is reached. This alarm will
sound in all modes. The countdown time is reset to its starting value automatically after the alarm
sounds.
To stop the alarm
Press any button.
E-46
D
D D
B
Illumination
The display of the watch is illuminated for easy reading in the dark.
To turn on illumination
In any mode (except when a setting screen is on the digital display),
pressL to illuminate the display.
• You can use the procedure below to select either 1.5 seconds or
three seconds as the illumination duration. When you press L, the
display will remain illuminated for about 1.5 seconds or three
seconds, depending on the current illumination duration setting.
To change the illumination duration
1. In the Timekeeping Mode, hold down A for at least two seconds until
digital display. This is the setting mode. Release A after
• The name of t he city curren tly selected as yo ur Home Cit y will appear on the digital d isplay
with an arrow (
2. Press C 10 times until
• See step 3 unde r “To change the curre nt time and date set tings” (page E-15) for information
about how to sc roll through set ting screens.
3. Press D to toggle the illumination duration between three seconds (
1.5 seconds (
4. When the setting is the way you want, press A twice to return to the Timekeeping Mode.
▲
) fl ashing to the lef t.
LIGHT 1
LIGHT 1
displayed).
or
LIGHT 3
is displayed.
ADJUST
ADJUST
appears.
LIGHT 3
appears on the
displayed) and
E-45
E-47
Page 9

Operation Guide 5266
Illumination Precautions
• Illumination may be hard to see when viewed under direct sunlight.
• Illumination turns off automatically whenever an alarm sounds.
• Illumination will not turn on while an alarm is sounding, while high-speed hand movement is in
progress, while a sensor is taking a reading, or while the watch is performing calculation (
displayed). Illumination will turn on if L is pressed between sensor reading operations.
• Frequent use of illumination runs down the battery.
E-48
CALC
Troubleshooting
Time Setting
Why is the current time setting off by a couple of hours?
■
Your Home City setting may be wrong (page E-12). Check your Home City setting and correct it, if
necessary.
Why is the current time setting off by one hour?
■
You may need to change your Home City’s standard time/daylight saving time (DST) setting. Use
the procedure under “To change the current time and date settings” (page E-15) to change the
standard time/daylight saving time (DST) setting.
Sensor modes
Why can’t I change the temperature unit setting?
■
The temperature unit setting is always Celsius (°C) whenever
City. In this case, the setting cannot be changed.
Why does “ERR” appear while a sensor operation is in progress?
■
Subjecting the watch to strong impact can cause sensor malfunction or improper contact of internal
circuitry. When this happens,
will be disabled.
ERR
(error) will appear on the digital display and sensor operations
Qibla Readings and
Temperature Measurement
TOKYO
is selected as the Home
Button Operation Tone
The button operation tone sounds any time you press one of the watch’s buttons. You can turn the
button operation tone on or off as desired.
• Even if you turn off the button operation tone, the alarm, Hourly Time Signal, and Countdown
Timer Mode alarm all operate normally.
• Prayer alarm will sound even if the button operation tone is turned off (
To turn the button operation tone on and off
ERR
• If
appears while a measurement operation is being performed in a sensor mode, restart the
measurement. If
wrong with the sensor.
ERR
• If
keeps appearing during measurement, it could mean there is a problem with the
applicable sensor.
Why does “ERR” appear on the digital display following bidirectional calibration?
■
- - -
If
appears and then changes to
something wrong with the sensor.
ERR
• If
disappears after about one second, try performing the calibration again.
ERR
• If
keeps appearing, contact your original dealer or nearest authorized CASIO distributor to
have the watch checked.
Whenever you have a sensor malfunction, take the watch to your original dealer or nearest
authorized CASIO distributor as soon as possible.
What causes incorrect direction readings?
■
• Incorrect bidirectional calibration. Perform bidirectional calibration (page E-24).
• Nearby source of strong magnetism, such as a household appliance, a large steel bridge, a
steel beam, overhead wires, etc., or an attempt to perform direction measurement on a train,
boat, etc. Move away from large metal objects and try again.
What causes different direction readings to produce different results at the same
■
location?
Magnetism generated by nearby high-tension wires is interfering with detection of terrestrial
magnetism. Move away from the high-tension wires and try again.
1. In the Timekeeping Mode, hold down A for at least two seconds
ADJUST
until
mode. Release A after
• The name of t he city curren tly selected as yo ur Home Cit y will
2. Use C to cycle through settings on the digital display until the
current button operation tone setting (
• See step 3 unde r “To change the cur rent time and date s ettings”
3. Press D to toggle the button operation tone between on (
and off (
4. When the setting is the way you want, press A twice to return to the
Timekeeping Mode.
ERR
appears on the digital display again, it can mean there is something
appears on the digital display. This is the setting
ADJUST
appear on th e digital display with an arrow (
left.
(page E-15) for informatio n about how to scro ll through set ting
screens.
MUTE
).
ERR
(error) on the calibration screen, it means that there is
appears.
MUTE
MUTE
or
▲
KEY
).
) fl ashing to the
) is displayed.
KEY
)
E-49
E-50
Why am I having problems taking direction readings indoors?
■
A TV, personal computer, speakers, or some other object is interfering with terrestrial magnetism
readings. Move away from the object causing the interference or take the direction reading
outdoors. Indoor direction readings are particularly diffi cult inside ferro-concrete structures.
Remember that you will not be able to take direction readings inside of trains, airplanes, etc.
Battery
Why is the low battery alert fl ashing?
■
Low battery alert
E-52
Battery power is low. Watch operations are disabled while the low
battery alert is fl ashing on the digital display.
If the low battery alert disappears after battery power recovers but then
starts to fl ash again after a short while, it means that you need to have
the watch’s battery replaced.
Specifi cations
Accuracy at normal temperature:
Digital Timekeeping:
month, Hijri day
Time format: 12-hour and 24-hour
Gregorian calendar system: Full Auto-calendar pre-programmed from the year 2000 to 2099
Hijri calendar: Based on the range of the Gregorian calendar; auto correction at end of each
month
Other: City data (70 cities + user setting based on time differential); screen switching
(Gregorian or Hijri date, regular timekeeping); year/month/day display format
Analog Timekeeping:
Qibla:
Second hand indication of Qibla; 20 seconds continuous readings; Calibration (bidirectional);
Magnetic declination correction; Magnetic north indication; display of one of 16 direction
indicators; Angle value 0° to 359°
Prayer Times:
time displays per day); prayer alarm; prayer elapsed time measurement (up to 30
minutes); prayer calculation method setting; display of next prayer time
Moon Age:
Thermometer:
Measurement and display range: –10.0 to 60.0°C (or 14.0 to 140.0°F)
Display unit: 0.1°C (or 0.2°F)
Reading timing: 5-second intervals for 1 to 2 minutes
Bearing Sensor Precision:
Direction: Within ±15°
Values are guaranteed for a temperature range of –10°C to 40°C (14°F to 104°F).
Temperature Sensor Precision:
±2°C (±3.6°F) in range of –10°C to 60°C (14.0°F to 140.0°F)
Hour, minutes, seconds, a.m. (A)/p.m. (P), month, day, day of the week, Hijri
Hour, minutes (hand moves every 10 seconds), seconds
Gregorian 2000 through 2099; FAJR, SUNRISE, ZUHR, ASR, MAGHRIB, ISHA (six
Display of Moon age values at sunset for dates from Gregorian 2000 to 2099
±30 seconds a month
E-51
E-53
Page 10

Operation Guide 5266
Alarms:
5 daily alarms; hourly time signal
Stopwatch:
Measuring unit: 1/100 second
Measuring capacity: 23:59' 59.99
Measuring modes: Elapsed time, split time
Countdown Timer:
Measuring unit: 1 second
Countdown start time setting range: 1 second to 100 minutes (1-minute increments and
1-second increments)
Illumination:
Other:
Battery:
LED (Light-emitting diode); Selectable illumination duration (approximately
1.5 seconds or 3 seconds)
Button operation tone on/off
Two silver oxide batteries (Type: SR927W)
Approximate battery operating time: 2 years under the following conditions:
• 1 illumination operation (1.5 seconds) per day
• 5 prayer alarms and 1 normal alarm (6 total) per day
• 20 seconds of continuous direction readings, 20 times per month
• 2 minutes of continuous temperature readings (5-second intervals), once per week
Frequent use of illumination runs down the battery.
E-54
"
City Data Table
UTC Offset/
GMT
Differential
0.0 Casablanca 33.6 –7.6 MWL STD W 3
0.0 Rabat 34.0 –6.8 MWL STD W 3
0.0 London 51.5 –0.1 MWL STD W 2
1.0 Paris 48.9 2.4 MWL STD W 1
1.0 Algiers 36.8 3.0 EGYPT STD 0
1.0 Lagos 6.5 3.4 EGYPT STD W 3
1.0 Bonn 50.7 7.1 MWL STD E 1
1.0 Abuja 9.1 7.5 EGYPT STD W 2
1.0 Frankfurt 50.1 8.7 MWL STD E 1
1.0 Rome 41.9 12.5 MWL STD E 2
1.0 Berlin 52.5 13.4 MWL STD E 3
2.0 Tripoli 32.9 13.2 EGYPT STD E 2
2.0 Cape Town –33.9 18.4 MWL STD W 24
2.0 Istanbul 41.0 29.0 MWL STD E 5
2.0 Cairo 30.0 31.2 EGYPT STD E 4
2.0 Khartoum 15.6 32.5 EGYPT STD E 3
2.0 Ankara 39.9 32.9 MWL STD E 5
L
UTC Offset/
GMT
Differential
5.0 Karachi 24.9 67.0 KARACHI STD E 1
5.0 Tashkent 41.3 69.2 MWL STD E 5
5.5 Mumbai 19.1 72.9 KARACHI STD W 1
5.5 Delhi 28.6 77.2 KARACHI STD E 1
5.5 Hyderabad 17.4 78.5 KARACHI STD W 1
5.5 Kolkata 22.6 88.4 KARACHI STD W 1
5.75 Kathmandu 27.7 85.3 MWL STD 0
6.0 Dhaka 23.7 90.4 KARACHI STD 0
6.5 Yangon 16.8 96.2 MWL STD W 1
7.0 Bangkok 13.7 100.5 MWL STD W 1
7.0 Jakarta –6.2 106.8 MWL STD E 1
8.0
8.0 Singapore 1.3 103.8 MWL STD 0
8.0 Hong Kong 22.4 114.1 MWL STD W 2
8.0 Beijing 39.9 116.4 MWL STD W 6
9.0 Tokyo 35.7 139.7 MWL STD W 7
9.5 Adelaide –34.9 138.6 MWL STD E 8
10.0 Sydney –33.9 151.2 MWL STD E 13
11.0 Noumea –22.3 166.5 MWL STD E 12
L-2
City Name Latitu de (˚)
City Name Latitu de (˚)
Kuala lumpur
North
Latitude +,
South
Latitude –
North
Latitude +,
South
Latitude –
3.1 101.7 MWL STD 0
Longitude (˚)
East
Longitude +,
West
Longitude –
Longitude (˚)
East
Longitude +,
West
Longitude –
FAJR/ISHA
Prayer
Calculation
Method
FAJR/ISHA
Prayer
Calculation
Method
ASR Prayer
Calculation
Method
ASR Prayer
Calculation
Method
DECLINATION (˚)
(DEC)
E: east
W: west
DECLINATION (˚)
(DEC)
E: east
W: west
declination
declination
declination
declination
UTC Offset/
GMT
Differential
2.0 Beirut 33.9 35.5 MWL STD E 4
2.0 Amman 32.0 35.9 MAKKAH STD E 4
2.0 Damascus 33.5 36.3 MAKKAH STD E 4
3.0 Moscow 55.8 37.6 MWL STD E 10
3.0
3.0 Jeddah 21.5 39.2 MAKKAH STD E 3
3.0 Madinah 24.5 39.6 MAKKAH STD E 3
3.0 Makkah 21.4 39.8 MAKKAH STD E 3
3.0 Sanaa 15.4 44.2 MAKKAH STD E 2
3.0 Baghdad 33.3 44.4 MWL STD E 4
3.0 Riyadh 24.7 46.7 MAKKAH STD E 3
3.0 Kuwait 29.4 48.0 MAKKAH STD E 3
3.0 Manama 26.2 50.6 MAKKAH STD E 2
3.0 Doha 25.3 51.5 MAKKAH STD E 2
3.5 Tehran 35.7 51.4 MWL STD E 4
4.0 Abu Dhabi 24.5 54.4 MAKKAH STD E 2
4.0 Dubai 25.3 55.3 MAKKAH STD E 2
4.0 Muscat 23.6 58.6 MAKKAH STD E 1
4.5 Kabul 34.5 69.2 KARACHI STD E 3
UTC Offset/
GMT
Differential
12.0 Wellington –41.3 174.8 MWL STD E 22
11.0 Pago Pago –14.3 –170.7 MWL STD E 12
–
–10.0 Honolulu 21.3 –157.9 ISNA STD E 10
–9.0 Anchorage 61.2 –149.9 ISNA STD E 19
–8.0 Los Angeles 34.1 –118.2 ISNA STD E 13
–7.0 Denver 39.7 –105.0 ISNA STD E 9
–6.0 Mexico City 19.4 –99.1 MWL STD E 6
–6.0 Dallas 32.8 –96.8 ISNA STD E 4
–6.0 Chicago 41.9 –87.6 ISNA STD W 3
–5.0 New York 40.7 –74.0 ISNA STD W 13
–4.0 Santiago –33.4 –70.6 MWL STD E 3
–3.5 St.John's 47.6 –52.7 ISNA STD W 20
–3.0 Rio De
–2.0 Fernando de
–1.0 Praia 14.9 –23.5 MWL STD W 11
Custom, Initial
value: 0.0
UTC Offset/GMT Differential: Based on data for December 2010
DEC: Based on data for 2010
DEC Source: World Data Center for Geomagnetism Kyoto
City Name Latitu de (˚)
Addis Ababa
City Name Latitu de (˚)
Janeiro
Noronha
Custom Initial Latitude 0˚Initial
North
Latitude +,
South
Latitude –
9.0 38.7 MWL STD E 2
North
Latitude +,
South
Latitude –
–22.9 –43.2 MWL STD W 22
–3.8 –32.4 MWL STD W 21
Longitude (˚)
East
Longitude +,
West
Longitude –
Longitude (˚)
East
Longitude +,
West
Longitude –
Longitude 0˚
FAJR/ISHA
Prayer
Calculation
Method
FAJR/ISHA
Prayer
Calculation
Method
FAJR18°
ISHA17°
ASR Prayer
Calculation
Method
ASR Prayer
Calculation
Method
STD 0
DECLINATION (˚)
(DEC)
E: east
W: west
DECLINATION (˚)
(DEC)
E: east
W: west
declination
declination
L-1
declination
declination
L-3
 Loading...