

Page 1
MA0410-EA
Power Supply
Operation Guide 3707
The power supply of this watch uses a solar cell to generate electrical power, which is stored by a
rechargeable battery. Using or storing the watch where it is not regularly exposed to light, or allowing
it to be blocked from light by your sleeve for long periods as you are wearing it can cause the power
of the rechargeable battery to run down. To ensure stable operation, be sure to allow the watch to be
exposed to light as much as possible when you are wearing or storing it.
❚
Charging Precautions
Avoid charging the watch in the following locations, and anywhere else where the watch may become
very hot.
• On the dashboard of an automobile parked in the sun
• Very close to an incandescent light source or other sources of heat
• In a location exposed to direct sunlight for long periods
Depending on the light source you are using, the case of the watch may become quite
hot during charging. Take care to guard against burn injury after charging.
❚
Checking the Battery Level
Normal Low Power Alert Timekeeping Disabled
Battery level
drops due to
insufficient
charging.
Jumps two seconds.
Normal
Low Power Alert
Timekeeping Disabled
• Even after the battery drops to the level that timekeeping becomes disabled, you will be able to
resume normal operation by charging the battery.
• After timekeeping becomes disabled, the hands will move to the current time after the battery is
recharged sufficiently.
• Keep the watch exposed to light until normal operation returns.
Normal operation
Time calibration signal reception disabled
Timekeeping disabled
Date indicator becomes
“ ” at midnight.
Battery level
drops further due
to insufficient
charging.
Hands stop at
12 o’clock.
Power Saving
Power Saving puts the watch into a sleep state, which will cause the second hand to stop moving
whenever the watch is left in the dark.
• Note that hand movement may stop if the watch is blocked from light by your sleeve.
❚
How the sleep state works
The second hand stops whenever the watch is left in the dark for about 60 or 70 minutes between the
hours of 10:00 p.m. and 6:00 a.m. Time calibration reception continues to be performed at this time.
If the watch is left in the dark for an additional seven or eight days, the hour and minute hand also
stop. Time calibration is not performed while the hour and minute hands are not moving.
• Timekeeping continues inteLnti
❚
To charge the battery
Point the solar cell (face) of the watch at a light source to
charge the battery.
• Remember that even a partial blockage of the solar cell
reduces charging efficiency.
❚
Charging Guide
Starting from a full charge, the watch should be able to
continue operating for about five months without further
charging under the conditions described below.
Daily Use (All time values are approximate.)
• Signal reception: 6 minutes
Making sure the watch is regularly exposed to light ensures
stable operation.
Required Daily Charging Time
• The following is the daily amount
of charging required each day to
support the operations under
“Daily Use”.
Exposure Level
(Brightness)
Outdoor Sunlight
(50,000 lux)
Sunlight Through
a Window
(10,000 lux)
Daylight Through
a Window on an
Overcast Day
(5,000 lux)
Indoor
Fluorescent
Lighting
(500 lux)
Approximate
Exposure
Time
6 minutes
30 minutes
48 minutes
8 hours
• Charge Times Required to Advance to a Higher Level
Exposure Level (Brightness)
Outdoor Sunlight (50,000 lux)
Sunlight Through a Window (10,000 lux)
Daylight Through a Window on an Overcast Day
(5,000 lux)
Indoor Fluorescent Lighting (500 lux)
• Note that the above charging times are for reference only. Actual charging time depends on a variety
of environmental factors.
Approximate Exposure Time
Timekeeping Restored Full Charge
1 hour
3 hours
4 hours
37 hours
16 hours
78 hours
– – –
– – –
1
Page 2
Operation Guide 3707
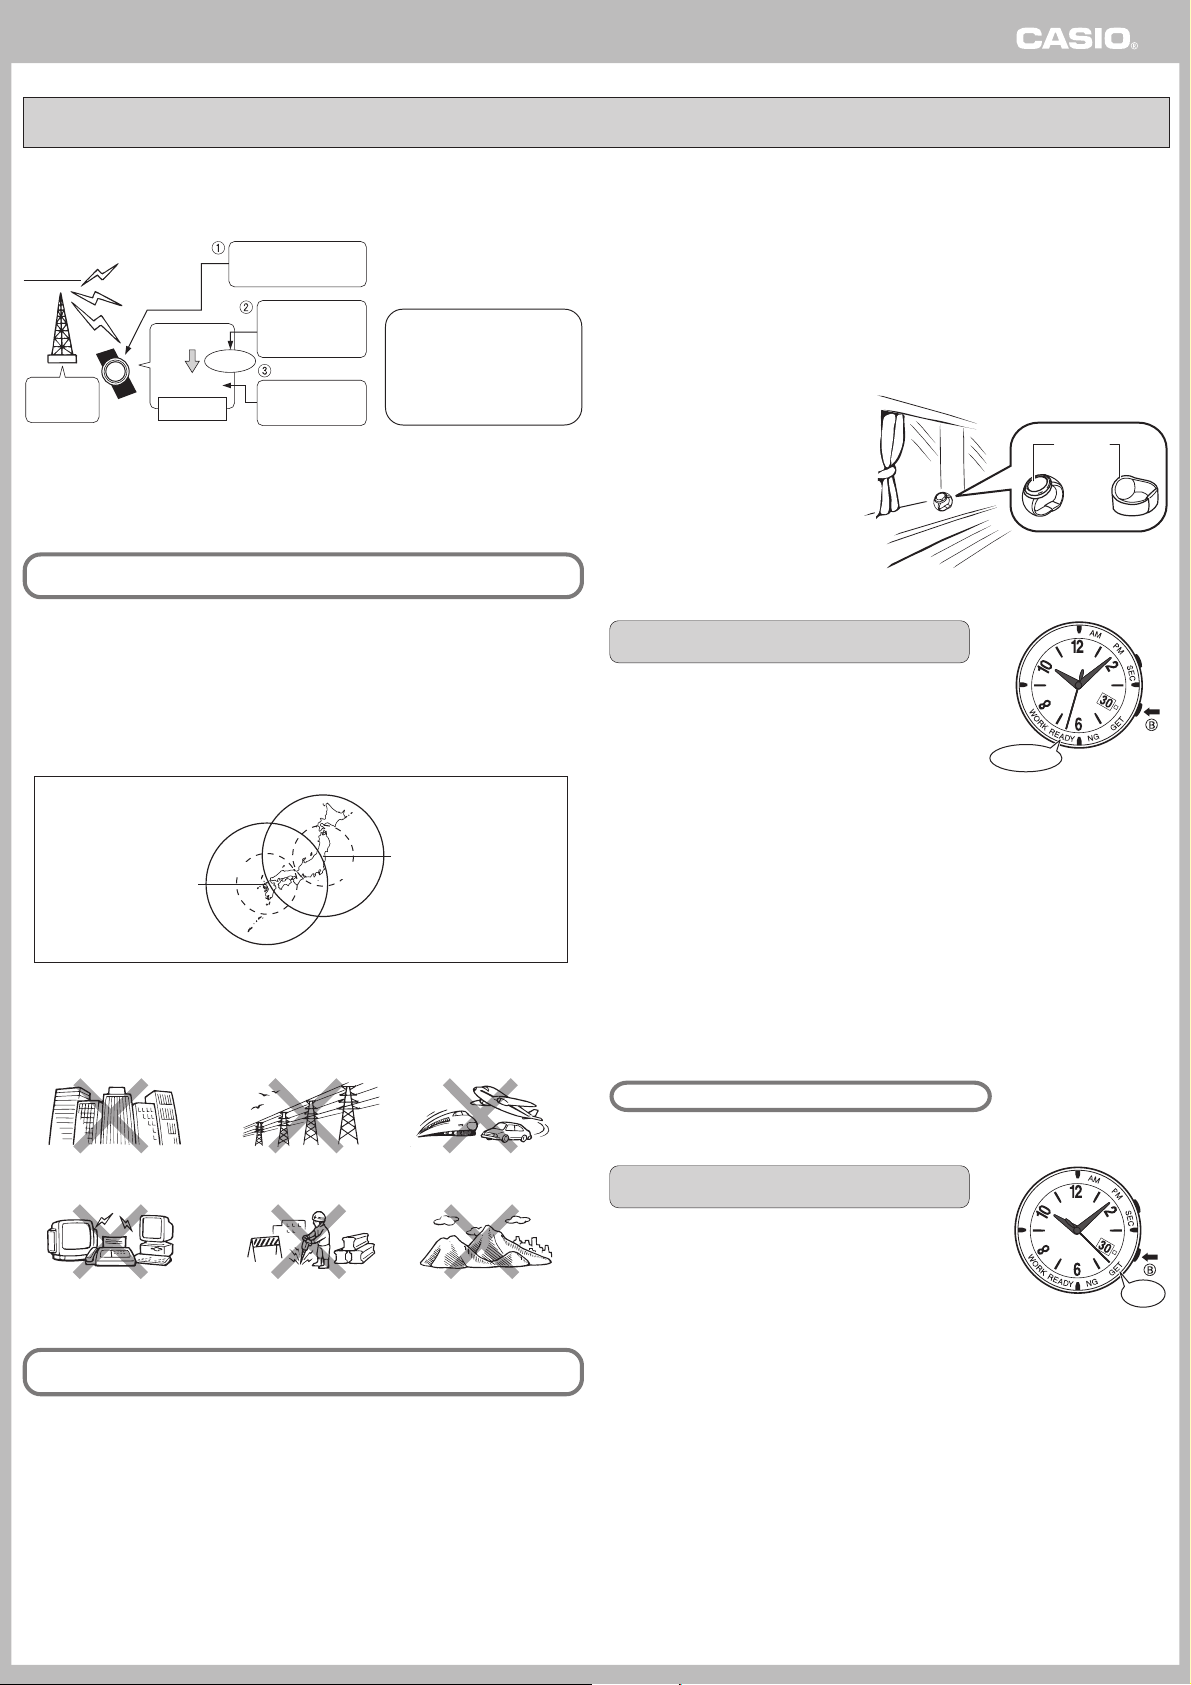
How a Radio-controlled Watch Works
What is a radio-controlled watch?
Your radio-controlled watch is designed to receive a time calibration signal that contains standard
time data, and adjust its current time setting accordingly.
Transmitter
Cesium
atomic clock
Long-wave
time
calibration
signal
Watch
Signal data
Time data
Internally
Signal is received
using built-in antenna.
Watch decodes
received data
and converts it
Decode
to time data.
Time is adjusted
according to
time data.
After the watch receives the
Standard Time signal, it
performs internal calculations
to determine the current time.
Because of this, there may be
an error of up to one second
in the displayed time.
Calibration Signal
• The Japanese calibration signal (Call Sign: JJY) is maintained by the National Institute of Information
and Communications Technology (NICT). It is a long wave signal transmitted 24 hours a day from the
Mt. Otakadoya transmitter (40kHz) located in Tamura-gun, Fukushima Prefecture, and from the Mt.
Hagane transmitter (60kHz) located on the border between Saga Prefecture and Fukuoka Prefecture.
Note that transmission of the time calibration signal may be interrupted occasionally due to
maintenance, lightning, etc.
Reception Range
This watch is designed to receive either the Mt. Otakadoya signal (40kHz) or the Mt. Hagane signal
(60kHz), whichever is strongest.
• Under optimum conditions, the calibration signal should be receivable up to 1,000 kilometers from the
transmitter. Note that the wave is relatively weak at distances greater than 500km, so reception may
be poor at long distances.
• Geographic contours, nearby buildings, seasonal conditions, the time of day, can even make reception
impossible even when you are within range of the transmitter.
• Reception is best at night.
Receiving the Calibration Signal
There are two methods you can use to receive the time calibration signal.
Auto receive (Reception is performed automatically at midnight, 1:00, 2:00, 3:00 and 4:00 each
• Auto receive is terminated as soon a reception is successful.
• If auto receive is not successful for any of the normal auto receive operations shown above, auto
receive is performed one more time at 5:00 a.m.
• Successful auto receive keeps timekeeping accurate.
Manual receive (You initiate reception using a button operation.)
❚
Remove the watch from your wrist and place
it somewhere so its right side (9 o’clock side,
where the antenna is located) is facing a
window.
• Do not move the watch while it is receiving
the calibration signal.
❚
A calibration signal receive operation takes
anywhere from about two to seven minutes.
❚
In any mode, hold down the
seconds.
• The second hand will move to READY, and signal reception will
start.
morning.)
To position the watch for optimum reception
Time Required for Reception
To perform manual receive
BB
B button for about two
BB
READY
9 o’clock
side
Or
1000km
500km
1000km
Mt. Otakadoya
(40kHz)
Transmitter Locations
Mt. Hagane
(60kHz)
500km
Location
Reception is difficult and may even be impossible in the locations described below. Avoid such
locations when performing signal reception.
• You should think of your watch operating like a radio or TV when it is receiving the calibration signal.
Among or near buildings Near high-voltage lines
Next to a household appliance or
office equipment (TV, speaker,
fax, computer, cell phone, etc.)
If you are experiencing problems with reception, move away from the types of locations described
above to a location with better reception, and try again.
In a location where there is
radio interference (construction
site, airport, etc.)
Inside a vehicle
(automobile, train, plane, etc.)
Near mountains
❚
To interrupt reception
Press any button. This will cause the watch to return to the Timekeeping Mode.
❚
When reception is successful
The watch will terminate reception and adjust the current time. Next the second hand will move to
GET.
❚
When reception is not succesful
The second hand will move to NG (No Good), without adjusting the time setting.
• After the second hand is pointing at GET or NG, the watch will return to the Timekeeping Mode if you
press any button or if you do not perform any operation for about one or two minutes.
❚
Hand Operation During Signal Reception
Second Hand ..................... The second hand moves to READY when the reception operation starts,
Hour and Minute Hands ... The hour and minute hands continue to operate normally.
Note that the second hand does not move during signal reception.
❚
To check the result of the last signal receive operation
In the Timekeeping Mode, press the
enters the Receive Result Mode.
• If the watch was able to perform a successful signal receive
operation since midnight, the second hand will move to GET. If
the watch has been unable to receive any signal successfully,
the second hand will move to NG.
• To return to the Timekeeping Mode, press the B button twice.
• The watch will also return to the Timekeeping Mode if you do not
perform any operation for about one or two minutes.
indicating that the watch is getting ready to receive. It points to WORK
while actual reception is in progress.
BB
B button. This
BB
GET
Calibration Signal Reception Precautions
• Auto reception can be performed while the watch is in the Timekeeping Mode only.
• If the hands become misaligned for some reason, they may not indicate the correct time, even if the
time calibration signal is received normally. If this happens, use the procedure under “Adjusting Home
Positions” to adjust the home positions of the hands and the date.
• Pressing any button while auto reception is in progress will cause reception to stop.
• This watch is designed to adjust its current time setting in accordance with the calibration signal
transmitted in Japan only. It operates like a standard (non-radio controlled) watch outside of the range
of the receivable time calibration signal transmitters.
• When the watch is unable to receive the time calibration signal for some reason, timekeeping accuracy
is within ±20 seconds per month.
• Proper reception may be impossible if there is something blocking the signal.
• The watch’s calendar shows dates up to the year 2099. Attempting a receive operation after that
causes an error.
2
Page 3

Operation Guide 3707
Modes and Display Screens
Each press of the
• The display will automatically revert to the Timekeeping Mode if you leave it in another mode without performing any operation for about two or three
minutes.
Hour Hand Minute Hand
BB
B button cycles through available modes in the sequence shown below.
BB
Timekeeping Mode
Receive Result Mode
Second hand indicates GET or NG.
Home Position Adjustment Mode
Second hand
stops at 12
o’clock.
Button
Button
(Mode Switching)
DateSecond Hand
If the time setting is incorrect
Normally, you do not need to adjust the time setting of the watch as long as it is able to receive the time calibration
signal. See “Receiving the Calibration Signal” for more information. If the time setting is off for some reason, use the
Home Position Adjustment Mode to adjust the hands.
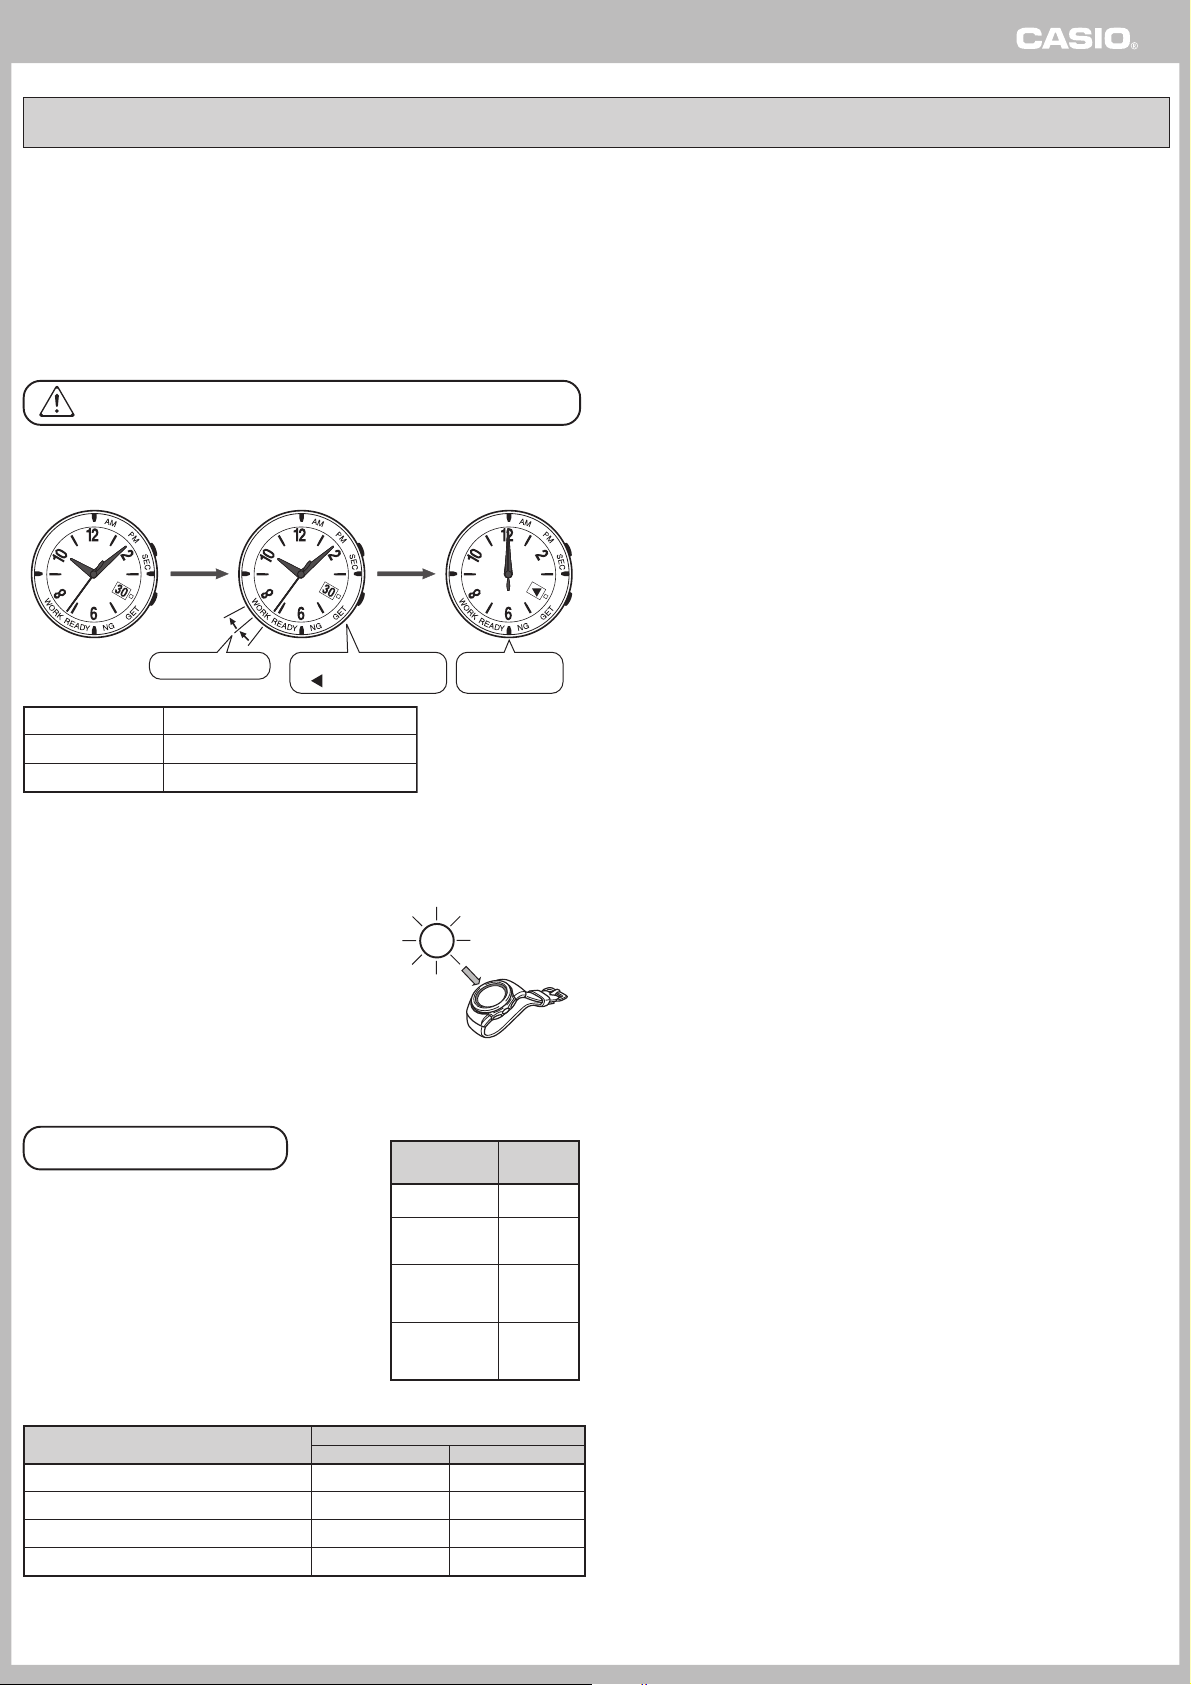
Use the following procedure to adjust the home positions of the hands and the date when
Adjusting Home Positions
1. In the Timekeeping Mode,
• If second hand alignment is
2. To adjust the second hand
• If second hand alignment is
If the second hand is pointing at 12 o’clock
Advance to step 3.
If the second hand is not pointing at 12 o’clock
Press the B button to move the second hand clockwise, until it points
at 12 o’clock.
• Each press of the B button advances the second hand by one second.
• Holding down the B button for about two seconds advances the
second hand at high speed. High-speed movement of the second hand
will continue until it completes a full revolution, or until you press any
button to stop it.
3. Press the
• This will cause the hour and
• If current hour and minute hand
If the hour and minute hands are
pointing at 12 o’clock
Advance to step 4.
If the hour and minute hands are not
pointing at 12 o’clock
• If it is easier to adjust the hand home
positions by moving them
counterclockwise, advance to step 4.
• If it is easier to adjust the hand home
positions by moving them clockwise,
use the B button to align them with
12 o’clock.
• Each press of the B button moves the hand setting 10 seconds.
• Holding down the B button for about two seconds advances the hands
at high speed. High-speed movement of the hands will continue until it
completes a 12-hour cycle, or until you press any button to stop it.
BB
press the
B button twice to
BB
enter the Home Position
Adjustment Mode.
correct, it should point directly at
12 o’clock.
home position, hold down
AA
the
A button until the
AA
second hand performs a full
rotation (about five
seconds).
correct, it should point directly at
12 o’clock.
AA
A button to
AA
advance to hour and minute
hand home adjustment.
minute hands to move
counterclockwise.
alignment is correct, they will
both stop at 12 o’clock.
Counterclockwise
12 o’clock
(2 times)
Clockwise
the time setting is wrong, even after the time calibration signal is received normally.
4. Press the
• This will cause the minute hand
If the hour and minute hands are
pointing at 12 o’clock
Advance to step 5.
If the hour and minute hands are not pointing at 12 o’clock
Press the B button to move the hour and minute hands back, until it
points at 12 o’clock.
• Each press of the B button moves the hand setting 10 seconds.
• Holding down the B button for about two seconds moves the hands
back at high speed. High-speed movement of the hands will continue
until it completes a 12-hour cycle, or until you press any button to stop
it.
5. Press the
• The date indicator will show if
If appears for the date
Advance to step 6.
If does not appear for the date
Hold down the B button for about two seconds to start automatic highspeed scrolling of the date. The is located between 31 and 1. When
the date gets close to 31, press the B button again to stop the
scrolling. Press the B button to advance the date until appears.
6. Press the
• At this time the date indicator will start to scroll. When the date
• This returns to the Timekeeping Mode, and resumes normal
After you complete the home position adjustment procedure,
place the watch in a location that allows good time calibration
signal reception, and then perform a manual receive operation.
See “To perform manual receive” for more information.
AA
A button.
AA
to move counterclockwise about
one or two minutes, and then
stop around 12 o’clock.
AA
A button to
AA
advance to date home
position adjustment.
the date home position is correct.
Note that it can take up to 90
seconds before appears.
AA
A button to return to the Timekeeping Mode.
AA
stops scrolling, the hour and minute hands start to move. Note that
all of the watch buttons are disabled while the date is scrolling or
the hour and minute hands are moving at this time.
After the hour and minute hands stop moving, press the
button.
second hand operation.
BB
B
BB
3
Page 4

Operation Guide 3707
Manual Time Adjustment 1
If you lose your way during manual time adjustment
If you become confused and lose your way during the following
procedures, simply put the watch down and do not perform any button
operation for two or three minutes. This will cause the watch to enter
the Timekeeping Mode (indicated by normal one-second movement of
the second hand) automatically. After that, you can try performing the
manual setting procedure again from the beginning.
❚
To reset the second hand manually
1. In the Timekeeping Mode,
hold down the
about five seconds until the
second hand stops at AM or
PM.
• This is the manual setting mode.
• Note that the hands of the watch
do not move in the manual
setting mode.
• If you do not perform any button
operation for about two or three
minutes, the watch will exit the
manual setting mode and normal
hand movement will resume.
2. Press the
• This will cause the second hand
to move to SEC.
3. In accordance with a time
signal on the TV or radio,
press the
• This will increase the minute
setting by one and restart the
seconds count from 00.
• In Japan, you can obtain the
current time by dialing 117 on the
telephone.
AA
A button for
AA
AA
A button twice.
AA
BB
B button.
BB
AM
SEC
(2 times)
You can perform the following procedures to adjust the time and date when
the watch is unable to receive a time calibration signal for some reason.
❚
To set the hour and minute manually
1. In the Timekeeping Mode,
hold down the
about five seconds until the
second hand stops at AM or
PM.
• Note that the hands of the watch
do not move in the manual
setting mode.
• If you do not perform any button
operation for about two or three
minutes, the watch will exit the
manual setting mode and normal
hand movement will resume.
• Pressing the A button and the B button at the same time in the
manual setting mode will cause the hands to move to the original
(unadjusted) time setting. Then the watch will return to the
Timekeeping Mode.
2. Use the operation described below to move the hands
clockwise.
To move the hands counterclockwise
Advance to step 3.
To move the hands clockwise
Press the
the hands clockwise by one
minute.
• Holding down the B button for
about two seconds moves the
hands clockwise at high speed.
High-speed movement of the
hands will continue until it
completes a 12-hour cycle, or
until you press any button to stop
it.
• After setting the time you want, press the A button to advance to step 4.
3. Use the operation described below to move the hands
counterclockwise.
Press the
• This will cause the minute hand to move counterclockwise about
one or two minutes, and then stop around 12 o’clock.
AA
A button for
AA
BB
B button to move
BB
AA
A button.
AA
AM
(Forward)
BB
Press the
B button to move
BB
the hands counterclockwise
by one minute.
• Holding down the B button for
about two seconds moves the
hands counterclockwise at high
speed. High-speed movement of
the hands will continue until it
completes a 12-hour cycle, or
until you press any button to stop
it.
4. To return to the Timekeeping Mode, press the
times.
• This will cause the hands to move to the current time, and resume
normal movement.
AA
A button six
AA
(Back)
4
Page 5

Operation Guide 3707
Manual Time Adjustment 2
❚
To adjust the date
1. In the Timekeeping Mode,
hold down the
about five seconds until the
second hand stops at AM or
PM.
• Note that the hands of the watch
do not move in the manual
setting mode.
• If you do not perform any button
operation for about two or three
minutes, the watch will exit the
manual setting mode and normal
hand movement will resume.
2. Press the
times.
• The second hand will move to
12 o’clock.
3. Press of the
advance date by one.
• If the watch automatically skips
the end of the month date (30 or
31) you are trying to set, first
perform the steps below to
change the month setting and
then come back to adjust the
date setting.
4. Press the
• This will cause the second hand to move to the current month
setting.
5. Press the
AA
A button for
AA
AA
A button three
AA
BB
B button to
BB
AA
A button.
AA
BB
B button to advance the month by one.
BB
Dec
Nov
Oct
Jan
Feb
AM
(3 times)
(Forward)
MarSep
Date
You can perform the following procedures to adjust the time and date when
the watch is unable to receive a time calibration signal for some reason.
6. Press the
• This will cause the second hand to move to the ten’s digit of the
7. Press the
• You can set the year within the range of 2000 to 2099.
8. Press the
• This will cause the second hand to move to the one’s digit of the
9. Press the
10.
• This returns to the Timekeeping Mode.
• This will cause the hands to move to the current time, and resume
AA
A button.
AA
year setting.
BB
B button to increase the ten’s digit setting by
BB
one.
00
10
80
70
AA
A button.
AA
year setting.
BB
B button to increase the one’s digit setting by
BB
one.
8
7
AA
Press the
A button.
AA
normal movement.
50
60
0
6
1
5
20
3090
(Forward)
40
2
39
(Forward)
4
Aug
(Forward)
Apr
Jul
Jun
May
• The watch automatically makes adjustments for leap years and month
lengths. The date will change automatically when the current time
reaches midnight. The date change at the end of the month may take
more time than normal.
5
 Loading...