

Page 1
MO1611-EA
© 2016 CASIO COMPUTER CO., LTD.
Operation Guide 3448
ENGLISH
Congratulations upon your selection of this CASIO watch.
• Keep the watch away from audio speakers, magnetic necklaces, cell phones,
and other devices that generate strong magnetism. Exposure to strong
magnetism can magnetize the watch and cause incorrect direction readings. If
incorrect readings continue even after you perform bidirectional calibration, it
could mean that your watch has been magnetized. If this happens, contact
your original retailer or an authorized CASIO Service Center.
E-2
Things to check before using the watch
1. Check the Home City and the daylight saving time (DST) setting.
Use the procedure under “To configure Home City settings” (page E-16) to configure your
Home City and daylight saving time settings.
Important!
Proper Hijri calendar, Prayer Time Mode, and Moon Age data depend on correct
Home City, time, and date settings in the Timekeeping Mode. Make sure you
configure these settings correctly.
2. Configure latitude and longitude settings for your current location.
See “Configuring Latitude and Longitude Settings for Your Current Location” (page E-19)
3. Set the current time.
See “Configuring Current Time and Date Settings” (page E-22).
The watch is now ready for use.
E-4
.
•
The measurement functions built into this watch are not intended for taking
measurements that require professional or industrial precision. Values produced
by this watch should be considered as reasonable representations only.
• Note that CASIO COMPUTER CO., LTD. assumes no responsibility for any
damage or loss suffered by you or any third party arising through the use of
your watch or its malfunction.
Warning !
About This Manual
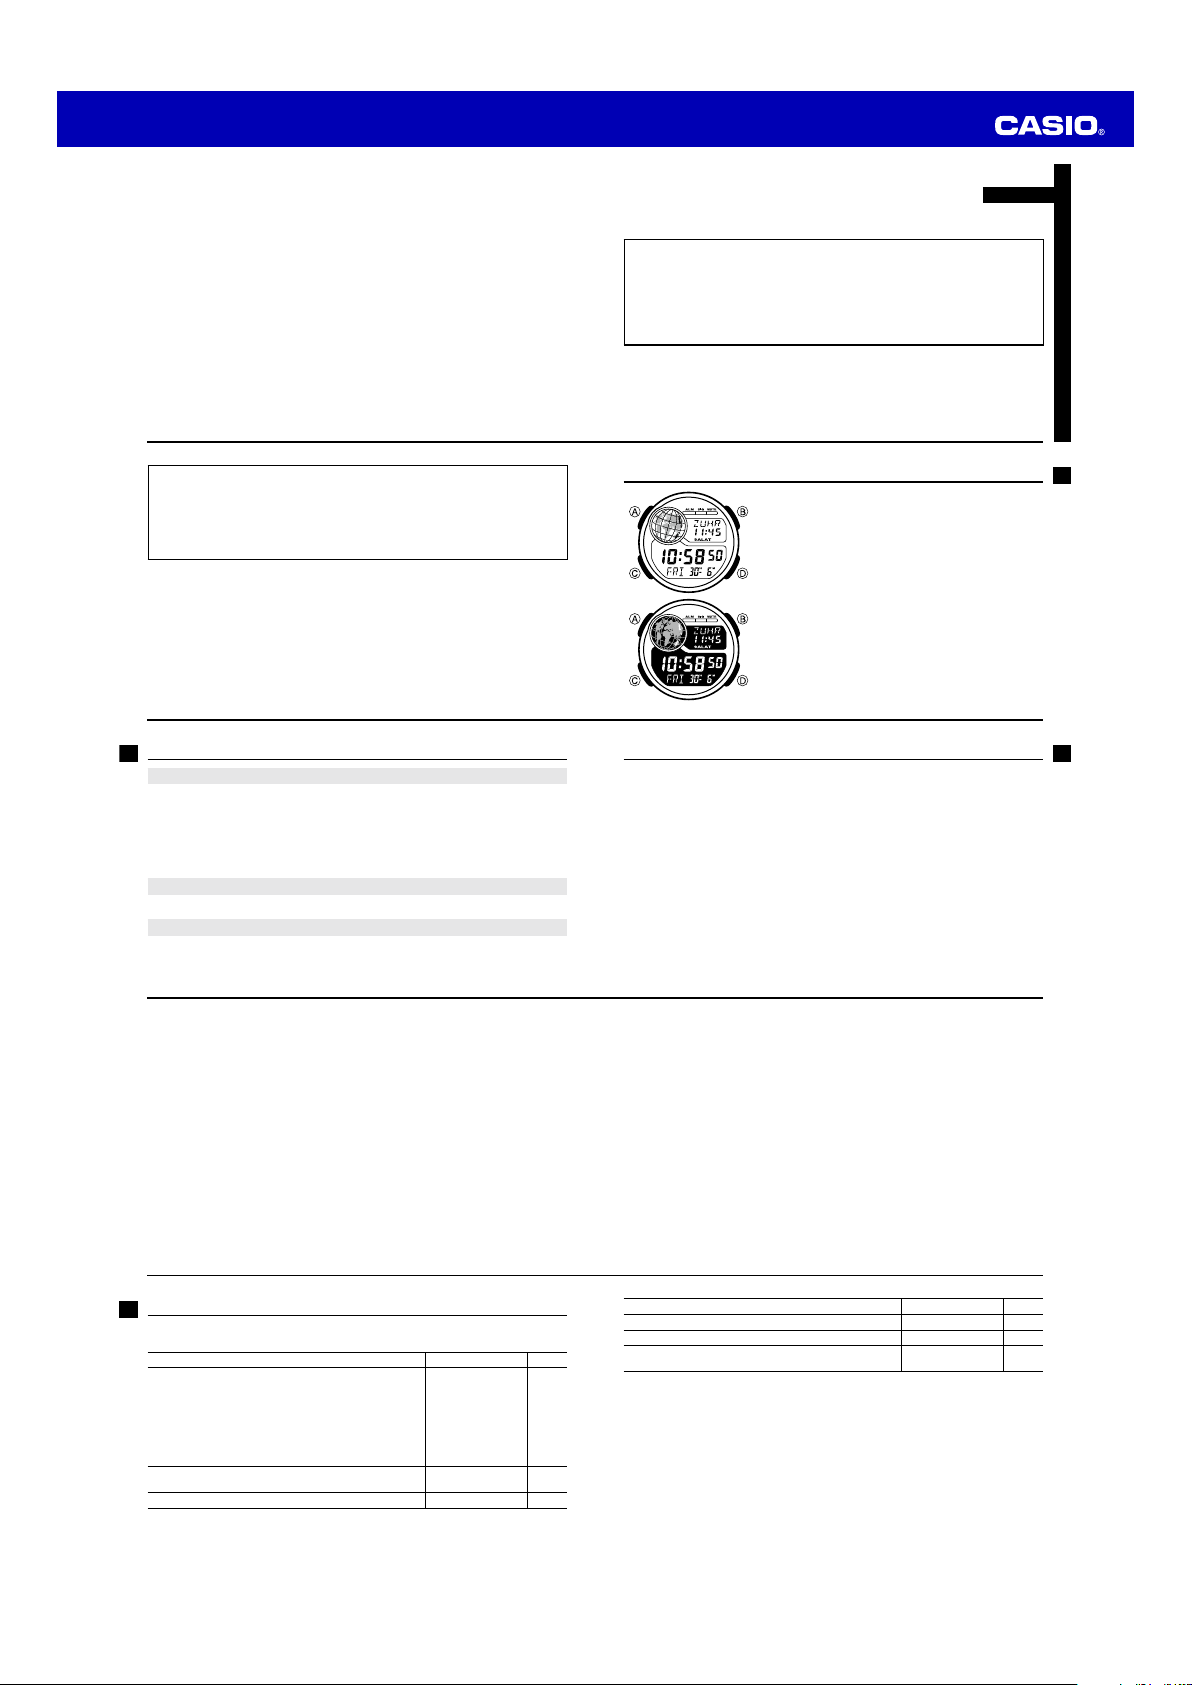
• Depending on the model of your watch, display text
appears either as dark figures on a light background, or
light figures on a dark background. All sample displays
in this manual are shown using dark figures on a light
background.
• Button operations are indicated using the letters shown
in the illustration.
• Note that the product illustrations in this manual are
intended for reference only, and so the actual product
may appear somewhat different than depicted by an
illustration.
Contents
About This Manual …………………………………………………………………… E-3
Things to check before using the watch ………………………………………… E-4
Mode Reference Guide ……………………………………………………………… E-8
Timekeeping ……………………………………………………………………………E-14
Configuring Home City Settings …………………………………………………… E-16
To configure Home City settings ………………………………………………E-16
To change the Daylight Saving Time (summer time) setting ………………E-18
Configuring Latitude and Longitude Settings for Your Current Location …E-19
Configuring Current Time and Date Settings ……………………………………E-22
To change the current time and date settings ………………………………E-22
To specify a Hijri date offset ……………………………………………………E-27
E-1
E-3
E-5
Viewing Prayer Names and Prayer Times …………………………………………E-29
To display today’s prayer times ………………………………………………E-31
To enable or disable a prayer alarm …………………………………………E-32
To stop a sounding prayer alarm………………………………………………E-33
To switch a prayer alarm between audible and silent ………………………E-34
To select a prayer time calculation method (FAJR, ISHA) …………………E-39
World Time ………………………………………………………………………………E-45
To view the time for another city code ………………………………………E-45
To toggle a city code time between Standard Time
and Daylight Saving Time …………………………………………………E-46
Using the Alarm ………………………………………………………………………E-47
To set an alarm time ……………………………………………………………E-48
To test the alarm ………………………………………………………………E-49
To enable or disable a timekeeping alarm ……………………………………E-50
To enable or disable the Hourly Time Signal ………………………………E-51
E-6
Mode Reference Guide
Your watch has six “modes”. The mode you should select depends on what you want
to do.
To do this: Enter this mode: See:
• View the current time and date in the Home City
• Configure Home City and daylight saving time (DST)
settings
• Configure current location latitude and longitude settings
• Configure time and date settings
• Specify the Hijri calendar offset
• Configure prayer alarm settings
• Configure prayer alarm calculation settings
View today’s prayer name and prayer times
View the current time in one of 70 cities (31 time zones) World Time Mode E-45
E-8
Timekeeping Mode
Today’s Salat Time
Screen
E-14
E-29
Using the Stopwatch …………………………………………………………………E-52
To measure times with the stopwatch ………………………………………E-53
Using the Countdown Timer …………………………………………………………E-54
To configure the countdown timer ……………………………………………E-55
To use the countdown timer ……………………………………………………E-56
Illumination ……………………………………………………………………………E-57
To illuminate the display ……………………………………………………… E-57
Button Operation Tone ………………………………………………………………E-58
To enable or disable the button operation tone ……………………………E-58
Reference ………………………………………………………………………………E-59
To disable Auto Display ………………………………………………………E-59
To enable Auto Display …………………………………………………………E-59
Specifications …………………………………………………………………………E-60
To do this: Enter this mode: See:
Set an alarm time Alarm Mode E-47
Use the stopwatch to measure elapsed time Stopwatch Mode E-52
Use the countdown timer
Countdown Timer
Mode
E-54
E-7
E-9
Page 2
Operation Guide 3448
l
l
l
l
l
l
l
l
l
l
l
l
l
l
l
l
l
l
l
l
l
l
l
l
l
l
l
l
l
l
l
l
l
l
l
l
l
l
l
l
l
l
l
l
l
l
l
l
l
l
l
l
l
l
l
l
l
l
l
l
l
l
l
l
l
l
l
l
l
l
l
l
l
l
l
l
l
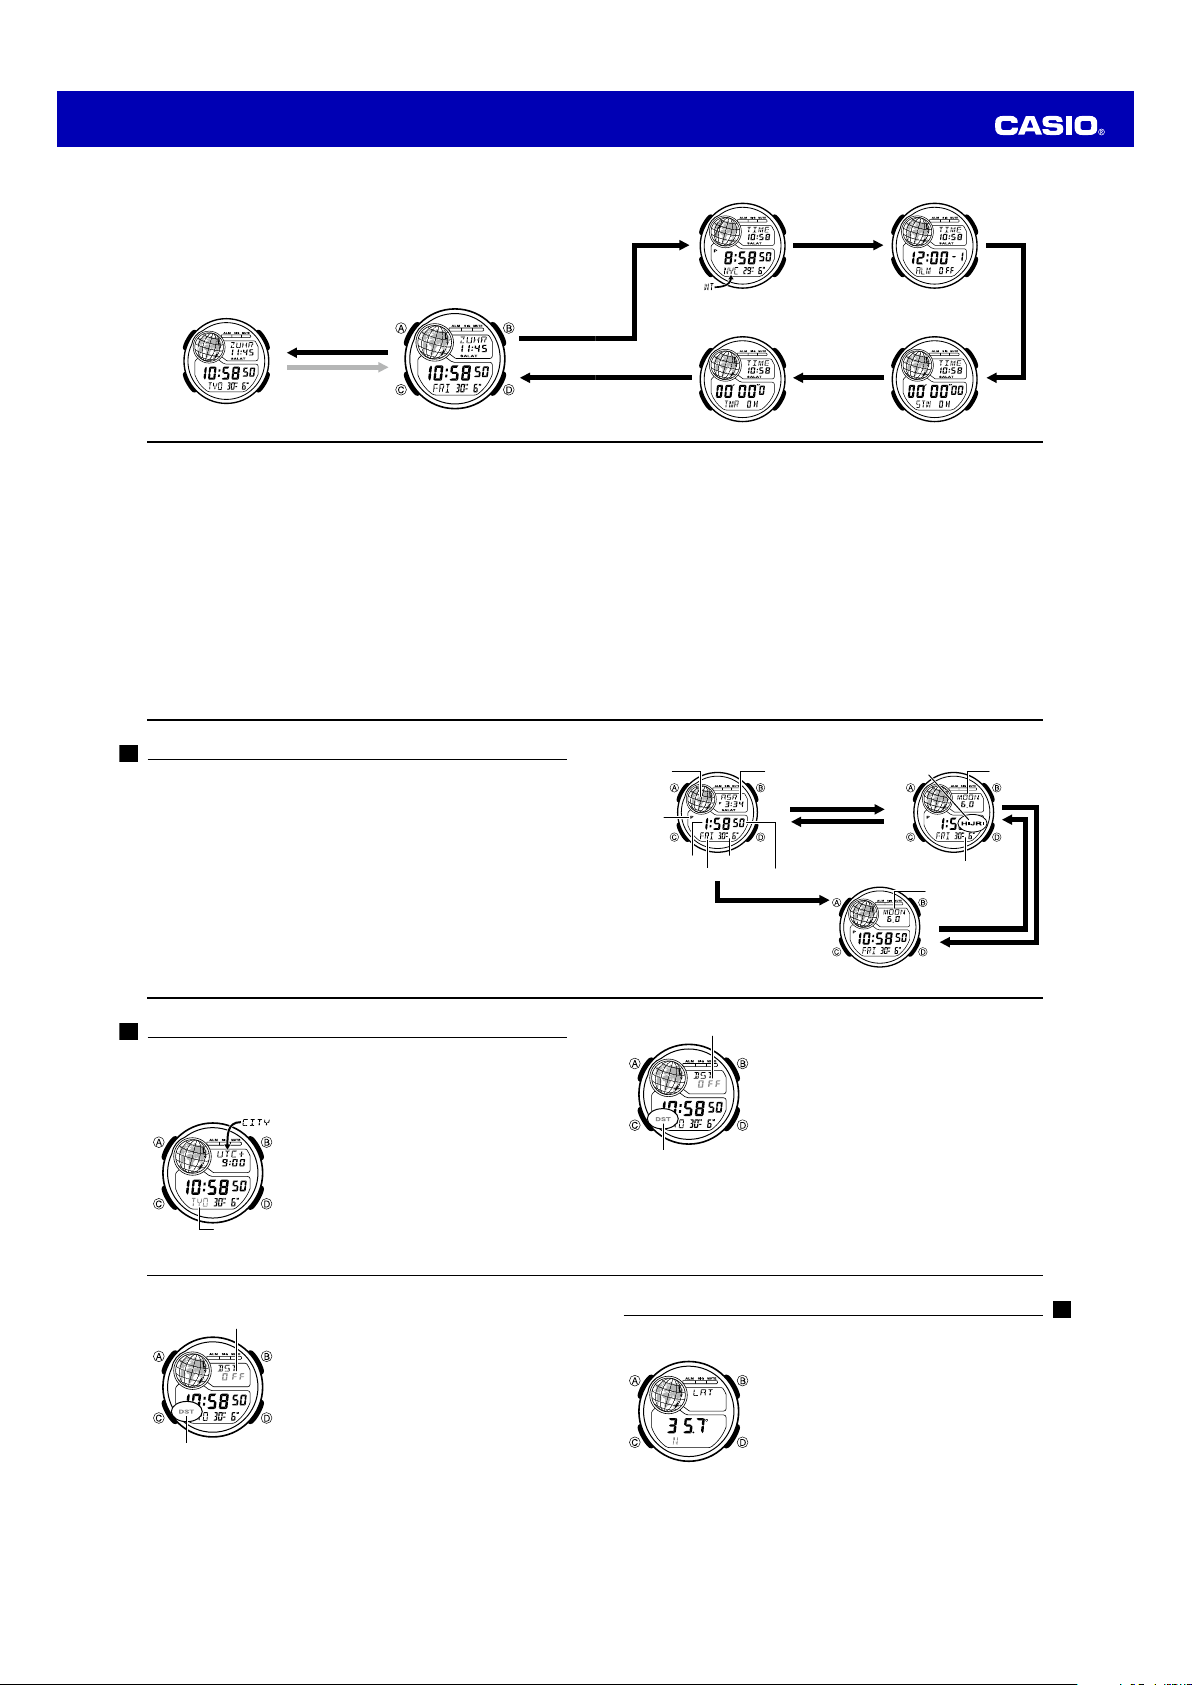
Selecting a Mode
• The illustration below shows which buttons you need to press to navigate between
modes.
• To return to the Timekeeping Mode from any other mode, hold down C for about
two seconds.
• In any mode (except when a setting screen is on the display), press B to illuminate
the display.
Today’s Salat
Time Screen
D
3 or 4 seconds
E-10
General Functions
This section explains general functions and operations.
Auto Return Features
• If you leave the watch in the mode below for two or three minutes without
performing any operation, it automatically changes to the Timekeeping Mode.
– Alarm Mode
• If you leave a screen with flashing digits on the display for two or three minutes
without performing any operation, the watch exits the setting screen automatically.
Initial Screens
When you enter the modes below, the data you were viewing when you last exited the
mode appears first.
– World Time Mode
– Alarm Mode
E-12
Timekeeping Mode
C
C
Timekeeping
Use the Timekeeping Mode to set and view the current time and date.
• To check the Hijri calendar and Moon age at noon of the current date, press A. If
you do not perform any operation for three or four seconds, the watch will return to
the Gregorian calendar automatically.
HIJRI
• The
indicator on the display indicates that the Hijri calendar date is
displayed.
• If you press D while the elapsed prayer time of the current day’s final prayer (page
E-35) is displayed or if 30 minutes pass after the current day's final prayer, the Moon
age will appear on the display and remain displayed until midnight.
• Map: In the Timekeeping and World Time modes, the map shows the zone where
the currently displayed digital time is from. In the Alarm, Stopwatch, and Countdown
Timer modes, it shows the zone of the currently selected Home City Time.
E-14
World Time Mode
C
Countdown Timer Mode
C
Scrolling
The B and D buttons are used on the setting screen to scroll through data on the
display. In most cases, holding down these buttons during a scroll operation scrolls
through the data at high speed.
Timekeeping screen
(Gregorian)
Map Prayer time
P (p.m.)
indicator
Hour : Minutes
Appears 30 minutes after the current
day's final prayer, or if D is pressed
while the elapsed prayer time (page E-35) of
the current day’s final prayer is displayed.
Day Month
Day of week
Seconds
A
3 or 4 seconds
Timekeeping screen
(Gregorian/Moon age)
Alarm Mode
Stopwatch Mode
Timekeeping screen
HIJRI indicator
(Hijri/Moon age)
Day Month
Moon age
A
3 or 4 seconds
Moon age
C
E-11
E-13
E-15
Configuring Home City Settings
There are two methods you can use to configure Home City settings: selecting a
Home City and then selecting standard time or daylight saving time (DST), or selecting
T1 to T3
and then specifying a UTC* offset.
* Coordinated Universal Time (UTC) is the global time standard used to regulate time.
To configure Home City settings
City Code
E-16
To change the Daylight Saving Time (summer time) setting
Setting
DST indicator
E-18
1. In the Timekeeping Mode, hold down A for about two
seconds. Release the button as soon as the flashing
Hold SET
indicator disappears from the display and the
currently selected city code flashes on the display. This
indicates the Home City setting mode.
• Holding down A too long will display the prayer
alarm enable/disable setting screen (page E-32).
• For details about city codes, see the
“City Data Table” at the back of this manual.
1. In the Timekeeping Mode, hold down A for about two
seconds. Release the button as soon as the flashing
Hold SET
indicator disappears from the display and the
currently selected city code flashes on the display. This
indicates the Home City setting mode.
• Holding down A too long will display the prayer
alarm enable/disable setting screen (page E-32).
2. Press C to display the DST setting screen.
3. Press D to toggle between Daylight Saving Time
DST ON
(
) and Standard Time (
4. When the setting is the way you want, press A twice to
return to the Timekeeping Mode.
DST
• The
indicator appears, indicating that Daylight
Saving Time is in effect.
DST OFF
).
Setting
DST indicator
5. When the setting is the way you want, press A twice to return to the Timekeeping
Mode.
• The DST indicator appears, indicating that Daylight Saving Time is in effect.
Note
• After you specify a city code, the watch will use UTC offsets to calculate the
current time for other time zones based on the current time in your Home City.
Configuring Latitude and Longitude Settings for Your Current Location
You can ensure correct display of prayer times, and moon ages by configuring latitude
and longitude settings for your current location.
2. Press D (East) and B (West) to scroll through city
names until the one you want to use as your Home City
code is displayed.
• When setting a location that does not have a city
code assigned, you can select a city code from T1 to
T3
(page L-1). When T1 through T3 is selected,
press C and then use D and B to select the time
offset.
3. Press C to display the DST setting screen.
4. Press D to toggle between Daylight Saving Time
DST ON
(
) and Standard Time (
1. In the Timekeeping Mode, hold down A for about two
seconds. Release the button as soon as the flashing
Hold SET
indicator disappears from the display and the
currently selected city code flashes on the display. This
indicates the Home City setting mode.
• Holding down A too long will display the prayer
alarm enable/disable setting screen (page E-32).
2. Press A.
• This displays the latitude and longitude setting
screen.
• In the following steps, each press of C cycles
between settings as shown below.
DST OFF
).
E-17
E-19
Page 3

Operation Guide 3448
l
l
l
l
l
l
l
l
l
l
l
l
l
l
l
l
l
l
l
l
l
l
l
l
l
l
Latitude (N or S) Latitude (°)
Longitude (E or W)Longitude (°)
3. Press D to toggle latitude between N and S.
4. Press C.
5. Use D (–) and B (+) to change the flashing latitude value in 0.1° increments.
D
0.1° 61.9° 62.0°0°
B
6. Press C.
7. Press D to toggle longitude between E and W.
E-20
D
D
B
B
Configuring Current Time and Date Settings
You can use the procedure below to adjust the current time and date settings if they
are not correct.
This watch displays Hijri calendar months and days. The watch normally calculates
and displays Hijri calendar dates automatically. If necessary, you can correct the
displayed data by ±3 days.
To change the current time and date settings
E-22
E-24
City Code
Screen To do this: Do this:
1. In the Timekeeping Mode, hold down A for about two
seconds. Release the button as soon as the flashing
Hold SET
indicator disappears from the display and the
currently selected city code flashes on the display. This
indicates the Home City setting mode.
• Holding down A too long will display the prayer
alarm enable/disable setting screen (page E-32).
• Select your Home City code before changing any
other setting.
Toggle between Daylight Saving Time
DST ON
(
) and Standard Time
DST OFF
(
).
Toggle between 12-hour (
24H
24-hour (
Reset the seconds to
Change the hour or minute Use D (+) and B (–).
Change the year Use D (+) and B (–).
Change the day or month Use D (+) and B (–).
Toggle the setting between Day/Month
DD-M
(
) and Month/Day (
) timekeeping.
00
12H
M-DD
) and
)
Press D.
Press D.
Press D.
Press D.
8. Press C.
9. Use D (–) and B (+) to change the flashing longitude value in 0.1° increments.
D
D
0.1° 179.9°0°
B
10. When the settings are the way you want, press A to return to the Timekeeping
Mode.
• Pressing D and B at the same time during steps 3 through 9 will return the
latitude and longitude to their initial default settings. For information about initial
default settings, see the “City Data Table” at the back of this manual.
• For full information on city code, see the “City Data Table” at the back of this
manual.
2. Press C to move the flashing in the sequence shown below to select the other
settings.
City Code DST
Illumination Duration
Setting
3. When the setting you want to change is flashing, use D and B to change it as
described below.
Screen To do this: Do this:
Screen To do this: Do this:
• For information about selecting a Home City and configuring the DST setting, see
“Configuring Home City Settings” (page E-16).
4. Press A twice to exit the setting screen.
• The day of the week is displayed automatically in accordance with the date
(year, month, and day) settings.
Note
Changing your Home City setting will cause all of the following settings to become
initialized: latitude and longitude (to the location of the Home City), the prayer
calculation method (Fajr, Isha, Asr). Note that these settings are not initialized when
T1
to T3 is selected for the Home City setting.
D
180°
B
B
12/24-Hour
Format
Button Operation
Tone
Change the city code
Toggle the setting between enabled
BEEP
(
) and disabled (
Toggle the setting between 1.5 seconds
(1) and 3 seconds (3)
Second Hour Year
MUTE
)
Minute
Month
DayDate Format
Use D (east) and B
(west).
Press D.
Press D.
E-21
E-23
E-25
12/24-Hour Format
• With the 12-hour format, the P indicator appears to the left of the hour digits for
times in the range of noon to 11:59 p.m. and no indicator appears to the left of the
hour digits for times in the range of midnight to 11:59 a.m.
• With the 24-hour format, times are displayed in the range of 0:00 to 23:59, without
any indicator.
• The 12-hour/24-hour timekeeping format you select in the Timekeeping Mode is
applied in all other modes.
E-26
• Note that the Hijri offset also returns to 0 whenever you change the watch’s
Gregorian date setting or the latitude and/or longitude settings.
• Changing the watch’s Gregorian date setting can cause an error in the displayed
Hijri date until the watch performs automatic Hijri date correction at the end of the
month (on the 29th or 30th day of the month). If the Hijri date display is wrong,
adjust it by changing the Hijri date offset.
Hijri Calendar Precautions
Hijri dates displayed by this watch are the results of calculations. Actual Hijri dates
may be determined by religious authorities based on observations of a New Moon
following sundown. This can result in dates calculated by the watch being different
from actual Hijri dates.
E-28
To specify a Hijri date offset
HIJRI indicator
Note
• The Hijri offset setting is temporary. At the end of each month, the watch
automatically corrects the Hijri date and returns the Hijri offset to 0.
1. In the Timekeeping Mode, hold down A for about five
seconds until the ON or
as soon as the flashing starts.
• This displays the prayer alarm enable/disable setting
screen.
2. Press A.
• This displays Hijri calendar date offset setting
screen.
3. Use D (+) and B
range of ±3 days.
4. When the setting is the way you want, press A.
• This will display the corrected Hijri date.
OFF
starts to flash. Release A
(–)
to change the offset within a
E-27
Viewing Prayer Names and Prayer Times
This watch is designed to display prayer name and prayer start times. The Today’s
Salat Time Screen shows prayer times and elapsed prayer time. A Prayer Time Alarm
(which can be enabled or disabled) sounds for 10 seconds when each prayer time
arrives. Press any button to stop the alarm after it starts to sound.
About prayer times
Prayer times are calculated automatically in accordance with the time, date, city code,
and prayer time calculation method you set in the Timekeeping Mode. This, of course,
means that you should always make sure that your Timekeeping Mode settings are
configured correctly.
Prayer Indicator Prayer Time
FAJR
SHRK
(SHOROOK) Sunrise time (FAJR prayer end limit)
ZUHR
Fajr start time
Zuhr start time
E-29
Page 4

Operation Guide 3448
l
l
l
l
l
l
l
l
l
l
l
l
l
l
l
l
l
l
l
l
l
l
l
l
l
l
l
l
l
l
l
l
l
l
l
l
l
l
l
l
l
Prayer Indicator Prayer Time
ASR
MGRB
(MAGHRIB) Maghrib start time
ISHA
E-30
• If the time of the next prayer arrives while you are viewing today’s prayer times,
the watch will perform a prayer alarm alert operation (page E-32) and return to the
Timekeeping screen (Gregorian).
To enable or disable a prayer alarm
E-32
To switch a prayer alarm between audible and silent
• The prayer alarm enabled/disabled setting is not changed.
• Button operation tones will sound, even if silent is selected for the prayer alarm. To
disable button operation tones, see “To enable or disable the button operation
tone” (page E-58).
Asr start time
Isha start time
1. In the Timekeeping Mode, hold down A for about five
seconds until the ON or
as soon as the flashing starts.
• This displays the prayer alarm enabled/disabled
setting screen.
• This indicator shows the current alarm enabled/
disabled setting.
2. Press C as many times as necessary to display the
name of the prayer whose prayer alarm setting enable/
disable you want to change.
• If the prayer alarm of the displayed prayer is
SALAT
enabled,
name. No indicator is shown if the displayed alarm is
disabled.
In the Timekeeping Mode, hold down D for about two
seconds.
• This toggles prayer alarms between audible and silent
). If silent is set for the prayer alarm, will be
(
displayed next to
Nothing is displayed next to
name if audible is set for the prayer alarm.
• All prayer alarms are silent while silent is set for the
prayer alarm. In this case the prayer name and time will
flash on the display when a prayer time is reached.
OFF
starts to flash. Release A
will be displayed below its prayer
SALAT
below the prayer name.
SALAT
below the prayer
To display today’s prayer times
Prayer name
Prayer time
Prayer time
alarm enabled
indicator
• SALAT will not appear if the Hijri/Moon age Timekeeping screen or the
Gregorian/Moon age Timekeeping screen (page E-15) is displayed.
3. Press D to toggle the display alarm between enabled and disabled.
4. After the setting is the way you want, press A twice to return to the Timekeeping
Mode.
To stop a sounding prayer alarm
Press any button.
Displaying Elapsed Prayer Time
Elapsed prayer time
1. In the Timekeeping Mode, press D.
• This displays the Today’s Salat Time Screen.
2. Press D to display the next prayer name and prayer
start time.
SHRK
FAJR
ISHA
• If three to four seconds elapse without any operation
being performed, the watch will return to the
Timekeeping screen (Gregorian) (page E-15).
• Pressing A returns to the Timekeeping screen (Hijri/
Moon age) (page E-15).
The Timekeeping screen (Gregorian) shows elapsed time
up to 30 minutes following a prayer time, only for prayers
whose prayer alarm time is enabled.
• If 30 minutes elapse, the watch will automatically
display the next prayer name and prayer start time. 30
minutes after the current day's final prayer, the
Timekeeping screen (Gregorian/Moon age) will appear
and remain displayed until midnight.
(SHOROOK)
MGRB
(MAGHRIB)
ZUHR
ASR
E-31
E-33
E-34
• While the prayer elapsed time is displayed, you can press D to display the next
prayer name and prayer start time. While the current day's final prayer time is
displayed, you can press D to display the Gregorian/Moon age Timekeeping
screen (page E-15), which will remain displayed until midnight.
• Pressing A will display the Hijri/Moon age Timekeeping screen (page E-15) for about
three or four seconds. After that, the elapsed prayer time will re-appear.
E-36
Method Organization Method
University Of Islamic
Sciences, Karachi
Egyptian General
Authority of Survey
CUSTOM
E-38
(Abbreviation)
KHI
EGY
- - -
Angle of the sun
under the Horizon
(Fajr)
18.0° 18.0°
19.5° 17.5°
10-20.0°, 90
minutes before
sunrise
Angle of the sun under
the Horizon (Isha)
10-20.0°,90 minutes after
Maghrib, 120 minutes
(during Ramadan only)
About prayer time calculation methods
Methods that are used to determine prayer times (especially Fajr, Asr, and Isha) differ
somewhat between countries and regions. This watch comes with a total of five
built-in prayer time calculation methods that conform with various geographical areas
around the world. In addition, you can also set your own calculation method for
calculation of Fajr, Asr, and Isha.
Prayer Time Calculation Methods
Method Organization Method
Umm al-Qura University,
Makkah
Muslim World League
Islamic Society of North
America (ISNA)
To select a prayer time calculation method (FAJR, ISHA)
Important!
See “Prayer Time Calculation Methods” (page E-37) before configuring the setting below.
Prayer time
calculation method
(Abbreviation)
UQM
MWL
INA
1. In the Timekeeping Mode, hold down A for about five
2. Press A.
3. Press C.
Angle of the sun
under the Horizon
(Fajr)
18.5° 90 minutes after
18.0° 17.0°
15.0° 15.0°
seconds until the ON or
as soon as the flashing starts.
• This displays the prayer alarm enable/disable setting
screen.
• This displays Hijri calendar date offset setting
screen.
• This displays the prayer time calculation method
setting screen.
• The screen will show the currently selected prayer
time calculation method.
• Each press of C will cycle between settings as
shown below.
OFF
starts to flash. Release A
Angle of the sun under
the Horizon (Isha)
Maghrib/120 minutes
(during Ramadan only)
E-35
E-37
E-39
Page 5

Operation Guide 3448
Prayer Time Calculation Methods
(Page E-40, step 4)
- - -
[
(CUSTOM)]
4. Use the D and B buttons to select a prayer time calculation method as shown
below.
UQM
E-40
7. When the FAJR setting is the way you want, press C.
• This will display the [ISHA] setting screen. This setting can be configured only if
you select [- - - (CUSTOM)] for the prayer time calculation method, above. If you
select any method other than [- - - (CUSTOM)], a default ISHA setting is applied.
8. Use the D and B buttons to scroll through the ISHA settings on the display as
shown below.
10.0° 20.0° 1:30 1:30 2:00
- - -
DDD
BBB
- - -
[
(CUSTOM)] not selected.
FAJR Setting
(Page E-41, step 6)
DD
MWL
B
B
(CUSTOM)
EGY
DD
B
B
B
ASR Setting
(Page E-43, step 10)
ISHA Setting
(Page E-42, step 8)
INA
DB
BD
KHI
Hijri date offset
(Page E-27)
D
• Scrolling from 10.0° to 20.0° is in units of 0.5°.
1:30:
90 minutes after Maghrib
1:30 2:00:
9. When the ISHA setting is the way you want, press C.
• This will display the [ASR] setting screen.
E-42
Prayer Time Precautions
• When you move from one region to another, be sure that you correctly configure
Timekeeping Mode settings (city code, prayer time calculation method, and current
time) for the region you are moving into. Remember that if you fail to configure
these settings correctly, prayer times cannot be calculated and displayed properly.
E-44
90 minutes after Maghrib/120 minutes (during Ramadan only)
5. After selecting the prayer time calculation method you want, press C.
• Selecting a method other than [- - - (CUSTOM)] will display the [ASR] setting
screen. Go to step 10.
• Selecting [- - - (CUSTOM)] displays the [FAJR] setting screen. This setting can
be configured only if you select [- - - (CUSTOM)] for the prayer time calculation
method, above. If you select any method other than [- - - (CUSTOM)], a default
FAJR setting is applied.
6. Use the D and B buttons to scroll through the FAJR settings on the display as
shown below.
10.0° 20.0° –1:30
DD
BB
B
D
• Scrolling from 10.0° to 20.0° is in units of 0.5°.
–1:30:
90 minutes before sunrise
10. Use D and B to select
setting.
ASR1(STANDARD):
ASR2(HANAFI):
11. After the settings are the way you want, press A.
• This returns to the Timekeeping Mode.
• If you next want to set the date offset for the Hijri calendar, press C (page E-27).
• Pressing D and B at the same time while the setting screen is displayed will
return the prayer time calculation method to its initial default settings, except for the
Hijri date offset. After that, you can configure settings from step 4 of this procedure.
For information about initial default settings, see the “City Data Table” at the back of
this manual.
ASR1
(STANDARD) or
Sun position when the length of the shadow of an object is
equal to the length of its shadow at noon plus the length of
the object
Sun position when the length of the shadow of an object is
equal to the length of its shadow at noon plus twice the
length of the object
ASR2
(HANAFI) for the [ASR]
World Time
World Time
City Map
World Time
City code
Home City
time
Current World
Time City time
World Time shows the current time in 70 cities (31 time
zones) around the world. You can also configure three
additional cities (
• All of the operations in this section are performed in the
World Time Mode, which you enter by pressing C
(page E-11).
To view the time for another city code
In the World Time Mode, press D to scroll eastwardly
through city codes.
• For full information about city codes, see the
“City Data Table” at the back of this manual.
• If the current time for a city is wrong, check your
Timekeeping Mode time and time zone settings and
make the necessary changes.
T-1, T-2, T-3
), if you want.
E-41
E-43
E-45
To toggle a city code time between Standard Time and Daylight Saving Time
DST indicator
E-46
To set an alarm time
2. Hold down A until the flashing
the alarm time hour digits start to flash, which indicates the setting screen. Release
A
after the digits start to flash.
• This operation enables the One-time Alarm automatically.
• If you want to use the Daily Alarm, refer to “To enable or disable a timekeeping
alarm” (page E-50) after performing step 5.
1. In the World Time Mode, use D (east) to display the
city code (time zone) whose Standard Time/Daylight
Saving Time setting you want to change.
2. Hold down A for about two seconds to toggle Daylight
Saving Time (
not displayed).
• The
• Note that the DST/Standard Time setting affects only
1. In the Alarm Mode, use D to scroll through the alarm
screens until the alarm number you want to set is
displayed.
DST
displayed) and Standard Time (
DST
indicator is on the display whenever you
display a city code for which Daylight Saving Time is
in effect.
the currently displayed city code. Other city codes
are not affected.
DD
−1 −2 −3
DD
Hold SET
indicator disappears from the display and
−5 −4SIG
DD
3. Press C to move the flashing between the hour and minute settings.
E-48
DST
Using the Alarm
Current time
Alarm enabled
indicator
Alarm time
(Hour : Minutes)
or SIG
Alarm number
• The selected digits are those that are flashing.
4. While a setting is flashing, use D (+) and B (–) to change it.
• When setting the alarm time using the 12-hour format, take care to set the time
correctly as a.m. (no indicator) or p.m. (P indicator).
5. Press A to exit the setting screen.
Alarm Operation
The alarm tone sounds at the preset time for 10 seconds, regardless of the mode the
watch is in.
• Alarm and Hourly Time Signal operations are performed in accordance with the
Timekeeping Mode time.
• To stop the alarm tone after it starts to sound, press any button.
To test the alarm
In the Alarm Mode, hold down D to sound the alarm.
Your watch has a total of five alarms, each of which you
can configure as a daily alarm or one-time alarm.
• Daily Alarm: Sounds at the preset time each day.
• One-time Alarm: Sounds once at the preset time and
then is disabled automatically.
You can also enable an Hourly Time Signal that causes
the watch to beep every hour on the hour.
• All of the operations in this section are performed in the
Alarm Mode, which you enter by pressing C (page E-11).
• Alarms operate in coordination with the current Home
City Time.
E-47
E-49
Page 6
Operation Guide 3448
l
l
l
l
l
l
l
l
l
l
l
l
l
l
l
l
l
l
l
l
l
l
l
l
l
l
l
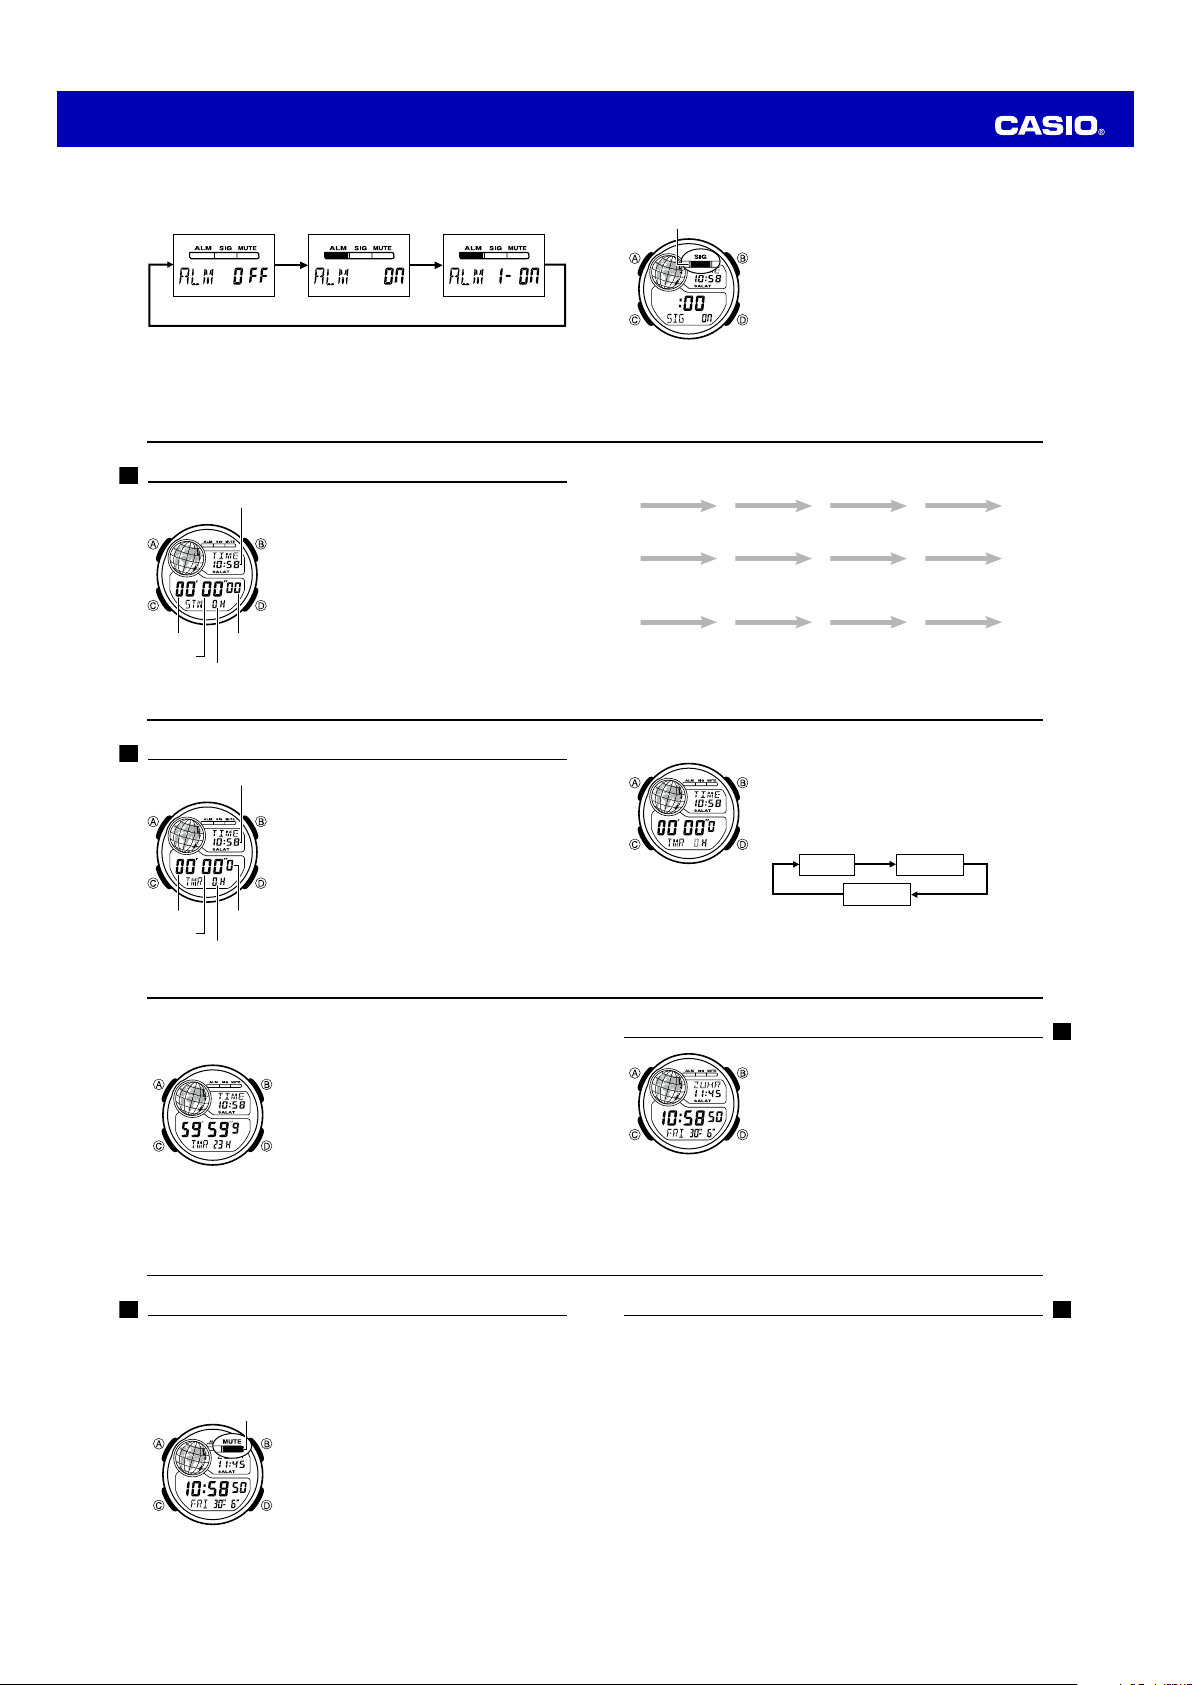
To enable or disable a timekeeping alarm
1. In the Alarm Mode, use D to select the alarm whose setting you want to change.
2. Press A to cycle through the alarm settings as shown below.
AA
Alarm Disabled Daily Alarm Enabled One-Time Alarm Enabled
• In all modes, the alarm enabled indicator is shown for the alarm that is currently
enabled.
• The alarm enabled indicator flashes while the alarm is sounding.
E-50
Using the Stopwatch
The stopwatch lets you measure elapsed time, split times,
and two finishes.
• The display range of the stopwatch is 23 hours, 59
minutes, 59.99 seconds.
• The stopwatch continues to run, restarting from zero
after it reaches its limit, until you stop it.
• The stopwatch measurement operation continues even
if you exit the Stopwatch Mode.
• Exiting the Stopwatch Mode while a split time is frozen
on the display clears the split time and returns to
elapsed time measurement.
• All of the operations in this section are performed in the
Stopwatch Mode, which you enter by pressing C
(page E-11).
Minutes
Seconds
E-52
Current time
1/100
second
Hours
Using the Countdown Timer
The countdown timer can be set within a range of one
second to 24 hours. An alarm sounds when the
countdown reaches zero.
• All of the operations in this section are performed in the
Countdown Timer Mode, which you enter by pressing
C
(page E-11).
1/10
second
Minutes
Seconds
E-54
Current time
Hours
To enable or disable the Hourly Time Signal
Hourly time signal
enabled indicator
A
To measure times with the stopwatch
Elapsed Time
D
Start Stop Resume Stop Clear
Split Time
D
Start Split
Two Finishes
D
Start Split
To configure the countdown timer
3. When the setting you want to change is flashing, use D (+) and B (–) to change
the flashing item.
• To specify a countdown start time of 24 hours, set 00'00"0H.
1. In the Alarm Mode, use D to select the Hourly Time
Signal.
2. Press A to toggle it between enabled and disabled.
• The Hourly Time Signal enabled indicator is shown on
the display in all modes while the Hourly Time Signal is
enabled.
D D D A
A A D A
SPL
(
displayed)
A D A A
First runner
finishes.
Display time of
first runner.
Split release Stop Clear
Stop
Second runner
finishes.
1. While the countdown start time is on the display in the
Countdown Timer Mode, hold down A until the flashing
Hold SET
indicator disappears, and the current
countdown start time starts to flash. This indicates the
setting screen.
2. Press C to move the flashing in the sequence shown
below to select other settings.
Hours Minutes
C
C
Seconds
Split release
Display time of
second runner.
C
E-51
Clear
E-53
E-55
4. Press A to exit the setting screen.
To use the countdown timer
E-56
Press D while in the Countdown Timer Mode to start the
countdown timer.
• When the end of the countdown is reached, the alarm
sounds for ten seconds or until you stop it by pressing
any button. The countdown time is reset to its starting
value automatically when the alarm sounds.
• Press D while a countdown operation is in progress to
pause it. Press D again to resume the countdown.
• To stop a countdown operation completely, first pause
it (by pressing D), and then press A. This returns the
countdown time to its starting value.
Button Operation Tone
The button operation tone sounds any time you press one of the watch’s buttons. You
can enable or disable the button operation tone as desired.
• Even if you disable the button operation tone, the alarm, Hourly Time Signal, and
Countdown Timer Mode alarm all operate normally.
• Prayer alarm will sound even if the button operation tone is disabled.
To enable or disable the button operation tone
Mute indicator
E-58
Perform the procedure under “Configuring Current Time
and Date Settings” (page E-22) to toggle the button operation
tone between enabled (the Mute indicator not displayed)
and disabled (the Mute indicator displayed).
• The Mute indicator is displayed in all modes when the
button operation tone is disabled.
Illumination
An LED (light-emitting diode) illuminates the display for
easy reading in the dark.
To illuminate the display
In any mode (except when a setting screen is on the
display), press B to illuminate the display.
• When you press B, the display will be illuminated for
about 1.5 seconds or 3 seconds, depending on the
current illumination duration setting.
• Perform the procedure under “Configuring Current Time
and Date Settings” (page E-22) to change the illumination
duration.
Illumination Precautions
• Illumination may be hard to see when viewed under direct sunlight.
• Illumination turns off automatically whenever an alarm sounds.
• Frequent use of illumination runs down the battery.
Reference
Auto Display
Auto Display sequentially shows the prayer name and prayer time while the watch is
in the Timekeeping Mode.
To disable Auto Display
Press any button to disable Auto Display. This returns to the Timekeeping Mode.
To enable Auto Display
In the Timekeeping Mode (page E-14), hold down D and B at the same time until the
watch beeps.
Note
• Auto Display cannot be performed while a setting screen is on the display.
• The prayer alarm (page E-34) is automatically muted while Auto Display is enabled.
E-57
E-59
Page 7

Operation Guide 3448
Specifications
Accuracy at normal temperature:
Timekeeping:
World Time:
Prayer Times:
E-60
Battery:
Hour, minutes, seconds, p.m. (P), month, day, day of the week, Hijri
month, Hijri day
Time format: 12-hour and 24-hour
Gregorian calendar system: Full Auto-calendar pre-programmed from the year
2000 to 2099
Hijri calendar: Based on the range of the Gregorian calendar; auto correction at
end of each month
Other: Daylight Saving Time (summer time)/Standard Time; screen switching
Gregorian or Hijri/Moon age; year/month/day display format
70 cities (31 time zones); plus addition of desired 3 cities
Other: Standard Time/Daylight Saving Time (summer time)
Gregorian 2000 through 2099; FAJR, SHRK, ZUHR, ASR, MGRB,
ISHA (six time displays per day); prayer alarm; prayer elapsed time
measurement (up to 30 minutes); prayer calculation method setting; display
of next prayer time
One lithium battery (Type: CR2032)
Approximately 7 years on type CR2032; Prayer Alarm: 5 times (10 seconds X 5)/
day, 10 seconds of alarm operation, 1.5 seconds of illumination per day
Specifications are subject to change without notice.
E-62
±30 seconds a month
Moon Age:
Display of Moon age values at noon for dates from Gregorian 2000 to
2099
Alarms:
5 daily alarms (daily or one-time), hourly time signal
Stopwatch:
Measuring unit: 1/100 second
Measuring capacity: 23:59' 59.99"
Measuring modes: Elapsed time, split time, two finishes
Countdown Timer:
Measuring unit: 1/10 second
Input range: 1 second to 24 hours (1-second increments, 1-minute increments
and 1-hour increments)
Illumination:
Other:
LED (Light-emitting diode); Selectable illumination duration
(approximately 1.5 seconds or 3 seconds)
Button operation tone enable/disable
E-61
City Data Table
UTC Offset/
GMT
Differential
0.0 CAS Casablanca 33.6 –7.6 MWL ASR1
0.0 RBA Rabat 34.0 –6.8 MWL ASR1
0.0 LON London 51.5 –0.1 MWL ASR1
1.0 PAR Paris 48.9 2.4 MWL ASR1
1.0 ALG Algiers 36.8 3.0 EGY ASR1
1.0 LOS Lagos 6.5 3.4 EGY ASR1
1.0 BNJ Bonn 50.7 7.1 MWL ASR1
1.0 ABV Abuja 9.1 7.5 EGY ASR1
1.0 FRA Frankfurt 50.1 8.7 MWL ASR1
L
UTC Offset/
GMT
Differential
2.0 DAM Damascus 33.5 36.3 UQM ASR1
3.0 MOW Moscow 55.8 37.6 MWL ASR1
3.0
3.0 JED Jeddah 21.5 39.2 UQM ASR1
3.0 MED Madinah 24.5 39.6 UQM ASR1
3.0 SAH Sanaa 15.4 44.2 UQM ASR1
3.0 BGW Baghdad 33.3 44.4 MWL ASR1
3.0 RUH Riyadh 24.7 46.7 UQM ASR1
3.0 KWI Kuwait 29.4 48.0 UQM ASR1
3.0 BAH Manama 26.2 50.6 UQM ASR1
L-2
UTC Offset/
GMT
Differential
5.5 HYD Hyderabad 17.4 78.5 KHI ASR1
5.5 CCU Kolkata 22.6 88.4 KHI ASR1
5.75 KTM Kathmandu 27.7 85.3 MWL ASR1
6.0 DAC Dhaka 23.8 90.4 KHI ASR1
6.5 RGN Yangon 16.9 96.2 MWL ASR1
7.0 BKK Bangkok 13.8 100.5 MWL ASR1
7.0 JKT Jakarta –6.2 106.8 MWL ASR1
7.0 SUB Surabaya –7.3 112.8 MWL ASR1
8.0 KUL
8.0 SIN Singapore 1.3 103.9 MWL ASR1
L-4
City
City Latitu de (˚)
Code
City
City Latitu de (˚)
Code
ADD Addis Ababa
City
City Latitu de (˚)
Code
Kuala lumpur
Longitude (˚)
North
East
Latitude +,
Longitude +,
South
West
Latitude –
Longitude –
Longitude (˚)
North
East
Latitude +,
Longitude +,
South
West
Latitude –
Longitude –
9.0 38.7 MWL ASR1
Longitude (˚)
North
East
Latitude +,
Longitude +,
South
West
Latitude –
Longitude –
3.1 101.7 MWL ASR1
FAJR/ISHA
Prayer
Calculation
Method
FAJR/ISHA
Prayer
Calculation
Method
FAJR/ISHA
Prayer
Calculation
Method
ASR Prayer
Calculation
Method
ASR Prayer
Calculation
Method
ASR Prayer
Calculation
Method
UTC Offset/
GMT
Differential
1.0 ROM Rome 41.9 12.5 MWL ASR1
1.0 BER Berlin 52.5 13.4 MWL ASR1
2.0 TIP Tripoli 32.9 13.2 EGY ASR1
2.0 CPT Cape Town –33.9 18.4 MWL ASR1
2.0 IST Istanbul 41.0 29.0 MWL ASR1
2.0 CAI Cairo 30.0 31.2 EGY ASR1
2.0 KRT Khartoum 15.5 32.6 EGY ASR1
2.0 ANK Ankara 39.9 32.9 MWL ASR1
2.0 BEY Beirut 33.9 35.5 MWL ASR1
2.0 AMM Amman 32.0 35.9 UQM ASR1
UTC Offset/
GMT
Differential
3.0 DOH Doha 25.3 51.5 UQM ASR1
3.5 THR Tehran 35.7 51.4 MWL ASR1
4.0 AUH Abu Dhabi 24.5 54.4 UQM ASR1
4.0 DXB Dubai 25.2 55.3 UQM ASR1
4.0 MCT Muscat 23.6 58.5 UQM ASR1
4.5 KBL Kabul 34.5 69.2 KHI ASR1
5.0 KHI Karachi 24.9 67.0 KHI ASR1
5.0 TAS Tashkent 41.3 69.2 MWL ASR1
5.5 BOM Mumbai 19.1 72.9 KHI ASR1
5.5 DEL Delhi 28.6 77.2 KHI ASR1
UTC Offset/
GMT
Differential
8.0 HKG Hong Kong 22.3 114.2 MWL ASR1
8.0 BJS Beijing 39.9 116.4 MWL ASR1
9.0 TYO Tokyo 35.7 139.7 MWL ASR1
9.5 ADL Adelaide –34.9 138.6 MWL ASR1
10.0 SYD Sydney –33.9 151.2 MWL ASR1
11.0 NOU Noumea –22.3 166.5 MWL ASR1
12.0 WLG Wellington –41.3 174.8 MWL ASR1
3.0 T-1 CUSTOM1
3.0 T-2 CUSTOM2
City
City Latitu de (˚)
Code
City
City Latitu de (˚)
Code
City
City Latitu de (˚)
Code
(Makkah)*
(Makkah)*
Longitude (˚)
North
East
Latitude +,
Longitude +,
South
West
Latitude –
Longitude –
Longitude (˚)
North
East
Latitude +,
Longitude +,
South
West
Latitude –
Longitude –
Longitude (˚)
North
East
Latitude +,
Longitude +,
South
West
Latitude –
Longitude –
21.4 39.8 UQM ASR1
21.4 39.8 UQM ASR1
FAJR/ISHA
Prayer
Calculation
Method
FAJR/ISHA
Prayer
Calculation
Method
FAJR/ISHA
Prayer
Calculation
Method
ASR Prayer
Calculation
Method
ASR Prayer
Calculation
Method
ASR Prayer
Calculation
Method
L-1
L-3
L-5
Page 8

Operation Guide 3448
UTC Offset/
GMT
Differential
3.0 T-3 CUSTOM3
–
–10.0 HNL Honolulu 21.3 –157.9 INA ASR1
–9.0 ANC Anchorage 61.2 –149.9 INA ASR1
–8.0 LAX Los Angeles 34.1 –118.2 INA ASR1
–7.0 DEN Denver 39.7 –105.0 INA ASR1
–6.0 MEX Mexico City 19.4 –99.1 MWL ASR1
–6.0 DFW Dallas 32.8 –96.8 INA ASR1
–6.0 CHI Chicago 41.9 –87.6 INA ASR1
–5.0 NYC New York 40.7 –74.0 INA ASR1
L-6
City
City Latitu de (˚)
Code
11.0 PPG Pago Pago –14.3 –170.7 INA ASR1
(Makkah)*
Longitude (˚)
North
East
Latitude +,
Longitude +,
South
West
Latitude –
Longitude –
21.4 39.8 UQM ASR1
FAJR/ISHA
Prayer
Calculation
Method
ASR Prayer
Calculation
Method
UTC Offset/
GMT
Differential
–4.0 YHZ Halifax 44.6 –63.6 INA ASR1
–3.5 YYT St.John's 47.6 –52.7 INA ASR1
–3.0 RIO Rio De
–2.0 FEN Fernando de
–1.0 RAI Praia 14.9 –23.5 MWL ASR1
* The initial default latitude and longitude settings for CUSTOM city codes are those
UTC Offset/GMT Differential: Based on data as of May 2016
for Makkah.
City
City Latitu de (˚)
Code
Janeiro
Noronha
Longitude (˚)
North
East
Latitude +,
Longitude +,
South
West
Latitude –
Longitude –
–22.9 –43.2 MWL ASR1
–3.8 –32.4 MWL ASR1
FAJR/ISHA
Prayer
Calculation
Method
ASR Prayer
Calculation
Method
L-7
 Loading...