

Page 1
MO1504-EB
© 2015 CASIO COMPUTER CO., LTD.
Operation Guide 3440 3441
Getting Acquainted
Congratulations upon your selection of this CASIO watch. To get the most out of your
purchase, be sure to read this manual carefully.
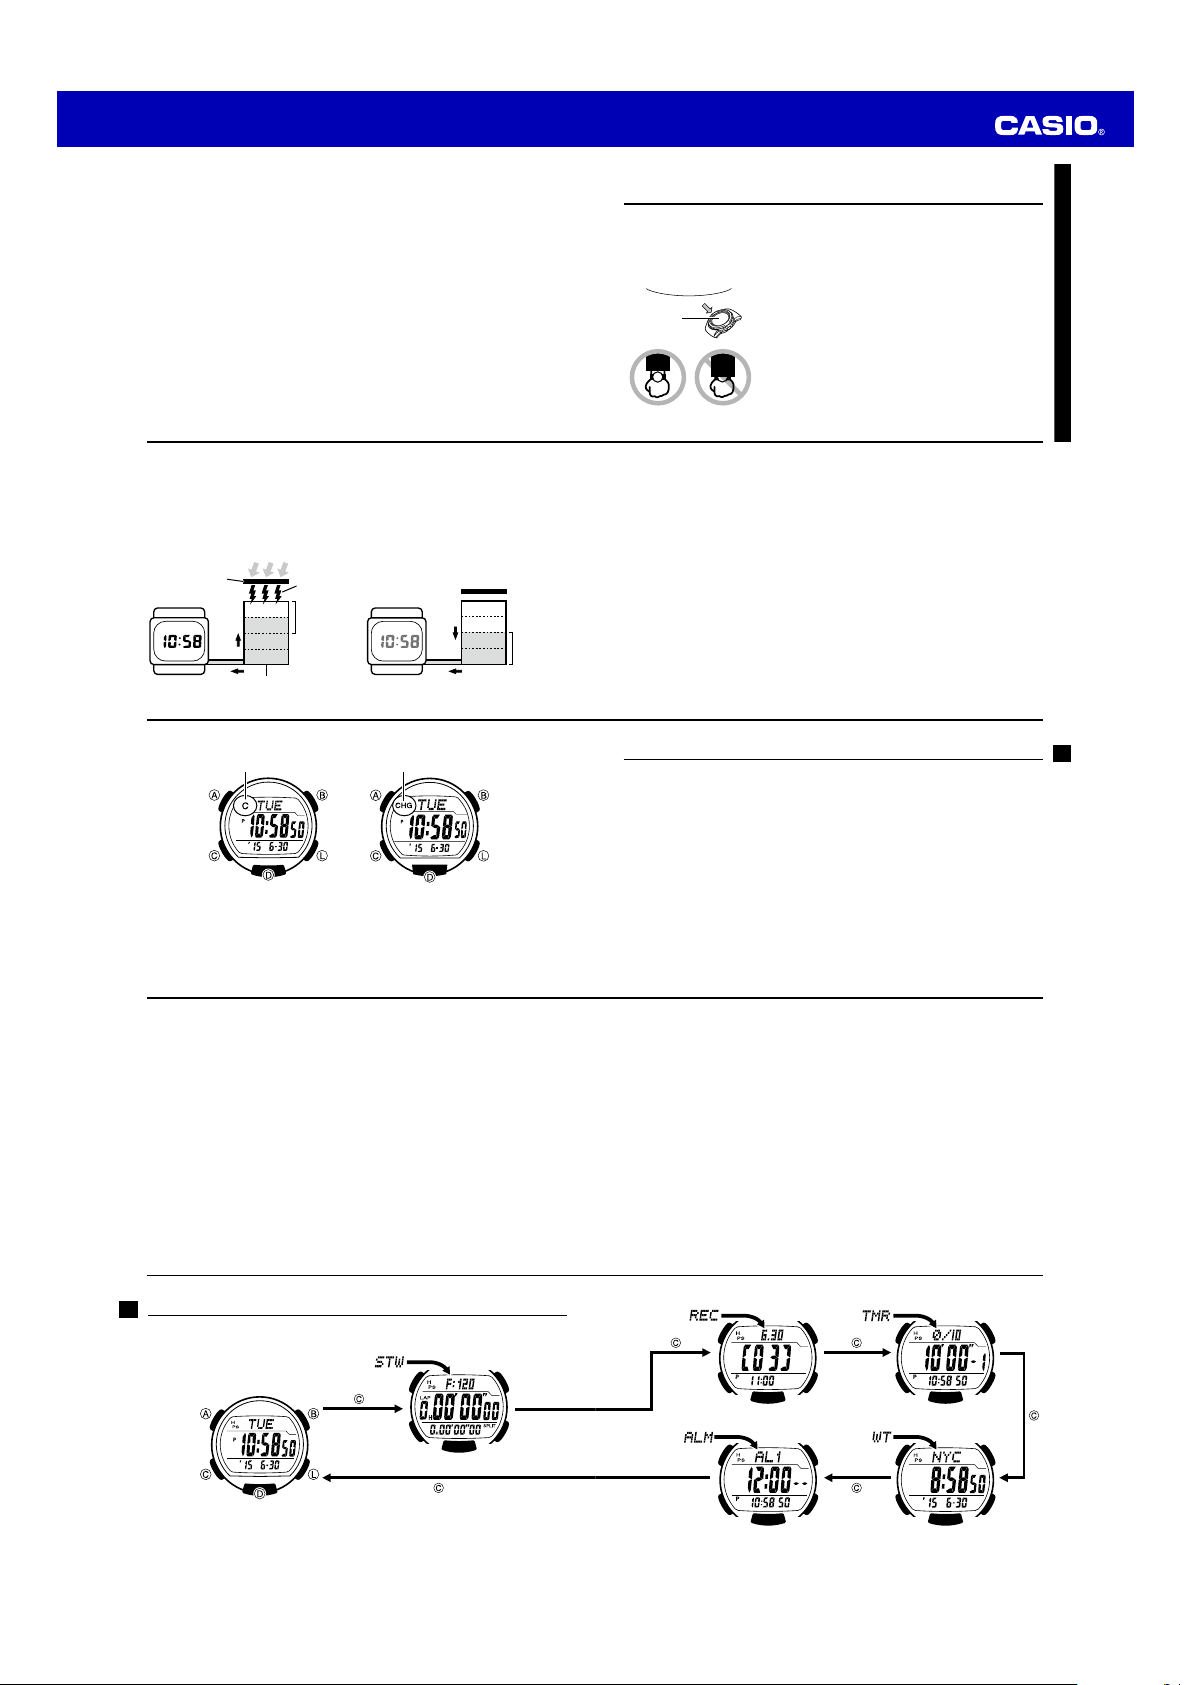
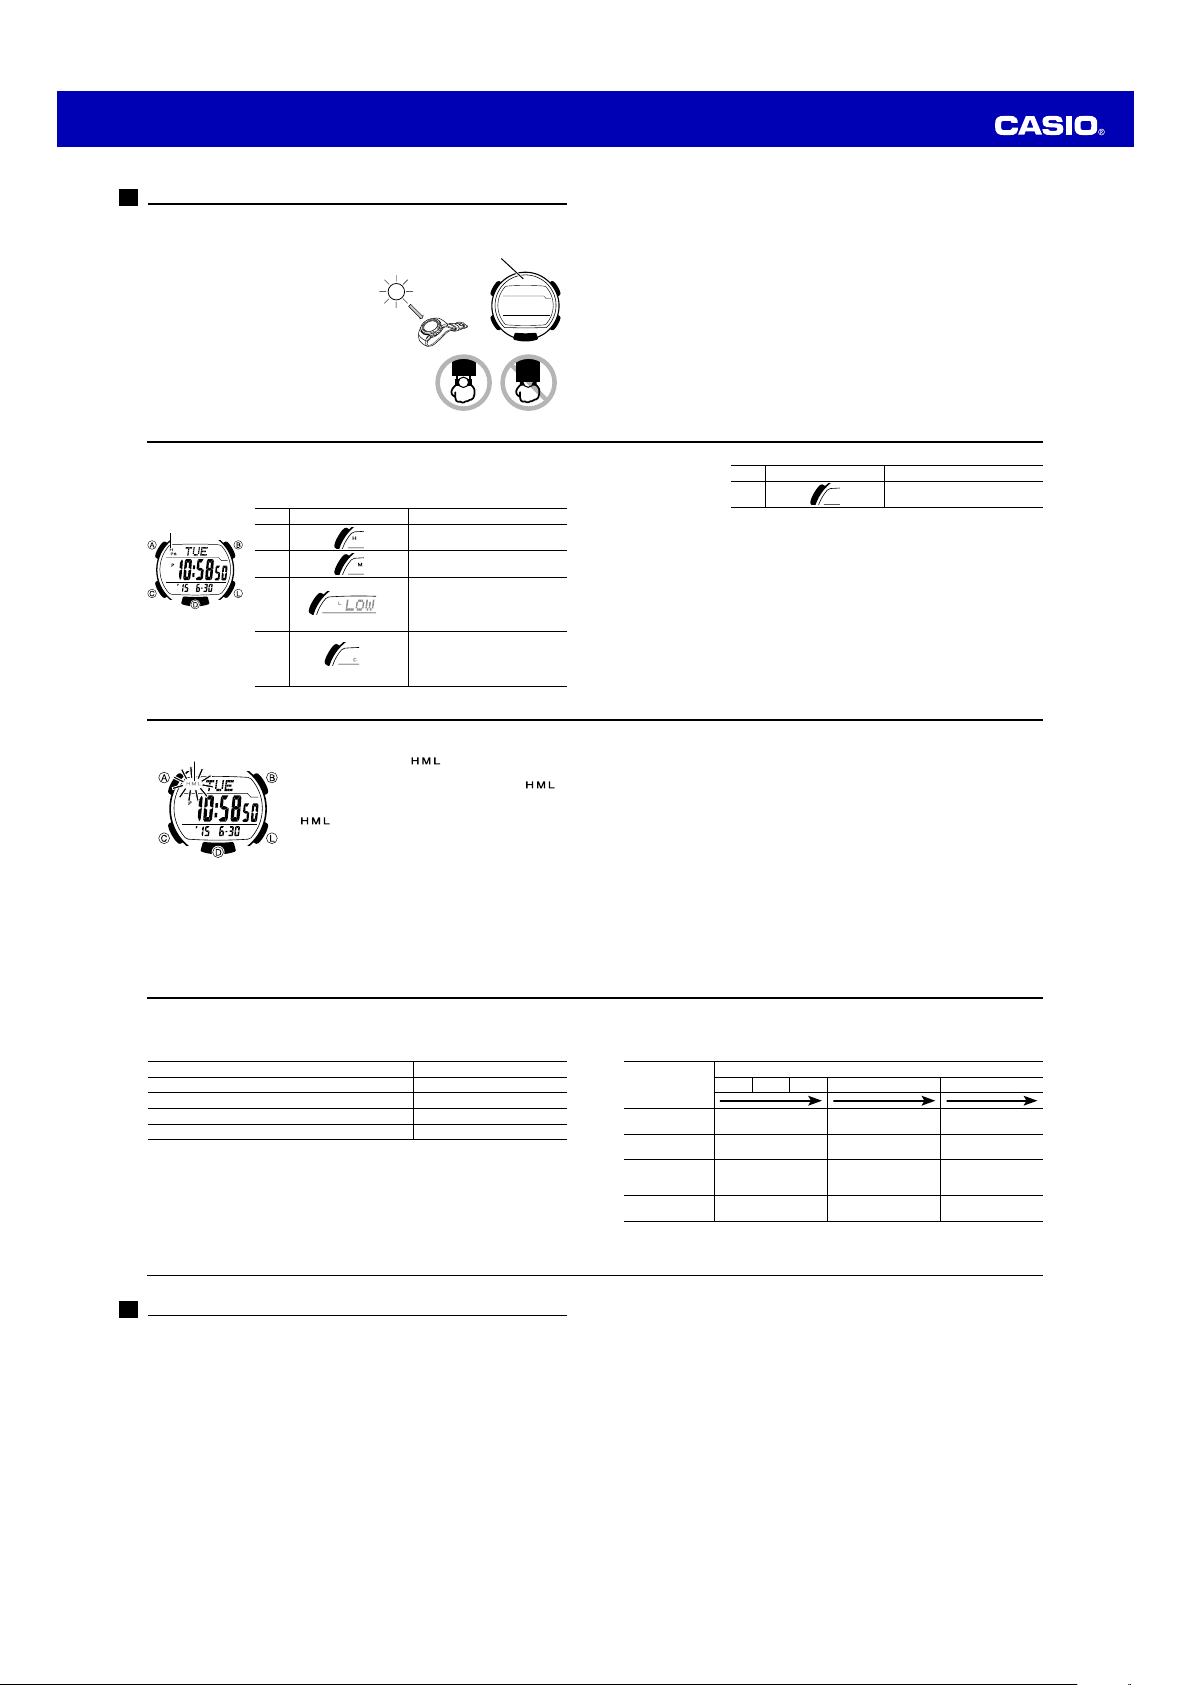
Keep the watch exposed to bright light
Bright Light
l
l
l
l
l
l
l
Solar panel
The electricity generated by the solar panel of the watch is
stored by a rechargeable battery. Leaving or using the
l
l
l
l
watch where it is not exposed to light causes the battery
to run down. Make sure the watch is exposed to light as
much as possible.
• When you are not wearing the watch on your wrist,
position the face so it is pointed at a source of bright
light.
• You should try to keep the watch outside of your sleeve
as much as possible. Charging is reduced signifi cantly
if the face is covered only partially.
E-1
• The watch continues to operate, even when it is not exposed to light. Leaving the
watch in the dark can cause the battery to run down, which will result in some
watch functions to be disabled. If the battery goes dead, you will have to
re-confi gure watch settings after recharging. To ensure normal watch operation, be
sure to keep it exposed to light as much as possible.
Solar panel
(Converts light to
electrical power.)
E-2
E-4
Countdown Timer………………………………………………………………………E-26
World Time ………………………………………………………………………………E-30
Alarms ……………………………………………………………………………………E-33
Illumination ……………………………………………………………………………E-38
E-6
Bright Light
Electrical
energy
All
LEVEL 1
functions
LEVEL 2
enabled
LEVEL 3
Charge
LEVEL 4
Rechargeable battery
C (Module 3440 charge indicator) CHG (Module 3441 charge indicator)
To confi gure the countdown timer ……………………………………………E-27
To use the countdown timer ……………………………………………………E-29
To view the time in another city ………………………………………………E-31
To toggle a city code time between Standard Time and
Daylight Saving Time ………………………………………………………E-32
To set an alarm time ……………………………………………………………E-34
To test the alarm ……………………………………………………………… E-35
To turn an alarm on and off ……………………………………………………E-36
To turn the Hourly Time Signal on and off ……………………………………E-37
To illuminate the display manually …………………………………………… E-38
To specify the illumination duration……………………………………………E-39
Battery discharges in the dark.Battery charges in the light.
LEVEL 1
LEVEL 2
Some or all
LEVEL 3
Dis-
charge
[Module 3441][Module 3440]
LEVEL 4
functions
disabled
• The actual level at which some functions are disabled depends on the watch
model.
Be sure to read “Power Supply” (page E-40) for important information you
•
need to know when exposing the watch to bright light.
If the display of the watch is blank...
If the display of the watch is blank, it means that the watch’s Power Saving function
has turned off the display to conserve power.
See “Power Saving Function” (page E-53) for more information.
•
About This Manual
• The operational procedures for Modules 3440 and 3441 are identical. All of the
illustrations in this manual show Module 3440.
• Button operations are indicated using the letters shown in the illustration.
• Each section of this manual provides you with the information you need to perform
operations in each mode. Further details and technical information can be found in
the “Reference” section.
Contents
General Guide ………………………………………………………………………… E-8
To exit the demo mode …………………………………………………………E-10
Timekeeping ……………………………………………………………………………E-11
To set the time and date ………………………………………………………E-12
To change the Daylight Saving Time (summer time) setting ………………E-16
Stopwatch ………………………………………………………………………………E-17
To measure times with the stopwatch ………………………………………E-18
To position the lap time and split time on the display ………………………E-20
Recall Mode …………………………………………………………………………… E-22
To recall stopwatch records ……………………………………………………E-22
To delete a log …………………………………………………………………E-24
To delete all logs ………………………………………………………………E-25
Power Supply ………………………………………………………………………… E-40
Reference ………………………………………………………………………………E-48
To turn the button operation tone on and off …………………………………E-52
To recover from the sleep state ………………………………………………E-54
To turn Power Saving on and off ………………………………………………E-54
Specifi cations …………………………………………………………………………E-57
E-3
E-5
E-7
General Guide
• Press C to change from mode to mode.
• In any mode, press L to illuminate the display.
Timekeeping Mode
E-8
Stopwatch Mode
Recall Mode
Alarm Mode
Countdown Timer Mode
World Time Mode
E-9
Page 2
Operation Guide 3440 3441
Demo Mode
In the Timekeeping Mode, holding down C for about three seconds will enter the
demo mode. In the demo mode, the screen cycles through the normal timekeeping,
stopwatch, and World Time screens in fi ve-second intervals.
To exit the demo mode
Press any button.
E-10
To set the time and date
3. Press C to move the fl ashing in the sequence shown below to select the other
settings.
City Code
E-12
Screen: To do this: Do this:
/
5. Press A to exit the setting screen.
• The day of the week is displayed automatically in accordance with the date (year,
month, and day) settings.
1. In the Timekeeping Mode, hold down A until the city
code starts to fl ash, which indicates the setting screen.
2. Use D and B to select the city code you want.
• Make sure you se lect your H ome City c ode before
changing any other setting.
• For full infor mation on c ity code s, see the “Ci ty
Code Table” at the bac k of this manua l.
12/24-Hour
DST
Format
Illumination
Duration
Toggle the button operation tone between
(on) and (off)
Toggle the illumination duration between
(approximately 1.5 seconds) and
(approximately 3 seconds).
Toggle between Power Saving on ( ) and off
()
Seconds
Button
Operation Tone
Hour
DayPower Saving
Month
PressD.
PressD.
PressD.
Minutes
Year
Timekeeping
Use the Timekeeping Mode to set and view the current time and date.
PM indicator
Read This Before You Set the Time and Date!
This watch is preset with a number of city codes, each of which represents the time
zone where that city is located. When setting the time, it is important that you fi rst
select the correct city code for your Home City (the city where you normally use the
watch). If your location is not included in the preset city codes, select the preset city
code that is in the same time zone as your location.
• Note that all of the times for the World Time Mode city codes (page E-30) are
displayed in accordance with the time and date settings you confi gure in the
Timekeeping Mode.
• The following steps ex plain how to co nfi gure time keeping set tings only.
4. When the timekeeping setting you want to change is fl ashing, use D or B to
change it as described below.
Screen: To do this: Do this:
Change the city code
Toggle between Daylight Saving Time ( )
and Standard Time ( )
Toggle between 12-hour ( ) and 24-hour
( ) timekeeping
Reset the seconds to PressD.
Change the hour and minutes Use D (+) and B (–).
Change the year, month, or day Use D (+) and B (–).
12-hour and 24-hour timekeeping
• With the 12-hour format, the P (PM) indicator appears to the left of the hour digits
for times in the range of noon to 11:59 p.m. and no indicator appears to the left of
the hour digits for times in the range of midnight to 11:59 a.m.
• With the 24-hour format, times are displayed in the range of 0:00 to 23:59, without
any indicator.
• The 12-hour/24-hour timekeeping format you select in the Timekeeping Mode is
applied in all other modes.
Daylight Saving Time (DST)
Daylight Saving Time (summer time) advances the time setting by one hour from
Standard Time. Remember that not all countries or even local areas use Daylight
Saving Time.
Day of week
Hour : Minutes Seconds
Year – Month – Day
UseD (east) and
(west).
PressD.
PressD.
E-11
B
E-13
E-14
To change the Daylight Saving Time (summer time) setting
1. In the Timekeeping Mode, hold down A until the city
code starts to fl ash, which indicates the setting screen.
2. Press C and the DST setting screen appears.
3. Use D to cycle through the DST settings in the
sequence shown below.
'
DST indicator
E-16
4. When the setting you want is selected, press A to exit
the setting screen.
DST
• The
indicator appears to indicate that Daylight
Saving Time is turned on.
To measure times with the stopwatch
Lap/Split indicator
Lap time
Elapsed Time
D
Start Stop Resume Stop Reset
B D B B
Lap/Split Times
D D B B
Split
Split time
E-18
Lap/Split indicator
D
Start Lap/Split Next Lap/
Stop Reset
Stopwatch
Remaining memory
Lap time
Note
• PressingD to perform a lap/split time operation freezes the lap/split time at that
point on the display for about eight seconds. After that, the display returns to
normal stopwatch time measurement.
• During a stopwatch time measurement operation, the current lap/split number is
shown at the top of the display, and the lap time and split time are shown in the
middle and at the bottom. You can change the positions of the lap time and split
time by pressing A while a stopwatch operation is in progress or stopped. For
details, refer to “To position the lap time and split time on the display” (page E-20).
Split time
The 1/100-second stopwatch can measure elapsed time
and lap/split times. Stopwatch times are stored in memory.
• The stopwatch measurement operation continues even
if you exit the Stopwatch Mode.
• Exiting the Stopwatch Mode while a lap/split time is
frozen on the display clears the lap/split time and
returns to elapsed time measurement.
• All of the operations in this section are performed in the
Stopwatch Mode, which you enter by pressing & (page
E-8).
Note
• See page E-50 for information about the type of data
the watch stores in memory when you use the
stopwatch.
• Use the Recall Mode (page E-22) to view data stored in
memory.
E-15
E-17
E-19
Page 3
Operation Guide 3440 3441
l
l
l
l
l
l
l
l
l
l
l
l
l
l
l
To position the lap time and split time on the display
Each press of A cycles the lap time and split time positions in the sequence shown
below.
• You can perform the above operation while stopwatch operation is ongoing or
stopped.
Remaining memory
Lap time
Split time
E-20
Split time
Lap time
Hours
Lap time
Minutes
Seconds
Split time
Hours
Seconds
Minutes
Recall Mode
Creation date
(Month – Day)
Log number
Time measurement
was performed
Log Title Screen
E-22
• The locations of the lap time and split time in the Stopwatch Record screen are
determined by the display format you last selected in the Stopwatch Mode (page
E-17).
• The BEST indicator identifi es the record that contains the best lap time in the log.
• If a best lap time record is deleted automatically when the log becomes full, the
BEST indicator will not be transferred to the record with the next best lap time. See
“Memory Management” on page E-48 for more information about automatic deletion
of records.
To delete a log
1. In the Recall Mode, display the title screen or one of the records of the log you want
to delete.
2. While holding down B, hold down D for about two seconds until the watch beeps.
CLR
• “
” will fl ash on the display for two seconds and then the watch will beep.
ReleaseB and D at this time.
• You cannot delete the log of an ongoing elapsed time measurement operation.
Use the Recall Mode to recall and delete records stored
by the Stopwatch Mode.
• Stopwatch records are stored in “logs” that are created
automatically by the watch. See “Memory Management”
on page E-48 for more information.
• The title screen of the newest log appears fi rst
whenever you enter the Recall Mode.
• Log numbers are automatically assigned in sequence,
starting from
•
All of the operations in this section are performed in the
Recall Mode, which you enter by pressing C (page E-9).
To recall stopwatch records
In the Recall Mode, use A to scroll through the log title
screens, starting from the newest one, as shown below.
When the title screen of the log you want is displayed, use
D
(+) and B (–) to cycle through the records contained
in the log.
.
More than 10 hours
• Whenever the elapsed time exceeds 10 hours, the measurement changes from
1/100-second units to 1-second units.
Stopwatch Record
Screen
Log Title Screen
To delete all logs
While holding down B, hold down D for about fi ve seconds until the watch beeps
once and then a second time.
CLR
• “
” will fl ash on the display for two seconds and then the watch will beep once.
KeepB and D depressed and “
and then the watch will beep again. This indicates that all log data is cleared.
• You cannot delete logs while an elapsed timing operation is in progress.
Lap/Split number
Lap time
Split time
ALL
” will fl ash on the display for three seconds,
Best Lap Time
Screen
BEST indicator
E-21
E-23
E-24
Countdown Timer
Number of Repeats
Seconds
Countdown End Beeper
The countdown end beeper lets you know when the countdown reaches zero. The
beeper stops after about 5 seconds or when you press any button.
E-26
3. When the setting you want to change is fl ashing, use D and B to change it as
described below.
Setting Screen Button Operation
Minutes, Seconds UseD (+) and B (–) to change the setting.
Number of Repeats
• To disable either t imer, set 00' 00" a s its countdo wn start t ime.
4. Press A to exit the setting screen.
E-28
Dual timers can be set with two different starting times.
The watch can be confi gured so the two timers alternate,
so when one reaches the end of its countdown, the other
timer starts. You can specify a “number of repeats” value,
which controls how many times the two-timer countdown
operation is performed (1 = once, 2 = twice, etc.). The
starting time of each timer can be set in fi ve-second steps
up to 99 minutes, 55 seconds.
You can specify up to 10 repeats. The watch emits a short
beep whenever either of the timers reaches the end of its
countdown during an ongoing timer operation. The watch
Timer 1Minutes
emits a 5-second beep when the end of the fi nal timer
operation (specifi ed by the number of repeats) is reached.
UseD (+) and B (–) to change the setting.
To confi gure the countdown timer
To use the countdown timer
Current repeat count
Current timer time
PressD while in the Countdown Timer Mode to start the countdown timer.
• The countdown is performed by alternating between Timer 1 and Timer 2. A short
beep is emitted to signal a changeover from one timer to the other.
• Press D to pause a countdown. Press D again to resume.
• Pressing B while a countdown timer is stopped resets it to the start time specifi ed
by you.
• The watch emits a 5-second beep when the end of the fi nal timer operation
(specifi ed by the number of repeats) is reached.
• Even if you exit the Countdown Timer Mode, the countdown timer operation
continues and the watch beeps as required.
1. While the countdown start time is on the display in the
Countdown Timer Mode, hold down A until the current
countdown start time starts to fl ash, which indicates the
setting screen.
• If the countd own star t time is not dis played, use
the procedu re under “To use th e countdown t imer”
(page E-29) to dis play it.
2. Press C to move the fl ashing in the sequence shown
below to select other settings.
Timer 1
Timer 1
Minutes
Seconds
Number of Repeats
Preset number of repeats
(Reset)
Timer 1 or 2
Current time
(Start/Stop)
Timer 2
Minutes
Timer 2
Seconds
E-25
E-27
E-29
Page 4
Operation Guide 3440 3441
World Time
City code
Current time in
selected city
E-30
To toggle a city code time between Standard Time and Daylight Saving Time
DST indicator
E-32
To set an alarm time
2. After you select an alarm, hold down A until the hour setting of the alarm time
starts to fl ash, which indicates the setting screen.
• This operati on turns on t he alarm auto matically.
3. Press C to move the fl ashing between the hour and minute settings.
4. While a setting is fl ashing, use D (+) and B (–) to change it.
• With the 12-h our format , set the time c orrectly as a .m. or p.m. (P indicator).
5. Press A to exit the setting screen.
E-34
World Time shows the current time in 48 cities (31 time
zones) around the world.
• The times kept in the World Time Mode are
synchronized with the time being kept in the
Timekeeping Mode. If you feel that there is an error in
any World Time Mode time, check to make sure you
have the correct city selected as your Home City. Also
check to make sure that the current time as shown in
the Timekeeping Mode is correct.
• Select a city code in the World Time Mode to display
the current time in any particular time zone around the
globe. See the “City Code Table” at the back of this
manual for information about the UTC differential
settings that are supported.
• All of the operations in this section are performed in the
World Time Mode, which you enter by pressing
(page E-9).
1. In the World Time Mode, use D and B to display the
city code (time zone) whose Standard Time/Daylight
Saving Time setting you want to change.
2. Hold down A to toggle between Daylight Saving Time
(DST indicator displayed) and Standard Time (DST
indicator not displayed).
• The DST indicator is shown on the World Time Mode
screen while Daylight Saving Time is turned on.
• Note that the Standard Time/Daylight Saving Time
setting affects only the currently displayed city code.
Other city codes are not affected.
• Note that you cannot switch between Standard Time
and Daylight Saving Time while UTC is selected as the
city code.
1. In the Alarm Mode, use D to scroll through the alarm
screens until the one whose time you want to set is
displayed.
• To set an alarm time, di splay the appli cable alar m
screen (
• The snooze a larm operat ion repeats eve ry fi ve
minutes.
through , or ).
C
To view the time in another city
While in the World Time Mode, use D (eastward) and B (westward) to scroll through
the city codes (time zones).
• Pressing D and B at the same time will jump to the UTC time zone.
E-31
Alarms
Alarm number
Alarm time
(Hour : Minutes)
Alarm Operation
The alarm tone sounds at the preset time for 10 seconds, regardless of the mode the
watch is in. In the case of the snooze alarm, the alarm operation is performed a total
of seven times, every fi ve minutes, until you turn the alarm off (page E-36).
• Alarm and Hourly Time Signal operations are performed in accordance with the
Timekeeping Mode time.
• To stop the alarm tone after it starts to sound, press any button.
• Performing any one of the operations below during a 5-minute interval between
snooze alarms cancels the current snooze alarm operation.
Displaying the Timekeeping Mode setting screen (page E-12)
Displaying the
To test the alarm
In the Alarm Mode, hold down D to sound the alarm.
The Alarm Mode gives you a choice of fi ve daily alarms,
one of which is a snooze alarm.
Also use the Alarm Mode to turn the Hourly Time Signal
(
) on and off.
• The snooze alarm screen is indicated by , while
the other alarm screens are numbered through
. The Hourly Time Signal screen is indicated by
.
• All of the operations in this section are performed in the
Alarm Mode, which you enter by pressing C (page
E-9).
setting screen (page E-34)
E-33
E-35
To turn an alarm on and off
Alarm on indicator
Snooze alarm
indicator
Alarm on/off
E-36
1. In the Alarm Mode, use D to select an alarm.
2. Press B to toggle it on and off.
• Turning on a alarm ( ,,, or )
displays the alarm on indicator on its Alarm Mode
screen.
• In all modes, the alarm on indicator is shown for any
alarm that currently is turned on.
• The alarm on indicator fl ashes while the alarm is
sounding.
• The snooze alarm indicator fl ashes while the snooze
alarm is sounding and during the 5-minute intervals
: Alarm on
: Alarm off
between alarms.
Illumination
A LED (light-emitting diode) illuminate the display for easy
reading in the dark.
Illumination Precautions
• The illumination provided by the light may be hard to
see when viewed under direct sunlight.
• Illumination automatically turns off whenever an alarm
sounds.
• Frequent use of illumination runs down the battery.
To illuminate the display manually
In any mode, press L to turn on illumination.
• You can use the procedure below to select either 1.5 seconds or 3 seconds as the
illumination duration. When you press L, the illumination will remain on for about
1.5 seconds or 3 seconds, depending on the current illumination duration setting.
E-38
To turn the Hourly Time Signal on and off
Hourly time
signalon indicator
To specify the illumination duration
1. In the Alarm Mode, use D to select the Hourly Time
Signal (
2. Press B to toggle it on and off.
• The Hourly Time Signal on indicator is shown on the
display in all modes while this function is turned on.
1. In the Timekeeping Mode, hold down A until the
display contents start to fl ash. This is the setting screen.
2. Press C 10 times until the current illumination duration
setting (
3. Press D to toggle the setting between
(approximately 1.5 seconds) and (approximately
3 seconds).
4. Press A to exit the setting screen.
).
E-37
or ) appears.
E-39
Page 5
Operation Guide 3440 3441
l
l
l
l
l
l
l
l
l
l
l
l
l
l
l
l
l
l
l
l
l
l
l
l
Power Supply
This watch is equipped with a solar panel and a rechargeable battery that is charged
by the electrical power produced by the solar panel. The illustration shown below
shows how you should position the watch for charging.
Example:
Orient the watch so its face is
pointing at a light source.
• The illustration shows how to position a
watch with a resin band.
• Note that charging effi ciency drops when
any part of the solar panel is blocked by
clothing, etc.
• You should try to keep the watch outside of
your sleeve as much as possible. Charging
is reduced signifi cantly if the face is
covered only partially.
E-40
Battery Power Indicator and Recover Indicator
The battery power indicator on the display shows you the current status of the
rechargeable battery’s power.
Battery power
indicator
E-42
Recover indicator
Level Battery Power Indicator Function Status
1 All functions enabled.
2
3
4
• Performing illumination, or beeper operations during a
short period may cause
the display.
After some time, battery power will recover and
(recover) will disappear, indicating that the above
functions are enabled again.
• If (recover) appears frequently, it probably means
that remaining battery power is low. Leave the watch in
bright light to allow it to charge.
l
l
Solar panel
All functions enabled.
Illumination, and beeper disabled.
Except for timekeeping and the
(charge) indicator, all functions
and display indicators disabled.
Module 3441 charge indicator is
CHG
fl ashing
.
(recover) to appear on
Important!
• Storing the watch for long periods in an area where there is no light or wearing it in
such a way that it is blocked from exposure to light can cause rechargeable battery
power to run down. Be sure that the watch is exposed to bright light whenever
possible.
• This watch uses a rechargeable battery to store power produced by the solar
panel, so regular battery replacement is not required. However, after very long use,
the rechargeable battery may lose its ability to achieve a full charge. If you
experience problems getting the rechargeable battery to charge fully, contact your
dealer or CASIO distributor about having it replaced.
• Never try to remove or replace the watch’s rechargeable battery yourself. Use of
the wrong type of battery can damage the watch.
• All data stored in memory is deleted, and the current time and all other settings
return to their initial factory defaults whenever battery power drops to Level 5
(pages E-42 and E-43) and when you have the battery replaced.
• Turn on the watch’s Power Saving function (page E-53) and keep it in an area
normally exposed to bright light when storing it for long periods. This helps to keep
the rechargeable battery from going dead.
E-41
Level Battery Power Indicator Function Status
5 All functions disabled.
• The fl ashing L and
and that exposure to bright light for charging is required as soon as possible.
• At Level 5, all functions are disabled and settings return to their initial factory
defaults. Once the battery reaches Level 2 after falling to Level 5, reconfi gure the
current time, date, and other settings.
• The watch’s Home City code setting will change automatically to
whenever the battery drops to Level 5.
• Display indicators reappear as soon as the battery is charged from Level 5 to Level
2.
C
• Leaving the watch exposed to direct sunlight or some other very strong light source
can cause the battery power indicator to show a reading temporarily that is higher
than the actual battery level. The correct battery level should be indicated after a
few minutes.
Charging Precautions
Certain charging conditions can cause the watch to become very hot. Avoid leaving
the watch in the areas described below whenever charging its rechargeable battery.
Also note that allowing the watch to become very hot can cause its liquid crystal
display to black out. The appearance of the LCD should become normal again when
the watch returns to a lower temperature.
Warning!
Leaving the watch in bright light to charge its rechargeable battery can cause it
to become quite hot. Take care when handling the watch to avoid burn injury.
The watch can become particularly hot when exposed to the following
conditions for long periods.
• On the dashboard of a car parked in direct sunlight
• Too close to an incandescent lamp
• Under direct sunlight
LOW
indicators at level 3 tell you that battery power is very low,
TYO
(Tokyo)
E-43
E-44
Charging Guide
The following table shows the amount of time the watch needs to be exposed to light
each day in order to generate enough power for normal daily operations.
Exposure Level (Brightness) Approximate Exposure Time
Outdoor Sunlight (50,000 lux) 5 minutes
Sunlight Through a Window (10,000 lux) 24 minutes
Daylight Through a Window on a Cloudy Day (5,000 lux) 48 minutes
Indoor Fluorescent Lighting (500 lux) 8 hours
• For details about the battery operating time and daily operating conditions, see the
“Power Supply” section of the Specifi cations (page E-59).
• Stable operation is promoted by frequent exposure to light.
E-46
Reference
This section contains more detailed and technical information about watch operation.
It also contains important precautions and notes about the various features and
functions of this watch.
Stopwatch
• You can use lap time measurement to time how long it takes to complete a specifi c
portion (such as a single lap) of a race.
• You can use split time measurement to time how long it takes to get from the start to
a specifi c point in a race.
Memory Management
Each time you press D to start a new elapsed time or lap/split operation in the
Stopwatch Mode (page E-17), the watch automatically creates a new “log” in its
memory. The log remains open for data storage until you permanently close it by
pressingB to reset the stopwatch to all zeros.
The watch has enough memory to hold up to 121 records. Each log title screen (start
date and time) and lap/split time uses up one record.
E-48
E-45
Recovery Times
The table below shows the amount exposure that is required to take the battery from
one level to the next.
Exposure Level
(Brightness)
Outdoor Sunlight
(50,000 lux)
Sunlight Through a
Window (10,000 lux)
Daylight Through a
Window on a Cloudy
Day (5,000 lux)
Indoor Fluorescent
Lighting (500 lux)
• The above exposure time values are all for reference only. Actual required exposure
times depend on lighting conditions.
• A log title screen identifi es a single elapsed time operation, from the start up to the
point the stopwatch is reset to all zeros.
• A lap/split time record is stored under a log title screen each time you perform a
lap/split operation.
Example 1
Single elapsed time measurement
Log title screen + 120 lap records = 121 records
Example 2
Multiple elapsed time measurements
Measurement 1 log title screen + 60 lap records = 61 records
Measurement 2 log title screen + 59 lap records = 60 records
• Use the Recall Mode to view stopwatch records (page E-22).
• If watch memory is already full when you perform a stopwatch button operation that
creates a new log, the oldest log in memory and all of its records are deleted
automatically to make room for the new log.
• If you are adding records to the only log in memory and watch memory becomes
full, adding another record causes the oldest record in the log to be deleted
automatically to make room for the new record.
Approximate Exposure Time
Level 5 Level 4 Level 3
3 hours (Module 3440)
2 hours (Module 3441)
10 hours (Module 3440)
9 hours (Module 3441)
19 hours (Module 3440)
16 hours (Module 3441)
228 hours (Module 3440)
190 hours (Module 3441)
26 hours (Module 3440)
22 hours (Module 3441)
130 hours (Module 3440)
109 hours (Module 3441)
263 hours (Module 3440)
221 hours (Module 3441)
Level 2 Level 1
7 hours (Module 3440)
6 hours (Module 3441)
35 hours (Module 3440)
29 hours (Module 3441)
71 hours (Module 3440)
59 hours (Module 3441)
– – – – – –
E-47
E-49
Page 6

Operation Guide 3440 3441
• If you are adding records to a log when there are multiple logs in memory and
watch memory becomes full, adding another record causes the oldest log in
memory and all of its records to be deleted automatically to make room for new
records.
How Stopwatch Data is Stored
The following table describes how data is stored when you perform the various button
operations described on page E-18.
Stopwatch Button Operation Data Store Operation
D
Start (from all zeros)
B
Stop Time measurement stops, without storing data in memory.
D
Resume
D
Lap/Split Creates new record: displayed lap/split times
B
Reset
E-50
To turn the button operation tone on and off
E-52
• The watch will not enter the sleep state between 6:00 AM and 9:59 PM. If the watch
is already in the sleep state when 6:00 AM arrives, however, it will remain in the
sleep state.
To recover from the sleep state
Perform any one of the following operations.
• Move the watch to a well-lit area.
• Press any button.
To turn Power Saving on and off
On/Off status
E-54
Creates a new log for the current date. (The log is updated
as timing progresses.)
Time measurement resumes, without storing data in
memory.
Creates new record: displayed lap/split times (Stopwatch
display is reset to all zeros.)
1. In the Timekeeping Mode, hold down A until the city
code starts to fl ash, which indicates the setting screen.
2. Press C nine times until the current button operation
tone setting (
3. Press D to toggle the setting between
and (tone off).
4. Press A to exit the setting screen.
• The mute indicator is displayed in all modes when the
button operation tone is turned off.
1. In the Timekeeping Mode, hold down A until the city
code starts to fl ash, which indicates the setting screen.
2. Press C 11 times until the Power Saving on/off screen
appears.
3. Press D to toggle Power Saving on (
4. Press A to exit the setting screen.
• The Power Saving indicator is on the display in all
modes while Power Saving is turned on.
or ) appears.
(tone on)
) and off ( ).
Button Operation Tone
Mute indicator
Power Saving Function
Power saving indicator
Elapsed Time
in Dark
60 to 70 minutes
6 or 7 days
• Wearing the watch inside the sleeve of clothing can cause it to enter the sleep
state.
Auto Return
If you do not perform any operation for about two or three minutes while a setting
screen (with a fl ashing setting) is on the display, the watch will exit the setting screen
automatically.
Scrolling
TheB and D are used in various modes and setting screens to scroll through data
on the display. In most cases, holding down these buttons during a scroll operation
scrolls at high speed.
Initial Screens
When you enter the World Time Mode or Alarm Mode, the data you were viewing
when you last exited the mode appears fi rst.
The button operation tone sounds any time you press one
of the watch’s buttons. You can turn the button operation
tone on or off as desired.
• Even if you turn off the button operation tone, alarms,
the Hourly Time Signal, and other beepers all operate
normally.
When turned on, the Power Saving function enters a sleep
state automatically whenever the watch is left in an area
for a certain period where it is dark. The table below
shows how watch functions are affected by the Power
Saving function.
Display Operation
Blank, with Power Saving indicator
fl ashing
Blank, with Power Saving indicator
not fl ashing
All functions enabled, except for
the display
Beeper tone, illumination, and
display are disabled.
E-51
E-53
E-55
Timekeeping
• Resetting the seconds to 00 while the current count is in the range of 30 to 59
causes the minutes to be increased by 1. In the range of 00 to 29, the seconds are
reset to 00 without changing the minutes.
• The year can be set in the range of 2000 to 2099.
• The watch’s built-in full automatic calendar makes allowances for different month
lengths and leap years. Once you set the date, there should be no reason to
change it except after you have the watch’s battery replaced.
• The current time for all city codes in the Timekeeping Mode and World Time Mode
is calculated in accordance with the Coordinated Universal Time (UTC) for each
city, based on your Home City time setting.
World Time
The seconds count of the World Time is synchronized with the seconds count of the
Timekeeping Mode.
E-56
Countdown Timer:
Number of timers: 2 (one set)
Setting unit: 5 seconds
Range: 99 minutes 55 seconds each timer
Countdown unit: 1 second
Number of repeats: 1 to 10
Other: 5-second time up beeper
World Time:
Alarms:
Illumination:
Other:
E-58
48 cities (31 time zones)
Other: Daylight Saving Time/Standard Time
5 daily alarms (with 1 snooze alarm); Hourly Time Signal
LED (light-emitting diode); Selectable illumination duration
Button operation tone on/off
Specifi cations
Accuracy at normal temperature:
Timekeeping:
Stopwatch:
Power Supply:
Hour, minutes, seconds, p.m. (P), year, month, day, day of the week
Time format: 12-hour and 24-hour
Calendar system: Full Auto-calendar pre-programmed from the year 2000 to 2099
Other: Home City code (can be assigned one of 48 city codes); Standard Time /
Daylight Saving Time (summer time)
Time measurements
Measuring unit: 1/100 for the fi rst 10 hours, and then 1 second after 10 hours
Measuring capacity: 99:59'59"
Measuring accuracy: ±0.0012%
Measuring modes: Elapsed time, lap/split times
Memory capacity: 121 records (used by lap/split time records and log title
screens)
Solar panel and one rechargeable battery
Approximate battery operating time:
Module 3440: 13 months
Module 3441: 11 months
(from full charge to Level 4) under the following conditions:
• Watch not exposed to light
• Internal timekeeping
• Display on 18 hours per day, sleep state 6 hours per day
• 1 illumination operation (1.5 second) per day
• 10 seconds of alarm operation per day
Frequent use of illumination runs down the battery.
±30 seconds a month
E-57
E-59
Page 7
Operation Guide 3440 3441
L-1
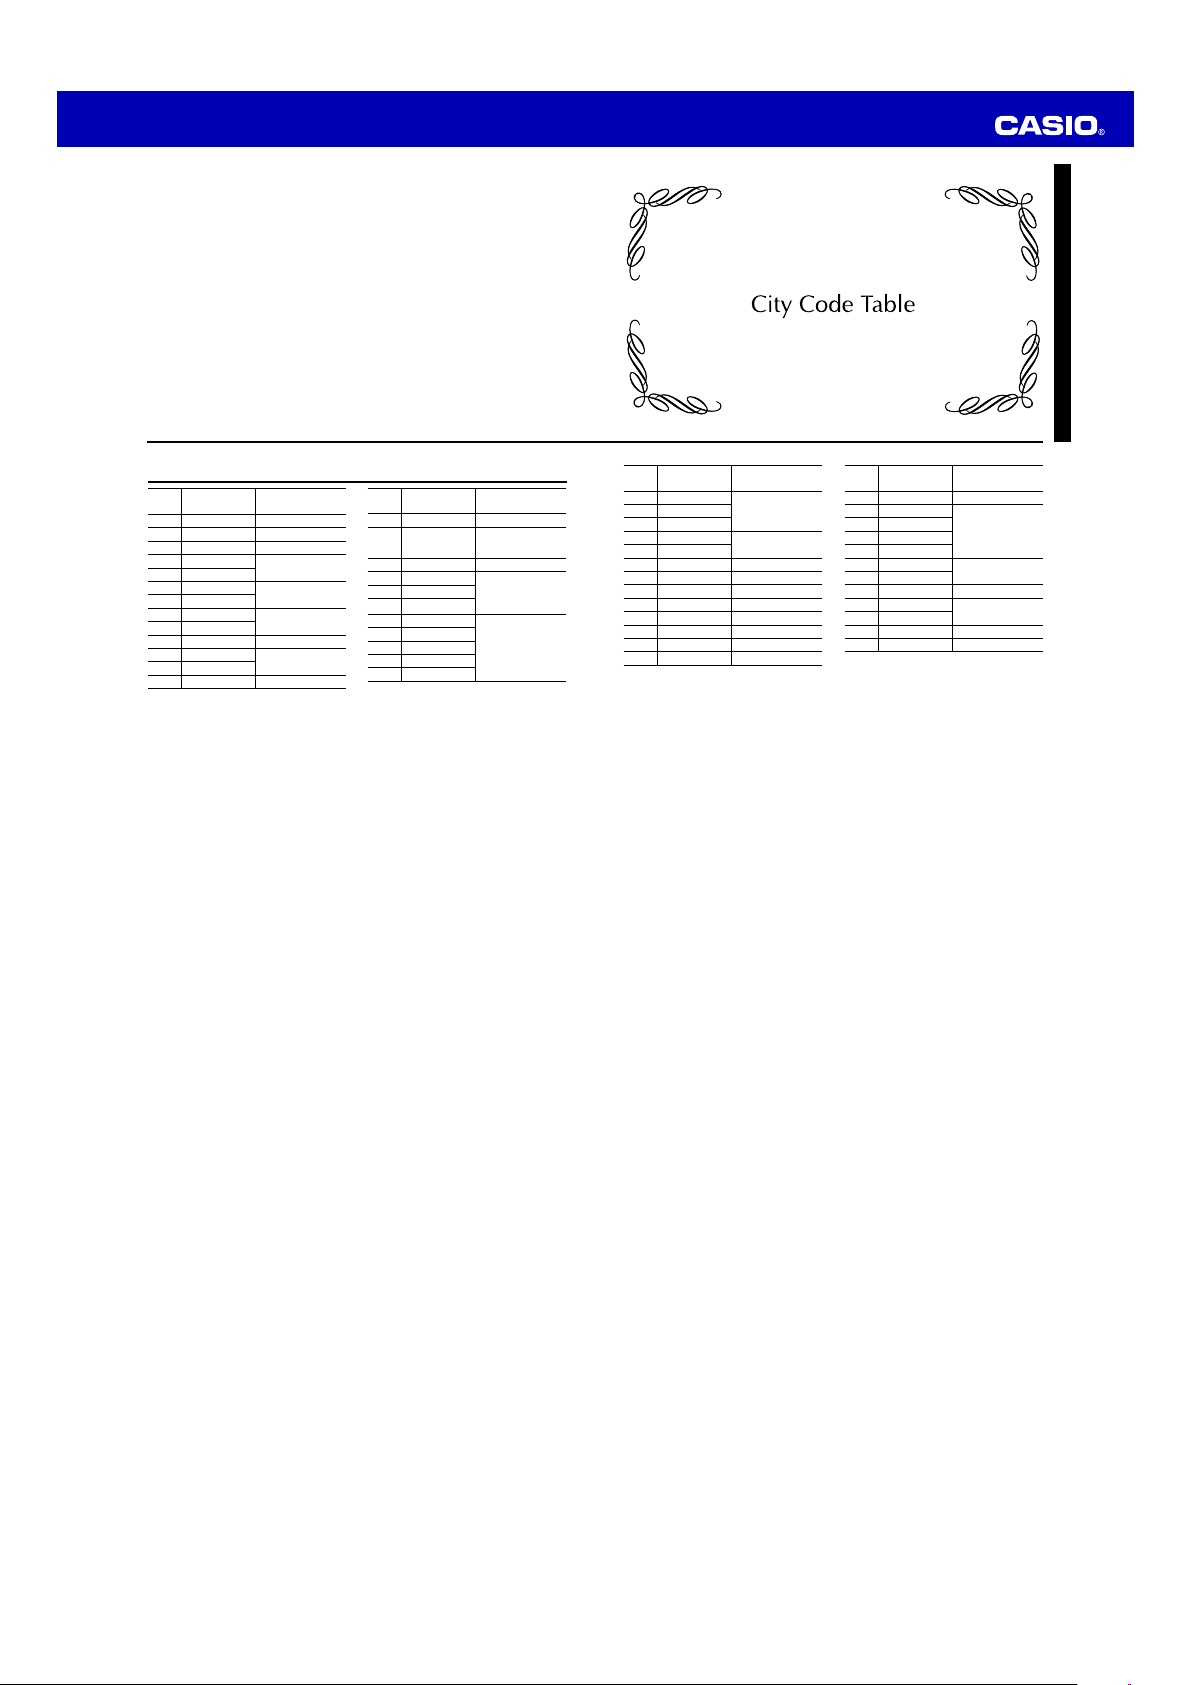
City Code Table
City
City
Code
PPG Pago Pago –11
HNL Honolulu –10
ANC Anchorage –9
YVR Vancouver
LAX Los Angeles
YEA Edmonton
DEN Denver
MEX Mexico City
CHI Chicago
NYC New York –5
SCL Santiago
YHZ Halifax
YYT St. Johns –3.5
L-2
UTC Offset/
GMT Differential
City
City
City
City
Code
RIO Rio De Janeiro –3
Fernando de
FEN
Noronha
–8
–7
–6
–4
RAI Praia –1
UTC
LIS Lisbon
LON London
MAD Madrid
PAR Paris
ROM Rome
BER Berlin
STO Stockholm
UTC Offset/
GMT Differential
–2
0
+1
Code
ATH Athens
JRS Jerusalem
MOW Moscow
JED Jeddah
THR Tehran +3.5
DXB Dubai +4
KBL Kabul +4.5
KHI Karachi +5
DEL Delhi +5.5
KTM Kathmandu +5.75
DAC Dhaka +6
RGN Yangon +6.5
• This table shows the city codes of this watch.(As of December 2014)
• The rules governing global times (UTC offset and GMT differential) and summer
time are determined by each individual country.
UTC Offset/
GMT Differential
+2CAI Cairo
+3
City
City
Code
BKK Bangkok +7
SIN Singapore
HKG Hong Kong
BJS Beijing
TPE Taipei
SEL Seoul
TYO Tokyo
ADL Adelaide +9.5
GUM Guam
SYD Sydney
NOU Noumea +11
WLG Wellington +12
UTC Offset/
GMT Differential
+8
+9
+10
L-3
 Loading...