

Page 1

MA1411-EC
© 2014 CASIO COMPUTER CO., LTD.
Basic Operations
Manuals
WORLDWIDE
Main Menu
STB-1000
Manuals
WORLDWIDE
Main Menu
STB-1000
Timekeeping Mode
Stopwatch Mode
Recall Mode
World Time Mode
Alarm Mode
Countdown Timer Mode
Setup Mode
Control Mode
Press B to switch modes. The
Tap Operations
Manuals
WORLDWIDE
Main Menu
STB-1000
Operation Guide 3423
Operations common to each
mode are shown below. Check
content when using the watch.
This watch has eight modes
(functions), including the
Timekeeping Mode that displays
the current time.
Mode Switching
(Timekeeping Mode)
Timekeeping Mode
flowchart below shows how the
mode switches when you press
B.
* To toggle between the Control
Mode and other modes, hold
down B for approximately three
seconds. Perform this operation
while the Control indicator is on
the display.
a. Control indicator
When an alarm or timer beep or
vibration alert operation is being
performed, the tap operation can
be used to stop the beep or
vibration.
The tap indicator flashes on the
display while the tap operation is
enabled.
a.Tap indicator
At this time, tapping the center of
the watch's display twice
(double-tapping) stops the beep
or vibration.
Stopwatch Mode
Recall Mode
World Time Mode
Alarm Mode
Countdown Timer Mode
Setup Mode
Control Mode
The Control Mode can be
switched only when connected to
a mobile phone. For details, refer
to the CASIO WATCH+ App
Setup Guide.
Important!
The Control Mode cannot be
switched to while the app
setting is one that does not
use the Control Mode.
Important!
Tapping the display with your
fingernail or some other hard
object can scratch the watch's
display panel. Be sure to tap
with the ball of the finger.
Page 2
Watch Settings
Manuals
WORLDWIDE
Main Menu
STB-1000
Manuals
WORLDWIDE
Main Menu
STB-1000
Sets the time offset of the city
where the watch is used. When
summer time is implemented in
the city where the watch is used,
summer time can also be set.
Important!
Incorrectly setting the time
offset will cause incorrect
times to be displayed in the
World Time Mode.
Time Offset Setting
flash.
Press B to display the
summer time setting screen.
Press D to specify ON
2.
3.
Manuals
WORLDWIDE
Main Menu
STB-1000
When communicating with a
mobile phone, the time and date
of the mobile phone is
automatically adjusted to. When
there is no communication with a
mobile phone, the time and date
can be adjusted with the
procedure below.
【Preparation】
The procedure here is performed
in the Timekeeping Mode. Press
B to switch to the Timekeeping
Mode.
See: Mode Switching.
(Timekeeping Mode)
Operation Guide 3423
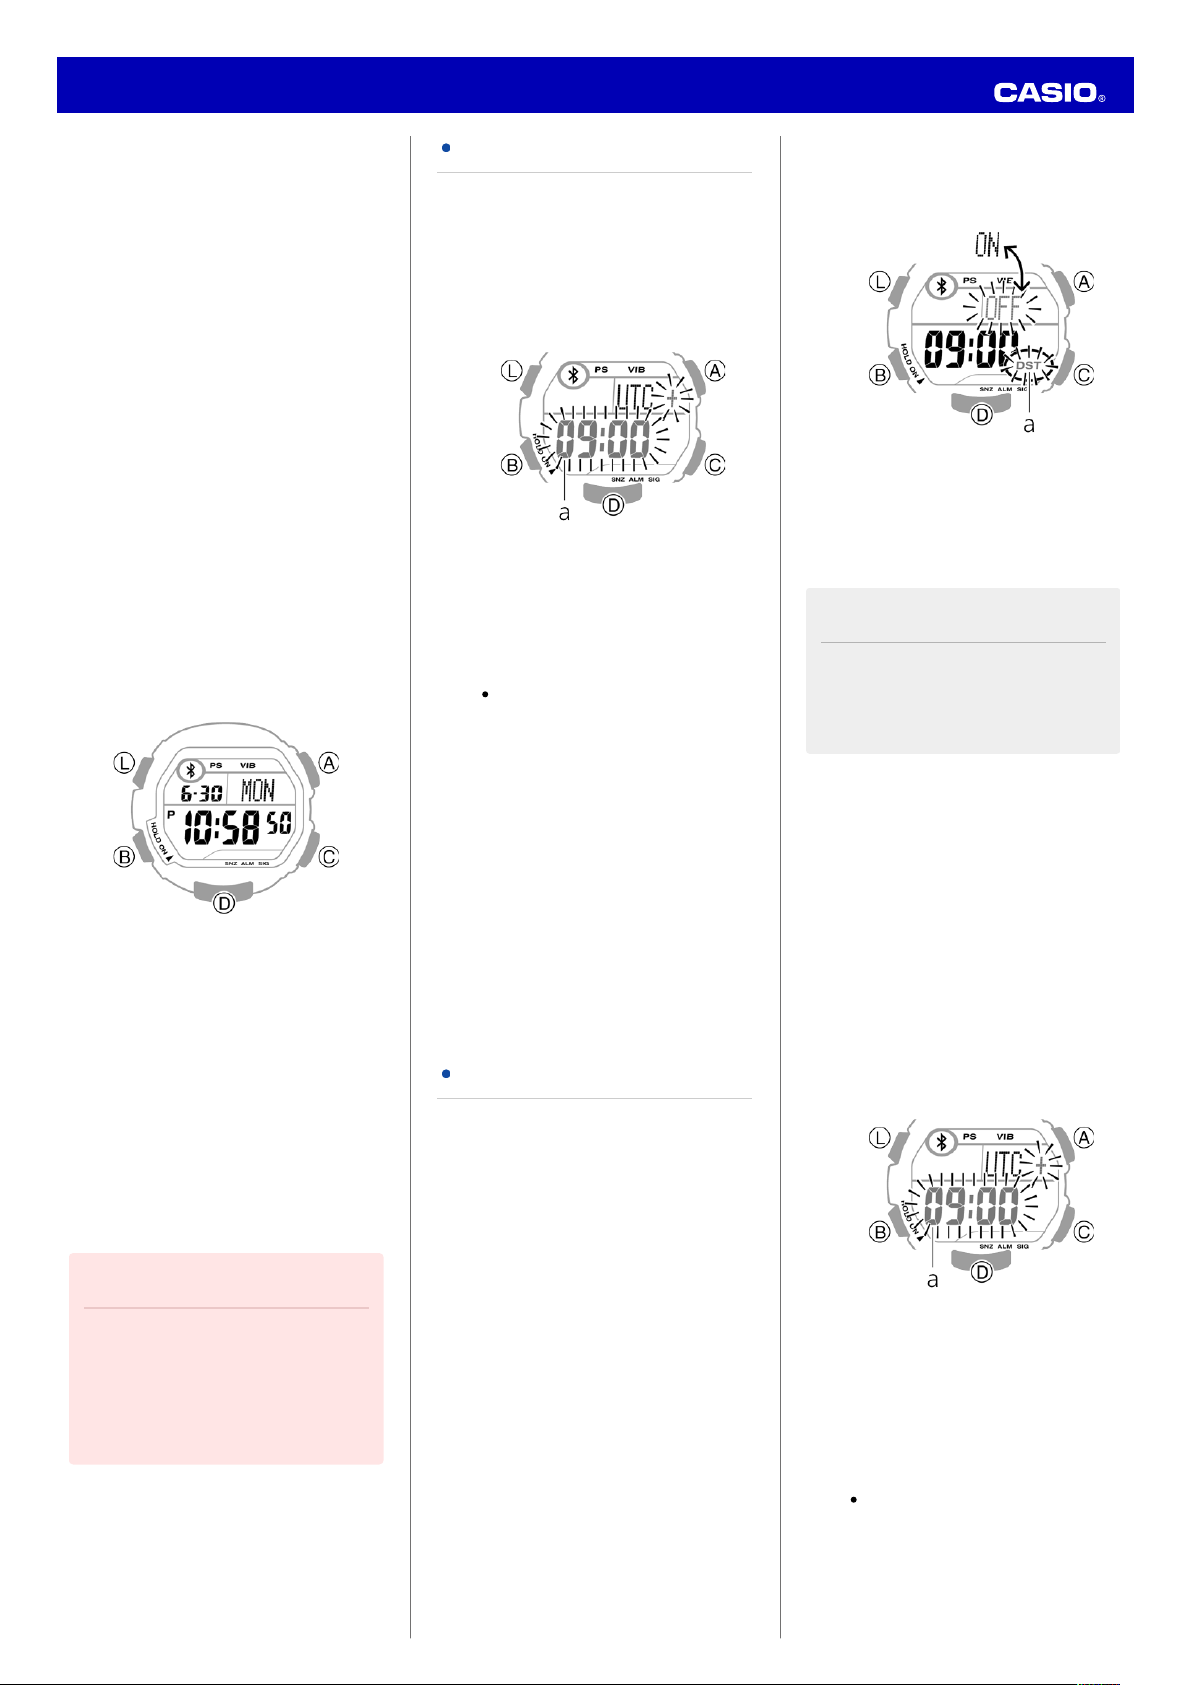
1.
Hold down C for about two
seconds.
[SET Hold] will appear and
the time offset will flash.
4.
Note
The DST indicator is
displayed while summer time
is set.
a. Time differential
2.
Use D and A to change the
flashing time offset setting.
For the time offset,
specify a time zone listed
in the City Name List.
(summer time) or OFF
(standard time).
a.DST indicator
Press C to end setting.
Setting the City
Sets the time offset of the city
where the watch is used. When
summer time is implemented in
the city where the watch is used,
summer time can also be set.
Important!
Incorrectly setting the time
offset will cause incorrect
times to be displayed in the
World Time Mode.
Example:
If you plan to use the watch
in Tokyo, set a time offset of
[+ 09:00].
3.
Press C to end setting.
Summer Time Setting
Hold down C for about two
1.
seconds.
[SET Hold] will appear and
the time offset value will
flash.
Press B to display the
2.
summer time setting screen.
Setting the Time and Date
1.
Hold down C for about two
seconds.
[SET Hold] will appear and
the time offset value will
flash.
a. Time differential
2.
Press B three times to
display the seconds reset
screen.
Press D to reset the
seconds to 00.
Page 3
Setting the Time and Date
Main Menu
Hold down C for about two
seconds.
[SET Hold] will appear and
the time offset value will
flash.
a. Time differential
Press B three times to
display the seconds reset
screen.
Press D to reset the
seconds to 00.
1.
2.
Switching between 12-hour
and 24-hour Timekeeping
Manuals
Main Menu
Hold down C for about two
seconds.
[SET Hold] will appear and
the time offset value will flash
on the display.
a. Time differential
Press B twice to display the
1.
2.
STB-1000
Summer Time
Manuals
WORLDWIDE
Main Menu
STB-1000
Setting Supplement
Manuals
WORLDWIDE
Main Menu
STB-1000
Manuals
WORLDWIDE
Main Menu
STB-1000
Supplement:
Pressing D between 30
seconds and 59 seconds will
advances the "minutes" by
one minute and reset the
seconds.
3.
Press B to display the date
and time setting screen.
a. Hour
Date and time setting:
Each press of B moves
the flashing in the
Press C to end setting.4.
following sequence:
"hour", "minute", "year",
"month", "day".
Press D or A to change
the setting of the flashing
item.
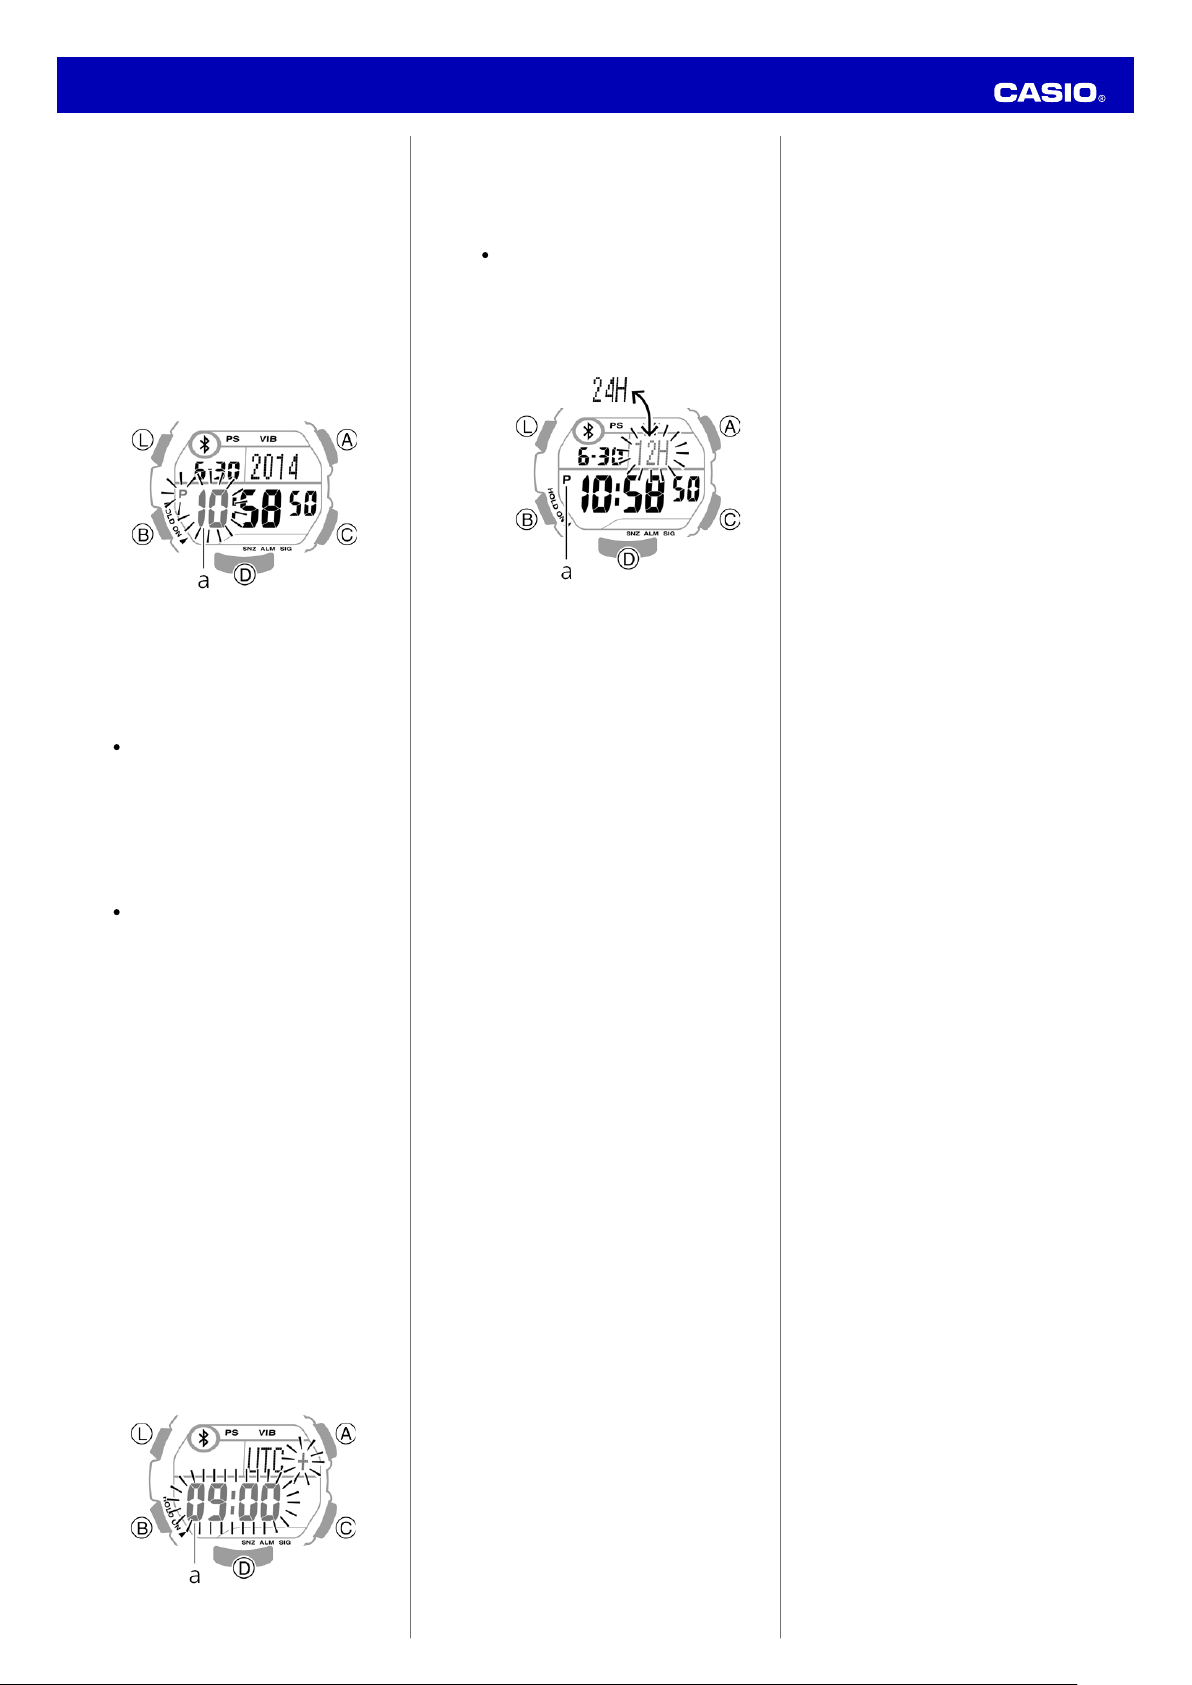
Switching between 12-hour
and 24-hour Timekeeping
1.
Hold down C for about two
seconds.
[SET Hold] will appear and
the time offset value will flash
on the display.
Operation Guide 3423
screen for selecting 12-hour
or 24-hour timekeeping.
Press D to select [12H]
(12-hour timekeeping) or
[24H] (24-hour
timekeeping).
3.
Summer time is also called DST
(Daylight Saving Time) and it is a
summer time system that
advances one hour ahead of
standard time (STD: standard
time). The summer time
implementation period and
implementation regions differ by
country. Also, there are countries
and/or regions that do not use
the summer time system.
a. PM indicator
Note:
The PM indicator appears
between noon and 11:59
p.m. while 12-hour
timekeeping is being used. It
is not displayed if 24-hour
timekeeping is being used.
After all the settings are the
way you want, press C to exit
the setting screen.
On the Timekeeping Mode
setting screen, each press of B
switches items in the sequence
below.
Time offset
↓
Summer time
↓
12/24-hour timekeeping display
↓
Second
↓
Hour
↓
Minute
↓
Year
↓
Month
↓
Day
↓
Operation tone ON/OFF
↓
Illumination duration
↓
Alarmtimer alert method
↓
Power saving
↓
Return to time offset
a. Time differential
Page 4
Stopwatch
Manuals
WORLDWIDE
Main Menu
STB-1000
Measuring Elapsed Time
a. Hours
b. Minutes
c. Seconds
d. 1/100 seconds
*1 Number of remaining memories
Shows the current number of memories that
can record.
Manuals
WORLDWIDE
Main Menu
Use the button operations below to
1.
STB-1000
Measuring Splits
a. Hours
b. Minutes
c. Seconds
d. 1/100 seconds
*1 Number of remaining memories
Shows the current number of memories that
can record.
Main Menu
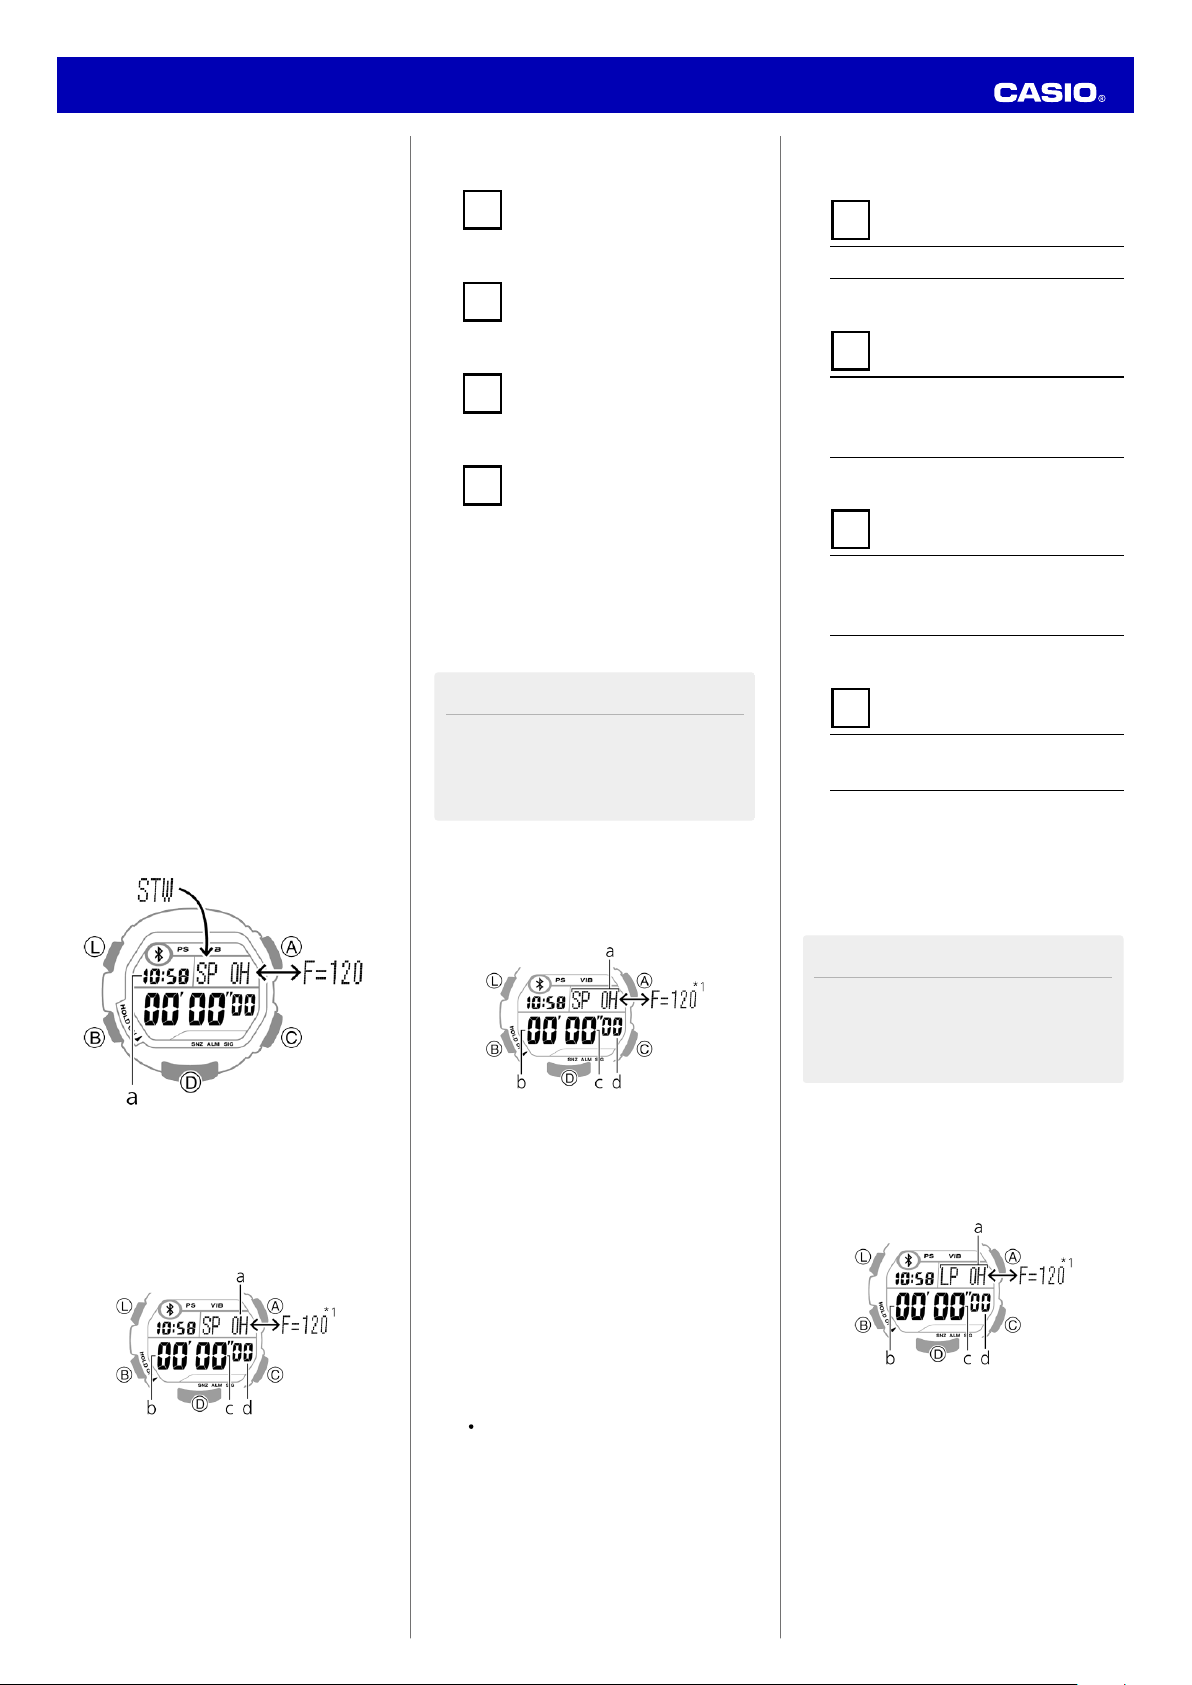
Make sure [SP 0H] (split) is displayed.
If [LP 0H] (lap) is displayed, press C
to switch to [SP 0H] (split)
Use
the button operations below to
1.
2.
STB-1000
Measuring Elapsed Time
Manuals
WORLDWIDE
Main Menu
STB-1000
Measuring Splits
Manuals
WORLDWIDE
Main Menu
STB-1000
Manuals
WORLDWIDE
Main Menu
STB-1000
A maximum of 99 hours, 59
minutes, 59.99 seconds can be
measured.
In addition to normal
measurement, you can also
measure lap times and split
times.
Measured results are recorded to
up to 120 memories, so records
can be checked later.
Reference:
Recalling Records - Recall -
【Preparation】
The procedure here is performed
in the Stopwatch Mode. Press B
to switch to the Stopwatch Mode.
See: Mode Switching.
(Stopwatch Mode)
Operation Guide 3423
measure elapsed time.
D Start
↓
A Stop
↓
D Resume
↓
A Stop
Press A to reset the display.
2.
Press B six times to return to the
3.
Timekeeping Mode.
Note
When the number of remaining
memories becomes 0, the oldest record
is deleted and new measurement results
are recorded.
3.
4.
measure elapsed time.
D Start
Measurement starts.
↓
D Split 1
The first split time remains on the
display for eight seconds, and then
measurement returns.
↓
D Split 2
The second split time remains on the
display for eight seconds, and then
measurement returns.
↓
A Goal
Cumulative time is displayed and
measurement stops.
Press A to reset the display.
Press B six times to return to the
Timekeeping Mode.
a. Current time
a. Hours
b. Minutes
c. Seconds
d. 1/100 seconds
*1 Number of remaining memories
the
Shows
record.
can
current
numberofmemories
Note
When the number of remaining
memories becomes 0, the oldest record
is deleted and new measurement results
are recorded.
a. Hours
b. Minutes
c. Seconds
d. 1/100 seconds
*1 Number of remaining memories
Shows the current number of memories that
can record.
Make sure [SP 0H] (split) is displayed.
1.
that
If [LP 0H] (lap) is displayed, press C
to switch to [SP 0H] (split)
*1 Number of remaining memories
Shows the current number of memories that
can record.
Measuring Laps
a. Hours
b. Minutes
c. Seconds
d. 1/100 seconds
Page 5

Recalling Records
─
Main Menu
STB-1000
Measuring Laps
a. Hours
b. Minutes
c. Seconds
d. 1/100 seconds
*1 Number of remaining memories
Shows the current number of memories that
can record.
Main Menu
STB-1000
Recalling Records
─
Recall
You can check recorded
measurement times.
Use B to switch to the Recall
Mode.
See: Mode Switching
(Recall Mode)
a. Measurement time
b. Measurement date (month,
day)
c. Measurement number
Supplement:
The last recorded date, time,
measurement number
appears (a measurement
number is a number for
managing recorded data).
Press C to select a
measurement number.
If you do not know the
measurement number,
select according to
measurement date and/or
measurement time.
D
1.
2.
─
The [BEST] is displayed
Deleting Memory Data
Manuals
WORLDWIDE
Main Menu
STB-1000
1.
2.
Make sure [LP 0H] (lap) is displayed.
If [SP 0H] (split) is displayed, press
C to switch to [LP 0H] (lap)
Use the button operations below to
measure elapsed time.
D Start
Measurement starts.
↓
D Lap 1
After the Lap 1 time is displayed for
eight seconds, returns to next lap
measurement.
↓
D Lap 2
Operation Guide 3423
3.
Recall
You can check recorded
measurement times.
Use B to switch to the Recall
1.
Mode.
See: Mode Switching
(Recall Mode)
─
4.
Each press of
recorded
in
the
measurement
sequenceitwas
displays
time
saved.
for the fastest lap time.
Press B five times to return
to the Timekeeping Mode.
eight seconds, returns to next lap
measurement.
After the Lap 2 time is displayed for
↓
A Goal
Last lap time is displayed and
measurement stops.
Press A to reset the display.
3.
Press B six times to return to the
4.
Timekeeping Mode.
Note
When the number of remaining
memories becomes 0, the oldest record
is deleted and new measurement results
are recorded.
a. Measurement time
b. Measurement date (month,
day)
c. Measurement number
Supplement:
The last recorded date, time,
measurement number
appears (a measurement
number is a number for
managing recorded data).
Press C to select a
2.
measurement number.
If you do not know the
measurement number,
select according to
measurement date and/or
measurement time.
Deleting a Specific Record
Use B to switch to the Recall
1.
Mode.
See: Mode Switching
(Recall Mode)
a. Measurement time
b. Measurement date (month,
day)
c. Measurement number
2.
Press C to select the
measurement number you
wanttodelete.
Page 6

Deleting Memory Data
Main Menu
Deleting a Specific Record
Use B to switch to the Recall
Mode.
See: Mode Switching
(Recall Mode)
a. Measurement time
b. Measurement date (month,
day)
c. Measurement number
Press C to select the
measurement number you
want to delete.
Hold down A for about two
1.
2.
3.
Laps and Splits
Manuals
WORLDWIDE
Main Menu
STB-1000
World Time
Manuals
WORLDWIDE
Main Menu
STB-1000
Looking Up Times in Other
Manuals
WORLDWIDE
Main Menu
STB-1000
Operation Guide 3423
seconds.
Displays [Hold CLEAR],
deletes the specified record.
4.
Press B five times to return
to the Timekeeping Mode.
Deleting All Records
Press B to enter the Recall
1.
Mode.
See: Mode Switching
(Recall Mode)
Laps
The time required to cover a
fixed section, as in a race around
a track is called a "lap".
Splits
a. Start
① Lap 1
② Lap 2
③ Lap 3
You can know the time in 100
world cities.
【Preparation】
The procedure here is performed
in the World Time Mode. Press B
to switch to the World Time
Mode.
See: Mode Switching
(World Time Mode)
a. Measurement time
b. Measurement date (month,
day)
c. Measurement number
Hold down A for about five
2.
seconds.
[Hold A-CLR] appears,
indicating that all records are
deleted.
3.
Press B five times to return
to
the
Timekeeping
Mode.
The elapsed time from the start
of a race to any point along the
way, such as the times at 10 km,
20 km, and 30 km point of a
marathon, is called "split".
Press D or A to select a city.
1.
The time of that city is
a. Start
b. Stop
① Split 1
② Split 2
③ Split 3
displayed.
Countries
Holding down D or A fast
forwards city names.
a. City name
b. Time of selected city
2.
Press B four times to return
the
to
Timekeeping
Mode.
Page 7

Setting Summer Time
Manuals
WORLDWIDE
Main Menu
STB-1000
Alarm
At the specified time, alerted by
beep or vibration.
【Preparation】
The procedure here is performed
in the Alarm Mode. Press B to
switch to the Alarm Mode.
See: Mode Switching
(Alarm Mode)
Manuals
WORLDWIDE
Main Menu
STB-1000
Manuals
WORLDWIDE
Main Menu
STB-1000
Alarm
Manuals
WORLDWIDE
Main Menu
STB-1000
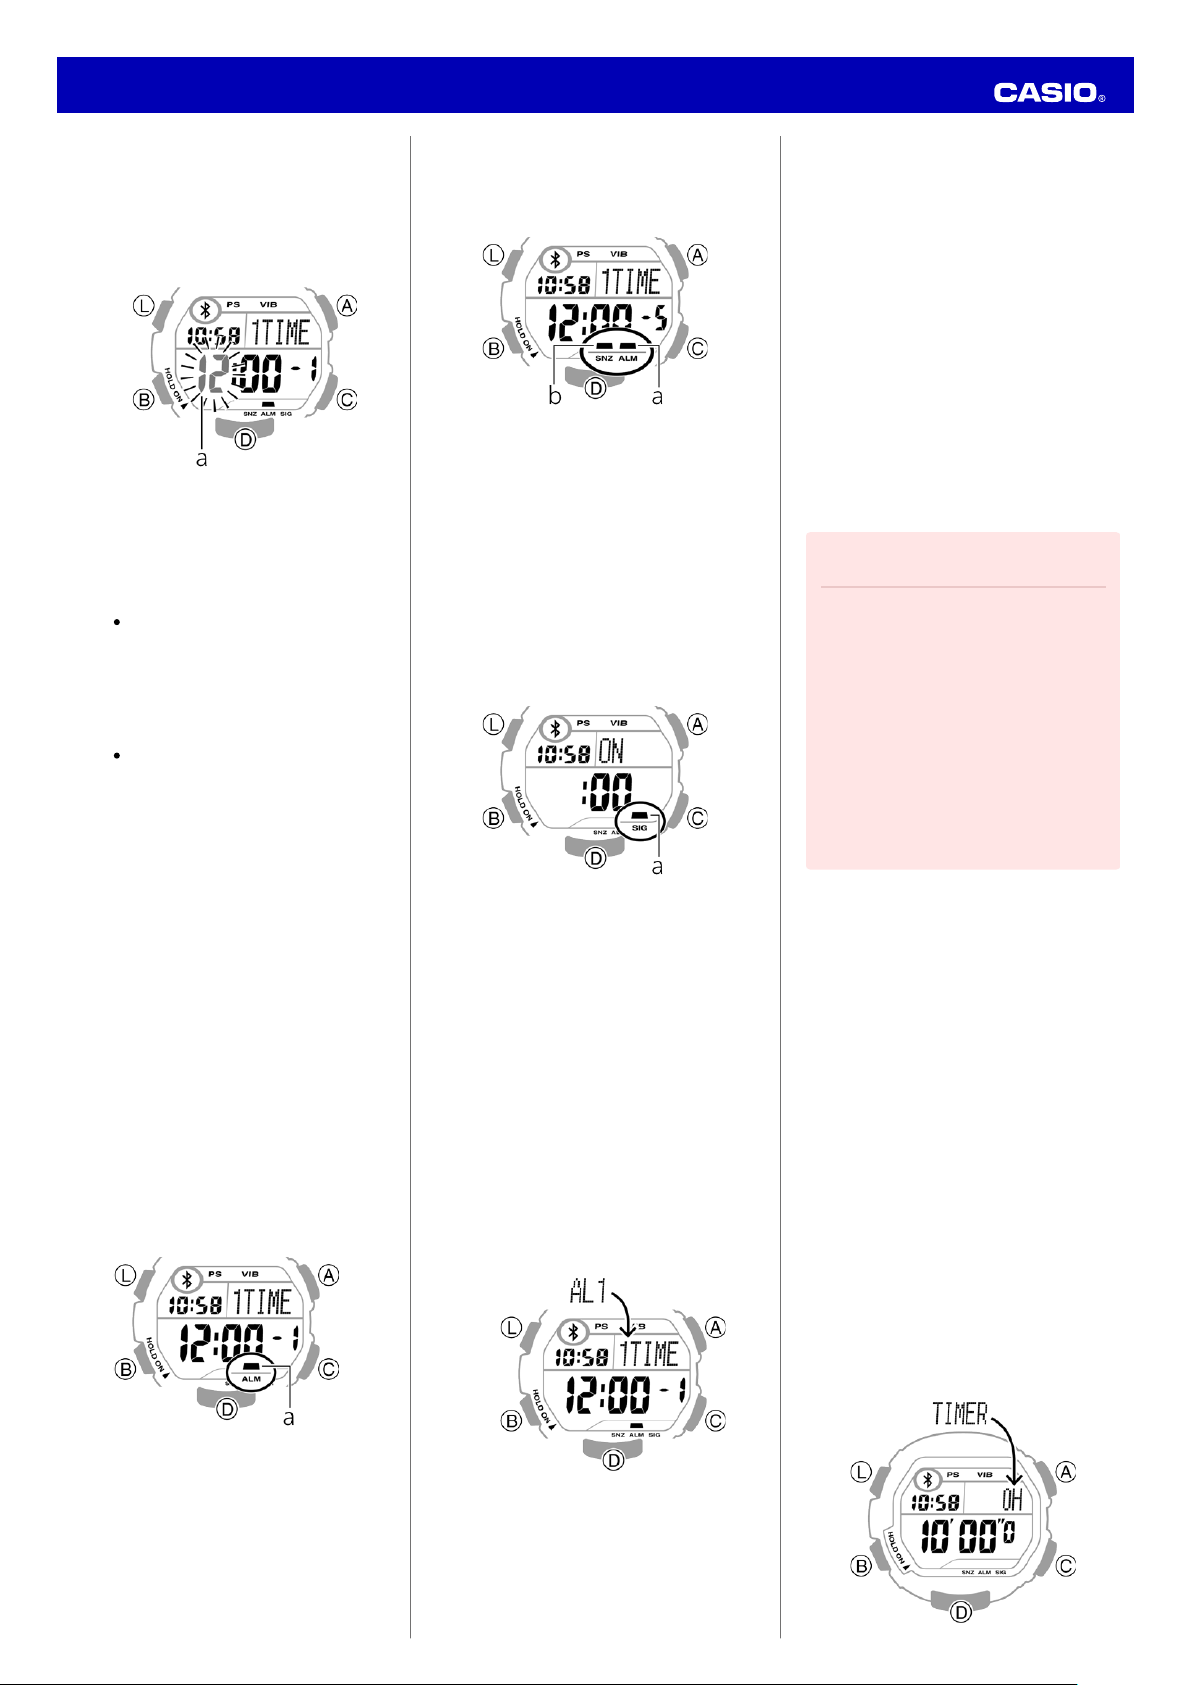
Setting an Alarm Time
Press D to select the alarm
screen you want to set.
a. Alarm number
Six alarms can be selected,
including the hourly time
signal.
Check the alarm you want to
set by the alarm number on
the screen.
to
Normal alarms.
Snooze alarm.
Alerts at the specified
time. Alert repeats
every five minutes,
seven times.
1.
When summer time is used in
another city, summer time can be
set for that city.
Hold down C for about two
1.
seconds.
After [DST Hold] is displayed,
switch summer time ON or
OFF.
2.
PressBfour
to
At the specified time, alerted by
beep or vibration.
【Preparation】
The procedure here is performed
in the Alarm Mode. Press B to
switch to the Alarm Mode.
See: Mode Switching
The DST indicator is lit
while summer time is set.
a. City name
b. DST indicator
timestoreturn
the
Timekeeping
Mode.
Operation Guide 3423
a.
Current
Setting an Alarm Time
Press D to select the alarm
1.
screen you want to set.
a. Alarm number
Six alarms can be selected,
including the hourly time
signal.
Check the alarm you want to
set by the alarm number on
the screen.
time
Normal alarms.
to
Snooze alarm.
Alerts at the specified
time. Alert repeats
every
five
minutes,
seven
times.
Hourly time signal.
Alerts at 00 minutes
every hour.
Displaying an alarm
screen:
Press D to cycle between
alarm screens in the
following sequence:
normal alarms
(
through
snooze alarm, hourly time
signal.
2.
Press A to specify the alarm
or hourly time signal
operation.
The operations below can be
specified
number.
for
to and
each
alarm
: Alarm does
not sound.
: Alarm sounds
only once at
the preset
time.
: Alarm sounds
at the preset
time each day.
: Hourly time
signal does not
sound.
: Hourly time
signal sounds at
00 minutes every
hour.
),
Page 8
When ON is set for the snooze
time each day.
: Hourly time
signal does not
sound.
: Hourly time
signal sounds at
00 minutes every
hour.
Turning OFF an Alarm
Manuals
WORLDWIDE
Main Menu
STB-1000
Manuals
WORLDWIDE
Main Menu
STB-1000
Timer
Manuals
WORLDWIDE
Main Menu
STB-1000
Turning OFF an Alarm
Manuals
WORLDWIDE
Main Menu
Press D to select the alarm
screen whose settings you
want to change.
Press A to set OFF for alarm
and/or hourly time signal
operation.
1.
2.
STB-1000
3.
Hold down C for about two
seconds.
[SET Hold] will appear,
"hour" will flash.
a. Hour
Alarm time setting:
Each press of B moves
the flashing between the
"hour" and the "minute"
settings.
Use D and A to change
the setting of the flashing
item.
4.
Press C to end setting.
5.
Press B three times to return
to the Timekeeping Mode.
Alarm indicators:
Appropriate indicators light when
the alarm
signal is set to ON.
Alarm set to ON
and/or hourly time
Operation Guide 3423
alarm
a. Alarm indicator
b. Snooze indicator
When ON is set for the hourly
time signal
a. Hourly time signal
indicator
Press D to select the alarm
1.
screen whose settings you
want to change.
3.
PressBthree
to
the
Timekeeping
timestoreturn
Mode.
Stopping the Alarm
When an alarm tone is sounding
or when vibrating, it can be
stopped by pressing any button
or by double-tapping the center
of the watch display.
Important!
With the snooze alarm, even
if the beep or vibration is
stopped by pressing any
button or by double tapping, it
will repeat at five-minute
intervals seven times. To stop
part way through, set snooze
alarm operation to OFF.
Performs a countdown of the set
time. When the remaining time
becomes zero, alert by beep or
vibration.
【Preparation】
The procedure here is performed
in the Timer Mode. Press B to
switch to the Timer Mode.
See: Mode Switching
a. Alarm indicator
(Timer Mode)
2.
Press A to set OFF for alarm
and/or
operation.
hourly
time
signal
Page 9

Setting the Time
Manuals
WORLDWIDE
Main Menu
STB-1000
Using the Timer
Manuals
WORLDWIDE
Main Menu
STB-1000
Manuals
Display Illumination
WORLDWIDE
Main Menu
STB-1000
Manuals
Illuminating the Display
WORLDWIDE
Main Menu
STB-1000
Operation Guide 3423
Hold down C for about two
1.
seconds.
[Set Hold] will appear and
"hours" will flash.
a. Hours
b. Minutes
c. Seconds
Time Setting:
Each press of B moves
the flashing in the
following sequence:
"hour", "minute", "second".
Use D and A to change
the setting of the flashing
item.
2.
Press C to end setting.
3.
Press B twice to return to the
Timekeeping Mode.
Note
A simple operation illuminates the
display of the watch for easy
reading in the dark. You can also
enable an Auto Light feature that
illuminates the display whenever
a. Hours
b. Minutes
c. Seconds
d. 1/10 seconds
Use the button operations below to
1.
perform a countdown.
D Start
Timer starts.
↓
D Stop
Timer stops.
you angle the watch towards
your face for viewing.
Press L in any mode to illuminate
↓
D Resume
Timer resumes.
↓
the display.
Supplement
The display illumination will
turn off automatically if an
Time up (00:00)
Alert by beep or vibration.
alarm alert, incoming call
alert, or any alert operation
starts while it is on.
To discontinue a timer operation part
way through,press D to stop it and then
press A to reset to the timer start time.
To stop a beep or vibration alert
operation, press any button or double-
tap the center of the watch's display.
Changing the Illumination
Duration
The illumination duration can be
set to two types: 1.5 seconds
Press B twice to return to the
2.
Timekeeping
Mode.
and three seconds.
Setting "0H00’00”" can set a
100-hour
countdown
timer.
Press B to switch to the
1.
Timekeeping Mode.
See: Mode Switching
Page 10

Press L in any mode to illuminate
the display.
Supplement
The display illumination will
turn off automatically if an
alarm alert, incoming call
alert, or any alert operation
starts while it is on.
The illumination duration can be
set to two types: 1.5 seconds
and three seconds.
Main Menu
Changing the Illumination
Duration
Press B to switch to the
Timekeeping Mode.
See: Mode Switching
Hold down C for about two
seconds.
[SET Hold] will appear and
the time offset value will
flash.
a. Time differential
Press B 10 times to display
the illumination duration
setting screen.
Press D to select [LT1] (1.5
seconds) or [LT3] (3
seconds).
1.
2.
3.
4.
Illuminating the Display
Press L in any mode to illuminate
the display.
Supplement
The display illumination will
turn off automatically if an
alarm alert, incoming call
alert, or any alert operation
starts while it is on.
The illumination duration can be
set to two types: 1.5 seconds
and three seconds.
Main Menu
Changing the Illumination
Duration
Press B to switch to the
Timekeeping Mode.
See: Mode Switching
Hold down C for about two
1.
2.
Other Settings
Button Operation Tone
Manuals
Main Menu
STB-1000
Enabling Auto Light
Use the procedure below to
enable Auto Light, which will
automatically turn on display
illumination whenever you tilt the
watch towards for face to read it.
Main Menu
Important!
While Auto Light is enabled,
display illumination will turn
on whenever your wrist is in
certain positions, even if you
are not looking at the watch.
This can shorten battery life.
Enabling Auto Light
Press B to switch to the
Timekeeping Mode.
See: Mode Switching
Hold down L for about three
seconds.
This cause the Auto Light ON
indicator to appear on the
display.
1.
2.
STB-1000
Enabling Auto Light
Manuals
WORLDWIDE
Main Menu
STB-1000
seconds.
[SET Hold] will appear and
the time offset value will
flash.
3.
Press B 10 times to display
the illumination duration
setting screen.
4.
Press D to select [LT1] (1.5
seconds) or [LT3] (3
seconds).
5.
Press C to end setting.
a. Time differential
Operation Guide 3423
Use the procedure below to
enable Auto Light, which will
automatically turn on display
illumination whenever you tilt the
watch towards for face to read it.
Important!
While Auto Light is enabled,
display illumination will turn
on whenever your wrist is in
certain positions, even if you
are not looking at the watch.
This can shorten battery life.
Enabling Auto Light
Press B to switch to the
1.
Timekeeping Mode.
See: Mode Switching
Hold down L for about three
2.
seconds.
This cause the Auto Light ON
indicator to appear on the
display.
Tone sounds or no sound when
a button is pressed can be set.
1.
2.
3.
Setting
Press B to switch to the
Timekeeping Mode.
See: Mode Switching
Hold down C for about two
seconds.
[SET Hold] will appear and
the time offset value will
flash.
a. Time offset
Press B nine times to display
the button operation tone
setting screen.
a. Auto Light ON
indicator
Supplement
Auto Light remains enabled
for about six hours. After that
disables automatically.
4.
Press D to select [KEY♪] or
[MUTE].
Selecting [MUTE] causes
a mute indicator to light
and the button operation
tone will not sound.
a.
Mute
indicator
5.
PressCto
end
setting.
Page 11

Alert Method Setting
Main Menu
STB-1000
Battery Replacement
Period
About the Battery
Manuals
WORLDWIDE
Main Menu
STB-1000
Manuals
WORLDWIDE
Main Menu
STB-1000
Marks Displayed on the
Display
Bluetooth icon
Meaning: Mobile Link can be
used.
Power Saving indicator
Meaning: Mobile Link function
availability is limited to save
power.
Auto Light ON indicator
①
②
③
Alarm, timer, etc. alerts can be
switched to beep or vibration.
Press B to switch to the
1.
Timekeeping Mode.
See: Mode Switching
Hold down C for about two
2.
seconds.
[SET Hold] will appear and
the time offset value will
flash.
a. Time differential
3.
Press B 11 times to display
the alert method setting
screen.
4.
Press D to select [BEEP] or
[VIB].
Selecting [VIB] will cause
a vibration indicator to
light and enable vibration
alert.
Operation Guide 3423
Meaning: Light lights
automatically.
④
Vibration indicator
Replacement Period
When battery voltage drops, a
battery icon is displayed on the
display. While the battery icon is
displayed, usable functions are
limited.
If the battery icon is always
displayed, replace the battery.
Battery
a.
icon
Viewing the Display
Marks Displayed on the
Display
Meaning: Alarms and timer
alerted by vibration.
⑤
Tap indicator
Meaning: Double-tap
operation is possible.
⑥
PM indicator
Meaning: Watch 12-hour
timekeeping display time is
afternoon.
⑦
Control indicator
Meaning: Control Mode can
be used.
⑧
Snooze indicator
Meaning: Snooze alarm
sounds.
⑨
Alarm indicator
Meaning: Alarm sounds.
⑩
Hourly time signal indicator
Meaning: Hourly time signal
sounds.
⑪
DST indicator
Meaning: Time is summer
time.
⑫
indicator
Mute
Meaning: Operation tone does
not sound.
a.
5.
PressCto
Vibration
end
indicator
setting.
Bluetooth is a registered
trademark or trademark of
Bluetooth SIG, Inc. of the
①
Bluetooth icon
Meaning: Mobile Link can be
used.
②
Power Saving indicator
Meaning:
availabilityislimitedtosave
power.
Mobile
Link
function
United States.
®
Page 12
Supplementary Info
City Name List
Manuals
WORLDWIDE
Main Menu
STB-1000
City Name
Time
Zone
(UTC)
0
Reykjavik
Lisbon
Casablanca
London
Madrid
+1
Paris
Algiers
Brussels
Amsterdam
Zurich
Frankfurt
Oslo
Rome
Copenhagen
Berlin
Stockholm
Budapest
Warsaw
Delhi +5.5
Kathmandu +5.75
Novosibirsk*
+6
Dhaka
Yangon +6.5
Bangkok
+7Hanoi
Jakarta
Operation Guide 3423
Cape Town
Sofia
Kuala Lumpur
Singapore
City Name
(UTC)
Reykjavik
Lisbon
Casablanca
London
Madrid
Paris
Algiers
Brussels
Time
Zone
0
Athens
Helsinki
+2
Istanbul
Kyiv
Cairo
Jerusalem
Moscow*
+3Addis Ababa
Jeddah
Tehran +3.5
Dubai +4
Hong Kong
Perth
+8
Beijing
Manila
Shanghai
Taipei
Seoul
+9
Tokyo
Adelaide +9.5
Vladivostok*
+10Guam
Amsterdam
Zurich
Frankfurt
Oslo
Rome
Copenhagen
Berlin
Stockholm
Budapest
Warsaw
+1
Kabul +4.5
Karachi +5
Delhi +5.5
Kathmandu +5.75
Novosibirsk*
+6
Dhaka
Yangon +6.5
Bangkok
+7Hanoi
Jakarta
Sydney
Noumea +11
Wellington
+12
Suva
Chatham Islands +12.75
Nukualofa +13
Kiritimati +14
Pago Pago -11
Honolulu -10
Page 13

-7
Phoenix
Chihuahua
Denver
Mexico City
-6
Winnipeg
Dallas
Houston
Guatemala City
Chicago
Atlanta
-5
Havana
Toronto
Lima
Washington DC
Kingston
Philadelphia
Bogota
New York
Boston
Anchorage -9
Vancouver
San Francisco
Seattle
Los Angeles
Tijuana
Edmonton
Phoenix
Chihuahua
Denver
Mexico City
Winnipeg
Dallas
Houston
Guatemala City
Chicago
Atlanta
Havana
Operation Guide 3423
Caracas -4.5
Santiago
La Paz
-4
-8
-7
-6
San Juan
Halifax
St. John's -3.5
Buenos Aires
-3Montevideo
Rio de Janeiro
Fernando de
Noronha
Praia -1
* As of June 2014, the change of
the time offsets of the cities
below to plus one hour is not
reflected by this watch.
When the summer time setting is
ON, advance by one hour and
use it.
Moscow
Novosibirsk
Vladivostok
-2
Toronto
Lima
Washington DC
Kingston
Philadelphia
Bogota
New York
Boston
-5
 Loading...