


MA0611-EA
Operation Guide 3014
Introduction
Thank you for purchasing this CASIO product. To ensure that it can
provide you with the years of service for which it is designed, be sure to
read this manual carefully and follow the instructions contained herein.
Pay particular attention to the Safety Precautions on the following pages.
Be sure to read the Safety Precautions before trying to use this product.
Safety Precautions
Danger
Never use this product if you are wearing a cardiac pacemaker.
Do not use this product in the vicinity of anyone who is wearing a
cardiac pacemaker or any other type of medical device.
Should you ever feel any discomfort or any other abnormal
feeling while using this product, immediately stop using it and
contact your physician.
Do not use this product inside of an aircraft.
Warning!
Do not use this product during scuba diving or other type of
diving that requires special equipment.
• This product is not a diving watch. Improper use can lead to
serious accident. Do not wear the chest strap while you are
immersed in water.
For Safe Operation
Do not use this product in the vicinity of a microwave oven, TV,
computer, or cell phone, or while inside of an automobile or train.
This product may not produce correct readings if used in the
vicinity of a TV or radio transmitter.
Do not leave this product on the dashboard of an automobile or in
any other location that is subject to very high temperatures.
Never put on the chest strap after it has been in a very hot
location for a long time. Doing so creates the risk of burn injury.
If you do not have the stamina to workout for long periods, if you
are suffering from any type of ailment, or if you are unsure of your
physical condition, consult a physician before using this product.
Should you ever start to feel discomfort or any other abnormal
feeling while using this product, immediately stop using it and
remove the chest strap.
Always keep aware of the situation around you whenever
operating or using this product.
Keep the chest strap out of the reach of young children.
Handling Batteries
Whenever removing the button type battery that powers the
watch or sensor bar, take care to ensure that the battery is not
swallowed accidentally. Special care is required where young
children are present.
Keep batteries out of the reach of small children. Should a battery
ever be swallowed accidentally, contact a physician immediately.
Caution!
Skin Irritation
Should you ever experience any skin irritation or any other
abnormality while wearing the chest strap, immediately take it off.
Since the watch and the chest strap come into direct contact with
the skin, the following conditions may cause skin irritation.
• When a wearer is allergic to metal or leather
• When the watch or chest strap is rusty dirty, sweaty, etc.
• When the wearer is in poor physical condition
• Tightening the chest strap too tightly can cause you to sweat,
and can make it hard for air to pass under the strap, which can
lead to skin irritation. Do not over-tighten the chest strap.
• Should you ever notice any abnormality, immediately stop
using the product and consult a physician.
Caring for This Product
To clean the product, wipe it with a soft, dry cloth, or with a cloth
that has been moistened in weak solution of water and a mild
neutral detergent. Wring out all excess liquid from the cloth
before wiping. Never use thinner, benzene, alcohol, or any other
volatile agent to clean the product.
Use of the Product
When putting on or taking off the chest strap, make sure you do
not twist, bend, or stretch it excessively.
Take care not to drop the product or otherwise subject it to strong
impact.
To avoid unexpected accidents, always check around you to
ensure you are in a safe place before looking at the display of the
watch. Looking at the watch while marathoning or jogging on the
open road, while riding a bicycle, or operating a motor vehicle
can lead to accidents.
Take care to avoid running into others.
Should the watch stop running, have the battery replaced as
soon as possible.
Take care to avoid breaking your fingernails when fastening and
unfastening the band. Particular care is required by people with
long fingernails.
To avoid skin irritation due to unexpected injury or allergy, do not
wear the watch while sleeping.
When picking up or otherwise coming into contact with a child,
remove the watch from your wrist to avoid injury to the child or
causing irritation of the child’s skin.
Never try to take the watch apart!
Never try to take the watch apart. Doing so creates the risk of
personal injury and malfunction of the watch.
Battery Replacement
When the watch’s battery is replaced, foreign matter adhering to
contact surfaces can cause a loss of water resistance. In order to
ensure water resistance is maintained and the watch performs at
the level for which it is designed, make sure you always request
battery replacement from your dealer or CASIO distributor.
Keep backup copies of data!
Make sure you always keep separate written copies of important
data to protect against its loss. Malfunction, repair, and battery
replacement can cause memory contents to be deleted.
1

Operation Guide 3014
Features
■ Heart Rate Monitor
Keeps track of your heart rate, workout intensity, and
workout time.
Measurement system:
Constant monitoring of electrocardiogram by strap
type electrodes
Transmission method:
Heartbeat detected by the chest strap and sent to the
watch.
■ Stopwatch
100 hours maximum, 1/100 second,
energy consumption calculation
■ Memory
••
• Workout Data: 100 records
••
Workout date, elapsed workout time, workout time
within target heart rate range, average workout heart rate, energy
consumption, body fat burned
• Daily Data: 30 records
Workout date, cumulative workout time, cumulative energy
consumption
• Weekly Data: 31 records
Cumulative energy consumption
■ Timer
Number of timers: 2
Countdown unit: 1 second
Setting range: 100 hours
Setting unit: 30 seconds
Number of repeats: 1 to 99, endless
• Settable number of repeats; single/twin switching
■ Alarms
Three (hour and minute setting, ON/OFF)
Hourly Time Signal (ON/OFF)
■ Display Illumination
For easy reading in the dark
Read this first!
This product is intended for use as an exercise support tool only.
It is not a medical device.
• Never use this product if you are wearing a cardiac pacemaker or any
other type of medical device.
• Do not use this product in the vicinity of anyone who is wearing a
cardiac pacemaker or any other type of medical device.
• Do not wear this product while riding on an aircraft. Doing so creates
the risk of interference with the aircraft’s equipment.
• Do not wear this product while swimming. The water resistance of the
sensor bar does not cover immersion in water. Communication
between the sensor bar and watch is not possible in water.
• Do not use this product if the strap causes skin irritation or any other
abnormality.
• To clean the product, wipe it with a soft, dry cloth, or with a cloth that
has been moistened in weak solution of water and a mild neutral
detergent. Wring out all excess liquid from the cloth before wiping.
Never use thinner, benzene, alcohol, or any other volatile agent to
clean the product.
• The rubber band of the chest strap needs to come into direct contact
with your skin. Water, stretching, and twisting can cause the rubber to
deteriorate. It is recommended that the rubber band be replaced at
regular intervals.
Display Illumination
In any mode, press the C button to turn on illumination for about 1.5
seconds for easy reading in the dark.
Important!
• The light may be difficult to see if you turn it on under bright sunlight.
• Illumination will turn off if any beeper operation (alarm or button
operation tone) is performed while the display is illuminated.
• You may notice a slight sound from the watch while the face is
illuminated. This is the sound of EL panel vibration, and does not
indicate malfunction.
General Guide
Watch
Button
(Mode Switching)
••
• Heart Rate Measurement
••
In the Timekeeping Mode, Stopwatch Mode, or Timer Mode, press the
B button to start synchronization with the sensor bar. For details, see
“Synchronizing the Watch with the Sensor Bar”.
••
• Selecting 12-hour or 24-hour Timekeeping
••
Each press of the E button toggles the timekeeping format between 12hour and 24-hour.
Chest Strap
Sensor Bar, Inside Surface
LCD
Back
Sensor pads
Battery
ButtonButton
Button
(Light)
Button
Sensor bar
2
Operation Guide 3014
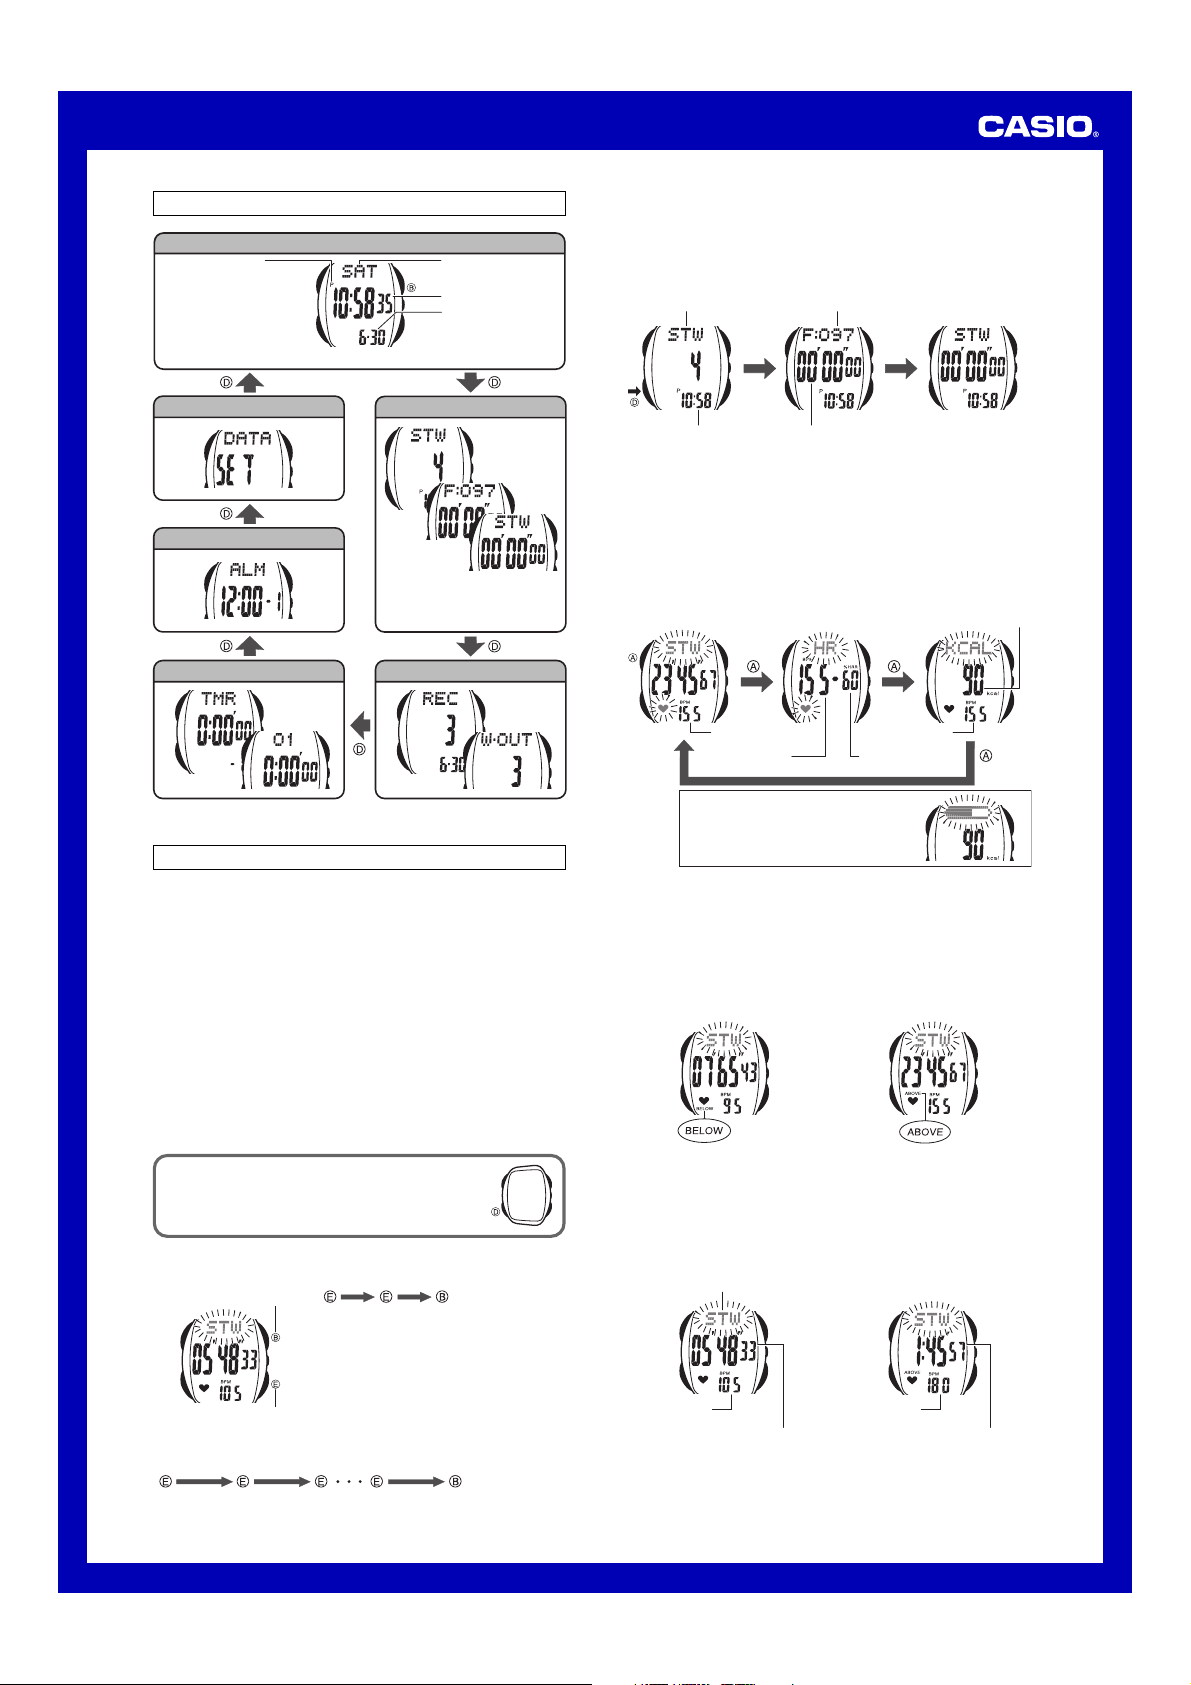
Modes and Display Screens
P (PM) indicator
••
• Each press of the B
••
button toggles between
the month-day screen
and the heart rate
screen.
Personal Data Mode Stopwatch Mode
Alarm Mode
Timer Mode Data Recall Mode
Timekeeping Mode
Month-Day Screen
• The details of the measurement
Day of the week
Hour, minute, second
Month, day
that was displayed the last time
you exited this mode will be
displayed first.
Stopwatch Mode Screens
■ Understanding the Stopwatch Mode Display Format
In the Timekeeping Mode, press the D button to enter the Stopwatch
Mode. When you enter the Stopwatch Mode, the display will cycle
through the three screens shown below. The example screens below
show what would appear when elapsed time is reset to all zeros.
Mode indicator Remaining memory records
Current time Elapsed time
■ Selecting a Measurement Screen
Each press of the A button in the Stopwatch Mode will cycle through
contents as shown below. The example screens below show what would
appear during heart rate measurement.
• When you enter the Stopwatch Mode, the details of the measurement
that was displayed the last time you exited the mode will be displayed
first.
Workout Time Screen Heart Rate Screen Energy Consumption
Heart rate
Heart rate
Intensity
Screen
Energy consumption
Heart rate
Using the Stopwatch
You can use the Stopwatch Mode to measure elapsed time as well as
your heart rate as you work out. You can also display other Stopwatch
Mode screens to view workout intensity and energy consumption.
• In order to measure your heart rate, workout intensity, and energy
consumption, you need to use the Personal Data Mode to configure
your personal data settings. Also, you should put on the chest strap
before starting your workout.
Using the Stopwatch
• Measuring Unit: 1/100 second
• Measuring Capacity: 99:59'59.99"
• Heart Rate: 30 to 220 bpm
• Intensity: 0 to 99%
• Energy Consumption Value: 0 to 2,389 kcal (9,999 kJ)
• Target Heart Rate Alarm, Target Energy Consumption Alarm
To use the stopwatch
To enter the Stopwatch Mode, press the D button
once while in the Timekeeping Mode.
■ Elapsed Time Measurement
• Reset (Data to memory)
Start
Stop Start
Start Stop Reset
Holding down the B button for about two
seconds while the stopwatch is stopped will
reset it to all zeros and stores the data from
the last measurement operation in memory.
••
• Cumulative Time Measurement
••
• Start
• Stop
Pressing the E button to restart the
stopwatch without resetting it to all zeros
resumes elapsed time measurement
from where it was last stopped.
Stop Reset
(About 2 seconds)
(About 2 seconds)
When the target energy consumption
alarm is turned on, the Workout Intensity
Graph will be displayed at the top of the
Energy Consumption screen (in place of
KCAL).
■ Target Heart Rate Screen
When one of the heart marks shown below appears on the Stopwatch
Mode display, it means that the heart rate being measured by the watch
is outside of the preset target heart rate range. An alarm will also sound
if the watch is in the Stopwatch Mode and the Target Heart Rate Alarm
is turned on.
Below target range Above target range
■ Stopwatch Time Displays
During the first hour of a stopwatch time measurement, the display
shows minute, second, and 1/100-second values. After the end of the
first hour is reached, the display switches to hour, minute, and second
values.
First Hour Subsequent Hours
Flashing
Heart rate Heart rate
Elapsed time
(minutes, seconds,
1/100 second)
Elapsed time
(hours, minutes,
seconds)
3

Operation Guide 3014
■ Memory
Measurement results are stored into memory whenever you reset the
stopwatch to all zeros.
(Reset)
• If memory is already full, resetting the stopwatch to all zeros will cause
the oldest data in memory to be deleted automatically to make room
for the new data.
Configuring Personal Information
You need to preset certain personal information before your watch can
calculate your energy consumption, workout intensity, and body fat
burned. The following are the parameters you need to preset.
••
• Target Heart Rate Alarm on/off
••
••
• Target Heart Rate upper limit
••
••
• Target Heart Rate lower limit
••
••
• Energy Consumption Unit: kcal (kilocalories) or kJ (kilojoules)
••
••
• Target Energy Consumption Alarm on/off
••
••
• Target energy consumption value
••
••
• Resting heart rate: Your heart rate before getting up when you awake
••
in the morning
••
• Age
••
••
• Gender
••
••
• Weight
••
••
• Body fat unit
••
Personal information settings are configured in the
Personal Data Mode, which you enter by pressing
the D button five times while in the Timekeeping
Mode.
Personal Information Settings
■ Target Heart Rate Alarm On/Off
HR TARGET
■ Target Range Upper Limit
LIMIT HIGH
■ Target Range Lower Limit
LIMIT LOW
■ Energy Consumption Unit
kJ
Press the E button to toggle the Target
Heart Rate Alarm on and off.
• When the alarm is on, a beeper will
sound whenever the heart rate being
measured by the stopwatch is either
above or below the target range.
• The beeper will continue to sound at one
minute intervals if your heart rate remains
outside the target range.
Use the E (+) and B (–) buttons to
change the displayed value in the range of
1 to 220.
• It is recommended that you calculate
your target heart rate upper and lower
limits in accordance with your target
heart rate. See “Target Heart Rate
Guide” for more information.
Use the E (+) and B (–) buttons to
change the displayed value in the range of
[resting heart rate setting plus 1] to [target
range upper limit minus 1].
Use the E or B button to toggle between
KCAL (kilocalories) and KJ (kilojoules).
Personal Data Mode Screen
Important!
• You will not be able to perform the following procedure unless the
stopwatch is reset to all zeros. If you experience problems performing
this procedure, enter the Stopwatch Mode and then hold down the B
button for about two seconds to reset the stopwatch to all zeros.
To configure personal data settings
(2 seconds)
• Use the E and B buttons to change the currently selected
setting. Holding down either button changes the setting at high
speed.
• For information about each setting, see “Personal Information
Settings”.
3. After all the settings are the way you want, press the A button to exit
the setting screen.
• The watch also will exit the setting screen automatically if you do not
perform any operation for about two or three minutes.
1. In the Personal Data Mode, hold down
the A button until the Target Heart Rate
Alarm (HR TARGET) On/OFF setting
starts to flash.
2. Configure your personal data settings.
• Use the D button to scroll between
setting screens.
■ Target Energy Consumption Alarm On/Off
KCAL ALARM
■ Target Energy Consumption Value
KCAL TARGET
■ Resting Heart Rate
REST-HR
■ Age
■ Gender
Press the E button to toggle the Target
Energy Consumption Alarm on and off.
Use the E (+) and B (–) buttons to change
the displayed value in 1 kcal (or kJ) steps
from 10 to 2,000 kcal (42 to 8,370 kJ).
Use the E (+) and B (–) buttons to
change the displayed value in the range of
30 to [target range lower limit minus 1] (145
maximum).
• Measure your heart rate before getting
up when you awake in the morning. This
is your resting heart rate.
Use the E (+) and B (–) buttons to
change the displayed value in the range of
15 to 70.
Use the E or B button to toggle between
m (male) and F (female).
4

Operation Guide 3014
■ Body Weight Unit
Use the E or B button to toggle between
kg (kilograms) and lb (pounds).
■ Weight
WEIGHT
Use the E (+) and B (–) buttons to
change the displayed value in the range of
20 to 200 kilograms or 44 to 440 pounds.
■ Body Fat Unit
Use the E (+) and B (–) buttons to
change the displayed unit to either
g (grams) or oz (ounces).
■ Target Heart Rate Guide
1. Measure your resting heart rate while lying in bed, either before you
go to sleep or immediately after you wake up.
2. Calculate your maximum heart rate by subtracting your current age in
years from 220.
3. In the Age, Resting Heart Rate, Workout Intensity (%HRR) Table
below, find your desired level of workout intensity.
For race training
For weight loss and endurance
High (80%+)
Medium-to-High (60% to 80%)
Monitoring Your Heart Rate During a Workout
This section explains what you need to do to monitor your heart rate
while exercising. This section assumes that you have already configured
your personal information settings.
Getting Ready
Before exercising, you need to attach the chest strap to your chest and
synchronize the signal between the sensor bar and watch.
Certain types of heart rate monitors can cause interference with the
signal sent by the sensor bar to your watch. If you suspect that you are
getting interference, move away from the other heart rate monitor.
To attach the chest strap to your chest
Moisten
2. Insert one of the tabs on either end of the strap into one of the holes
in the sensor bar, from the inside of the sensor bar. Secure the tab in
place so it lays down flat as shown in the illustration.
3. Wrap the chest strap around your chest so it is in direct contact with
your skin, and secure the tab at the other end of the strap to the other
hole of the sensor bar. Fasten the strap securely to ensure that it
does not slip down while you are exercising.
4. Make sure that the sensor pads are located above your rib cage.
• Take care that you do not fasten the chest strap too tightly.
1. Slightly moisten the two sensor pads
(diamond pattern areas) on the inside
surface of the sensor bar. This will
provide better contact for the sensor
pads.
Tab
For beginners and low load
Low (40% to 50%)
4. Use the formula below to calculate your target heart rate.
Exercising Heart Rate (Target Heart Rate) =
(Maximum Heart Rate – Resting Heart Rate) ×
Workout Intensity + Resting Heart Rate
Age, Resting Heart Rate, Workout Intensity (%HRR) Table
Resting Heart Rate 60bpm Resting Heart Rate 70bpm Resting Heart Rate 80bpm
Workout Intensity (%HRR) Workout Intensity (%HRR) Workout Intensity (%HRR)
Age
40% 50% 60% 80% 40% 50% 60% 80% 40% 50% 60% 80%
116
20
112
30
108
40
104
50
100
60
70
80
• Values are calculated by CASIO and are presented as general guidelines only. Actual
requirements will vary by individual.
About your heart rate
Your heart rate is a value that indicates the number of times your
heart beats per minute. During a workout, your heart rate
increases in order to supply large amounts of oxygen to your
muscles.
As your fitness level increases, the blood sent to your muscles
becomes richer in oxygen, and so you will need to workout at a
higher intensity in order to achieve the same training effect as you
did previously. This is what is known as “cardiovascular fitness”.
As your cardiovascular system develops, your heart is able to
move more blood with each pump, which means that it does not
need to pump as often as it did before. This is why heart rate is a
major factor when setting workout goals.
144
130
138
125
132
120
126
115
120
110
96
114
105
92
108
100
172
164
156
148
140
132
124
122
118
114
110
106
102
98
135
130
125
120
115
110
105
148
142
136
130
124
118
112
174
166
158
150
142
134
126
128
124
120
116
112
108
104
140
135
130
125
120
115
110
152
146
140
134
128
122
116
176
168
160
152
144
136
128
Synchronizing the Watch with the Sensor Bar
While you are wearing the chest strap, press the B button while the
watch is in the Timekeeping Mode, Stopwatch Mode, or Timer Mode to
start synchronization.
After synchronization is complete, the watch will receive the signal from
the sensor bar and display your heart rate.
• The heart mark will flash on the display while your heart rate is being
monitored.
• In the Stopwatch Mode, the Heart Rate screen shows the workout
intensity along with the heart rate.
• In the Timer Mode, the heart rate is displayed while a timer operation
is in progress. Heart rate is not displayed while the timer is reset to its
starting time.
• Pressing the B button while the watch is monitoring your heart rate
will perform synchronization again.
• Synchronization will be cancelled automatically if the watch is not able
to receive any signal from the sensor bar for about 60 seconds.
Timekeeping Mode Stopwatch Mode
(Heart Rate Screen)
Heart mark Heart mark
5

Operation Guide 3014
Heart Rate Monitor Troubleshooting
If this happens:
No heart rate appears on
the display, or displayed
values are excessive or
vary widely.
Heart rate measurement
suddenly stops
automatically.
Interference in the signal
from the chest strap.
Check this:
Is the strap attached to your chest correctly?
•Your heart rate cannot be detected
correctly if the strap is not attached to your
chest correctly.
•See “To attach the chest strap to your
chest”.
Are the sensor bar’s sensor pads
(diamond pattern areas) wet?
•Your heart rate cannot be detected if your
skin is dry.
•Warm up until you start sweating or
moisten the sensor pads with water.
Are the sensor bar’s sensor pads dirty?
•Dirty sensor pads interfere with stable
heart rate pickup.
•Clean the sensor pads as required. To clean
the sensor pads, wipe them with a soft, dry
cloth, or with a cloth that has been moistened
in weak solution of water and a mild neutral
detergent. Wring out all excess liquid from
the cloth before wiping. Never use thinner,
benzene, alcohol, or any other volatile agent
to clean the sensor pads.
Is the sensor bar’s battery dead?
•If so, contact your dealer or CASIO
distributor to have the battery replaced.
Is there some source of electromagnetic
waves (high-tension power lines, TV, cell
phone, etc.) nearby?
•Electromagnetic waves can make normal
heart rate detection and communication
impossible.
•Possible sources of electromagnetic
waves are: signal equipment, overhead
railway cables, electric bus cables,
streetcars, automobiles, motorcycles,
computers, motorized fitness equipment,
medical devices, electronic security gates,
radios, railway crossings, TV transmitters,
radar sites, etc.
Do you have heart trouble?
•Normal readings are not possible if you
have a heart abnormality that causes
changes in the waveform of an
electrocardiogram, or if you are suffering
from arrhythmia.
Is the watch too far from the chest strap?
•The maximum allowable distance between
the strap and watch is about 90 cm (35.4
inches). Communication is not possible
when they are too far apart.
Do you have a hairy chest?
•Hair on the chest can interfere with heart
beat detection.
Did more than one minute pass without
the watch detecting any signal from the
chest strap?
•This will cause measurement to stop
automatically. Restart the measurement
operation.
Did the battery of the sensor bar or watch
go dead during measurement?
•The RECOV indicator will flash on the
display when the watch’s battery goes low.
If the RECOV indicator appears frequently,
have the watch’s battery replaced.
•If communication with the sensor bar is
not possible and the RECOV indicator is
not flashing on the display, it could mean
that the sensor bar battery is dead or that
the system is malfunctioning. Take the
watch in to your dealer or CASIO
distributor.
Important!
•Data in the watch’s memory will be deleted
when you have the battery replaced.
Is someone nearby using the same type of
watch as this one?
•Move away from the other watch.
If this happens:
The watch does not
calculate energy
consumption.
The energy consumption
value is strange.
A heart mark appears
when the stopwatch or
timer is reset.
Check this:
Is your heart rate above 90 bpm?
• The watch will not calculate energy
consumption unless your heart rate is 90
bpm or higher.
Are your personal information settings
correct?
• The watch calculates energy consumption
using your heart rate and personal
information. Make sure your personal
information settings are correct and up to
date.
Did you press the
stopwatch or timer following an operation
during which you did not perform heart
rate measurement?
• Pressing the B button in order to reset
the stopwatch or timer also starts a heart
rate measurement operation. The heart
mark will disappear from the display if you
hold down the B button to reset to the
stopwatch or timer.
BB
B button to reset the
BB
Memory
The watch maintains workout records that contain a wealth of
information about each workout. A workout record is created for your last
workout that you timed in the Stopwatch Mode and stored automatically
whenever you clear the stopwatch to all zeros.
Note that memory is shared by lap/split time records and workout
records. There is also a cumulative record that keeps track of long-term
cumulative totals.
The following will give you some idea about how much memory capacity
is available.
• If you use memory to store lap/split time records only (no workout
records), you can store up to 200 records during a single workout.
• If you use memory to store workout records only (Start
Reset), you can store up to 42 records.
Memory Data
The following details the contents of each type of record that can be
stored in memory.
■ Workout Data: 100 records
• Workout Date: month, day
• Workout Time: 99 hours, 59 minutes, 59 seconds
• Workout Time within Target Heart Rate Range
• Average Heart Rate and Workout Intensity
• Workout Energy Consumption
• Workout Body Fat Burned: 0 to 2,834 grams (99.99 ounces)
■ Daily Data: 30 records
• Workout Date: month, day
• Cumulative Workout Time: 99 hours, 59 minutes, 59 seconds
• Cumulative Energy Consumption: 0 to 2,389 kcal (9,999 kJ)
• Adds energy consumption calculated every 30 seconds when heart
rate is 90 bpm or higher during workout.
• If the date changes while measurement is in progress, measurement
results up to that point are saved and new record is started.
■ Weekly Data: 31 records
• Cumulative Energy Consumption: 0 to 239,005 kcal (999,999 kJ).
• Adds energy consumption calculated every 30 seconds when heart
rate is 90 bpm or higher during workout.
• The watch uses a week that runs from Monday to Sunday.
➡
Stop
➡
6

Operation Guide 3014
To recall memory contents
1. In the Timekeeping Mode, press the D button twice to enter the Data
Recall Mode.
2. Use the A button to select the type of data (Workout Data, Daily
Data, Weekly Data) you want.
Title Screen
(One second)
Workout Data
Daily Data
••
• Viewing Daily Data
••
Pressing the E button will scroll from the newest to the oldest, while the
B button will scroll from old to new.
Newest Data Oldest Data
Measurement
date
Energy
consumption
Workout time
Weekly Data
3. While the type of data (Workout Data, Daily Data, Weekly Data) you
want to view is on the display, use the E and B buttons to scroll
through its stored measurement values and calculated values.
• The stored measurement values and calculated values that appear
on the display depend on the currently selected data type as
shown below.
••
• Viewing the Data for a Workout
••
Pressing the B button will scroll through workout data from the data
with the lowest memory number to the data with the highest memory
number.
Newest Data Oldest Data
Record
number
Measurement date
Workout time Workout time within target
BURNING
TOTAL
heart rate range
TAR GET
••
• Viewing Weekly Data
••
Pressing the E button will scroll from the newest to the oldest, while the
B button will scroll from old to new.
Newest Data Oldest Data
4. After viewing all the data you want,
press the D button four times to return
to the Timekeeping Mode.
Clearing Memory Data
To clear a specific workout record
1. In the Data Recall Mode, display the
workout record whose data you want to
clear.
2. While holding down the B button, hold
down the E button.
3. When the confirmation message
appears, keep the B and E buttons
Confirmation message
depressed to clear the record.
• If you do not want to clear the record,
release the B and E buttons when the
confirmation message appears.
Body fat burned Intensity
• Each press of the E button will cycle through the workout data
enclosed in the boundary above.
Energy
consumption
Average
heart rate
To delete daily data or weekly data
Caution!
• Performing the procedure below to delete daily data will delete all daily
data. Also, deleting weekly data will delete all weekly data.
• Deleting daily data does not affect the data of each workout or the
weekly data.
• Deleting weekly data does not affect the data of each workout or the
daily data.
1. In the Data Recall Mode, display the
data of the type you want to delete.
• To delete daily data, display any one
of the daily data records. To delete
weekly data, display any one of the
weekly data records.
2. While holding down the B button, hold
down the E button.
3. When the confirmation message appears, keep the B and E
buttons depressed to clear the data.
• If you do not want to clear the data, release the B and E buttons
when the confirmation message appears.
7

Operation Guide 3014
Using the Timer
The twin countdown timer supports interval training by letting you use
one timer for the high-intensity phase and the other timer for the
recovery phase of your workout.
• You can select either a single timer or twin timer.
To enter the Timer Mode, press the D button
three times while in the Timekeeping Mode.
To select the timer type
1. In the Timer Mode, check the display to make sure the timer is
stopped and reset to its start time.
• If the timer is running, press the E button to stop it. To reset the
timer, hold down the B button for about two seconds.
2. In the Timer Mode, press the A button to toggle between the Timer
1 and Timer 2 screen.
• If you want to use Timer 1 only, turn off Timer 2. To toggle Timer 2 on
or off, display the Timer 2 screen and hold down the B button for
about two seconds.
• Timer 1 is always on and cannot be turned off.
Timer 1 Screen Timer 2 Screen
To configure timer settings
(2 seconds)
2. Hold down the A button for about two seconds until the number of
repeats at the top of the display starts to flash.
• This is the setting screen.
3. Configure the timer settings as shown below.
• Use the D button to move to the next setting. Use the E (+) and
B (–) buttons to change the currently selected setting.
• Holding down the E or B button changes the current setting at
high speed.
• For a starting time of 100 hours, set 0 hours 00 minutes 00
seconds.
4. After all the settings are the way you want, press the A button to exit
the setting screen.
• The watch also will exit the setting screen automatically if you do not
perform any operation for about two or three minutes.
Number of repeats
Timer 2Timer 1
1. In the Timer Mode, check the display to
make sure the timer is stopped and
reset to its start time.
• If the timer is running, press the E
button to stop it. To reset the timer,
hold down the B button for about two
seconds.
■ Number of Repeats
Range: 1 to 99 repeats, or unlimited (when
xx” is displayed for the number of
“
repeats)
Buttons: E (+), B (–)
D
■ Timer 1 Hours
Range: 0 to 99
Buttons: E (+), B (–)
D
■ Timer 1 Minutes
Range: 0 to 59
Buttons: E (+), B (–)
D
■ Timer 1 Seconds
Setting: 0 or 30
Buttons: E (+), B (–)
D
■ Timer 2 Hours
Range: 0 to 99
Buttons: E (+), B (–)
D
■ Timer 2 Minutes
Range: 0 to 59
Buttons: E (+), B (–)
D
■ Timer 2 Seconds
Setting: 0 or 30
Buttons: E (+), B (–)
To use the timer
• Holding down the B button for about two seconds while the
countdown is stopped will reset the timer.
• Pressing the E button while the timer countdown is stopped
will restart the countdown.
Before measuring heart rate and workout
• Reset
intensity, be sure first to configure your
personal information and put on the chest
strap.
• Heart rate and workout intensity values
measured in the Timer Mode are not
stored in memory.
In the Timer Mode, press the E button to
• Start
start the countdown, and the E button to
• Stop
stop it.
To start heart rate reception from the chest
strap, press the B button.
• In the Timer Mode, the heart rate is
displayed while a timer operation is in
progress. Heart rate is not displayed
while the timer is reset to its starting time.
8

Operation Guide 3014
Timer Mode Screens
Countdown Screen Countdown Screen with
Number of repeats
Remaining time
• The number of repeats flashes while Timer 2 is counting down.
Heart Rate Monitor
Time remaining until auto start
Heart rate
Timer Alarm
The alarm sounds for five seconds when the end of each countdown is
reached. The alarm sounds for 10 seconds when the end of the final
countdown is reached.
To stop the alarm beeper
Press any button. Pressing a button will stop the alarm only, without
performing the normal function assigned to that button.
Using the Alarms and Hourly Time Signal
Your watch comes with three alarms and an hourly time signal.
Daily Alarms (ALM 1, ALM 2, ALM 3)
The watch beeps for about 10 seconds when an alarm time is reached.
Hourly Time Signal
The hourly time signal causes the watch to beep every hour on the hour.
Alarm and hourly time signal settings are
configured in the Alarm Mode, which you enter by
pressing the D button four times while in the
Timekeeping Mode.
To display an alarm screen
In the Alarm Mode, use the B button to scroll through the alarm
screens.
• Holding down the B button scrolls at high speed.
Alarm 1 Alarm 2
Alarm time
Current time
Hourly Time Signal Alarm 3
To set an alarm time
(2 seconds)
3. Use the E (+) and B (–) buttons to change the hour setting.
• Holding down either button changes the setting at high speed.
• When setting the hour, make sure you specify AM or PM (P)
correctly when using 12-hour timekeeping, or that you specify the
correct 24-hour time. The same 12-hour/24-hour format you select
for the Timekeeping Mode time is also applied in the Alarm Mode.
Alarm number
1. In the Alarm Mode, display the screen of
the alarm whose setting you want to
change.
2. Hold down the A button for about two
seconds until the hour digits of the
current alarm time start to flash. This is
the setting screen.
• Displaying the setting screen also
turns on the alarm automatically and
causes the alarm on indicator to
appear on the screen.
4. Press the D button to move the flashing to the minutes.
5. Use the E (+) and B (–) buttons to change the minute setting within
the range of 0 to 59.
• Holding down either button changes the setting at high speed.
6. After all the settings are the way you want, press the A button to exit
the setting screen.
• The watch also will exit the setting screen automatically if you do not
perform any operation for about two or three minutes.
To turn an alarm or the hourly time signal on or off
While the screen for an alarm or the hourly time signal is on the display,
press the E button to toggle it on (alarm/Hourly time signal on indicator
displayed) and off (indicator not displayed).
• When any alarm is turned on, the alarm on indicator is displayed in all
other modes.
Alarm Hourly Time Signal
Alarm on indicator Hourly time signal on indicator
To stop the alarm beeper
Press any button.
To test the alarm
In the Alarm Mode, hold down the E button to sound the alarm.
Configuring Home Time Settings
(2 seconds)
D
1. In the Timekeeping Mode, hold down the
A button for about two seconds until
the seconds digits of the current time
start to flash. This is the setting screen.
2. Configure the Home Time settings as
shown below.
• Use the D button to move to the next
setting. Use the E (+) and B (–)
buttons to change the currently
selected setting.
• Holding down the E or B button
changes the current setting at high
speed.
3. After all the settings are the way you
want, press the A button to exit the
setting screen.
• The watch also will exit the setting screen
automatically if you do not perform any
operation for about two or three minutes.
■ Seconds Reset to 00
Press the E button.
• 00 to 29, no change in minutes.
• 30 to 59, increases minutes by 1.
9

D
D
D
Operation Guide 3014
■ Hour
Use the E (+) and B (–) buttons to
change.
■ Minute
Use the E (+) and B (–) buttons to
change.
Range: 00 to 59
■ Year
Use the E (+) and B (–) buttons to
change.
Range: 2000 to 2099
■ Month
Use the E (+) and B (–) buttons to
change.
Range: 1 to 12
D
• When setting the hour, make sure you specify AM (no indicator)
or PM (P) correctly, or that you specify the correct 24-hour time.
• You can set a date in the range of January 1, 2000 to
December 31, 2099.
• The day of the week is set automatically in accordance with the
date you set.
• The watch makes adjustments for leap years and month lengths
automatically.
■ Day
Use the E (+) and B (–) buttons to
change.
Range: 1 to 31 (auto month length setting)
10
 Loading...