

Casio 2766 Owner's Manual
MO0307-EA
Operation Guide 2766
Getting Acquainted
Congratulations upon your selection of this CASIO watch. To get the most out
of your purchase, be sure to carefully read this manual and keep it on hand
for later reference when necessary.
Expose the watch to bright light to charge its battery before using it.
You can use this watch even as its battery is being charged by exposure to
bright light.
• Be sure to read “Battery” of this manual for important
information you need to know when exposing the watch to bright
light.
Applications
The built-in sensors of this watch measure direction, altitude, barometric
pressure, and temperature. Measured values are then shown on the display.
Such features make this watch useful when hiking, mountain climbing, or
when engaging in other such outdoor activities.
• The measurement functions built into this watch are not intended for
taking measurements that require professional or industrial precision.
Values produced by this watch should be considered as reasonable
representations only.
• When engaging in mountain climbing or other activities in which losing
your way can create a dangerous or life-threatening situation, always be
sure to use a second compass to confirm direction readings.
• CASIO COMPUTER CO., LTD. assumes no responsibility for any loss,
or any claims by third parties that may arise through the use of this
watch.
Warning!
If the digital display of the watch is blank...
l
l
l
l
l
l
l
l
l
l
l
l
l
l
• The initial factory default setting is Power Saving on.
• The watch recovers from the sleep state if you move it to a well-lit area
you press any button, or if you angle the watch towards your face for
reading.
It can take up to two seconds for the display to turn on.
*
• See “Power Saving Function” for more information.
About This Manual
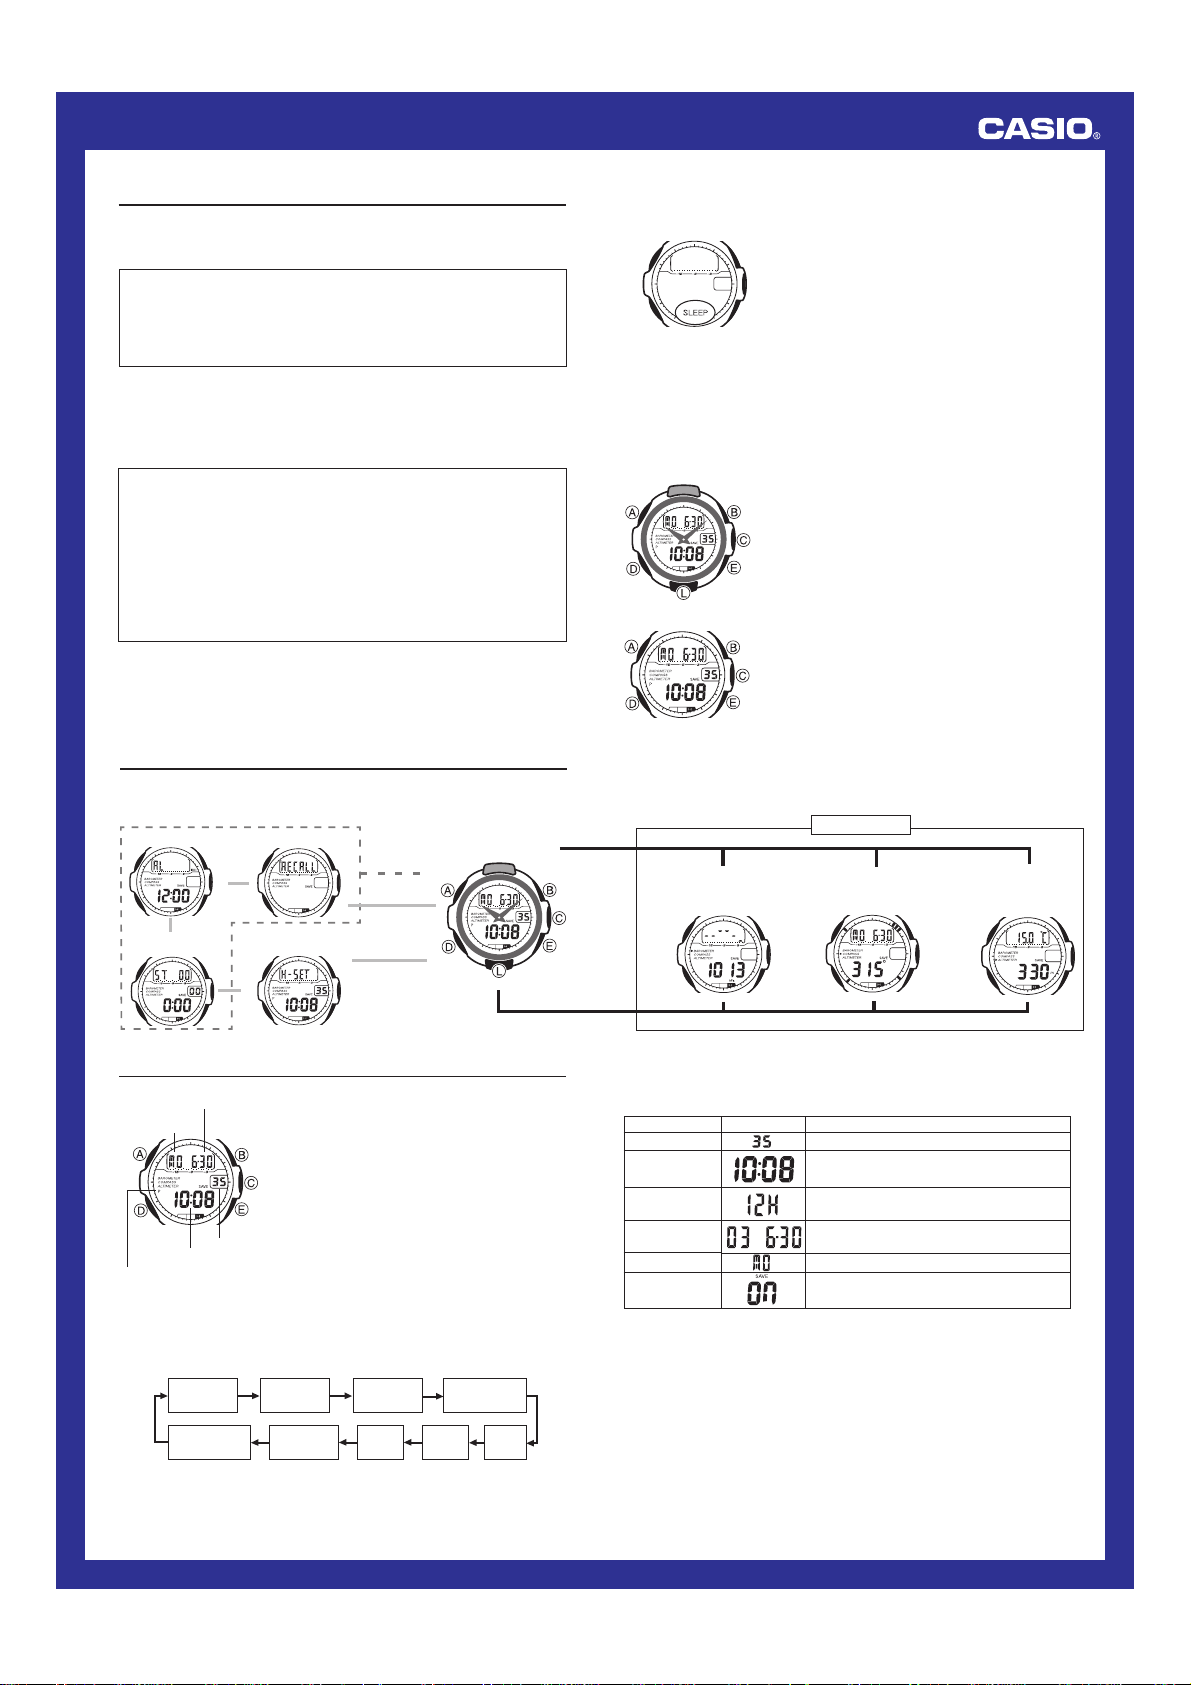
(Light)
If the SLEEP indicator is on the display (either
flashing or steady), it means that the display is
blank because the watch’s Power Saving function
has turned off the display to conserve power.
Power Saving automatically turns off the display
and enters a sleep state whenever the watch is
left for a certain period where it is dark.
• Button operations are indicated using the
letters shown in the illustration.
• Each section of this manual provides you with
the information you need to perform operations
in each mode. Further details and technical
information can be found in the “Reference”
section.
• Most of the display examples in this manual
show only the digital display, without the analog
hands, as shown in the lower illustration.
, if
*
General Guide
• The illustration below shows which buttons you need to press to navigate
between modes.
• In any mode, press L to illuminate the display.
Alarm Mode
Data Recall Mode
D
Hold down
D.
Timekeeping Mode
▲
▲
▲
▲
D
Stopwatch Mode
Hand Setting Mode
D
▲
Press D.
▲
D
▲
Timekeeping
Month – Day
Day of week
Seconds
Hour : Minutes
PM indicator
To set the digital time and date
1. In the Timekeeping Mode, hold down A until the seconds start to flash,
which indicates the setting screen.
2. Press D to move the flashing in the sequence shown below to select other
settings.
Seconds
Power Saving
on/off
This watch features separate digital and analog
timekeeping. The procedures for setting the
digital time and analog time are different.
• Whenever you need to adjust both the digital
and the analog time settings, make sure you
adjust the digital setting first.
Digital Time and Date
Use the Timekeeping Mode to set and view a
digital display of the current time and date. When
setting the digital time, you can also configure
settings for the 12/24-hour format and the Power
Saving function.
Month
12/24-Hour
Format
Year
Hour
Day of
week
Minutes
Day
• From the Timekeeping Mode or another sensor mode, you can use buttons
B, C, or E to directly enter the mode assigned to it. From any other
mode, you must go to the Timekeeping Mode first.
Sensor Modes
Press B.
Thermometer Mode
3. When the setting you want to change is flashing, use E to change it as
described below.
Setting
▲
Barometer/
l
l
l
l
l
l
l
l
Screen
Seconds
Hour, Minutes
12/24-Hour
format
Year, Month,
Day
Day of week
Power Saving
on/off
4. Press A to exit the setting screen.
• Resetting the seconds only (without changing the hour or minute setting)
causes the analog minute hand setting to be adjusted automatically.
• See “Power Saving Function” for details about configuring Power Saving
settings.
Press C.
Digital Compass Mode
Press E to reset the seconds to 00.
Use E (+) to change the setting.
Use E to toggle between 12-hour (12H)
and 24-hour (24H) timekeeping.
Use E (+) to change the setting.
Use E (+) to change the setting.
Press E to toggle Power Saving on (ON)
and off (OFF).
▲
l
l
l
l
l
l
l
l
Press D.
Button Operations
Press E.
Altimeter Mode
▲
l
l
l
l
l
l
l
l
1
Operation Guide 2766
l
l
l
l
l
l
l
l
l
l
l
l
l
l
l
l
l
l
l
l
l
l
l
l
l
l
l
l
l
l
l
l
Note
• Resetting the seconds to 00 while the current count is in the range of 30 to
59 causes the minutes to be increased by 1. In the range of 00 to 29, the
seconds are reset to 00 without changing the minutes.
• With the 12-hour format, the P (PM) indicator appears on the display for
times in the range of noon to 11:59 p.m. and no indicator appears for times
in the range of midnight to 11:59 a.m.
• With the 24-hour format, times are displayed in the range of 0:00 to 23:59,
without any indicator.
• The 12-hour/24-hour timekeeping format you select in the Timekeeping
Mode is applied in all modes.
• The year can be set in the range of 2000 to 2039.
• The watch’s built-in full automatic calendar automatically makes allowances
for different month lengths and leap years. Once you set the date, there
should be no reason to change it except when battery power drops to Level
4.
Setting the Analog Time
Perform the procedure below when the time indicated by the analog hands
does not match the time of the digital display.
To adjust the analog time
1.In the Timekeeping Mode, press D four times
to enter the Hand Setting Mode.
2.Hold down A until the current digital time
starts to flash, which indicates the analog time
setting screen.
3.Press E to advance the analog time setting by
20 seconds.
• Holding down E advances the analog time setting at high speed.
• If you need to advance the analog time setting a long way, hold down
E until the time starts advancing at high speed, and then press B.
This locks the high-speed hand movement, so you can release the two
buttons. High-speed hand movement continues until you press any
button. It will also stop automatically after the time advances 12 hours
or if an alarm starts to sound.
4. Press A to exit the setting screen.
• To return to the Timekeeping Mode, press D.
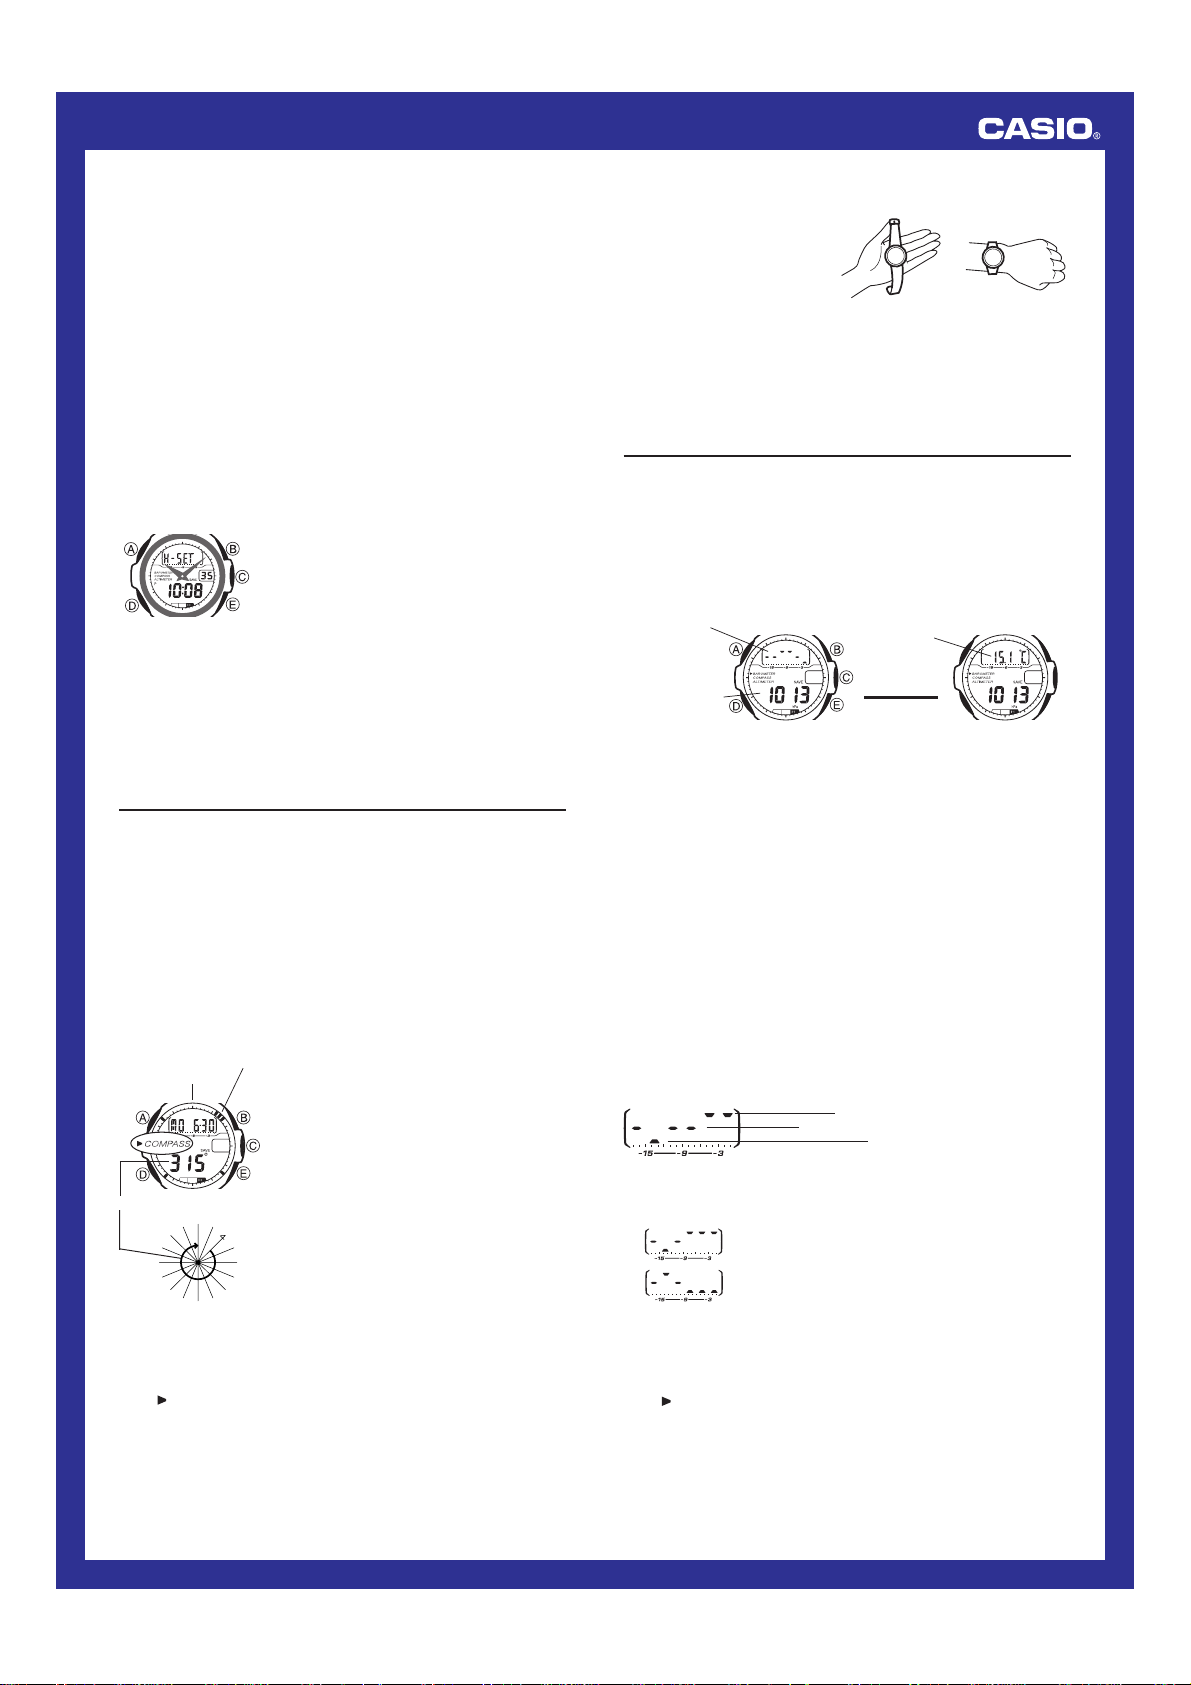
Digital Compass
A built-in bearing sensor detects magnetic north. The watch uses this data to
display an angle value and four pointers indicating north, south, east, and
west. Direction readings are performed in the Digital Compass Mode.
• You can calibrate the bearing sensor if you suspect the direction reading is
incorrect.
To enter and exit the Digital Compass Mode
1. While in the Timekeeping, Barometer/Thermometer, or Altimeter Mode,
press C to enter the Digital Compass Mode.
• At this time, the watch immediately starts a Digital Compass operation.
After the first reading is obtained, the watch continues to take direction
readings automatically each second, for up to 20 seconds.
2. Press D to return to the Timekeeping Mode.
To take a direction reading
Magnetic north pointer
12 o’clock
position
l
l
l
l
l
l
l
l
l
l
Angle value (in degrees)
• During measurement the watch displays an angle value and four direction
pointers of the first reading, which change dynamically when the watch is
moved. After measurement is complete, the angle value and four direction
pointers are frozen in accordance with the last measurement.
• The
NNW
NW
NW
W
W
W
S
W
SW
W
S
S
S
E
S
E
S
E
S
SE
indicator flashes on the display while a measurement is in progress.
1. Enter the Digital Compass Mode.
2. Place the watch on a flat surface or (if you are
wearing the watch), make sure that your wrist
is horizontal (in relation to the horizon).
3. Point the 12 o’clock position of the watch in
the direction you want to measure.
4. Press C to start a Digital Compass
measurement operation.
• After direction measurement is complete, an
angle value appears on the display. The angle
value indicates the clockwise angle formed
between magnetic north (which is 0 degrees)
0°
N
N
E
and the direction that the 12 o’clock position of
the watch is pointing.
N
• Also, four pointers appear to indicate magnetic
E
NE
north, south, east, and west.
E
N
• After the first reading is obtained, the watch
E
continues to take direction readings
automatically each second, for up to 20
seconds.
Note
• Note that taking a measurement
while the watch is not horizontal
(in relation to the horizon) can
result in large measurement
error.
• Any ongoing direction measurement operation is temporarily paused while
the watch is performing an alert operation (alarm or hourly time signal) or
while the watch’s backlight is turned on (by pressing L). The measurement
operation resumes for its remaining duration after the operation that caused
the pause is finished.
• See “Digital Compass Precautions” for other important information about
taking direction readings.
Barometer/Thermometer
This watch uses a pressure sensor to measure air pressure (barometric
pressure) and a temperature sensor to measure temperature.
• You can calibrate the temperature sensor and the pressure sensor if you
suspect that readings are incorrect.
To take barometric pressure and temperature readings
Pressing B in the the Timekeeping Mode or in any of the other sensor
modes enters the Barometer/Thermometer Mode and automatically starts
taking barometric pressure and temperature measurements.
History Graph and
Barometric PressureHistory graph
Barometric
pressure
• It can take up to four or five seconds for the barometric pressure reading to
appear after you enter the Barometer/Thermometer Mode.
• Barometric pressure is displayed in units of 1hPa.
• The displayed barometric pressure value changes to
measured barometric pressure falls outside the range of 260 hPa to 1100
hPa. The barometric pressure value will be displayed again as soon as the
measured barometric pressure is within the allowable range.
• Temperature is displayed in units of 0.1°C.
• The displayed temperature value changes to
temperature falls outside the range of –10.0°C to 60.0°C. The temperature
value will be displayed again as soon as the measured temperature is
within the allowable range.
• Some countries refer to the barometric pressure unit hecto-pascal (hPa) as
millibars (mb). It really makes no difference, because 1hPa = 1mb.
• See “Barometer and Thermometer Precautions” for important precautions.
Barometric Pressure History Graph
Barometric pressure indicates changes in the atmosphere. By monitoring
these changes you can predict the weather with reasonable accuracy.
The barometric pressure history graph contains points that show you the
changes in barometric pressure readings taken by the watch for up to the last
18 hours. The time line along the bottom of the graph runs from left to right,
which means that the rightmost point on the graph is the latest reading. The
relative positions of the points on the graph indicate whether barometric
pressure is rising, falling, or holding relatively steady.
Relatively steady (within ±3hPa)
• No point is plotted on the graph whenever a measurement operation fails
due to sensor malfunction, low battery power, or any other reason.
The following shows how to interpret the data that appears on the barometric
pressure history graph.
Temperature
Press B to
toggle between
screens.
▲
Rising (rise greater than 3hPa)
Falling (fall greater than 3hPa)
A rising graph generally means improving weather.
A falling graph generally means deteriorating weather.
About Barometric and Temperature Measurements
• Barometric pressure and temperature measurement operations are
performed as soon as you enter the Barometer/Thermometer Mode. After
that, barometric pressure and temperature measurements are taken every
five seconds for the first three minutes.
indicator to the left of “BAROMETER” on the display flashes while a
• The
measurement is in progress.
• The barometer automatically takes measurements every three hours
(starting from midnight), regardless of what mode you are in. The results of
these measurements are used for plotting points on the barometric
pressure history graph.
• You can also perform a barometric pressure and temperature measurement
at any time by pressing B in the Barometer/Thermometer Mode.
Temperature and
Barometric Pressure
l
l
l
l
l
l
l
l
▲
xxxx hPa if a
xx. x °C if a measured
2
Operation Guide 2766
Barometer and Thermometer Precautions
• The pressure sensor built into this watch measures changes in air
pressure, which you can then apply to your own weather predictions. It is
not intended for use as a precision instrument in official weather prediction
or reporting applications.
• Sudden temperature changes can affect pressure sensor readings.
• Temperature measurements are affected by your body temperature (while
you are wearing the watch), direct sunlight, and moisture. To achieve a
more accurate temperature measurement, remove the watch from your
wrist, place it in a well ventilated location out of direct sunlight, and wipe off
all moisture from the case. It takes approximately 20 to 30 minutes for the
case of the watch to reach the actual surrounding temperature.
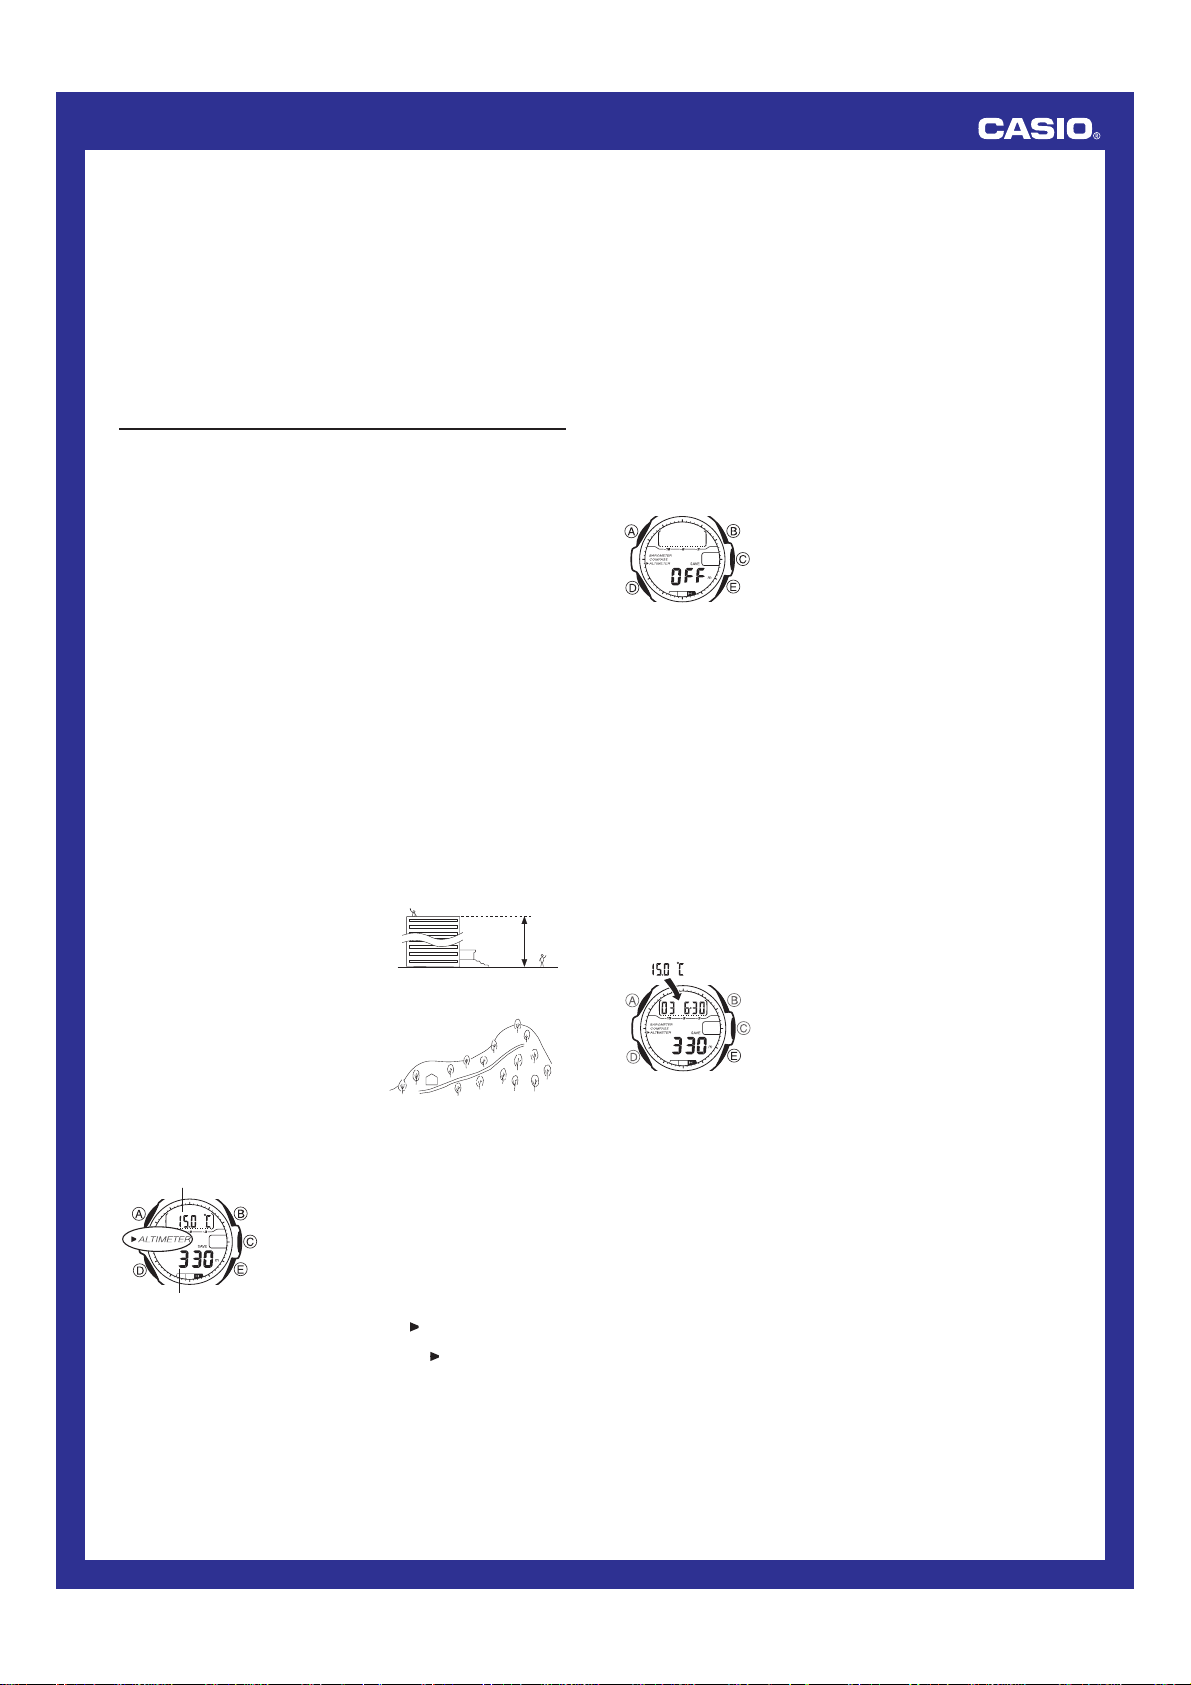
Altimeter
A built-in altimeter uses a pressure sensor to detect the current air pressure,
which is then used to estimate the current altitude. The watch is preprogrammed with ISA (International Standard Atmosphere) preset values,
which are used to convert air pressure readings to altitude values. If you
preset a reference altitude, the watch will also calculate the current relative
altitude based on your preset value. Memory is also provided for the storage
of altimeter data.
Important!
• This watch estimates altitude based on air pressure. This means that
altitude readings for the same location may vary if air pressure changes.
• This watch employs a semiconductor pressure sensor, which is affected by
temperature changes. Make sure that the watch is not being exposed to
temperature changes while you are taking altitude measurements.
• To avoid the effect of sudden temperature changes on measurement, wear
the watch so it is in direct contact with your wrist during measurement.
• Do not rely upon this watch for altitude measurements or perform button
operations while engaging in sports where there are sudden altitude
changes, while sky diving, hang gliding, or paragliding, or while riding a
gyrocopter, glider, or any other aircraft.
• Do not use this watch for measuring altitude in applications that demand
professional or industrial level precision.
• Remember that the air inside of a commercial aircraft is pressurized.
Because of this, the readings produced by this watch will not match the
altitude readings announced or indicated by the flight crew.
How the Altimeter Works
With the Preset Values (No Reference Altitude)
• The watch measures the air pressure at your current location and uses the
built-in ISA values to convert it to the equivalent altitude.
With a Reference Altitude
• If you set a reference altitude, the watch
uses that value when calculating altitude
based on air pressure.
• To determine the height of a tall building,
set the reference altitude to 0 on the
ground floor. Note, however, that you may
not be able to get a good reading if the
building is pressurized or air-conditioned.
• When mountain climbing, you can set the
reference value in accordance with a
marker along the way or altitude
information from a map. After you do this,
the altitude readings produced by the
watch will be more accurate than they
would without a reference altitude.
To take an altitude reading
Pressing E in the Timekeeping Mode or in any
Temperature
l
l
l
l
l
l
l
l
l
Altitude
of the other sensor modes enters the Altimeter
Mode and automatically starts altitude
measurement.
• It can take up to four or five seconds for the
altitude reading to appear after you enter the
Altimeter Mode.
• The Altimeter Mode screen also displays the
current temperature. See “Barometer/
Thermometer” for more information.
• During the first three minutes after entering the
Altimeter Mode, the
display and measurements are taken every five
seconds. After that, the
flashing and remains on the display as
measurements are taken every two minutes.
A
400
indicator flashes on the
indicator stops
B
• Pressing E causes the measurement operation to restart from the
beginning of the cycle described above.
• Altitude is displayed in units of 5 meters.
• The measurement range for altitude is –700 to 10,000 meters.
• The measured altitude may be a negative value in cases where there is a
reference altitude value set or because of certain atmospheric conditions.
• The displayed altitude value changes to
altitude falls outside the measurement range. The altitude value will be
displayed again as soon as the measured altitude is within the allowable
range.
Setting a Reference Altitude
After you set a reference altitude, the watch adjusts its air-pressure-to-altitude
conversion calculation accordingly. The altitude measurements produced by
this watch are subject to error caused by changes in air pressure. Because of
this, we recommend that you update the reference altitude whenever one is
available during your climb.
xxxxx meters if a measured
To set a reference altitude
1. In the Altimeter Mode, hold down A for about
two seconds until the watch beeps and the
display goes blank. About four or five seconds
after that,
l
l
l
l
l
l
l
l
l
l
l
l
l
l
l
l
l
l
l
2. Press E (+) or B (–) to change the current
• You can set the reference altitude within the range of –10,000 to 10,000
meters.
• Pressing E and B at the same time returns to
altitude), so the watch performs air pressure to altitude conversions
based on preset data only.
3. Press A to exit the setting screen.
Altitude Records
Storing altitude data in memory creates an altitude record. If a reading is
greater than all of the other altitude readings currently stored in memory, it is
stored in the maximum altitude record. The following describes the contents
of each type of record.
Recording date (year, month, day), time, and altitude: Up to 41 records
Maximum altitude (including recording date and time): 1 record
• The maximum altitude record shows information about the altitude record
that has the greatest altitude value. The maximum altitude record is
updated any time a reading produces an altitude that is greater than that of
the current maximum altitude record.
OFF or the current reference
altitude value (if set) will flash on the display.
OFF or the current reference altitude
• If
value does not appear at this time, press A
to return to the Altimeter Mode screen, and
perform step 1 again.
reference altitude value by 5 meters.
OFF(no reference
To store an altitude record in memory
In the Altimeter Mode, hold down E for about
one second until the watch beeps. This indicates
that a record of the altitude reading (date, time,
and altitude) has been stored in memory.
• You can recall data in memory using the Data
Recall Mode.
• Note that there is enough memory to store a
total of 41 records. If there are already 41
records in memory, storing another one
automatically deletes the oldest record to make
room for the new one.
To view altitude record data
1. Use D to enter the Data Recall Mode.
• The message RECALL appears for about one second, followed by
maximum altitude record.
2. Press E to cycle through the altitude record screens in the sequence
shown below.
• The maximum altitude record appears first. After that, each press of E
scrolls through records in sequence, starting from the oldest record.
• For each record, the lower part of the display alternates at one-second
intervals between the recording time and altitude value.
• If an error occurs while altitude data is being stored in memory or if there is
no altitude data in memory, xxxx is shown for the measured altitude
value on the corresponding altitude record screen.
3
 Loading...