

Page 1
USER’S GUIDE 2496
l
l
l
l
l
l
l
l
l
l
l
l
l
l
l
l
l
l
l
l
l
l
l
l
l
l
I
I
I
I
About This Manual
• Button operations are indicated using the
letters shown in the illustration.
• Each section of this manual provides you with
the information you need to perform operations
in each mode. Further details and technical
information can be found in the “Reference”
section.
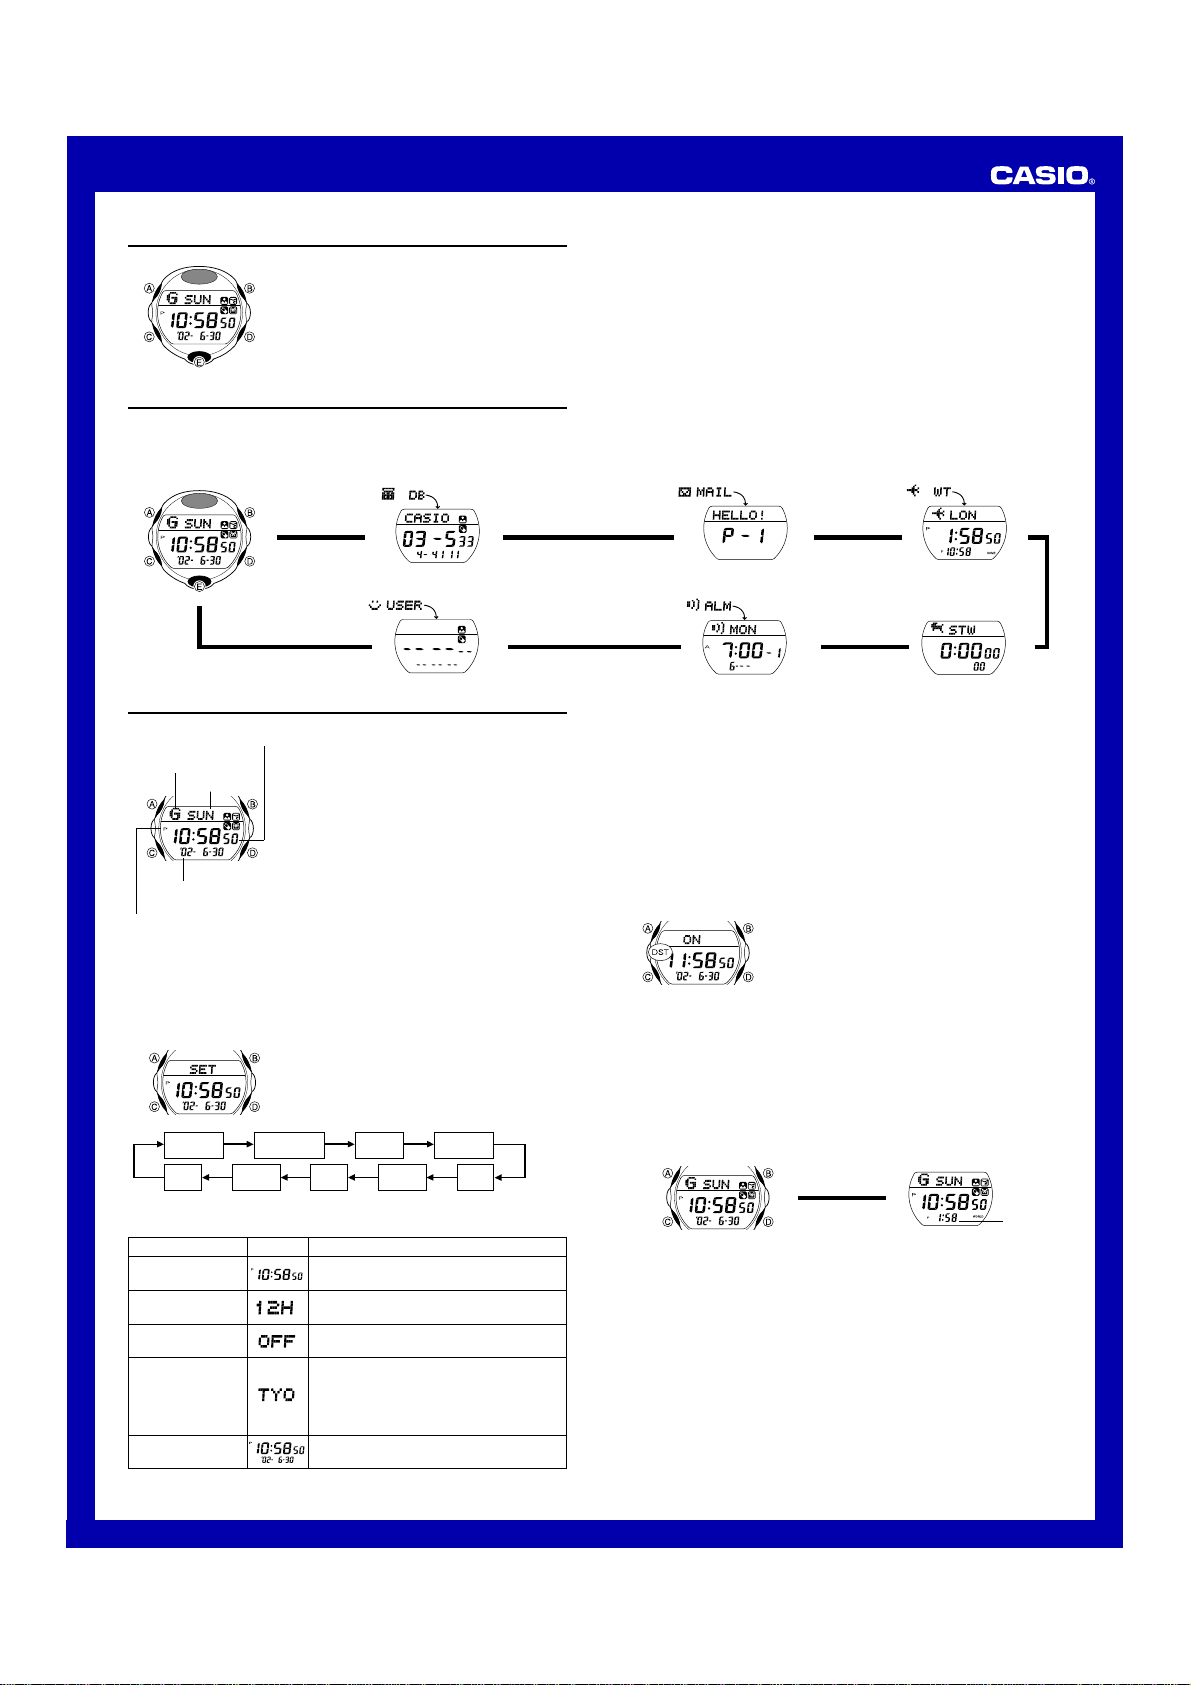
General Guide
• Press C to change from mode to mode.
• In any mode, press A to illuminate the display.
Timekeeping Mode Data Bank Mode
Mail Mode
World Time Mode
Press C.
▲
▲
▲
Timekeeping
Hour : Minutes Seconds
Animated figure
Day of week
Year Month – Day
PM indicator
Read This Before You Set the Time and Date !
The times displayed in the Timekeeping Mode and World Time Mode are
linked. Because of this, make sure you select a city code for your Home City
(the city where you normally use the watch) before you set the time and date.
To set the time and date
l
l
l
l
l
l
Seconds
Day
3. When the setting you want to change is flashing, use D and B to change
it as described below.
Setting Screen Button Operations
Seconds
12/24-Hour Format
DST
City Code
Hour, Minutes,
Year, Month, Day
Use the Timekeeping Mode to set and view the
current time and date. You can also select the
Timekeeping Mode display format (time and date
or time and world time).
• In the Timekeeping Mode, animated figures
appear whenever you press A to turn on the
backlight, and whenever the minutes reach 00.
• You can also use the Timekeeping Mode to
exchange user information by infrared. See
“Data Communication” for more information.
1. In the Timekeeping Mode, hold down A until
the seconds start to flash, which indicates the
l
l
l
l
l
l
l
l
l
l
Month
setting screen.
2. Press C to move the flashing in the sequence
shown below to select other settings.
12/24-Hour
Format
Year
DST
Minutes
Press D to reset to 00.
Press D to toggle between 12-hour (
and 24-hour (
Press D to toggle between Daylight Saving
Time (
ON
Use D (east) and B (west) to change the
setting.
• For full information on city codes, see
the “City Code Table.”
) timekeeping.
24H
) and Standard Time (
Use D (+) and B (–) to change the setting.
City code
Hour
OFF
12H
).
▲
▲
Alarm ModeUser Information Mode
Stopwatch Mode
▲
4. Press A to exit the setting screen.
• See “Daylight Saving Time (DST)” below for details about DST setting.
• The 12-hour/24-hour timekeeping format you select in the Timekeeping
Mode is applied in all modes.
• The day of the week is automatically displayed in accordance with the date
(year, month, and day) settings.
Daylight Saving Time (DST)
Daylight Saving Time (summer time) advances the time setting by one hour
from Standard Time. Remember that not all countries or even local areas use
Daylight Saving Time.
▲
To toggle the Timekeeping Mode time between DST and Standard Time
1. In the Timekeeping Mode, hold down A until
the seconds start to flash, which indicates the
setting screen.
2. Press C twice to display the DST setting
screen.
3. Press D to toggle between Daylight Saving
Time (
displayed) and Standard Time
ON
(
displayed).
OFF
4. Press A to exit the setting screen.
• The DST indicator appears on the display to indicate that Daylight Saving
Time is turned on.
To select the Timekeeping Mode screen format
Each press of D in the Timekeeping Mode toggles the display between the
Time–Date screen and the Time–World Time screen.
Time – Date Time – World Time
Press D.
▲
▲
World time
• The world time that appears is the one that was on the display when you
last exited the World Time Mode. See “World Time” for more information.
)
1
Page 2
USER’S GUIDE 2496
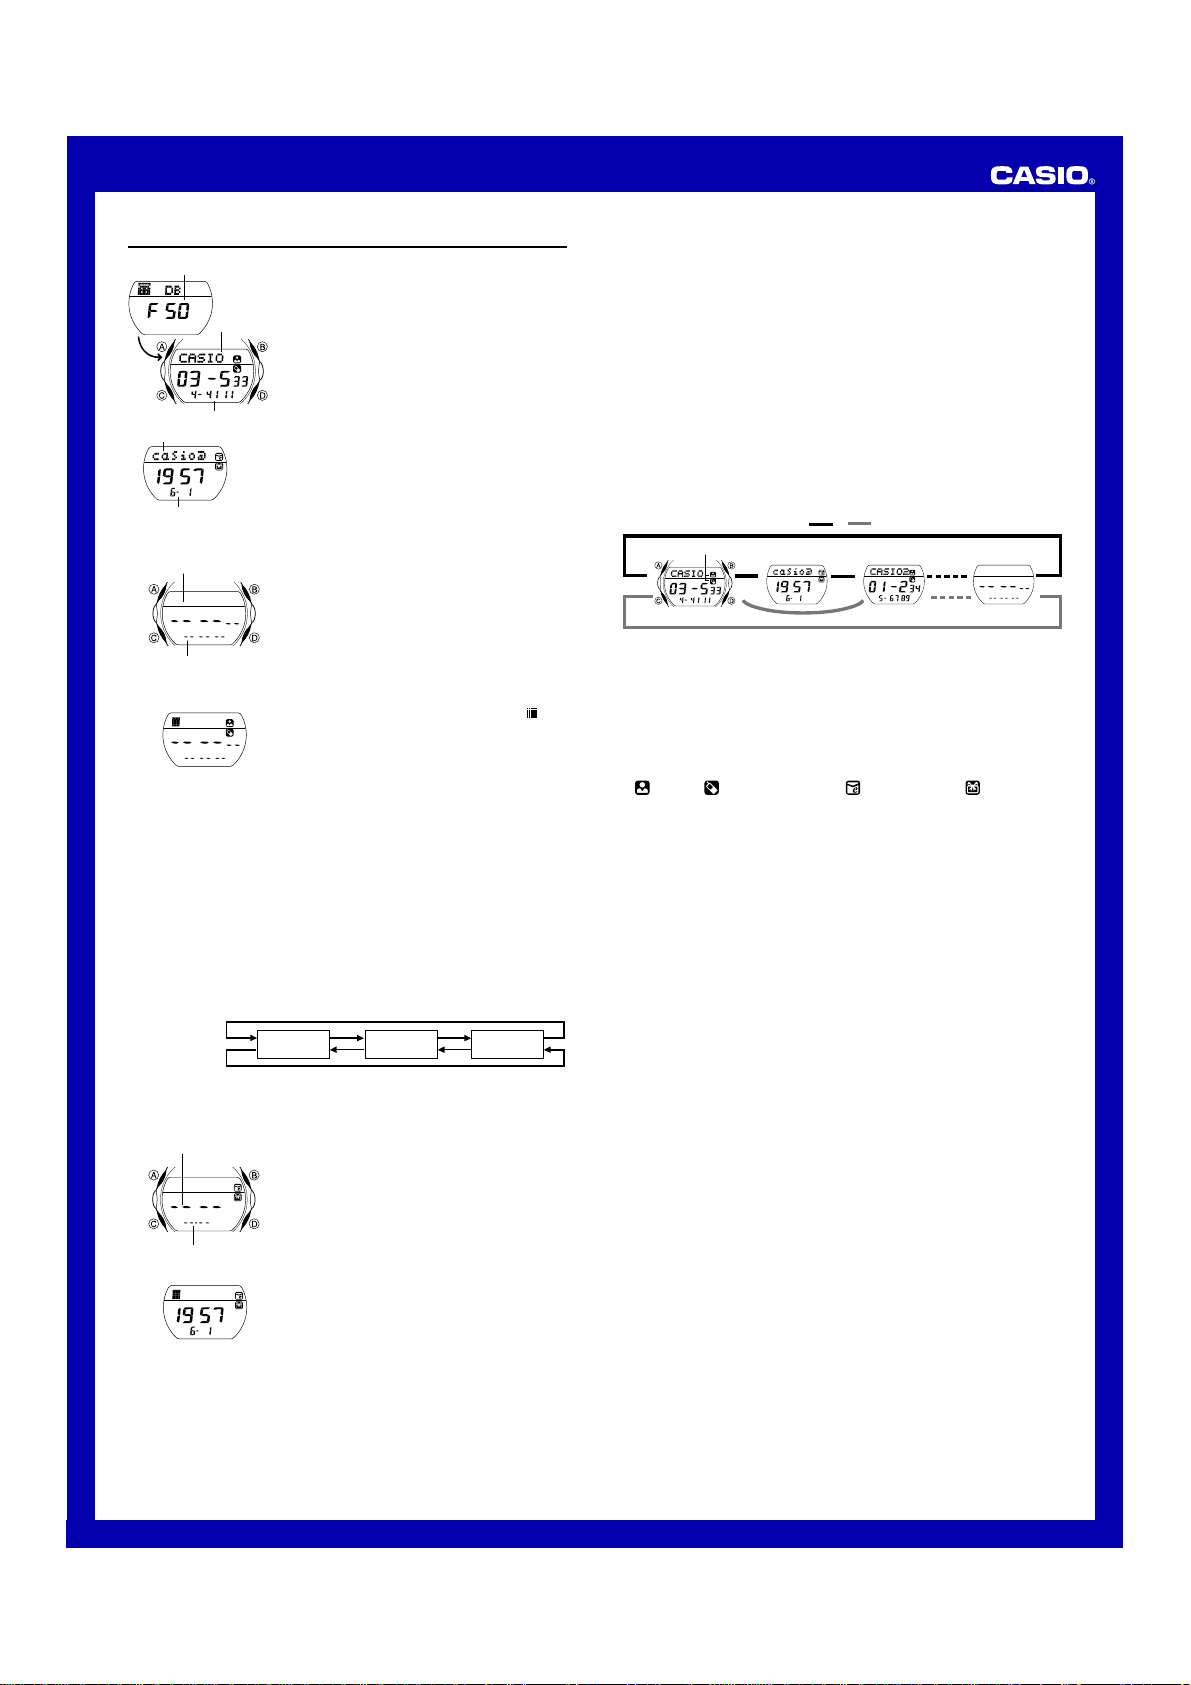
Data Bank
Remaining memory
Name
Telephone number
e-mail address
Date of birth
To create a new Data Bank record
Text area
Number area
New Data Screen
l
l
l
l
l
l
l
l
l
l
3. Input the name.
• You can input up to eight characters for the name.
• Use D (+) and B (–) to cycle through characters at the cursor position,
and then press C to move the cursor to the right. See “Inputting Text” for
more information.
• Pressing C while the cursor is located at the eighth character moves
the cursor to the first digit of the number area.
4. After you input the name, press C as many times as necessary to move
the cursor to the number area (if it is not already there).
5. Input the telephone number.
• Use D (+) and B (–) to cycle through numbers at the cursor position in
the sequence shown below, and then press C to move the cursor to the
right.
Press D.
Press B.
• You can input up to 12 digits for the telephone number. Pressing C
while the cursor is located at the 12th digit displays the date of birth
input screen.
Year
I
I
I
I
I
I
I
I
I
I
I
I
I
Date (Month – Day)
l
l
l
l
l
l
l
l
l
l
The Data Bank Mode lets you store up to 60
records, each containing a name, telephone
number, e-mail address, and date of birth.
Records are automatically sorted based on the
characters of the name. You can recall records by
scrolling through them on the display.
• Instead of an e-mail address, you can use Data
Bank Mode memory to store addresses, mobile
phone numbers, URLs, etc.
• See “Sort Table” for details on how the
watch sorts records.
• All of the operations in this section are
performed in the Data Bank Mode, which you
enter by pressing C.
• See “Data Communication” for information
about exchanging Data Bank records.
1. In the Data Bank Mode, use B and D to
cycle through the record screens until the new
data screen appears.
• The new data screen is the one that is blank
(contains no name and telephone number).
• If the message
display, it means that memory is full. To
store another record, you will first have to
delete some of the records stored in
memory.
2. Hold down A until the flashing cursor (
appears in the text area of the display.
• Steps 3 through 9 describe how to input a
name, telephone number, e-mail address,
and date of birth into the record. If you want
to exit the setting screen and store the data
you have input up to any point during steps
3 through 9, press A twice.
x 0 to 9 (space)
6. After inputting the phone number, press C as
many times as necessary to display the date
of birth input screen.
7. Input the date of birth.
• Use D (+) and B (–) to change the setting
at the current cursor position, and then
press C to move the cursor to the right.
• Input four digits (2 + 2) for the year.
8. While the cursor is located at the day setting
of the date of birth, press C to move the
cursor to the text area.
9. Input the e-mail address.
• You can input up to 32 characters for the
e-mail address.
FULL appears on the
)
10. After the e-mail address is the way you want, press A to store the
record.
• When you press A to store data, the message
display for a while, indicating that data is being sorted. After the sort
operation is complete, the cursor appears in the text area, ready for
input of a new Data Bank record.
• Depending on how many records you have in memory, the sort
operation can take up to 20 seconds.
11. Input more data (starting from step 3) or press A again to return to the
Data Bank record name and telephone number screen (without the
cursor).
• The name can show six characters at a time, so longer text scrolls
continuously from right to left. The last character is indicated by the symbol
H after it.
SORT
appears on the
To recall Data Bank records
In the Data Bank Mode, use D (+) and B (–) to scroll through Data Bank
record screens on the display.
Press D. Press B.
▲
▲
Data type icons
▲
Name/Telephone
Number Screen
• Each Data Bank record has a Name/Telephone Number screen, and an
E-mail Address/Date of Birth screen. The Name/Telephone Number screen
always appears first.
• Note that the E-mail Address/Date of Birth screen does not appear if it does
not contain at least e-mail address or date of birth data. In this case,
pressing D scrolls to the next Data Bank record.
• A data type icon indicates the type of data that is displayed to the left of it:
(Name), (Telephone number), (e-mail address), (date of birth)
• Pressing B returns to the previous record’s Name/Telephone Number
screen, not the previous record’s E-mail Address/Date of Birth screen.
• The e-mail address can show six characters at a time. Longer text is
displayed by alternating 6-character blocks at regular intervals. The last
character of the address is indicated by the symbol H after it.
• Pressing D while the last Data Bank record (Name/Telephone Number
screen or E-mail Address/Date of Birth screen) is on the display or B while
the first record (Name/Telephone Number screen) is on the display displays
the new data screen.
▲
▲
E-mail Address/
Date of Birth Screen
▲
▲
▲
New Data
Screen
▲
To edit a Data Bank record
1. In the Data Bank Mode, use D (+) and B (–) to scroll through the record
screens and display the one you want to edit.
2. Hold down A until the flashing cursor appears on the display.
3. Use C to move the cursor to the character or digits you want to change.
4. Use D (+) and B (–) to change the character.
5. After making the changes that you want, press A to store the record.
•
appears on the display indicating that data is being sorted. After
SORT
that, the record’s Name/Telephone Number screen appears.
To delete a Data Bank record
1. In the Data Bank Mode, use D (+) and B (–) to scroll through the record
screens and display the one you want to delete.
• Note that performing the next two steps deletes the entire record,
regardless of whether you start from the Name/Telephone Number
screen or the E-mail Address/Date of Birth screen. You cannot delete
only Name/Telephone Number screen or E-mail Address/Date of Birth
screen data.
2. Hold down A until the flashing cursor appears on the display.
3. Press D and B at the same time to delete the record.
• The message
deleted. After the record is deleted, the cursor appears on the display,
ready for input.
4. Input data or press A to return to the new data screen.
• Pressing A causes the
data is being sorted. After that, the new data screen appears.
appears to indicate that the record is being
CLEAR
to appear on the display indicating that
SORT
• Use D (+) and B (–) to cycle through characters at the cursor position,
and then press C to move the cursor to the right. See “Inputting Text” for
more information.
2
Page 3
USER’S GUIDE 2496
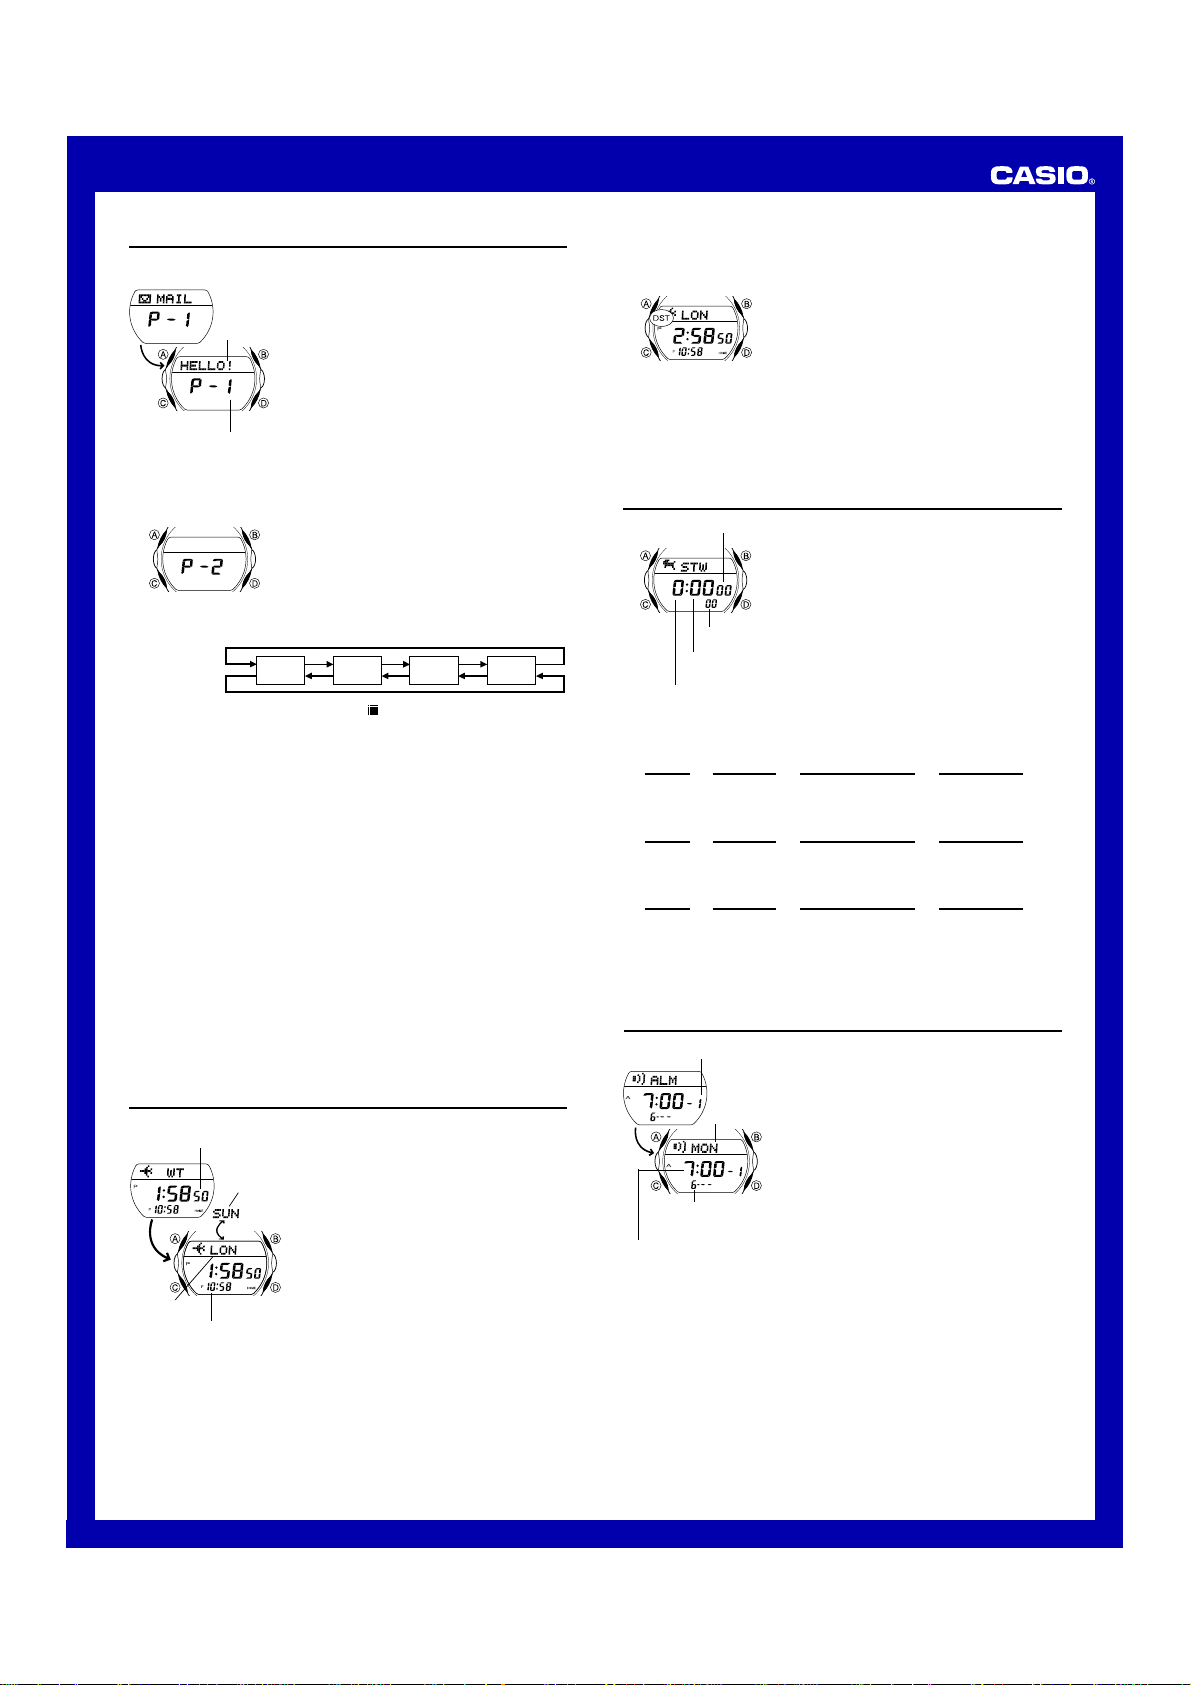
The Mail Mode lets you input up to four mail
messages of up to 30 characters each. Input mail
text can be sent to and received from another
watch by IR.
Mail text
Page number
• Mail messages are identified by page numbers
Px1 through Px4.
• Up to six characters of mail text can be
displayed at a time, so longer text is displayed
by alternating 6-character blocks at regular
intervals. The last character of mail text is
indicated by the symbol H after it.
• All of the operations in this section are
performed in the Mail Mode, which you enter
by pressing C.
• See “Data Communication” for information
about exchanging mail messages.
To input mail text
1. In the Mail Mode, use D and B to select the
mail message page where you want to input
text.
• Note that page Px4 is also used to store
received mail text. This means that if you
receive a mail message while you have text
stored on page Px4, the existing text will
be overwritten by the newly received
message.
Press D.
Press B.
2. Hold down A until the flashing cursor (
3. Input the text you want.
• Use D (+) and B (–) to cycle through characters at the cursor position,
and then press C to move the cursor to the right. See “Inputting Text” for
more information.
4. After inputting your text, press A to store it.
Px1
Px2
Px3
) appears on the display.
Px4
To edit mail message text
1. In the Mail Mode, use D (+) and B (–) to scroll through the messages
and display the one you want to edit.
2. Hold down A until the flashing cursor appears on the display.
3. Use C to move the cursor to the character you want to change.
4. Use D (+) and B (–) to change the character.
5. After making the changes that you want, press A to store them and return
to the mail message screen.
To delete a mail message
1. In the Mail Mode, use D (+) and B (–) to scroll through the messages
and display the one you want to delete.
2. Hold down A until the flashing cursor appears on the display.
3. Press D and B at the same time to delete the message.
•
4. Input text, or press A to return to the mail message screen.
appears to indicate that the message is being deleted. After
CLEAR
the message is deleted, the cursor appears on the display, ready for
input.
World Time
Current time in the zone
of the selected city code
Day of
week
City code
Timekeeping Mode time
(Home time)
World Time shows the current time in 40 cities
(27 time zones) around the world.
• If the current time shown for a city is wrong,
check your Timekeeping Mode time and Home
City code settings and make the necessary
changes.
• The upper part of the display alternates
between the city code and the day of the week.
• All of the operations in this section are
performed in the World Time Mode, which you
enter by pressing C.
To view the time in another city code
In the World Time Mode, press D to scroll
through city codes (time zones) to the east or B
to scroll to the west.
• For full information about city codes, see the “City
Code Table.”
To toggle a city code time between Standard Time and Daylight
Saving Time
1. In the World Time Mode, use D and B to
display the city code whose Standard Time/
Daylight Saving Time setting you want to
change.
2. Hold down A for about two seconds to toggle
Daylight Saving Time (DST displayed) and
Standard Time (DST not displayed).
• The DST indicator is on the display whenever
you display a city code for which Daylight
Saving Time is turned on.
• Note that the DST/Standard Time setting
affects only the currently displayed city code.
Other city codes are not affected.
Stopwatch
Seconds
1/100 second
Minutes
Hours
To measure times with the stopwatch
Elapsed Time
Start Stop Re-start Stop Clear
Split Time
Start Split Split release Stop Clear
Two Finishes
Start Split Stop Split release Clear
J J J J
DD D D B
J J J J
DB B D B
(SPL displayed)
J J J J
DB D B B
First runner
finishes.
Display time
of first runner.
The stopwatch lets you measure elapsed time,
split times, and two finishes.
• The display range of the stopwatch is 23 hours,
59 minutes, 59.99 seconds.
• The stopwatch continues to run, restarting from
zero after it reaches its limit, until you stop it.
• The stopwatch measurement operation
continues even if you exit the Stopwatch Mode.
• Exiting the Stopwatch Mode while a split time is
frozen on the display clears the split time and
returns to elapsed time measurement.
• All of the operations in this section are
performed in the Stopwatch Mode, which you
enter by pressing C.
Second runner
finishes.
Display time of
second runner.
Alarms
Alarm number
Day of
week
Alarm date
(Month – Day)
Alarm time
(Hour : Minutes)
Alarm Types
The alarm type is determined by the settings you make, as described below.
• Daily alarm
Set the hour and minutes for the alarm time. This type of setting causes the
alarm to sound everyday at the time you set.
• Date alarm
Set the month, day, hour and minutes for the alarm time. This type of setting
causes the alarm to sound at the specific time, on the specific date you set.
• 1-Month alarm
Set the month, hour and minutes for the alarm time. This type of setting
causes the alarm to sound everyday at the time you set, only during the
month you set.
You can set up to five independent multi-function
alarms with hour, minutes, month, day, and day of
the week. When an alarm is turned on, the alarm
tone sounds when the alarm time is reached.
You can also turn on an Hourly Time Signal that
causes the watch to beep twice every hour on the
hour.
• There are five alarm screens numbered1
through 5. The hourly time signal screen is
indicated by
• Alarm settings (and Hourly Time Signal
settings) are available in the Alarm Mode,
which you enter by pressing C.
SIG
.
3
Page 4

USER’S GUIDE 2496
• Monthly alarm
Set the day, hour and minutes for the alarm time. This type of setting causes
the alarm to sound every month at the time you set, on the day you set.
• Weekly alarm
Set the day of the week, hour and minutes for the alarm time. This type of
setting causes the alarm to sound every week at the time you set, on the day
of the week you set.
Note
• In addition to the alarm types described above, you can also set up alarms
with the following two configurations.
Hour, minutes, month, day of the week
This type of alarm sounds at the specified time whenever the specified day
of the week occurs during the specified month.
Hour, minutes, day, day of the week
This type of alarm sounds at the specified time each time the specified day
falls on the specified day of the week.
• Alarms sound in accordance with the time (and year, month, day, day of the
week) kept by the Timekeeping Mode. Because of this, the alarm will not
sound if your settings specify a condition that does not exist. For example,
June 30, 2002 falls on a Sunday. If you set an alarm for Tuesday, June 30, it
will not sound during 2002.
To set an alarm time
1. In the Alarm Mode, use D to scroll through
the alarm screens until the one whose time
you want to set is displayed.
x1 x2 x3
SIG
Alarm on indicator
I
I
I
I
I
I
I
I
I
I
I
I
I
Hour Day of week
4. While a setting is flashing, use D (+) and B (–) to change it.
• To set an alarm that does not include a month and/or day, set xx for
each setting.
• To set an alarm that does not include the day of the week, set --- for
the setting.
• When setting the alarm time using the 12-hour format, take care to set
the time correctly as a.m. (A indicator) or p.m. (P indicator).
5. Press A to exit the setting screen.
Alarm Operation
The alarm sounds at the preset time for about 20 seconds, or until you stop it
by pressing any button.
• An alarm does not sound if its preset time is reached while an IR data
communication operation is in progress.
2. After you select an alarm, hold down A until
the hour setting of the alarm time starts to
flash, which indicates the setting screen.
• This operation automatically turns on the
alarm.
3. Press C to move the flashing in the sequence
shown below to select other settings.
Minutes Month Day
x5 x4
To test the alarm
In the Alarm Mode, hold down D to sound the alarm.
To turn an alarm and the Hourly Time Signal on and off
1. In the Alarm Mode, press D to select an alarm or the Hourly Time Signal.
2. When the alarm or the Hourly Time Signal you want to is selected, press
B to turn it on and off.
Indicates alarm is on.
Indicates Hourly Time Signal is on.
Note
• The on ( displayed)/off ( not displayed) status of an alarm is
indicated on the corresponding alarm screen (1 through 5). The Hourly
Time Signal on (
all alarm screens.
• When the Hourly Time Signal and an alarm are both turned on, the
indicators appear as
• The alarm on indicator and the Hourly Time Signal on indicator are shown
on the display in all modes while these functions are turned on.
• If any alarm is on, the alarm on indicator is shown on the display in all
modes.
displayed)/off ( not displayed) status is indicated on
.
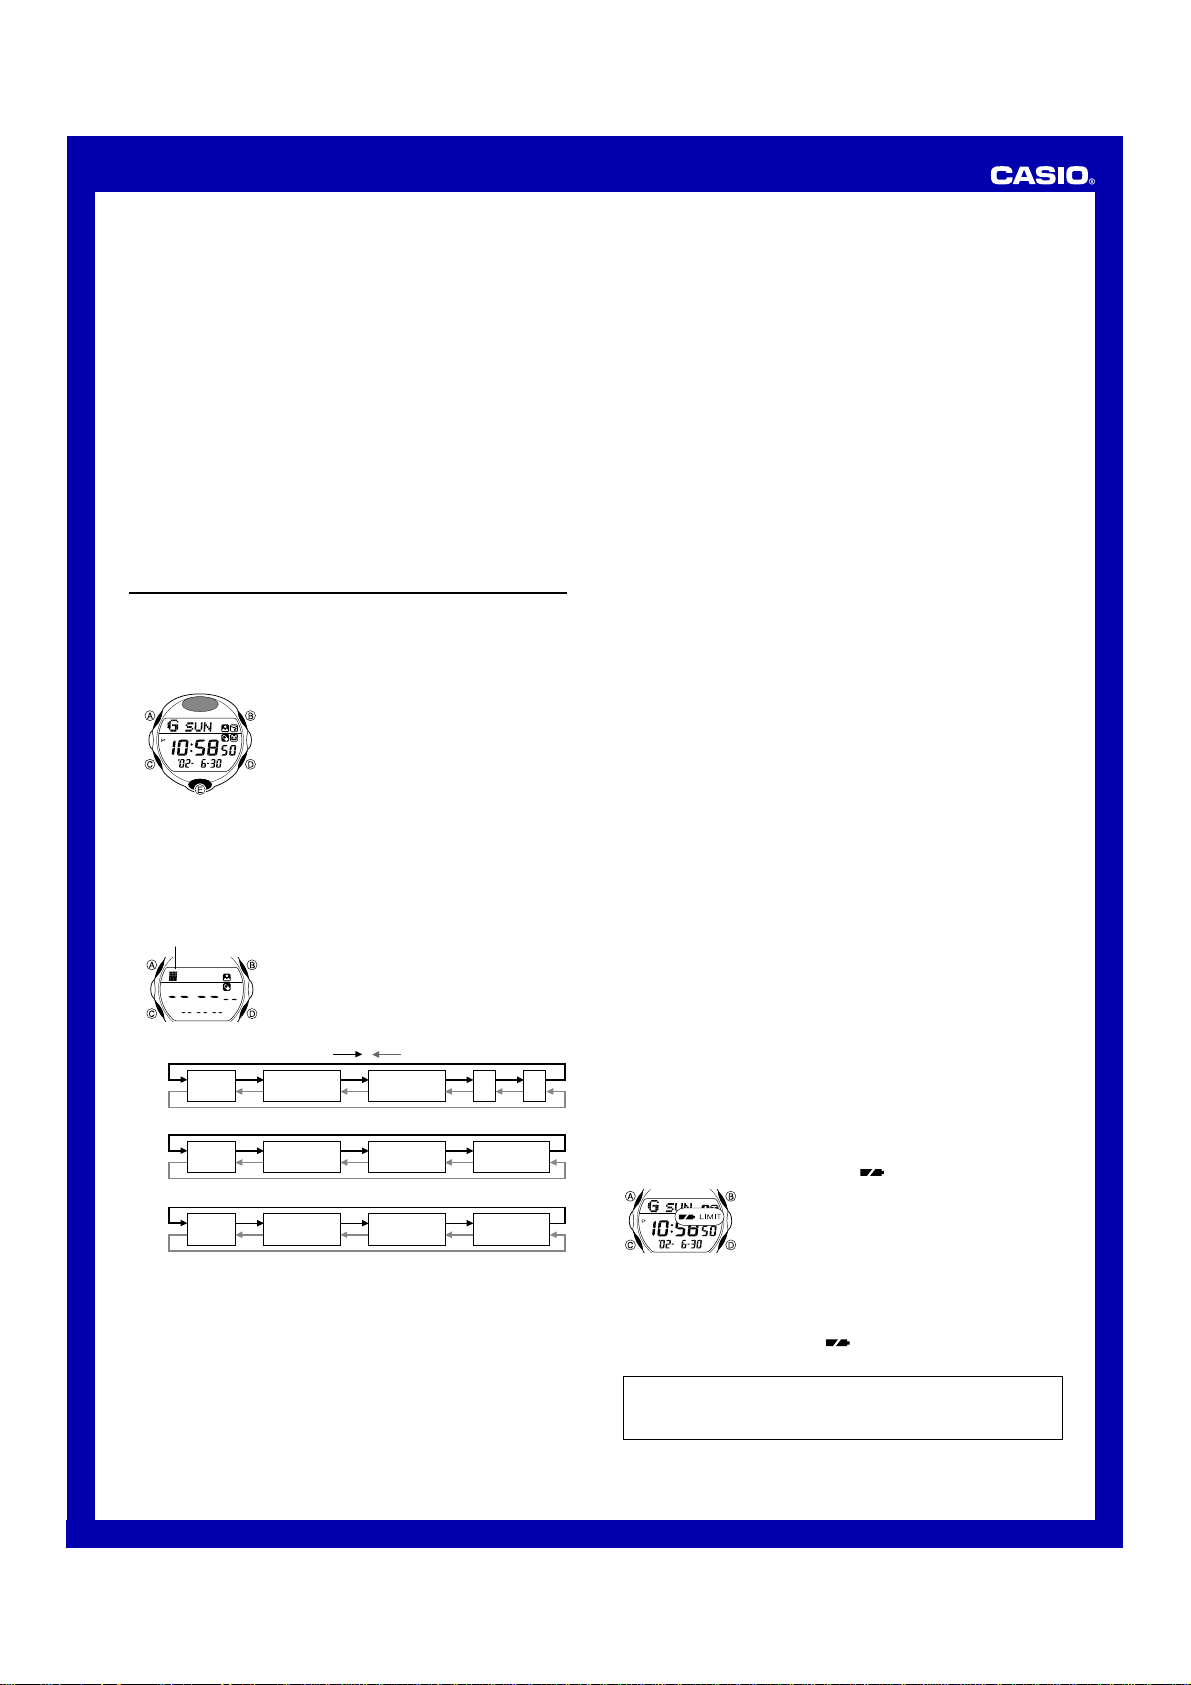
User Information
User information identifies the watch as yours. It
also provides a record of your name, phone
numbers, e-mail address, and the date of birth
when such information is required.
• All of the operations in this section are
performed in the User Information Mode, which
you enter by pressing C.
• See “Data Communication” for information
about exchanging user information.
To input user information
1. In the User Information Mode, hold down A until the flashing cursor ( )
appears in the text area of the display. This is the input screen.
2. Input your user information by performing the procedure starting from step
3 under “To create a new Data Bank record”.
• Pressing A at any time during user information input exits the input screen
and displays the current user information.
To recall user information
Pressing D in the User Information Mode switches between the Name/
Telephone Number screen and the E-mail Address/Date of Birth screen. Note
that the E-mail Address/Date of Birth screen does not appear unless it
contains at least e-mail address or date of birth data.
Name/Telephone
Number Screen
Press D.
▲
Press D or B.
E-mail Address/
Date of Birth Screen
▲
Data type icons
To edit user infomation
1. In the User Information Mode, hold down A until the flashing cursor
appears on the display.
2. Use C to move the cursor to the character or digits you want to change.
3. Use D (+) and B (–) to change the character.
4. After making the changes that you want, press A to store the record.
To delete user information
1. In the User Information Mode, hold down A until the flashing cursor
appears on the display.
2. Press D and B at the same time to delete the information.
• The message
deleted. After that, the cursor appears on the display, ready for input.
3. Input information or press A to exit the input screen.
appears to indicate that the information is being
CLEAR
Data Communication
IR port
Positioning the Watches for Communication
Get ready
1
Sender
Position your arms no more than 10cm
(3.5 inches) apart.
Sender
3
Sender
Receiver
This section describes how to perform IR data
communication and exchange Data Bank Mode,
Mail Mode, and User Information Mode data with
another Module No. 2496 watch.
Important!
• Infrared is an invisible type of light that travels
in a straight line. Because of this, the IR ports
of two devices that are trying to communicate
must point directly at each other.
• In order to help ensure you and your partner
can exchange data without any problem, be
sure that you and the person with whom you
are communicating follow the steps outlined
below.
Receiver
2
Receiver
Perform the required button operation, and
point the receiver’s face towards the sender.
Perform data communication
4
Receiver
Sender
Perform the sender button operation, and
point its face towards the face of the
receiver.
Keep the watches face-to-face until they
beep.
4
Page 5

USER’S GUIDE 2496
• Note the following important points whenever performing a data
communication operation.
✓ Make sure the two IR ports are pointed directly at each other.
✓ Make sure the two IR ports are within 10cm (3.5 inches) of each other.
✓ Keep the watches still until they beep, which indicates the end of data
communication.
✓ To help ensure the watches remain still, do not try to look at their displays
until they beep.
✓ Align the IR ports of the two watches within 10 seconds after performing
the button operations to set up the sender and receiver.
• In the case of user information, the two watches exchange their information
with each other. See “Exchanging User Information” for more information.
• Data Bank data can be sent one record at a time, while Mail data can be
sent one message at a time. See “Communicating with Another Watch” for
more information.
• If you experience problems with data communication, see
“Troubleshooting”.
Exchanging User Information
In the case of user information, the two watches exchange their information
with each other, just like two people exchanging names, e-mail addresses,
and phone numbers. Received user information is ultimately stored in the
Data Bank Mode.
• The user information that your watch sends to another watch is the data
you have input in the User Information Mode. Before sending user
information, use the User Information Mode to check it to make sure it is
correct.
To exchange user information
1. Decide with the owner of the other watch who will be the sender and who
will be the receiver.
• It makes no real difference which watch sends user information first. The
following operation causes both the sender and the receiver to get the
information of the other watch.
2. On both watches, press C to enter the Timekeeping Mode.
• What you do next depends on whether you are the sender or receiver.
The sender should perform steps 6 through 8, while the receiver should
perform steps 3 through 5.
3. On the receiver watch, hold down B for about
two seconds.
4. When the watch beeps, release B. This
causes the
on the display.
5. Point the face of the receiver towards the
sender, and perform steps 6 through 8 on the
sender.
6. On the sender watch, hold down E for about
two seconds.
7. When the watch beeps, release E. This
causes the
display.
8. Point the face of the sender at the face of the
receiver, so they are face-to-face.
• User information data exchange starts at
• Data exchange can take up to 11 seconds. During that time, keep the IR
ports pointed at each other and avoid moving the watches.
9. Both watches beep to indicate when data exchange is complete.
• After data exchange is complete, the watches beep and the message
appears on the displays of both watches for about five seconds.
OK!
Next, the watches enter the Data Bank Mode, each showing the data they
just received.
• If data exchange was not successful for some reason, the watches beep
and display the message
happens, perform the above procedure again from step 1.
Communicating with Another Watch
Use the following procedures to exchange Data Bank Mode data and Mail
Mode messages with another watch. In this configuration, one watch is the
sender and the other watch is the receiver.
• When a watch receives a mail message, the message text is stored in page
Px4 of the Mail Mode.
this time.
ERROR!
(receive) indicator to appear
REC
indicator to appear on the
SEND
for about five seconds. If this
To receive data from another watch (receiver operation)
1. Press C to enter the Timekeeping Mode.
2. Hold down B for about two seconds.
3. When the watch beeps, release B. This
causes the
on the display.
4. Point the face of the receiver towards the
sender, and have your partner perform the
sender operation.
• Data communication starts at this time.
(receive) indicator to appear
REC
• Data exchange can take up to six seconds. During that time, keep the IR
ports pointed at each other and avoid moving the watches.
5. Both watches beep to indicate when data communication is complete.
• After data communication is complete, the message
receiver display for about five seconds. Next, the watch displays the data
that it received.
• If data communication is not successful for some reason, the watches beep
and display the message
receiver enters the Timekeeping Mode. If this happens, perform the above
procedure again from step 2.
ERROR!
for about five seconds. After that the
appears on the
OK!
To send data to another watch (sender operation)
1. Enter the mode (Data Bank Mode or Mail
Mode) that contains the data you want to
send, and display the data.
2. Hold down E for about two seconds.
3. When the watch beeps, release E. This
causes the
display.
• At this point, your communication partner
(the receiver) should also be setting up to
receive.
4. Point the sender’s IR port at the receiver’s IR
port, so the watches are face-to-face. Data
communication should start automatically.
• Data communication can take up to six
seconds to complete. Keep the watches still
until they both beep.
• After data communication is complete, the message
sender display for about five seconds. Next, the watch displays the data that
it sent.
• If data communication is not successful for some reason, the watches beep
and the message
sender display shows the data you selected to send in step 1, above. If this
happens, perform the above procedure again from step 2.
ERROR!
appears for about five seconds. After that the
indicator to appear on the
SEND
OK!
appears on the
Troubleshooting
Problem
Even though I
hold down E to
send or B to
receive, the
applicable
SEND
indicator
REC
does not appear
on the watch’s
display.
The
ERROR!
message keeps
appearing when
I try to perform
data
communication.
Probable Cause
• You did not release
• A setting screen
or
• The watch is not in
• Battery power is low.
• Both watches are
• The two IR ports are
• The two IR ports are
• After
• The watches were
the button.
(digits or cursor
flashing) is on the
display.
the correct mode.
set up as senders
(
on the
SEND
display) or receivers
(
on the
REC
display).
too far from each
other.
not pointing straight
at each other.
REC
the display of the
watch you took
longer than about 10
seconds to align the
two IR ports.
moved during data
communication.
or
SEND
appeared on
What you should do
• After the watch beeps, release
the button.
• Press A to exit the setting screen.
• Enter the Timekeeping Mode to
exchange user information data
with another watch.
• To send Data Bank data or a mail
message, enter the applicable
mode and then perform the send
operation.
• To receive Data Bank data or a
mail message, enter the
Timekeeping Mode.
• See “Battery”.
• Make sure
display of the sender, and
is on the display of the receiver.
• Make sure the two IR ports are
no more than 10cm (3.5 inches)
from each other. Communication
becomes more stable the closer
the IR ports are to each other.
• Make the two IR ports are
pointed straight at each other.
• Align the IR ports of the two
watches within 10 seconds after
appears on one watch
SEND
and
REC
watch.
• Keep the IR ports of the two
watches pointed straight at each
other until the watches beep.
• Remove the watches from your
wrists and place them on a table
or other surface to keep them still
during data communication.
• See the illustration for information
about how the watches should be
oriented during data
communication. Be sure to
perform each step in order, from
1 to 4.
is on the
SEND
appears on the other
REC
5
Page 6
USER’S GUIDE 2496
Note
• This watch does not support IR data communication with any other device
besides another Module No. 2496 watch.
• Do not allow anything to block the path between the two IR ports.
• IR communication may not be possible outdoors or in other areas exposed
to bright light. Best results are obtained under indoor lighting of 500 lux.
• A separate, nearby IR data transfer operation can interfere with the IR data
communication operation of this watch.
• All watch button operations are disabled while
display.
• During a user information data exchange operation, if
on the watch sending data first (the sender) and the
other watch (the receiver), no data is exchanged between the two watches.
Perform the user information data exchange operation again. In the above
case, the receiver switches to the Data Bank Mode after displaying
so you need to change it to the Timekeeping Mode before trying to perform
a new user information data exchange operation.
• When the receiver’s Data Bank memory is full, the
will appear if you try to receive more Data Bank or User Information data.
After that, the receiver switches to the Data Bank Mode, which shows the
message
FULL
.
SEND
ERROR!
or
REC
ERROR!
appears on the
OK!
is on the
appears
OK!
message
Reference
This section contains more detailed and technical information about watch
operation. It also contains important precautions and notes about the various
features and functions of this watch.
Auto Display
Inputting Text
The following describes how to input text in the Data Bank, Mail, and User
Information Modes.
To input characters
Cursor
l
l
l
l
l
l
l
l
l
l
Name
(space)
E-mail address
(space)
Mail text
(space)
2. When the character you want is at the cursor position, press C to move
the cursor to the right.
3. Repeat steps 1 and 2 to input the rest of the characters you want.
• See the “Character List” for information about the characters you can input.
Auto Display continually changes the contents of
the digital display.
To turn off Auto Display
Press any button to turn off Auto Display.
To turn on Auto Display
Hold down C for about three seconds until the
watch beeps.
• Note that Auto Display cannot be performed
while a setting screen is on the display.
1. When the cursor is on the display, use D and
B to cycle through the available characters,
in the sequence shown below.
• The characters you can input depend on
whether you are inputting a name, an e-mail
address, or mail text.
Press D.
A
to
Z
(upper-case)
a to z
(lower-case)
A
to
Z
(upper-case)
Press B.
0
to
(number)
0
to
(number)
0
to
(number)
9
9
9
_
:to {
(symbol)
:to {
(symbol)
.
Auto Return Features
• If you leave the watch in the Data Bank, Mail, Alarm or User Information
Mode for two or three minutes without performing any operation, it
automatically changes to the Timekeeping Mode.
• If you leave a screen with flashing digits or a cursor on the display for two
or three minutes without performing any operation, the watch automatically
saves any settings you have made up to that point and exits the setting
screen.
Data and Setting Scrolling
The B and D buttons are used in various modes and setting screens to
scroll through data on the display. In most cases, holding down these buttons
during a scroll operation scrolls through the data at high speed.
,
Initial Screens
When you enter the Data Bank, Mail, World Time or Alarm Mode, the data
you were viewing when you last exited the mode appears first.
Timekeeping
• Resetting the seconds to 00 while the current count is in the range of 30 to
59 causes the minutes to be increased by 1. In the range of 00 to 29, the
seconds are reset to 00 without changing the minutes.
• With the 12-hour format, the P (PM) indicator appears on the display for
times in the range of noon to 11:59 p.m. and the A (AM) indicator appears
for times in the range of midnight to 11:59 a.m.
• With the 24-hour format, times are displayed in the range of 0:00 to 23:59,
without any indicator.
• The year can be set in the range of 2000 to 2099.
• The watch’s built-in full automatic calendar automatically makes allowances
for different month lengths and leap years. Once you set the date, there
should be no reason to change it except after you have the watch’s battery
replaced.
World Time
• The current time in all World Time Mode cities is calculated in accordance
with the Greenwich Mean Time (GMT) differential for each city, based on
the current Home City time setting in the Timekeeping Mode.
• The seconds count of the World Time is synchronized with the seconds
count of the Timekeeping Mode.
• The GMT differential is the time difference between the time zone where
the city is located and Greenwich Mean Time.
• GMT differential is calculated by this watch based on Universal Time
Coordinated (UTC) data.
Backlight Precautions
The backlight uses an EL (electro-luminescent) panel that causes the entire
display to glow for easy reading in the dark. In any mode, press A to
illuminate the display for about two seconds.
• Holding down A to display the setting screen or to switch between Daylight
Saving Time and Standard time in the World Time Mode also causes the
backlight to light.
• The electro-luminescent panel that provides illumination loses power after
very long use.
• The illumination provided by the backlight may be hard to see when viewed
under direct sunlight.
• The watch may emit an audible sound whenever the display is illuminated.
This is due to vibration of the EL panel used for illumination, and does not
indicate malfunction.
• The backlight automatically turns off whenever an alarm sounds.
• Frequent use of the backlight shortens the battery life.
Battery
If battery power goes low while you are inputting Data Bank data or user
information, the data you are inputting may not be saved in memory. Normal
watch operation will return after the
disappear, have the battery replaced.
Always leave battery replacement up to the dealer where you bought the
watch or to an authorized CASIO distributor. Be sure to show the
“Attention dealer or CASIO distributor” information to the person replacing
the battery.
The indicator flashes on the display
whenever battery power is below a certain level.
Low battery power can cause the following
conditions to occur.
• Dim, difficult-to-read display characters
• Failure of the backlight and alarm operations
• Inability of Data Bank and User Information
Mode operations
• Inability to perform IR data communication
indicator disappears. If it does not
6
Page 7

USER’S GUIDE 2496
LIMIT Indicator
Certain functions consume large amounts of battery power, and using them
too much can cause a sudden momentary drop in battery power. The watch
monitors how much you use these high consumption functions, and displays
the LIMIT indicator whenever it determines you are using them too much.
• Backlight and alarm operation, Data Bank and User Information Mode
operations, and IR data communication are disabled while the LIMIT
indicator is on the display.
• The following are the trigger values for functions that are monitored for
battery usage.
Approximately 90 consecutive backlight, IR data communication, and alarm
operations
Approximately 900 button input tone operations
• The LIMIT indicator disappears from the display after the battery recovers
its normal power level after it has a chance to “rest.”
Attention dealer or CASIO distributor
1. Open and remove the back cover.
• Opening the back cover causes the message OPEN to appear on the
display.
• If CLOSE appears on the display when you open the back cover, replace
the back cover. Wait for a few minutes and try again.
2. Remove the battery holder.
3. Remove the old battery and load a new one.
4. Replace the battery holder.
5. Touch the AC contact and the battery [+] side with metallic tweezers.
• The AC (all clear) operation DOES NOT delete Data Bank Mode data
and user information stored in memory.
6. Close the back cover.
7. Press any button besides A. This causes the watch to start an internal
data check, which is indicated by CHECK appearing on the display. The
Timekeeping Mode display appears after the internal check is complete.
• The internal check takes up to 10 seconds. All watch buttons are disabled
during that time.
City Code Table
City Code City GMT Differential City Code City GMT Differential
PPG PAGO PAGO –11 JRS JERUSALEM +02
HNL HONOLULU –10 JED JEDDAH +03
ANC ANCHORAGE –09 THR TEHRAN +3.5
YVR VANCOUVER –08 DXB DUBAI +04
SFO SAN FRANCISCO –08 KBL KABUL +4.5
LAX LOS ANGELES –08 KHI KARACHI +05
DEN DENVER –07 MLE MALE +05
MEX MEXICO CITY –06 DEL DELHI +5.5
CHI CHICAGO –06 DAC DHAKA +06
MIA MIAMI –05 RGN YANGON +6.5
NYC NEW YORK –05 BKK BANGKOK +07
CCS CARACAS –04 SIN SINGAPORE +08
RIO RIO DE JANEIRO –03 HKG HONG KONG +08
LON LONDON +00 SEL SEOUL +09
PAR PARIS +01 TYO TOKYO +09
MIL MILAN +01 ADL ADELAIDE +9.5
ROM ROME +01 GUM GUAM +10
BER BERLIN +01 SYD SYDNEY +10
IST ISTANBUL +02 NOU NOUMEA +11
CAI CAIRO +02 WLG WELLINGTON +12
* Based on data as of December 2001.
E-mail Address
a a k k u u 4 4
b b l l v v 5 5 ? ?
c c m m w 6 6 @ @ * _ _
d d n n x x 7 7 ! !
e e o y y 8 8 " , ,
f p p z z 9 9 # # - - | z
g g q 0 0 : : $ . .
h h r r 1 1 ; ; % % / /
I s s 2 2 < & &
j j t 3 3
Mail Text
A A K K U U 4 4
B B L L V V 5 5 ? ?
C C M M W W 6 6 @ @ * _ _
D D N N X X 7 7 ! !
E E O O Y Y 8 8 " , ,
F F P P Z Z 9 9 # # - - | z
G G Q Q 0 0 : : $ . .
H H R R 1 1 ; ; % % / /
I I S S 2 2 < & &
J J T T 3 3
=
=
>
= ' ' ¥
>
= ' ' ¥
(
)
+
[
(
)
+
[
(
) ^
+ '
[
(
) ^
+ '
[
]
{
}
~
]
{
}
~
]
{
]
{
Sort Table
1 (space) 7 F 13 L 19 R 25 X 31 3 37 9
2 A 8 G 14 M 20 S 26 Y 32 4 38 3 B 9 H 15 N 21 T 27 Z 33 5 39 .
4 C 10 I 16 O 22 U 28 0 34 6
5 D 11 J 17 P 23 V 29 1 35 7
6 E 12 K 18 Q 24 W 30 2 36 8
Character List
Name
A A G G M M S S Y Y 4 4 - B B H H N N T T Z Z 5 5 . .
C C I I O O U U 0 0 6 6
D D J J P P V V 1 1 7 7
E E K K Q Q W W 2 2 8 8
F F L L R R X X 3 3 9 9
7
 Loading...