

Page 1
5
Module No. 2326/2336
2326/2336-1
CC
GENERAL GUIDE
• Press
C to change from mode to mode.
CC
CC
• Pressing
C after performing an operation in any mode besides the Stopwatch Mode returns directly to the Timekeeping Mode.
CC
• If you do not press any button in any mode besides the Stopwatch Mode or Recall Mode, the watch automatically returns to the Timekeeping Mode after a few minutes.
• If you do not press any button while a setting screen (with flashing digits or settings) is on the display, the watch automatically exits the setting screen after a few minutes.
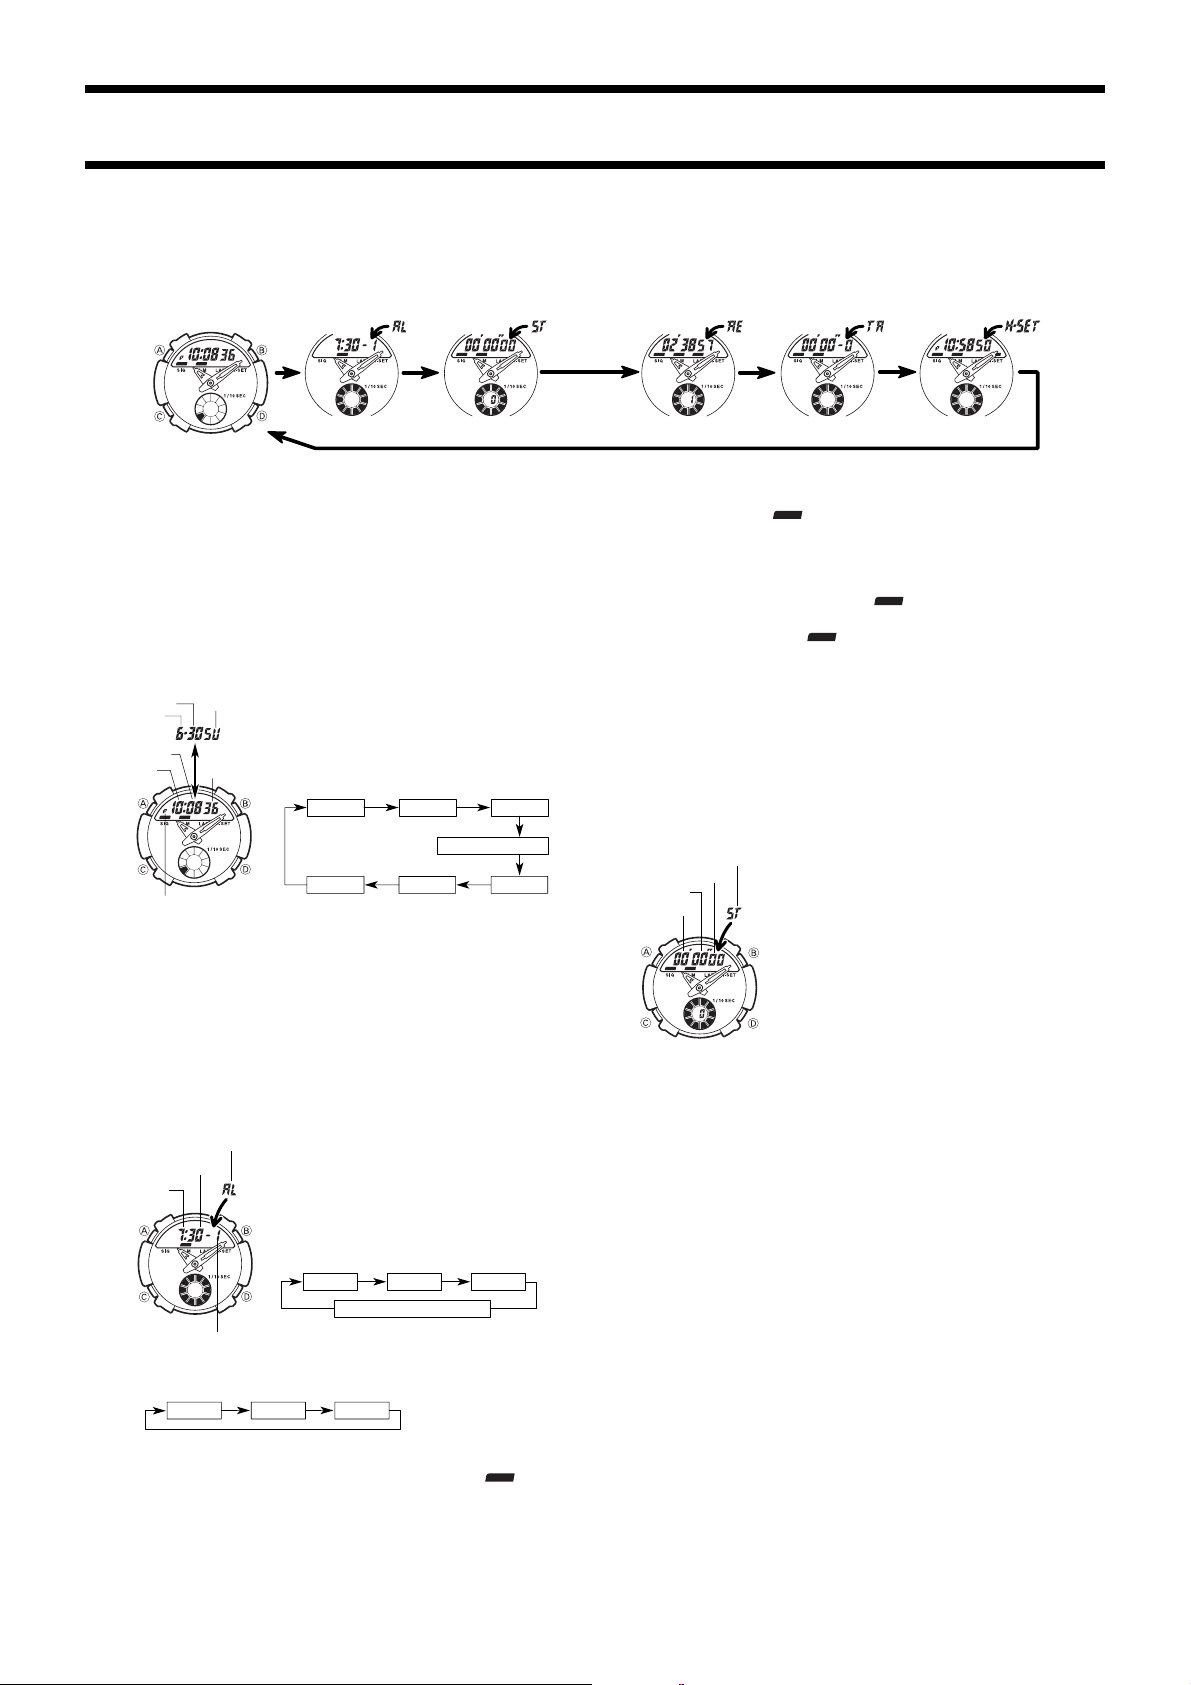
Timekeeping Mode
Alarm Mode Stopwatch Mode
5 5 5 5 5
ABOUT THE BACKLIGHT
BB
• Press
B to illuminate the digital display for about 2 seconds. The backlight is
BB
disabled while an input screen (with a flashing setting) is on the display.
• The backlight of this watch employs an electro-luminescent (EL) light, which loses
its illuminating power after very long term use.
• Frequent use of the backlight shortens the battery life.
• The watch emits an audible sound whenever the display is illuminated. This does
not indicate malfunction of the watch.
• The illumination provided by the backlight may be hard to see when viewed under
direct sunlight.
• The backlight automatically turns off whenever an alarm sounds.
TIMEKEEPING MODE
DD
• Press
D to toggle between the time and date screens.
DD
To set the time and date
1. In the Timekeeping Mode, hold down
DD
D.
DD
onds digits start to flash.
CC
2.Press
C to move the selection around the display in
CC
the following sequence.
Seconds Hour
AA
A until the sec-
AA
Minutes
Month
Minutes
Hour
Day
Day of week
Press
Seconds
Recall Mode Countdown Alarm Mode Hand Setting Mode
The operational procedures for Module 2326 and 2336 are identical.
All of the Illustrations in this manual show Module 2326.
5.After you set the alarm time, press
• The alarm on indicator (
alarm is on.
To switch the hourly time signal on and off
1.In the Alarm Mode, press
2.Hold down
• The above operation also turns on the Hourly Time Signal.
3.Press
4.Press
• The Hourly Signal on indicator (
To test the alarm sound
Hold down
• Note that pressing
To change the alarm sound
1.Hold down
2.While the alarm is sounding (because you are holding down
• You can select from among eight different alarm sounds.
• The sound last being produced when you press
AA
A until 00 starts to flash on the display.
AA
DD
D to turn the Hourly Time Signal on (
DD
and off (no indicator).
AA
A to return to the Alarm Mode.
AA
the Hourly Time Signal is on.
CC
C to sound the alarm.
CC
CC
C also changes the mode.
CC
CC
C to sound the alarm.
CC
the alarm sound.
AA
A to return to the Alarm Mode.
AA
) is shown on the display in all modes when any
DD
D to select :00.
DD
indicator appears above SIG)
) is shown on the display in all modes when
CC
C), press
CC
DD
D is the one used for the alarm.
DD
DD
D to change
DD
12/24-Hour Format
5
PM indicator
3.While the seconds digits are selected (flashing), press
00. If you press
are reset to 00 and 1 is added to the minutes. If the seconds count is in the range
of 00 to 29, the minutes count is unchanged.
4. While any other digits (besides seconds), are selected (flashing), press
crease the number or
current number at high speed.
• While the 12/24-hour setting is selected, press
mats.
• The day of the week is automatically set in accordance with the date.
• The date can be set with the range of January 1, 1995 to December 31, 2039.
5.After you set time and date, press
• Whenever you change the digital time setting, the hands move automatically until
they match the digital setting.
Hour
2.Hold down
because they are
• The above operation also turns on the Daily Alarm.
3.Press
4. While the hour or minutes digits are selected (flashing) press
number or
lection at high speed.
• While the On/Off setting is selected, press
tor appears above ALM) and off (no indicator).
• The format (12-hour and 24-hour) of the alarm time matches the format you select
for normal timekeeping.
• When setting the alarm time using the 12-hour format, take care to set the time
correctly as morning (no indicator) or afternoon (P).
DD
D while the seconds count is in the range of 30 to 59, the seconds
DD
BB
B to decrease it. Holding down either button changes the
BB
Mode indicator
Minutes
5
Alarm number
AA
A until the hour digits start to flash on the display. The hour digits flash
AA
selected
CC
C to move the flashing around the display in the following sequence.
CC
Hour On/OffMinutes
BB
B to decrease it. Holding down either button changes the current se-
BB
Day YearMonth
DD
D to reset the seconds to
DD
DD
D to in-
DD
DD
D to switch between the two for-
DD
AA
A to return to the Timekeeping Mode.
AA
ALARM MODE
You can set three independent daily alarms. You can
specify the hour and minutes for each alarm time. When
the Daily Alarm is on, the alarm sounds for 20 seconds at
the preset time each day. Press any button to stop the
alarm after it starts to sound. When the Hourly Time Signal is on, the watch beeps every hour on the hour.
To set the alarm time
DD
1.Press
D while in the Alarm Mode to select Alarm 1
DD
through Alarm 3.
Alarm 1 Alarm 3Alarm 2
:
00 (Hourly Time Signal
.
DD
D to switch the alarm on (
DD
)
DD
D to increase the
DD
indica-
Mode indicator
1/100 second
Seconds
Minutes
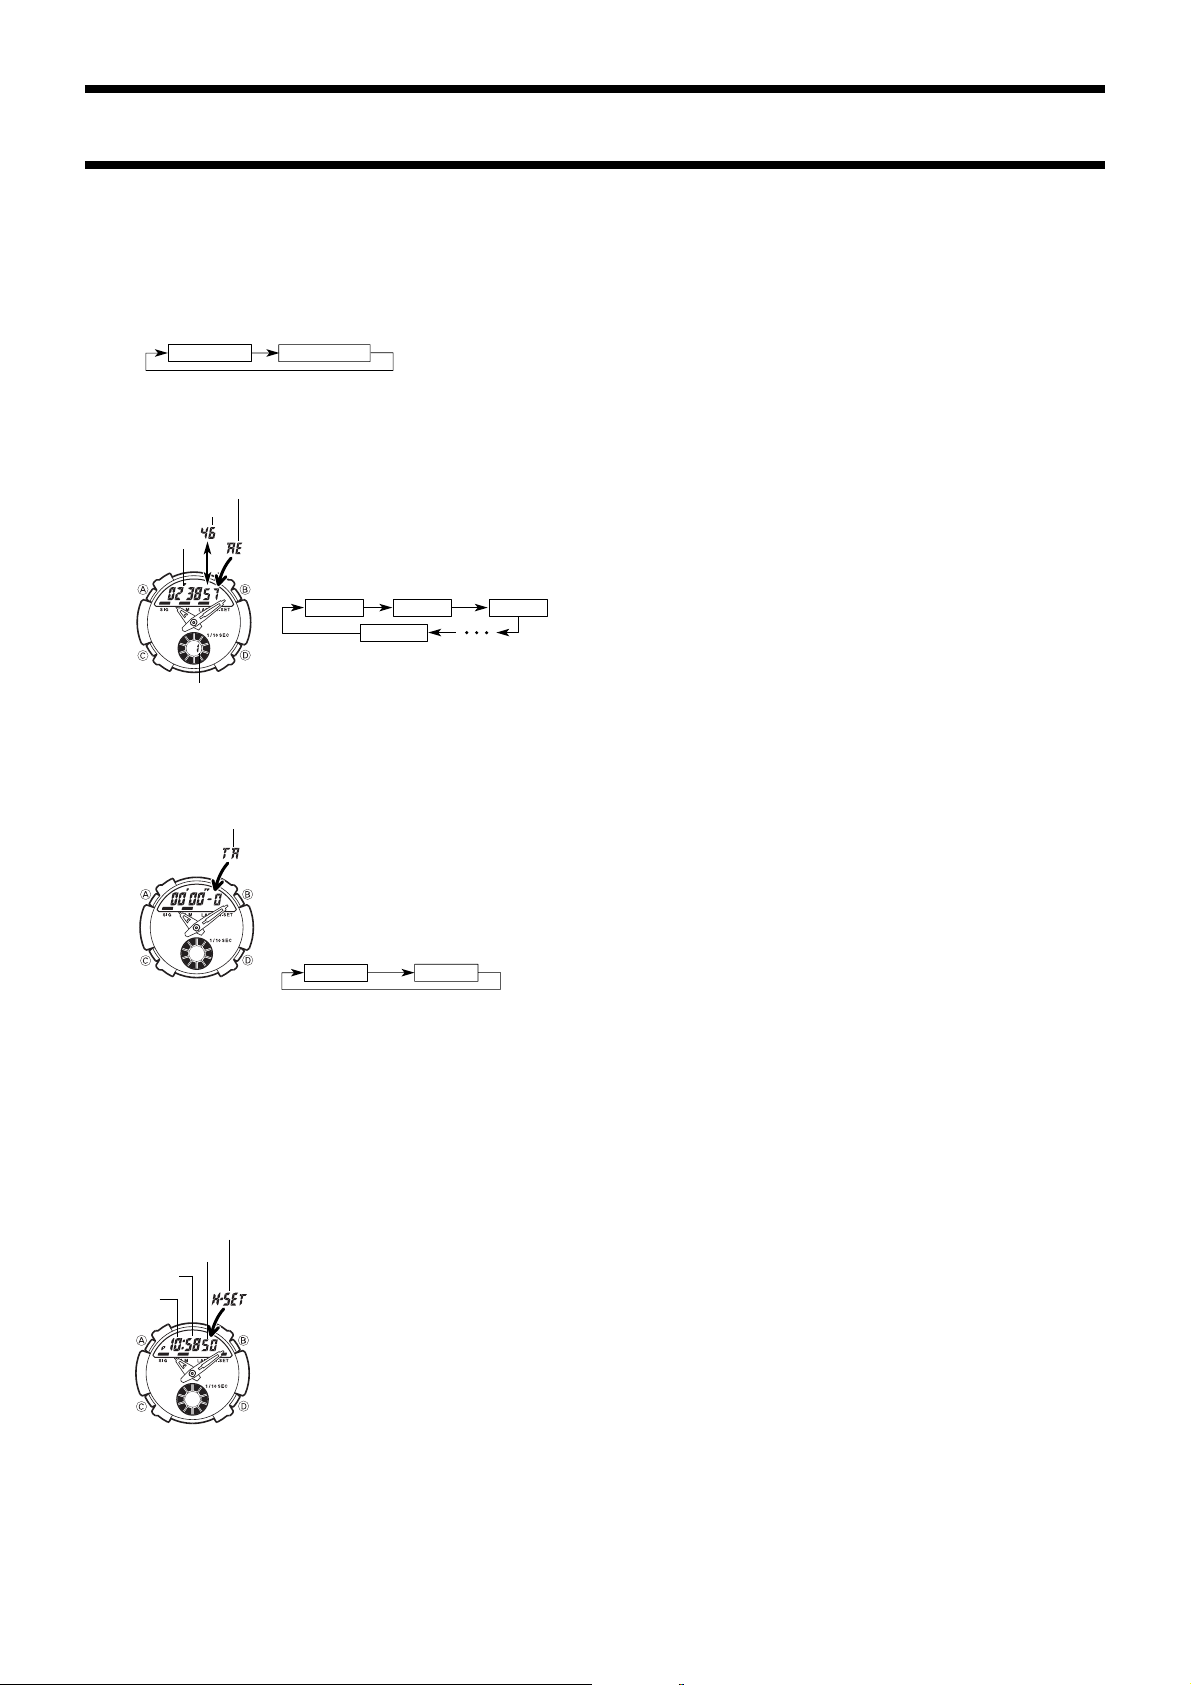
To measure lap times
DD
1.Press
D to start an elapsed time measurement.
DD
AA
2.Press
A to record the time of the first lap.
AA
• At this time, the measured lap time stays on the display for about seven seconds,
after which the display automatically changes back to the stopwatch time.
3.Repeat step 2 to record more lap times and store them in memory.
• The watch can store up to 20 lap times, and so the display shows up to 20 lap
numbers. After lap 20, the indicator starts over from lap 1, which indicates that the
oldest lap times in memory are being replaced by the newest measured times.
DD
4.Press
D to stop the stopwatch and store the final lap time.
DD
AA
5.Press
A to clear the stopwatch to 00' 00" 00.
AA
AA
• Pressing
A clears the lap time to 00' 00" 00, without changing the current lap num-
AA
ber. The lap number returns to 0 when you perform the next elapsed time measurement operation with the stopwatch.
• For details on the recalling lap times, see “RECALL MODE”.
• Lap times are kept in memory until you clear the stopwatch (by pressing
then start a new elapsed time measurement operation.
About time memories
This watch can store up to 20 lap times per stopwatch operation. Once 20 lap times
are stored, pressing
measurement with the newest one. All lap times in memory are automatically cleared
whenever you clear the stopwatch to 00' 00" 00 and then start a new elapsed time
measurement operation.
About speed calculations
Once you preset a lap distance, the watch automatically calculates the speed of each
lap (in Kilometers or miles per hour) in accordance with the time measured by the
stopwatch. This function is useful in the timing of motor sports events.
• You can view calculated speeds in the Recall Mode.
• Speeds can be calculated up to 999 (km/h or mph).
• You can input or change the length either before or after the timing operation.
STOPWATCH MODE
The Stopwatch Mode can record elapsed time and lap
times up to 59 minutes, 59.99 seconds. Measured times
are automatically stored into memory. If you preset a lap
distance, the watch automatically calculates the speed of
each lap.
• The term “lap time” refers to the amount of time that it
takes to complete a specific segment of a race (such as
each lap of a track race).
To measure elapsed time
DD
1.Press
D to start the stopwatch.
DD
DD
2.Press
D to stop the stopwatch.
DD
• You can resume the measurement operation by press-
DD
ing
D again.
DD
AA
3.Press
A to clear the stopwatch to 00' 00" 00.
AA
AA
A) and
AA
AA
A again (record the 21st lap time) replaces the oldest lap time
AA
Page 2
To preset the lap distance
• Note that the following explanation applies to both kilometers and miles, and no
adjustment is necessary to switch between the two distance units.
• Note that you will not be able to preset the lap distance unless the elapsed time on
the Stopwatch Display is cleared to 00' 00" 00.
1.Hold down
2.Press
AA
A while in the Stopwatch Mode until the digits of the distance value to
AA
the left of the decimal point start to flash. The digits flash because they are
ed
.
CC
C to change the selection in the following sequence.
CC
select-
Integer digits Decimal places
DD
3.Press
D to increase the selected digit or
DD
button changes the current selection at high speed.
• The maximum lap distance you can preset is 99.99.
4.After you set the lap distance, press
BB
B to decrease it. Holding down either
BB
AA
A to return to the Stopwatch Mode.
AA
2326/2336-2
Mode indicator
Average speed
Lap time
5
Lap number
To clear lap times
In the Recall Mode, hold down
memory.
• Clearing a lap time causes the displayed time and lap number to become zero.
Mode indicator
5
DD
3.Press
D to increase the selected number or
DD
button changes the selection at high speed.
• To set the starting value of the countdown time to 60 minutes, set 00 00.
4.After you set the countdown start time, press
Mode.
To use the countdown alarm
DD
1.Press
D while in the Countdown Alarm Mode to start the countdown alarm.
DD
DD
2.Press
D again to stop the countdown alarm.
DD
• You can continue countdown alarm operation by pressing
3.Stop the countdown and then press
value.
• The countdown alarm is automatically reset to its starting value after the alarm
stops.
RECALL MODE
The Recall Mode lets you look up data that you recorded
in the Stopwatch Mode. You can also delete data in the
Recall Mode.
To recall times
1.Whenever you enter the Recall Mode, the display shows
the time for the oldest lap.
DD
2.Press
D to scroll forward through the lap times.
DD
LAP 1 LAP 2 LAP 3
LAP 20
• When you recall data that includes a time and speed,
the display alternately shows the time and speed.
• The speed display shows the message Err whenever
you recall data whose speed is greater then 999.
AA
A until the watch beeps to clear all the lap times in
AA
COUNTDOWN ALARM MODE
The countdown alarm can be set within a range of 1 second to 60 minutes. When the countdown reaches zero,
an alarm sounds for 10 seconds or until you press any
button.
To set the countdown start time
1. Hold down
2.Press
AA
A until the minutes digits start to flash on
AA
the display. The minutes digits flash because they are
selected
.
CC
C to move the flashing around the display in the
CC
following sequence.
Minutes Seconds
BB
B to decrease it. Holding down either
BB
AA
A to return to the Countdown Alarm
AA
DD
D.
AA
A to reset the countdown alarm to its starting
AA
DD
Mode indicator
Seconds
Minutes
Hour
5
3.After you set the analog time, press
HAND SETTING MODE
When the time shown on the display does not match the
analog setting, use this mode to correct the analog setting. When setting the hands, set the hour and minutes
while ignoring the seconds. When setting 7:10 and 30
seconds, for example, set 7:10.
To set the analog time
1.Hold down
digital time starts to flash on the display.
• The following step changes the hands of the analog time-
piece without changing the flashing digital time.
2.Press
piece. Holding down
high speed.
• Note that there is not function for moving the hands back,
so make sure you do not move the hand too far. Otherwise, you will have to set them again.
AA
A while in the Hand Setting Mode until the
AA
DD
D to advance the hand setting of the analog time-
DD
AA
A to return to the Hand Setting Mode.
AA
DD
D changes the hand setting at
DD
 Loading...