

Page 1
Module No.
1856/1933/2065
1856/1933/2065-1
CC
• Press
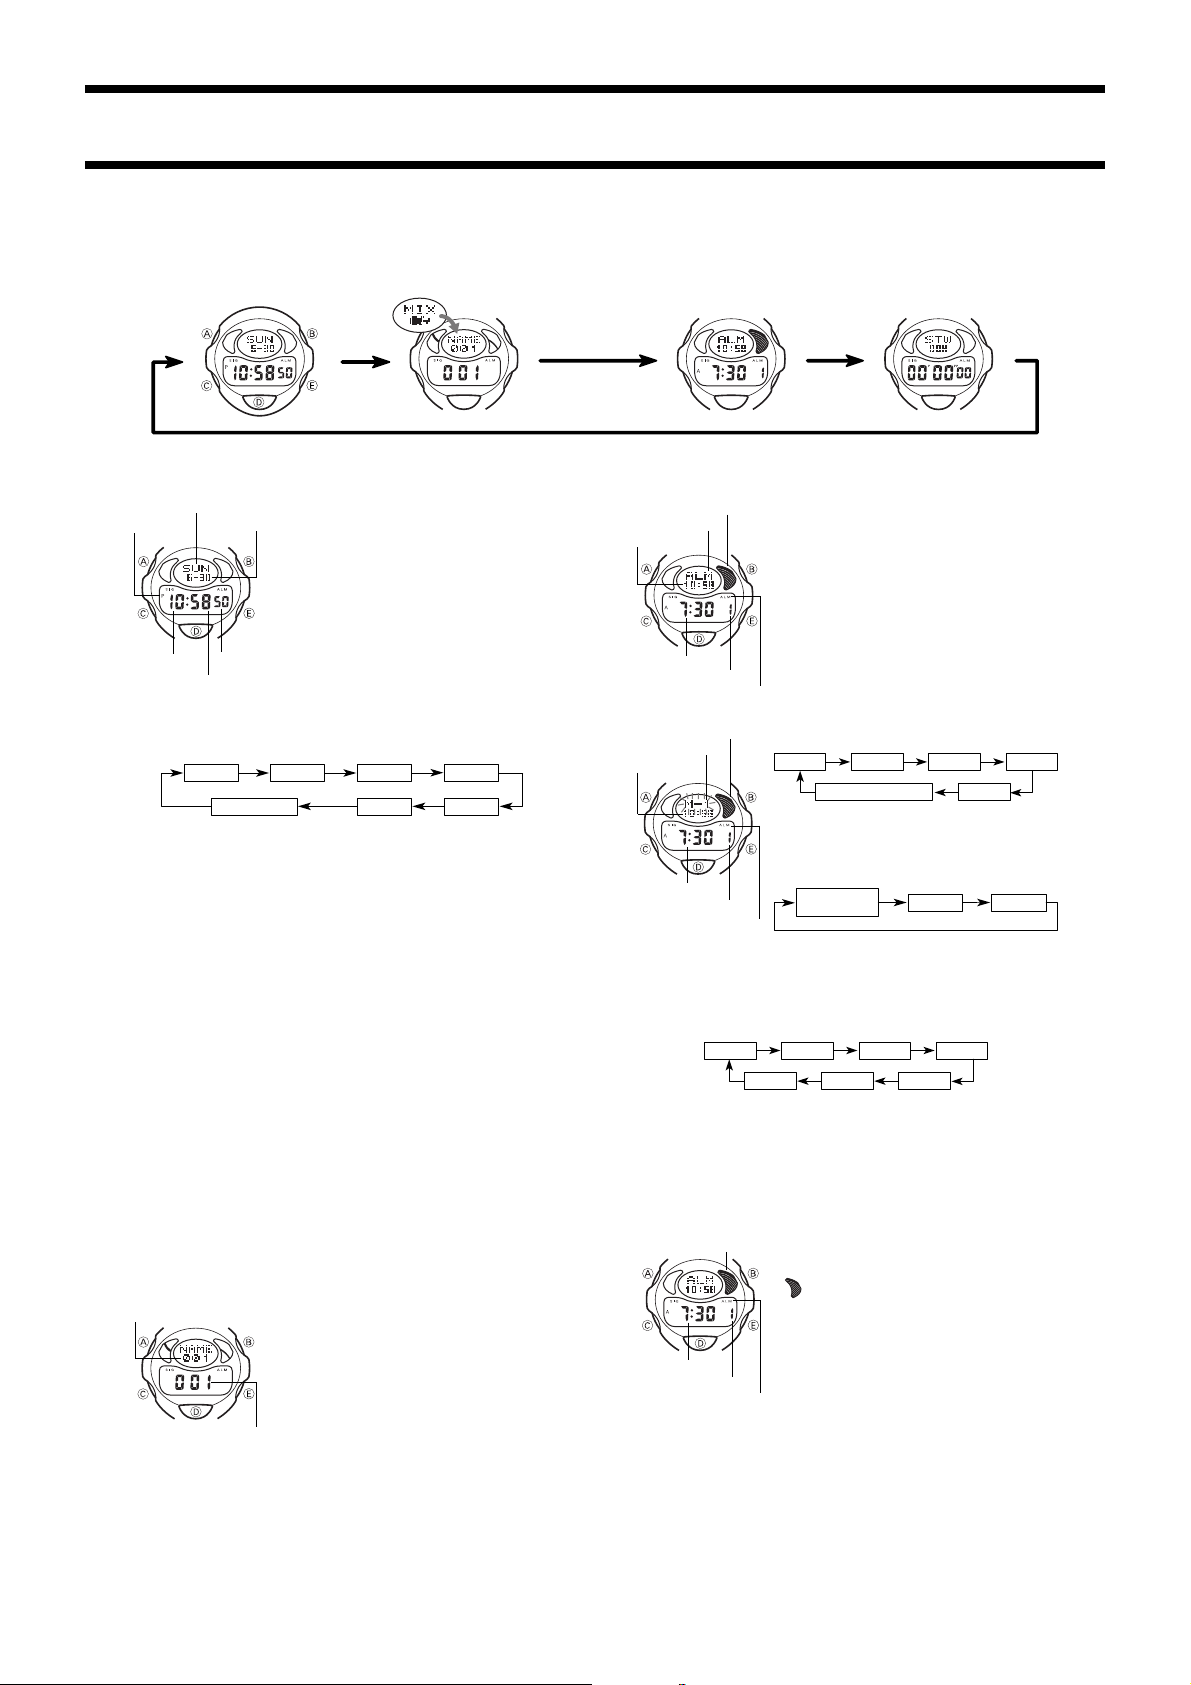
C to change from mode to mode.
CC
• In the Timekeeping Mode, press
Timekeeping Mode Mix Mode Alarm Mode Stopwatch Mode
DD
D to illuminate the display for about 3 seconds. In the Stopwatch Mode, press
DD
TIMEKEEPING MODE
Day of week
PM indicator
To set the time and date
1. Hold down
2.Press
3. While the seconds digits are selected (flashing), press
4. While any other digits (besides seconds) are selected (flashing), press
• Use the contrast adjustment screen (indicated by “CNT”) to adjust display contrast
5.After you set the time and date, press
• The day of week is automatically set in accordance with the date.
• The date can be set within the range of January 1, 1995 to December 31, 2039.
• If you do not operate any button for a few minutes while a selection is flashing, the
About the backlight
In the Timekeeping Mode, press
In Stopwatch Mode, press
• The backlight of the watch employs an electro-luminescent (EL) light, which loses
• The illumination provided by the backlight may be hard to see when viewed under
• The watch will emit an audible sound whenever the display is illuminated. This is
• The backlight automatically turns off whenever an alarm sounds.
Month – Day
Hour
Minutes
AA
A while in the Timekeeping Mode. The seconds digits flash on the
AA
display because they are
CC
C to change the selection in the following sequence.
CC
Seconds
onds to 00. If you press
the seconds are reset to 00 and 1 is added to the minutes. If the seconds count is
in the range of 00 to 29 , the minutes count is unchanged.
crease the number or
current selection at high speed.
within a range of 1 to 7. Press
figures darker) or
either button does not change the contrast setting at high speed.
flashing stops and the watch goes back to the Timekeeping Mode automatically.
illuminating power after very long use.
direct sunlight.
caused by a transformer that vibrates when the EL panel lights up. It does not
indicate malfunction of the watch.
• In the Timekeeping Mode, press
the 12-hour and 24-hour formats. When using the 12hour timekeeping format, the letters A and P are used
to indicate “am” and “pm” on the display. No indicator
appears on display for 24-hour format.
DD
• Press
D in the Timekeeping Mode to activate the EL
DD
backlight.
BB
• Pressing
B in the Timekeeping Mode randomly selects
BB
and plays one of the six melodies (three preset melodies, three user melodies) in watch memory. While a
melody is playing, dancers and musicians perform on
the display.
Seconds
Pressing any button interrupts play of the melody.
• See the “MELODY LIST” at the back of this manual for
details on the three preset melodies.
selected
.
Hour
Contrast
EE
BB
E or
B while the seconds count is in the range of 30 to 59,
EE
BB
BB
B to decrease it. Holding down either button changes the
BB
BB
B to decrease the value. In the case of contrast setting, holding
BB
DD
D to illuminate the display for about 3 seconds.
DD
BB
B to illuminate the display for about 3 seconds.
BB
Minutes
Day
EE
E to increase the contrast value (which makes
EE
AA
A to return to the Timekeeping Mode.
AA
EE
E to switch between
EE
Year
Month
EE
BB
E or
B to reset the sec-
EE
BB
EE
E to in-
EE
MIX MODE
The Mix Mode lets you arrange your own melody and store it in watch memory. You
can select a rhythm, tempo, and phrase to create a melody. See “USING THE MIX
MODE” for details about how to create a melody.
To play a Mix Mode melody
Title
Melody number
• Holding down
deletes the melody.
BB
B for about two seconds while a melody is selected (but not playing)
BB
EE
1. Use the
E button to select one of the three available
EE
melodies.
DD
2. Press
D to play the currently selected melody. Press-
DD
ing any button interrupts play of the melody.
• While a melody is playing, dancers and musicians perform on the display.
• If the melody number you select above does not have a
user memory assigned to it, a default rhythm pattern
plays instead.
BB
• Pressing
B while a melody is selected (but not playing)
BB
displays the melody evaluation screen for the melody.
See “USING THE MIX MODE” for details on evaluating
melodies.
GENERAL GUIDE
Individual alarm on indicator
Current time
To set alarms
Individual alarm on indicator
Alarm sound name
Current time
4.Press
• The format (12-hour and 24-hour) of the alarm time matches the format you select
• When setting the alarm time using the 12-hour format, take care to set the time
5.While the alarm sound name is flashing, press
• Melody numbers, 001 through 003 can be replaced by user melody names. If you
6.After you finish inputting data, press
• If you do not operate any button for a few minutes while a selection is flashing, the
To stop the alarm
Press any button to stop an alarm when it starts to sound.
To switch an Alarm on and off
Individual alarm on indicator
BB
B to illuminate the display.
BB
ALARM MODE
You can set five independent alarms. Use the Alarm Mode
Mode indicator
Alarm time
Alarm number
General alarm on indicator
Alarm time
Alarm number
General alarm on indicator
EE
E to increase the selected digits and
EE
either button changes the selection at high speed.
for normal timekeeping.
correctly as morning (A) or afternoon (P).
able alarm sounds to find the one you want.
have not created your own melodies or if you did not assign names to melodies
you created, melodies are identified by their numbers 001 through 003.
flashing stops and the watch goes back to the Alarm Mode automatically.
Alarm time
Alarm number
General alarm on indicator
to turn the alarm and the Hourly Time Signal on and off.
• When an alarm is turned on, an alarm tone sounds for
about 10 to 30 seconds when the alarm time is reached.
• When the Hourly Time Signal is turned on, the watch
beeps every hour on the hour.
• You can use any of the preset melodies (M-1, M-2, M-
3) or melodies you arrange with the Mix Mode for the
alarm in place of the standard beep sound. See “USING THE MIX MODE” for details on arranging your own
melodies.
• See the “MELODY LIST” on the next page of this manual for details on the three preset melodies.
• The alarm does not sound if the alarm time is reached
while you are arranging a melody in the Mix Mode.
EE
1.Press
E while in the Alarm Mode to select an alarm
EE
(Alarm 1 through Alarm 5).
Alarm 1
2. After you select an alarm, hold down
sound name flashes on the display because it is
lected
• At this time, the alarm is automatically switched on.
3.Press
quence.
M-1
M-2
1.In the Alarm Mode, press
2.When the alarm you want is selected, press
it on and off.
ALM ....... General alarm indicator
Alarm 2
Hourly Time Signal
.
CC
C to change the selection in the following se-
CC
Alarm sound
name
002003
AA
A to return to the Alarm Mode.
AA
......... Individual alarm indicator
Indicates whether the alarm whose number
is currently selected in the Alarm Mode is
on.
This indicator is shown on the display in all
modes while any alarm is on.
Hour
BB
B to decrease them. Holding down
BB
EE
BB
E or
B to scroll through the avail-
EE
BB
M-3
001
EE
E to select an alarm.
EE
Alarm 3
BEEP
Alarm 5
AA
A. The alarm
AA
Minutes
BB
B to switch
BB
Alarm 4
se-
Page 2
1856/1933/2065-2
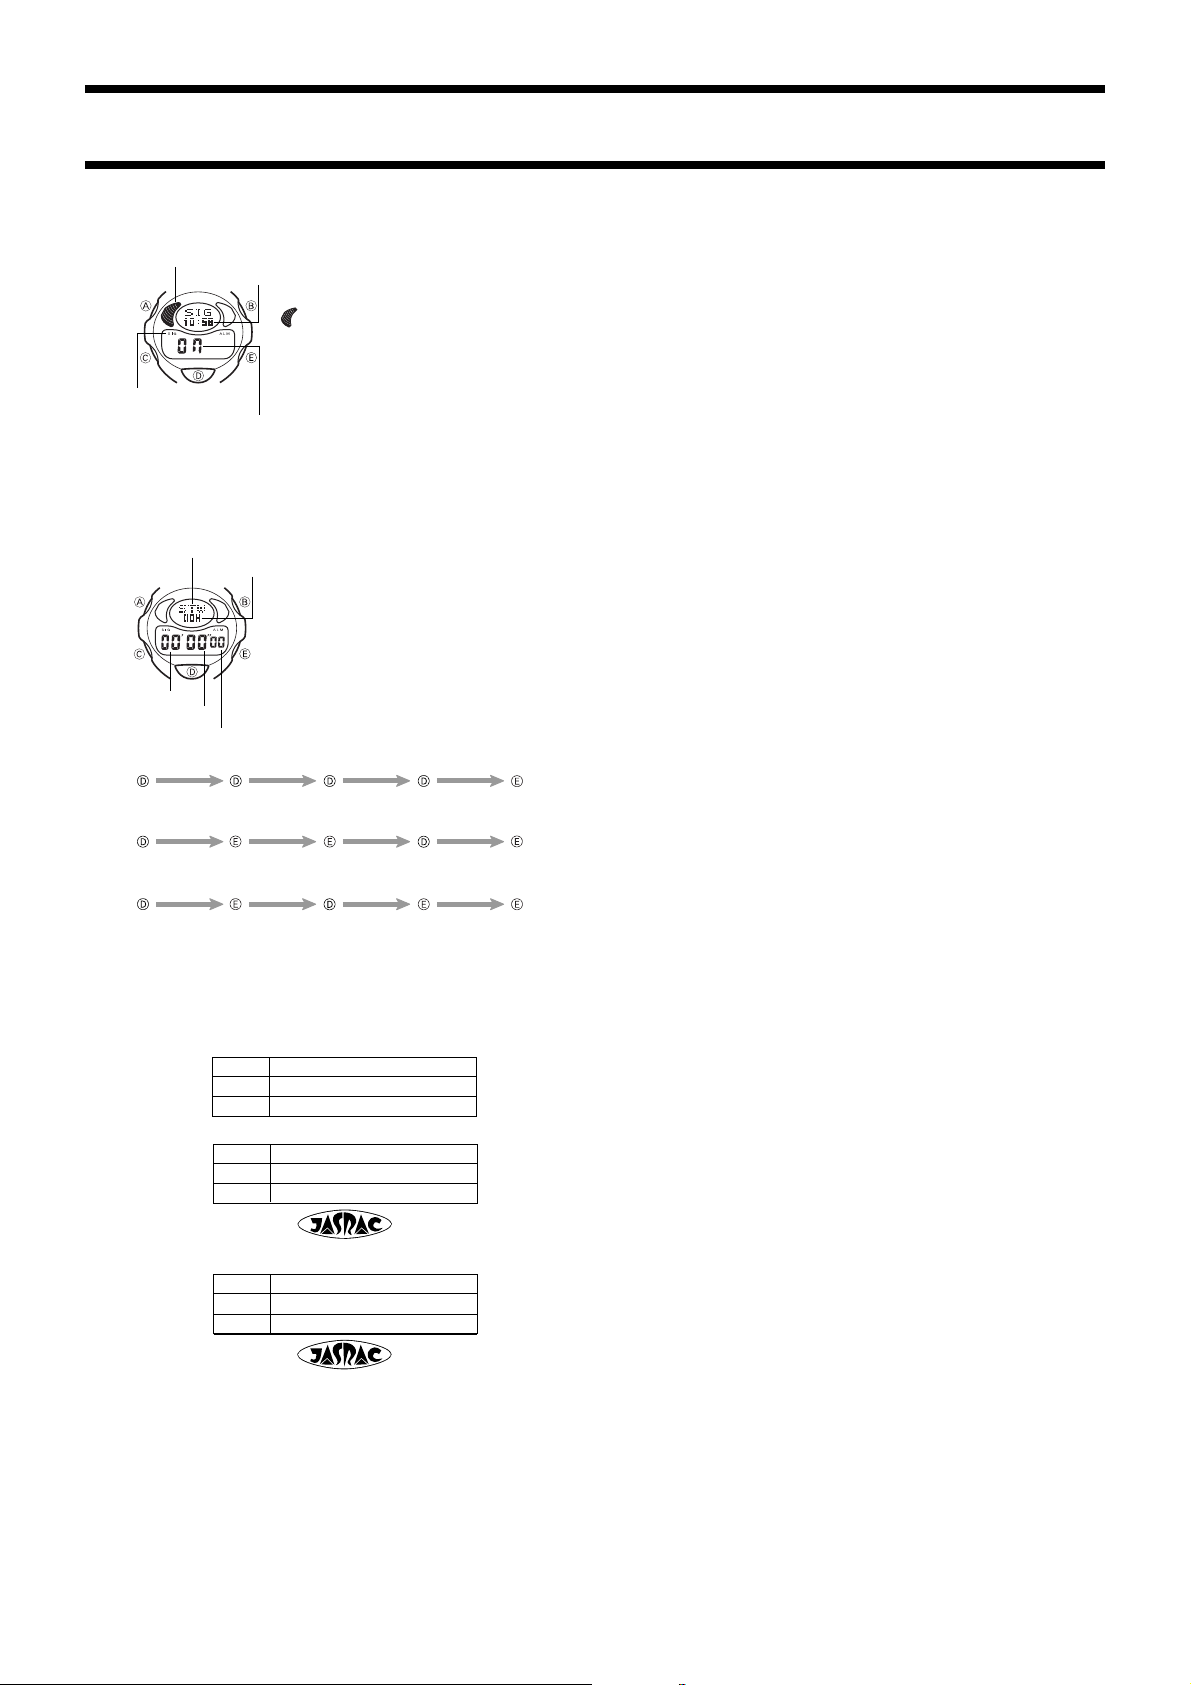
To turn Hourly Time Signal on and off
Hourly time signal
on indicator 1
Hourly time signal
on indicator 2
To test the alarm
Press
alarm.
Current time
Hourly time signal
on/off display
DD
D while in the Alarm Mode to sound the alarm. Press any button to stop the
DD
1.In the Alarm Mode, press
Signal.
2. When the Hourly Time Signal is selected, press
toggle it on (ON appears in lower part of the display)
and off (OFF displayed).
......... Hourly Time Signal Indicator 1
This indicator is shown in the Alarm Mode
only to indicate that the Hourly Time Signal
is on.
SIG ........ Hourly Time Signal Indicator 2
This indicator is shown on the display in all
modes while the Hourly Time Signal is on.
EE
E to select the Hourly Time
EE
STOPWATCH MODE
Mode indicator
Minutes
Seconds
1/100 Second
Elapsed time measurement
Start
Split time measurement
The Stopwatch Mode lets you measure elapsed time, split
times, and two finishes. The range of the stopwatch is 23
Hours
hours, 59 minutes, 59.99 seconds. You can use the EL
backlight by pressing
is operating.
Stop Re-start Stop Clear
BB
B at any time while the stopwatch
BB
BB
B to
BB
Start
Split time and 1st-2nd place times
Start
Split Split release Stop Clear
Split Stop Split release Clear
First runner
finishes.
MELODY LIST
1856
M-1 HIGH ENERGY PROTONS
M-2 FEEL THE UNIVERSE
M-3 FREAK
All of these are CASIO original melodies.
1933
M-1 New year’s day
M-2 Orinoco flow
M-3 Runaway
2065
M-1 Lovin’ you
M-2 In The Summertime
M-3 Baby, I love Your Way
Second runner
finishes.
Record time of
first runner.
Record time of
second runner.
T-9890248
T-9910248
Page 3
Phrase Mark
Instrument
Phrase Mark
Instrument
Electric guitar
Timbales
Trumpet
Piano
Maracas
Bell
Cymbal
Violin
Accordion
Marimba
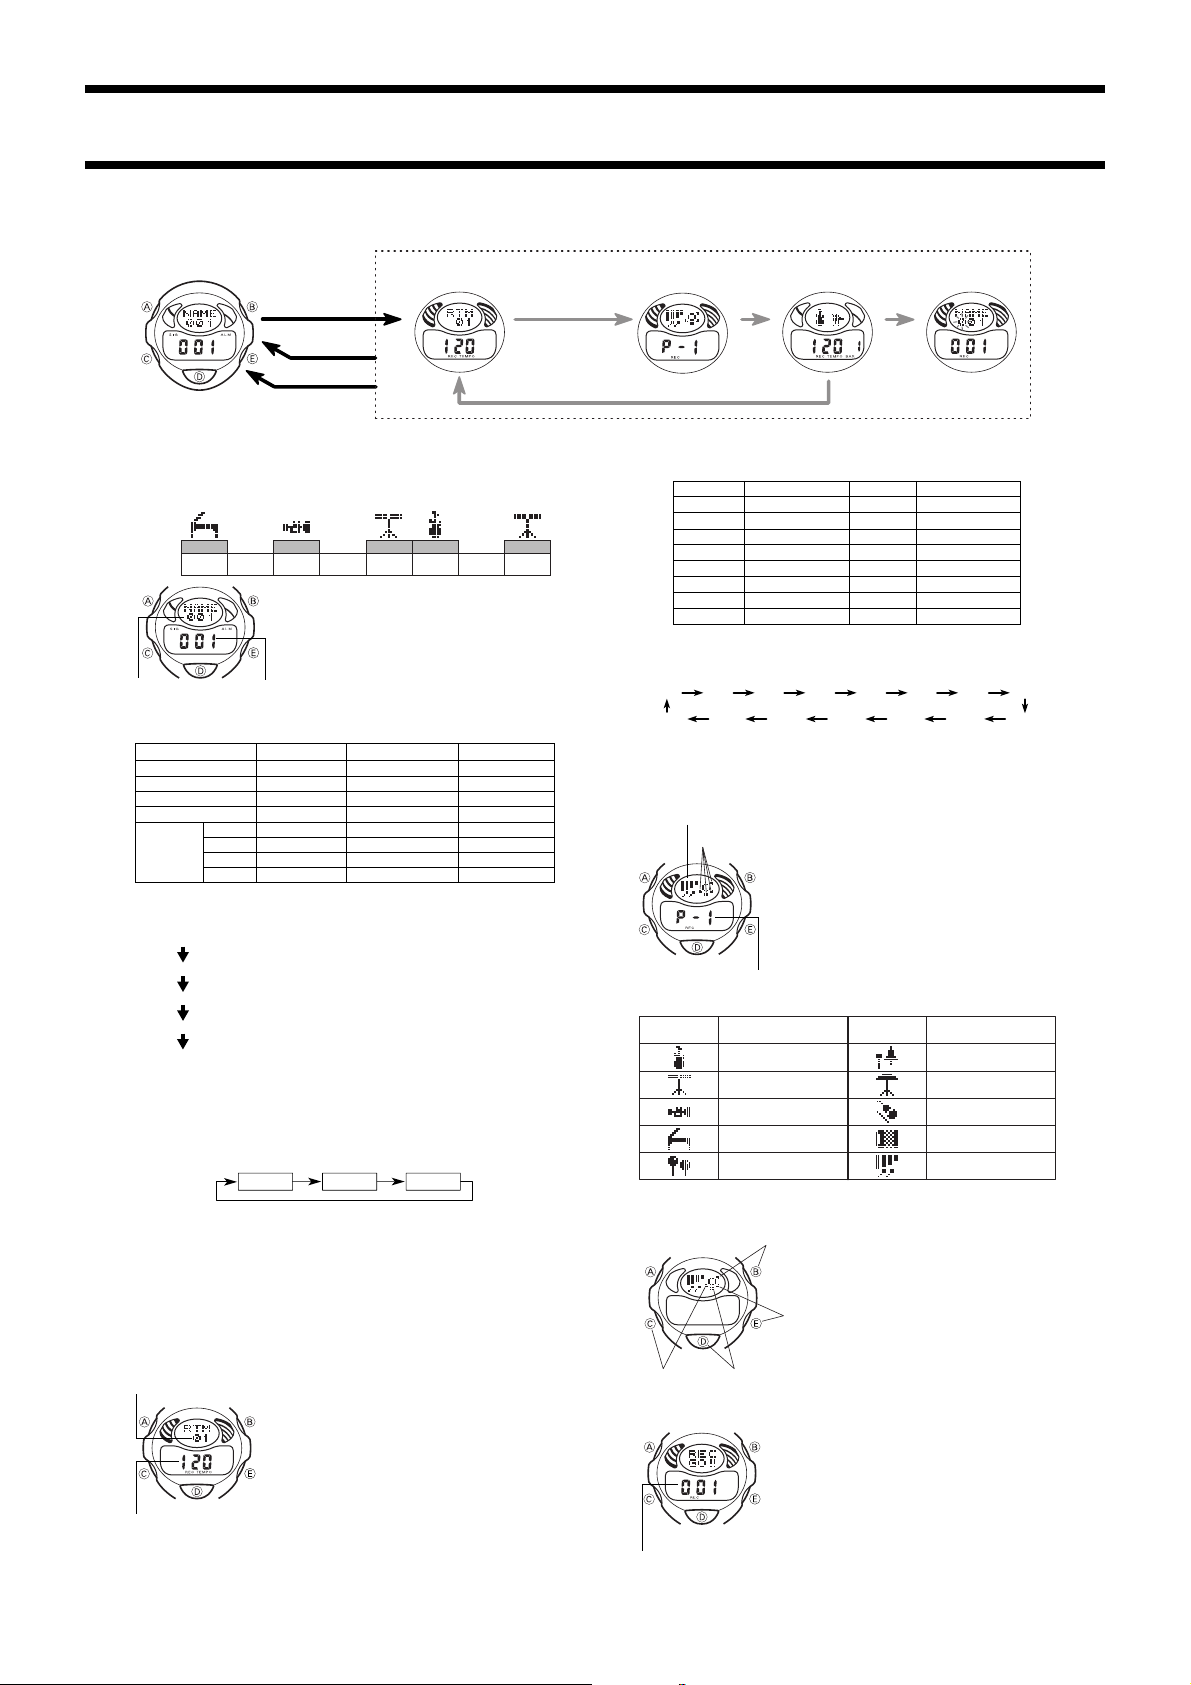
Selecting a
Melody Number Selecting a
Hold down
AA
Press
A
AA
no operation
for a few minutes
AA
A
AA
Rhythm and Tempo
USING THE MIX MODE
Selecting a Phrase Insert Phrases
CC
Press
C
CC
The above illustration shows the general flow of the Mix Mode only.
Note that you will also have to press other keys in addition to those noted above.
Press
Press
Press
1856/1933/2065-3
Assign a title
CC
C
CC
DD
D
DD
CC
C
CC
Press
DD
D
DD
The Mix Mode lets you arrange your own melody and store it in watch memory. You
can select a rhythm, tempo and phrase to create a melody eight measures long.
Phrase
Measure1Measure2Measure3Measure4Measure5Measure6Measure7Measure
Rhythm
• You can arrange a melody using the watch’s pre-programmed rhythms and phrases only. You cannot input
your own melodies.
After you arrange a melody, you can play it back in the
Mix Mode or use it for an alarm sound.
• In the Timekeeping Mode, press
Mode.
Melody name Melody number
• The following shows the default rhythm patterns that are assigned to each melody
number. These patterns are automatically restored whenever you delete the melody.
Melody Number 001 002 003
Melody Name 001 002 003
Rhythm Number 01 02 03
Rhythm Name 16 beat New jack swing Mambo
Tempo Value 120 190 110
Phrases
Assign
General Procedure
The following are the general steps for arranging a melody in the Mix Mode. Details
for each step are provided in the following sections.
1.Select a melody number (001~003).
2.Select a rhythm and tempo that you want to use as a basis for your melody.
3.Assign phrases to each button.
4.Insert phrases by pressing buttons in accordance with the rhythm.
5.Assign a melody name to the completed melody.
Important!
If you do not perform any button operation for a few minutes while arranging a melody, the watch automatically returns from the input screen to the standard Mix Mode
screen. If this happens, restart from step 1 of the General Procedure.
Selecting a Melody Number
There are three melody memory areas numbered 001, 002 and 003. Press
select the memory area where you want to store the melody you will arrange.
• Until you input your own melody name, the default melody name is the same as the
melody number.
• Selecting a melody number that already has a melody assigned to it and inputting a
new melody causes the existing melody to be replaced by the new one.
• Pressing
the display plays back the melody. Press any button to interrupt melody playback.
• Pressing
the display displays an evaluation of the melody. See “Mixing a Melody” below for
details.
• Holding down
melody assigned to it is on the display deletes the melody and restores the melody
number’s default pattern.
Selecting a Rhythm and Tempo
Rhythm number
Tempo value
P-1 Electric guitar Trumpet Violin
P-2 Trumpet Marimba Accordion
P-3 Maracas Bell Timbales
P-4 Cymbal Cymbal Piano
001 003002
DD
D while the melody number that already has a melody assigned to it is on
DD
BB
B while the melody number that already has a melody assigned to it is on
BB
BB
B for about two seconds while a melody number that already has a
BB
Select a rhythm and tempo that you want to use as a basis for your melody.
1.Hold down
• The indicators “REC” and “TEMPO” appear on the dis-
2.Press
AA
A until the rhythm selection screen appears.
AA
play.
BB
B to advance to the next rhythm number. The
BB
following table shows the meaning of each rhythm number.
CC
C to enter the Mix
CC
8
EE
E to
EE
Number Rhythm Name Number Rhythm Name
01 16 beat 09 Country
02 New jack swing 10 Swing
03 Mambo 11 House
04 Rock 12 R&B
05 Bossa nova 13 Soul
06 Ballad 14 Oriental
07 Samba 15 Hip hop
08 Reggae 16 Techno
DD
• Pressing
D plays a sample of the currently displayed rhythm. Press any button to
DD
interrupt play of a rhythm.
3. After setting the rhythm, press
the sequence shown below.
60 70 80 90 100 110 120
200 190
• The initial tempo setting is the one that is recommended for the currently selected
rhythm.
DD
• Pressing
D plays a sample of the currently selected rhythm and tempo. Press any
DD
button to interrupt play of a rhythm.
Selecting a Phrase
Phrase mark
Button marks
Button position number
The following table shows the meaning of each phrase mark.
• Each phrase is written in a style that is representative of its phrase mark instru-
ment.
To assign a phrase to a button
P-4
P-3
Mixing a Melody
[Standby screen]
Melody number
EE
E to cycle through the available tempo values in
EE
130
170 160 150 140180
While rhythm and tempo selection screen is on the dis-
CC
play, press
C to display the phrase selection screen.
CC
You can assign one of 10 musical phrases each to but-
BB
CC
DD
tons
B,
BB
phrase mark on the display shows which phrase is assigned to which button.
P-1
P-2
Use the following procedure to play phrases in time with
the rhythm you selected to arrange the melody you want.
The melody stops automatically after eight measures.
1.When the phrase assignment screen is on the display,
press
• Pressing
ting screen.
• Holding down
the currently selected rhythm and tempo.
• Pressing
which means that output is muted. While MUTE is on
the display, you can arrange your melody without outputting any sound. Press
indicator and unmute the output.
EE
C,
D and
E. A button mark (flashing) and the
CC
DD
EE
EE
1.Use
E to select the button to which you want
EE
to assign the phrase.
BB
2.Use
B to select a phrase.
BB
• Repeat steps 1 and 2 to assign phrases to all
four buttons.
DD
• Pressing
D plays a sample of the currently se-
DD
lected phrase. Press any button to interrupt play
of a phrase.
CC
C to display the Mix Mode standby screen.
CC
CC
C again returns to the rhythm and tempo set-
CC
BB
B at this time displays the numbers of
BB
EE
E at this time displays the MUTE indicator,
EE
EE
E again to clear the MUTE
EE
Page 4

DD
2.Press
D. This causes a four-beat count to sound and
DD
then starts the mixer.
3. Insert phrases by pressing
dance with the rhythm.
• During the above mixing procedure, the left side of the
upper display shows the instrument for the phrase that
is assigned to each button you press. The right side of
the upper display shows random animations of musi-
MeasureTempo value
A 11-level evaluation screen appears after you finish inputting the phrase. The following table shows the display indicator for each evaluation point range.
Point
Range
10
5 to 9
0 to 4
BB
• Press
B if you want to view the evaluation again.
BB
Evaluating a Melody
After you mix an melody, you can evaluate it and decide whether or not you want to
keep it.
To accept a melody and assign it a name
cians.
Display Indicator
bar
graph
flashes
9
8
5
7
6
6
7
5
8
9
1
2
3
4
4
3
2
1
1.While the OK message is on the display after you finish
arranging a melody under “Mixing a Melody”, press
to accept the melody and display the name assignment
screen.
• This displays the name input screen, with a character
input cursor flashing at the far left. You can input up to
three characters for a melody name.
BB
B,
BB
EE
E,
EE
DD
D and
DD
CC
C in accor-
CC
1856/1933/2065-4
DD
D
DD
EE
2.Use
3.When the character you want is at the cursor position, press
• Repeat steps 2 and 3 to input the other two characters.
4.After the melody name is the way you want it, press
• After you arrange a melody, you can play it back in the Mix Mode or Timekeeping
Mode, and you can use it for an alarm sound.
• Pressing
anything.
• Pressing
assigned to the melody number.
• Not performing any operation for two or three minutes while OK message is on the
display stores the melody with the name currently assigned to the melody number.
• You can assign a name to a melody only immediately after arranging the melody.
You cannot change the melody name only without changing the melody itself.
To reject a melody
1.While the OK message is on the display after you finish arranging a melody under
2.Press
3.Next, the rhythm and tempo selection screen appears, so you can try arranging the
To delete the melody
• Holding down
melody assigned to it is on the display deletes the melody and restores the melody
number’s default pattern.
BB
E and
B to scroll forward and back through characters at the current cursor
EE
BB
position.
Press
Press
to the right.
melody name in memory, and return to the normal Mix Mode screen.
AA
A before OK appears on the display aborts the procedure without saving
AA
AA
A while OK is on the display stores the melody with the name currently
AA
“Mixing a Melody”, press
appears on the display.
DD
D. At this time, the message RETRY appears on the display.
DD
EE
E to reject the melody. At this time, the message NG
EE
A to Z0 to 9 (Space)
CC
C to move the cursor
CC
AA
A to store the melody and its
AA
melody again.
BB
B for about two seconds while a melody number that already has a
BB
 Loading...