

Page 1
Module No. 2026
-22 -12 0
hPa mb
P
GETTING ACQUAINTED
Congratulations upon your selection of this CASIO watch. To get the most out
of your purchase, be sure to carefully read this manual and keep it on hand for
later reference when necessary.
Applications
The built in sensors of this watch measure altitude, barometric pressure, and
temperature. Measured values are then shown on the display. Such features
make this watch useful when hiking, mountain climbing, or when engaging in
other such outdoor activities.
• The measurement functions built into this watch are not intended for
taking measurements that require professional or industrial precision.
Values produced by this watch should be considered as reasonable
representations only.
• CASIO COMPUTER CO., LTD. assumes no responsibility for any loss,
or any claims by third parties that may arise through the use of this
watch.
Warning!
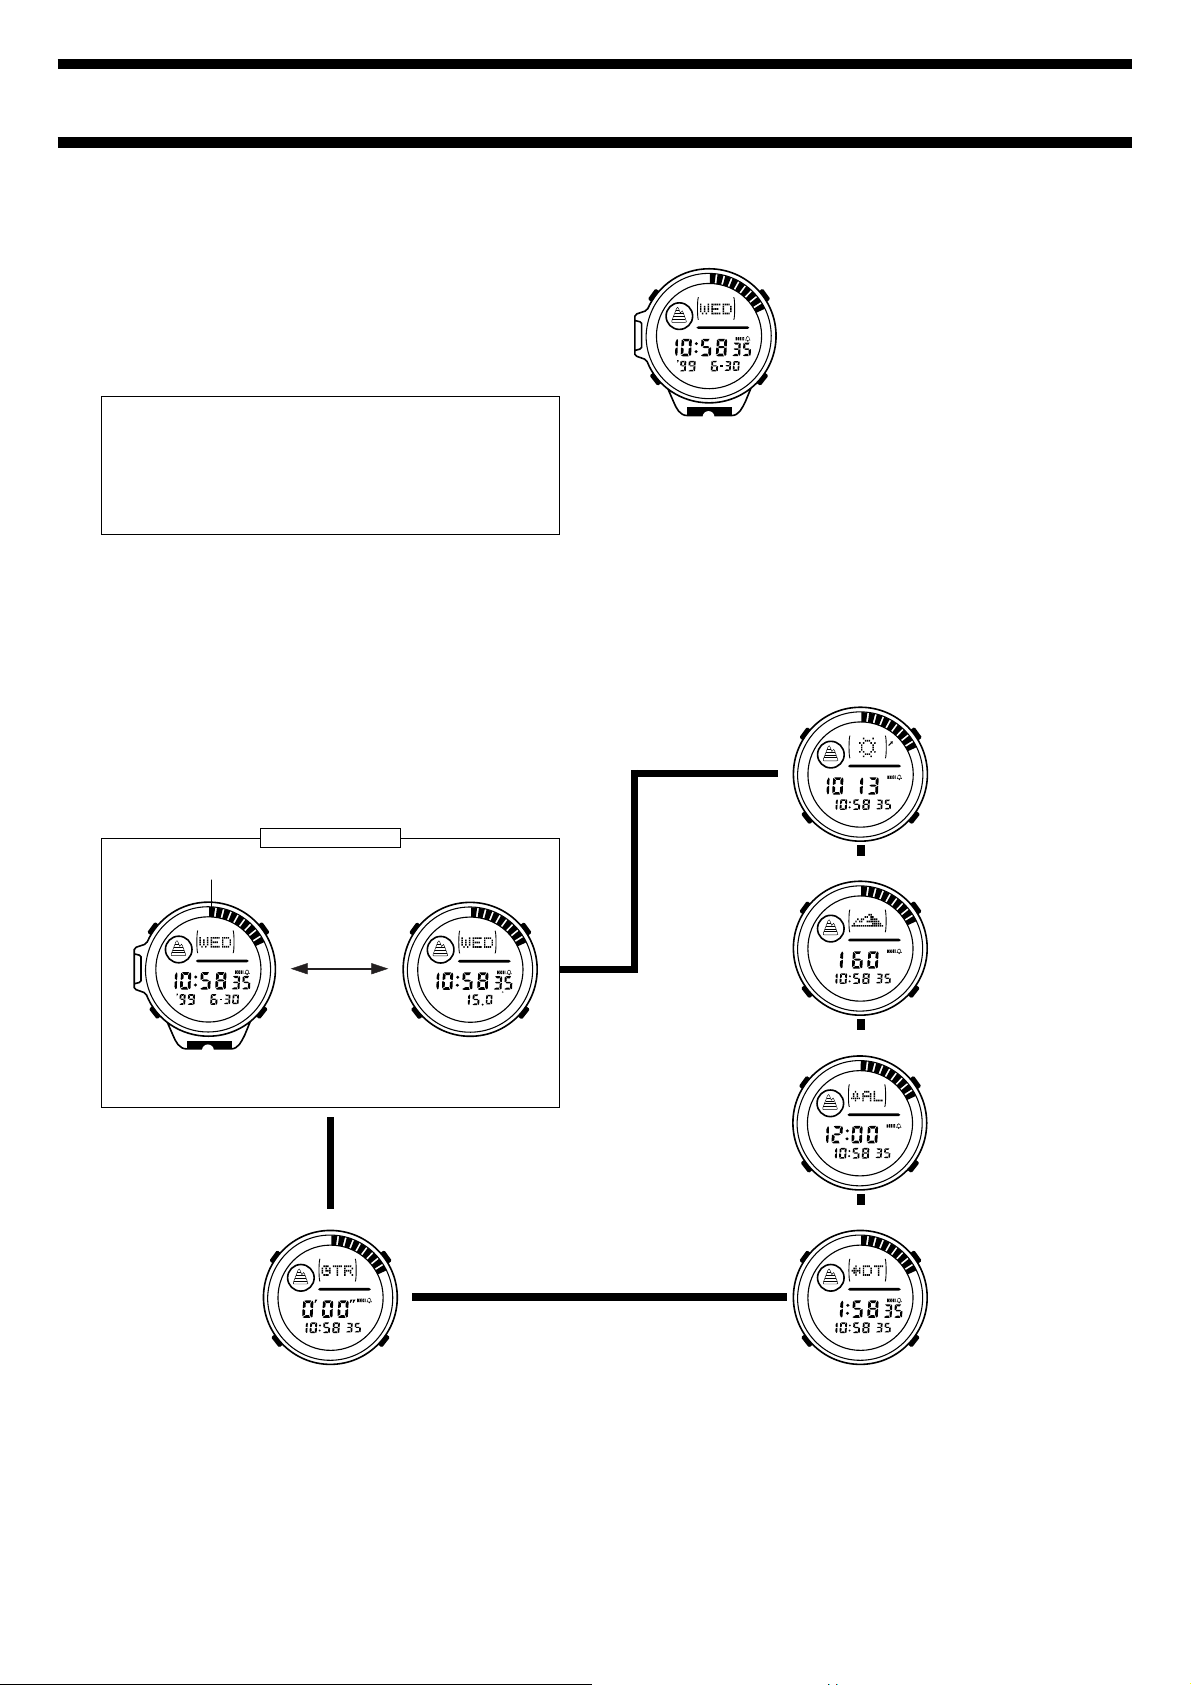
GENERAL GUIDE
• Press C to change from mode to mode.
• If the mode does not change when you press C, it may mean that Auto Display is turned on. See “Auto Display” for information about how to turn it off.
• In any mode, press L to illuminate the display.
About This Manual
A
-22 -12 0
P
C
L
B
D
• Button operations are indicated using the
letters shown in the illustration.
• Each section of this manual provides you
with the information you need to perform
operations in each mode. Further details
and technical information can be found in
the “REFERENCE” section.
Barometer Mode
2026-1
Timekeeping Mode
Altitude Markers
A
-22 -12 0
P
C
B
Press B.
D
L
[ Date ] [ Temperature ]
▲
Countdown Alarm Mode
-22 -12 0
P
Press C.
▼
▲
Altimeter Mode
-22 -12 0
m
-22 -12 0
P
C
P
▲
Alarm Mode
-22 -12 0
A
P
▲
Dual Time Mode
▼
-22 -12 0
LOCAL
P
P
HOME
Page 2
2026-2
TIMEKEEPING
In addition to normal timekeeping, use the Timekeeping Mode to set the
current time and date.
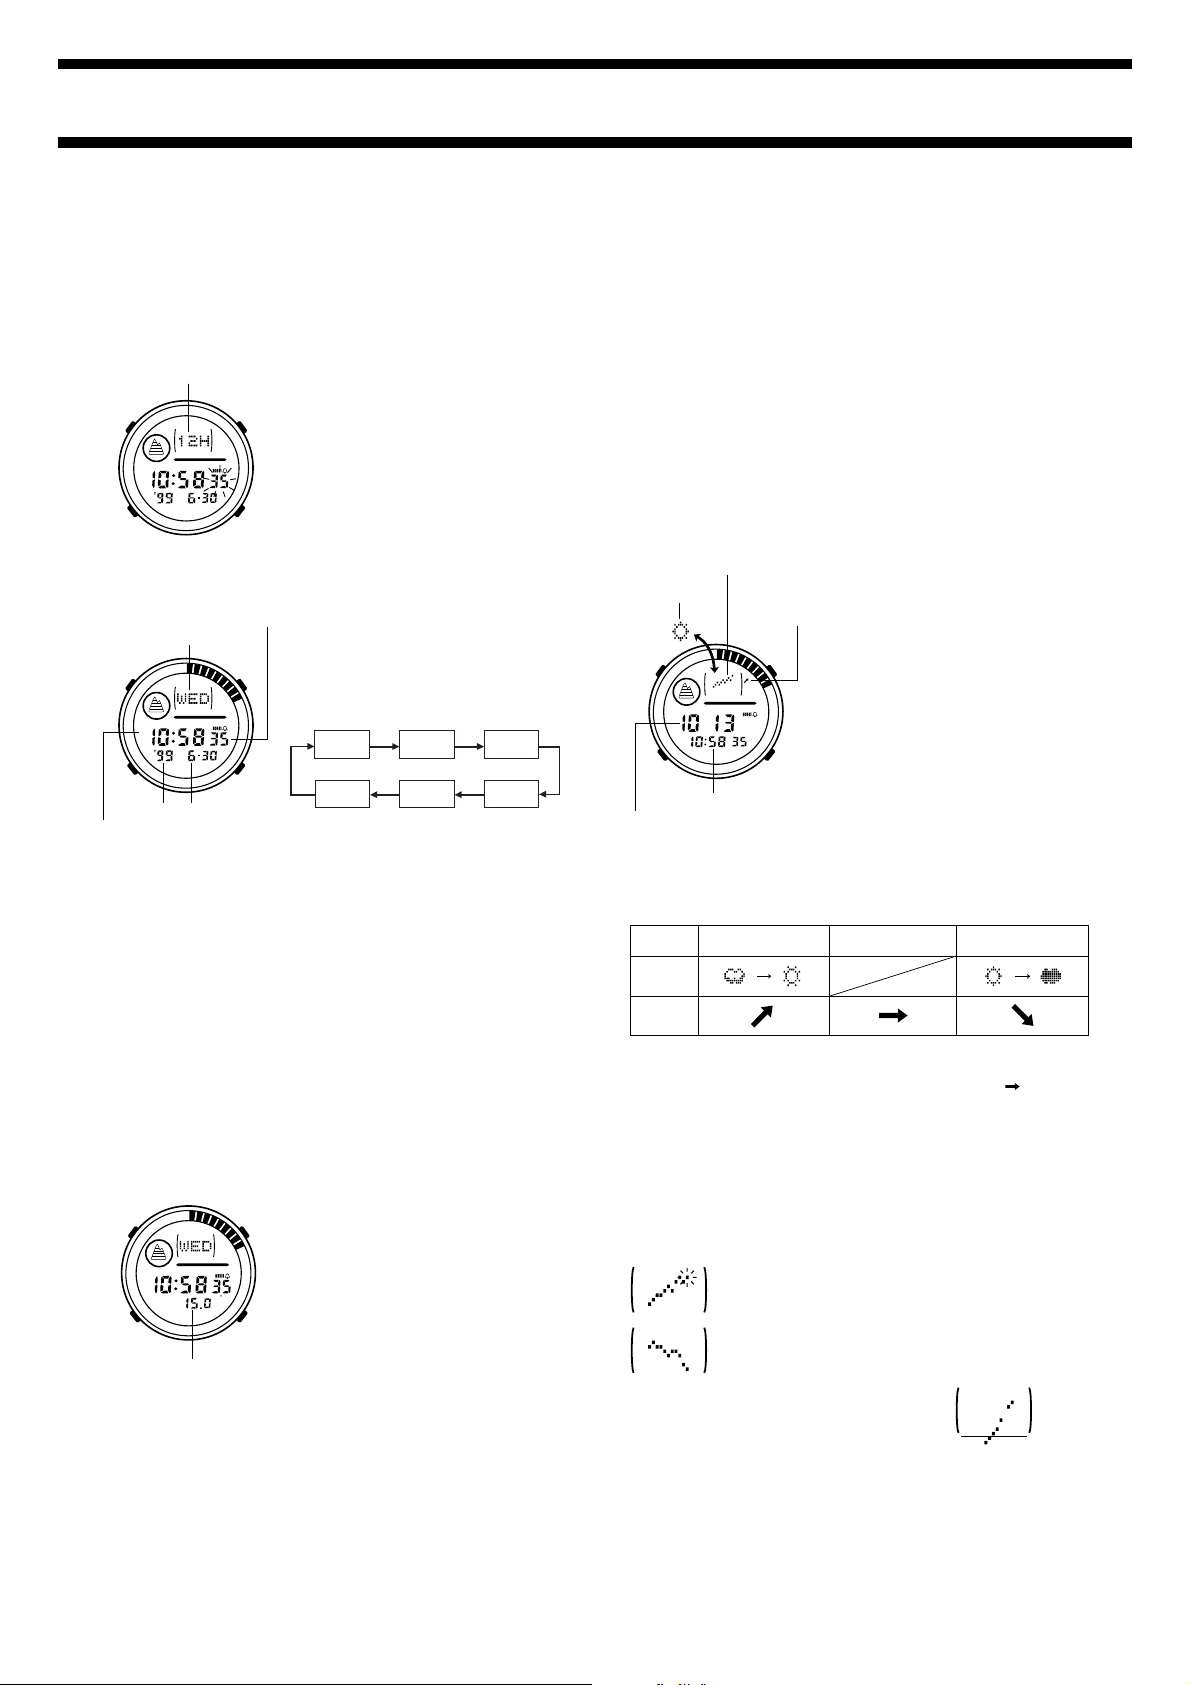
Calibrating the Seconds Count
Use the following procedure to calibrate the seconds count. You can also
specify whether you prefer to use 12-hour or 24-hour timekeeping for all
screen that show times.
Time system indicator
A
-22 -12 0
P
C
1. In the Timekeeping Mode, hold down A
until the seconds digits start to flash.
2. Press D to set the seconds count to
• Pressing D while the seconds count is in
B
the range of 30 to 59 resets the seconds to
00 and adds 1 to the minutes. If the
seconds count is in the range of 00 to 29,
the minutes count is unchanged.
• While the seconds digits are flashing, press
B to toggle between 12-hour (
D
3. Press A to return to the current time
24-hour (
screen.
24H) timekeeping.
00.
12H) and
Setting the Current Time and Date
Hour : Minutes Seconds
Day of week
A
-22 -12 0
P
C
Month – Day
Year
PM indicator
3. While hour, minutes, year, month, or day is selected (flashing), press D to
increase the setting or B to decrease it.
4. After the time and date are set the way you want them, press A to return
to the current time screen.
Notes
• The day of the week is automatically displayed in accordance with the date
(year, month, and day) setting.
• The year can be set in the range of 1995 to 2039.
• The watch’s built-in full automatic calendar automatically make allowances
for different month lengths and leap years. Once you set the date, there
should be no reason to change it except after replacement of the watch’s
batteries.
1. In the Timekeeping Mode, hold down A
until the seconds digits start to flash.
• The seconds digits are flashing because
B
2. Press C to move the flashing in the
selected
they are
sequence shown below to select other
settings.
Seconds
.
Hour
D
MonthDay Year
Minutes
THERMOMETER
A built-in temperature sensor measures temperature and shows the measured
value on the display. You can calibrate the temperature sensor if you suspect
the temperature reading is incorrect.
Understanding the Temperature Screen
1. Use C to enter the Timekeeping Mode.
A
-22 -12 0
P
C
C
Temperature
About Temperature Measurements
• When you first display the Temperature screen, it shows the current
temperature at that time. If you leave the Temperature screen on the
display, temperature measurements are taken every five seconds for the
first three minutes. After that, temperature measurements are taken every
five minutes.
• Temperature measurements are affected by your body temperature (while
you are wearing the watch), direct sunlight, and moisture. To achieve a
more accurate temperature measurement, remove the watch from your
wrist, place it in a well ventilated location out of direct sunlight, and wipe off
all moisture from the case. It takes approximately 20 to 30 minutes for the
case of the watch to reach the actual surrounding temperature.
• You can change the measured temperature value displayed by this watch
between Celsius (°C) and Fahrenheit (°F). See “Changing the Temperature
Units” .
2. Press B to display the Temperature
B
screen.
• Temperature is displayed in units of 0.1°C
(or 0.2°F).
• The displayed temperature value changes to
xx.x °C (or ° F) if a measured temperature
falls outside the range of –10.0°C to 60.0°C
D
(14.0°F to 140.0°F). The temperature value
will be displayed again as soon as the
measured temperature is within the
allowable range.
BAROMETER
This watch uses a pressure sensor to measure air pressure. You can calibrate
the pressure sensor if you suspect the barometric pressure reading is
incorrect.
Applications
• Before going mountain climbing, you can take readings to find out the
probable upcoming weather.
• You can predict the weather for golf or other outdoor activities.
Important!
• The pressure sensor built into this watch measures changes in air pressure,
which you can then apply to your own weather predictions. It is not intended
for use as a precision instrument in official weather prediction or reporting
applications.
• The barometric pressures that you see in the newspaper and on the TV
weather report are measurements corrected to values measured at 0m sea
level.
Understanding the Barometer Screen
Barometric pressure graph
Weather graphic
A
-22 -12 0
hPa mb
P
C
Current time
Barometic pressure
Weather Graphic and Pressure Tendency Indicator
The watch automatically takes a barometric pressure reading every two hours.
It compares the current reading with the last one. If the difference is greater
than ±2hPa/mb (0.05inHg), the graphic and tendency indicator are changed
accordingly.
Weather
Graphic
Tendency
Indicator
• If the difference between two readings is less than ±2hPa/mb (0.05inHg) or
if the watch was unable to make a successful reading for some reason, the
graphic remains the same and the tendency indicator shows
• The “Improving” graphic and rising tendency indicator are shown
immediately after replacement of the watch batteries.
Barometric pressure graph
Barometric pressure indicates changes in the atmosphere. By monitoring
these changes you can predict the weather with reasonable accuracy.
The barometric pressure graph shows the barometric readings for the past 20
hours. The flashing point on the right of the display is the point for the last
measurement. The following shows how to interpret the data that appears on
the barometric pressure graph.
A rising graph generally means improving weather.
A falling graph generally means deteriorating weather.
Note that if there are sudden changes in weather or
temperature, the graph line of past measurements
may run off the top or bottom of the display. The entire
graph will become visible once barometric conditions
stabilize.
The following conditions cause the barometric
pressure measurement to be skipped, with the
corresponding point on the barometric pressure graph
being left blank.
• Barometric reading that is out of range (460hPa/mb to 1100hPa/mb or
13.55inHg to 32.45inHg)
• Sensor malfunction
• Dead batteries
Use C to enter the Barometer Mode.
• Barometric pressure is displayed in units of
Pressure
tendency
indicator
1hPa/mb (or 0.05inchesHg).
• The displayed barometric pressure value
changes to
measured barometric pressure falls outside
the range of 460hPa/mb to 1100hPa/mb
B
(13.55inHg to 32.45inHg). The barometric
pressure value will be displayed again as
soon as the measured barometric pressure
is within the allowable range.
• In the Barometer Mode, the top part of the
display alternates between a barometric
D
pressure graph and a weather graphic. A
pressure tendency indicator is also shown
on the display.
xxxx hPa/mb (or inHg) if a
No ChangeImproving
Deteriorating
.
Not visible on
the display.
Page 3

2026-3
-22 -12 0
m
P
5,000
4,000
3,000
2,000
1,000 m
4,000 feet
8,000
12,000
16,000
900
700
600
800
400
200
100
300
About Barometric Measurements
• The barometer automatically takes measurements every two hours (starting
from midnight), regardless of what mode you are in. The results of these
measurements are used for the weather graphic, pressure tendency
indicator, and barometric pressure graph.
• Barometric pressure measurements are also taken every five seconds for
three minutes after you enter the Barometer Mode. After that, the
measurements are taken every five minutes. The results of these
measurements are used to produce the numeric barometric pressure
values that appear on the display.
• You can also perform a barometric pressure measurement at any time by
pressing D in the Barometer Mode. A manual measurement updates the
barometric pressure value on the display.
• You can change the measured barometric pressure unit between hectopascals/millibars (hPa mb) and inchesHg (inHg). See “Changing the
Barometric Pressure Units” for details.
• Some countries refer to the barometric pressure unit hecto-pascal (hPa) as
millibars (mb). It really makes no difference, because 1hPa = 1mb. In this
manual, we use hPa/mb or hPa (mb).
• Sudden temperature changes can affect pressure sensor readings.
• Attaching the watch to or removing it from your wrist causes a sudden
change in watch temperature, which can result in incorrect indications by
the weather graphic and pressure tendency indicator.
ALTIMETER
A built-in altimeter uses a pressure sensor to detect the current air pressure,
which is then used to estimate the current altitude. The watch is preprogrammed with ISA (International Standard Atmosphere) preset values,
which are used to convert air pressure readings to altitude values. You should
remember, however, that conversion values are based on ideal conditions.
The air pressure readings taken by the watch are also affected by weather,
temperature, and other factors, beside altitude. To overcome this, you can set
reference altitude
a
make the necessary adjustments for non-altitude factors.
How the Altimeter Mode Works
With the Preset Values (No Reference Altitude)
• The watch measures the air pressure at your current location and uses the
built-in ISA values to convert it to the equivalent altitude.
With a Reference Altitude
• After you set the reference altitude, the watch adjusts its air pressure to
altitude conversion calculation accordingly.
• To determine the height of a tall
building, set the reference altitude to 0
on the ground floor. Note, however,
that you may not be able to get a good
reading if the building is pressurized or
air conditioned.
• When mountain climbing, you can set
the reference value in accordance with
a marker along the way or altitude
information from a map. After you do
this, the altitude readings produced by
the watch will be more accurate than
they would without a reference
altitude.
• Note that the following conditions will prevent you from obtaining accurate
readings:
When air pressure changes because of changes in the weather
Extreme temperature changes
When the watch itself is subjected to strong impact
Understanding the Altimeter Screen
Altitude graph
A
P
C
Current time
Altitude indicator
based on a known value, which is used by the watch to
400
Use C to enter the Altimeter Mode.
• Altitude is displayed in units of 5 meters (20
-22 -12 0
m
Altitude
markers
Altitude
feet).
• The measurement range for altitude is 0 to
6,000 meters (0 to 19,680 feet).
B
• The displayed altitude value changes to
xxxx meters (or feet) if a measured
altitude falls outside the measurement
range. The altitude value will be displayed
again as soon as the measured altitude is
within the allowable range.
D
• The measured altitude may be a negative
value in cases where there is a reference
altitude value set or because of certain
atmospheric conditions.
About the Altitude Graph
The altitude graph shows the results of altitude
measurement readings taken every two hours. The
value of each dot on the graph is equivalent to the
difference between the highest altitude and lowest
altitude measured divided by 9.
• The flashing dots at the far right of the graph
indicate the most recent measurement.
• On the altitude graph, the highest altitude
measured is shown with nine dots, while the lowest
altitude is shown with one dot.
Altitude
Time
Altitude Indicator and Altitude Markers
The latest altitude measurement is shown by the altitude indicator and
markers.
Altitude Indicator
Altitude Markers
Descent
Ascent
Indicates nagative altitude
• The altitude indicator shows altitude in 1,000-meter (4,000-foot) units, while
the altitude markers show altitude in 20-meter (80-foot) units.
• You can rotate the bezel so its pointer (
to use as a reference point. After that, changes in the markers relative to
the pointer indicate whether you are ascending or descending.
• The altitude indicator flashes when the last altitude reading is outside the
display range.
• The altitude indicator and altitude markers remain on the display in all modes.
Rotary Bezel
) is pointed at a marker you want
Setting a Reference Altitude
After you set a reference altitude, the watch adjusts is air pressure to altitude
conversion calculation accordingly. The altitude measurements produced by
this watch are subject to error caused by changes in air pressure. Because of
this, we recommend that you update the reference altitude whenever one is
available during your climb.
1. In the Altimeter Mode, hold down B (or
A
-22 -12 0
P
C
2. Press D to increase the current reference altitude value by 5 meters (or
20 feet) or B to decrease it.
• You can set the reference altitude within the range of –6,000 to 6,000
meters (–19,680 to 19,680 feet).
• Pressing B and D at the same time clears the reference altitude, so the
watch performs air pressure to altitude conversions based on preset data
only.
3. After setting the reference altitude you want, press A to return to the
Altitude screen.
B
m
D
D) until the watch beeps. After a few
moments, the message
(flashing).
• A reference altitude value appears instead
OFF (no reference altitude) if there is
of
already a reference altitude set.
• If you do not operate any button for about
five seconds while
value is flashing, the flashing stops and the
watch goes back to the Altitude screen.
OFF appears
OFF or reference altitude
About Altitude Measurements
• The altimeter automatically takes measurements every two hours (starting
from midnight), regardless of what mode you are in. The results of these
readings are used for the altitude graph, altitude indicator, and altitude
markers.
• Altitude measurements are also taken every five seconds for three minutes
after you enter the Altimeter Mode. After that, the measurements are taken
every five minutes. The results of these measurements are used to produce
the numeric altitude value that appears on the display.
• You can also perform an altitude measurement at any time by pressing B
or D in the Altimeter Mode. A manual measurement updates the altitude
value on the display.
• Certain atmospheric conditions can cause the measured altitude value to
be negative.
• You can change the unit of measurement for the displayed altitude values
between meters (m) and feet (ft). See “Changing the Altitude Units”.
Page 4

2026-4
ALARM
Alarm on indicator
Hour : Minutes
A
-22 -12 0
A
P
C
Current time
Hourly time signal on indicator
3. Press C to move the flashing in the sequence shown below to select
other digits.
4. While hour or minutes is selected (flashing), press D to increase the
setting or B to decrease it.
• When setting the alarm time using the 12-hour format, take care to set the
time correctly as a.m. (A indicator) or p.m. (P indicator).
5. After the alarm time is the way you want it, press A to return to the Alarm
Mode screen.
Daily Alarm Operation
The alarm sounds at the preset time each day for about 20 seconds, or until
you stop it by pressing any button.
To test the alarm
Hold down B to sound the alarm.
Turning the Daily Alarm and Hourly Time Signal
on and off
In the Alarm Mode, press D to cycle through the on and off settings as shown
below.
[Alarm ON Indicator / Hourly Time Signal ON Indicator]
You can set a Daily Alarm that sounds at the
same time each day, while it is turned on. You
can also turn on an Hourly Time Signal that
causes the watch to beep twice every hour on
B
the hour.
Setting the Alarm Time
1. Use C to enter the Alarm Mode.
2. Hold down A until the hour digits of the
D
alarm time start to flash.
• The hour digits are flashing because they
selected
are
• This operation automatically turns on the
Daily Alarm.
Hour Minutes
.
COUNTDOWN ALARM
Minutes' Seconds"
A
-22 -12 0
P
C
Current time
3. While minutes digit is selected (flashing), press D to increase the setting
or B to decrease it.
• To set the starting value of the countdown time to 60 minutes, set
4. After the countdown time is the way you want it, press A to return to the
Countdown Alarm Mode screen.
Using the Countdown Timer
Press D to start the countdown timer.
• Press D while a countdown operation is in progress to pause it. Press D
again to resume the countdown.
• To completely stop a countdown operation, first pause it (by pressing D),
and then press B. This returns the countdown time to its starting value.
The countdown timer can be set within a range
of 1 minute to 60 minutes. When the
countdown reaches zero, an alarm sounds for
B
10 seconds or until you stop it by pressing any
button.
Setting the Countdown Time
1. Use C to enter the Countdown Alarm
D
Mode.
2. Hold down A until the minutes digit of the
countdown time starts to flash.
0' 00".
BACKLIGHT
Auto light switch on indicator
A
-22 -12 0
P
AUTO
C
L
The backlight uses an EL (electro-luminescent)
panel that causes the entire display to glow for
easy reading in the dark. The watch’s auto light
B
switch automatically turns on the backlight
when you angle the watch towards your face.
• The auto light switch must be turned on
(indicated by the auto light switch on
indicator) for it to operate.
D
Alarm On
Signal On
Alarm Off
Signal Off
Alarm On
Signal Off
Alarm Off
Signal On
DUAL TIME
Dual time
A
-22 -12 0
LOCAL
P
P
HOME
C
Main time
4. While hour or minutes is selected (flashing), press D to increase the
setting or B to decrease it.
• When setting the dual time using the 12-hour format, take care to set the
time correctly as a.m. (A indicator) or p.m. (P indicator).
5. After the dual time is the way you want it, press A to return to the Dual
Time Mode screen.
• The seconds count of the dual time is synchronized with the seconds count
of the main time set in the Timekeeping Mode.
Dual time lets you keep track of time in two
different time zones.
B
Setting the Dual Time
1. Use C to enter the Dual Time Mode.
2. Hold down A until the hour digits of the
dual time start to flash.
3. Press C to move the flashing in the
D
sequence shown below to select other
digits.
Hour Minutes
Turning on the Backlight Manually
In any mode, press L to illuminate the display for about two seconds.
• The above operation turns on the backlight regardless of the current auto
light switch setting.
About the Auto Light Switch
Turning on the auto light switch causes the backlight to turn on for about two
seconds, whenever you position your wrist as described below in any mode.
• See “Backlight Precautions” for other important information about using the
backlight.
Moving the watch to a position that is parallel to the ground and then tilting
it towards you more than 40 degrees causes the backlight to light.
Parallel to
ground
Warning!
• Never try to read your watch when mountain climbing or hiking in
areas that are dark or in areas with poor footing. Doing so is
dangerous and can result in serious personal injury.
• Never try to read your watch when running where there is danger of
accidents, especially in locations where there might be vehicular or
pedestrian traffic. Doing so is dangerous and can result in serious
personal injury.
• Never try to read your watch when riding on a bicycle or when
operating a motorcycle or any other motor vehicle. Doing so is
dangerous and can result in a traffic accident and serious personal
injury.
• When you are wearing the watch, make sure that its auto light switch
is turned off before riding on a bicycle or operating a motorcycle or
any other motor vehicle. Sudden and unintended operation of the auto
light switch can create a distraction, which can result in a traffic
accident and serious personal injury.
More
than
°
40
Page 5

2026-5
To turn the auto light switch on and off
In the Timekeeping Mode’s Date screen, hold down D for two seconds to turn
the auto light switch on (
• In order to protect against running down the batteries, the auto light switch
is automatically turned off approximately six hours after you turn it on.
Repeat the above procedure to turn the auto light switch back on if you
want.
• The auto light switch on indicator (
the auto light switch is turned on.
displayed) and off (
AUTO
AUTO
not displayed).
AUTO
) is on the display in all modes while
REFERENCE
This section contains more detailed and technical information about watch
operation. It also contains important precautions and notes about the various
features and functions of this watch.
Auto Display
Auto Display automatically switches between
the Barometer Mode’s weather graphic and the
barometric pressure graph. Note that you
A
-22 -12 0
P
C
Auto Return Feature
• After you perform an operation in any mode (except for the backlight
operation), pressing C returns to the Timekeeping Mode.
• If you leave a screen with flashing digits on the display for two or three
minutes without performing any operation, the watch automatically saves
anything you have input up to that point and exits the setting screen.
• If you leave the Temperature screen displayed without performing any
operation for about 10 or 11 hours, the watch beeps and automatically
returns to the Timekeeping Mode’s Date screen. If the watch is in another
mode (other than the Timekeeping, Barometer, and Altimeter Modes), the
watch beeps but the mode does not change.
• Note that once you enter the Barometer and Altimeter Modes, the watch
beeps and automatically returns to the Timekeeping Mode if you do not
press any button for 10 or 11 hours.
Data and Setting Scrolling
The B and D buttons are used in various setting screens to scroll through
data. In most cases, holding down these buttons during a scroll operation
scrolls through the data at high speed.
12-hour/24-hour Timekeeping Formats
The 12-hour/24-hour timekeeping format you select in the Timekeeping Mode
is applied in all other modes.
• With the 12-hour format, the P (PM) indicator appears to the left of the hour
digits for times in the range of noon to 11:59 p.m. and the A (AM) indicator
appears to the left of the hour digits for times in the range of midnight to
11:59 a.m.
• With the 24-hour format, times are indicated in the range of 00:00 to 23:59,
without any indicator.
Changing the Temperature Units
A
-22 -12 0
P
C
C
Calibrating the Temperature Sensor
The temperature sensor of this watch is calibrated at the factory before
shipment and further adjustment is normally not required. If you notice serious
errors in the temperature readings produced by the watch, you can calibrate
the sensor to correct the errors.
cannot use any of the watch’s other functions
B
while Auto Display is turned on.
To turn the Auto Display off
Hold down C for about two seconds until the
watch beeps.
D
To turn the Auto Display on
In the Timekeeping Mode’s Date screen, hold
down C for about three seconds until the
watch beeps.
• Note that Auto Display cannot be turned on
while you are making watch settings.
1. In the Timekeeping Mode, press B to
display the Temperature screen.
2. Hold down A until the
B
appears (flashing).
• A temperature value appears instead of
OFF (factory calibration) if you previously
calibrated the temperature sensor.
3. Press C to move the flashing to the unit
D
4. Press D toggle between the two settings.
5. Press A to return to the Temperature
setting (
screen.
°C or °F).
OFF message
Important!
Incorrectly calibrating the temperature sensor can result in incorrect readings.
Carefully read the following before doing anything.
• Compare the readings produced by the watch with those of another reliable
and accurate thermometer.
• If adjustment is required, remove the watch from your wrist and wait for 20
or 30 minutes to give the temperature of the watch time to stabilize.
To calibrate the temperature
1. In the Timekeeping Mode, press B to
display the Temperature screen.
A
-22 -12 0
P
C
C
4. After calibrating the temperature, press A to return to the Temperature
screen.
2. Hold down A until the
B
appears (flashing).
• A temperature value appears instead of
OFF (factory calibration) if you previously
calibrated the temperature sensor.
3. Each press of D increases the displayed
temperature by 0.1°C (or 0.2°F) while
D
pressing B decreases it.
• Pressing B and D at the same time
returns to the factory calibration (
OFF message
OFF).
Changing the Barometric Pressure Units
Changing the barometric pressure units automatically restarts the barometric
pressure graph and the altitude graph.
1. Use C to enter the Barometer Mode.
C
A
2. Hold down A until the watch beeps. After a
few moments, the message
B
(flashing).
-22 -12 0
hPa mb
P
• A barometric pressure value appears
instead of
previously calibrated the barometric
pressure sensor.
3. Press C to move the flashing to the unit
D
setting you want (hPa mb or inHg).
4. Press D select the unit you want.
5. Press A to return to the Barometer Mode
screen.
OFF (factory calibration) if you
OFF appears
Calibrating the Barometric Pressure Sensor
The pressure sensor of this watch is calibrated at the factory before shipment
and further adjustment is normally not required. If you notice serious errors in
the barometric pressure readings produced by the watch, you can calibrate
the sensor to correct the errors.
Important!
Incorrectly calibrating the barometric pressure sensor can result in incorrect
readings. Before performing the calibration procedure, compare the readings
produced by the watch with those of another reliable and accurate barometer.
To calibrate the barometric pressure
1. Use C to enter the Barometer Mode.
2. Hold down A until the watch beeps. After a
A
-22 -12 0
hPa mb
P
C
4. After calibrating the barometric pressure, press A to return to the
Barometric Pressure screen.
few moments, the message
B
(flashing).
• A barometric pressure value appears
instead of
previously calibrated the barometric
pressure sensor.
3. Each press of D increases the displayed
D
barometric pressure by 1hPa/mb
(0.05inHg), while pressing B decreases it.
• Pressing B and D at the same time
returns to the factory calibration (
OFF (factory calibration) if you
OFF appears
OFF).
Changing the Altitude Units
Changing the altitude units automatically restarts the altitude graph and the
barometric pressure graph.
1. Use C to enter the Altimeter Mode.
A
C
-22 -12 0
m
P
2. Hold down A until the altitude unit (m or ft)
B
starts to flash.
3. Press D to select the unit you want.
4. Press A to return to the Altimeter Mode
screen.
D
Page 6

2026-6
Altimeter Mode Precautions
Generally, air pressure and temperature decrease as altitude increases. This
watch bases its altitude measurements on International Standard Atmosphere
(ISA) values stipulated by the International Civil Aviation Organization (ICAO).
These values define relationships between altitude, air pressure, and
temperature.
ALTITUDE AIR PRESSURE TEMPERATURE
6,000 m
5,500 m
5,000 m
4,500 m
4,000 m
3,500 m
3,000 m
2,500 m
2,000 m
1,500 m
1,000 m
500 m
0 m
Source: International Civil Aviation Organization
ALTITUDE AIR PRESSURE TEMPERATURE
20,000 ft
18,000 ft
16,000 ft
14,000 ft
12,000 ft
10,000 ft
8,000 ft
6,000 ft
4,000 ft
2,000 ft
0 ft
Source: International Civil Aviation Organization
There are two standard methods of expressing altitude: Absolute altitude and
relative altitude. Absolute altitude expresses an absolute height above sea
level. Relative altitude expresses the difference between the height of two
different places.
Important!
• This watch estimates altitude based on air pressure. This means that
altitude readings for the same location may vary if air pressure changes.
• This watch employs a semiconductor pressure sensor, which is affected by
temperature changes. When taking altitude measurements, be sure to do
so while ensuring that the watch is not exposed to temperature changes.
• Do not rely upon this watch for altitude measurements or perform button
operations while engaging in sports where there are sudden altitude
changes, while sky diving, hang gliding, or paragliding, or while riding a
gyrocopter, glider, or any other aircraft.
• Do not use this watch for measuring altitude in applications that demand
professional or industrial level precision.
472hPa/mb
540hPa/mb
616hPa/mb
701hPa/mb
795hPa/mb
899hPa/mb
1013hPa/mb
13.76inHg
16.22inHg
19.03inHg
22.23inHg
25.84inHg
About 6.7hPa/mb per 100 m
About 7hPa/mb per 100 m
About 8hPa/mb per 100 m
About 9hPa/mb per 100 m
About 10hPa/mb per 100 m
About 11hPa/mb per 100 m
About 12hPa/mb per 100 m
About 0.119inHg per 200 ft
About 0.1315inHg per 200 ft
About 0.15inHg per 200 ft
About 0.17inHg per 200 ft
About 0.192inHg per 200 ft
About 0.21inHg per 200 ft
Height of building 130 m
(Relative altitude)
–24°C
–17.5°C
–11°C
About 6.5°C
–4.5°C
per 1,000 m
2°C
8.5°C
15°C
–12.2°F
2.0°F
16.2°F
About 3.6°F
per 1,000 ft
30.5°F
44.7°F
59.0°F29.92inHg
Rooftop at an altitude of
230 m above sea level
(Altitude above sea
level)
Sea
Error Warnings
This watch is designed to automatically stop taking measurements when there
is a sensor malfunction, when battery power drops below a certain level, or
when battery output is affected by very cold temperatures.
[ Sensor Malfunction ]
-22 -12 0
hPa mb
P
Important!
• Should a sensor malfunction, the watch beeps for about three seconds to
alert you.
• If a sensor malfunctions or if battery power is low when it comes time for a
measurement to be taken, the measurement value appears as
display. In the case of barometric pressure measurement, the
corresponding point on the barometric pressure graph is left blank.
• There may be cases where the
batteries) message is cleared once you change modes. In this case, you
can continue using the watch normally unless the error warning message
reappears.
Whenever there is a sensor malfunction, be sure to take the watch to an
authorized CASIO distributor or service provider as soon as possible. If
the appearance of the
temperature, the message should clear from the display when normal
temperature returns. It is recommended, however, that you still have the
watch checked by an authorized CASIO distributor or service provider.
ERR (sensor malfunction) or BAT (low
BAT message is caused by extremely low
[ Low Batteries ]
-22 -12 0
P
C
xx on the
Backlight Precautions
• The electro-luminescent (EL) panel loses illuminating power after very long
use.
• The illumination provided by the backlight may be hard to see when viewed
under direct sunlight.
• The watch will emit an audible sound whenever the display is illuminated. It
does not indicate malfunction of the watch.
• The backlight automatically turns off whenever an alarm sounds.
Auto light switch precautions
• Avoid wearing the watch on the inside of your wrist while the auto light
switch feature is turned on. Doing so causes the auto light switch to operate
when it is not needed, which shortens battery life. If you want to wear the
watch on the inside of your wrist, turn off the auto light switch feature.
• The backlight turns off in about two seconds, even if you keep the watch
pointed towards your face.
• The backlight may not light if the face of the watch is more than 15 degrees
off the parallel as shown below. Make sure that the back of your hand is
parallel to the ground.
Parallel to ground
More than 15
degrees too high
More than 15
degrees too low
Precautions Concerning Simultaneous Measurement
of Altitude and Temperature
Though you can perform altitude and temperature measurements at the same
time, you should remember that each of these measurements require different
conditions for best results. With temperature measurement, it is best to
remove the watch from your wrist in order to eliminate the effects of body heat.
In the case of altitude measurement, on the other hand, it is better to leave the
watch on your wrist, because doing so keeps the watch at a constant
temperature, which contributes to more accurate altitude measurements.
The following describes what you should do to give priority to either altitude or
temperature.
• To give altitude measurement priority, leave the watch on your wrist or in
any other location where the temperature of the watch is kept constant.
• To give temperature measurement priority, remove the watch from your
wrist and allow it to hand freely from your bag or in another location where it
is not exposed to direct sunlight. Note that removing the watch from your
wrist can momentarily affect pressure sensor readings.
• Static electricity or magnetic force can interfere with proper operation of the
auto light switch. If the backlight does not light, try moving the watch back to
the starting position (parallel with the ground) and then tilt it back toward
you again. If this does not work, drop your arm all the way down so it hangs
at your side, and then bring it back up again.
• Under certain conditions the backlight may not light until about one second
or less after turn the face of the watch towards you. This does not
necessarily indicate malfunction of the backlight.
 Loading...