

Page 1
Module No. 2001/2002
2001/2002-1
GETTING ACQUAINTED
Congratulations upon your selection of the CASIO Wrist Audio Player (this
watch). To get the most out of your purchase, be sure to read this manual
carefully and keep it on hand for later reference when necessary.
• The MP3 (MPEG Audio Layer 3) audio playback capabilities of this
watch are intended for listening to audio and music files only for your
own personal enjoyment. Such files are normally protected by copyright
law and by international treaties. You may not otherwise reproduce,
distribute, publicly perform, or create derivative works of such files,
unless authorized by the appropriate copyright owner(s).
• CASIO COMPUTER CO., LTD. assumes no responsibility for any loss,
or any claims by third parties that may arise through the use of this
watch.
Warning!
About This Manual
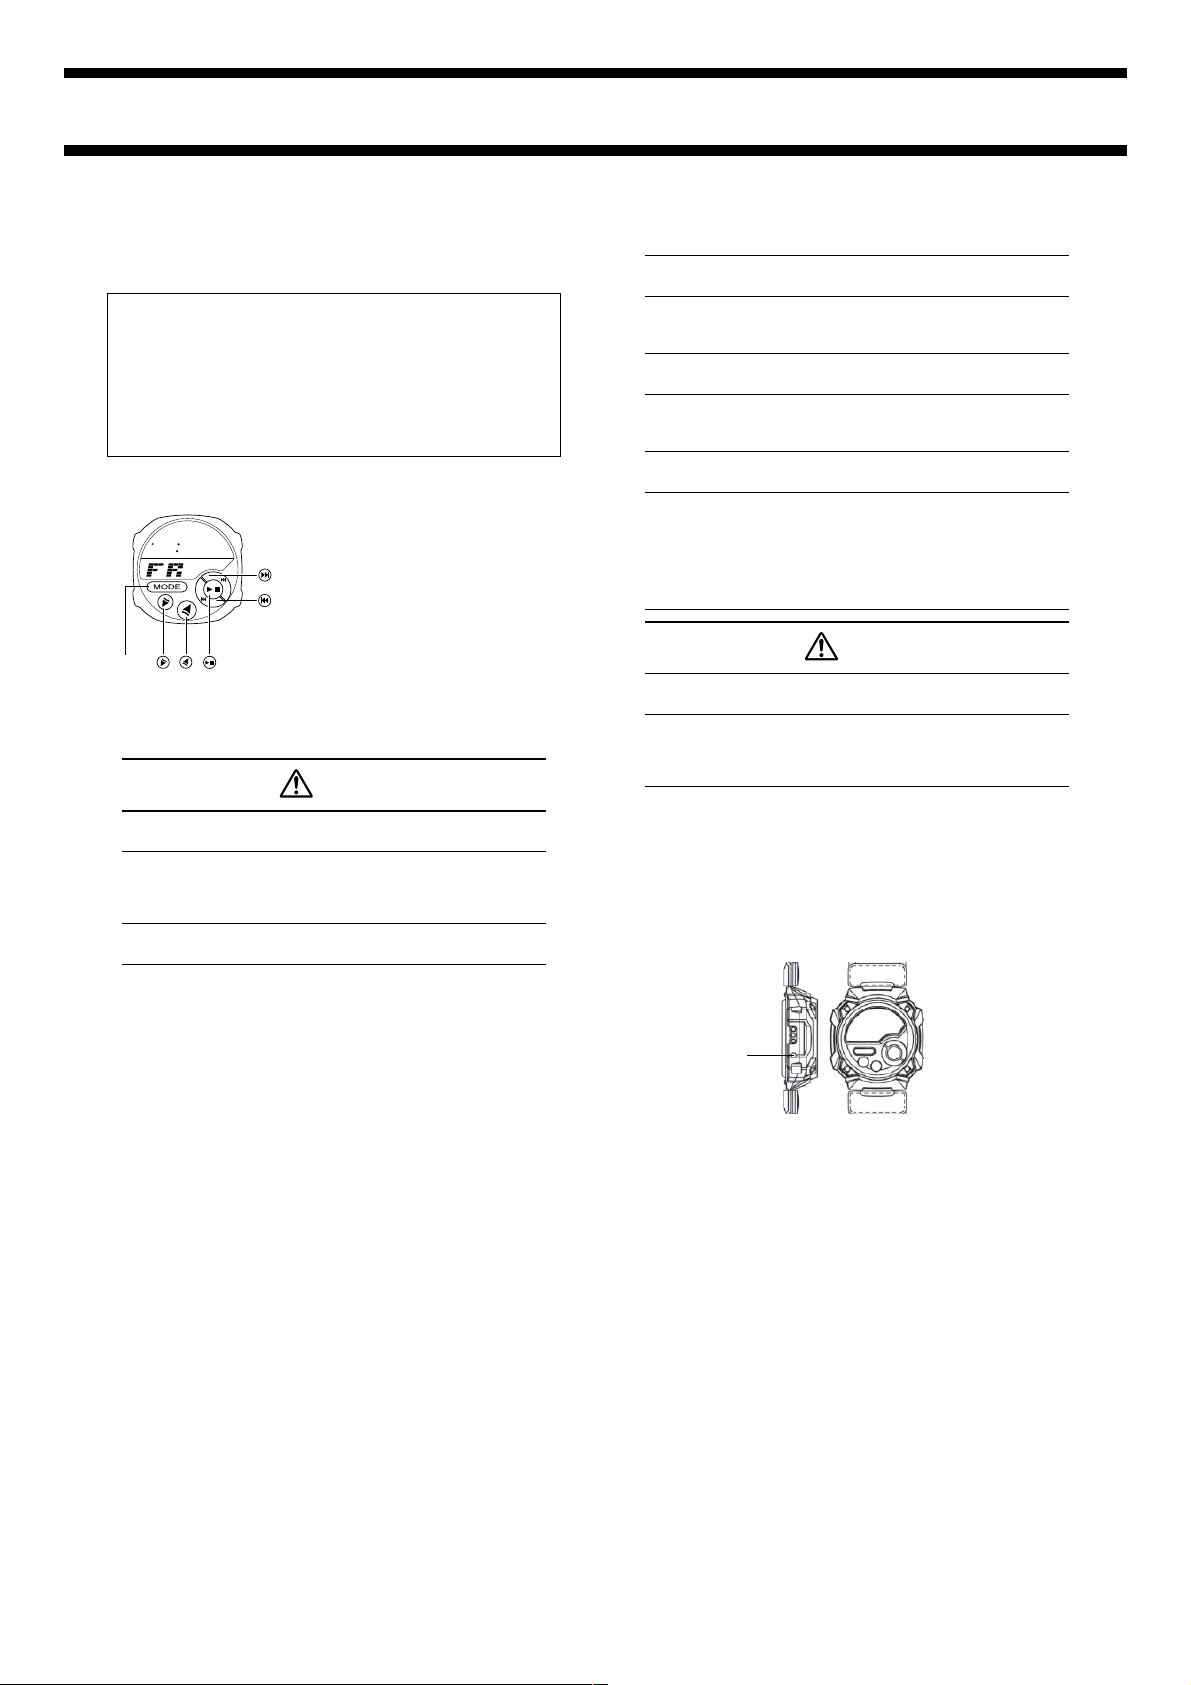
• Button operations are indicated using the
text or icons marked on the watch.
• Each section of this manual provides you
with the information you need to perform
operations in each mode. Troubleshooting
information can be found in the
“REFERENCE” section.
• This User’s Guide covers actual watch
operations only. For information about
downloading MP3 files to the watch, see the
contents of the Manual folder on the CDROM that comes with the watch.
MODE
10 588
35
SAFETY PRECAUTIONS
Warning
• Avoid leaving the AC Adaptor and Interface/Charger Unit in areas
subjected to high humidity and large amounts of dust. Such conditions
create the risk of fire and electric shock.
Rechargeable Battery Handling
Never try to remove the rechargeable battery from the watch yourself.
Leave all battery replacement procedures up to your original dealer or
CASIO distributor.
Volume Setting
Listening to music at very loud volumes for long periods can damage your
hearing. Be especially careful about the volume setting to avoid sudden
high volume sound when you first start listening to music with the watch.
Precautions During Use
• Never listen to music while driving a car, riding a motorcycle or
bicycle, or operating any other type of vehicle. Doing so can interfere
with you being alerted to dangerous situations around you and creates
the risk of accident.
• Never listen to music while walking outside. Doing so can interfere
with you being alerted to traffic and conditions around you and creates
the risk of accident.
Caution
Data Backup
• Be sure to back up all important data on your computer hard disk or
some other medium.
• Data stored in memory can be unexpectedly lost due to malfunction,
repair, etc.
Charging the battery
Use only the AC Adaptor or the Interface/Charger Unit that comes with
your watch to charge its battery. Use of another device for charging
creates the risk of battery leakage, overheating, explosion, fire, and
personal injury.
AC Adaptor and Interface/Charger Unit
Note the following important precautions whenever using the AC Adaptor
and Interface/Charger Unit that comes with your watch.
• Should you notice smoke or strange odor coming from the AC Adaptor
or Interface/Charger Unit, immediately unplug the power cord from the
wall outlet and request servicing from your original dealer. Continued
use under these conditions creates the risk of electric shock.
• Make sure that the AC Adaptor and Interface/Charger Unit are not
exposed to water, dirt, or any other foreign matter. Should the AC
Adaptor or Interface/Charger unit ever get wet, immediately unplug the
power cord from the wall outlet and request servicing from your
original dealer.
• Never use the AC Adaptor or Interface/Charger Unit while it is covered
with a blanket or any other object.
• Never touch the AC Adaptor or Interface/Charger Unit when your
hands are wet. Doing so creates the risk of electric shock.
• Never try to take AC Adaptor or Interface/Charger Unit apart or allow
the contacts inside the Interface/Charger Unit to become shorted.
• Never expose the AC Adaptor or Interface/Charger Unit to direct heat
or dispose of them by incineration.
• Do not drop the AC Adaptor or Interface/Charger Unit or otherwise
subject them to strong impact.
• During thunderstorms, unplug the AC Adaptor and Interface/Charger
Unit from the wall outlet.
• Avoid prolonged contact between your skin and the AC Adaptor and
Interface/Charger Unit while power is being supplied to them, and
between your skin and the watch while its battery is being charged.
Prolonged contact creates the risk of low temperature burn injury.
• Keep the AC Adaptor and Interface/Charger Unit out of the reach of
small children.
• Use only a power source whose output matches the rating marked on
the plate of AC adaptor.
• Do not locate the power cord near stoves or other sources of intense
heat. Heat can melt power cord insulation and create the risk of fire
and electric shock.
• When unplugging the power cord from the wall socket, grasp the AC
adaptor. Never pull on the cord itself. Doing so can damage the power
cord and create the risk of fire and electric shock.
• Whenever leaving the AC Adaptor and Interface/Charger Unit
unattended for long periods, be sure to unplug the AC adaptor from
the wall socket.
BEFORE USING THE WATCH...
Resetting the Watch
Pressing the reset button with a thin, pointed object resets the watch and
returns the current time, stopwatch, and alarm settings to their initial factory
defaults.
Reset button
Reset the watch whenever either of the following conditions exists.
• If nothing appears on the display of the watch when you charge its battery
the first time after purchasing it.
• Whenever the watch starts to operate abnormally or when nothing appears
on the display.
Button Operations
The following describes the two types of button operations you need to
perform when operating this watch.
Press .......... Press the button and release it immediately. A confirmation tone
Hold down .. Hold down the button until a confirmation tone sounds and the
• Regardless of whether you are pressing or holding down a button, make
sure to depress the button as far as it will go. Confirm proper operation by
listening for the confirmation tone and watching the display of the watch.
sounds and the applicable function is performed when you
release the button.
applicable function is performed.
Page 2
GENERAL GUIDE
000
00
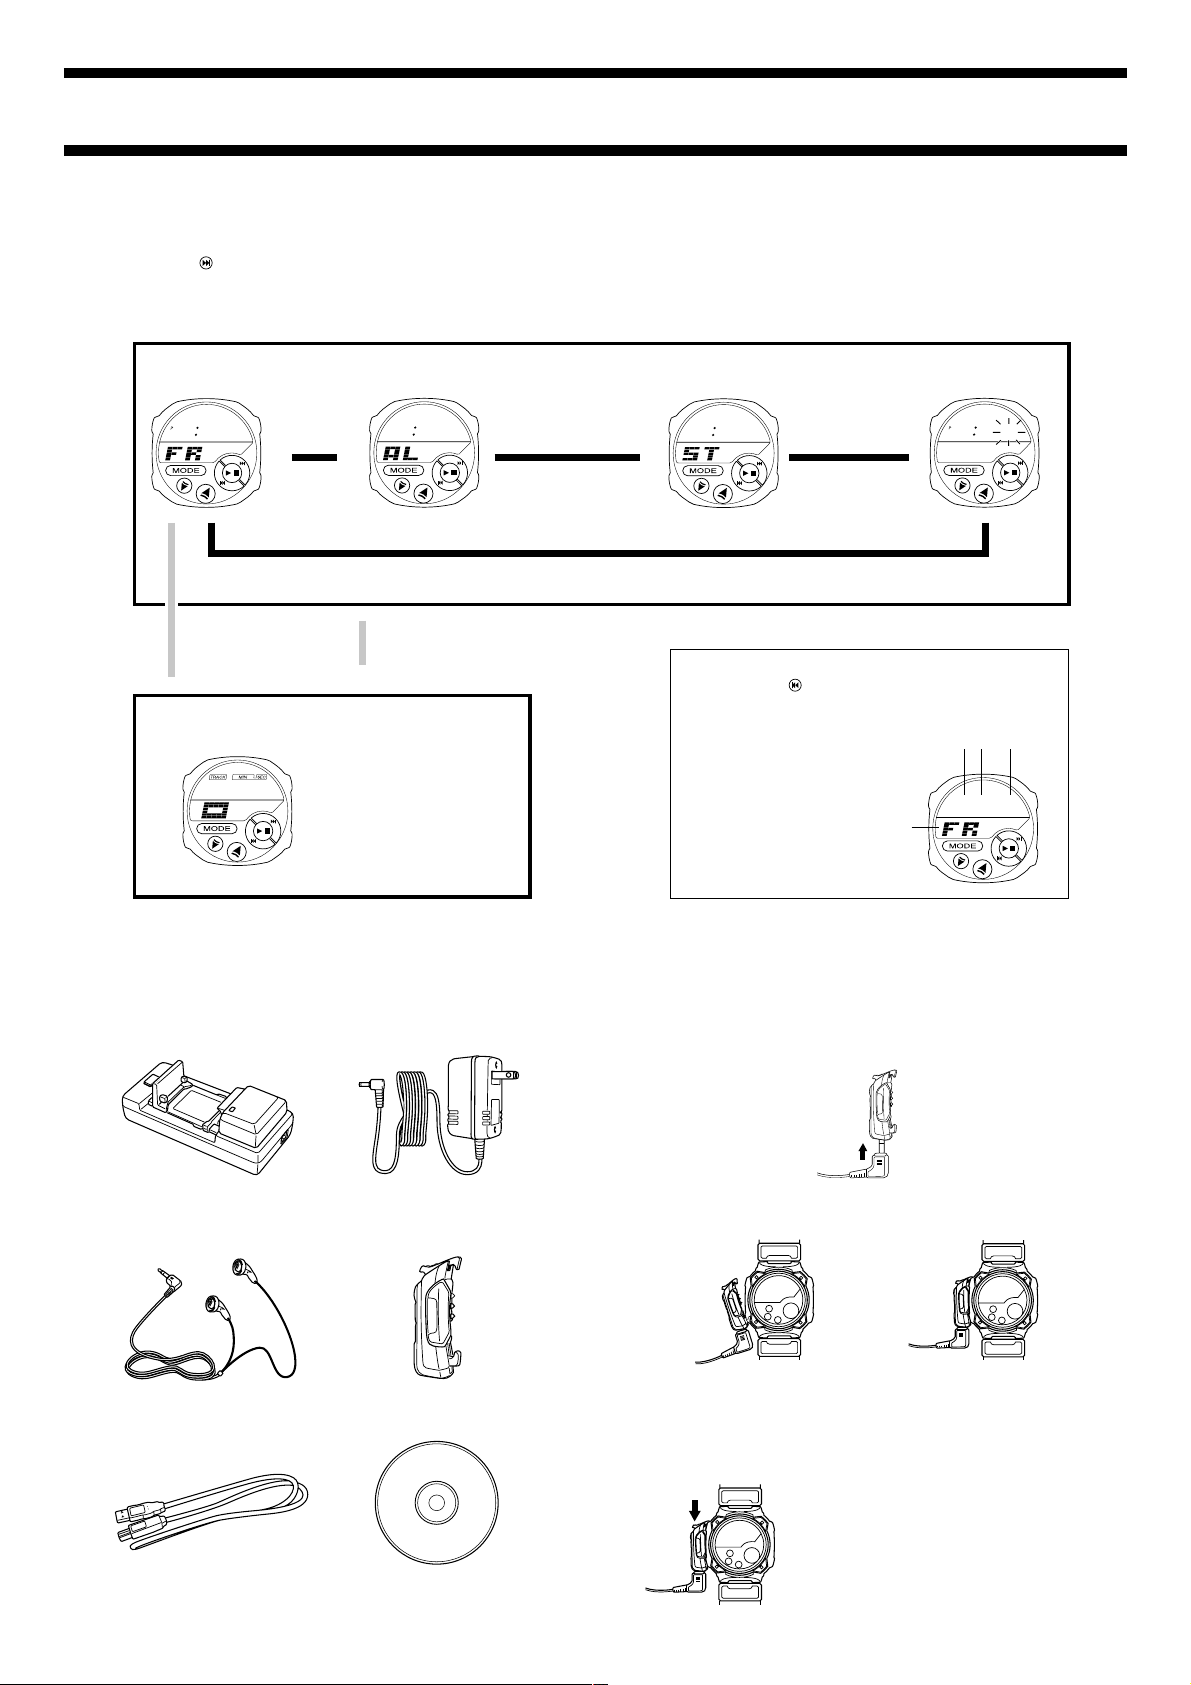
• Press MODE to change from mode to mode.
• Pressing the
the display.
• Pressing the MODE button after you perform an operation in the Alarm
Mode, Stopwatch Mode, or Setting Mode returns directly to the
Timekeeping Mode.
Timekeeping Mode Alarm Mode Stopwatch Mode Setting Mode
button in any mode besides the Player Mode illuminates
• The watch reverts to the Timekeeping Mode automatically if you do not
perform any button operation in any mode for about one minute.
2001/2002-2
10 588
35
Press MODE.
▲
▲
Hold down MODE. Hold down MODE.
Player Mode
Note
01 2
• The display is illuminated for
36
about three seconds whenever
you enter the Player Mode.
• The display may illuminate for
about three seconds when you
perform a play, stop, or other
operation in the Player Mode.
12 00
▲
▲
GETTING READY
Unpacking
Make sure all of the items shown on this page are included when you unpack
your watch.
10 58
63
35
00
▲
Switching the Screen between the Current Time and Date
Holding down the
the current date.
button in the Timekeeping Mode displays
Day of the week
▲
Month Day Year
Connecting the Stereo Earphones to the Watch
You must use the earphone attachment to connect the stereo earphones to
the watch.
To attach the earphone attachment to the watch
1. First plug the earphone plug into the jack on the bottom of the earphone
attachment.
Interface/Charger Unit AC Adaptor
Stereo Earphones Earphone Attachment
USB Cable CD-ROM
(Link Soft)
2. Hook the earphone attachment’s lower hook into the hole on the side of
the watch, and then swing the top of the attachment against the watch so
the upper hook locks on to the watch.
➔
• Make sure that the attachment
hooks do not accidentally press
the reset button.
To remove the earphone attachment from the watch
Press the release button at the top of the earphone attachment to release it
from the watch.
Important!
• The watch is not water resistant while the
• We recommend that you do not leave the
• Press the attachment against
the watch until it clicks into
place.
earphone attachment is attached. Avoid all
moisture whenever the earphone
attachment is attached to the watch.
earphone attachment attached to the watch
when you are not using it.
Page 3
2001/2002-3
Charging the Battery
The watch contains a rechargeable lithium ion battery that supplies power for
normal operation.
• A full charge provides approximately four
hours of continuous playback, or
10 588
35
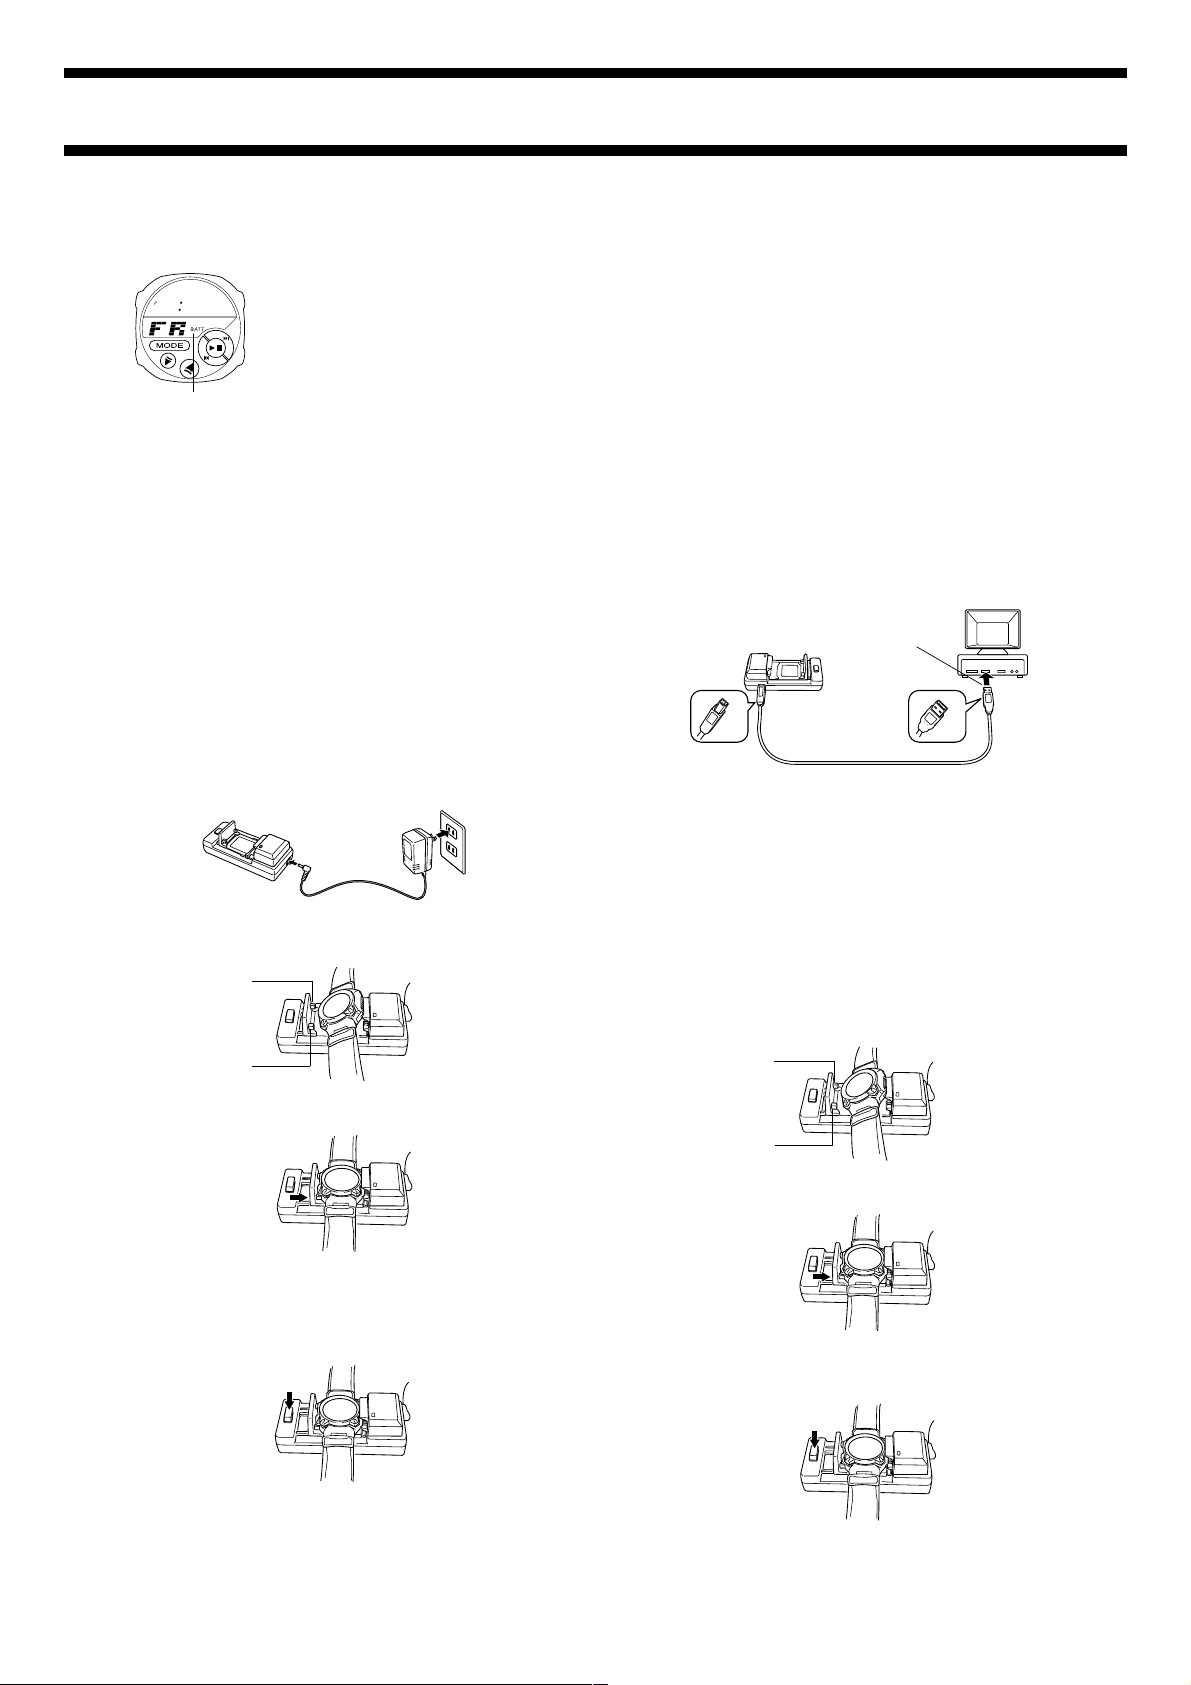
Low battery indicator
Important!
• Use only the Interface/Charger Unit and AC Adaptor that comes with the
watch to charge its battery.
• Proper charging may be impossible if the contacts inside the Interface/
Charger Unit tray or on the watch become dirty. Keep the contacts clean
by wiping them periodically with a dry cotton swab.
• Never allow the Interface/Charger Unit or watch contacts to become
shorted.
• Best results are obtained when charging is performed under room
temperature (around 23°C).
• Do not subject the Interface/Charger Unit to vibration while charging is
taking place. Doing so can result in a poor connection and improper
charging.
To charge the battery
1. Remove the earphone attachment from the watch, if it is attached.
2. Connect the AC Adaptor to the Interface/Charger Unit and plug it into a
wall outlet.
3. Angle the left side (9 o’clock side) of the watch into the Interface/Charger
Unit tray so the two tabs in the tray enter the holes in the side of the
watch.
Tab
approximately two months of continuous
time display.
• It takes approximately four hours to achieve
a full charge.
• The BATT (low battery) indicator appears
on the display of the watch when battery
power is low. MP3 file playback is disabled
while the BATT indicator is displayed. The
timekeeping function continues to operate
for about four days after the BATT indicator
appears.
• The BATT indicator may also appear when
you are in a very cold area. MP3 file
playback is disabled at this time as well.
Note
• The amount of operation you can expect on a full charge depends on
conditions when the battery is charged, the conditions of the battery,
temperature, and other factors.
• The watch’s rechargeable battery requires periodic replacement. If the
amount of operation provided by each full charge becomes noticeably
short, it probably means that you need to have the battery replaced.
• Contact your original dealer or CASIO distributor about having the battery
replaced. Note that you will be charged for battery replacement.
Connecting to a Computer
You need to connect the watch to a computer when you want to download
MP3 files.
Note
• To download MP3 files from your computer to the watch, you must also
install the software contained on the CD-ROM what comes with the watch.
See the contents of the Manual folder on the CD-ROM for more
information.
To connect the watch to a computer
1. Remove the earphone attachment from the watch, if it is attached.
2. Connect the Interface/Charger Unit to your computer using the USB cable
that comes with the watch.
USB port
• Plug the ends of the USB cable securely into the proper ports, as far as
they will go. Proper operation is not possible if connections are not secure.
• When using the Interface/Charger Unit to connect to a computer, there is
no need to connect the AC Adaptor to the Interface/Charger Unit.
• Operation is not guaranteed when you connect to a computer that has
another USB device connected to it.
• Operation is not guaranteed if you are using a USB hub or a USB cable
extension. Be sure to use only the USB cable that comes with the
Interface/Charger Unit.
• Proper operation may not be possible, depending on the type of the USB
devices being used.
• When connecting to a computer, make sure the temperature is as close to
room temperature (around 23°C) as possible.
3. Angle the left side (9 o’clock side) of the watch into the Interface/Charger
Unit tray so the two tabs in the tray enter the holes in the side of the
watch.
Tab
4. Lay the watch the rest of the way into the tray and then slide the tray in
the direction indicated by the arrow until it locks into place with a click.
• The lamp on the Interface/Charger Unit lights red to indicate that charging
has started when the watch is correctly mounted in place. This lamp goes
out when charging is complete.
To remove the watch from the Interface/Charger Unit
1. Press the release button to release the tray.
2. Slide the tray open and remove the watch.
Tab
Tab
4. Lay the watch the rest of the way into the tray and then slide the tray in
the direction indicated by the arrow until it locks into place with a click.
To remove the watch from the Interface/Charger Unit
1. Press the release button to release the tray.
2. Slide the tray open and remove the watch.
Page 4

2001/2002-4
01 2
36
02 5
38
PLAYER MODE
Use the Player Mode to play back MP3 files you have downloaded from your
computer to the watch.
• The memory capacity and total play time of your watch depends on its
module number. Play time also depends on the playback mode you are
using.
Mode
Bit Rate
Module 2002 (32MB)
Module 2001 (16MB)
• To download MP3 files from your computer to the watch, you must install
the software contained on the CD-ROM what comes with the watch. See
the contents of the Manual folder on the CD-ROM for more information.
Entering the Player Mode
Holding down for about two seconds in any mode enters the Player Mode
and automatically starts playback of the MP3 files in watch memory.
• Instead of holding down
seconds in any mode to enter the Player Mode.
• Holding down MODE for about two seconds while playback is stopped in
the Player Mode changes to the Timekeeping Mode.
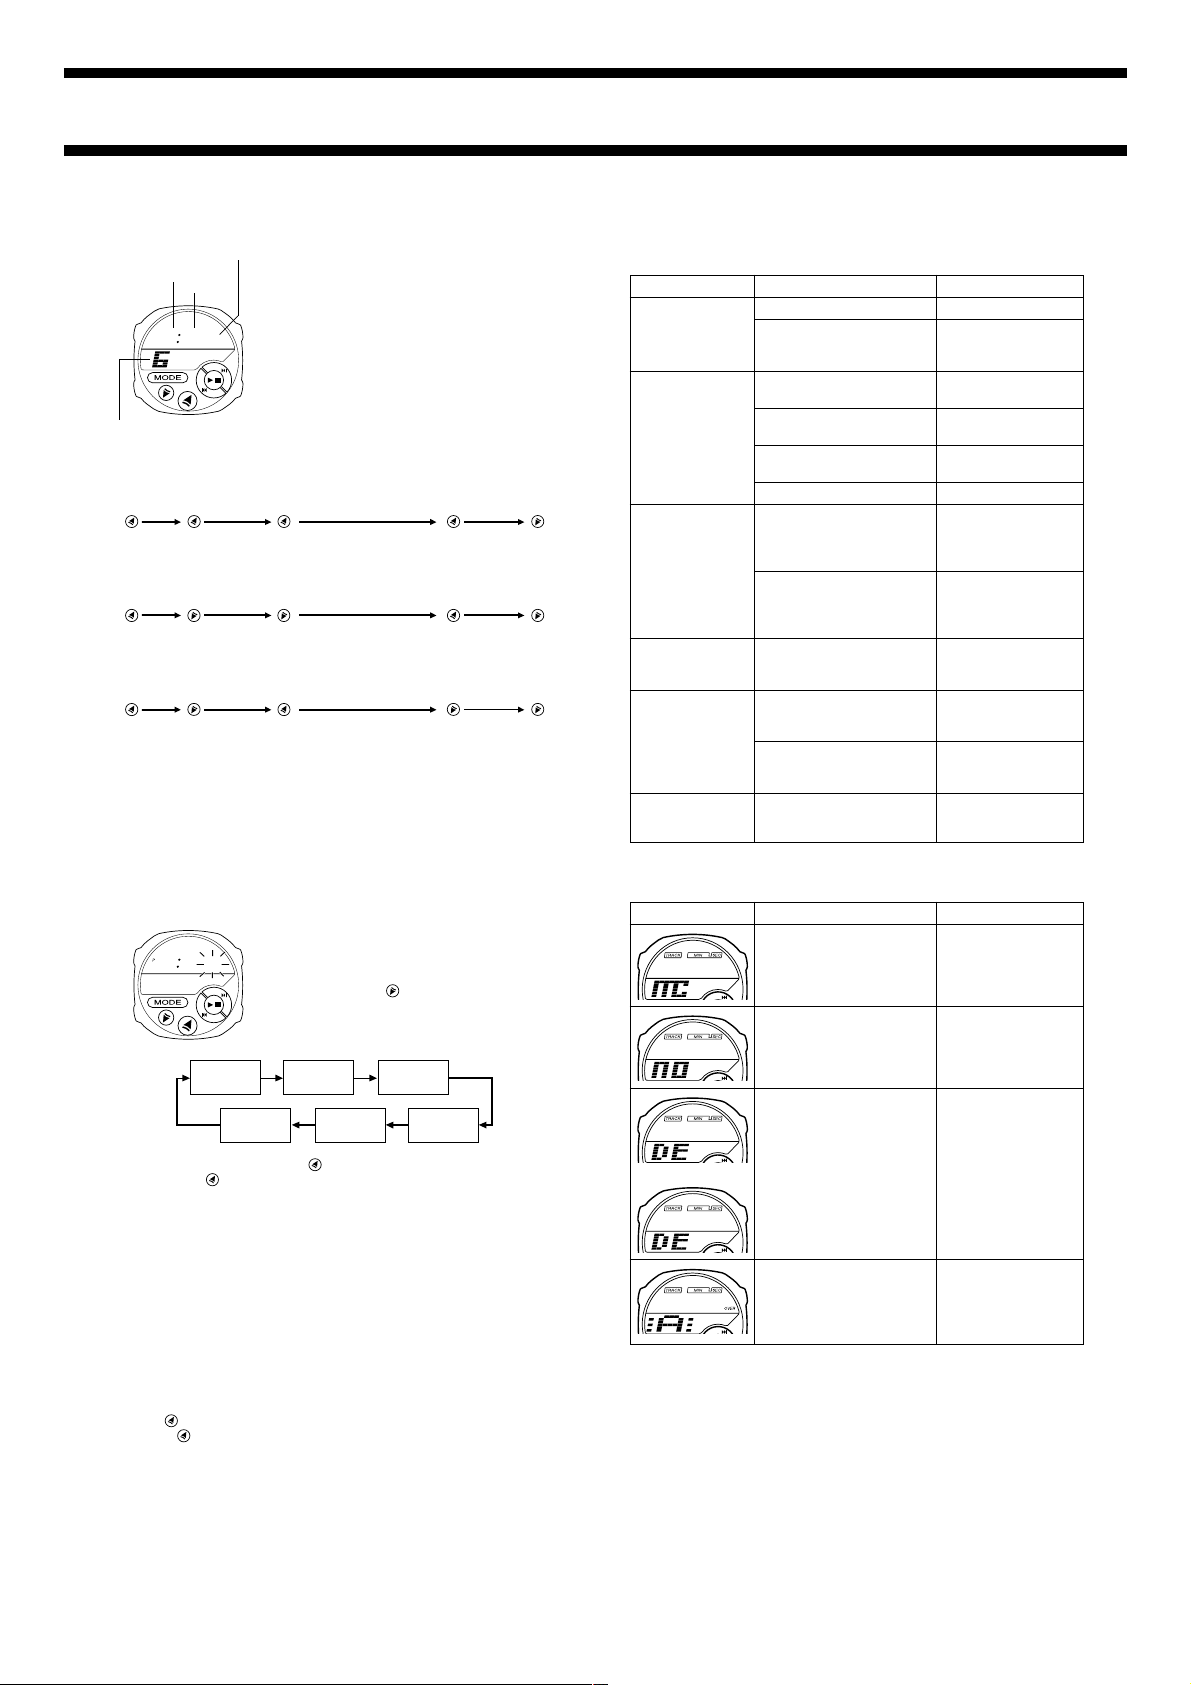
Player Mode Display
The Player Mode display shows the information described below.
Track (file)
number
Play time
01 2
36
High Quality
128Kbps
33 minutes
16.5 minutes
, you can hold down MODE for about two
Track number
Shows the number of the currently playing (or
selected) track (file).
Play time
Shows the total play time of the currently
playing (or selected) track (file). Immediately
after playback starts, this area shows the bit
rate (Kbps) of the MP3 file.
Medium Quality
96Kbps
44 minutes
22 minutes
Low Quality
64Kbps
66 minutes
33 minutes
Current Time Display During Playback
To display the current time while playback is in progress, hold down MODE
for about two seconds. The display returns to the Player Mode screen when
you press MODE again.
Playback Modes
The watch has six playback modes. The text inside the parentheses shows
the mode indicators that appear on the display of the watch.
Normal Mode (No indicator)
This mode plays back tracks in track number order and stops
automatically when the end of the last track is reached.
Shuffle Mode (SHUFFLE)
This mode plays back tracks in random order. Playback stops
automatically after all tracks are played.
All Track Loop Mode (LOOP)
This mode plays back tracks in track number order in an endless loop.
Shuffle All Track Loop Mode (SHUFFLE LOOP)
This mode plays back tracks in random sequence in an endless loop.
1-Track Loop Mode (1 LOOP)
This mode plays back a single track in an endless loop.
Part Loop Mode (P LOOP)
This mode plays back a specific part of a track in an endless loop.
To select the playback mode
Playback mode
indicator
The Normal Mode is the initial default playback
mode whenever you enter the Player Mode.
Each press of the MODE button changes the
playback mode in the sequence listed in the
previous section. You can even change the
playback mode while playback is in progress.
An indicator on the display shows the current
playback mode.
Playback status/track (file)
information
Playback Status/Track (file) Information
• The current playback status of the Player Mode is indicated as shown
below.
........... Stopped
........... Paused
........... Play (Appears only when playback starts or when a skip
• During playback, this area shows any track information (track name, artist,
album name) contained in the MP3 file, or the animated character you
downloaded with the MP3 file. Only the animated character is shown if
there is no track information in the MP3 file.
• If you do not download an animated character with an MP3 file, the watch
automatically assigns one of its built-in animated characters.
operation is performed.)
Adjusting Playback Volume
We highly recommend that you set the volume to a low level before starting
playback.
• Pressing
• You can set volume to one of 21 levels ranging from 0 (no output) to 20
(maximum). Pressing either
value.
increases volume, while decreases it.
or displays the current volume level
Playback
The following are the buttons that control playback.
.. • Toggles playback between play and pause.
.. • Skips to the beginning of the next track.
• Pressing this button while playback is in progress jumps to the
beginning of the next track and resumes playback from there.
• Pressing this button while playback is stopped or paused jumps to the
beginning of the next track and stops or pauses.
• Holding down this button while playback is in progress performs fast
forward. If fast forward reaches the end of the track, it stops without
advancing to the next track.
.. • Pressing this button while playback is in progress or paused within a
track, jumps to the beginning of that track. Pressing this button again
at the beginning of a track jumps to the beginning of the previous
track.
• Holding down this button while playback is in progress performs fast
reverse. If fast reverse reaches the beginning of the track, it stops
without jumping back to the previous track.
Note
• Pressing the MODE button in the Part Loop Mode displays the Equalizer
Screen. See “Equalizer Settings” for more information.
Using the Part Loop Mode
You can use the Part Loop Mode to specify a particular section of a track for
endless loop play.
To use Part Loop playback
Part Loop Mode
indicator
5. When playback reaches the end of the section you want to loop, press
• The indicator LE (Loop End) appears on the display indicating that the end
point is registered.
• Pressing
the end point.
6. To cancel Part Loop playback, press any button besides
• This returns to the screen that appears when you perform step 2, above.
• To exit the Part Loop Mode and return to the Normal Mode, press MODE
twice.
automatically starts loop playback between the start point and
1. Use and to move to the beginning of
the track that contains the section you want
to play.
2. Use the MODE button to select the Part
Loop Mode.
• The indicator P LOOP is on the display in
the Part Loop Mode.
3. Press
4. When playback reaches the beginning of
• The indicator LS (Loop Start) appears on
to start playback of the track.
the section you want to loop, press
the display indicating that the start point is
registered.
.
.
.
Page 5

2001/2002-5
Hour
Minutes
Exit
3 30
Equalizer Settings
You can use the Equalizer Screen to select one of five different equalizer
settings to produce the playback effect you want.
To make equalizer settings
1. Press the MODE button a number of times
until the Equalizer Screen appears.
02 5
38
Equalizer Screen
indicator
02 0
10
Equalizer indicator
• The Equalizer Screen appears when you
press the MODE button while in the Part
Loop Mode.
2. If you want to monitor the effects of your
equalizer setting, press
playback.
3. Use
• Changing the equalizer settings causes the
4. After the setting is the way you want, press
and to change the equalizer
setting.
equalizer indicator to appear as shown
below.
Highest Range
Enhanced
High Range
Enhanced
Flat
Low Range
Enhanced
Lowest Range
Enhanced
the MODE button to exit the Equalizer
Screen and return to the Normal Mode.
to start
TIMEKEEPING MODE
Hour : Minutes
Seconds
10 588
35
Day of week
Switching between Standard Time and Daylight
Saving Time
Daylight Saving Time (DST) automatically advances the time setting by one
hour from Standard Time. Whether you should use Daylight Saving Time
depends on the geographic area where you are currently located.
To select Daylight Saving Time
In the Timekeeping Mode, hold down for about two seconds to toggle
between Daylight Saving Time (DST displayed) and Standard Time (DST not
displayed).
The Timekeeping Mode displays the current
time. This is the normal “home” mode of the
watch when playback is not being performed.
• Hold down
current date. Releasing the button returns to
the current time display.
• Use the SETTING MODE to set the current
time and date.
when you want to view the
ALARM MODE
You can set a Daily Alarm that sounds at the same time each day, while it is
turned on. You can also turn on an Hourly Time Signal that causes the watch
to beep twice every hour on the hour.
Note
• During Player Mode playback, the Daily Alarm and Hourly Time Signal
sound through the earphone.
• The volume level of the Daily Alarm, Hourly Time Signal cannot be
adjusted.
Setting the Alarm Time
1. In the Alarm Mode, press so that the
Hourly time
signal on indicator
Alarm time
(Hour : Minutes)
Alarm on indicator
3. Press
4. While the minute setting is flashing, use
• Holding down
5. Press
so that the minute digits of the alarm time start to flash.
changes the setting at high speed.
to exit the setting screen.
Daily Alarm Operation
The alarm sounds at the preset time each day for about 20 seconds, or until
you stop it by pressing any button.
To test the alarm
In the Alarm Mode, hold down to sound the alarm.
To turn the Daily Alarm and Hourly Time Signal on and off
In the Alarm Mode, press to cycle through the on and off settings as
shown below.
[Alarm ON Indicator / Hourly Time Signal ON Indicator]
Alarm On
Signal On
hour digits of the alarm time start to flash,
which indicates the setting screen.
• The hour digits are flashing because they
are selected.
• Each press of
the setting screen in the sequence shown
below.
2. While the hour setting is flashing, use to
change it.
• This operation automatically turns on the
Daily Alarm.
• Holding down
speed.
• When setting the alarm time using the 12hour format, take care to set the time
correctly as am (no indicator) or pm (P
indicator).
Alarm Off
Signal Off
moves the flashing around
changes the setting at high
to change it.
Alarm On
Signal Off
Alarm Off
Signal On
Switching between 12-hour and 24-hour Timekeeping
Each press of in the Timekeeping Mode toggles between 12-hour and 24hour timekeeping.
The 12-hour/24-hour timekeeping format you select is applied in all modes.
• With the 12-hour format, the P (PM) indicator appears to the left of the hour
digits for times in the range of noon to 11:59 p.m. There is no indicator for
times in the range of midnight to 11:59 a.m.
• With the 24-hour format, times are indicated in the range of 0:00 to 23:59,
with 24 indicator.
Page 6
2001/2002-6
PC A
CC
PC A
CC
PC A
CC
01 A
CC
01 2
36
STOPWATCH MODE
Seconds
Hours
Minutes
123
45
1/10 second
Elapsed time measurement
Start Stop Re-start Stop Clear
Split time measurement
Two Finishes
Start Split
First runner
finishes.
The Stopwatch Mode lets you measure
elapsed time, split times, and two finishes. The
range of the stopwatch is 23 hours, 59
minutes, 59.9 seconds.
Note
• Entering the Player Mode while a stopwatch
timing operation is in progress automatically
stops the operation and resets the
stopwatch to all zeros.
Split releaseStart Split Stop Clear
Stop
Second runner finishes.
Record time of first
runner.
Split release
Record time of
second runner.
Clear
SETTING MODE
Use the Setting Mode to set the current time and date, and to reset the
seconds to 00.
To set the time and date
10 58
35
Seconds
2. While a setting is flashing, use to change it.
• Holding down
• When setting the time using the 12-hour format, take care to set the time
correctly as am (no indicator) or pm (P indicator).
• The year can be set in the range of 2000 to 2039.
• The day of the week is automatically displayed in accordance with the date
(year, month, and day) settings.
3. When everything is the way you want it, press MODE to exit the setting
screen and return to the Timekeeping Mode.
• The watch’s built-in full automatic calendar automatically makes
allowances for different month lengths and leap years.
changes the flashing setting at high speed.
1. In the Timekeeping Mode, press MODE
three times to enter the Setting Mode.
• The seconds digits start to flash, which
indicates the setting screen.
• Each press of
the setting screen in the sequence shown
below.
Hour
Day
Month
moves the flashing around
Minutes
Year
Troubleshooting
Problem
• Buttons do not
respond.
• Irregular display
Cannot playback or
cannot hear any
sound.
Static in the
playback
Cannot download
MP3 data.
Cannot charge the
battery.
Playback time
provided by a full
charge is short.
Error Messages
Display
or
REFERENCE
Possible Cause
Battery power is low.
There may be some problem
with the watch’s internal
system.
There is no MP3 data in
memory.
The stereo earphones are
not plugged in correctly.
The volume setting is too
low.
Battery power is low.
The watch may be too close
to a TV or other appliance
that generates strong
electromagnetic force.
The watch make be too close
to a mobile phone or other
device that generates radio
waves.
The USB cable may not be
connected properly.
The AC Adaptor or Interface/
Charger Unit may not be
connected properly.
The AC Adaptor may not be
plugged into an AC outlet.
The battery has reached the
end of its service life or it is
defective.
Possible Cause
The watch’s built-in Multi
Media Card may be
defective.
There is no MP3 data in
watch memory.
The MP3 data in watch
memory may be corrupted or
there may be a problem with
MMC formatting.
The play time of a track
exceeds the maximum of 99
minutes 99 seconds.
Action
Charge the battery.
Press the reset button
to reset the watch.
Download data to the
watch.
Plug in the earphones
correctly.
Increase the volume.
Charge the battery.
Move the watch away
from the appliance.
Stop using the device
or move the watch
away from the device.
Check the connection
and make sure it is
secure.
Check all connections
and make sure they
are secure.
Securely plug the AC
adaptor into an AC
outlet.
Contact your original
dealer or CASIO
distributor.
Action
Contact your original
dealer or CASIO
distributor.
Use the Link Soft to
download MP3 files to
the watch.
Use the Link Soft to reformat watch memory
and download the MP3
data again.
Keep the play time of
any single track below
99 minutes 99
seconds.
Resetting the Seconds Count to Zero
1. In the Timekeeping Mode, press MODE three times to enter the Setting
Mode.
• The seconds digits start to flash, which indicates the setting screen.
2. Press
• Pressing
3. Press MODE to exit the setting screen and return to the Timekeeping
Note
• The watch automatically exits the setting screen and returns to the
to reset the seconds count to 00.
while the seconds count is in the range of 30 to 59 resets the
seconds to
minutes count is unchanged.
Mode.
Timekeeping Mode if you do not perform any operation for about one
minute.
00 and add 1 to the minutes. In the range of 00 to 29, the
Page 7

2001/2002-7
About the Pre-recorded Demo Tune
1
2
1
Your Wrist Audio Player comes with a pre-recorded demo tune when you
purchase it. Use the following procedure to play it back.
1. Plug the earphones 1 into the Earphone Attachment 2 and then attach
the Earphone Attachment to the Wrist Audio Player.
2. Hold down the
and start playback.
• While in the Player Mode, use the
• To return to the Timekeeping Mode from the Player Mode, stop playback
and hold down the MODE button for about two seconds.
Note
• The pre-recorded demo tune is deleted by the initialize operation
performed the first time you establish a link between your computer and
Wrist Audio Player. See the Link Soft User’s Guide contained in the
Manual folder on the CD-ROM that comes with the watch for more
information.
• You cannot upload the pre-recorded demo tune to your computer.
button for about two seconds to enter the Player Mode
button to stop and restart playback.
2
MODE
10 588
35
Connecting Wrist Audio Player to a Computer
Use the following procedure when connecting Wrist Audio Player to a
computer for the first time.
1. Insert the Wrist Audio Player Software CD-ROM into your computer’s CDROM drive.
2. Install Wrist Audio Player Link Soft on your computer.
3. Connect the Interface/Charger Unit that comes with Wrist Audio Player to
your computer.
• This causes a message to appear on the computer screen telling you to
install the USB driver.
4. Install the USB driver as instructed by the messages that appear on your
computer screen.
5. Start up the Link Soft, and then mount your Wrist Audio Player on the
Interface/Charger Unit.
• This establishes a link between Wrist Audio Player and your computer.
Note
• For details about the above operation, see the documentation in the
“Manual” folder on the CD-ROM.
• You must have Adobe Acrobat Reader 4.0 or higher installed on your
computer to view the documentation in the “Manual” folder. A copy of
Adobe Acrobat Reader (installer file name: ar405eng) is also included on
the CD-ROM that is bundled with Wrist Audio Player.
• After installing Acrobat Reader, start it up, click Open on the File menu,
open the “Manual” folder, and then select the version of the documentation
you want. You cannot open a documentation file by double-clicking its icon
the first time after installing Acrobat Reader.
Playback Sound Quality
The playback quality of MP3 data is greatly affected by the software used to
convert the music data to MP3 data. If you experience poor quality playback
or noise with Wrist Audio Player, try playing the data back on your computer
or another device. Poor quality playback on another device indicates the
problem lies with the conversion software you are using. Contact the
producer of the software about remedying the situation.
Supported Data Types
Your Wrist Audio Player supports playback of MP3 data that conforms to the
conditions described below. No sound will be produced if you try to play back
data that does not conform to these conditions.
MPEG1 Audio Layer 3 Format
Some conversion software automatically converts to MPEG2 Audio Layer 3,
which is not supported by Wrist Audio Player. If this is the case with the
software you are using, contact the producer of your software to find out
about how to convert to MPEG1 Audio Layer 3.
128kbps or Lower Bit Rate
Specifying variable bit rate on some software causes data to be converted at
a bit rate greater than 128kbps. Be sure to select a fixed bit rate of 128kbps
or lower for conversion of files to be played back on Wrist Audio Player.
 Loading...