

Page 1
Module No. 1910
WORK
HOME
FAX CALL
E-MAIL OTHER
WORK
HOME
FAX CALL
E-MAIL OTHER
WORK
HOME
FAX CALL
E-MAIL OTHER
WORK
HOME
FAX CALL
E-MAIL OTHER
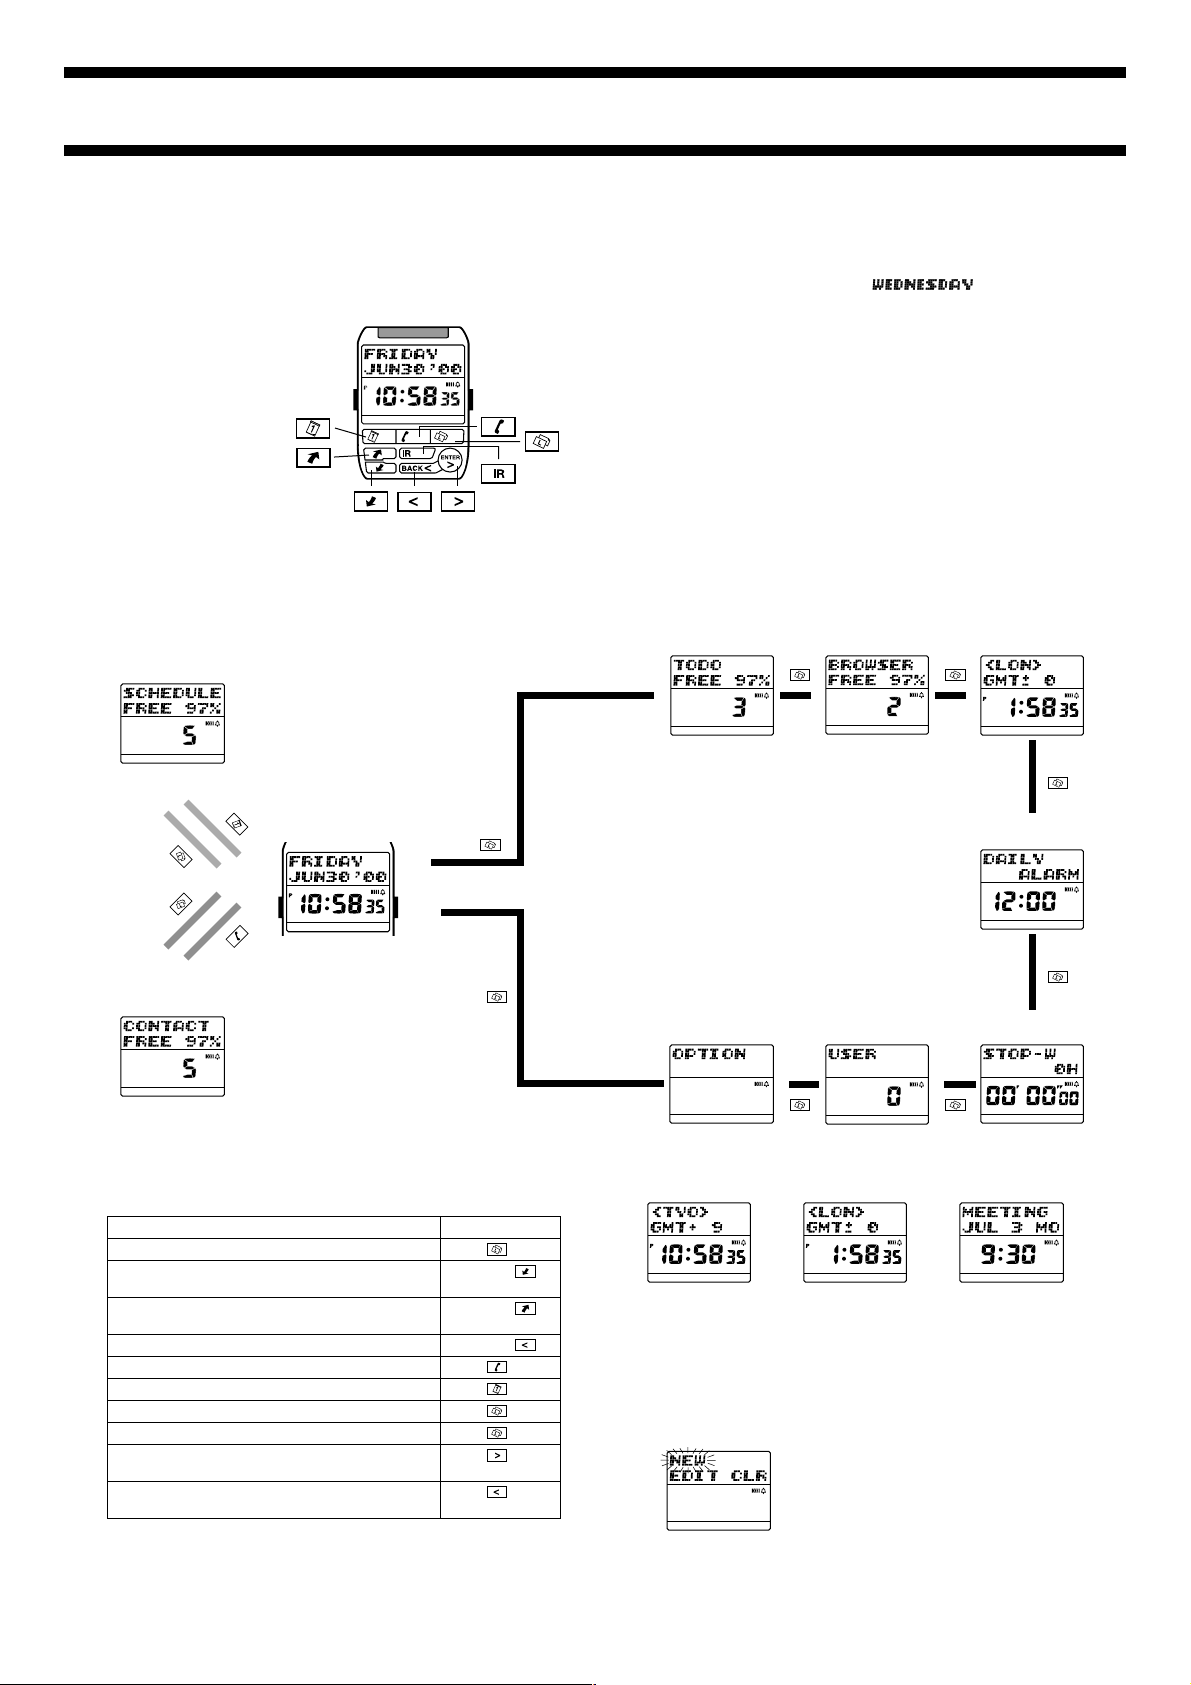
GETTING ACQUAINTED
1910-1
This section contains important basic information about using the watch. Be
sure to read this section before trying to use the watch for the first time.
About this manual
• Each section of this
manual provides you with
the information you need
to perform operations in
each mode. Further
details and technical
information can be found
in the “REFERENCE”
section.
• Button operations are
indicated using the letters
and arrow marks shown in
the illustration.
AB
HOME
FAX CALL
WORK
E-MAIL OTHER
General Guide
• In the case of data storage modes (Contact, Schedule, User, Browser, To
Do), the initial screens shown below appear first for about one second. After
that, the data stored in the mode appears.
• If a data storage mode does not have any data, the message
appears after the initial screen.
NO DATA!
Schedule Mode
HOME
FAX CALL
WORK
E-MAIL OTHER
▼
Press
Timekeeping Mode
.
Press .
▼
▼
Contact Mode
▼
AB
HOME
FAX CALL
E-MAIL OTHER
Press
WORK
.
▼
• This watch indicates days of the week and months as shown below.
Days of the week:
TUESDAY (Tuesday), (Wednesday),
THURSDAY (Thursday), FRIDAY (Friday), SATURDAY
(Saturday)
JAN (January), FEB (February), MAR (March), APR (April),
Months:
MAY (May), JUN (June), JUL (July), AUG (August), SEP
(September), OCT (October), NOV (November), DEC (December)
• The term “the watch” in this manual refers to the CASIO PC-UNITE Watch
(Module 1910).
• The term “M-1510 Watch” in this manual refers to the CASIO PC-UNITE or
PCX Watch (Module 1510).
• The term “Watch Application” in this manual refers to the CASIO PC-UNITE
Watch Version 2.0 Software Application.
• PC-UNITE is a trademark of CASIO COMPUTER CO., LTD.
To Do Mode
▼
SUNDAY (Sunday), MONDAY (Monday),
Browser Mode World Time Mode
▼
HOME
FAX CALL
WORK
E-MAIL OTHER
▼
HOME
FAX CALL
WORK
E-MAIL OTHER
▼
Alarm Mode
HOME
FAX CALL
E-MAIL OTHER
▼
Option Mode
User Mode
WORK
Stopwatch Mode
HOME
FAX CALL
WORK
• The following describes all the mode change key operations you can
perform.
Cycle through modes
Display the World Time City while in the Timekeeping
Mode
Display your Home Time City while in the
Timekeeping Mode
Display your next appointment in the Schedule Mode
Go to the Contact Mode from any mode
Go to the Schedule Mode from any mode
Go to the Timekeeping Mode from the Contact Mode
Go to the Timekeeping Mode from the Schedule Mode
Go to the Weekly Schedule screen from the
Timekeeping Mode
Return to the Timekeeping Mode from the Weekly
Schedule screen
E-MAIL OTHER
When you want to do this:
Do this:
Press .
Hold down .
Hold down .
Hold down .
Press .
Press .
Press .
Press .
Press .
Press .
E-MAIL OTHER
▼
HOME
FAX CALL
WORK
E-MAIL OTHER
▼
HOME
FAX CALL
WORK
Home Time City World Time Mode Schedule Mode
HOME
FAX CALL
WORK
E-MAIL OTHER
Inputting Text and Other Data
The following describes general procedures for inputting text, symbols and
numbers. The operations described here can be used in any mode where you
can input data. See the other sections of this manual that describe the various
modes for information about displaying record input screens.
Record Operation Menu
HOME
FAX CALL
WORK
E-MAIL OTHER
The record operation menu lets you select the
operation you want to perform while inputting,
editing, and deleting data in a mode that stores
data (Contact, Schedule, User, Browser, To
Do).
• The actual content of the record operation
menu depends on what mode you are in
when you display it.
• Unavailable menu items are replaced with
***. If memory is full, for example, the
NEW item is replaced by *** indicating
you cannot input new data.
Page 2
1910-2
Text Input Buttons
Cursor
Text Area
Number Area
Character type indicator
Space
Scrolls through
characters
AB
HOME
FAX CALL
WORK
E-MAIL OTHER
Select character type
Delete
Move cursor / Enter
• The flashing cursor ( ) shows the location where the next character will be
input.
Display Areas
The display has two areas for input and recall,
As their names suggest, the text area is for inputting and displaying text
(Contact name field, Schedule description field, Browser text field, etc.), while
the number area is for inputting and displaying numbers (time, date, telephone
number fields, etc.).
• In the Contact Mode and User Mode, the lower line of the text area is used
for number display.
a text area
and
a number area
To input characters
1. While the cursor is flashing in the text area of the display, use and
to move the cursor to the location where you want to input a character.
2. Use B to select the type of character you want to input.
• Each press of B cycles through the character types as shown below. The
currently selected character type is indicated on the display by the
character type indicator.
upper-case alpha
A
3. Use
4. When the character you want is shown, press
•
Note
• See the “CHARACTER LIST” for details about the characters you can input
and to scroll through the available characters at the cursor
location.
the next position.
and keys move the cursor left and right.
on the watch.
lower-case alpha
a
numbers
0
to move the cursor to
symbols
@
To delete a character
1. Use and to move the cursor to the character you want to delete.
2. Press
to delete the character at the cursor position.
To insert a character
1. Use and to move the cursor to the location where you want to
insert a character.
2. Press
3. Input the character you want.
to insert a space at the current cursor position.
To input numbers
1. While the cursor or digits are flashing in the number area of the display,
2. Use
and to move the cursor to the digit you want to input.
use
and to change the setting.
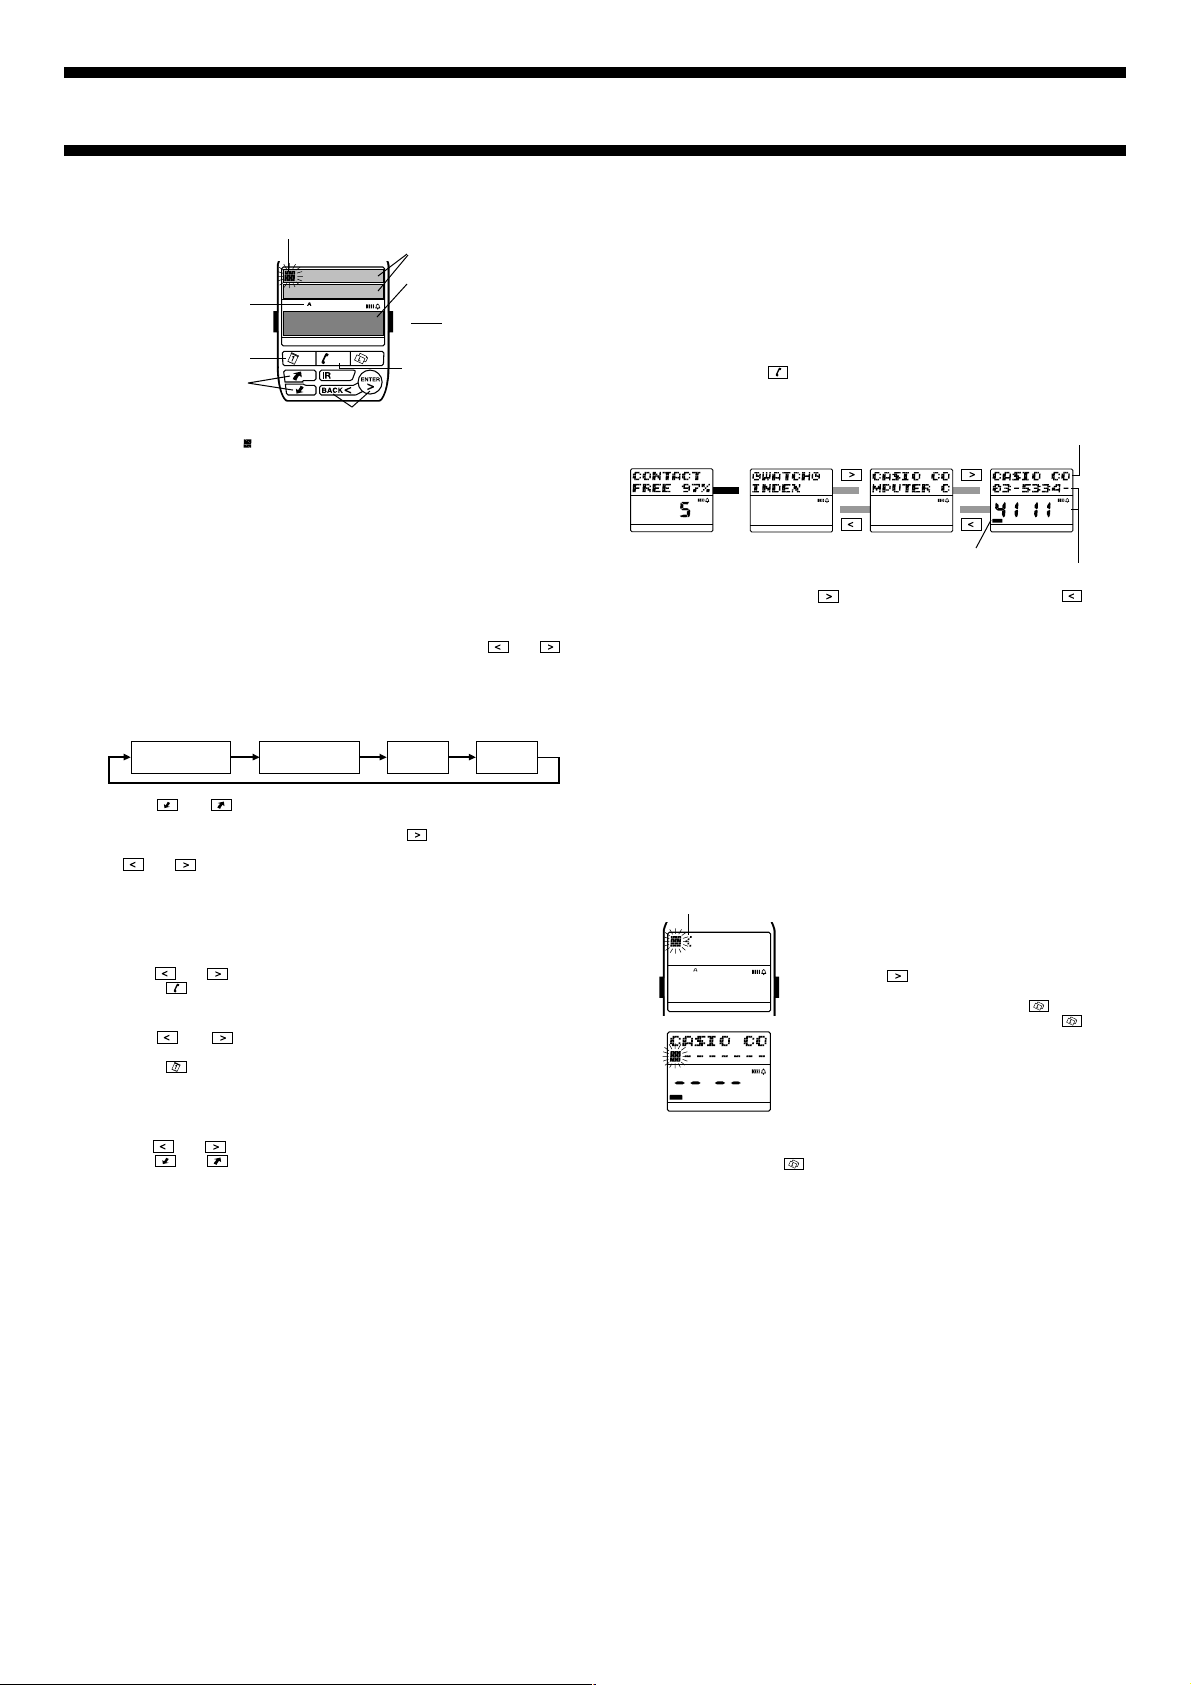
CONTACT MODE
The Contact Mode lets you store names, telephone numbers, e-mail
addresses and other data for later recall when you need it. See “Data Fields”
for details on Contact Mode data fields.
• With the M-1510 Watch, this function is called the Telememo Mode instead
of Contact Mode.
Entering the Contact Mode
In any mode, press the key to enter the Contact Mode.
• The display initially shows how many Contact records are stored and the
percentage of memory that is unused. Next, the display changes to the
index screen.
[Memory Status] [Index] [Name] [Data]
E-MAIL OTHER
▲
▲
HOME
FAX CALL
WORK
▲
▲
E-MAIL OTHER
▲
.
HOME
FAX CALL
E-MAIL OTHER
WORK
HOME
FAX CALL
WORK
Data field indicator
Telephone number
• From the index screen, press
to return to the index screen.
• The data screen shows the telephone number, fax number, and other data.
• Field names are shown along the bottom of the display. The data field
indicator is located above the name of the field screen that is on the display.
In the above screen, for example, the number shown is a work telephone
number.
• The following is the meaning of each available field name: WORK (work
number), HOME (home number), FAX (work and home fax numbers),
CALL (two mobile phone, pager, or other numbers), E-MAIL (e-mail
address), OTHER (other).
• The message
screen while there is no Contact Mode data stored in memory.
NO DATA! appears when you display the name or data
to change to the name screen. Press
Inputting Contact Data
Use the following procedure to input a new Contact record. See “Inputting Text
and Other Data” for full details about inputting characters.
To input a new Contact record
End mark
AB
HOME
FAX CALL
HOME
FAX CALL
E-MAIL OTHER
E-MAIL OTHER
WORK
WORK
• A Contact record must have at least a name to be stored. Other fields can
be skipped by pressing
1. In the Contact Mode, display the name or
data screen.
2. Hold down A for about two seconds until
the record operation menu appears.
NEW is flashing on the operation menu, so
3.
press the
input screen.
4. Input the name, and then press the
5. Input data for the other fields, pressing
after each.
• The number area initially contains all
hyphens. You can leave the hyphens or
replace them with numbers or spaces.
6. When you are finished inputting all the data
you want, press the A button to return to
the name screen.
key to display the new record
without inputting anything.
Name
HOME
FAX CALL
E-MAIL OTHER
WORK
key.
Turning On the Display Backlight
Except when you are making settings or performing a data communication
operation, pressing the B button in any mode turns on the backlight for about
two seconds. The backlight uses an EL (electro-luminescent) panel that
causes the entire display to glow for easy reading in the dark.
If you need to keep the backlight on longer, keep the B button depressed.
Even if you do, however, the backlight automatically turns off after about six
seconds.
Important!
• You may not be able to see the backlight if you turn it on under direct
sunlight.
• The backlight turns off automatically if an alarm or other buzzer operation is
performed while it is on.
• The EL backlight vibrates slightly when it is turned on, which can cause a
noticeable sound. This does not indicate malfunction.
• The electro-luminescent panel loses illuminating power after very long use.
Recalling Contact Records
Contact data that is input on this watch or received from another watch is listed
äWATCHä index. This data is listed in the sequence that it is input,
in the
without sorting.
When you input data on your computer, sort it, and then download it to the
watch, it is listed in an index of the same sequence as that produced by the
computer sort operation.
Whenever you want to recall Contact data, the first step is to select which
äWATCHä or index sorted on a computer) you want to use.
index (
Index Sequence in Watch Memory
Indexes are stored in watch memory in the sequence shown below.
1. Index sorted on a computer
2. Indexes imported from M-1510 Watch
äWATCHä Index
3.
To view data in an index imported from M-1510 Watch or in the
index, scroll down past the index sorted on a computer and then scroll through
the data in the imported or
• You cannot edit or delete an index using the watch.
äWATCHä index.
äWATCHä
Page 3
1910-3
WORK
HOME
FAX CALL
E-MAIL OTHER
To recall a Contact record
1. Press to display the index screen.
2. Use
• To recall a record in the
3. Press
• If there is no data stored under the letter you select in step 2, pressing
4. Press
5. When the name field screen for the Contact record you want to recall is
6. Use
• The data field indicator at the bottom of the screen shows which field’s data
• Only fields that contain data appear. Fields without data are skipped
and to select the letter that starts the name field data of the
record you want to recall.
field begins with the letter you selected in step 2.
in step 3 displays the message NO DATA!. Note that you cannot scroll
from the
selection screen in step 2.
displayed, press
to display the name field screen of the first record whose name
NO DATA! screen. You must press to return to the letter
to scroll forward through the names or to scroll back.
and to view the other fields of the Contact record.
äWATCHä index, scroll down to äWATCHä.
to display its data screen.
is currently on the display.
automatically.
Editing a Contact Record
1. Display the name or data screen of the record you want to edit.
2. Hold down the A button for about two seconds until the record operation
menu appears.
3. Press
display the record editing screen.
4. Make any changes to the record you want, pressing the
finish editing each field.
• If you want to leave the data in a field as it is, press the
making any changes.
5. When you are finished making all the changes you want, press the A
button.
to move the flashing to EDIT, and then press the key to
key after you
key without
Deleting a Contact Record
1. Display the name or data screen of the record you want to delete.
2. Hold down the A button for about two seconds until the record operation
menu appears.
3. Press
4. In response to the confirmation message that appears on the display,
to move the flashing to CLR, and then press the key.
press the
procedure without deleting anything.
key to delete the record or the A button to abort the
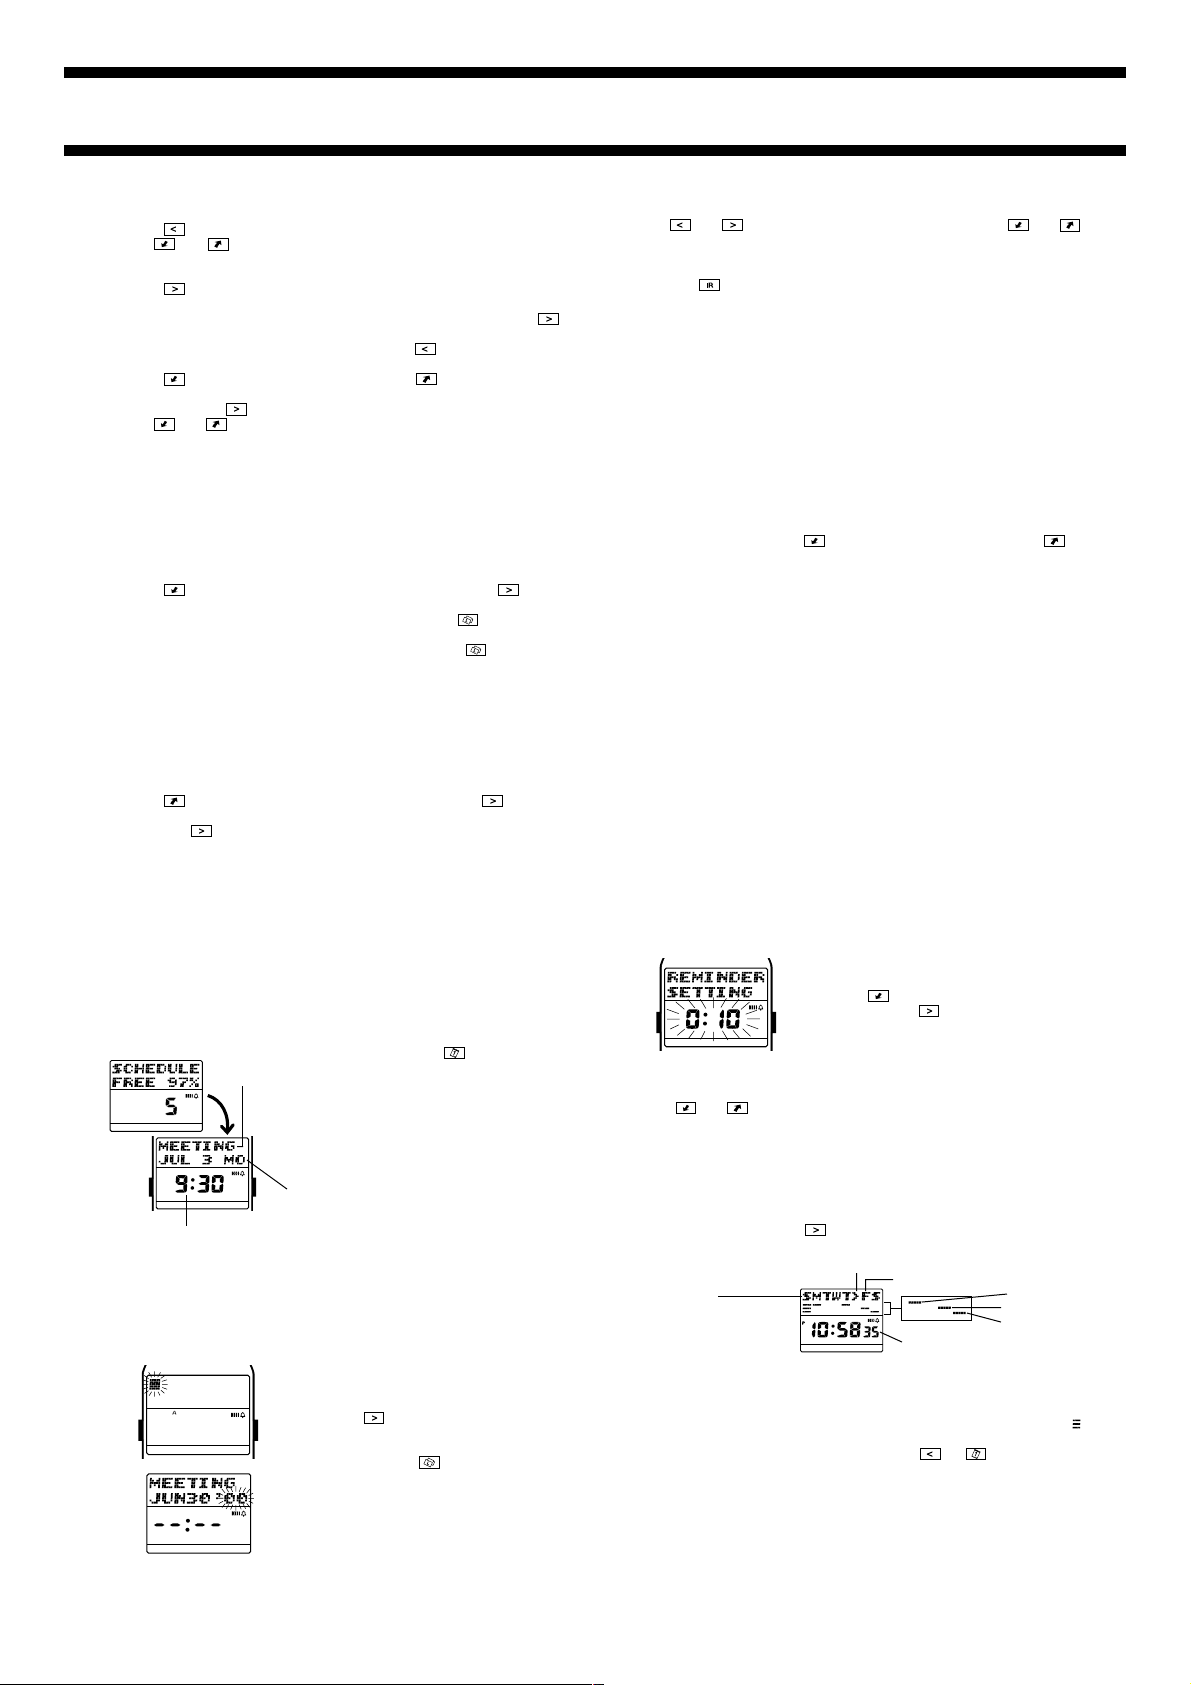
SCHEDULE MODE
The Schedule Mode helps to keep you on time all the time by letting you take
a record of your appointments with you wherever you go. Schedule alarms
sound to remind you of important events. See “Data Fields” for details on
Schedule Mode fields.
Entering the Schedule Mode
In the any mode, press the key to enter the
Description
HOME
FAX CALL
WORK
E-MAIL OTHER
AB
HOME
FAX CALL
E-MAIL OTHER
WORK
Time
Inputting a Schedule Record
Use the following procedure to input a new Schedule record. See “Inputting
Text and Other Data” for full details about inputting characters.
To input a new Schedule record
AB
HOME
FAX CALL
WORK
E-MAIL OTHER
Schedule Mode.
• The display initially shows how many
Schedule records are stored and the
percentage of memory that is unused. Next,
the display changes to the next scheduled
appointment.
Month Day Day of week
1. In the Schedule Mode, hold down the A
button for about two seconds until the
record operation menu appears.
NEW is flashing on the operation menu, so
2.
press the
input screen.
3. Input the description of the appointment,
and then press the
• The initial date set for a new Schedule
record is today’s date, as kept in the
Timekeeping Mode.
key to display the new record
key.
4. Input the date (year, month, day), and time (hour and minutes).
• Use
• To create a Schedule record as an All Day Event (for an anniversary,
5. When you are finished inputting all the data you want, press the A button.
• The Schedule record screen shows the day of the week in place of the year.
• Schedule records are automatically sorted according to date and time.
• A standard Schedule record must have description and date, and time data
• When inputting a Schedule record, if you input a time but then change your
and to move the flashing between the digits, and and
to cycle through numbers at the flashing digit.
birthday, or event that takes all day), set the year, month, and day, and then
press the
to be stored. An All Day Event Schedule record must have description and
date data.
mind and want to change the record to an All Day Event, you can simply
delete the time. If you do this, however, the time you originally input remains
associated with the All Day Event, even though it does not appear on the
watch display. When you upload the record to your computer, the time you
originally input appears on the computer screen, even though the record is
for an All Day Event.
key. This causes the time setting to disappear from the display.
Recalling Schedule Records
In the Schedule Mode, press to scroll forward through records or to
scroll back.
Schedule Reminder Alarm
You can set a schedule reminder alarm to sound at the time for which
appointments are scheduled (0:00), or at 5, 10, 15, 30, 45, or 60 minutes
before appointment times. When the watch is in the Timekeeping Mode, the
description, time, and date of a Schedule record appears on the display when
its schedule reminder time is reached.
• The schedule reminder alarm setting is applied for all schedule records.
You cannot make individual settings for each schedule record.
• The initial factory default for schedule reminder alarms is 10 minutes before
the Schedule record time.
• The schedule reminder alarm sounds for about 20 seconds or until you
press any button or key.
• A schedule reminder alarm cannot be set for an All Day Event Schedule
record.
• The description remains on the display for about three minutes in the
Timekeeping Mode, or until you press any key after the schedule reminder
alarm stops sounding.
• If another Schedule time is reached within about three minutes after a
previous Schedule time, the second alarm does not sound unless you
cleared the first record’s description from the display by pressing any key
after its schedule reminder alarm stops sounding.
Setting the Schedule Reminder Alarm Time
1. In the Schedule Mode, hold down the A
button for about two seconds until the
record operation menu appears.
2. Press
AB
HOME
FAX CALL
WORK
• The schedule reminder alarm setting indicates how many minutes before
the Schedule record time the alarm will sound.
3. Use
• You can select one of the following for this setting:
Schedule record time),
minutes),
4. After you select the setting you want, press the A button.
E-MAIL OTHER
and to change the setting.
0:30 (30 minutes), 0:45 (45 minutes), 1:00 (1 hour).
and then press .
• At this time the current schedule reminder
alarm setting appears flashing on the
display.
0:05 (5 minutes), 0:10 (10 minutes), 0:15 (15
to move the flashing to REM
0:00 (same time as
Weekly Schedule Screen
In the Schedule Mode, press to change to the Weekly Schedule screen
for the week that contains today’s date.
Separator
Day of the week
S (Sunday), M (Monday),
T (Tuesday), W (Wednesday),
T (Thursday), F (Friday),
S (Saturday)
• A bar (
• A day for which there is an All Day Event Schedule record is indicated by
• To return to the Schedule record screen, press
è) appears under each day of the week where you have an
appointment scheduled. The position of each bar indicates the relative part
of the day for which the appointment is scheduled.
alternating with Ö.
Current day of the week
0:00 to 11:59
12:00 to 17:59
18:00 to 23:59
Current time
(or ).
HOME
FAX CALL
WORK
E-MAIL OTHER
Page 4

1910-4
AB
WORK
HOME
FAX CALL
E-MAIL OTHER
WORK
HOME
FAX CALL
E-MAIL OTHER
äWATCHäPAGE
TRAIN; 7:00, 7:30, 8:00
BUS; 7:15, 7:45, 8:15
URL
CASIO; www.casio
G-SHOCK; www.g-shock
Page title
Text
Editing a Schedule Record
1. Recall the record you want to edit.
2. Hold down the A button for about two seconds until the record operation
menu appears.
3. Use
4. Make any changes you want to the description and date/time field data.
• Press
• While the date/time field screen is on the display, use
• To change the Schedule record to an All Day Event, press
5. When you are finished making all the changes you want, press the A
and to move the flashing to EDIT, and then press the
key.
to toggle the display between the description field and the date/
time field screens.
the flashing in the following sequence.
Year Month
the date digits are flashing. This causes the time setting to disappear. Press
again to make the time setting reappear.
Day
Hour
and to move
Minutes
while any of
button.
Deleting a Schedule Record
1. Recall the record you want to delete.
2. Hold down the A button for about two seconds until the record operation
menu appears.
3. Press
4. In response to the confirmation message that appears on the display,
press the
procedure without deleting anything.
to move the flashing to CLR, and then press the key.
key to delete the record or the A button to abort the
TO DO MODE
The To Do Mode makes it possible to keep track of all the important things you
need to do. See “Data Fields” for details on To Do Mode fields.
Entering the To Do Mode
In the Timekeeping Mode, press the
Description
HOME
FAX CALL
WORK
E-MAIL OTHER
AB
HOME
FAX CALL
WORK
E-MAIL OTHER
Priority
Inputting a To Do Record
Use the following procedure to input a new To Do record. See “Inputting Text
and Other Data” for full details about inputting characters.
To input a new To Do record
AB
HOME
FAX CALL
HOME
HOME
FAX CALL
FAX CALL
E-MAIL OTHER
E-MAIL OTHER
E-MAIL OTHER
WORK
WORK
WORK
6. When you are finished inputting all the data you want, press the A button.
• To Do records are stored in the order you input them.
• A To Do record must have description data to be stored.
key once to enter the To Do Mode.
• The display initially shows how many
records are stored in the mode and the
percentage of memory that is unused.
Next, the display changes to show a To
Do record.
Month Day Year
1. In the To Do Mode, hold down the A
button for about two seconds until the
record operation menu appears.
NEW is flashing on the operation menu, so
2.
press the
input screen.
3. Input the description of the task, and then
press the
4. Use
task as a value from 1 (highest) through 4
(lowest), and then press the
5. Input the year, month, and day.
• The number area initially contains all
hyphens. Replace all the hyphens with
values for the year, month, and day.
• Use
between digits, and
through numbers at the flashing digit.
key to display the new record
key.
and to input the priority of the
key.
and to move the flashing
and to cycle
Checking Finished Tasks
You can check off completed tasks in order to identify them as done.
To check a finished task
1. Recall the record whose task you want to check.
2. Hold down the
the priority value on the screen.
• Holding down
key for two seconds, until d (the checkmark) replaces
for two seconds again changes back to the priority value.
Editing a To Do Record
1. Recall the record you want to edit.
2. Hold down the A button for about two seconds until the record operation
menu appears.
3. Press
4. Make the changes you want to the description, priority, and date.
• Press
• While the date field screen is on the display, use
flashing the following sequence.
5. When you are finished making all the changes you want, press the A
button.
to move the flashing to EDIT, and then press the key.
to cycle between the description, priority, and date field screens.
Year
Month
and to move the
Day
Deleting a To Do Record
1. Recall the record you want to delete.
2. Hold down the A button for about two seconds until the record operation
menu appears.
3. Press
4. In response to the confirmation message that appears on the display,
press the
procedure without deleting anything.
to move the flashing to CLR, and then press the key.
key to delete the record or the A button to abort the
BROWSER MODE
The Browser Mode makes it possible to keep text on hand all the time. See
“Data Fields” for details on Browser Mode data fields.
About Browser Mode Text
Browser data is grouped according to units called pages. A page consists of a
title and text.
[Watch Page] [User Page (created with Watch Application)]
• The Browser Mode has a default page named
Browser text you input using the procedure under “Inputting Browser Data”
is input into the
be renamed, deleted, or moved.
• You can use the Watch Application to create your own user pages and input
Browser text into them on your computer. Then you can download your
Browser pages to the watch. You cannot create user pages with the watch.
äWATCHäPAGE. The äWATCHäPAGE cannot
Entering the Browser Mode
In the Timekeeping Mode, press the key
Current
page title
Current page number
twice to enter the Browser Mode.
• The display initially shows how many
records are stored in the mode and the
percentage of memory that is unused. Next,
the display changes to show the title of the
page whose text you were viewing when you
last exited the Browser Mode.
äWATCHäPAGE. All
Recalling a To Do Record
In the To Do Mode, press to scroll forward through records or to scroll
back.
Page 5
1910-5
WORK
HOME
FAX CALL
E-MAIL OTHER
WORK
HOME
FAX CALL
E-MAIL OTHER
▲
▲
Inputting Browser Data
1. In the Browser Mode, use the and keys to scroll through the page
2. Press the
• The contents of the
message
contain any data yet.
AB
äWATCHäPAGE is shown.
titles until
WORK
WORK
key to open the äWATCHäPAGE.
NO DATA! appears if the äWATCHäPAGE does not
HOME
FAX CALL
HOME
FAX CALL
äWATCHäPAGE appear on the display. The
3. Hold down the A button for about two
seconds until the operation menu appears.
NEW is flashing on the operation menu, so
E-MAIL OTHER
E-MAIL OTHER
4.
press the
input screen.
5. Input the text you want.
• See “Inputting Text and Other Data” for
details on inputting text.
6. After the text is the way you want it, press
the A button to return to the Browser data
display screen.
key to display the new data
Recalling Browser Data
You can scroll the page titles in watch memory on the display to find the one
you want. Then you can view the text stored under a specific page title.
To recall a Browser page and scroll through its text
Line of text
HOME
FAX CALL
WORK
E-MAIL OTHER
Current line number
1. In the Browser Mode, use and to
scroll through the page titles until the one
you want is on the display.
2. Press the
text stored under the page title you
selected.
3. Use
through the text stored in the page.
• Pressing
screen.
key to display the first line of
and to scroll line-by-line
returns to the page title
Editing Browser Data
You cannot edit the page title of Browser data.
To edit Browser data
1. Recall the line of Browser text that you want to edit.
2. Hold down the A button for about two seconds until the operation menu
appears.
3. Use
4. Make any changes to the text you want.
5. When you are finished making all the changes you want, press the A
and to move the flashing to EDIT, and then press the
key.
button.
USER MODE
The user data identifies the watch as yours and also provides of reference of
your own phone numbers, fax numbers, and other data when it is required.
See “Data Fields” for details on User Mode data fields.
Notes
• You can exchange user data with another watch using the User data
exchange function.
• With the M-1510 Watch, this function is called the Owner Mode instead of
User Mode.
Entering the User Mode
In the Timekeeping Mode, press the key
six times to enter the User Mode.
• The initial screen shows
HOME
FAX CALL
WORK
E-MAIL OTHER
AB
HOME
FAX CALL
WORK
E-MAIL OTHER
contains data, and
Inputting User Data
Use the following procedure to input new data. See “Inputting Text and Other
Data” for full details about inputting characters.
To input new User data
1. In the User Mode, hold down the A button
for about two seconds until the record
operation menu appears.
NEW is flashing on the operation menu, so
2.
AB
HOME
FAX CALL
HOME
FAX CALL
E-MAIL OTHER
E-MAIL OTHER
WORK
WORK
press the
input screen.
3. Input the name, and then press the
key.
4. Input data for the other fields, pressing
after each.
5. When you are finished inputting all the data
you want, press the A button.
Recalling User Data
In the User Mode, use and to switch between the name screen and
data screen.
[Name] [Data]
1 if the User Mode
0 if it does not.
key to display the new data
Deleting Browser Data
You can delete a single line of text from a page or an entire page.
To delete a single line of text
1. Recall the line of text you want to delete.
2. Hold down the A button for about two seconds until the operation menu
appears.
3. Press
4. In response to the confirmation message that appears on the display,
press the
without deleting anything.
To delete an entire page
1. Recall the title of the page you want to delete and then press to
display the text in the page.
• Note that the following step will not display the operation menu if a page title
is on the display. You must display the contents of the page first.
2. Hold down the A button for about two seconds until the operation menu
appears.
3. Press
4. In response to the confirmation message that appears on the display,
press the
procedure without deleting anything.
• Displaying the
procedure causes all
äWATCHäPAGE itself, however, is not deleted.
to move the flashing to L-CL, and then press the key.
key to delete the line or the A button to abort the procedure
to move the flashing to P-CL, and then press the key.
key to delete the page or the A button to abort the
äWATCHäPAGE contents in step 1 of the above
äWATCHäPAGE contents to be deleted. The
Data field indicator
• While the data screen is on the display, you can use
other fields.
• The data screen’s data field indicator shows the field screen that is currently
displayed. See “CONTACT MODE” for information about data field
indicator.
and to view
Editing User Data
1. In the User Mode, hold down the A button for about two seconds until the
record operation menu appears.
EDIT is flashing on the operation menu, so press the key to display
2.
the record editing screen.
3. Make any changes to the data you want, pressing the
finish editing each field.
• If you want to leave the data in a field as it is, press the
making any changes.
4. When you are finished making all the changes you want, press the A
button.
key after you
key without
Deleting User Data
1. In the User Mode, hold down the A button for about two seconds until the
record operation menu appears.
2. Press
key.
3. In response to the confirmation message that appears on the display,
press the
procedure without deleting anything.
or to move the flashing to CLR, and then press the
key to delete the data or the A button to abort the
Page 6

1910-6
WORK
HOME
FAX CALL
E-MAIL OTHER
WORLD TIME MODE
The World Time Mode shows the current time in 27 cities (29 time zones)
around the world, along with the current time in your home city (Home Time).
Entering the World Time Mode
In the Timekeeping Mode, press the key three times to enter the World
Time Mode.
City code
AB
Time in indicated city
• In the World Time Mode, pressing
between GMT differential (time difference between GMT and the displayed
zone) and Home Time differential (time difference between your Home
Time and the displayed zone).
• See “World Time Mode Timekeeping” for details about city codes, GMT
differential, and technical information about the World Time Mode.
WORK
HOME
GMT differential
FAX CALL
E-MAIL OTHER
Press .
▲
Home time differential
▲
HOME
FAX CALL
WORK
toggles the upper part of the display
E-MAIL OTHER
Viewing the Time in Another City
In the World Time Mode, press to scroll forward through the city codes
and to
• City codes scroll in the sequence shown in the “CITY CODE TABLE”.
scroll back.
Daylight Saving Time (DST)
Hold down the key for two seconds to toggle the displayed time zone
between Daylight Saving Time (Summer Time) and Standard Time. The
indicator DST on the display indicates that the zone is set for Daylight Saving
Time.
• Daylight Saving Time automatically advances the time setting by one hour
from Standard Time.
• You can make individual Daylight Saving Time settings for each time zone.
ALARM MODE
You can use the Alarm Mode to set a Daily Alarm that sounds at the same
time each day, while turned on. You can also turn on an Hourly Time Signal
that causes the watch to beep twice every hour on the hour.
Entering the Alarm Mode
In the Timekeeping Mode, press the key four times to enter the Alarm Mode.
Turning the Daily Alarm and Hourly Time Signal On
and Off
The Daily Alarm and Hourly Time Signal sound only while they are turned on.
To turn the Daily Alarm and Hourly Time Signal on and off
In the Alarm Mode, press the key to cycle through the on and off settings
as shown below.
[Alarm ON Indicator / Hourly Time Signal ON Indicator]
Alarm On
Signal On
Alarm Off
Signal Off
Alarm On
Signal Off
Alarm Off
Signal On
STOPWATCH MODE
With the Stopwatch Mode, you can measure elapsed time, split times, and two
finishes. The range of the stopwatch is 23 hours, 59 minutes, 59.99 seconds.
Entering the Stopwatch Mode
Hours
Minutes
1/100 second
Seconds
(a) Elapsed Time
▼
(b) Split Time
Start Split Split release Stop Clear
▼
(c) Two Finishes
Start Split releaseStopSplit Clear
▼
First runner
finishes.
In the Timekeeping Mode, press the key
five times to enter the Stopwatch Mode.
Using the Stopwatch
The and keys are used to control
stopwatch operations as shown below.
• Note that the
while the backlight is lit.
▼
▼
▼
Second runner finishes.
Record time of first
runner.
and keys are disabled
▼
StopRe-start ClearStart Stop
▼
▼
Record time of
second runner.
▼
▼
▼
Setting the Daily Alarm Time
Use the following procedure to set the time that you want the Daily Alarm to
sound each day.
To set the Daily Alarm
1. In the Alarm Mode, hold down the A
button for two seconds until the hour digits
of the alarm time start to flash on the
display.
AB
HOME
FAX CALL
WORK
Alarm on indicator
Hourly time signal on
indicator
E-MAIL OTHER
2. Use
• When setting the alarm time using the 12hour format, take care to set the time
correctly as am (no indicator) or pm (P
indicator).
3. Use the
4. Use the
5. After the alarm time is the way you want it,
and to change the hour
setting.
flashing to the minutes digits.
minutes setting.
press the A button to return to the Daily
Alarm display screen.
or keys to move the
and keys to change the
Daily Alarm Operation
The alarm sounds at the preset time each day for about 20 seconds, or until
you stop it by pressing any button or key.
To test the alarm
In the Alarm Mode, hold down the key to sound the alarm.
TIME AND DATE SETTINGS
Use the procedures described in this section to set the time and date after the
battery is replaced.
Calibrating the Seconds Count
Use the following procedure to calibrate the seconds count on a time signal
from a radio, TV, or other source.
To calibrate the seconds count
AB
HOME
FAX CALL
WORK
• Pressing
seconds to
range of 00 to 29, the minutes count is unchanged.
3. Press the A button to return to the current time display.
E-MAIL OTHER
while the seconds count is in the range of 30 to 59 resets the
00 and adds 1 to the minutes. If the seconds count is in the
Setting the Clock
Use the following procedure to select a city as your Home Time City, and then
set its time and date. You can also specify whether you prefer to use 12-hour
or 24-hour timekeeping for all screens that show times.
Important!
Changing the city setting usually changes the time setting and sometimes
changes the date setting. Because of this, you should select your Home Time
City before setting the time and date.
1. In the Timekeeping Mode, hold down the
A button for two seconds, until the
seconds digits start to flash on the display.
• The seconds digits are flashing because
2. Press the
selected
they are
00 when the time signal you are
to
calibrating to sounds.
.
key to set the seconds count
Page 7

1910-7
WORK
HOME
FAX CALL
E-MAIL OTHER
WORK
HOME
FAX CALL
E-MAIL OTHER
WORK
HOME
FAX CALL
E-MAIL OTHER
WORK
HOME
FAX CALL
E-MAIL OTHER
To set the clock
1. In the Timekeeping Mode, hold down the
A button for two seconds, until the
seconds digits start to flash on the display.
• The seconds digits are flashing because
AB
HOME
FAX CALL
WORK
3. Use
you want is displayed.
• City codes scroll in the sequence shown in the “CITY CODE TABLE”.
4. After setting the Home Time city, use
the sequence shown below to select other digits and settings.
E-MAIL OTHER
and to scroll through the available city codes until the one
Press . Press .
2. Press the
Seconds City Code
Day
• Use the
year, month, or day setting is selected (flashing).
• When the 12/24-hour setting is selected, use
hour (
5. After the clock is set the way you want it, press the A button to return to
the current time display.
Notes
• The year can be set in the range of 1995 to 2039.
• The day of the week is automatically displayed in accordance with the year,
month, and day setting.
• The watch’s built-in full automatic calendar automatically makes allowances
for different month lengths and leap years. Once you set the date, there
should be no reason to change it except after the replacement of the
watch’s battery.
and keys to change the digits when the hour, minutes,
12H) and 24-hour (24H) timekeeping.
Month
selected
they are
Time city setting.
and to move the flashing in
Hour Minutes
Year
.
key to display the Home
12/24-Hour
Format
to toggle between 12-
Daylight Saving Time
Use the following procedure to switch between Standard Time and Daylight
Saving Time (summer time). Daylight Saving Time automatically advances the
time setting by one hour from Standard Time.
To switch between Standard Time and Daylight Saving Time
1. In the Timekeeping Mode, hold down the
A button for two seconds, until the
seconds digits start to flash on the display.
2. Press the B button to toggle between
AB
HOME
FAX CALL
WORK
E-MAIL OTHER
Standard Time and Daylight Saving Time.
• The indicator DST on the display indicates
that the Home Time is set for Daylight
Saving Time.
3. Press the A button to return to the current
time display.
DATA COMMUNICATION
The procedures in this section tell you how to exchange data with a personal
computer running Watch Application or any of the PC link applications on the
CD-ROM that comes with the watch, or with another PC-UNITE or PCX watch
(Module 1510 or 1910).
Important!
See “Data Communication Precautions” for important information about
orienting the watch for data communication and information about
communication errors.
Communicating with a Computer
In this configuration, all of the data selection and settings are performed on the
computer side. Perform the following procedure when the message “Put the
watch in the data transfer mode, and point the two infrared ports
towards each other.” appears on the computer.
To communicate with a computer
Infrared port
1. Use to enter the Timekeeping Mode.
2. Press the
PC is flashing on the operation menu, so
3.
press the
Communication Mode.
key.
key to enter the PC
4. Align infrared ports of the watch and
computer, and click OK on the message
dialog box on the computer’s screen.
• The watch establishes an infrared link with
the computer and data transfer starts.
• After data communication is complete, the
message
display, and then the watch changes to the
Timekeeping Mode.
OK! appears on the watch
Interrupting Data Communication
Press the key to interrupt a data communication operation.
• Communication stops and the message
appears on the display. Press any key to return to the Timekeeping Mode.
TRANSFER ERROR!
User Data Exchange
With the following operation, the two watches exchange the data in their
respective User Mode. Received data is ultimately stored in the
index of the Contact Mode.
• With the M-1510 Watch, this function is called the Owner Mode instead of
User Mode.
• When exchanging data with an M-1510 Watch, see the documentation that
comes with the M-1510 for its required button and key operations.
To exchange User data
1. Use to enter the Timekeeping Mode.
2. Press the
3. Press
• Note that the
data input in its User Mode.
AUTO is flashing on the operation menu, so press the key.
4.
5. Align infrared ports of the two watches.
• The watches establish an infrared link with each other and data transfer
starts.
• After data communication is complete, the message
watch display, and then the watches change to the Contact Mode, showing
the received data.
key.
or to move the flashing to WATCH, and then press the
key.
WATCH item is not shown if the watch does not have any
äWATCHä
OK! appears on the
Communicating with Another Watch
Use the following procedures to exchange Contact, Schedule, To Do,
Browser, and User data with another watch. In this configuration, one watch is
the sender and the other watch is the receiver.
• User data cannot be received in the User Mode. It can be received in the
Contact Mode or by performing the User Data Exchange procedure.
• This watch can send Contact, Schedule, To Do, and User Mode data one
record at a time. Browser data is sent one page at a time.
To send data to another watch (sender operation)
1. Enter the mode that contains the record you want to send, and display the
data.
• A data communication operation cannot be performed while the Contact
Mode index screen or Schedule Mode Weekly Schedule screen is on the
display. Switch to a data screen before trying to send or receive data.
• When sending Browser Mode data, be sure to display the text data on the
page you want to send before starting the send operation.
2. Press the
3. Press
WATCH, and then press the key.
SEND is flashing on the operation menu,
4.
so press the
5. Align infrared ports of the two watches.
• The watches establish an infrared link with
each other and data transfer starts.
• After data communication is complete, the
message
display, and then the watch changes to the
screen that shows the data that was sent.
To receive data from another watch (receiver operation)
1. Enter the mode for the data you will be receiving.
• A data communication operation cannot be performed while the Contact
Mode index screen or Schedule Mode Weekly Schedule screen is on the
display. Switch to a data screen before trying to send or receive data.
2. Press the
3. Press
key.
or to move the flashing to WATCH, and then press the
key.
key.
or to move the flashing to
key.
OK! appears on the watch
AB
HOME
FAX CALL
E-MAIL OTHER
WORK
Page 8

1910-8
4. Press or to move the flashing to
RECEIVE.
WORK
HOME
FAX CALL
E-MAIL OTHER
5. Press the
operation.
6. Align infrared ports of the two watches.
• The watches establish an infrared link with
each other and data transfer starts.
• After data communication is complete, the
message
display, and then the watch changes to the
screen that shows the data that was
received.
key to start the data receive
OK! appears on the watch
REFERENCE
This section contains more detailed and technical information about watch
operations.
Changing the Text Scrolling Speed
Text is displayed in the upper part of the display. When the text is too long to
fit on the display, it automatically scrolls vertically or horizontally. Use the
following procedure to control the speed of the text scrolling.
To change the text scrolling speed
HOME
FAX CALL
HOME
FAX CALL
E-MAIL OTHER
E-MAIL OTHER
WORK
WORK
Display Contrast
Use the following procedure to adjust the relative darkness of the display
figures.
To adjust display contrast
HOME
FAX CALL
WORK
4. After you are finished making the setting you want, press the
return to the Option Mode.
• Press
E-MAIL OTHER
to return to the Timekeeping Mode.
Input Confirmation Tone
Use the following procedure to turn the input confirmation tone on and off.
To turn the input confirmation tone on and off
HOME
FAX CALL
WORK
• If the button or key confirmation tone is currently turned on, the display
shows
SOUND OFF.
4. After you are finished making the setting you want, press the
return to the Option Mode.
• Press
E-MAIL OTHER
SOUND ON. If the tone is currently off, the display shows
to return to the Timekeeping Mode.
1. In the Timekeeping Mode, press the
key seven times to enter the Option Mode.
SPD should be flashing on the display.
2.
Press the
speed screen.
3. Press
HIGH (high speed) and LOW (low
speed).
4. After you are finished making the setting
you want, press the
Option Mode.
• Press
Mode.
1. In the Timekeeping Mode, press the
key seven times to enter the Option Mode.
2. Press
and then press
3. Press the
darker, and the
lighter.
key to display the scroll
or to toggle between
key to return to the
to return to the Timekeeping
to move the flashing to CONT,
.
key to make display figures
key to make them
key to
1. In the Timekeeping Mode, press the
key seven times to enter the Option Mode.
2. Press
and then press
3. The sound setting is flashing on the display,
so press
displayed setting.
to move the flashing to SND,
.
or to execute the
key to
Text Data Scrolling
Text is displayed in the upper part of the display. When the text is too long to
fit on the display, it automatically scrolls vertically or horizontally. Pressing A
stops the scrolling and displays the first block. Each subsequent press of A
scrolls one block at a time. Automatic scrolling starts again when you press A
while the final block of text data is on the display.
• When text scrolls vertically, eight-character lines scroll upwards on the
display.
Example: Vertical scrolling of CASIO COMPUTER CO., LTD.
▼
AB
HOME
FAX CALL
WORK
E-MAIL OTHER
▼
▼
▼
▼
Data and Setting Scrolling
The , , and keys are used in various modes and screens to
scroll through data on the display. When you are setting the time or date, or
inputting text, holding down these keys scroll through the settings at high speed.
Initial Displays
When you enter the Contact, To Do, Browser, or World Time Mode, the data
you were viewing when you last exited the mode appears first.
Auto Screen Operations
• The normal default mode for this watch is the Timekeeping Mode. If you
leave the watch in any mode (except for the World Time and Stopwatch
Modes) for two or three minutes without performing any operation, it
automatically changes to the Timekeeping Mode.
• If you leave a data input or settings screen (a screen with a flashing cursor
or digits) on the display for two or three minutes without performing any
operation, the watch automatically saves anything you have input up to that
point and exits the input or setting screen.
12-hour/24-hour Timekeeping Formats
The 12-hour/24-hour timekeeping format you select in the Timekeeping Mode
is also applied in the Schedule, World Time and Alarm Modes.
• With the 12-hour format, the P (PM) indicator appears to the left of the hour
digits for times in the range of noon to 11:59 pm. No indicator is shown from
midnight to 11:59 am.
• With the 24-hour format, times are indicated in the range of 0:00 to 23:59,
with 24 indicator.
World Time Mode Timekeeping
The following points describe how time is kept in the World Time Mode.
• World Time Zone times are calculated in accordance with the GMT
(Greenwich Mean Time) differential for each zone, using the time set in the
Timekeeping Mode.
• The seconds count of the World Time is synchronized with the seconds
count of the Timekeeping Mode.
• The GMT differentials used by this watch are based on Universal Time
Coordinated (UTC) data.
Page 9

1910-9
Data Communication Precautions
The following explains important points to note during data communication,
and provides details about communication error messages.
Important!
• Keep the watch and the other device perfectly still during data communication.
• Do not allow anything to break the path between the two infrared ports
during data communication.
• Infrared communication may not be possible outdoors or in other areas
exposed to bright light. Best results are obtained under indoor lighting of
500 lux.
• The two infrared ports should be oriented so they are no more than 20cm
from each other, and are at an angle of less than 30 degrees from each other.
• Data communication at an angle greater than 15 degrees may be possible if
the two infrared ports are moved closer to each other.
• Proper infrared communication may be impossible if the two infrared ports
are too close to each other.
• You may need to position the infrared ports closer together when
transferring large volumes of data, when performing data transfer in an area
that is relatively hot, or when watch battery power is low.
• A separate nearby infrared data transfer operation can interfere with the
data communication operation of this watch.
• When positioning the watch for infrared data communication, make sure
you fold the band snugly underneath the watch case as shown in the
illustration.
Precautions when Exchanging Data with an M-1510 Watch
• This watch can receive Telememo Mode index data from an M-1510 Watch.
Received index data is stored in the Contact Mode before the
äWATCHä index.
• This watch does not display a category icon for Schedule records received from
an M-1510 Watch. When you send a Schedule record from this watch to an M1510 Watch, the M-1510 Watch displays a category icon that looks like
• When you send an All Day Event Schedule record to an M-1510 Watch, the
M-1510 automatically adds a time of 12:00 before storing the data. Or if you
originally input and later deleted a time when inputting the record, it
automatically adds the time you originally input. Note that the M-1510
schedule reminder alarm also sounds in accordance with the automatically
added time.
• When this watch receives a To Do record from an M-1510 Watch, this
watch does not display a category icon or time (hour, minutes) for the
record. When you send a To Do record from this watch to an M-1510
Watch, the M-1510 displays a category icon that looks like
xx:xx.
• When this watch receives Browser data that includes indexes from an M-1510
Watch, this watch does not display the indexes.
• Any character sent from an M-1510 Watch or downloaded from your
computer that is not supported by this watch is replaced by
Data Communication Errors
The following describes error messages that can appear during data
communication, and what you should do to correct them.
Message Meaning
MODEL ERROR! The software installed on the computer
TRANSFER ERROR! The path between the infrared ports is
DATAFULL ERROR! The receiving watch memory is full.
ERROR! Any communication error other than the
does not support data communication with
this watch.
blocked, the watch was moved, or some
other external influence is interfering with
proper data communication.
above.
.
, and a time of
ã.
Memory Capacity
Watch memory can hold a total of 24 Kbytes of data. Memory is shared
between the Contact, Schedule, To Do, User, and Browser Modes. The
following table shows how many data items (records, appointments, tasks, or
pages) can be stored in each mode under various data conditions.
• The maximum capacity is 16 Kbytes for the Contact Mode, and 8 Kbytes for
other modes.
• Note that the memory capacities in the table below are based on the
premise that there is no data stored in any of the other modes.
Data Configuration
Contact
Schedule
To Do
• The capacity of the Browser Mode is 8,100 characters when there is a
äWATCHäPAGE only (no user pages). If there is no data in the
äWATCHäPAGE, there can be up to 30 user pages in memory.
User Page title: 4 characters (24 bytes)
Text: Six lines with 30 characters each (192 bytes)
Each page title requires a minimum of eight bytes, plus the memory used
for input characters. The above values include these minimums.
The actual number of allowable user pages depends on the number of lines
of text in each page.
• There can be only one set of User Mode data in memory.
Name: 8 characters (16 bytes)
Telephone: 12 digits, one field only (8 bytes)
Name: 10 characters (16 bytes)
Telephone: 12 digits, one field only (8 bytes)
Fax: 12 digits, one field only (8 bytes)
Call: 12 digits, one field only (8 bytes)
e-mail: 32 characters (40 bytes)
Other: 10 characters (16 bytes)
Date and Time: 8 bytes
Description: 15 characters (16 bytes)
Date and Time: 8 bytes
Description: 50 characters (56 bytes)
Priority and Date: 8 bytes
Description: 15 characters (16 bytes)
Priority and Date: 8 bytes
Description: 50 characters (56 bytes)
Approximate Number
of Records
680
170
340
128
340
128
Data Fields
The following lists the data fields in each mode and shows the number of
characters that can be input into each field.
Contact Mode and User Mode
Field Name Contents
NAME Up to 63 characters
WORK, HOME Up to 12 numbers, spaces, hyphens
W.FAX , H.FAX Up to 12 numbers, spaces, hyphens
CALL 1, CALL 2 Up to 12 numbers, spaces, hyphens
E-MAIL Up to 63 characters
OTHER Up to 63 characters
• “WORK” is for a work phone number, while “HOME” is for a home phone
number.
• “W.FAX” is for a work fax number, while “H.FAX” is for a home fax number.
• The “CALL 1” and “CALL 2” fields can be used for cell phone numbers,
pager numbers, etc.
• The “OTHER” field can be used for miscellaneous information.
Schedule Mode
Field Name Contents
Description Up to 127 characters
Date/Time Year, month, day, hour, minutes
To Do Mode
Field Name Contents
Description Up to 127 characters
Priority Value from 1 to 4, checkmark for completed tasks
Date Year, month, day
Browser Mode
Field Name Contents
Page Title Downloaded from your computer
Body Text 127 characters per line
Page 10

BUSYBUSY
BUSY Indicator
BUSYBUSY
The indicator BUSY appears on the display while the watch is accessing
memory data to perform any of the following operations.
HOME
FAX CALL
WORK
E-MAIL OTHER
• Data input, editing, deletion
• During data recall, scrolling from the last
record to the first record (or from the first
record to the last record).
• Checking a finished To Do record task
Battery Precautions
The BATT indicator appears on the display of the watch when battery power
drops below a certain level, or when you try to use this watch under very cold
conditions. If the BATT indicator appears because of use under cold
conditions, it should clear (and normal operation should return) after the watch
is brought back to normal temperature. As battery power drops lower, the
backlight will fail to light and display characters will become dim. Should any
or all of this happen, have the battery replaced as soon as possible. Using the
watch while the battery is low can result in abnormal operation. Note that all
data in the watch memory is deleted when its battery is replaced. Be sure to
make separate back up copies of all important data to protect against its loss.
ALWAYS LEAVE BATTERY REPLACEMENT UP TO THE DEALER
WHERE YOU BOUGHT THE WATCH OR TO AN AUTHORIZED CASIO
DISTRIBUTOR.
CHARACTER LIST
Upper-case alpha
ABCDEFGH I JKLM
ABCDEFGHIJKLM
NOPQRSTUVWXYZ
NOPQRSTUVWXYZ
Lower-case alpha
abcde f gh i j k lm
abcdefghijklm
nopq r s t uvwxyz
nopqrstuvwxyz
Numbers
0123456789
0123456789
Symbols
!#$%&’ ()*+,–
!"#$%&'()*+ ,-
./:;<=>?@[ \ ] ^
./:;<=>?@[\]^
_` { | }~
`
_ {|}~
CITY CODE TABLE
City Code
– – –
HNL
ANC
LAX
DEN
CHI
NYC
CCS
RIO
– – –
– – –
GMT
LON
PAR
CAI
JRS
JED
THR
DXB
KBL
KHI
DEL
DAC
RGN
BKK
HKG
TYO
ADL
SYD
NOU
WLG
Based on data as of June 1999.
*
City
HONOLULU
ANCHORAGE
LOS ANGELES
DENVER
CHICAGO
NEW YORK
CARACAS
RIO DE JANEIRO
LONDON
PARIS
CAIRO
JERUSALEM
JEDDAH
TEHRAN
DUBAI
KABUL
KARACHI
DELHI
DHAKA
YANGON
BANGKOK
HONG KONG
TOKYO
ADELAIDE
SYDNEY
NOUMEA
WELLINGTON
Differential
GMT
Other major cities in same time zone
–11
PAGO PAGO
–10
PAPEETE
–09
NOME
SAN FRANCISCO, LAS VEGAS,
–08
VANCOUVER, SEATTLE, DAWSON CITY
–07
EL PASO, EDMONTON
HOUSTON, DALLAS/FORT WORTH, NEW
–06
ORLEANS, MEXICO CITY, WINNIPEG
–05
MONTREAL, DETROIT, MIAMI, BOSTON,
PANAMA CITY, HAVANA, LIMA, BOGOTA
–04
LA PAZ, SANTIAGO, PORT OF SPAIN
–03
SAO PAULO, BUENOS AIRES, BRASILIA,
MONTEVIDEO
–02
–01
PRAIA
+00
DUBLIN, LISBON, CASABLANCA,
DAKAR, ABIDJAN
+01
MILAN, ROME, MADRID, AMSTERDAM,
ALGIERS, HAMBURG, FRANKFURT,
VIENNA, STOCKHOLM, BERLIN
+02
ATHENS, HELSINKI, ISTANBUL, BEIRUT,
DAMASCUS, CAPE TOWN
+03
KUWAIT, RIYADH, ADEN, ADDIS ABABA,
NAIROBI
+3.5
SHIRAZ
+04
ABU DHABI, MUSCAT
+4.5
+05
MALE
+5.5
MUMBAI, CALCUTTA
+06
COLOMBO
+6.5
JAKARTA, PHNOM PENH, HANOI,
+07
VIENTIANE
+08
SINGAPORE, KUALA LUMPUR, BEIJING,
TAIPEI, MANILA, PERTH, ULAANBAATAR
+09
SEOUL, PYONGYANG
+9.5
DARWIN
+10
MELBOURNE, GUAM, RABAUL
+11
PORT VILA
CHRISTCHURCH, NADI, NAURU ISLAND
+12
1910-10
 Loading...