

INSTALLATION, OPERATION & MAINTENANCE MANUAL (IOM)
MODEL DA1
DA1 - DIRECT-ACTING, SPRING LOADED
PRESSURE REDUCING REGULATOR
SECTION I
I. DESCRIPTION AND SCOPE
The Model DA1 is a pressure reducing regulator used to control downstream (outlet or P2) pressure. Sizes are
1/2" (DN15), 3/4" (DN20), 1" (DN25), 1-1/4" (DN32), 1-1/2" (DN40), 2" (DN50), 3" (DN80) and 4" (DN100).
With proper trim uti li za tion, the unit is suitable for liquid, gaseous, or steam service. Refer to Technical Bulletin
DA1-TB for design conditions and selection recommendations. (NOTE: This product was formerly identifi ed as
a Model D1; a Model DA1 and D1 are one and the same product.)
SECTION II
IOM-DA1
11-13
II. REFERENCES
Refer to Technical Bulletin DA1-TB and DAG-TB for
tech ni cal specifi cations of a Model DA1 regulator.
SECTION III
III. INSTALLATION
CAUTION A
For welded installations, all internal trim parts, seals
and diaphragm(s) must be removed from reg u la tor
body prior to welding into pipeline. The heat of
fusion welding will dam age non-metallic parts if
not re moved. NOTE: This does not apply to units
equipped with extended pipe nip ples.
1. Regulator may be rotated around pipe axis 360
degrees. For ease of maintenance, the recommended position is with the spring chamber (4)
upwards. In liquid service it is recommended that
the spring cham ber (4) be oriented downwards, and
that a cus tom er supplied and installed vent valve
be pro vid ed at the external sensing con nec tion to
bleed-off trapped gas/air under the di a phragm.
2. Provide space below, above, and around reg u la tor
for removal of parts during maintenance.
3. Install block valves and pressure gauges to provide means for adjustment, operation, bypass,
or removal of the regulator. A pipeline strainer
is recommended before inlet to remove typical
ABBREVIATIONS
CCW – Counter Clockwise
CW – Clockwise
ITA – Inner Trim Assembly
pipe line debris from entering valve and damaging
internal “soft goods”, primarily the dynamic seal(27)
and the V-TFE seat (21) when applied.
4. Downstream Sensing Installation Considerations
– Internal or External Sensing:
a. The regulator may be installed with inter-
nal or external sensing. Unless otherwise
specifi ed, the regulator is supplied by factory
with internal sensing. The regulator may be
con vert ed in the fi eld to external sensing (see
Section VII Maintenance, Paragraph H).
b. Reference DAG-TB, Table DAG-11 for recom-
mendations for applying external pressure
sensing.
c. For internal sensing, no external line is re-
quired. For external sensing, use an external
control line. The line is connected from the port
(1/4" NPT) on the side of the body di a phragm
fl ange (see port 5 in Fig. 5) to a pres sure tap
10 to 15 pipe diameters downstream of the
reg u la tor. Use 1/4" or 3/8" outer di am e ter
tubing or 3/8" (DN10) pipe hav ing an inner
di am e ter equiv a lent to schedule 40 pipe.
d. For condensable vapors (i.e. steam) slope the
external sensing line downward 2 to 5 de grees
to outlet piping to prevent water pock ets,

which allows the diaphragm chamber to
always be self draining. The external sensing
line may be sloped upward for liquids or gases.
CAUTION B
DO NOT HYDROSTATIC TEST THROUGH AN
INSTALLED UNIT; ISOLATE REGULATOR
FROM TEST. The upper range spring pres sure
level on the nameplate is the rec om mend ed “upper operating limit” for the sens ing diaphragm.
Higher pres sures could cause internal dam age.
In ad di tion, note on the nameplate that the Inlet
and Outlet pres sure and tem per a ture ratings
are at different levels.
IV. PRINCIPLE OF OPERATION
Installation of adequate overpressure pro tec tion
is recommended to pro tect the reg u la tor from
over pres sure and all down stream equip ment from
dam age in the event of regulator failure.
Supply
@ P
Blowdown-
Drain
SECTION IV
CAUTION C
1
Model DA1
Reducing
Regulator
TR
(Shaded portion for steam/condensate systems)
Recommended Piping Schematic
For Pressure Reducing Station
TR
SRV
Bypass
Outlet
@ P
2
Blowdown-
Drain
P1
1. Movement occurs as pressure variations register
on the diaphragm. The registering pressure is the
outlet, P2, or downstream pressure. The range
spring op pos es di a phragm movement. As outlet
pressure drops, the range spring pushes the di a phragm down, opening the port; as outlet pres sure
V. STARTUP
1. Start with the block valves closed.
2. Relax the range spring by turning the ad just ing
screw CCW (viewed from above) a minimum of
three (3) full rev o lu tions. This reduces the outlet
(down stream) pres sure set point.
3. If it is a “hot” piping system, and equipped with
a bypass valve, partially open the bypass valve
to pre heat the system piping and to allow slow
ex pan sion of the piping. Ensure proper steam
trap operation if installed. Closely monitor outlet
(down stream) pressure via gauge to ensure not
over-pres sur iz ing. NOTE: If no bypass valve is
in stalled, extra caution should be used in starting
up a cold system; i.e. do everything slowly.
4. Crack open the outlet (downstream) block
valve.
CAUTION D
Do not walk away and leave a bypassed reg u la tor unattended!
increases, the diaphragm pushes up and the port
opening closes.
2. A complete diaphragm failure will cause the reg u la tor to fail open and fl uid will discharge from the
spring chamber vent hole.
SECTION V
5. Slowly open the inlet (upstream) block valve to
about 25% open, observing the outlet (down stream) pres sure gauge. Determine if the reg u la tor is fl owing. If not, slowly rotate the regulator
ad just ing screw CW (viewed from above) until fl ow
be gins.
6. Continue to slowly open the inlet (upstream) block
valve until fully open.
7. Continue to slowly open the outlet (downstream)
block valve, especially when the downstream piping system isn’t pressurized. If the outlet (down stream) pressure exceeds the desired pres sure,
close the inlet block valve and go to Step 2. Close
bypass valve approximately 25%, and re peat pro ce dure.
8. When fl ow is established steady enough that the
outlet (downstream) block valve is fully open, begin
to slowly close the bypass valve if installed.
IOM-DA12

9. Develop system fl ow to a level near its expected
normal rate, and reset the regulator set point by
turning the adjusting screw CW to increase outlet
pressure, or CCW to reduce outlet pressure.
10. Reduce system fl ow to a minimum level and ob-
serve pressure set point. Outlet pressure will rise
VI. SHUTDOWN
from the set point of Step 9. The maximum rise
in outlet pressure on decreasing fl ow should not
exceed the stated up per value of the range spring
by greater than 10%. If it does, consult factory.
SECTION VI
1. Shutoff inlet block valve.
2. Allow suffi cient time for the line pressure down-
stream of the inlet block valve to bleed down.
3. Shutoff the outlet block valve.
VII. MAINTENANCE
A. General:
1. The regulator may be serviced without re-
mov ing the regulator from pipeline. The
regulator is designed with quick-change trim
to simplify maintenance.
2. Record the nameplate information to req-
ui si tion spare parts for the regulator. The
in for ma tion should include: size, KM Product
Code, Serial Number, and internal or ex ter nal
sens ing. (NOTE: Never both types of sens-
ing.) If external sensing is used, be sure that
the external sensing line is connected.
3. Refer to Section IX for recommended spare
parts. Only use original equipment parts sup plied by Cashco/KM for re build ing or re pair ing
regulators.
4. Owner should refer to owner's procedures for
removal, handling, cleaning and disposal of
nonreuseable parts, i.e. gaskets, etc.
NOTE: On regulators originally suplied as
Special Cleaning Option-55, -56, or -57,
maintenance must include a level of cleanliness equal to Cashco cleaning standards of
#S-1134, #S-1542, and #S-1589 respectively.
Con tact factory for details.
4. Relieve the trapped upstream and downstream
pres sure.
5. The regulator may now be removed from the
pipe line or disassembled for inspection and pre-
ven ta tive main te nance while in-line.
SECTION VII
5. The Inner Trim is re moved and replaced in the
body ( 23) as an assemblage of parts. The
Inner Trim Assembly, here in af ter called ITA,
consists of the following parts:
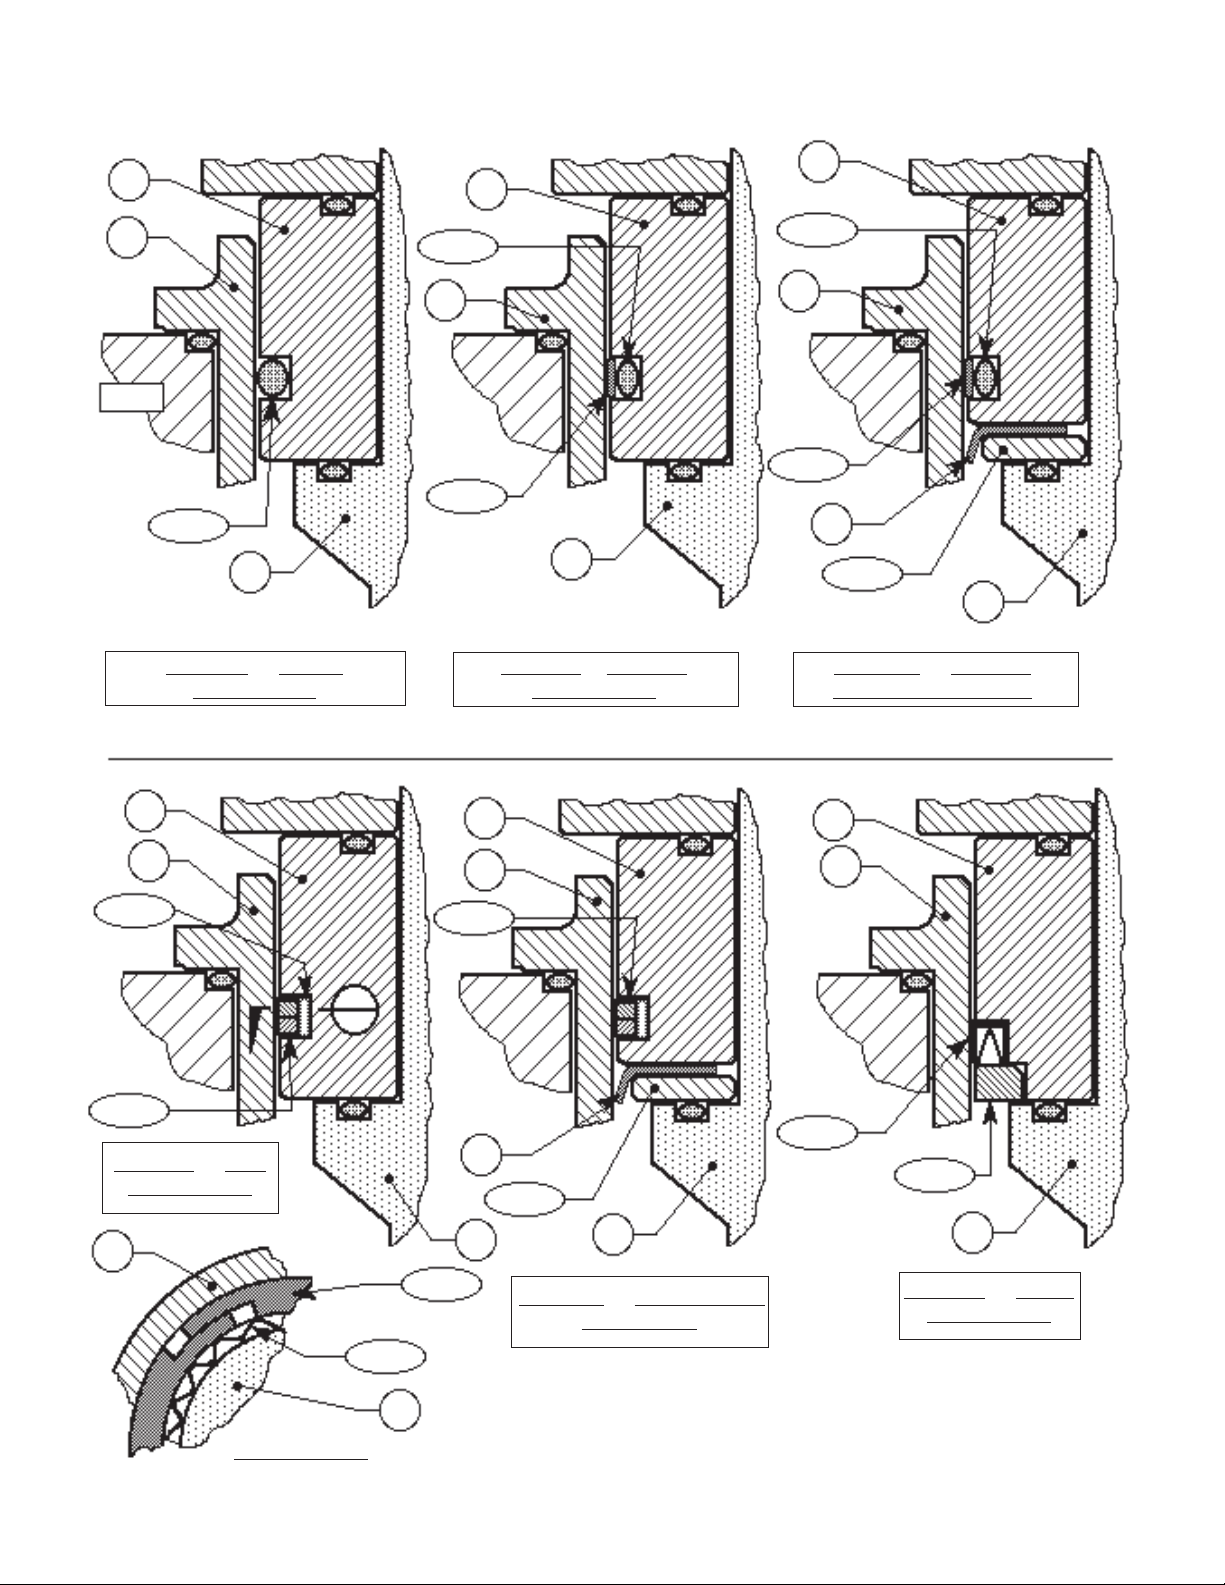
A detailed view of the dynamic side seal parts
is shown in Figure 1 on the next page.
Item Dynamic
No. Seal Type Part Description
13 ..................... All ..........................Guide Bearing/Piston
14 ..................... All .................................. StaticStem Seal
14.1 ...............All ...................... Upper Static Stem Seal
14.2 ...............All ......................Middle Static Stem Seal
14.3 ...............All ...................... Lower Static Stem Seal
15 .....................All ................................ Cage O-ring Seal
16 .................CW,PW .............................................. Wiper
17.1 ..............CW,PW ................................. Wiper Washer
17.2 ........... OR,CP,PR ........ Camber Adjusting Washer *
17.3 ................. UC ..................................... Seal Retainer
19 ..................... All ................................................... Cage
20 ..................... All ...........................................Valve Plug
21 ..................... All ............................................ Seat Ring
27 .....................All ............................. Dynamic Side Seal
27.1 ...........CP,CW ................................. TFE Cap Seal
27.2 ...........CP, CW ..................... O-ring Energizer/Seal
27.3 .............. UC .......... U-Cup Seal w/Metal Energizer
27.4 .............. OR ....................................... O-Ring Seal
27.5 ...........PR,PW ............................. Piston Ring Seal
27.6 ...........PR,PW ............. Piston Ring SST Energizer
IOM-DA1
* Metal Diaphragm Only.
3
13
13
13
19
BODY
27.4
Type OR — O-Ring
Dynamic Seal
20
27.2
19
27.1
20
Type CP— TFE Cap
Dynamic Seal
27.2
19
27.1
16
17.1
20
Type CW — TFE Cap
Dynamic Seal + Wiper
13
19
27.6
27.5
Type PR — PRA
Dynamic Seal
19
27.6
27.5
13
19
27.5
16
20
17.1
20
Type PW — PRA Dy nam ic
Seal + Wiper
13
19
27.3
17.3
20
Type UC — U-Cup
Dynamic Seal
SECTION "A"
13
Figure 1: Dynamic Side Seals
IOM-DA14
B. Main Valve Disassembly:
WARNING 1
SYSTEM UNDER PRESSURE. Prior to per form ing any maintenance, isolate the reg u la tor from
the sys tem and relieve all pressure. Failure to
do so could result in personal injury.
1. Shut down the system in accordance with
Section VI.
2. Disconnect the external sensing line, if
installed.
3. Though it is possible to disassemble the valve
unit while installed in a pipeline, it is recommended that maintenance be done in a shop
when possible. The description thereafter will
assume shop disassembly. Remove valve
from pipeline.
4. Place the valve unit in a vise with the spring
chamber (4) upwards.
5. Loosen adjusting screw lock nut (2) and relax
range spring (6) forces by turning adjusting
screw (1) CCW (viewed from above) until
removed from spring chamber (4).
6. Loosen the diaphragm fl ange bolts (11) and
nuts (12) uniformly.
7. Place matchmarks on body (23) and spring
chamber (4) fl anges. Remove the spring
chamber (4).
8. Remove spring follower (5) and range spring
(6).
9. For composition diaphragm construction,
hold the milled “fl ats” on top of the valve plug
(20) stationary with vise grips. Loosen and
remove the diaphragm lock nut (7). NOTE:
Metal diaphragm constructions do NOT have
a diaphragm lock nut (7).
13. Evenly loosen the three cage cap screws
(18) in single revolution increments. If the
reg u la tor con tains a lower piston spring (22),
the ITA should rise as the cage cap screws
(18) are evenly backed out. A downwards
holding force should be ap plied to the top of
the piston-guide bearing (13) to pre vent the
ITA from pop ping up as the last threads of the
cage cap screws (18) are backed out.
14. Remove the ITA by pulling up on the valve
plug (20). Set ITA aside.
15. Remove the lower piston spring (22), as
applicable, from within the body (23). NOTE:
Com po si tion diaphragm constructions do not
nor mal ly include a lower piston spring (22); all
metal diaphragm constructions MUST in clude
a lower piston spring (22).
16. Remove o-ring cage seal (15).
17. If supplied, remove internal sensing drilled
plug (32) using 5/32" (4 mm) Allen wrench.
18. Remove body (23) from vise. Clean all reusable metal parts according to owner's pro ce dures. NOTE: On regulators originally suplied
as Special Cleaning Option-55, -56, or -57,
maintenance must include a level of clean li ness equal to Cashco cleaning standards of
#S-1134, #S-1542, #S-1589 respectively.
Con tact factory for details.
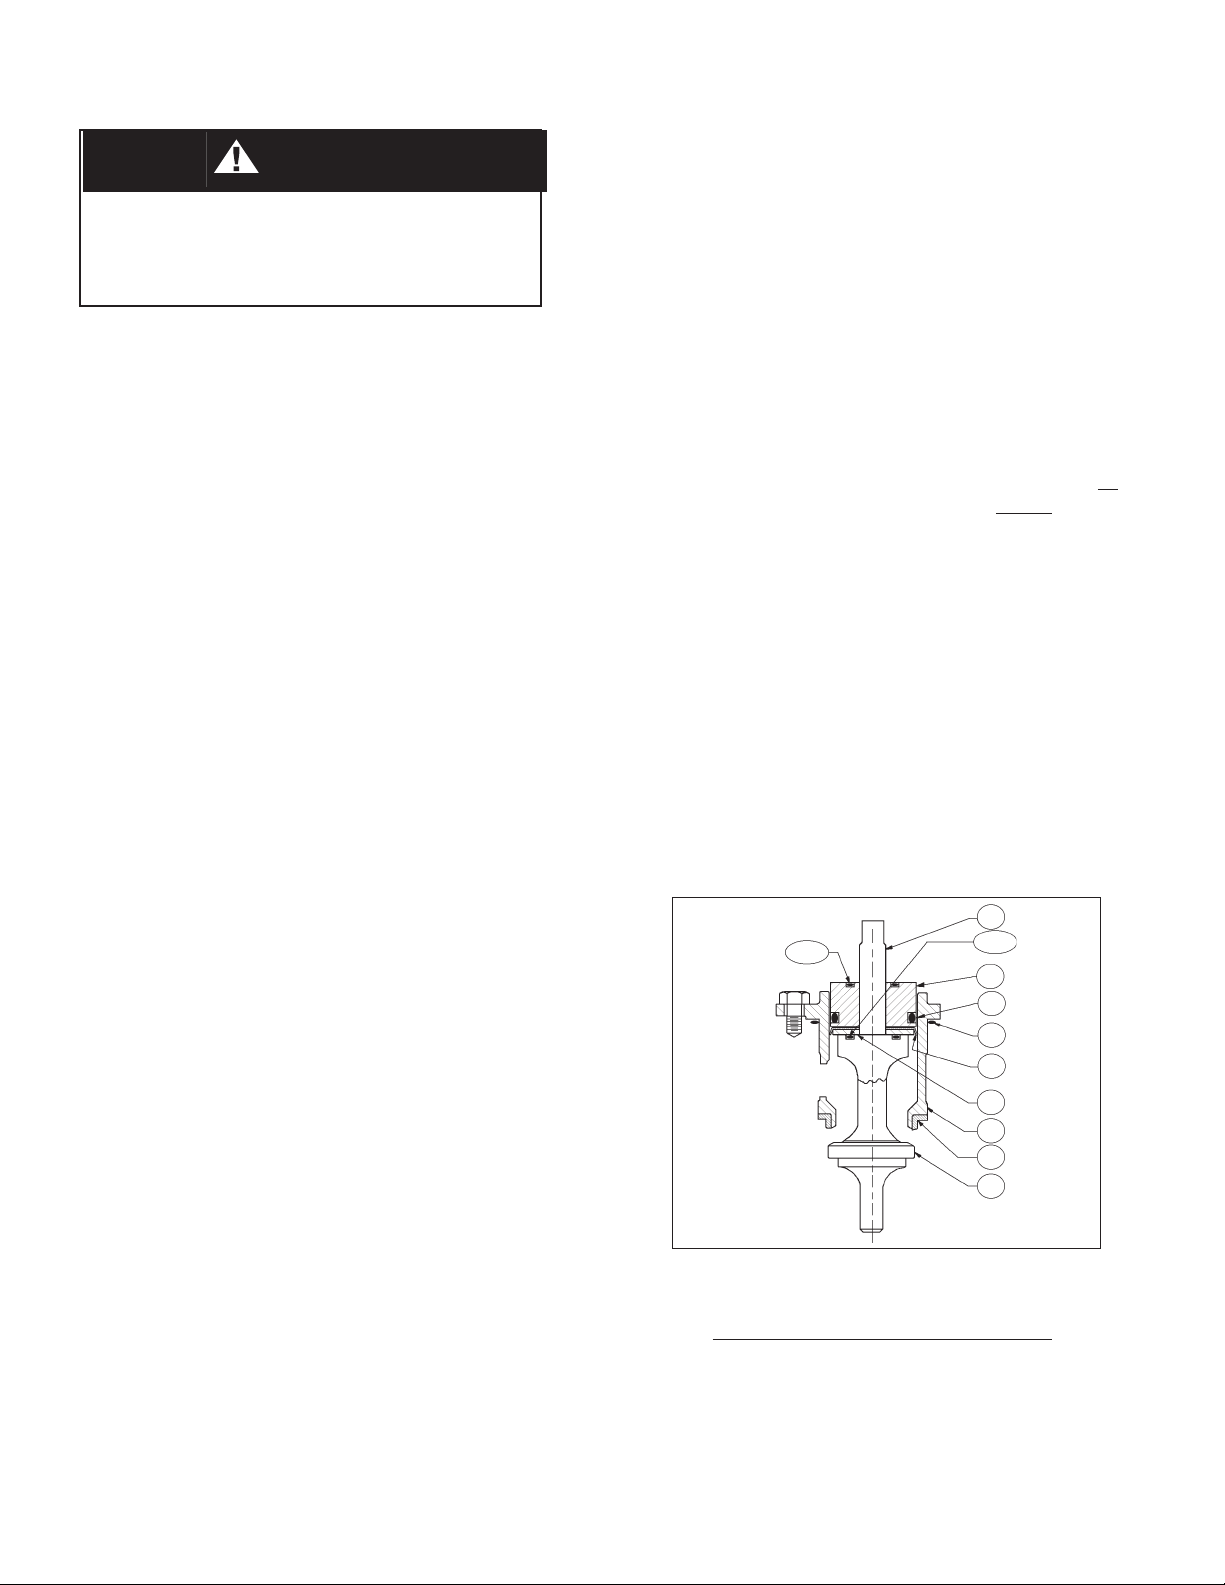
C. Disassembly of the ITA:
20
14.2
14.3
13
27
15
16
17
19
21
20
10. Remove upper diaphragm pressure plate
(8).
11. Remove diaphragm(s) (9, 9.1, 9.2, 9.9) and
o-ring upper stem seal (14.1). Examine
diaphragm(s) to determine whether failed; determine if op er at ing conditions are exceeding
pressure, pressure drop or temperature limits.
12. For composition diaphragm construction,
remove lower diaphragm pusher plate (10).
IOM-DA1
Figure 2: Assembled ITA,
Composition Di a phragm Construction
1. Units with Composition Diaphragm(s) (See
Figure 2):
a. Pull the valve plug (20) down wards and
out of the piston-guide bear ing (13) and
out of the cage's (19) bottom, while holding the cage (19).
b. Remove the piston-guide bearing (13)
5
 Loading...