

CAS RETAIL WEIGHING SOLUTION CT100 Owner's Manual
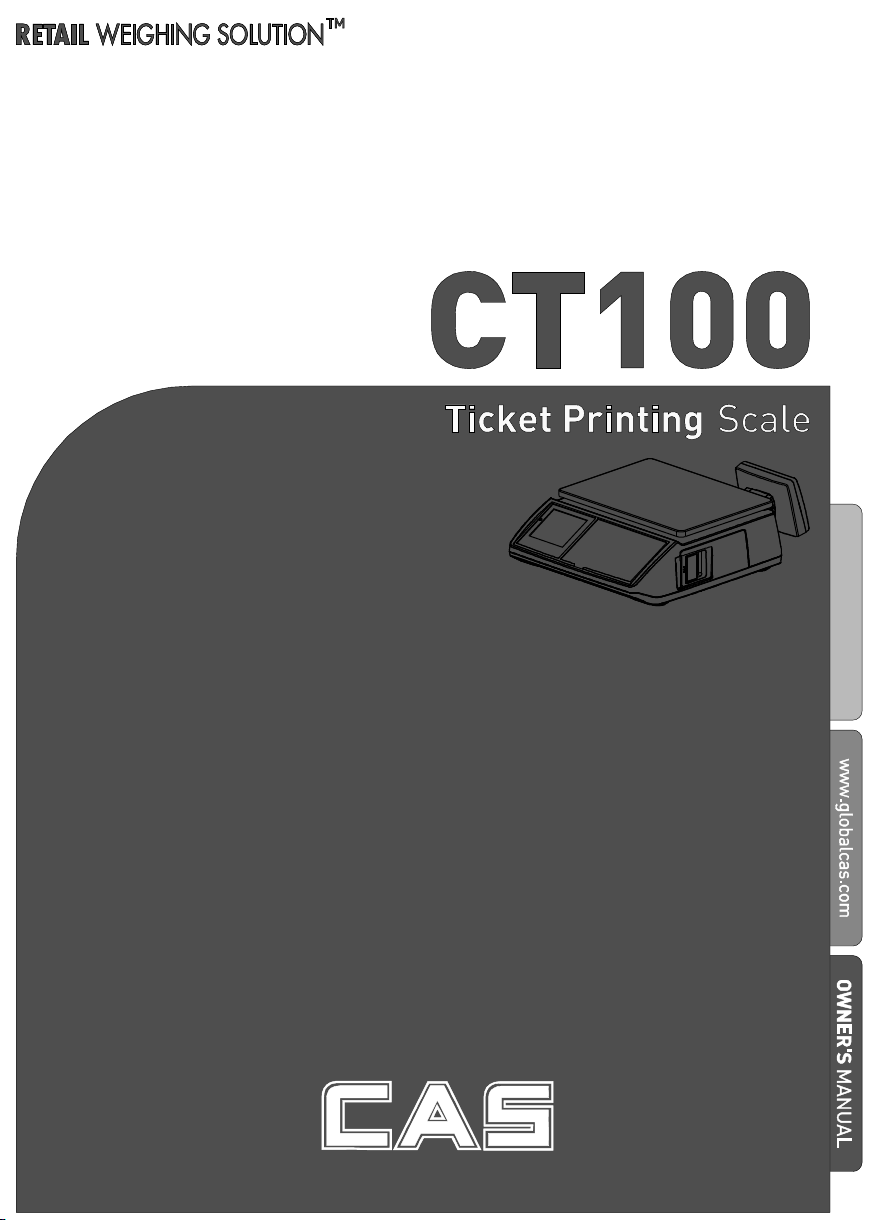
CT100
User’s Manual
Manual_CT1
00_V1
2

CONTENTS
PRECAUTIONS
PREFACE
CHANGING THE PRINTER ROLL
NAME AND FUNCTIONS
Chapter 1 Basic Operation ................................................................................. 17
Chapter 2 Sales for Weighed item ...................................................................... 23
Chapter 5 Discount & Payment ......................................................................... 37
Chapter 6 Sales Transactions Simulation ......................................................... 45
I. SAELS MODE
Chapter 3 Sales for non-weighed item............................................................... 24
Chapter 4 Clerk Operation .................................................................................. 27
II. PROGRAM MODE
Chapter 7 PLU Programming ........................................................................... 54
Chapter 8 Report................................................................................................. 59
Chapter 9 SET 1 (Discount, Barcode & HW Setting) ...................................... 66
Chapter 10 SET 2 (Date, Time & Default Setting) ........................................... 77
Chapter 11 Options (Receipt Formatting) ......................................................... 80
Chapter 12 Clerk................................................................................................. 88
Chapter 13 Logo ................................................................................................. 91
Chapter 14 Tax Rate Group ............................................................................... 94
Chapter 15 Test ................................................................................................... 96
Chapter 16 Group ............................................................................................. 100
Chapter 17 Network.......................................................................................... 102
Chapter 18 Wireless LAN ................................................................................. 104
Chapter 19 RS-485 ........................................................................................... 110
Chapter 20 USB................................................................................................ 113
ERROR MESSAGES
SPECIFICATION
TABLE LIST
CASH DRAWER INTERFACE
RS-232C & RS-485 INTERFACE
USB INTERFACE
RJ-45 INTERFACE
PROGRAM MENU MAP
.......................................................................................... 4
....................................................................................................... 6
.............................................. 7
....................................................................9
....................................................................................... 16
.......................................................................... 51
........................................................................... 121
................................................................................... 122
............................................................................................. 123
..................................................... 124
.................................................. 124
.................................................................................. 125
............................................................................... 125
.................................................................. 126
3

4
PRECAUTIONS
5

PREFACE
Thank you for purchasing your CT100.
CAS scales are designed and produced under rigid quality control to deliver
outstanding performance, reliability and long life.
This manual will help you with the proper operation and care of your new
CT100.
Please review the CT100 manual before you use the scale and keep it handy
for future reference.
■ The Pb battery of product may not be fully charged. It is recommended to
charge Pb battery using AC power before initial usage.
6


■ It is recommended to tear off the ticket left to right.
8
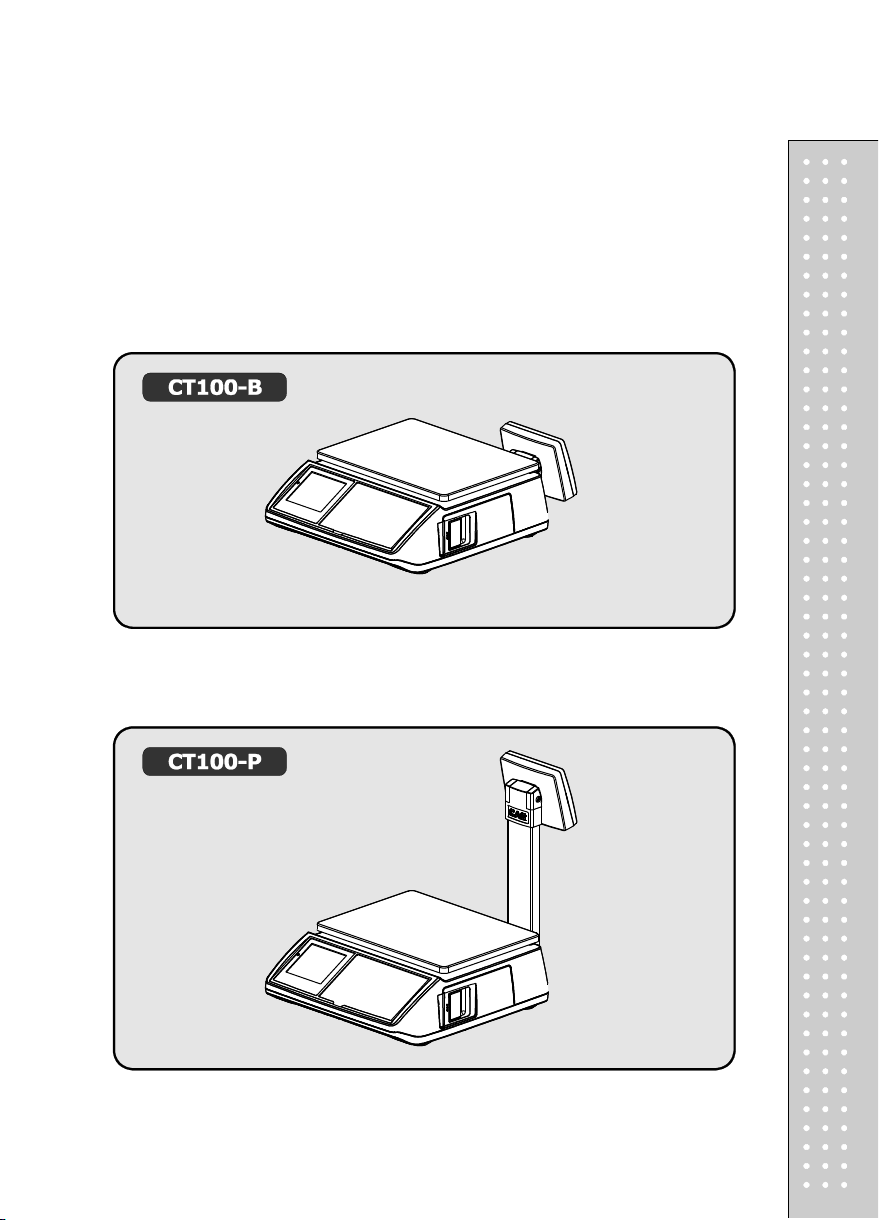
NAME AND FUNCTIONS
OVERALL VIEW
■ B TYPE
■ P TYPE
9
10
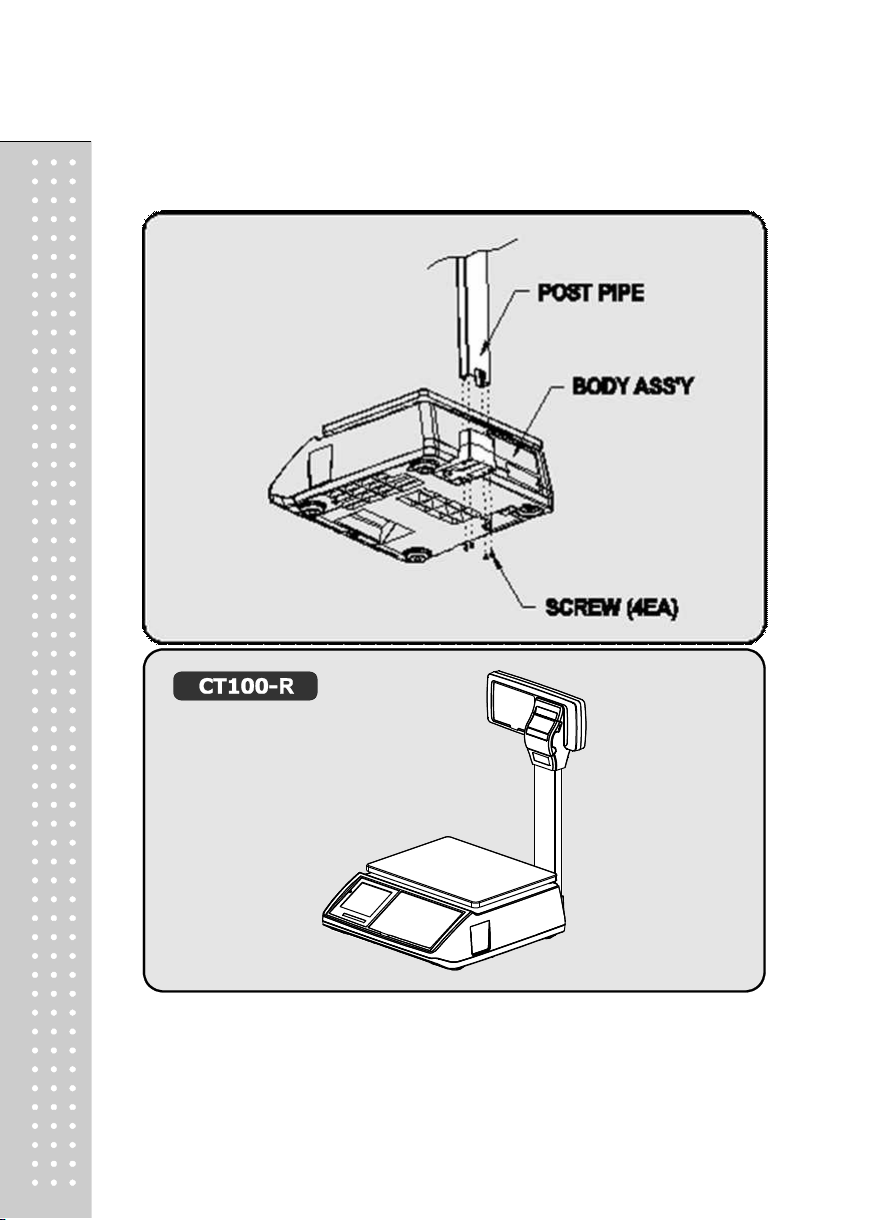
■ R TYPE
■ POLE TYPE INSTALLATIONS
- Insert the post pipe into a post bracket.
- Insert and fasten the display assembly screw
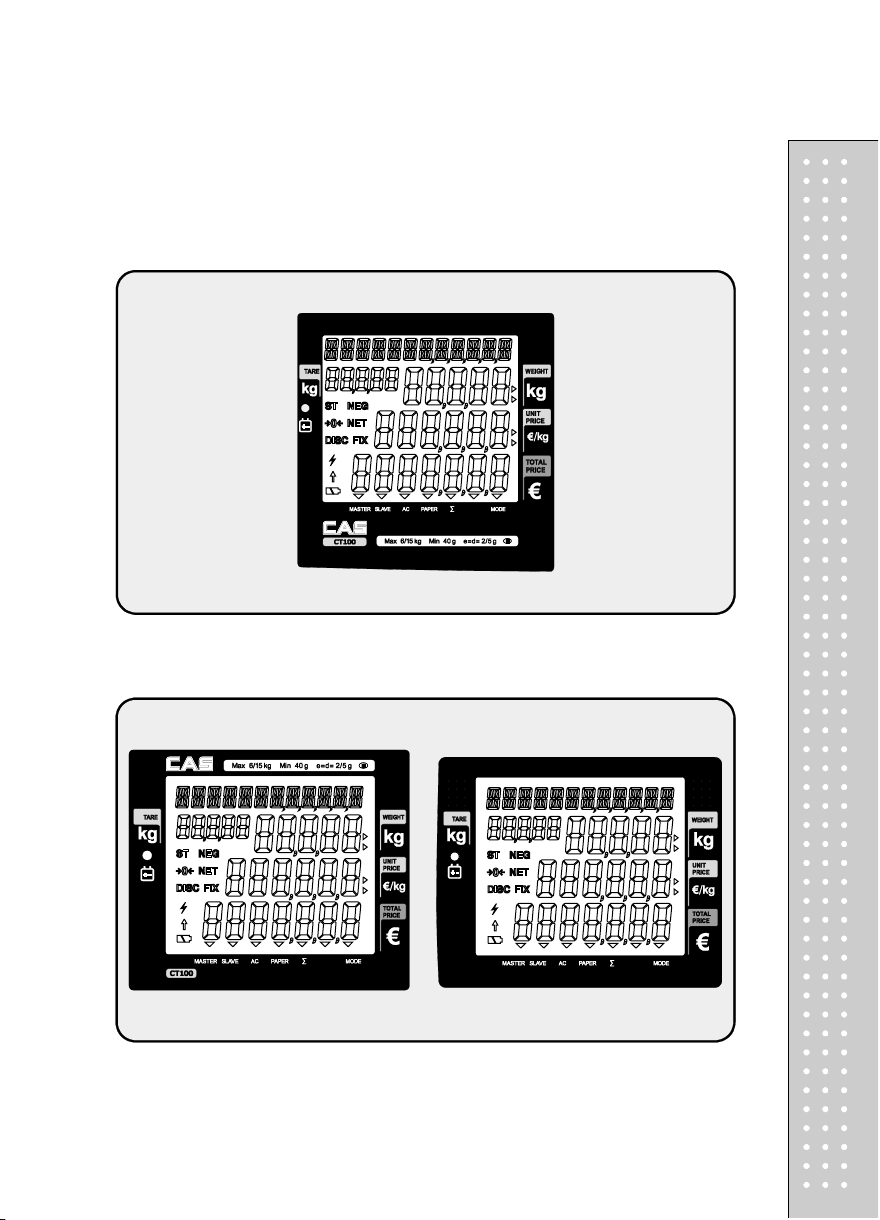
DISPLAY
■ Front(Clerk-side display) ex) 15kg Version
■ Pole Display ex) 15kg Version
11
12
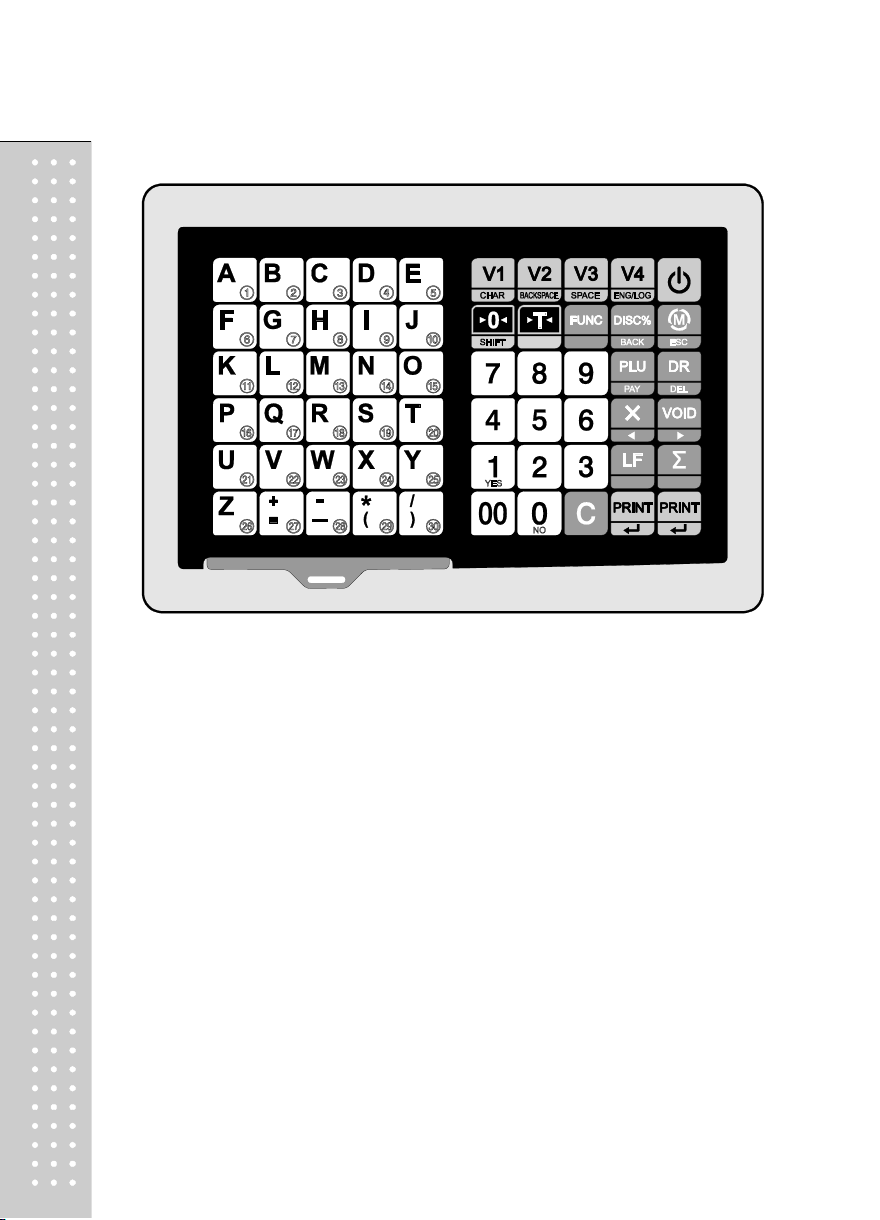
KEYBOARD
Table 1 : Symbols on Display
SYMBOLS DESCRIPTION
MASTER (▼)
SLAVE (▼)
AC (▼)
PAPER (▼)
∑ (▼)
MODE (▼)
When blinks there is some problem with paper roll in the printer.
Master mode
Slave mode
AC power mode
In the subtotal mode
Program mode
ST
NET
DISC
NEG
FIX
Low battery warning when it is below residual 20 %
SHIFT key pressed
To adjust the weight to zero.
Stable
Tare on
Discount price
Negative transaction
Fixed price
Communication working
13
14
~
~
~
Table 2 : Key Functions
KEYS
FUNCTIONS
SALES MODE PROGRAM MODE
To input all numerical data
To input double zero
To clear all of numbers input on the display
To select clerk 1~4
To select clerk 5~8 (option)
To set zero
To set or clear tare value
To go to program mode
To call up a PLU with numeric key
To input nonweighed item
SHIFT : To select alternate key functions
To turn on or off the power / backlight
To show subtotal / total / payment sum
* PLUs # 1~30 may be used for both the direct and indirect PLUs.
~
Most commonly used 30 items are recommended to be used for
Direct PLU keys
direct PLUs for users' convenience.
To change key map
KEYS
+
FUNCTIONS
SALES MODE PROGRAM MODE
*The cash drawer is opened no matter how the "opening time"is set.
After pressing
* To finalize the payment
SHIFT + PAY : To pay in credit
To make discount for subtotal
in cash
* To print receipt
PAY : To pay in cash
◀ : Sales list
▶: Sales list +
To open cash drawer
To feed the paper
To make discount
After pressing
To print current data
To go to the previous menu
To go to the next menu
DEL : To delete a specific sale in
sales list
BACK : To go back to the
higher level of menu
ENTER : To go into the lower
Fast selection of PLU ()
Fast selection of PLU (+)
level of menu
in the PLU mode
in the PLU mode
15

16
I. Sales Mode
Chapter 1. Basic Operation
a. Turning the scale or backlight on / off
b. Feeding the paper
c. Opening cash drawer
d. Self- test on printing
e. Zero function
f. Tare function
Chapter 2. Sales for weighed ite m
a. Sales with free price (hand pricing)
b. PLU sales
Chapter 3. Sales for non-weighed item
a. Sales with free price (hand pricing)
b. PLU sales
Chapter 4. Clerk Ope ration
a. CLERK MODE 0 (All clerk operation)
b. CLERK MODE 1 (Only one clerk operation)
c. CLERK MODE 2 (Supermarket mode)
d. CLERK MODE 3 (Label-1 mode)
e. CLERK MODE 4 (Label-2 mode)
Chapter 5. Discount & Payment
a. Discount for a single transaction
b. Discount for subtotal
c. Payment
d. Duplicate receipt
Chapter 6. Sales Transaction Simulation
* Sales with free price
* Void
* Programmed discount
* PLU sales
* Non-weighed sales
* Subtotal
* Discount for subtotal
* Sales list viewing
* Deleting a specific sale transaction
* Payment in credit
* Payment in cash
Chapter 1. Basic Operation
This chapter explains how to turn the scale or backlight on/off, feed the paper,
open cash drawer, and do self-test on printer.
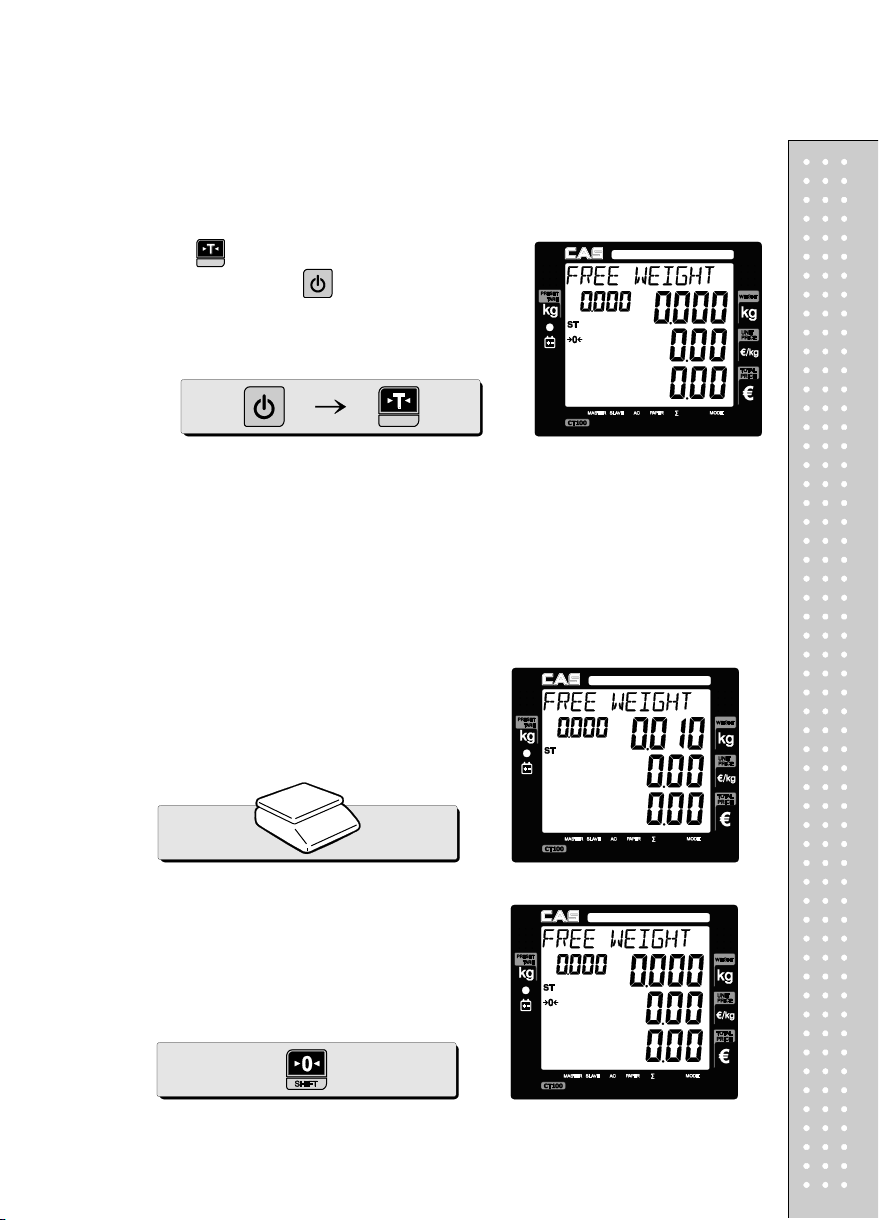
a. Turning the scale or backlight on/off
①
Press
■ Only when user is in battery use the backlight lasts 1 minute and
automatically is turned off. Then, if the scale senses more than minimum
weight the backlight is automatically turned on.
Minimum weight : refer to SPECIFICATION Table on page 120.
②
Press
And press and hold it for more than a
second to turn the scale off.
for a second to turn backlight off.
17
18
b. Feeding the paper
■ Feeding the paper is to make sure that printer paper is properly set and operated.
Press when user needs to feed
①
the paper.
c. Opening cash drawer
■ This operation is to use the scale with cash drawer. The cash drawer is
opened when the scale is connected to both AC power and 12 V battery
■ Cash drawer will be opened whenever printing a receipt.
■ Please set "Cash Drawer Open Time" to "1" if user doesn't wants printing each
time and use key. Refer to page 74 "f. Setting Pulse length to open
cash drawer".
①
Press to open cash drawer in time set.
d. Self-test on printing
①
Press while counting 0~9 after turning on
the scale by pressing . Then, it automatically
prints out the test report.
■ The printing self-test function may be also executed on test mo de in
"II. Programming mode".
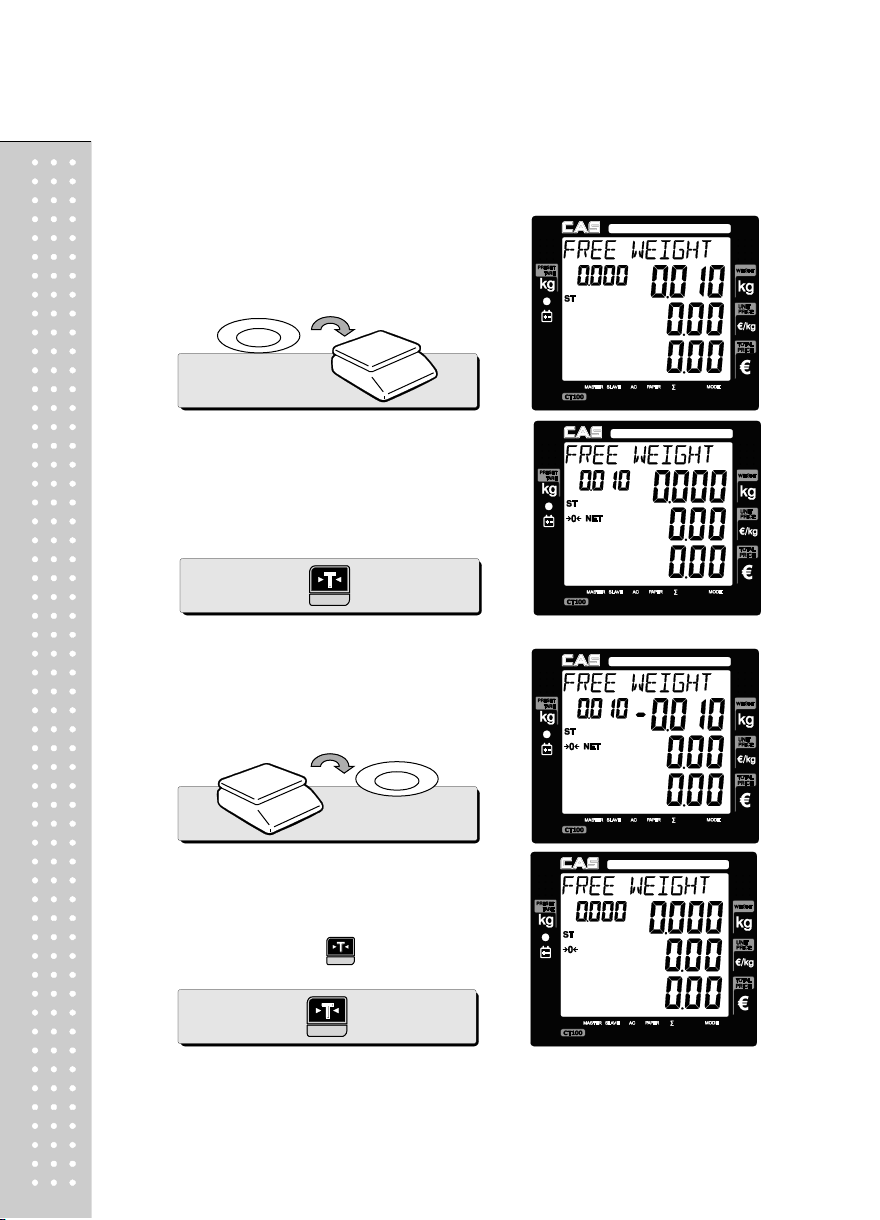
e. Zero function
■ The scale is not in initial zero point when there is(are) any item(s) on the
platter user may need to set zero using "zero" key.
The scale is not in initial zero point.
①
Set zero point. User can set zero only within
②
±2% of capacity. For example, the 6kg
CT100 model is ±120g.
19
20
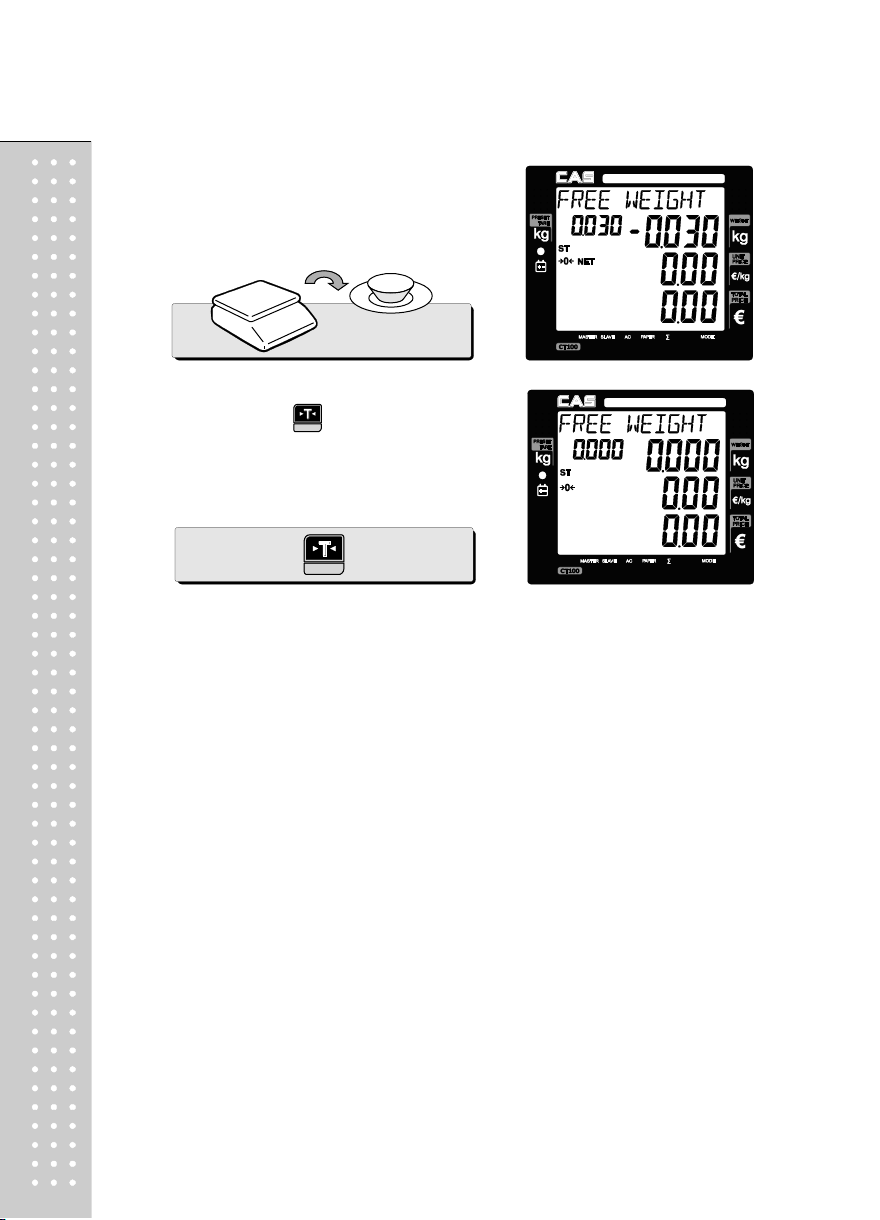
f. Tare function
■ One Time Tare
This function is to subtract the weight of actual tare.
①
Place a tare on the platter. For example, 10g.
②
Subtract the tare weight. After setting the tare
user may place item on the platter, and the
scale reads only the weight of item.
③
Remove tare from the platter if user does not
need tare function. At this time the weight shows
negative value of tare.
④
To clear up the tare value, and go back to set
zero point, press the key again.
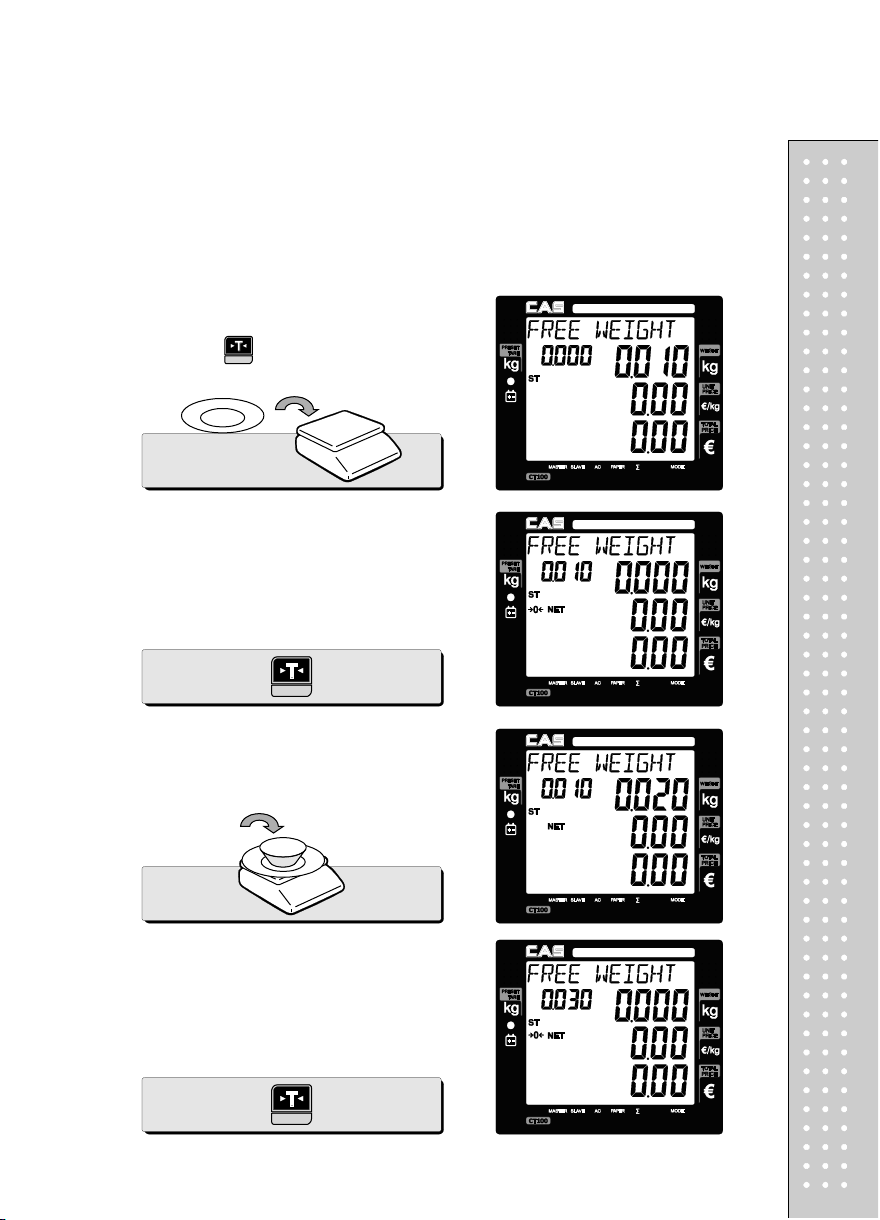
■ Successive Tare
This function is to subtract two successive tares.
The successive tare can be set in the calibration mode. Please contact your
dealer if you want to use
"Successive Tare".
①
Place a tare on the platter. For example, 10g.
Press the key.
②
The scale will subtract the tare weight.
Place another tare on the platter.
③
For example, 20g.
④
The scale will add up the weight of tares. After
setting the successive tares user may place item
on the platter, and the scale reads only the
weight of item.
21
22
Remove all weights from platter if user does
⑤
not need tare function. At this time the weight
shows negative value of tare.
⑥
To clear up the tare value, and go back to set zero
point, press the key again.
Next two chapters, chapter 2 & 3, explain how to make sales transactions for
weighed item and for non-weighed item respectively. User may use or not use PLU
(Price Look-Up), which can be pre-programmed into the scales. Let’s look at how
to operate the sales function of CAS CT100.
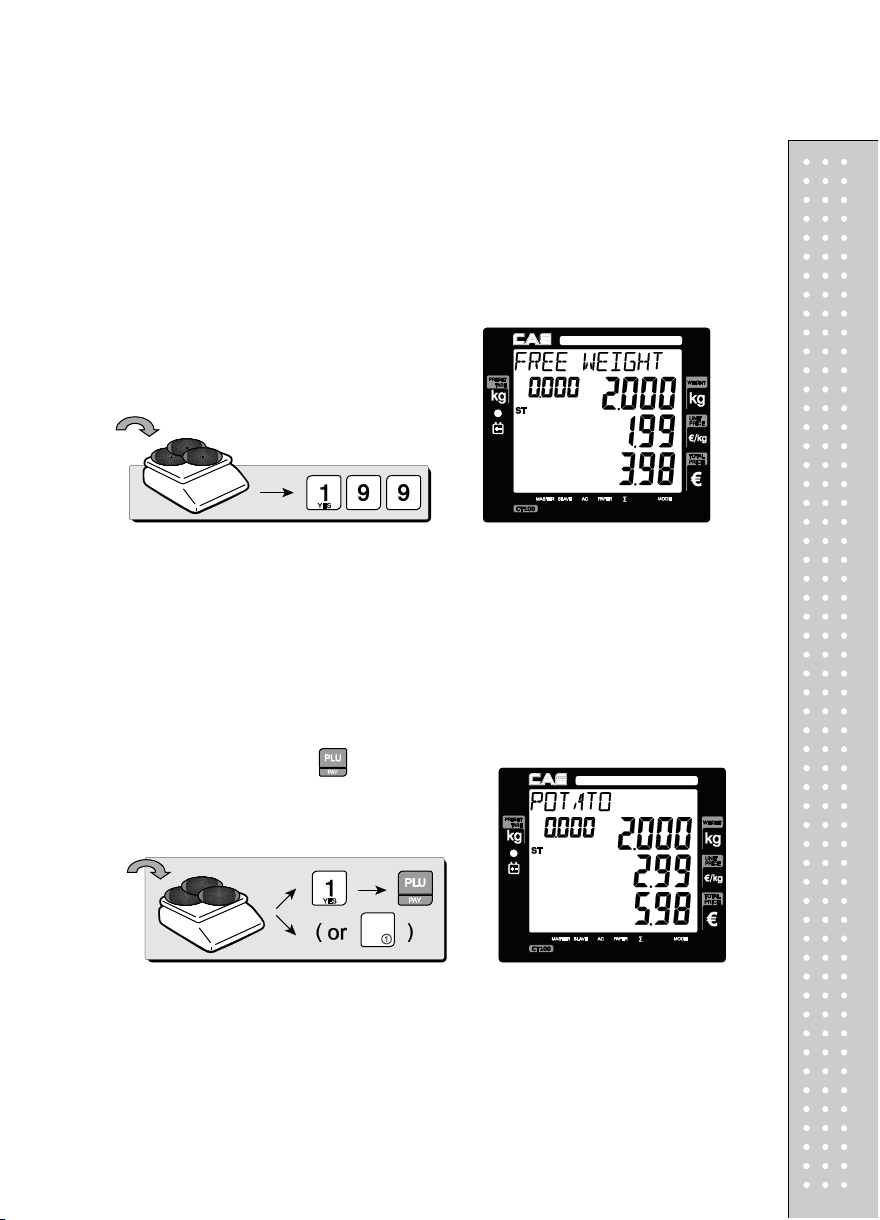
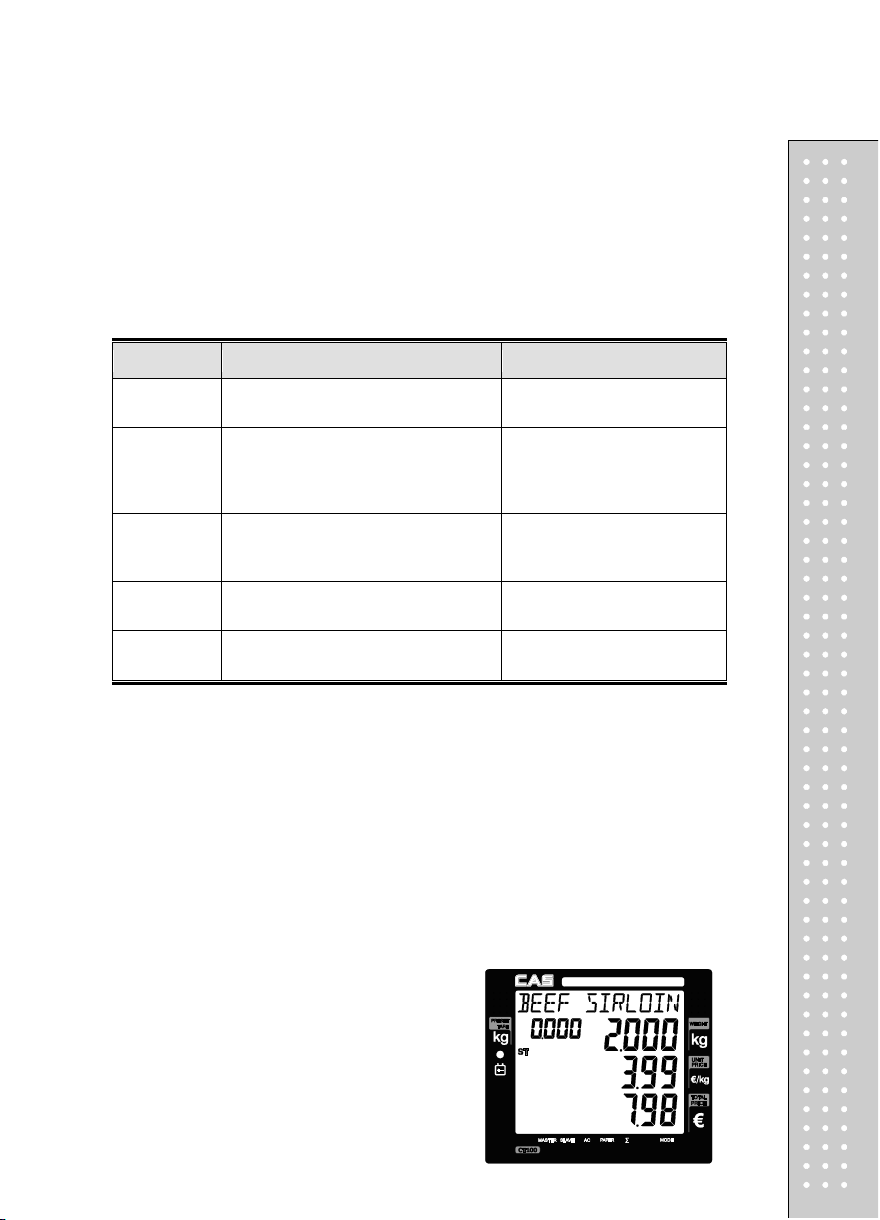
Chapter 2. Sales for weighed item
a. Sales with free price(hand pricing)
①
Put appropriate item of, for example, 2kg on the
platter and press numeric keys for its unit price in
weighing mode.
* All of sales transactions with free price are
stored and accumulated on "PLU 0"
for report.
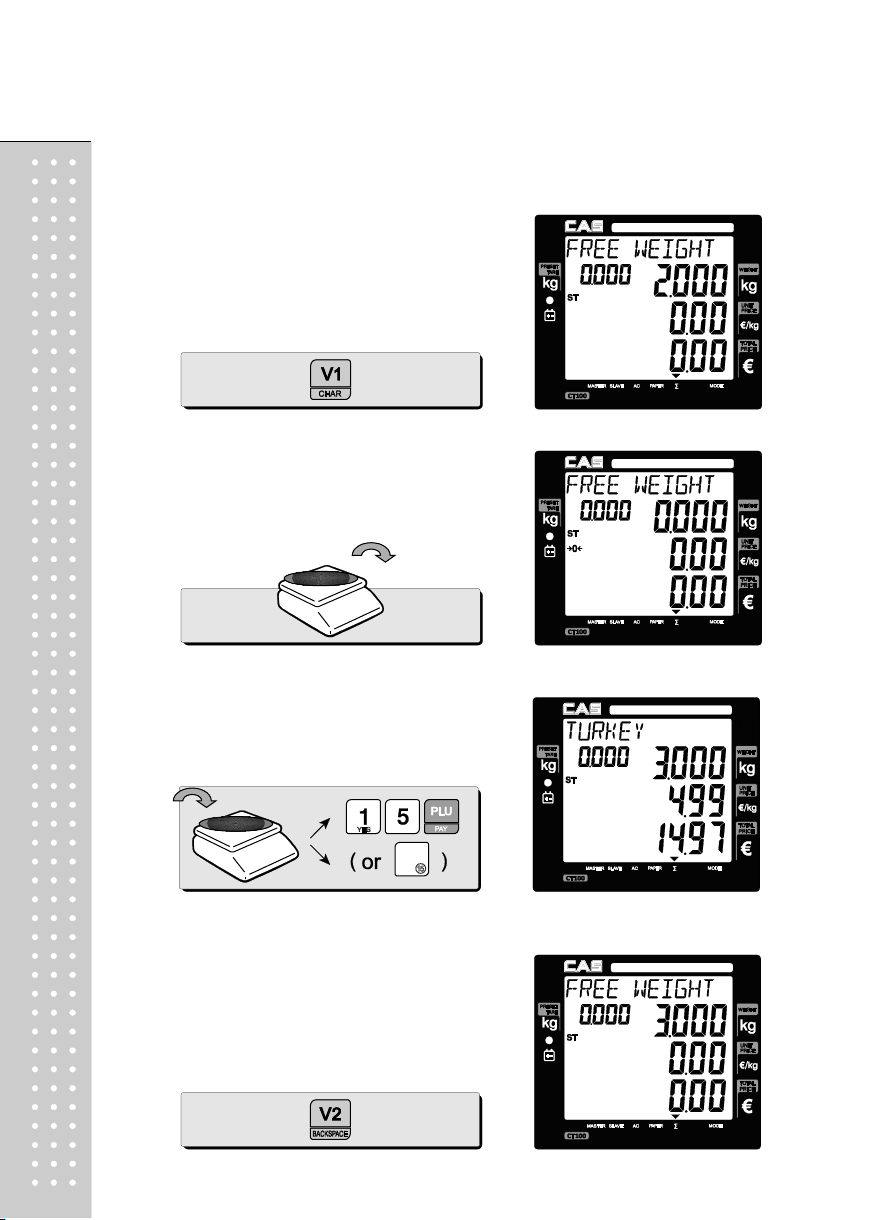
b. PLU Sales
PLU means Price Look-Up, which is pre-programmed into the scale for commonly used unit
price and item. It may store such information as unit price, item code, department, item name,
tax rate group, weighed or non-weighed, fixed or non-fixed item, and printing or non-printing
barcode for a PLU.
CAS CT100 can store up to 1,000 PLUs in its memory. Let’s look at how to make a sales
transaction using a PLU.
①
Put appropriate item on the platter. And press
either PLU number and (or direct PLU key
between 1~30 which are preset in the programming
mode). For example, lets put in "PLU 1(non-fixed
PLU)", which unit price is 2.99.
* Direct PLU s: user may save one touch direct PLUs for most commonly-used 30 items.
* If user saves indirect PLUs of #1~30 he/she does not need to save direct PLUs of # 1~30
because the indirect PLUs of #1~30 are automatically saved in the direct PLU keys of
#1~30. Most commonly used 30 items are recommended to be saved in the direct PLU
keys for users' convenience.
23
24
* If current PLU1 has fixed price attribute, which is set in the program mode user cannot
change the unit price for PLU called up. However, if current PLU has non-fixed price
attribute user may change (override) the unit price as his/her sales transaction requires.
① In case of non-fixed priced PLU user may put in
(override) new price for current PLU at sales condition,
for example, "last minute sales" or "10 minutes
sales" etc. Lets try last minute sales of PLU 1; 1 kg for 1.99.
Chapter 3. Sales for non-weighed item
a. Sales with free price(hand pricing)
①
Simply input item's unit price and press key.
Pressing displays initial "1".
②
For sales of only 1 item just press

③
For more than single item sales,
Simply input item's unit price and press
and quantity. Then display will show total price.
* User may make sales up to 1,999 items per transaction.
④
Press to clear previous transaction and
go back to initial weighing mode.
b. PLU Sales
■ Please make sure current PLU is set with non-fixed price in the PLU program
mode. Otherwise, user cannot change unit price for the PLU called up.
■ User cannot change the unit price of "Fixed Price Item" after calling up the PLU.
①
Press either PLU number and (or appropriate
direct PLU key between 1~30). For example,
direct "PLU 8", which unit price is 3.99.
First press .
25

26
②
Press key to change unit price.
Input new price, 3.00. Then, press and
③
the number of non-weighed item unit, for
example, 5 units.
Press to clear previous transaction and go
④
back to initial weighing mode.
All clerks can use the scale for a
Only one clerk can use the scale for
Only one transaction per clerk at a
Only one transaction per clerk at a
Chapter 4. Clerk Operation
There are three different type of clerk modes.
max number of sales per CLERK : 99
Table 3: Clerk Mode (refer to clerk mode setting on page 88)
Modes DESCRIPTION Receipt Printing
0
1
2
(Supermarket
mode)
3(Label1
Mode)
4(Label2
Mode)
seriesof sales activity.
a series of sales activity.
However, other clerk can use the scale for
other series of sales activities in this mode.
Only one transaction per clerk at a
moment.
moment
moment
a. CLERK MODE 0 (All clerk operation)
Assumption : (These are consecutive, separate, transactions.)
e) All of above-mentioned PLUs should have other code number than "code 0".
① Call up PLU of Beef Sirloin, #14 for clerk V1.
• All clerks can use the scale for a series of sales activity.
• It prints ticket (receipt) including each item total information.
a) 2kg of Beef Sirloin (PLU setting # 14, €3.99/kg, No weight; No) for clerk V1.
b) 3kg of Turkey (PLU setting # 15, €4.99/kg, No weight; No) for clerk V2.
c) 3kg of Rib Eye (PLU setting # 17, €5.99/kg, No weight; No) for clerk V3.
d) 3 packs of Potato (PLU setting
# 1, €1.99/pack, No weight; Yes) for clerk V1.
It prints ticket (receipt) including
each item and total information.
It prints only part of ticket (receipt),
which a transaction is made, and
prints total amount after a series of
transactions are completed.
It prints ticket (receipt) only for one
transaction per clerk.
It prints Label (receipt) only for one
transaction per clerk.
It prints Label (receipt) only for one
transaction per clerk.
27
28
② Call up PLU of Beef Sirloin, #14 for clerk V1
③ Select the clerk 1.
④ Remove Beef Sirloin from the platter.
⑤
Call up PLU of Turkey, #15 for clerk V2.
⑥ Select the clerk V2.
⑦ Remove Turkey from the platter.
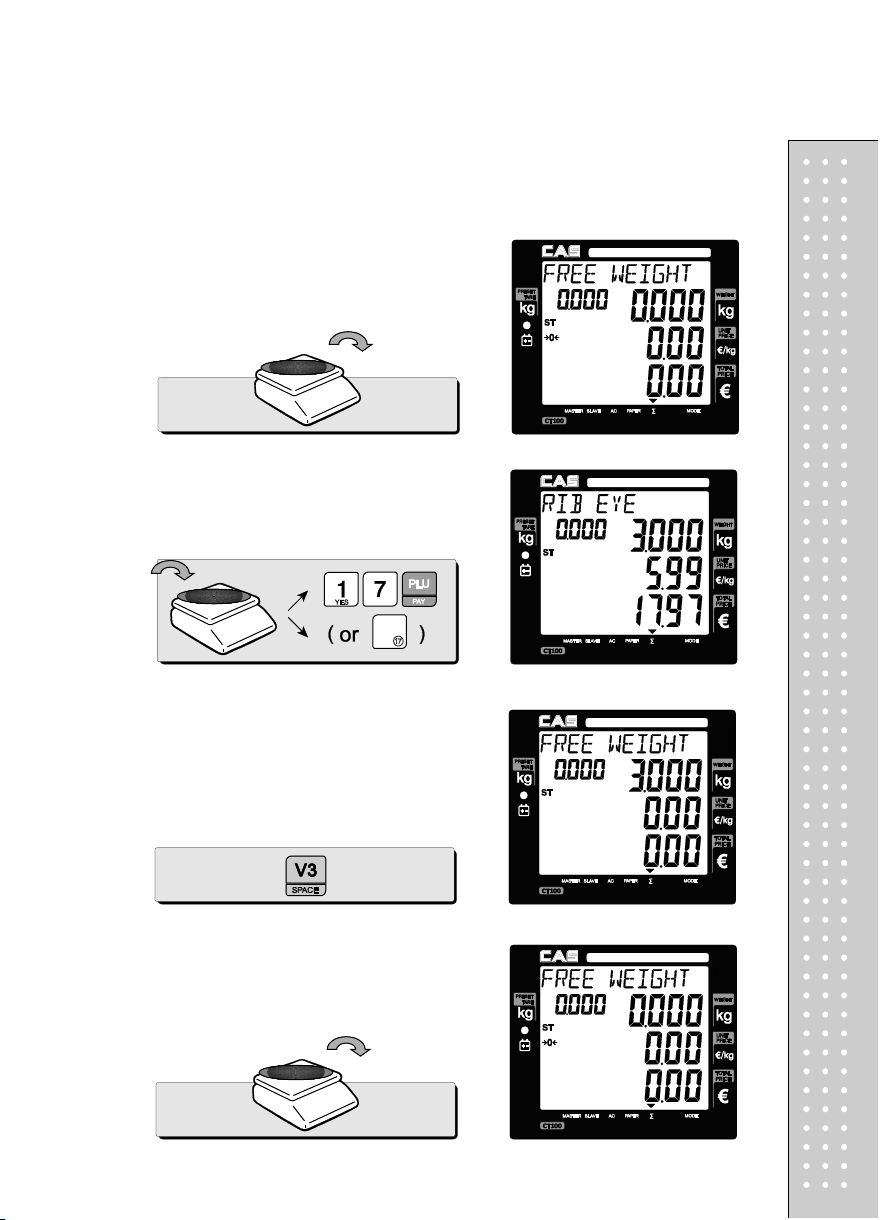
⑧ Call up PLU of Rib Eye, #17 for clerk V3.
⑨ Select the clerk V3.
⑩ Remove Rib Eye from the platter.
29
30
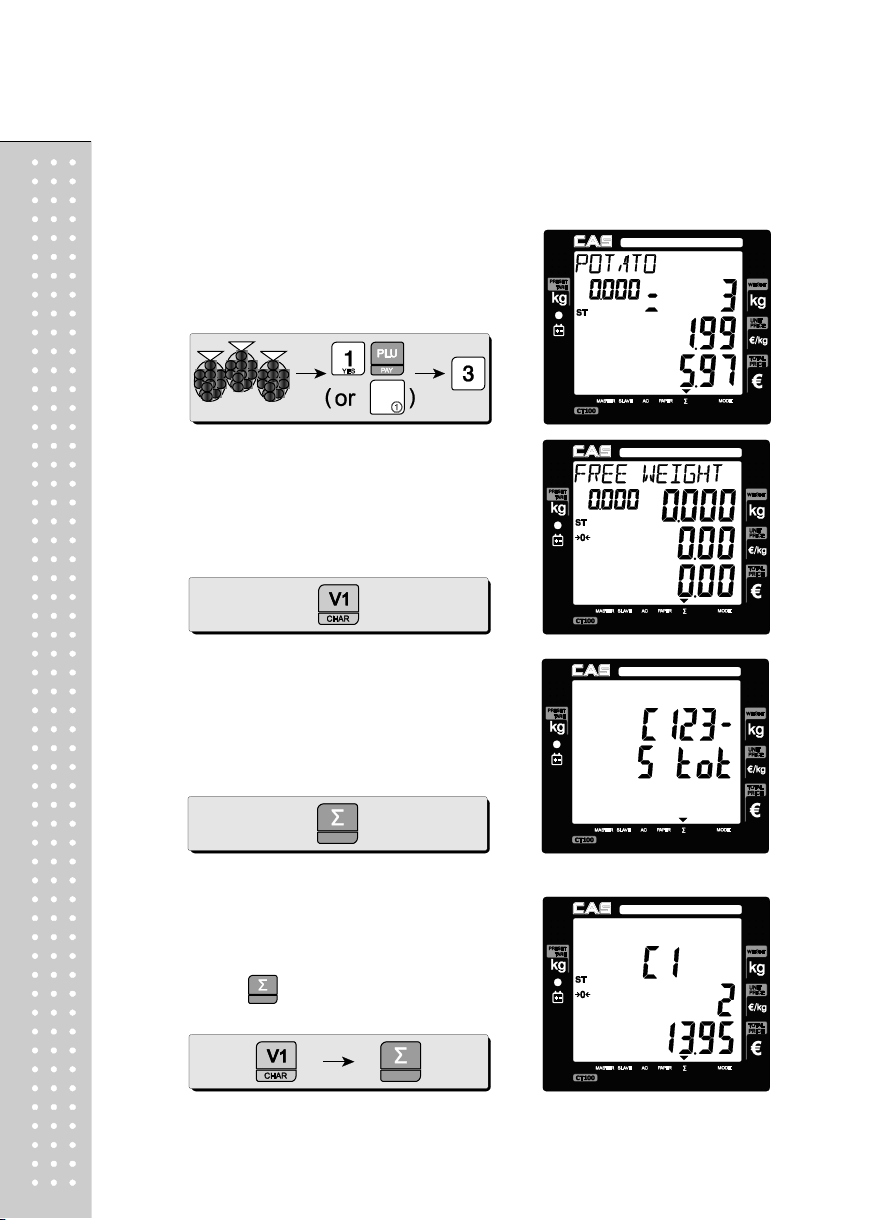
⑪ Call up PLU of Potato(No weight Item),
#1 for clerk V1. Customer purchase 3 packs
of Potato.
⑫ Select the clerk V1.
⑬ Subtotal Mode.
Get subtotal amount.
⑭ Select appropriate clerk (V1, V2, V3, V4)
Selecting V1 in the SUBTOTAL mode and
pressing key prints out a ticket (receipt)
for Clerk1 transaction(s).

※User may print out individual clerk's receipt by pressing individual clerk key
(using , , ) then
31
 Loading...