

CAS LP 1.6 Series, LP-1.6R Owner's Manual

LP 1.6 Series
Label Printing Scale
OWNER’S MANUAL

CONTENTS
PRECAUTIONS 4
1. Installation Procedures 6
1.1 Cautions 6
1.2 Assembling the Display Pole 6
1.3 Installing the Label Roll 9
2. Keypad & Display 11
2.1 Numeric Keypad 11
2.2 PLU Keypad 12
2.3. Displays 14
2.3.1 Weight Display 14
2.3.2 Unit Price Display 14
2.3.3 Total Price Display 14
2.4. Printer Mechanism 14
3. Operation 16
3.1 REG mode Operations 16
3.1.1 Simple Weighing 16
3.1.2 How to Use TARE 17
3.1.3 Add-up Sales 17
3.1.4 How to Use PAY Key 18
3.1.5 How to Use FOR Key 19
3.1.6 Multiple Labels 20
3.1.7 Auto Printing (AUTO MODE) 21
4. PROGRAM Mode 22
4.1 System Maps 22
4.2 PLU Programming 23
4.3 Preset keys Programming 27
4.4 Message (Ingredients) Programming 28
4.5 Programming the Head Data 29
4.6 Programming the Shop Data 30
4.7 SET 32
4.7.1 Programming the Date (SET #1) 34
4.7.2 Programming the Time (SET #2) 35
4.7.3 Programming the Department Number (SET #3) 36
4.7.4 Programming the Label (SET #4) 37
4.7.5 Programming the Adjust Number (SET #5) 42
4.7.6 Programming the Printing Information (SET #6) 43
4.7.7 Programming the Auto Print Function (SET #7) 45
4.7.8 Programming Address (SET #8) 46
4.7.9 Programming Baud Rate (SET #9) 47
4.8 INT(Initialize PLU and MSG data) 48
4.9 Password 49
5. ACCOUNT Mode 50
5.1 System Maps 50
5.2 Print Report 51
5.2.1 Grand Total 51
5.2.2 All PLU 52
5.2.3 Individual PLU 52
5.2.4 Non-PLU 53
5.3 Clearing Sales Data 54
5.3.1 Grand Total 54
5.3.2 All PLU 55
5.3.3 Non- PLU 55
5.3.4 All 56
5.4 Printhead Check (CHESS) 57
6. Error Messages 58
7. Specifications 59
APPENDIX 60
5
4
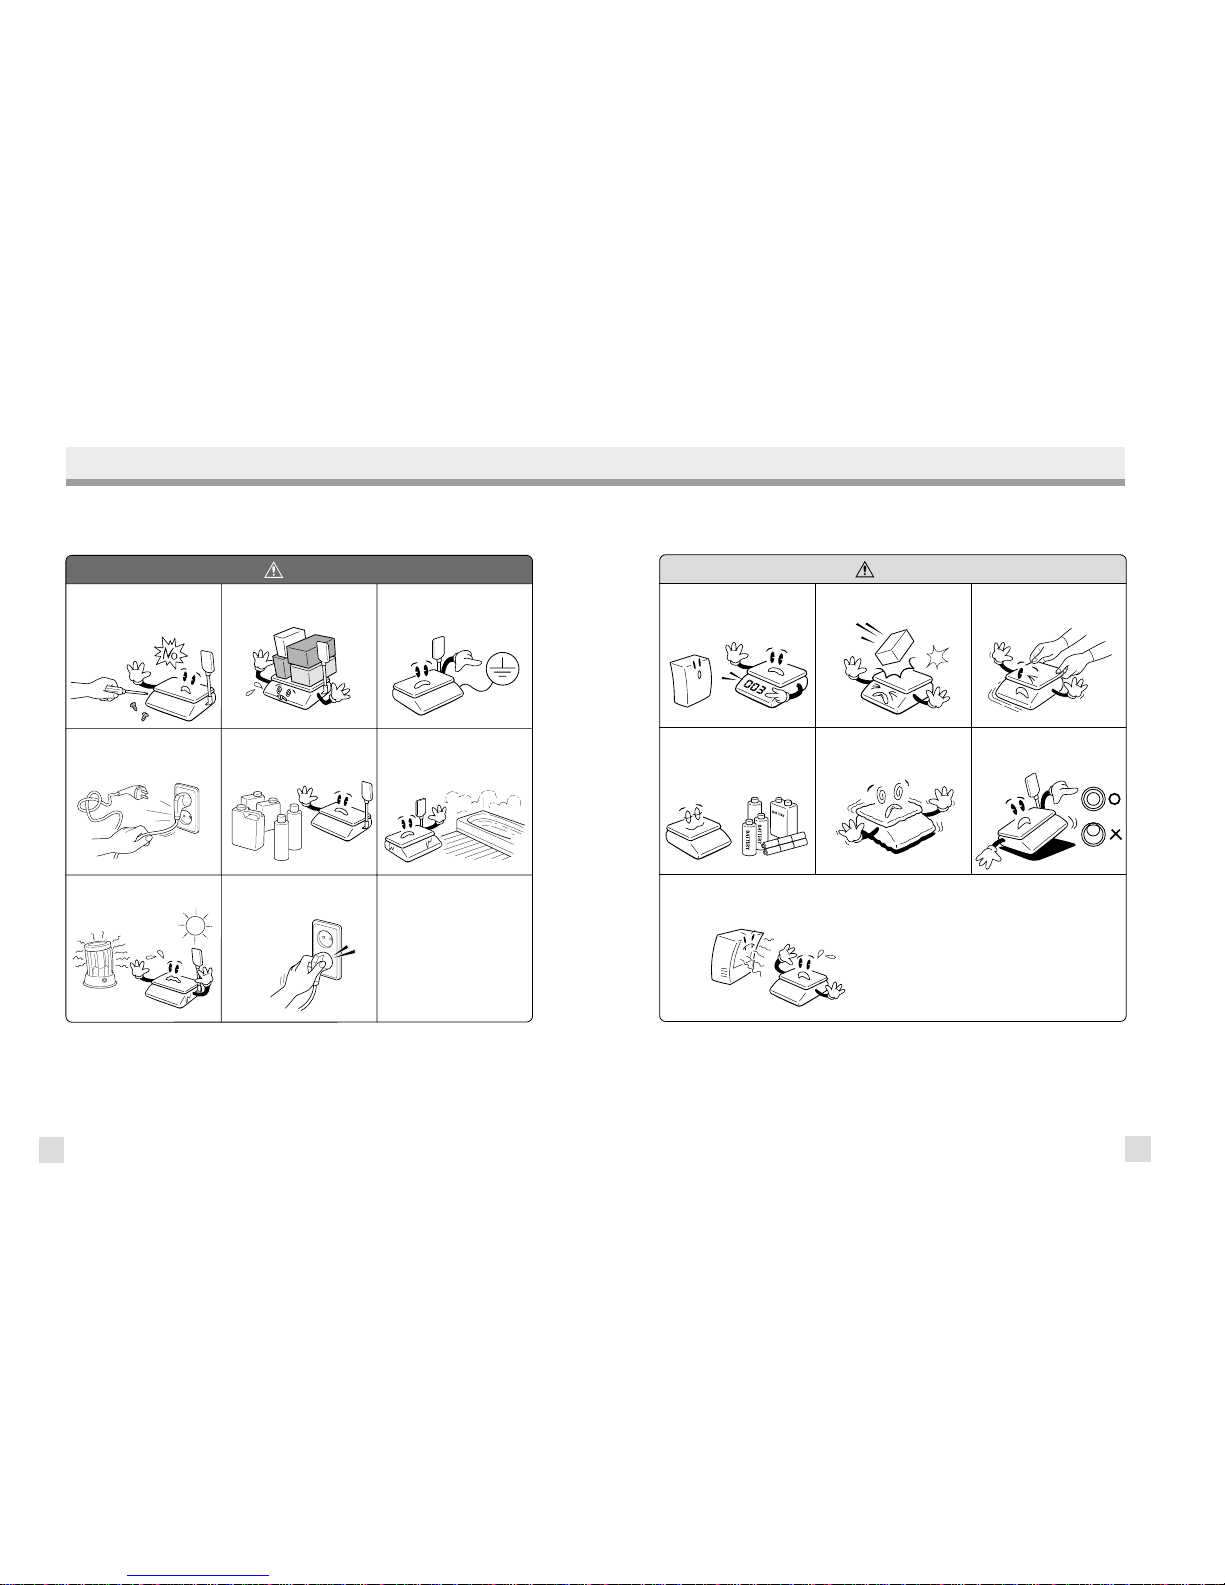
PRECAUTIONS WARNING
Precautions when installing the scale. To ensure that you get the most from your scale,
please follow these instruction.
Make sure to plug your scale into the proper power outlet. For maximum performance,
plug into a power outlet 30 minutes before the usage for warm up.
Do not disassemble the scale.
When any damage or defect occurs,
contact your CAS
authorized dealer
immediately for
proper repair.
Do not overload beyond the maximum
weight limit.
Do not pull the plug by its cord when
unplugging. Damaged cord could cause
electric shock or fire.
To prevent from fire occurring, Do not
place or use the scale near flammable or
corrosive gas.
Avoid placing the scale near heater
or in direct sunlight.
Scale must be grounded to minimize
electricity static. This will minimize
defect or electric shock.
Insert plug firmly to wall outlet to
prevent electric shock.
To reduce electric shock or incorrect
reading, Do not spill water on the scale
or place it in humid condition.
Warning
For consistent and accurate reading,
maintain periodical check by your
CAS authorized dealer.
Avoid sudden shock to the scale.
Internal mechanism could be damaged.
Place the scale on firm and temperature
consistent environment.
Take the battery out when scale is not in
use for long time. Leakage from the
batteries is hazardous.
Keep the scale away from other
electromagnetic generating devices.
This may interfere with accurate
reading.
Grab on the bottom of the scale when
moving. Do not hold by the platter.
Attention
By adjusting 4 corners of the scale, set
the scale even using the built in scale
leveling indicator.
Note: This scale uses a rechargeable battery to retain programmed information. While the scale is ON or in use it keeps the battery
charged. The battery must be fully charged before turning power OFF or memory contents can be lost. It takes approximately 48
hours to fully charge the battery from complete discharge. Even though the scale’s battery will most likely not be completely
discharged when you receive the scale, you should still charge it for 48 hours. Once fully charged, the battery can retain
programmed information for at least 6 months with power OFF. To ensure memory contents do one of the following:
Leave power ON for at least 2 days before programming.
OR
Do not turn OFF power for at least 2 days after programming.
7
6
1. Installation Procedures
1.1 Cautions
A) Environment : This scale must be installed in a dry and liquid free environment.
B) Location : This scale must be placed on a flat and stable surface. Please keep the scale
away from oscillating fans, ventilation systems, or drafts as these air disturbances can be
picked-up by the scale and may cause incorrect weight readings.
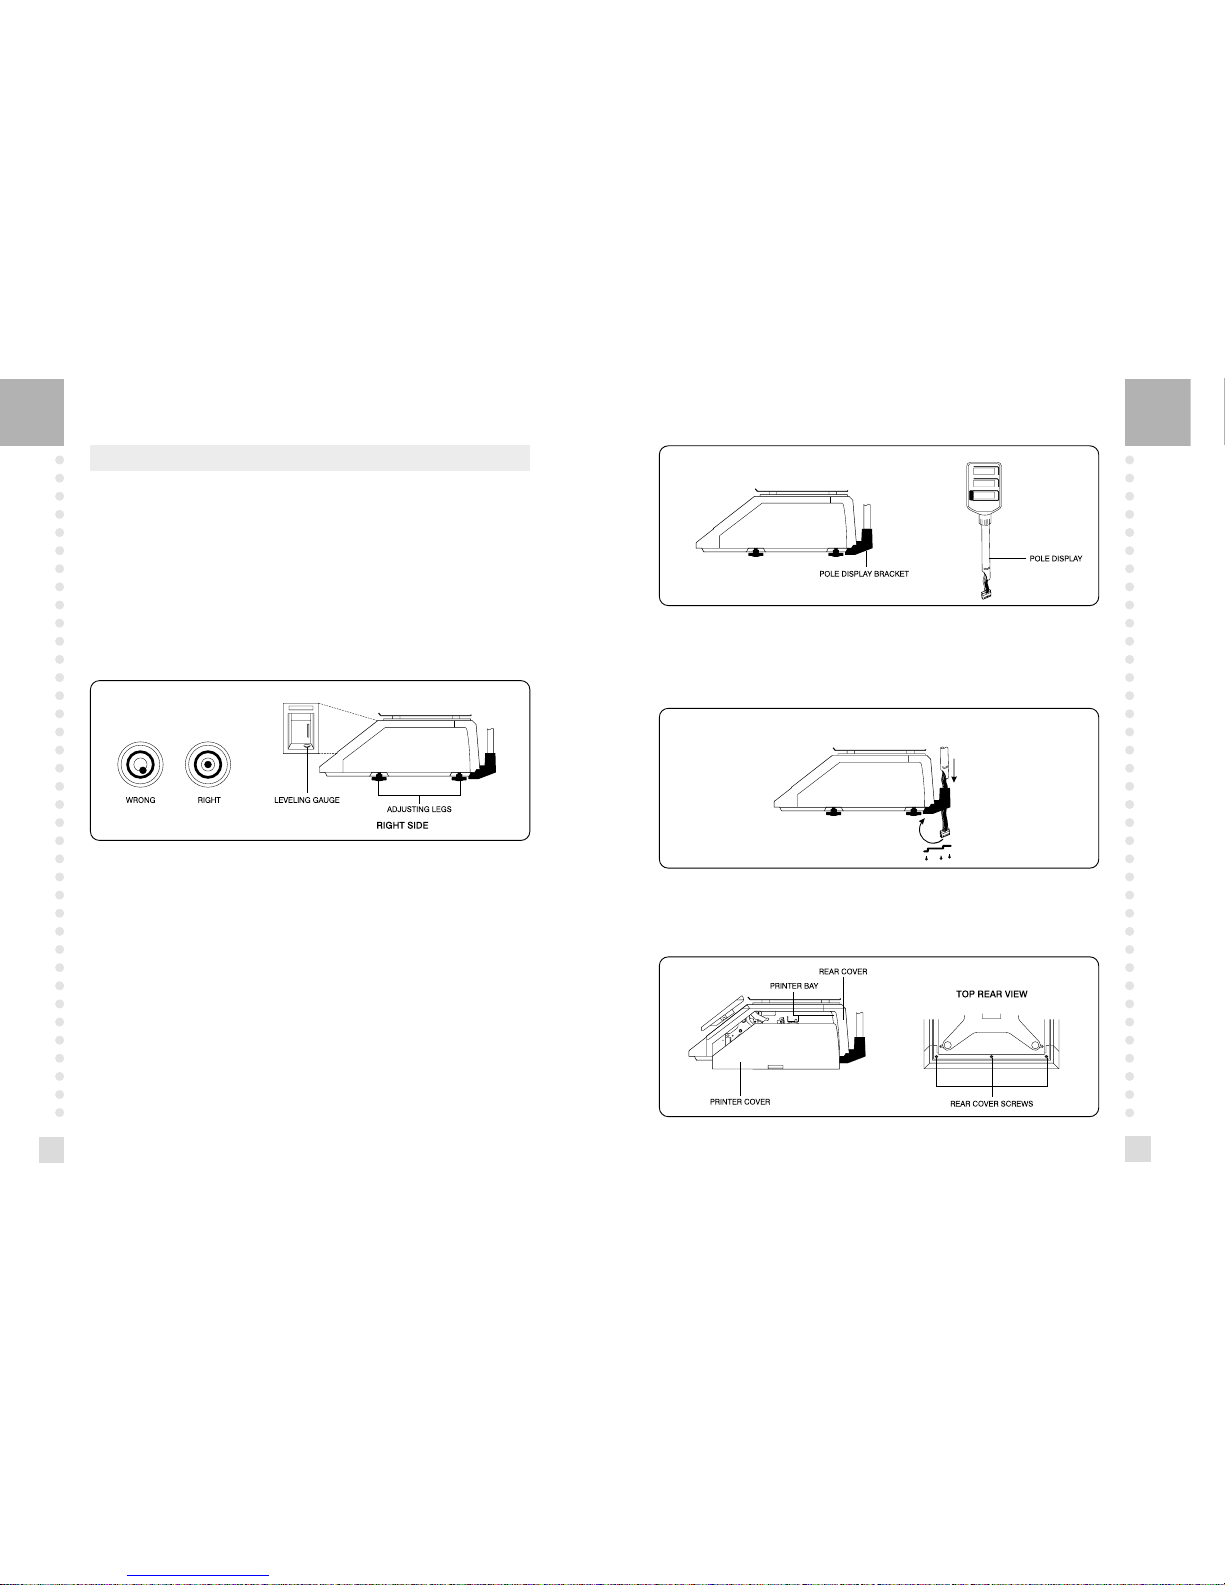
C) Leveling : If the scale is not properly level, please adjust the 4 legs at the bottom of the
scale (turn legs clockwise or counter-clockwise) so as to center the bubble of the leveling
gauge inside the indicated circle. (See below Fig.)
D) The socket-outlet shall be installed near the equipment and shall be easily accessible.
E) Danger of explosion if battery is incorrectly replaced. Replace only with the same or
equivalent type recommended by the manufacturer. Dispose of used batteries according to
the manufacturer instructions.
1.2 Assembling the Display Pole
If your scale is the “Pole” type then you must follow this section and then continue to the
next. However, if your scale is the “Non-Pole” type then you may skip this section and go on
to the next. To begin installing the Pole display, make sure your scale comes with the display
bracket & the pole display. (See below fig.)
LEVELING GAUGE
NOTE : Scale is to be used in-doors ONLY
Feed the pole display connectors down the display bracket and up through the hole in the
scale under-body. Attach the bracket cover to the display pole and then attach the bracket
cover to the bracket itself.(See below fig.)
Remove the platter from the platform. Open the printer side cover and then remove the three
rear cover screws. Feed the connectors in through the printer bay into the scale. (See below fig.)
9
8
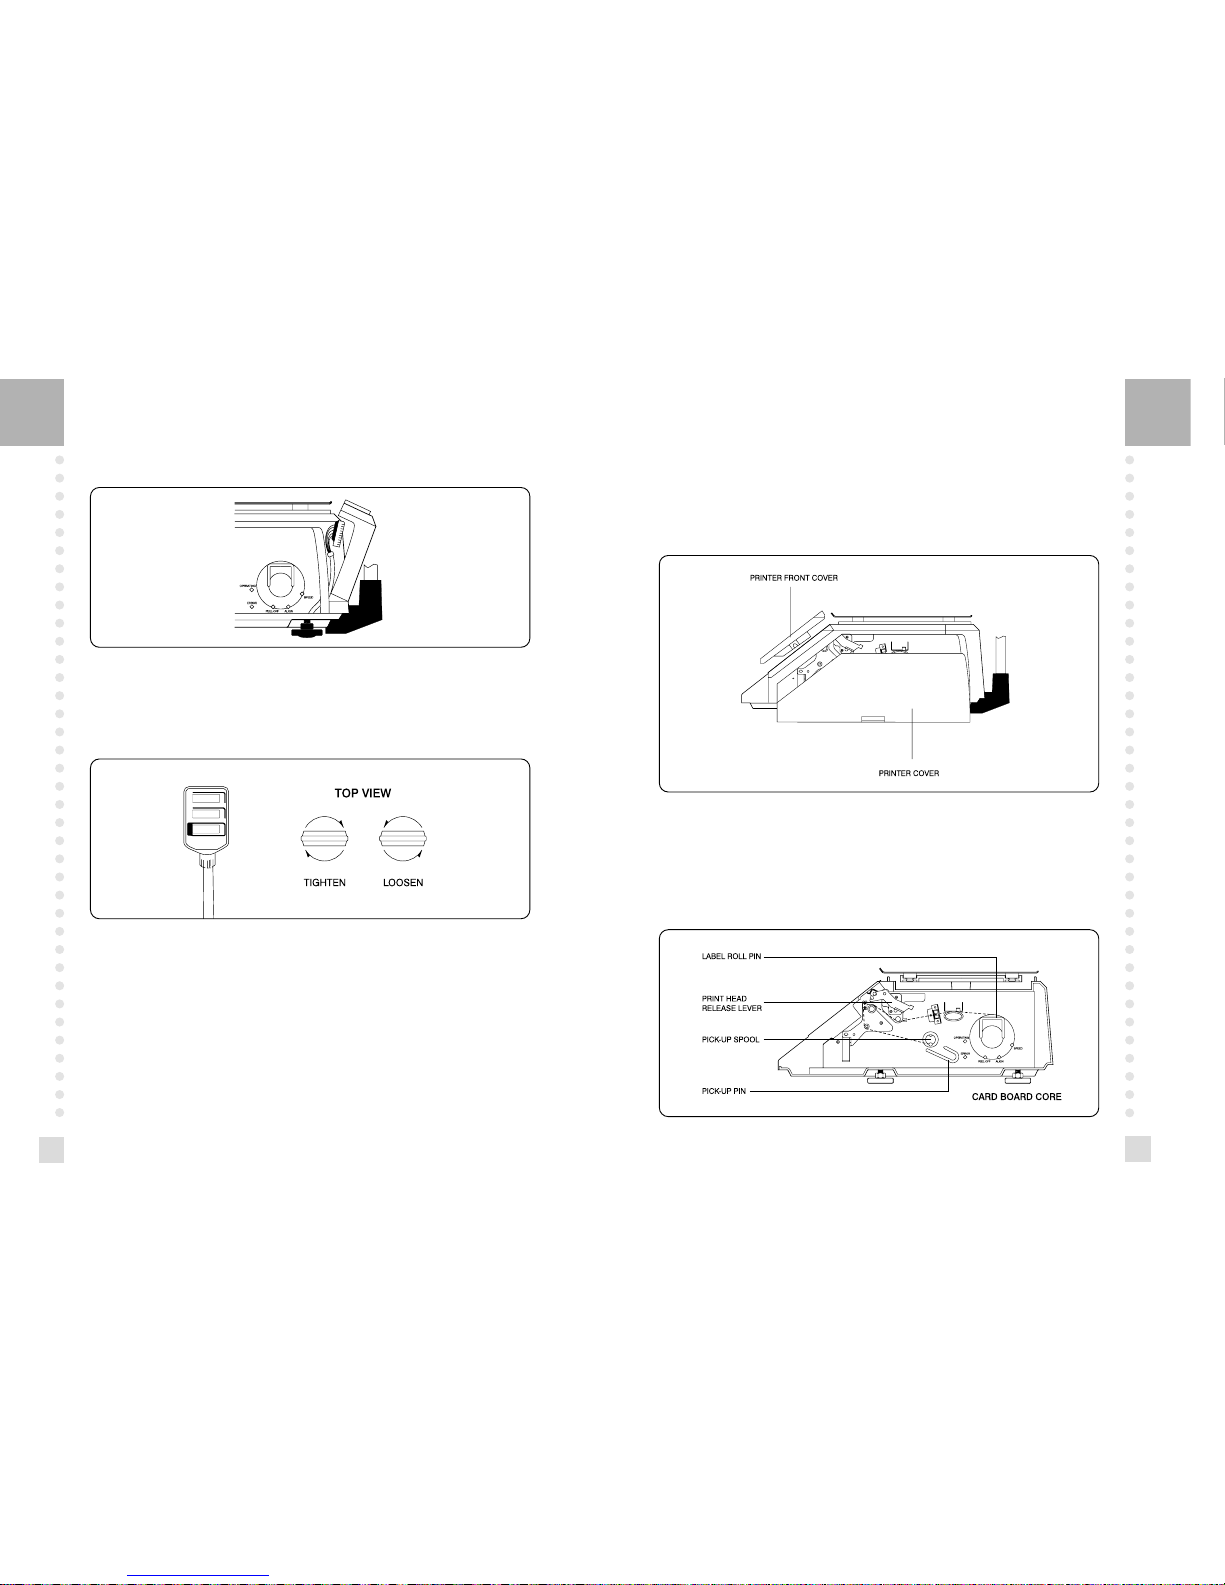
Place the rear cover back to its original position and re-attach the three screws that hold it in
place. The pole display installation is now complete.
This display can turn about 180°. However, if the display head does not turn freely, please
loosen the twist lock nut on the display pole. (See below fig.)
1.2 Installing the Label Roll
To install the label roll at any time you must follow the directions in this section.
Remove the printer front-cover and the printer side-cover. As you can see there is detailed
diagram affixed onto the inside of the printer side-cover. Use this diagram (or this manual) for
future reference on how to properly install the label roll. (See below fig.)
Tilt the rear cover towards the back of the scale and connect the three connectors to their
adequate receptacles on the rear display P.C.B (See below fig.)
Find and remove the Label Roll Pin and the Pick-up Pin. Also find the Print Head Release
Lever and lift it upwards. Release the Print Head Release Lever and the print head will
automatically lift up. If there were any labels previously installed please remove all the
collected backing paper on the pick-up spool. Also remove the cardboard paper roll core if
there was a label roll previously installed. (See below fig.)
11
10
Take the new roll of labels and find the ending. Peel-off and discard about 3 labels. Place the
label in the scale and thread the backing through the appropriate places.
Please view the checkpoints on the diagram. Feed the backing paper over the Paper Pressure
Shaft lifting the Pressure Plate in order to place backing between the two ( ); Feed the
backing paper between the two green Sensor Caps ( ); under the Label Guide Roller making
sure that the backing paper lies between the two washers on the Label Guide Roller ( ); feed
the backing over the red Rubber Roller and under the Print Head being careful not to touch
the underside of the Print Head ( ); over the Peel-off Bar ( ); under the Return roller(
);
feed the backing under and around the Pick Up Spool(
).
Now Attach the Pick Up Spool Pin into the spool and turn it slowly counterclockwise in order
to tighten the backing paper.
Push the Print Head down in order to lock it back in place( ).
You will feel and hear it lock in place. Replace the printer covers. You have completed the
label roll installation. (See below fig.)
2. Keypad & Display
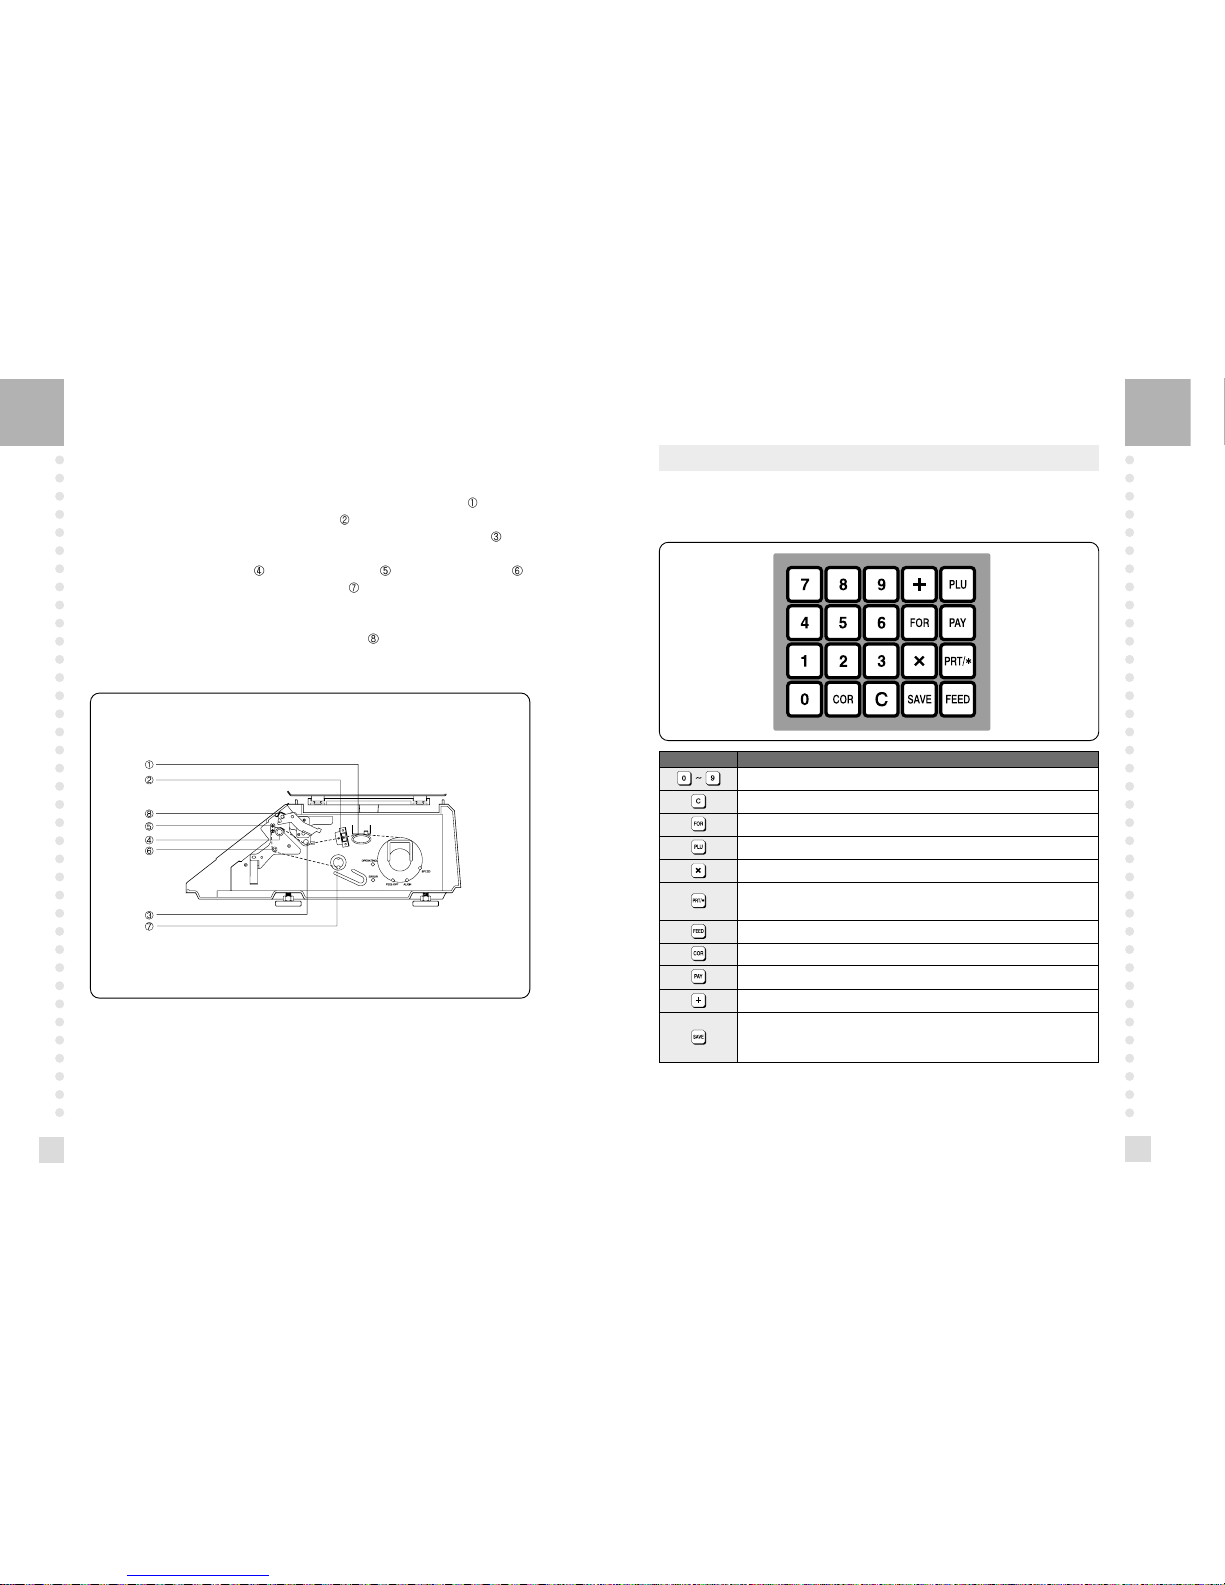
2.1 Numeric Keypad
The Numeric Keypad is used to enter all numerical data in PGM mode. In REG Mode, the
Numeric Keypad is used to enter prices, quantities, and counts. (See below fig.)
KEY Function
Numeric Keys used to enter numerical data.
Clear Key used to clear error conditions and bring displays to their initial state.
Used to enter by piece sales, i.e. 3 Pieces FOR $1.00.
Price Look Up Key. This key is used to “call-up” PLU’s by their numbers.
The multiple label Key. This key is used to generate more than one label with the same data.
This is the print Key. It is used to manually print out a label in REG mode. It also works as an
“ENTER” key in PGM mode.
This is the FEED Key. It is used to feed a blank label through the printer mechanism.
Used to cancel account data.
Used to calculate change after adding several transactions.
Used to add several transactions
When ON, this function will not let the unit price or tare weight of a PLU automatically clear
even after you remove the item from the platter. The function acts like a toggle switch : you
will know the function is ON by the indicator lamp in the Unit Price display.
Notice : The PAY and + Keys may not be legal in some countries.
13
12
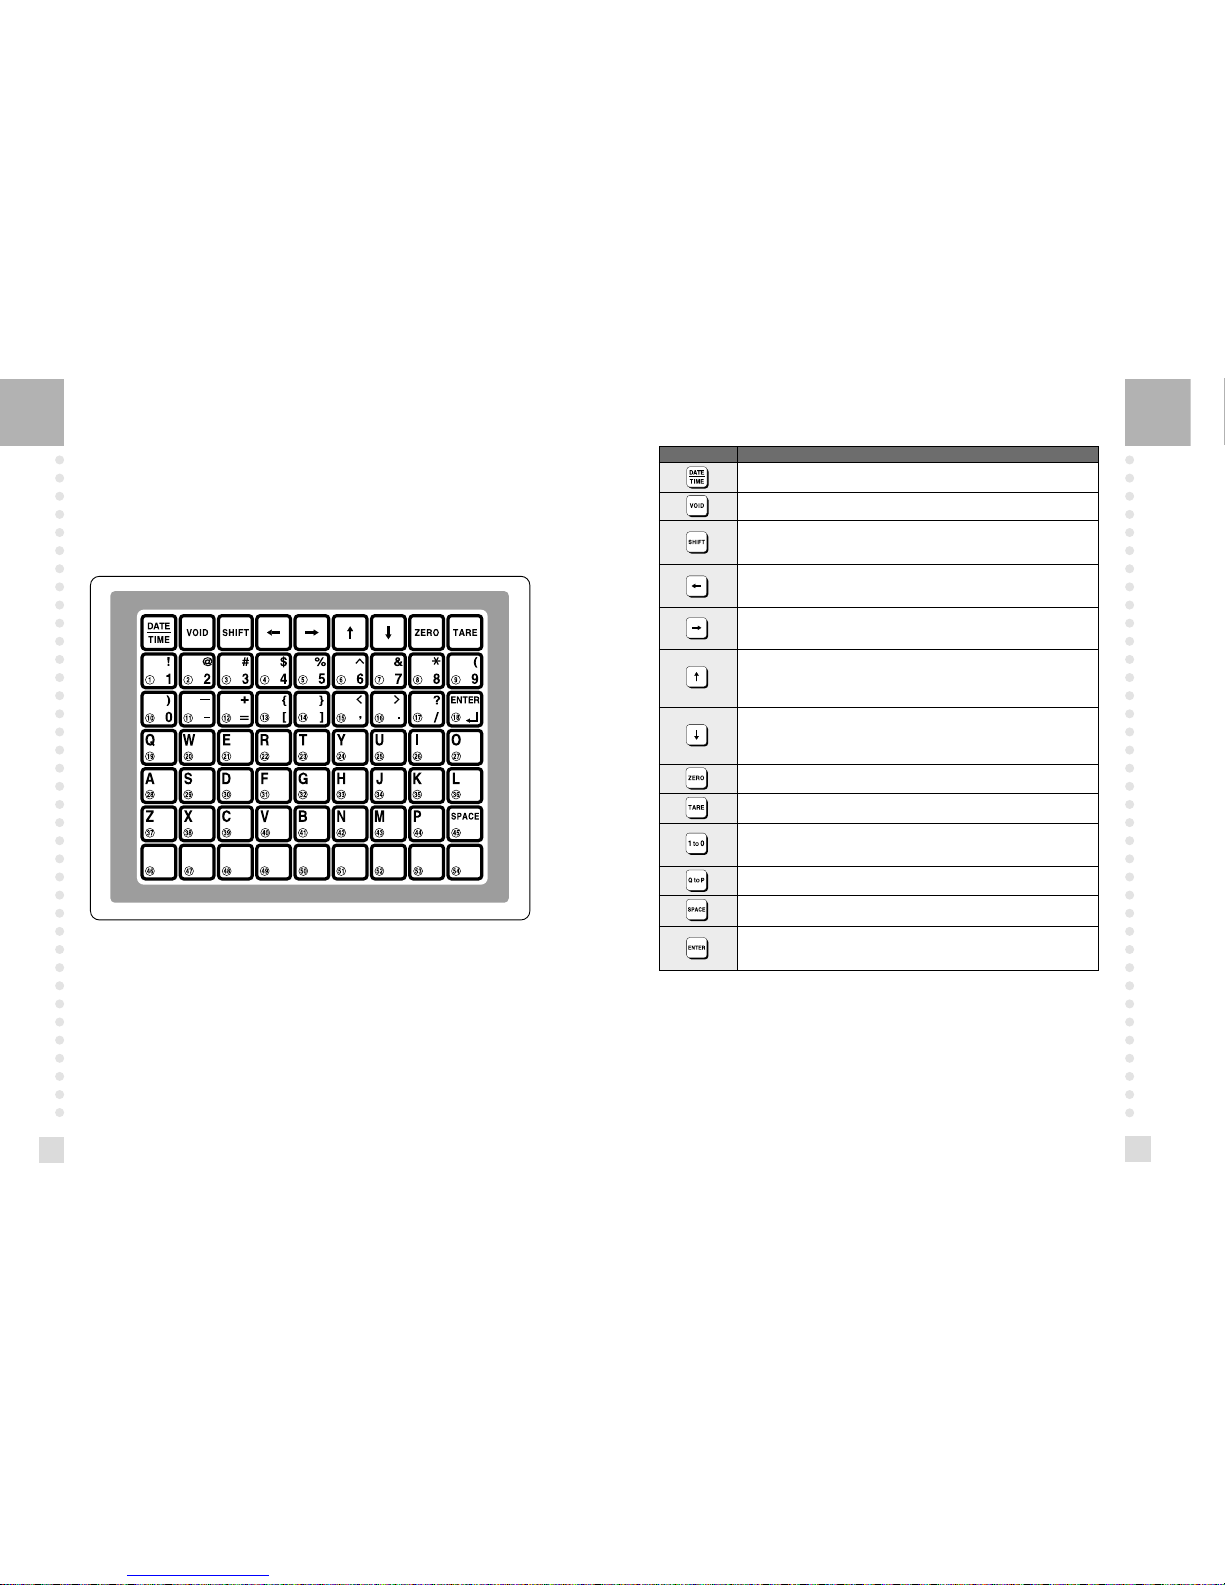
2.2 PLU Keypad
The PLU Keypad is used to enter alpha-numerical data. To use the keypad for programming
you must remove the pull-out sheet. To use the PLU Keypad in REG mode, you can write the
name and number of the PLU’s on the corresponding speed keys on the pull-out sheet. All
commodity names, message data, and store name and address are typed using these keys. The
scale automatically programs the PLU Keypad to be PLU 1 to 54. A speed key’s number is
shown circled on the lower left-hand side of each key.
KEY Functions
This key displays the time and date in REG mode.
Used to go to PROGRAM mode and ACC mode.
This key works like a Caps Lock key on a computer. It is used to type capital letters. You can
tell if the SHIFT function is active by an indicator lamp in the UNIT PRICE display.
This is the Left Arrow Key. It is used to scroll the cursor to the left when programming alphanumeric data.
This is the Right Arrow Key. It is used to scroll the cursor to the right when programming
alpha-numeric data.
This is the Up Arrow Key. It is used to scroll from Line to Line when programming commodity
names, message data, or store name and address. It is also used to move up the System
Maps. In REG mode, it is used to go to AUTO mode.
This is the Down Arrow Key. It is used to scroll from Line to Line when programming
commodity names, message data, or store name and address. It is also used to move down
the System Maps.
This key is used to set the Zero Point to 0.00.
Used to clear Tare entries and to enter Tare weight.
These keys are used to enter numbers as “text” for a commodity name, message data, or
store name and address. The symbol keys are also used to type text.
These are the Letter Keys. They are used to type in text.
This is the Space Key. It functions the same as a space bar on a computer keyboard.
This key is the ENTER Key. It functions just like an Enter Key on a computer. It is used to go
to Line 2 or the next Line after typing some text.
PGM mode is used to set all of the scale's functions and PLUs.
REG mode is used for operating the scale.
ACC is used to generate sales reports.
In AUTO mode labels are issued when the weight is stabilized and greater than the weight that
you set in PROGRAM mode. The use of PRT/* key will also generate a label.
15
14
2.3. Displays
2.3.1 Weight Display
The WEIGHT display shows the weight of an item on the platter whether it be positive or
negative and within the range of the scale. The WEIGHT display also indicates if the scale is
at ZERO or if there is a tare entered into the scale by way of a ZERO and NET lamps.
2.3.2 Unit Price Display
The UNIT PRICE display shows the price per pound of an item to be weighed. It also
indicates whether the SAVE function is active by way to the indicator lamp. The UNIT
PRICE display, in program mode only, indicates the condition of the SHIFT lamp. If the
SHIFT lamp is OFF, you can type in capital letters, but if the SHIFT lamp is ON, you can
only type lowercase letters. Finally, the UNIT PRICE display also indicates if the scale is in
AUTO mode by way of an indicator lamp.
2.3.3 Total Price Display
The TOTAL PRICE display shows the unit price multiplied by the weight to give the total
price.
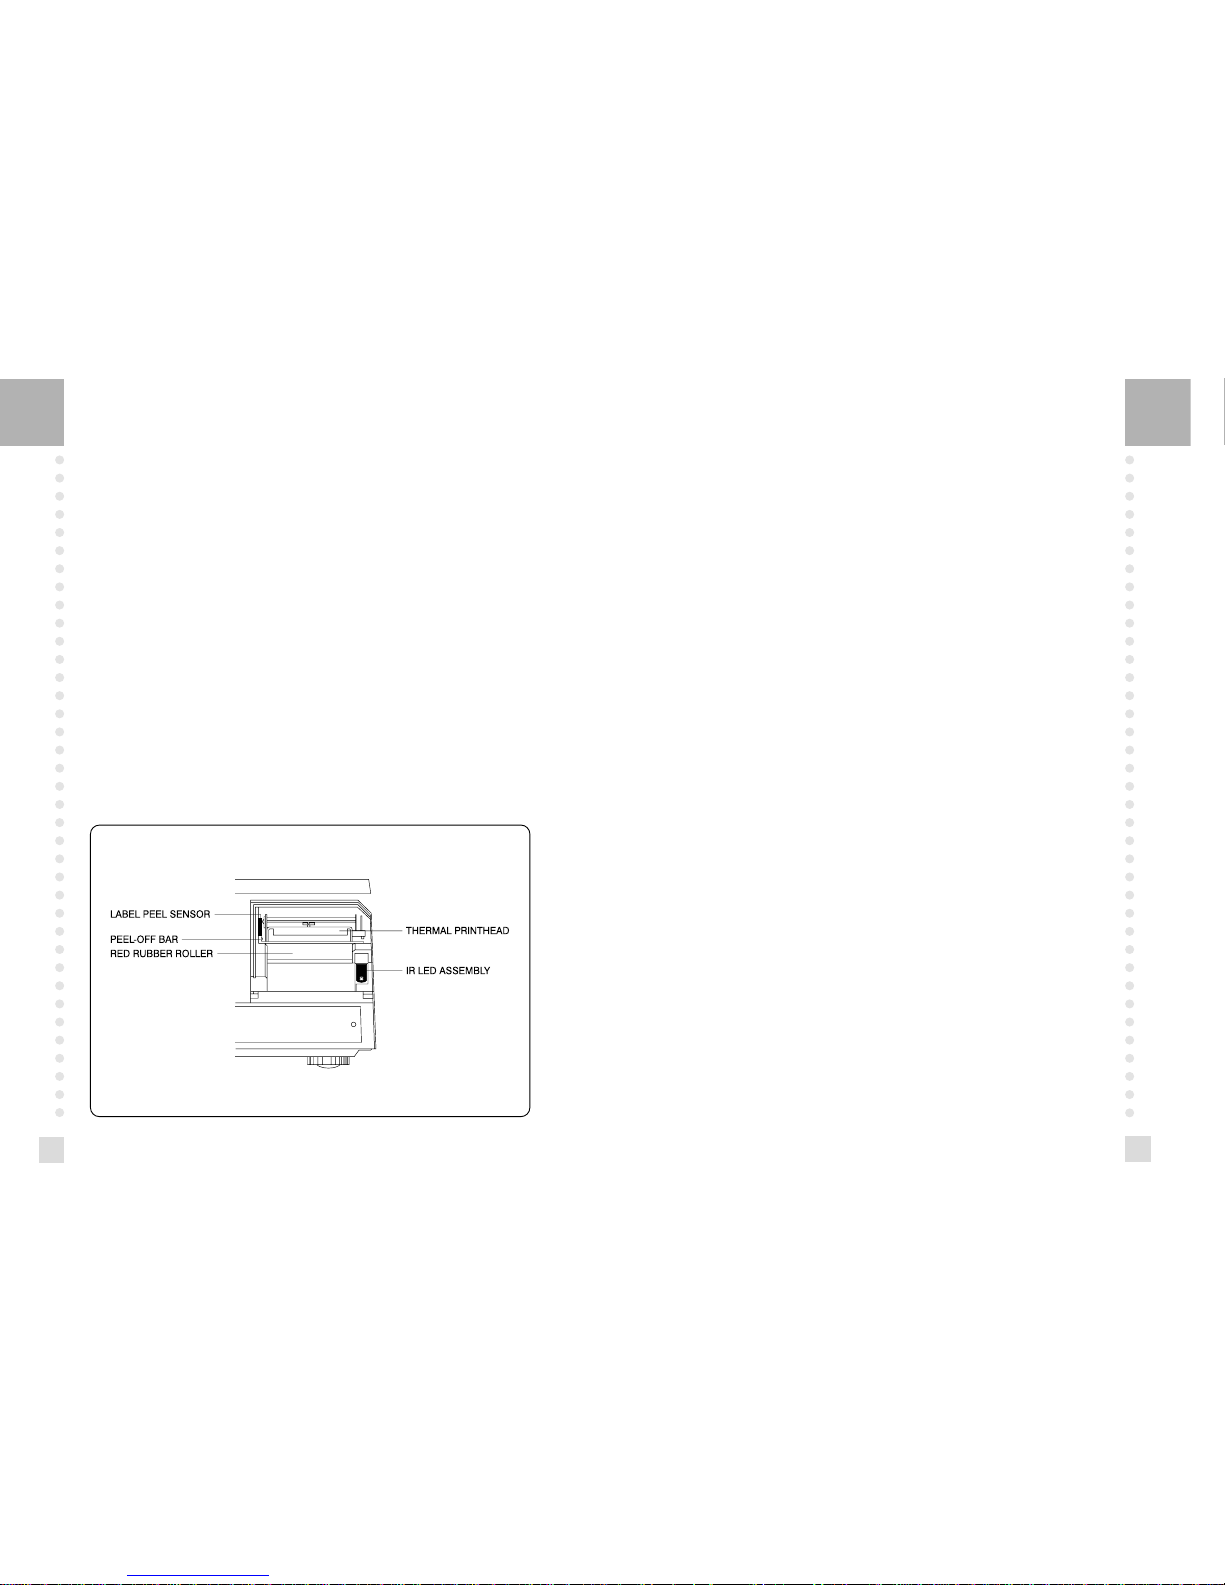
2.4. Printer Mechanism
It is very important that you be familiar with the printer mechanism. Every time your labels
run out you will be required to install the label roll and you will need to know the general
parts of the printer.
Front View: (With Printer Front Cover removed)
LABEL PEEL SENSOR : This sensor is used in conjunction with IR LED to detect if there is a
printed label waiting to be taken.
THERMAL PRINTHEAD : The Thermal Printhead is the part that does the actual printing. The
printhead is VERY sensitive! Please keep water and other liquids AWAY from the printhead.
DO NOT TOUCH the underside of the printhead. If labels become jammed and stuck to the
printhead, please call a qualified CAS Dealer to solve this problem. When finished installing
labels, it is necessary to push down on the TOP of the printhead to lock it in place.
RED RUBBER ROLLER : This is the part that the printhead press the labels against in order to
print. Please do not scratch or harm in any way this roller. Any damage to the roller can result in
bad print or lower quality print.
PEEL-OFF BAR : This part causes the labels to peel-off their backing paper when the paper slides
over it. Always install the labels OVER the Peel-Off Bar.
IR LED : This part is used in conjunction with the Label Peel Sensor to detect if there is a printed
label waiting to be taken. (Infra-Red Light Emiting Diode)
NOTE : Always replace the Printer Side Cover and the Printer Front Cover to ensure proper
operation of the scale. Failure to do so can result in printer failure. Also, failure to comply with
any or all of the guidelines for proper maintenance can adversely affect your scales warrantee.
17
16
3. Operation
3.1 REG mode Operations
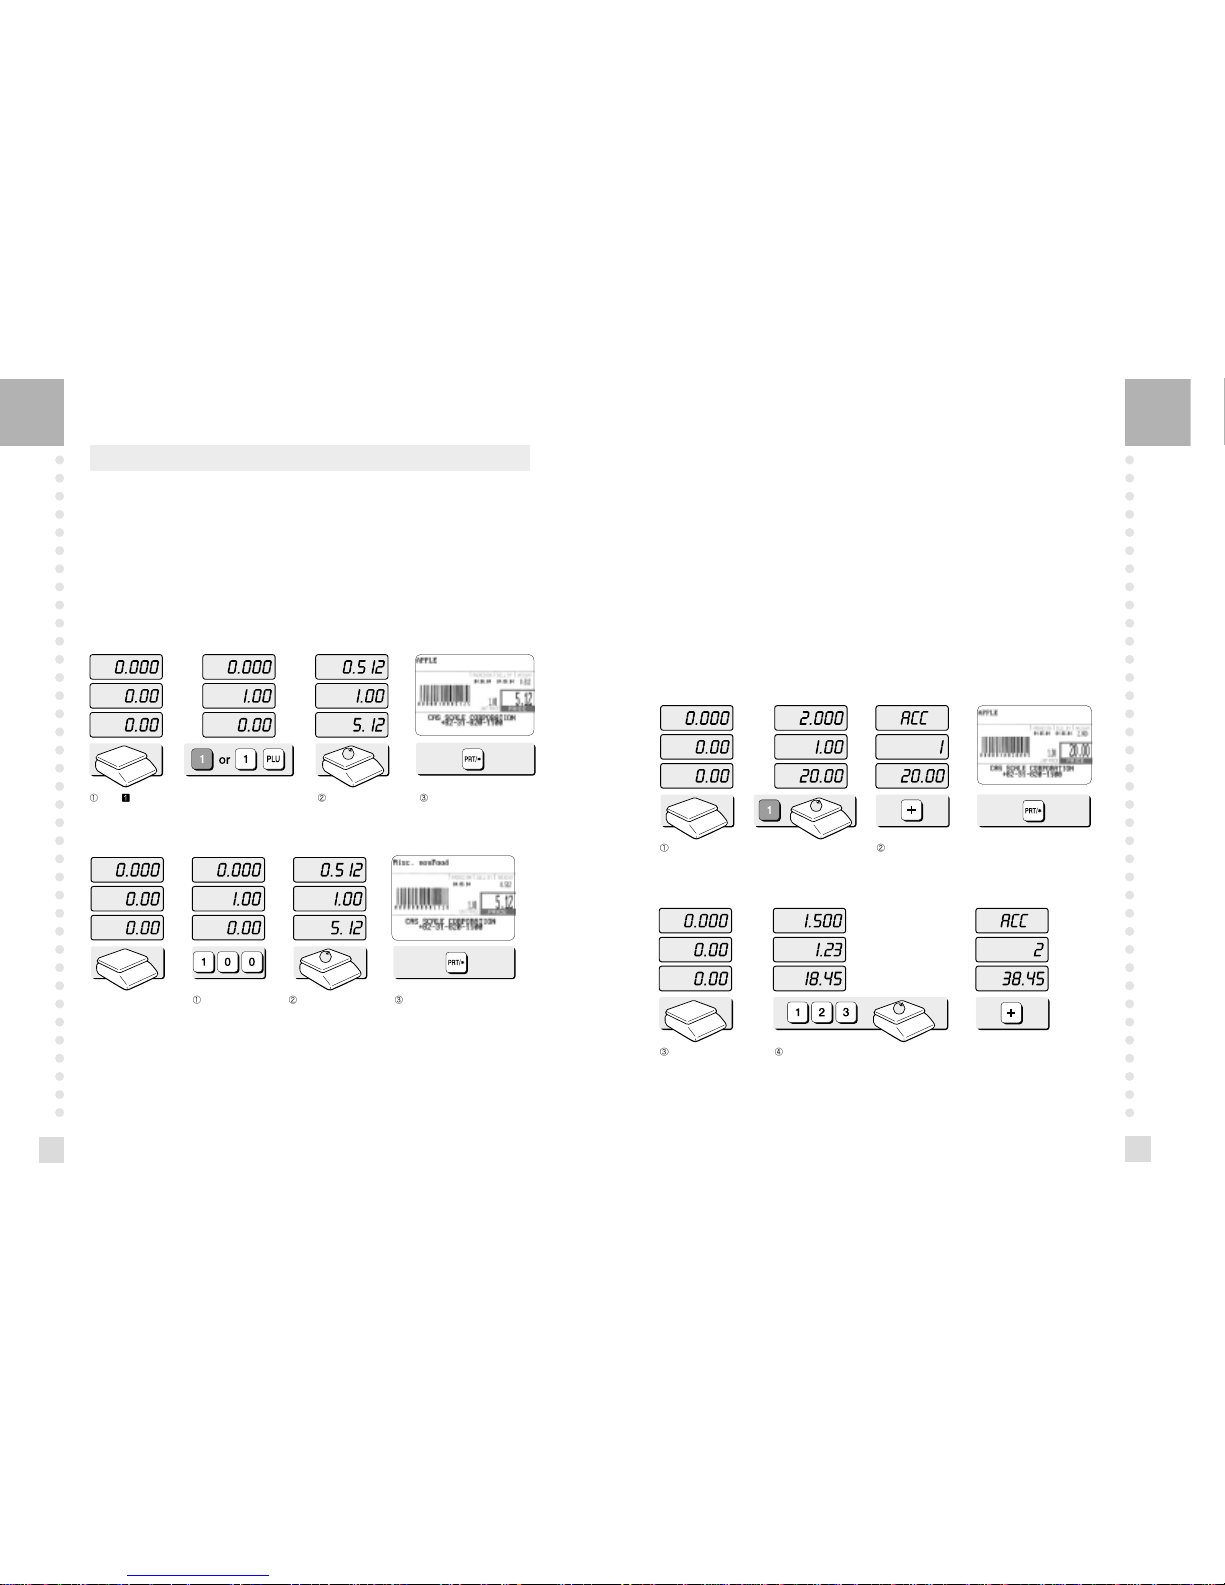
3.1.1 Simple Weighing
There are two types of sales you can generate; PLU Sales and NON-PLU Sales. PLU Sales
are sales based on a programmed PLU whereas Non-PLU Sales are sales you generate
without calling up a PLU.
PLU Sales :
To call up a PLU, simply type the PLU’s number on the Numeric keypad and then press the
PLU key. Another way to call up a PLU is to simply press 1 of 54 preset keys which are set to
a particular PLU.
Press speed key or press 1 key on the numeric keypad
and PLU key.
Put an item on the
platter.
Press the PRT/* key.
Enter a unit price. Place the commodity
on the platter.
Press the PRT/* key.
NON-PLU Sales:
3.1.2 How to Use TARE
Known Tare:
If you know the weight of container you may use this method to enter the tare.
For example, if the weight of the container is 10g press the 1, 0, and TARE key. Call up a
PLU and place a commodity then you will see the net weight.
Unknown Tare:
If you do not know the weight of the container you may use this method. Place the container
on the platter and press the TARE key. Call up a PLU and place the commodity on the platter
then you will see the net weight.
Releasing the Tare
To release the tare, remove all items from the platter and then press the TARE key.
3.1.3 Add-up Sales
Call up a PLU and put an item on the platter.
You can add up non-PLU item. Enter a unit price and place an item on the
platter. If you want to add up.
press the + key.
Remove an item
from the platter
If you want to add up this item.
press the + key. You will have a label automatically.
19
18
Call up a PLU and put an item on the platter. If you do not want to add up,
press the PRT/* key instead of + key.
Call up a PLU and put an item on the platter. If you want to add up.
press the + key.
If you want to have a total
report label.
press the PRT/* key.
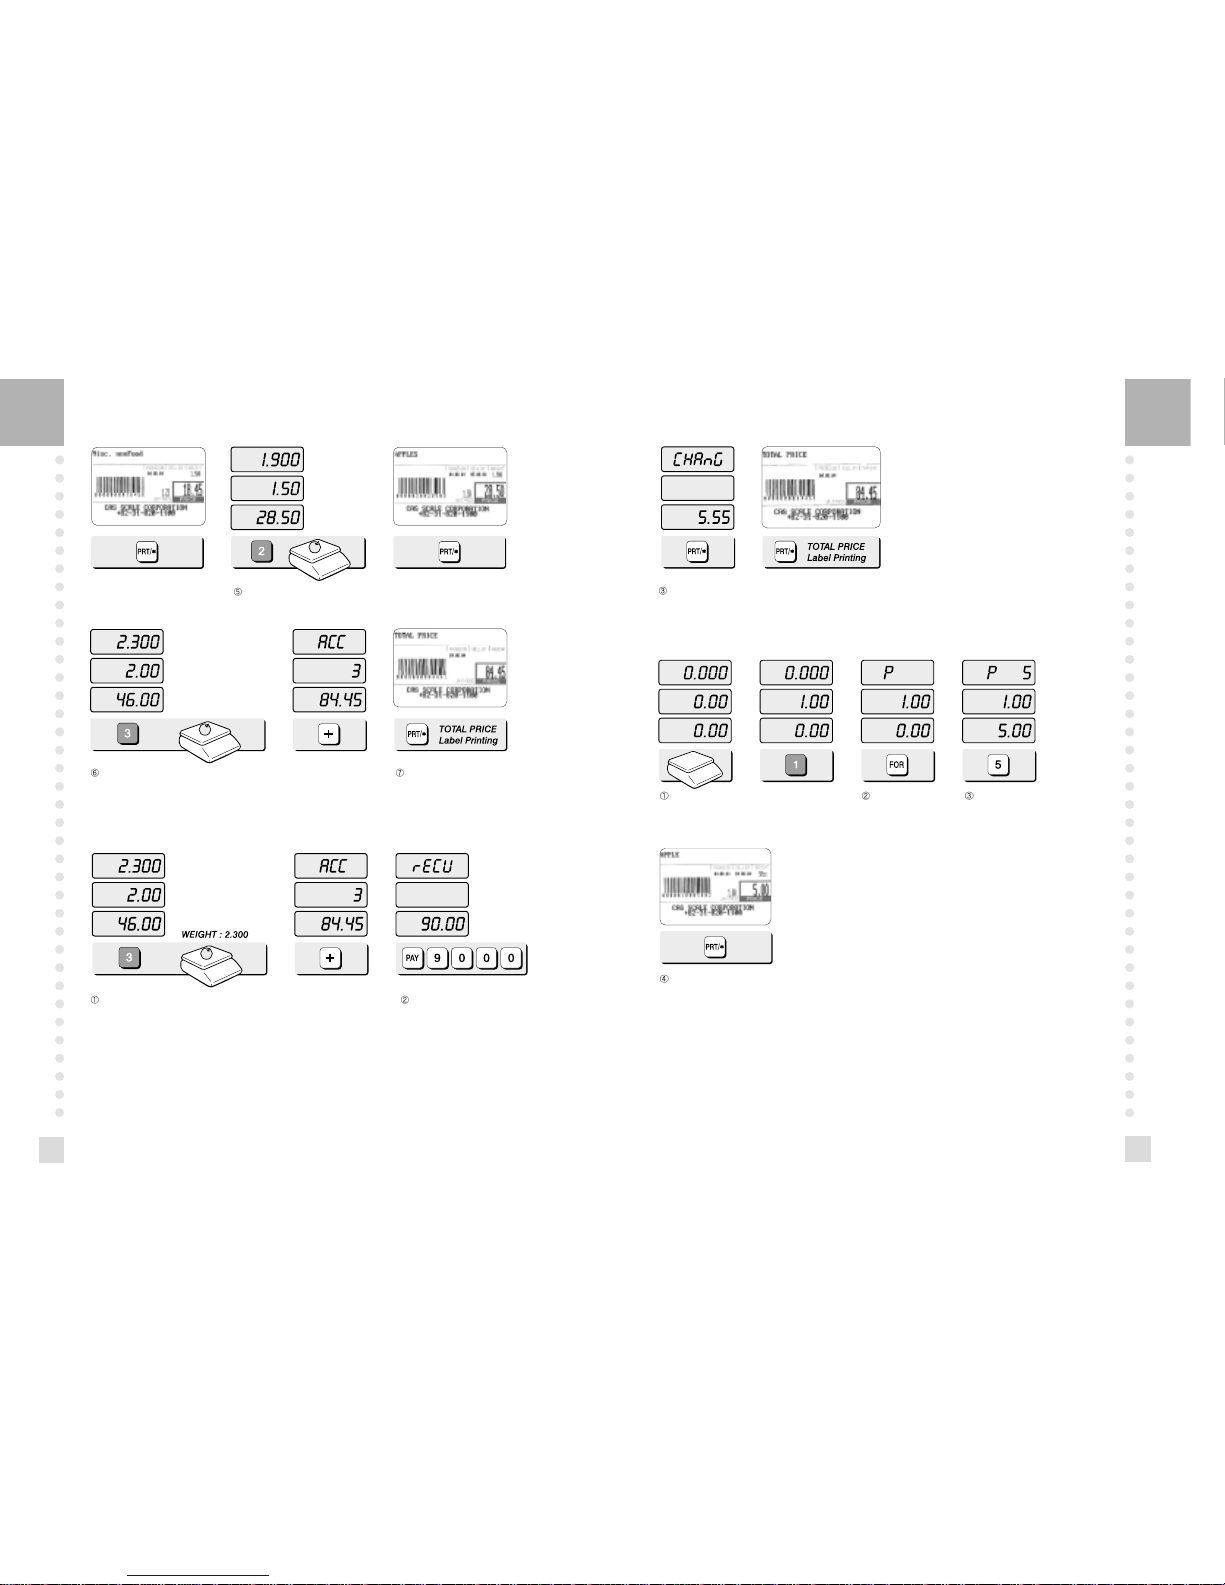
3.1.4 How to Use PAY Key
Call up a PLU and put an item on the platter. If you want to add up.
press the + key.
Press the PAY key to calculate your
changes after add-up sales and
enter customer payment. Ex)
$90.00, type 9,0,0,0.
Press the PRT/* key. You will see changes on the display.
(If you press the PRT/* key again, you will have a total price label.)
3.1.5 How to Use FOR Key
Call up a PLU or enter unit price of non PLU. Press the FOR key. Press 5 key on the
numeric keypad.
Press the PRT/* key.
NOTE : If you made a incorrect label printed you can cancel it in sales report.
Press COR key after printing label then you will see “dELEtE”.
21
20
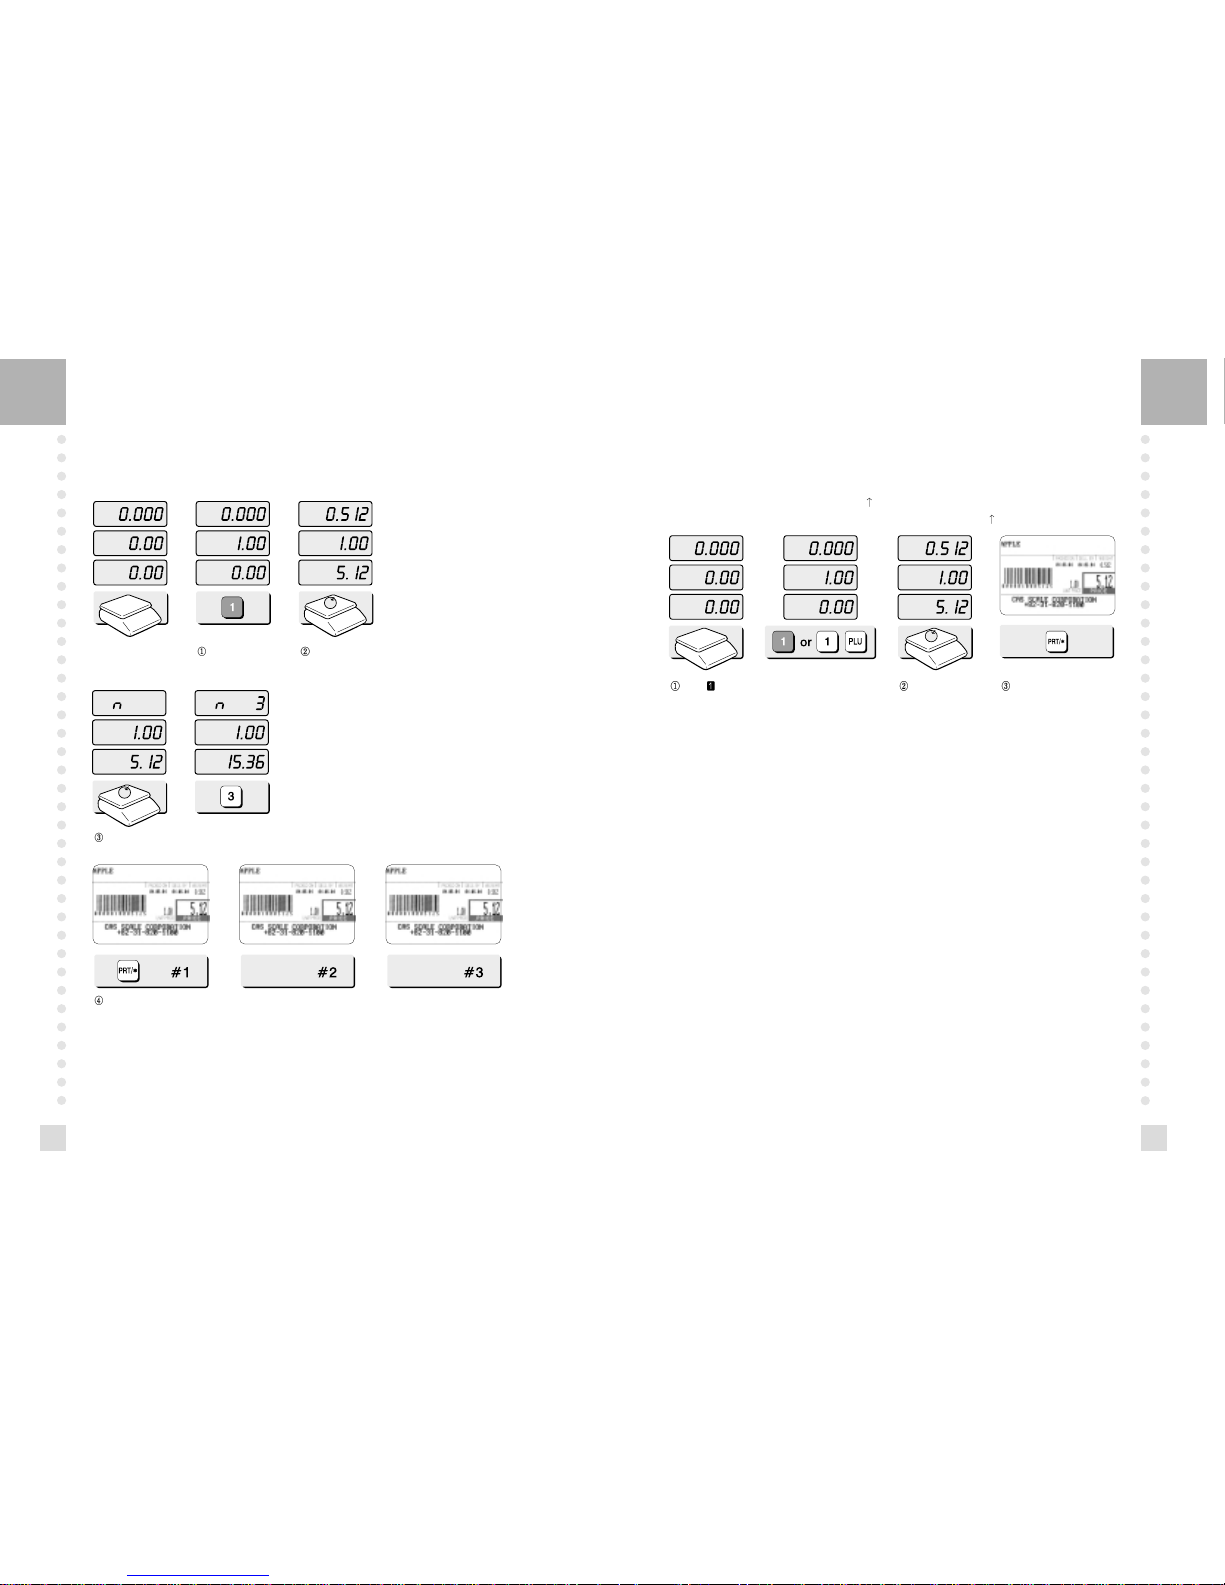
3.1.6 Multiple Labels
You can generate identical labels by using multiple label printing. To use multiple label
printing, and press the X key, enter the quantity of duplicate labels you need, and then press
the PRT/* key.
Call up a PLU. Press X Key
Enter the quantity of duplicate labels you need.
3.1.7 Auto Printing (AUTO MODE)
In AUTO mode, labels are issued when the weight is stabilized and greater than 100g. The
use of PRT/* key will also generate a label.
How to go to AUTO mode : Press the key. If the scale is in AUTO mode AUTO lamp is
ON in the UNIT PRICE display. To finish AUTO mode, press the key again.
Press speed key or press 1 key on the
numeric keypad and press PLU key.
Put an item on the
platter.
A label will be issued
automatically.
Press the PRT/* key.
 Loading...