

Page 1
`
2
Page 2

3
CONTENTS
PRECAUTIONS ............................................................ 4
PREFACE ....................................................................... 6
OVERALL VIEW ........................................................... 6
DISPLAY & KEYBOARD ........................................... 7
OPERATIONS ............................................................... 9
Chapter 1. Basic Operation ........................................ 10
Chapter 2. PLU Saving & Calling - up ....................... 12
Chapter 3. User's Set-up Mode .................................. 14
Chapter 4. Formatting Printing Receipt ................... 17
Chapter 5. Sales Transaction ..................................... 21
Chapter 6. EURO Setting Method (Option) .............. 26
ERROR MESSAGES ................................................. 29
ASCII Code ................................................................... 30
SPECIFICATION .......................................................... 31
Page 3
`
4
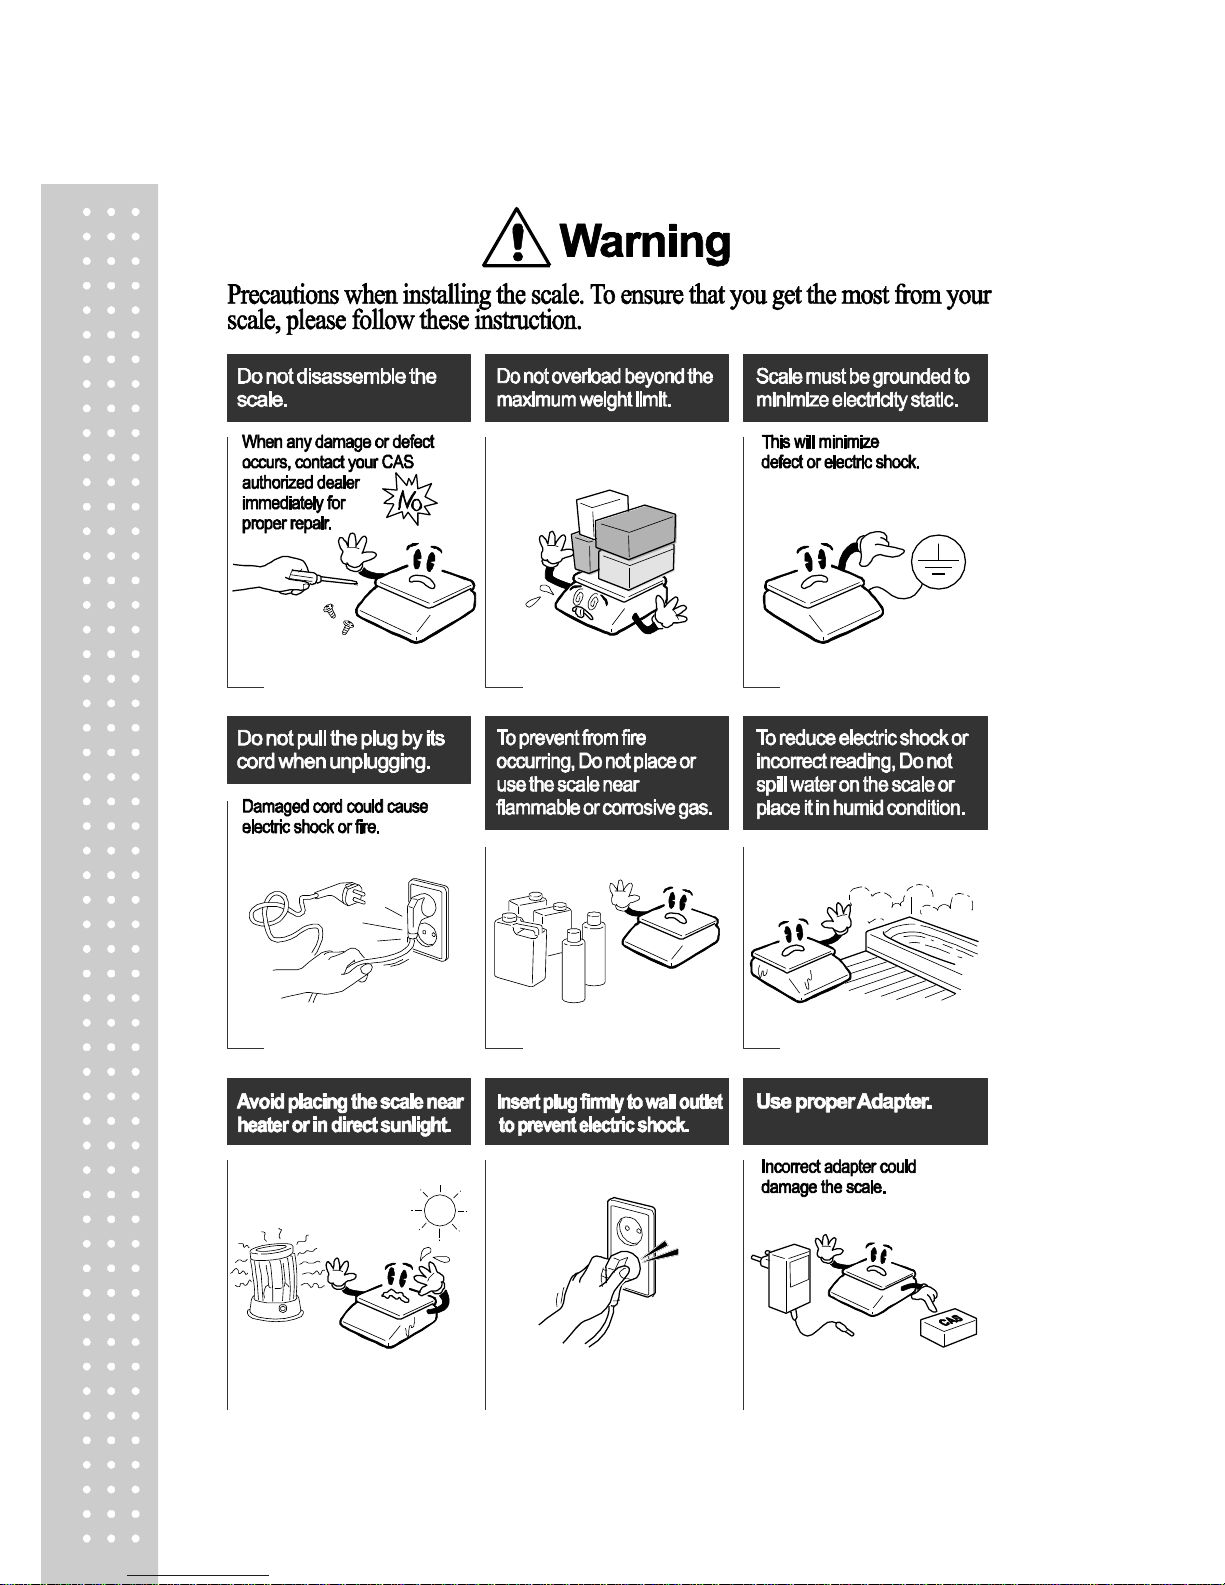
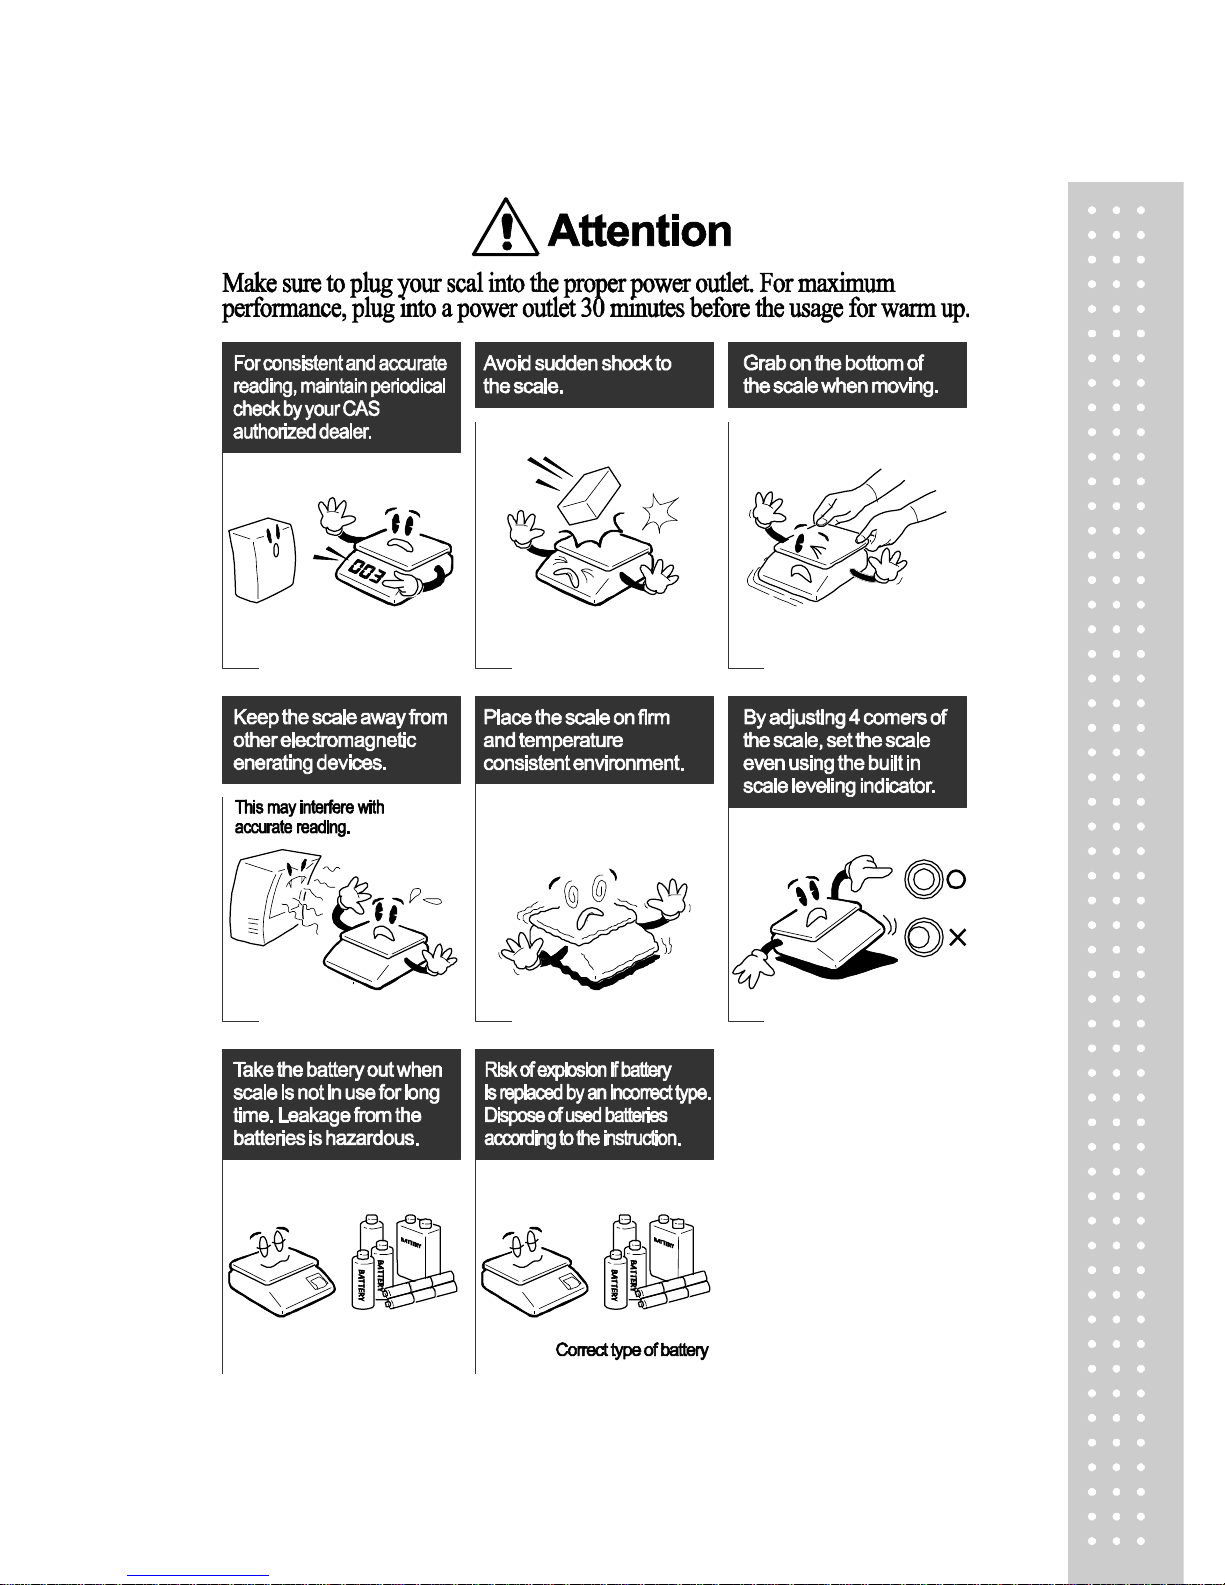
PRECAUTIONS
Page 4
5
Page 5
`
6
PREFACE
Thank you for purchasing your CAS ER JR scale.
CAS scales are designed and produced under rigid quality control to deliver
outstanding performance, reliability and long life.
This manual will help you with the proper operation and care of your new CAS ER JR.
Please review the ER JR scale manual before you use the scale and keep it handy
for future reference.
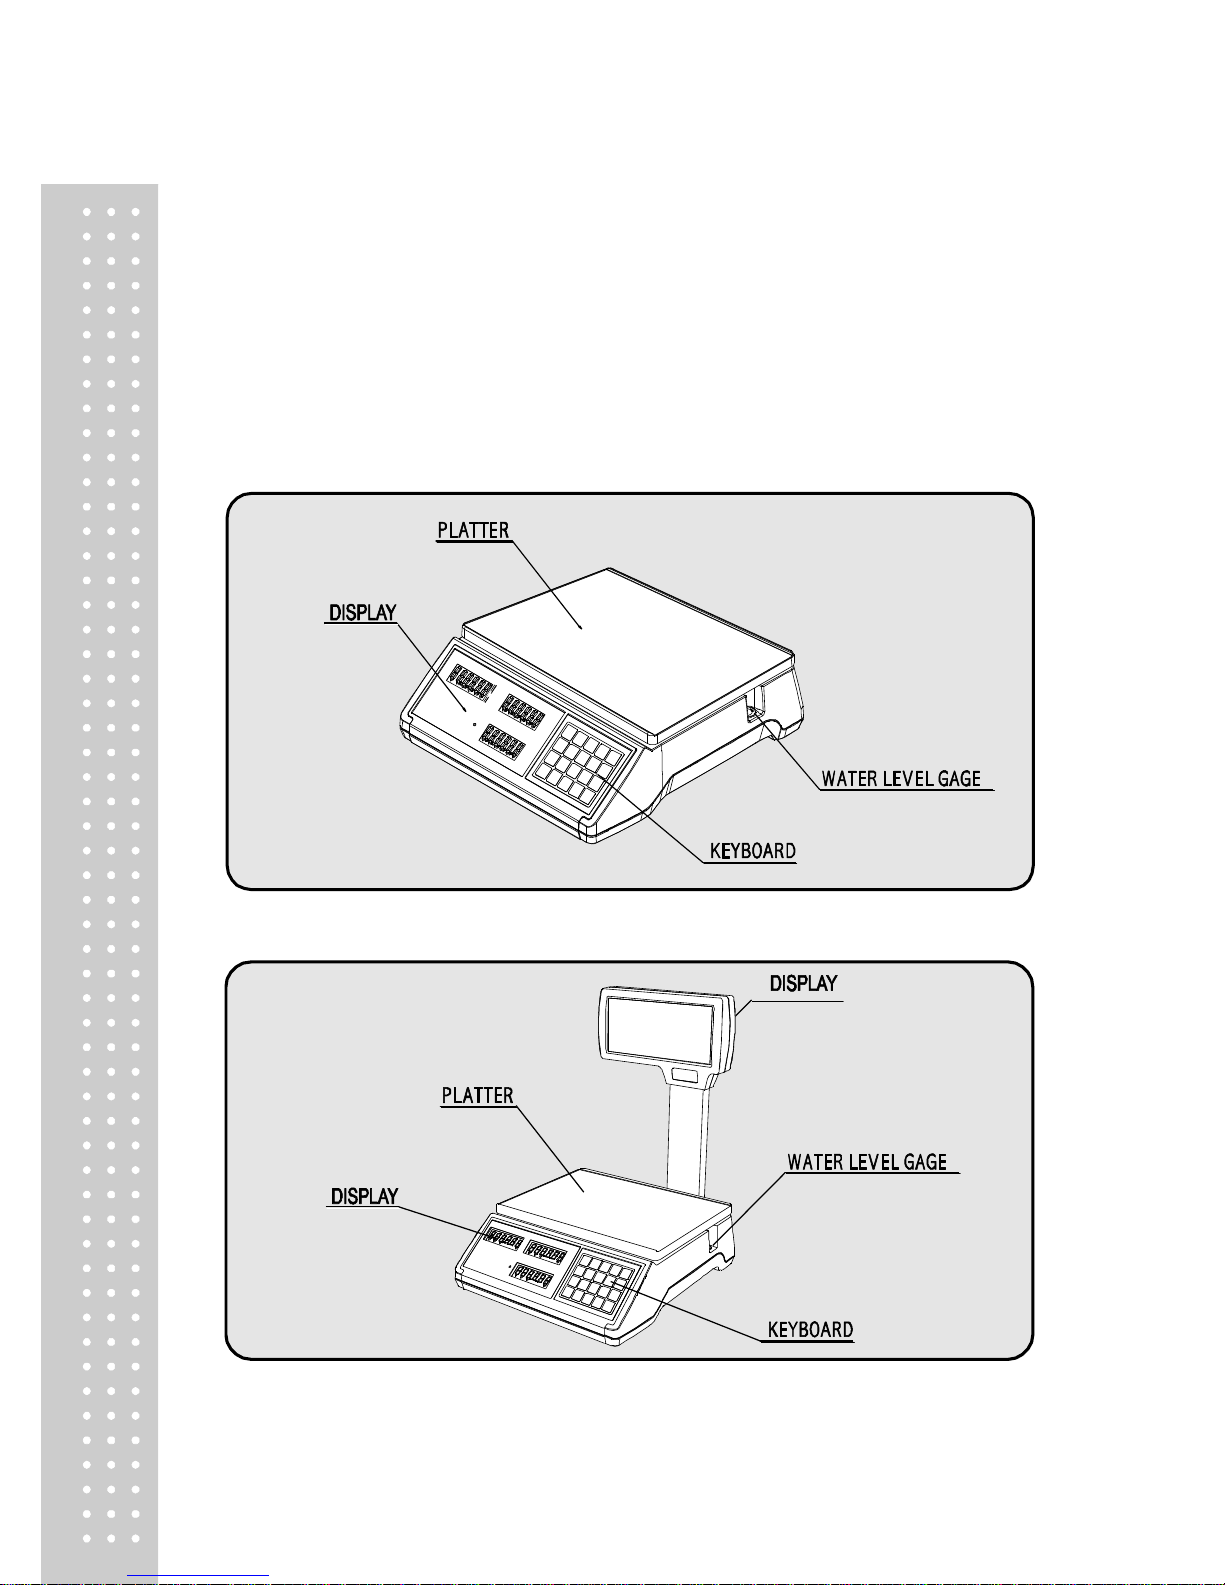
OVERALL VIEW
STANDARD TYPE
POLE TYPE
Page 6
7
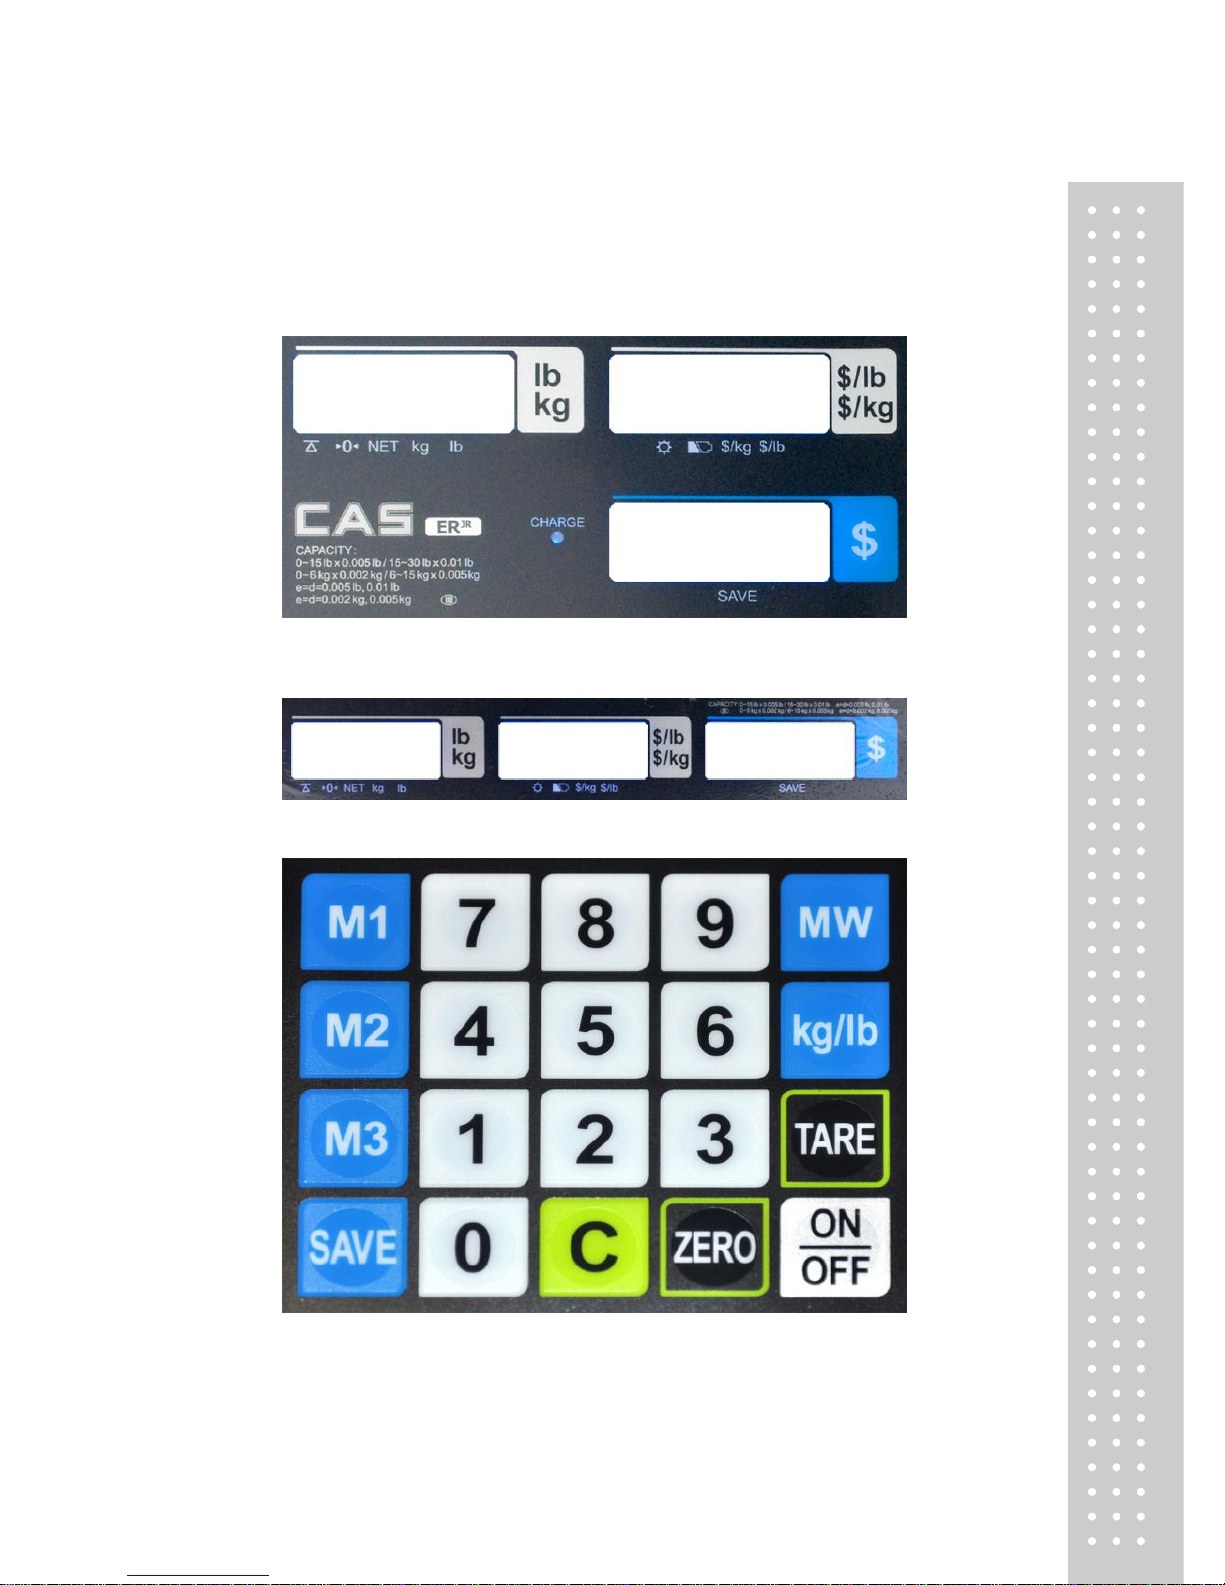
DISPLAY & KEYBOARD
Front Display
Rear Display
KEYBOARD
Page 7
`
8
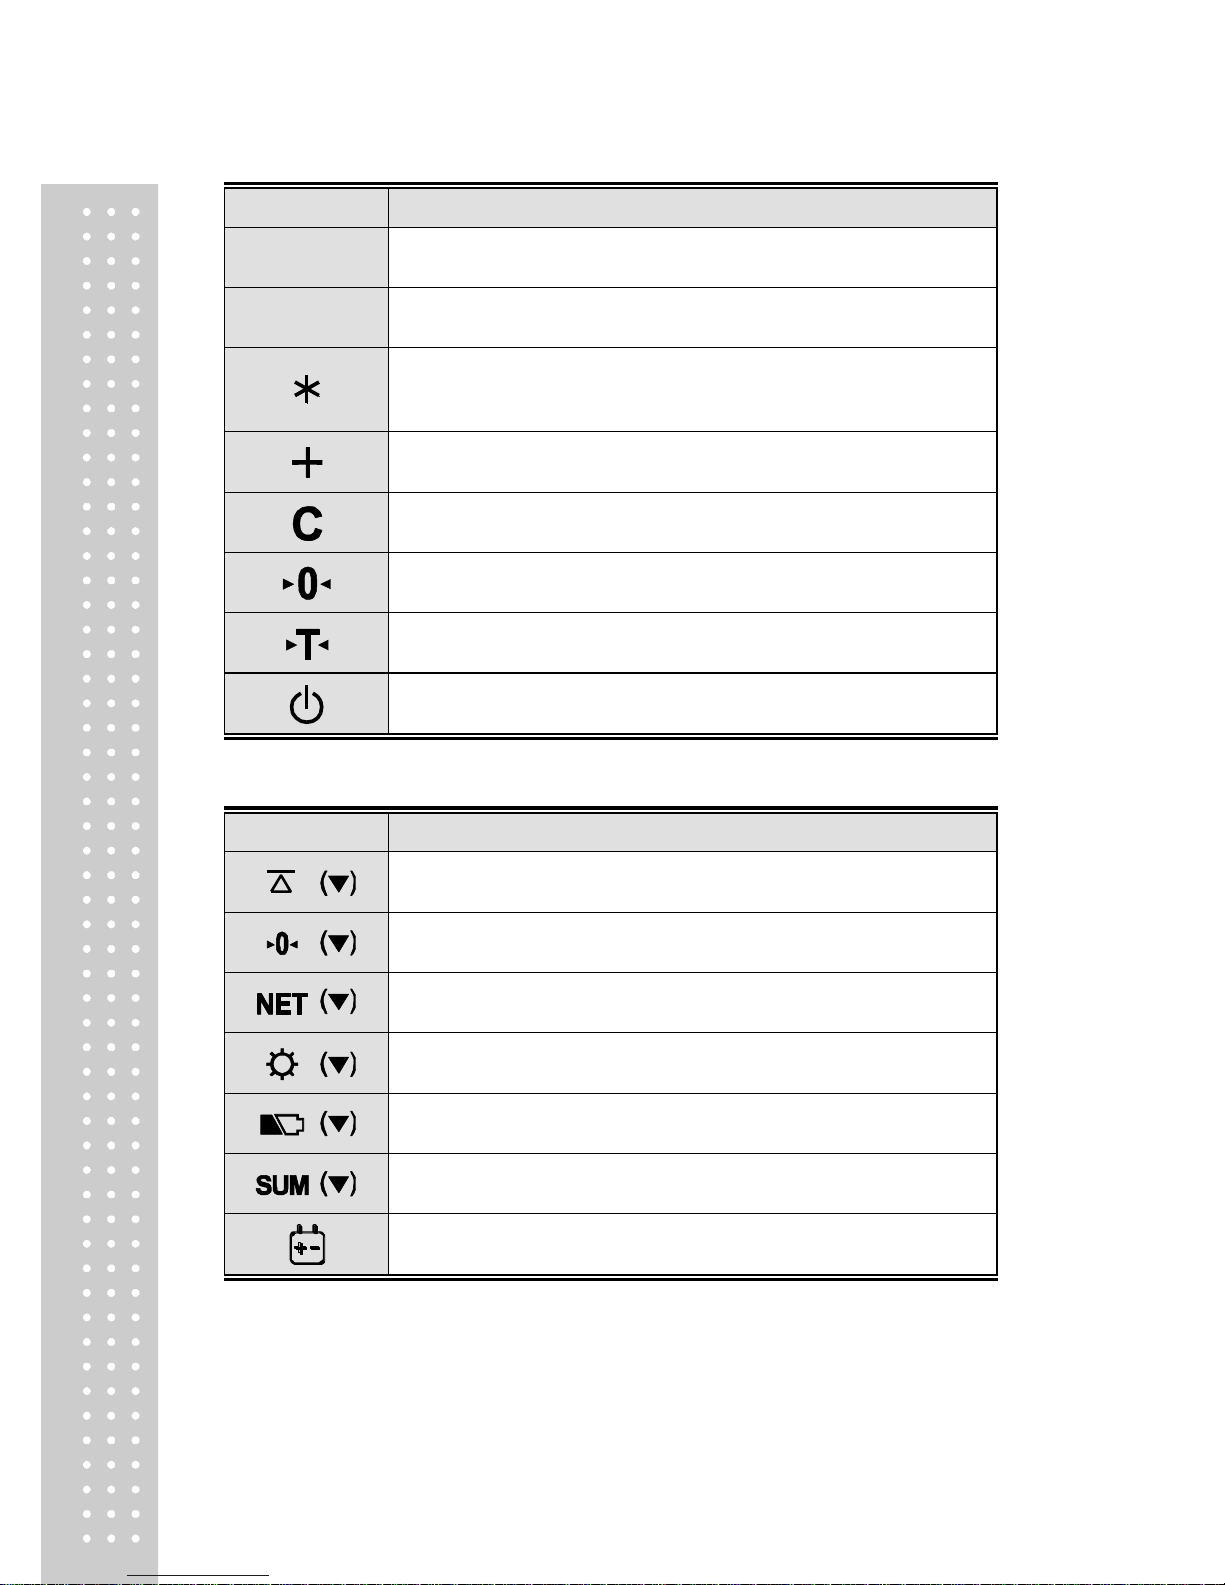
■ Table : Key Functions
KEYS
FUNCTIONS
0 ~ 9
Numbers import
M1 ~ M4
Direct PLU keys
Function key, PLU restore, Push more than 2 second when using
PLU Restore mode or finalize sales transaction
To make several sales transaction by adding up
To clear data
To set zero
To set up or clear tare value
To turn on/off the scale or backlight
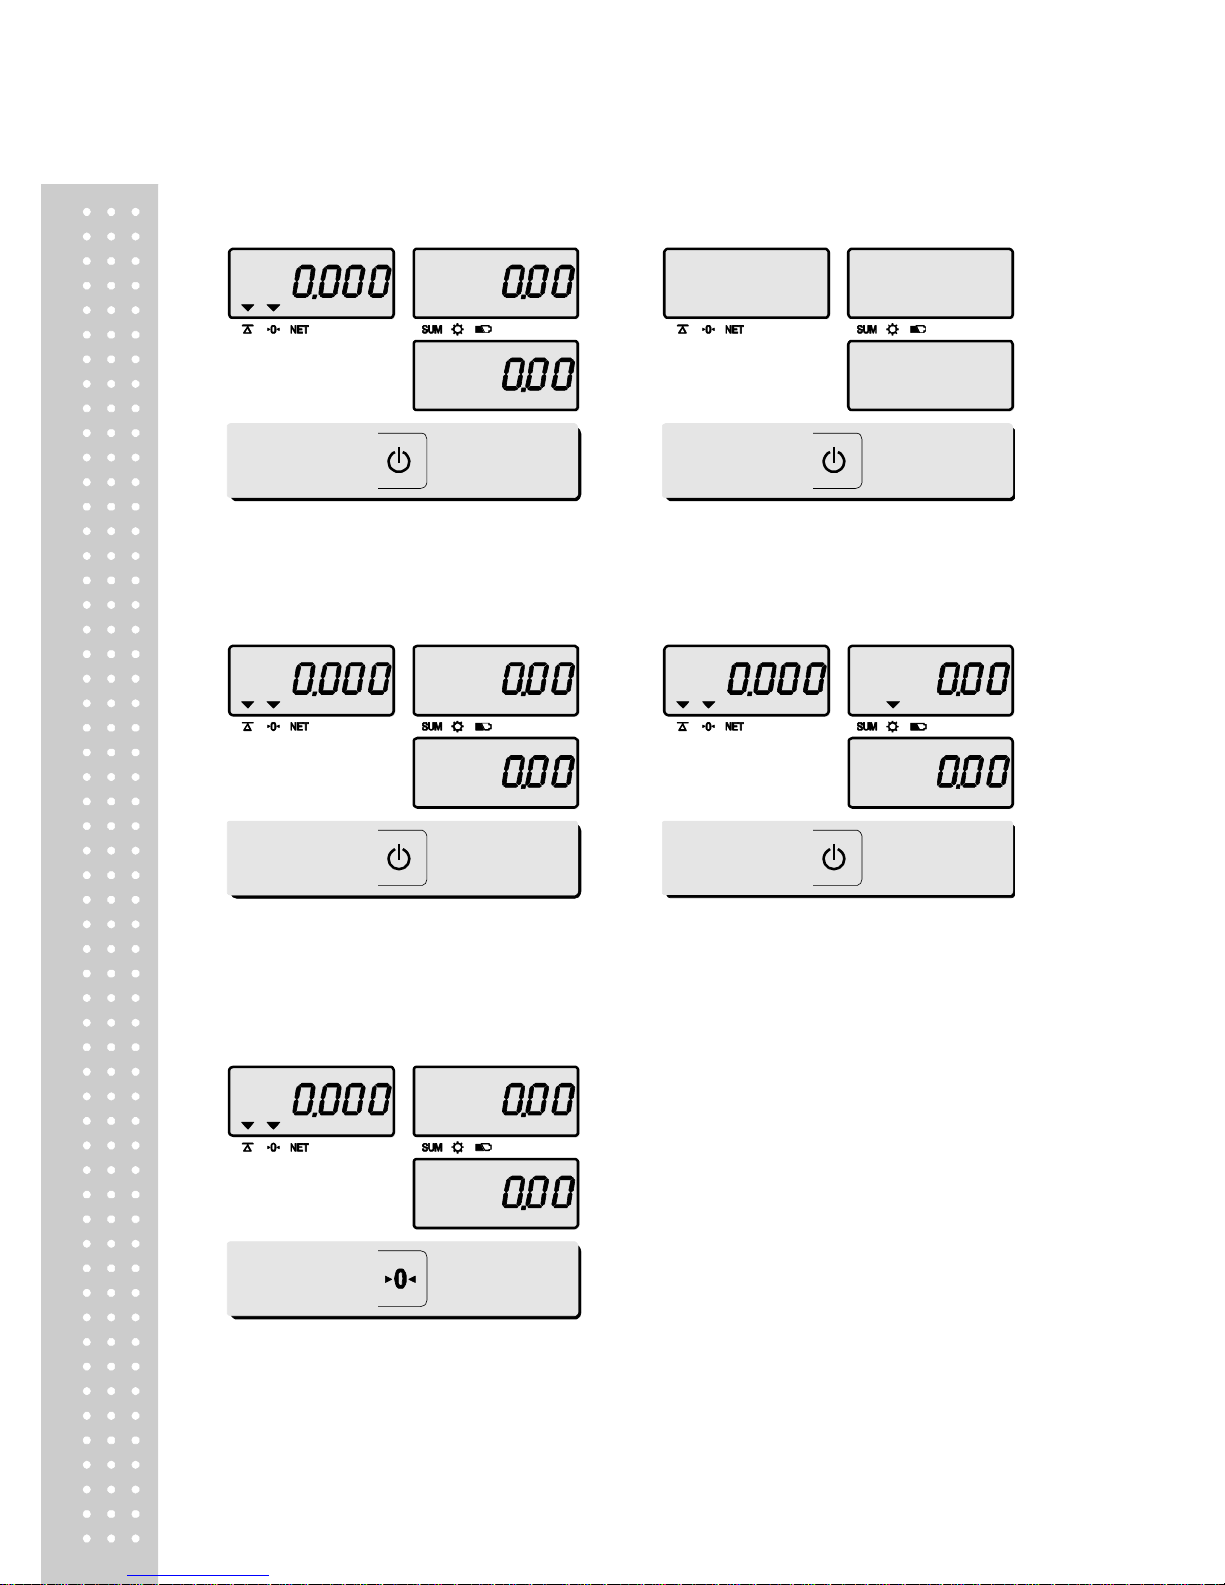
■ Table : Symbols on Display
SYMBOL
DESCRIPTION
Weight steady
To adjust zero
Tare on
Backlight on
Low power warning
Used to call a total price of add up transactions
Charge status
Page 8

9
OPERATIONS
Programming Mode
Chapter 1. Basic Operation
a. To turn on/off scale
b. To turn on/off backlight
c. Zero function
d. Tare function
- One time tare
- Successive tare
Chapter 2. PLU Saving & Calling-up
a. Saving unit price on PLU
b. Saving PLU name (option)
c. Calling up PLU
Chapter 3. User' s Set-up Mode
a. Auto power - off
b. Backlight ON/OFF function
c. Brightness function
d. Low battery backlight auto off function
e. Selecting the printer
Chapter 4. Formatting Printing Receipt
a. Using Printer
b. Receipt header setting
c. Receipt currency (unit) setting
d. Receipt date setting
Sales mode
Chapter 5. Sales transaction
a. Input the unit price through the number key
b. Input the unit price through calling up the PLU
c. Add up the total amount
d. Inspect or clear the total amount
Chapter 6. EURO Setting Method (Option)
a. Saving EURO rate
b. Switching currency
Page 9
`
10
Chapter 1. Basic Operation
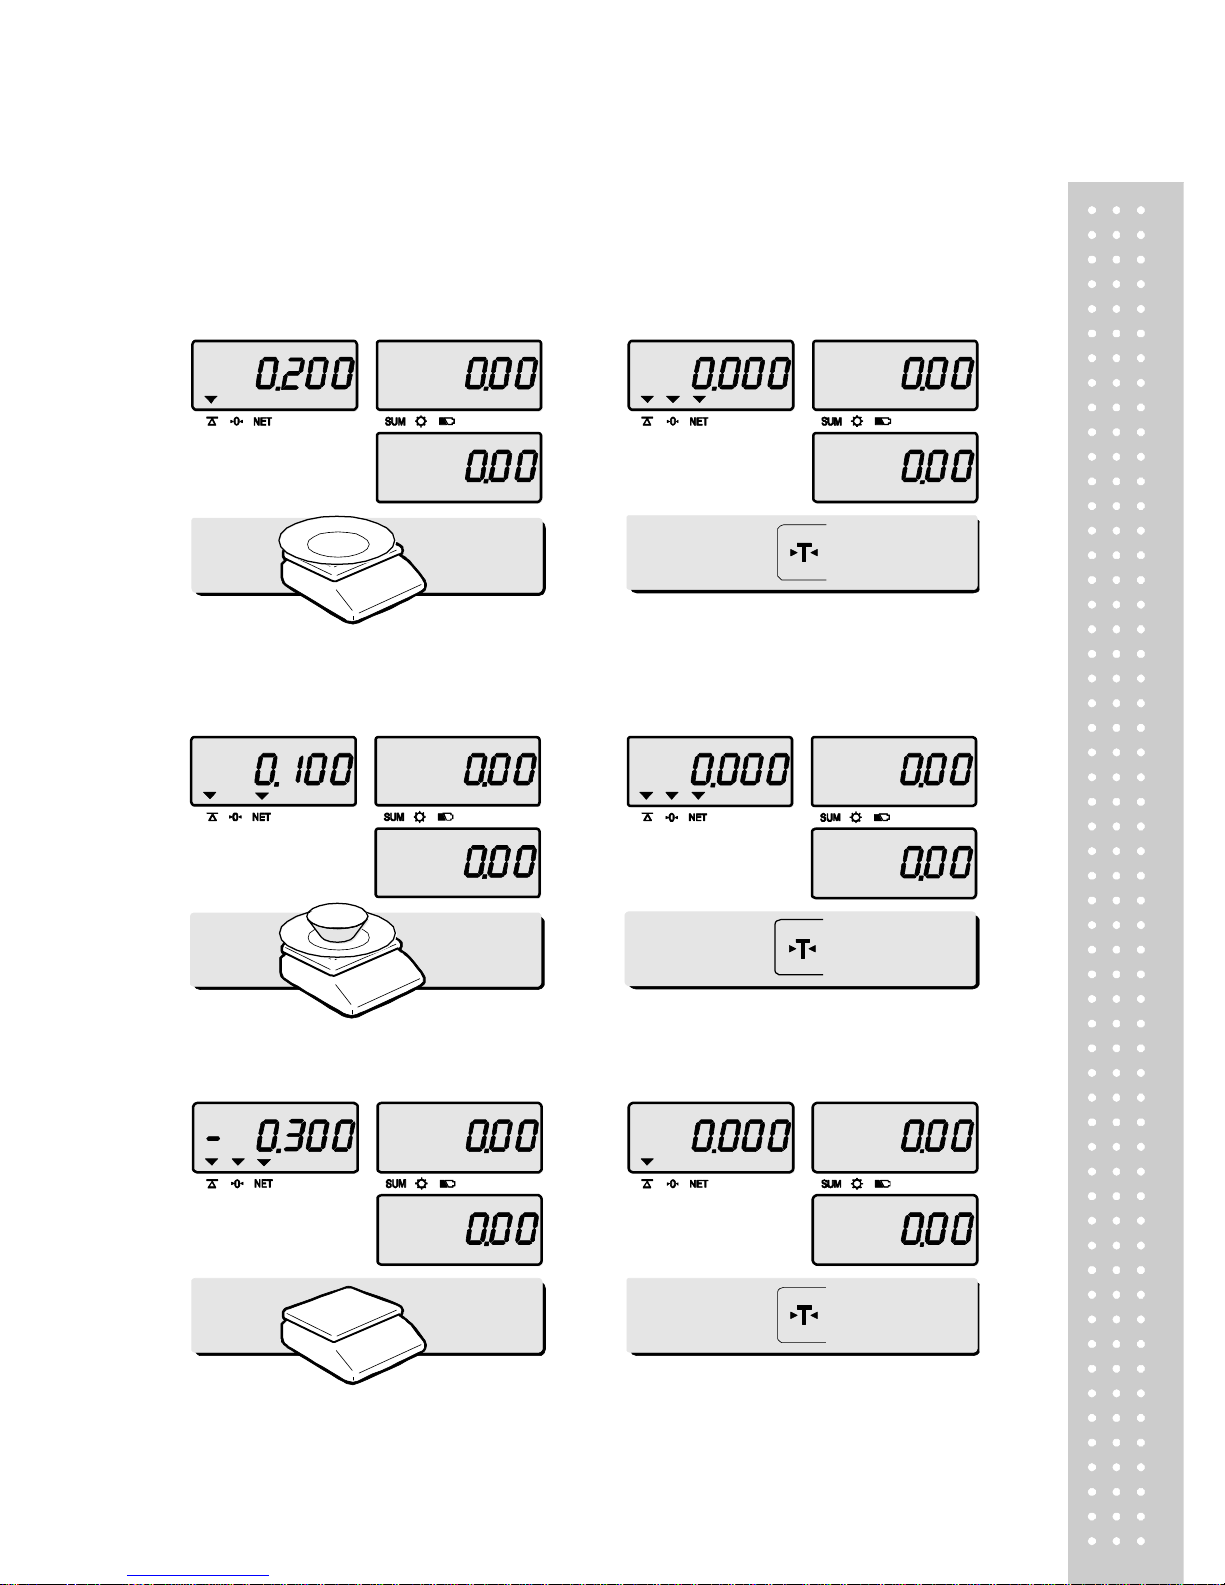
a. To turn on/off the scale
① Press the ON/OFF key to turn on.
② Press the ON/OFF key for a few
seconds to turn off.
b. To turn on/off the backlight
① Press ON/OFF key for a few seconds
under the power on.
② Press ON/OFF key again under the
backlight on.
c. Zero function
① Press ZERO key to set Zero
Page 10
11
d. Tare function
Tare means the weight of container. You may use tare function when you weigh
an item with container and measure only the weight of item.
■ One time tare
① Place a container on the platter.
EX) 200g of tare.
② Press TARE key to set zero point.
EX) 200g of tare.
■ Successive tare
③ Place another container on the
platter. EX) 100g of tare.
④ Press TARE key to set zero point.
⑤ After weighing item remove all of the
container from the platter.
⑥ Press TARE key again to set zero.
Page 11
`
12
Chapter 2. PLU Saving & Calling-up
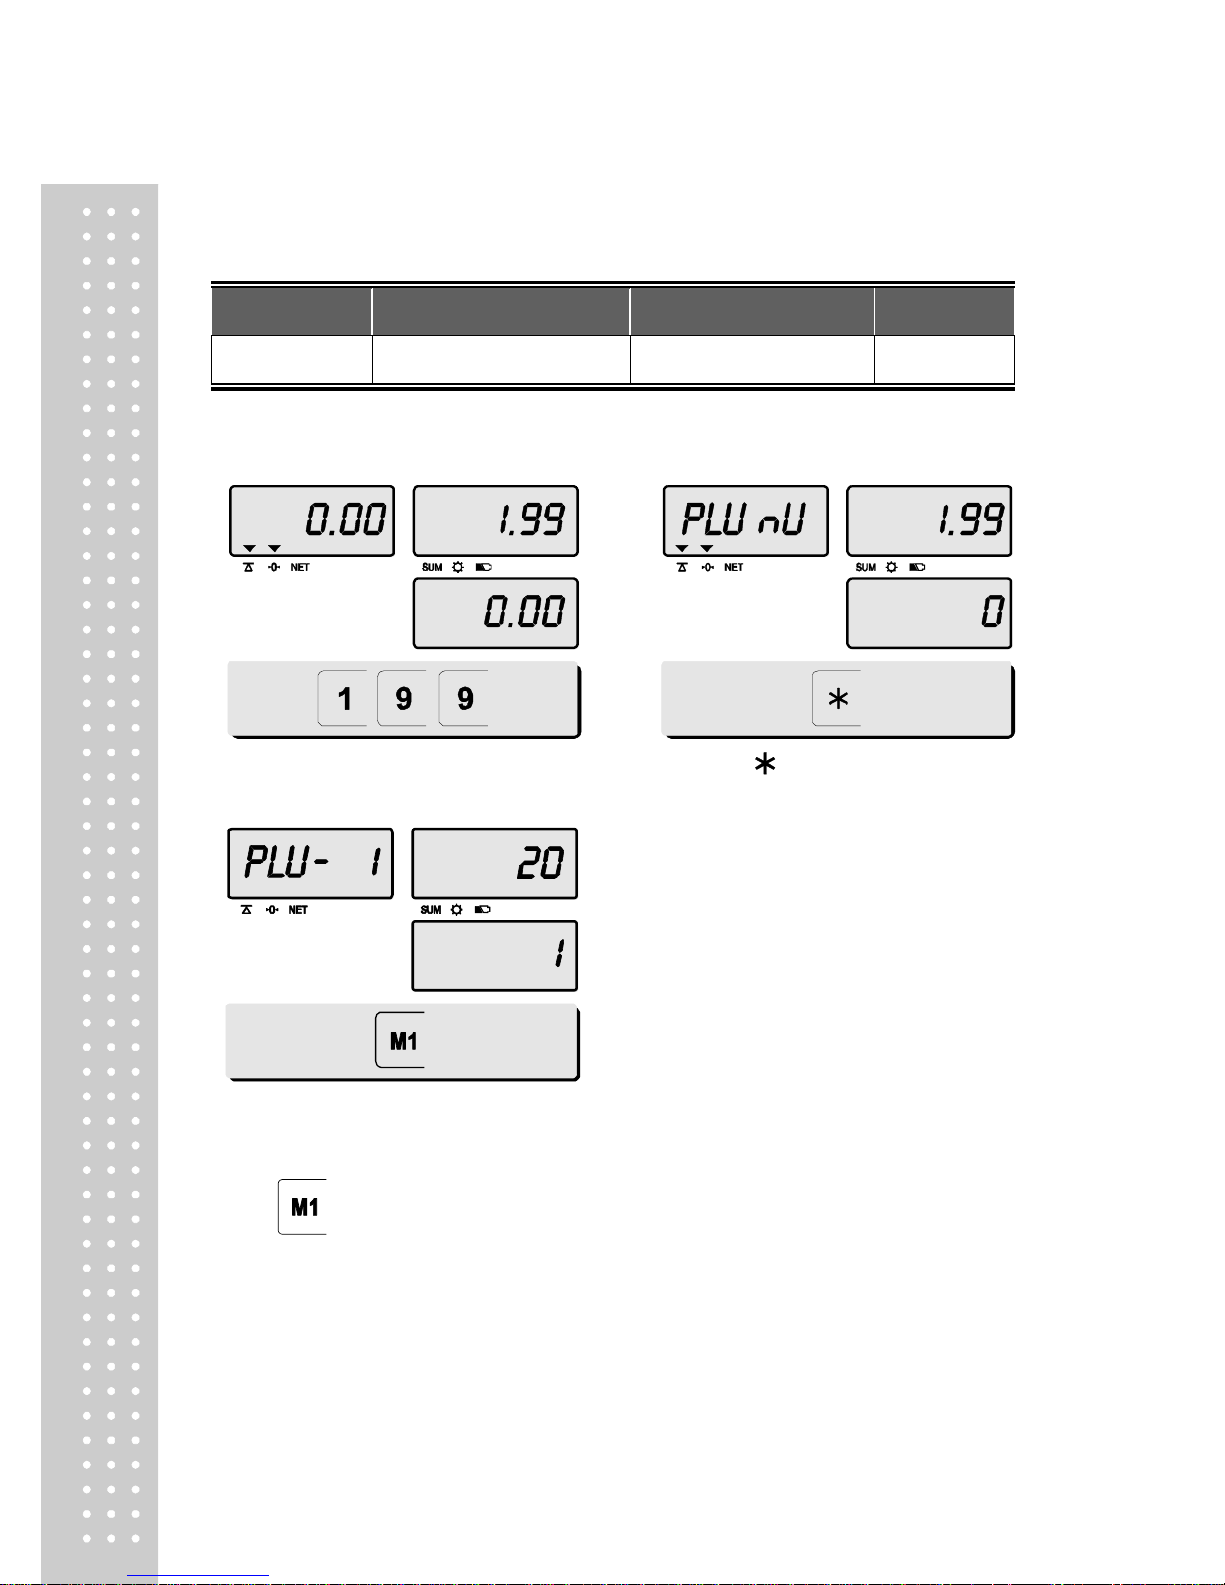
a. Saving unit price on PLU
This section explains how to save unit price in PLU.
Number of PLU
Range
Remarks
PLU name 4 1~4
① Press number key to input unit price
you wish to have. EX)1.99
② Press “ ” key for a few seconds to
enter the PLU 's state can be pre-establish
③ Press PLU key (M1 ~M4) to input a
direct PLU address.
Ex)
Page 12
13
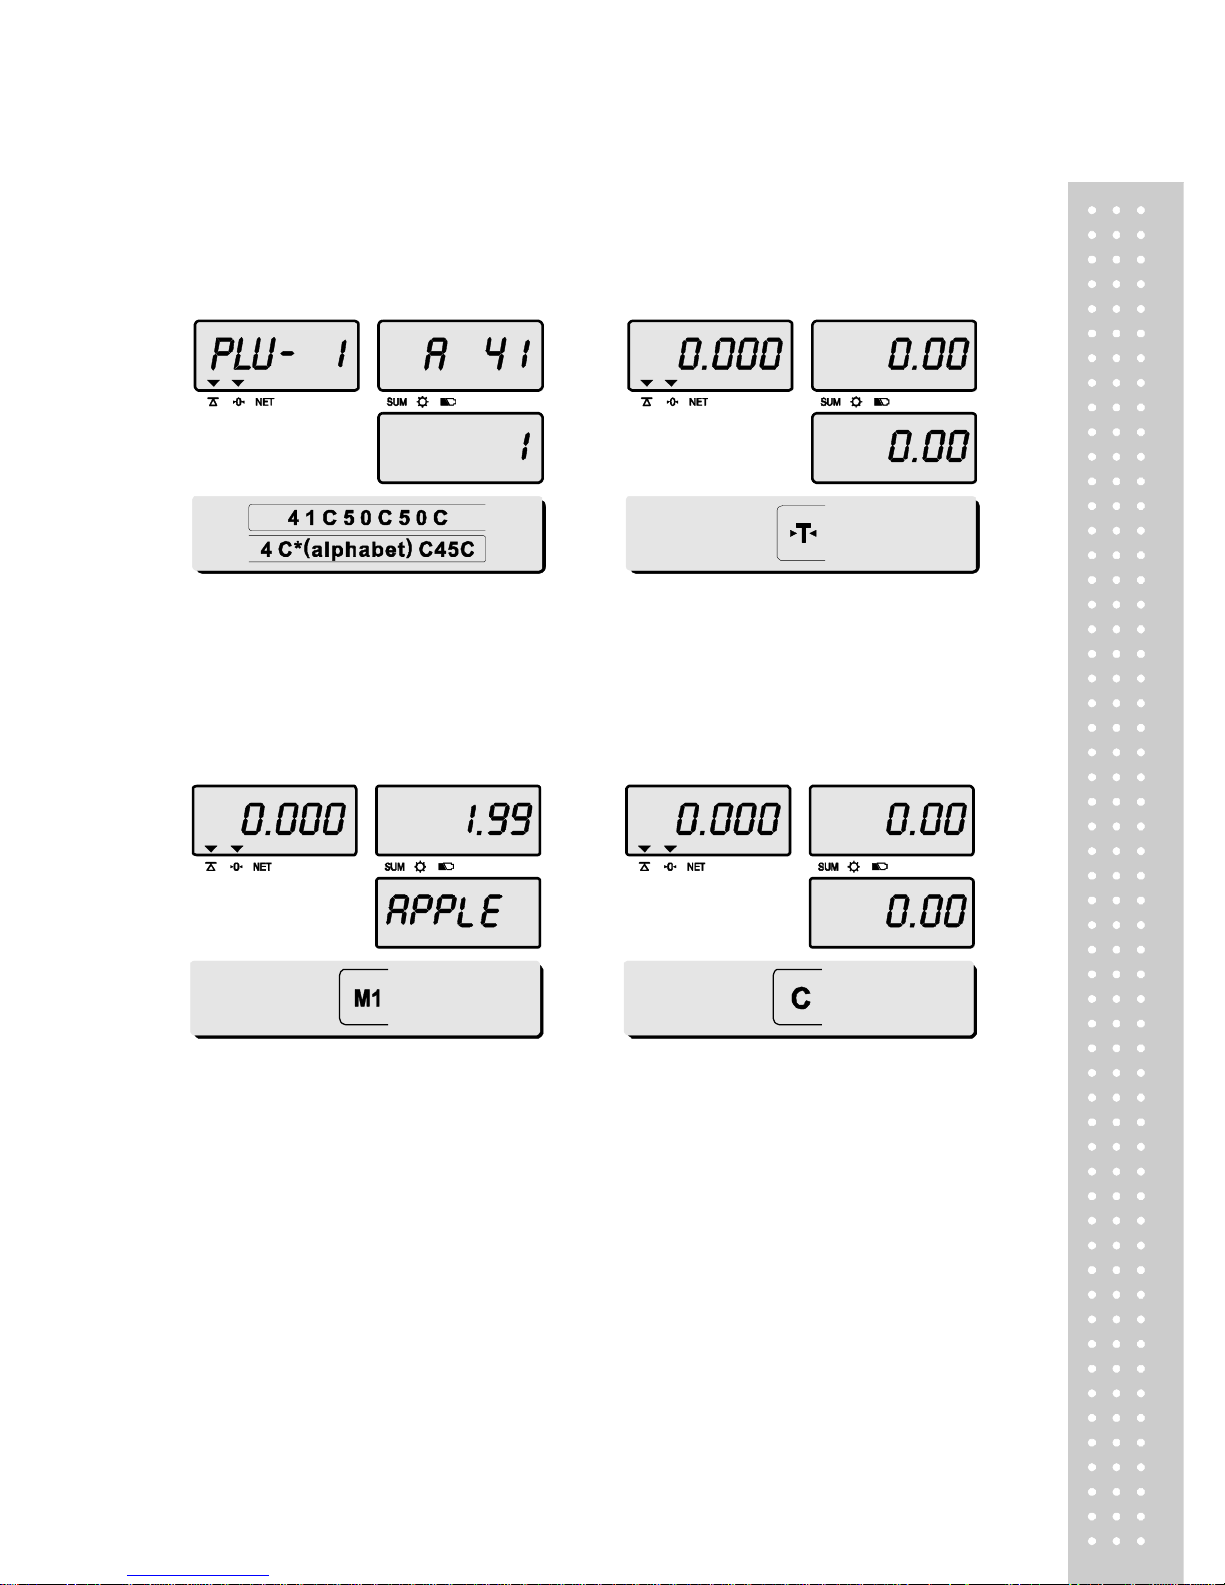
b. Saving PLU name (Option)
C key is to input, save a character, and move to next character (or byte).
TARE key is to move next programming menu.
① Input appropriate ASCII codes to save
the PLU name.
Ex) “APPLE” is “4, 1, C, 5, 0, C, 5, 0,
C, 4, C(alphabet), C, 4, 5, C”.
② Press TARE key to exit to normal
weighing mode or C key up to maximum
8th byte. Then automatically exit to
normal weighing mode.
c. Calling up PLU
① Press M1 ~ M4 key to call up
PLU. e,g, Press M1 key.
② Press C key to clear and return to the
normal weighing mode.
Page 13
`
14
Chapter 3. User’s Set-up Mode
This section explains how to set up the following functions.
Functions
Options
Remarks
a. Auto power-off
NO / 10 / 30 / 60
b. Backlight ON/OFF
OFF / ON / 3 / 5 / 10
c. Brightness function
1 ~ 7
Default 3
d. Low battery backlight auto off
OFF / ON
e. Printer selection
NON/DEP-50/DLP-50
Press ZERO key to save current option and move to next function setting mode.
Press TARE key to move to other next option.
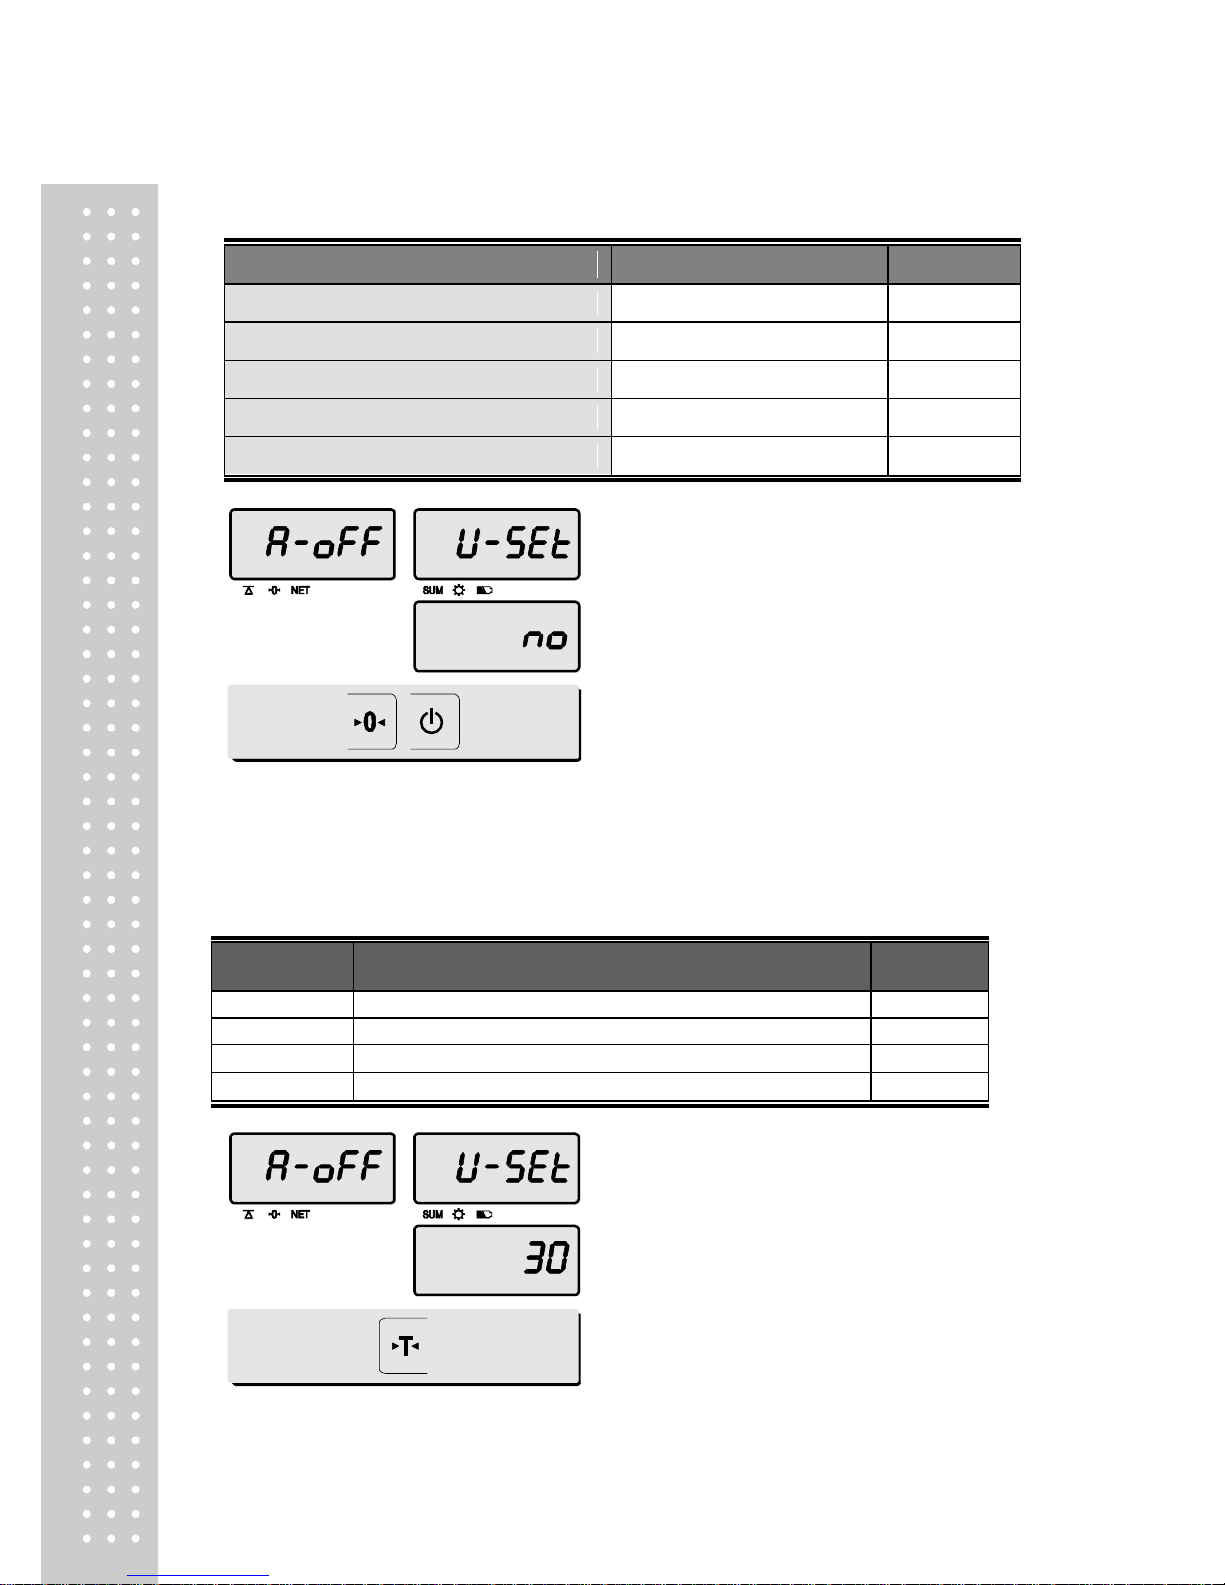
a. Auto power-off
This section explains how to set backlight on & off function and automatic off function.
Options
Description
Remarks
NO
No auto power-off.
10 (minutes)
Auto power-off in 10 minutes when no use.
30 (minutes)
Auto power-off in 30 minutes when no use.
60 (minutes)
Auto power-off in 60 minutes when no use.
① To get into “User’s Set-up Mode” press
ON/OFF key pressing and holding ZERO key.
① Select an option you wish to have by using
TARE key. Ex) 30 (minutes).
Page 14
15
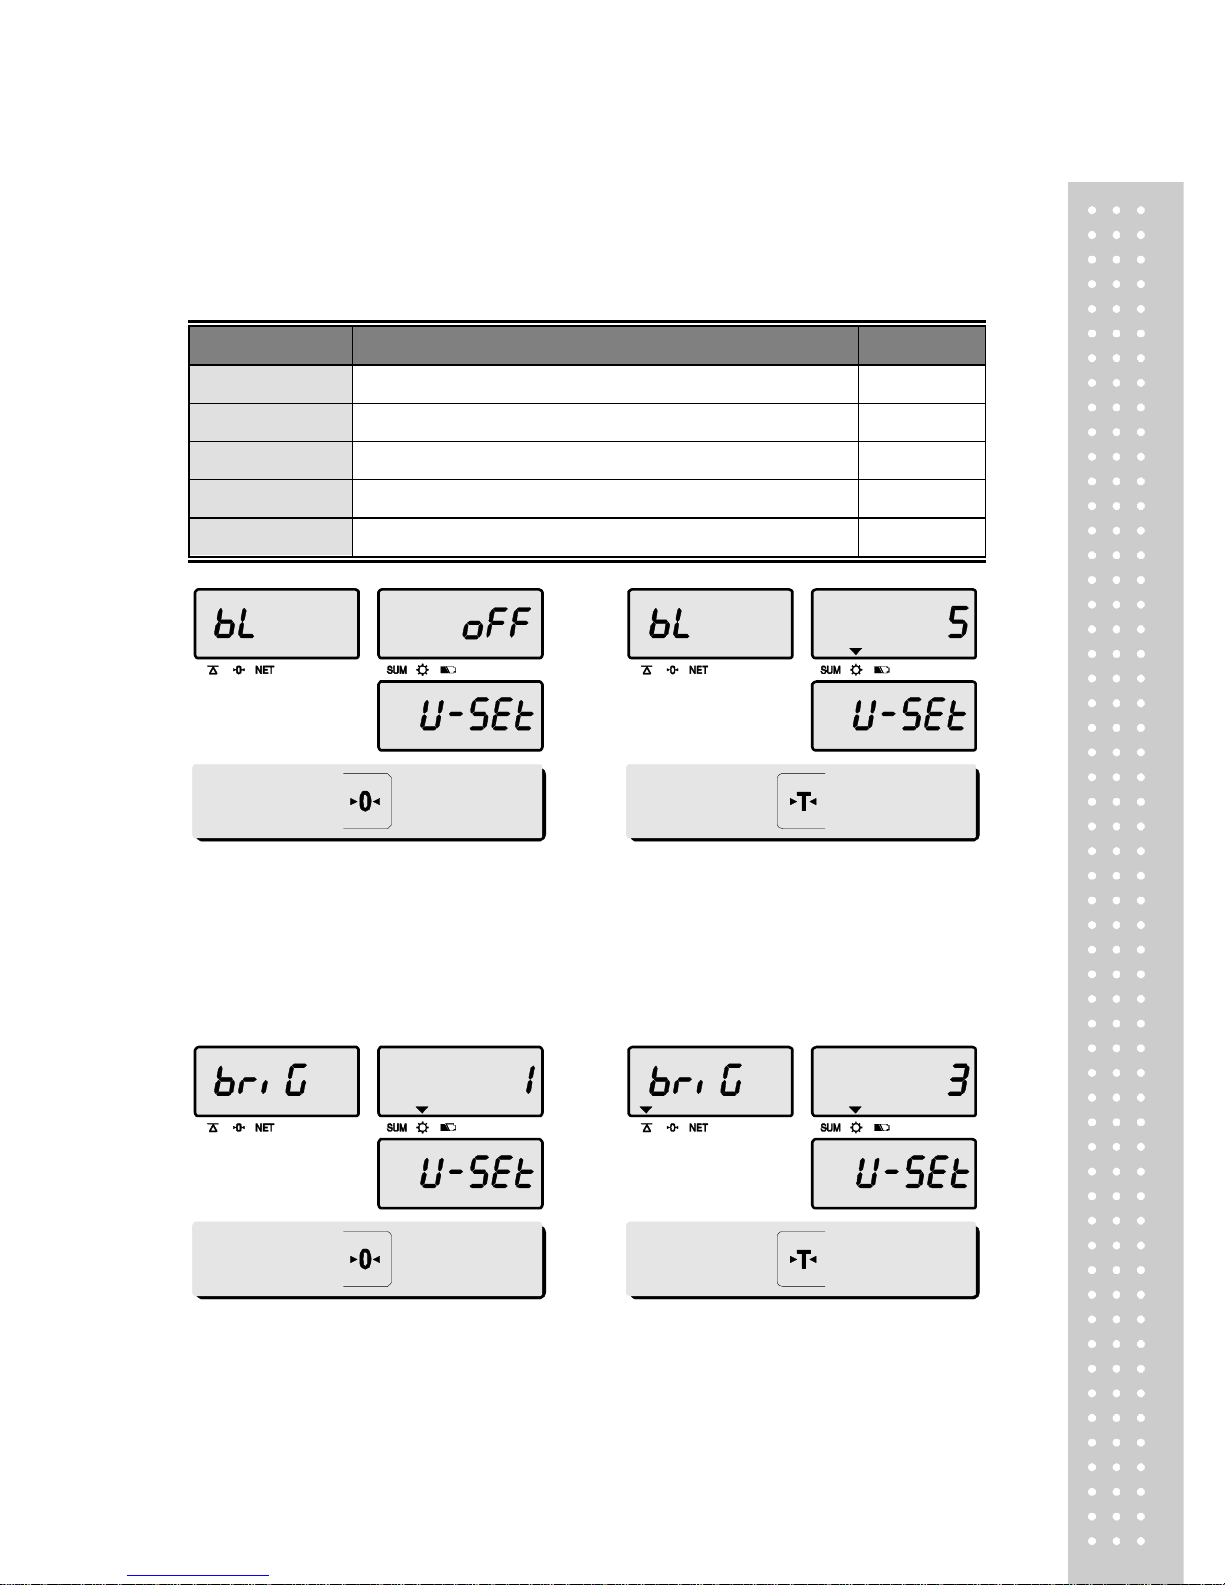
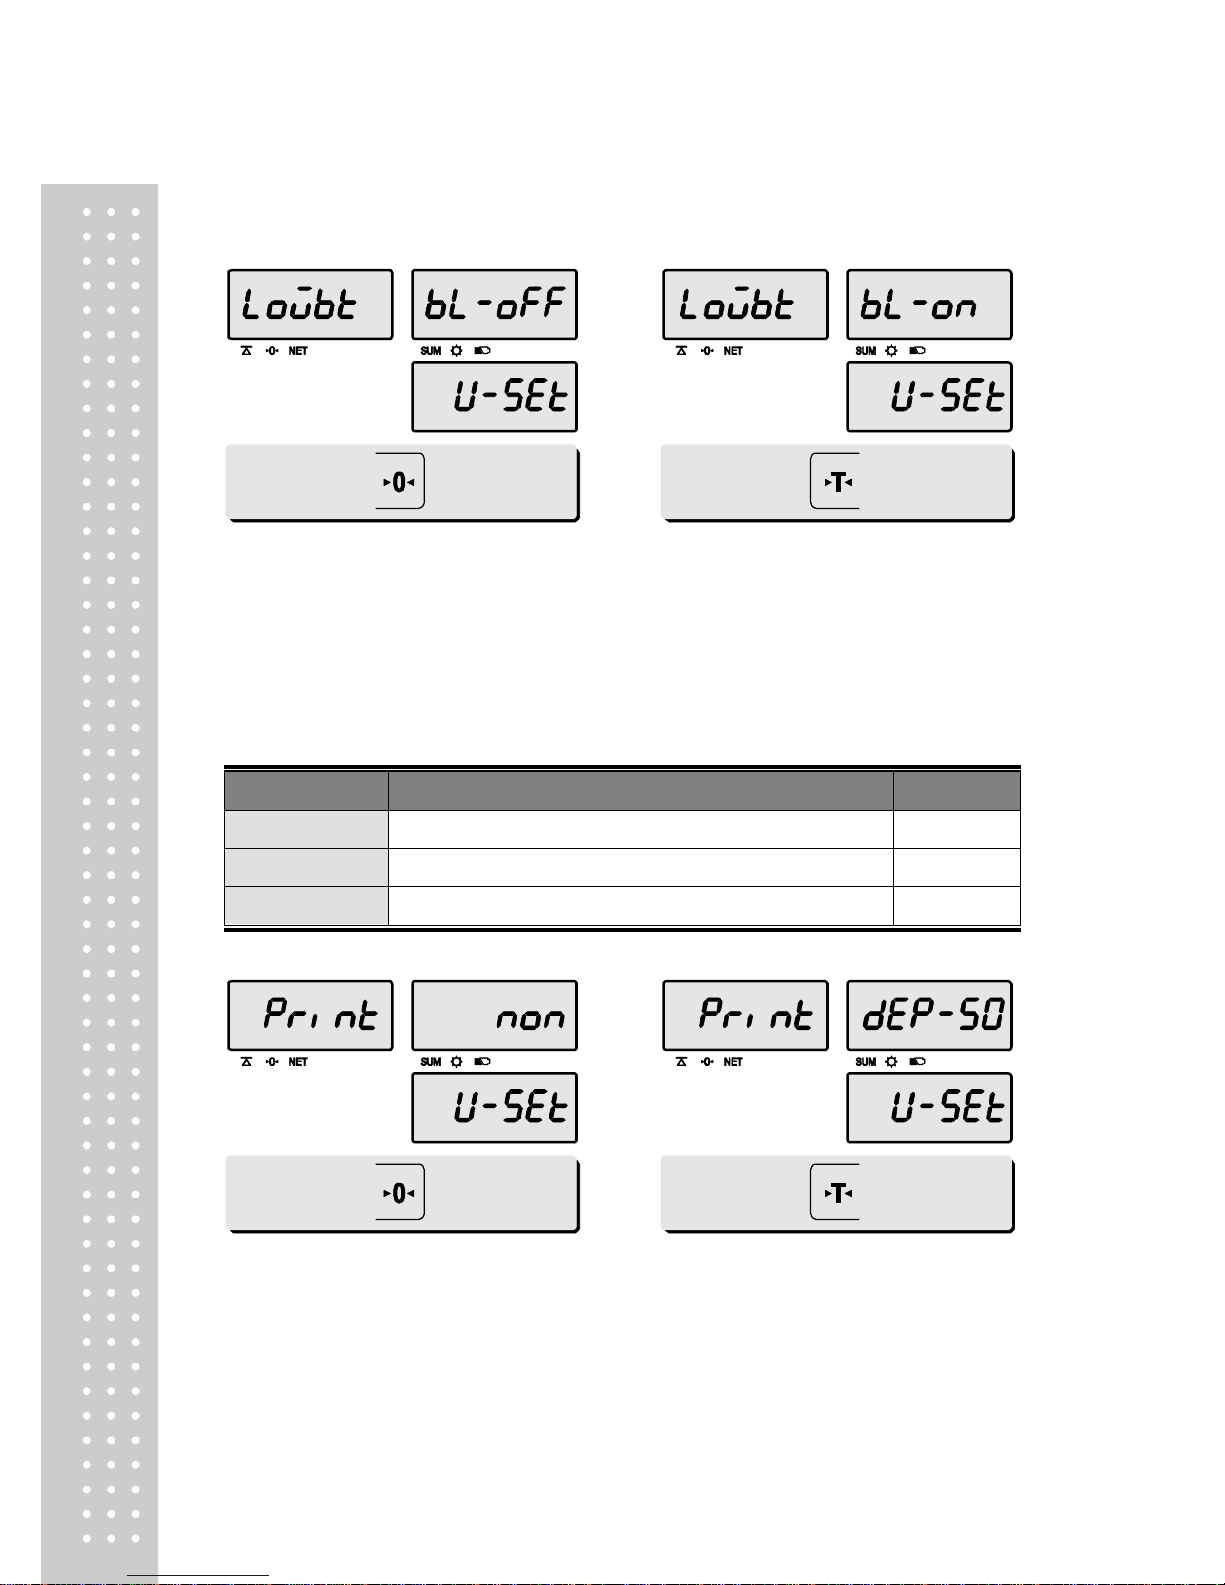
b. Backlight ON/OFF function
This section explains how to set backlight on & off function and automatic off
function.
Options
Description
Remarks
OFF
Backlight always off
ON
Backlight always on
3 (Seconds)
Automatic backlight-off when not in use for 3 seconds.
5 (Seconds)
Automatic backlight-off when not in use for 5 seconds.
10 (Seconds)
Automatic backlight-off when not in use for 10 seconds.
① Press ZERO key to move next function
setting, backlight ON/OFF.
② Use TARE key to select one of backlight
auto power-off option or backlight ON/OFF.
Ex) Select 5 seconds auto power-off option.
c. Brightness function
This section explains how to set brightness level (1 ~ 7)
③ Press ZERO key to move next function
setting, backlight brightness.
④ Press TARE key to select brightness
(1~7).
Page 15
`
16
d. Low battery backlight auto off function
This section explains how to set Backlight Auto Off. If the scale uses
backlight Auto Off function, it will turn off when low battery indicator occurs
① Press ZERO key to move next function setting,
low battery backlight auto off..
② Press TARE key to select backlight on/off.
e. Selecting the printer
This section explains how to select the printer option when you'd like to use
the
printer connected to ER JR.
Options
Description
Remarks
NON
No printer in use
DEP-50
DEP-50 printer interface
DLP-50
DLP-50 printer interface
① Press ZERO key to move next function setting,
selecting the printer.
② Select the printer you’re using with
ER JR by pressing TARE key. EX) DEP-50
Page 16
17
Chapter 4. Formatting Printing Receipt
This chapter explains how to set the receipt format in the following fields.
Options
Description
Remarks
HEADER
To input characters you wish to have on
the receipt header.
Maximum 1,2 line / 24 characters,
3 line / 16 characters for each line
UNIT
To input currency symbol or characters
you wish to have on the receipt.
Maximum 8 characters
DATE
To input date on the receipt.
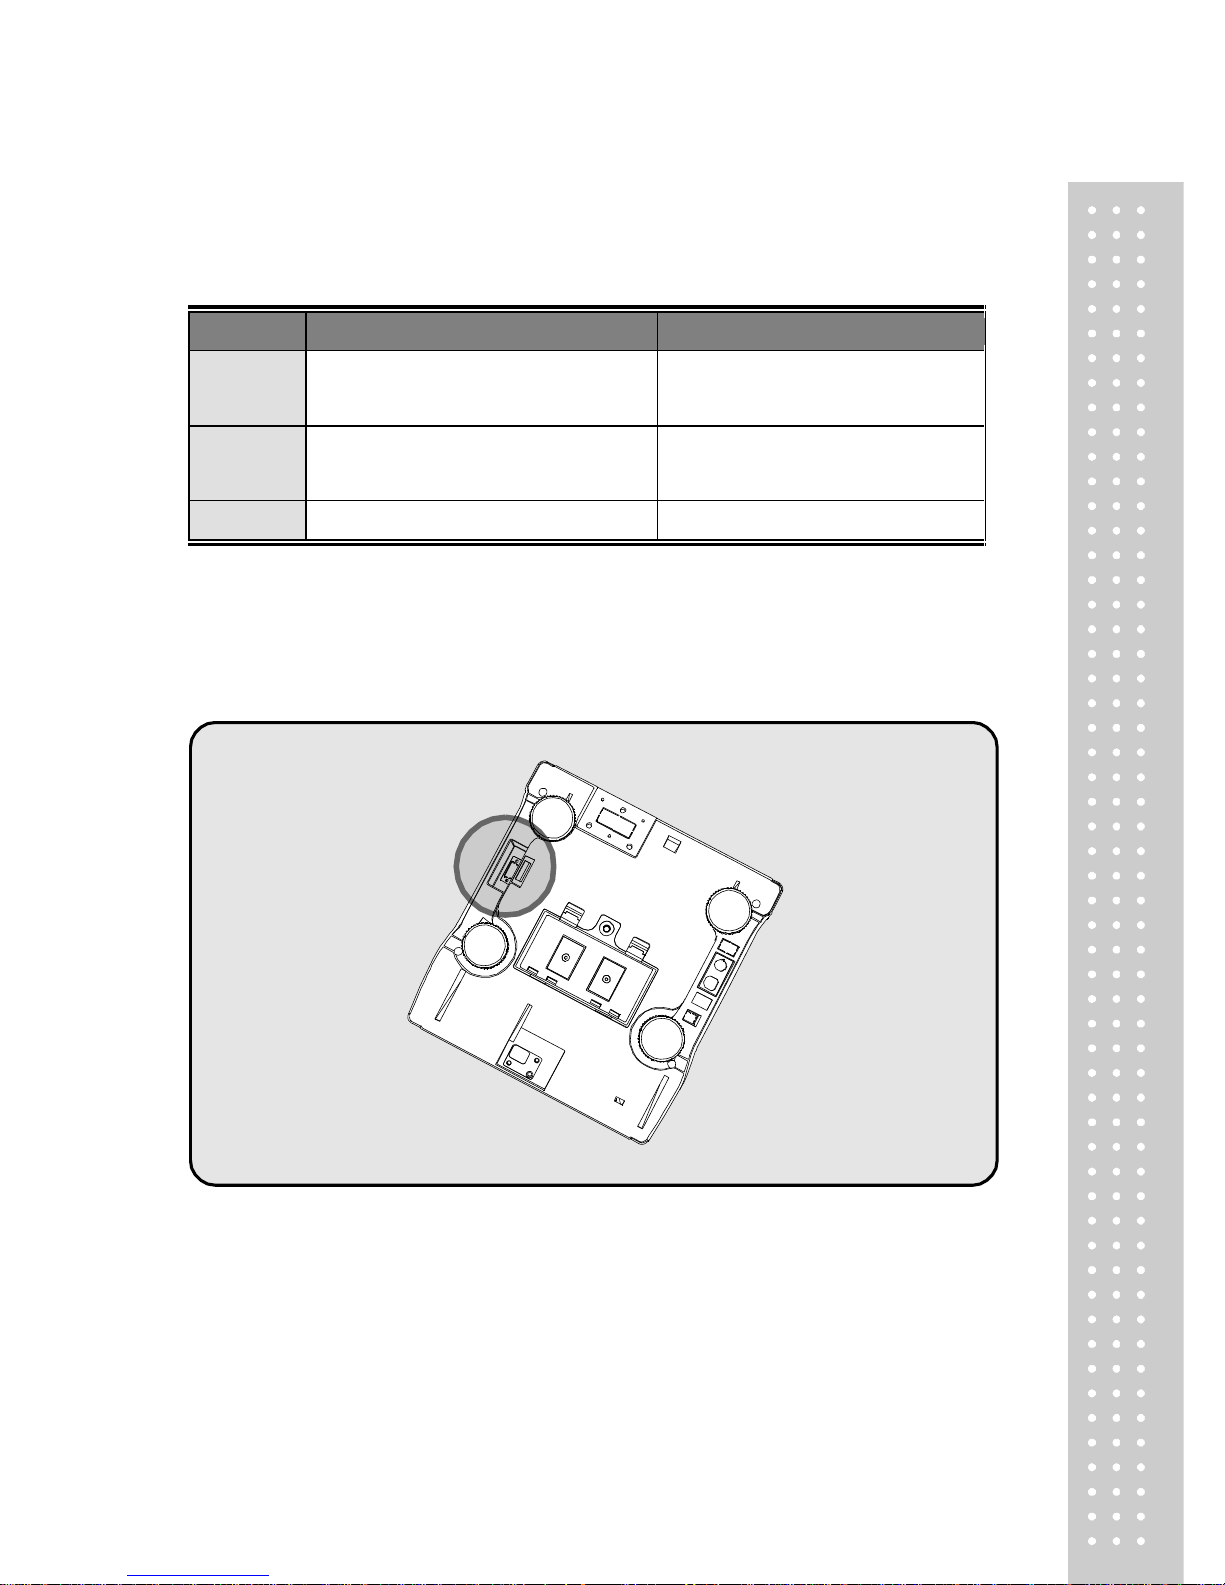
a. Using Printer
Please connect your printer to RS-232C port, which is located at the gray part
on the picture, using RS-232C cable.
Page 17
`
18
b. Receipt header setting
Options
Description
Remarks
HEADER
To input characters you wish to have
on the receipt header.
Maximum 1,2 line / 24 characters,
3 line / 16 characters for each line
User may input the name of store, telephone number, or other expressions
he/she wishes to have on the receipt.
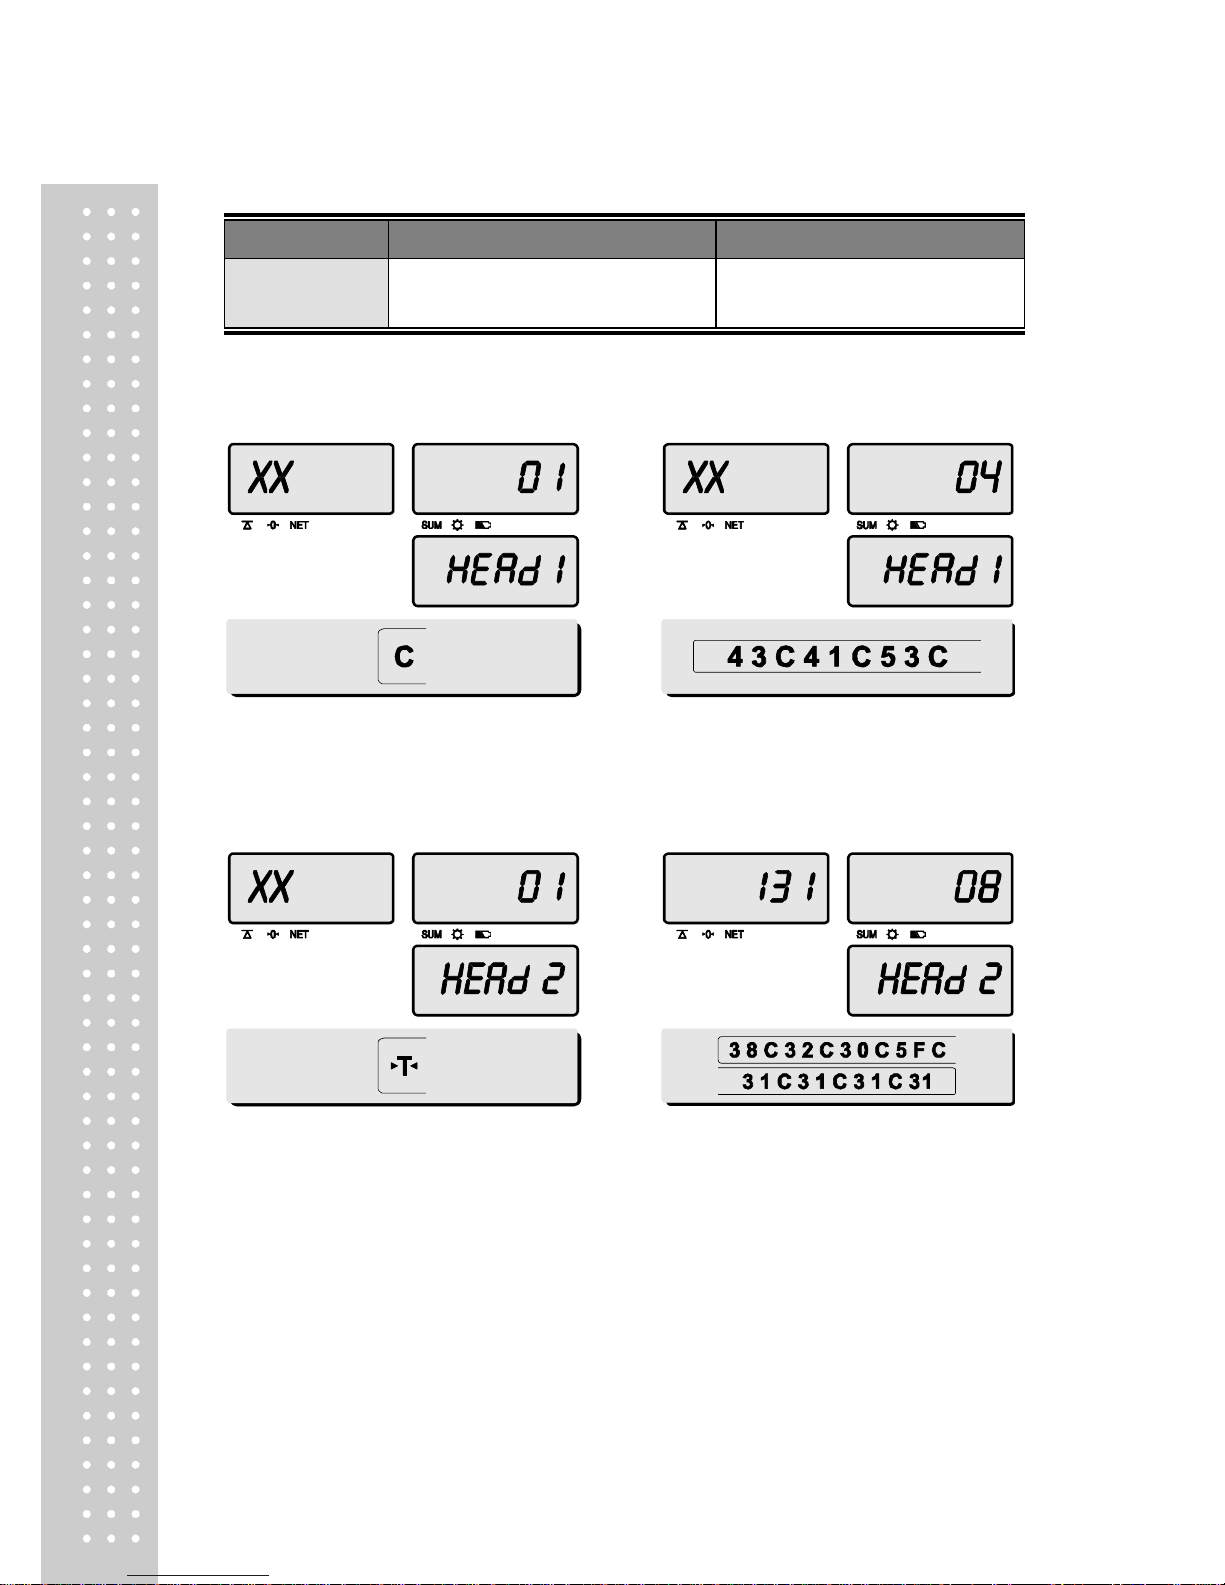
① Hold down C key and press ON/OFF
key under the scale power off. “O1” on the
“Unit Price” display represents that you are
ready to input the first character.
② Input appropriate ASCII codes (page on 30)
you wish to have. Ex) CAS.
③ To save it and go next header line press
TARE key.
④ Using ASCII code you can input appropriate
data on Header 2.
Ex) 820-1111, telephone #.
Page 18
19
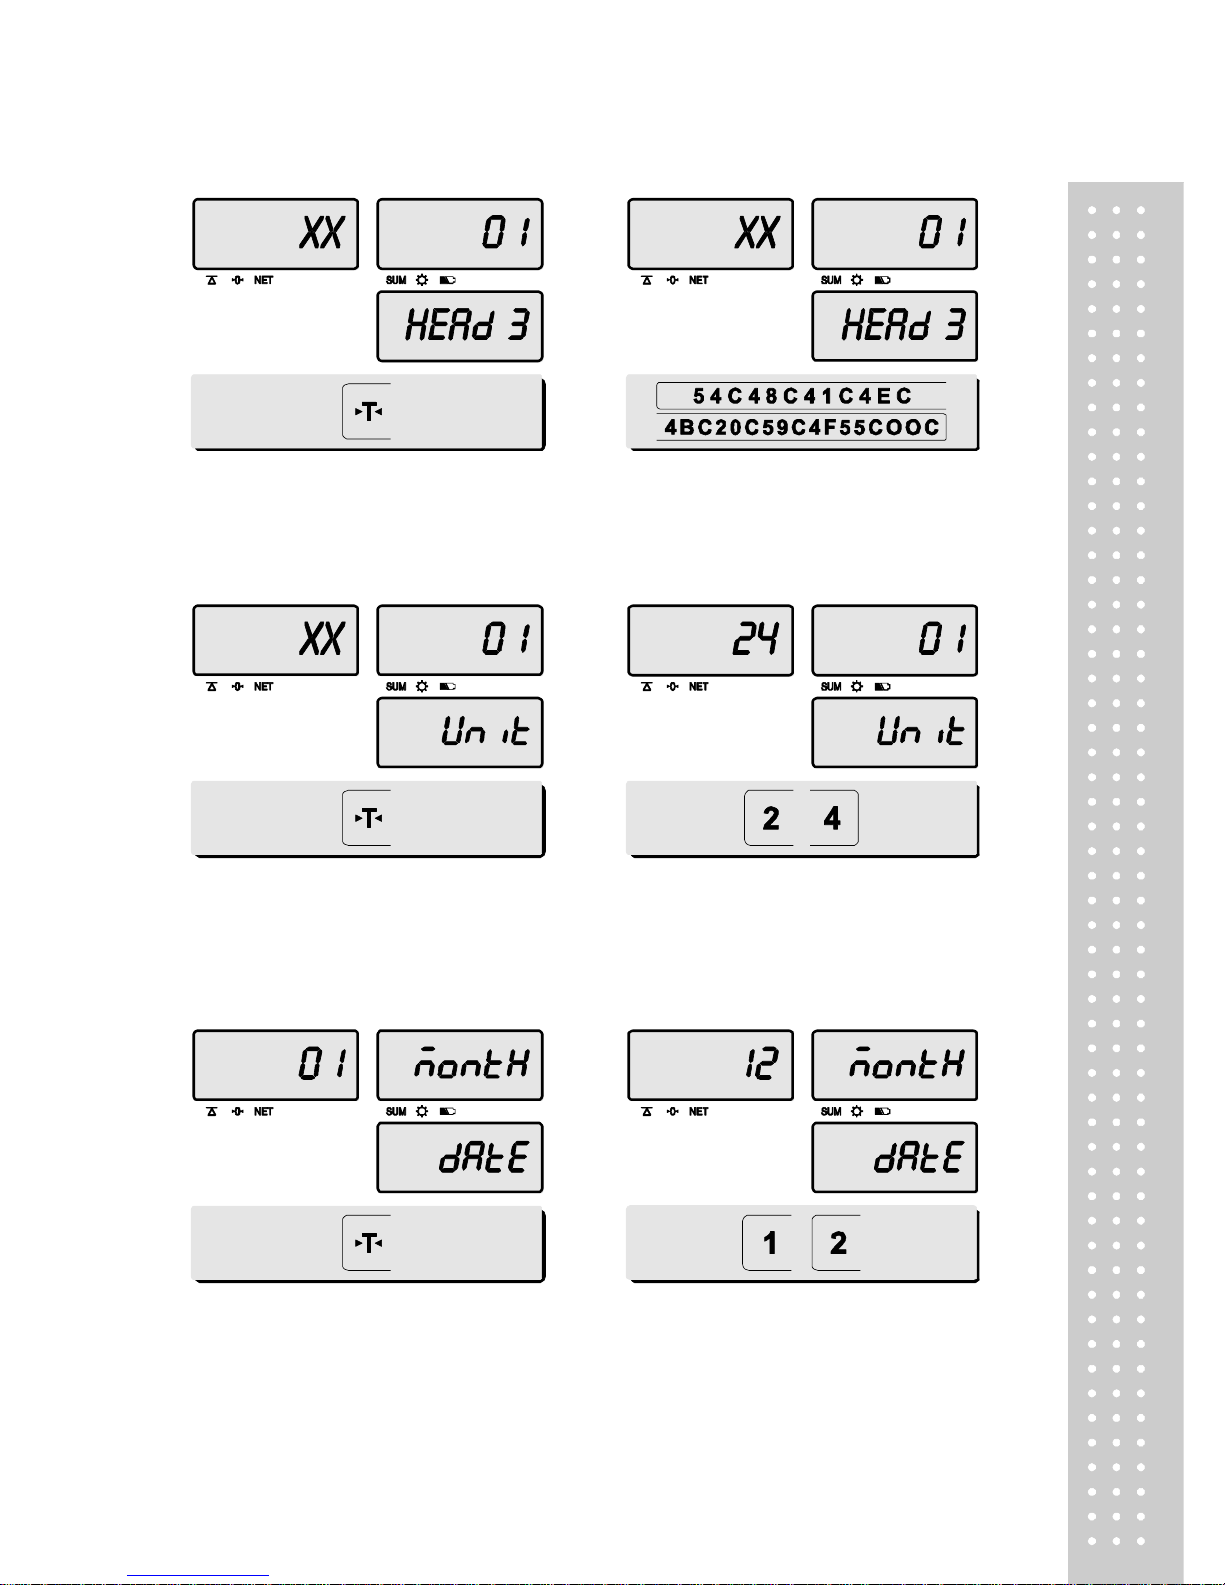
⑤ To save it and go next header line press
TARE key.
⑥ Using ASCII code you can input
appropriate data on Header 3.
Ex) THANK YOU
c. Receipt currency (unit) setting
① Initial currency (unit) display status.
② Using ASCII code you can input appropriate
character or currency symbols on UNIT.
Ex) $
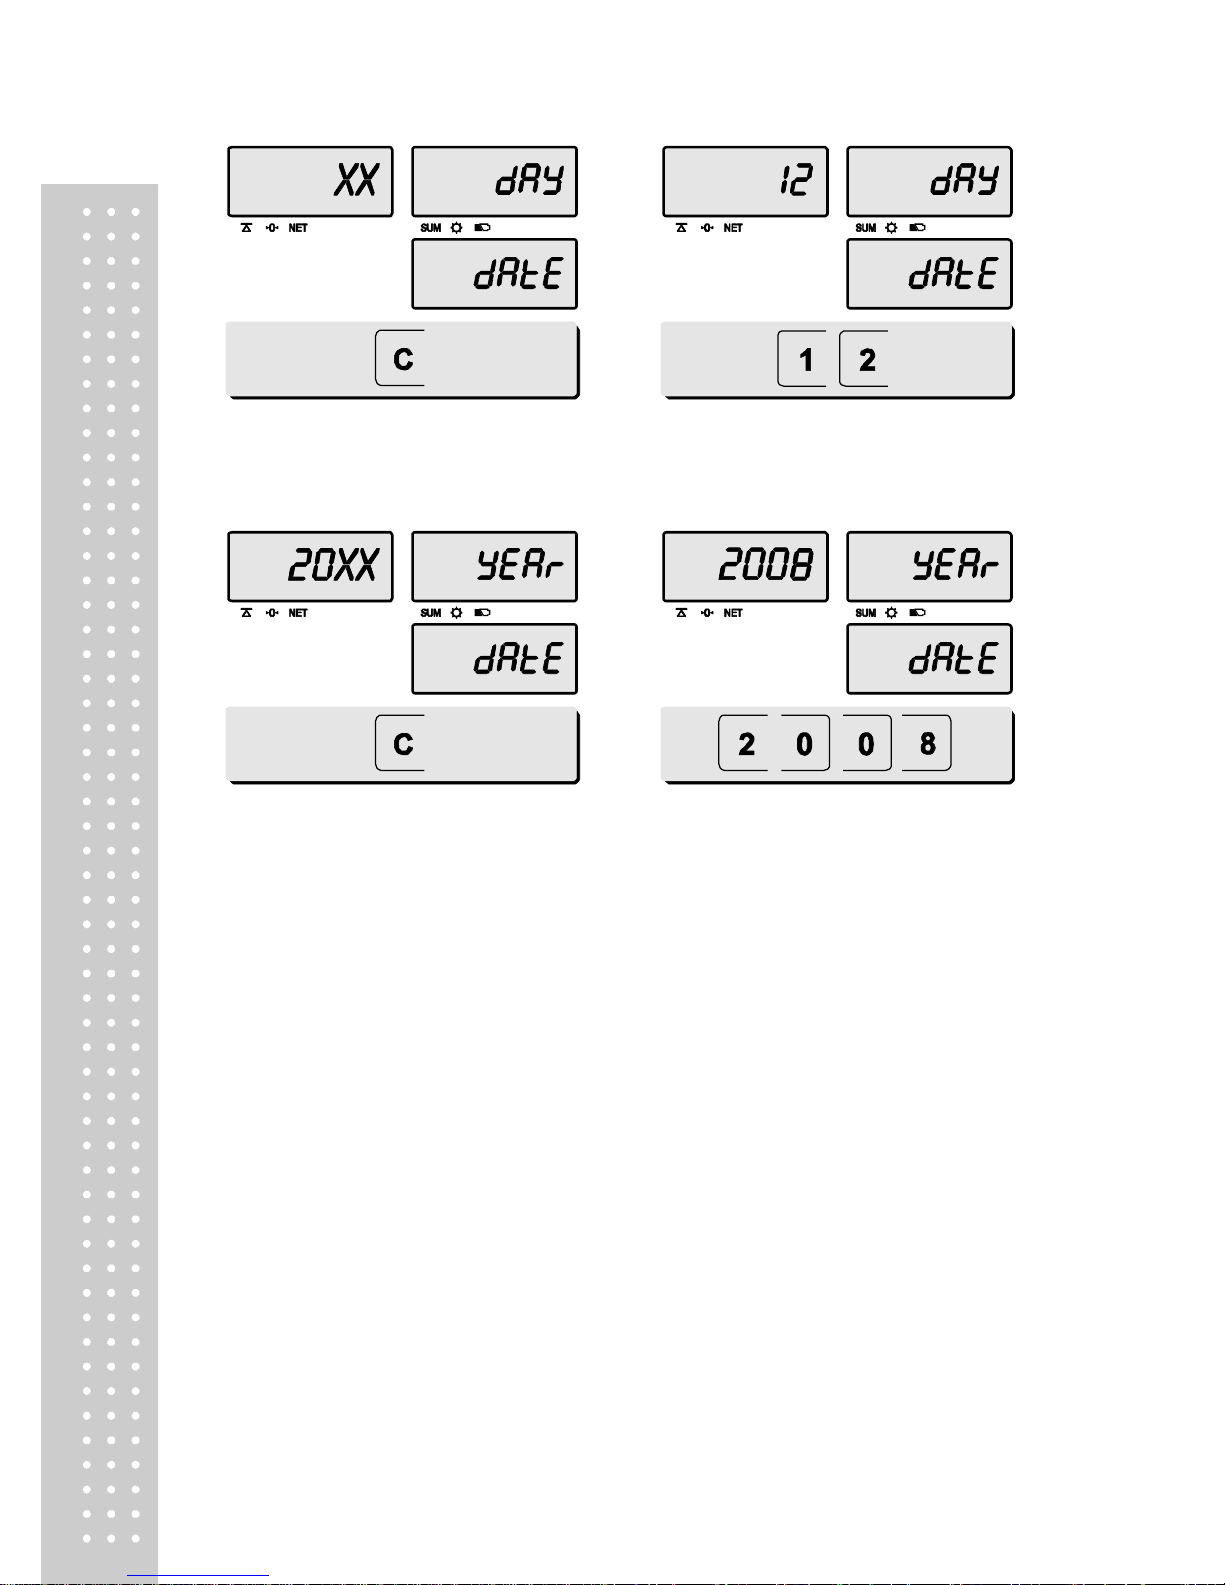
d. Receipt date setting
① To save it and go to “Initial DATE display”
status press TARE key.
② Just input appropriate month you wish to
have, not using ASCII code.
Ex) 12 (December)
Page 19
`
20
③ Press C key to go to next “DAY” setting.
④ Just input appropriate day you wish to
have, not using ASCII code.
Ex) 12th day
⑤ Press C key to go to next “YEAR” setting.
⑥ Just input appropriate year you wish to
have, not using ASCII code.
Ex) Year 2008
• If you press C or T(TARE) key you can automatically go to normal
weighing mode.
Page 20
21
Chapter 5. Sales transaction
ER JR can provide inputting the unit price through the numeric key and calling up
PLU.
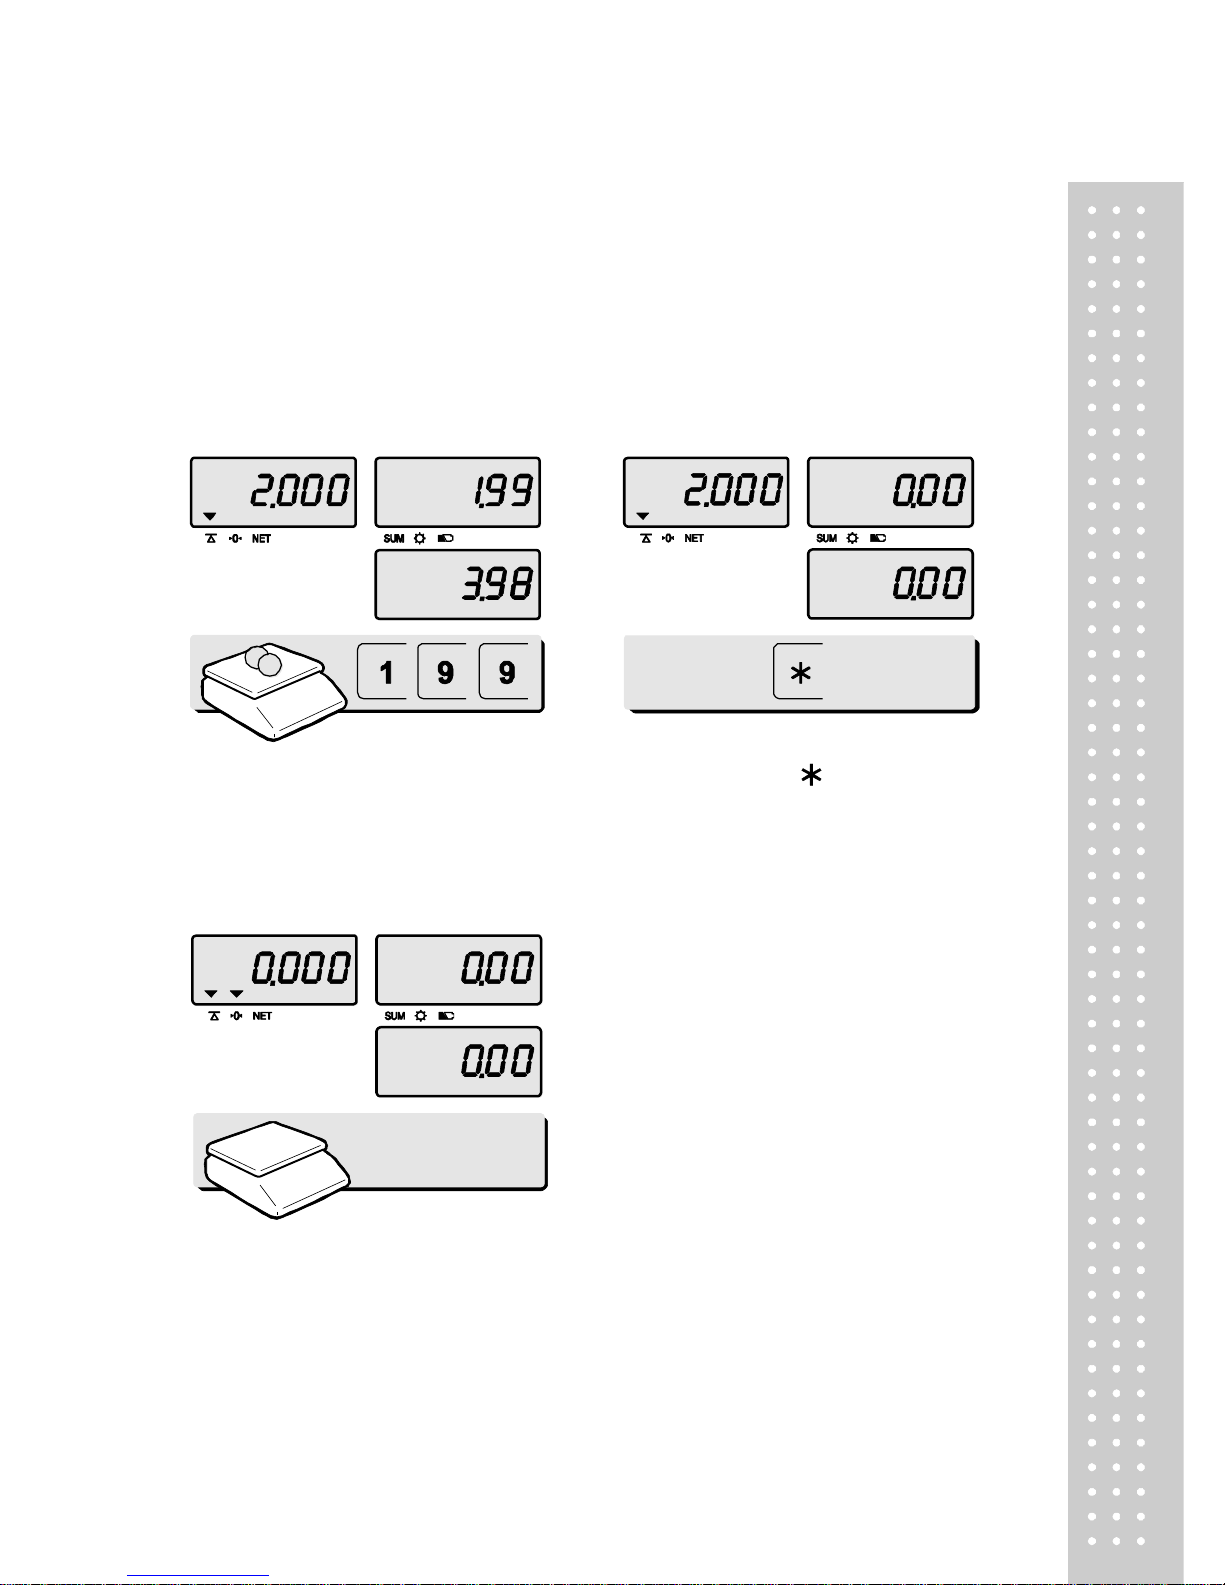
a. Input the unit price through the numeric key
This section explains how to input the unit price through the numeric key
and complete the sales transaction.
① Place an item on the platter and
press appropriate numeric keys to input
unit price. EX) 1.99 for unit price.
② If you press key add this
transaction to daily total amount and
number of sales data.,Unit-price & totalprice window is clear.
※ if the scale is connected printer,
sale transaction data will printed out.
③ Remove the item from the platter.
Page 21
`
22
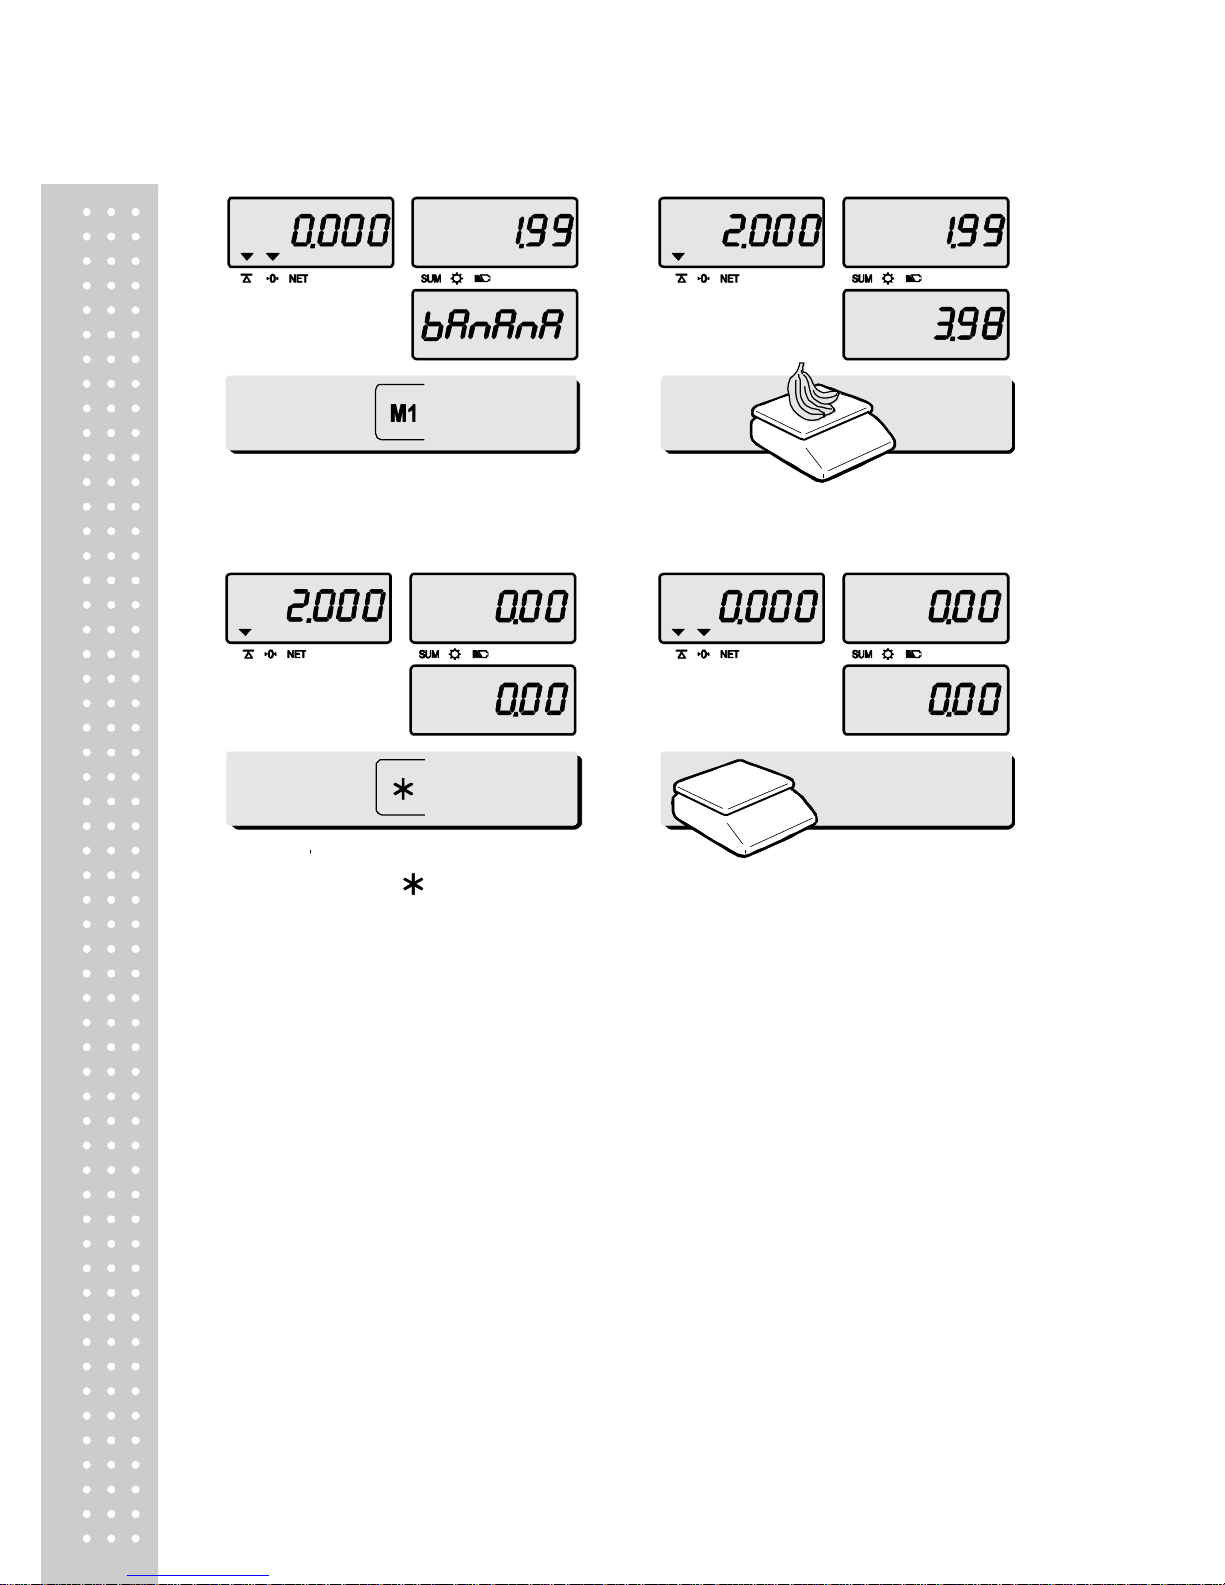
b. Input the unit price through calling up PLU
① Press M1 ~M4 key can call up
the PLU. EX) M1
② Place an item on the platter.
③ If you press “ ” key add this
transaction to daily total amount and
number of sales data.,Unit-price & totalprice window is clear.
※ if the scale is connected printer,
sale transaction data will printed out
④ Remove an item on the platter.
Page 22
23
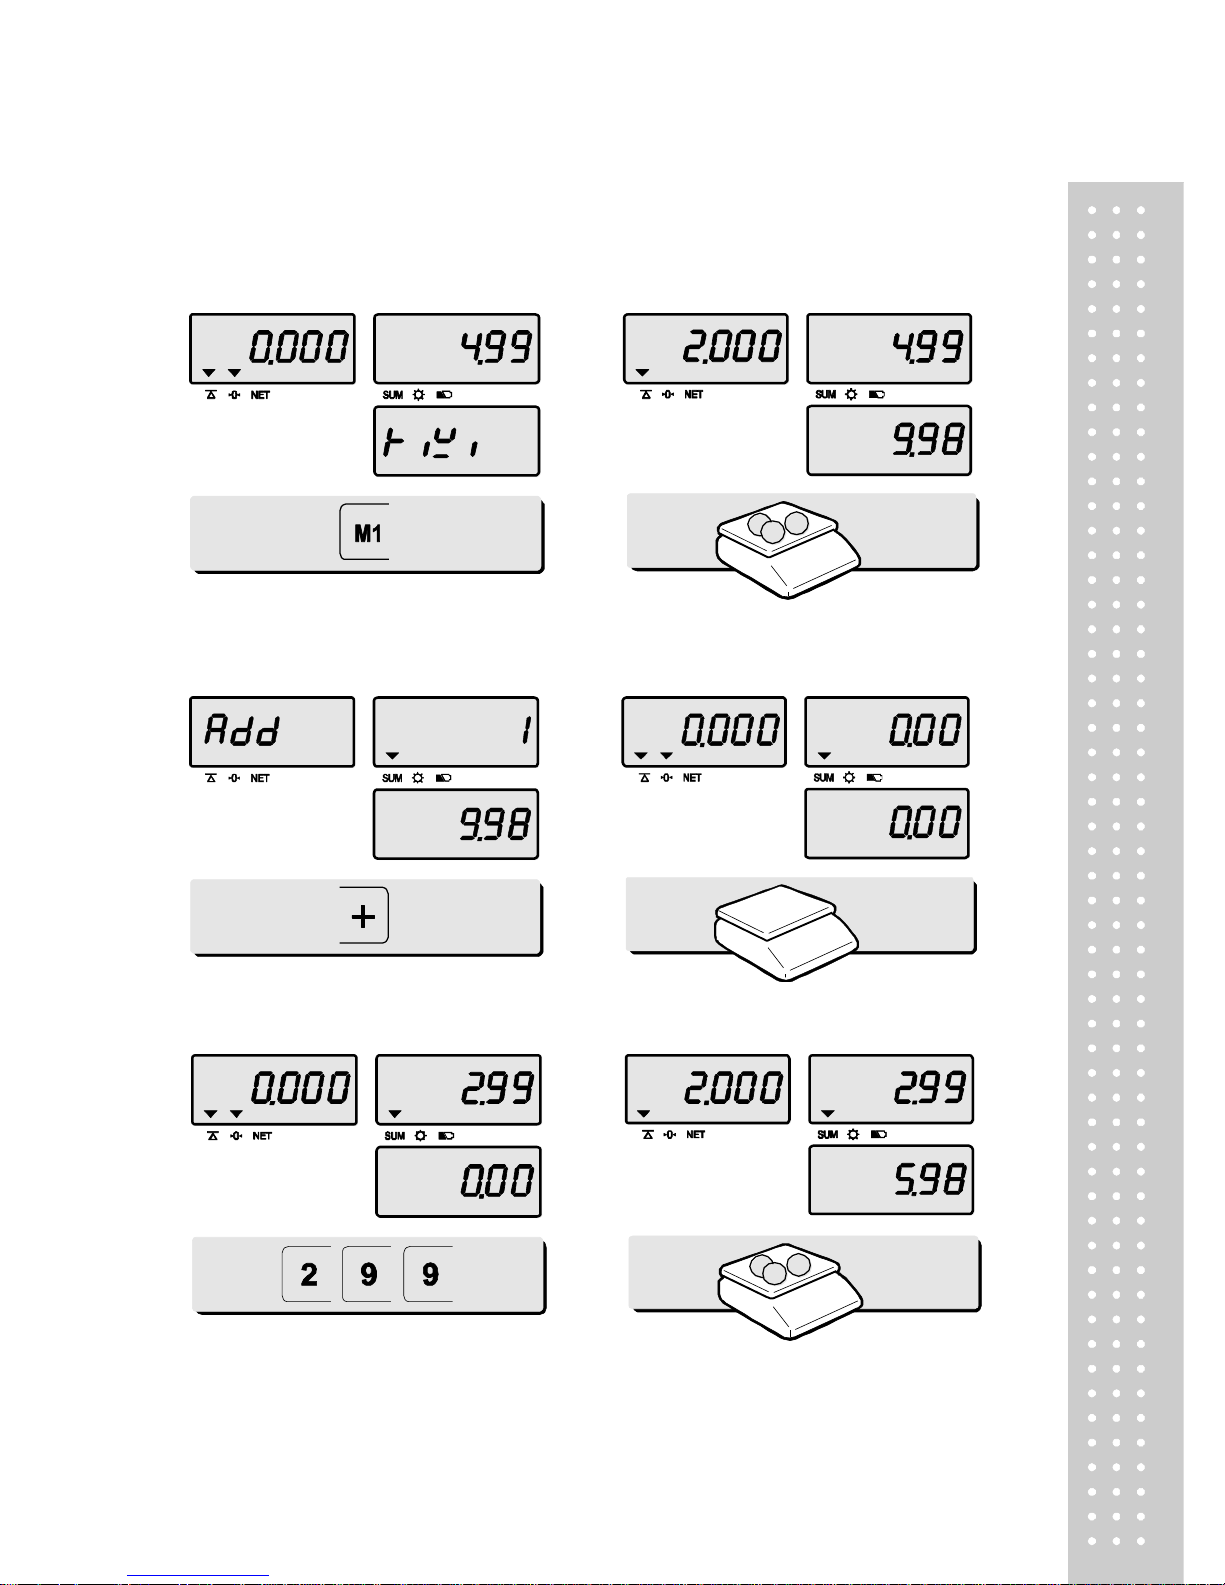
c. Add up the total amount
Press + key to make the adding-up transactions. You may either call up PLU to
input the unit price.
① Press M1 ~M4” key to call up the
PLU directly. e.g. M1.
② Place an item on the platter.
③ Press + key.
④ Remove the item from the platter.
⑤ Input the unit price through the
number key.
EX) 2.99 for peanut dessert.
⑥ Place the item on the platter.
Page 23
`
24
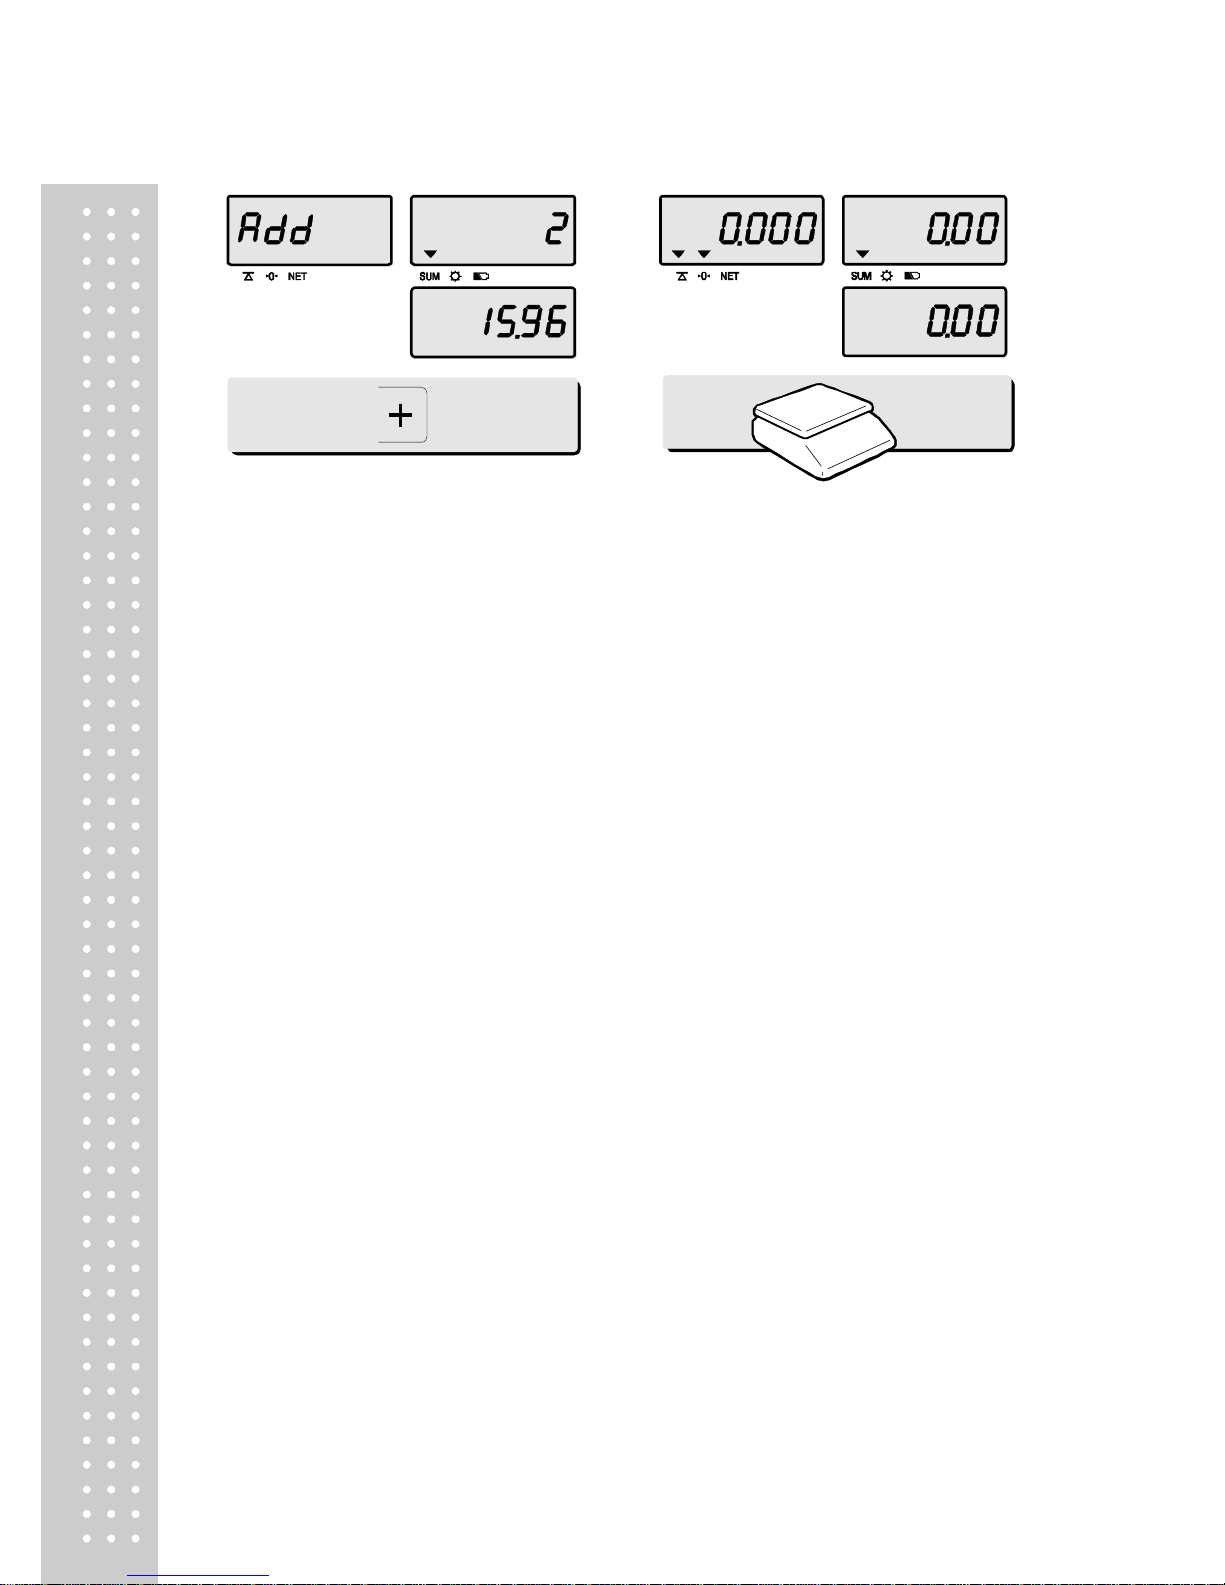
⑦ Press + key. “ Total price ”
display says total price added. And
“ Unit ” display says the number of
sales transactions added
⑧ Remove the item from the platter
You can also place the item on the platter first, and then input the unit price
The maximal adding-up times is 1000, and the maximal total price is 999,999
Page 24
25
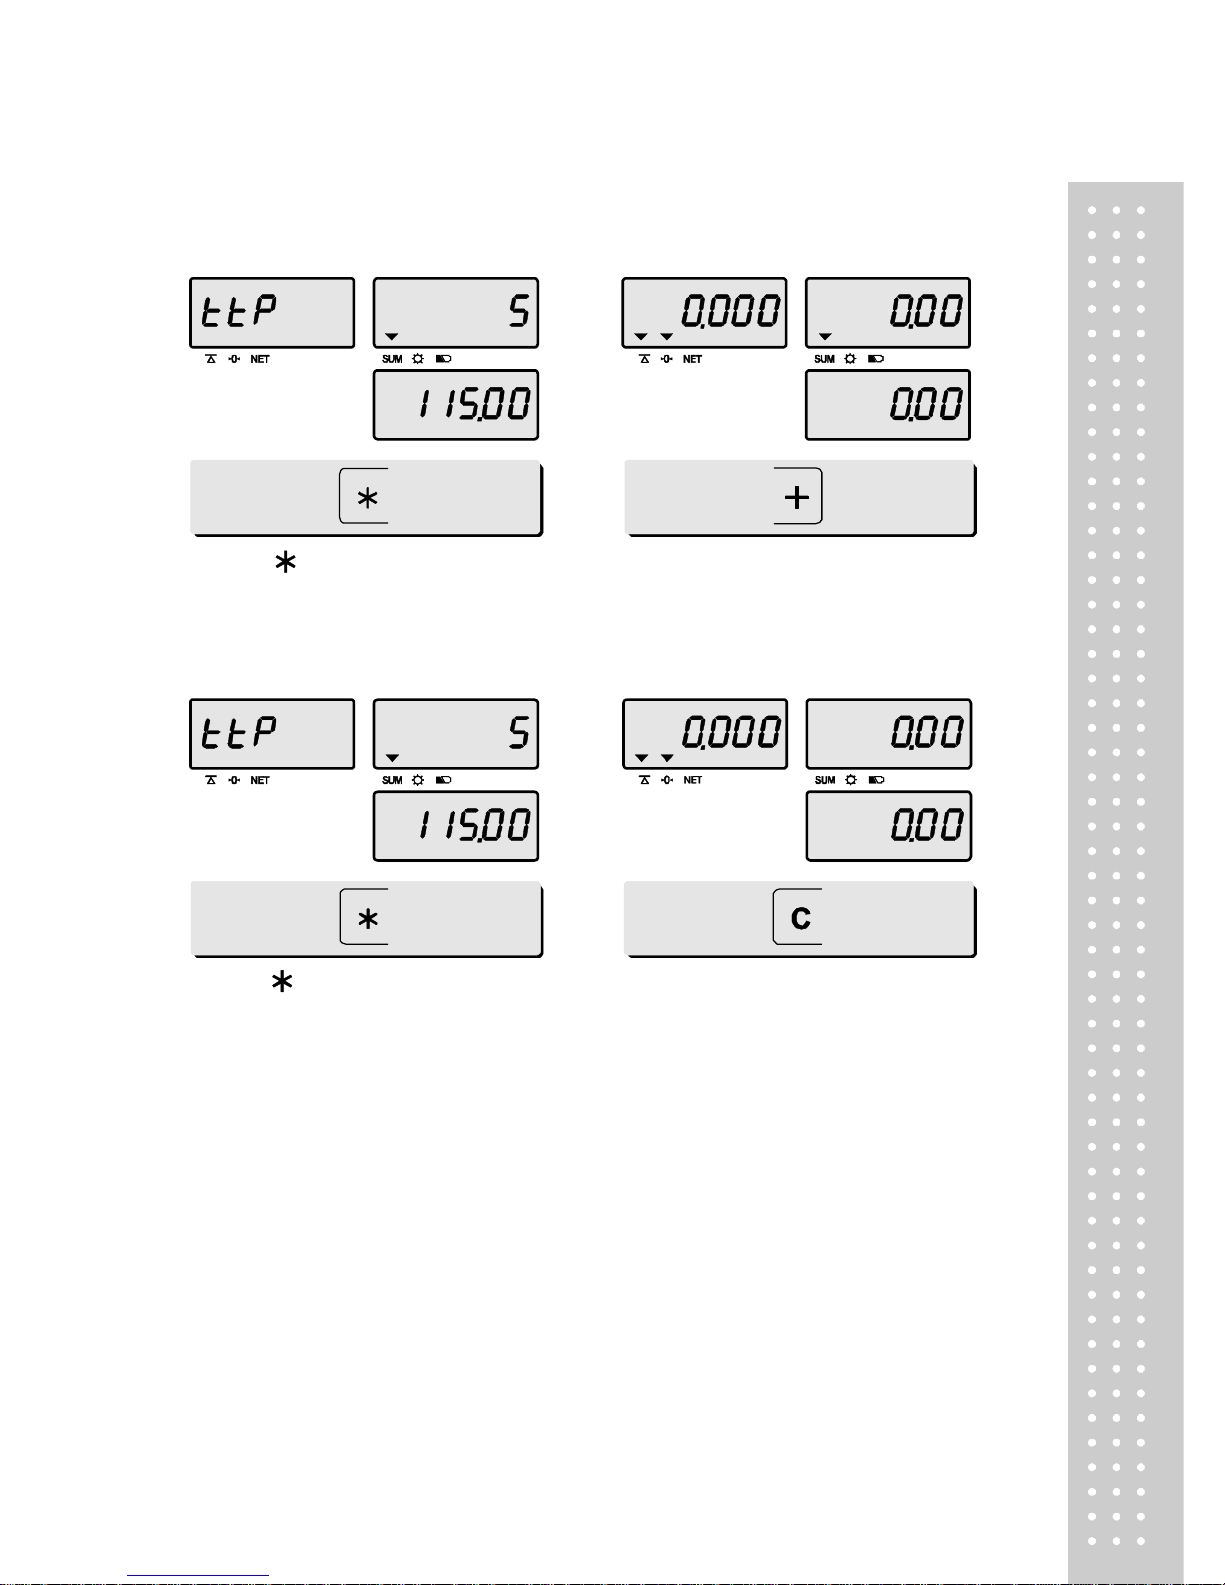
d. Inspect or clear the total amount
Checking total account.
① Press key to inspect the total
amount.
e.g. total amount=115.00. total
number of transaction = 5
② Press + Key to go to normal weighing
mode.
③ Press key to inspect the total
price.
e.g. total amount=115.00, total number
of transaction=5.
④ Press C key to clear the total
amount, and exit to the normal weighing
mode.
Page 25
`
26
Chapter 6. EURO Setting Method(Option)
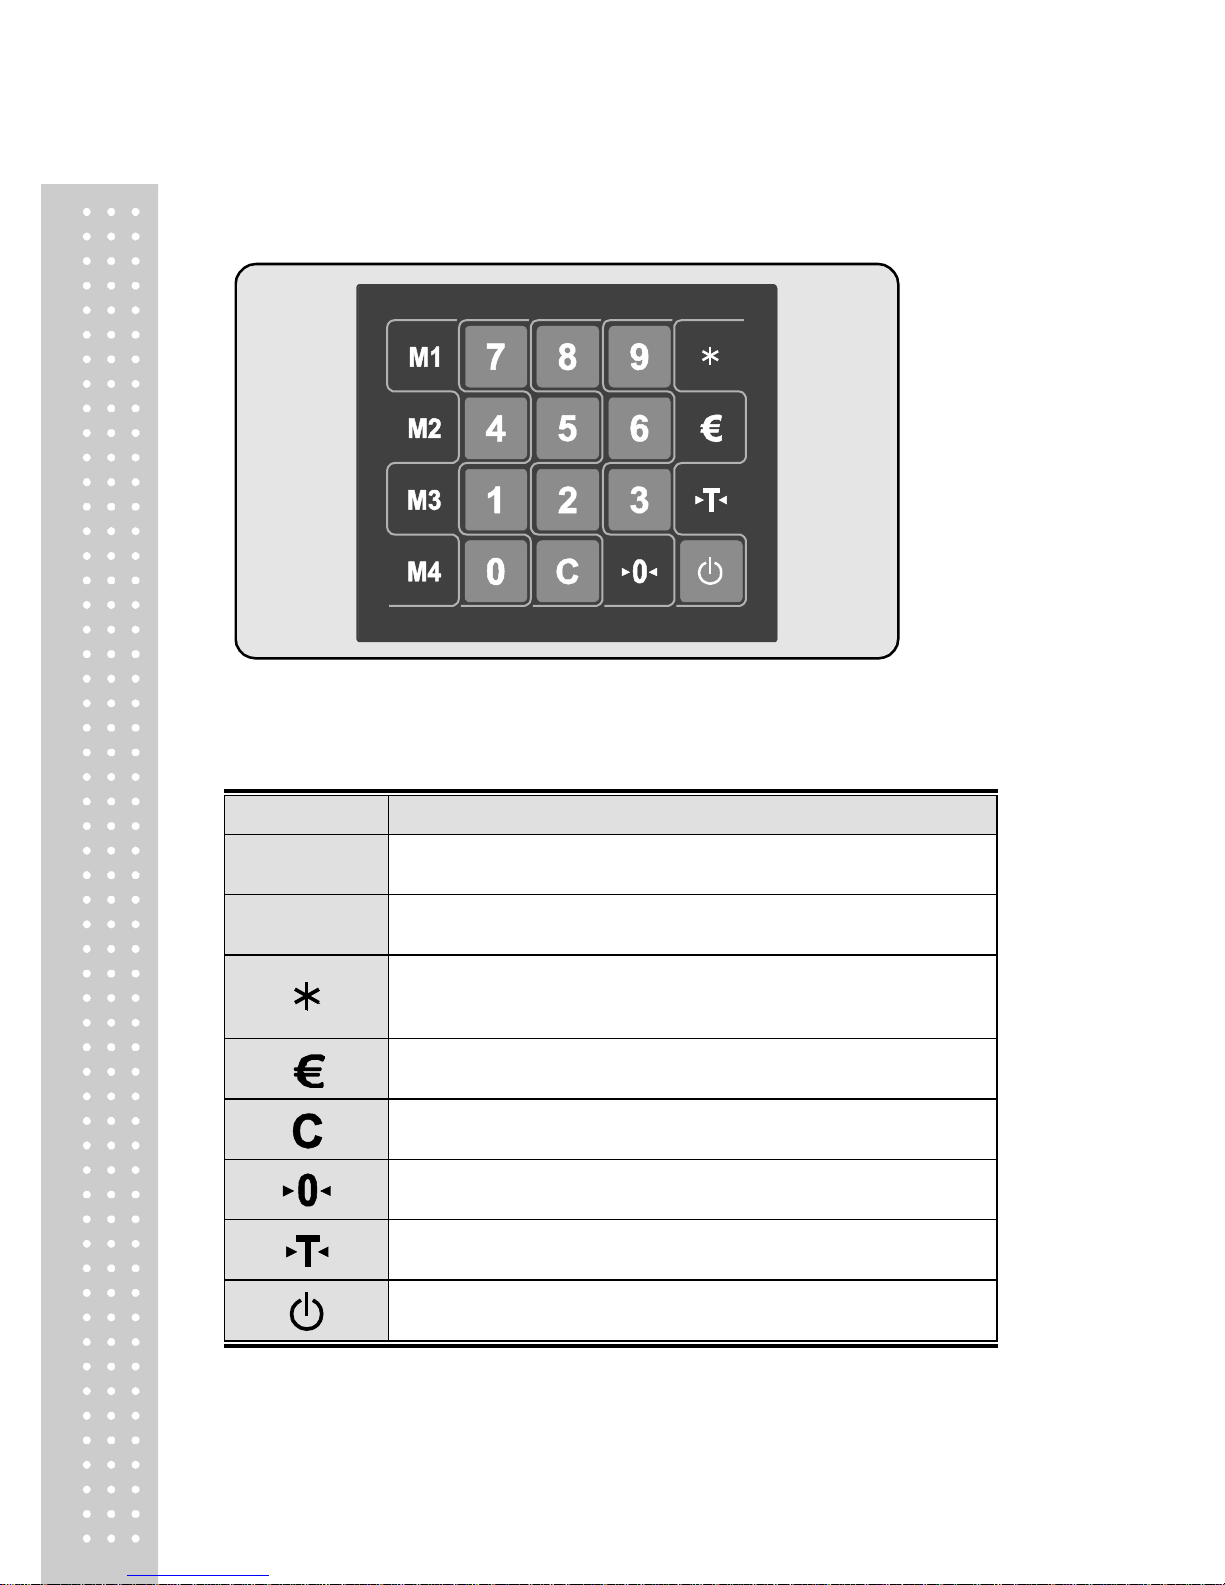
■ KEYBOARD
■ Table : Key Functions
KEYS
FUNCTIONS
0 ~ 9
Numbers import
M1 ~ M4
Direct PLU keys
Function key, PLU restore, Push more than 2 second when using
PLU Restore mode or finalize sales transaction
Used to set Euro to local currency, and vice versa
To clear data
To set zero
To set up or clear tare value
To turn on/off the scale or backlight
Page 26
27
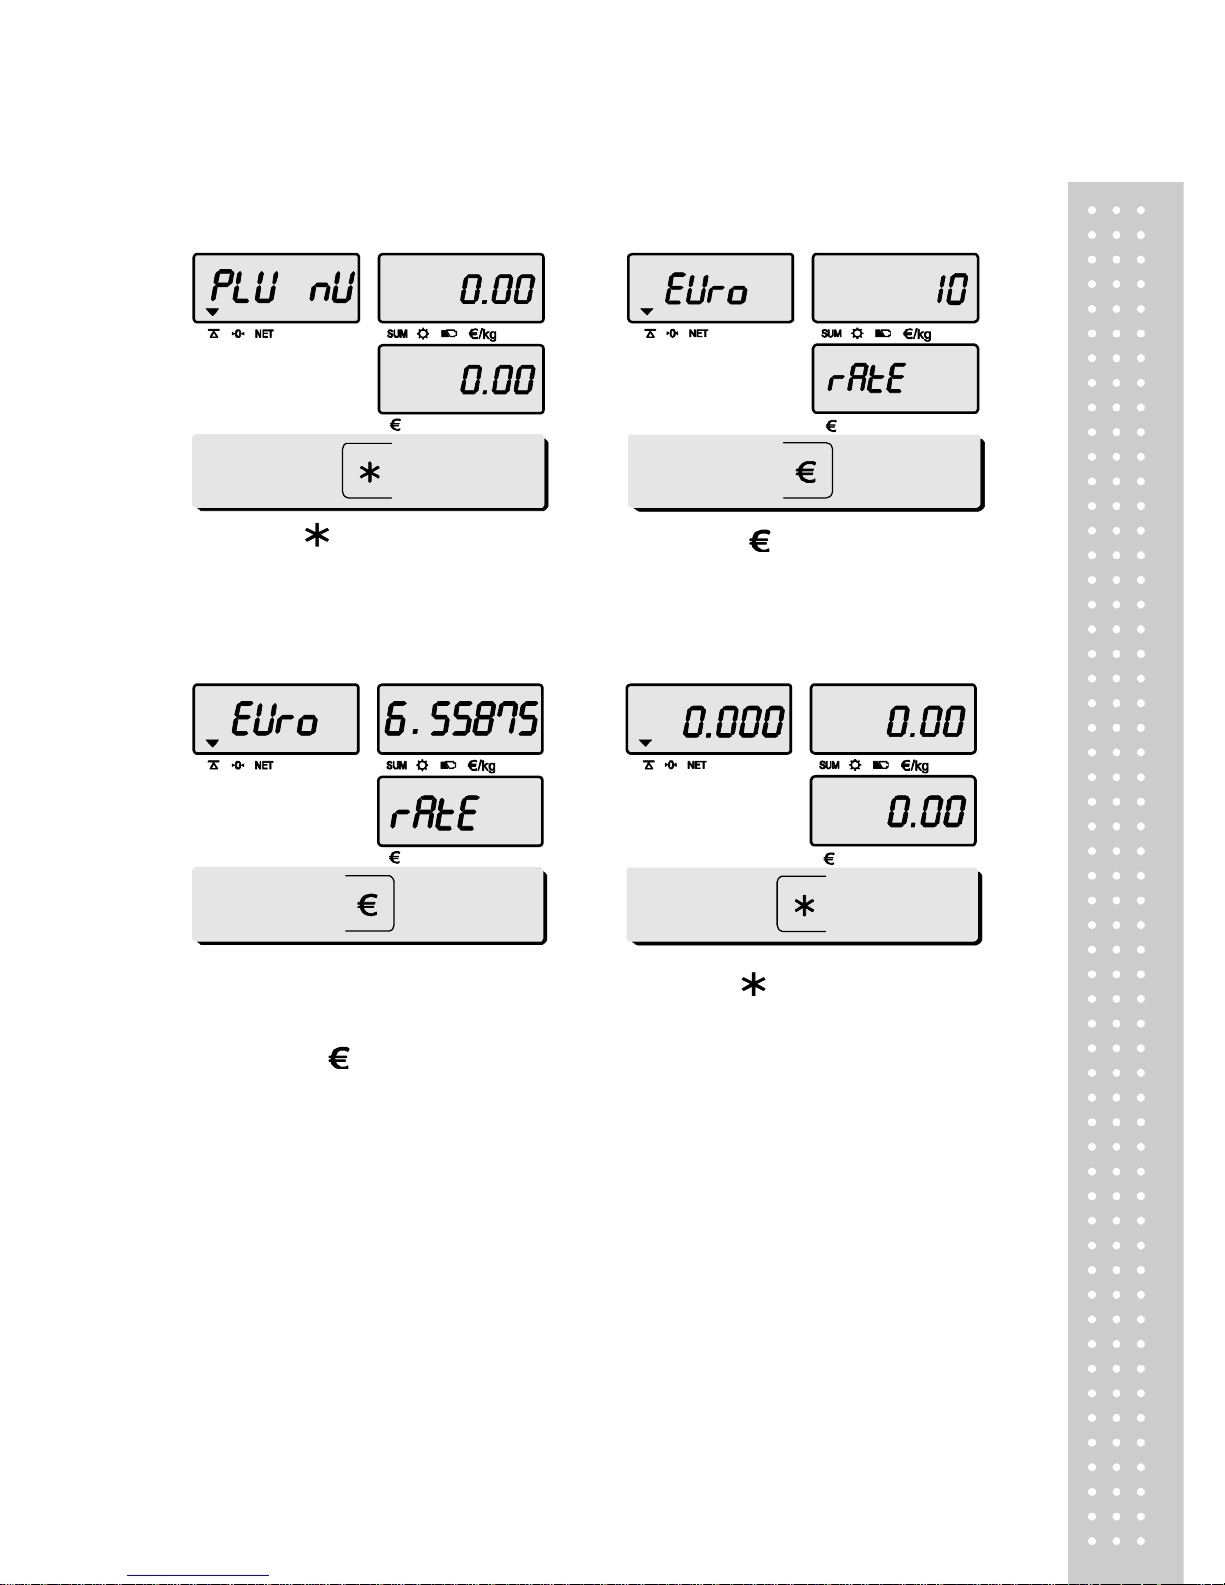
a. Saving EURO rate
① Press the key for a few seconds
② Press the If you have entered
the EURO rate before, you will see the
previous EURO rate ‘10’ in the unit
price display.
③ Enter appropriate euro rate.
For example, enter €1 = 6.55878
(local currency). To move decimal
point press key five time in the
total price display.
You can’t input ‘0’ as EURO rate
value
④ Press the key for a few seconds
to save it, then you will go to normal
mode.
Page 27
`
28
b. Switching currency
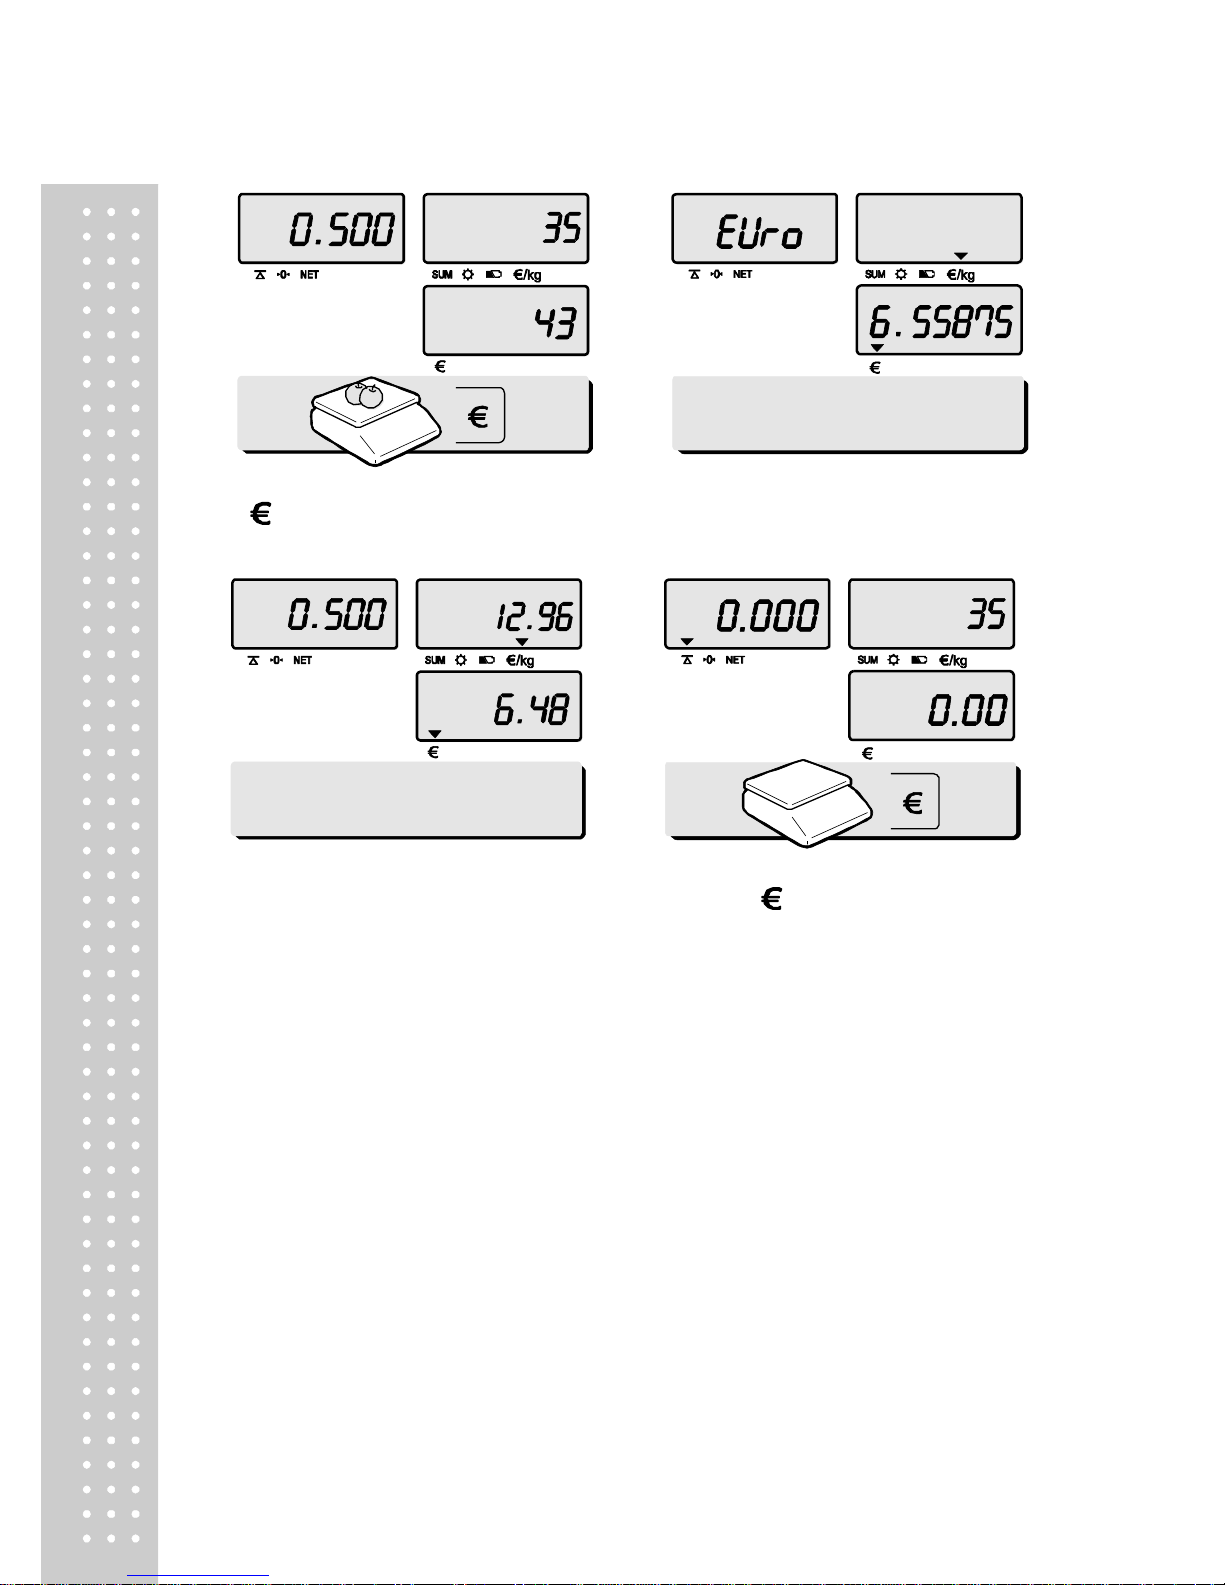
① Place an item on the platter and press
key in the normal weighing mode
② You will see the EURO currency rate
for 2 seconds and this message is
disappeared.
③ Please make sure EURO currency
symbol is on.
④ Remove the item from the platter.
and press key to go back to the
normal weighing mode.
※ NOTE : € 6.55875 ≒ € 6.56 in this example
€ 6.55475 ≒ € 6.55 in this example
※ EURO Conversion Option
- PLU Unit price is only available in NON EURO.
- Total Price(TTP Call, DTP Call) is automatically showed in the display that depending on the
current unit
- ADD mode is only available when you use EURO or NON EURO currencies separately.
Ex) You could not add 2 items of EURO currency and add another item in NON EURO item in
order to do so, after the Total Price Transaction then you would be able to use the NON
EURO currency
Page 28
29
ERROR MESSAGES & SPECIFICATION
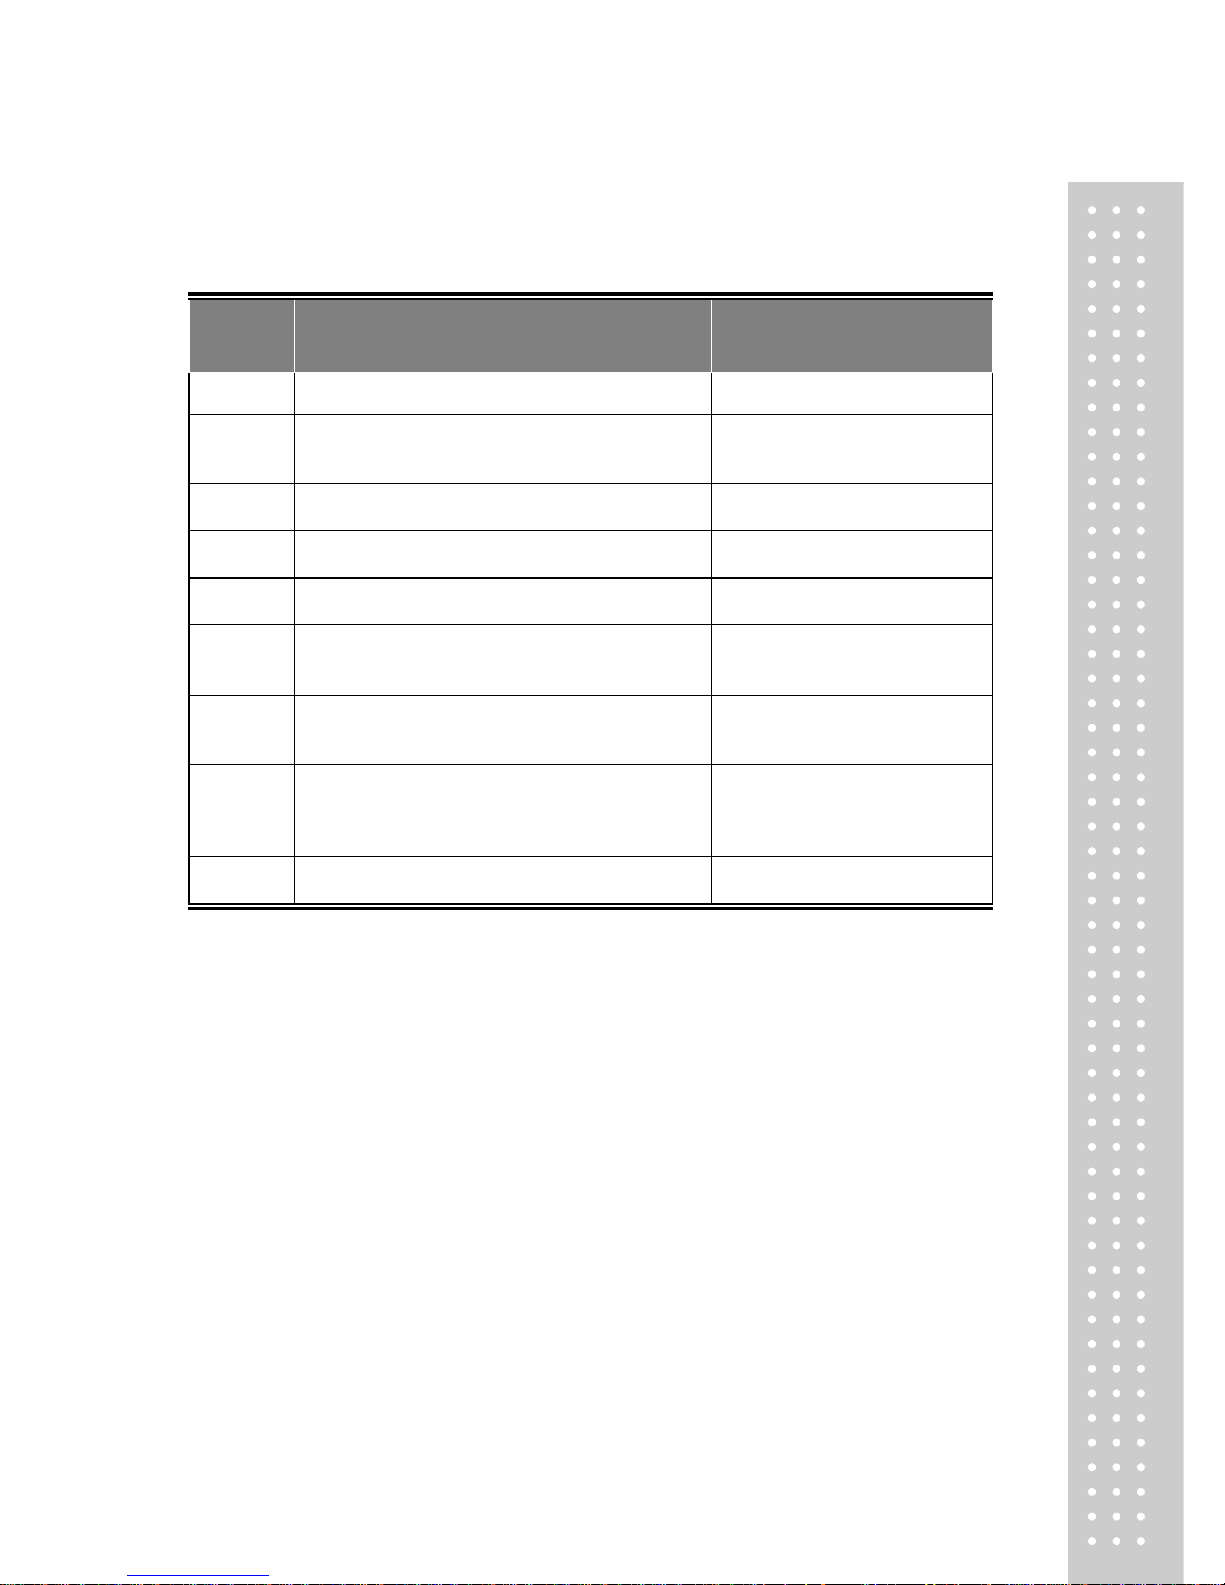
■ Table : Error Message
Error
Message
on Display
Description
Solution
"Err 0"
The "Err 0" occurs when scale is not stable.
Remove unstable facts.
"Err 1"
The "Err 1" occurs when a current zero point has
shifted from the last span calibration.
Please call your CAS dealer.
"Err 3"
The "Err 3" is an overload error.
Please remove the weight.
"Err 4"
The "Err 4" is leakage of payment.
Scale needs more payment.
"Err 5"
The "Err 5" means there is already tare.
Remove the tare.
"Err 6"
The "Err 6" means total price summation is over.
Please change unit price or
remove some weight.
"Err 8"
The "Err 8" means Euro rating price is over.
Please change unit price or
change euro rate.
“Err 13”
The "Err 13" means the soft key code is broken.
Please try to find out which key
lost soft key code and then input
this code again.
“Err 15”
The "Err 15" means 1/2 or 1/4 unit price is over.
Please change unit price
Page 29
`
30
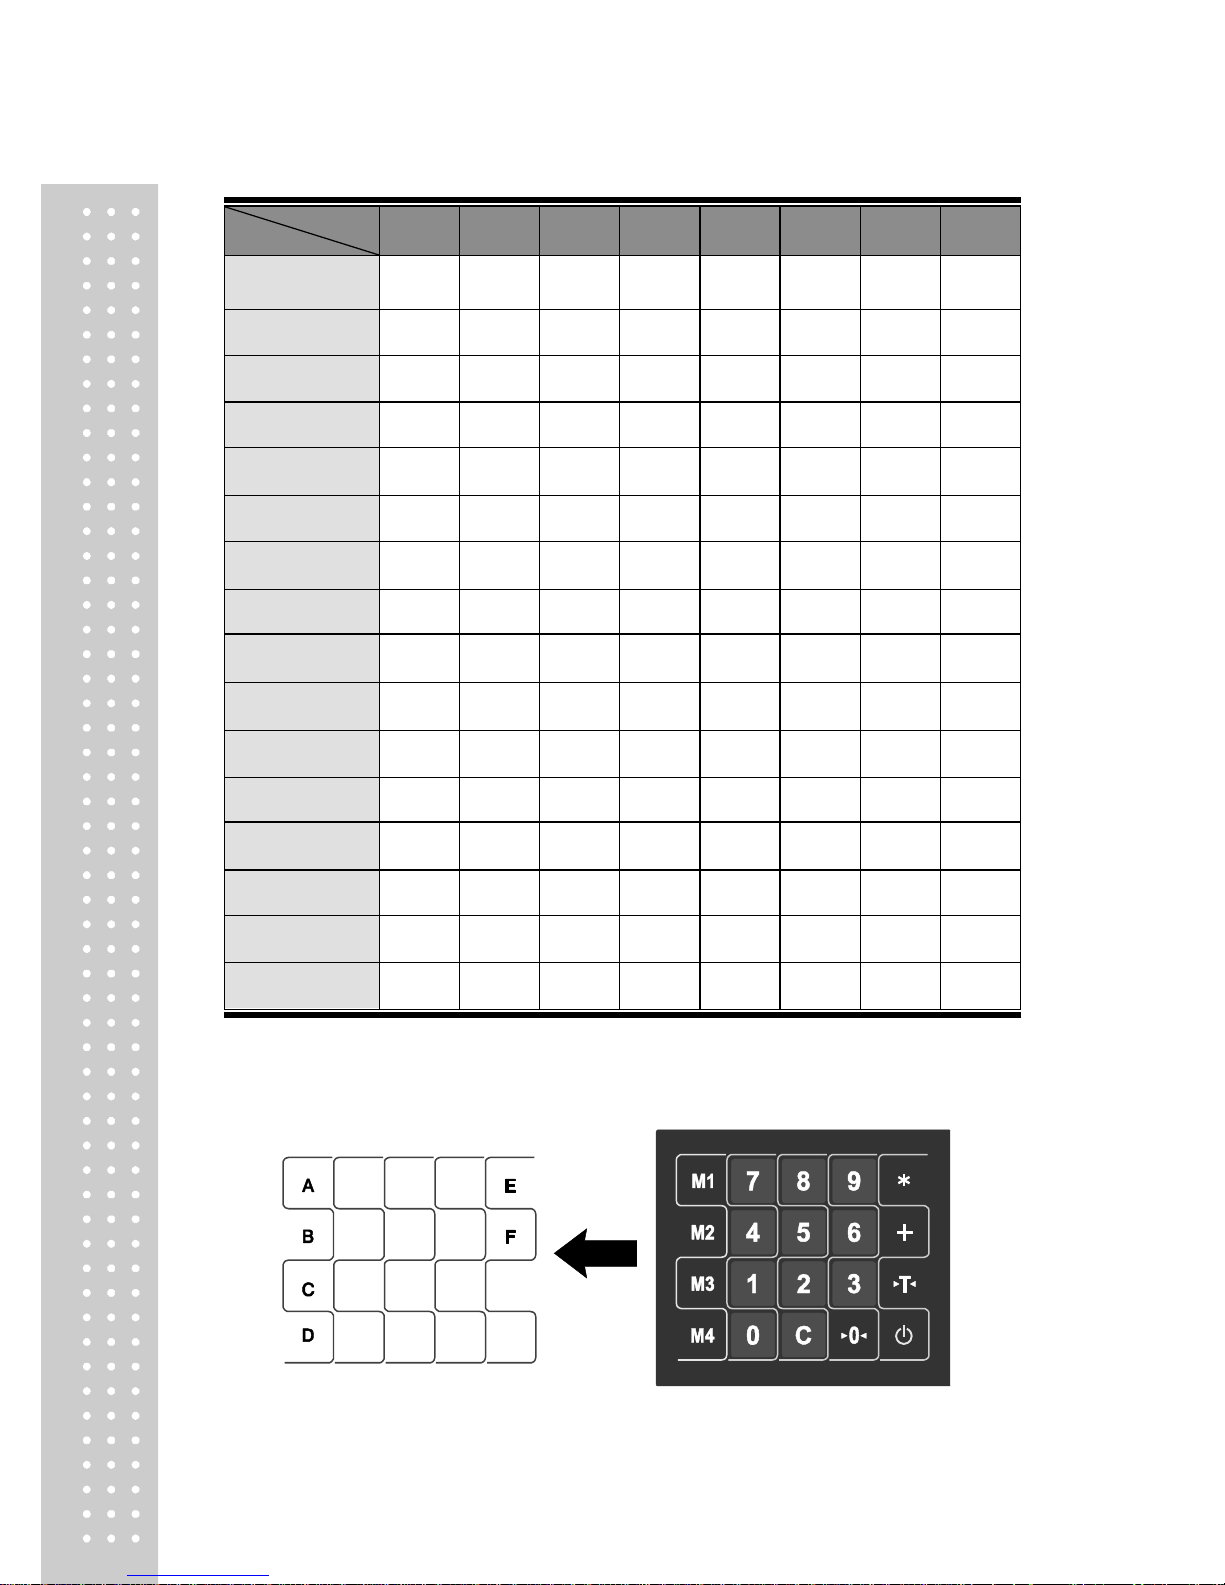
Table: ASCII Code
HIGH ORDER
LOW ORDER
2 3 4 5 6 7 8
9
0
SP 0 @ P ‘ p
1
! 1 A Q a q
2
˝ 2 B R b r
3
# 3 C S c s
4
$ 4 D T d t
5
% 5 E U e u
6
& 6 F V f v
7
´ 7 G W g w
8
( 8 H X h x
9
) 9 I Y i y
A
* : J Z j z
B
+ ; K [ k
C
, < L ¥ l
D
- = M ] m
E
. > N ^ n
F
/ ? O _ o
Picture1: Alphabet location on the Keyboard
Page 30
31
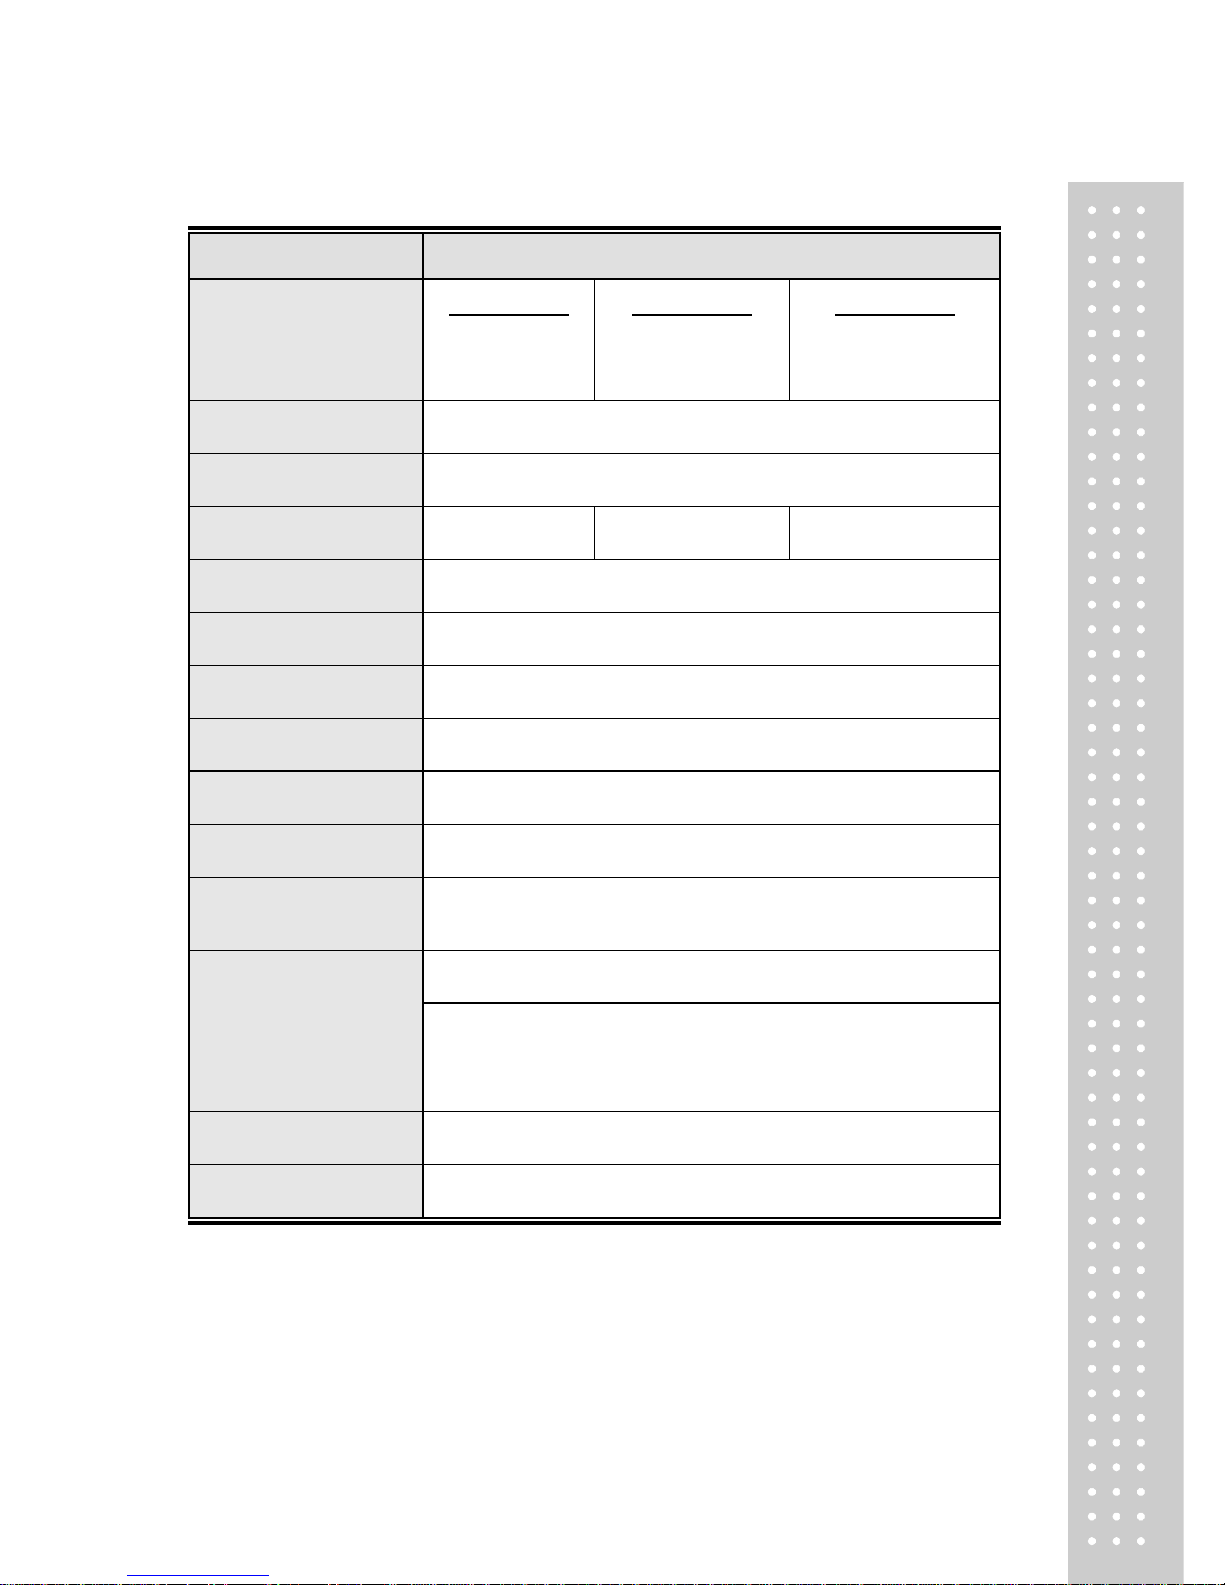
■ Table : SPECIFICATION
MODEL
ER JR
CAPACITY
Dual Interval
Max 3/6kg
e = 1/2g
Dual Interval
Max 6/15kg
e = 2/5g
Dual Interval
Max 15/30kg
e = 5/10g
DISPLAY
5 / 6 / 6 (Weight/Unit Price/Total Price)
SYMBOL ON DISPLAY
Charge, Stabilization, Zero, Tare, Low battery, Sum, Backlight
MAXIMUM TARE
- 2.999 kg
- 5.998 kg
- 14.995 kg
OPERATING
TEMPERATURE
-10℃ ~ +40℃
POWER SOURCE
12V DC Adaptor
POWER
CONSUMPTION
Approximately LCD Type 7W(Charging)
PLATTER SIZE (mm)
290(W) x 209(D)
PRODUCT SIZE (mm)
304(W) x 324(D) x 112(H)
PRODUCT WEIGHT
3.3kg
MINIMUM VOLTAGE
LEVEL OF THE
BATTERY
About 5.6V
BATTERY LIFE
When battery is charged for 12 hours
Approximately 200 hours (backlight off)
BATTERY TYPE
Pb battery, 6V 3.6Ah/20Hr
OPTIONS
Pole, Backlight,RS-232C
※ Notice : specifications are subject to change for improvement without
notice.
Page 31

`
32
MEMO
Page 32

33
MEMO
Page 33

`
34
MEMO
Page 34

35
Page 35

`
36
 Loading...