

CAS DB-II series Owner's Manual
2

3
CONTENTS
PRECAUTIONS......................................................... 4
PREF ACE........................................................................ 6
NAMES AND FUNCTIONS .............................. 6
OPERATIONS............................................................. 8
SETUP MODE........................................................... 20
ERROR MESSAGES............................................ 25
SERIAL INTERFACE.......................................... 25
SPECIFICA TIONS................................................. 26
HOW TO INSTALL DB –II Series............... 27
ASSEMBLING THE DISPLAY
OF DB-II WALL TYPE
........................................ 28
4
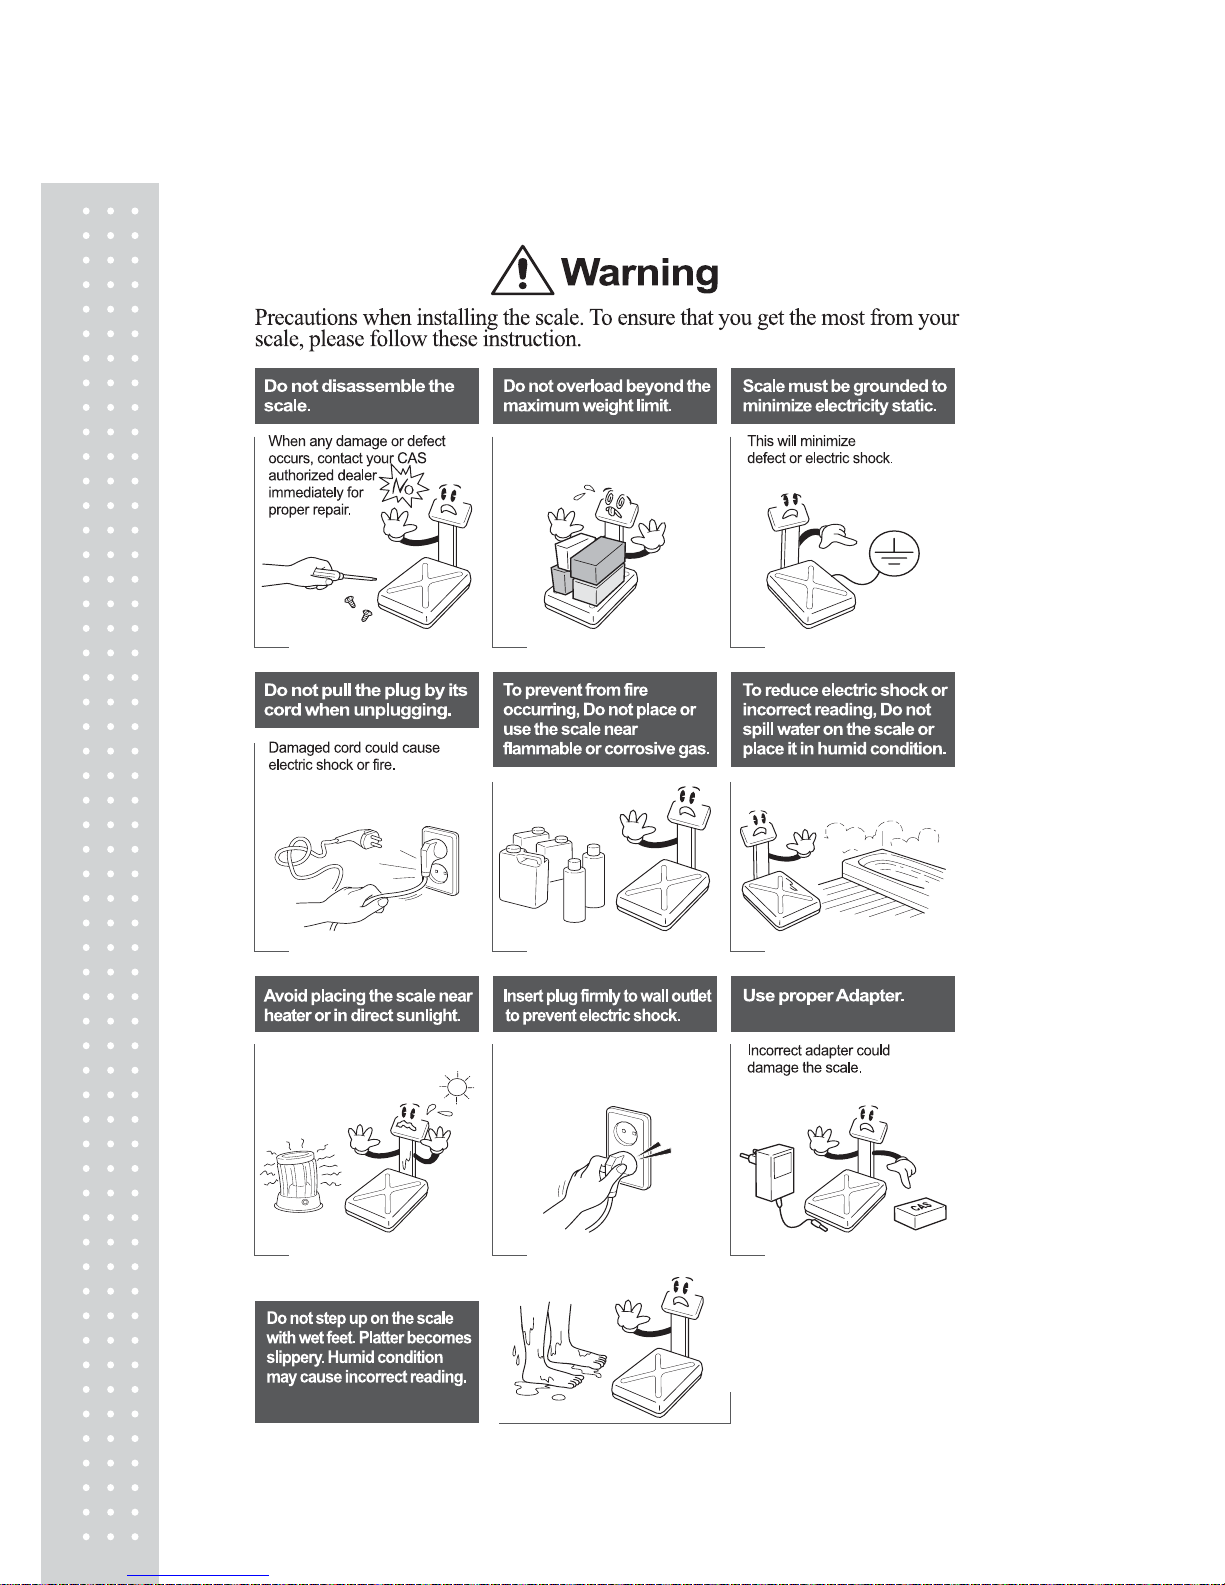
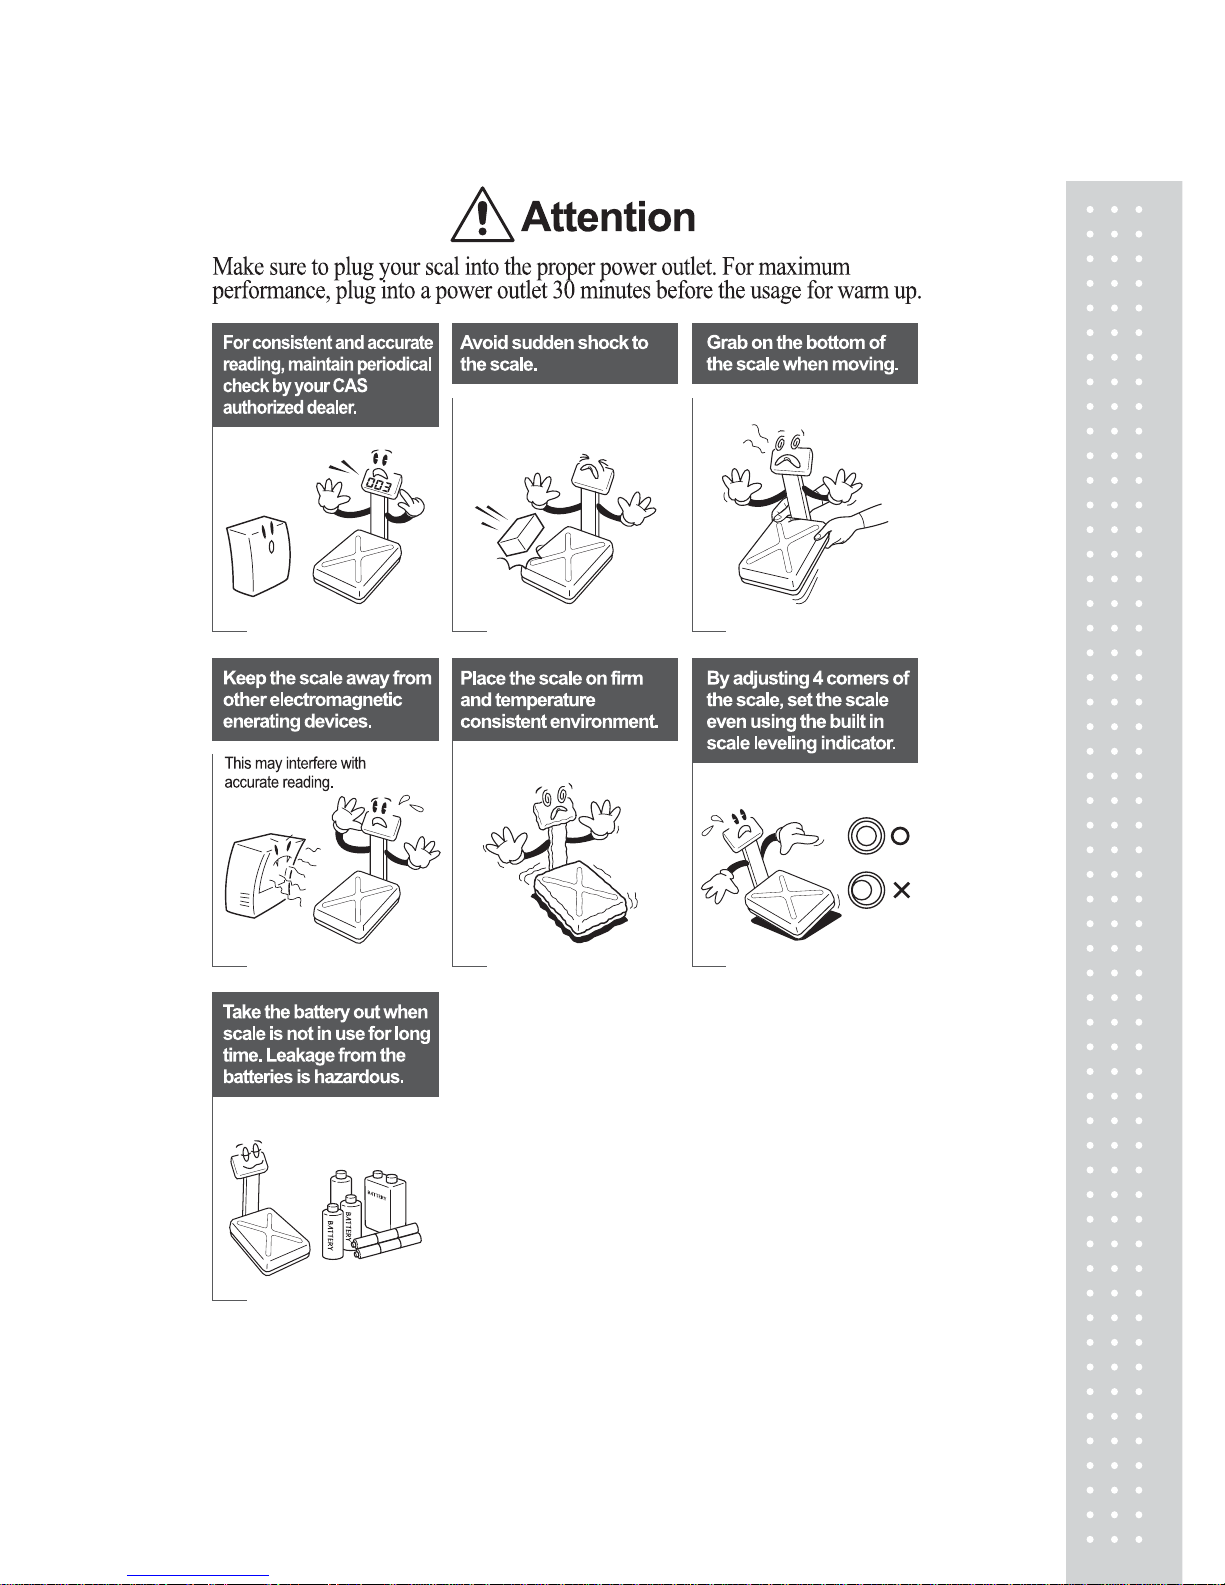
PRECAUTIONS
5
6
PREF ACE
Thank you for the purchasing of CAS DB-II series.
This series have been designed with CAS reliability, under rigid quality control
and with outstanding performance. Your specialty departments can enjoy with
CAS products.
We hope that CAS product meets your needs.
The user manual is designed to guide you to understand product operation and
proper care of product.
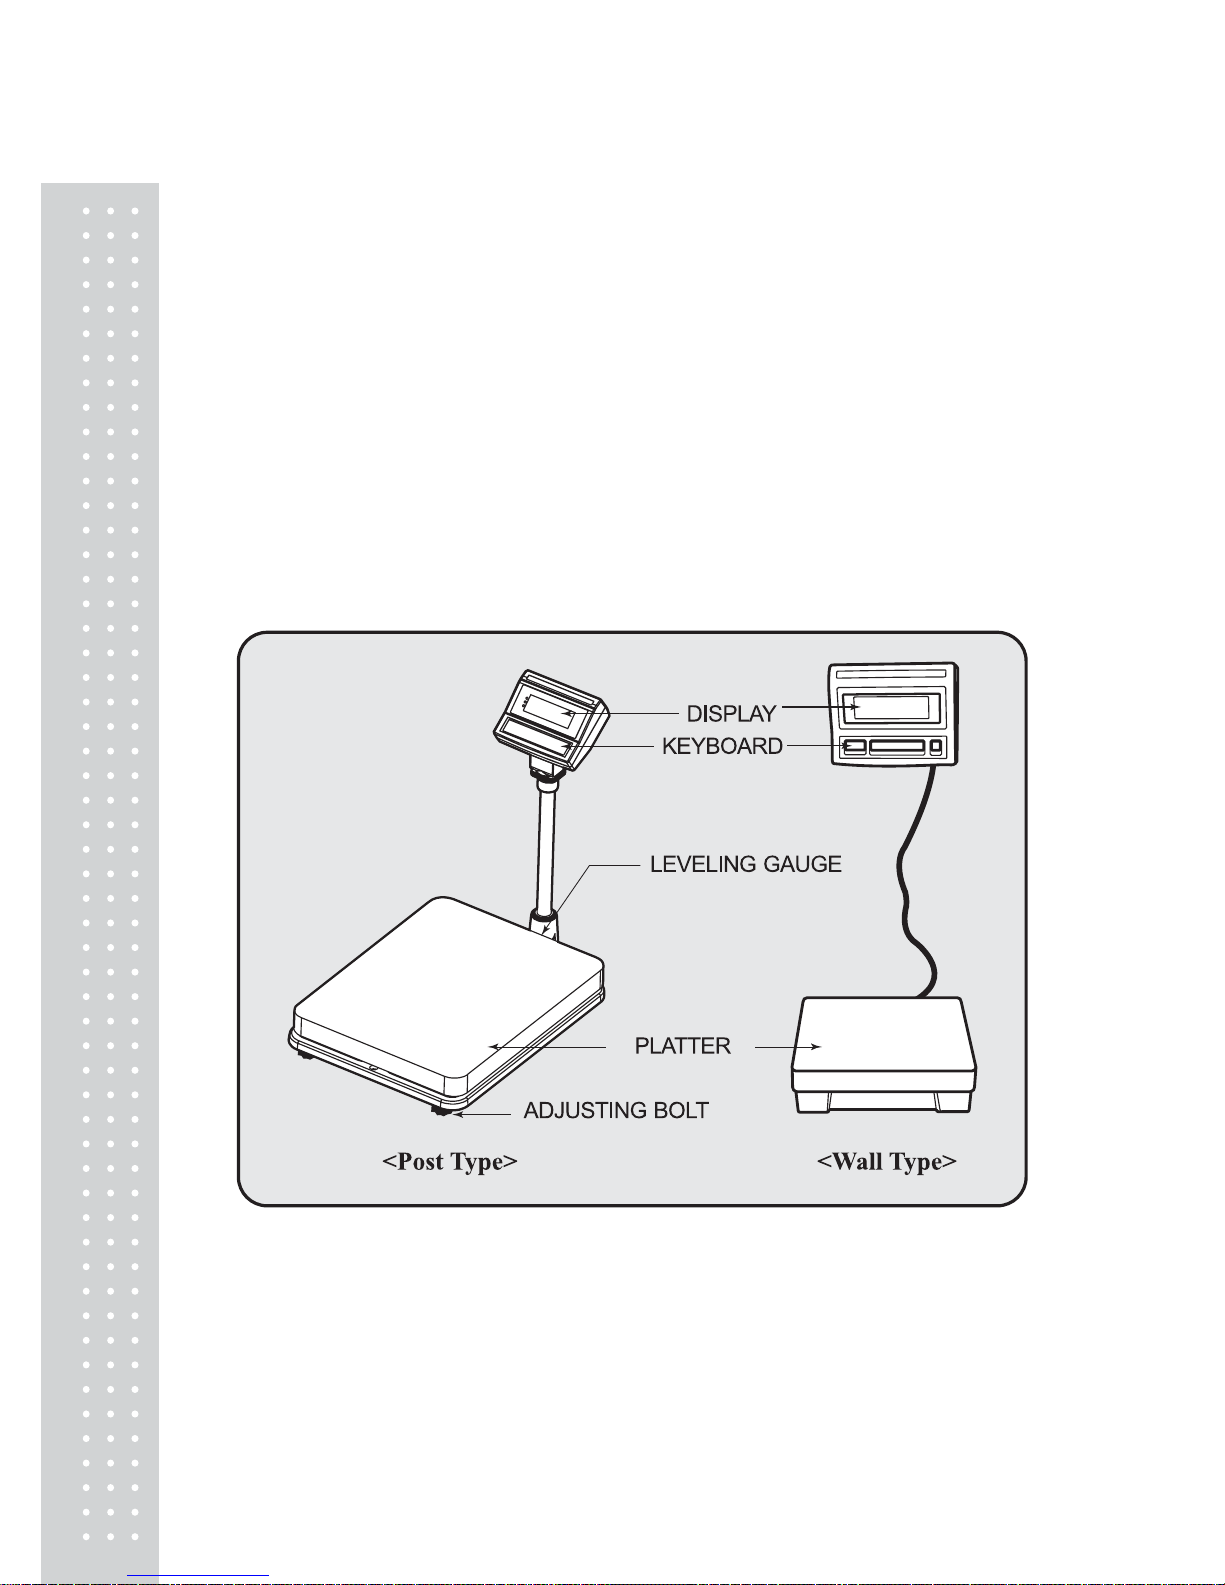
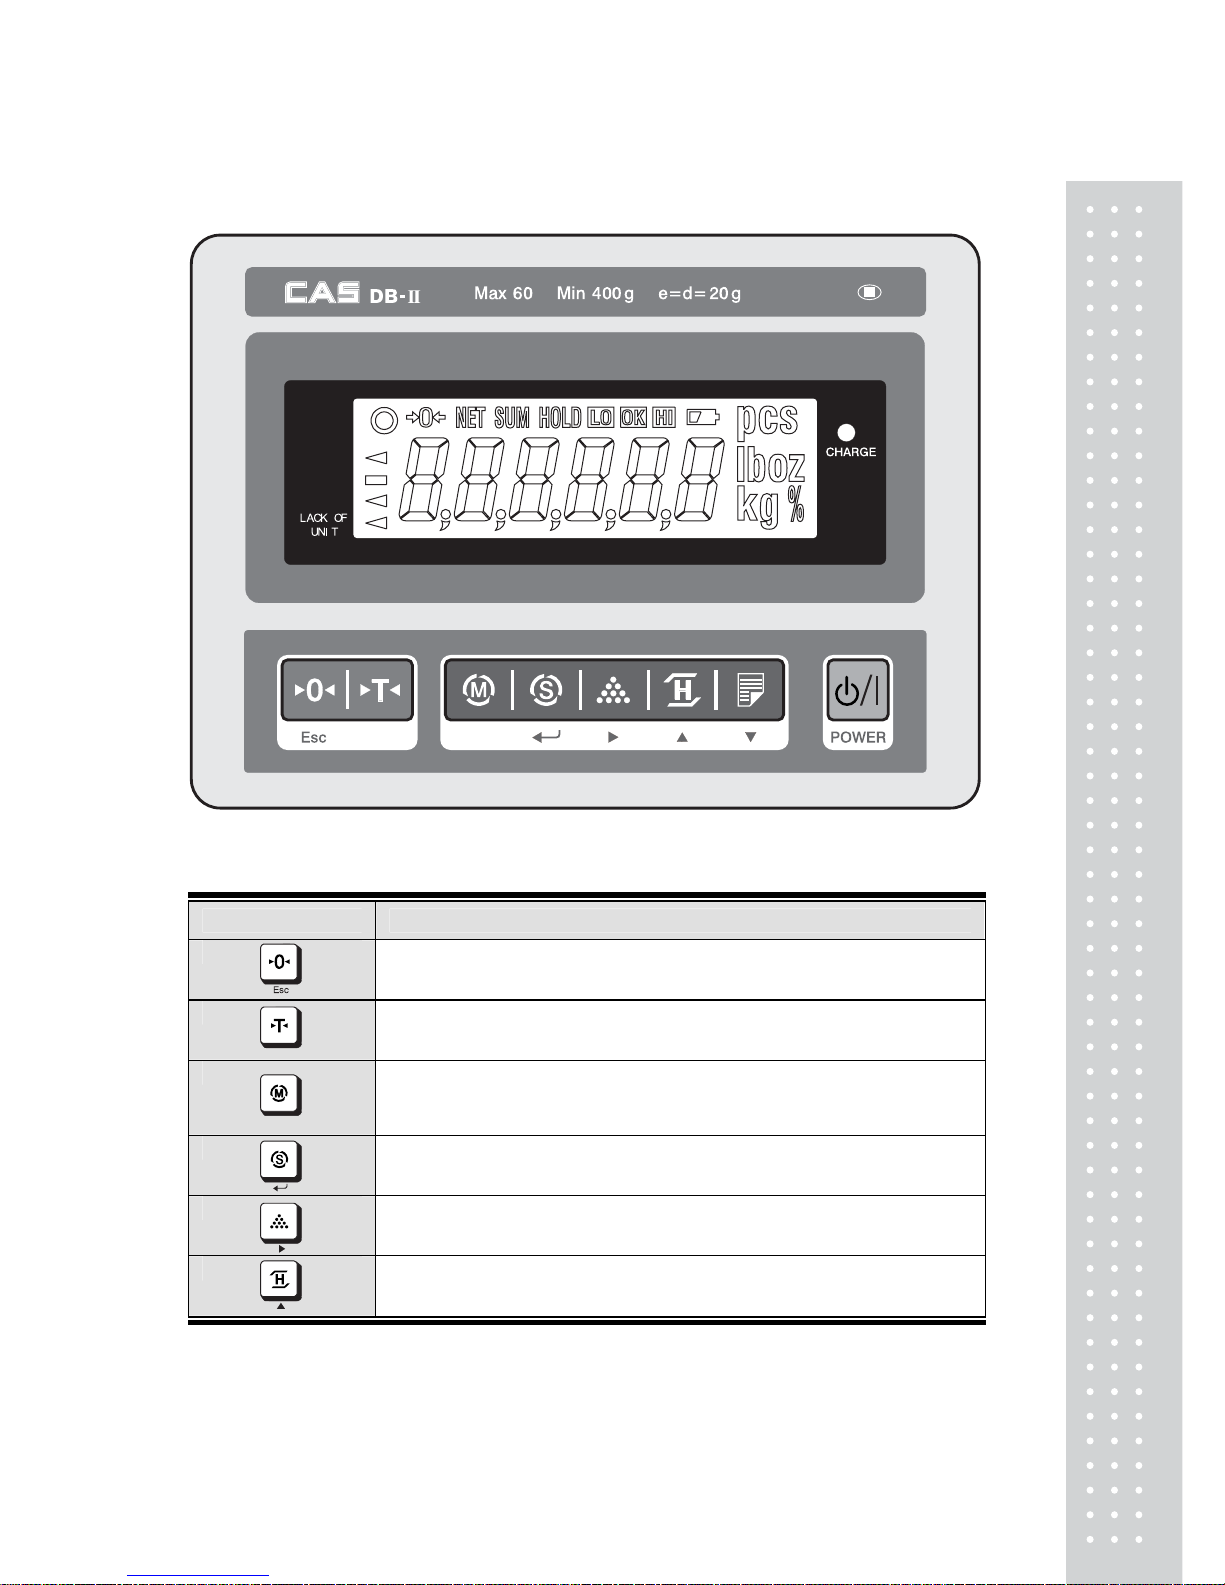
NAMES AND FUNCTIONS
OVERALL VIEW
7
DISPLA Y AND KEYBOARD
■
KEY FUNCTIONS
KEYS DESCRIPTIONS
Used to set the zero point to 0.00.
Used as an ESC key in Setup Mode.
Used to enter a tare weight and used to cancel a tare weight.
Used to convert the mode as below.
[WEIGHING] [pcs] [%] [WEIGHT LIMIT ON/OFF]
[COUNT LIMIT ON/OFF] [UNIT CONVERSION] [WEIGHING]
Used as an ENTER key.
Used to calculate a unit weight of a sample.
[ ] Used to enter next digit.▶
Used to display average weight.
[▲] Used to have number up.
8
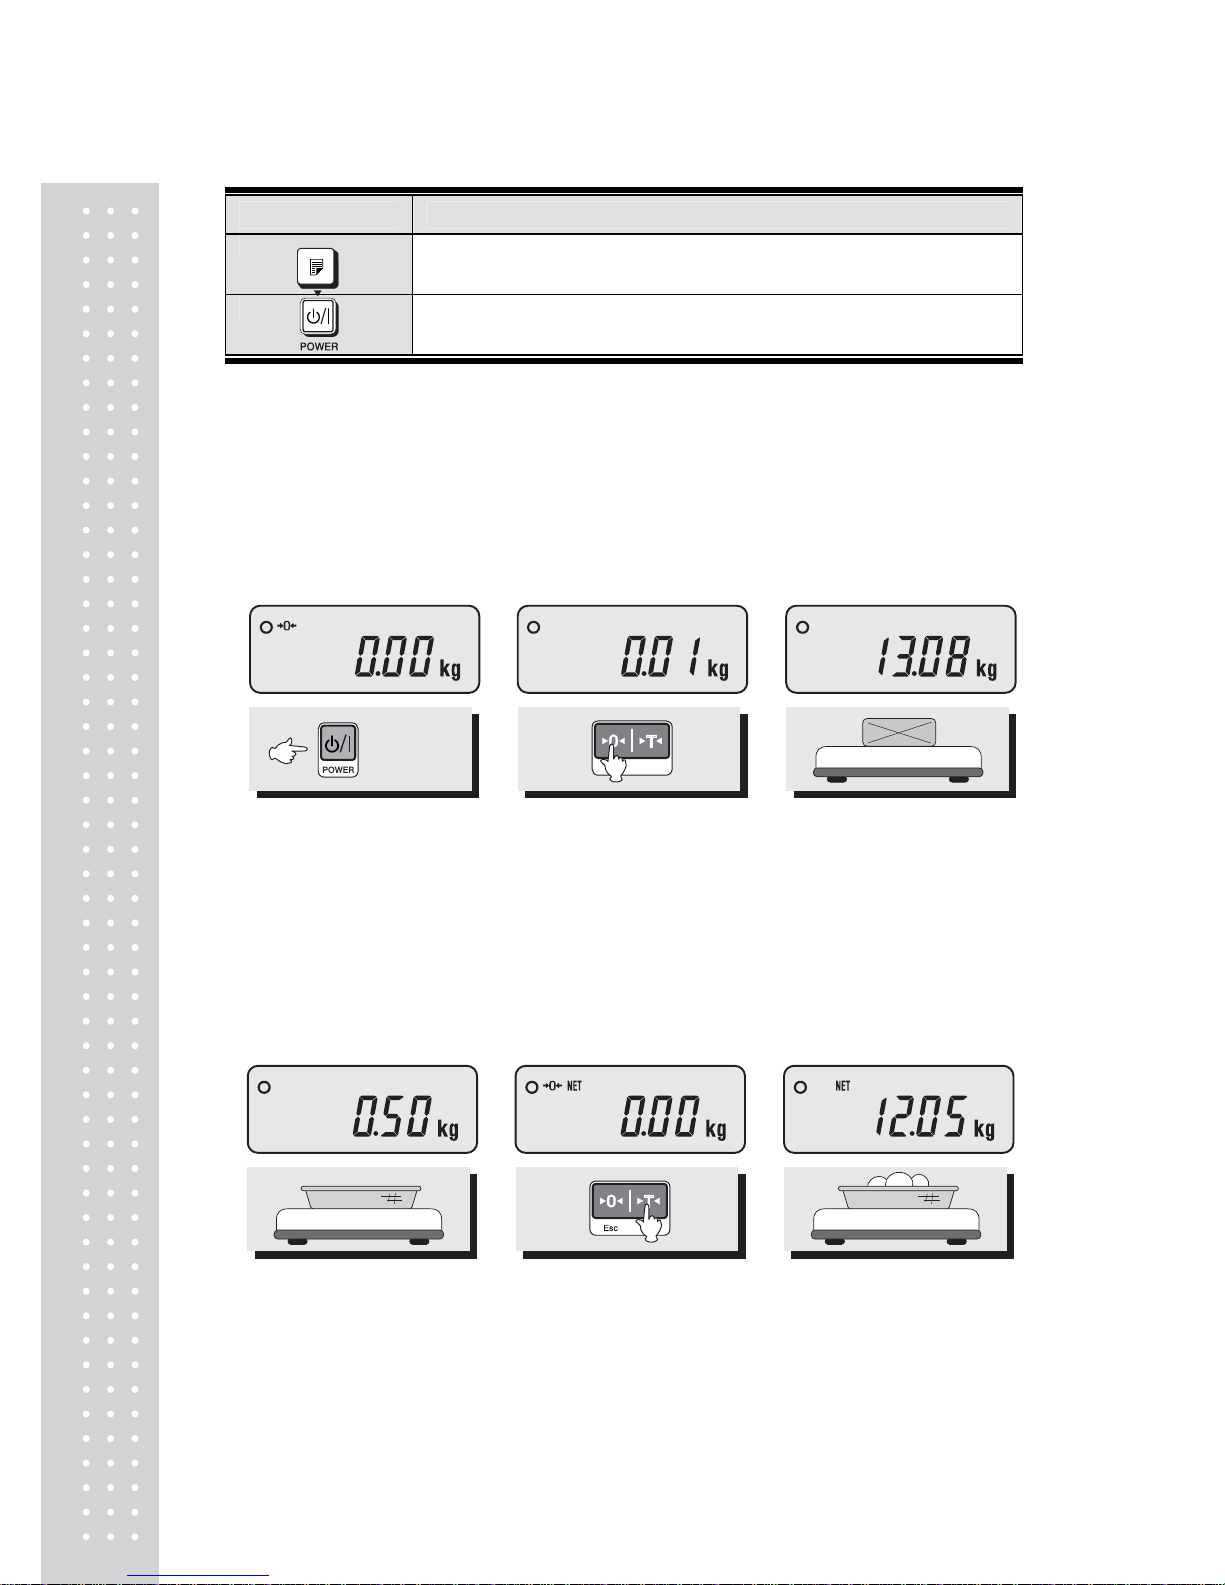
KEY DESCRIPTIONS
PRINT key.
[▼] Used to have number down.
Used to turn ON or OFF the power.
OPERA TIONS
1. General Weighing
■ The display indicates if the scale is at zero or if there is a tare entered into the
scale by way of a ZERO and NET.
① Turn on the power.
The display shows 0.00.
Make sure that STABLE and
ZERO lamps are on.
②When the display is not zero
though there is nothing on
the platter, press the ZERO
key.
③Place an item on the platter.
When the STABLE lamp is
on, read the weight.
2. Weighing with T a re
■ Tare is the weight of container being used for a commodity.
The TARE key subtracts the weight of the container.
① Place the container on the
platter.
②Press the TARE key, NET
lamp is on.
③Place an item in the
container.
9
④ To release the TARE function, remove an item and
container from the platter and press the TARE key.
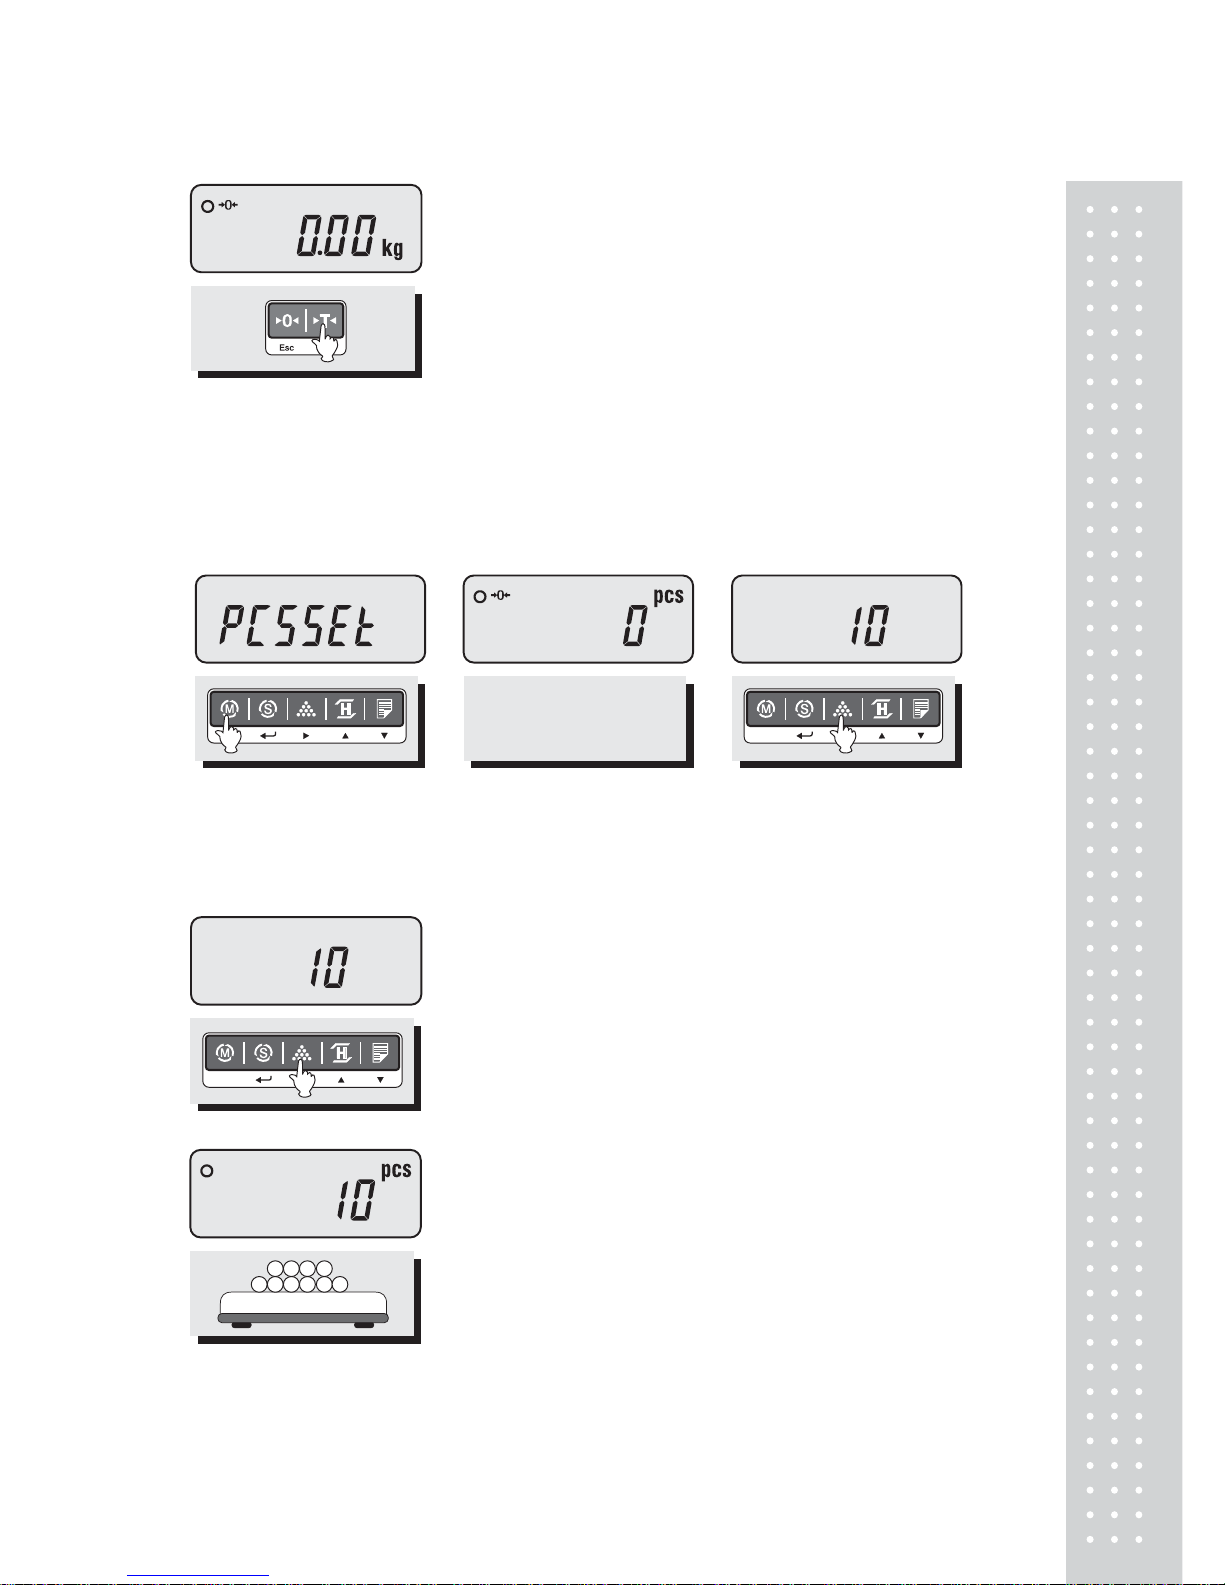
3. Counting Mode
■ If you want to count parts, first you have to set sample size.
OR
① Press the MODE key until the display shows “PCSSET”. Make
sure that PCS lamp is on. If you have set sample size before,
the display shows “0”.
②Press the SAMPLE key,
then the display shows “10”.
③If you want to increase sample size, press the SAMPLE key.
The display shows 10, 20, 30, 40, 50, 100, 150 and 200 every
time pressing the SAMPLE key.
④If you set sample size to 10, place 10 samples on the platter.
10
⑤ If the display shows “LACK”, the counting result may not correct. (LCD version : Lack of Unit lamp is On) If the
display shows “ LOW”, it is impossible to count samples because the unit weight is too small. (Refer to Table 1)
Model DB-II 6kg DB-II 15kg DB-II 30kg DB-II 60kg DB-II 150kg DB-II 300kg
Range of Lack (Single)
2g ≥ Lack ≥ 0.1g 5g ≥ Lack ≥ 0.1g 10g ≥ Lack ≥ 0.1g 20g ≥ Lack ≥ 1g 50g ≥ Lack ≥ 1g 100g ≥ Lack ≥ 1g
Range of Lack (Dual)
1g ≥ Lack ≥ 0.1g 2g ≥ Lack ≥ 0.1g 5g ≥ Lack ≥ 0.1g 10g ≥ Lack ≥ 1g 20g ≥ Lack ≥ 1g 50g ≥ Lack ≥ 1g
Range of Low
0.1g ≥ Low 0.1g ≥ Low 0.1g ≥ Low 1g ≥ Low 1g ≥ Low 1g ≥ Low
< Table 1 >
⑥ Place parts on the platter, then the display shows the number
of parts. You can also use tare function in counting mode.
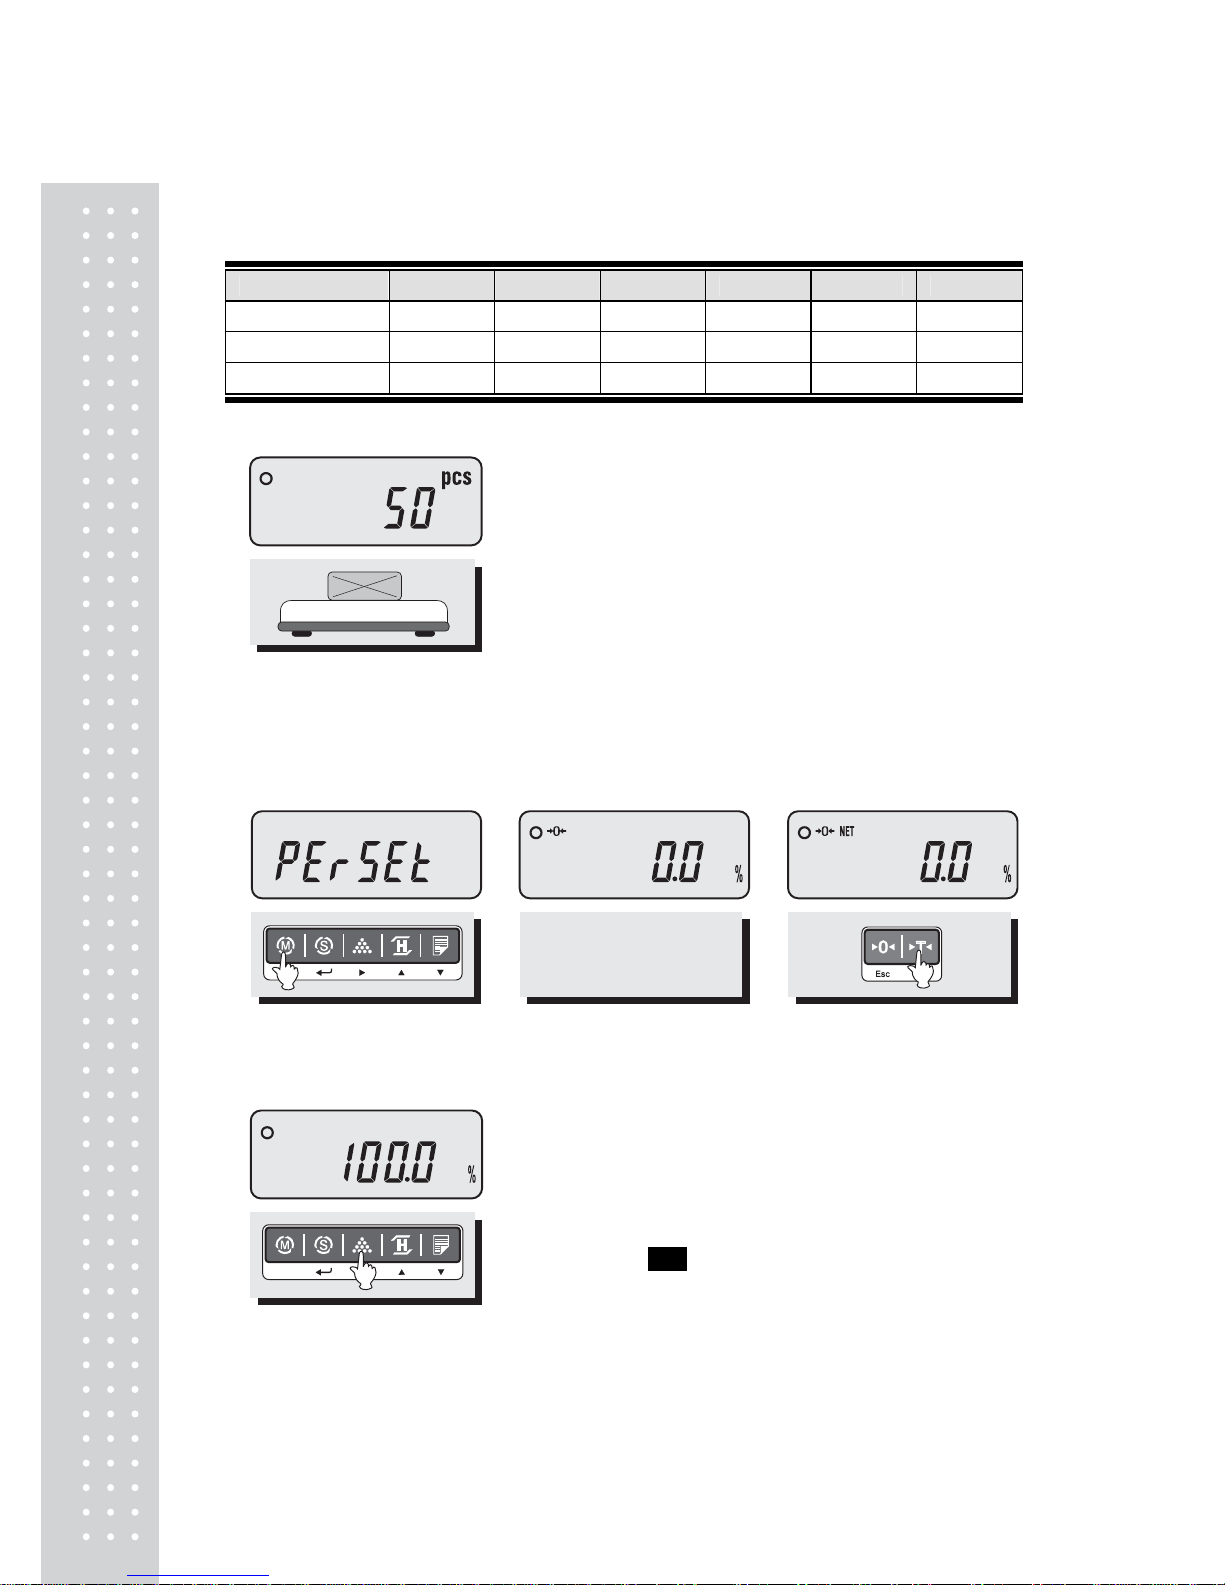
4. Percent Weighing Mode
■ The weight is displayed as a percentage of the reference.
OR
① Press the MODE key until the display shows “PErSEt”. If you
have set reference sample before, the display shows “0.0”.
②If you want to use container,
place it and press the TARE key.
③Place reference sample on the platter and press the SAMPLE
key.
T
he display shows “100.0”.
Make sure that reference sample should be bigger than 3% of
maximum capacity. If it is lower than 3% of maximum capacity,
t
he display shows “low”. In this case, increase the weight of
reference sample and press the SAMPLE key.
11
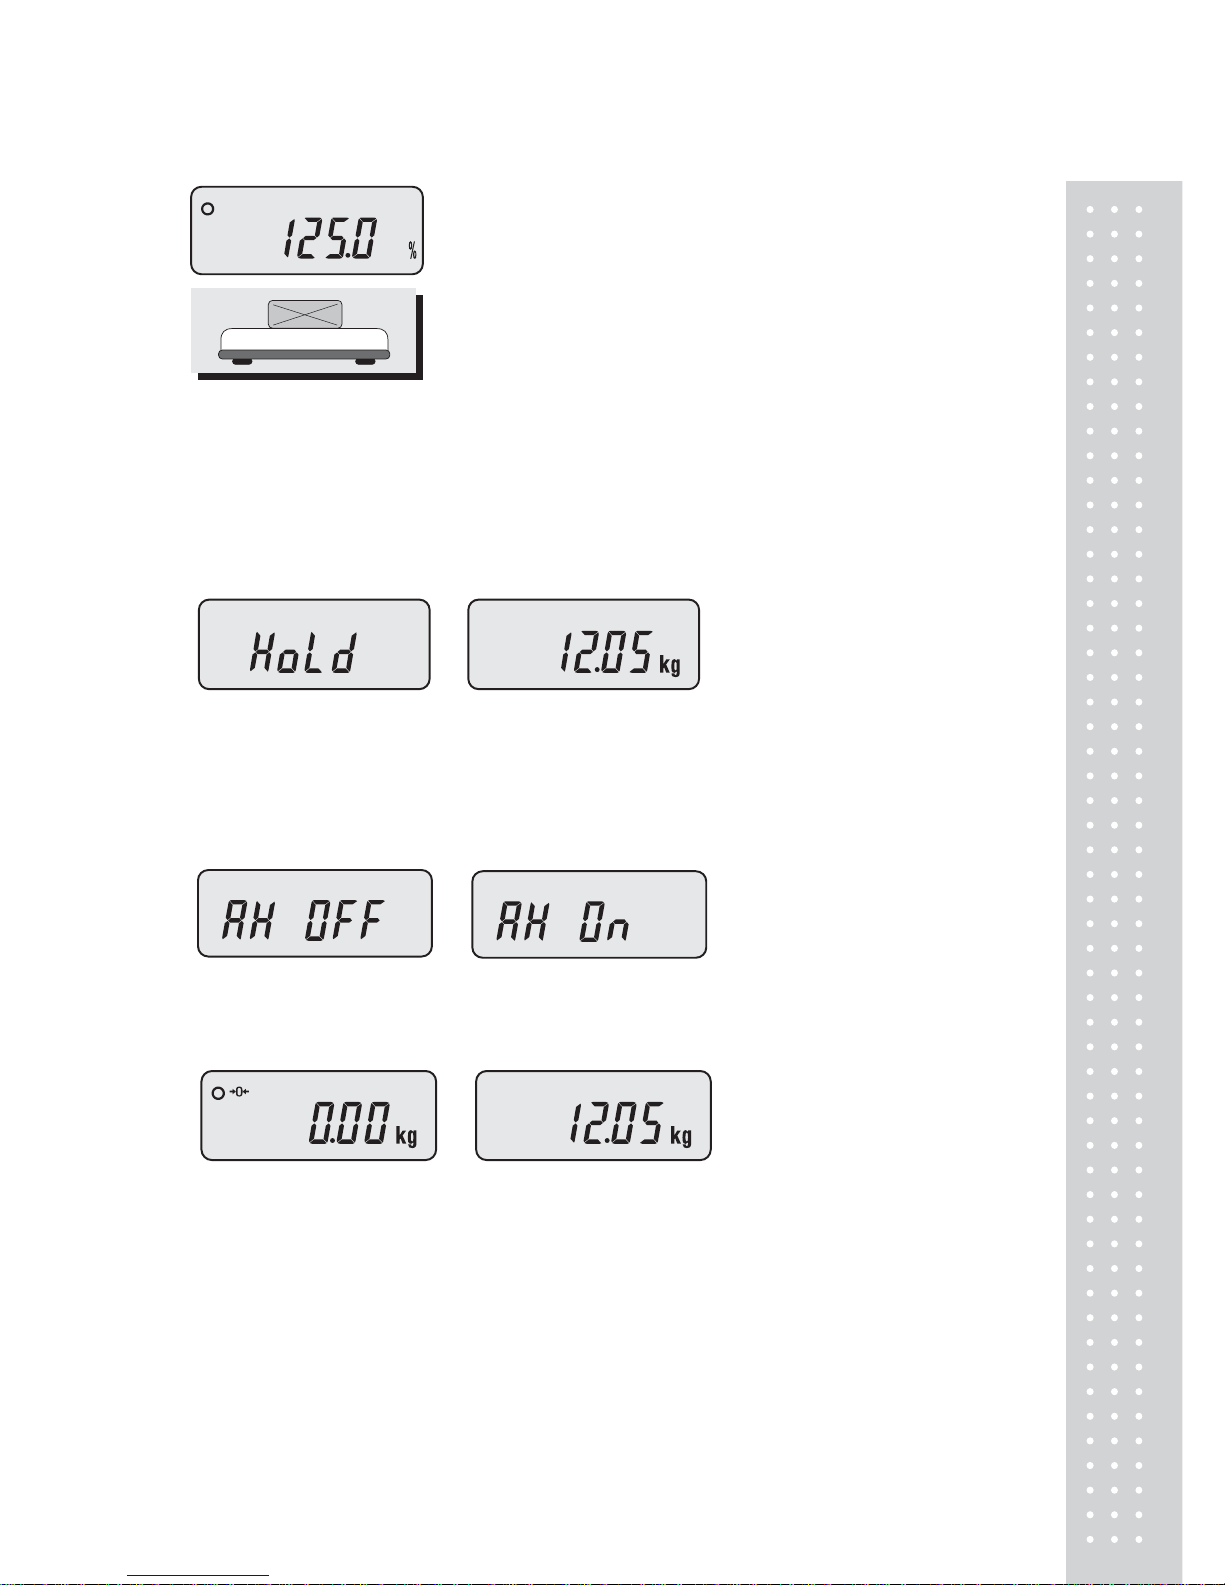
5. Hold Function(Weight Mode ONLY)
■ Key hold
① Place an item on the platter and then press the HOLD key.
① “HOLD” is shown on the
display.
②Average weight is shown on
the display.
■ After average weight display 3 times, HOLD function will be release automatically.
■ Auto Hold function
①After weighing item
remove all of the container
from the platter, press Hold key.
② Use “TARE” key to select
one of Auto Hold function.
③ Press “Hold” key to save
and exit to normal mode.
④Place an item on the platter.
Then weight display will show “Hold”.
The “Hold” blinks for two times, and then
the average weight blinks continuously.
⑤After remove the item of the platter, place another item on the platter.
Then display will show average weight again.
If you don’t want use auto-hold function, remove the item and press hold key.
Display shows AH_on. Press tare key. İt will be changed AH_off.
Then press Hold key. Auto-hold function will not operate.
④Place an item on the platter, then the weight is displayed as a
percentage of the reference.
 Loading...