

Page 1

1
CL5000 Series
User’s Manual
Rev 2006.03.13
Page 2

2
Table of Contents
1. GENERAL .................................................................................................................... ................................. 8
1.1 PRECAUTIONS ............................................................... ..................................................................... 8
1.2 INTRODUCTIONS .............................................................................................................................. 10
1.3 SPECIFICATIONS ............................................................... ............................................................... 11
1.4 NAME AND FUNCTIONS................................................................................................................... 13
1.5 Basic set-up ...................................................................................................................................... 15
1.6 SYMBOLS........................................................................................................................................... 16
1.7 KEY FUNCTIONS .............................................................................................................................. 16
1.8 Installation of the Label Roll............................................................... ............................................... 20
2. PROGRAMMING ................................................................................................................ ......................... 23
2.1 PLU Programming.............................................................................................................................. 26
2.1.1 Create By-Weight PLU (Menu code 1120) ............................................................................ 27
2.1.2 Create By-Count PLU (Menu code 1120) .............................................................................. 34
2.1.3 Create By-PCS PLU (Menu code 1120) ................................................................................. 39
2.1.4 Editing PLU (Menu code 1120) ............................................................................................... 43
2.1.5 Sample Printing (Menu code 1170)......................................................................................... 44
2.1.6 Listing PLU (Menu code 1150) ............................................................................................... 44
2.1.7 Copying PLU (Menu code 1141) ............................................................................................. 44
2.1.8 Deleting PLU (Menu code 1142)............................................................................................. 45
2.1.9 Moving PLU (Menu code 1143) ............................................................................................ 45
2.1.10 Selecting PLU Items (Menu code 1144) ............................................................................... 46
2.1.11 PLU Sale Count (Menu code 1145)....................................................................................... 46
2.2. Programming PLU Data Table I
........................................................................................................ 47
2.2.1 Department (Menu code 1210) ............................................................................................... 47
2.2.2 New/Edit Department (Menu code 1211) ............................................................................... 47
2.2.3 List Department (Menu code 1212) ........................................................................................ 48
2.2.4 Delete Department (Menu code 1213).................................................................................... 48
2.2.5 Group (Menu code 1220).................................................................................................. ....... 48
2.2.6 New/Edit Group (Menu code 1221) ........................................................................................ 49
2.2.7 List Group (Menu code 1222) ................................................................................................. 49
2.2.8 Delete Group (Menu code 1223)............................................................................................. 49
2.2.9 Tax Rate (Menu code 1230)............................................................................................... ..... 50
2.2.10 New/Edit Tax Rate (Menu code 1231) ................................................................................. 50
2.2.11 List Tax Rate (Menu code 1232) .......................................................................................... 51
2.2.12 Delete Tax Rate (Menu code 1233)...................................................................................... 51
2.2.13 Sales Message (Menu code 1240) ........................................................................................ 51
2.2.14 New/Edit Sales Message (Menu code 1241) ........................................................................ 52
Page 3

3
2.2.15 List Sales Message (Menu code 1242) ................................................................................. 52
2.2.16 Delete Sales Message (Menu code 1243)............................................................................. 53
2.2.17 Origin (Menu code 1250)....................................................................................................... 53
2.2.18 New/Edit Origin (Menu code 1251) ...................................................................................... 53
2.2.19 List Origin (Menu code 1252) ............................................................................................... 54
2.2.20 Delete Origin (Menu code 1253)........................................................................................... 54
2.2.21 Barcode (Menu code 1260)................................................................................................... 54
2.2.22 New/Edit Barcode (Menu code 1261)................................................................................... 55
2.2.23 List Barcode (Menu code 1262).......................................................................................... .. 57
2.2.24 Delete Barcode (Menu code 1263) ....................................................................................... 57
2.2.25 Tare (Menu code 1270)......................................................................................................... 57
2.2.26 New/Edit Tare (Menu code 1271) ........................................................................................ 58
2.2.27 List Tare (Menu code 1272) ................................................................................................. 59
2.2.28 Delete Tare (Menu code 1273)............................................................................................. 59
2.2.29 Tare Key (Menu code 1274) ................................................................................................. 60
2.2.30 Unit Symbol (Menu code 1280)............................................................................................. 60
2.2.31 New/Edit Unit Symbol (Menu code 1281) ............................................................................ 60
2.2.32 List Unit Symbol (Menu code 1282) ..................................................................................... 61
2.2.33 Delete Unit Symbol (Menu code 1283).....................
............................................................ 61
2.3 Programming PLU Data Table II............................................................... ......................................... 62
2.3.1 Ingredient (Menu code 1310) .................................................................................................. 62
2.3.2 New/Edit Ingredient (Menu code 1311).................................................................................. 62
2.3.3 List Ingredient (Menu code 1312)........................................................................................... 63
2.3.4 Delete Ingredient (Menu code 1313) ...................................................................................... 63
2.3.5 Nutrition Facts (Menu code 1320) .......................................................................................... 63
2.3.6 New/Edit Nutrition Facts (Menu code 1321).......................................................................... 64
2.3.7 List Nutrition Facts (Menu code 1322 ).................................................................................. 67
2.3.8 Delete Nutrition Facts (Menu code 1323) .............................................................................. 67
2.4 Discount Programming....................................................................................................................... 68
2.4.1 Discount (Menu code 1130) .................................................................................................... 68
2.4.2 New/Edit Discount (Menu code 1131) .................................................................................... 68
2.4.3 List Discount (Menu code 1132).......................................................................................... ... 70
2.4.4 Delete Discount (Menu code 1133)......................................................................................... 71
2.4.5 Delete by PLU No. (DC) (Menu code 1137) ........................................................................... 71
2.4.6 Delete by Dept. No. (DC) (Menu code 1138).......................................................................... 71
2.4.7 Delete ALL (DC) (Menu code 1139) ....................................................................................... 72
2.5 Global Discount Programming ........................................................................................................... 73
2.5.1 Global Discount (Menu code 1530)......................................................................................... 73
2.5.2 Priority Setting (Menu code 1531).......................................................................................... 73
Page 4

4
2.5.3 Weight/Count/PCS Discount (Menu code 1532/1533/1534) .................................................. 73
2.6 Speed Key Setting ............................................................................................................................. 74
2.6.1 Speed Key (Menu code 1160).............................................................................................. ... 74
2.7 Traceability........................................................................................................................................ 75
2.7.1 Traceability (Menu code 1330)............................................................................................... 75
2.7.2 New/Edit Traceability (Menu code 1331)............................................................................... 75
2.7.3 List Traceability (Menu code 1332) ....................................................................................... 76
2.7.4 Delete Traceability (Menu code 1333) ................................................................................... 76
2.8 Country Programming ........................................................................................................................ 77
2.8.1 Country (Menu code 1340) ..................................................................................................... 77
2.8.2 New/Edit Country (Menu code 1341) ..................................................................................... 77
2.8.3 List Country (Menu code 1342) .............................................................................................. 77
2.8.4 Delete Country (Menu code 1343).......................................................................................... 78
2.9 Programming Slaughter House .......................................................................................................... 78
2.9.1 Slaughter House (Menu code 1350)........................................................................................ 78
2.9.2 New/Edit Slaughter House (Menu code 1351) ....................................................................... 78
2.9.3 List Slaughter House (Menu code 1352) ................................................................................ 79
2.9.4 Delete Slaughter House (Menu code 1353)............................................................................ 79
2.10 Programming Cutting Hall................................................................................................................ 79
2.10.1 Cutting Hall (Menu code 1360) ............................................................................................. 79
2.10.2 New/Edit Cutting Hall (Menu code 1361) ............................................................................. 79
2.10.3 List Cutting Hall (Menu code 1362)......................
................................................................ 80
2.10.4 Delete Cutting Hall (Menu code 1363) ................................................................................. 80
2.11 Programming Store Data.................................................................................................................. 81
2.11.1 Store Data (Menu code 1410) ............................................................................................... 81
2.11.2 New/Edit Store (Menu code 1411) ....................................................................................... 81
2.11.3 List Store (Menu code 1412) ............................................................................................ .... 82
2.11.4 Delete Store (Menu code 1413) ............................................................................................ 82
2.11.5 Customer (Menu code 1420)................................................................................................. 82
2.11.6 New/Edit Customer (Menu code 1421)................................................................................. 83
2.11.7 List Customer (Menu code 1422) ......................................................................................... 83
2.11.8 Delete Customer (Menu code 1423) ..................................................................................... 84
2.11.9 Scroll Message (Menu code 1430)........................................................................................ 84
2.11.10 Configuration (Menu Code 1431)........................................................................................ 84
2.11.11 Edit Scroll Message (Menu Code 1432) ............................................................................. 85
2.11.12 List Scroll Message (Menu Code 1433).............................................................................. 86
2.11.13 Currency (Menu code 1440) ............................................................................................... 86
2.11.14 New/Edit Currency (Menu Code 1441)............................................................................... 86
2.11.15 List Currency (Menu Code 1442) ....................................................................................... 88
Page 5

5
2.11.16 Delete Currency (Menu code 1443).................................................................................... 88
2.12 Programming Global Setting ............................................................................................................ 89
2.12.1 Global Label Format (Menu code 1510) ............................................................................... 89
2.12.2 Barcode Format (Menu code 1520) ...................................................................................... 90
2.13 Printing Programming ...................................................................................................................... 93
2.13.1 Printing (Menu code 1700).................................................................................................... 93
2.13.2 Print label item (Menu code 1710) ....................................................................................... 93
2.13.3 Markdown (Menu code 1720) ............................................................................................... 95
2.13.4 Printer Hardware (Menu code 1730) .................................................................................... 96
2.13.5 Print Mode (Menu code 1731) .............................................................................................. 96
2.13.6 Label Size/Ticket Size (Menu code 1732)............................................................................ 97
2.13.7 Sensor Calibration (Menu code 1733) .................................................................................. 97
2.13.8 Sensor & Motor (Menu code 1734) ...................................................................................... 97
2.13.9 Print Intensity (Menu code 1735) ......................................................................................... 97
2.13.10 Adjust Feed Length (Menu code 1736) .............................................................................. 98
2.13.11 Label Preprint (Menu code 1737) ....................................................................................... 98
2.13.12 Serial Number Format (Menu code 1740) .......................................................................... 98
2.13.13 Add-Up Total (Menu code 1750)...................................................................................... 100
2.13.14 Ticket (Menu code 1760).................................................................................................. 100
2.13.15 Select Ticket Item (Menu code 1761) .............................................................................. 101
2.13.16 Select List Item (Menu code 1762)......................
............................................................. 102
2.14 Programming Scale Configuration ................................................................................................. 104
2.14.1 Scale Configuration (Menu code 1800)............................................................................... 104
2.14.2 Sale Mode (Menu code 1810) ............................................................................................. 104
2.14.3 Operation Mode (Menu code 1820) .................................................................................... 106
2.14.4 Department (Menu code 1830) ........................................................................................... 106
2.14.5 Date & Time (Menu code 1840) ......................................................................................... 107
2.14.6 User/ Security Configuration (Menu code 1850)................................................................ 108
2.14.7 New/Edit User(Menu code 1851) ....................................................................................... 108
2.14.8 Change Password (Menu code 1852) ................................................................................. 109
2.14.9 List User (Menu code 1853) ............................................................................................... 109
2.14.10 Delete User (Menu code 1854)......................................................................................... 110
2.14.11 Config Permission (Menu code 1855)............................................................................... 110
2.14.12 Clerk Key ( Menu code 1856 ).......................................................................................... 112
2.14.13 Test (Menu code 1860) ..................................................................................................... 112
2.14.14 Display Test (Menu code 1861)........................................................................................ 113
2.14.15 A/D Test (Menu code 1862) ............................................................................................. 113
2.14.16 Keyboard Test (Menu code 1863) .................................................................................... 113
2.14.17 Chess Printer Test (Menu code 1864) ............................................................................. 113
Page 6

6
2.14.18 Printer Sensor Test (Menu code 1865) ............................................................................ 114
2.14.19 Memory Information (Menu code 1866) ........................................................................... 114
2.14.20 Firmware Version (Menu code 1867) ............................................................................... 114
2.14.21 Scale Parameter (Menu code 1870).................................................................................. 115
2.14.22 Function Key Define (Menu code 1880) ........................................................................... 116
2.15 Report .............................................................................................................................. .............. 118
2.15.1 Introduction ......................................................................................................................... 118
2.15.2 Report Menu (Menu code 1600).......................................................................................... 118
2.15.3 X1/X2 Report (Menu code 1610/1630) ............................................................................... 118
2.15.4 X1/X2 Scale Sales Report (Menu code 1611/1613) ........................................................... 119
2.15.5 X1/X2 PLU Report (Menu code 1612/1632)....................................................................... 121
2.15.6 X1/X2 Miscellaneous PLU Report (Menu code 1613/1633)............................................... 123
2.15.7 X1/X2 Group Report (Menu code 1614/1644) .................................................................... 125
2.15.8 X1/X2 Deptment Sales Report (Menu code 1615/1635) .................................................... 127
2.15.9 X1/X2 Hourly Sales Report (Menu code 1616/1636) ......................................................... 129
2.15.10 X1/X2 Clerk Sales Report (Menu code 1617/1637) ......................................................... 131
2.15.11 Z1/Z2 Report (Menu code 1620/1640) ............................................................................. 133
2.15.12 Clear All Report (Menu code 1650) .................................................................................. 134
3. SALES OPERATION................................................................................................................................. 135
3.1 Basic Operation................................................................................................................................ 135
3.2 Zero.................................................................................................................................................. 135
3.3 Tare .............................................................................................................................. ................... 136
3.3.1 Manual Tare Entry ............................................................................................................... 136
3.3.2 Weighed Tare Entry .......................................
....................................................................... 136
3.3.3 How to Clear Tare................................................................................................................. 137
3.3.4 Preset Tare............................................................................................................................ 137
3.4 Calling Up a PLU.............................................................................................................................. 137
3.4.1 Using Numeric Key ............................................................................................................... 137
3.4.2 Using Speed Key ................................................................................................................... 138
3.5 Override (FOR key)............................................................... ........................................................... 138
3.5.1 By-Weight PLU ........................................................................................................... .......... 138
3.5.2 By-Count PLU....................................................................................................................... 139
3.5.3 By-PCS PLU.......................................................................................................................... 140
3.6 Sales Operation............................................................... ................................................................. 141
3.6.1 Weighed Item Operation........................................................................................................ 141
3.6.2 By Count Item........................................................................................................................ 143
3.6.3 By PCS Item........................................................................................................................... 143
3.7 Discount ........................................................................................................................................... 144
3.7.1 Unit Price Discount - By Weight PLU.................................................................................. 144
Page 7

7
3.7.2 % Unit Price Discount - By Weight PLU.............................................................................. 146
3.7.3 Unit Price Discount - By PCS PLU....................................................................................... 147
3.8 Add-Up Transaction ........................................................................................................................ 149
3.9 Clerk Operation................................................................................................................................ 151
3.9.1 Standard Clerk Operation...................................................................................................... 152
3.9.2 Floating Clerk Operations ..................................................................................................... 153
3.10 Void................................................................................................................................................ 155
3.11 Payment & Change ........................................................................................................................ 156
3.12 Return ............................................................................................................................................ 158
3.13 Prepack Key.............................................................................................................................. ..... 159
3.14 X Key ............................................................................................................................................. 160
3.14.1 By-Weight PLU ................................................................................................................... 160
3.14.2 Non-Weighed PLU .............................................................................................................. 162
3.15 How to Change Sell By Date/Time ................................................................................................ 162
3.16 How to Change Origin .................................................................................................................... 163
3.17 How to Change PLU Type ............................................................................................................. 163
3.18 Direct Discount .............................................................................................................................. 164
3.18.1 Fixed Price Key................................................................................................................... 164
3.18.2 % Discount Price Key................................................................................................... ....... 165
3.19 PLU Connection ............................................................................................................................. 165
3.19.1 Referenced PLU Function ................................................................................................ ... 165
3.19.2 Coupled PLU Function......................................................................................................... 166
3.19.3 Linked PLU Function........................................................................................................... 166
3.20 Sales Operation Control Parameters ............................................................... .............................. 166
3.20.1 Fixed Weight ....................................................................................................................... 166
3.20.2 Prepack Without Report ................................................................................................. ..... 166
4. Appendix .................................................................................................................................................. 167
4.1 Label Format............................................................... ...............................................................
...... 167
4.2 Label Format Sample ....................................................................................................................... 173
4.3 Label Field ....................................................................................................................................... 174
4.3.1 Item Label Field..................................................................................................................... 174
4.3.2 Total Label Field ................................................................................................................... 177
4.4 ASCII Code Table ............................................................................................................................ 179
4.5 Window Character Set Information.................................................................................................. 180
Page 8
8
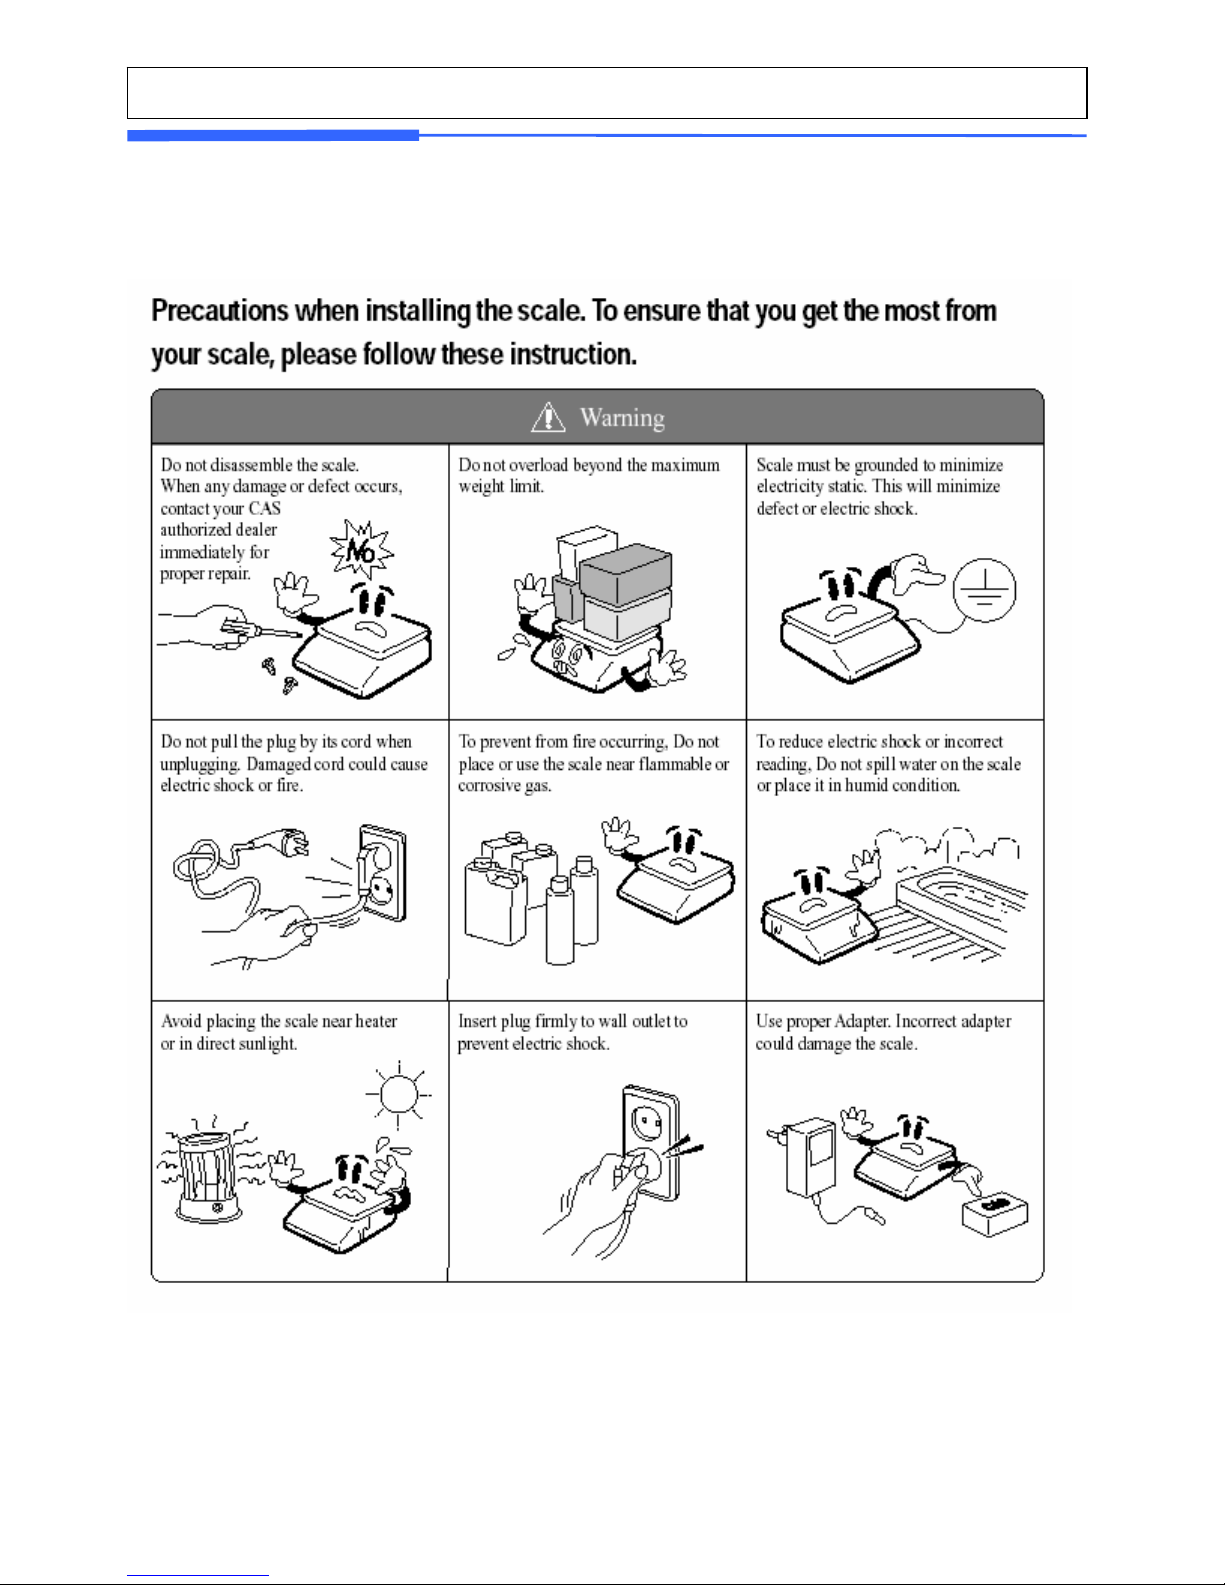
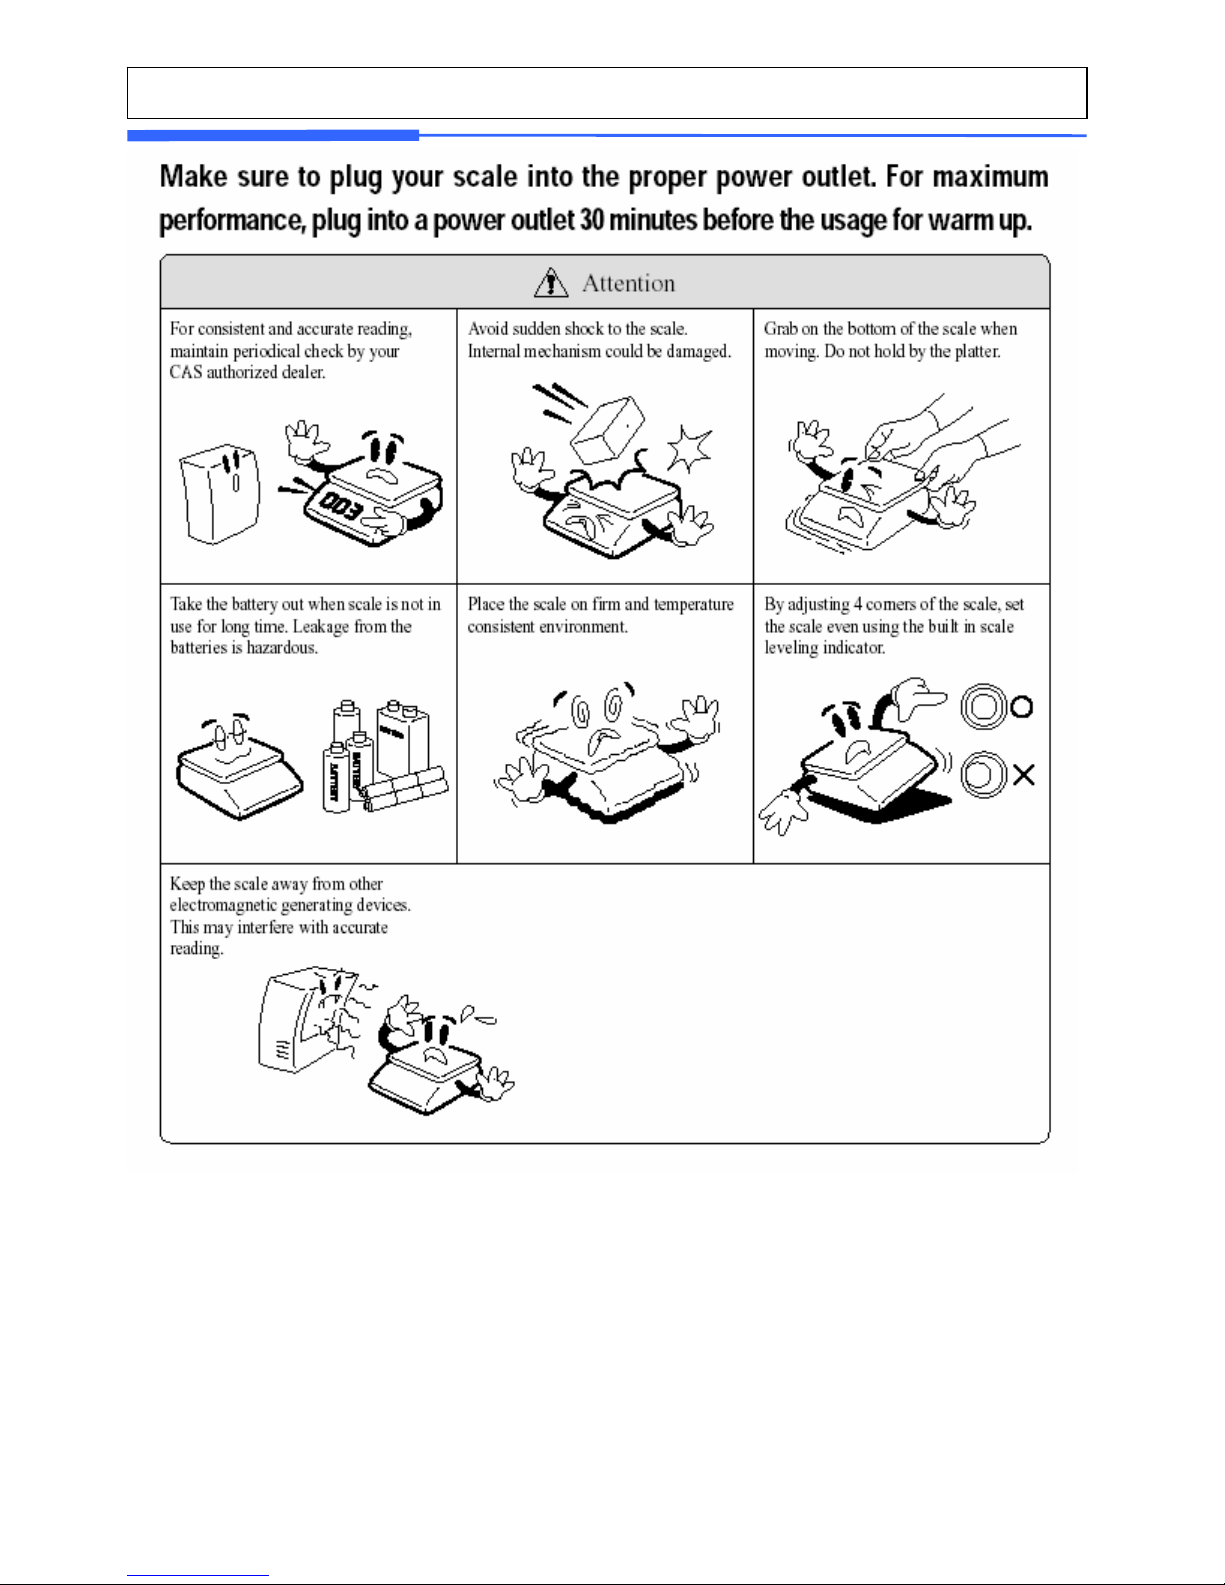
1. GENERAL
1.1 PRECAUTIONS
Page 9
9
This equipment is indoor use and all the communication ※
wirings are limited to inside of the building.
Page 10

10
1.2 INTRODUCTIONS
Thank you for purchasing the CAS CL5000 price computing electronic printing
scale. We have designed this equipment with many advanced features, high
quality construction, and user-friendly menu driven programming. We are
confident that you will find the CAS CL5000 scale will meet all of your most
demanding needs.
Remember, for proper installation and maintenance please have your
Authorized CAS Dealer do the primary installation, programming, and
demonstration. Your CAS Authorized Dealer also has a wide variety of supplies,
accessories, and expansion options for whatever your new and increasing demands
may require. Authorized CAS dealers are trained to help you with every aspect of
the CL5000 and should you need servicing, they are expertly trained by CAS to
assist you with virtually any problem.
Page 11

11
1.3 SPECIFICATIONS
Capacity
0~15 lb x 0.005 lb / 15~30 lb x 0.01 lb
0~6 kg x 0.002 kg / 6~15 kg x 0.005 kg
0~30 lb x 0.01 lb / 30~60 lb x 0.02 lb
0~15 kg x 0.005 kg / 15~30 kg x 0.01 kg
Max. Tare - 9.995 lb - 29.99 lb
A/D Conversion Rate Approx. 8 times/sec.
Measurement Type Load Cell
Platter Size 380 x 244 mm
Key
48 PLU key,
36 function key
72 PLU key,
36 function key
Speed Key
Standard
Type
(B)
96 PLU
Pole Type(P,R)
Hanging Type(H)
144 PLU
24 digit VFD + Graphic LCD
Display
Preset Tare : 4 digit
Weight : 5 digit
Unit Price : 6 digit
Total Price : 6 digit
Printer Speed 100 mm/sec.
Printing Resolution 202 dpi
Label Size
Width: 40mm~60 mm
Length: 30mm~120 mm
Barcode Type
UPC, EAN13, EAN13A5, I2OF5, CODE128, CODE39, CODE93, CODABAR
MSI/PLESSEY, IATA2OF5
Font
Small, Middle, Large Size, Free Format, Italic, Bold, Underline, Through Line, Double
through line, Reverse, shadow, outline
Printer Type DIRECT THERMAL PRINT
Operating Temp. -10° C~ 40° C (14° F~ 104° F)
Power AC 100~240V 50/60Hz 1.5A
Page 12

12
Number Range
PLU 3000 1-99999
Ingredient 510 character 999 1~999
User Defined Barcode Format 99 1~99
Department 99 1~99
Tax T y pe 9 1~9
Group 99 1~99
Clerk 31 1~31
Discount 99 1~99
Origin 499 1~499
Traceability 99 1~99
Slaughter House 99 1~99
Cutting Hall 99 1~99
Traceability Country 99 1~99
45 Fixed
Label Format
20 Free Format
Bitmap Image 14
Customer 99 1~99
Quantity Symbol 8 1~8
Scroll Message 9 1~9
X1,X2,Z1,Z2 Report
Pay Type 7
Sales Message 99 1~99
Nutrition fact 99 1~99
Programmable Data
Tare Table 99 1~99
Sales Period Dual totals for daily/monthly or user selectable re porting period.
Sales Report Mode Read: X1/X2 Mode, Read & Reset: Z1/Z2 Mode
Note: Specifications are subject to change without notice.
Page 13

13
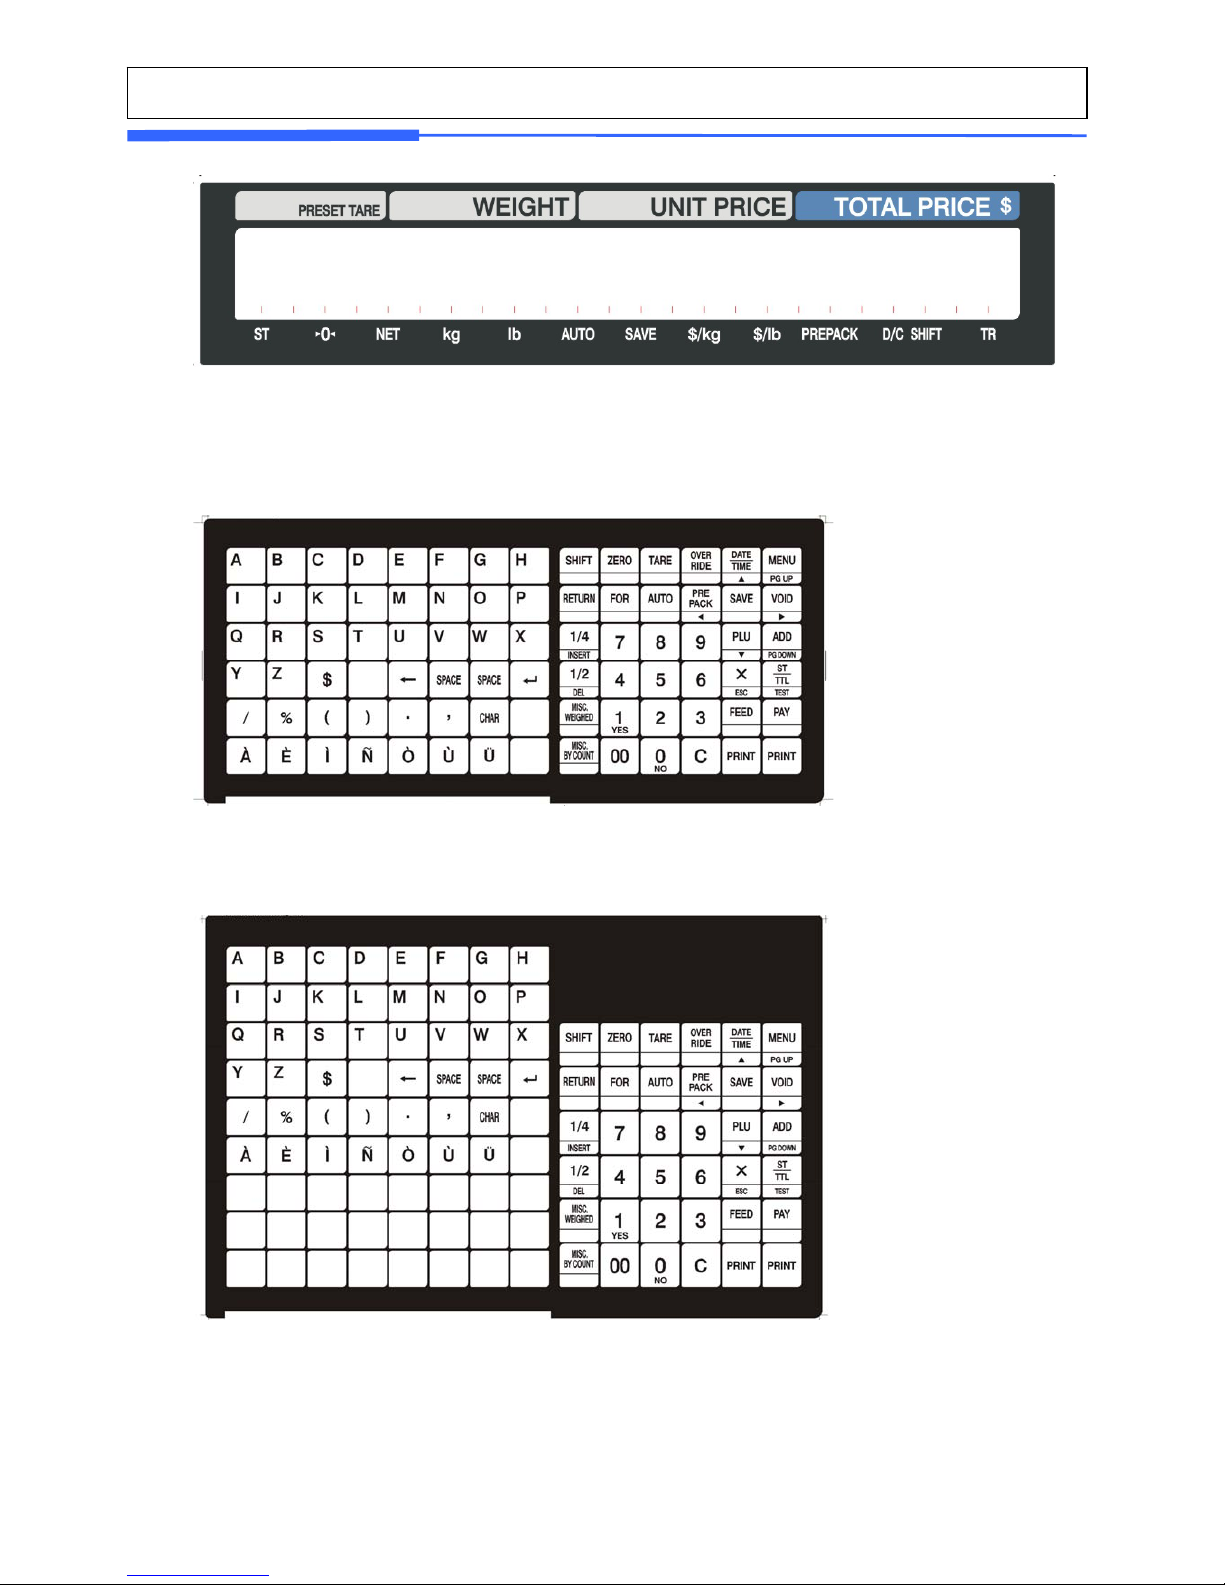
1.4 NAME AND FUNCTIONS
■ Standard Type ■ Pole Type P
■ Pole Type R ■ Hanging Type H
Page 14
14
DISPLAY
KEYBOARD
B-Type (Standard)
P Type, R-Type (pole type)
Page 15

15
H-Type (hanging type)
1.5 Basic set-up
How to install tray
B,P,R type H-type tray
NOTE: Push down ball connection
H-type mouting method (3 suggested)
Page 16
16
1.6 SYMBOLS
SYMBOLS DESCRIPTION
ST ( ) Stable indicator
▶0◀
Zero weight indicator
NET ( ) Net weight indicator
AUTO Auto Print Mode indicator
SAVE Auto clearing status indicator
PREPACK Prepack Mode indicator
DC ( ) Discount status indicator
SHIFT ( ) Speed key shift status indicator
TR Data transmission status indicator
lb lb indicator
kg kg indicator
$/lb $/lb indicator
$/kg $/kg indicator
1.7 KEY FUNCTIONS
KEYS FUNCTIONS
~
Numeric keys. Used to enter pricing, qty, count, tare,
etc.
Double zero key
Clear key. Used to clear erroneous entries and error
conditions.
Re-Zero key. Use to remove small variations in the
scale’s zero.
Tare key. Use to manually enter and remove tare
weights.
1/2 lb key. Use to apply unit price per 1/2 lb
1/4 lb key. Use to apply unit price per 1/4 lb
Override key. For temporary price change entry.
0 9
00
C
ZERO
TAR E
OVER
RIDE
1/2
1/4
Page 17
17
Date & Time key. Toggles the display between time,
date, scale number and department number.
MENU key. This key toggles from program menu to
sale mode.
Page up key: Used to go to previous page in program
mode.
For key. Use this key for by- count or by pcs pricing:
3 @ 3 FOR $1.00. It toggles between the QTY, PIECE,
and PRICE fields.
AUTO key. Auto-print mode
Pre-Pack key. Used to enter Pre-Packaging mode in
which the scale Auto-prints for every transaction and
prevents the auto clearing of data.
Save key. Save mode prevents the auto clearing of
any called-up data like tare weight, PLU pricing, etc.
Void key. To remove erroneous sales from ADD-Up
When you type a PLU number and press this key, it
calls-up that PLU.
ADD-Up key. This key when used in conjunction with
ST/TTL key allows you print a customer-total label as
well as individual transaction labels.
Page Down key. Used to go to next page in program
mode.
Multi-Label key. Use this key to print multiple sales of
the same transaction.
Escape key. It is used to exit in program mode.
Subtotal / Total key. Used with the ADD key in order
to print customer-totals.
Feed key. Use this key to feed labels or paper through
printer
Pay key. Use this key to calculate change.
Test key. Used to print test pattern
Print key. Used to manually print transactions and
also serves as an ENTER key.
FEED
PAY
TEST
PRINT
DATE
/TIME
▲
MENU
PG UP
FOR
AUTO
PRE
PACK
◀
SAVE
V
OID
▶
PLU
▼
ADD
PG DOWN
X
ESC
ST
TTL
Page 18
18
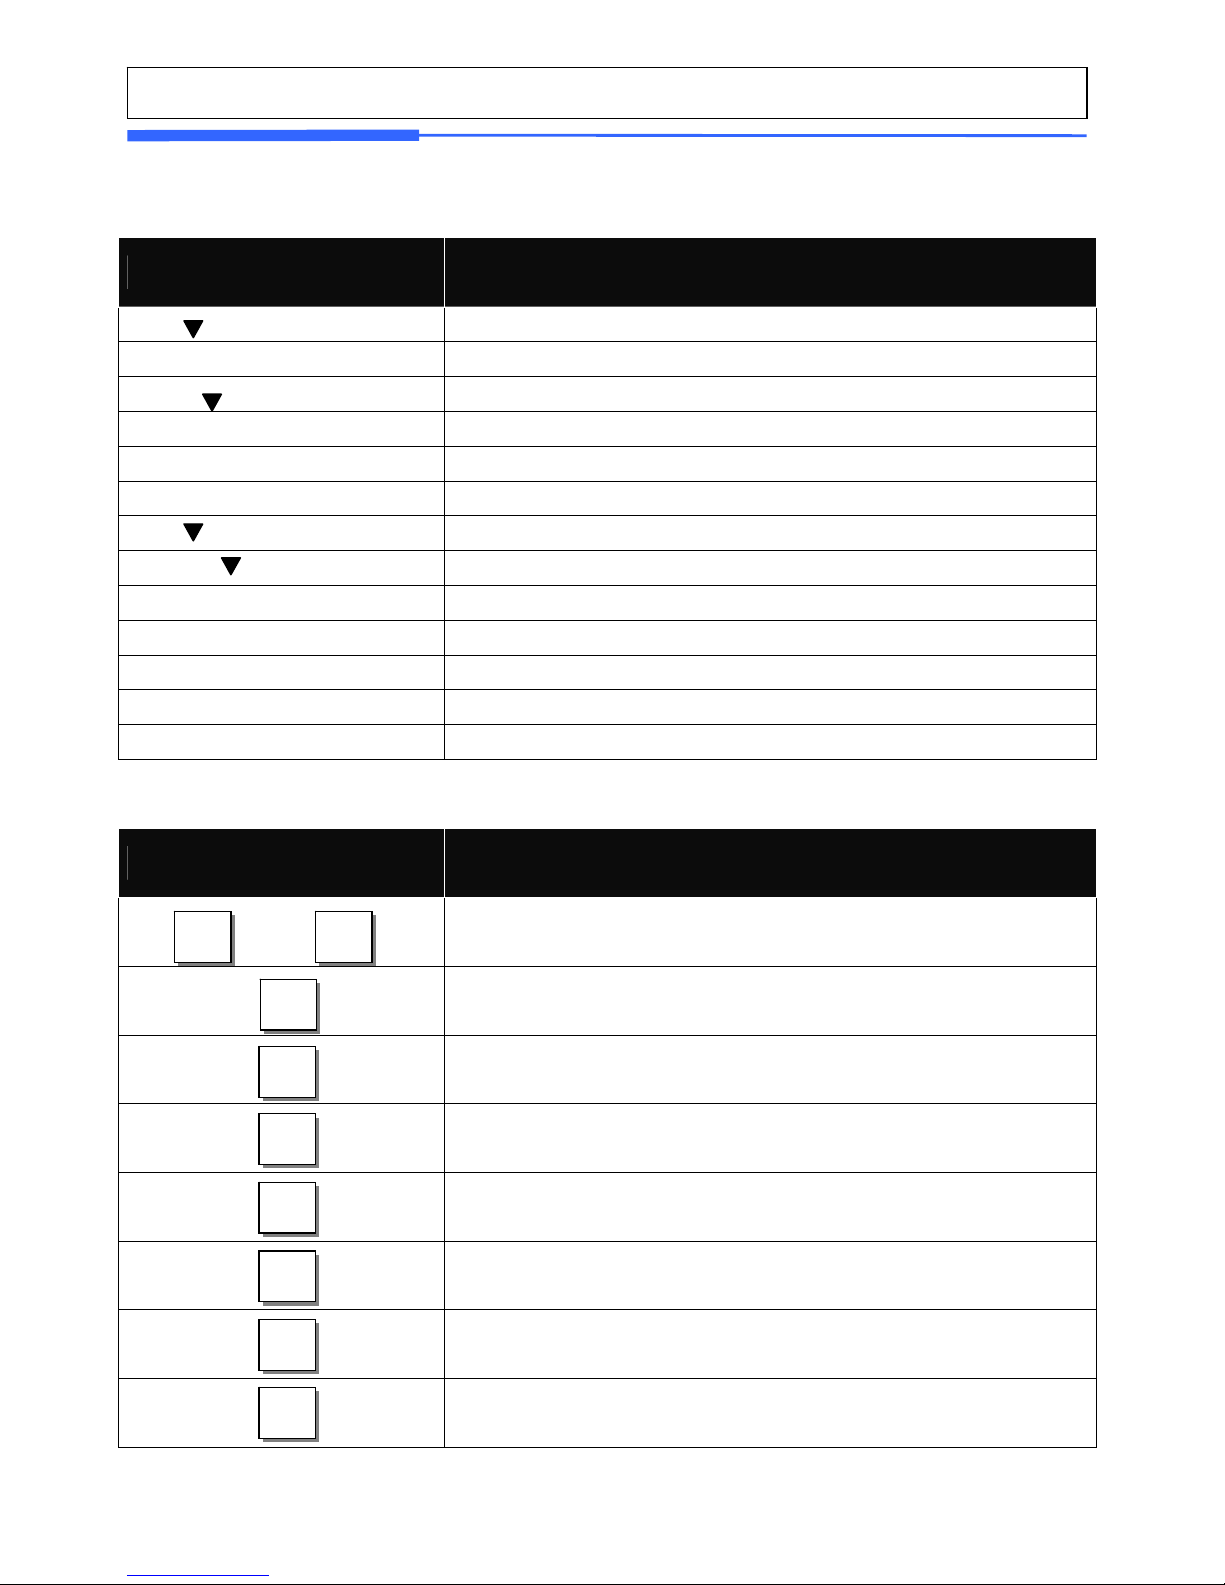
Return key. Used to credit sales for erroneous
transactions or returns.
Shift Key. Used to SHIFT function in program Mode
Discount % key. Used to discount price.
Insert key: Insert mode for text typing in program
mode.
WT/CT key. Toggles between Weight PLU and Count
PLU.
CAPS Key: Used to type a small letter in program
mode.
Miscellaneous By-Weight PLU key.
Miscellaneous By-Count PLU key.
Miscellaneous By-PCS PLU key.
Negative Discount
DELETE key. Used to delete text data in program mode
Special Discount by Special Unit Price
To change the price of PLU called-up to negative price.
Change Fixed Price Called PLU
Open Cash Drawer
To show total amount added-up. (Greek)
Call Reference PLU
To continue to use the weight selected by user.
To switch label to ticket and vice versa.
On/Off LCD Backlight
Edit Sell by Date
RETURN
SHIFT
DISC%
INSERT
WT/CT
CAPS
MISC.
By
WEIGHT
MISC.
BY
COUNT
MISC.
PCS
DISC-
DEL
Special
NEG
FP
OPEN
G.TTL
REF
IN WT
L/T
BL
SDATE
Page 19
19
Edit Origin
Edit PLU Item
Edit Discount
To assign speed key.
~
Clerk Key
Indirect Clerk Call
~
Alpha keys. Used to type text data.
Used to type $
For future
Backspace key. Used to backspace and delete text
data.
Space bar.
Used to go to next line to enter text
~
Special symbol keys.
Used to type special symbol. (See ASCII code table on
page 192)
Use to change weight unit.
Use to apply 1/2 unit price
Use to apply 1/4 unit price
Note : X key is only used in sale mode and ESC key is only used in program
mode.
Sale mode : X key
Program mode : ESC key
X
ESC
CHAR
A
Z
$
Currenc
y
←
SPACE
/
Ü
V1
V32
V
ORIGIN
ITEM
DISC
SKEY
Kg/lb
1/2
1/4
Page 20

20
1.8 Installation of the Label Roll
■Label Specifications
Outer diameter of roll : 100mm
Inner diameter of roll : 40mm
Width of receipt roll : 40, 50, 60mm
Width of label roll : 60mm(MAX)
■ Print Area
Width of label : 60mm(MAX)
Length of label : 120mm(MAX)
Page 21
21
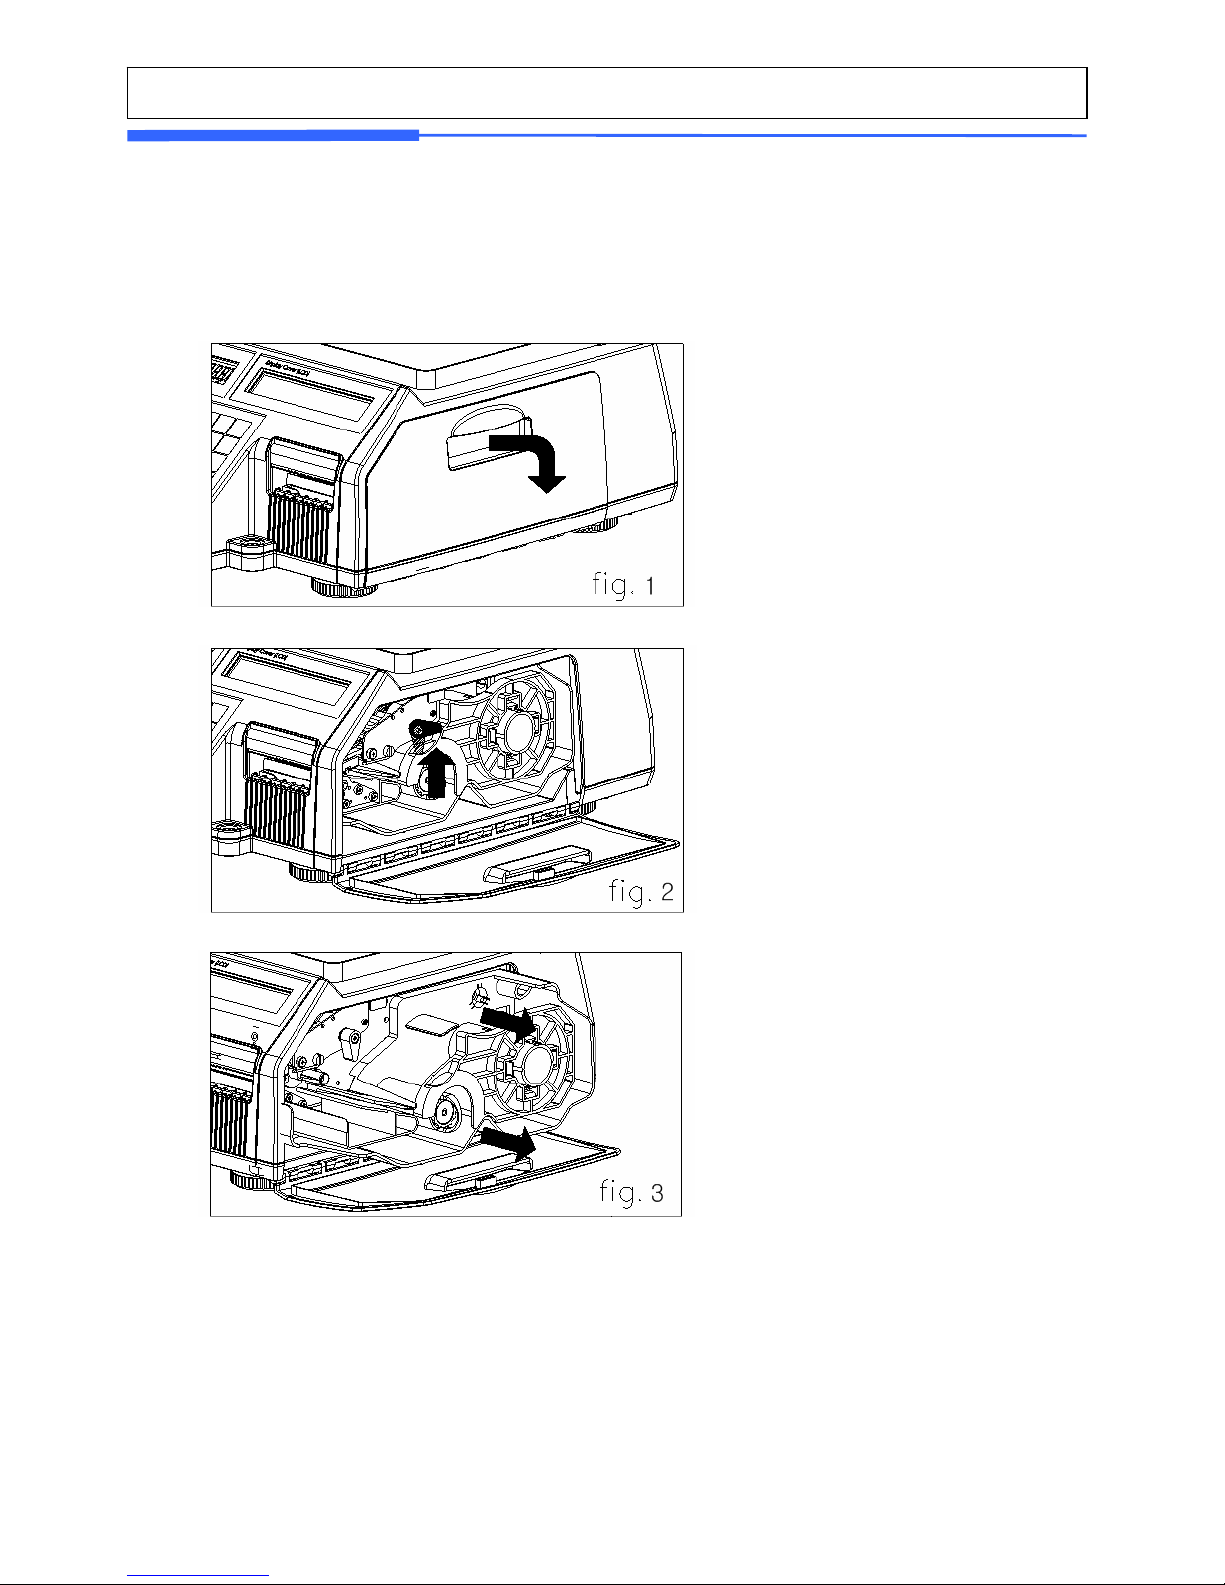
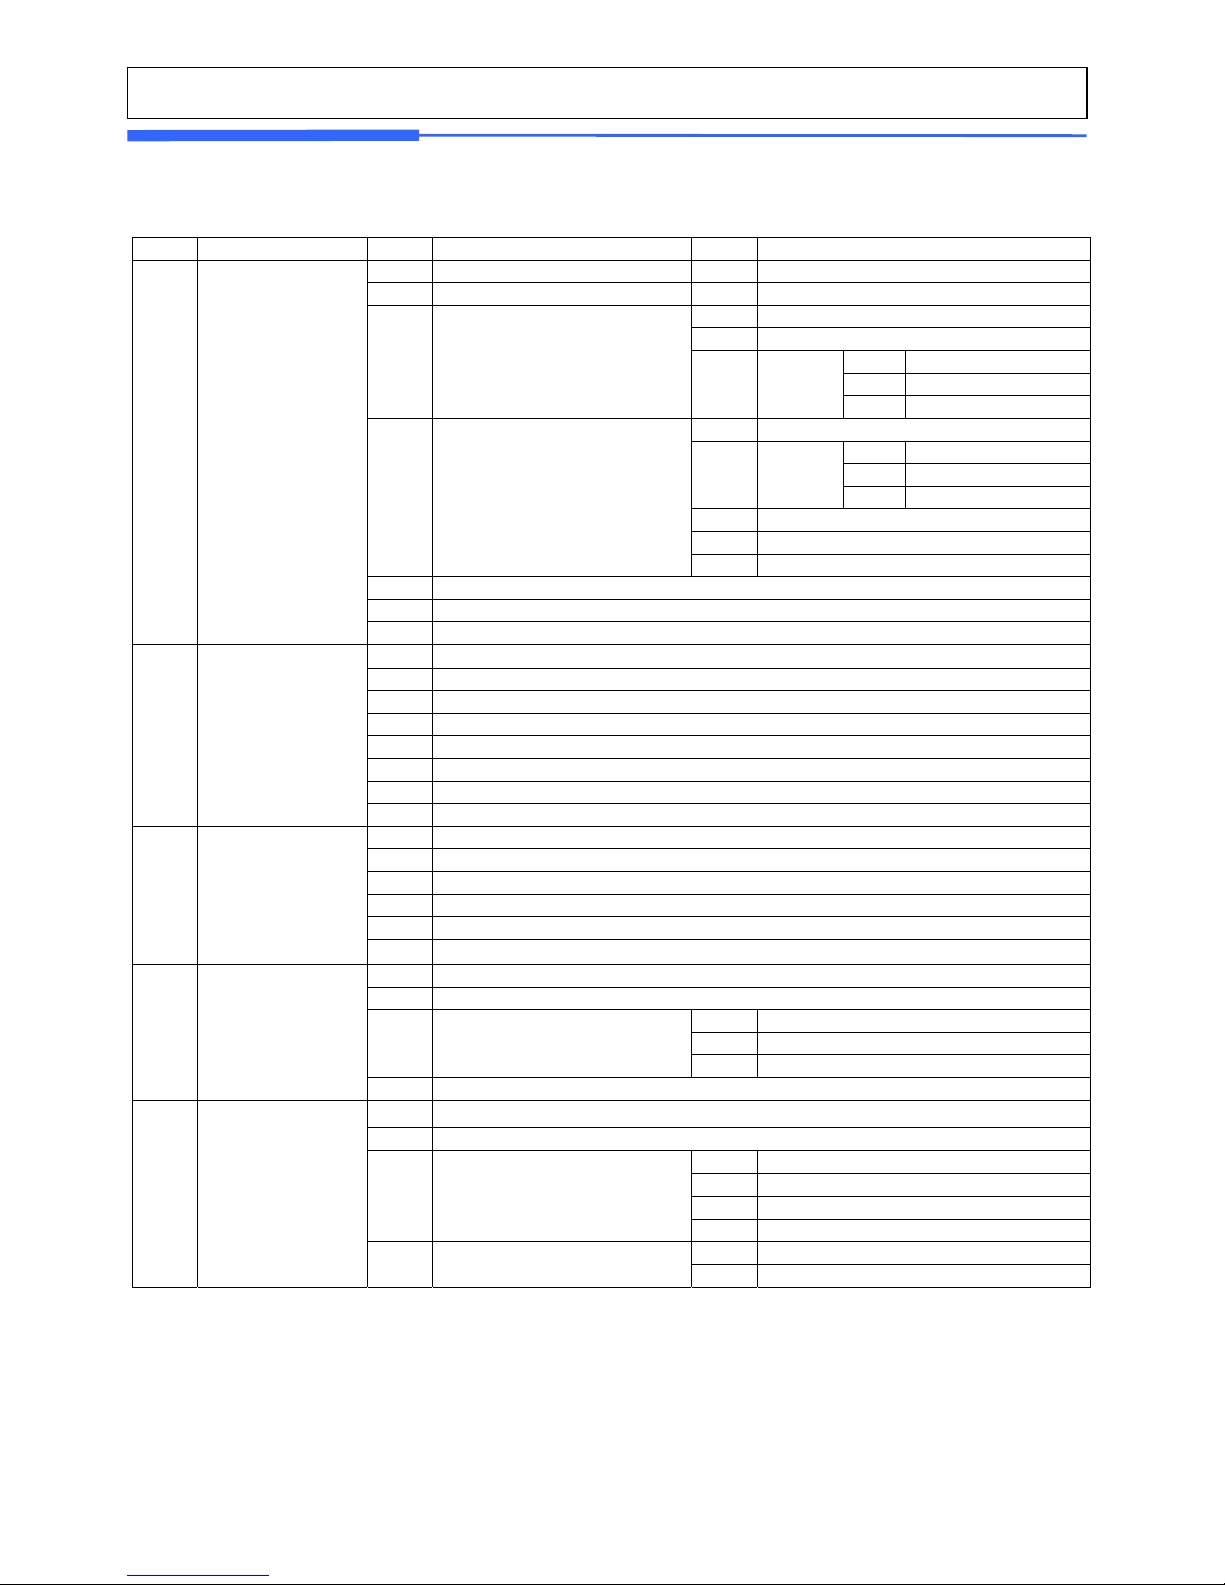
To install the label roll at ANY time you must follow the directions in this
section:
1) Press the ON/OFF key and make sure that the display is completely off. Open the
printer’s side-access panel. (See fig.1)
2) Lift up TPH lever as fig 2.
3) Remove cartridge as fig. 3.
4) Remove Pick-Up Spool assembly and paper guide from the cartridge as fig. 4.
Page 22
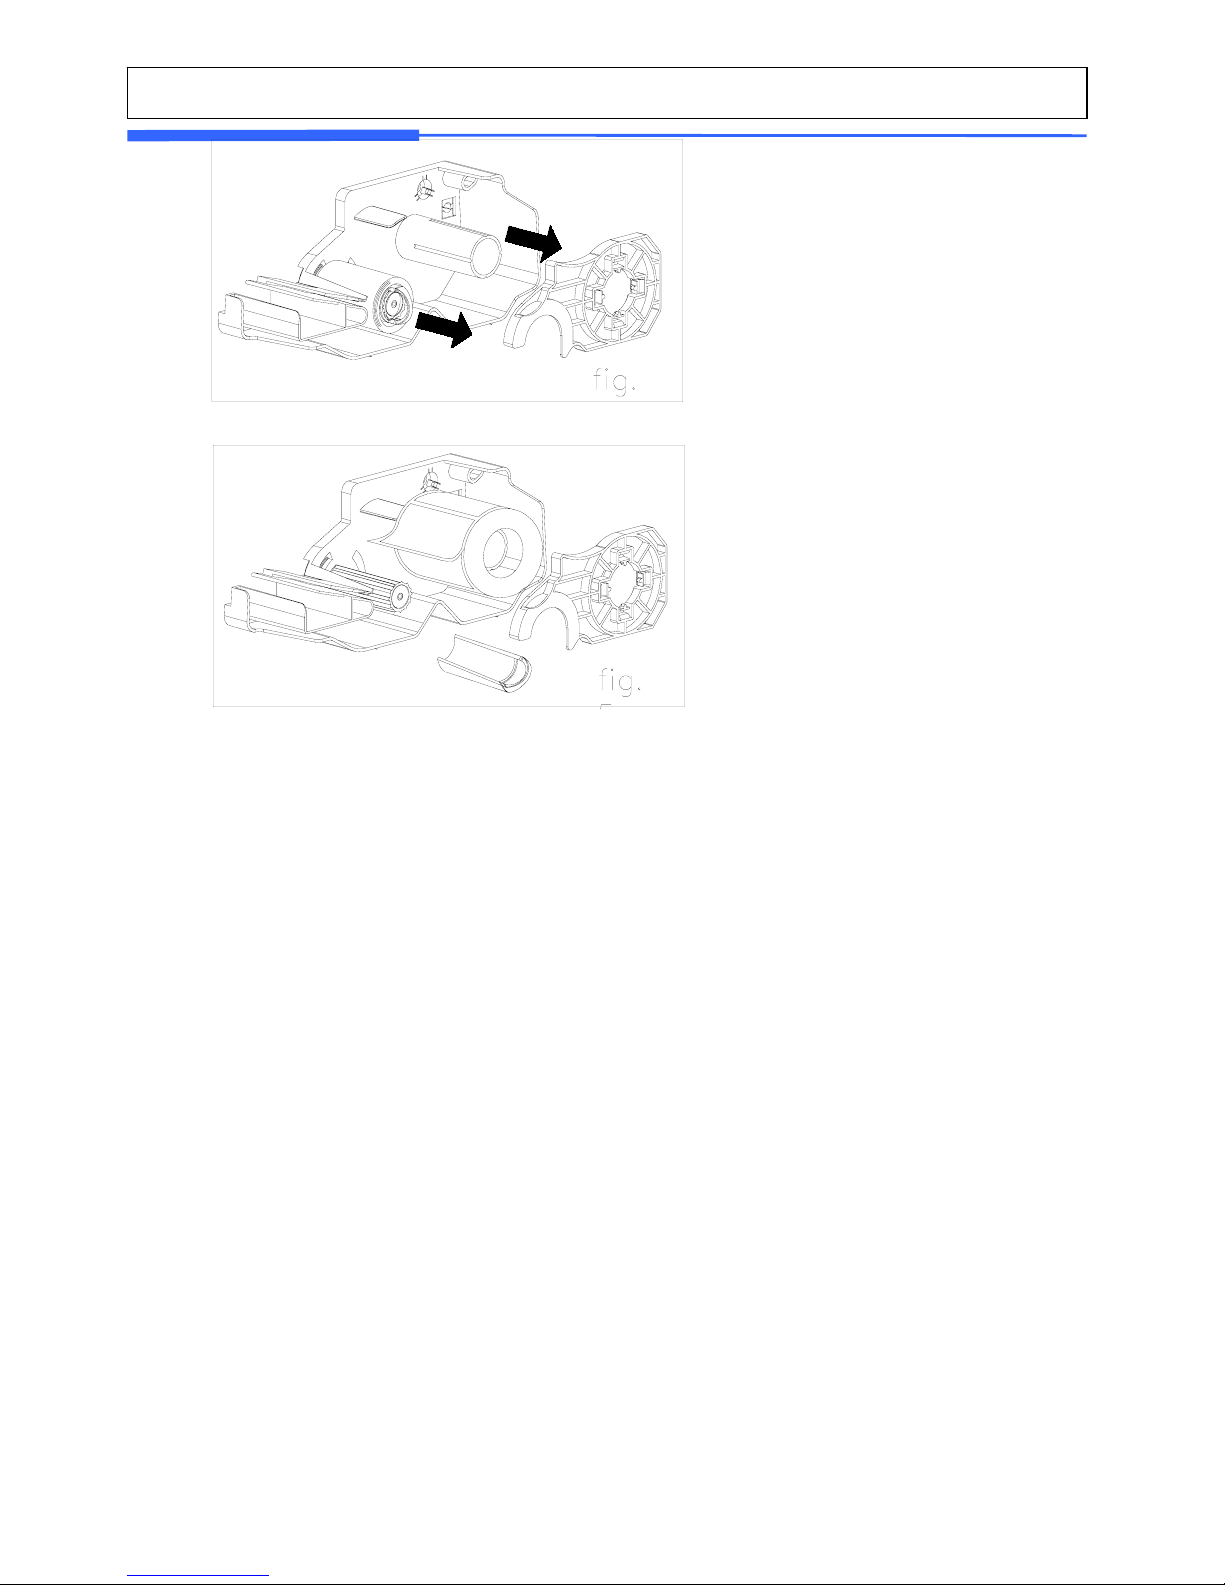
22
4
5) Place the label in the scale as fig. 5
5
6) Press the FEED key.
*If label position is not correct, you have to check follows :
a, Label size.(Label setting menu)
b. Feed Adjustment .(Feed adjustment menu)
c. Sensor calibration(Sensor Calibration menu)
Page 23
23
2. PROGRAMMING
Program Mode Menu Tree (Menu code : 1000)
CODE Menu CODE Sub Menu CODE Sub Menu
1110 Change Price
1120 New/Edit
1131 New/Edit
1132 List
1137 Delete by PLU(DC)
1138 Delete by Dept(DC)
1130 Discount
1133 Delete
1139 Delete All(DC)
1141 Copy
1147 Delete by PLU No.
1148 Delete by Dept. No.
1142 Delete
1149 Delete All
1143 Move
1144 Select PLU Items
1140 Management
1145 PLU Sale Count
1150 List
1160 Speed Key
1100 PLU
1170 Sample Printing
1210 Department
1220 Group
1230 Tax Rate
1240 Sales Message
1250 Origin
1260 Barcode
1270 Tare
1200 PLU Data Table I
1280 Unit Symbol
1310 Ingredient
1320 Nutrition Facts
1330 Traceability
1340 Country
1350 Slaughter House
1300 PLU Data Table II
1360 Cutting Hall
1410 Store
1420 Customer
1431 Configuration
1432 Edit Scroll Message
1430 Scroll Message
1433 List Scroll Message
1400 Store Data Table
1440 Currency
1510 Label Format
1520 Barcode
1531 Priority Setting
1532 Weight Discount
1533 Count Discount
1530 Discount
1534 PCS Discount
1541 Set Global Tax
1500 Global Setting
1540 Tax
1542 Global Tax No.
Page 24
24
1611 Scale
1612 PLU
1613 Misc. PLU
1614 Group
1615 Department
1616 Hourly
1610 X1 Report
1617 Clerk
1620 Z1 Report
1631 Scale
1632 PLU
1633 Misc. PLU
1634 Group
1635 Department
1636 Hourly
1630 X2 Report
1637 Clerk
1640 Z2 Report
1600 Report
1650 Clear All
1710 Print Label Item
1720 Markdown
1731 Print Mode
1732 Label/Ticket Size
1733 Sensor Calibration
1734 Sensor & Motor
1735 Print Intensity
1736 Adjust Feed Length
1730 Printer Hardware
1737 Label Preprint
1740 Serial Number Format
1750 Add-Up Total
1761 Select Ticket Item
1700 Print
1760 Ticket
1762 Select List Item
1810 Sale Mode
1820 Operation Mode
1830 Department
1840 Date/Time
1851 New/Edit User
1852 Change Password
1853 List User
1854 Delete User
1855 Config Permission
1850
User/Security
Configuration
1856 Clerk Key
1861 Display
1862 A/D
1863 Keyboard
1864 Chess Printer
1865 Printer Sensor
1866 Memory Information
1860 Test
1867 Firmware Version
1871 Display
1872 Printing
1873 Sale setup
1870 Scale Parameter
1874 Clerk Logout
1800 Scale Config
1880 Function Key Define
Page 25

25
1911 Service Type
1912 DHCP
1913 IP
1914 Remote IP
1915 RS232C
1916 WLAN Setting
1910 Network Setting
1917 WLAN Config
1920 Application
1930 Scale Lock/Unlock
1940 Check Scale
1900 Communication
1950 Backup to Scale
z How to access PROGRAM MODE
You can see the Program Menu screen by pressing the MENU key.
The 2 numbers at top left (1/3) indicate the number of pages or screens. The number to
the left of the slash is the current page or screen number and the number to the right of
the slash indicates the total number of pages or screens. You can use the PG UP and PG
DOWN keys to navigate from page to page, or you can use the Arrow keys to go through
each page 1 line at a time.
(Screen 1 of 3)
Menu code.
Selectable menu. If you want
to select PLU, simply press 1.
If you press “PG DOWN” key, you can see other menu screens as below.
PROGRAM MODE (1/3)
1. PLU
2. PLU Data Table I.
3. PLU Data Table II.
PROGRAM MODE (2/3)
4. Store Data Table
5. Global Setting
6. Report
PROGRAM MODE (3/3)
7. Print
8. Scale Config
9. Communication
PROGRAM MODE (1/3)
1. PLU
2. PLU Data Table I.
3. PLU Data Table II.
1000
Page 26
26
2.1 PLU Programming
You can set 45 items for a PLU as below table and if you do not want to use
some items, you can prohibit those items in menu code:1144.
< PLU ITEM>
No Item Description
1 Department Department No.
2
PLU No
PLU No.
3 PLU Type Select PLU type among By Weight, By Count or By-PCS
4 Name 1 Enter name 1 of item. Maximum 40 characters.
5 Name 2 Enter name 2 of item. Maximum 40 characters.
6 Name 3 Enter name 3 of item. Maximum 40 characters.
7 Group No. Select group number. This value can be from 0 to 99.
8 Label No. (0~99) (0=Do not use Label No.), Label Formats “1~12”.
If Global Setting is YES, it is not shown.
9 Aux. Label No. (0~99) (0=Do not use Label No.), Label Formats “1~12”.
This function prints aux. label as saved number of label number
10 Origin No. (0~500) 0=Do not use origin.
11
※ Unit Weight Unit weight of Price(No.19) (1:unit price for 1lb,2:unit price for
1/2lb,3:unit price for 1/4lb,4:unit price for 1kg,5:unit price for 100g)
12
※ Fixed Weight
The weight is fixed regardless of item
13 Prefix Enter serial code for PLU (Greece version of CL5000 series)
14 Item code Item code
15 Use Fixed Price Type You can set wheter use Fixed Price or not
16
☆ Pieces
(0-999) Set the number for By-PCS PLU
17
☆ Quantity Symbol ID
(0~8) Set symbol of PCS or Count
18 Fixed price Price is fixed regardless of weight or pcs
19 (Unit) Price This value can be from 0 to 999999.
20 Special Price It can be unit price by using Special key.
21 Tax No. Enter tax number. This value can be from 0 to9
22
※ Tare / Tare No.
You can enter tare weight manually or enter No. of tare data.
(By-weight PLU)
23
※ % Tare
0~99.99 You can enter tare weight as percentage of item. If
you set it to 20%, 20% of item is tare weight.
24
※ Tare % Limit
0~99.99 You can enter tare limit.
%tare <= % limit -> Gross weight is printed
%tare > % limit -> Net weight is printed
Page 27
27
25 Barcode No. This value can be from 0 to 99, If Global Setting is YES, it is not
shown.
26 Produced Date (0~999) This is subtracted to the current date in order to be
calculated.
27 Packed Date (0~999) This is added to the current date in order to be
calculated.
28 Packed Time (0~99) If you set it to 0, it is not printed
29 Sell-by Date (0~9999) This is expirations date that is numbered in days and
added to the Packed On date in order to be calculated. If you
set it to 0, it is not printed
30 Sell-by Time (0~99) If you set it to 0, it is not printed
31 Cook-by Date (0~9999) This is expirations date that is numbered in days and
added to the Packed On date in order to be calculated.
32 Ingredients No. (0~999) Enter ingredients
33 Traceability No. (0~99) Enter traceability No.
34 Bonus For future use.
35 Nutri. Fact No. (0~500) Enter nutrition fact ID
36 Sales Msg No. (0~99) Enter sales message No.
37 Reference PLU Dept. (0~99) Enter reference department No.
38 Reference PLU No. (0~999999) Enter reference PLU No.
39 Coupled PLU Dept. (0~99) Enter coupled PLU department
40 Coupled PLU No. (0~999999) Enter coupled PLU No.
41 # of Link PLU (0~2) Enter the number of linked PLU.
42 Link PLU1 Dept. (0~99) Enter PLU1 department No.
43 Link PLU1 No. (0~999999) Enter PLU1 No.
44 Link PLU2 Dept. (0~99) Enter PLU2 department No.
45 Link PLU2 No. (0~999999) Enter PLU2 No.
※ These items are shown on the display when you select By Weight PLU.
☆ These items are shown on the display when you select By Count or By PCS PLU.
2.1.1 Create By-Weight PLU (Menu code 1120)
<New/Edit PLU : MENU -> 1. PLU -> 2.New/Edit>
* You can press the SAVE key at anytime to save the current PLU data and if you want to exit
without saving, press the ESC key.
Page 28

28
1
PRINT
1
PRINT
1. Enter Department No. and PLU No.
* Department should be set previously
EX) Department No. = [ 1 ] Default
PLU No. : [ 1 ]
NEW/ EDIT
Department No. : [ 1] Default
PLU No. : [ 1] No Data or Param
2. Select PLU Type
1. By Weight ->
2. By Count ->
3. By PCS ->
EX) BY-Weight Item
By-Weight PLUs are priced as price-perweight; for example, $3.99/lb or $1.99/lb. You
must weigh these PLUs before you can execute a
sales transaction. (#/
△△ may be changed on
Menu 1144).
PLU No. : 1 (1/△△)
PLU Type : [ 1]
1. By-Weight
[SAVE]=Save [ESC]=Escape
1
PRINT
3. Enter PLU Name 1
EX) “BEEF”
PLU No. : 1 (2/△△)
Name 1: [BEEF ]
[SAVE]=Save [ESC]=Escape
B
PRINT
E E F
4. Enter PLU Name 2
EX) “Sirloin”
PLU No. : 1 (3/△△)
Name 2: [Sirloin ]
[SAVE]=Save [ESC]=Escape
S
PRINT
i r n
Shift
O l i
5. Enter PLU Name 3
EX) “STEAK”
PLU No. : 1 (4/△△)
Name 3: [STEAK ]
[SAVE]=Save [ESC]=Escape
S
PRINT
T E A
K
6. Select Group
* If there is no group for this PLU, enter “0”
EX) 1. Meat
PLU No. : 1 (5/△△)
Group : [ 1]
1. Meat
[SAVE]=Save [ESC]=Escape
1
PRINT
Page 29
29
8. Select Origin
* If you do not want to use origin, enter “0”
EX) 49. China
PLU No. : 1 (8/△△)
Origin No. : [ 1]
49. China
[SAVE]=Save [ESC]=Escape
4
PRINT
9
9. Enter Fixed Weight
The weight of an item is fixed.
* If you do not want to use, enter 0.
EX) Do not use Fixed Weight
PLU No. : 1 (9/△△)
FixedWeight : [ 0.000] lb
[SAVE]=Save [ESC]=Escape
0
PRINT
11. Item Code
EX) Item Code = 1941
PLU No. : 1 (11/△△)
ItemCode : [ 1941]
[SAVE]=Save [ESC]=Escape
1
PRINT
9 4 1
7. Select Label Format
* If you enter “0”, standard label format (menu code
1510) is used.
* For details about label f ormat, refer to 8. Setting Global
option
EX) 1. IS6030-00001(60x30)
PLU No. : 1 (6/△△)
Label No. : [ 1]
IS6030-00001(60X30)
[SAVE]=Save [ESC]=Escape
1
PRINT
PLU No. : 1 (7/△△)
Aux. Label No. : [ 1]
IS6030-00001(60X30)
[SAVE]=Save [ESC]=Escape
10. Enter Prefix
* If you do not want to use, enter 0.
EX) Do not use Fixed Weight
PLU No. : 1 (10/△△)
Prefix : [ 1]
[SAVE]=Save [ESC]=Escape
1
PRINT
12. Use Fixed Price Type
EX) Fixed price type 1
PLU No. : 1 (12/△△)
Use Fixed Price Type : [ 1]
[SAVE]=Save [ESC]=Escape
PRINT
1
Page 30

30
13. Price
EX) Price = $10.00
PLU No. : 1 (13/△△)
Price : [ 10.00]
[SAVE]=Save [ESC]=Escape
1
PRINT
0 0 0
15. Tax No.
* It may be changed by setting Menu code 1541.
* If you do not want to use, enter “0”
EX) Tax data 1
PLU No. : 1 (15/△△)
Tax No. : [ 1]
[SAVE]=Save [ESC]=Escape
PRINT
1
16. Tare
* You can use Tare Table, depending on the setting of
Parameter 584
EX) Tare Value = 100 g
PLU No. : 1 (16/△△)
Tare : [ 0.100] lb
[SAVE]=Save [ESC]=Escape
PRINT
1 0 0
17. %Tare
EX) 10.00%
PLU No. : 1 (17/△△)
%Tare : [ 10.00]
[SAVE]=Save [ESC]=Escape
1
PRINT
0 0 0
18. Tare % limit
* If you do not want to use, enter “ 0”
EX) Do not use Tare % limit
PLU No. : 1 (18/△△)
Tare %Limit : [ 0.00]
[SAVE]=Save [ESC]=Escape
PRINT
0
19. Barcode No.
* You can use barcode ID depending on the setting of
Menu code 1520
EX) Barcode Data Table 1
PLU No. : 1 (19/△△)
Barcode No. : [ 1]
EAN-8, DDIIIIIC
[SAVE]=Save [ESC]=Escape
PRINT
1
14. Special Price
EX) Price = $10.00
PLU No. : 1 (14/△△)
Special Price : [ 20.00]
[SAVE]=Save [ESC]=Escape
2
PRINT
0 0 0
Page 31

31
PLU No. : 1 (26/△△)
Ingredient No. : [ 0]
[SAVE]=Save [ESC]=Escape
PRINT
0
26. Ingredient No.
* If you do not want to use, enter “0”
EX) Do not use ingredient
20. Produced Date
PLU No. : 1 (20/△△)
Produced Date : [ 1]
[SAVE]=Save [ESC]=Escape
PRINT
1
21. Packed Date
PLU No. : 1 (21/△△)
Packed Date : [ 1]
[SAVE]=Save [ESC]=Escape
PRINT
1
22. Packed Time
PLU No. : 1 (22/△△)
Packed Time : [ 1]
[SAVE]=Save [ESC]=Escape
PRINT
1
PLU No. : 1 (23/△△)
Sell By Date : [ 2]
[SAVE]=Save [ESC]=Escape
PRINT
2
23. Sell By Date
* This value can be from 0 to 9999.
* If you do not want to use, enter “0”
EX) 2
PLU No. : 1 (24/△△)
Sell By Time : [10]
[SAVE]=Save [ESC]=Escape
1
PRINT
0
24. Sell By Time
* This value can be from 0 to 99.
* If you do not want to use, enter “0”
EX) 10
PLU No. : 1 (25/△△)
Cook By Date : [ 2]
[SAVE]=Save [ESC]=Escape
PRINT
2
25. Cook By Date
* This value can be from 0 to 9999.
* If you do not want to use, enter “0”
EX) 2
Page 32

32
30. Sales Msg No.
*
If you do not want to use, enter “0”
EX) Sales Message 1
PLU No. : 1 (30/△△)
Sales Msg No. : [ 0]
1, Thank You
[SAVE]=Save [ESC]=Escape
PRINT
1
PLU No. : 1 (27/△△)
Traceability No. : [ 1]
[SAVE]=Save [ESC]=Escape
PRINT
1
27. Traceability No.
* If you do not want to use, enter “0”
PLU No. : 1 (28/△△)
Bonus : [ 5]
[SAVE]=Save [ESC]=Escape
PRINT
5
28. Bonus
* If you do not want to use, enter “5”
PLU No. : 1 (29/△△)
Nutri.Fact No. : [ 1]
[SAVE]=Save [ESC]=Escape
PRINT
1
29. Nutri. Fact No.
* If you do not want to use, enter “0”
PLU No. : 1 (31/△△)
Reference PLU Dept : [ 0]
[SAVE]=Save [ESC]=Escape
PRINT
0
31. Reference PLU Department
*
If you do not want to use, enter “0”
EX) Do not use Reference PLU Department
PLU No. : 1 (32/△△)
Reference PLU No. : [ 0]
[SAVE]=Save [ESC]=Escape
PRINT
0
32. Reference PLU No.
* If you do not want to use, enter “0”
EX) Do not use reference PLU No.
PLU No. : 1 (33/△△)
Coupled PLU Dept : [ 0]
[SAVE]=Save [ESC]=Escape
PRINT
0
33. Coupled PLU Department
*
If you do not want to use, enter “0”
EX) Do not use Coupled PLU Department
PLU No. : 1 (34/△△)
Coupled PLU No. : [ 0]
[SAVE]=Save [ESC]=Escape
PRINT
0
34. Coupled PLU No.
* If you do not want to use, enter “0”
EX) Do not use coupled PLU number
Page 33

33
PLU No. : 1 (35/△△)
# of Link PLU : [ 2]
[SAVE]=Save [ESC]=Escape
PRINT
2
35. # of Link PLU
* If you do not want to use, enter “0”
EX) Do use coupled PLU 2
PLU No. : 1 (36/△△)
Link PLU1 Dept : [ 0]
[SAVE]=Save [ESC]=Escape
PRINT
0
36. Link PLU1 Dept
* If you do not want to use, enter “0”
EX) Do not use coupled PLU number
PLU No. : 1 (37/△△)
Link PLU1 No. : [ 0]
[SAVE]=Save [ESC]=Escape
PRINT
0
37. Link PLU1 No.
* If you do not want to use, enter “0”
EX) Do not use coupled PLU number
PLU No. : 1 (38/△△)
Link PLU2 Dept : [ 0]
[SAVE]=Save [ESC]=Escape
PRINT
0
38. Link PLU2 Dept
* If you do not want to use, enter “0”
EX) Do not use coupled PLU number
PLU No. : 1 (39/△△)
Link PLU2 No. : [ 0]
[SAVE]=Save [ESC]=Escape
PRINT
0
39. Link PLU2 No.
* If you do not want to use, enter “0”
EX) Do not use coupled PLU number
Page 34

34
2.1.2 Create By-Count PLU (Menu code 1120)
(MENU -> 1. PLU -> 2.New/Edit)
* You can press the SAVE key at anytime to save the current PLU data and if you want to exit
without saving, press the ESC key.
1
PRINT
2
PRINT
1. Enter Department No. / PLU No.
* Department should be set previously
EX) Department # = 1. Default
PLU # = 2
NEW/ EDIT
Department No. : [ 1] Default
PLU No. : [ 2] No Data or Param
2. Select PLU Type
1. By Weight ->
2. By Count ->
3. By PCS ->
EX) BY-Count Item
PLU No. : 2 (1/△△)
PLU Type : [ 2]
2. By-Count
[SAVE]=Save [ESC]=Escape
2
PRINT
3. Enter PLU Name 1
EX) “PEAR”
PLU No. : 2 (2/△△)
Name 1: [PEAR ]
[SAVE]=Save [ESC]=Escape
P
PRINT
E A R
4. Enter PLU Name 2
EX) Do not use name 2
PLU No. : 2 (3/△△)
Name 2: [ ]
[SAVE]=Save [ESC]=Escape
PRINT
5. Enter PLU Name 3
EX) Do not use name 3
PLU No. : 2 (4/△△)
Name 3: [ ]
[SAVE]=Save [ESC]=Escape
PRINT
Page 35

35
6. Group
* If there is no group data, enter 0
EX) 2. Fruit
PLU No. : 2 (5/△△)
Group : [ 2]
2. Fruit
[SAVE]=Save [ESC]=Escape
2
PRINT
8. Origin No.
* If you do not want to use origin, enter 0
EX) 119. Korea
PLU No. : 2 (8/△△)
Origin No. : [ 1]
119. Korea
[SAVE]=Save [ESC]=Escape
1
PRINT
9 1
10. Item Code
EX) Item Code = 273
PLU No. : 2 (10/△△)
ItemCode : [ 273]
[SAVE]=Save [ESC]=Escape
PRINT
2 7 3
7. Select Label Format
* If you enter “0”, standard label format (menu code
1510) is used.
* For details about label f ormat, refer to 8. Setting Global
option
EX) 1. IS6030-00001(60x30)
PLU No. : 2 (6/△△)
Label No. : [ 1]
IS6030-00001(60X30)
[SAVE]=Save [ESC]=Escape
1
PRINT
PLU No. : 2 (7/△△)
Aux. Label No. : [ 1]
IS6030-00001(60X30)
[SAVE]=Save [ESC]=Escape
9. Enter Prefix
* If you do not want to use, enter 0.
EX) Do not use Fixed Weight
PLU No. : 2 (9/△△)
Prefix : [ 1]
[SAVE]=Save [ESC]=Escape
1
PRINT
11. Qty Unit No.
EX) Qty Unit No. 6
PLU No. : 2 (11/△△)
Qty Unit No. : [ 6]
[SAVE]=Save [ESC]=Escape
PRINT
6
Page 36

36
13. Price
EX) Price = $10.00
PLU No. : 2 (13/△△)
Price : [ 10.00]
[SAVE]=Save [ESC]=Escape
1
PRINT
0 0 0
15. Tax No.
* It may be changed by setting Menu code 1541.
* If you do not want to use tax id, enter 0
EX) Tax data 1
PLU No. : 2 (15/△△)
Tax No. : [ 1]
Type=1, rate = 10.00 %
[SAVE]=Save [ESC]=Escape
PRINT
1
16. Barcode No.
* It is used depending on the setting of the Menu code
1520
EX) Barcode Data Table 1
PLU No. : 2 (16/△△)
Barcode No. : [ 1]
EAN-8, DDIIIIIC
[SAVE]=Save [ESC]=Escape
PRINT
1
12. Use Fixed Price Type
EX) Fixed price type 1
PLU No. : 2 (12/△△)
Use Fixed Price Type : [ 1]
[SAVE]=Save [ESC]=Escape
PRINT
1
14. Special Price
EX) Price = $10.00
PLU No. : 2 (14/△△)
Special Price : [ 20.00]
[SAVE]=Save [ESC]=Escape
2
PRINT
0 0 0
17. Produced Date
PLU No. : 2 (17/△△)
Produced Date : [ 1]
[SAVE]=Save [ESC]=Escape
PRINT
1
18. Packed Date
PLU No. : 2 (18/△△)
Packed Date : [ 1]
[SAVE]=Save [ESC]=Escape
PRINT
1
Page 37

37
20. Sell By Date
* This value can be from 0 to 9999
EX) 2 days
PLU No. : 2 (20/△△)
Sell By Date : [ 2]
[SAVE]=Save [ESC]=Escape
PRINT
2
21. Sell By Time
* This value can be from 0 to 99
EX) 10 hours
PLU No. : 2 (21/△△)
Sell By Time : [10]
[SAVE]=Save [ESC]=Escape
1
PRINT
0
23. Ingredient No.
* If you do not want to use ingredient, enter “0”
EX) Do not use ingredient
PLU No. : 2 (23/△△)
Ingredient No. : [ 0]
[SAVE]=Save [ESC]=Escape
PRINT
0
19. Packed Time
PLU No. : 2 (19/△△)
Packed Time : [ 1]
[SAVE]=Save [ESC]=Escape
PRINT
1
PLU No. : 2 (22/△△)
Cook By Date : [ 2]
[SAVE]=Save [ESC]=Escape
PRINT
2
22. Cook By Date
* This value can be from 0 to 9999.
* If you do not want to use, enter “0”
EX) 2
PLU No. : 2 (24/△△)
Traceability No. : [ 1]
[SAVE]=Save [ESC]=Escape
PRINT
1
24. Traceability No.
* If you do not want to use, enter “0”
PLU No. : 2 (25/△△)
Bonus. : [ 5]
[SAVE]=Save [ESC]=Escape
PRINT
5
25. Bonus
* If you do not want to use, enter “5”
PLU No. : 2 (26/△△)
Nutri. Fact No : [ 1]
[SAVE]=Save [ESC]=Escape
PRINT
1
26. Nutri. Fact No.
* If you do not want to use, enter “0”
Page 38

38
28. Reference PLU Department
* If you do not want to use reference department ID,
enter “0”
EX) Do not use Reference Department
PLU No. : 2 (28/△△)
Reference PLU Dept : [ 0]
[SAVE]=Save [ESC]=Escape
PRINT
0
29. Reference PLU No.
* If you do not want to use reference PLU, enter “0”
EX) Do not use Reference PLU
PLU No. : 2 (29/△△)
Reference PLU No. : [ 0]
[SAVE]=Save [ESC]=Escape
PRINT
0
27. Sales Msg No.
*
If you do not want to use, enter “0”
EX) Sales Message 1
PLU No. : 2 (27/△△)
Sales Msg No. : [ 0]
1, Thank You
[SAVE]=Save [ESC]=Escape
PRINT
1
PLU No. : 2 (30/△△)
Coupled PLU Dept : [ 0]
[SAVE]=Save [ESC]=Escape
PRINT
0
30. Coupled PLU Department
*
If you do not want to use, enter “0”
EX) Do not use Coupled PLU Department
PLU No. : 2 (31/△△)
Coupled PLU No. : [ 0]
[SAVE]=Save [ESC]=Escape
PRINT
0
31. Coupled PLU No.
* If you do not want to use, enter “0”
EX) Do not use coupled PLU number
PLU No. : 2 (32/△△)
# of Link PLU : [ 0]
[SAVE]=Save [ESC]=Escape
PRINT
0
32. # of Link PLU
* If you do not want to use, enter “0”
EX) Do not use coupled PLU number
Page 39

39
2.1.3 Create By-PCS PLU (Menu code 1120)
(MENU -> 1. PLU -> 2.New/Edit)
By-PCS PLU is used depending on the Para 593.
* You can press the SAVE key at anytime to save the current PLU data and if you want to exit
without saving, press the ESC key.
1
PRINT
3
PRINT
1. Enter Department No. / PLU No.
* Department should be set previously
EX) Department # = 1. Default
PLU # = 2
NEW/ EDIT
Department No. : [ 1] Default
PLU No. : [ 3] No Data or Param
2. Select PLU Type
1. By Weight ->
2. By Count ->
3. By PCS ->
EX) BY-PCS Item
PLU No. : 3 (1/△△)
PLU Type : [ 3]
3. By-PCS
[SAVE]=Save [ESC]=Escape
3
PRINT
3. Enter PLU Name1
EX) “CAKE”
PLU No. : 3 (2/△△)
Name 1: [CAKE ]
[SAVE]=Save [ESC]=Escape
C
PRINT
A K E
4. Enter PLU Name2
EX) Do not use name 2
PLU No. : 3 (3/△△)
Name 2: [ ]
[SAVE]=Save [ESC]=Escape
PRINT
5. Enter PLU Name3
EX) Do not use Name3
PLU No. : 3 (4/△△)
Name 3: [ ]
[SAVE]=Save [ESC]=Escape
PRINT
6. Group
* If there is no group data, enter 0
EX) 2.
groceries
PLU No. : 3 (5/△△)
Group : [ 2]
2. Groceries
[SAVE]=Save [ESC]=Escape
2
PRINT
Page 40

40
7. Select Label Format
* If you enter “0”, standard label format (menu code
1510) is used.
* For details about label f ormat, refer to 8. Setting Global
option
EX) 1. IS6030-00001(60x30)
PLU No. : 3 (6/△△)
Label No. : [ 1]
IS6030-00001(60X30)
[SAVE]=Save [ESC]=Escape
1
PRINT
PLU No. : 3 (7/△△)
Aux. Label No. : [ 1]
IS6030-00001(60X30)
[SAVE]=Save [ESC]=Escape
8. Origin No.
* If you do not want to use origin, enter 0
EX) 119. Korea
PLU No. : 3 (8/△△)
Origin No. : [ 1]
119. Korea
[SAVE]=Save [ESC]=Escape
1
PRINT
9 1
10. Item Code
EX) Item Code = 273
PLU No. : 3 (10/△△)
ItemCode : [ 273]
[SAVE]=Save [ESC]=Escape
PRINT
2 7 3
9. Enter Prefix
* If you do not want to use, enter 0.
EX) Do not use Fixed Weight
PLU No. : 3 (9/△△)
Prefix : [ 1]
[SAVE]=Save [ESC]=Escape
1
PRINT
12. Qty Unit No.
EX) Qty Unit No. 6
PLU No. : 3 (12/△△)
Qty Unit No. : [ 6]
[SAVE]=Save [ESC]=Escape
PRINT
6
11. Pieces
* If you enter “0”, it is regarded as 1.
EX) 10 piece
PLU No. : 3 (11/△△)
Pieces : [ 10]
[SAVE]=Save [ESC]=Escape
PRINT
1 0
Page 41

41
14. Price
EX) Price = $10.00
PLU No. : 3 (14/△△)
Price : [ 10.00]
[SAVE]=Save [ESC]=Escape
1
PRINT
0 0 0
16. Tax No.
* It may be changed by setting Menu code 1540.
* If you do not want to use tax ID, enter 0
EX) Tax data 1
PLU No. : 3 (16/△△)
Tax No. : [ 1]
Type=1, rate = 10.00 %
[SAVE]=Save [ESC]=Escape
PRINT
1
17. Barcode No.
* It is used depending on the setting of the Menu code
1520
EX) Barcode Data Table 1
PLU No. : 3 (17/△△)
Barcode ID : [ 1]
EAN-8, DDIIIIIC
[SAVE]=Save [ESC]=Escape
PRINT
1
13. Use Fixed Price Type
EX) Fixed price type 1
PLU No. : 3 (13/△△)
Use Fixed Price Type : [ 1]
[SAVE]=Save [ESC]=Escape
PRINT
1
15. Special Price
EX) Price = $10.00
PLU No. : 3 (15/△△)
Special Price : [ 20.00]
[SAVE]=Save [ESC]=Escape
2
PRINT
0 0 0
18. Produced Date
PLU No. : 3 (18/△△)
Produced Date : [ 1]
[SAVE]=Save [ESC]=Escape
PRINT
1
19. Packed Date
PLU No. : 3 (19/△△)
Packed Date : [ 1]
[SAVE]=Save [ESC]=Escape
PRINT
1
Page 42

42
22. Sell By Time
* This value can be from 0 to 99
EX) 10 hours
PLU No. : 3 (22/△△)
Sell By Time : [10]
[SAVE]=Save [ESC]=Escape
1
PRINT
0
21. Sell By Date
* This value can be from 0 to 9999
EX) 2 days
PLU No. : 3 (21/△△)
Sell By Date : [ 2]
[SAVE]=Save [ESC]=Escape
PRINT
2
20. Packed Time
PLU No. : 3 (20/△△)
Packed Time : [ 1]
[SAVE]=Save [ESC]=Escape
PRINT
1
24. Ingredient No.
* If you do not want to use ingredient, enter 0
EX) Do not use ingredient
PLU No. : 3 (24/△△)
Ingredient No. : [ 0]
[SAVE]=Save [ESC]=Escape
PRINT
0
PLU No. : 3 (23/△△)
Cook By Date : [ 2]
[SAVE]=Save [ESC]=Escape
PRINT
2
23. Cook By Date
* This value can be from 0 to 9999.
* If you do not want to use, enter “0”
EX) 2
PLU No. : 3 (25/△△)
Traceability No. : [ 1]
[SAVE]=Save [ESC]=Escape
PRINT
1
25. Traceability No.
* If you do not want to use, enter “0”
PRINT
5
PLU No. : 3 (27/△△)
Nutri Fact No. : [ 1]
[SAVE]=Save [ESC]=Escape
PRINT
1
26. Nutri. Fact No.
* If you do not want to use, enter “0”
PLU No. : 3 (26/△△)
Bonus : [ 5]
[SAVE]=Save [ESC]=Escape
26. Bonus
* If you do not want to use, enter “5”
Page 43

43
2.1.4 Editing PLU (Menu code 1120)
(MENU -> 1. PLU -> 2.New/Edit)
* You can edit PLU as PLU creating and you can press the SAVE key at anytime to
save the current PLU data and if you want to exit without saving, press the ESC key.
PLU No. : 3 (29/△△)
Coupled PLU Dept : [ 0]
[SAVE]=Save [ESC]=Escape
PRINT
0
30. Coupled PLU Department
*
If you do not want to use, enter “0”
EX) Do not use Coupled PLU Department
PLU No. : 3 (30/△△)
Coupled PLU No. : [ 0]
[SAVE]=Save [ESC]=Escape
PRINT
0
31. Coupled PLU No.
* If you do not want to use, enter “0”
EX) Do not use coupled PLU number
28. Reference PLU Department
* If you do not want to use reference department ID,
enter “0”
EX) Do not use Reference Department
PLU No. : 3 (27/△△)
Reference PLU Dept : [ 0]
[SAVE]=Save [ESC]=Escape
PRINT
0
29. Reference PLU No.
* If you do not want to use reference PLU, enter “0”
EX) Do not use Reference PLU
PLU No. : 3 (28/△△)
Reference PLU No. : [ 0]
[SAVE]=Save [ESC]=Escape
PRINT
0
PLU No. : 3 (31/△△)
# of Link PLU : [ 0]
[SAVE]=Save [ESC]=Escape
PRINT
0
32. # of Link PLU
* If you do not want to use, enter “0”
EX) Do not use coupled PLU number
27. Sales Msg No.
*
If you do not want to use, enter “0”
EX) Sales Message 1
PLU No. : 3 (28/△△)
Sales Msg No. : [ 0]
1, Thank You
[SAVE]=Save [ESC]=Escape
PRINT
1
Page 44

44
2.1.5 Sample Printing (Menu code 1170)
(MENU -> 1. PLU -> 7.Sample Printing)
If you press SAVE key during PLU creating or editing, label is printed.
2.1.6 Listing PLU (Menu code 1150)
(MENU -> 1. PLU -> 5.List)
2.1.7 Copying PLU (Menu code 1141)
(MENU -> 1. PLU -> 4.Management -> 1.Copy)
If there is a similar PLU, you can copy it.
1. Enter Department No.
* Enter department number that you wish to see
EX) Department No. 1
List (1/2)
Department No.: [ 1]
PRINT
1
2. Enter PLU Range
EX) PLU 1~10
List (2/2)
Start PLU No : [ 1]
End PLU No : [ 10]
List All - press "SAVE" key
PRINT
1
PRINT
0 1
No. Reference(descript)
1 1 BEEF
2 2 CAKE
3 3 PEAR
※ If you want to print PLU list, press the
TEST key.
2. Select Destination
Enter the Department number where the new PLU(s) will be
located
Enter the PLU number that you wish to copy the Source PLU
into
1. Select Source
Enter the Department No. and PLU No. that you wish to copy
EX) Source Department # = 1
Source PLU # =1
COPY (1/2)
Source Dept. No. : [ 1] Grocery
Source PLU No. : [ 1] Potato
COPY (2/2)
Dest. Dept. No. : [ 2] vegetable
Dest. PLU No. : [ 1] No Data
PRINT
1
PRINT
1
PRINT
2
PRINT
1
Page 45

45
2.1.8 Deleting PLU (Menu code 1142)
(MENU -> 1. PLU -> 4.Management -> 2.Delete)
There are three ways to delete PLU. Simply enter the number that you wish to delete.
2.1.9 Moving PLU (Menu code 1143)
(MENU -> 1. PLU -> 4.Management -> 3.Move)
※ You can move PLU. If there is discount information, it is also moved.
2. Select Destination
Enter the Department number where the PLU(s) will be
located
Enter the PLU number that you wish to move the Source PLU
into
1. Select Source
Enter the Department No. and PLU No. which you wish to
move
EX) Source Department # = 1
Source PLU # =1
MOVE (1/2)
Source Dept. No. : [ 1] Grocery
Source PLU No. : [ 1] Potato
MOVE (2/2)
Dest. Dept. No. : [ 2] vegetable
Dest. PLU No. : [ 6] No Data
PRINT
1
PRINT
1
PRINT
2
PRINT
1
EX) Department No. : 1
PLU No. :1
DELETE BY PLU NO (2/2)
Department No. : [ 1] Grocery
PLU No. : [ 1]
PRINT
1
PRINT
1
EX) Press 1 key to select Delete by PLU No.
DELETE (1/1)
1. Delete by PLU No.
2. Delete by Dept. No.
3. Delete All
PRINT
1
Page 46

46
2.1.10 Selecting PLU Items (Menu code 1144)
(MENU -> 1. PLU -> 4.Management -> 4.Select PLU Items)
If you enter Y, you cannot use that item when you create PLU.
To enter Y, press Y key or 1 key.
To enter N, press N key or 0 key.
Note : You can use the “PG UP” and “PG DOWN” keys to navigate from page to
page, or you can use the Arrow keys to go through each page 1 line at a time.
2.1.11 PLU Sale Count (Menu code 1145)
(MENU-> 1. PLU-> 4.Management-> 5.PLU Sale Count)
You can count each PLU sale and also you can clear this count.
This sale count is used for serial number printing of PLU
To clear PLU sale count, press the TEST key.
SELECT PLU ITEMS (1/10)
Department No. : [ N ]
Name2 : [ N ]
Name3 : [ Y ]
PLU SALE COUNT (1/2)
Department No. : [ 1] Grocery
PLU No. : [ 1]
PLU SALE COUNT (2/2)
Count:20
[TEST]= clear [ZERO]=clear all
PRINT
1
PRINT
1
Page 47

47
2.2. Programming PLU Data Table I
2.2.1 Department (Menu code 1210)
(MENU -> 2. PLU Data Table I -> 1.Department)
If a scale is assigned to department 1 then all of the PLU s tha t you select on that scale
will be from department 1. You can assign the department by pressing MENU, 8 and 3
keys. If you want to change the department assignment of the scale, you have to
change the setting. You also have to set Speed key for this department.
2.2.2 New/Edit Department (Menu code 1211)
(MENU -> 2. PLU Data Table I -> 1.Department -> 1. New/Edit )
※ You can press the SAVE key at anytime to save the current data and if you want to exit
without saving, press the ESC key.
1. Department Number
Department number is available 1 to 99.
EX) Department No. = 2
NEW/ EDIT DEPARTMENT (1/2)
Department No. : [ 2 ]
2. Department Description
EX) Department Decription = GROCERY
NEW/ EDIT DEPARTMENT (2/2)
Description : [ GROCERY ]
Speed Key Set No: [ ]
PRINT
2
PRINT
G R O C E R Y
3. Speed Key Setting
Refer to 2.6.1 Speed Key
EX) Speed key set no. = 1
NEW/ EDIT DEPARTMENT (2/2)
Description : [ GROCERY ]
Speed Key Set No: [ 1 ]
PRINT
1
Page 48

48
2.2.3 List Department (Menu code 1212)
(MENU -> 2. PLU Data Table I -> 1.Department -> 2. List )
※ If you want to print list, press the TEST key.
2.2.4 Delete Department (Menu code 1213)
(MENU -> 2. PLU Data Table I -> 1.Department -> 2. Delete )
2.2.5 Group (Menu code 1220)
(MENU -> 2. PLU Data Table I -> 2.Group)
This menu is to group any PLU(s) regardless the PLU’s “department”. Any individual
PLU must be involved in any department, but not in any group. User may select any
PLUs as a group at users’ needs. Especially, grouping PLU(s) can be used to get total
sum for a specific.
1. Set the department range that you wish to
see.
EX) Department 1 to 10
LIST DEPARTMENT (1/1)
- Start Number : [ 1]
- End Number : [ 10]
List All-press [SAVE] key
PRINT
1
PRINT
0 1
No. Reference(descript)
1 1 Default
2 1 GROCERY
1. Enter Department number
EX) Delete department 2
DELETE DEPARTMENT (1/1)
Department No. : [ 2] GROCERY
PRINT
2
Page 49

49
2.2.6 New/Edit Group (Menu code 1221)
(MENU -> 2. PLU Data Table I -> 1.Group -> 1. New/Edit )
※ You can press the SAVE key at anytime to save the current data and if you want to
exit without saving, press the ESC key.
2.2.7 List Group (Menu code 1222)
(MENU -> 2. PLU Data Table I -> 2.Group -> 2. List )
※ If you want to print list, press the TEST key.
2.2.8 Delete Group (Menu code 1223)
(MENU -> 2. PLU Data Table I -> 2.Group -> 3. Delete )
2. Enter Group Description
EX) Group Description = BAGEL
1. Enter Group Number
Group number is available 1 to 99.
EX) Group No = 1
PRINT
NEW/EDIT GROUP (1/1)
Group No. : [ 1]
Description : [ ]
NEW/EDIT GROUP (1/1)
GROUP No. : [1]
Description : [BAGEL ]
1
B A G E L
PRINT
1. Set the group range that you wish to see
EX) 1~10
LIST GROUP (1/1)
- Start Number : [ 1]
- End Number : [ 10]
List All-press [SAVE] key
PRINT
1
PRINT
0 1
No. Reference(descript)
1 BAGEL
1. Enter group number
EX) Delete group 1.
DELETE GROUP (1/1)
Group No : [ 1] BAGEL
PRINT
1
Page 50

50
2.2.9 Tax Rate (Menu code 1230)
(MENU -> 2. PLU Data Table I -> 3.TAX Rate)
You can use tax number when you create PLU.
2.2.10 New/Edit Tax Rate (Menu code 1231)
(MENU -> 2. PLU Data Table I -> 3.TAX Rate -> 1. New/Edit )
※ You can press the SAVE key at anytime to save the current data and if you want
to exit without saving, press the ESC key.
Tax Type
Item Symbol Description
Internal TAX 0 Tax is included in total price
External TAX 1 Tax is added to total price
※ Refer to menu code 1873(T.price = price + Tax) on chapter 2.14.21
1. Enter tax number
TAX number is available 1 to 9
EX) TAX No. = 1
PRINT
NEW/EDIT TAX RATE (1/2)
TAX No. : [1]
1
2. Set Tax Type
See Tax Ty pe table as below.
EX) Internal TAX Type
3. Enter Tax Rate
EX) Tax Rate = 5.00%
5
NEW/EDIT TAX RATE (2/2)
TAX TYPE (0=Int/1=Ext) : [0]
TAX Rate : [ 0.00] %
0
PRINT
NEW/EDIT TAX RATE (2/2)
TAX TYPE (0=Int/1=Ext) : [0]
TAX Rate : [ 5.00] %
0 0
4. Exit Menu
If you want to exit, press “ESC” key.
X
ESC
Page 51

51
2.2.11 List Tax Rate (Menu code 1232)
(MENU -> 2. PLU Data Table I -> 3.TAX Rate -> 2. List )
※ If you want to print list, press the TEST key.
2.2.12 Delete Tax Rate (Menu code 1233)
(MENU -> 2. PLU Data Table I -> 3.TAX Rate -> 3. Delete )
2.2.13 Sales Message (Menu code 1240)
(MENU -> 2. PLU Data Table I -> 4.Sales Message)
Sales message can be printed on PLU labels so l ong as the format that you use contains
a Sales Message field. This is a great tool for advertising and cross-marketing products.
1. Set the range of tax rate
EX) 1~9
LIST TAX RATE (1/1)
- Start Number : [ 1]
- End Number : [ 9]
List All-press [SAVE] key
PRINT
1
PRINT
9
No. Reference(descript)
1 I 5.00%
1. Enter tax number
EX) Delete tax number 1
DELETE TAX RATE (1/1)
TAX No. : [ 1]
PRINT
1
Page 52

52
2.2.14 New/Edit Sales Message (Menu code 1241)
(MENU -> 2. PLU Data Table I -> 4. Sales Message -> 1. New/Edit )
※ You can press the SAVE key at anytime to save the current data and if you want to exit
without saving, press the ESC key.
2.2.15 List Sales Message (Menu code 1242)
(MENU -> 2. PLU Data Table I -> 4. Sales Message -> 2. List )
※ If you want to print list, press the TEST key.
1. Enter Message Number
Message number is available 1 to 99
EX) Message No. = 1
PRINT
NEW/EDIT SALES MESSAGE (1/1)
Message No. : [ 1]
Message : [ ]
NEW/EDIT SALES MESSAGE (1/1)
Message No. : [1]
Message : [THANK YOU ]
1
SPACE
Y O U T H A N K
2. Enter Message
EX) Message = THANK YOU
PRINT
3. Exit Menu
If you want to exit, press “ESC” key.
X
ESC
1. Set the List Range
Set the range of sales message that you wish to
check
EX) 1~10
LIST SALES MESSAGE (1/1)
- Start Number : [ 1]
- End Number : [ 10]
List All - press [SAVE] key
PRINT
1
PRINT
0 1
No. Reference(descript)
1 THANK YOU
Page 53

53
2.2.16 Delete Sales Message (Menu code 1243)
(MENU -> 2. PLU Data Table I -> 4. Sales Message -> 3. Delete )
2.2.17 Origin (Menu code 1250)
(MENU -> 2. PLU Data Table I -> 5.Origin)
You can use origin number when you create PLU.
How to print origin on a label
1. The format that you use contains Origin field
2. Set MENU-> 8.scale config -> 6.parameter -> 2.printing oper(print origin for comm.Line)
2.2.18 New/Edit Origin (Menu code 1251)
(MENU -> 2. PLU Data Table I -> 5.Origin -> 1. New/Edit )
※ You can press the SAVE key at anytime to save the current data and if you want
to exit without saving, press the ESC key.
1. Enter Message No.
EX) Delete message 1.
DELETE SALES MESSAGE (1/1)
Message No : [ 1]
PRINT
NEW/EDIT ORIGIN (1/1)
Origin No. [ 10]
Origin : [ ]
NEW/EDIT ORIGIN (1/1)
Origin No. [ 10]
Origin : [ KOREA ]
PRINT
K O R E A
1. Enter Origin No.
Origin number is available 1 to 500
EX) Origin No = 10
2. Enter Origin
EX) Origin = KOREA
1 0
3. Exit Menu
If you want to exit, press “ESC” key.
X
ESC
PRINT
1
Page 54

54
2.2.19 List Origin (Menu code 1252)
(MENU -> 2. PLU Data Table I -> 5.Origin -> 2. List )
※ If you want to print list, press the TEST key.
2.2.20 Delete Origin (Menu code 1253)
(MENU -> 2. PLU Data Table I -> 5.Origin -> 3. Delete )
2.2.21 Barcode (Menu code 1260)
(MENU -> 2. PLU Data Table I -> 6.Barcode)
You can use barcode when you create PLU.
Barcode can be changed depending on the Global setting of barcode
.
1. Set the List Range
Set the range of origin that you wish to check
EX) 1~20
LIST ORIGIN (1/1)
- Start Number : [ 1]
- End Number : [ 20]
List All – Press [SAVE] Key
PRINT
1
PRINT
0 2
No. Reference(descript)
10 KOREA
1. Enter Origin No.
EX) Delete Origin 10.
DELETE ORIGIN (1/1)
Origin No. [ 10]
PRINT
0 1
Page 55

55
2.2.22 New/Edit Barcode (Menu code 1261)
(MENU -> 2. PLU Data Table I -> 6.Barcode -> 1. New/Edit )
※ You can press the SAVE key at anytime to save the current data and if you want
to exit without saving, press the ESC key.
Type of Barcode
No. Type Description
1 EAN-13 13digit
2 EAN13A5 13digit + 5digit
3 EAN-8 8 digit
4 I20F5 2~24 digit
5 UPCA 12 digit
6 UPC-13 13 digit
7 CODE39
8 CODE93
9 CODE128
10 CODABAR
Alphanumeric character, Format ‘T’, prints out the name of
PLU.
2. Barcode Description
EX) Barcode Description = EAN13-1
1. Enter Barcode No.
This value can be from 1 to 99.
EX) Barcode No = 1
NEW/EDIT BARCODE (1/2)
Barcode No : [ 1]
Description : [ ]
NEW/EDIT BARCODE (1/2)
Barcode No : [ 1]
Description : [EAN13-1 ]
3. Barcode Type
* See below table.
EX) Barcode Type = 1. EAN-13
NEW/EDIT BARCODE (2/2)
Type : [ 1] EAN-13
Form (0~4) : [0]
User Defined Barcode
PRINT
1
A N 1 3 -
PRINT
1
1
PRINT
E
Page 56

56
The following defines the format characters for Barcode Formats : (Example)
Form No. Format Description
0 User Defined Barcode
1 DDIIIIIPPPPPC
2 DDIIIIPPPPPPC
3 DIIIIIPPPPPPC
4 DIIIIIIPPPPPC
z I: item code
z N: PLU number
z P: price
z V: price check digit
(It is created automatically)
z U: unit price
z W: weight
z Q: quantity
z D: department
z G: group
z K: country code (For future)
z A: ticket counter (Only for ticket)
z B: scale transaction counter
z C: total barcode check sum
(It is created automatically)
z F: PLU prefix character
z T: text character
z R: transaction counter for each PLU
z L: clerk number
z S: weight code(Swedenish)
z J: swedenish total price
z %: print next fixed character
*
z 0~9: numbers
*%: It is used to enter characters therefore you cannot use this to enter numbers.
4. Enter Barcode Form
You can select from a list of Barcode types or
you can create your own custom format
* Refer to below table.
EX) Barcode Form = 1. Change DDIIIIIPPPPPC
to GGIIIIIVPPPPC
NEW/EDIT BARCODE (2/2)
Type : [ 1] EAN-13
Form (0~4) : [1]
DDIIIIIPPPPPC
PRINT
1
PRINT
G G
BARCODE NO. 1 : 1 (2/2)
Type : [ 1] EAN-13
From (0~4) : [1]
[GGIIIIIPPPPPC ]
4. Exit Menu
If you want to exit, press “ESC” key.
X
ESC
Page 57

57
2.2.23 List Barcode (Menu code 1262)
(MENU -> 2. PLU Data Table I -> 6.Barcode -> 2. List )
※ If you want to print list, press the TEST key.
2.2.24 Delete Barcode (Menu code 1263)
(MENU -> 2. PLU Data Table I -> 6.Barcode -> 3. Delete )
2.2.25 Tare (Menu code 1270)
(MENU -> 2. PLU Data Table I -> 7.Tare)
If Parameter 584 option (Use Tare No.) is “Yes” you can use this tare number which is
set here when you create PLU, If it is set to “No” you have to program tare weight again.
1. Set the list range
Set the range of barcode that you wish to check
EX) 1~10
LIST BARCODE (1/1)
- Start Number : [ 1]
- End Number : [ 10]
List All – Press [SAVE] Key
PRINT
1
PRINT
0 1
No. Reference(descript)
1 GGIIIIIPPPPPC EAN13-1
1. Enter barcode number to delete
EX) Delete barcode 1.
DELETE BARCODE (1/1)
Barcode No : [ 1]
PRINT
1
Page 58

58
2.2.26 New/Edit Tare (Menu code 1271)
(MENU -> 2. PLU Data Table I -> 7.Tare -> 1. New/Edit )
※ You can press the SAVE key at anytime to save the current data and if you want
to exit without saving, press the ESC key.
▶ Ty pe o f Ta re
Tare No. Type of Tare Description
1 Numeric Tare Enter tare weight by using numeric keys.
2 Weight Tare Put a container on the platter.
3. Tare Type
There are 2 types as below table
EX) Tare Type = 1, Numeric Tare
1. Enter Tare No.
This value can be from 1 to 99.
EX) Tare No. = 1
NEW/EDIT TARE (1/2)
Tare No. : [ 1]
Description : [ ]
NEW/EDIT TARE (2/2)
Tare Type : [ 1] -> Numeric Tare
Tare : [ 0.000]lb
1
PRINT
If you set Tare Type to “2”, put a container on the platter and press the PRINT key after
2~3 seconds.
NEW/EDIT TARE (2/2)
Tare Type : [ 1] -> Numeric Tare
Tare : [ 0.010]lb
1 0
PRINT
1
PRINT
4. Enter Tare Value
EX) Tare = 0.010 lb
2. Tare Description
EX) Tare Description = Container
NEW/EDIT TARE (1/2)
Tare No. : [ 1]
Description : [CONTAINER ]
C
PRINT
O
N T A I N E R
Page 59

59
* If you set Tare No. to 1 when you create PLU, tare is set to 0.010lb that is
programmed here.
2.2.27 List Tare (Menu code 1272)
(MENU -> 2. PLU Data Table I -> 7.Tare -> 2. List )
※ If you want to print list, press the TEST key.
2.2.28 Delete Tare (Menu code 1273)
(MENU -> 2. PLU Data Table I -> 7.Tare -> 3. Delete )
1. Set the list range
Set the range of tare that you wish to check
EX) 1~10
LIST TARE (1/1)
- Start Number : [ 1]
- End Number : [ 10]
List All – Press [SAVE] Key
PRINT
1
PRINT
0 1
No. Reference(descript)
1 1 0.010lb CONTAINER
1. Enter tare number to delete
EX) Delete tare no. 1
DELETE TARE (1/1)
Tare No. : [ 1]
5. Exit Menu
If you want to exit, press “ESC” key.
X
ESC
PRINT
1
Page 60

60
2.2.29 Tare Key (Menu code 1274)
(MENU -> 2. PLU Data Table I -> 7.Tare -> 4.Tare Key )
You can assign Tare Key. There are 9 Tare keys and you have to set these keys in menu
1880 (Key define). See Chapter 2.14.22
2.2.30 Unit Symbol (Menu code 1280)
(MENU -> 2. PLU Data Table I -> 8.Unit Symbol)
Y ou can program unit symbol to print label.
2.2.31 New/Edit Unit Symbol (Menu code 1281)
(MENU -> 2. PLU Data Table I -> 8. Unit Symbol -> 1. New/Edit )
※ You can press the SAVE key at anytime to save the current d a ta and if you want
to exit without saving, press the ESC key.
2. Enter unit symbol
=
TH
1. Enter unit number
This value can be from 1 to 8.
EX) Qty Unit No. = 1
PRINT
NEW/EDIT UNIT SYMBOL (1/1)
Qty Unit No. [1]
Symbol : [ ]
NEW/EDIT UNIT SYMBOL (1/1)
Qty Unit No. : [1]
Symbol : [
TH
]
1
CHAR
9
PRINT
9
1. Enter tare Key
EX) Tare Key = 1
TARE KEY (1/1)
Tare Key : [ 1]
Tare No. : [ ]
PRINT
1
2. Enter tare number
EX) Tare No = 1
TARE KEY (1/1)
Tare Key : [ 1]
Tare No. : [ 1] 0.010lb CONTAINER
PRINT
1
Page 61

61
2.2.32 List Unit Symbol (Menu code 1282)
(MENU -> 2. PLU Data Table I -> 8. Unit Symbol -> 2. List )
※ If you want to print list, press the TEST key.
2.2.33 Delete Unit Symbol (Menu code 1283)
(MENU -> 2. PLU Data Table I -> 8. Unit Symbol -> 3. Delete )
※ If you want to enter special symbol, press the CHAR key and enter the code
value. (See ASCII code table on chapter 4.4
)
3. Exit menu
If you want to exit, press “ESC” key.
X
ESC
1. Set the list range
EX) 1~8
LIST UNIT SYMBOL (1/1)
- Start Number : [ 1]
- End Number : [ 8]
List All – Press [SAVE] Key
PRINT
1
PRINT
8
No. Reference(descript)
1
TH
1. Enter unit symbol number to delete
EX) Delete unit symbol 1.
DELETE UNIT SYMBOL (1/1)
Qty Unit No. [ 1]
PRINT
1
Page 62

62
2.3 Programming PLU Data Table II
2.3.1 Ingredient (Menu code 1310)
(MENU -> 3. PLU Data Table II -> 1.Ingredient)
2.3.2 New/Edit Ingredient (Menu code 1311)
(MENU -> 3. PLU Data Table II -> 1.Ingredient -> 1. New/Edit )
※ You can press the SAVE key at anytime to save the current data and if you want
to exit without saving, press the ESC key.
2. Enter ingredient
EX) Ingredient Line1 = SALT
Ingredient Line 2 = SUGAR
To print “SUGAR” on next line, enter “↵” after
“SALT
”
.
1. Enter ingredient number.
This value can be from 1 to 999.
EX) Ingredient number = 1
PRINT
NEW/EDIT INGREDIENT (1/1)
Ingredient No. : [ 1]
Ingredients : [ ] 1/510
NEW/EDIT INGREDIENT (1/1)
Ingredient No. : [ 1]
Ingredients : [SALT↵SUGAR ] 1/510
1
S A L T
PRINT
↵
S U G A
R
3. Exit menu
If you want to exit, press “ESC” key.
X
ESC
* The number of right side of "[ ]" is digit and total
number of character.
* Pressing "PAGE UP/DN" key turns to next or previous
page.
Page 63

63
2.3.3 List Ingredient (Menu code 1312)
(MENU -> 3. PLU Data Table II -> 1.Ingredient -> 2. List )
※ If you want to print list, press the TEST key.
2.3.4 Delete Ingredient (Menu code 1313)
(MENU -> 3. PLU Data Table II -> 1.Ingredient -> 3. Delete )
2.3.5 Nutrition Facts (Menu code 1320)
(MENU -> 3. PLU Data Table II -> 2.Nutrition Facts)
You can program nutrition facts for your needs and you can use this when you create
PLU. Nutrition facts is printed small or large size depending on the label format.
▶ Nutrition facts table
Nutrition Facts Unit
Calories
Calories From Fat
Total Fat G
Saturated Fat G
Cholesterol mg
Sodium mg
Total Carbohydrates G
Dietary Fibers G
1. Set the list range
EX) 1~10
LIST INGREDIENT (1/1)
- Start Number : [ 1]
- End Number : [ 10]
List All – Press [SAVE] Key
PRINT
1
PRINT
0 1
No. Reference(descript)
1 SALT↵ SUGAR
1. Enter ingredient number to delete
EX) Delete ingredient no. 1
DELETE INGREDIENT (1/1)
Ingredient No. : [ 1]
PRINT
1
Page 64

64
Sugars G
Protein G
Vitamin A %
Calcium %
Vitamin C %
Iron %
Etc
2.3.6 New/Edit Nutrition Facts (Menu code 1321)
(MENU -> 3. PLU Data Table II -> 2. Nutrition Facts -> 1. New/Edit )
※ You can press the SAVE key at anytime to save the current data and if you want
to exit without saving, press the ESC key.
You can use the PG UP and PG DOWN keys to navigate from page to page, or
you can use the Arrow keys to go through each page 1 line at a time.
3. Enter Serving Size
EX) Sering size = 1CUP
NEW/EDIT NUTRIFACT (2/10)
Serving Size : [1CUP ]
Serving Per : [ ]
PRINT
1. Nutrition Fact No
* This value can be from 1 to 500.
EX) Nutrition fact no = 1
NEW/EDIT NUTRIFACT (1/10)
Nutrition Fact No. : [ 1]
Description : [ ]
PRINT
1
2. Enter description
EX) BEEF STEW
NEW/EDIT NUTRIFACT (1/10)
Nutrition Fact No : [ 1]
Description: [BEEFSTEW ]
PRINT
W
E T S F E E B
P U C 1
4. Serving Per Container
EX) Sering Per Container = 2
NEW/EDIT NUTRIFACT (2/10)
Serving Size : [1CUP ]
Serving Per : [2 ]
PRINT
2
5. Calories
EX) Calories = 230
NEW/EDIT NUTRIFACT (3/10)
Calories : [ 230 ]
Calories From Fat : [ 0 ]
PRINT
0 3 2
Page 65

65
6. Calories from fat
EX) Calories From Fat= 120
NEW/EDIT NUTRIFACT (3/10)
Calories : [ 230 ]
Calories From Fat: [ 120 ]
PRINT
0 2 1
7. Toral Fat
EX) Total fat = 14 g
NEW/EDIT NUTRIFACT (4/10)
Total Fat : [ 14 ] g
Saturated Fat : [ 0 ] g
PRINT
4 1
8. Saturated fat
EX) Saturated fat = 7 g
NEW/EDIT NUTRIFACT (4/10)
Total Fat : [ 14 ] g
Saturated Fat : [ 7 ] g
PRINT
7
9. Cholesterol
EX) Cholesterol = 40 mg
NEW/EDIT NUTRIFACT (5/10)
Cholesterol : [ 40 ] mg
Sodium : [ 0 ] mg
PRINT
0 4
12. Dietary Fibers
EX) Dietary Fiber = 2 g
NEW/EDIT NUTRIFACT (6/10)
Total Carbohydrate : [ 16 ] g
Dietary Fibers : [ 2 ] g
PRINT
2
13. Sugars
EX) Sugars = 3 g
NEW/EDIT NUTRIFACT (7/10)
Sugars : [ 3 ] g
Protein : [ 0 ] g
PRINT
3
10. Sodium
EX) Sodium = 950 mg
NEW/EDIT NUTRIFACT (5/10)
Cholesterol : [ 40 ] mg
Sodium : [ 950 ] mg
PRINT
0 5 9
11. Total Carbohydrate
EX) Total Carbohydrate = 16 g
NEW/EDIT NUTRIFACT (6/10)
Total Carbohydrate : [ 16 ] g
Dietary Fibers : [ 0 ] g
PRINT
6 1
Page 66

66
16. Calcium
EX) Calcium = 2%
PRINT
2
NEW/EDIT NUTRIFACT (8/10)
Vitamin A : [ 20 ] %
Calcium : [ 2 ] %
17. Vitamin C
EX) Vitamin C = 0 %
NEW/EDIT NUTRIFACT (9/10)
Vitamin C : [ 0 ] %
Iron : [ 0 ] %
PRINT
0
18. Iron
EX) Iron = 6 %
NEW/EDIT NUTRIFACT (9/10)
Vitamin C : [ 0 ] %
Iron : [ 6 ] %
PRINT
6
19. Etc
EX) Etc = 2
NEW/EDIT NUTRIFACT (10/10)
Etc : [ 2 ]
PRINT
2
20. Exit menu
If you want to exit, press “ESC” key.
X
ESC
14. Protein
EX) Protein = 11 g
NEW/EDIT NUTRIFACT (7/10)
Sugars : [ 3 ] g
Protein : [ 11 ] g
PRINT
1 1
15. Vitamin A
EX) Vitamin A = 20%
NEW/EDIT NUTRIFACT (8/10)
Vitamin A : [ 20 ] %
Calcium : [ 0 ] %
PRINT
0 2
Page 67

67
2.3.7 List Nutrition Facts (Menu code 1322 )
(MENU -> 3. PLU Data Table II -> 2.Nutrition Facts -> 2. List )
※ If you want to print list, press the TEST key.
2.3.8 Delete Nutrition Facts (Menu code 1323)
(MENU -> 3. PLU Data Table II -> 2.Nutrition Facts -> 3. Delete )
1. Set the list range
EX) 1~10
LIST NUTRIFACT (1/1)
- Start Number : [ 1]
- End Number : [ 10]
List All – Press [SAVE] Key
PRINT
1
PRINT
0 1
No. Reference(descript)
1 BEEFSTEW
1. Enter nutrition fact number to delete.
EX) Delete nutrition facts no.1
DELETE NUTRIFACT (1/1)
Nutrition Facts No : [ 1]
PRINT
1
Page 68

68
2.4 Discount Programming
2.4.1 Discount (Menu code 1130)
(MENU -> 1. PLU -> 3.Discount)
Yo u have to set discount information for each PLU.
2.4.2 New/Edit Discount (Menu code 1131)
(MENU -> 1. PLU -> 3.Discount -> 1. New/Edit )
※ You can press the SAVE key at anytime to save the current data and if you want
to exit without saving, press the ESC key.
You can use the PG UP and PG DOWN keys to navigate from page to page, or
you can use the Arrow keys to go through each page 1 line at a time.
▶ Discount Type
# Type Description
1 Unit Price Discount
- By Weight PLU: Set the discount amount on unit price,
depending on weight.
- By Count/PCS PLU: Set the discount amount on unit
price, depending on number of items.
2 % Unit Price Discount
- By Weight PLU: set discount % of unit price, depending
on weight.
- By Count/PCS PLU: set discount % of unit price,
depending on number of items.
3 Total Price Discount - Set discount amount for total price.
4 % Total Price Discount - Set discount % of total price.
5 Fixed Price - Set a fixed amount for discount.
2. Enter discount type
Refer to Discount Type table as below
※ Discount information can be different
depending on the discount type.
EX) 1. Unit Price Discount
1. Enter department number and PLU
number.
EX) Department No = 1, PLU No = 1
NEW/EDIT DISCOUNT (1/7)
Department No. : [ 1] Default
PLU No. : [ 1] BEEF
WEIGHT DISCOUNT (2/7)
Discount Type : [ 1]
1. Unit Price Discount
1
PRINT PRINT
1
PRINT
1
Page 69

69
6 Free Item - Set free of charge item.
7 Free Addition - By Weight PLU: Set discount weight.
- By Count/PCS PLU: Set discount number
8 Total Price by total price Set a discount amount of total price for current total
price.
9 % Total Price by Total
Price
- Set a discount % of total price for current total price
10 Unit Price by Total Price - Set a discount amount of unit price for current total price
11 Extra by Total Price - Set a discount number of item for current total price
☞ Please refer to "para 572" when user wants to also see the unit price discounted
on "Unit Price" segment together with total price discounted in display
No Type Description
1 First Target Weight Set the first weight limit for discount and apply discount for
more than limit weight.
2 First Value Price Set the discount amount of unit price for the first weight
limit.
3 Second Target Weight Set the second weight limit for discount and apply discount
for more than limit weight.
4 Second Value Price Set the discount amount of unit price for the second weight
limit.
3. Enter discount value
Refer to bleow table.
※ Target unit is different depending on the PLU
type. This is By Weight PLU therefore this unit is
weight. In case of By count PLU or By PCS PLU,
unit is count.
EX) 1
st
Target : 0.100 lb
1
st
Value : 1.00 $
2
nd
Target : 0.500 lb
2
nd
Value : 2.00 $
NEW/EDIT DISCOUNT (3/7)
First Target : [ 0.100] Weight
First Value : [ 1.00] Price
1
PRINT
PRINT
0 0
1 0 0
NEW/EDIT DISCOUNT (4/7)
Second Target : [ 0.500] Weight
Second Value : [ 2.00] Price
5
PRINT
PRINT
0 0
2 0 0
Page 70

70
2.4.3 List Discount (Menu code 1132)
(MENU -> 1. PLU -> 3.Discount -> 2.List)
4. Discount Condition 1 : (Set the day of
week )
1-> Discount
0-> Do not discount
EX) Discount on Thursday, Friday and
NEW/EDIT DISCOUNT (5/7)
Input ‘1’ or ‘0’ : [SMTWTFS]
Day of Week : [0000111]
5. Discount Condition 2 : (Set date and time)
※ If you set date and time to 0, it means
discount all the time
EX) Start Date : 04-07-01
End Date : 04-07-31
Start Time : 8 am
End Time : 6:30pm
NEW/EDIT DISCOUNT (6/7)
Start Date : [04:07:01] YY-MM-DD
End Date : [04:07:31] YY-MM-DD
0
PRINT
0 0 0 1 1 1
0 4 0 7
PRINT
0 1
0 4 0 7
PRINT
3 1
NEW/EDIT DISCOUNT (7/7)
Start Time : [08:00:00] (0..23 Hour
End Time : [18:30:00] (0..23 Hour
0 8 0 0
PRINT
0 0
1 8 3 0
PRINT
0 0
6. Exit menu
If you want to exit, press the ESC key.
X
ESC
1. Enter department number to check
EX) Department No 1.
LIST DISCOUNT (1/2)
Department No: [ 1]
PRINT
1
Page 71

71
※ If you want to print list, press the TEST key.
2.4.4 Delete Discount (Menu code 1133)
(MENU -> 1. PLU -> 3.Discount -> 3.Delete )
There are three ways to delete Discount. Simply enter the number that you wish to delete.
2.4.5 Delete by PLU No. (DC) (Menu code 1137)
(MENU -> 1. PLU -> 3.Discount -> 3.Delete->1.Delete by PLU no.(DC)
2.4.6 Delete by Dept. No. (DC) (Menu code 1138)
(MENU -> 1. PLU -> 3.Discount->3.Delete->2.Delete by Dept. No (DC)
2. Enter PLU range to check
EX) PLU 1~10
LIST DISCOUNT (2/2)
Start PLU No : [ 1]
End PLU No : [ 10]
List All – Press “ SAVE” Key
PRINT
1
PRINT
0 1
PLU Type
1 Unit price discount
1. Enter the department number and
PLU number to delete
EX) Department number = 2
PLU number =1
DELETE BY PLU NO(DC) (1/1)
Deptment No. : [ 2] Grocery
PLU No. : [ 1]
PRINT
2
PRINT
1
EX) Press 1 key to select Delete by PLU No.(DC)
DELETE (1/1)
1. Delete by PLU No. (DC)
2. Delete by Dept. No. (DC)
3. Delete All (DC)
PRINT
1
1. Enter the department number to
delete
EX) Department number = 2
DELETE BY DEPT. NO(DC) (1/1)
Deptment No. : [ 2] Grocery
PRINT
2
EX) Press 2 key to sel e ct Delete by Dept. No.(DC)
DELETE (1/1)
1. Delete by PLU No. (DC)
2. Delete by Dept. No. (DC)
3. Delete All (DC)
PRINT
2
Page 72

72
2.4.7 Delete ALL (DC) (Menu code 1139)
(MENU -> 1. PLU -> 3.Discount -> 3.Delete->3.Delete ALL(DC)
1. Enter the department number and
PLU number to delete
EX) Press 1 key to select Delete all (DC)
DELETE ALL(DC) (1/1)
Are you sure?(1=Y/0=N) [ ]
PRINT
1
EX) Press 3 key to select Delete all(DC)
DELETE (1/1)
1. Delete by PLU No. (DC)
2. Delete by Dept. No. (DC)
3. Delete All (DC)
PRINT
3
Page 73

73
2.5 Global Discount Programming
2.5.1 Global Discount (Menu code 1530)
(MENU -> 5. Global Setting -> 3.Discount)
You can apply same discount regardless of PLU.
2.5.2 Priority Setting (Menu code 1531)
(MENU -> 5.Global -> 3.Discount -> 1.Priority)
You can set discount type. Refer to Discount Priority Setting Table as below..
You can see discount information on the display by setting of menu 1871 and also you
can check it on a label. (See chapter 2.14.21)
▶ Discount
Priority Setting
No Type Description
0 No Discount No discount applied
1 PLU Discount PLU discount only applied
2 Global Discount Global discount only applied
3 No Discount in
PLU then Global
PLU discount is applied. If there is no PLU discount, apply
global discount
2.5.3 Weight/Count/PCS Discount (Menu code 1532/1533/1534)
If you want to apply same discount regardless of PLU, you can set discount
information in menu code, 1532, 1533 and 1544. Refer to Discount Programming on
chapter 2.4.2
Global Discount condition by weight Item (Menu code 1532)
(MENU -> 5.Global -> 3.Discount -> 2.Weight discount)
Global Discount condition by Count Item (Menu code 1533)
(MENU -> 5.Global -> 3.Discount -> 3.Count discount)
Global Discount condition by PCS Item (Menu code 1534)
(MENU -> 5.Global -> 3.Discount -> 4.PCS discount)
Page 74

74
2.6 Speed Key Setting
This menu is to set “speed keys”, one-touch keys, for most frequently used PLUs to
simply call up them. You can program up to 5 speed key set. Remember that there is a
SHIFT key that allows you to double-use the Speed Keys. The Speed keys are
numbered left-to-right and top-to-bottom.
Yo u can use speed key set number when you program menu 1211.(See chapter 2.2.2)
☞ User can not assign the function key as speed keys.
2.6.1 Speed Key (Menu code 1160)
(MENU -> 1.PLU -> 6.Speed Key)
1. Speed Key Set No.
Enter speed key set no. You can use this number when you
program menu 1211. (See the chapter 2.2.2)
EX) Speed key set No. = 2
SPEED KEY (2/2)
Speed Key No : [ 1]
PLU No : [ 0]
2. Speed Key Programming
The Speed keys are numbered left-to-right
and top-to-bottom. In case of standard type,
there are 8 columns and 6 rows for a total of 48
physical keys but if you press the SHIFT key and
then one of the 48 Speed keys, then you can
access Speed keys 49 through 96. In case of
pole type, there are 72 keys but if you press the
SHIFT key and then one of the 72 Speed keys,
then you can access Speed keys 73 through 144.
EX1) Speed key no. 1
EX2) Speed key no. 49
(In case of standard type)
SPEED KEY (1/2)
Speed Key Set No: [ 2]
SPEED KEY (2/2)
Speed Key No : [ 49]
PLU No : [ 0]
A
2. PLU No.
Enter PLU no. to assign speed key
* PLU should be belong to scale’s department.
EX1) PLU 10 = BEEF
SPEED KEY (2/2)
Speed Key No : [ 1]
PLU No : [ 10] BEEF
PRINT
0
PRINT
1
A PRINT
SHIFT
PRINT
2
Page 75

75
2.7 Traceability
2.7.1 Traceability (Menu code 1330)
(MENU -> 3. PLU Data Table II -> 3.Traceability)
You can use this traceability number when you program PLU.
2.7.2 New/Edit Traceability (Menu code 1331)
(MENU -> 3. PLU Data Table II -> 3.Traceability -> 1. New/Edit )
※ You can press the SAVE key at anytime to save the current data and if you want
to exit without saving, press the ESC key.
2. Enter description
EX) Description = SIRLOIN
1. Enter traceability number
This value can be from 1 to 99.
EX) Traceability number = 1
NEW/EDIT TRACEABILITY (1/3)
Traceability No. : [ 1]
Description : [ ]
PRINT
1
PRINT
N I S I O L R
NEW/EDIT TRACEABILITY (1/3)
Traceability No. : [ 1]
Description: [SIRLOIN ]
3. Born in country number
EX) Born in country No. = 1. SWEDEN
Note : To program country, see chapter 2.8 Country
programming.
4. Bred in country number
EX) Bred in country No. = 95. KOREA
NEW/EDIT TRACEABILITY (2/3)
Born in Country No. : [ 1]
Bred in Country No. : [ 1]
SWEDEN
PRINT
1
NEW/EDIT TRACEABILITY (2/3)
Born in Country No. : [ 1]
Bred in Country No. : [ 95]
KOREA
PRINT
5 9
Page 76

76
2.7.3 List Traceability (Menu code 1332)
(MENU -> 3. PLU Data Table II -> 3.Traceability -> 2. List )
※ If you want to print list, press the TEST key.
2.7.4 Delete Traceability (Menu code 1333)
(MENU -> 3. PLU Data Table II -> 3.Traceability -> 3. Delete )
X
ESC
5. Slaughter house numer
EX) Slaughter house No. = 12. BILLY’S
Note : To program slauter house, see page 76 (2 .9 Slauter
house programming).
6. Cutting hall number
EX) Cutting hall No. = 23. HAN’S CUT
7. Exit menu
If you want to exit, press “ESC” key.
PRINT
2 1
NEW/EDIT TRACEABILITY (3/3)
Slaughter House No. : [ 12]
Cutting Hall No. : [ 1]
BILLY’S
NEW/EDIT TRACEABILITY (3/3)
Slaughter House No. : [ 12]
Cutting Hall No. : [ 23]
HAN’S CUT
PRINT
3 2
1. Set the list range
Set the list range to check
EX) 1~10
LIST TRACEABILITY (1/1)
- Start Number : [ 1]
- End Number : [ 10]
List All – press [SAVE] key
PRINT
1
PRINT
0 1
No. Traceability
1 : 99 : 12 : 23 : SIRLOIN
1. Enter traceability number to delete
EX) Delete traceability no. 2
DELETE TRACEABILITY (1/1)
Traceability No : [ 2]
PRINT
2
Page 77

77
2.8 Country Programming
2.8.1 Country (Menu code 1340)
(MENU -> 3. PLU Data Table II -> 4.Country)
You can use country data when you program traceability.
2.8.2 New/Edit Country (Menu code 1341)
(MENU -> 3. PLU Data Table II -> 4.Country -> 1. New/Edit )
※ You can press the SAVE key at anytime to save the current data and if you want
to exit without saving, press the ESC key.
2.8.3 List Country (Menu code 1342)
(MENU -> 3. PLU Data Table II -> 4.Country -> 2. List )
※ If you want to print list, press the TEST key.
2. Enter country name
EX) Name = KOREA
1. Enter country number
This value can be from 1 to 250.
EX) Country No. = 1
PRINT
1
PRINT
A E R O K
NEW/EDIT COUNTRY (1/1)
Enter Country No. : [ 1]
Name : [ ]
NEW/EDIT COUNTRY (1/1)
Enter Country No. : [ 1]
Name : [KOREA ]
X
ESC
3. Exit menu
If you want to exit, press “ESC” key.
1. Set the list range
Set the list range to check
EX) 1~10
LIST COUNTRY (1/1)
- Start Number : [ 1]
- End Number : [ 10]
List All – press [SAVE] key
PRINT
1
PRINT
0 1
Page 78

78
2.8.4 Delete Country (Menu code 1343)
(MENU -> 3. PLU Data Table II -> 4.Country -> 3. Delete )
2.9 Programming Slaughter House
2.9.1 Slaughter House (Menu code 1350)
(MENU -> 3. PLU Data Table II -> 5.Slaughter House)
You can use slaughter house data when you program traceability.
2.9.2 New/Edit Slaughter House (Menu code 1351)
(MENU -> 3. PLU Data Table II -> 5.Slaughter House -> 1. New/Edit )
※ You can press the SAVE key at anytime to save the current data and if you
want to exit without saving, press the ESC key.
1. Enter country number to delete
EX) Delete country no. 1
DELETE COUNTRY (1/1)
Enter Country No : [ 1]
PRINT
1
2. Enter Slaughter House
Enter slaughter house name or registered number.
EX) Slaughter house registered no. = KSH12
1. Enter slaughter House number
This value can be from 1 to 99..
EX) Slaughter house No. = 1
PRINT
1
PRINT
2 1 H S K
X
ESC
4. Exit menu
If you want to exit, press “ESC” key.
NEW/EDIT SLAUGHTER HOUSE (1/1)
Enter Slaughter House No. : [ 1]
House : [ ]
Country : [ ]
NEW/EDIT SLAUGHTER HOUSE (1/1)
Enter Slaughter House No. : [ 1]
House : [KSH12 ]
Country : [ ]
3. Enter slaughter house country number
You can use contry number which is programmed at
menu 1341
EX) Slaughter house Country No. = 1. KOREA
PRINT
1
NEW/EDIT SLAUGHTER HOUSE (1/1)
Enter Slaughter House No. : [ 1]
House : [KSH12 ]
Country : [ 1]
Page 79

79
2.9.3 List Slaughter House (Menu code 1352)
(MENU -> 3. PLU Data Table II -> 5.Slaughter house -> 2. List )
※ If you want to print list, press the TEST key.
2.9.4 Delete Slaughter House (Menu code 1353)
(MENU -> 3. PLU Data Table II -> 5.Slaughter House -> 3. Delete )
2.10 Programming Cutting Hall
2.10.1 Cutting Hall (Menu code 1360)
(MENU -> 3. PLU Data Table II -> 6.Cutting Hall)
You can use this cutting hall data when you program traceability.
2.10.2 New/Edit Cutting Hall (Menu code 1361)
(MENU -> 3. PLU Data Table II -> 6.Cutting Hall -> 1. New/Edit )
※ You can press the SAVE key at anytime to save the current data and if you want
to exit without saving, press the ESC key.
1. Set the list range
Enter list range to check
EX) 1~10
LIST SLAUGHTER HOUSE (1/1)
- Start Number : [ 1]
- End Number : [ 10]
List All – press [SAVE] key
PRINT
1
PRINT
0 1
1. Enter slaughter house number to delete
EX) Delete slaughter house no. 1
DELETE SLAUGHTER HOUSE (1/1)
Enter Slaughter House No : [ 1]
PRINT
1
1. Enter cuttting hall number
This value can be from 1 to 99
EX) Cutting hall no. = 1
PRINT
1
NEW/EDIT CUTTING HALL (1/1)
EnterCutting Hall No. : [ 1]
Hall : [ ]
Country : [ 0]
Page 80

80
2.10.3 List Cutting Hall (Menu code 1362)
(MENU -> 3. PLU Data Table II -> 6.Cutting Hall -> 2. List )
※ If you want to print list, press the TEST key.
2.10.4 Delete Cutting Hall (Menu code 1363)
(MENU -> 3. PLU Data Table II -> 6.Cutting Hall -> 3. Delete )
2. Enter cutting hall information
Enter cutting hall name or registered number.
EX) Cutting hall registered number = KSH12
PRINT
2 1 H C K
X
ESC
4. Exit menu
If you want to exit, press “ESC” key.
1. Set the list range
Set the list range to check
EX) 1~10
LIST CUTTING HALL (1/1)
- Start Number : [ 1]
- End Number : [ 10]
List All – press [SAVE] key
PRINT
1
PRINT
0 1
No. reference(descript.)
1 1 : KCH12
1. Enter cutting hall number to delete
EX) Delete cutting hall no. 1
DELETE CUTTING HALL (1/1)
Enter Cutting Hall No. : [ 1]
PRINT
1
3. Cutting hall Country number
You can use contry number which is programmed at
menu 1341 (See page 74)
EX) Cutting Hall Country no. = 1. KOREA
PRINT
1
NEW/EDIT CUTTING HALL (1/1)
Enter Cutting Hall House No. : [ 1]
Hall : [KCH12 ]
Country : [ 0]
NEW/EDIT CUTTING HALL (1/1)
Enter Cutting Hall House No. : [ 1]
Hall : [KCH12 ]
Country : [ 1]
Page 81

81
2.11 Programming Store Data
This chapter explains how to access, program STORE data table (Price Look Up) in
CL5000 series.
2.11.1 Store Data (Menu code 1410)
(MENU -> 4. Store Data Table ->1.Store)
This section shows how to create, edit, list and delete store, customer, and advertisement message
data.
2.11.2 New/Edit Store (Menu code 1411)
(MENU -> 4. Store Data Table ->1.Store -> 1.New/Edit Store )
2. Press “PRINT” key and enter appropriate text
in “NAME”.
EX) NAME=YANGJOO
1. Enter store number.
EX) #1
NEW/EDIT STORE (1/2)
Store No. : [ 1]
Name : [ ]
NEW/EDIT STORE (1/2)
Store No. : [ 1]
Name : [YANGJOO ]
1
3. Press “PRINT” key, then user may enter other
store information such as TELEPHONE NUMBER or
any text information.
EX) TEL.#=0318200730, TEXT=1 HO
NEW/EDIT STORE (2/2)
TEL. : [0318200730 ]
Text : [1 HO ]
4. Press “PRINT” key and user may go back to
STORE main menu by using “ESC” key.
X
ESC
Y A N G
PRINT
PRINT
J O
O
Page 82

82
2.11.3 List Store (Menu code 1412)
(MENU -> 4. Store Data Table ->1.Store -> 2.List Store )
¾ This menu shows the list of STORE saved.
¾ Press “2” in STORE menu to get into LIST STORE menu.
¾ Press “SAVE” key to list all of STORE information saved.
※ If you want to print list, press the TEST key.
2.11.4 Delete Store (Menu code 1413)
(MENU -> 4. Store Data Table ->1.Store -> 3.Delete Store )
¾ This menu is to delete the STORE user wish to.
¾ Press “3” in STORE menu to get into DELETE STORE menu
.
2.11.5 Customer (Menu code 1420)
(MENU -> 4. Store Data Table -> 2.Customer )
This section shows how to register customers’ account and their information.
Customer information is to manage the specific customer’s account receivable.
* Customer registration is used for printing a receipt of credit transactions
1. Set the list range
Set the list range to check
EX) 1~10
LIST STORE (1/1)
- Start Number : [ 1]
- End Number : [ 10]
List All – press [SAVE] key
PRINT
1
PRINT
0 1
No. reference(descript.)
1 Yangjoo 0318200730
1. Enter cutting hall number to delete
EX) Delete cutting hall no. 1
DELETE STORE (1/1)
Store No. : [ 1]
PRINT
1
Page 83

83
2.11.6 New/Edit Customer (Menu code 1421)
(MENU -> 4. Store Data Table -> 2.Customer -> 1.New/Edit )
2.11.7 List Customer (Menu code 1422)
(MENU -> 4. Store Data Table -> 2.Customer -> 2.List )
¾ This menu shows the list of CUSTOMER saved.
¾ Press “2” in CUSTOMER menu to get into LIST CUSTOMER menu.
¾ Press “SAVE” key to list all of CUSTOMER information saved.
2. Enter other informations in [ ], such as
Name, Address1, and Address2.
EX) NAME=BILLY, ADDRESS 1=GARAEBI.
ADDRESS 2=1033/1801
1. Enter Customer number and press “PRINT”
key.
EX) Customer No.=1,
NEW/EDIT CUSTOMER (1/3)
Customer No. : [ 1 ]
NEW/EDIT CUSTOMER (2/3)
Name : [BILLY ]
Address 1 : [GARAEBI ]
Address 2 : [ 1033/1801 ]
3. Press “PRINT” key, then user may enter the
Address 3, TEL. Number and customer’s CREDIT
LIMIT AMOUNT.
EX) TEL.=0318201173
CREDIT LIMIT AMOUNT=200.00
NEW/EDIT CUSTOMER (3/3)
Address 3 : [ ]
TEL. : [0318201173 ]
Credit Limit Amount : [ 200.00 ]
④ Press “PRINT” key to enter the information.
User may go back to main CUSTOMER menu by
pressing “X/ESC” key.
PRINT
1
PRINT
Y
PRINT
B
L B
A E
I L
R G A I
1 3 / 3 1 0 8
PRINT
0 1
0 1 2 0 8 3 1 1
PRINT
7 3
PRINT
0 0 2 0 0
X
ESC
Page 84

84
※ If you want to print list, press the TEST key.
2.11.8 Delete Customer (Menu code 1423)
(MENU -> 4. Store Data Table -> 2.Customer -> 3.Delete )
¾ This menu is to delete the CUSTOMER user wish to.
¾ Press “3” in CUSTOMER menu to get into DELETE CUSTOMER menu.
¾ Enter customer number to delete.
2.11.9 Scroll Message (Menu code 1430)
(MENU -> 4. Store Data Table -> 3.Scroll Message)
This function is to set the scrolling advertisement on LCD Display.
2.11.10 Configuration (Menu Code 1431)
(MENU->4. Store Data Table -> 3.Scroll Message -> 1. Configuration)
CONFIGURATION (1/1)
Wait Time (1s) : [ 5]
Speed : [4]
1. Configuration
User may set the wait time from 1 to 9999
second. Setting wait time as ‘0’ is not to use
“Scroll Message” function.
EX) Wait Time = 5
“Speed” means the scrolling speed of message.
User may set it from 1 to 9.
Default speed: 4 (recommended).
1. Set the list range
Set the list range to check
EX) 1~10
LIST COTOMER (1/1)
Start Number : [ 1]
End Number : [ 10]
PRINT
1
PRINT
0 1
1. Enter cutting hall number to delete
EX) Delete cutting hall no. 1
DELETE STORE (1/1)
Store No. : [ 1]
PRINT
1
PRINT
5
PRINT
4
No. reference(descript.)
1 BILLY 200.00
Page 85

85
2.11.11 Edit Scroll Message (Menu Code 1432)
(MENU -> 4. Store Data Table -> 3. Scroll Message ->2. Edit Scroll
Message)
1. Input and edit Message
User may input up to five messages and select two
different scrolling effect.
Please input messages No. and message.
EDIT SCROLL MESSAGE (1/7)
Message No. : [1]
Message : [Scroll Message.... ]
2. Set scrolling message effect
Effect =0 : No use of scrolling message effect.
Effect =1 : Scroll message left to right
Effect =2 : Scroll message right to left
EDIT SCROLL MESSAGE (2/7)
Effect : [1]
-> Left to Right
4. Set date of scroll message
If you set “Y”[1] at Date Setting, you can go to
next screen to set day of week.
(For example, if you set M to 0, scroll message is
not shown on Monday.)
You have to enter date.
If you set Start Date to 00-00-00, it means that
scroll message is shown from now and if you set
End Date to 00-00-00, it means that scroll
message is shown from now until December 31,
99
You have to enter time.
You have to enter hour, minute, and second in
regural sequence and start time should be lower
than end time.
EDIT SCROLL MESSAGE (4/7)
Date Setting (Y/N) : [Y]
EDIT SCROLL MESSAGE (5/7)
Input ‘1’ or ‘0’ : [SMTWTFS]
Day of Week : [1111111]
EDIT SCROLL MESSAGE (6/7)
Start Date : [00-00-00] DD-MM-YY
End Date : [00-00-00] DD-MM-YY
EDIT SCROLL MESSAGE (7/7)
Start Time : [00:00:00]
End Time : [00:00:00]
3. Select use or unuse for scrolling message
If you set [N] at Use Setting, this scrolling
message is not use. If it use this scroll, then set
[Y]
EDIT SCROLL MESSAGE (3/7)
Use message (Y/N) : [Y]
Page 86

86
2.11.12 List Scroll Message (Menu Code 1433)
(MENU -> 4.Store Data Table -> 3.Scroll Message -> 3.List)
This function is to set the scrolling advertisement on LCD Display.
2.11.13 Currency (Menu code 1440)
(MENU -> 4. Store Data Table -> 4. Currency)
User may save rate of currency to default currency and convert to another
currency simply by this function.
☞ Please refer to “Menu 1880 Function key definition”.
2.11.14 New/Edit Currency (Menu Code 1441)
(MENU -> 4. Store Data Table -> 4.Currency -> 1.New/Edit)
NEW/EDIT CURRENCY (1/3)
Enter Currency No : [1]
Rate Decimal Point : [4]
1. Numbering Currency
User may save up to 4 different currencies by
numbering 1~4.
EX) Currency No. = 1
PRINT
1
NEW/EDIT CURRENCY (1/3)
Enter Currency No : [1]
Rate Decimal Point : [3]
2. Rate Decimal Point
Enter th Rate Decimal Point (default = 4)
EX) Rate Decimal Point = 3
PRINT
3
1. Set the list range
Set the list range to check
EX) 1~10
LIST COTOMER (1/1)
- Start Number : [ 1]
- End Number : [ 10]
List All – Press [SAVE] key
PRINT
1
PRINT
0 1
Page 87

87
☞ Printing formats of currency symbol
No
Printing Format Remarks
0
“100.00”, “0.12”
1
“$ 100.00”, “$ 0.12”
2
“100.00 $”, “0.12 $”
3
“
$ 100.00 c”, “$ 0.12 c”
4
“$ 100.00 c”, “12 c” (Greek) When total amount is less than 1, only “Last
currency symbol” shows up.
5
“$100.00”, “$0.12”
6
“100.00
$”, “0.12$”
7
“
$100.00c”, “$0.12c”
8
“$100.00c”, “12c” (Greek) When total amount is less than 1, only “Last
currency symbol” shows up.
NEW/EDIT CURRENCY (2/3)
Currency Rate : [ 12.800]
Primary Sign : [
]
3. Currency Rate.
Enter comparative rate of currency to default
currency set.
EX) Default currency = $1.00
Comparative currency rate to default currency
= € 1.2800.
PRINT
0 0 8 2 1
NEW/EDIT CURRENCY (2/3)
Currency Rate : [ 12.800]
Primary Sign : [$
]
4. Primary Sign
Enter the first currency sign to be changed.
EX) Primary Sign = $
PRINT
0 8
CHAR
NEW/EDIT CURRENCY (3/3)
Last Sign : [ ]
Price Decimal Point : [0]
5. Last Symbol
Enter the last currency symbol to be changed.
EX) No last symbol
PRINT
NEW/EDIT CURRENCY (3/3)
Last Sign : [ ]
Price Decimal Point : [2]
6. Price Decimal Digit
Enter the number of decimal digit
EX) Price Decimal point digit = 2
PRINT
2
Page 88

88
2.11.15 List Currency (Menu Code 1442)
(MENU -> 4. Store Data Table -> 4.Currency -> 2.List)
※ If you want to print list, press the TEST key.
2.11.16 Delete Currency (Menu code 1443)
(MENU -> 4. Store Data Table -> 4.Currency -> 3.Delete)
1. Set the list range
Set the list range to check
EX) 1~4
LIST CURRENCY (1/1)
- Start Number : [ 1]
- End Number : [ 4]
List All – press [SAVE] key
PRINT
1
PRINT
4
No. reference(descript.)
1 1.2800 $
1. Currency number to delete
EX) Delete Currency no. 2
DELETE CURRENCY (1/1)
Enter Currency No : [ 2]
PRINT
2
Page 89

89
2.12 Programming Global Setting
2.12.1 Global Label Format (Menu code 1510)
(MENU -> 5. Global Setting -> 1.Label Format)
Pre-programmed fixed label formats are from #1 to #10 and these formats cannot be
modified.
Label format #11~#30 are free formats that users may modify at their needs. Users may
download one into the scale and set a specific free label format. (Refer to 4.2 Label
format on chapter
2.14.20)
※ You can press the SAVE key at anytime to save the current data and if you want
to exit without saving, press the ESC key.
2. Set PLU label No.
Set PLU label number
EX) PLU Label No. = 2. IS6040-0000(60x40)
1. Global Label
If you use Global Label, enter 1. If not, enter 0.
*If you set it to 1, 1
st
format number is ignored which is
set in PLU programming
*2
nd
label format is printed if it is set.
EX) Use global label
PRINT
1
PRINT
2
LABEL FORMAT (1/3)
Use Global Label (1=Y/0=N): [Y]
PLU Label No. : [0]
LABEL FORMAT (1/3)
Use Global Label (1=Y/0=N): [Y]
PLU Label No. :[2]
IS6040-0000(60x40)
3. Set Miscellaneous label number
Set label format for miscellaneous item.
EX
)
Misc. Label ID = 2. IS6040-0000(60x40)
PRINT
2
LABEL FORMAT (2/3)
Misc. Label No. : [ 2 ]
Total Label No. : [ 2 ]
IS6040-0000(60x40)
4. Set total label number
Set label format of total label for Add-Up sales.
EX
)
Total label No. = 10 , TC6060-0002(60x60)
PRINT
0
LABEL FORMAT (2/3)
Misc. Label No. : [ 2 ]
Total Label No. : [10]
TC6040-0000(60x40)
1
Page 90

90
2.12.2 Barcode Format (Menu code 1520)
(MENU -> 5. Global Setting -> 2.Barcode)
Global Barcode Setting provides all-in-one barcode setting by selecting nine different
barcode options so that user does not need to save data for individual PLUs one by one.
All related barcode data are selected and saved from PLU barcode data table user may
already register.
※ You can press the SAVE key at anytime to save the current data and if you want to
exit without saving, press the ESC key .
X
ESC
7. Exit menu
If you want to exit, press “ESC” key.
6. Set printing direction of PLU and Misc.
item
EX) Reverse Item Label = “Y”
PRINT
Y
5. Set printing direction of total label
EX) Reverse Total Label = “Y”
PRINT
Y
LABEL FORMAT (3/3)
Reverse Total Label : [ Y ]
Reverse Item Label : [ N ]
LABEL FORMAT (3/3)
Reverse Total Label : [ Y ]
Reverse Item Label : [ Y ]
2. Set barcode number for by-weight PLU
EX) PLU Weight barcode No. = 2
1. Set Global Barcode
If you use global barcode, enter 1. If not, enter 0.
*If you set it to 1, barcode number is ignored which is set
in PLU programming
EX) Use global barcode
PRINT
1
PRINT
2
BARCODE (1/4)
Use Global Barcode (1=Y/0=N) : [ Y ]
PLU Weight Barcode No. : [ 0 ]
PLU Count Barcode No. : [ 0 ]
BARCODE (1/4)
Use Global Barcode (1=Y/0=N) : [ Y ]
PLU Weight Barcode No. : [ 2 ]
PLU Count Barcode No. : [ 0 ]
Page 91

91
3. Set barcode number for by-count PLU
EX
)
PLU Count barcode No. = 2
PRINT
2
5. Set barcode number for fixed PLU
EX
)
PLU fixed barcode No. = 2
PRINT
2
BARCODE (1/4)
Use Global Barcode (1=Y/0=N) : [ Y ]
PLU Weight Barcode No. : [ 2 ]
PLU Count Barcode No. : [ 2 ]
BARCODE (2/4)
PLU PCS Barcode No. : [ 2 ]
PLU Fixed barcode No. : [ 2 ]
Misc. Weight Barcode No. : [ 2 ]
7. Set barcode number for Misc. count
item
EX) Misc. count barcode N o. = 2
PRINT
2
6. Set barcode number for Misc. weight
item
EX) Misc. weight barcode No. = 2
PRINT
2
BARCODE (2/4)
PLU PCS Barcode No. : [ 2 ]
PLU Fixed barcode No. : [ 2 ]
Misc. Weight Barcode No. : [ 2 ]
BARCODE (3/4)
Misc. Count Barcode No. : [ 2 ]
Misc. pcs Barcode No. : [ 2 ]
Add-Up TTL Barcode No. : [ 0 ]
8. Set barcode number for Misc. PCS Item
EX) Misc. PCS barcode No. = 2
PRINT
2
BARCODE (3/4)
Misc. Count Barcode No. : [ 2 ]
Misc. pcs Barcode No. : [ 2 ]
Add-Up TTL Barcode No. : [ 0 ]
9. Set barcode number for Add-Up Total
EX
)
Add Up TTL barcode No. = 2
PRINT
2
BARCODE (3/4)
Misc. Count Barcode No. : [ 2 ]
Misc. pcs Barcode No. : [ 2 ]
Add-Up TTL Barcode No. : [ 0 ]
4. Set barcode number for by-PCS PLU
EX
)
PLU PCS barcode No. = 2
PRINT
2
BARCODE (2/4)
PLU PCS Barcode No. : [ 2 ]
PLU Fixed Barcode No. : [ 2 ]
Misc. Weight Barcode No. : [ 0 ]
Page 92

92
X
ESC
11. Exit menu
If you want to exit, press “ESC” key.
10. Set barcode number for floating Total
EX
)
Floating TTL barcode No. = 2
PRINT
2
BARCODE (4/4)
Floating TTL Barcode No. : [ 0 ]
Page 93

93
2.13 Printing Programming
This chapter explains how to set printing-related environments, such as print label
item, markdown, Hardware, serial number format, and ticket.
2.13.1 Printing (Menu code 1700)
(MENU -> 7. Print)
PRINT Submenu
No. Submenus Description
1 Print Label Item Select item(s) which is(are) not printed on label.
2 Markdown Select “Yes” or “No” to print both of original and discount
information on the label.
3 Print Hardware Set the label type and sensor of printer
4 Serial Number Format Set the format of serial number to print label or ticket
5 ADD-UP Total Select add-up total label whether is printed or not
6 Ticket Set printing item for ticket
2.13.2 Print label item (Menu code 1710)
(MENU -> 7. Print -> 1.Print Label Item)
If you set any of the items to Y, then th ey will NOT print on any labels regardless of
the label format.
Y
ou can use the PG UP and PG DOWN keys to navigate from page to page, or you
can use the Arrow keys to go through each page 1 line at a time.
※ You can press the SAVE key at anytime to save the current data and if you want to
exit without saving, press the ESC key .
PRINT (1/2)
1. Print Label Item
2. Markdown
3.Printer Hardware
1.If you do not want to print, enter 0(N), if you
want to print, enter 1(Y).
or
1
PRINT LABEL ITEM (1/16)
Department Name (Y/N) : [N]
Department Number (Y/N) : [N]
Group Number (Y/N) : [N]
0
PRINT PRINT
PRINT (2/2)
4. Serial Number Format
5. Add-Up Total
6. Ticket
Page 94

94
▶ “Print Label Item”
Page Item
Department Name
Department Number
1
Group Number
PLU Number
PLU Name 1
2
PLU Name 2
PLU Name 3
Item Code
3
Unit Weight
Tax Rate
Tax Price
4
Tare Weight
Pieces
Unit Symbol
5
Sell By Date
Sell By Time
Packed On Date
6
Packed On Time
Produced Date
Cook By Date
7
Bonus Point
Origin
Ingredient
8
Sales Message
Refer. Net Weight
Refer. Gross Weight
9
Percent Tare
Percent Tare Limit
Saved Price
10
Label Serial
Store Name
Clerk Number
11
Clerk Name
Customer Name
Customer Number
12
Scale Number
Page 95

95
Day of Week
Currency Rate
13
Second Total Price
Second Unit Price
Traceability
14
Nutrition Fact
Label Caption
Total Tax Price
15
Second Add Total
Barcodes 16
Image
2.13.3 Markdown (Menu code 1720)
(MENU -> 7. Print -> 2.Markdown)
Markdown is to select “Yes” or “No” to print both of original and discount
information on the label. There are 4 selectable sub-menus on label.
▶ Markdown Sub-menu
No. Sub-menu Description
1 Total Price Markdown Select “Yes” to display both of original total price and
discount total price if any. Otherwise, select “No”.
2 Unit Price Markdown Select “Yes” to display both of original unit price and
discount unit price if any. Otherwise, select “No”.
3 Weight Markdown Select “Yes” to display both of original weight and discount
weight if any. Otherwise, select “No”.
4 Quantity Markdown Select “Yes” to display both of original quantity and discount
quantity if any. Otherwise, select “No”.
1. Select Yes or No by using 1 or 0 key and press
the PRINT key.
or
MARKDOWN (1/2)
Total Price Markdown (Y/N) : [ Y ]
Unit Price Markdown (Y/N) : [ Y ]
Weight Markdown (Y/N) : [ Y ]
2. After setting all of above MARK DOWN submenus use “X/ESC” key or “SAVE” key to go back
to PRINT main menu.
or
SAVE
X
ESC
1 0
PRINT PRINT
MARKDOWN (2/2)
Quantity Markdown : [ Y ]
Page 96

96
2.13.4 Printer Hardware (Menu code 1730)
(MENU -> 7. Print -> 3.Printer Hardware)
This section is to explain how to set printing H/W environments in the following table.
▶ Printer Hardware Sub-Menu
No. Sub-Menu Description
1 Print Mode
Select label, ticket or continuous label mode.
2 Label / Ticket
Size
If it is Label mode, “Width(60)”, “Height(40)” and “Gap
length(2)” size is set, If it is Ticket mode, “Width(60)”,
“Feed(20)” and “End Margin(5)” size is set. If you use
Continuous Label Paper in Label mode, “Gap length” value is
applied to “End Margin”.
* The values in ( ) are default.
3 Sensor
Calibration
Enter the “Gap(128)” and “Peel(128)” values
for printing
sensor calibration.
* The values in ( ) are default.
* If you press “TEST” key, Gap and Peel values are adjusted
automatically.
* In case of Ticket mode, Gap value is not saved.
4 Sensor & Motor
Set Peel-off sensor, Rewind Motor and Label Paper type
5 Print Intensity
Set the extent of intensity of label (ticket) printed.
6 Adjust Feed
Length
Set adjusting values of feed length.
This value can be from -200 to +200. You can change sign(+,-) by
pressing ZERO key.
+ value will print higher than THP.
* Pressing “TEST” key automatically feeds to adjust the feed
length.
7 Label Preprint
You can set preprint length.
2.13.5 Print Mode (Menu code 1731)
(MENU -> 7. Print -> 3.Printer Hardware -> 1.Print Mode)
1.Press “3” to get into H/W setting mode on Print
Menu.
3
PRINTER HARDWARE (1/3)
1. Print Mode
2. Label/Ticket Size
3. Sensor Calibration
Select “0” for Label Mode, “1” for Ticket Mode or
“2” for Continuous Label Mode.
Press “PRINT” to save.
PRINT MODE (1/1)
Print Mode (0-2) : [0]
Label Mode
Page 97

97
2.13.6 Label Size/Ticket Size (Menu code 1732)
(MENU -> 7. Print -> 3. Printer Hardware -> 2.Label Size)
2.13.7 Sensor Calibration (Menu code 1733)
(MENU -> 7. Print -> 3. Printer Hardware -> 3.Sensor Calibration)
2.13.8 Sensor & Motor (Menu code 1734)
(MENU -> 7. Print -> Printer Hardware -> 4. Sensor & Motor)
2.13.9 Print Intensity (Menu code 1735)
(MENU -> 7. Print -> 3. Printer Hardware -> 5.Print Intensity)
Enter any value from “0” to “20”.
Press “TEST” to test printing a label.
.
PRINT INTENSITY (1/1)
Printer Intensity (0-20) : [10]
[TEST] = Test Intensity
Enter appropriate values or “Yes” or “No” for
“PRINT METHOD TYPE”, “ACTIVE PEEL-OFF”,
“ACTIVE REWIND MOTOR”, and “LABEL PAPER”.
* If there is no gap on a label, set Label Paper to
0, if there a gap, set it to 1.
*When "Ticket Mode" is in "Print Mode", [Rewind
Motor] and [Labe Paper] do not work.
SENSOR&MOTOR (1/1)
Active Peel-off : [ Y ]
Active Rewind Motor : [ Y ]
Label Paper (0=No Gap, 1=Gap) : [ 1 ]
Enter values for “Width”, “Height”, “Gap Length”.
If you press “TEST” key, height and gap length of
current label is measured.
* If it is Ticket Mode, “TICKET SIZE” is displayed,
and “TEST” key is not operated.
* If it is Label mode and Continuous Label Paper,
“TEST” key is not operated. And "End Margin"
instead of "Gap Length" shows up.
LABEL SIZE (1/1)
Width :[60]mm
Height:[40]mm
Gap Length:[ 2]mm
Enter appropriate values for “Gap”, “Peel”, “Out of
Paper ”.
* If you press “ TEST” key, Gap and Peel values are
adjusted automatically.
* If it is Ticket mode, “Gap” value is not saved.
SENSOR CALIBRATION (1/1)
Gap :[128]
Peel:[128]
[TEST]=Auto Calibration
TICKET SIZE (1/1)
Width :[60]mm
Feed : [20]mm
End Margin :[ 5]mm
SENSOR CALIBRATION (1/1)
Gap (Rcpt):[128]
Peel:[128]
[TEST]=Auto Calibration
Page 98

98
2.13.10 Adjust Feed Length (Menu code 1736)
(MENU -> 7. Print -> 3. Printer Hardware -> 6.Adjust Feed Length)
2.13.11 Label Preprint (Menu code 1737)
(MENU -> 7. Print -> 3. Printer Hardware -> 7.Label Preprint)
2.13.12 Serial Number Format (Menu code 1740)
(MENU -> 7. Print -> 4.Serial Number Format)
SERIAL NUMBER FORMAT programming is for numbering of label/ticket issued (printed) on
label/ticket. User may identify daily total counts of label/ticket used up.
After setting all of above H/W setting sub-menus
use “X/ESC” key to go back to
PRINT main menu
X
ESC
Enter any value of the feed alignment from “-200”
to “+200”.
Press “ZERO” to toggle sign.
Press “TEST” to test feed or “ENTER” to save
current “FEED Length value.
* 1pixel = 0.125mm
Ex) “+80” will print 10mm higher.
“-40” will print 5mm lower.
A
DJUST FEED LENGTH (1/1)
Feed Adjustment (-200~+200):[+ 0]
[TEST]=Test, [ZERO]=+ or -
Enter “Y(Yes)” or “N(No)” to select Preprint mode
and any value of the preprint length from “0”mm
to “10”mm.
Press “TES
T
”
to test preprinting.
LABEL PREPRINT (1/1)
Preprint Mode (Y/N) : [ N ]
Preprint Length (0-10) : [ 10]
① Press “4” to go to SERIAL NUMBER FORMAT
menu in PRINT main menu.
4
SERIAL NUMBER FORMAT (1/1)
Label Serial No. : [BBBBB ]
Ticket Serial No. : [%N%O%:AAAAA ]
② Enter appropriate data in [ ].
EX) #0001 on label
RCT#001 on ticket
% # B B B B
PRINT
% R % C % T
A
PRINT
A A
SERIAL NUMBER FORMAT (1/1)
Label Serial No. : [%#BBBB ]
Ticket Serial No. : [%R%C%TAAA ]
Page 99

99
Meaning
z I: Item Code
z N: PLU Number
z P: Price
z U: Unit Price
z W: Weight
z Q: Quantity
z D: Department
z G: group
z A: Ticket Counter (Ticket Mode)
z B: Scale Transaction Counter
z F: PLU Prefix Character
z T: Text Character
z R: Transaction Counter of Each PLU
z L: Clerk Number
z %: Print Fixed Character in the Next Space.
z K: Country Code (For Future)
Sample Ticket Serial Number
Sample Label Serial Number
#0012
Page 100

100
2.13.13 Add-Up Total (Menu code 1750)
(MENU -> 7. Print -> 5.Add-up Total)
This section shows how to set printing environments of total label and item label
when you use ADD-UP sales.
ADD-UP Setting
ADD-UP Setting Description
Print Total Label Total label is printed when you press the PRINT key
during add-up sales.
Print Item Label Item label is printed whenever you press the ADD
key.
* It is applied to Label mode.
2.13.14 Ticket (Menu code 1760)
(MENU -> 7. Print -> 6.Ticket )
This section shows how to select item(s) (Contents) printed on ticket.
① Press “5” to get into ADD-UP TOTAL menu in
PRINT main menu.
5
A
DD-UP TOTAL (1/1)
Prt. Total Label: [ Y ]
Prt. Item Label : [ Y ]
② Press “0” for “No” or “1” for “Yes” in [ ].
EX) Print Total Label - Yes
Print Item Label - No
A
DD-UP TOTAL (1/1)
Prt. Total Label: [ Y ]
Prt. Item Label: [ N ]
③ Press “PRINT” key to save and go back to
PRINT main menu
PRINT
1 0
PRINT
① Press “6” to go to TICKET setting.
TICKET (1/1)
1. Select Ticket Item
2. Select List Item
6
 Loading...