

Page 1
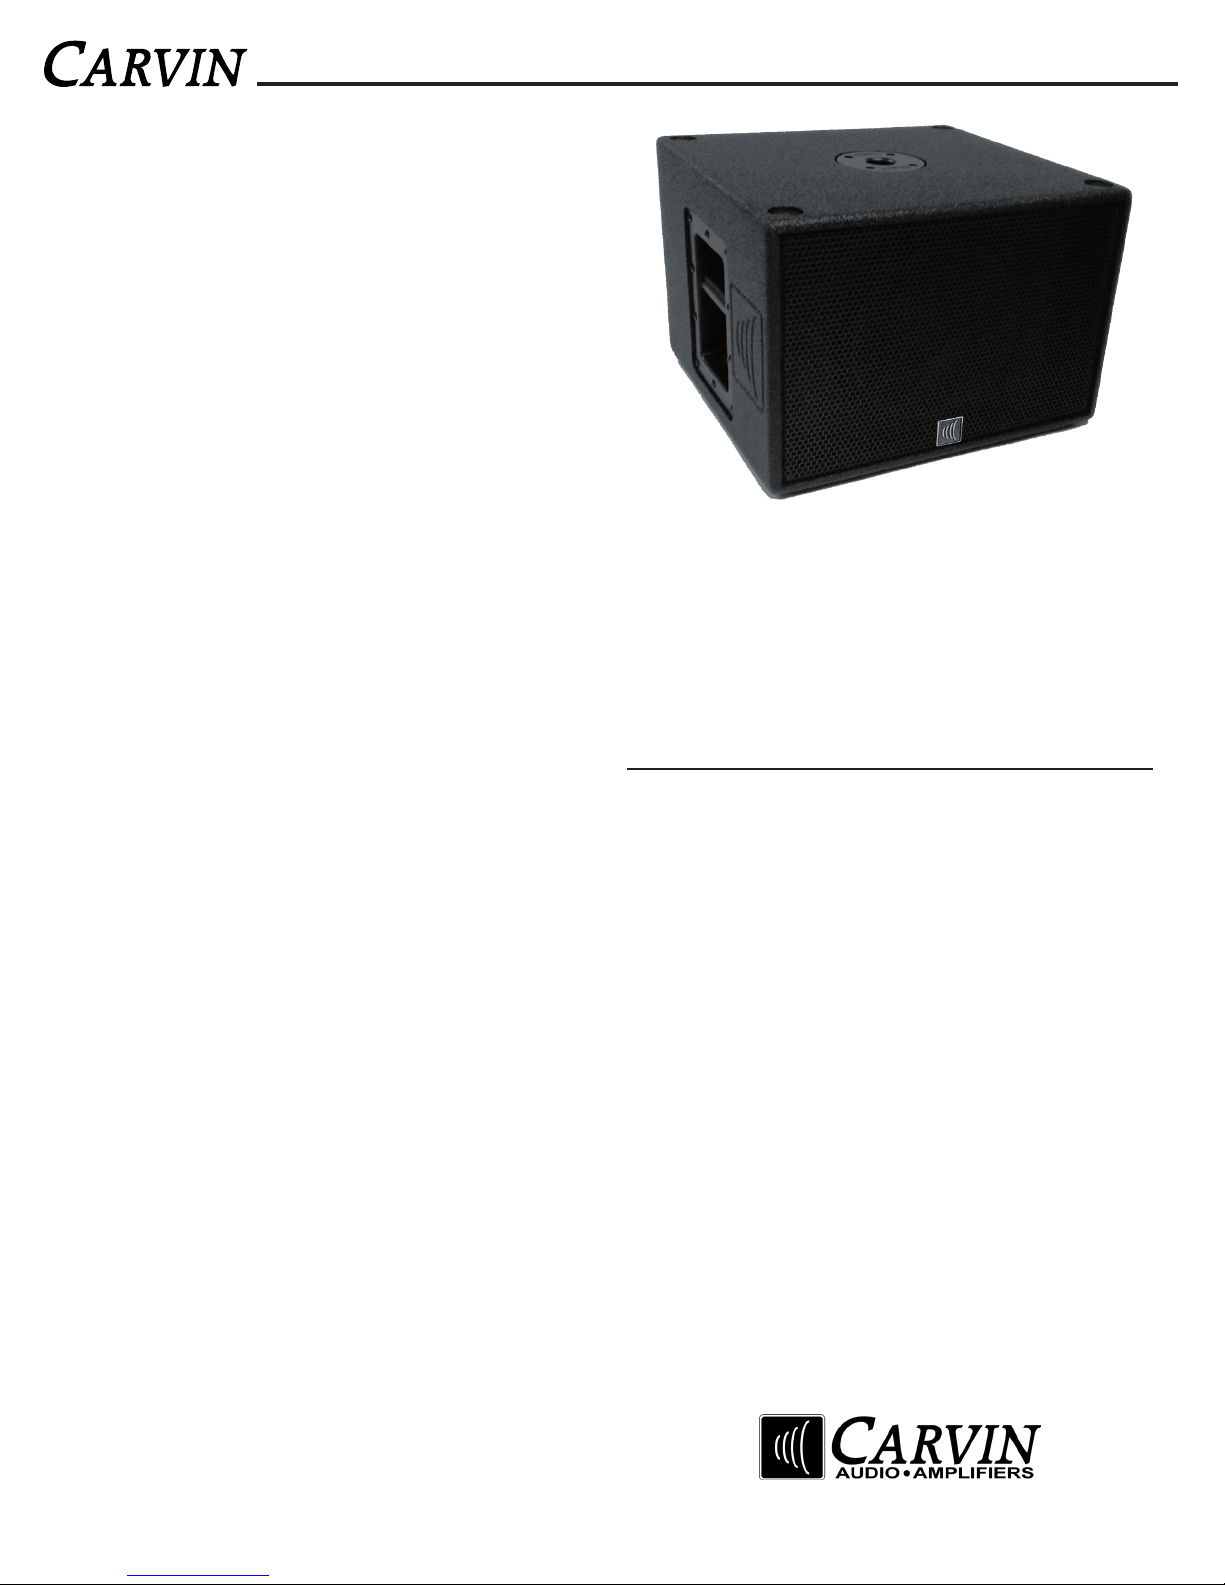
S610B Powered 10” SUBWOOFER with Battery Power USER MANUAL
The S610B powered 10” subwoofer offers extreme portability and
powerful bass in a compact lightweight package. While designed to
integrate perfectly with the S600B StageMate™ portable PA system,
it can add 400 watts of extended low end to any PA system.
Like the S600B StageMate™, the S610B subwoofer can run on AC
power or on it’s own internal battery power, and is rechargeable
from either AC power or a 12V car socket. The S610B adds deep
bass to the S600B StageMate™ system while keeping the system
portable and allowing high-power operation where other systems
simply can not go.
The 10-inch high-excursion subwoofer is custom designed to deliver
bass down to 40 Hz and below from a compact enclosure. Built for
professional touring, the cabinet is made from multi-ply Baltic birch,
CNC machined for precise construction, then covered in impact and
weather resistant Duratec™ UV finish.
The S610B subwoofer links to the MAIN volume control of the
S600B StageMate™ for consistent bass balance at any volume. Set
the LEVEL on the S610B sub where it sounds best, then forget it.
The StageMate™ system easily expands by adding a second S610B
sub and S648 extention cabinets driven by the S600B StageMate™.
Advanced compact design and flexible power options in a light
weight and rugged package make the S610B the ultimate portable
subwoofer system.
- Compact subwoofer with outstanding low frequency peformance
- Easy addition to the S600B StageMate™ PA system
- Can run for hours in battery mode on a single charge, rechargeable
from wall AC or car 12V DC accessory socket
- 10-inch subwoofer optimized for small enclosures
- 400w amplifier is electronically optimized for the subwoofer and
enclosure
- Amp limiter built-in for increased source headroom
- Cool running Class D operation
- Dual summing XLR and 1/4” inputs from stereo sources
- Direct Out XLR for linking to another S610B or house system
- Threaded pole mount connection w/SS50T pole
(S600B or S648 fits on top 1-3/8” end of pole)
- “Lock-in” AC cord prevents accidental disconnect
GETTING STARTED QUICKLY
1. With POWER off, set the LEVEL on the S610B subwoofer to the
center “S600” position. This is the normal setting connecting to the
S600B, providing a safe starting point for any system.
2. Connect the Line Out XLR of the S600B StageMate™ (or other
source) to the LINE IN XLR on the S610B subwoofer.
3. On the S600B StageMate™ set the LINK TO MAIN switch to “IN”.
4. Turn ON the S600B StageMate™ (or other source), then turn on
the S610B sub.
5. Play music from the S600B (source) at a comfortable volume level.
Adjust the S610B sub’s LEVEL control to blend in the desired level of
subwoofer bass.
If no sound is heard from the subwoofer, turn down the S600B MAIN
and check your connection, the LINK TO MAIN switch and POWER LED.
6. Adjust the EQ controls to your liking. For more bass from the
system, turn up the LEVEL on the S610B subwoofer. Turning up the
BASS on the S600B StageMate™ may produce distorted bass while
the S610B remains clear.
7. Need more volume? Even though the S610B is driven by a powerful amplifier, connecting an additional S610B is the best way to get
substantially more bass output. We recommend one S610B for each
S600B with S648 extention.
RECEIVING INSPECTION - read before getting started
INSPECT YOUR SYSTEM FOR DAMAGE which may have occurred during shipping.
If damage is found, please notify the shipping company and Carvin Audio immediately.
SAVE THE CARTON & ALL PACKING MATERIALS. In the event you have to re-ship your
unit, always use the original carton and packing material. This will provide the best possible
protection during shipment. Carvin and the shipping company are not liable for any damage
caused by improper packing.
SAVE YOUR INVOICE. It will be required for warranty service if needed in the future.
SHIPMENT SHORTAGE. If you find items missing, they may have been shipped separately.
Please allow several days for the rest of your order to arrive before inquiring.
RECORD THE SERIAL NUMBER on the enclosed warranty card and on this manual for your
records. Keep your portion of the card and return the portion with your name and comments to us.
SPECIFICATIONS: S610B POWERED SUBWOOFER
Amplifier Power: 400W
Frequency Response: 48Hz-120Hz (-3dB), 33Hz-180Hz (-10dB)
Speaker Configuration: 10” Subwoofer, bass reflex
Sensitivity: 0dBu (775 mVrms), max SPL 118dB
Coverage: Omni
Input Impedance: XLR: 2.2K Ohms, 1/4”: 10K Ohms
Level range: +/-10dB
Direct Out: unity gain from XLR input, 100 Ohm gnd lift
Protection: amp limiter, over current, under voltage, thermal
Power Amp topology: Class D
Power Supply topology: High frequency switch mode
AC Power Requirements: 90 to 250VAC 50/60 Hz, 100VA
DC Battery Charge Input: 12-15VDC, 2A
(accepts typical car battery voltage via C12VDC cord)
Mounting/Transport: threaded pole mount (M20t), bottom rubber feet,
top foot receptacles for stacking, recessed steel handle
Dimensions: 18.25”W x 16.5”D x 12.5”H (720 x 650 x 495 mm)
Weight : 35 lbs. (15.9 kgs) with battery
Warranty: One year parts and labor
Optional Accessories: SS50T threaded mount (M20t) adjustable pole 30”-54”
CV610S nylon cover
C12VDC charging cable for 12V vehicle accessory outlet
B600 replacement battery
16262 WEST BERNARDO DR. SAN DIEGO, CA 92127
800-854-2235 CARVINAUDIO.COM
Page 2
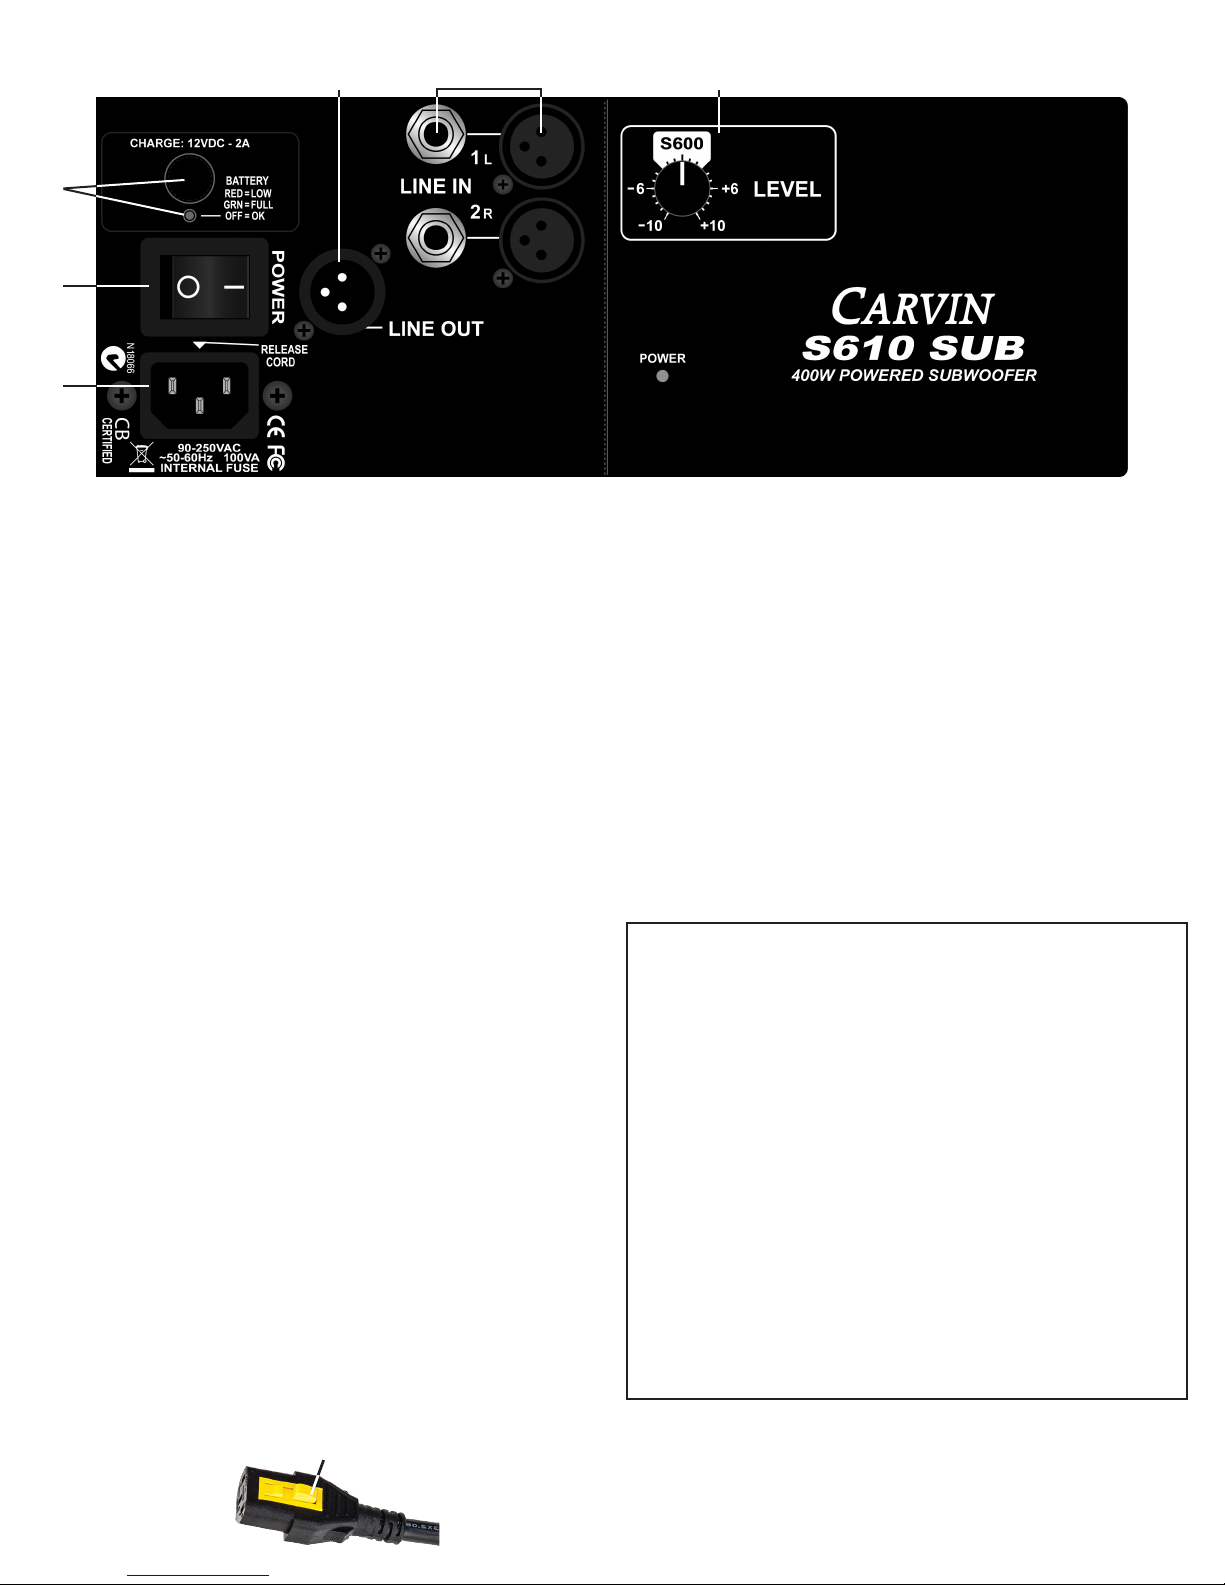
S610B SUBWOOFER CONTROL PANEL
1
6
4
5
23
1
. LINE IN: XLR AND 1/4” INPUTS
The two XLR and two 1/4” LINE IN connectors allow connection of input signals
from a variety of sources. Only one input connection is required.
If connected to the LINE OUT of the S600B StageMate™, set the LINK to
MAIN switch to IN on the S600B.
The XLR jacks are balanced inputs and the 1/4” input jacks are unbalanced
inputs but will accept balanced signals or cables.
All four inputs sum to mono for the subwoofer speaker and for the LINE OUT
XLR.
For summed mono from stereo sources, connect both Left and Right signals.
These inputs do not accept speaker output levels from amplifiers.
2. LEVEL (VOLUME)
Use the LEVEL to control the overall volume of the subwoofer speaker.
When connected to the S600B StageMate™, start with the LEVEL set to the
middle “S600” range. Play music at a comfortable volume from the S600B
StageMate™, then adjust the LEVEL control on the S610B subwoofer.
Once a good bass balance is acheived, use the MAIN volume on the S600B
StageMate™ to control the overall system including the S610B subwoofer.
3. LINE OUT XLR JACK
The LINE OUT XLR provides a balanced output for going to another S610B or
other systems. The LINE OUT signal combines all LINE IN input signals to mono
and is not affected by the LEVEL control or crossover circuits.
The XLR is protected against Phantom power (DC voltage) on cables coming
from phantom powered mixer inputs. Ground pin 1 of the XLR is lifted to 100
ohms above the chassis ground to prevent hum from grounding issues.
4. POWER SWITCH / LED
The POWER switch turns the subwoofer ON or OFF. The green POWER
LED will light approximately 3 seconds after the POWER switch is turned on.
To charge the S610B from AC power, the POWER switch must be ON. Note
the battery will run the system if AC power is unplugged and switch is ON.
5. AC POWER JACK & FUSE
The AC POWER JACK will accept 90VAC to 250VAC, 50Hz or 60Hz. Plug the
cord into a grounded 3 prong power source. No attempt should ever be made
to use the AC cord without the ground connected.
A locking AC cord (Carvin part# 120V18L7) is supplied. However, a standard
AC cord can be used (for European 230V use a CEE-7 plug cord set).
To detach the cord from the subwoofer, press the release lever on the top of
the cord near the power switch.
The FUSE for AC power is located internally near the AC input. To check or
replace, first turn the POWER switch OFF and remove the power cord. Remove
the 12 screws from the edge of the control panel. Carefully remove the control
panel from the speaker enclosure.
The AC fuse type is a 5mm x 20mm 250V Slow Blow rated at 5A.
6. CHARGE 12VDC CONNECTOR, LED INDICATOR & FUSE
The CHARGE connector is for charging the S610B internal battery from a
car or other vehicle using an adapter such as our C12VDC power cord to plug
into a 12V car accessory socket. The S610B will charge through the CHARGE
connector whether the POWER switch is OFF or ON. The S610B can be used
while connected to the CHARGE 12VDC connector for continuous use. It is
recommended to start with a full charge.
The battery status LED will indicate GREEN when the batter y is at full
charge, OFF when it is slightly drained (OK), and RED when the battery is
LOW.
NOTE: Charging a completely dead battery or running at high volume
requires more power and can drain your vehicle’s battery faster.
The FUSE for the 12VDC power system is located internally near the 12VDC
connector. To check or replace, first turn the POWER switch OFF, and remove
the power cord. Remove the 12 screws from the edge of the control panel.
Carefully remove the control panel from the speaker enclosure.
The battery fuse type is a 6.35mm x 32mm 250V Slow Blow rated at 15A.
BATTERY OPERATION AND CHARGING
The S610B subwoofer features a rechargeable 12 volt battery system which
is able to power the unit without connecting to a wall AC socket.
MAXIMIZING BATTERY LIFE: Run time will vary depending on speaker volume.
The S610B can run for over 2 hours at a loud volume. At lesser volumes the
S610B can run for 4 hours and more. If the CHARGE LED near the power switch
blinks RED or if the sound becomes distorted or intermittent, lower the volume
for better sound and longer play.
CHARGING: The battery will charge when the unit is powered ON from AC
power, or it can be charged any time through the CHARGE 12VDC connector.
Charge time for a nearly dead battery to full charge is approximately 6 hours.
BATTERY REPLACEMENT: If battery run time is greatly reduced after many
charge cycles it may need replacement (Carvin part #B600). To replace the
battery first turn the POWER switch OFF, and remove the power cord. Remove
the 12 screws from the edge of the control panel. Remove the panel from the
speaker enclosure. Disconnect the wires from the battery posts (leave these
wires connected to the circuit board to prevent shorting the battery) and disconnect the 4-pin speaker connector from the circuit board. Remove the nut
and wood block holding the battery. Secure the new battery with block and
nut. Connect the wires with the correct +/- polarity. If connected backwards
the fuse will blow and need replacing.
Replace the control panel screws by hand to avoid stripping (after repeated use).
LOCKING AC CORD
#120V16L7
PRESS TO
RELEASE
Page 3

POLE MOUNTING THE
S600B AND S648
ON THE S610B SUBWOOFER
1. Find a solid, level surface to place the S610B, preferably
out of high traffic areas. Stack a second S610B if desired.
2. Screw in a threaded pole (M20t) on top of the S610B
subwoofer. (Adjust SS50T pole to proper length, see below)
3. Place the S600B on the standard pole end.
4. Using an SS3 short pole, one S648 extension can be
secured on top of the S600B or S648.
-Maximum recommended height is 6-1/2 ft.(2m), or
with 2 subwoofers up to 7ft (2.15m) only on solid flooring.
-Typical pole length settings:
(1) S610B sub, S600B = 48in. (1.2m)
(1) S610B sub, S600B+S648 (or two S648) =36in. (0.9m)
(2) S610B subs, S600B+S648 = <30in. (0.75m)
CAUTION:
As with any pole mounted setup, avoid placing it directly
next to busy walkways, on dance floors, or use in windy
conditions.
Do not place the stacked system on uneven surfaces, loose
sand or rocky ground.
If the stack is unsteady, use seperate tripod pole stands for
the S600B and/or S648.
Do not stack more than two S600B or S648 on the pole
mounted in the S610B subwoofer.
THREADED POLE END
MAX HEIGHT:
6-1/2 ft. (2m)
S600B ON BOTTOM
SS50T pole set
THREADED
END (M20t)
SS50T pole set to ~36in. (0.9m)
S600B ON BOTTOM
set to minimum
~30in. (0.75m)
MAX HEIGHT: 7 ft. (2.15m)
w/2 subs, only on solid ooring
SS3 (SHORT POLE INSERT)
REQUIRED
SHORT STACK FOR
ELEVATED STAGES
CAN STAND
ON SIDE
WHEN USING
SEPERATE
STANDS FOR
S600B/S648
S610B SUBWOOFER TO THE
S600B STAGEMATE
1. Connect an XLR cable to the LINE OUT XLR of
the S600B StageMate™
2. On the S600B, press IN the LINK TO MAIN
switch located just to the left of the LINE OUT
connector.
3. Connect the other end of the XLR cable to one
of the LINE IN inputs on the S610B subwoofer.
USING THE SYSTEM:
1. On the S610B subwoofer adjust the LEVEL
control, adding enough bass to match the volume
of the S600B StageMate™.
2. Control the volume of the whole system with
the MAIN control on the S600B StageMate™.
CONNECTING THE
™
PA MIXER
HELPFUL HINTS:
If more bass is wanted overall, turn up the LE VEL on the
S610B subwoofer instead of turning up the LOW controls
on the S600B.
This will prevent the limiter in the S600B from engaging
early. Adjustments can still be made to each S600B channel.
NO SOUND FROM SUBWOOFER:
- Check the POWER LED and battery indicator LED.
- Check the XLR connection:
The LINE IN of the S610B subwoofer connects to the LINE OUT
of the S600B (or other source).
- The S600B “LINK TO MAIN” switch should be set to IN.
POOR BASS RESPONSE:
- Increase the LEVEL setting on the S610B subwoofer to the
middle “S600” range.
setting.
- On the S600B Stagemate™, set each channel’s LOW frequency
control to the middle “0” setting and adjust for each input.
Channels not providing bass content (such as vocal mics) can
be set lower.
- The placement of the subwoofer in the room can cause cancellations at low frequency. Try moving the subwoofer a few feet,
or to the other side of the setup.
TOO MUCH BASS:
- Reduce the LEVEL setting on the S610B subwoofer to the middle
“S600” range. Some systems may require a lower setting.
- On the S600B Stagemate™, set each channel’s LOW frequency
control to the middle “0” setting and adjust for each input.
FOR MAXIMUM OUTPUT:
- Avoid blocking the front of the subwoofer with instrument
cases, stage props or other items which can absorb or reflect
sound.
- If the LEVEL is set very high, it may cause the protection
circuits to limit the output. Start with the LEVEL within the
center “S600” range and increase by small amounts.
- Add a second S610B subwoofer. If you are using the S600B
with more than one S648 extention or two S600B’s, a second
S610B sub may be needed to match the required level.
Some systems may require a higher
Page 4

RISK OF ELECTRIC SHOCK
EXAMPLE SETUP using the S600B StageMate™, S648 extention speakers, and S610B subwoofer:
S600B
DRIVING
THREE S648
EXTENSION
CABINETS
UX600R Wireless Receiver
S610B
Subwoofer
This symbol is intended to
alert the user to the presence
of uninsulated “dangerou s
voltage” within the product’s
enclosure that may be of sufficient magnitude to constitute a risk of electric
shock to persons.
CAUTION
RISK OF ELECTRIC SHOCK
DO NOT OPEN
This symbol is
intended to alert the
user to the presence
of important operating
and maintenance (servicing) instructions in the literature accompanying
the appliance.
IMPORTANT! FOR YOUR PROTECTION, PLEASE READ THE FOLLOWING:
WATER AND MOISTURE: Appliance should not be used near water (near a bathtub, washbowl,
kitchen sink, laundry tub, in a wet basement, or near a swimming pool, etc). Care should be taken
so that objects do not fall and liquids are not spilled into the enclosure through openings.
POWER SOURCES: The product should be connected to a power supply only of the type
described in the operating instructions or as marked on the appliance.
GROUNDING OR POLARIZATION: Precautions should be taken so that the grounding or
polarization is not defeated.
POWER CORD PROTECTION: Power supply cords should be routed so that they are not likely
to be walked on or pinched by items placed upon or against them. Prevent sharp bends of the
cord, paying paticular attention to the plug at each end of the cord.
SERVICING: The user should not attempt to service the appliance beyond that described in the
operating instructions. All other servicing should be referred to qualified service personnel.
FUSING: If your unit is equipped with a fuse receptacle, replace only with the same type fuse.
Refer to replacement text on the unit for correct fuse type.
SAFETY INSTRUCTIONS (EUROPEAN)
The conductors in the AC power cord are colored in accordance with the following code.
GREEN & YELLOW—Earth BLUE—Neutral BROWN—Live
U.K. MAIN PLUG WARNING: A molded main plug that has been cut off from the cord is
unsafe. NEVER UNDER ANY CIRCUMSTANCES SHOULD YOU INSERT A DAMAGED
OR CUT MAIN PLUG INTO A POWER SOCKET.
UX600M Wireless Mic
S610B
Subwoofer
LIMITED WARRANTY
Your Carvin Audio product is guaranteed against failure for 1 YEAR unless otherwise
stated. Carvin will service and supply all parts at no charge to the customer providing the unit is under warranty. Shipping costs are the responsibility of the customer.
CARVIN DOES NOT PAY FOR PARTS OR SERVICING OTHER THAN OUR OWN. A
COPY OF THE ORIGINAL INVOICE IS REQUIRED TO VERIFY YOUR WARRANTY. Carvin
Corp. assumes no responsibility for horn drivers or speakers damaged by this unit.
This warranty does not cover, and no liability is assumed, for damage due to: natural
disasters, accidents, abuse, loss of parts, lack of reasonable care, incorrect use, or
failure to follow instructions. This warranty is in lieu of all other warranties, expressed
or implied. No representative or person is authorized to represent or assume for Carvin
Corp. any liability in connection with the sale or servicing of Carvin products.
CORP. SHALL NOT BE LIABLE FOR INCIDENTAL OR CONSEQUENTIAL DAMAGES.
CARVIN
MAINTAINING YOUR EQUIPMENT
Avoid spilling liquids or allowing any other foreign matter inside the unit. The panel of
your unit can be wiped with a dry or slightly damp cloth in order to remove dust and bring
back the new look.
As with all pro gear, avoid prolonged use in caustic environments (salt
air). When used in such an environment, be sure the amplifier is adequately protected.
SERVICE
In the USA: email: service@carvin.com, or visit our website: www.carvinaudio.com
and under “SUPPORT” click on “REPAIR INFORMATION”
Outside the USA: contact your dealer, or go to http://www.carvinaudio.com click on
“DEALERS” for your nearest service center.
Include a written description of the problem with serial number and date of purchase.
76-60111B 010917
CAUTION
RISK OF ELECTRIC SHOCK
REFER SERVICING TO QUALIFIED SERVICE
PERSONNEL! THIS UNIT CONTAINS HIGH
VOLTAGE INSIDE!
 Loading...