

Page 1
How to bias:
MTS3200, MTS3212
Rev A
8/1/2008
carvinservice.com
- 1 -
Page 2
Only a certified technician should bias Carvin amps, this is very
dangerous, you can get hurt, please be very careful when working
with any tube amp!
If you have changed the tubes make sure they are a matched set. When you bias the
amp at 100ma and the tubes are matched you will have the desirable 25mA going
through each of the 4 tubes.
-The Bias for the X100B, X212B should be 100mA at 100W setting, with 120VAC.
STEP 1
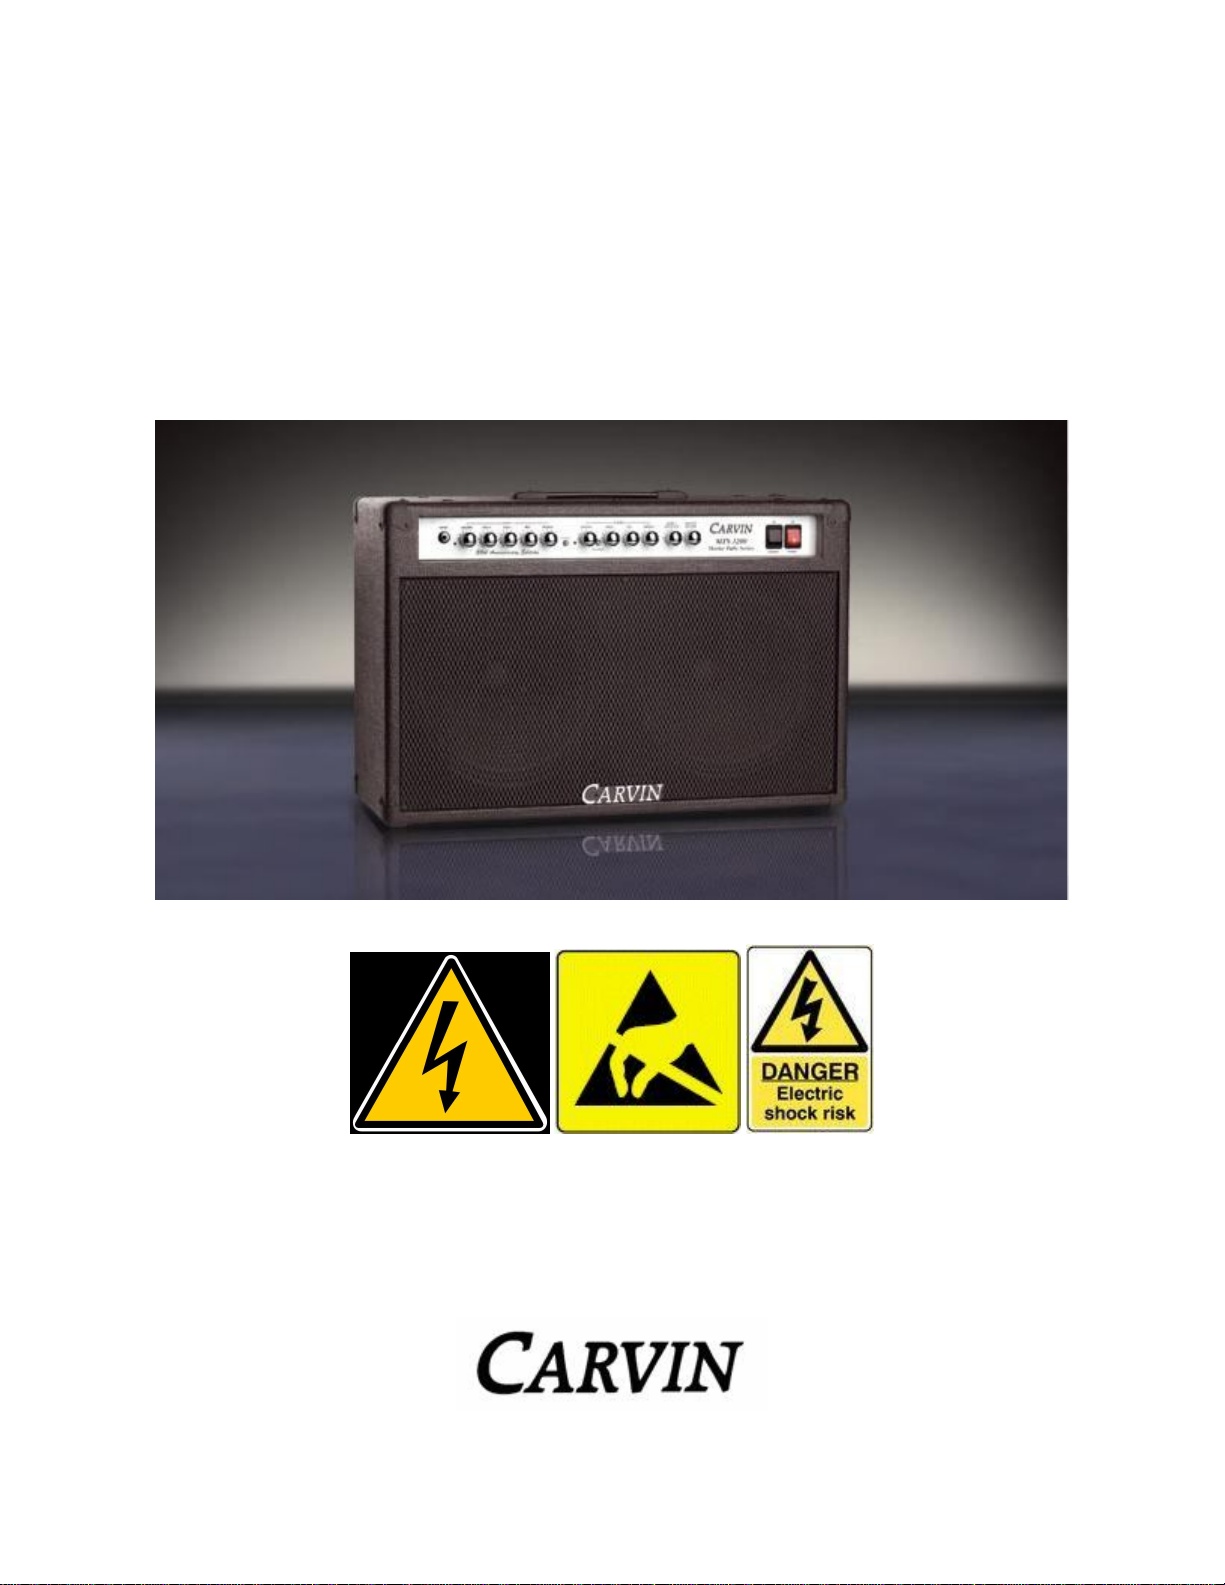
These are the tools you will need:
1. A flat head screw driver
“small”.
2. A multi-meter, w/ milli amp
STEP 2
reading.
3. Banana to clip leads.
4. Amp stand (optional).
Take the amp out of the amp
enclosure (cabinet). Set it in an amp
stand. Be very careful with the tubes
they can break.
NOTE: If you don't have an amp
stand then support the chassis on
some blocks of wood so that the
power tubes are not touching
anything - they get very hot!
- 2 -
Page 3
STEP 3
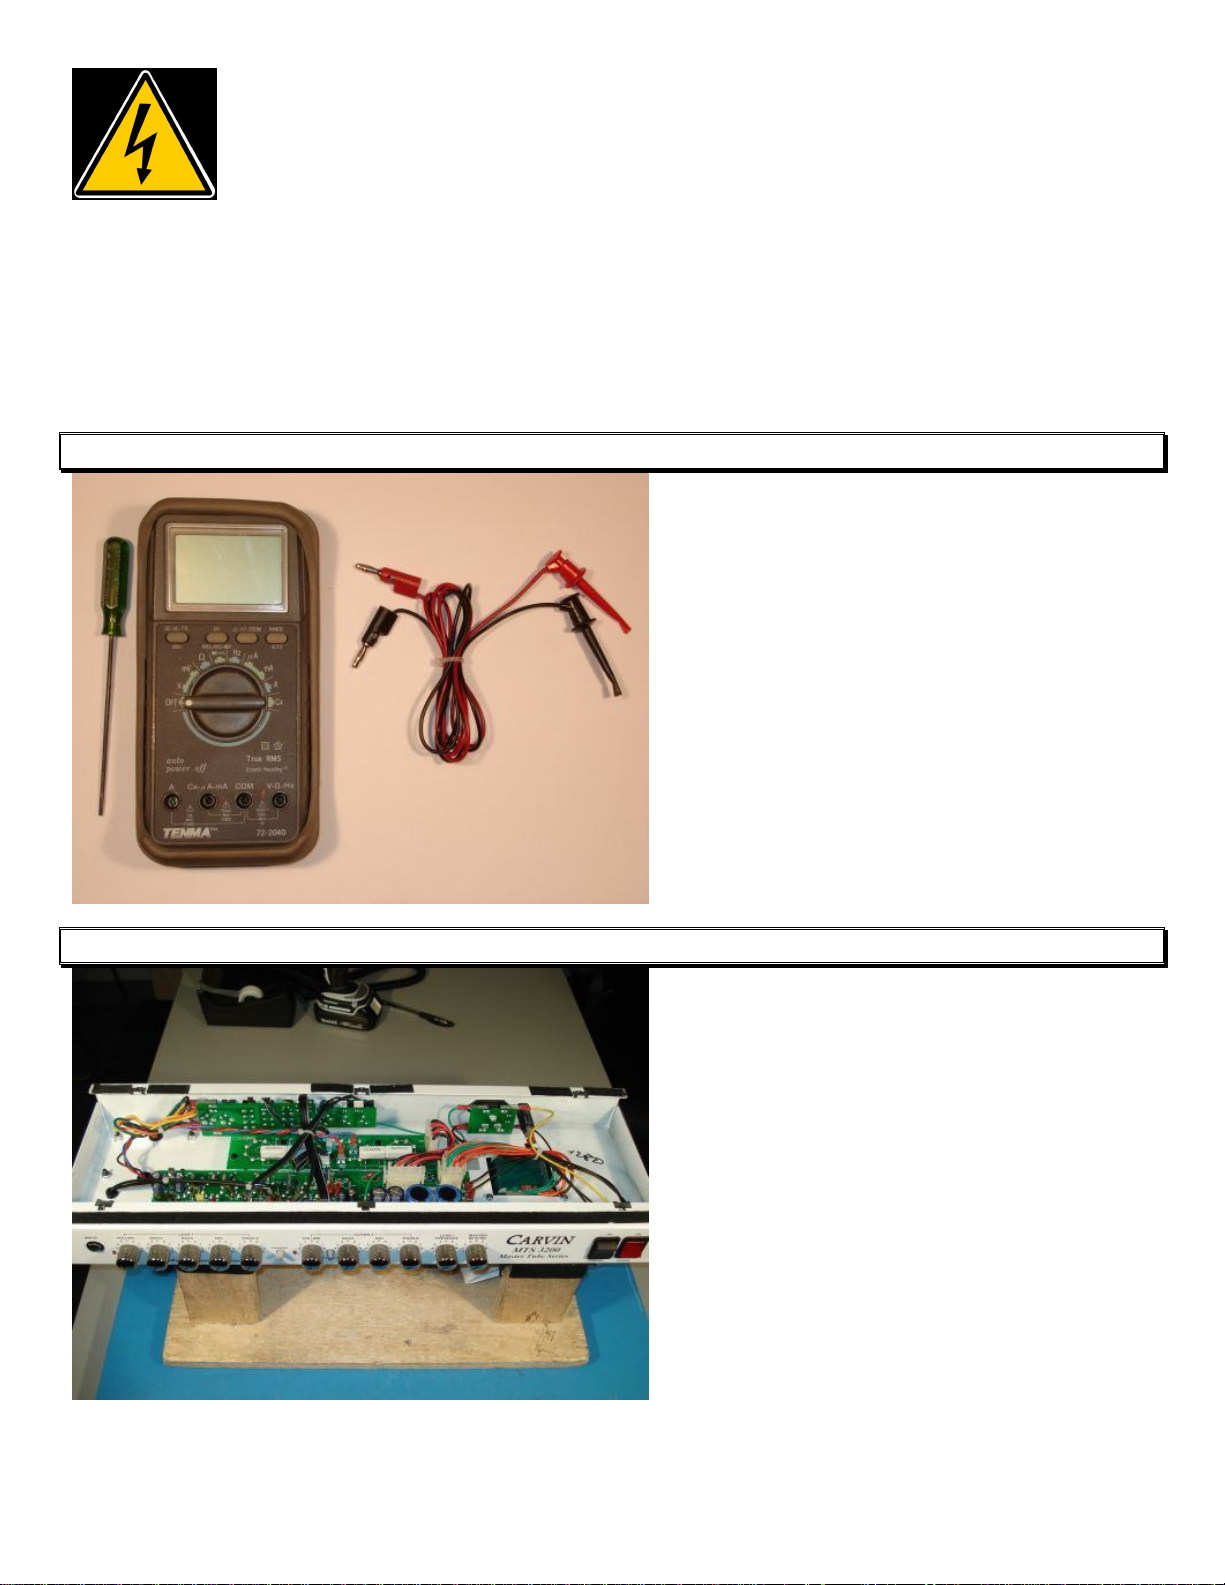
STEP 4
Plug in speaker to output 1 or 2, they
are both the same, both jacks are in
parallel.
NOTE: For speaker setup click on
“Troubleshooting” and “Speakers”.
IMPORTANT: Do NOT turn on the
amplifier without a speaker plugged
in!"
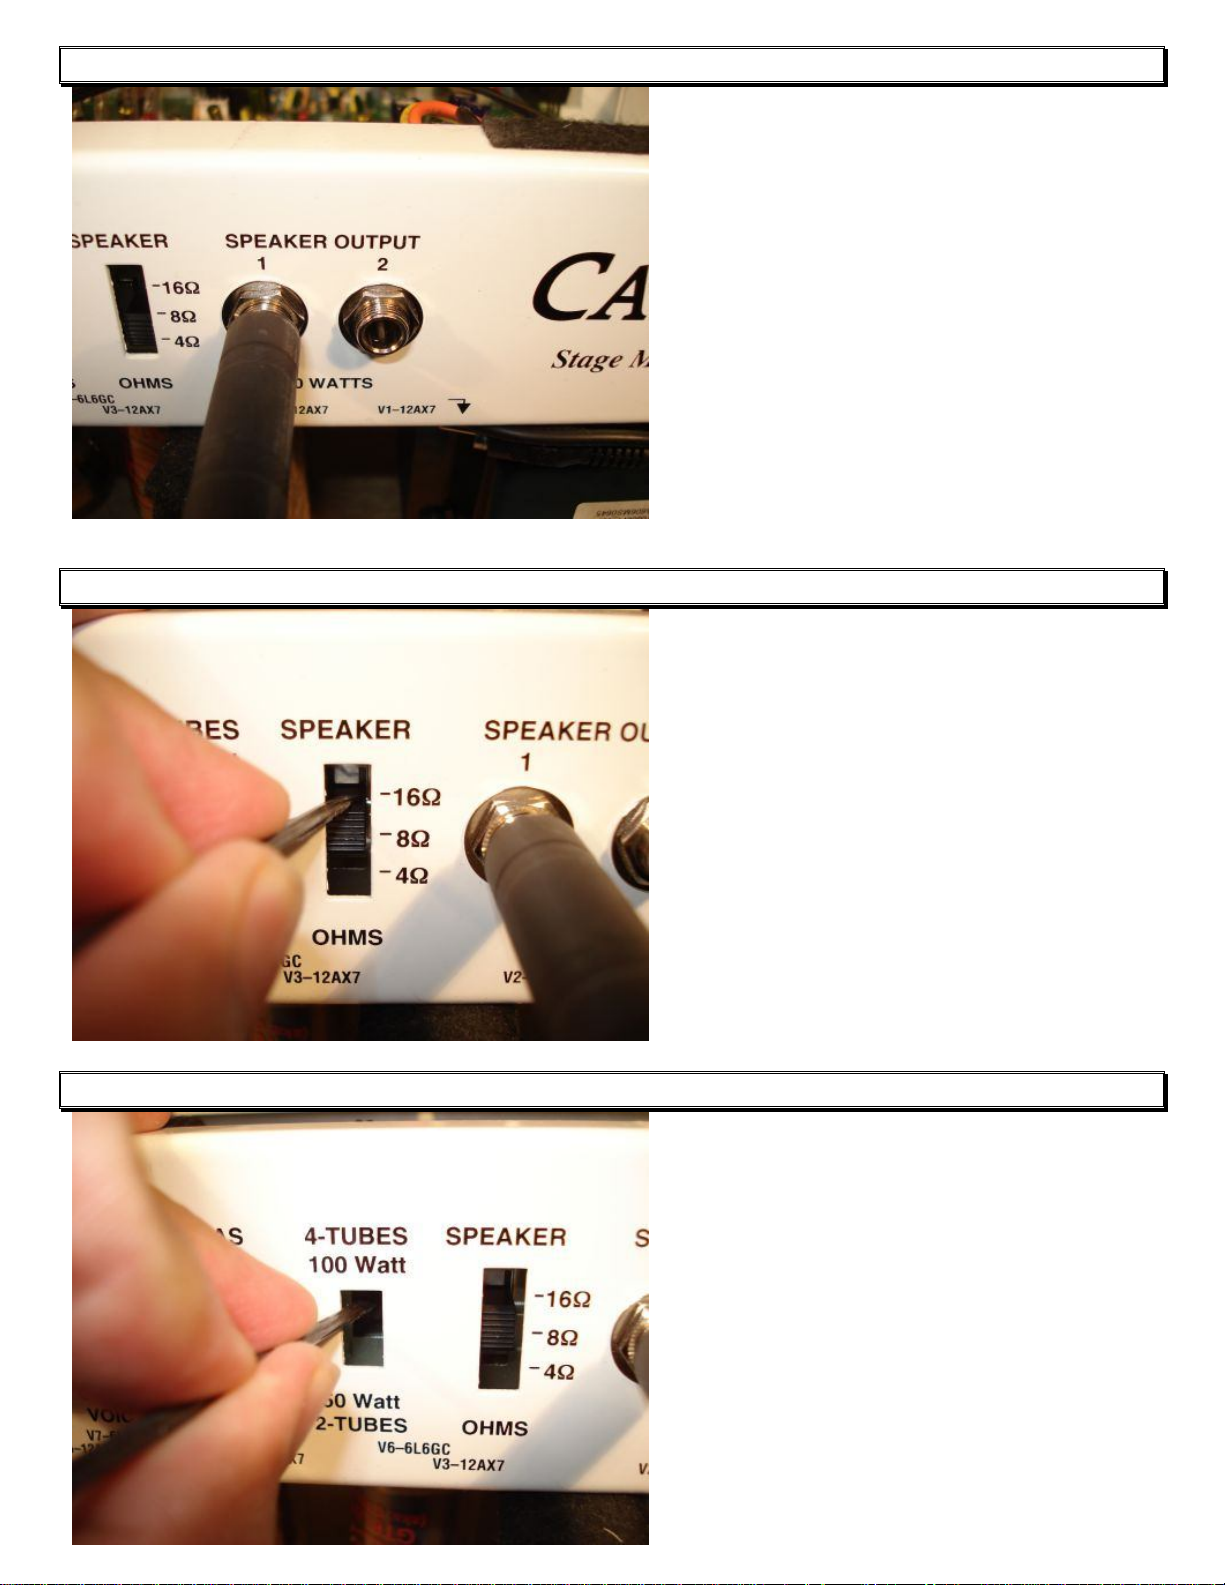
STEP 5
Make sure the OHM setting is
correct. Improper setting will result
in damage to the amp!
NOTE: On the back is where you
will find the OHM setting, make sure
the speaker matches the OHM
setting.
Set the switch in the back to 100W
4-tubes.
NOTE: This step is very important,
if you don’t set this to 100W setting
you will not get the correct bias
setting when you adjust it later in the
procedures.
- 3 -
Page 4

STEP 6
STEP 7
A) Lower the volume down on both channels.
B) Unplug your guitar cord from the input of the
amp.
NOTE: If you have signal going
through the amp, it will not be the
true reading, when you set the bias.
A) Connect the leads to the meter. B) Set your meter to the milliamp (MA) position.
Make sure the fuse inside is good.
NOTE: If the Fuse inside your meter is open, the meter will never work. It will
always read 0mA. In the meter above, mA and COM is selected, you have the
option to plug in the lead on (A) but because the setting will be set to 100mA it is
best to use mA.
- 4 -
Page 5

STEP 8
1. 2.
Connect clips from meter to Standby Switch. It’s easier to clip the leads to the
wires that go from the standby switch to the main circuit board as pictured.
IMPORTANT: Never power the amp ON before connecting the leads, you will
get a big spark, you may blow the fuse of the Meter and or damage the amp.
STEP 9
STEP 10
Plug in AC Cord.
NOTE: Sometimes when the AC
Cord is new it does not want to go in
all the way. Push firmly to force it
in, if that is the case.
Turn the Power Button ON. Wait 2
minutes for the amp to get hot, after the 2
minutes you should see the meter read
current. It will start slow then increase up
to 100mA, adjust it accordingly.
NOTE: Do Not turn ON the Standby
switch, leave it on STANDBY.
- 5 -
Page 6

STEP 11
Check your meter at this point, if it
goes over 100mA, lower it by
turning the bias potentiometer with
the screw driver, clock wise, if it’s
under 100mA bring it up by turning
the potentiometer the other way.
It is OK and normal for the bias reading to fluctuate a little bit and may not be
exactly 100mA but as close as possible.
IMPORTANT: I was using a current shunt to measure the current that’s why the
pictures below shows mV, your meter should read (mA).
Good Bias High Bias Low Bias
STEP 12
Power down Steps:
1. Turn OFF the amp
2. Disconnect the meter leads.
3. Unplug your AC cord and wait for the tubes to cool down, so that you can put the
amp back in the cabinet.
- 6 -
Page 7

IMPORTANT: During biasing and normal amp operation if there is a burning smell
or loud crackling noise that comes from the speaker, you should turn off the amp as
your may have a bad tube. The same is true if your meter reads higher that 150mA
or goes into overload. The tubes should never glow RED on the gray plate material,
the largest metal part inside the tube. This indicates a major problem and extremely
unsafe condition. If this happens turn off the amp immediately!
IMPORTANT: The tubes get very hot! Don’t touch them, you will burn your
skin if you do. If the amp is ON the tubes will get hot, even if you are not
playing the amp, wait 30 minutes before handling the unit to ensure the amp
cooled down.
IMPORTANT: This is not the only way to set the bias on this amp, this is the
Carvin Approved method which is used on the Production line in the San Diego,
California Factory.
NOTE: If the tubes are getting hot and 3 to 5 minutes went by and you don’t see
any reading on your meter check your meter, you may have the leads plugged into
the wrong place in your meter or the fuse of your meter is open.
EXPORT(230-240VAC 50Hz): Follow the same instructions.
Comments or questions email us at Carvinservice@carvin.com
- 7 -
 Loading...