


CARVIN ENGINEERING DATA |
PB100/PB200 BASS AMPS |
OPERATING MANUAL |
PB200-15
PB100--15
PB1002 -105
Congratulations on your purchase of the PB100/PB200 bass amplifier. You have purchased a bass amplifier that you will be proud to own for years to come. Carvin has been building bass amplifiers for over 35 years, so you can expect award-winning performance from these compact professional bass systems. A total of 3 models are offered ranging from the 100 watt PB100 10” and PB100 15” combos, to the 160 watt PB200 15” combo with 1” Titanium HF Driver.
BASS SIGNAL PROCESSING
The preamp of a bass amplifier is the key to great tone. Of course, you have to start with a great sounding bass. If you have ever played your bass straight into a power amp, you would soon discover that it doesn’t sound very good. The reason is that bass guitar pickups must go through some serious signal processing before you can use the sounds. That’s where the PB100/PB200 electronics come in. The first thing you will notice is the PRE SHAPE EQ switches on your amp. These switches will dial in your tone through special filters without having to use your tone controls. Secondly, your BASS, MID & TREBLE controls are powerful active circuits, which will add flexibility in generating other tones. The PB200 also features a 5 BAND GRAPHIC EQ allowing you to put the final touches on your sound from specialized filters designed just for the bass guitar.
The PB100 and PB200 continues with features that are only found in the most comprehensive bass rigs. A COMPRESSOR, which is sought out by most professional’s, is featured because it controls the over-all level of the amp regardless of where the volume control is set. You can now control your peaks without the amp getting too loud or keep the amp from distorting.
Another feature in the PB100 and PB200 is the NOISE GATE. This feature is normally associated with recording studios. However, we felt it was important enough to include into every professional bass amp that Carvin builds. The noise gate eliminates or “gates off” the noise generated from your pickups when you stop playing. This feature will be appreciated by your band and audience.
You may easily add to your signal processing with an effects processor to enhance your sound. Any device from a foot pedal to a full effects rack can be plugged into the rear of the “buffered” Send / Receive EFFECTS LOOP.
The preamp LINE/PHONES jack can also be used as a main output from the preamp to send your signal to a mixing console or another high powered amplifier, allowing you to use the full complement of signal processing from your unit.
RECEIVING INSPECTION—read before getting started
INSPECT YOUR AMP FOR ANY DAMAGE which may have occurred during shipping. If any damage is found, please notify the shipping company and CARVIN immediately.
SAVE THE CARTON & ALL PACKING MATERIALS. In the event you have to re-ship your unit, always use the original carton and packing material. This will provide the best possible protection during shipment. CARVIN and the shipping company are not liable for any damage caused by improper packing.
SAVE YOUR INVOICE. It will be required for warranty service if needed in the future. SHIPMENT SHORTAGE. If you find items missing, they may have been shipped sepa-
rately. Please allow several days for the rest of your order to arrive before inquiring. RECORD THE SERIAL NUMBER on the enclosed warranty card or below on this manual for
your records. Keep your portion of the card and return the portion with your name and comments to us, or you may register online at www.carvin.com/registration.
GETTING STARTED QUICKLY
If you are like most bass players, you probably want to get started right away, in order to get started, you will need your new amp, a 120 or 230 AC grounded power outlet, your instrument and a standard guitar cord. Now, turn the amp and volume off, set the tone controls at their mid “0” center position, turn the compressor and noise gate off and set the 5 band graphic EQ (PB200) to the their center/mid positions. Plug your amp into the AC voltage and then plug in your bass. Now, turn the amp’s power switch ON and gradually raise the volume. Re-adjust the pre-shape switches and tone controls as needed and your ready to go.
COMBO CABINET DESIGN
Part of the success of the PB100/PB200 combo amplifiers are their light weight design and high performance. A tuned bass reflex port is featured in each system adding to the speaker’s efficiency in the 35 Hz to 50 Hz range, while giving overall warmth for a bigger and rounder sound. The PB200 combo series also features a 1”Titanium HF Driver to extend the upper range to 16k Hz, enhancing the harmonics for percussive slap and fingering. The 1” Titanium HF Driver is fully adjustable from a continuously variable rheostat located at the rear. All enclosures are covered in durable black DuraTuff II™ for your transporting protection.
POWER AMP
Pure, clean bass power is delivered to your speaker from the PB100/PB200 series ultralow distortion power amp. The PB100/PB200 THD (total harmonic distortion) is lower than 1%. Typical distortion is less than .08% at nominal listening levels. The output impedance is designed for maximum The power amp features turn-on muting, short circuit and thermal overload protection. ( Note: It is normal for the amp to get warm to the touch).
Model PB100-10/15 Specifications: Model PB200 Specifications:
Freq. Response: |
20 Hz to 20k Hz ±3 dB |
Freq. Response: |
20 Hz to 20k Hz ±3 dB |
THD: |
Typically less than .1% |
THD: |
Typically less than .1% |
RMS Power: |
100 watts |
RMS Power: |
160 watts @ 8Ω bridged or |
CD/Tape Input: |
(150kΩ) Passive or Active |
|
80w @ 4Ω per output jack |
Pre EQ Switches: |
LO 100Hz, MID 300/500, HI 6 k |
CD/Tape Input: |
(150kΩ) Passive-Active |
Tone Controls: |
LO: 80Hz ±12dB |
Pre EQ Switches: |
LO 100Hz, MID 300/500, HI 6k |
(3 band active) |
MID: 200-2KHz ±12dB |
Tone Controls: |
LO: 80Hz ±12dB |
|
HI: 8KHz ±12dB |
(3 band active) |
MID: 200-2KHz ±12dB |
Compressor / Gate: |
30dB reduction |
|
HI: 8KHz ±12dB |
Comp Thresh/Ratio: |
-7 to -27 dB, 3:1 ratio |
Compressor / Gate: |
30dB reduction |
Cabinet Freq. Resp: |
45 Hz to 3.5 kHz (10”) |
Comp Thresh/Ratio: |
-7 to -27 dB, 3:1 ratio |
Cabinet Freq. Resp: |
41 Hz to 2.5 kHz (15”) |
5 Band Graphic EQ: |
80Hz, 250Hz, 500Hz, |
Cabinet Types: |
Tuned ported bass reflex |
|
800Hz, & 2kHz, ±12dB |
Cabinet Construction: |
13 Ply Plywood |
Cabinet Freq. Resp: |
41 Hz to 16k Hz |
Warranty: |
One Year |
Cabinet Types: |
Tuned ported bass reflex |
Power Requirments: |
120VAC, 130VA |
Cabinet Construction: |
13 Ply Plywood |
|
240VAC, 130VA |
Tweeter Attenuation: |
Continuously variable |
Fuse: |
3A 250V slow blow |
Warranty: |
One Year |
PB100-10: |
16W x 12D x 17.7H. 30 lbs. |
Power Requirments: |
120VAC, 225VA |
PB100-15: |
17.5W x 12D x 22.7H. 48 lbs. |
|
240VAC, 225VA |
Cover Options: |
CV100-10 or CV100-15 |
Fuse: |
5A 250V slow blow |
|
|
PB200-15: |
17.5Wx12Dx25H. 46 lbs. |
|
|
Cover Option: |
CV200-15 |
For your records, you may wish to record the following information.
Serial No._____________________ Invoice Date_______________
|
12340 World Trade Drive, San Diego, CA 92128 |
76-00215B 0705 |
800.854.2235 www.carvin.com |
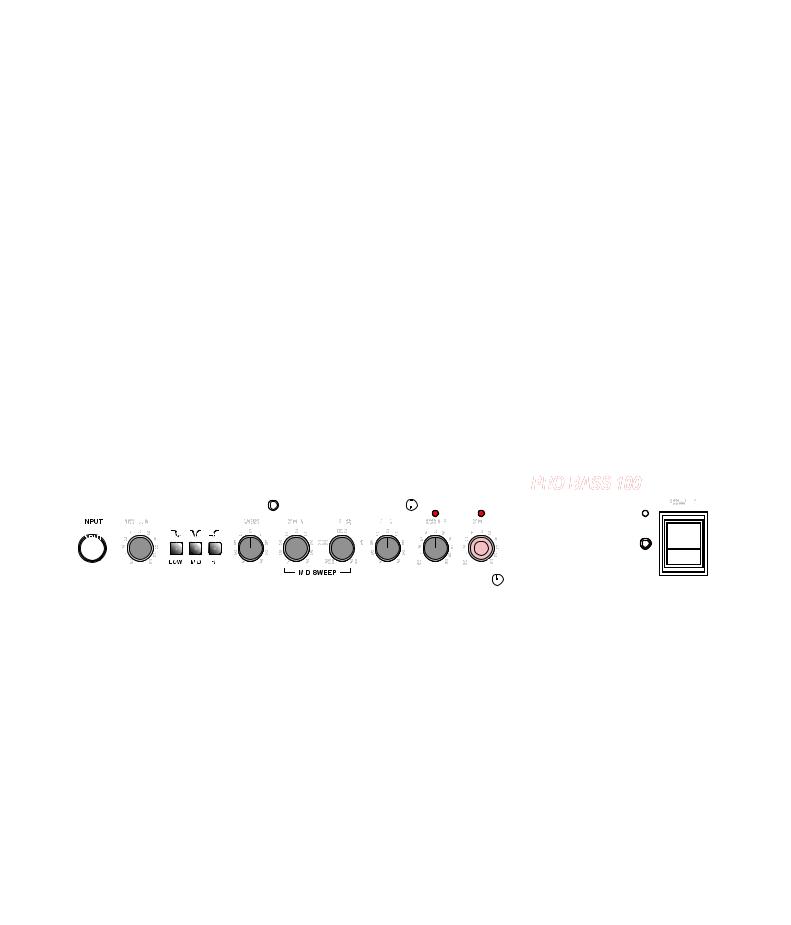
FRONT & REAR PANEL CONTROLS
1. INPUT JACK 1/4”, CD/TAPE RCA INPUTS
The 1/4" phone jack is an instrument input designed to handle both active and passive basses. The RCA Tape/CD inputs are line level inputs designed to work with CD and TAPE players. These jacks will work simultaneous together. Use control on the CD player to control the mix with the bass guitar.
2. VOLUME CONTROL
The VOLUME control adjusts the volume of the amplifier. Depending on the output of your bass guitar’s pickups, the volume control will be set at different positions. Because of the amps extra
gain to compensate for low output |
you can easily get the amps full output at “3” on the dial |
with high output pickups, so adjust |
volume accordingly. Likewise, if you add more boost from the |
LOW pre-shape switch or increase |
BASS tone control, you can easily distort the amp unless you |
reduce the volume. The setting of |
control does not affect the compressor or gate settings. |
3. PRE-SHAPING SWITCHES
The pre-shaping switches are preset |
and cut equalization settings to enhance your sound. |
• LOW - With this switch in, the result is a strong punchy low end starting at 100Hz. |
|
• MID - The mid switch is a mid cut |
in both switch positions. With the mid pushed in, the cut |
is centered around 300Hz which |
the deep bass and leaves the mids intact. For the slap |
player and anyone who wants tight |
and bright mids and highs this is the desired position. With |
the mid left in the out position, the |
centered around 500Hz and produces a brighter more common |
bass amp sound for the player |
a pick or is light on the fingers. |
• HI - The Hi switch is a treble boost |
frequencies above 6k Hz. This switch is for player who wants |
a bright fret clicking sound. |
|
4. BASS AND TREBLE TONE CONTROLS
The BASS and TREBLE tone controls are custom shaped controls to deliver punchy lows and crisp
tight highs for a variety of bass |
|
When the BASS control is turned |
right, it boosts the signal and when turned to the left cuts the |
signal. The effected frequencies are |
at 80Hz and can deliver a great deal of volume. Be care- |
ful not to distort the low end, especially with the LOW pre-shaping switch pushed in. |
|
When the TREBLE control is turned |
right, it boosts the signal and when turned to the left, it cuts |
the signal. The boosted frequency |
TREBLE control is centered at 8k Hz. |
5. MID SWEEP TONE CONTROLS (GAIN & FREQ.)
These two controls will take some time to learn how to use. First, the FREQ. control does not function if the GAIN control is set in the center “0” position. To demonstrate, turn the GAIN to the right for full boost. Now turn the FREQ. control from full left to full right and notice the added mids change frequencies as you play your bass. Now turn the GAIN to the full left and re-sweep the FREQ. control and notice the mids disappear at different frequencies. There are many variables as you can hear, so write down some of the settings for future reference. Unlike normal mid sweeps, Carvin’s mid sweep system is tailored to gradually lower the gain in the harsher frequency ranges around 1k Hz. The mid sweep system is designed for fine tuning your overall sound. However, with the pre-shape filter switches already in your amplifier, you may not require the use of the mid sweep feature.
6. COMPRESSOR (COMP)
For some people, a compressor is a new feature. What it basically does is reduce (or compress) the volume of the incoming signal to conform to a preset maximum output level. This describes the COMP knob in the full-clock wise position where it functions as a limiter. As the knob is turned back (counter clockwise) the compressor lets a larger and larger percentage of the incoming signals to pass through. This percentage is called the “compression ratio”. When the knob reaches the off position (full counter clockwise) the ratio is 1:1 were all the input signal passes through the compressor. The maximum compression ratio is 3:1.
The advantages of a compressor is to increase the overall level of playing (or the average level) and not have peaks or other sudden loud parts (transients). For example, in slap bass playing, the plucked notes can put out peaks that could distort the amplifier at normal playing volumes. On the other hand, if the amplifiers volume was adjusted for these peaks, the rest of the notes would be too quiet to hear. Now, when the compressor is adjusted to where the indicator LED comes on when the peaks are present, the amplifier can be played louder and still reduce the peaks without distortion. It’s like having someone constantly and instantly re-adjusting the volume of the amplifier to prevent distortion when the peaks occur.
7. NOISE GATE
The noise gate may also be a new feature to some people, but it is a fairly simple tool for reducing pickup hum noise or any other noise on the input of the amplifier when the player is not playing. Think of the gate functioning like a door or (gate) at the input of the amplifier. When no input signal is detected the volume shuts down (as if a gate closes), therefore eliminating any noise picked up from entering the amplifier. Then when an input signal is detected, the volume is restored instantly (as if a gate was
PB100
|
|
|
|
|
|
|
|
|
|
|
|
|
|
|
|
|
|
|
|
|
|
|
|
|
|
|
|
|
|
|
|
|
|
|
|
|
|
|
|
|
|
|
|
|
|
|
|
|
|
|
|
|
|
|
|
|
|
|
|
|
|
|
|
|
|
|
|
|
|
|
|
|
|
|
|
|
|
|
|
|
|
|
|
|
|
|
|
|
|
|
|
|
|
|
|
|
|
|
|
|
|
|
|
|
|
|
|
|
|
|
|
|
|
|
|
|
|
|
|
|
|
|
|
|
|
|
|
|
|
|
|
|
|
|
|
|
|
|
|
|
|
|
|
|
|
|
|
|
|
|
|
|
|
|
|
|
|
|
|
|
|
|
|
|
|
|
|
|
|
|
|
|
|
|
|
|
|
|
|
|
|
|
|
|
|
|
|
|
|
|
|
|
|
|
|
|
|
|
|
|
|
|
|
|
|
|
|
|
|
|
|
|
|
|
|
|
|
|
|
|
|
|
|
|
|
|
|
|
|
|
|
|
|
|
|
|
|
|
|
|
|
|
|
|
|
|
|
|
|
|
|
|
|
|
|
|
|
|
|
|
|
|
|
|
|
|
|
|
|
|
|
|
|
|
|
|
|
|
|
|
|
|
|
|
|
|
|
|
|
|
|
|
|
|
|
|
|
|
|
|
|
|
|
|
|
|
|
|
|
|
|
|
|
|
|
|
|
|
|
|
|
|
|
|
|
|
|
|
|
|
|
|
|
|
|
|
|
|
|
|
|
|
|
|
|
|
|
|
|
|
|
|
|
|
|
|
|
|
|
|
|
|
|
|
|
|
|
|
|
|
|
|
|
|
|
|
|
|
|
|
|
|
|
|
|
1 |
|
|
|
|
|
|
|
|
|
|
|
|
|
|
|
|
|
|
|
|
7 |
|
|
|
|
|
|
|
|
|
|
||
|
|
|
|
|
|
|
|
|
|
|
|
|
|
|
|
|
|
|
|
|
|
|
|
|
|
|
|
|
|
|
|
|
|
|
|
|
|
|
|
|
|
|
|
|
|
|
|
|
|
|
|
|
|
|
|
|
|
|
|
|
|
|
|
|
|
|
|
|
|
|
|
|
|
|
|
|
|
|
|
|
|
|
|
|
|
|
|
|
|
|
|
|
|
|
|
|
|
|
|
|
|
|
|
|
|
|
|
|
|
|
|
|
|
|
|
|
|
|
|
|
|
|
|
|
|
|
|
|
|
|
|
|
|
|
|
|
|
|
|
14 |
10 |
11 |
12 |
13 |
SUGGESTED SETTINGS PB100/PB200
The following are suggested settings for common bass sounds and styles. These settings provide a good starting point to get familiar with the PB200 and PB100’s controls. Don’t be afraid to make adjustments and experiment with the controls to find your particular sound.
|
|
|
|
|
|
|
|
STANDARD FINGER |
|
|
|
|
|
|
|
|
|
|
|
STANDARD SLAP |
|
|
|
|
|
|
|
|
|
|
|
|
ACCENTED SLAP |
|
|
|
|
|
|
|||||||||||||||||||
BASS |
|
|
GAIN |
|
FREQ |
TREBLE |
BASS |
|
|
GAIN |
FREQ |
TREBLE |
BASS |
|
|
GAIN |
|
FREQ |
TREBLE |
|||||||||||||||||||||||||||||||||||||||
3 |
0 |
3 |
|
3 |
0 |
3 |
|
|
800 |
|
|
3 |
0 |
3 |
3 |
0 |
3 |
|
|
3 |
0 |
3 |
|
800 |
|
|
3 |
0 |
3 |
3 |
0 |
3 |
|
3 |
0 |
3 |
|
800 |
|
|
3 |
0 |
3 |
|||||||||||||||
6 |
|
|
|
|
6 |
6 |
|
|
|
|
6 |
300 |
|
|
|
1K |
6 |
|
6 |
6 |
|
|
|
|
6 |
6 |
|
|
6 |
300 |
|
|
|
1K |
6 |
|
|
6 |
6 |
|
|
|
6 |
6 |
|
|
|
6 |
300 |
|
|
1K |
6 |
|
6 |
|||
9 |
|
|
|
|
9 |
9 |
|
|
|
|
9 |
|
|
|
|
|
|
9 |
|
9 |
9 |
|
|
|
|
9 |
9 |
|
|
9 |
|
|
|
|
|
|
9 |
|
|
9 |
9 |
|
|
|
9 |
9 |
|
|
|
9 |
|
|
|
|
|
9 |
|
9 |
12 |
|
|
12 |
|
12 |
|
|
12 |
|
200 |
|
|
|
2K |
12 |
|
12 |
12 |
|
|
12 |
|
12 |
|
12 |
200 |
|
|
|
2K |
12 |
|
|
12 |
12 |
|
12 |
|
12 |
|
12 |
|
200 |
|
|
2K |
12 |
|
12 |
|||||||||
|
|
|
|
|
|
|
|
|
MID SWEEP |
|
|
|
|
|
|
|
|
|
|
|
|
|
|
|
|
MID SWEEP |
|
|
|
|
|
|
|
|
|
|
|
|
|
|
|
|
MID SWEEP |
|
|
|
|
|
|
|
||||||||
|
|
|
|
|
|
|
|
|
|
|
|
|
|
|
|
|
|
|
|
|
|
|
|
|
|
|
|
|
|
|
|
|
|
|
|
|
|
|
|
|
|
|
|
|
|
|
|
|||||||||||
|
|
|
|
|
|
|
|
|
|
|
|
|
|
|
|
|
|
|
|
|
|
|
|
|
|
|
|
|
|
|
|
|
|
|
|
|
|
|
|
|
|
|
|
|
|
|
|
|||||||||||
|
|
|
|
|
• LOW PRE-SHAPE OUT |
|
|
|
|
|
|
|
|
|
• LOW PRE-SHAPE IN |
|
|
|
|
|
|
|
|
|
• LOW PRE-SHAPE |
IN |
|
|
|
|
||||||||||||||||||||||||||||
|
|
|
|
|
• MID PRE-SHAPE OUT |
|
|
|
|
|
|
|
|
|
• MID PRE-SHAPE |
|
|
IN |
|
|
|
|
|
|
|
|
|
• MID PRE-SHAPE |
IN |
|
|
|
|
|||||||||||||||||||||||||
|
|
|
|
|
• HI PRE-SHAPE |
OUT |
|
|
|
|
|
|
|
|
|
• HI PRE-SHAPE |
|
|
OUT |
|
|
|
|
|
|
|
|
|
• HI PRE-SHAPE |
IN |
|
|
|
|
||||||||||||||||||||||||
|
|
|
|
|
|
|
|
|
|
|
|
|
|
|
|
|
|
|
|
|
|
|
|
|
|
|
|
|
|
|
|
|
|
|
|
|
|
|
|
|
|
|
|
|
|
|
|
|
|
|
|
|
|
|
|
|
|
|
|
|
|
|
|
|
|
|
|
|
|
|
|
|
|
|
|
|
|
|
|
|
|
|
|
|
|
|
|
|
|
|
|
|
|
|
|
|
|
|
|
|
|
|
|
|
|
|
|
|
|
|
|
|
|
|
|
|
|
 Loading...