

Carrier AIRCONDITIONER ZC, ZC, ZH, ZQ Owner's Manual

Air Conditioner Owner`s Guide
Acondicionador de Aire Manual del Usuário
Climatiseur Manuel de L`utilisateur
READ THE OWNER`S GUIDE BEFORE USING
Por favor lea el manual detenidamente antes de usar su aire aire condicionado
Nota: Las instrucciones en Español empiezan en la página 26.
Lisez attentivement toutes les directives avant d`installer votore appareil.
Note: Les instruciones en Français commencent a la page 50.
MODELS ZC - Cool Only
ZH - Heat Cool
ZQ - Heat Pump

A FEW WORDS ABOUT YOUR NEW AIR CONDITIONER
Thank you for choosing a Carrier Air Conditioner! You can feel confident in your selection because the same
pride in craftsmanship and engineering knowledge that went into Carrier equipment installed in the Astrodome
in Texas, the Sistine Chapel in Rome; the United States Capitol halls of Congress, and thousands of other
installations worldwide has gone into the construction of your unit.
One of the principal advantages of owning a Carrier room air conditioner with electric heat is that the unit
heats AND cools, so it can be used year-round! (Only on models with heat feature)
While cooling, your new Carrier unit also filters and dehumidifies. In cold weather, the unit gently heats
and circulates air throughout the room. Carrier room air conditioners with electric heat quietly give you
maximum cooling comfort!
This Owner's Guide will supply you with all the information you need for installing, operating and maintaining
your new unit. Take a few moments to discover how to get the most in cooling comfort and economical
operation from your new room air conditioner.
SOME SUGGESTIONS
1. To avoid installation difficulties, read instructions completely before starting. This publication
contains information pertinent to the installation and operation of your new room air conditioner.
2. When possible, install unit on a shaded side of the house or building.
CAUTION
Coil fins on chassis are sharp and chassis is heavy. Chassis removal can cause personal injury.
3. Make sure that wall mounting area is structurally sound enough to support the unit.
4. For heat units, the heat is not for primary source of heat.
5. Room air conditioners are designed to fit easily into standard double-hung windows.
However, some window frame design variations require changes to modification to
the window for safe, proper installation. If assistance is needed, please call your local Carrier
Distributor. If there is no distributor in your area, call 1-800-CARRIER (227-7437).

1
2
3
4
5
6
7
8
9
10
11
12
RECEIVING THE AIR CONDITIONER
GETTING ACQUAINTED WITH THE AIR CONDITIONER
AIR CONDITIONER WITH REMOTE CONTROL
OPERATING THE ELECTRONIC UNIT WITH THE REMOTE CONTROL
OPERATING UNIT FROM THE CONTROL PANEL
(WITHOUT THE REMOTE CONTROL)
AIR DIRECTION AND EXHAUST CONTROL
TIPS TO ACHIEVE MAXIMUM EFFICIENCY AND COMFORT
WHERE AND HOW TO INSTALL THE AIR CONDITIONER TO
ACHIEVE A BETTER PERFORMANCE
DRAIN SYSTEM OPTIONS
SAFETY INSTRUCTIONS
MAINTENANCE AND PRESERVATION
PRACTICAL SOLUTIONS
INDEX
INDICE / INDICE
4
5
6
7
11
12
13
14
17
22
22
24

1. RECEIVING THE AIR
CONDITIONER
Read the instructions in the User's Manual.
Keep the Manual. It is always useful.
Unpack the unit.
Check if the unit exterior is in perfect condition.
Check if the items provided with the unit are inside the
box.
1 - User's Manual
2 - Seal
3 - Drain pan
4 - Screws (4)
5 - Remote control and batteries
6 - Rear drain
In case there is any damage, or if one of the mentioned
items is missing, contact the store that sold it to you.
4
For your safety wear gloves.
NOTE
The window installation accessory kit
comes with cooling only units.
NOTE
5
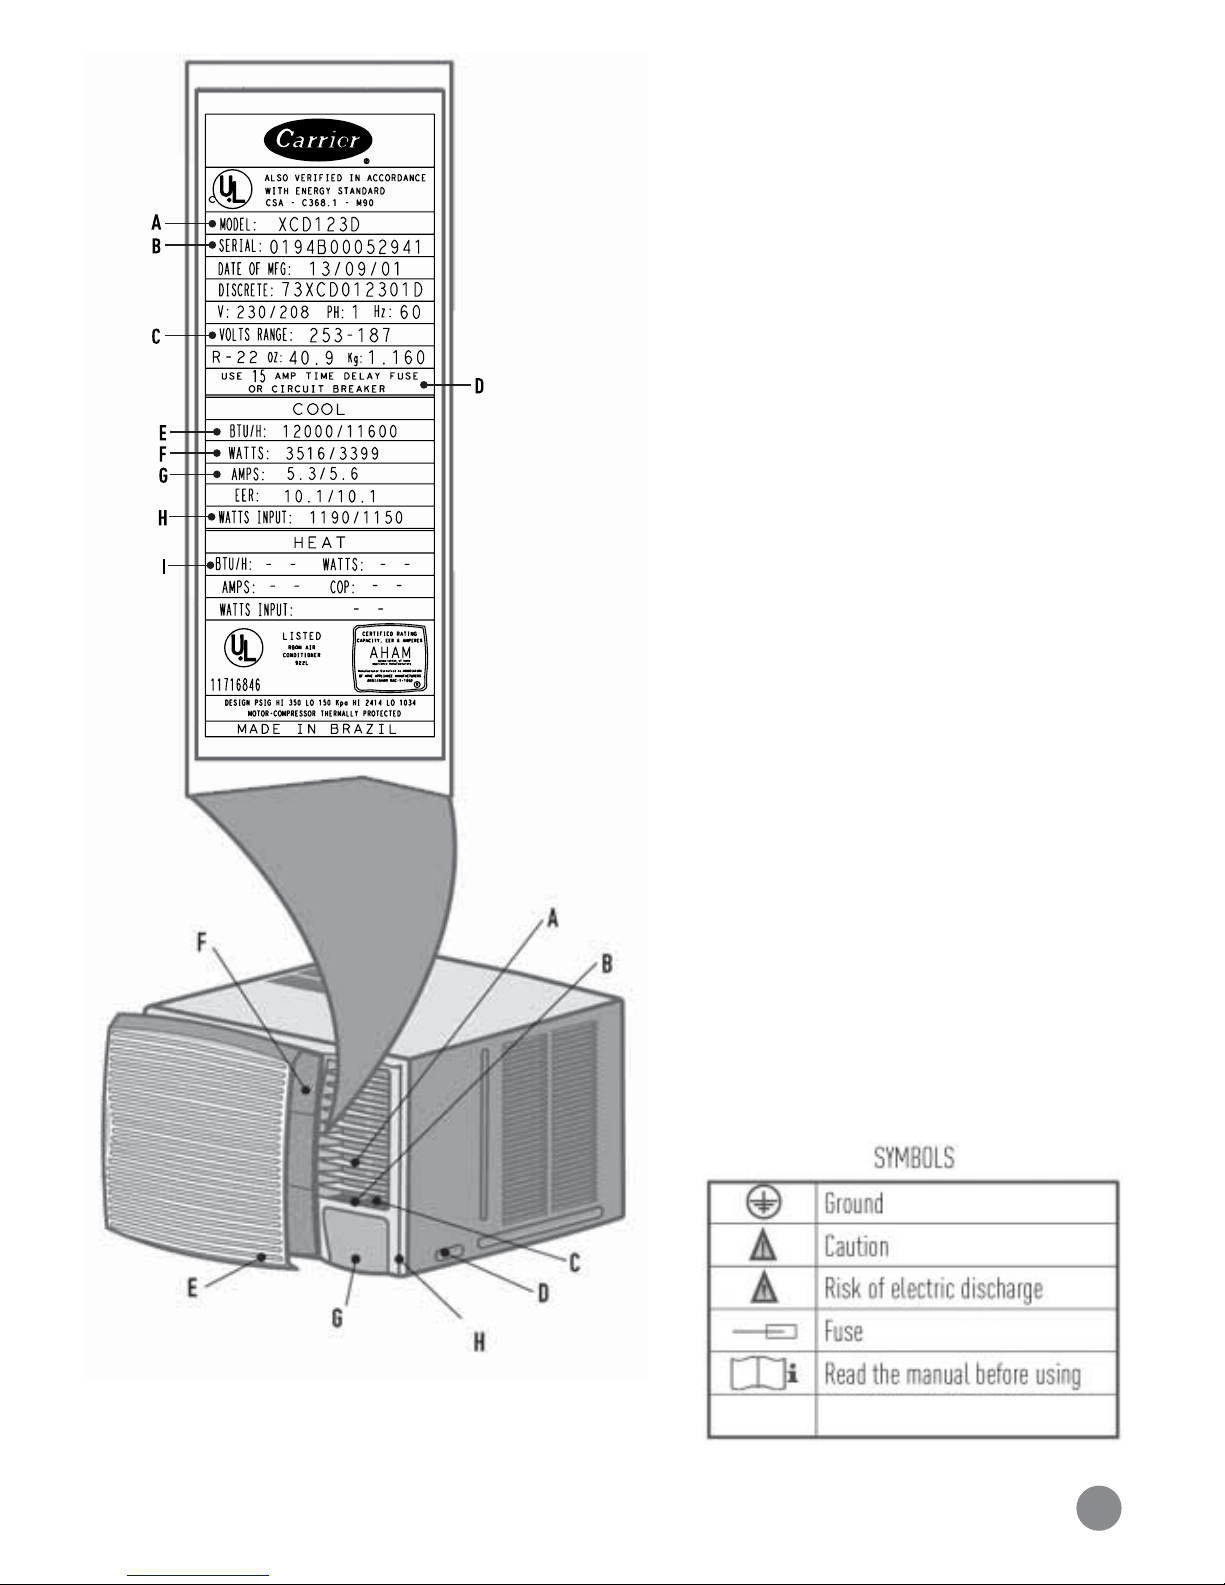
2. GETTING ACQUAINTED WITH THE
AIR CONDITIONER
Check the appliance technical characteristics on the
nameplate.
Cabinet
A - Horizontal louvers for the air flow
B - Vertical louvers for the air flow
C - Air exhaust control
D - Safety screws (both sides)
E - Filter cover
F - Filter
G - Control panel
H - Front Grille
Nameplate
A - Model
B - Serial number
C - Voltage (V)
D - Circuit Breaker (A)
E - Cooling capacity (Btu/h and W)
F - Power consumption (W)
G - Current (A)
H - Power efficiency (W/W)
I - Heating capacity (Btu/h and W)

6
3. AIR CONDITIONER WITH REMOTE CONTROL
Control panel
Main display (indicates the selected temperature or mode)
In order to change the temperature unit from Celsius to Fahrenheit degrees, or vice-versa,
simultaneously press the Select button and (+) for 3 seconds on the control panel.
On/Off
Energy Saver
Turbo mode
Heating mode
Temperature and Timer adjustment
Timer
Cooling mode
De-humidification mode
Fan mode
Speed setting
Sleep mode
Auto mode
1 - On/Off
2 - Filter cleaning indicator
3 - Timer on indicator
4 - Selector
Remote control
Turbo
NOTE

7
4. OPERATING THE ELECTRONIC
UNIT WITH THE REMOTE CONTROL
Insert two 1.5 V AAA batteries (supplied with the
electronic model unit), opening the cover on the rear
of the remote control.
Timer operation, turn the unit off or on at a
determined time (from 1 to 12 hours), press the Timer
button. If the unit is off, after the programming, it will
turn on at the end of the set time. If it is on, it will
turn off at the end of the period.
In order to set the time to turn on and off, press the
buttons (+) or (-) until the desired time (in number of
hours) is achieved.
When this function is activated, the corresponding
indicator remains lit on the panel.
The battery useful life is around one year.
Use only new batteries. Use only specified batteries.
To turn on or off the unit, press the On/Off button.
The unit "beeps" every time an
operation is activated.
NOTE
The unit display will turn off 5 minutes
after the mode is activated, and the Timer
indicator will remain lit.
NOTE

To increase or reduce the temperature in the room,
press the buttons (+) or (-), as required.
To display the room temperature, press buttons (+)
and (-) simultaneously for 3 seconds.
These buttons set the time hour by hour, up to 12 hours.
8
When this function is activated, the letter is displayed
on the panel.
To cool, press the Cooling mode button.
To heat, press the Heating function button.
When this function is activated, the letter
is displayed
on the panel.
To cancel this function, press the Timer
button again, and set the time to zero.
NOTE
The temperature ranges from 18ºC / 65°F
to 32ºC / 90°F. To set the maximum or the
minimum, the unit beeps twice.
NOTE
Only for models with heat feature.
NOTE

9
When this function is activated, the letter is displayed
on the panel.
In order to circulate air (without cooling or heating),
press the Fan button.
When this function is activated, the letter
is displayed
on the panel.
To automatically adjust the unit according to the room
temperature variations, alternating between cool and
heat and high, medium or low speed, activate the Auto
mode.
The speed can be selected among one of the three
existing levels.
To set the fan speed, press the fan speed button.
The selected speed (air flow) will be indicated on the
control panel as follows:
To eliminate the air humidity in the room, press the
De-humidification button. This function gradually
removes the room humidity, with little changes to the
temperature, providing more comfort.
When this function is activated, the letter
is displayed
on the panel. The unit will always operate in low cooling.
The Fan Function only circulates the air in
the room.
NOTE
 Loading...