


Models 58PAP and 58RAP
Induced-Combustion Furnaces
NOTE TO INSTALLER:
This manual must be left with the equipment user.
WARNING; If the information in this manual
is not followed exactly, a fire or explosion may
result causing property damage, personal in
jury or loss of life.
Do not store or use gasoline or other flam
mable vapors and liquids in the vicinity of
this or any other appliance.
WHAT TO DO IF YOU SMELL GAS:
• Do not try to light any appliance.
• Do not touch any electrical switch; do not
use any phone in your building.
• Immediately call your gas supplier fi*om a
neighbor's phone. Follow the gas sup
plier's instructions.
• If you cannot reach your gas supplier, call
the fire department.
Installation and service must be performed
by a qualified installer, service agency or
the gas supplier.
USER'S INFORMATION MANUAL FOR
THE OPERATION AND MAINTENANCE
OF YOUR NEW GAS-FIRED FURNACE
GAS FURNACES
WELCOME TO A NEW GENERATION OF COMFORT
Congratulations! Your new, 78% efficient gas furnace is a sound
investment which will reward you and your family with years of
warm memories winter after winter.
Not only is your new furnace energy efficient, it is also ex
tremely reliable. Spend just a few minutes with this booklet to
learn about the operation of your new famace—and the small
amount of maintenance it takes to keep it operating at peak ef
ficiency. Years went into the development of your new fiimace.
Thke a little time now to assure its most efficient operation for
years to come.
- ‘i
A90110
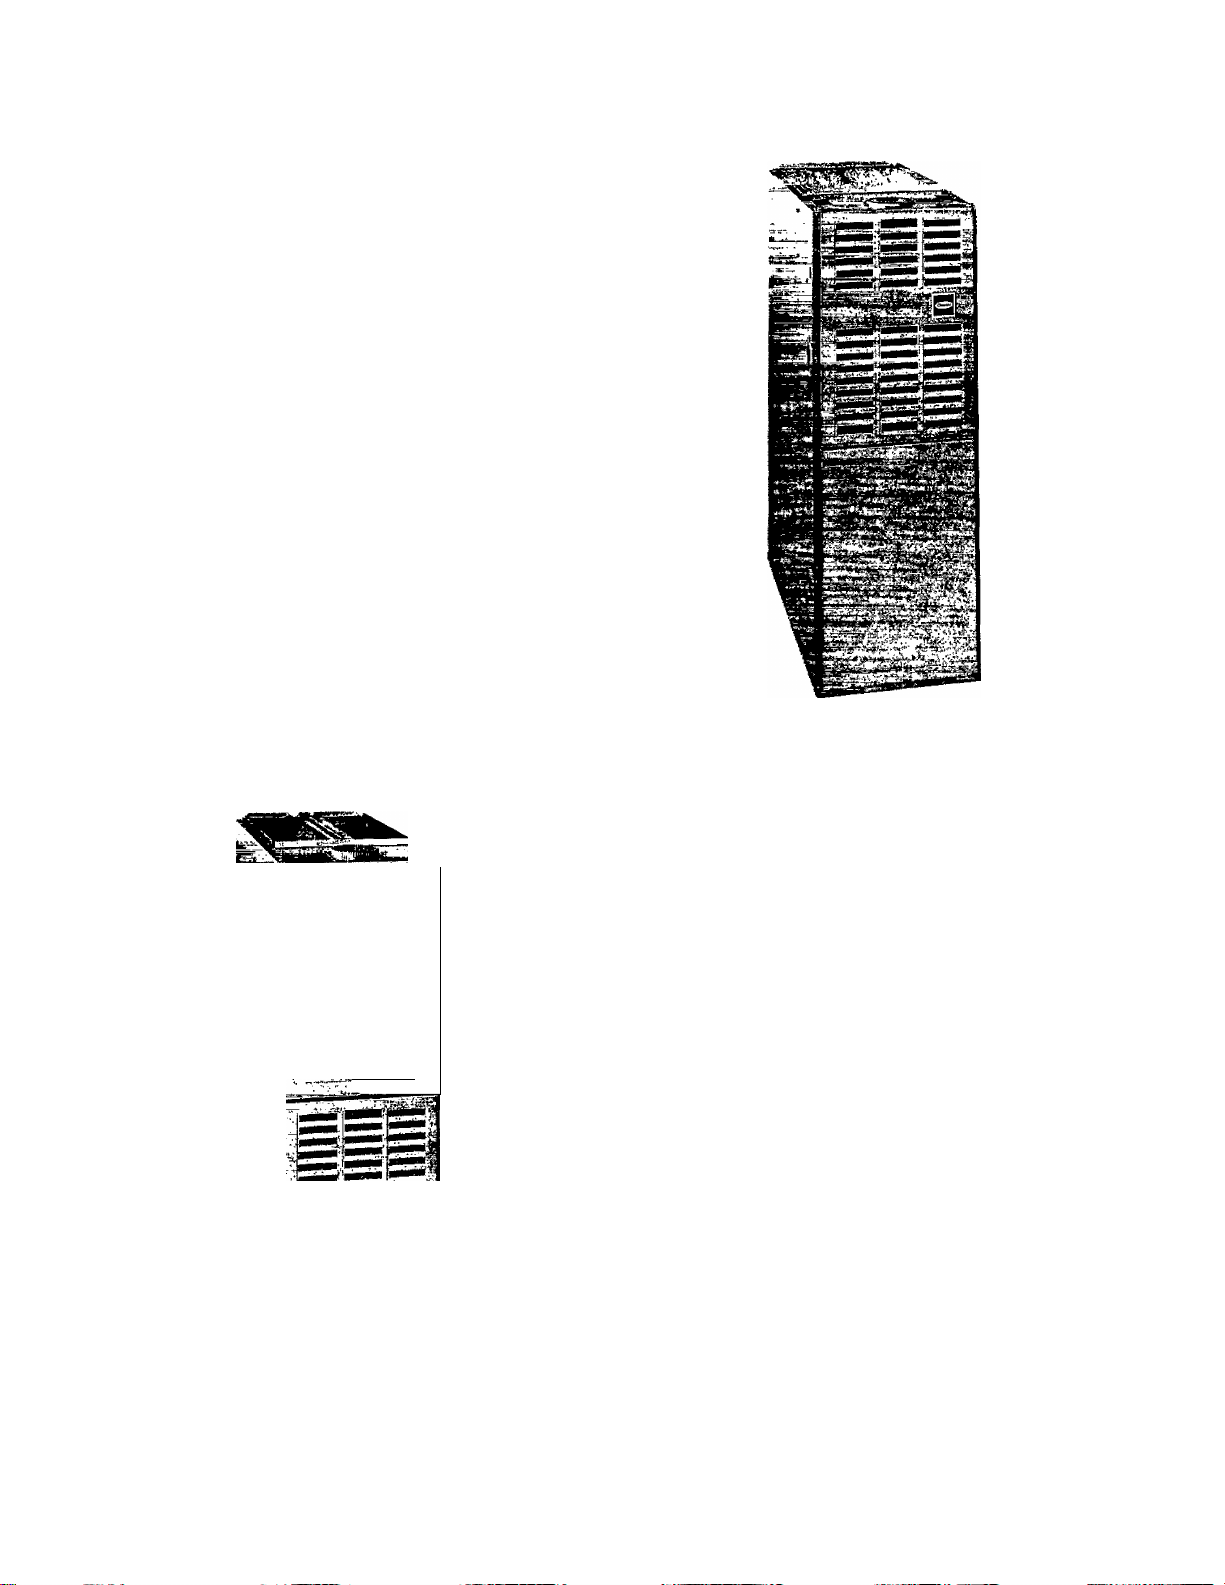
MODEL 58PAP
UPFLOW FURNACE
■;k
'K:
^ ^ V
fl
FURNACE IDENTIFICATION
For your convenience, record the product and serial numbers of
your new furnace on the form below. Should you ever require
service, you will have ready access to the information needed by
the service representative.
Product No.
Serial No
(■:
__
Date Installed.
A90109
MODEL 58RAP
DOWNFLOW FURNACE
WA
Dealer Name _
Address
City
_____
------------
State,
Telephone.
Zip.

IMPORTANTI IMPORTANT!
Please Fill Out And Return Within The Next 10 Days.
• 1. □ Mr. 2. □ Mrs. 3. □ Ms. 4. □ Miss
Hrst Name Initial Last Name
I I I 1 I I I I 1 I I u I I 1 I I I I I 1 1 I 1 1 I I I
street Apt No.
I ( I I I J I I i M 1 1 I I I I I i I I i i I 1 i I I
City State ZIP Code
....................................................................1 -1 I J 1 ..I
Date of Installation;
O Important! For proper registration, please fill in the model
number, and serial number of this product:
A. Model Number.
Month
Day
Year
! i I I I I I I I I 1 I i - l 1 i I
B. Serial Number:
M 1 I M I 1 1 I I I I I I 1 1
O Date of birth of person
whose name appears above;
Excluding yourself, what is the and AGE (in years) of children and other adults tiving in your household?
1. □ No one else in household
Male Female Age
1, □ 2, □ I
1. □ 2. □ L_l
---1_
!
1
years
years
Month
1. □
1. □
1 9
Year
Female Age
2. □ I
_ _
2. □
1 —I years
I years
O What type of product is this?
1. □ Central Air Conditioner
2. □ Gas Furnace
3. O Oil Furnace
4. □ Electric Furnace
5. □ Heat Pump
O A. Price paid for this product (excluding [nstatfatien charges and sales tax):
$ !__I
___I___I___\___
B. Price paid for installation;
I .00
■tl 1 I I l_l.nn
O Name of company that sold you this product;
Mill
9 When did you acquire your product?
1. □ Upon purchase of a new dwelling.
2. □ To replace an older system of the same brand,
3. □ To replace an older system of another brand.
4. □ Within a year after purchasing a dwelling with no central air.
5. □ 2-4 years after buying a dwelling with no central air system.
6. □ Over4yearsafter buying a dwelling with no central air system.
O If you replaced an older system, approrumately hovr old was that system?
1. □ Don't know 4. □ 9-11 years 7. □ 18-20 years
2. □ 1-5 years S. □ 12-14 years 8. □ 21-24 years
3. O 6-S years 6. □ 15-17 years 9, □ Over 24 years
O It this is a replacement, what brand did you previously own?
о
1. □ Amana 6. O Janitrol 11. □ Snyder
2. □ Bryant 7. □ Lennox 12, □ Tempstar
3. □ Carrier 6. □ Payne 13, □ Trane
4. □ Day & Night 9. □ Rheem 14. □ York
5. □ Hetl 10. □ Ruud 15. □ Other______
What factors most influenced your selection of this product? (Check a maximum of two.)
1. □ Brand reputation
2. □ Dealer reputation
3. □ Previous experience with products
of this brand
4. □ Previous experience with this dealer
5. □ Price
...................
I I ! ! M
6, □ Energy efficiency
7, □ Locahon of dealer
8, □ Dealer's installation policy
9, □ Friend’s/relative’s recommendation
10. □ Contractor’s/dealer's recommendation
11. □ Other
Marital Siabis:
1. □ Married
2. □ DTvorcedfSeparated
Occupation: You Spouse
Homemaker
Professional/Technical
Upper Management/Execirtive
Middle Management.................................................................................................. □ 4. □
Sale si Marketing
Cterleal or Service Worker..............................................
Thadesman/Machine Oper./Laborer........................................................................ □ 7. □
Retired
Student
Self EmployediBusiness Owner............................................................................... □ 10. □
ig Which group describes your annual family income?
1. □ Under $15.000 7, □ $40,000-$44,999
2. □ $15,000-519.999 8. □ $45,000-$49,999
3. □ $20.000-$24,999 9. □ $50,000-859,999
4. □ $25,000-$29,999 10. □ S60,000-$74,999
5. □ $30,000-$34,999 11. O $7S,000-$99,999
6. □ $35,000-$39,999 12. O $100,000&over
Education; (please check those which apply) Spouse
Some High School or Less
Completed High School........................................................................................... O 2. □
Vocational/Technical School..............................................................................................3, □
Some College
Completed College ................................................
Some Graduate School □ 6. D
Completed Graduate School
9 Which credit cards do you use regularly?
1. □ American Express, Diners Club
2, □ MasterCard, Visa, Discover
3, □ Department Store, Oii Company, etc,
4. □ Do not use credit cards
® For your primary residence, do you:
1. □ Own a House?
2. □ Own a Townhouse or Condominium?
3. □ Rent a House?
4. D Rent an Apartment, Townhouse or Condominium?
..................
..............................................
....
.....................
.............................
...............................................................................................
.......................................
............................
....
................................................................................................................ 4. □
...
.................................................
...
........................
....
...................................................................................
....................
3. D Widowed
4. D Never Married (Single)
....................................................
1. O
...
..............................................
..............................
.................. ..
..........................................................................7, □
........................................P 9. □
...
...........................................
8. □
...
. . . □ 2. □
...
...
. , O 6. □
□ 3. □
. O 5. □
O 1. □
...
. □ 5. □
To help us understand our customers’ lifestyles, please indicate the interests and activitiss in which you or your spouse enjoy participating on i
oB '
■sl
-I
Ш 1
о 1
01. □ Bicycling Frequently
02. □ Golf
03. □ Physical Fitness/Exercise
04. □ Running/Jogging
05. □ Snow Skiing Frequently
1
05. □ Tennis Frequently
07, □ Camplng/Hiking
i
08, □ Fishing Frequently
09, □ HuntingfShooting
[
10, □ Power Boating
I
1
11. □ Sailing
12. □ House Plants
1
13. O Grandchildren
t
I Using the numbers in the above list, please
indicate the 3 most important activities for.
I Please check all that apply to your household:
1, □ Regularly Purchase items
Through the Mail
2. □ Military Veteran in Household
Thanks (or taking the time to fill out this questionnaire. Your answers will be used (or market research studies and reports — andwii help us better serve you in the future. They will also allow you to receive Important mailings arid
spedal oilers from a rrumber of fine companies whose products and services relate directly to the specitic interests, hobbies, and other Inforrrration indicated above. Through this selective program, you will be able to obtain more
Information about acitivities In which you are Involved and less about those In which you are not. Please check here if, (or some reason, you would prefer not to participate in tnls opportunity. □
If ygu have comments or suggestions about our product please write to; Carrier
14. 3 Needlework/Khitting
15. □ Vegetable Gardening
16. □ Rower Gardening
17. □ Sewing
18. □ Crafts
19. □ AutomoCve Work
20. □ Electronics
21. □ Home Workshop/Do It Yourself
22. □ Recreational Vehicles
23. n Stereo. Reoordsi/Tapes/CDs
24. □ Buy Pre-Recorded Videos
25. □ Avid Book Reading
26. □ Bible/Devotional Reading
You L
3. □ Member of Frequent Flyer Program
4. □ Support Health Charities
5. □ Subscribe to Cable TV
Consumer Relations Department
P.O. Box 4808
Syracuse, NY 13221
or call 1-800-C-A-R-R-l-E-R
27. □ Health/Natural Foods
28. □ Photography
29. □ Home Furnishing/Decorating
30. O Attending Cultural/Arts Events
31. D Fashion Clothing
32. D Fine Art/Antiques
33. □ Foreign Travel
34. □ Travel in the USA
D Gourmet Cooking
36. □ Wines
37. □ Coin/Stamp Collecfing
38. □ Collectibies/Collections
Spouse L_UL_UU_J
6. □ Have a Microwave Oven
7. □ Have a CD Player
8. □ Have a VCR
39. □ Dor Nation’s Heritage
40. □ Heal Estate Investments
41. □ Stock/Bond Investments
42. D Entering Sweepstakes
43. □ Casino Gambling
44. □ Science Fiction
45. □ Wildlife/Environ mental Issues
46. □ Diehng/Weight Control
47. □ Science/New Technology
48. □ Self Improvement
49. □ Walking for Health
50. □ Watching Sports on TV
9. □ Use a Personal Computer
10. □ Have a Dog
11. D HaveaCat

STAPLE OR TAPE HERE
Please send products and other correspondence to:
Carrier
Consumer Relations Department
RO. Box 4808
Syracuse, NY 13221
P O BOX 173244 DENVER CO 80217-3244
FOUl HERE
PLACE
FIRST-CLASS
STAMP
HERE

UPFLOW FURNACE COMPONENTS
m
m
m
m
s
m
E
E
E
¡m
Relief Box
Gas Valve Control Knob (On, Pilot, Off)
Gas Valve
Gas Burner
Pilot Burner and Thermocouple
Blower Door Safety Switch
Blower and Blower Motor
Draft Safeguard Tlibe and Switch
Rating Plate (Behind Junction Box)
Gas Manifold
Filter Retainer
Air Filter
A92180
DOWNFLOW FURNACE COMPONENTS
I 1 I
Manual-Reset Auxiliary Limit Switch (Behind
Enclosure)
i 2 I Blower and Blower Motor
I
3 i Relief Box
I 4 I
Rating Plate
i 5 I Gas Valve Control Knob (On, Pilot, Off)
I 6 I
Gas Valve
I 7 I
Gas Burner
A92181
I 8 ~ |
Blower Door Safety Switch
\ 9 i Draft Safeguard Tbbe and Switch
1101 Gas Manifold
i 11~| Pilot Burner and Thermocouple

IMPORTANT FACTS
Your furnace must have adequate airflow for efficient combus
tion and safe ventilation. Do not enclose it in an airtight room
or “seal” it behind solid doors, lb minimize the possibility of
serious personal injury, fire, damage to your furnace, or im
proper operation, carefully follow these safety rules:
• Keep the area around your furnace free of combustible mate
rials, gasoline, and other flammable liquids and vapors.
• Do not cover the furnace, store trash or debris near it, or in
any way block the flow of fresh air to the unit.
• Combustion air must be clean and uncontaminated with
chlorine or fluorine. These compounds are present in many
products around the home, such as: water softener salts, laun
dry bleaches, detergents, adhesives, paints, varnishes, paint
strippers, waxes, and plastics.
Make sure the combustion air for your furnace does not contain
any of these compounds. During remodeling be sure the com
bustion air is fresh and uncontaminated. If these compounds
are burned in your furnace, the heat exchangers and metal vent
system may deteriorate.
Untrained personnel can perform basic maintenance function.^
such as cleaning and replacing air filters. All other operations
must be performed by trained service personnel. Observe safety
precautions in this manual, on tags, and labels attached to the
furnace and other safety precautions that may apply.
Recognize safety information: This is the safety-alert symbol
A. When you see this symbol on the furnace and in instruc
tions or manuals, be alert to the potential for personal Injury.
Understand the signal word^—DANGER, WARNING, or CAU
TION. These words are used with the safety-alert symbol.
DANGER identifies the most serious hazards which will result
in severe personal injury or death. WARNING signifies hazards
that could result in personal injury or death. CAUTION is used
to identify unsafe practices, which would result in minor per
sonal injury or product and property damage.
STARTING YOUR FURNACE
Your furnace is equipped with a continuously burning pilot
flame.
• This manual ignition system requires the pilot to be matchlit by hand.
• Read and follow the operating instructions on the furnace,
especially the item that reads as follows:
Wait 5 minutes to clear out any gas. Then smell for gas, includ
ing near the floor. If you smell gas, STOP! Follow “B” in the
safety information above on this label. If you don’t smell gas, go
to the next step,
A92182
• A furnace installed in the attic or other insulated space must
be kept free and clear of the insulating material. Examine the
furnace area when installing the furnace or adding more insula
tion. Some materials may be combustible.
NOTE: Do not use this furnace if any part has been under wa
ter. Immediately call a qualified service technician to inspect
the furnace and to replace any part of the control system and
any gas control which has been under water.
NOTE: The qualified installer or agency must use only factory-
authorized replacement parts, kits, and accessories when modi
fying or repairing this product.
This furnace contains SAFETY DEVICES which must be
closed. If the furnace is left unattended for an extended period
of time, have it checked periodically for proper operation. This
precaution will prevent problems associated with NO HEAT,
such as frozen water pipes, etc. See “Before You Request a Serv
ice Call” section in this manual.
SAFETY CONSIDERATIONS
Installing and servicing heating equipment can be hazardous
due to gas and electrical components. Only trained and quali
fied personnel should install, repair, or service heating
equipment.
• If a suspected malfunction occurs with your gas control sys
tem, such as the pilot not lighting when it should, refer to the
shutdown procedures on the furnace or in the next section to
turn off your system, then call your service dealer as soon as
possible.
A WARNING
Should overheating occur, or the gas valve fail to shut off
the gas supply, turn off the external manual gas valve to
the furnace BEFORE turning off the electrical supply. (See
Fig. 7.) A failure to follow this warning could result in a fire
or explosion, and personal injury or death.
• CHECK AIR FILTER: Before attempting to start your fur
nace, be sure the furnace filter is clean and in place. (See the
maintenance section of this manual.) Then proceed as follows:
STEPS FOR STARTING YOUR FURNACE
Refer to the lighting instruction label affixed to the furnace
blower access door.
1. Set your room thermostat to the lowest temperature set
ting. (See Fig. 6.)
2. Close the external manual gas valve. (See Fig. 7.)
3. Thm OFF the electrical supply to your furnace. (See
Fig. 8.)
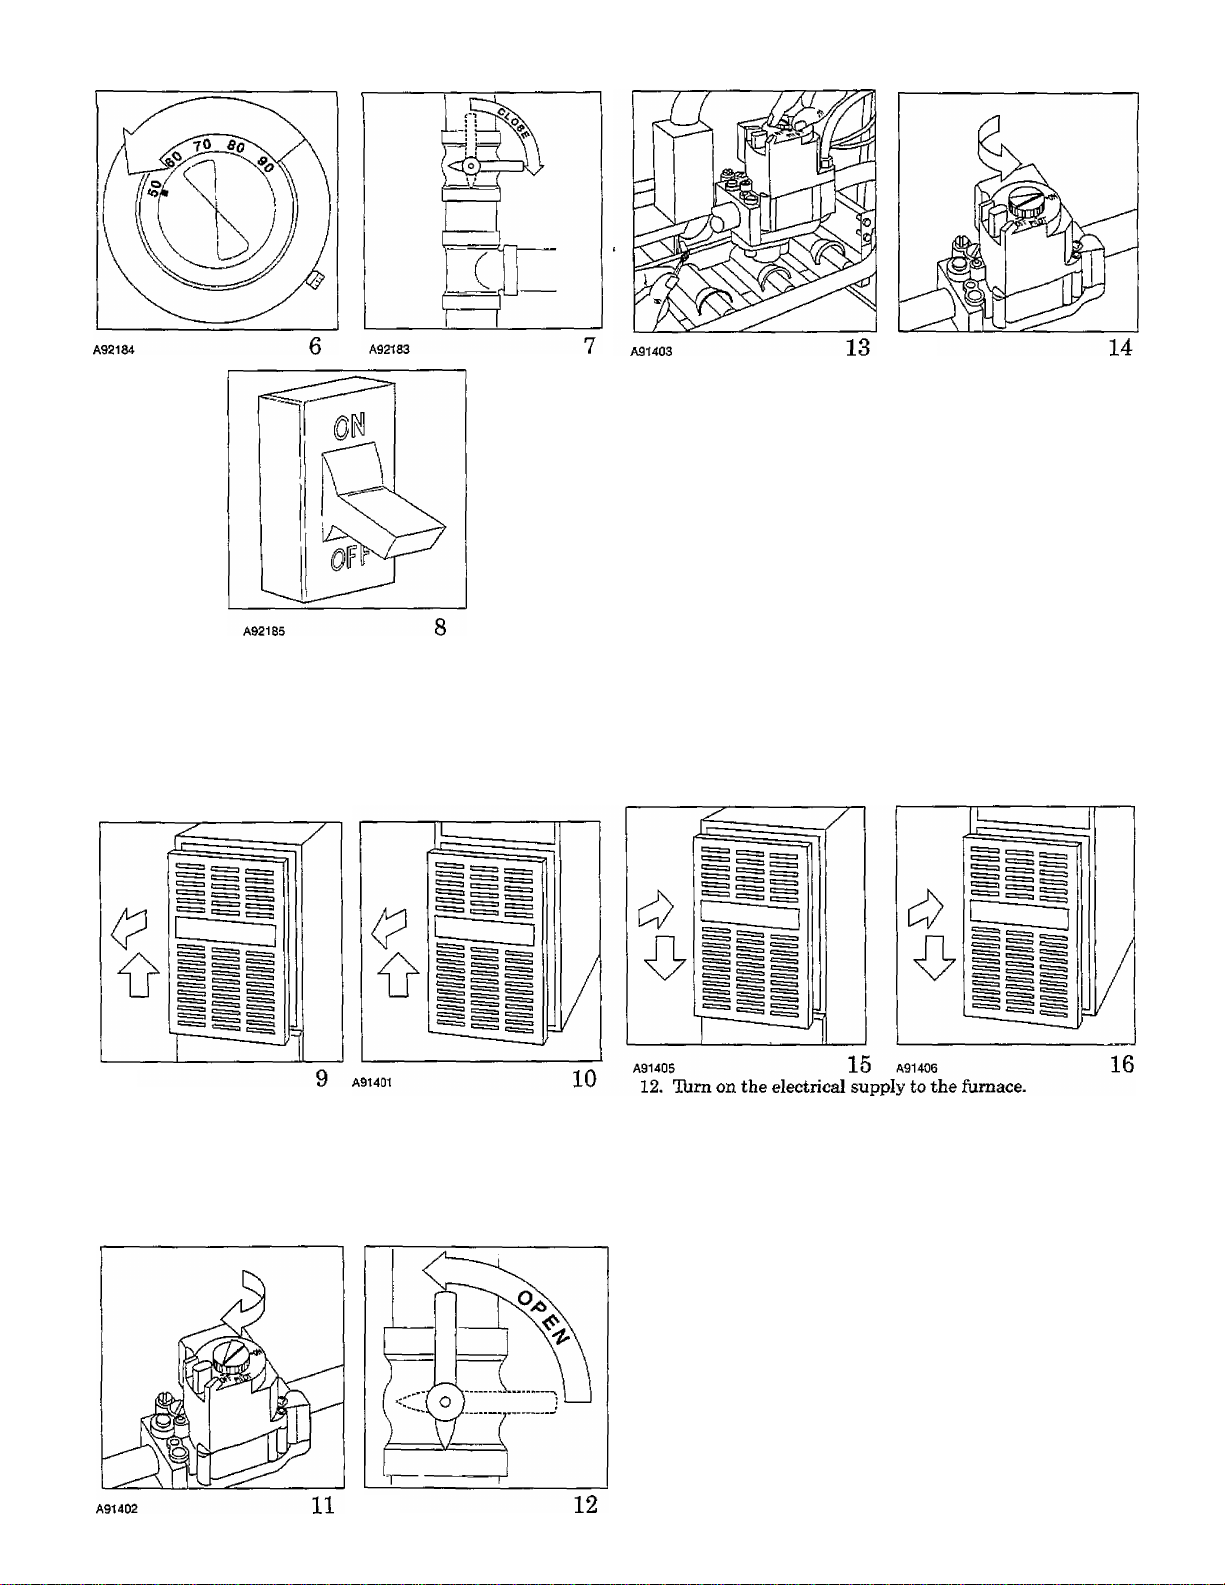
4. Remove the furnace access door(s).
a. Upflow—remove control door. (See Fig. 9.)
b. Downflow—remove blower door after removing 2
screws first, then remove the control door. (See Fig. 10.)
Reinstall the blower door.
NOTE: The blower door must be installed to permit furnace
operation.
A91404
7. TUrn the control knob on the internal gas valve to the
PILOT position.
8. Place a lighted match or other suitable source of flame
near the top of the pilot. (See Fig. 13.)
9. Depress the button or knob and hold it down. The pilot
will light. Remove and extinguish the match while contin
uing to hold the button or knob down for at least 60 sec,
then release. The pilot will remain lit.
NOTE: If pilot does not stay lit, repeat steps 5 through 9; how
ever, hold the button down for a longer period of time (at least
90 sec). If the pilot flame is extinguished after this second at
tempt, the thermocouple should be checked for a possible mal
function. Call your dealer for service.
10. After the pilot flame is established, turn the control knob
on the gas valve to the ON position.
11. Replace the access door. (See Fig. 15 or 16.) For downflow
furnaces, remove the blower access door, install the con
trol access door, then reinstall the blower access door and
secure with 2 screws.
A91400
5. Tkm the control knob on the internal gas valve clockwise
to the indicated OFF position. Wait 5 minutes for any ex
pelled gas to dissipate. (See Fig. 11.)
6. After waiting 5 minutes, open the external manual gas
valve. (See Fig. 12.)
A92186
13. Adjust the room thermostat to a setting slightly above
room temperature. This will automatically signal the fur
nace to start.
14. Furnace main burners should light shortly after you set
the thermostat. After you verify that the burners are lit,
you may adjust the room thermostat to your own personal
comfort setting. If the burners fail to light, shut down your
furnace and call your dealer for service. Refer to the light
ing instruction label affixed to your furnace blower access
door or page 8 for shutdown procedures.
NOTE: lb conserve energy when the heating season has ended,
you should shut down your manually ignited pilot. Follow the
procedures in the “Shutting Down Your Furnace” section of
this manual.
SUGGESTION: Setting the thermostat back a few degrees—
and compensating for the difference with warmer clothing—
can make a big difference in your fuel consumption on ex
tremely cold days. The few degrees at the top of your thermostat
“comfort level” are the most costly degrees to obtain.
When the room temperature drops below the temperature se
lected on the thermostat, the himace will be switched on auto
matically. When the room temperature reaches the degree
selected on the thermostat, the furnace will be automatically
switched off.
Some thermostats have a “fan” switch with 2 selections: AUTO
or ON. When set on AUTO, the furnace blower cycles on and
off, controlled by the thermostat. In the ON position, the fur
nace blower runs continuously except for a 45-sec delay at the
“call for heat.” This keeps the temperature level in your home
more evenly balanced. It also continuously filters the indoor
air.
SHUTTING DOWN YOUR FURNACE
Once the heating season has ended, or if you ever suspect a mal
function, you’ll want to turn your furnace off. The following
procedures and the procedures on the lighting/operating in
structions label on your furnace must be followed:
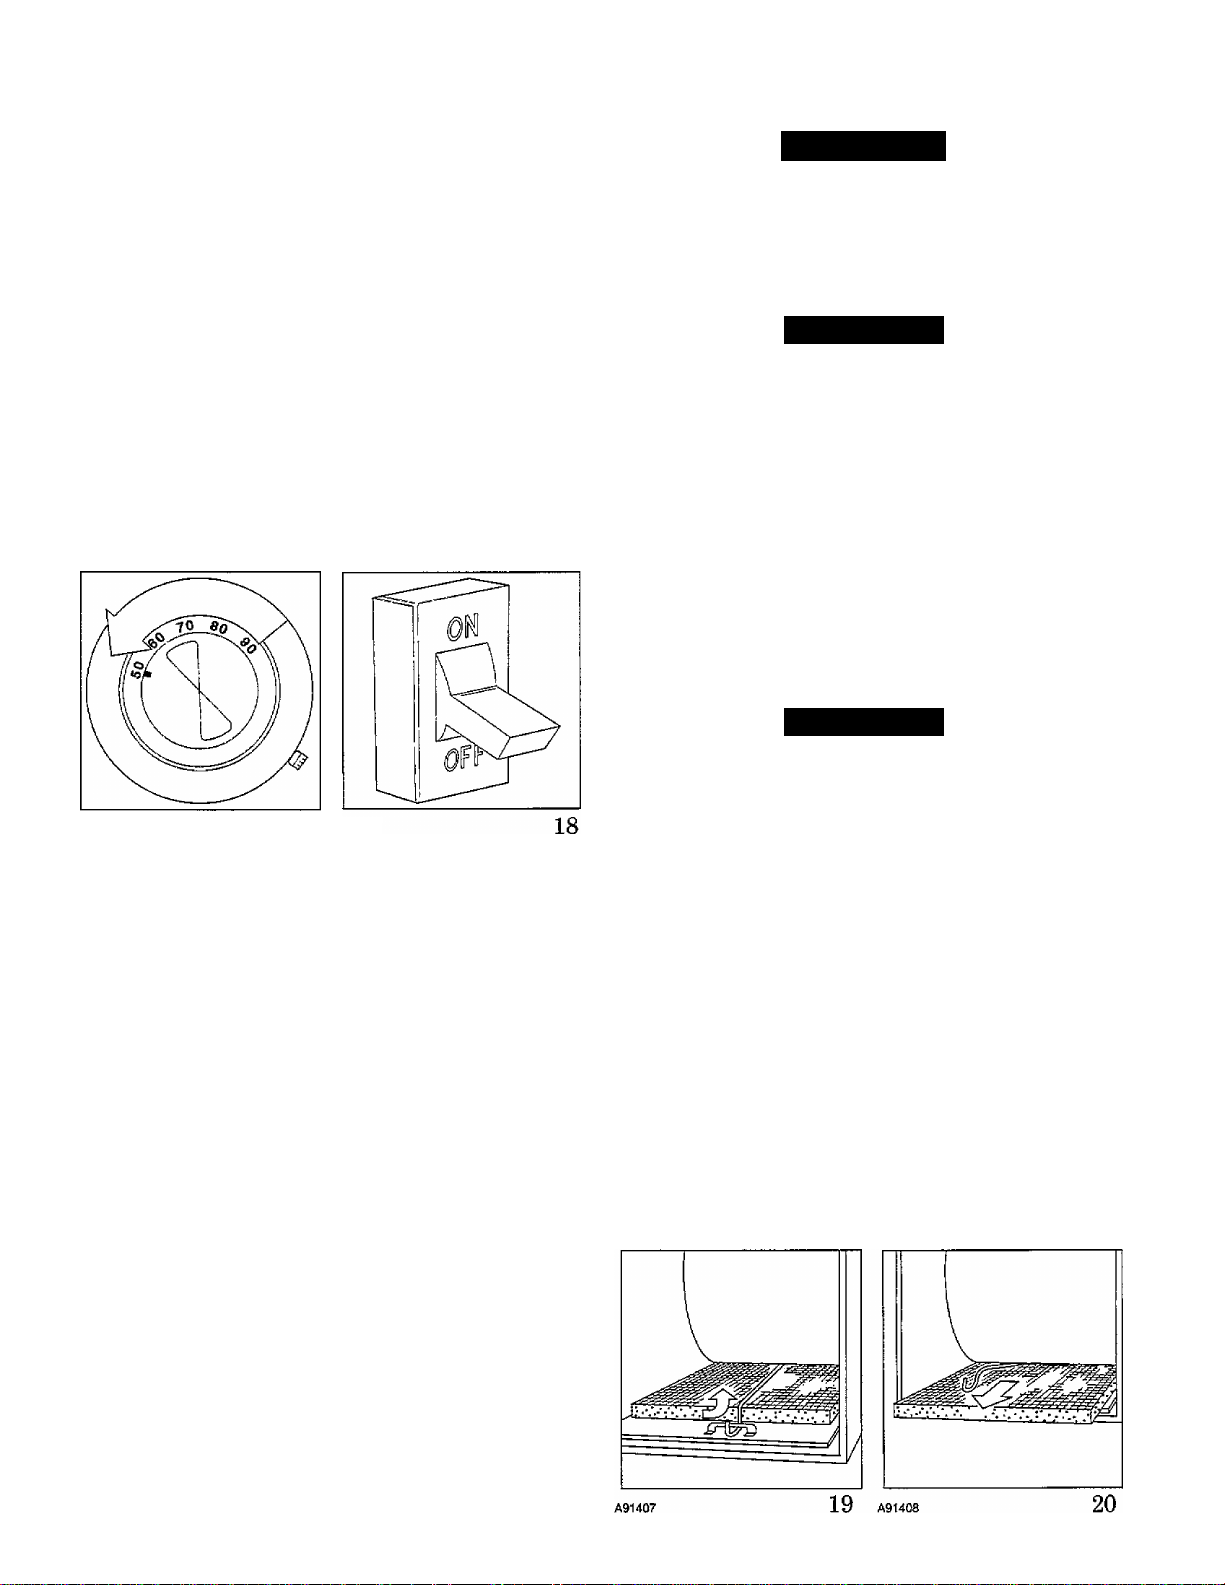
1. Set your room thermostat to the lowest temperature set
ting. (See Fig. 17.)
2. TUm OFF the electrical supply to your furnace. (See
Fig. 18.)
on this and the following pages. However, before beginning
maintenance, follow these safety precautions:
A WARNING
TURN OFF ELECTRICAL POWER SUPPLY TO YOUR
FURNACE BEFORE REMOVING THE ACCESS
DOORS TO SERVICE OR PERFORM MAINTE
NANCE. A FAILURE TO FOLLOW THIS WARNING
COULD RESULT IN PERSONAL INJURY OR DEATH.
A CAUTION
ALTHOUGH SPECIAL CARE HAS BEEN TAKEN TO
MINIMIZE SHARP EDGES, BE EXTREMELY CARE
FUL WHEN HANDLING PARTS OR REACHING
INTO THE FURNACE.
FILTERING OUT TROUBLE
A dirty filter will cause excessive stress on the fiimace blower
motor and can cause it to overheat and automatically shut
down. The furnace filter should be checked every 3 or 4 weeks
and cleaned if necessary.
If your furnace filter needs replacing, be sure to use the same
size and type of filter that was originally supplied. Use the fur
nace filter table (seepage?) and compare your furnace size with
the proper filter size.
A92184
3. Remove the access door(s) from your furnace. Lift up and
out at the bottom. (See Fig. 9 for upflow and Fig. 10 for
downflow furnaces.)
NOTE: The blower access door must be installed to permit fur
nace operation.
4. To shut off the burners but keep the pilot light burning,
turn the control knob of the internal gas valve to the PI
LOT position.
5. To shut off the complete gas control system (pilot and
burners), turn (and depress if required) the control knob
on the internal gas valve clockwise to the indicated OFF
position.
6. Close the external manual gas valve. (See Fig. 7.)
7. Replace the access door. (See Fig. 15 or 16.) On downflow
furnaces, remove the blower access door, install the con
trol access door, then reinstall the blower access door and
secure with 2 screws.
8. If the furnace is being shut down because a malfunction is
suspected, call your service dealer as soon as possible.
NOTE: Tb conserve energy when the heating season has ended,
you should shut down your manually ignited pilot.
If the furnace blower is to be used during the cooling season,
turn the control knob on the internal gas valve to OFF. Leave
the electrical supply to the furnace turned ON.
17 A92185
A CAUTION
NEVER OPERATE YOUR FURNACE WITHOUT A
FILTER IN PLACE.
Doing so may damage the furnace blower motor. An accu
mulation of dust and lint on internal parts of your furnace
can cause a loss of efficiency.
The air filter for upflow furnaces is normally located in the
blower compartment. Filters for the downflow furnaces are nor
mally located in the return-air plenum above the blower. If the
filters have been installed in another location, contact your
dealer for instructions. Tb inspect, clean and/or replace the air
filter(s), follow these steps:
• UPFLOW FURNACES ONLY:
1. Thrn OFF the electrical supply to the furnace. (See
Fig. 18.)
2. Remove control and blower access doors.
3. Push filter retainer toward the bracket opening to release
the filter. (See Fig. 19.)
4. Gently remove the filter and carefully turn the dirty side
up (if dirty) to avoid “spilling” dirt from the filter. (See
Fig. 20.)
PERFORMING ROUTINE MAINTENANCE
with the proper maintenance and care, your furnace will oper
ate economically and dependably. Basic maintenance, which
can easily be accomplished by following the directions, is found

5. Inspect the filter. If tom, replace the filter.
6. Wash the filter (if dirty) in a sink, bathtub, or outside with
a garden hose. Always use cold tap water. A mild liquid de
tergent may be used if necessary. Spray water through the
filter in the opposite direction of airflow (through the
cross-mesh binding side). Allow filter to dry.
7. Reinstall the clean filter with its cross-mesh binding side
facing the furnace blower.
8. Put filter retainer back in the bracket opening and lock it
in place.
9. Replace the blower and control access doors and turn ON
electrical power to your furnace. (See Fig. 15,16, and 21.)
NOTE: If side return ducts are used, two filters may be required
in some models. The procedure listed above may be used to re
move side filters.
• DOWNFLOW FURNACES ONLY:
TVo filters are located in the return-air plenum above the
blower (above line-of-sight) resting in the V-shaped channel on
top of the furnace. (See Fig. 22.)
1. lUrn OFF electrical supply to the furnace. (See Fig. 18.)
2. Remove blower access door after removing 2 screws.
3. Remove left side filter by tipping the filter top toward the
center—^raise it firom the V-shapped channel in which it
rests. (See Fig. 22 and 23.)
9. Replace blower door (secure with 2 screws) and turn ON
electrical power to your furnace.
UPFLOW FURNACE FILTER TABLE
FURNACE
CASING
WIDTH Side Return
14-3/16 (1) 16x25x1* (1) 14x25x1 Cleanable
17-1/2 (1)16x25x1* (1) 16x25x1 Cleanable
21
24-1/2
(1) 16 X 25 X 1 (1) 20 X 25 X 1* Cleanable
(2) 16 X 26 X 1 (1) 24 X 25 X 1* Cleanable
FILTER SIZE
Bottom Return FILTER TYPE
DOWNFLOW FURNACE FILTER TABLE
FURNACE
CASING WIDTH
14-3/16
17-1/2
21
24-1/2
* Factory provided with the furnace. Filter may be field modified
by cutting as required. Alternate sizes and additional filters
may be ordered from your dealer.
FILTER
SIZE
(2) 16 X 20 X 1*
(2) 16 X 20 X 1*
(2) 16x20x1*
(2) 16 X 20 X 1*
FILTER
TYPE
Cleanable
Cleanable
Cleanable
Cleanable
COMBUSTION AREA AND VENT SYSTEM
Inspect the combustion area and vent system before each heat
ing season. An accumulation of dirt, soot, or rust can mean a
loss of efficiency and improper performance. Buildups on the
main burners or pilot assembly can cause faulty firing. This
“delayed ignition” is characterized by an alarmingly loud
sound. If your furnace makes a loud noise when the main burn
ers are ignited by the pilot, shut down the furnace—call your
servicing dealer. Refer to the lighting instructions label on the
blower door for shutdown procedures.
Use your flashlight and follow these steps for inspecting the
combustion area and vent system of your furnace:
1. Thm off the electrical supply to the furnace and remove
the access doors. (See Fig. 8 and 9, or 10.)
2. Carefully inspect the gas burner (see Fig. 24) for dirt, rust,
or scale. Then, inspect the relief box, flue connection area,
and the vent pipe for mst.
A91411
A91410
4. Lower filter down along side of the blower and remove from
the furnace.
5. Tb remove the second filter, lift from V-shaped channel
and remove the same way as left side filter.
6. Inspect the filters. If tom, replace the filter.
7. Wash the filters (if dirty) in a sink, bathtub, or outside
with a garden hose. Always use cold tap water. A mild liq
uid detergent may be used if necessary. Spray water
through the filter in the opposite direction of airflow
through the cross-mesh binding side. Allow filter to dry.
8. Reinstall clean filters with the cross-mesh binding side
facing the furnace blower.
22
23
NOTE: If dirt, rust, soot, or scale accumulations are found, call
your servicing dealer. DO NOT OPERATE THE FURNACE.
3. Inspect the vent pipe for a sag, holes, or a disconnection. A
horizontal vent pipe must slope upward. If msty joints or
seams, or signs of water leakages are found call your dealer
for service.

A WARNING
If holes are found—or if the vent pipe is obstructed or is not
connected^—toxic fumes can escape into your home. DO
NOT OPERATE YOUR FURNACE. Call your dealer for
service. A failure to follow this warning could result in per
sonal injury or death.
4. Replace the access doors and restore electrical power to
the furnace. Be sure bottom door flange is inside of the fur
nace casing. (See Fig. 15,16, and 21.)
5. Start the furnace and observe its operation. If possible,
watch the burner flames. Are they burning bright blue? If
not (or if you suspect some other malfunction), call your
servicing dealer.
BEFORE YOU REQUEST A SERVICE CALL
BEFORE YOU CALL FOR SERVICE, CHECK FOR
SEVERAL EASILY SOLVED PROBLEMS:
□ Check for sufficient airflow. Check the air filter for dirt.
Check for blocked retum-air or supply-air grilles. Be sure they
are open and unobstructed. If this isn't the cause, call your
servicing dealer.
If your furnace isn’t operating at all, check the following list for
easily solved problems:
□ Is your thermostat set above room temperature? Is the
switch in the HEAT position?
O Is the electrical power supply switch ON? Is the blower ac
cess door firmly in place? Are any fuses blown—has a circuit
breaker tripped? (There is a fuse on the furnace control board.)
□ Is the manual shut-off valve in the gas supply pipe leading to
the furnace open? Does the lever point in the same direction
that the pipe runs (open)? Or is it at right angles (closed)?
NOTE: Before proceeding with the next checks, turn OFF the
electrical power supply to the furnace. Remove the control ac
cess door. The blower access door must be installed to permit
furnace operation. On downflow furnaces, the blower access
door must be removed before the control access door is re
moved, then reinstalled.
n Is the control knob on the gas valve turned to the ON posi
tion? If this or the preceding check shows an interruption in the
gas supply, make sure the gas has not been shut off for safety
reasons,
□ Check for pilot flame. If there is no pilot flame, follow the
manual start-up procedures or the furnace lighting instruction
label. If the pilot flame exists, check the control knob on the gas
valve. If the knob is in the PILOT position, turn it to ON and
complete the start-up procedures.
□ If for some reason the vent is blocked, the draft safeguard
switch will shut off the furnace. Reset the switch by pushing the
button located on top of the switch (see page 3 for switch
location).
If the switch trips a second time, turn off the furnace and call
for service.
□ DOWNFLOW FURNACE ONLY—Check the manual-reset
auxiliary limit switch located on the blower housing. If the
blower motor fails, this switch will shut off the furnace. Reset it
by pushing the button on the switch. If it trips again, turn off
the furnace and call for service.
□ If your fiimace still fails to operate, call your servicing dealer
for troubleshooting and repairs. Tell them the model and serial
numbers for your furnace. (You should have them recorded on
page 2 of this booklet.) If the dealer knows exactly which fur
nace you have, they may be able to offer suggestions over the
phone, or save valuable time through knowledgeable prepara
tion for the service call.
REGULAR DEALER MAINTENANCE
In addition to the type of routine maintenance you might be
willing to do, your fiirnace should be inspected regularly by a
properly trained service technician. An annual inspection (or
every other year, at least) should include the following:
1. Inspection of all flue product passages—including the
burners, pilot and pilot tube, heat exchanger, relief box,
and vent pipe.
2. Inspection of all combustion and ventilation air passages
and openings.
3. Close check of all gas pipes leading to (and inside of) your
furnace for leaks and/or deterioration.
4. Inspection, cleaning, and lubrication (when required) of
the blower motor and wheel.
NOTE: Refer to the unit service procedures for blower motor
oiling information. When required, the motor must be oiled by
a qualified service technician.
5. Routine inspection and cleaning/replacement of the air
filter.
6. Inspection of all supply- and retum-air ducts for obstmc-
tions, air leaks, and insulation. Any problems found
should be resolved at this time.
7. A check for loose connections attaching individual compo
nents. Inspection of all electrical wiring and their
connections.
8. Operational check of the furnace itself to determine work
ing condition. Repair or adjustment should be made at
this time.
9. Check the physical support around the furnace base for
cracks, gaps, sagging etc. Ensure there is a good air seal be
tween the furnace and support.
10. Check burner and pilot flames. Compare flames to Fig. 24
for proper operation.
Your servicing dealer offers an economical service contract that
covers seasonal inspections. Ask him for further details.

CARRIER CORPORATION
IF YOUR UNIT DOES NOT WORK, FOLLOW THESE STEPS IN ORDER:
FIRST: Contact the inst^ler. You may find his name on the ixoduct or in your
SECOND:
THIRD:
Homeowner’s Packet. If his name is not known, call your builder if
yours is a new residence.
Contact the nearest CARRIER distributor. (See telephone yellow pages.)
Contact:
CARRIER CORPORATION
Consumer Relations Department
RO. Box 4808
Syracuse, NY 13221
1-800-CARRIER (227-7437)
Unit Model No.,
Date of Installation.
Name of Owner
____
Unit Serial No..
Installed by
___
Address of Installation
Carrier Corporation
Indoor Gas-Fired Furnace Limited Warranty
LIMITED ONtYEAR WARRANTY—This CARRIER CORPORATION product is
warranted to be free from defects in material and workmanship under nor
mal use and maintenance for a period of one year from the date of original
installation, whether or not actual use begins on that date. A new or remanu
factured part to replace any defective part will be provided at CARRIER
CORPORATION’S sole option without charge for the part itself, PROVIDED
the defective part is returned to our distributor. This warranty applies only to
ttie product in its original installation location and is voided if the product is
reinstalled elsewhere.
THIS WARRANTY DOES NOT INCLUDE LABOR OR OTHER COSTS in
curred for diagnosing, repairing, removing, installing, shipping, servicing or
handling of either defective parts or replacement parts. SUCH COSTS MAY
BE COVERED by a separate warranty or service agreement provided by the
installer which is separate and disrinct from this factory wamanty,
EXTENDED NINE-YEAR UMITED WARRANTY ON HEAT EXCHANGER ONLY—During
the second through tenth years after the date of original installation, CAR
RIER CORPORATION further warrants the heat exchanger against defects
in material and workmanship under normal use and maintenance.
LIMITATION OF WARRANTIES—ALL IMPLIED WARRANTIES (INCLUDING IM
PLIED WARRANTIES OF MERCHANTABILITY AND FITNESS FOR A PAR
TICULAR PURPOSE) ARE HEREBY UMITED IN DURATION TO THE
PERIOD FOR WHICH EACH LIMITED WARRANTY IS GIVEN AND AP
PLIES. SOME STATES DO NOT ALLOW LIMITATIONS ON HOW LONG AN
IMPLIED WARRANTY LASTS, SO THE ABOVE LIMITATIONS MAY NOT
APPLY TO YOU. THE EXPRESSED WARRANTIES MADE IN THIS WAR
RANTY ARE EXCLUSIVE AND MAY NOT BE ALTERED, ENLARGED, OR
CHANGED BY ANY DISTRIBUTOR, DEALER. OR OTHER PERSON WHAT
SOEVER. ALL WORK UNDER THE TERMS OF THIS WARRANTY SHALL
BE PERFORMED DURING NORMAL WORKING HOURS. ALL REPLACE-
MENT PARTS, WHETHER NEW OR REMANUFACTURED, ASSUME AS
THEIR WARRANTY PERIOD ONLY THE REMAINING TIME PERIOD OF
THIS WARRANTY
CARRIER CORPORATION WILL NOT BE RESPONSIBLE FOR:
1. Normal maintenance as outlined in the installation and servicing instruc
tions or owner’s manual including filter cleaning and/or replacement and
lubrication.
2. Damage or repairs as a consequence of faulty installation or application
by others.
3. Failure to start due to voltage conditions, blown fuses, open circuit
breakers or other damages due to the inadequacy or interruption of elec
trical service.
4. Damage or repairs needed as a consequence of misapplication, abuse,
improper servicing, unauUiorized alteration or improper operation.
5. Damage as a result of floods, winds, fires, lightning, accidents, corrosive
environments or other conditions beyond the control of CARRIER COR
PORATION.
6. Costs for replacement parts or repair services which are not supplied or
designated by CARRIER and which are specifically covered under this
Warranty.
7. CARRIER CORPORATION products installed outside the continental
U.S.A., Alaska, Hawaii, and Canada.
8. Electricity or fuel costs or increases in electricity or fuel costs for any rea
son whatsoever, including additional or unusual use of supplemental
@]&CtrlO |l€3t
9. ANY SPECIAL, INDIRECT, OR CONSEQUENTIAL PROPERTY OR COM
MERCIAL DAMAGE OF ANY NATURE WHATSOEVER. Some states do
not allow the exclusion of incidental or consequential damages, so the
above limitation may not apply to you.
This warranty gives you specific legal nghts, and you may also have other rights which vary from slate to state.
Form No. 530-059 (New 5-90)

TO OBTAIN INFORMATION ON PARTS: Consult your installing dealer or classilled section of your local telephone directory under the
“Heating Equipment” or “Air Conditioning Contractors & Systems” headings for dealer listing by brand name.
Have availaUe the Model No., Seríes Letter & Serial Ho. of your equipment to insure correct lepiacement part
Carrier Corporation • Syracuse, New York 13221
Manufacturer reserves the right to discontinue, or change at any time, specifications or designs without notice and without incurring obligations.
Copyright 1992 Carrier Corporation Form: OM58-55 Replaces: OM58-49 Printed in U.S.A. 10 6-92 PC 101 Catalog No. 535-M8
 Loading...