

Page 1
Aquazone™ System Control Panel
Water Source Heat Pump Units
Installation Instructions
50RLP
CONTENTS
SAFETY CONSIDERATIONS
GENERAL
Aquazone System Control Panel Functionality
Stand-Alone Systems
CCN Systems Using PremierLink™ Controls
COMPONENTS
Aquazone System Control Panel Hardware
Water Source Heat Pumps with
PremierLink Controller Hardware
Field-Supplied Hardware
for Stand-Alone Systems
Field-Supplied Hardware for CCN Applications
INSTALLATION
Inspection
Mounting Location
Mounting
Wiring
Install Thermostat, Sensors and Switches
Install Loop Water Supply and Return
Temperature Sensors
Install Loop Water Pressure Sensor
Install Loop Water Flow Switch
Connect to CCN Communication Bus
START-UP
LID Power Up Display
Log On to the LID Display
Change the Default Password
Set the Clock
Configure Schedules
Program Set Points
Check System Parameters
Display Alarm History
Configure the Custom Programming Selections
Set the Aquazone System Control Panel
Controller Address
Log Off from Controller
LID Operation
Sequence of Operation
• HEAT REJECTION
• H EAT ADDITION
• WATER CIRCULATION
CONFIGURATION
Hardware Points
Software Points
Loop Supply Water Set Point
System Pressure Set Point
Global Dictionary
Heat Pump Default Configuration
Cool Source Default Configuration
Heat Source Default Configuration
Occupancy Configuration Screen
Network Time Schedule
Holiday Schedules
. . . . . . . . . . . . . . . . . . . . . . . . . . . . . . . . . . . . . . . . . 1,2
. . . . . . . . . . . . . . . . . . . . . . . . . . . . . . . . . . . . 2-9
. . . . . . . . . . . . . . . . . . . . . . . . . . . . . . . .10-14
. . . . . . . . . . . . . . . . . . . . . . . . . . . . . . . . . . . . . . . . . .10
. . . . . . . . . . . . . . . . . . . . . . . . . . . . . . . . .10
. . . . . . . . . . . . . . . . . . . . . . . . . . . . . . . . . . . . . . . . . . .10
. . . . . . . . . . . . . . . . . . . . . . . . . . . . . . . . . . . . . . . . . . . . . .10
. . . . . . . . . . . . . . . . . . . . . . . . . . . . . . . . . . . . . . . 14-20
. . . . . . . . . . . . . . . . . . . . . . . . . . . . . . . . . . . . . . .15
. . . . . . . . . . . . . . . . . . . . . . . . . . . . . . .16
. . . . . . . . . . . . . . . . . . . . . . . . . . . . . . . . .16
. . . . . . . . . . . . . . . . . . . . . . . . . . . . . . .17
. . . . . . . . . . . . . . . . . . . . . . . . . . . . . . . . . . . . . .17
. . . . . . . . . . . . . . . . . . . . . . . . . . . . . . . .21-27
. . . . . . . . . . . . . . . . . . . . . . . . . . . . . . . . . . . .21
. . . . . . . . . . . . . . . . . . . . . . . . . . . . . . . . . . . .23
. . . . . . . . . . . . . . . . . . . . . . . . . . . . . . . . . . .24
. . . . . . . . . . . . . . . . . . . . . . . . . . . . . . . . . .27
IMPORTANT: Read the ent ire instruction manual before
starting installation.
. . . . . . . . . . . . . . . . . . . . . . . 1
. . . . . .2
. . . . . . . . . . . . . . . . . . . . . . . . . . . . . . .2
. . . . . . . .2
. . . . . . . . . .2
. . . . . . . . . . . . . . . . . .7
. . . . . . . . . . . . . . . . . . . . . . . . . .8
. . . . . .9
. . . . . . . . . .13
. . . . . . . . . . . . . . . . . . . . . . . . . . . .13
. . . . . . . . . . . . . . . .13
. . . . . . . . . . . . . . . . . . . . .13
. . . . . . . . . . . . . .14
. . . . . . . . . . . . . . . . . . . . . . . . . . . . . . .14
. . . . . . . . . . . . . . . . . . . . . . . . . .14
. . . . . . . . . . . . . . . . . . . . . .15
. . . . . . . . . . . . . . . . . . . . . . . . . .16
. . . . . . . . . . . . . . . . . . . . . . . . . . . . . .16
. . . . .16
. . . . . . . . . . . . . . . . . . . . . . . . . . . . .17
. . . . . . . . . . . . . . . . . . . . . . . . . . . . .20
. . . . . . . . . . . . . . . . . . . . . . .24
. . . . . . . . . . . . . . . . . . . . . . . . .24
. . . . . . . . . . . . . . . . . . .26
. . . . . . . . . . . . . . . . .26
. . . . . . . . . . . . . . . . .26
. . . . . . . . . . . . . . . . . .26
. . . . . . . . . . . . . . . . . . . . . . . . . . . .27
Page
SAFETY CONSIDERATIONS
Installation and servicing of air-conditioning equipment can
be hazardous due to system pressure and electrical components. Only trained and qualified service personnel should
install, repair, or service air-conditioning equipment.
Untrained personnel can perform basic maintenance
functions. All other operations should be performed by trained
service personnel. When working on air-conditioning equipment, observe precautions in the literature, tags and labels
attached to the unit, and other safety precautions that may
apply.
Improper installation, adjustment, alteration, service, maintenance, or use can cause explosion, fire, electrical shock or
other conditions which may cause personal injury or property
damage. Consult a qualified installer, service agency, or your
distributor or branch for information or assistance. The qualified installer or agency must use factory-authorized kits or
accessories when modifying this product. Refer to the individual instructions packaged with the kits or accessories when
installing.
Follow all safety codes. Wear safety glasses and work
gloves. Use quenching cloth for brazing operations. Have fire
extinguisher available. Read these instructions thoroughly and
follow all warnings or cautions attached to the unit. Consult
local building codes and the National El ectrical Code (NEC)
for special installation requirements.
Understand the signal words — DANGER, WARNING,
and CAUTION. DANGER identifies the most serious
hazards which will result in severe personal injury or death.
WARNING signifies hazards that could result in personal
injury or death. CAUTION is used to identify unsafe practices,
which would result in minor personal injury or product and
property damage.
Recognize safety information. This is the safety-alert
symbol ( ). When you see this symbol on the unit and in
instructions or manuals, be alert to the potential for personal
injury.
Electrical shock can cause personal injury or death. Before
installing or servicing system, always turn off main power
to system. There may be more than one disconnect switch.
Turn off accessory heater power if applicable.
GENERAL
IMPORTANT: The installation of water source heat pump
units and all associated components, parts, and accessories
which make up the installation shall be in accordance with
the regulations of ALL authorities having jurisdiction and
MUST conform to all applicable codes. It is the responsibility of the installing contractor to determine and comply
with ALL applicable codes and regulations.
Manufacturer reserves the right to discontinue, or change at any time, specifications or designs without notice and without incurring obligations.
Book 1 4
Ta b 5 a 5 a
PC 111 Catalog No. 535-00077 Printed in U.S.A. Form 50RLP-1SI Pg 1 1-03 Replaces: New
Page 2
The Aquazone™ System Control Panel is a single packaged
system control panel for use with Aquazone water source heat
pumps (WSHPs) in stand-alone or direct digital control
applications using the Carrier Comfort Network (CCN). The
Aquazone system control panel controls and monitors the
operation of the water source heat pumps, the ancillary heat
rejection, the heat addition, and the system pumps to coordinate entire system operation. The Aquazone System Control
Panel is used with the following units: 50HQL, KQA, KQD,
RDS, RHC, RHR, RHS, RTG, RVC, RVR, RVS, RWS,
VQA, VQD.
The Aquazone system control panel includes a preprogrammed 6400 main logic comfort controller as the central
processing unit. The Aquazone system control panel is compatible for use in boiler/tower (water loop) or geothermal (ground
loop, ground water) water source heat pump arrangements.
Other system hardware components are specified in the
50RLP model nomenclature. Components can be added to customize the Aquazone System Control Panel for the specific
type of functionality desired, including staged heat rejection
and addition, dual or variable speed pump operation, and standalone or CCN installations. See Fig. 1.
Aquazone System Control Panel Functionality —
Functionality includes the ability to control up to two
water-circulating pumps and monitor water temperature to
initiate up to eight stages of cooling tower and/or boiler operation. The system control panel has the capability to work with
variable speed pumping arrangements for maximum energy
efficiency. In addition, the panel provides system control for
both stand-alone and DDC water source heat pump systems
(units installed with a factory-mounted PremierLink™ CCN
controller).
Stand-Alone Systems —
trol strategy, non-communicating Aquazone water source heat
pump thermostats are utilized to initiate the operation of
individual water source heat pump equipment for eac h zone.
The Aquazone System Control Panel can be ordered with the
appropriate hardware to accommodate and initiate scheduled
control of either 10 or 18 zones of WSHP units in stand-alone
operation. See Fig. 2.
In a stand-alone type of con-
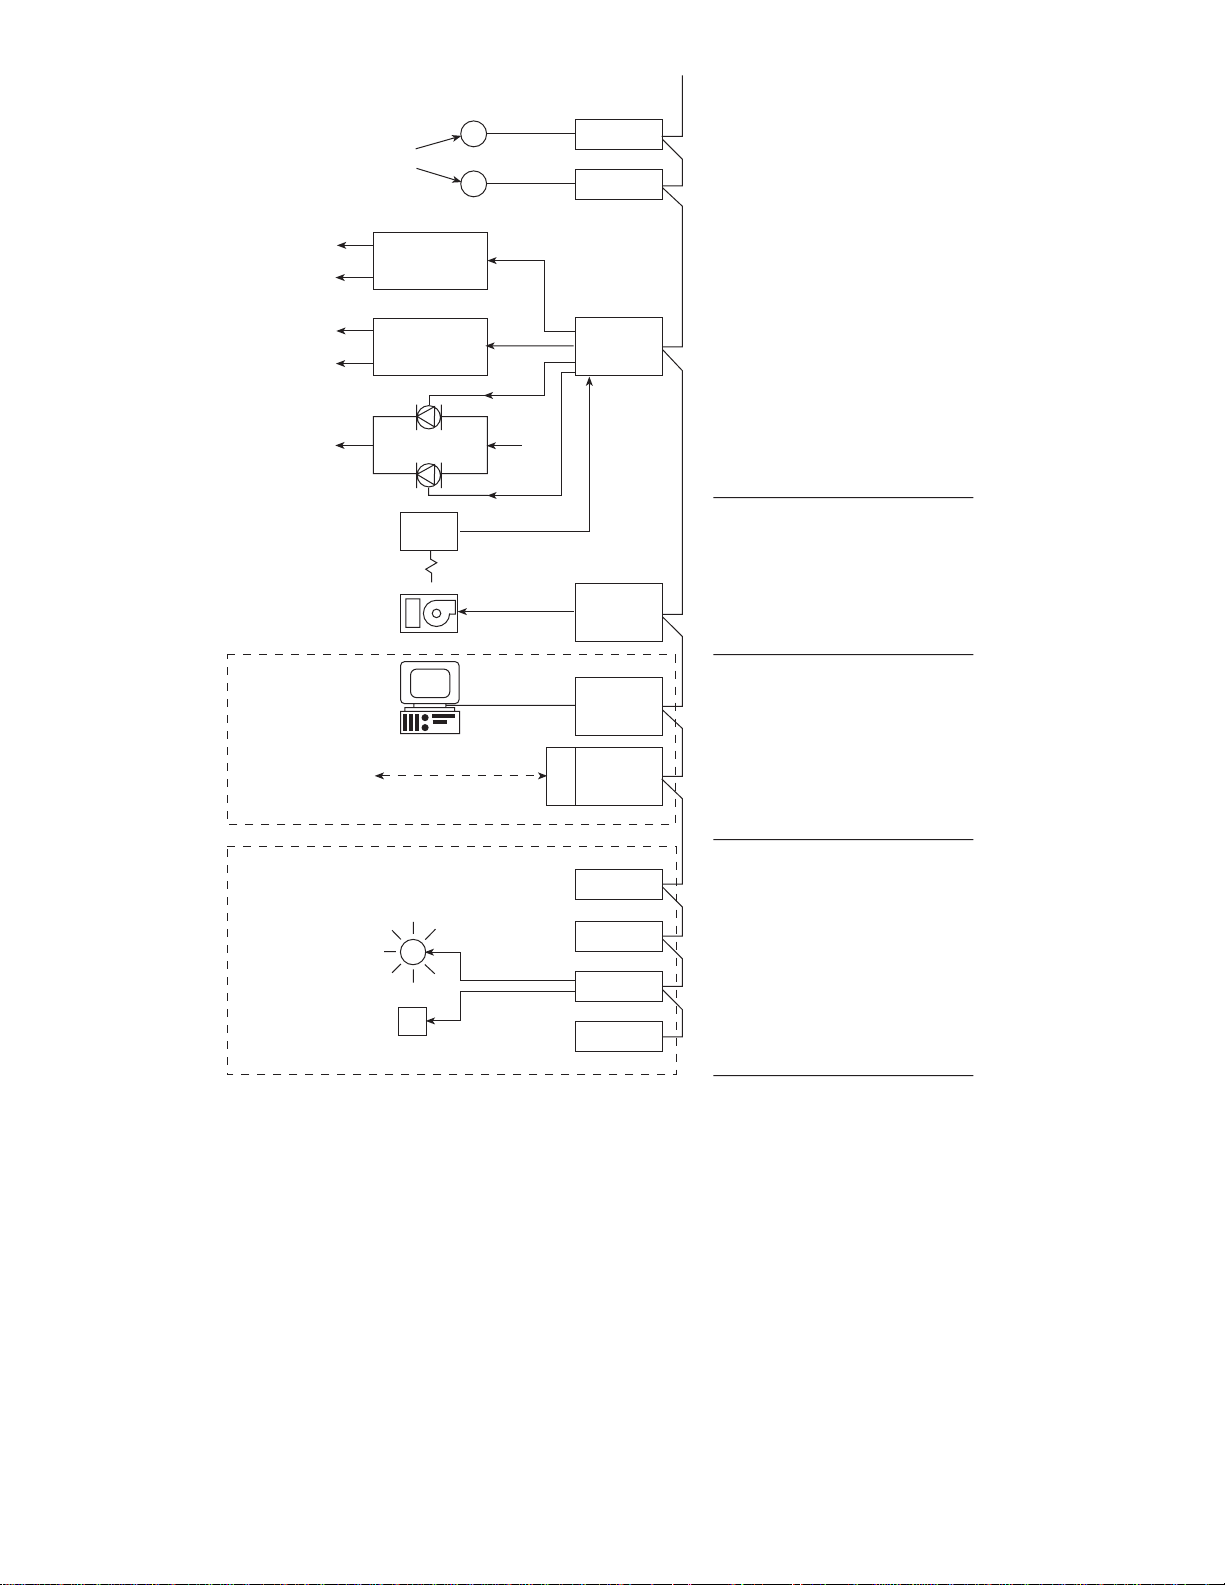
CCN Systems Using PremierLink Controls —
To
implement a direct digital control type of water source heat
pump system strategy , individual WSHP units are ordered with
a factory-installed PremierLink controller. The Aquazone system control panel has been pre-programmed to w ork specifically with th e Pr e m ie r L in k co ntroller to trans f er a n d c o ntrol all
modes of cooling/heating operation, transmit unit number,
zone temperature, zone temperature set points, discharge air
temperature, fan status, stages of heating, stages of cooling,
leaving water temperature, and alarm status information. See
Fig. 3.
COMPONENTS
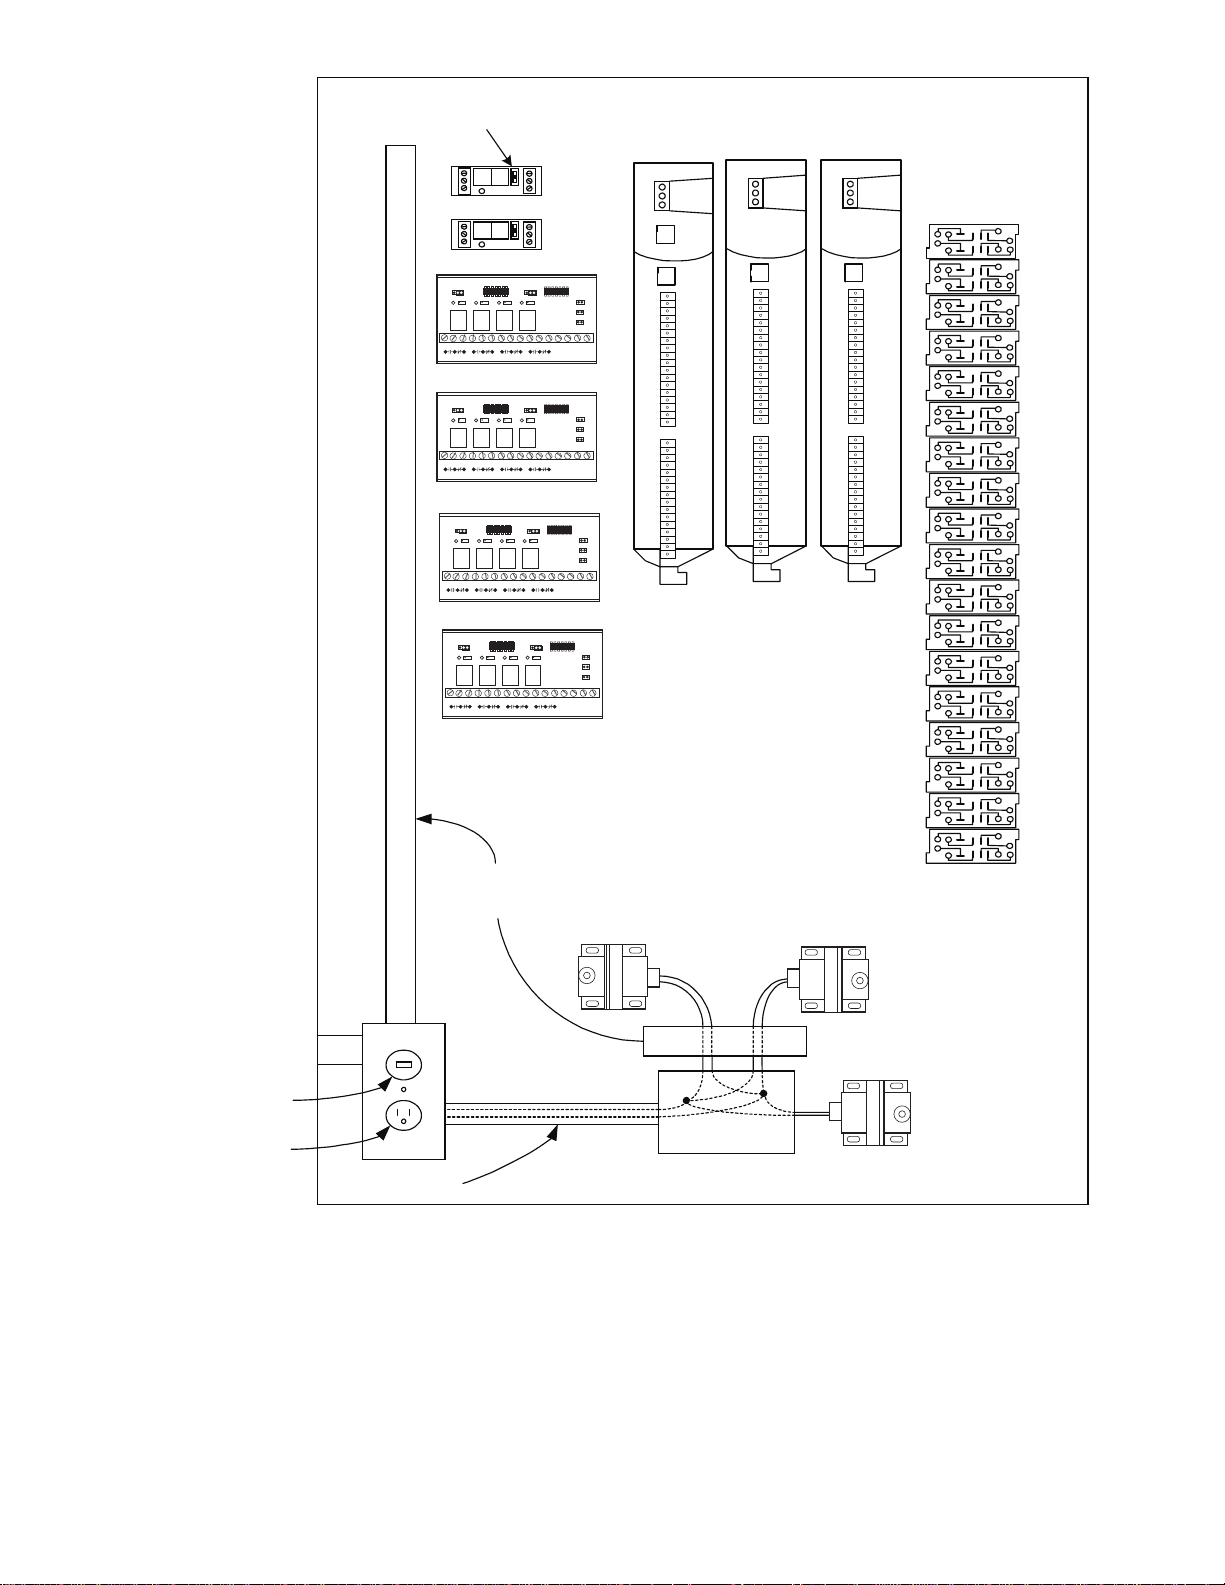
Aquazone System Control Panel Hardware —
The 50RLP Aquazone System Control Panel package consists
of the following hardware. See Fig. 4.
ENCL OS U RE — The Aquazone system control panel enclosure is constructed of perforated 16-gage steel and finished in a
gray powder-coated finish. The panel has a height of 42 in., a
width of 30 in. and a depth of 7 inches.
PROC ESSO R — The central processing units for the Aquazone system control panel are Carrier 6400 Comfort Controllers. The Comfort Controller provides general purpose HVAC
control and monitoring capability in a stand-alone or network
environment using closed-loop, direct digital control. The 6400
Comfort Controller has been pre-programmed to work in either
stand-alone or CCN water source heat pump system installations. Specifications for the 6400 Comfort Controller may be
found in the Comfort Controller literature.
PUMP CON TROL RELAYS — For both stand-alone and
CCN systems (based on the type of pumping operation
required) the Aquazone system control panel can be orde red
with a combination of multi-voltage control relays to provide
start/stop or lead/lag operation for single or dual pumps. The
combination desired is specified in the 50RLP model nomenclature in digit 8. See Fig. 1.
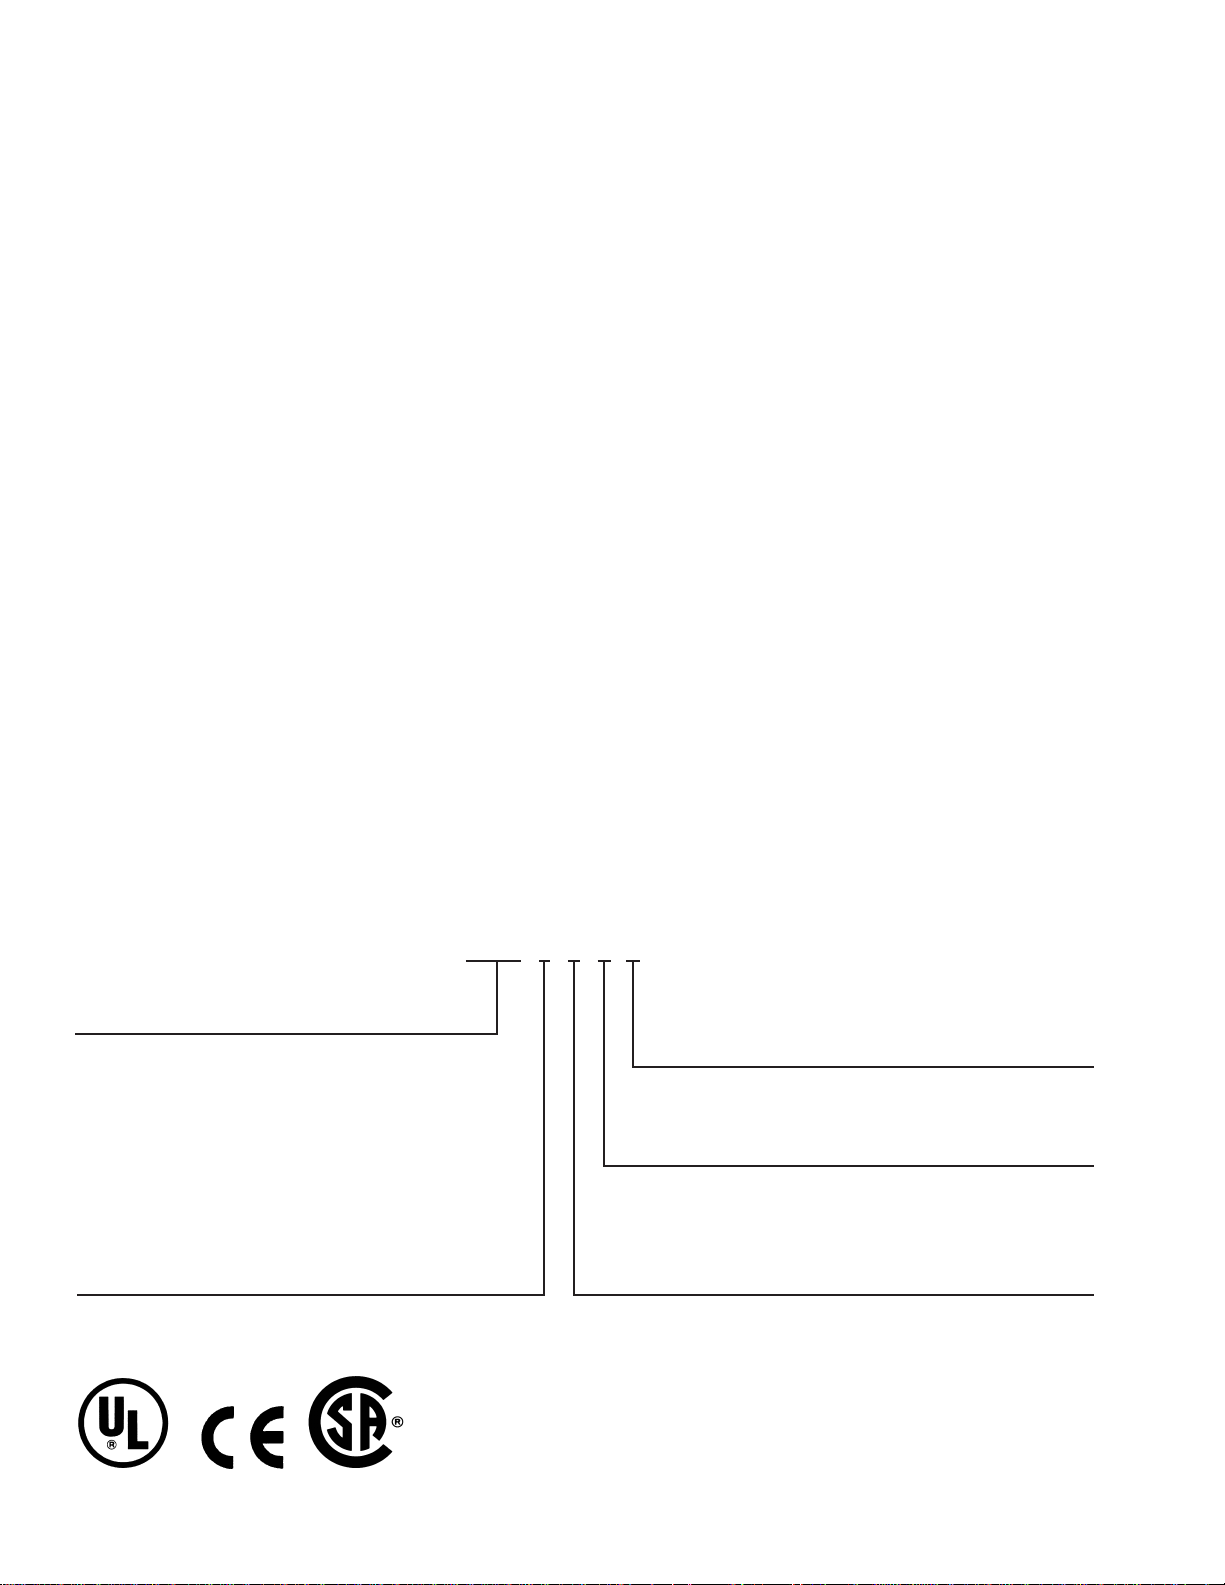
50RLP 0 0 0 0
Unit
50RLP – Aquazone System Control Panel
System Heat Rejection
0 – 2-Stage Card (2 Stages of Cooling Tower Operation)
1 – 4-Stage Card (4 Stages of Cooling Tower Operation)
2 – 2- and 4-Stage Cards (6 Stages of Cooling Tower Operation)
3 – Two 4-Stage Cards (8 Stages of Cooling Tower Operation)
4 – No Card, Variable Speed Cooling Tower Operation
*Option is utilized with Aquazone Thermostat for each WSHP unit.
†Option is utilized with PremierLink DDC control option on individual WSHP units.
**Accepts signals from a variable frequency device.
Fig. 1 — Model Number Nomenclature
WSHP Zone Operation
0 – 10 Relays, Control 10 Zones for Stand-Alone WSHP Units*
1 – 18 Relays, Control 18 Zones for Stand-Alone WSHP Units*
2 – No Relays, Carrier Comfort Network (CCN) System†
System Pumping Operation
0 – Both Relays, Start/Stop or Lead/Lag Operation for Single or
Dual Pumps
1 – No Relays, Variable Frequency Pump Operation**
System Heat Addition
0 – 2-Stage Card (2 Stages of Boiler Operation)
1 – 4-Stage Card (4 Stages of Boiler Operation)
2 – 2 and 4-Stage Cards (6 Stages of Boiler Operation)
3 – Two 4-Stage Cards (8 Stages of Boiler Operation)
4 – No Card, Modulating Valve Operation for Steam or
Hot Water
2
Page 3
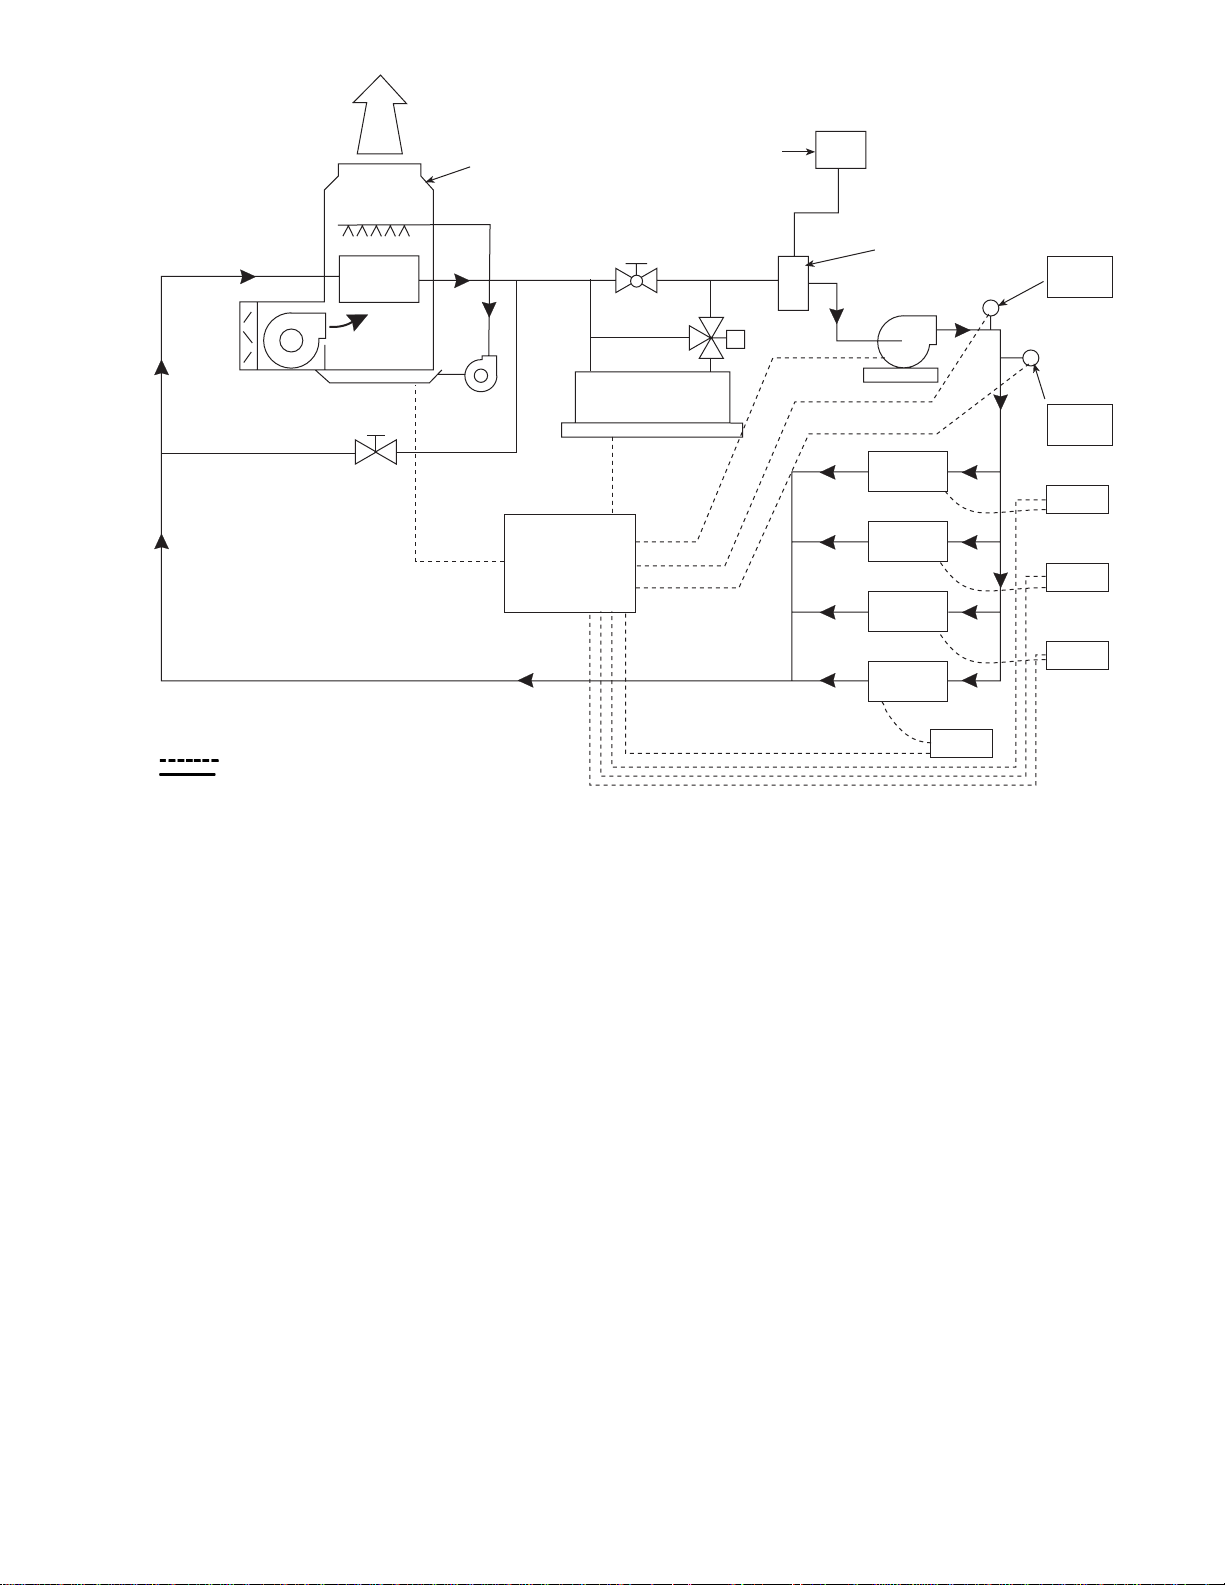
COOLING
TOWER
BOILER
EXPANSION
TANK
AIR SEPARATOR
PUMP
WSHP
FLOW
SENSOR
TEMP.
SENSOR
T-S TAT
AQUAZONE
SYSTEM
CONTROL
PANEL
LEGEND
Control Wiring
Loop Water Piping
Fig. 2 — Typical Stand-Alone WSHP System
If variable frequency drives are utilized for system pumps,
no pump control relays are specified. Each relay contains a red
light-emitting diode (LED), which indicates the relay coil is
energized. The pump control relays are located in the upper left
hand corner of the system control panel. See Fig. 4. Wiring is
shown in Fig. 5A-5C. Specifications for the pump control
relays are as follows:
Voltage Input: 24 vdc @ 15 mA, 14 vac @ 30 mA,
115 vac @ 20 mA, 230 vac
@ 20 mA.
Contact Rating: 10 A res. @ 115 vac,
7 A res. @ 230 vac/28 vdc,
1
N.O.:
/6 hp @ 115 vac.
T emperature Range: –60 F to 185 F
Indication: LED
Enclosure: 18 ga. metal back
Dimensions: 5.125-in. x 3.125-in. x 2.5-in.
(HxWxD) or 5.125-in. x 9.5-in. x
2.5-in. (HxWxD)
OUTPUT TRANSDUCERS — For both stand-alone and
CCN systems (based on the stages of heat addition or rejection
required) the Aquazone™ system control panel can be ordered
with a combination of 2-stage and 4-stage output transducers to
provide 2, 4, 6, or 8 stages. The combination desired i s specified in the 50RLP model nomenclature in digit 6 to specify heat
rejection stages and digit 7 to specify heat addition stages. See
Fig. 1. If variable speed cooling tower fan operation and/or
WSHP
T-S TAT
WSHP
T-S TAT
WSHP
T-S TAT
modulating valve operation for steam or water a re utilized, no
output transducer card is specified. The output transducer is a
solid-state multi-stage device used for staging control from a
single analog signal. Output transducers are located in the
upper left hand corner of the Aquazone System Control Panel
underneath the pump control relays. See Fig. 4. Specificat ions
for the pump control relays are as follows:
Supply Voltage: 24 vac ± 10% @ 100 mA,
24 vdc ± 10% @ 50 mA
Input Signal: 4-20 mA
Output: 2 SPDT relays for 2-stage,
4 SPDT relays for 4-stage.
Relay rating: 5A @ 120 vac
Accuracy & repeatability: ± 1%
Set point adjustment: 25-turn potentiometers
Input impedance: 250 W (mA input), 10 kW
(V input)
T emperature Range: 32 F to 158 F
Humidity Limit: 5 to 95% relative humidity
non-condensing
Dimensions: 3.25-in. x 3.5-in. x 1.375-in.
(HxWxD) for 2-stage, 3.25-in. x
5.5-in. x 1.375-in. (HxWxD)
for 4-stage
Relay Differential: 0.5 mA or 0.375 V.
3
Page 4
ZONE 2
ZONE 1
ROOM SENSOR
S
S
WSHP 2
WSHP 1
PREMIERLINK
WSHP CONTROLLER
PREMIERLINK
WSHP CONTROLLER
FAN(S)
SPRAY PUMP
STAGE 2
STAGE 1
MAIN
STANDBY
LOOP TEMP
VENTILATION
FAN
COMPUTER
COMPUTER
–PC ACCESS
LOCAL
REMOTE
TOWER
BOILER
PUMPS
LT
TELEPHONE
LINE
AQUAZONE SYSTEM
LCP
LOOP CONTROL PANEL
(CARRIER COMFORT
CONTROLLER)
CARRIER COMFORT NETWORK BLDG.
MASTER CONTROL PANEL
MCP
R
T
M
(CARRIER COMFORT
CONTROLLER)
REPEATER: INTERFACE
PC TO NETWORK
TELINK WITH
MODEM CONTROLLER
DATA COLLECTION
LOADSHED
COMFORT CONTROLLER
TENANT BILLING
LIGHTS
EQUIPMENT
D.C.
L
E
L.S.
CC6400
T.B.
BLDG./SYST. MANAGEMENT
Fig. 3 — CCN Water Source Heat Pump System with PremierLink™ Controllers
4
Page 5
g
g
g
g
y
FLT SEQ
FLT SEQ
MODE
A
MODE
A
FLT SEQ
A
A
MODE
A
FLT SEQ
A
MODE
A
A
HOA
Pump 1
Pump 2
B
C
B
Cool Sta
B
C
B
Cool Stages 2
B
C
B
Heat Sta
B
C
B
Heat Sta
Processor Input/Output 1 Input/Output 2
Low Volta
e
Zone Thermostat
Control Rela
UCS-421
MODE
INPUT
FLT SEQ
TYPE
H3
MODE
D
UCS-421
D
UCS-421
D
CH
V
H4
H5
MA
24V
INPUT
CHAIN
SIGNAL
POWER
OUTPUT
COMMON
INPUT
TYPE
H3
CH
V
H4
H5
MA
24V
INPUT
CHAIN
SIGNAL
POWER
OUTPUT
COMMON
INPUT
TYPE
H3
CH
V
H4
H5
MA
24V
INPUT
CHAIN
SIGNAL
POWER
OUTPUT
COMMON
D
C
es 1
MODE
FLT SEQ
D
C
FLT SEQ
D
C
s
es 1
UCS-421
MODE
INPUT
FLT SEQ
TYPE
H3
D
C
CH
V
H4
H5
MA
24V
INPUT
CHAIN
D
SIGNAL
POWER
OUTPUT
COMMON
es 2
POWER SWITCH
CONVENIENCE
OUTLET
PANDUCT®
WIRING DUCT
Transformer 1 Transformer 2
CONDUIT
Fig. 4 — Aquazone™ System Control Panel
Trans former 3
5
Page 6
COMPLETE C CONTROL
(IN WSHP)
RYW OGC
SYSTEM
ZONE
RELAYS
(1-18)
NO
R
W1
G
THERMOSTAT
Y1
W2
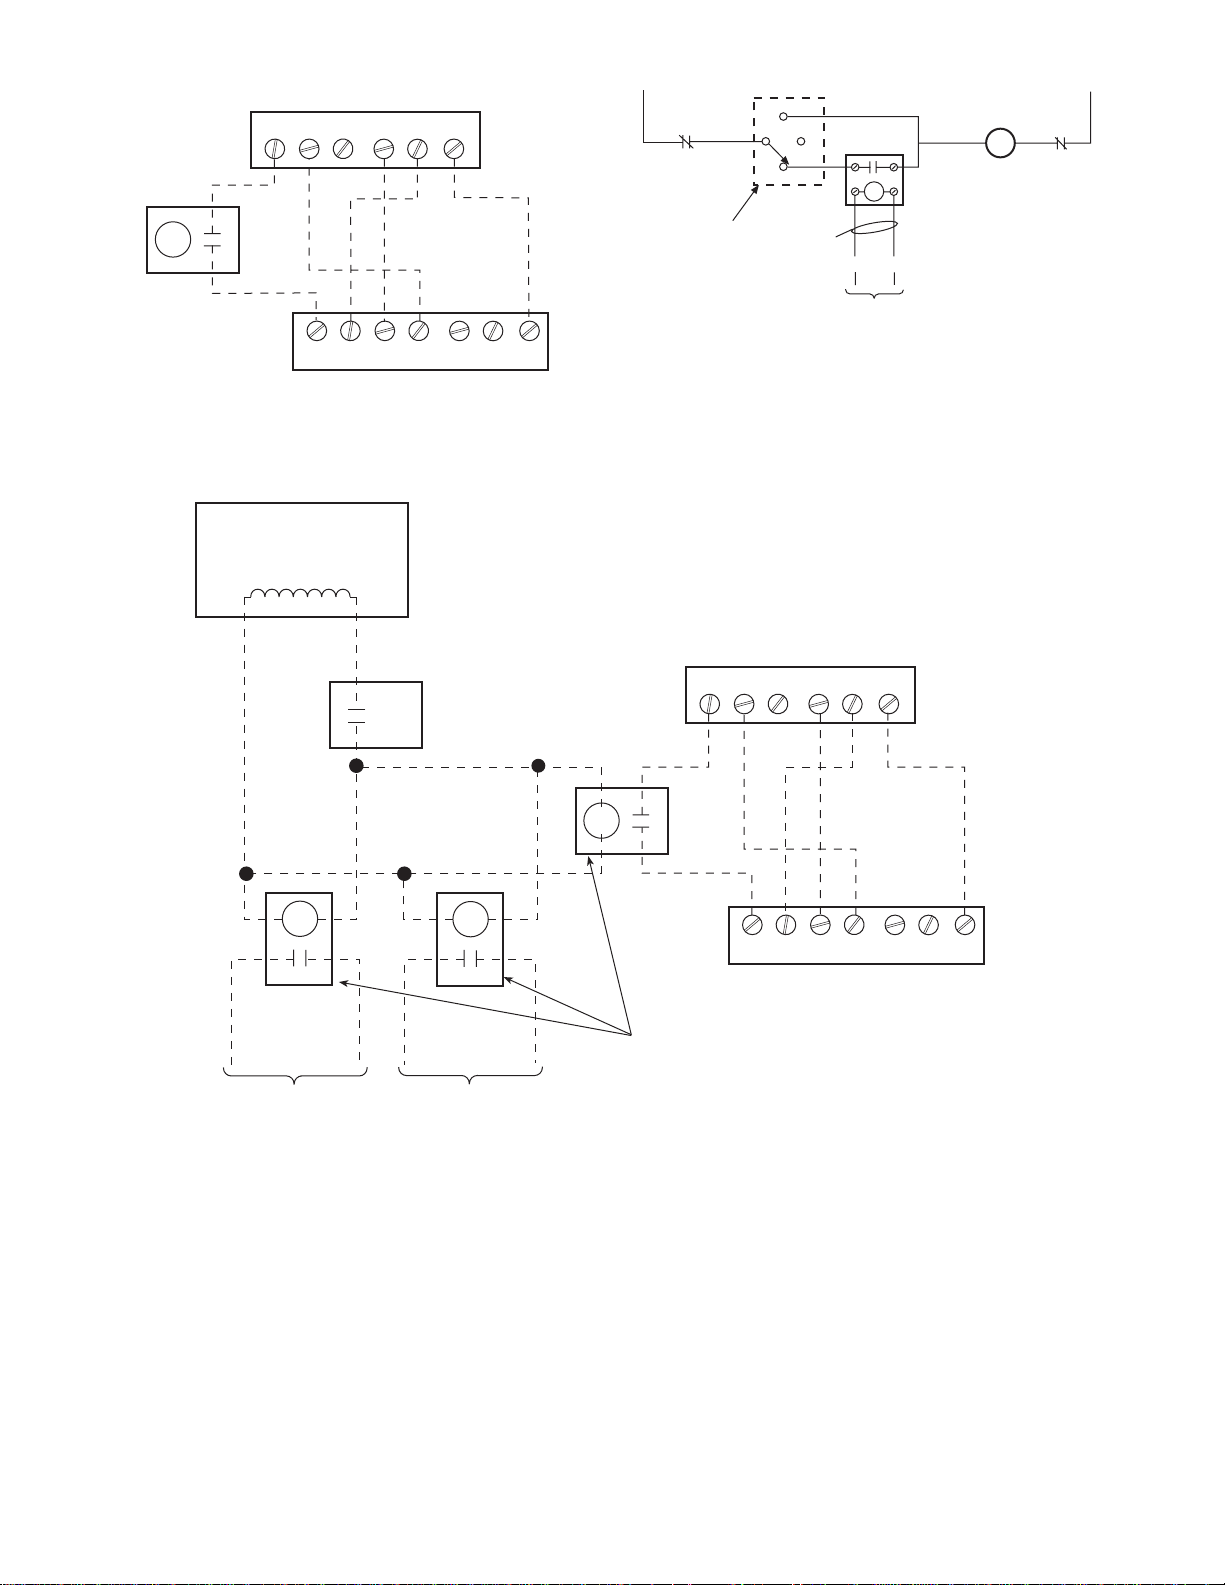
Fig. 5A — System Zone Relay Wiring
(Aquazone™ System Control Panel Used to
Control a Single Thermostat)
PANEL 24 VAC POWER
Y2
X1
H
FIRE
FREEZE,
ETC.
SWITCH S-1
C
Fig. 5C — Control Relay Wiring for Pump
Start/Stop or Cooling Tower Fan
O
A
TP WIRES
L
(+)
(-)
TO COMFORT
CONTROLLER
STARTER
COIL
M
CONTROL RELAY
OR
STAGING CARD
OL’
X2
s
N
TO OTHER WSHP COMPLETE C CONTROLS AND THERMOSTATS
H
SYSTEM ZONE
RELAYS
(1-18)
Fig. 5B — System Zone Relay Wiring
(Aquazone System Control Panel Used to Control Multiple Thermostats)
COMPLETE C CONTROL
RYW OGC
TYPICAL
FIELD-INSTALLED
RELAYS
(ONE PER WSHP)
(IN WSHP)
G
R
W1
THERMOSTAT
Y1
W2
Y2
C
ZONE THERMOSTAT CONTROL RELAYS — A unique
feature of the Aquazone system control panel is the capability to
add zone ther mostat contr ol rela ys. T his feat ure is used w hen th e
Aquazone system control panel i s utilized in a st and-alone type
of installation. Eithe r a set of 10 or 18 relays can be selected
from the 50RLP model nomenclat ure in digi t 9 to control ei the r
10 or 18 zones, respectively. If selected in the model nomencl ature, zone control relays are located on the right hand side of the
system control panel. See Fig. 4. See Fig. 5A-5C for wiring.
CONTROL TRANSFORMERS — Control transformers are
supplied with the Aquazone system control panel and are wired
to the power switch and convenience outlet. The control
transformers provide power to the nominal 24 VAC circuit in
Aquazone system control panel. The contractor will supply the
primary power to the power switch and conve nience outlet in
the field. Transformers include a manual reset button for resetting the circuit breaker. Control transformers are located on the
bottom half of the system control panel. Specifications for the
control transformers are as follows:
Primary: 120/208/240 vac
Secondary: 24 vac
Frequency: 60 Hz
MOUNTING RAILS AND WIRING DUCT — All exposed
panel wiring is low voltage. Line voltage wiring to the control
transformers, control circuits for pumps, cooling tower fans,
and boilers is factory-installed in conduit, using wiring duct,
and on mounting rails.
6
Page 7
POWER RECEPTACLE — A power receptacle is provided
in the Aquazone™ system control panel and is located in the
bottom left corner. Specifications for the power receptacle are
as follows:
Power: 120 vac
Rating: 15A @ 120 vac for receptacles
15A @ 120 vac for switch
250 V for fuse
WATER TEMPERATURE SENSORS — Two water temperature sensors and thermowells have been provided with the
Aquazone system control panel. The first sensor is utilized to
read loop supply water temperature, such that the system
control panel can adjust heat rejection and heat addition
equipment to maintain the loop temperature based on user
input. The second sensor may be installed to monitor return
loop water temperature. The active sensing element is a highly
stable precision thermistor material accurate to within ± 0.36 F.
The temperature range of the sensor is 10 F to 230 F.
WATER PRESSURE SENSOR — A water pressure sensor is
provided with the Aquazone system control panel with variable
speed pumping only , and is utilized to operate variable frequency drives for system pumps. The water sensor senses system
pressure and the pressure is sent to the system control panel.
The Aquazone system control panel speeds up or slows down
the variable frequency drive to control the pump in order to
keep the system at the correct pressure.
When a variable frequency drive is used for system pumping, the Aquazone water source heat pumps are typically
furnished with a factory or field-mounted solenoid valve that
allows water to flow though the heat pump. When solenoid
valves open, the system pressure drops, which results in the
variable frequency drive speeding up to allow the pump to
provide more water. When solenoid valves close, the system
pressure rises, which results in the variable frequency drive
slowing down to allow the pump to provide less water.
WATER FLOW SWITCH — A factory-provided wat er flow
switch is included with the Aquazone system control panel and
must be field-installed in the water loop piping. The flow
switch is connected to the control panel by a cable with a
watertight connector. This device uses a triac output that cannot
be connected directly to the Main Base Board. Therefore, a
control relay is used to signal the Main Base Board that loop
water flow is detected. The switch contains a fifteen-turn
adjustment potentiometer, to be used to adjust the set point in a
range of 3 to 60 cm/sec. The factory set point is 20 cm/sec.
The potentiometer switch may be adjusted down to zero
velocity (no flow) or above 60 cm/sec, however operation
in those ranges may not be linear or reliable.
Water Source Heat Pumps with PremierLink™
Controller Hardware —
tion is implemented, a factory-mounted PremierLink controller
is provided with the water source heat pump units. The package
from the factory includes the PremierLink controller, supply air
temperature sensor , and leavi ng water t emperatur e sensor.
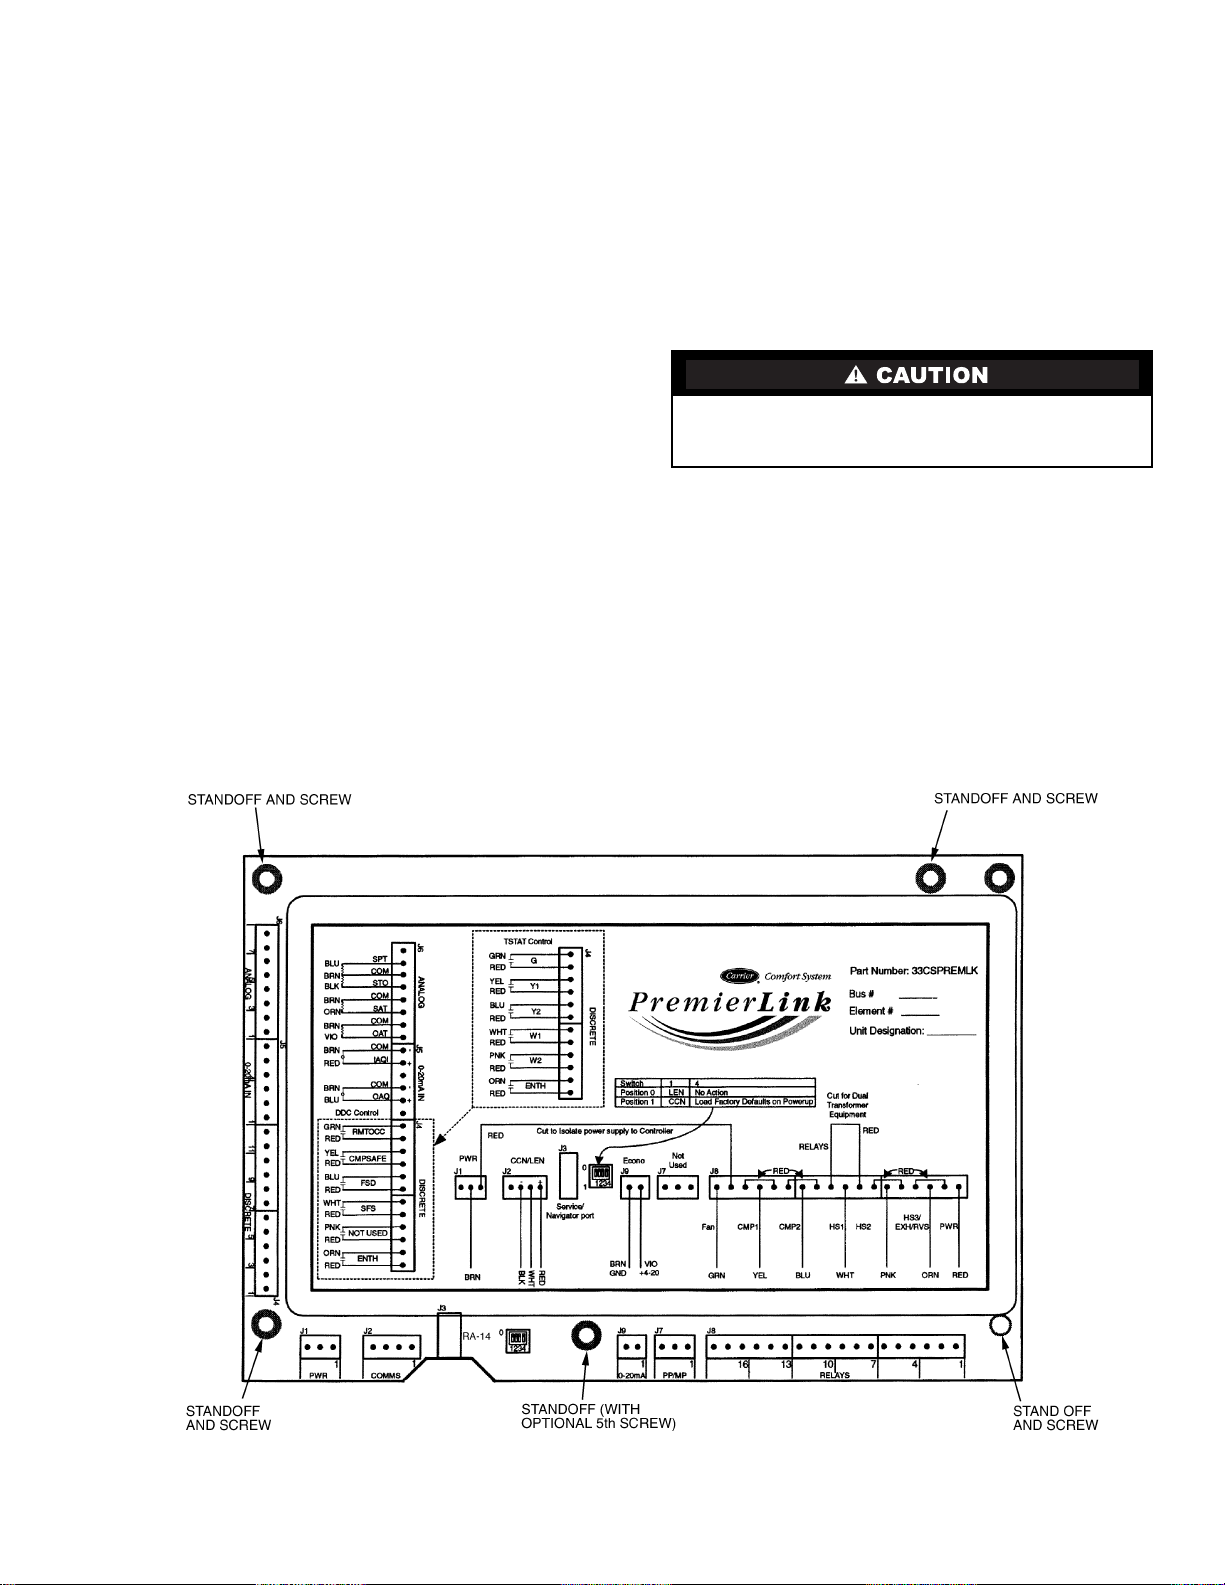
PREMIERLIN K CONTROLLER — PremierLink controllers
can be provided with any Aquazone water source heat pump
product by selecting this option in the model nomenclature.
See Fig. 6.
The PremierLink controller is provided with the Complete C
unit controller . F actory sup plied wiring is i llustrated in F ig. 7.
When a CCN system installa-
Fig. 6 — PremierLink™ Control Module
7
Page 8
Carrier’s diagnostic standard tier display tools such as
Navigator™ or Scrolling Marquee can be used with the
PremierLink™ controller. Access is available via an RJ-11
connection or a 3-wire connection to the communication bus.
Computers equipped with Carrier user interface software such
as Service Tool, ComfortVIEW™, or ComfortWORKS®
software are used to int erface with the system. W hen used as
part of the CCN, other devices such as the CCN data transfer,
Linkage Thermostat, or system control panel comfort
controller can read data from or write data to the PremierLink
Controller.
SUPPLY AIR TEMP ERATURE SENSOR — A factoryinstalled supply air temperature sensor is provided with the
PremierLink controller. Wiring of the temperature sensor is
shown in Fig. 7. The sensor is a 10 kohm thermistor, which is
protected by a stainless steel housing probe. Probe is
1
/4-inch in
diameter and 1.5-in. long. Wire is 22 AWG (American Wire
Gage), 7/30 copper wire, PVC white, 2 conductor type.
LEAVING WATER TEMPERATURE SENSOR — A factoryinstalled leaving water temperature sensor is provided with
PremierLink controller. Wiring of the temperature sensor is
shown in Fig. 7. The sensor is a 10 kohm thermistor is protected by a stainless steel housing probe. Probe is
1
/4-inch. in diameter and 1.5-in. long. Wire is 22 AWG , 7/30 copper wi re, PVC
white, 2 conductor type.
Field-Supplied Hardware for Stand-Alone Systems —
stand-alone configuration, individual Aquazone thermostats
(or compatible equivalent) are required for water source heat
pump units.
AQUAZONE THERMOSTAT — A field-supplied Carrier
thermostat is required to maintain space temperature for standalone water source heat pump installations. There are five
different Aquazone thermostats available for stand-alone applications. See Table 1.
T o utilize the Aquazone™ system control panel in a
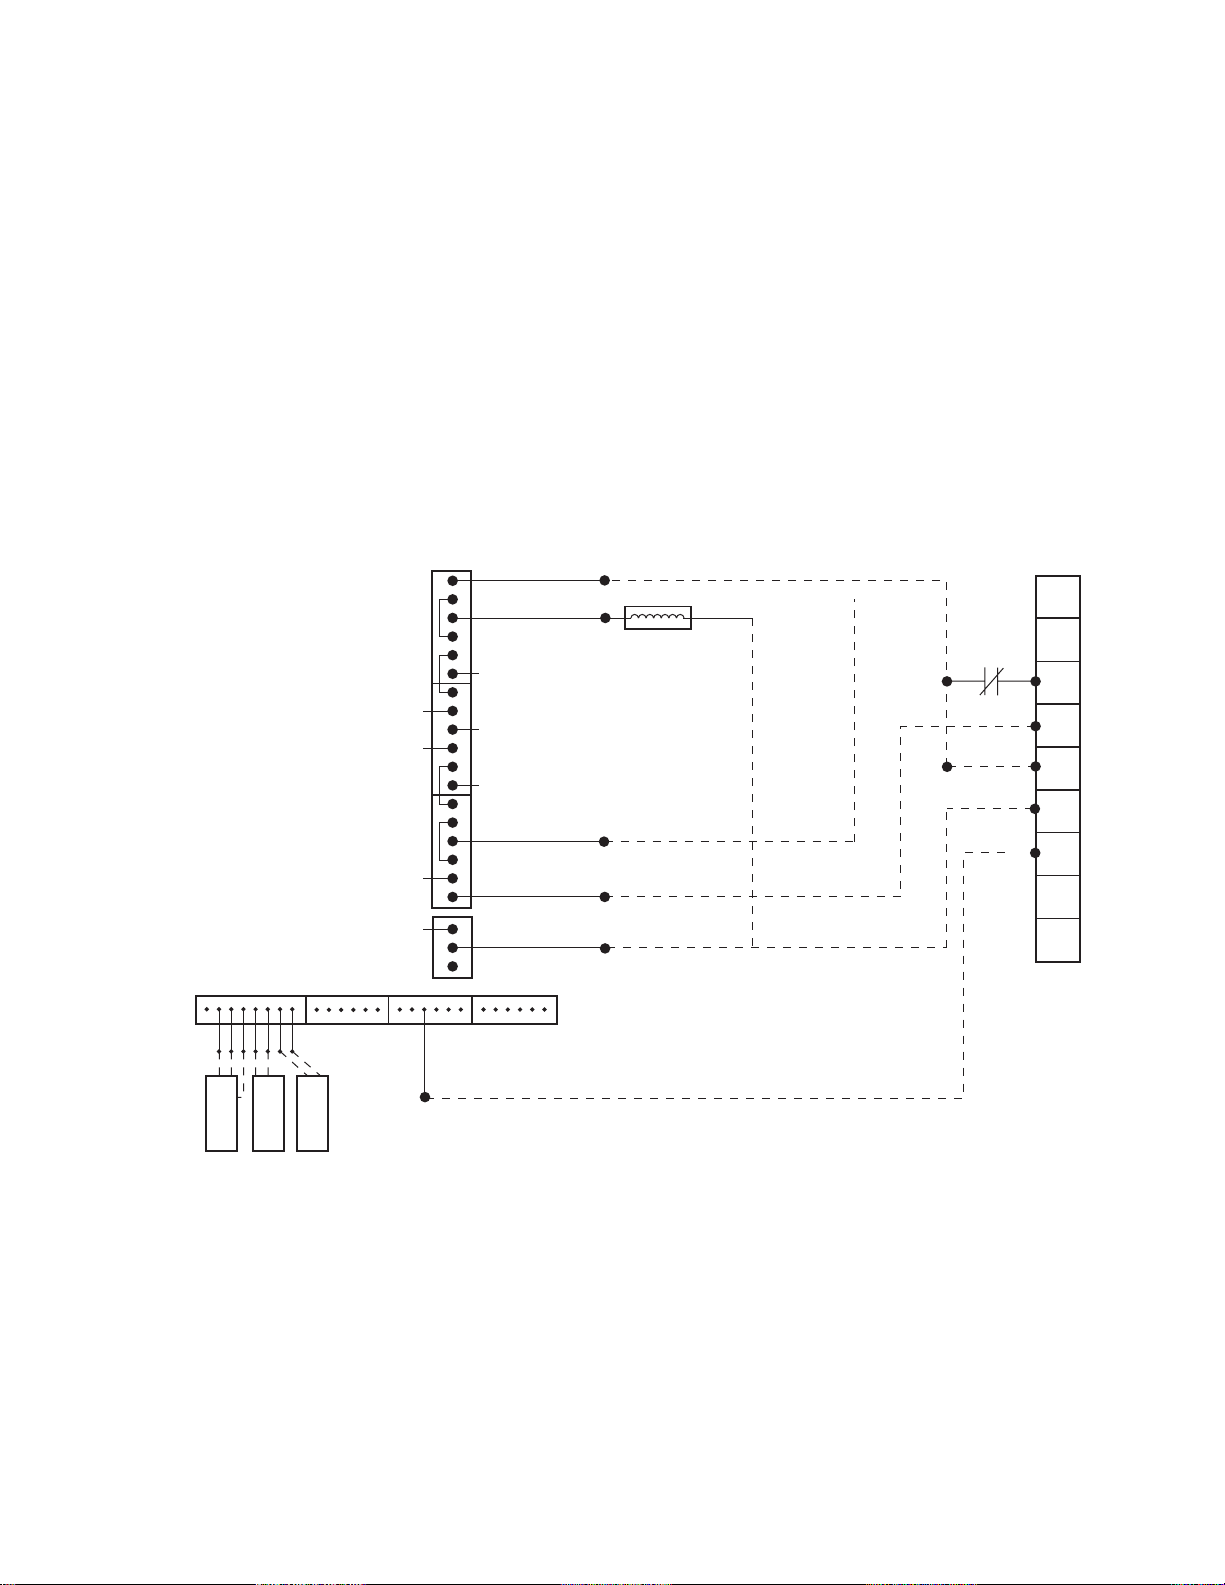
LEGEND
CR —
LW T —
SAT —
SPT —
NOTE: Reversing valve is on in Cooling
mode.
Control Relay
Leaving Water Temperature Sensor
Supply Air Temperature Sensor
Space Temperature Sensor
J6
S
P
T
J5
L
S
A
W
T
T
PREMIER
LINK
J8
PWR
J1
CMPSAFE
PWR
HS1/EXH/RVS
CMP1
FAN
J4
CR
CR
COMPLETE
C
CONTROL
Y
W
O
G
R
C
AL1
AL2
A
Fig. 7 — PremierLink Controller Applications with Complete C Control
8
Page 9

Table 1 — Aquazone™ Thermostats
ORDERING
NUMBER
50QE900-220WS
50QE900-220LA
50QE900-NPWS
50QE900-511WS
50QE900-250FS
THERMOSTAT TYPE FUNCTIONS
Aquazone 7-Day Programmable 2 stages heating, 2 stages cooling, auto changeover
Fahrenheit and Celsius temperature scales
Carrier
AUTO
®
Pm
COOL
HEAT
4 settings per day
24 vac
Backlit LCD
Keypad
5-minute compressor protection
NEVERLOST™ memory
3 security levels
Aquazone Light Activated, 7-Day Programmable
2 stages heating, 2 stages cooling, auto changeover
4 settings per day
Carrier
AUTO
®
Pm
COOL
HEAT
24 vac
Keypad lockout
5-minute compressor protection
Occupied with lights on, unoccupied with lights off
NEVERLOST memory
3 security levels
Aquazone Non-programmable 2 stages heating, 2 stages cooling, auto changeover
5-minute built-in compressor protection
R
Locking cover included
Fahrenheit and Celsius temperature scales
AUTO
COOL
HEAT
Large display
Keypad lockout
Backlit display or B terminal
NEVERLOST memory
Dual set point with adjustable deadband
Back plate with terminals
Aquazone 5-1-1 day programmable 2 stages heating, 2 stages cooling, auto changeover
5-minute built-in compressor protection
R
Keypad lockout and locking cover included
Fahrenheit and Celsius temperature scales
AUTO
COOL
HEAT
4 settings per day
Backlit and configurable display
O or B terminal
NEVERLOST memory
Dual set point with adjustable deadband
Self prompting program
Aquazone Flush Mount, 7-Day Programmable 2 stages heating, 2 stages cooling, auto changeover
4 settings per day, Holiday/vacation programming
Self prompting program with copy command locking
cover plate with tamperproof screws
Fahrenheit and Celsius temperature scales
Set point limiting
Mounts flush to the wall
NEVERLOST memory
Dual set point with adjustable deadband and B terminal
Remote sensor capability (sold separately): Wireless,
(33CSRFS-RC transmitter and 33CSRFS-RE receiver),
wired with override (33CSCEN-WB), duct mounted (33CSSEN-DS)
Field-Supplied Hardware For CCN Applications —
the water source heat pump unit is configurable with a variety
of Carrier space temperature sensors.
SP A CE TEMPERATURE SENSOR (SPT) — A field-supplied
Carrier space temperature sensor i s required to mai ntain spac e
temperature in sensor mode. There are three sensors ava ilable
for this application: the 33ZCT55SPT Space Temperature
Sensor with Override Button, the 33ZCT56SPT Space
Temperature Sensor with Override Button and Set Point
Adjustment, and the 33ZCT58SPT T58 Communicating Room
The factory-installed PremierLink™ controller for
Sensor with Override Button, Set Point Adjustment, and
Manual fan control.
INDOOR AIR QUALITY CO
quality sensor is required for CO
SENSOR — An indoor air
2
level monitoring. Three
2
different CO2 sensors are available for this application: the
33ZCSENCO2 sensor is an indoor, wall-mounted sensor with
an LED display, the 33ZCT55CO2 sensor is an indoor,
wall-mounted sensor without display (also includes a space
temperature sensor with override button), the 33ZCT56CO2
sensor is an indoor, wall-mounted sensor without display (also
includes a space temperature sensor with override button and
temperature offset).
9
Page 10

INSTALLATION
Inspection —
fects that may have occurred during shipping. If there is any
damage, contact your local representative before proceeding.
Mounting Location —
panel should be located indoors. Be sure the location preve nts
moisture and rain from coming into contact with the internal
hardware. Avoid areas where excessive moisture, corrosive
fumes, or vapors are present. The ambient temperature range at
the location should be between 32 to 125 F. Do not install the
Aquazone system control panel in electrical interference or
high radio frequency areas. Select a location which will be safe
from water damage and allow sufficient access for service and
Inspect the package contents for visual de-
The Aquazone™ system control
wiring. For proper service of the Aquazone system control
panel, the following service clearances are recommended:
Height: 54 in.
Width: 42 in.
Depth: 36 in.
Mounting —
Mount the Aquazone system control panel to
a wall with screws or bolts (not provided). Attach through the
mounting holes provided in enclosure. Provide clearance to
open key-locked access door. Refer to the mounting sheet included with the Aquazone system control panel for additional
detailed mounting instructions.
Wiring —
The Aquazone System Control Panel inputs and
outputs are shown in Table 2.
Table 2 — Aquazone System Control Panel Inputs and Outputs
PARAMETER POWER INPUT/OUTPUT TERMINAL
Processor Module
Loop Water Flow 24 vdc Input FLOW
System Supply Water Temp. 10 K thermistor Input SSWT
System Return Water Temp. 10 K thermistor Input SRWT
System Differential Pressure 4-20 mA Input SDP
Remote Occupied Mode 24 vdc Input RMTOCC
System Shut Down 24 vdc Input ALLSYS
Override Input for Zones 1 & 2 24 vdc Input OVRIZ1, OVRIZ2
Pump Number 1 & 2 Speeds 4-20 mA Output PUMP1, PUMP2
Cooling Tower 1 & 2 Speed/Level 4-20 mA Output CTL1, CTL2
Heat Source 1 & 2 Speed/Level 4-20 mA Output BLRL1, BLRL2
System Enable for Zone 1 & 2 24 vdc Output SYSZ1, SYSZ2
First Optional I/O Module
Override Input for Zone 3 to 10 24 vdc Input OVRIZ3 — OVRI Z10
System Enable for Zone 3 to 10 24 vdc Input SYSZ3 — SYSZ10
Second Optional I/O Module
Override Input for Zone 11 to 18 24 vdc Input OVRIZ11 — OVRIZ18
System Enable for Zone 11 to 18 24 vdc Input SYSZ11 — SYSZ18
Pump Control
Occupancy Schedule 1 to 18 Logic Internal Parameter —
Network Global Schedule 65 to 82 Logic Internal Parameter —
Override Input 1 to 18 Logic Input OVRIZ1 — OVRIZ1 8
System Enable Outputs Logic Output SYSZ1 — SYSZ18
Remote Occupied Mode Logic Input RMTOCC
System Differential Pressure Logic Input SDP
System Differential Pressure Set point Logic User Configuration —
Loop Water Flow Logic Input FLOW
Control Type Logic User Configuration —
Pump Number 1 & 2 Speeds Logic Output PUMP1, PUMP2
Shut Down Command Logic Output ALLSYS
Heat Rejection Control
System Supply Water Temp. Logic Input SSWT
System Return Water Temp. Logic Input SRWT
System Loop Temperature Set points Logic User Configuration —
Fluid Cooler/Tower Control Logic User Configuration —
Loop Water Flow Logic Input FLOW
Cooling Tower 1 & 2 Speed/Level Logic Output CTL1, CTL2
Heat Addition Control
System Supply Water Temp. Logic Input SSWT
System Return Water Temp. Logic Input SRWT
System Loop Temperature Set points Logic User Configuration —
Boiler Control Type Logic User Configuration —
Loop Water Flow Logic Input FLOW
Boiler 1 & 2 Speed/Level Logic Output BLRL1, BLRL2
10
Page 11

PREMIERLINK™ CONTROLLER INPUTS AND OUTPUTS — When PremierLi nk controllers are factory mounted
with water source heat pump equipment to implement a CCN
system installation, the inputs and outputs are shown in T able 3.
CONNECT POWER — The Aquazone™ system control
panel requires an uninterrupted 110-v, single-phase, 60 Hz
power supply. All field wiring must comply with all local and
national fire, safety and electrical codes. It is recommended
that the power supply be separate from the power source
supplying the water source heat pumps. The Aquazone system
control panel is internally fused and a power switch is located
Table 3 — PremierLink Controller Inputs and Outputs
INPUTS POWER TERMINAL(S)
SPACE TEMPERATURE (SPT)
SET POINT ADJUSTMENT (STO)
SUPPLY AIR TEMPERATURE (SAT)
LEAVING WATER TEMPERATURE
IAQ SENSOR (IAQI)
REMOTE TIME CLOCK (RMTOCC)
COMPRESSOR LOCKOUT (CMPSAFE)
FIRE SHUTDOWN (FSD)
SUPPLY FAN STATUS (SFS)
NOT USED
OUTPUTS POWER TERMINALS
FAN (SF)
COOL STAGE 1 (CMP1)
COOL STAGE 2 (CMP2)
HEAT STAGE 1 (HS1)
HEAT STAGE 2 (HS2)
HEAT 3/EXHAUST/REVERSING VALVE (HS3/EXH/RVS)
inside the enclosure. Supply power to the Aquazone system
control panel through the convenience outlet in the bottom left
hand corner of the Aquazone system control panel. Do not
apply power until all connections have been made and voltage
supply has been verified. Ground in accordance with NEC and
local electrical codes. Connect the dedicated ground wire to the
position in relationship to the main supply line and use shield
cable to protect from any electrical interference.
CONTROL WIRING — Low voltage wiring for the Aquazone system control panel is shown in Fig. 8.
AI (10 K Thermistor) J6-7, J6-6
AI (10 K Thermistor) J6-5, J6-6
AI (10 K Thermistor) J6-3, J6-4
AI (10 K Thermistor) J6-1, J6-2
(4-20 mA) J5-5, J5-6
DI (24 vac) J4-11, J4-12
DI (24 vac) J4-9, J4-10
DI (24 vac) J4-7, J4-8
DI (24 vac) J4-5, J4-6
——
DO Relay (24 vac, 1A) J8-18
DO Relay (24 vac, 1A) J8-15
DO Relay (24 vac, 1A) J8-12
DO Relay (24 vac, 1A) J8-9
DO Relay (24 vac, 1A) J8-6
DO Relay (24 vac, 1A) J8-3
LEGEND
AI —
DI —
DO —
Analog Input
Digital Input
Digital Output
11
Page 12

SYSZ18
2345 1678
45
PCB1
SW1
12345678
SW2
12345678
SW3
12345678
SW4
12345678
SW5
1
2
SW6
1
2
RED
PCB2
SW1
1
2345678
SW2
12345678
SW3
12345678
SW4
12345678
SW5
1 234
SW6
1 234
PCB2
RED
PCB3
SW1
1 2345678
SW2
1
2345678
SW3
1
2345678
SW4
12345678
SW5
1 234
SW6
1 234
AB
GRN
1
J2
2
BLK
3
RED
16
15
14
13
12
11
10
9
J4
8
1
7
0
6
INT
5
EXT
4
4-20mA
3
OTHER
2
0-10VDC
1
4-20mA
18
DO
34
17
AO
16
DO
34
15
AO
14
13
12
11
10
J3
9
8
7
6
5
4
3
J7
2
123
1
BLK
WHT
1
123
2
J7
3
J2
16
15
14
13
12
11
10
9
J4
8
7
1
0
6
5
INT
EXT
4
3
4-20mA
2
OTHER
1
0-10VDC
4-20mA
18
DO
17
AO
16
DO
15
AO
14
13
12
11
10
J3
9
8
7
6
5
4
To
3
2
J7
1
BLK
WHT
1
123
2
J7
J2
3
16
15
14
13
12
11
10
9
J4
8
7
1
0
6
5
INT
EXT
4
3
4-20mA
2
OTHER
1
0-10VDC
4-20mA
18
DO
17
AO
16
DO
15
AO
14
13
12
11
10
J3
9
8
7
6
5
4
3
2
1
GRN
BRN
RED
GRN
BRN
RED
TB1
+
-
TB3
TB2
TB5
TB4
78 OVRZ 2
56 OVRZ1
34 ALLSYS
12 RMTOCC
SDP
SRWT
SSWT
64 FLOW
78 OVRZ 10
56 OVRZ9
34 OVRZ8
12 OVRZ 7
78 OVRZ 6
56 OVRZ5
34 OVRZ4
12 OVRZ 3
78 OVRZ 18
56 OVRZ 17
34 OVRZ 16
12 OVRZ 15
78 OVRZ 14
56 OVRZ 13
34 OVRZ 12
12 OVRZ 11
8
SYSZ1
7
SYSZ2
7
AB
Fig. 8 — Typical Aquazone™ System Control Panel
C
D
E
Loop PanelLOW VOLTAGE CONTROL WIRING
TBP
1
RED
8
24 VAC
Common
Signal
Input
Chan
Output
24 VAC
Common
Signal
Input
Chan
BLRL1
Output
CTL2
2
24 VAC
Common
CB1
BLU
FLOW
1
Signal
Input
Chan
Output
CTL1
8
FLOW
7
24 VAC
Common
OFF
AUTO
T1
24 V
Signal
Input
Chan
Output
BLRL2
RED
SW
PUMP2
ON
OFF
AUTO
TBP
RED
3
BLU
TBP
RED
5
BLU
C
CB2
CB3
D
SW
PUMP1
ON
RED
T2
24 V
SYSZ10
7
7 8SYSZ9
7 8SYSZ8
7 8SYSZ7
7
SYSZ6
7 8SYSZ5
7 8SYSZ4
7 8SYSZ3
T3
24 V
7
SYSZ18
7 8
SYSZ17
7 8
SYSZ16
7 8
SYSZ15
SYSZ14
7
7 8
SYSZ13
7 8
SYSZ12
7 8
SYSZ11
GRN
TBP
YB
YEL
BLK
2345 1678
BRN
GRN
X2X1
YEL
8
BRN
BRN
BRN
BRN
8
BRN
BRN
BRN
BRN
BRN
GRN
X2X1
YEL
8
BRN
45
BRN
BRN
BRN
8
BRN
BRN
BRN
BRN
E
12
Page 13

ALLSYS —
BLRL1 —
BLRL2 —
CB —
CTL1 —
CTL2 —
FLOW —
OVRIZ1 —
OVRIZ2 —
OVRIZ3 —
OVRIZ4 —
OVRIZ5 —
OVRIZ6 —
OVRIZ7 —
OVRIZ8 —
OVRIZ9 —
OVRIZ10 —
OVRIZ11 —
System
Heat Source 1 Speed/Level
Heat Source 2 Speed/Level
Circuit Breaker
Cooling Tower 1 Speed/Level
Cooling Tower 2 Speed/Level
Loop Water Flow
Override Input for Zone 1
Override Input for Zone 2
Override Input for Zone 3
Override Input for Zone 4
Override Input for Zone 5
Override Input for Zone 6
Override Input for Zone 7
Override Input for Zone 8
Override Input for Zone 9
Override Input for Zone 10
Override Input for Zone 11
OVR IZ 12 —
OVR IZ 13 —
OVR IZ 14 —
OVR IZ 15 —
OVR IZ 16 —
OVR IZ 17 —
OVR IZ 18 —
PCB —
PUMP1 —
PUMP2 —
RMTOCC —
SDP —
SRWT —
SSWT —
SYSZ1 —
SYSZ2 —
SYSZ3 —
SYSZ4 —
LEGEND FOR FIG. 8
Override Input for Zone 12
Override Input for Zone 13
Override Input for Zone 14
Override Input for Zone 15
Override Input for Zone 16
Override Input for Zone 17
Override Input for Zone 18
Comfort Controller Circuit Board
Pump Number 1
Pump Number 2
Remote Occupied Mode
System Differential Pressure
System Return Water Temperature
System Supply Water Temperature
System for Zone 1
System for Zone 2
System for Zone 3
System for Zone 4
SYSZ5 —
SYSZ6 —
SYSZ7 —
SYSZ8 —
SYSZ9 —
SYSZ10 —
SYSZ11 —
SYSZ12 —
SYSZ13 —
SYSZ14 —
SYSZ15 —
SYSZ16 —
SYSZ17 —
SYSZ18 —
T —
TB —
TBP —
System for Zone 5
System for Zone 6
System for Zone 7
System for Zone 8
System for Zone 9
System for Zone 10
System for Zone 11
System for Zone 12
System for Zone 13
System for Zone 14
System for Zone 15
System for Zone 16
System for Zone 17
System for Zone 18
Transformer
Terminal Block
Terminal Block or Pin Connector
Install Thermostat, Sensors and Switches —
In
all installations, the loop supply water temperature sensor and
water flow switch must be installed in the field. The water
pressure sensor is used to sense water system pressure to
operate in conjunction with pump variable frequency drives.
A thermostat is used in stand-alone systems. A space temperature sensor is used in conjunction with water source heat
pumps provided with PremierLink™ controllers. Refer to the
accessory installation instructions literature provided with each
accessory that is used for accessory installation instructions.
NOTE: All thermostats, sensors, and switches are fieldinstalled accessories.
Install Loop Water Supply and Return Temperature Sensors —
sor in the main water supply, located before the water source
heat pumps. Install the water loop return sensor in the return
water piping from the water source heat pumps. The sensors
must be inserted fully into an immersion well ( provided). Seal
immersion well threads with tape and install into pipe tee or reducing fitting. The well screws into a
Thredolet fitting) furnished by the installing contractor. Screw
the sensor into the well via the
nate wiring with butt splice or soldering. Wire nuts are not recommended. Use full 8 ft of lead length provided to avoid moisture migration up the wire. Wire the supply sensor to terminals
SSWT. Wire the return sensor to terminals SRWT. See Fig. 8.
Sensors may be located in any position in relationship to the
main supply line. Use shield cable to protect from any electrical interference.
Install Loop Water Pressure Sensor —
pressure sensor on the discharge side of the circulating pump(s)
in a common supply main so that total system pressure rather
than individual pump(s) flow is detected. The pr essure sensor
must be placed in a vertical position and must match the actual
water flow direction with flow switch direction indicators. Seal
the switch fitting with Teflon tape and insert in a
Install the water loop supply sen-
1
/2-in. NPT saddle (or
1
/8-in. NPT brass fitting. Termi-
Install the
1
/4-in.
standard pipe tee (Thredolet fitting) or reducing fitting, with at
least three pipe diameters straight run upstream and downstream of the switch. Wire sensor to terminals SDP. See Fig. 8.
Install Loop Water Flow Switch —
Install the loop
water flow switch on the discharge side of the circulating
pump(s) in a common supply main so that total system flow
rather than individual pump(s) flow is detected. The flow
switch must be placed in a vertical position and must match the
actual water flow direction with flow switches direction indicators. Seal the switch fitting with Teflon tape and insert in a standard pipe tee or reducing fitting, with at least three pipe diameters straight run upstream and downstream of the switch.
Electrical connection can be made to the switc h. Two wires
should be run to the switch for 24 VAC power. The switch is
supplied with wire leads for connection to the FLOW terminal.
When power is supplied to the device, a warm-up period is
initiated. During this period, the right green LED will be lit.
Each LED to the left is successively lit until the farthest left red
LED is lit. Each LED will be turned off when the next is lit.
The warm-up period may take up to 30 seconds.
When flow is detected, a red LED at the far left will be lit.
With increasing flow, successive red LEDs will be lit. When
the switch determines sufficient flow is present, the amber
LED lights indicating the output has closed. This is not an indication of minimum flow. As flow increases, the first green
LED will be lit. Each successive green LED indicates greater
flow. The switch closure does not indicate minimum flow for
the machine. With one green LED lit, minor fluctuations in
water flow may cause nuisance alarms. Additional green LEDs
indicate higher flow rates, and can avoid the nuisance alarms.
The switch is calibrated to light the amber LED at a fluid
velocity of 0.8 ft/sec (0.24 m/sec). The flow rate will depend on
the nozzle size. See Table 4. See Table 5 for Water Flow
Switch Troubleshooting. If the water flow switch is not working correctly, refer to Table 5.
SIZE
4
5
6
8
Table 4 — Loop Water Flow Switch LED Display
SCHEDULE 40 PIPE
O.D. (in.) Wall Thickness (in.) I.D. (in.) Area (Ft
4.5 .237 4.026 0.09 32
5.563 .258 5.047 0.14 50
6.625 .28 6.065 0.20 72
8.625 .322 7.981 0.35 125
2
)GPM
13
Page 14

Table 5 — Water Flow Switch Troubleshooting
ENTER
PROBLEM SOLUTION
No display or output from the flow sensor
Flow sensor indicates zero flow
when flow is present
Flow Sensor indicates flow
when no flow is present
Check for 24 VAC across pins 1 and 3. These are small pins and caution should
be used when measuring the voltage in the harness so as not to damage the connector.
Check flow switch pin connections for damage.
Check for air in the chilled water system.
Check for 24 vac across pins 1 and 3. These are small pins and caution should be used
when measuring the voltage in the harness so as not to damage the connector.
Check for fouling on the sensor switch, which could inhibit the dissipation of heat from the probe.
Consider replacing the flow switch. The switch might be out of calibration,
the internal heater may have been damaged by extreme temperatures, pressure
or vibration, or mechanical damage to the tip of the device may have occurred.
Check for 24 vac across pins 1 and 3. These are small pins and caution should
be used when measuring the voltage in the harness so as not to damage the connector.
Low voltage can lead to less heat generated by the internal heater.
Consider replacing the flow switch. The switch might be out of calibration, the internal
heater may have been damaged by extreme temperatures, pressure or vibration, or
mechanical damage to the tip of the device may have occurred.
Connect to CCN Communication Bus —
The
Aquazone™ system control panel primary controller connects
to the bus in a daisy chain arrangement. Negative pins on each
component must be connected to respective negative pins and
likewise positive pins on each component must be connected to
respective positive pins. The controller signal pins must be
wired to the signal ground pins. Wiring connections for CCN
must be made at the 3-pi n pl ug. See Fig . 9.
At any baud (9600, 19200, 38400 baud), the number of
controllers is limited to 239 devices maximum. Bus length may
not exceed 4000 ft, with no more than 60 total devices on any
1000-ft section. Optically isolated RS-485 repeaters are
required every 1000 ft.
NOTE: Carrier device default is 9600 baud.
COMMUNICATION BUS WIRE SPECIFICATIONS —
The CCN Communication Bus wiring is field-supplied and
field-installed. It consists of shielded three-conductor cable
with drain (ground) wire. The cable selected must be identical
to the CCN Communication Bus wire used for the entire
network. See Table 6 for recommended cable.
Table 6 — Recommended Cables
MANUFACTURER CABLE PART NO.
Alpha
American
Belden
Columbia
2413 or 5463
A22503
8772
02525
NOTE: Conductors and drain wire must be at least 20 AW G
(American Wire Gage), stranded, and tinned copper. Individual
conductors must be insulated with PVC, PVC/nylon, vinyl,
Teflon, or polyethylene. An aluminum/polyester 100% foil
shield and an outer jacket of PVC, PVC/nylon, chrome vinyl,
or Teflon with a minimum operating temperature range of
–20 C to 60 C is required.
The communication bus shields must be tied together at
each system element. If the communication bus is entirely
within one building, the resulting continuous shield must be
connected to ground at only one single point. If the communication bus cable exits from one building and enters another
building, the shields must be connected to the grounds at a
lightning suppressor in each building (one point only).
START-UP
LID Power Up Display —
the Aquazone System Control panel, the red LED on the top
front of the processor module will flash at a rapid pace (about
twice a second) for the first 20 seconds. This rapid flash will
then be replaced by a slower pace of about once per second.
The green LED below the red LED will start flashing. This
LED indicates input/output communications for accessory input
output modules and t he LID di spla y.
The first six red LEDs on the controller will light.
The yellow LED will flash when the controller is broadcasting CCN messages to a laptop or other computer.
The LID display will show the controller identification,
time and date as shown below.
Aquazone System
hh:mm mm-dd-yy
Log On to the LID Display —
display of the Aquazone System Control panel, perform the
following procedure:
1. Press 3 and then . The LID display will show:
Controller Password
2. Press . The LID display will show:
Log in to Controller
Enter Password
NOTE: The LID display has two modes: Edit mode and
Status/Maintenance mode. If the LID display is in Edit
mode, then the display will only show the word “password.” Press the key to toggle to the Status
mode.
3. Key in the password and press .
NOTE: The default password is 1111.
4. The LID display will show:
Log in to Controller
Logged In
SET
EXPN/EDIT
When power is applied to
To Log On to the LID
ENTER
14
Page 15
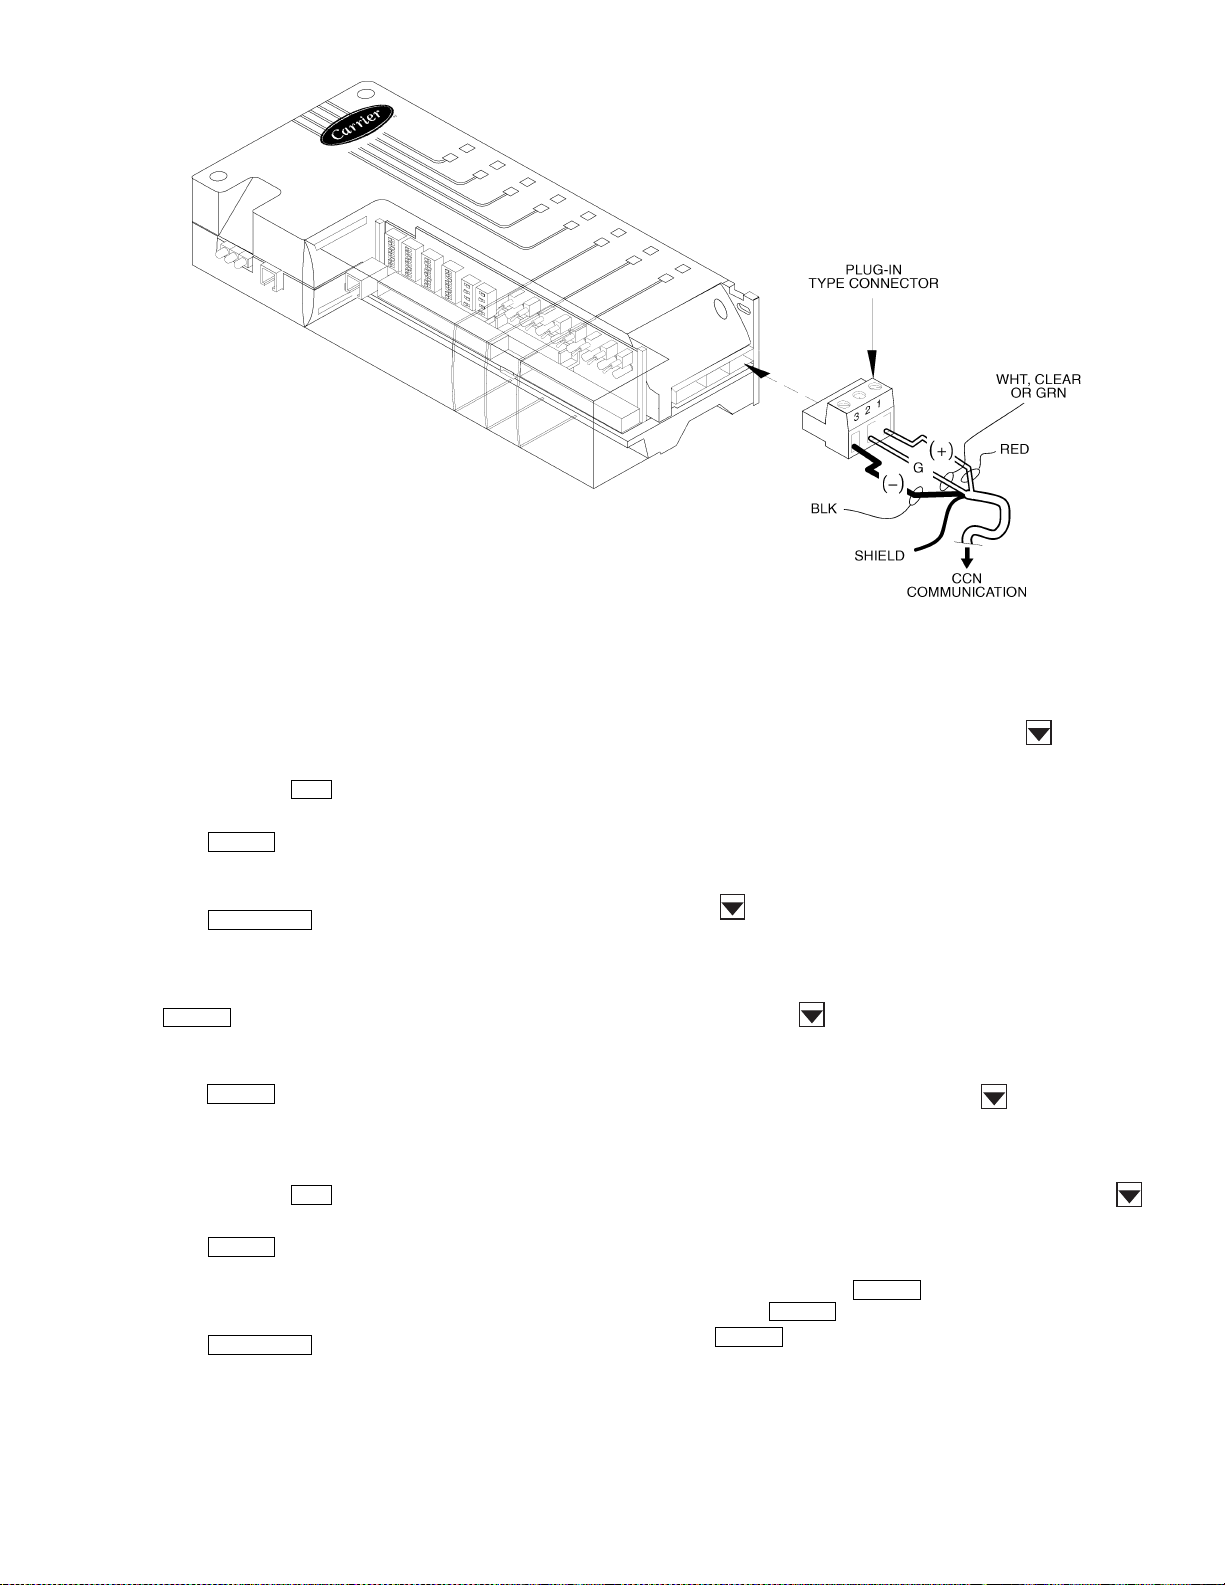
CLEAR
NOTE: Do not bundle power and
communication wiring with sensor
and device wiring.
Fig. 9 — Connection to CCN Bus
Change the Default Password —
To change the
default password, perform the following procedure:
NOTE: The password must have already been entered to per-
form this procedure.
1. Press 3 and then . The LID display will show:
SET
Controller Password
2. Press . The LID display will show:
ENTER
Log in to Controller
Enter Password
3. Press . The LID display will show:
EXPN/EDIT
Password
1111
4. Enter the new password (up to 8 digits) and press
ENTER
. The LID display will show:
Password
(New Password)
5. Press to leave the password screen and return to
CLEAR
the default display screen.
Set the Clock —
The user must be logged in to set the
clock. To set the clock, perform the following procedure:
1. Press 1 and then . The LID display will show:
SET
Set Clock
2. Press . The LID display will show:
ENTER
No Maintenance
NOTE: There is no maintenance informat ion regarding
setting the clock.
3. Press . The LID display will show:
EXPN/EDIT
Time
00:00
4. Enter the time. The time is entered in military time (for
example 14.59 for 2.59 pm). Press the button. The
LID display will show:
Day of W eek
1
5. Enter the day of week. The numbers 1 through 7 correspond to the days of the week (1 = MON, 2 = TUE,
3 = WED, 4 = THUR, 5 = FRI, 6 = SAT, 7 = SUN). Press
. The LID display will show:
Month
1
6. Enter the number of the corresponding month (1 through
12). Press . The LID display will show:
Day
1
7. Enter the day of the month. Press . The LID display
will show:
Year
95
8. Enter the last two digits of the current year. Press .
The LID display will show:
Update Clock
No
9. Press 1 and then to change display to a YES.
ENTER
Press . The clock will be updated. Press
ENTER
twice to view the default display and the clock
should update to the input time and date.
15
Page 16
Configure Schedules —
ALGO
ENTER
ENTER
CLEAR
perform the following procedure:
1. Press 1 and then . The LID display will show:
Occupancy Algorithm
2. Press . The LID display will show:
3. There are 18 occupancy algorithms: OCCPC01 to
4. Press . If the LID display shows “MODE 0”
5. Press . The LID display will show:
6. Press the button. The LID display will show:
7. Input the Occupancy Start time for this period.
8. Press the to input the Occupied To time for period 1.
9. Input the days and times for periods 2 through 8 as
10. Press clear to leave the occupancy programming.
ENTER
Occupancy 01
OCCPC01
OCCPC18. There is one algorithm for each of the
18 zone relay outputs. Use the up and down arrows to
select the desired schedule to modify then press
ENTER
Time Schedule
Enter to select
ENTER
then the user is in Maintenance mode and the LID display
is showing the maintenance information for the occupancy schedule. Press to enter the configuration mode. The LID display will show:
Manual Override Hours
0 hours
This is the first configuration for each occupancy algo-
rithm and is used to put the schedule in or out of occupancy override for the number of hours entered.
Period 1: Day of week
00000000
The eight digits represent if this period should apply to
certain days of the week or holidays. The digits represent
M, Tu, W, Th, F, Sa, Su, and Hol, respectively. Enter a
series of 0s or 1s with a 1 corresponding to the days that
this period should apply to and a 0 for the days that this
schedule should not apply to. As an example, entering
11111000 would make the schedule apply to days Monday through Friday and not apply to Saturday, Sunday, or
Holidays.
Period 1 occupied from
00:00
NOTE: 12.00 represents 12:00 pm.
required.
SCHD
. The LID display will show:
Program Set Points —
form the following procedure:
1. Press 2 and then . The LID display will show:
Setpoint Schedule
2. Press . The LID display will show:
3. Press .
4. If “No maintenance” is displayed, pres s t o
ENTER
Loop W ater Supply
SETPT01
ENTER
view the set point information. The LID display will
show:
Occupied Lo Setpoint
60.00
SCHD
To configure the schedules,
EXPN/EDIT
To program the set points, per-
EXPN/EDIT
This set point is the Loop Low Water Temperat ure set
point.
5. Press . The LID display will show:
Occupied Hi Setpoint
90.00
This set point is the Loop High Water Temperature set
point.
The down or up arrow will also display the Unoccupi ed
Low and High Temperature set points. These values
should be kept the same as the occupied values.
6. The system pressure set point (SETPT02) is used for
controlling variable speed pumps. This can be accessed
by pressing the down or up arrow when SETPT01 is on
the display.
7. Pressing the button will take the user out of the
set point configuration mode.
Check System Parameters —
parameters, press the button. The LID display will
show: “Hardware Points”. Pr ess to view the hardware points. The user can navigate up and down through the
points with the up and down arrows.
Press 2 and to display the software points. The user
can navigate up and down through the points with the up and
down arrows.
Refer to the Configuration section for a listing of the hardware and software points.
Display Alarm History —
there are alarms, the user can view the alarm history by
pressing the button. The LID display will show “Alarm
History.” Press . The LID display will show the date
and type of alarm.
As an example, if the LID display shows:
ALARM — 10:55 11-27-02
SSWT
That display indicates that on 11/27/02 at 10:55 the system
Supply W ater Temperature sensor went into an alarm condition.
The user can view other stored alarms by pressing the up
and down arrows. The five most recent alarms are stored.
CLEAR
To check system
STAT
ENTER
STAT
If the controller is indicating
HIST
ENTER
Configure the Custom Programming Selections —
perform the following procedure:
1. Press 37 . The LID display will show:
2. Press . The LID display will show:
3. Press if the display indicates “No Data.” Press
4. Press 1 and then to change to variable speed
5. Use the down and up arrows to select the other configura-
To configure the custom programming selections,
Custom Program
Global Dictionary
AQUAZONE
then press . Press again.
The LID display should now show:
PUMPS 0=ON/OFF, 1 = VFD
0.00
pumping (if required).
tion parameters as required. See the Configuration section
for an explanation of the configuration parameters.
EXPN/EDIT ENTER
ENTER
16
Page 17
Set the Aquazone™ System Control Panel
-
Controller Address —
Aquazone System Control panel controller, perform the
following procedure:
1. Press 7 and then . Press and then
EXPN/EDIT
.
2. Type in the CCN element number and press .
3. Press the button. Type in the CCN bus number and
press .
ENTER
Log Off from Controller —
zone System Control panel controller Press 3 and then .
Press . Press the button and then press 1. Press
ENTER
ENTER
to log off.
LID Operation —
CCN operator interface that gives the user the capability to
view and modify all configuration and service data for the
Aquazone System Control Panel Controller. The LID also
gives the user the capability to override all point display and
maintenance data.
MENU STRUCTURE — The LID operates on a hierarchy of
four levels (menus).
The top level contains the LID’s major functions. Each
function has a corresponding key on the LID. For an explanation of each function key, refer to Table 7.
The second level separates the major functions (items) into
types with corresponding type numbers that can be used for
quick access.
The third level gives the user the capability t o access each
occurrence of an item. For example, the application may
require two DO — Analog Comparison algorithms. Thus, the
Aquazone System Control Panel Controller would have two
occurrences of the DO — Analog Comparison algorithm.
The fourth level gives the user the capability to access maintenance and configuration data associated with the selected
occurrence of the item.
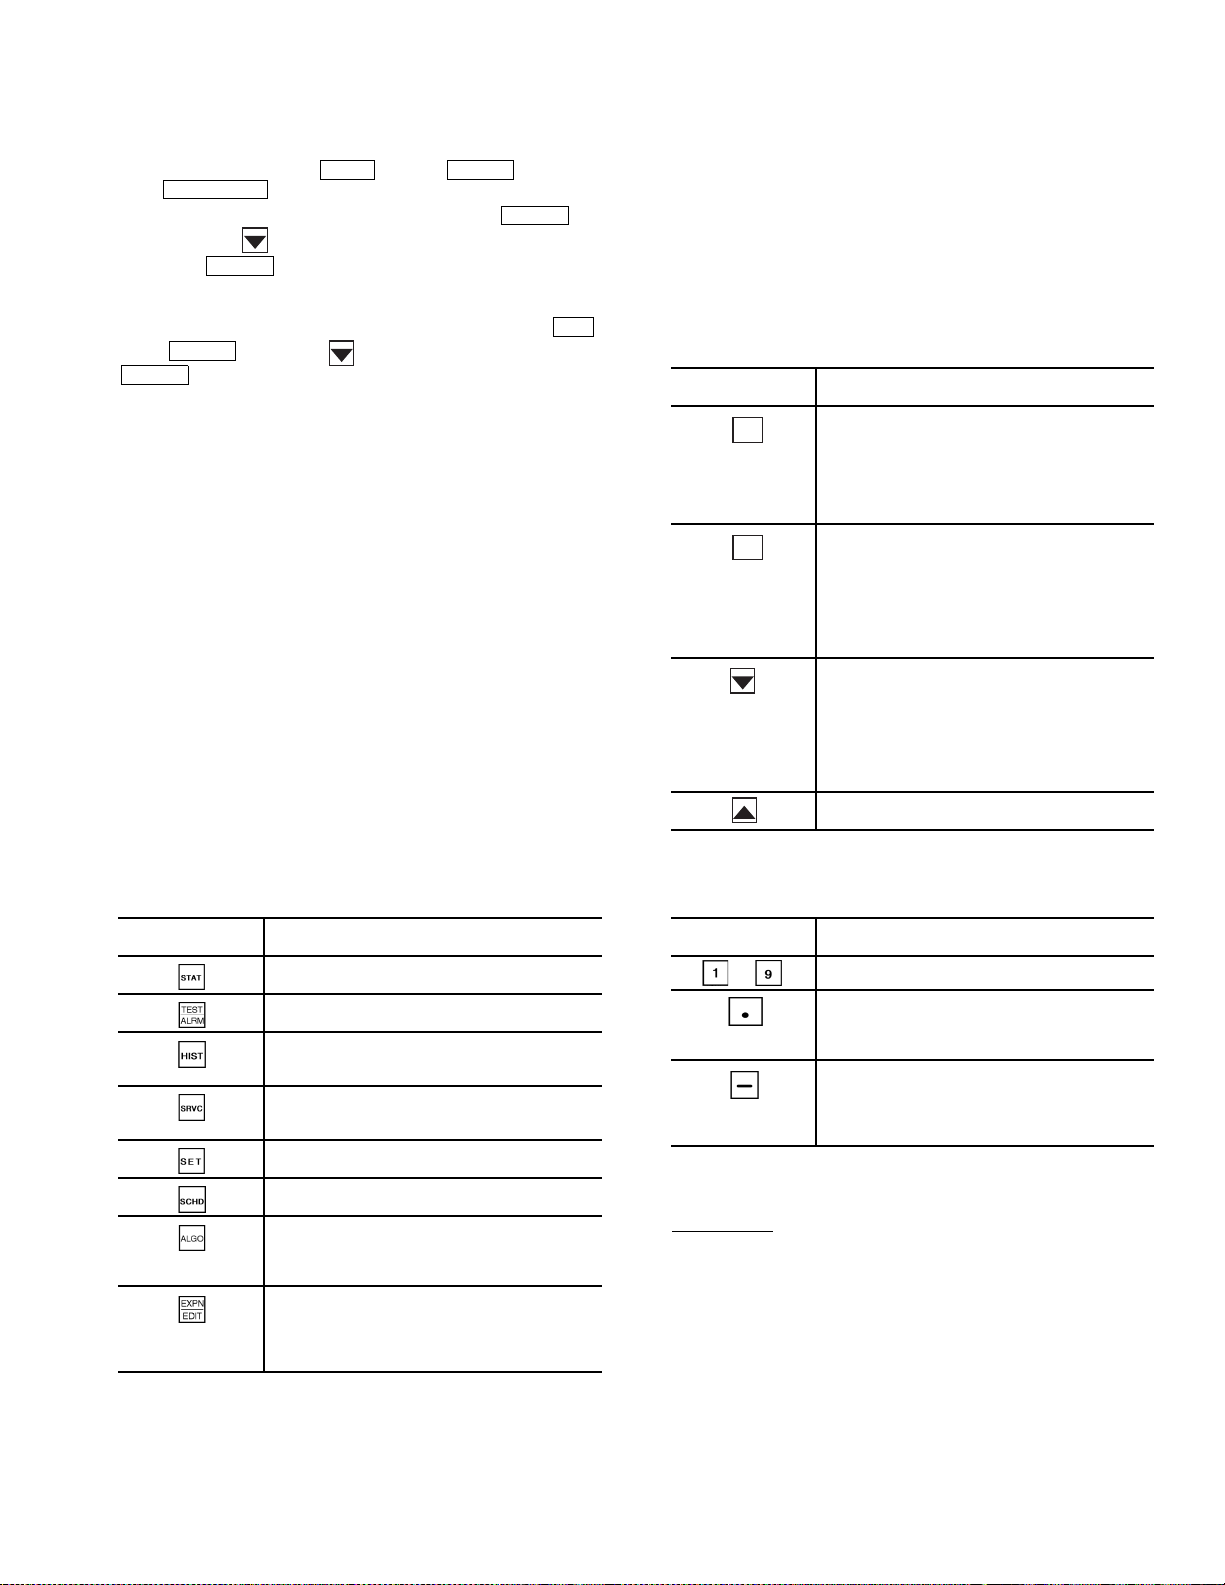
Table 7 — LID Function Keys
To set the address of the
SRVC ENTER
ENTER
To log off from the Aqua-
SET
The Local Interface Device (LID) is a
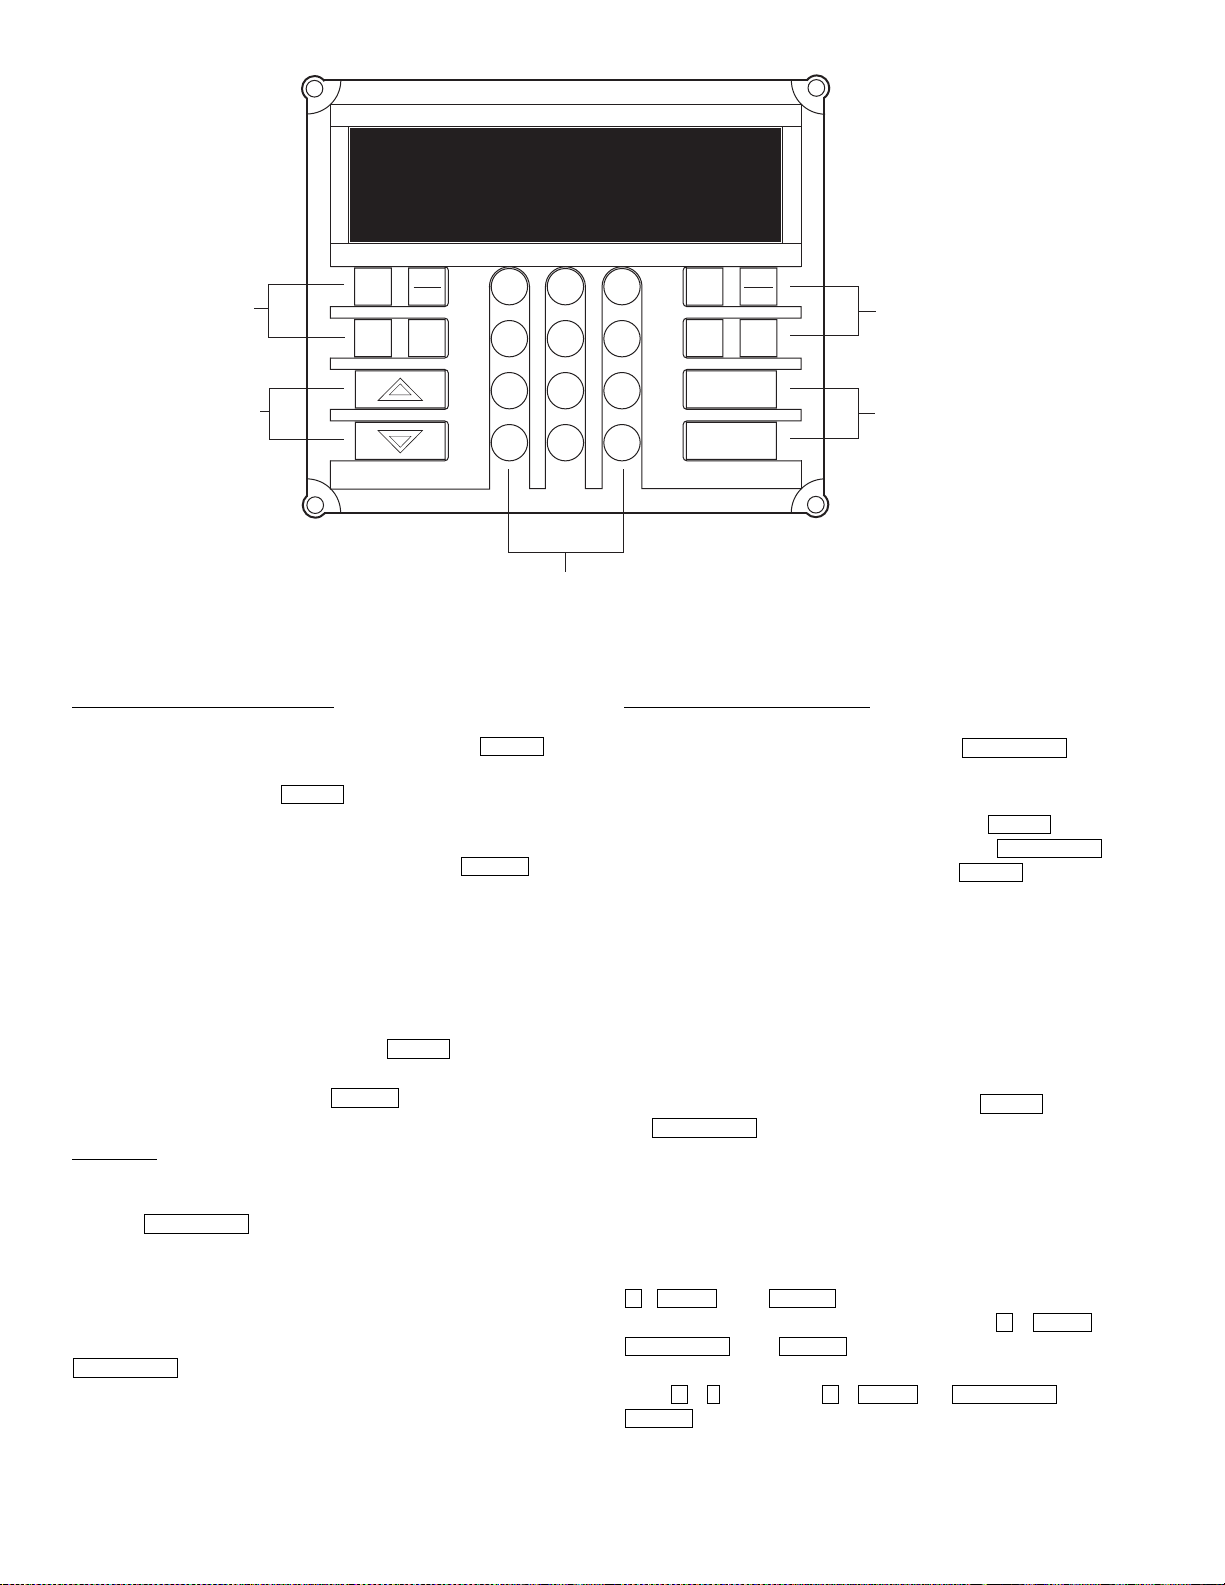
DEFAULT SC RE EN — Figure 10 shows a LID. This screen
provides the user with the 24-character controller name and the
controller’s current time, date, and alarm status. This screen
appears when the LID is powered up and communicating with
the Aquazone System Control Panel Controller or there is no
keyboard activity for10 minutes.
KEYPAD AND DISPLAY — The LID consists of a keypad
with 8 function keys, 4 operative keys, 12 numeric keys (0 to
9, ., and -) and a two-line, alphanumeric l iquid crystal display
(LCD). Each line on the LCD can display up to 24 characters.
See Fig. 10.
T able 8 below defines t he purpose of the LID’s operative keys.
Table 8 — Operative Keys
OPERATIVE
KEYS
CLEAR
ENTER
Clear — performs three operations:
• Cancels a data entry before the user
presses Enter, thus leaving the current
value unchanged.
• Returns a forced point to automatic
control.
• Redisplays the previous menu level.
Enter — performs two operations:
• Selects the displayed item, thus displaying
either its maintenance or configuration
data, depending on whether the user is in
the Status mode or the Edit mode.
• Accepts the value entered in a configuration
decision as new configuration data or as a
forc e.
Down arrow — displays the next configured
item or decision. When the last configured
item or decision is displayed, the LID
re-displays the first configured item or
decision. For example, when the user presses
the down arrow key while viewing the last
configuration decision of an algorithm, the LID
re-displays the first configuration decision.
Up arrow — Displays the previous configured
item or decision.
USE
Table 9 below defines the purpose of the LID’s numeric keys.
Table 9 — Numeric Keys
OPERATIVE
KEYS
LEGEND
AO —
DO —
Analog Output
Digital Output
USE
Status — gives access to maintenance
values and configuration data for points.
Alarm — gives access to maintenance
and configuration data for alarms.
History — gives access to maintenance
and configuration data for history system
functions.
Service — gives access to maintenance
and configuration data for service system
functions.
Setup — gives access to configuration
data for setup system functions.
Schedule — gives access to maintenance
and configuration data for schedules.
Algorithm — gives access to maintenance
and configuration data for AO, DO, and global
algorithms. It also gives access to BEST
custom programs.
Edit — gives the capability to switch from
Status mode to Edit (configuration) mode for
the selected item. (EXPN is not used in
conjunction with the Aquazone System
Control Panel Controller.)
++™
OPERATIVE
KEYS
Numeric keys
Performs two operations:
• Separates items, such as an algorithm from
its occurrence or hours from minutes.
• Serves as a decimal point in numeric values.
Performs two operations:
• Negates the value of numeric keys.
• Clears current data entry value any time it is
not the first key pressed during the data
entry sequence.
USE
VIEWING MODES — The user can view items in either the
Status (maintenance) mode or the Edit (configuration) mode.
Status Mode
— When the user first powers up the LID, it
displays the Aquazone System Control Panel Controller items
in the Status (maintenance) mode. The user may view the
current value or status of an item in the Sta tus mode without
actually logging on to the Aquazone System Control Panel
Controller. Knowing the current values or status of items can
be useful when troubleshooting. For example, the user could
determine if a point was forced.
NOTE: Not all items have maintenance data. If the item you
select does not have maintenance data, the LID will display
“No maintenance.”
17
Page 18
EXPN/EDIT
6
EXPN/EDIT
FUNCTION
KEYS
STAT
SET
EXPN
EDIT
SCHD
3
2
1
5
4
6
TEST
SRVC
ALRM
HIST ALGO
FUNCTION
KEYS
OPERATIVE
KEYS
7
–
NUMERIC KEYS
Fig. 10 — Typical LID Device
Access Items in the Status Mode
— The user can access
maintenance data in the Status mode in two ways:
• Pressing the appropriate function key (i.e., )
ALRM
once to access a category (i.e., alarms) and then continuing to press that key ( ) to scroll thr ough all the
ALRM
items in that category (i.e., Limit Alarm, Setpoint
Alarm, Discrete Alarm, First Out Alarm, Runtime
Alarm, and Number of Starts Alarm). Press
ENTER
display the first maintenance decision.
Scrolling by repeatedly pressing the function key,
NOTE:
displays the name of all the items in that category, whether
or not they are actually configured.
the up or down arrow,
displays only the configured items
Scrolling by pressing
within that category.
• Pressing the appropriate LID numeric key (i.e., 2) and
the appropriate function key (i.e., ) to directly
ALRM
access an item without having to scroll through all the
items in that category. Press to display the first
ENTER
maintenance decision.
Edit Mode
— Because the LID first displays items in the
Status mode when it is powered up, the user must log on to the
connected Aquazone™ System Control Panel Controller and
press the key to switch to the Edit mode.
EXPN/EDIT
While in the Edit mode, the user ca n cha nge the configuration of items. For example, the user could change the value of
an algorithm’s configuration decision.
NOTE: Not all items have configuration data. If the item
selected does not have configuration data, pressing the
EXPN/EDIT
key will have no effect. The LID will display
“No configuration.”
8
9
.
0
Access Items in the Edit Mode
CLEAR
ENTER
OPERATIVE
KEYS
— The two ways to access
items in the Edit mode are th e same as in the Status mode,
except for an additional step — pressing the key .
EXPN/EDIT
The user can access configuration data in the Edit mode in
two ways:
• Pressing the appropriate function key (i.e., ) once
to access a category (i.e., ala rms), pressing
to
and then continuing to press that key ( ) to scroll
ALRM
EXPN/EDIT
ALRM
through all the items in that category (i.e., Limit Alarm,
Setpoint Alarm, Discrete Alarm, First Out Alarm,
Runtime Alarm, and Number of Starts Alar m ) .
Scrolling by repeatedly pressing the function key,
NOTE:
displays the name of all the items in that category, whether
or not they are actually configured.
the up or down arrow,
displays only the configured items
Scrolling by pressing
within that category.
• Pressing the appropriate LID numeric key (i.e., 2),
the appropriate function key (i.e., ), and
ALRM
to directly access an item without having
to scroll through all the items in that category.
QUICK ACCESS IN EITHER STATUS OR EDIT
MODE — Use T able 10 on next page as a reference to directly
access Aquazone System Control Panel Controller items using
a LID in either the Status or Edit modes. For example, to access
maintenance data for the AO — Heating VAV algorithm, press
, , and . To access configuration data for
ALGO ENTER
the AO — Heating VAV algorithm, press , ,
, and
ENTER
.
If the database consisted of two
6 AL G O
AO — Heating VAV algorithms, to access the second one,
press ,
ENTER
(decimal),
6 . 2 ALGO EXPN/EDIT
, , , and
.
18
Page 19

Table 10 — Quick Access Chart
LID
NUM.
KEY
1 AO—Adaptive Control Hardware Points Alarm History Function Definition Limit Set Clock Occupancy
2 AO—Cooling CV Software Points Analog Point Trace Channel Definition Setpoint Real Time Clock Setpoint
3 AO—Cooling VAV Temperature Input Discrete Point Trace System Definition Discrete Controller Password Holiday
4 AO—Fan Tracking Milliamp Input Consumable Channel Setpoint Definition First out N/A S/W Setpoint
5 AO—Heating CV Custom Milliamp Input Internal Consumable Database Control Runtime N/A Network Time
6 AO—Heating VAV Voltage Input Runtime Channel Comfort Controller # of starts N/A N/A
7 AO—Humidity Control Custom Voltage Input N/A CCN Control N/A N/A N/A
8 AO—Mixed Air CV w/IAQ Sensed Discrete Input N/A LID Preferences N/A N/A N/A
9 AO—Mixed Air VAV w/IAQ Latched Discrete Input N/A N/A N/A N/A N/A
10 AO—Permissive Interlock Pulsed Discrete Input N/A N/A N/A N/A N/A
11 AO—Reset Milliamp Output N/A N/A N/A N/A N/A
12 AO—Shared Transducer Custom Milliamp Output N/A N/A N/A N/A N/A
13 AO—Static Pressure Voltage Output N/A N/A N/A N/A N/A
14 DO—Analog Custom Voltage Output N/A N/A N/A N/A N/A
15 DO—DX-Staging VAV Discrete Output N/A N/A N/A N/A N/A
16 DO—Electric Heat CV Stepper Motor Output N/A N/A N/A N/A N/A
17 DO—Electric Heat VAV Discrete Software Point N/A N/A N/A N/A N/A
18 DO—Enthalpy Comparison Analog Software Point N/A N/A N/A N/A N/A
19 DO—Interlock Network Data Out N/A N/A N/A N/A N/A
20 DO—Lighting Control Network Data In N/A N/A N/A N/A N/A
21 DO—Permissive Interlock N/A N/A N/A N/A N/A N/A
22 DO—Pump Control N/A N/A N/A N/A N/A N/A
23 DO—Prop Thermo N/A N/A N/A N/A N/A N/A
24 DO—Prop Ther mo 2 Pipe N/A N/A N/A N/A N/A N/A
25 DO—Prop Ther mo 4 Pipe N/A N/A N/A N/A N/A N/A
26 DO—Staged Thermostat N/A N/A N/A N/A N/A N/A
27 DO—Staging Control N/A N/A N/A N/A N/A N/A
28 DO—Time Clock N/A N/A N/A N/A N/A N/A
29 DO—Time Clock w/Check N/A N/A N/A N/A N/A N/A
30 AOSS Schedule N/A N/A N/A N/A N/A N/A
31 Network Broadcast N/A N/A N/A N/A N/A N/A
32 Linkage/AOSS Schedule N/A N/A N/A N/A N/A N/A
33 NTFC w/Enthalpy Check N/A N/A N/A N/A N/A N/A
34 Sensor Group N/A N/A N/A N/A N/A N/A
35 WSM Air Source N/A N/A N/A N/A N/A N/A
36 WSM Cool Source N/A N/A N/A N/A N/A N/A
37 Custom Program N/A N/A N/A N/A N/A N/A
LEGEND NOTES:
AO — Analog Output
AOSS — Adaptive Optimal Start/Stop
CV — Constant Volume
DO — Digital Output
IAQ — Indoor Air Quality
N/A — Not Available
NTFC — Nighttime Free Cooling
VAV — Variable Air Volume
WSM — Water System Manager
Algorithms
(ALGO)
Status
(STAT)
LID FUNCTION KEYS
History
(HIST)
1. If in the Edit mode and wish to switch to the Status mode, press
or press
2. Not all available selections will have items to select in sublevels.
Service
(SRVC)
EXPN/EDIT
Alarm
(ALRM)
again.
Setup
(SET)
Schedules
(SCHD)
CLEAR
19
Page 20

Sequence of Operation
HEAT RE JECTIO N — When the system pumps are operat ing and there is flow to the system, heat rejection control
compares the system supply water temperature to the hi gh set
point in the system loop temperature set points.
If the system supply water temperature approaches the high
set point, the controller commands the heat rejection outputs to
hold the system supply water temperature as close as possible
to the high set point.
If the system return water temperature drops below the
system high water temperature set point minus a hysteresis
value the heat rejection, outputs are disabled.
When the cooling tower output control type is set to
“variable,” the heat rejection outputs are calculated using a PID
calculation based on the system high temperature water set
point. Both outputs will modulate together.
When the heat rejection control type is set to “staged,” the
outputs will be modulated in a lead/lag configuration. The
modulating signal of the lead output will control a transducer
of two or four stages.
When the lead output is at 100% and the set point is not
being maintained, the lag output will be modulated to produc e
staging from another two or four stage output transducer.
The value output by each analog output is determined by a
PID calculation of leaving water temperature versus the system
high leaving water temperature set point.
In the event that the system high water temperature set point
cannot be maintained and is exceeded by a defined Hysteresis,
the heat rejection outputs will go to maximum output, the
system water source heat pumps will stop cooling, and the
system pumps will circulate water until the system temperatures are returned to the normal range. System cooling will
then be allowed to continue.
HEAT ADDITI ON — When the system pumps are operating
and there is flow to the system, boiler control compares the
system supply water temperature to the low set point in t he
system loop temperature set points.
If the system supply water temperature approaches the low
set point, then the controller commands the boile r outputs to
hold the system supply water temperature as close as possible
to the low set point .
If the system return water temperature rises above the
system low water temperature set point plus a Hysteresis value,
the boiler outputs are disabled.
When the boiler output control type is “variable,” the boiler
outputs will be calculated using a PID calculation based on the
system low temperature water set point. Both outputs will
modulate together.
When the boiler control type is set to “staged,” the outputs
are modulated in a lead lag configuration. The modulating
signal of the lead output controls a transducer (two or four
stages).
When the lead output is at 100% and the set point is not
being maintained, the lag output modulates to produce staging
from another two or four stage output transducer.
The value output by each analog output i s determined by a
PID calculation of leaving water temperature versus the system
low leaving wa ter temp eratu re se t poi nt.
In the event that the system low water temperature set point
cannot be maintained and is exceeded by a defined Hysteresis,
the boiler outputs will go to maximum output, the system water
source heat pumps will stop heating, and the system pumps
will circulate water until the system temperatures are returned
to the normal range. System heating will then be allowed to
continue.
WATER CIR CULATION — When operational mode is determined by one of the 18 occupancy schedules, one of the 18
network or global schedules, or occupancy overrides, then the
system pumps are put in operational mode. Also, if one of t he
system enable outputs is forced on, then the system pumps are
put in operational mode.
If the remote occupancy input is detected, then the pumps
are put in operational mode and all 18 schedules overridden to
on. This energizes all 18 system enable outputs.
The pump control type is configured as either variable flow
or constant flow . When the pumps are in operational mode, the
pump speed output values are determined in one of two ways:
1. In constant flow mode, the desired output (one or two) is
ramped to 100% to turn the pumps on in a lead/lag
fashion, based on run time.
2. In variable flow mode, both outputs are determined by a
Proportional Integral Derivative (PID) calculation, which
controls the system pressure set point.
Whenever the runtime of the lead pump exceeds the
runtime of the lag pump by 50 hours or more, then the pump
with the lesser runtime will become the lead pump.
If the lead pump output is at 100% and the loop water flow
input detects no flow, then the lag pump will be put to 100% to
start the lag pump. Both outputs will stay at 100% as an indicator that the lead pump did not start.
At each subsequent start-up, the lead pump will be tried
again. If both pumps are commanded to 100% and no flow is
detected, then the pumps will be forced off. To restart the system, a pump must be energized manually or the flow switch
must be overridden to indicate flow. The lead pump will start if
there is a demand for system circulation.
In the event that the pumps have been commanded to
provide water flow but either the flow switch does not indicate
flow or the differential pressure sensor does not indicate pressure is present, then the controller assumes that the pumps have
failed and commands the water source heat pumps to turn off
cooling or heat. The system fans will continue to circulate the
air.
In the event of a system shutdown command, the controller
commands the water source heat pumps to turn off all cooling
and heat sources and circulating fans.
20
Page 21

CONFIGURATION
The Aquazone™ System Control Panel contains a Comfort
Controller 6400 programmed using the standard algorithms
and enhanced by BEST++™ custom programming. The
BEST++ Templates for some of the programs have been
removed to prevent field alterations. For other programs,
the templates are included to allow for jobsite customization.
For basic information about the algorithms please refer to the
Comfort Controller Overview and Configuration manual
(808-891). Default configurations are listed later in this section.
Hardware Points —
T able 1 1 and 12.
Table 11 — Hardware Points 1 to 32 (HWP01-32)
DESCRIPTION VALUE NAME
Loop Water Flow
System Supply Water Temp
System Return Water Temp
System Diff. Pressure
Remote Occupancy Mode
System
Override Input Zone 1
Override Input Zone 2
Pump Number 1 Speed
Pump Number 2 Speed
Cooling Tower 1 Level
Cooling Tower 2 Level
Boiler 1 Level
Boiler 2 Level
System for Zone 1
System for Zone 2
Override Input Zone 3
Override Input Zone 4
Override Input Zone 5
Override Input Zone 6
Override Input Zone 7
Override Input Zone 8
Override Input Zone 9
Override Input Zone 10
System for Zone 3
System for Zone 4
System for Zone 5
System for Zone 6
System for Zone 7
System for Zone 8
System for Zone 9
System for Zone 10
Table 12 — Hardware Points 33 to 64 (HWP33-64)
DESCRIPTION VALUE NAME
Override Input Zone 11
Override Input Zone 12
Override Input Zone 13
Override Input Zone 14
Override Input Zone 15
Override Input Zone 16
Override Input Zone 17
Override Input Zone 18
System for Zone 11
System for Zone 12
System for Zone 13
System for Zone 14
System for Zone 15
System for Zone 16
System for Zone 17
System for Zone 18
The hardware points are shown in
Ye s F L O W
60.3 dF SSWT
51.0 dF SRWT
0.00 PSIG SDP
Off RMTOCC
Enable ALLSYS
On OVRIZ1
On OVRIZ2
100.0% PUMP1
0.0% PUMP2
0.0% CTL1
0.0% CTL2
83.2% BLRL1
0.0% BLRL2
Enable SYSZ1
Enable SYSZ2
Off OVRIZ3
Off OVRIZ4
Off OVRIZ5
Off OVRIZ6
Off OVRIZ7
Off OVRIZ8
Off OVRIZ9
Off OVRIZ10
Disable SYSZ3
Disable SYSZ4
Disable SYSZ5
Disable SYSZ6
Disable SYSZ7
Disable SYSZ8
Disable SYSZ9
Disable SYSZ10
Off OVRIZ11
Off OVRIZ12
Off OVRIZ13
Off OVRIZ14
Off OVRIZ15
Off OVRIZ16
Off OVRIZ17
Off OVRIZ18
Disable SYSZ11
Disable SYSZ12
Disable SYSZ13
Disable SYSZ14
Disable SYSZ15
Disable SYSZ16
Disable SYSZ17
Disable SYSZ18
LOOP WATE R FLOW SWITCH — This discrete input is
used to provide a signal that one of the loop water pumps is on.
If both pumps have been commanded to run and no water flow
is detected, then the system water source heat pumps will
run in the fan only mode for DDC (Direct Digital Control)
coordinated heat pump controllers, while the system relays for
thermostat systems will be turned of f.
Loop W ater Flow Switch:
Display Units Discrete ASCII
Default V alue No
Display Range Yes/No
Network Access Read/Write
SYSTEM SUPPLY WATER TEMPERATURE — The system supply water temperature is the temperature of the wat er
being pumped to the system of water source heat pumps. The
temperature is measured by a 10K Thermistor (MCI). This
output and sensor is required for proper function of t he loop
and heat pumps.
System Supply W ater Temperature:
Display Units degrees F (degrees C)
Default Value –40.0
Display Range –40.0-245.0
Network Access Read/Write
SYSTEM RETURN WATER TEMPERATURE — The system return wate r temperature is the temperatu re of the water
returning from the system of water source heat pumps. This
temperature measured by a 10K Thermistor (MCI). This output
and sensor is provided for informational purpose and indicates
the average load caused by the normal operation of the heat
pumps.
System Return Water Temperature:
Display Units degrees F (degrees C)
Default Value –40.0
Display Range –40.0-245.0
Network Access Read/Write
SYSTEM WATER PRESSURE — This sensor is used to
measure the pressure of the supply water to the system of water
source heat pumps. This sensor should be located
2
/3 of the way
down the supply water distribution piping or in a location that
will provide a good reference of the supply water pressure.
This sensor is used to control the speed of variable frequency
drives pumping water to the water source heat pumps. Each
water source heat pump may be equipped with a two position
isolation valve that may be closed when the compressors are
not energized in order to reduce the quantity of water being
pumped through the system.
System Water Pressure:
Display Units in. wg
Default V alue 0.0
Display Range 0.0-5.0
Network Access Read/Write
21
Page 22

REMOTE O CCUPANCY — This input is used to provide an
external clock input to enable all 18 of the local schedules, start
the loop pumps, and enable loop temperature control.
Remote Occupancy:
Display Units Discrete ASCII
Default Value Disable
Display Range Enable/Disable
Network Access Read/Write
SYSTEM/SHUT DOWN — This discrete input is used to
provide a signal from the fire alarm panel that will shut dow n
the Aquazone™ System Control Panel, disable the system
zone relays, and send out a command to shut down the water
source heat pumps.
System/Shut Down:
Display Units Discrete ASCII
Default Value Enable
Display Range EmStop/Enable
Network Access Read/Write
OVERRID E INPUT FOR ZO NE 1- 18 — These inputs are
used to sense an external dry contact that override/enable each
of the 18 local schedules, start the loop pumps, and enable loop
temperature control.
Override Input for Zone 1-18
Display Units Discrete ASCII
Default Value Disable
Display Range Enable/Disable
Network Access Read/Write
PUMP NUMBER 1 — When the Aquazone System Control
Panel is configured for variable speed pumping, this point
displays the speed of Pump 1, as determined by a PID loop set
to control supply water pressure. When the Aquazone system
control panel is configured for constant flow this point will
display 0% when the pump is OFF and 100% when the pump
is on.
Pump Number 1
Display Units %
Default V alue 0
Display range 0-100
Network Access Read/Write
PUMP NUMBER 2 — When the Aquazone system control
panel is configured for variable speed pumping, this point
displays the speed of Pump 2, as determined by a PID loop set
to control supply water pressure. When the Aquazone system
control panel is configured for constant flow this point will
display 0% when the pump is OFF and 100% when the pump
is on.
Pump Number 2
Display Units %
Default V alue 0
Display range 0-100
Network Access Read/Write
NUMBER O F STAGES — Table 13 is used with the following four points to determine the number of stages that should
be active for the percent output displayed and the hardware
installed with the Aquazone system control panel. When the
outputs are configured for staging the second output will ramp
up when the first output has reached 100%. While the second
output is controlling the temperature the first will be held at
100%. When the second output ramps down to zero percent the
first output will resume temperature control.
Table 13 — Total Number of Stages
TOTAL NUMBER OF STAGES 2
Output Displayed
Stage Activated
Stage Deactivated
TOTAL NUMBER OF STAGES 4
Output Displayed
Stage Activated
Stage Deactivated
20 25 45 50 70 75 95 100
— 1 — 2 — 3 — 4
1 — 2 — 3 — 4 —
45 50 95 100
— 1 — 2
1 — 2 —
COOLING TOWER 1 SPEED/LEVEL — When the Aquazone system control panel is configured for variable speed
cooling tower control, this point displays the speed of tower
fan 1. When the Aquazone system control panel is equi pped
for staged output, this point displays the percent of stages
commanded. The actual number of stages active will be
determined by the staging cards ordered with the Aquazone
system control panel. See Table 13. The value displayed is
determined by a PID (proportional/integral/derivative) loop set
to control the supply-water temperature at the Occupied high
set point.
Cooling T ower 1 Speed/Level
Display Units %
Default V alue 0
Display range 0-100
Network Access Read/Write
COOLING TOWER 2 SPEED/LEVEL — When the Aquazone system control panel is configured for variable speed
cooling tower control, this point displays the speed of tower fan
2. When the Aquazone system control panel is equipped for
staged output, this point displays the percent of stages commanded. The actual number of stages active will be determined
by the staging cards ordered with the Aquazone system control
panel. See Table 13. The value displayed is determined by a
PID loop set to control the supply water temperature at the
Occupied high set point.
Cooling T ower 2 Speed/Level
Display Units %
Default V alue 0
Display range 0-100
Network Access Read/Write
HEAT SOURCE 1 SPEED/LEVEL — When the Aquazone
system control panel is configured for modulating heat source,
this point displays the percent open or percent heat capacity requested. When the Aquazone system control panel is equipped
for staged output, this point displays the percent of stages commanded. The actual number of stages active will be determined
by the staging cards ordered with the Aquazone system control
panel. See Table 13. The value displayed is determined by a
PID loop set to control the supply water temperature at the Occupied Low set point.
Heat Source 1 Speed/Level
Display Units %
Default V alue 0
Display range 0-100
Network Access Read/Write
22
Page 23

HEAT SOURCE 2 SPEED/LEVEL — When the Aquazone™
system control panel is configured for modulating heat source,
this point displays the percent open or percent heat capacity
requested. When the Aquazone system control panel is
equipped for staged output, this point displays the percent of
stages commanded. The actual number of stages active will be
determined by the staging cards ordered with the Aquazone
system control panel. See Table 8. The value displayed is
determined by a PID loop set to control the supply water
temperature at the Occupied Low set point.
Heat Source 2 Speed/Level
Display Units %
Default V alue 0
Display range 0 100
Network Access Read/Write
SYSTEM FOR ZONE 1-1 8 — These Outputs are is used to
enable a group of thermostats by energizing and deenergizing
the associ at ed zon e r ela ys .
System for Zone 1-18
Display Units Discrete ASCII
Default V alue Off
Display Range On/Off
Network Access Read/Write
Software Points —
The software points are shown in
T able 14.
Table 14 — Software Points 65 to 96 (SWP65-96)
DESCRIPTION VALUE NAME
Outside Air Temperature
Lead Pump Const. Flow
Variable Speed Pumping
Cooling Tower 1
Cooling Tower 2
Heat Control 1
Heat Control 2
Pump 1 Run Time
Pump 2 Run Time
94.94 dF OAT
1.00 LEAD
Disable VSPC
Disable COOLT1
Disable COOLT2
Enable HEATC1
Disable HEATC2
253.00 HOURS PUMP1RT
250.00 HOURS PUMP2RT
OUTSIDE AIR TEMPERATURE — This software point is
included to receive an Outside Air Broadcast. If the system
is set up with Outside Air Broadcast, a control force will
be displayed on the OAT point of all system controllers.
For systems with factory-installed PremierLink™ controllers,
the individual unit leaving water temperature sensors are
connected to the OAT point. When OAT broadcast is enabled,
the leaving water temperature sensors connected to the
PremierLink controllers may be displayed temporarily by
removing the Outside Air Broadcast force. The Outside Air
Broadcast will be refreshed the next time the outside-air
temperature is broadcast.
Outside Air Temperature:
Display Units degrees F (degrees C)
Default Value –40.0
Display Range –40.0-245.0
Network Access Read/Write
LEAD PUMP CONSTANT FLOW — When the Aquazone
system control panel is configured for constant flow, this point
displays the current lead pump. This point may be forced to
keep the lead pump the same for more than the maximum
hours difference required for pump rotation. When the pump
runtime hours difference becomes greater than the maximum
number configured the pump runtime hours for both pumps
will reset to zero.
For example, the default maximum hours difference for
rotation is 50 hours. If the Lead Pump was forced to 2, so that
pump 2 is the lead pump, then the pump 2 runtime hours will
accumulate until the difference between the pump 1 and pump
2 runtime hours becomes greater than 50. The both will reset to
zero and pump 2 will start accumulating again.
Lead Pump Constant Flow:
Display Units Numeric
Default V alue 1
Display Range 1 or 2
Network Access Read/Write
VARIABLE SPEED PUMPING — If the Aquazone system
control panel is configured for variable speed pumping, this
point will indicate when the pumps are requested to be running.
Variable Speed Pumping:
Display Units Discrete ASCII
Default V alue Disable
Display Range Enable/Disable
Network Access Read/Write
COOLING TOW ER 1 — This point indicates when the first
cooling output is requested to control loop temperature.
Cooling T ower 1
Display Units Discrete ASCII
Default V alue Disable
Display Range Enable/Disable
Network Access Read/Write
COOLING TOWER 2 — This point indicates w hen the second cooling output is requested to control loop temperature.
Cooling T ower 2
Display Units Discrete ASCII
Default V alue Disable
Display Range Enable/Disable
Network Access Read/Write
HEAT CONTROL 1 — This point indicates when the first
heat output is requested to control loop temperature.
Heat Control 1
Display Units Discrete ASCII
Default V alue Disable
Display Range Enable/Disable
Network Access Read/Write
HEAT CONTROL 2 — This point indicates when t h e second
heat output is requested to control loop temperature.
Heat Control 2
Display Units Discrete ASCII
Default V alue Disable
Display Range Enable/Disable
Network Access Read/Write
PUMP 1 RUN TIM E — This point displays the number of
hours that the pump has run. When the maximum number of
hours is exceeded (9999 hours), both pumps run time hours
will reset to 0.
Pump 1 Run Time
Display Units Numeric
Default V alue 0
Display Range 0 to 9999
Network Access Read/Write
23
Page 24

PUMP 2 RUN TIME — This point displays the number of
hours that the pump has run. When the maximum number of
hours is exceeded (9999 hours), both pumps run time hours
will reset to 0.
Pump 2 Run Time
Display Units Numeric
Default V alue 0
Display Range 0 to 9999
Network Access Read/Write
Loop Supply Water Set Point —
The low set point
is the low limit the supply water temperature may drop down to
before the heat source will be activated to m aintain the Loop
Supply water temperature. The high set point is the high limit
the supply water may rise to before the cooling source w ill be
activated to maintain the loop supply water temperature. See
Table 15. Set points can also be modified with slide bars in the
ComfortVIEW™ software. See Fig. 11.
Table 15 — Loop Supply Water (SETPT01)
DESCRIPTION VALUE NAME
Occupied Lo Setpoint
Occupied Hi Setpoint
Unoccupied Lo Setpoint
Unoccupied Hi Setpoint
60.00 df OccLow
90.00 df OccHgh
60.00 df UnOccLow
90.00 df UnOccHgh
Occupied High:
Configuration Units PSIG
Configuration Range –9999.9 to 9999.9
Default Value 10.0
Unoccupied Low:
Configuration Units PSIG
Configuration Range –9999.9 to 9999.9
Default Value 10.0
Unoccupied High:
Configuration Units PSIG
Configuration Range –9999.9 to 9999.9
Default Value 10.0
Global Dictionary —
The Global Dictionary table is
shown in T able 17.
Table 17 — Global Dictionary (AQUAMASC)
DESCRIPTION VALUE NAME
PUMPS 0=ON/OFF,1=VFD
Pump Rotation Hours
TOWERS 0=STAGED,1=VFD
HEAT 0=STAGED,1=MOD/VFD
Sched Bcst 0=N,1=Y
0.00 PUMP_CFG
50.00 ROT_TIME
0.00 COOL_CFG
0.00 HEAT_CFG
0.00 GLOBAL
Occupied Low:
Configuration Units degrees F (degrees C)
Configuration Range –40.0 to 245.0
Default Value 60.0
Occupied High:
Configuration Units degrees F (degrees C)
Configuration Range –40.0 to 245.0
Default Value 90.0
Unoccupied Low:
Configuration Units degrees F (degrees C)
Configuration Range –40.0 to 245.0
Default Value 60.0
Unoccupied High:
Configuration Units degrees F (degrees C)
Configuration Range –40.0 to 245.0
Default Value 90.0
System Pressure Set Point —
This set point defines
the system pressure that the variable speed pumps will operate
when the Aquazone™ system control panel is configured for
variable speed pumping. See Table 16. Set points can also be
modified with slide bars in the ComfortVIEW softwa re. See
Fig. 12.
Table 16 — System Pressure (SETPT02)
DESCRIPTION VALUE NAME
Occupied Lo Setpoint
Occupied Hi Setpoint
Unoccupied Lo Setpoint
Unoccupied Hi Setpoint
10.00 PSIG OccLow
10.00 PSIG OccHgh
10.00 PSIG UnOccLow
10.00 PSIG UnOccHgh
Occupied Low:
Configuration Units PSIG
Configuration Range –9999.9 to 9999.9
Default Value 10.0
PUMP CONTRO L TYPE — This configuration determines
how the pump outputs will be controlled. If the pump relays
were ordered with the Aquazone system control panel, then the
pump control type should be set to 0. If the pump outputs will
control variable speed pumps, then the configuration should be
set to 1. When variable speed control is selected, both outputs
will control simultaneously.
Pump Control T ype:
Configuration Units None
Configuration Range 0 or 1
Default Value 0
PUMP ROTATION HOURS — When the pump control type
is set to 0 (on/off), this configuration is used to set the maximum number of hours the lead pump may accumulate beyond
the numbers of hours accumulated for the lag pump. When this
difference in hours is reached, the lead pump will change to the
pump with the lesser number of accumulated run hours.
Pump Rotation Hours:
Configuration Units HOURS
Configuration Range 0 to 9999
Default Value 50.0
TOWER/COOLING SOURCE CONTROL TYPE — This
configuration determines how the tower outputs will be controlled. If panels were ordered with the stage output tr ansducers,
then tower control type should be set to 0. If the tower outputs
will control variable speed tower fans, then the configuration
should be set to 1.
Variable speed configuration will control both outputs si-
multaneously.
T ower/Cooling Source Control Type:
Configuration Units None
Configuration Range 0 or 1
Default V alue 0
24
Page 25
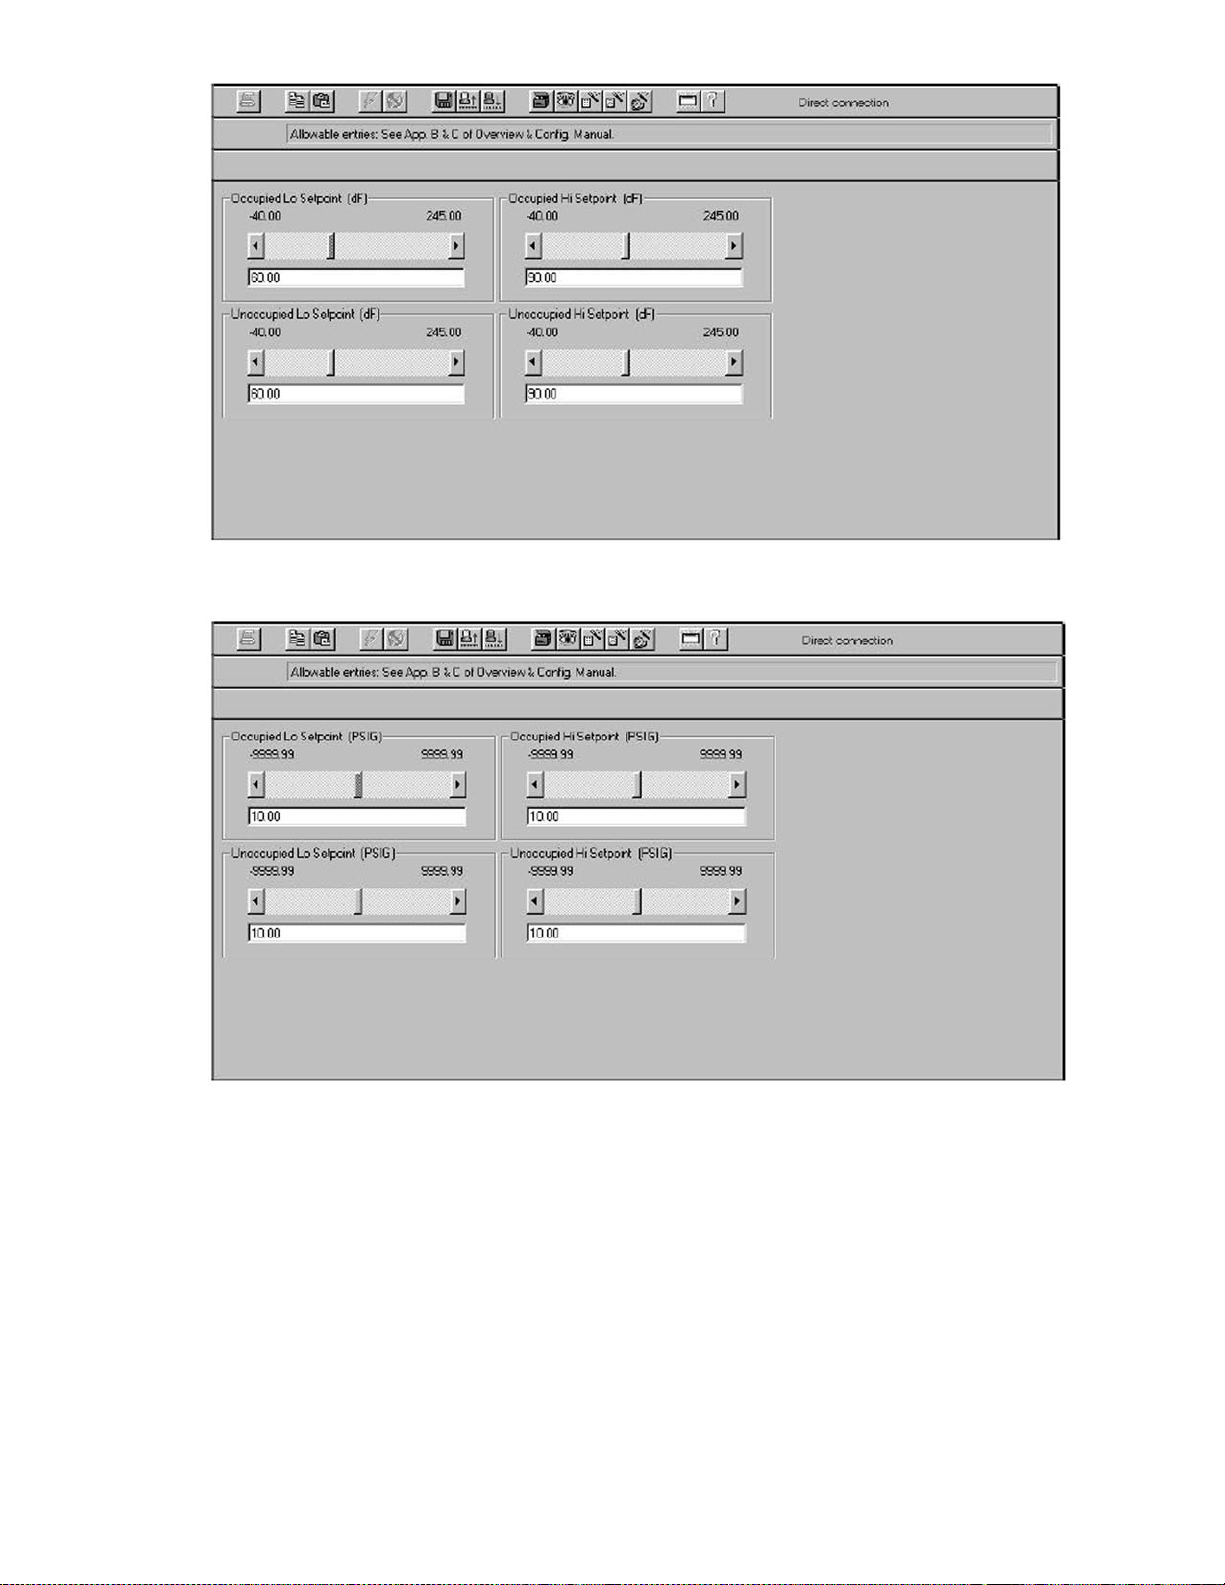
Fig. 11 — Loop Supply Water Set Point Screen
Fig. 12 — System Pressure Set Point Screen
BOILER/HEAT SOURCE CONTROL TYPE — This configuration determines how the tower outputs will be controlled.
If panels were ordered with the stage output transducers, then
tower control type should be set to 0. If the tower outputs will
control variable speed tower fans, then the configuration
should be set to 1.
Variable speed configuration will control both outputs
simultaneous ly.
Boiler/Heat Source Control Type:
Configuration Units None
Configuration Range 0 or 1
Default Value 0
GLOBAL SCHEDULE BROADCAST — If des i red, the
schedules 1 through 18 in the Aquazone™ system control
panel may be reconfigured to be schedules 65 through 82 (so
that they may be used as global schedules). If this is done, this
configuration must be set to 1. Local inputs for overriding
zones 1 to 18 or the remote occupancy input will then affect the
global schedules 65 through 82. In this condition local override
of individual PremierLink™ controllers will not occur since
the comfort controller does not respond to the command from
any PremierLink controller to override a global schedule. It is
recommended to allow the PremierLink controllers to broadcast global schedules.
25
Page 26

The loop controller comes pre-configured with local schedules
1 through 18. It is also pre-configured with network schedules 65
through 82 in order to receive global schedules broadcast from
PremierLink™ controllers or other networked controllers. See
Network Time Schedule section. This is the recommended
method for using global schedu les since a PremierLink controller
(when set up to broadcast a global schedule) will respond to a
schedule override request from another PremierLink controller
that it is broadcasting the global schedule. This allows all
PremierLink controllers following the same global schedule to
enter occupancy override as a group.
Global Schedule Broadcast:
Configuration Units None
Configuration Range 0 or 1
Default Value 0
Heat Pump Default Configuration —
The heat pump
default configuration table is shown in Table 18.
Table 18 — Pump 1 Spee
DESCRIPTION VALUE NAME
Analog Output Point
Status Point
Time Schedule
Setpoint Schedule
Reset Point
Reset
Start Reset Value
Stop Reset Value
Control Point
PID_Master_Loop
Proportional Gain
Integral Gain
Derivative Gain
Disabled Output Value
Minimum Output Value
Maximum Output Value
Starting Value
Block Iteration Rate
Powe r on Delay
*User configured.
Cool Source Default Configuration —
d (
PUMP_1)
PUMP1 Name*
VSPC Name*
OCCPC00 Name*
SETPT02 Name*
TEMP_I00 Name*
–40.00 PSIG StrtRst
245.00 PSIG StopRst
SDP Name*
2.0 KP
1.0 KI
0.0 KD
0.0% DsblOut
10.0% MinOut
100.0% MaxOut
35.0% StartVal
10 sec BlkRate
0 sec PowerUp
The cool
source default configuration table is shown in Table 19.
Table 19 — Cooling Tower 1 (COOLT_1)
DESCRIPTION VALUE NAME
Analog Output Point
Status Point
Time Schedule
Setpoint Schedule
Reset Point
Reset
Start Reset Value
Stop Reset Value
Control Point
PID_Master_Loop
Proportional Gain
Integral Gain
Derivative Gain
Disabled Output Value
Minimum Output Value
Maximum Output Value
Starting Value
Block Iteration Rate
Power on Delay
*User configured.
Heat Source Default Configuration —
CTL1 Name*
COOLT1 Name*
OCCPC00 Name*
SETPT01 Name*
SRWT Name*
–40.00 dF StrtRst
–39.00 dF StopRst
SSWT Name*
–3.0 KP
–1.5 KI
0.0 KD
0.0% DsblOut
0.0% MinOut
100.0% MaxOut
0.0% StartVal
10 sec BlkRate
0 sec PowerUp
The heat
source default configuration table is shown in Table 20.
Table 20 — Heating Control 1 (HEAT_1)
DESCRIPTION VALUE NAME
Analog Output Point
Status Point
Time Schedule
Setpoint Schedule
Reset Point
Reset
Start Reset Value
Stop Reset Value
Control Point
PID_Master_Loop
Proportional Gain
Integral Gain
Derivative Gain
Disabled Output Value
Minimum Output Value
Maximum Output Value
Starting Value
Block Iteration Rate
Power on Delay
*User configured.
Occupancy Configuration Screen —
BLRL1 Name*
HEATC1 Name*
OCCPC00 Name*
SETPT01 Name*
TEMP_I00 Name*
–40.00 dF StrtRst
245.00 dF StopRst
SSWT Name*
3.0 KP
1.5 KI
0.0% KD
0.0% DsblOut
0.0% MinOut
100.0% MaxOut
0.0% StartVal
10 sec BlkRate
0 sec PowerUp
The Occupancy Configuration Screen is used to configure the occupancy
schedule. See Table 21.
MANUAL OVERRIDE HOURS — The Manual Override
Hours point is used to command a timed override by entering
the number of hours the override will be in effect. If the occupancy schedule is occupied when this number is downloaded,
the current occupancy period will be extended by the num ber
of hours downloaded.
If the current occupancy period is unoccupied when the
occupancy override is initiated, the mode w ill change to oc cupied for the duration of the number of hours downloaded. If the
occupancy override is due to end after the start of the next
occupancy period, the mode will transition from occupancy
override to occupied without becoming unoccupied and the
occupancy override timer will be reset.
An active occupancy override or a pending occupancy
override may be canceled by downloading a zero to this
configuration. Once a number other than zero has been downloaded to this configuration, any subsequent downloads of any
value other than zero will be ignored by the controller.
Manual Override
Hours: Units hours
Range 0 to 4
Default V alue 0
OCCUPANCY SCHEDULE — For flexibility of scheduling,
the occupancy programming is broken into eight separate periods. For each period the schedule contains the following fields:
Day of W eek, Occupied From, and Occupied T o.
DAY OF WEEK — The Day of Week configuration consists
of eight fields corresponding to the seven days of the week and
a holiday field in the following order: Monday, Tuesday,
W ednesday, Thursday, Friday, Saturday, Sunday, Holiday.
It is displayed as:
M T W Th Fr Sa Su Hol
0 0 0 0 0 0 0 0
If a 1 is configured in the corresponding place for a certain
day of the week, the related “Occupied from” and “O ccupied
to” times for that period will take effect on that day of the
week. If a 1 is placed in the holiday field, the related times will
take effect on a day configured as a holiday. A zero means the
schedule period will not apply to that day.
Day of week: Range 0 or 1
Default Values 11111111 for period 1,
00000000 for the rest of
the periods
26
Page 27

OCCUPIED FROM — This field is used to configure the
hour and minute, in military time, that the mode for the
PremierLink™ controller will switch to occupied.
Occupied From: Units Hours:Minutes
Range 00:00 to 24:00
(Minutes 00 to 59)
Default Value 00:00
OCCUPIED TO — This field is used to configure the hour
and minute, in military time, that the mode for the PremierLink
controller switches from occupied to unoccupied.
Occupied To: Units Hours:Minutes
Range 00:00 to 24:00
(Minutes 00 to 59)
Default Value 24:00
Table 21 — Occupancy Schedule (OCCPC01)
DESCRIPTION VALUE NAME
Time Schedule
Manual Override Hours
Period 1: Day of Week
Period 1: Occupied from
Period 1: Occupied to
Period 2: Day of Week
Period 2: Occupied from
Period 2: Occupied to
Period 3: Day of Week
Period 3: Occupied from
Period 3: Occupied to
Period 4: Day of Week
Period 4: Occupied from
Period 4: Occupied to
Period 5: Day of Week
Period 5: Occupied from
Period 5: Occupied to
Period 6: Day of Week
Period 6: Occupied from
Period 6: Occupied to
Period 7: Day of Week
Period 7: Occupied from
Period 7: Occupied to
Period 8: Day of Week
Period 8: Occupied from
Period 8: Occupied to
Push Button Override
Thermostat Override
Time Delay
Timed Override Duration
Power on Delay
*User configured.
0 hours Ovrd
00000000 DOW1
00:00 Occ1
24:00 UnOcc1
00000000 DOW2
00:00 Occ2
24:00 UnOcc2
00000000 DOW3
00:00 Occ3
24:00 UnOcc3
00000000 DOW4
00:00 Occ4
24:00 UnOcc4
00000000 DOW5
00:00 Occ5
24:00 UnOcc5
00000000 DOW6
00:00 Occ6
24:00 UnOcc6
00000000 DOW7
00:00 Occ7
24:00 UnOcc7
00000000 DOW8
00:00 Occ8
24:00 UnOcc8
LATCHI00 Name*
TEMP_I00 Name*
5 min Value*
5 min Value*
0 sec PowerUp
Network Time Schedule —
The network time schedule
allows the occupancy schedule in another device on the CCN
to control the Aquazone™ system control panel’s occupancy
state.
Each time the occupancy schedule on the controlling device
changes to occupied, the controlling device broadcasts an
occupancy flag over the CCN. To receive an occupancy flag,
a network time created. Up to 18 network time schedules are
configured. The schedules are sequentially named OCCPC65E
to OCCPC82E, however Service Tool or Building Supervisor
software can be used to modify the names up to OCCPC99E.
Holiday Schedules —
A Holiday schedule allows the
user the capability to specify days of the year (holidays) on
which the Aquazone system control panel will follow the
holiday time schedule instead of the normal time schedule for
that day. Holiday time schedules are normally used to program
a weekday in unoccupied mode for the entire day since the
building will be empty during a holiday.
There are 16 different holiday schedules that can be created.
Holiday schedules can also last more than one day, as long as
the days are consecutive.
Holiday schedules must be configured on the time and date
broadcaster element on the CCN. If the Comfort Controller on
the Aquazone system control panel is the broadcaster, it will
send holiday status to all other system elements on the CCN. If
the Comfort Controller is not the broadcaster, do not configure
the holiday schedules for it, as they will not be used.
To configure a holiday schedule, ente r a “1” i n th e Holiday
column of the Day of Week point of the Occupancy schedule.
27
Page 28

Copyright 2003 Carrier Corporation
Manufacturer reserves the right to discontinue, or change at any time, specifications or designs without notice and without incurring obligations.
Book 1 4
Ta b 5 a 5 a
PC 111 Catalog No. 535-00077 Printed in U.S.A. Form 50RLP-1SI Pg 28 1-03 Replaces: New
 Loading...