

Page 1
q
y
g
g
g
Air-Cooled Condenser Units
Motormaster® Low Ambient Controls
Wiring Diagrams
50/60 Hz
WIRING DIAGRAM INDEX
Fig. No.
Standard Unit Control Schematic 09DK . . . . . . . . . . . . . . . . . 3
®
Motormaster
Motormaster, 09DK 460 v, 575 v (60 Hz) . . . . . . . . . . . . . . . . 5
Fan Cycling Control . . . . . . . . . . . . . . . . . . . . . . . . . . . . . . . . 12
, 09DK 208/230 (60 Hz) . . . . . . . . . . . . . . . . . . 4
LEGEND
(For All Figures)
09DK020-044
ATS —
EQUIP —
FC —
FM —
GND —
TB —
Air Temperature Switch Terminal Block Connection
uipment Marked Terminal
E
Fan Contactor Unmarked Terminal
Fan Motor Factor
Ground Field Control Wirin
Terminal Block Connection Field Power Wirin
NOTES (Figs. 3-5)
1. For field power connections, splice field wires to (3)
leads from contactor number 1 (FC1).
.
2.
Control Circuit
Wiring
220 v 380 v, 60 Hz
230 v
115 v
Use 14 AWG copper conductors only for
control circuit wiring.
Power Supply
Wiring
230 v, 50 Hz
400 v, 50 Hz
208/230 v, 60 Hz
460 v, 60 Hz
575 v, 60 Hz
Wirin
3. Fan motors are terminally protected. Thre e-phase motors
are protected against primary single-phasing conditions.
4. Replacement of original wire s must be with type 90 C
wire or its equivalent.
5. Factory wiring is in accordanc e with National Electrical
(NEC). Field modifications or additions must be in compliance with all applicable codes.
6. Wiring for field power supply must be rated 60 C. Use
copper, copper-clad aluminum or aluminum conductors.
Manufacturer reserves the right to discontinue, or change at any time, specifications or designs without notice and without incurring obligations.
Book 2
Ta b 4 a
PC 111 Catalog No. 530-913 Printed in U.S.A. Form 09DK-4W Pg 1 4-00 Replaces: 09DK-1W
Page 2
SAFETY CONSIDERATIONS
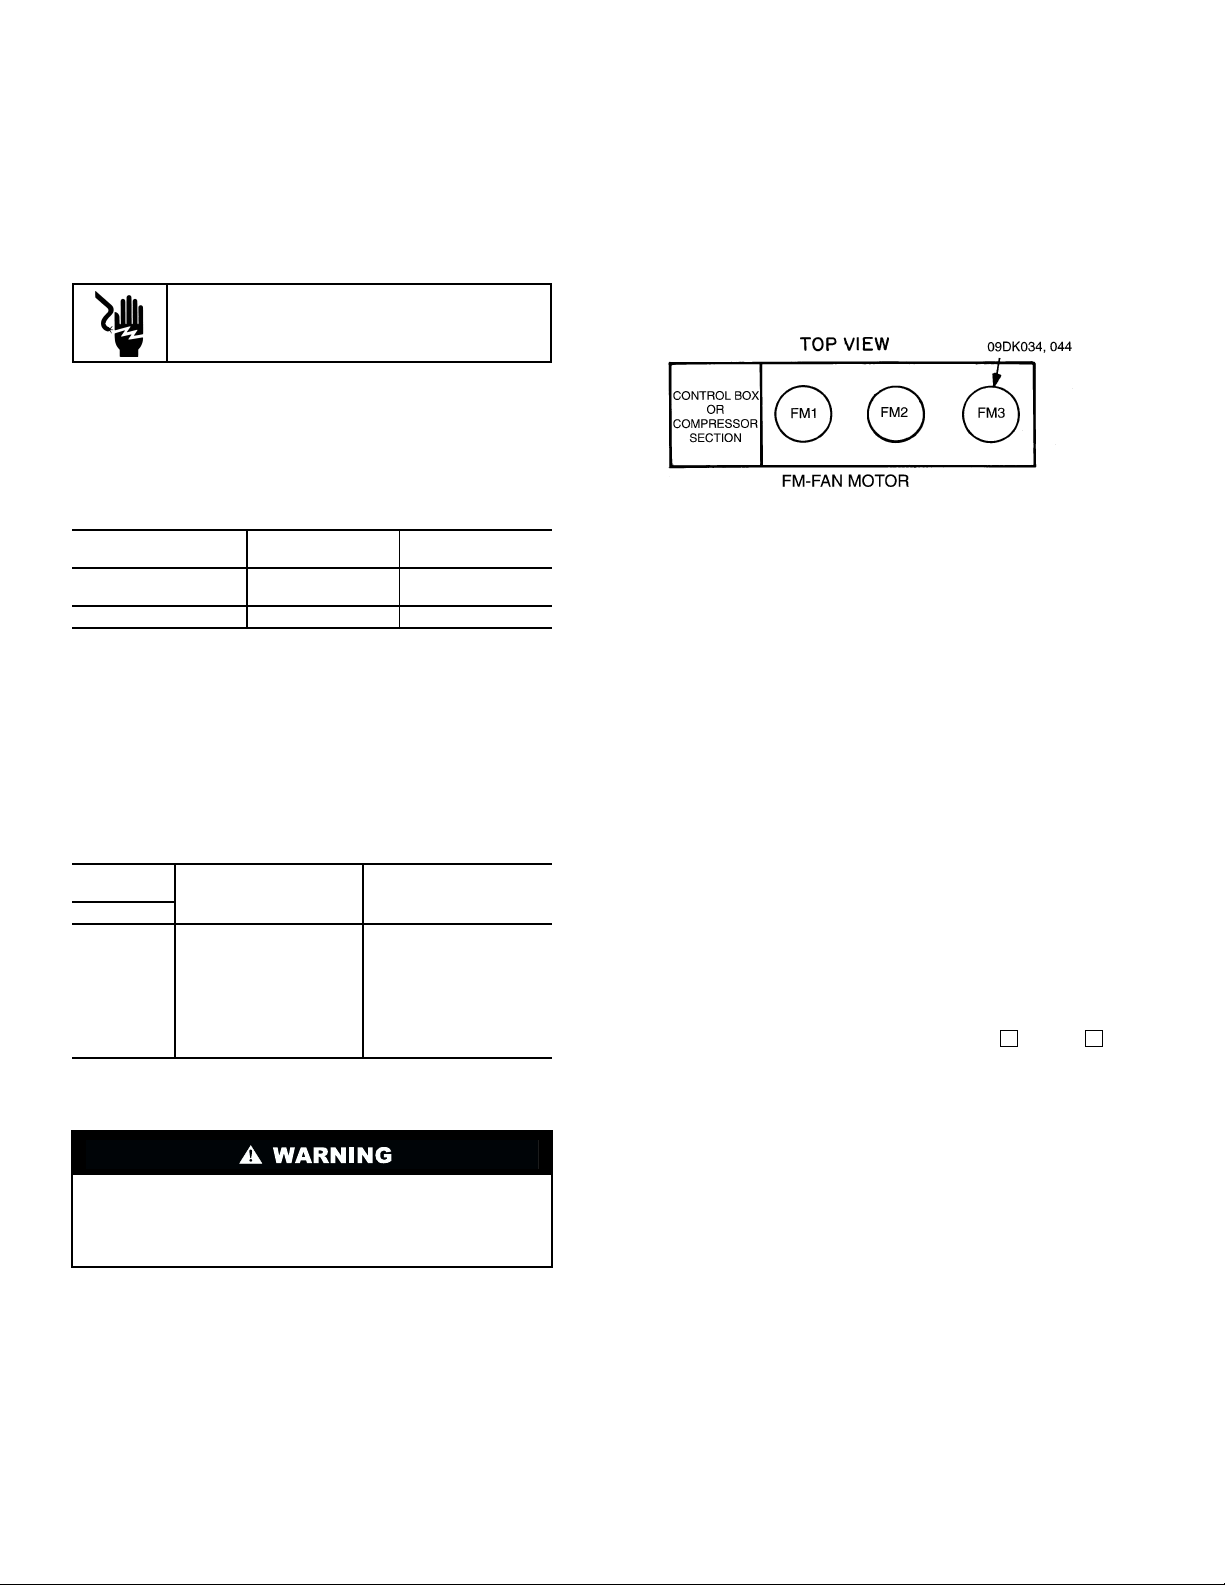
Fig. 1 — Fan Motor Locations
Installing, starting up, and servicing air conditioning equipment can be hazardous due to system pressures, electrical components, and equipment location.
Only trained, qualified installers and service mechanics
should install, start up, and service this equipment. When
working on the equipment, observe precautions in the literature
and on tags, stickers, and labels attached to the equipment. Follow all safety codes. Wear safety glasses and work gloves.
ELECTRIC SHOCK HAZARD
Open all remote disconnects before servicing
this equipment.
MOTORMASTER® LOW AMBIENT CONTROL
NOTE: Installation of Motormaster Low Ambient Control
requires use of fan cycling control accessory, see page 7.
Introduction
There are two accessory packages as follows:
2. Remove FM1 (fan motor no. 1) fan guard (see Fig. 1)
located next to control box end.
3. Disconnect FM1 wiring in the motor junction box and remove FM1 from unit.
4. Remove fan propeller from FM1 and save. Fan propeller
is reinstalled on the speed control motor in a later step.
5. Place motor mount spacer in place over FM1 motor
mount.
6. Install speed control motor with rainshield (included in
package) in place of FM1.
PACKAGE NO.
50DJ-902---801
50DJ-902---811
*For Motormaster head pressure control operation, 575-v unit
requires installation of transformer (Carrier Part No. HT01AH854)
not included in package.
UNIT
Volt s-Ph-H z
208/230-3-60
575-3-60*
460-3-60 200/230-1-60
MOTOR
Volt s-Ph-H z
200/230-1-60
Each accessory package contains the parts listed in Table 1.
Note that these installation instructions are for 60 Hz units,
but installation procedures for 50 Hz units are similar. See
price pages for required parts for 50 Hz Motormaster applications. Contact Application Engineering if installation assistance is required.
Table 1 — Package Contents
PACKAGE
NOS. 50DJ-902---801 50DJ-902---811
Quantity
1
1
1
1
1
1
1
1
Speed Control Motor Speed Control Motor
Motor Mount Spacer Motor Mount Spacer
Capacitor Capacitor
Capacitor Boot Capacitor Boot
Motormaster Controller Motormaster Controller
Fastener Package Fastener Package
Instruction Booklet Instruction Booklet
—Transformer
Installation
1. Disconnect all power to the unit and open control box.
To avoid possible electrical shock and personal injury, all
power to unit must be disconnected before working on
unit. T ag all disconnects to alert others unit is being worked
on.
7. Because the standard fan motor is 3-phase, and the speed
control motor is single-phase, it is necessary to add a capacitor. Install the capacitor on the divider panel above
the condenser coil.
8. Mount the capacitor upside down (terminals pointing
down) using capacitor strap and screws (holes must be
field drilled). See Fig. 2. To prevent capacitor from slipping down, insert an additional screw through the panel
for the capacitor to rest on.
9. Disconnect black wire connecting FM1 junction box to
TB1 terminal 2 (575-v only). See Fig. 3. Disconnect yellow wire from FC1 terminal 12. Disconnect blue wire
from FC1 terminal 13.
10. Connect yellow wire from capacitor to the red wire (T8)
in the speed control motor junction box. Use wire nut to
connect. See Fig. 4. Connect blue wire from other side of
capacitor to the yellow wire (T4) in the speed control motor junction box. Use wire nut to connect.
11. From the same terminal on the capacitor as blue wire connection, run a field-supplied wire to FC1 terminal 12. Tie
the blue (T1) and black (T5) wires in the motor junction
box together, using a wire nut.
12. Remove the black jumper connecting TB1 to TB1
1 2
in the control box.
13. Mount the Motormaster
®
controller vertically on the divider panel next to the capacitor. See Fig. 2. It must be
mounted vertically with the leads coming out the bottom.
Using the template at the back of these instructions, drill
the required 4 mounting holes. Use 4 no. 10 sheet metal
screws and star washers provided to attach the controller.
The star washers must be used to ensure electrical
ground.
2
Page 3
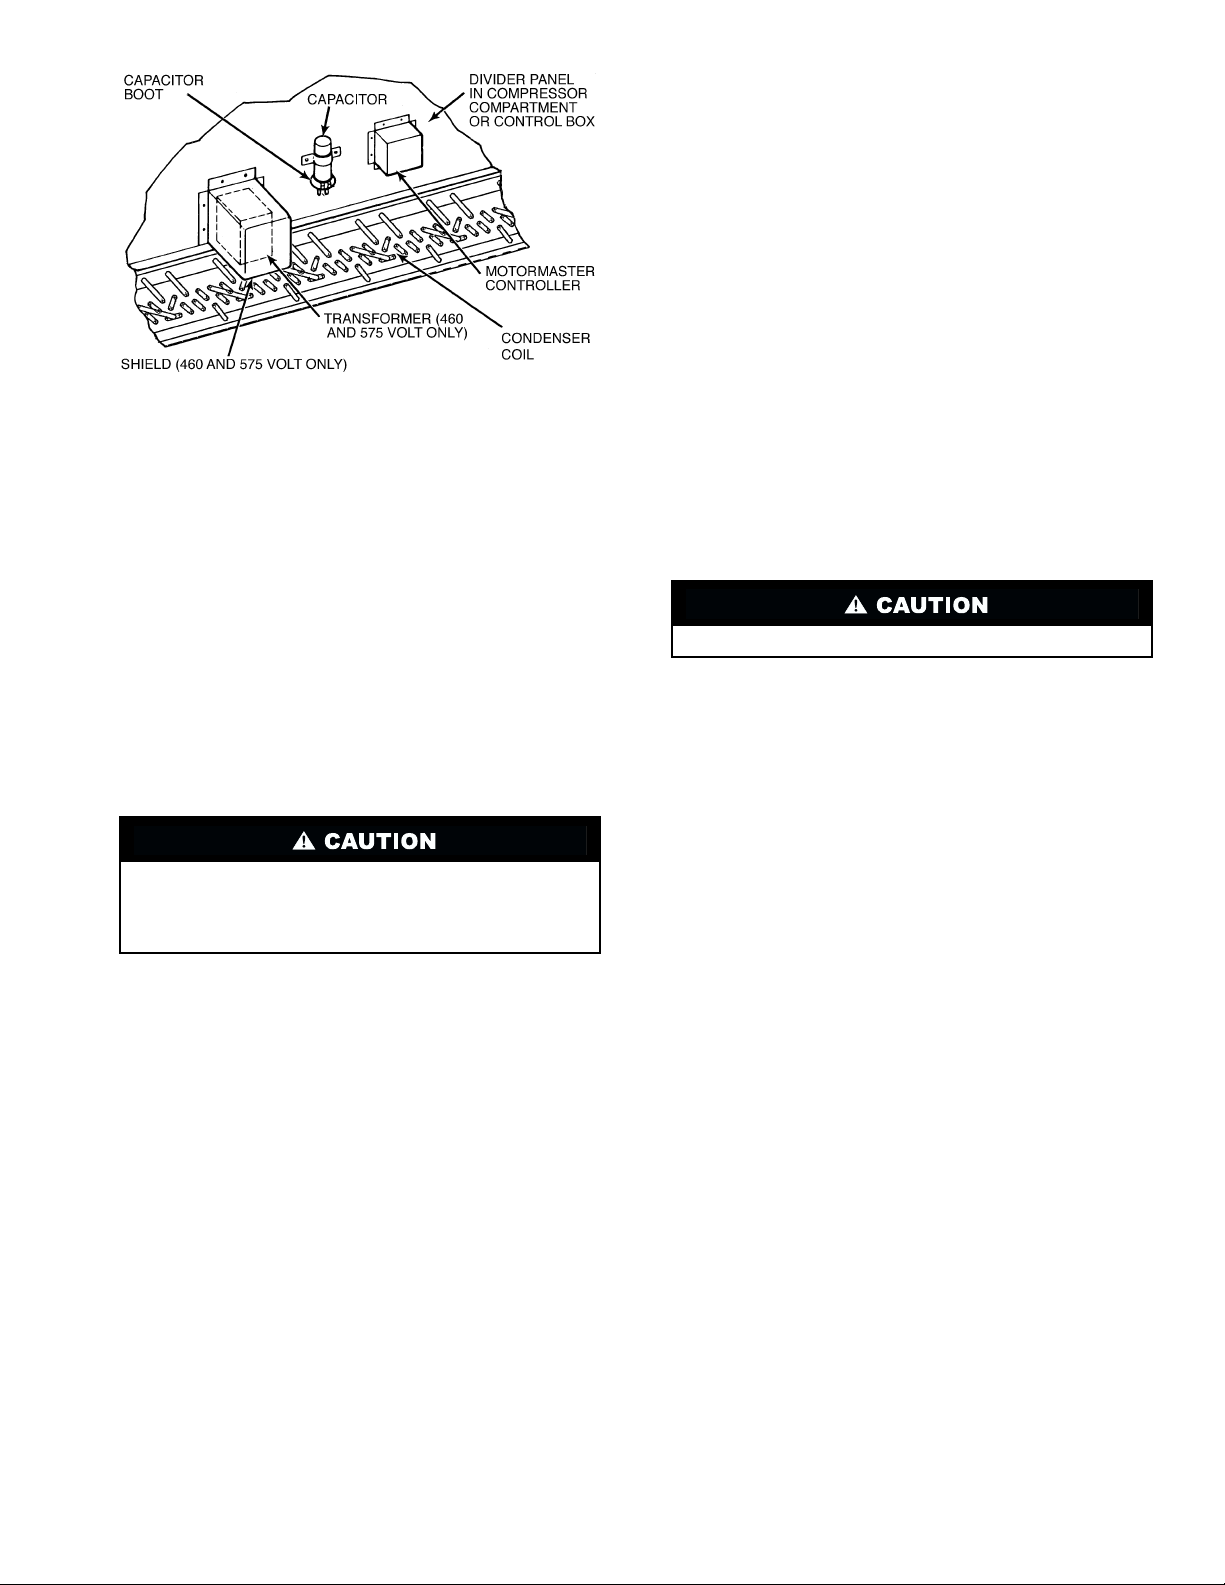
OTES:
1. Transformer shield and 575-v transformer are field supplied
(transformer part no. HT01AH854).
2. Exact mounting locations on divider panel for capacitor, Motormaster controller, and transformer are at discretion of installer.
There are no wires or obstructions on reverse side of divider
panel to interfere with mounting screws.
Fig. 2 — Mounting Motormaster® Controller,
Capacitor, and 575-V or 460-V Transformer
16. For 460-v and 575-v units only, mount and wire
transformer (460-v — P/N HT01AH852, 575-v —
P/N HT01AH854) as follows:
a. Mount tran sformer to the di vider panel . See Fi g. 2.
Drill required mounting holes.
b. Connect field-supplied wire from FC1 terminal 21
to the primary side of the transformer. See Fig. 5.
Connect a field-supplied wire from FC1
terminal 22 to the other primary of the transformer.
c. Run field-supplied wire from the secondary of the
transformer to the capacitor. Run field-supplied
wire from the other secondary of the transformer
to one of the black wires on the controller. See
Fig. 5.
d. Install field-supplied shield o ver the transformer.
See Fig. 2.
17. Reinstall the fan propeller and fan guard. Ensure that center of propeller is correct distance from top of fan orifice.
See Fig. 5.
18. Route the sensor wire from the controller to the sensor
location. Secure sensor wire to avoid contact with condenser coil.
14. For 208/230-v only:
Connect a field-supplied wire from TB1 terminal 1 to one
of the black wires in the Motormaster controller. Use wire
nut to connect. See Fig. 4.
15. Take the black wire that was disconnected in Step 3 and
connect it to the purple wire (P1) in the speed control motor junction box. Use wire nut to connect. Replace junction box cover.
Be sure the wires running to the speed control motor are
wire-tied securely to the motor mount, to prevent the wires
from becoming entangled in the propeller fan whe n unit is
running.
The sensor assembly is fragile. Handle with care.
19. For 09DK020-034 units, secure the sensor to the coil return bend. For 09DK044, secure the sensor to crossover
tube. See Fig. 7 for proper location for each unit. Use
no. 4-40 screw, two plate washers, and nut provided. See
Fig. 8.
20. Coil up excess wire and secure it to controller.
21. Protect sensor wire from physical damage by installing
field-supplied protective material.
22. Replace control box cover.
Winter Start Control —
These compressorless condenser sections do not need to be directly modified. However,
the total system may require winter start control. Refer to base
unit instructions.
3
Page 4
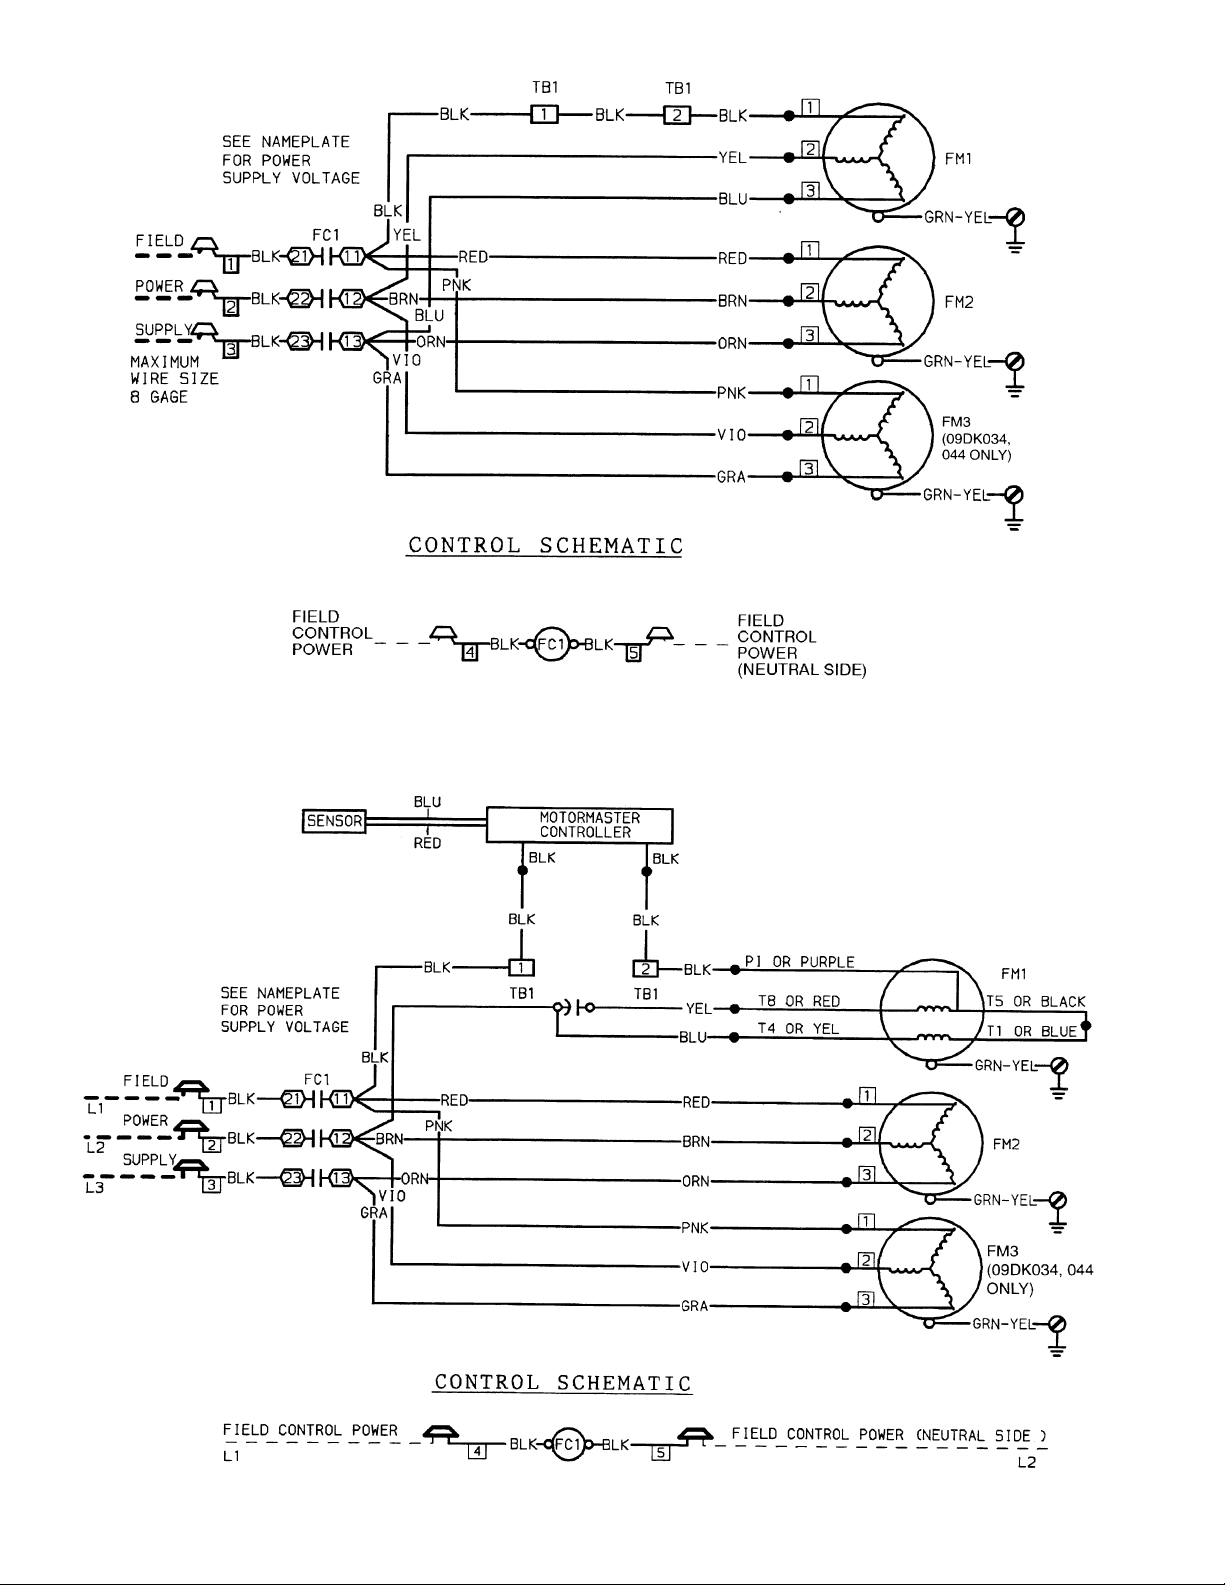
Fig. 3 — Standard Unit Power and Control Schematic, 09DK
Fig. 4 — Motormaster
®
Controller Wiring; 09DK 208/230-Volt Units
4
Page 5

Fig. 5 — Motormaster® Controller Wiring; 09DK 460-Volt and 575-Volt Units
Fig. 6 — Location of Propeller on Motor Shaft from
Outside of Orifice Ring
5
Page 6

NOTE: When using multiple indoor units, or a dual compressor
indoor unit, place sensor on circuit containing refrigerant from
leading compressor. Only one sensor is required.
Fig. 7 — Motormaster® Sensor Locations on Condenser Coil Header End, 09DK Units
Fig. 8 — Sensor Installation
6
Page 7

ACCESSORY FAN CYCLING CONTROL
Fig. 9 — Model 09DK (028 Shown)
Accessory Fan Cycling Control Usage
PACKAGE
NUMBER 09DK
500070
500071
500072
500073
QTY PER KIT NO.
070 071 072 073
1122Temperature Actuated Switch
1111Terminal Block
0011Terminal Adapter
1122Contactor
1111Instructor
1111Parts Bag
PARTS BAG CONTENTS:
5555Mounting Screws
2244Screws, 8-18 x
2244Screws, 6AB x
5588Wire Assemblies
3333Wire Ties
CONTROL CKT VOLTAGE
3 Ph, 60 Hz 3 Ph, 50 Hz
208230,
460,575
380 230,400
208230,
460,575
380 230,400 034,044
—
020 (60 Hz only),
— 034,044
Accessory Kit Contents — 09DK
USED ON
09DK
020,024,
028
024,028
ITEM
1
/2-in. long
1
/2-in. long
General —
The Accessory Fan Cycling Control maintains
unit cooling capacity control during changes in outside ambient
temperature. If full cooling is not required during certain operating periods, the accessory can save energy by supplying power to fewer fans.
Before Installation —
Check kit contents for missing or
damaged items. File claim immediately with transit company if
anything is missing or damaged. Check to be sure ac cessory
control voltage matches available power supply.
Fan Cycling Control Installation
1. Shut off power to unit.
Electrical shock can cause personal injury or death. Before
installing this accessory, be sure power to unit is disconnected. There may be more than one disconnect switch.
Attach tags at disconnect(s) to alert others not to restore
power until installation is completed.
2. Remove unit control box cover. See Fig. 9.
3. 09DK020-028 Units: Mount temperature actuated switch
(ATS) onto the bottom inner divider panel of unit, using
two no. 6AB x
are predrilled in panel. See Fig. 9.
09DK034,044 Units: Mount temperature actuated switches (A TS and ATS2) onto the bottom inner divider panel of
unit, using two no. 6AB x
(2 screws for each switch). Mount switches side by si de
in predrilled holes. See Fig. 9.
1
/2-in. long screws provided. Screw holes
1
/2-in. long screws provided.
4. 09DK020-028 Units: Install fan contactor FC2 and terminal block TB2 inside control box. See Fig 10. Disconnect
red wire from FC1 and orange wire from FC1 .
Connect red wire to FC2 . Connect orange wire to
23
FC2 . Attach 8-in. black wire provided in accessory
package to FC1 and FC2 . Connect the 8-in. blue
wire to FC1 and FC2 . Next, connect the 8-in.
white wire to FC1 neutral side, and FC2 . Attach the
18-in. black wire to FC1 control power side and TB2 .
Connect one lead of ATS to TB2 and connect the other
lead to FC2 .
11 13
21
11 11
13 13
C2
1
1
C1
7
Page 8

09DK034,044 Units: Install fan contactors FC2 and FC3
Fig. 10 — Component Arrangement
Fig. 11 — Terminal Adapter
and terminal block TB2 inside control box. See Fig 9.
Add terminal adapter to TB2 . See Fig. 10 and 11. Disconnect red and pink wires from FC1 . Also, disconnect orange and gray wires from FC1 . Connect red
wire to FC2 and pink wire to FC3 . Also, con-
21 21
nect orange wire to FC2 and gray wire to FC3 .
1
11
13
23 23
Attach 8-in. black wire provided in accessory package to
11 11
FC1 and FC2 . Connect the other 8-in. black
wire to FC1 and FC3 . Connect an 8-in. blue
wire to FC1 and FC2 . Attach the other 8-in. blue
wire to FC1 and FC3 . Next, connect an 8-in.
white wire to FC1 neutral side and FC2 . Attach the
other 8-in. white wire to FC2 and FC3 . Connect
11 11
13 13
13 13
C2
C2 C2
the 18-in. black wire to FC1 control power side and
1
TB2 . Attach one lead of ATS (Air Temperature
Switch) to TB2 and th e other lead to FC2 . Connect one lead of ATS2 to TB2 and the other lead to
C1
FC3 . See Fig. 12 for wiring connections.
1
1
C1
5. Route the wire leads of ATS around the coil, keeping
them away from the coil and any sharp metal edges. Install wire ties provided through predrilled holes in upper
divider panel. See Fig. 9. Run ATS wire leads through
wire ties, then into t he 1
3
/8-in. (35 mm) diameter control
box opening.
6. The underside of the ATS is the thermal sensor area that
senses the temperature of air entering the coil. The air
temperature switch opens at 60 ± 3 F and closes at 70 ±
3 F (020,024,028 units only). On 09DK034 and
09DK044 units, ATS opens at 55 ± 3 F and closes at 65 ±
3 F , and ATS2 opens at 70 ± 3 F and closes at 80 ± 3 F.
7. ATS controls fan motor (FM2). O n 09DK034 and 044
units, ATS2 controls fan motor (FM3).
8. If Motormaster
®
control is to be used to modulate fan
motor (FM1), see installation instructions included with
09DK wiring book, and see 32LT Motormaster control
installation instructions for additional general reference.
8
Page 9

Fig. 12 — Accessory Fan Cycling Control Wiring
9
Page 10

Copyright 2000 Carrier Corporation
Manufacturer reserves the right to discontinue, or change at any time, specifications or designs without notice and without incurring obligations.
Book 2
Ta b 4 a
PC 111 Catalog No. 530-913 Printed in U.S.A. Form 09DK-4W Pg 10 4-00 Replaces: 09DK-1W
Page 11

Page 12

MOUNTING TEMPLATE FOR MOTORMASTER® CONTROL
Copyright 2000 Carrier Corporation
Manufacturer reserves the right to discontinue, or change at any time, specifications or designs without notice and without incurring obligations.
Book 2
Ta b 4 a
PC 111 Catalog No. 530-913 Printed in U.S.A. Form 09DK-4W Pg 12 4-00 Replaces: 09DK-1W
 Loading...