

Page 1
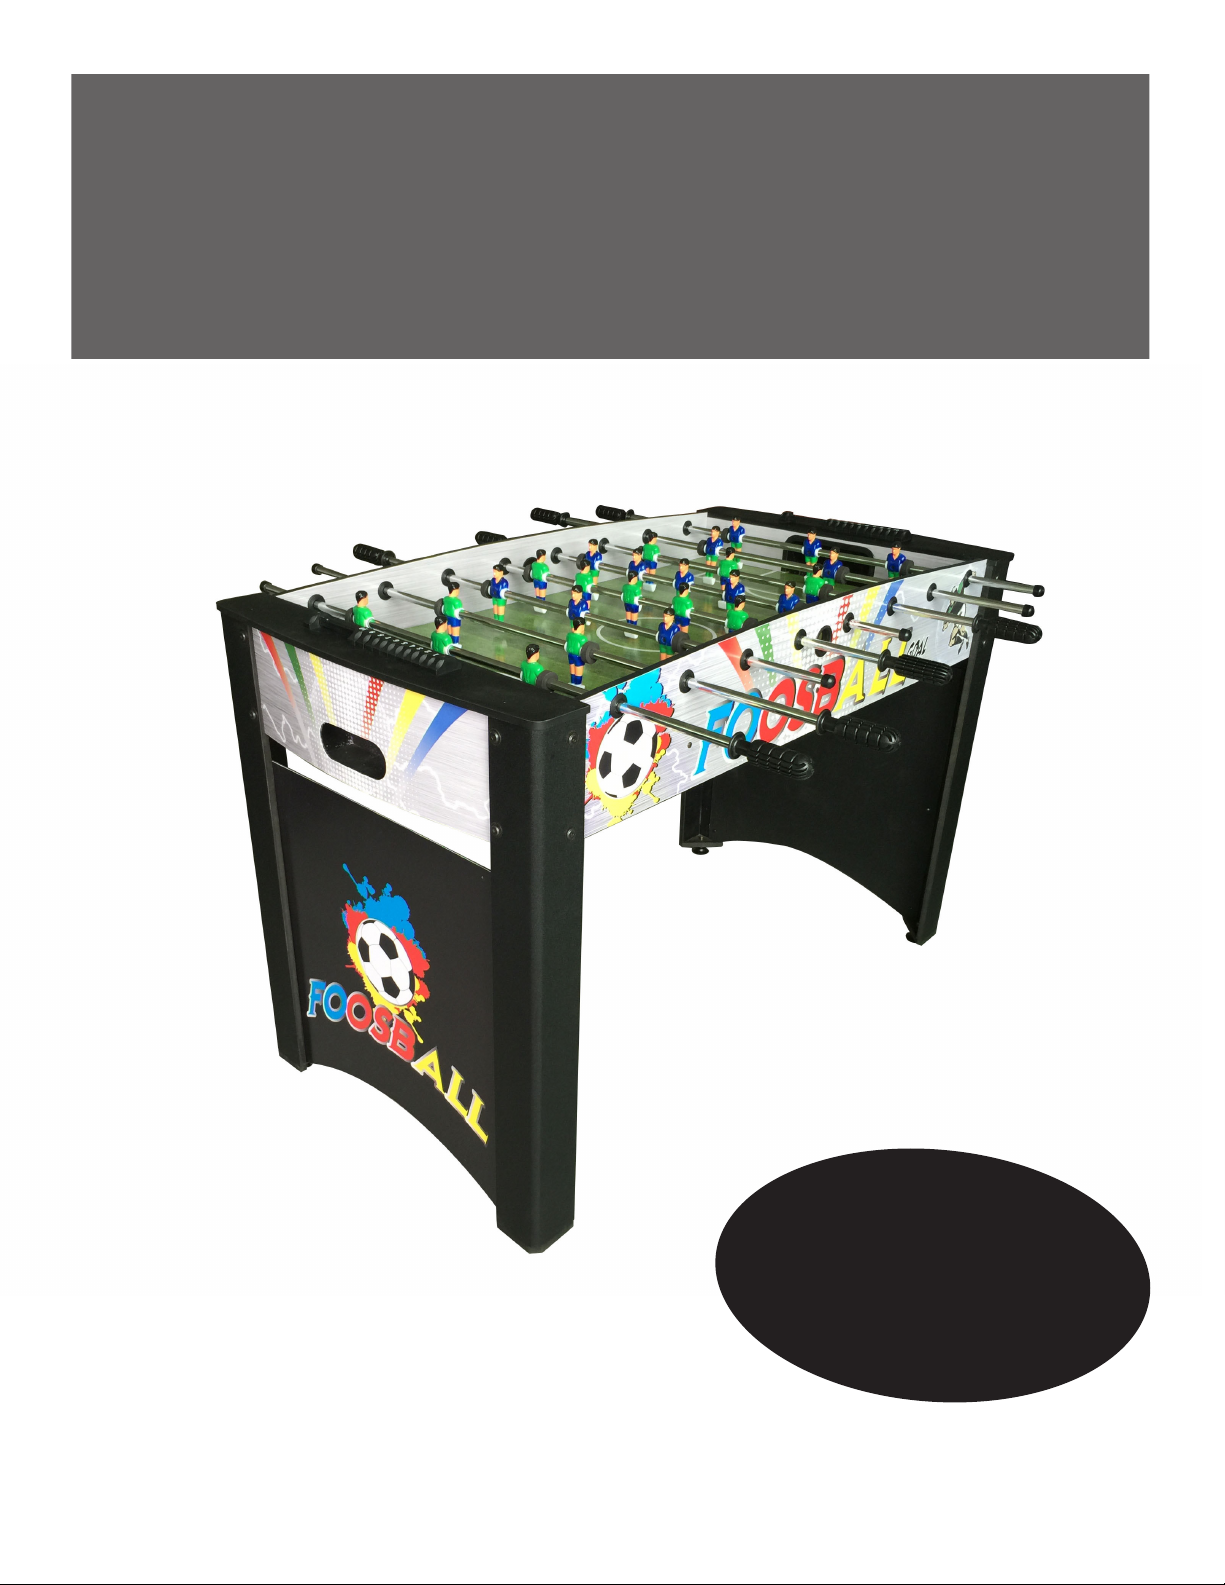
SHOOTOUT 48" FOOSBALL TABLE
ASSEMBLY INSTRUCTIONS
Please Do Not Hesitate to
Contact Our Consumer Hotline
at
800-759-0977
with Any Questions That May
Arise During Assembly or
Use of This Product!
NG4031F
Page 2

THANK YOU!
Thank you for purchasing this product.
We work around the clock and around the globe to ensure that our products
maintain the highest possible quality. However, in the rare case of issues
during assembly or use of this product, please contact our Consumer Hotline
at 800-759-0977 for immediate assistance before contacting your retailer.
Please read the warranty information at the back of these assembly
instructions for further details.
IMPORTANT! PLEASE READ THESE ASSEMBLY INSTRUCTIONS
IN ENTIRETY BEFORE ASSEMBLING YOUR PRODUCT.
2
Page 3
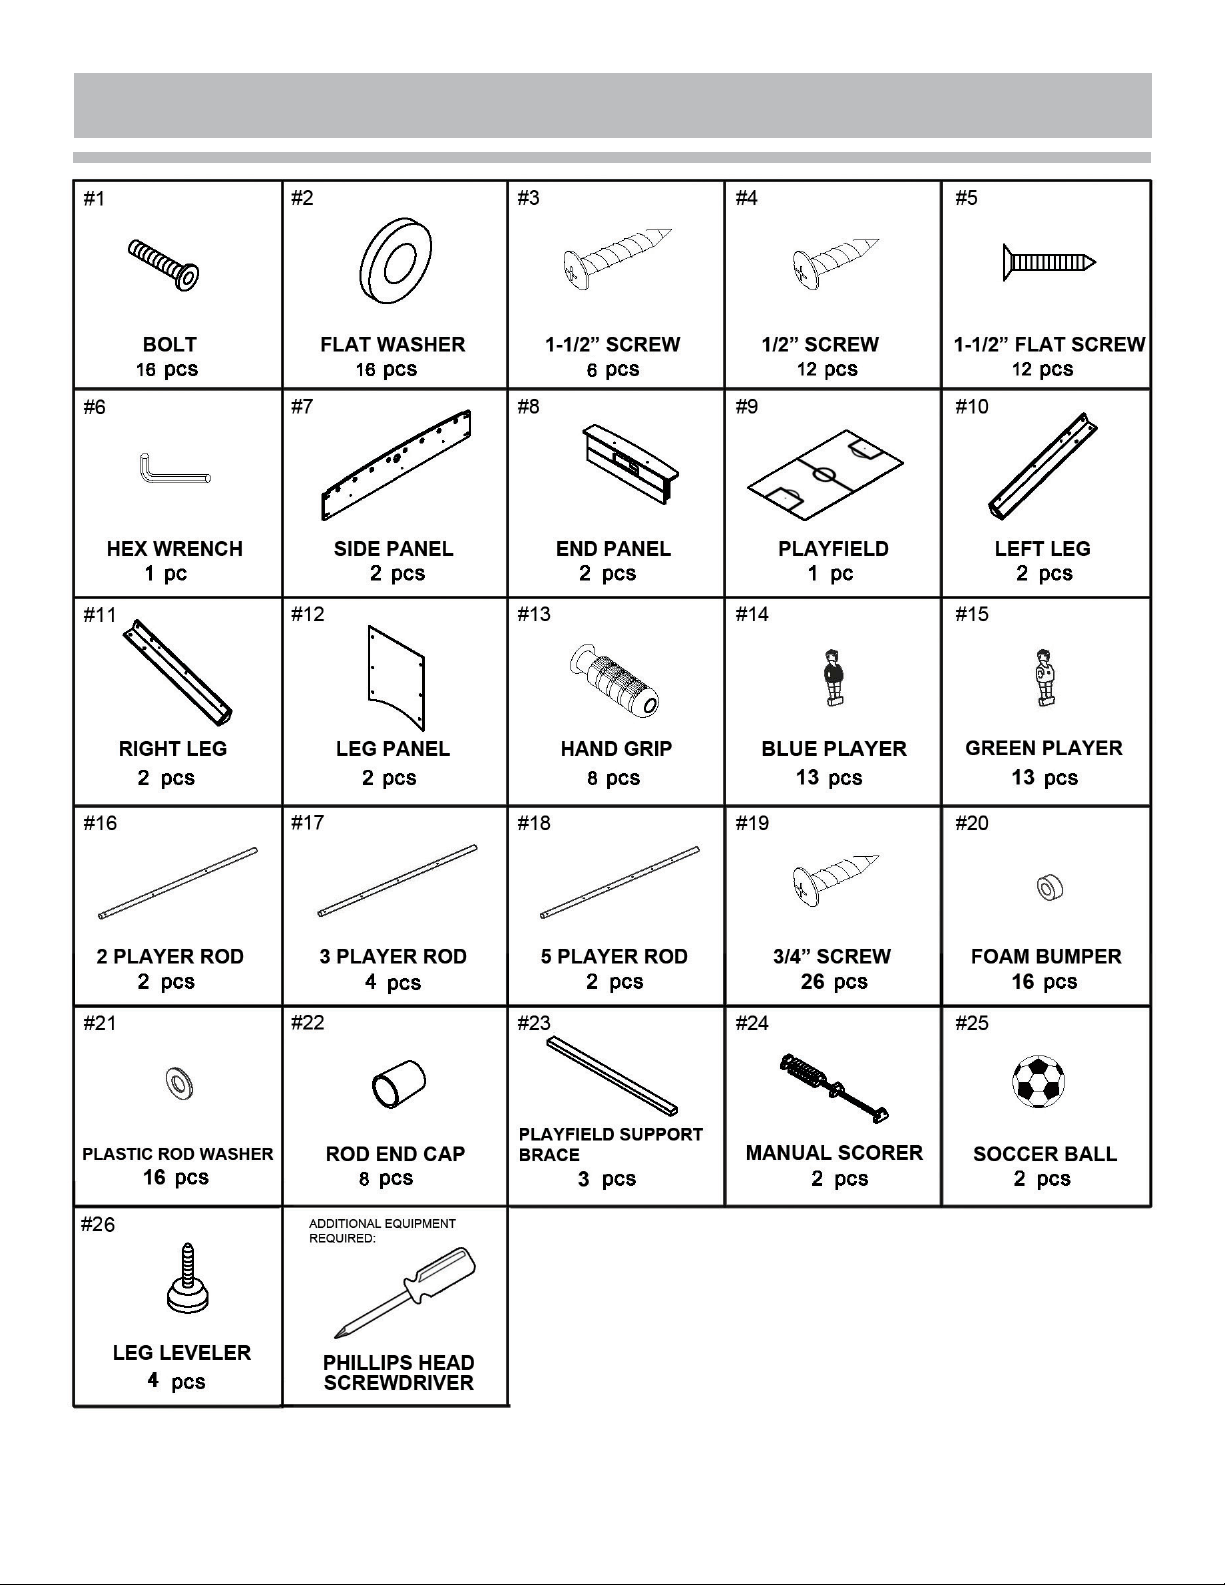
PARTS IDENTIFIER (NOT TO SCALE)
Please see Parts List at end of manual for part number when ordering parts. For replacement parts please call 800-759-0977.
3
Page 4
ASSEMBLY TIPS
1. Find a clean, level surface to begin the assembly of your game table. The table will be
partially assembled upside down and then turned over onto its legs. This is a heavy game
and turning it over will require at least two strong adults.
2. Remove all of the contents from box and verify that you have all of the parts shown on the
Note: Some parts may be pre-installed or
pre-assembled.
understand the text before beginning each assembly step.
4. When installing parts that have more than one screw or bolt, hand tighten all screws or
bolts in place before finishing tightening with screwdriver or hex wrench.
5. Electric screwdrivers may be helpful during assembly; however, please set a low torque
and use extreme caution because screws may be stripped or overtightened if the electric
screwdriver's torque is set too high.
WARNINGS!
READ AND FOLLOW ALL ASSEMBLY, OPERATION AND SAFETY INSTRUCTIONS CAREFULLY.
CHOKE HAZARD - THIS TABLE CONTAINS SMALL BALLS AND PARTS - NOT
SUITABLE FOR CHILDREN UNDER 3 YEARS OF AGE.
4
Page 5
ASSEMBLY INSTRUCTIONS
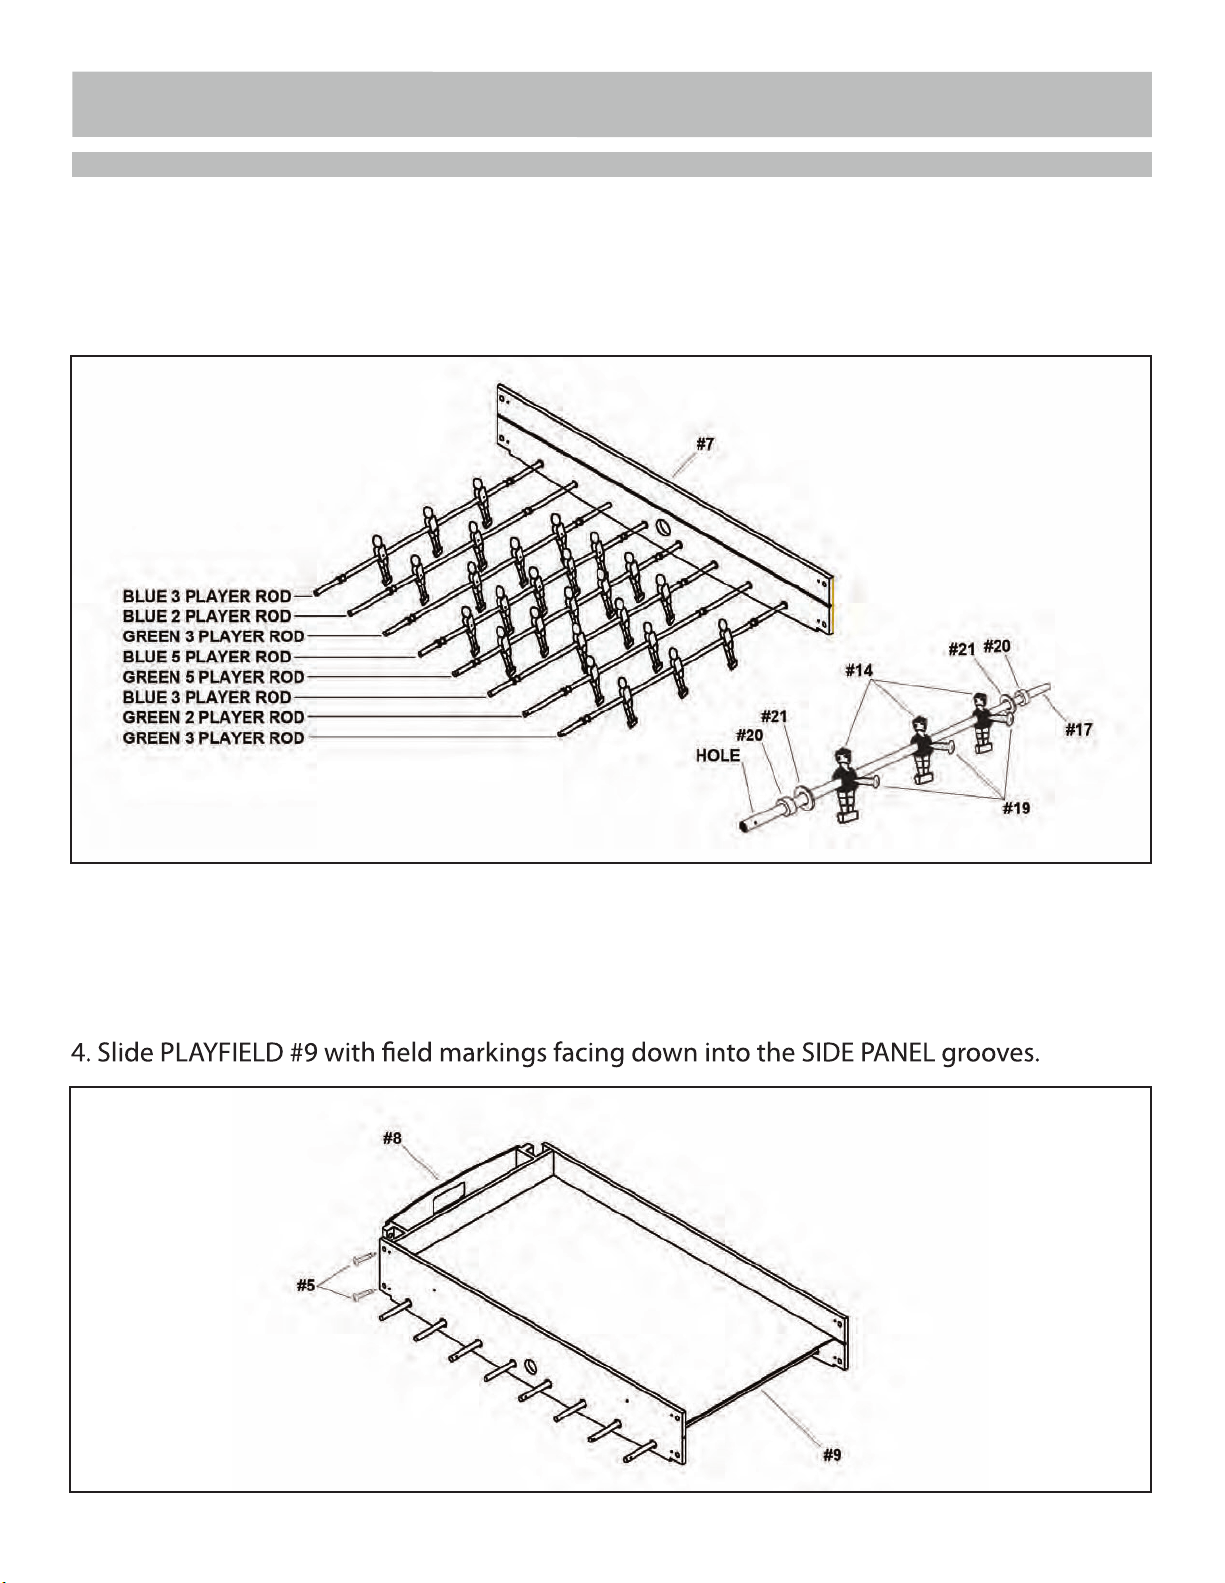
1. Insert pre-assembled BLUE PLAYER RODS and GREEN PLAYER RODS into one SIDE PANEL
#7 as shown below. Note: Although this table is assembled upside down, players are shown up-
right for clarity. Each team should face the opposite goal when table is turned over. Ensure that
FOAM BUMPERS and PLASTIC ROD WASHERS are in place before inserting rods.
Note: Players should face
opposing goal when upright.
EXAMPLE OF BLUE
3 PLAYER ROD ASSEMBLY:
2. Insert PLAYER RODS into remaining SIDE PANEL #7.
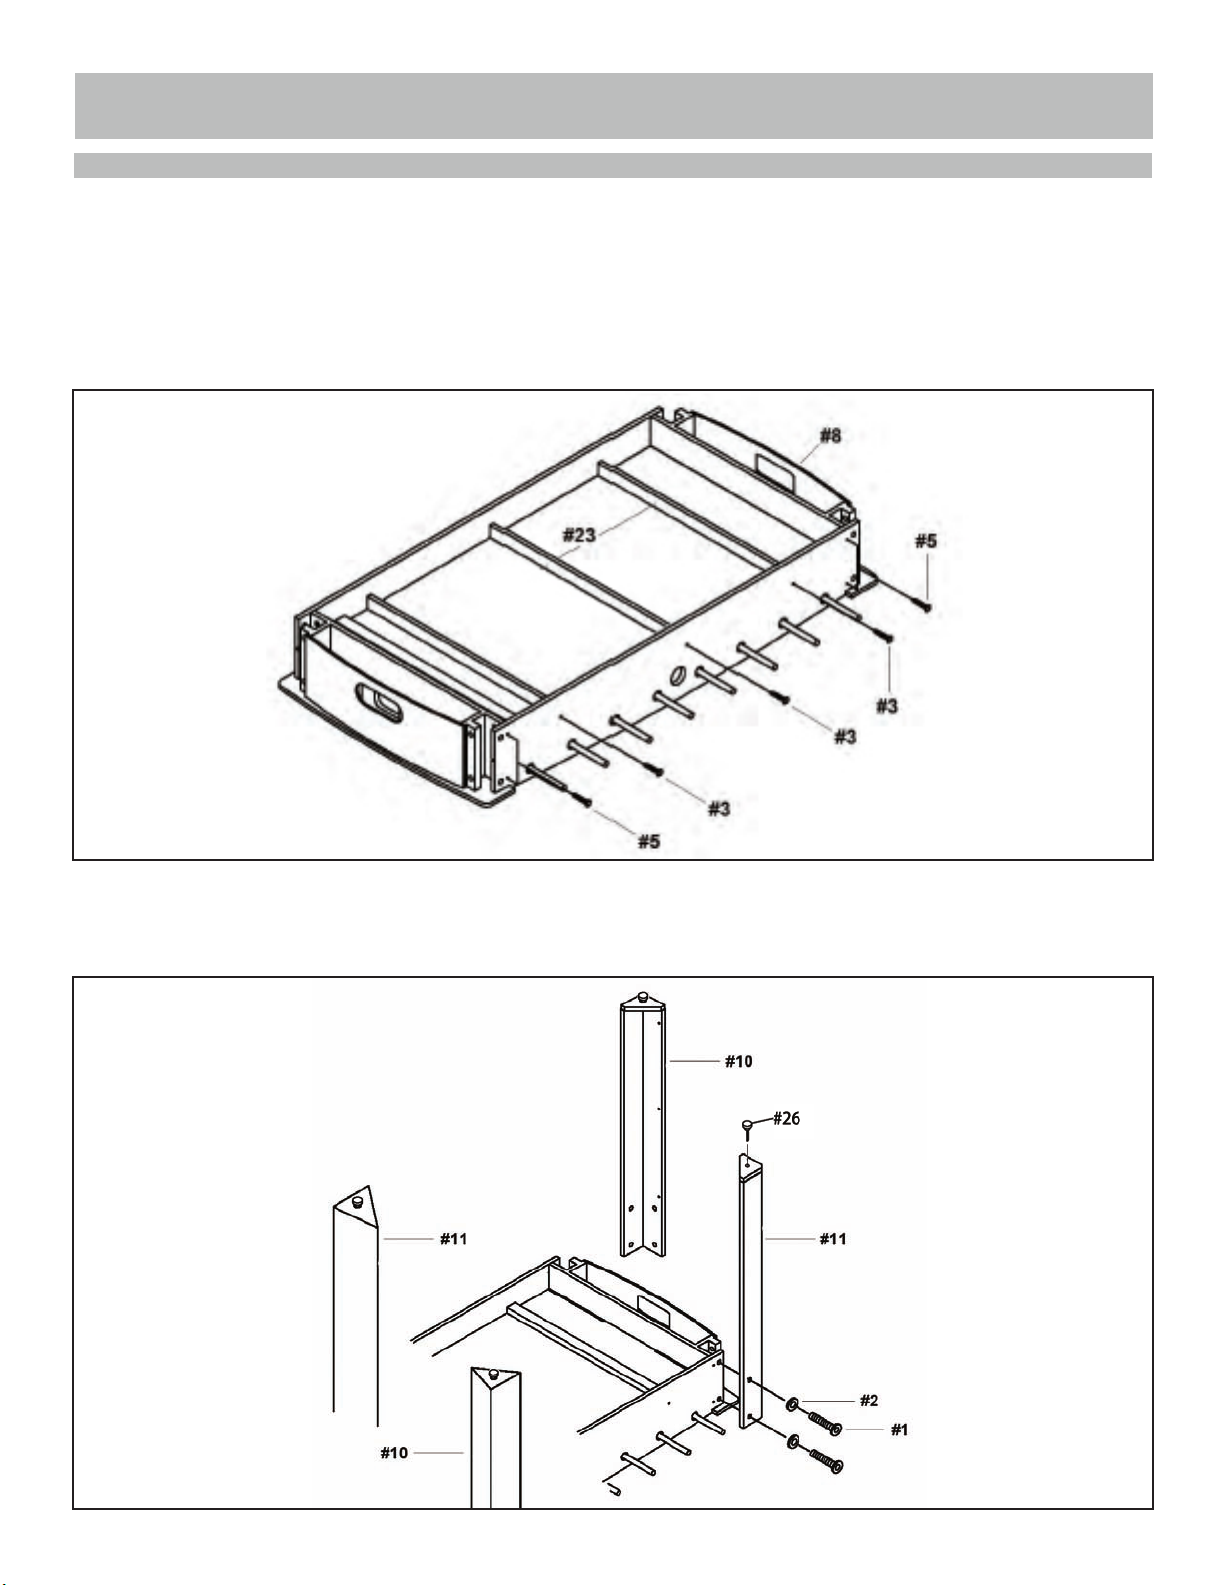
3. Attach one END PANEL #8 to one end of the table with 1-1/2" FLAT SCREW #5 using predrilled holes. Make sure panel edges are ush at top and hand insert all screws before tightening.
Do NOT overtighten screws.
5
Page 6
ASSEMBLY INSTRUCTIONS
5. Attach remaining END PANEL #8 to the opposite end of the table with 1-1/2" FLAT SCREW
#5. Make sure PLAYFIELD slides into grooves on both END PANELS as well.
6. Attach each PLAYFIELD SUPPORT BRACE #23 across the underside of the PLAYFIELD by
fastening to the SIDE PANELS with 1-1/2" SCREW #3 using pre-drilled holes.
7. Attach LEFT LEGS #10 and RIGHT LEGS #11 to the corners of the table as shown below
using BOLT #1 and FLAT WASHER #2. Thread one LEG LEVELER #26 onto each LEG.
6
Page 7
ASSEMBLY INSTRUCTIONS
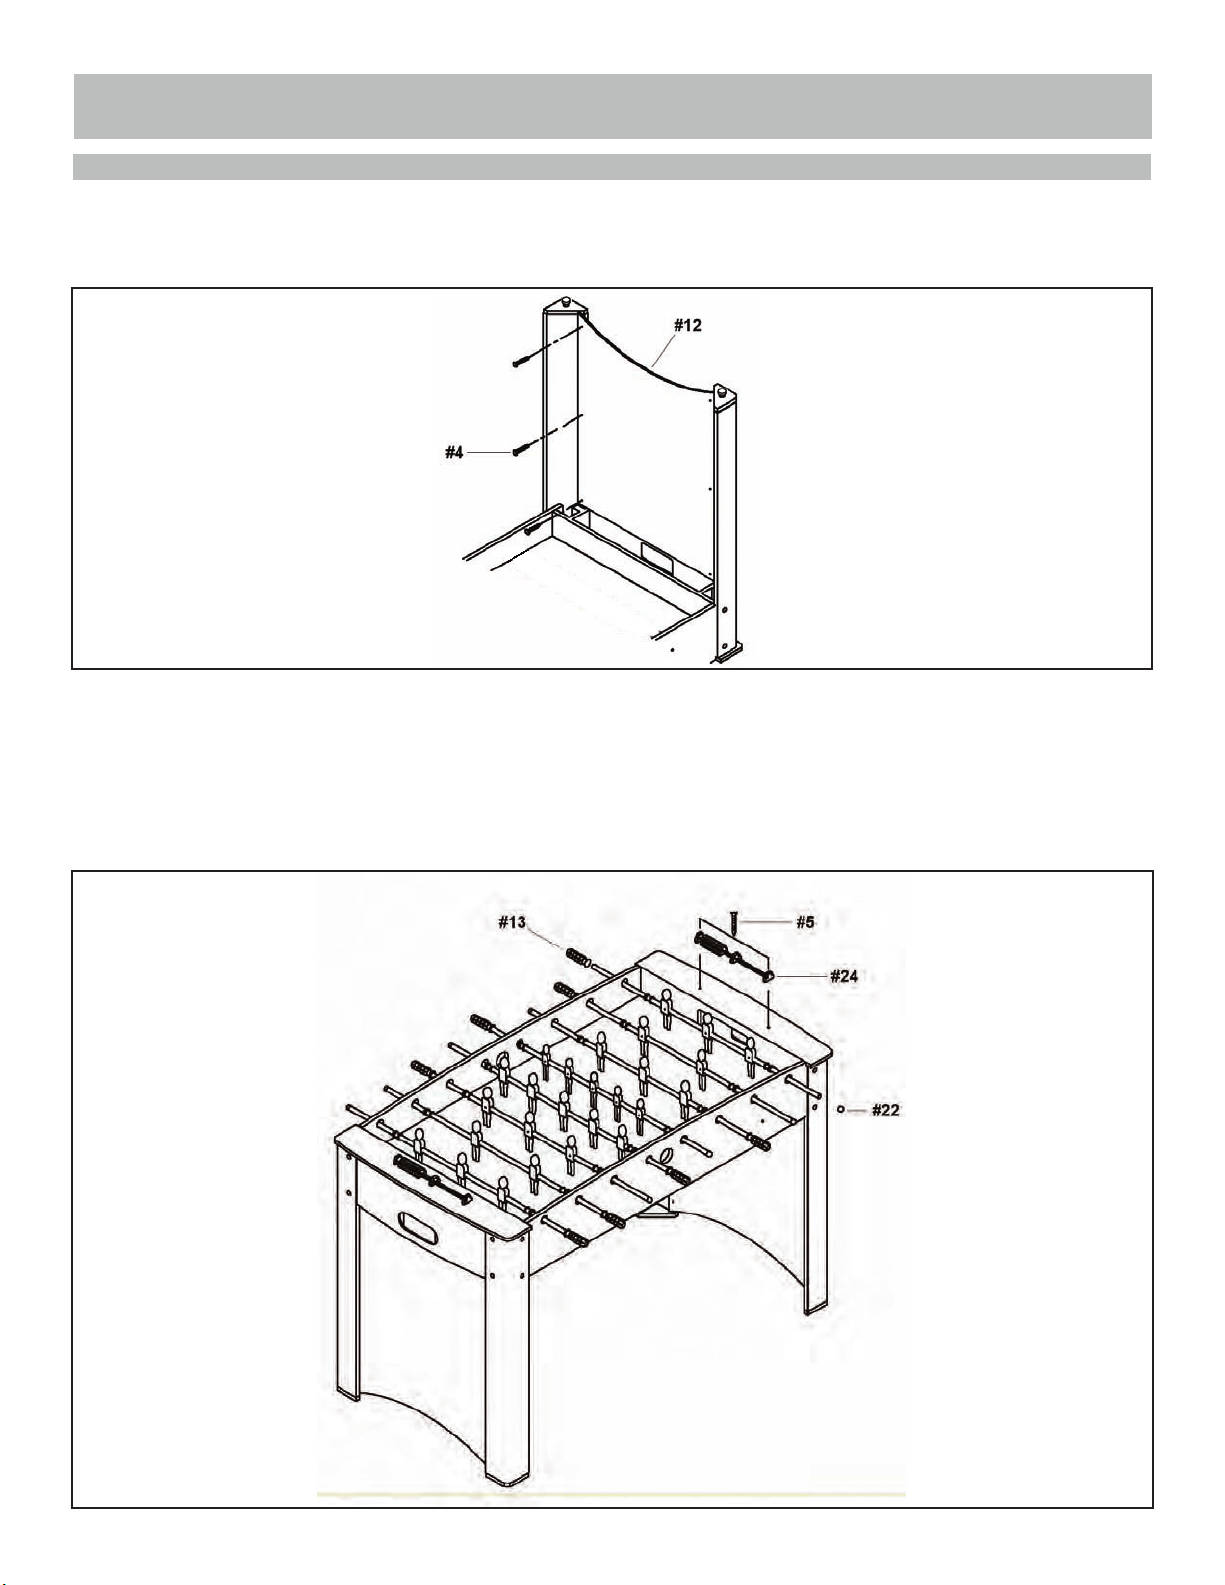
8. Attach each LEG PANEL #12 to LEGS with 1/2" SCREW #4. Note: Graphics should face
outward. Carefully turn table over.
9. Attach HAND GRIP #13 to the marked end of each PLAYER ROD. Attach ROD END CAP #22
to the opposite end of PLAYER RODS.
10. Attach one MANUAL SCORER #24 to each end of the table with 1-1/2" FLAT SCREW #5. Cut
and remove rubber bands holding parts together, if present. Be careful not to overtighten screws.
7
Page 8

CONGRATULATIONS!
You have now assembled your Game Table.
Please note the Care and Use instructions below to
ensure years of trouble free use of your game table.
CARE AND USE
1. This product is intended for INDOOR use only.
2. Do NOT sit, climb or lean on the table.
3. Do NOT drag the table when moving it as this will damage the legs.
8
Page 9

180-DAY LIMITED WARRANTY
9
This product is warranted to the original purchaser to be free from defects in material or workmanship
for a period of 180 days from the date of the original retail purchase.
This warranty does not cover defects or damage due to improper installation, alteration, accident or
any other event beyond the control of the manufacturer. Defects or damage resulting from misuse,
abuse or negligence will void this warranty. This warranty does not cover scratching or damage that
may result from normal usage.
This product is not intended for institutional or commercial use; the manufacturer does not assume
any liability for such use. Institutional or commercial use will void this warranty.
This warranty is nontransferable and is expressly limited to the repair or replacement of the defective
product. During the warranty period, the manufacturer shall repair or replace defective parts at no
cost to the purchaser. Shipping charges and insurance are not covered and are the responsibility of
the purchaser. Labor charges and related expenses for removal, installation or replacement of the
product or components are not covered under this warranty.
The manufacturer reserves the right to make substitutions to warranty claims if parts are unavailable
or obsolete.
The manufacturer shall not be liable for loss of use of the product or other consequential or incidental
costs, expenses or damages incurred by the consumer of any other use. The user assumes all risk of
injury resulting from the use of this product.
This warranty is expressly in lieu of all other warranties, expressed or implied, including warranties of
merchantability or tness for use to the extent permitted by Federal or state law. Neither the manufacturer nor any of its representatives assumes any other liability in connection with this product.
All warranty claims must be made through the retailer where the product was originally
purchased. A purchase receipt or other proof of date of purchase will be required to process
all warranty claims. The model number and part numbers found within the assembly
instructions will be required when submitting any parts requests or warranty claims.
For further warranty information or inquiries, please call 800-759-0977
Page 10
48" FOOSBALL TABLE - NG4031F
Parts List
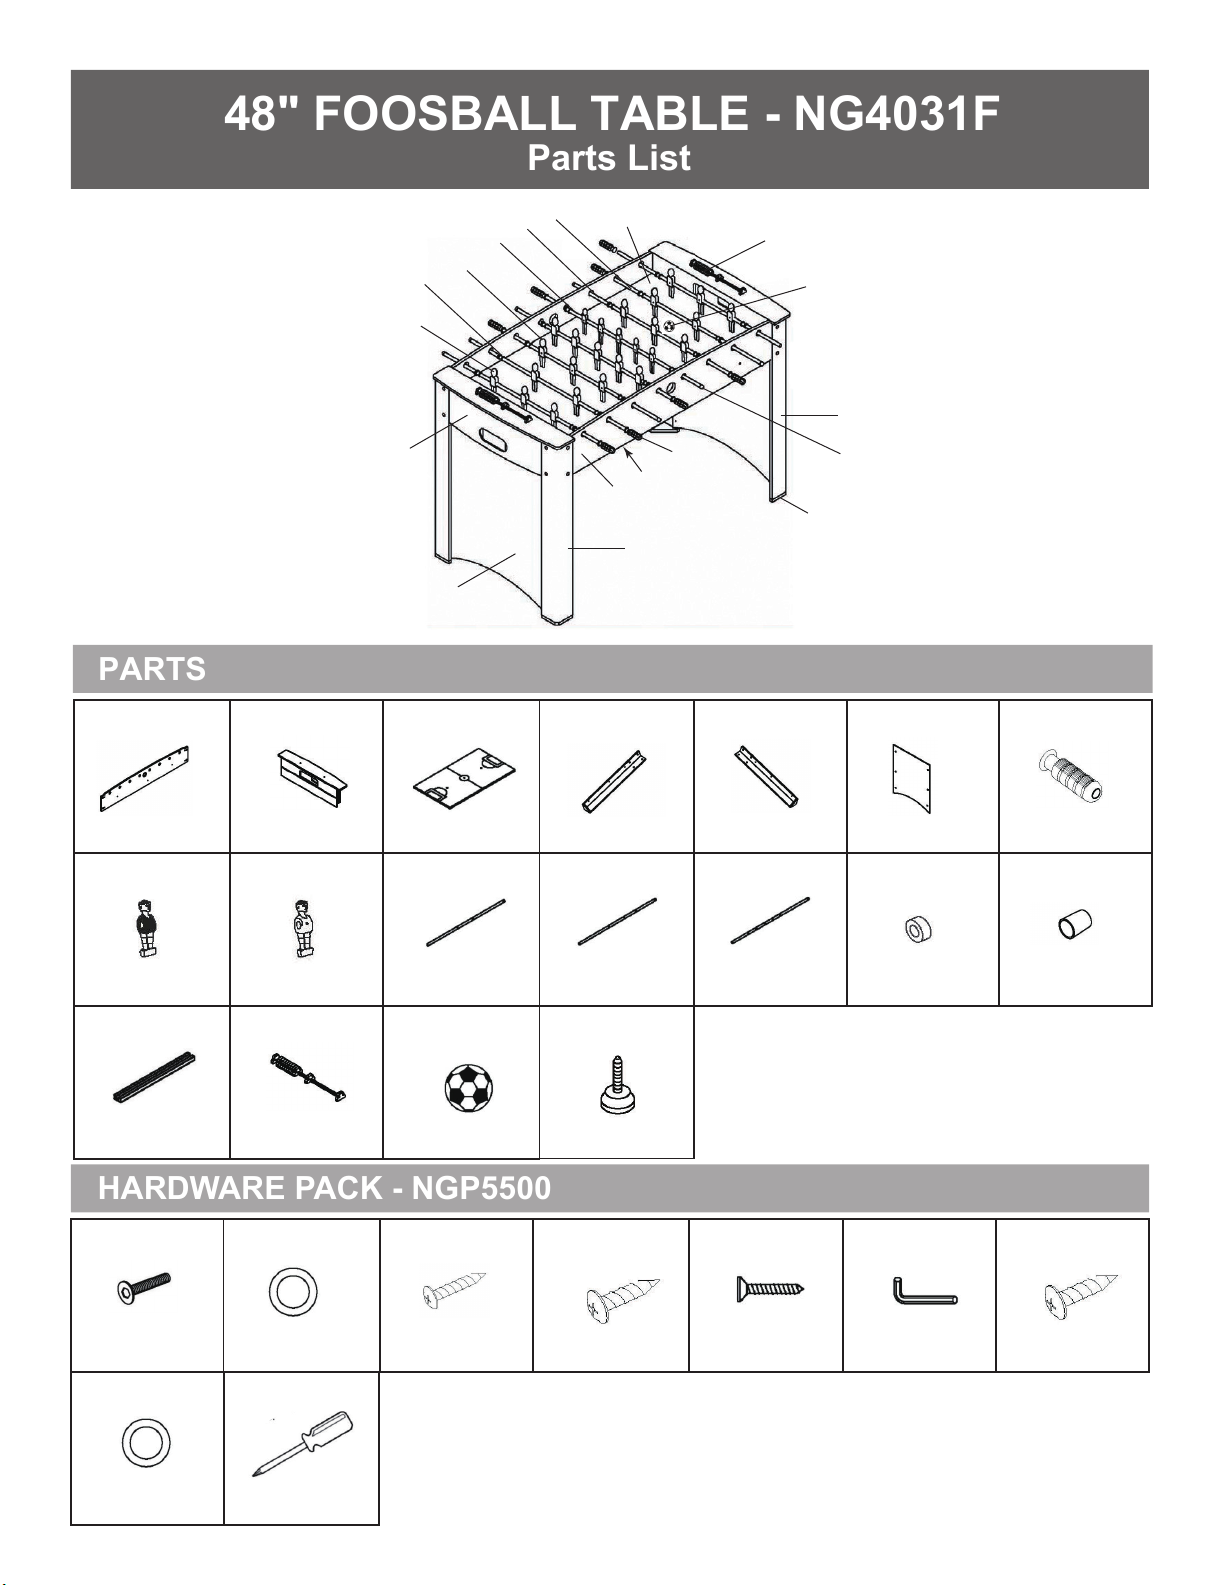
PARTS
HARDWARE PACK - NGP5500
20
14
15
18
17
16
9
24
25
10
8
12
#7 NGP6255 #8 NGP6256 #9 NGP6257 #10 NGP5504 #11 NGP5505
SIDE PANEL
#14 NGP5508 #15 NGP5509 #16 NGP5510 #17 NGP5511 #18 NGP5512 #20 NGP5513
BLUE PLAYER*
#23 NGP5515 #24 NGP5516 #25 NGP5102
END PANEL
GREEN PLAYER* 2 PLAYER ROD*
PLAYFIELD LEFT LEG
3 PLAYER ROD* 5 PLAYER ROD*
#26 NGP50785
13
23
7
11
RIGHT LEG
22
26
#12 NGP6258
LEG PANEL
FOAM BUMPER*
#13 NGP5507
HAND GRIP
#22 NGP5514
ROD END CAP
SUPPORT BRACE
#1 #2 #3 #4 #5 #6
BOLT
#21
PLASTIC ROD
WASHER
MANUAL SCORER
FLAT WASHER
ADDITIONAL EQUIPMENT
REQUIRED:
PHILLIPS HEAD
SCREWDRIVER
SOCCER BALL
1-1/2” SCREW
LEG LEVELER
1/2” SCREW
* Note: Items #14 - #20 are available as
pre-assembled sets as part no. NGP5943
#19
1-1/2” FLAT
SCREW
HEX WRENCH
3/4” SCREW
5/15
 Loading...