

Page 1
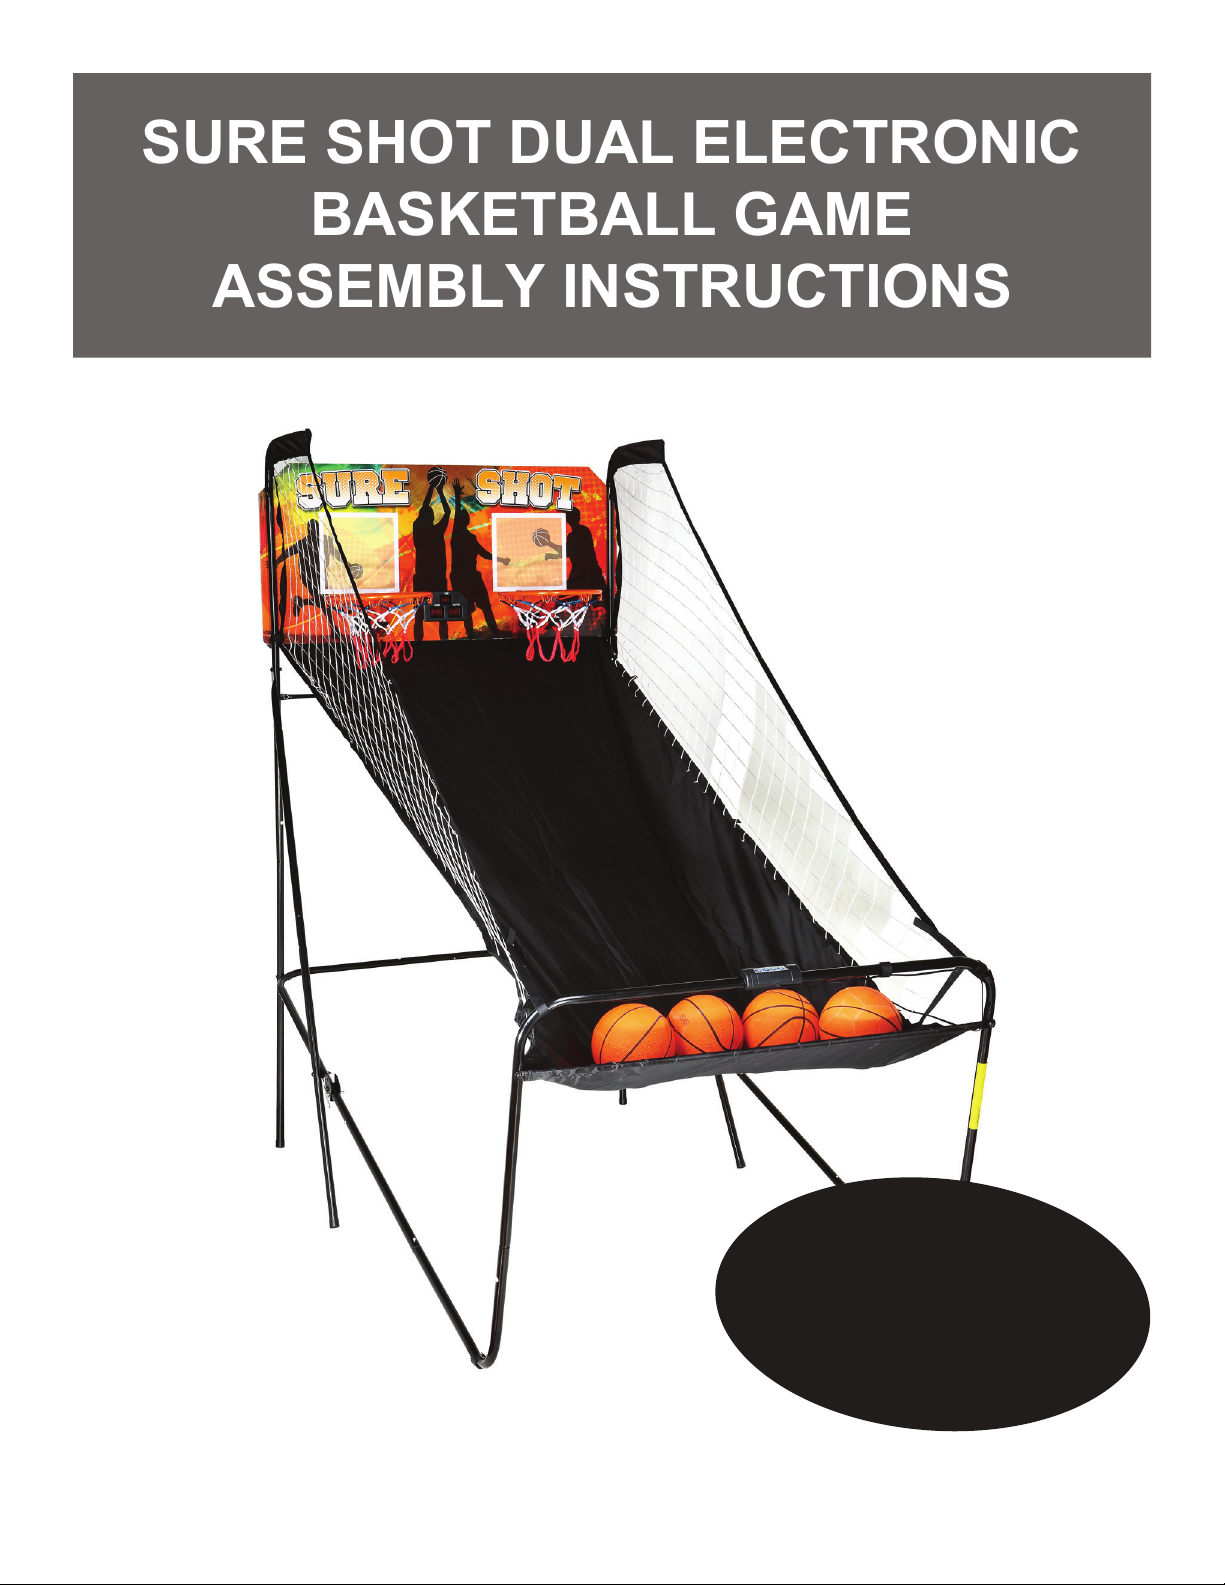
SURE SHOT DUAL ELECTRONIC
BASKETBALL GAME
ASSEMBLY INSTRUCTIONS
Please Do Not Hesitate to
Contact Our Consumer Hotline
at
800-759-0977
with Any Questions That May
Arise During Assembly or
Use of This Product!
NG2233BL
Page 2

THANK YOU!
Thank you for purchasing this product.
We work around the clock and around the globe to ensure that our products
maintain the highest possible quality. However, in the rare case of issues
during assembly or use of this product, please contact our Consumer Hotline
at 800-759-0977 for immediate assistance before contacting your retailer.
Please read the warranty information at the back of these assembly
instructions for further details.
IMPORTANT! PLEASE READ THESE ASSEMBLY INSTRUCTIONS
IN ENTIRETY BEFORE ASSEMBLING YOUR PRODUCT.
2
Page 3
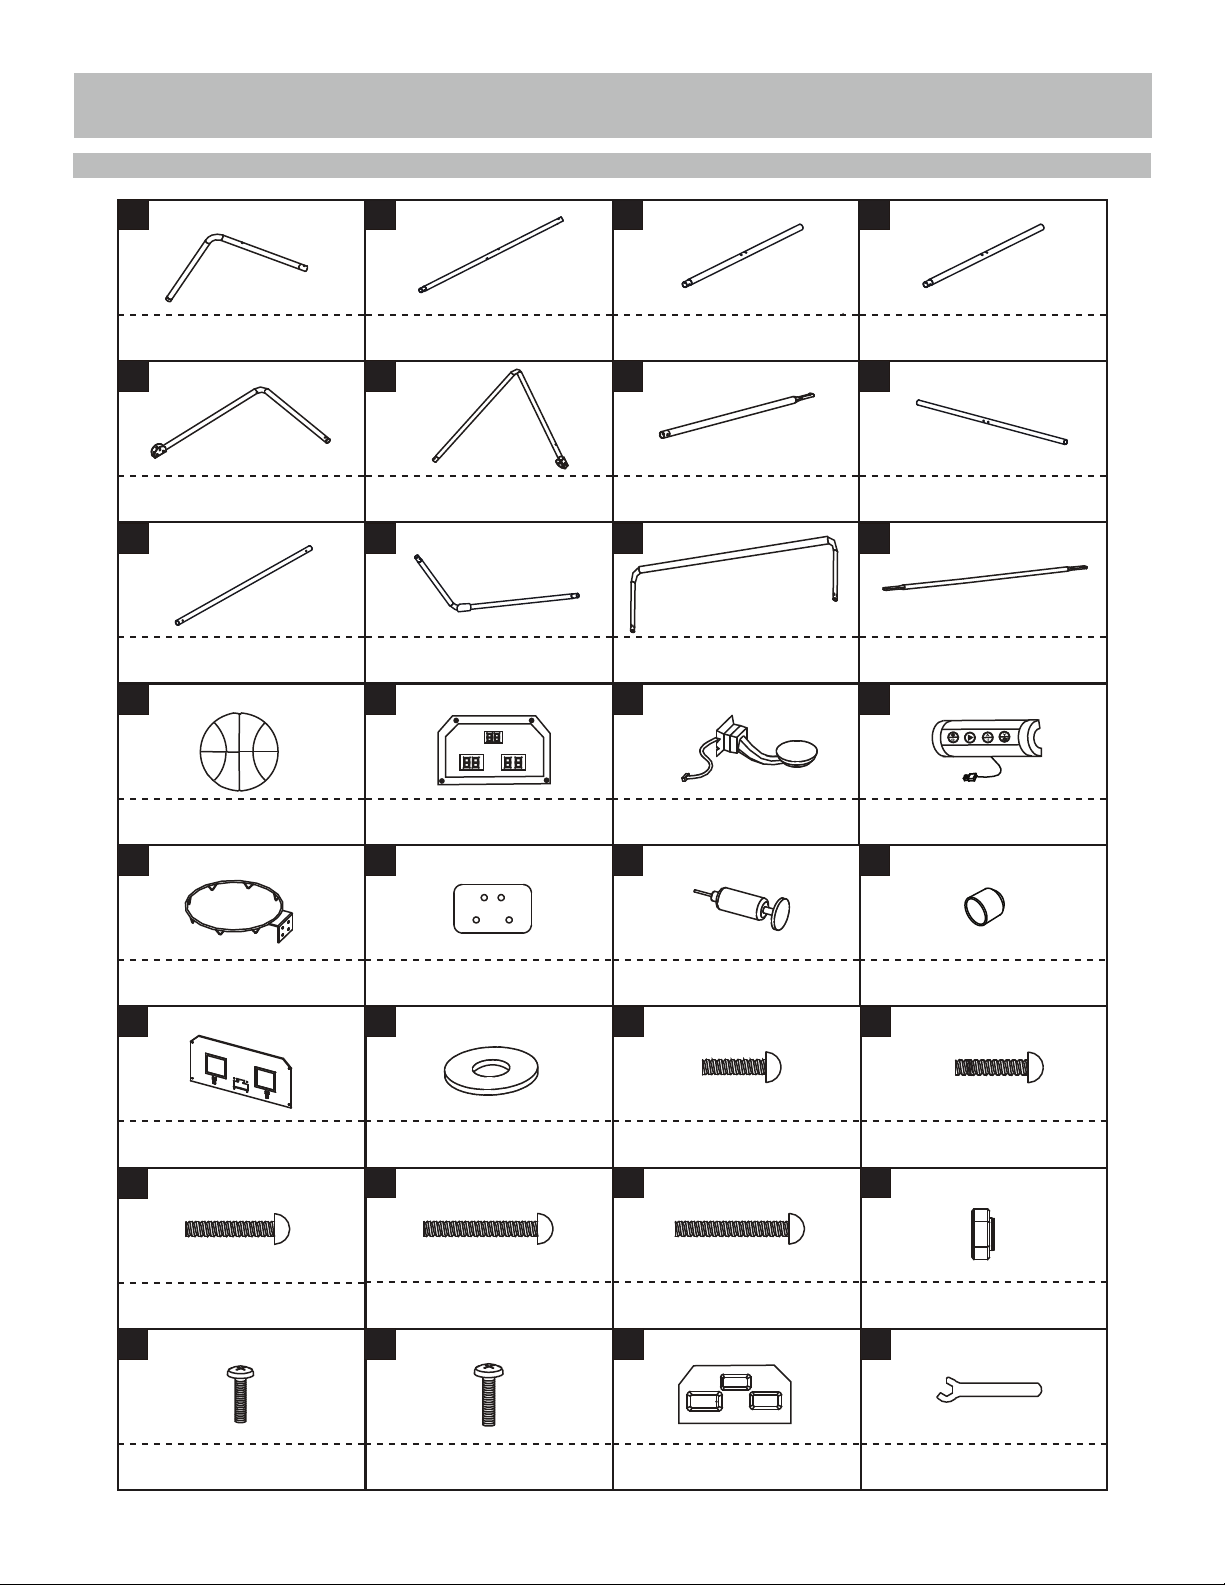
PARTS IDENTIFIER (NOT TO SCALE)
NGP6021
1
NGP6020
2 3 4
x2 x2 x1 x1
Ø22x580x440mm
NGP6024
Ø22x755x580mm
9
NGP6028
Tube 1
6 7 85
x1 x2 x2
Tube 5
10 11
Tube 2
Ø22x685mm
NGP6025
Tube 6
Ø22x755x580mm
NGP6029
x1
x2 x2 x1 x2
Tube 9 Tube 10
Ø22x740mm
NGP2217
13 14 15
Ø22x540x385mm
NGP6033
x4 x1 x2 x1
Basketball
7" Dia.
17
NGP6036 NGP6038 NGP6039NGP6037
18 19 20
NGP6022
Tube 3
Ø22x890mm
NGP6026
Tube 7
Ø22x830mm
NGP6030
Tube 11
Ø22x1065x520mm
NGP6034
Switch Sensor Control Box with Wire Electronic Scorer
12
16
NGP6023
Tube 4
Ø22x890mm
NGP6027
Tube 8
Ø22x835mm
NGP6031
Tube 12
Ø12.7x1070mm
NGP6035
x2
Rim
NGP6040 NGP6041* NGP6041*NGP6041*
21
22
x1
Backboard
NGP6041* NGP6041* NGP6041*NGP6041*
25
26
M6 Washer
x4
M6 x 42mm Bolt
NGP6041* NGP6042 NGP6041*NGP6041*
29
30
M6 x 48mm Bolt
x4
3.5 x 10mm Bolt
*Items included in Hardware Pack, NGP6041 6/15 For replacement parts please call 800-759-0977.
4 x 28mm Bolt
x2 x1
Inflation Pump with NeedleRim Support Plate
23
x64
M6 x 20mm Bolt
x16
27
x4
31
M6 x 35mm Bolt
TIME
HOME
VISITOR
x2
Electronic Scorer Face Plate
End Cap
24
M6 x 30mm Bolt
28
x2
M6 Nut
32
x1
Wrench
x2
x6
x32
x1
3
Page 4

PARTS IDENTIFIER (NOT TO SCALE)
33
34
NGP6043 NGP6044NGP6041*
x1
Allen Key
*Items included in Hardware Pack, NGP6041
Self-Stick Strap
PRE-INSTALLED PARTS
A1 A2
x2 x2
Net
For replacement parts please call 800-759-0977.
Spring Lock
TOOLS REQUIRED
• Phillips Screwdriver - Not included
• Standard (Flat Head) Screwdriver - Not included
• Allen Wrench - Included
x9
x2
35
A3
Ball Return Net
Plastic Pole Insert
x1
A4
x2
Lock Pin
CAUTION!
Electric Screwdrivers may be helpful during assembly;
however, please set a low torque and use extreme caution.
X 2
Strong Adults Needed No Children in
Assembly Area
Power Tools
- Set Low Torque
High Torque
over tightened
Keep away from pets Do not use or keep product
outdoors. For indoor use only.
No wet/humid conditions.
5/14
4
Page 5

ASSEMBLY TIPS
1. Find a clean, level surface to begin the assembly of your basketball game. We recommend
that two adults work together to assemble this game. You may want to carefully cut or tear
the four corners of the box so that the bottom of the box can be used as your work surface.
2. Remove all of the contents from box and verify that you have all of the parts shown on
Note: Some parts may be pre-installed
or pre-assembled.
understand the text before beginning each assembly step.
4. When installing parts that have more than one screw or bolt, hand tighten all
5. Electric screwdrivers may be helpful during assembly; however, please set a low torque
and use extreme caution because screws may be stripped or overtightened, resulting in
damaged parts, if the electric screwdriver’s torque is set too high.
WARNINGS!
READ AND FOLLOW ALL ASSEMBLY, OPERATION AND SAFETY INSTRUCTIONS CAREFULLY.
CHOKE HAZARD - THIS TABLE CONTAINS SMALL BALLS AND PARTS
NOT SUITABLE FOR CHILDREN UNDER 3 YEARS OF AGE.
5
Page 6

THANK YOU!
ASSEMBLY INSTRUCTIONS
FIG. 1 & 2
1. Attach Tubes 2 (#2) to Tube 3 and Tube 4 (#3 & #4) using spring lock (pre-installed) as shown in FIG.1.
2. Attach Tubes 7 (#7) to Tubes 8 (#8) using spring lock (pre-installed) as shown in FIG.2
2
3
4
7
8
X 2
X 1
X 1
X 2
X 2
2
3
FIG. 1
2
4
A2
Spring Lock
FIG. 2
A2
Spring Lock
7
8
FIG. 3
3. Attach Tube 5 and Tube 6 (#5 & #6) together using spring lock (pre-installed) as shown in FIG.3.
Punched hole
5
6
X 1
X 1
FIG. 3
5
6
A2
Spring Lock
6
Page 7
ASSEMBLY INSTRUCTIONS (CONT.)
FIG. 4
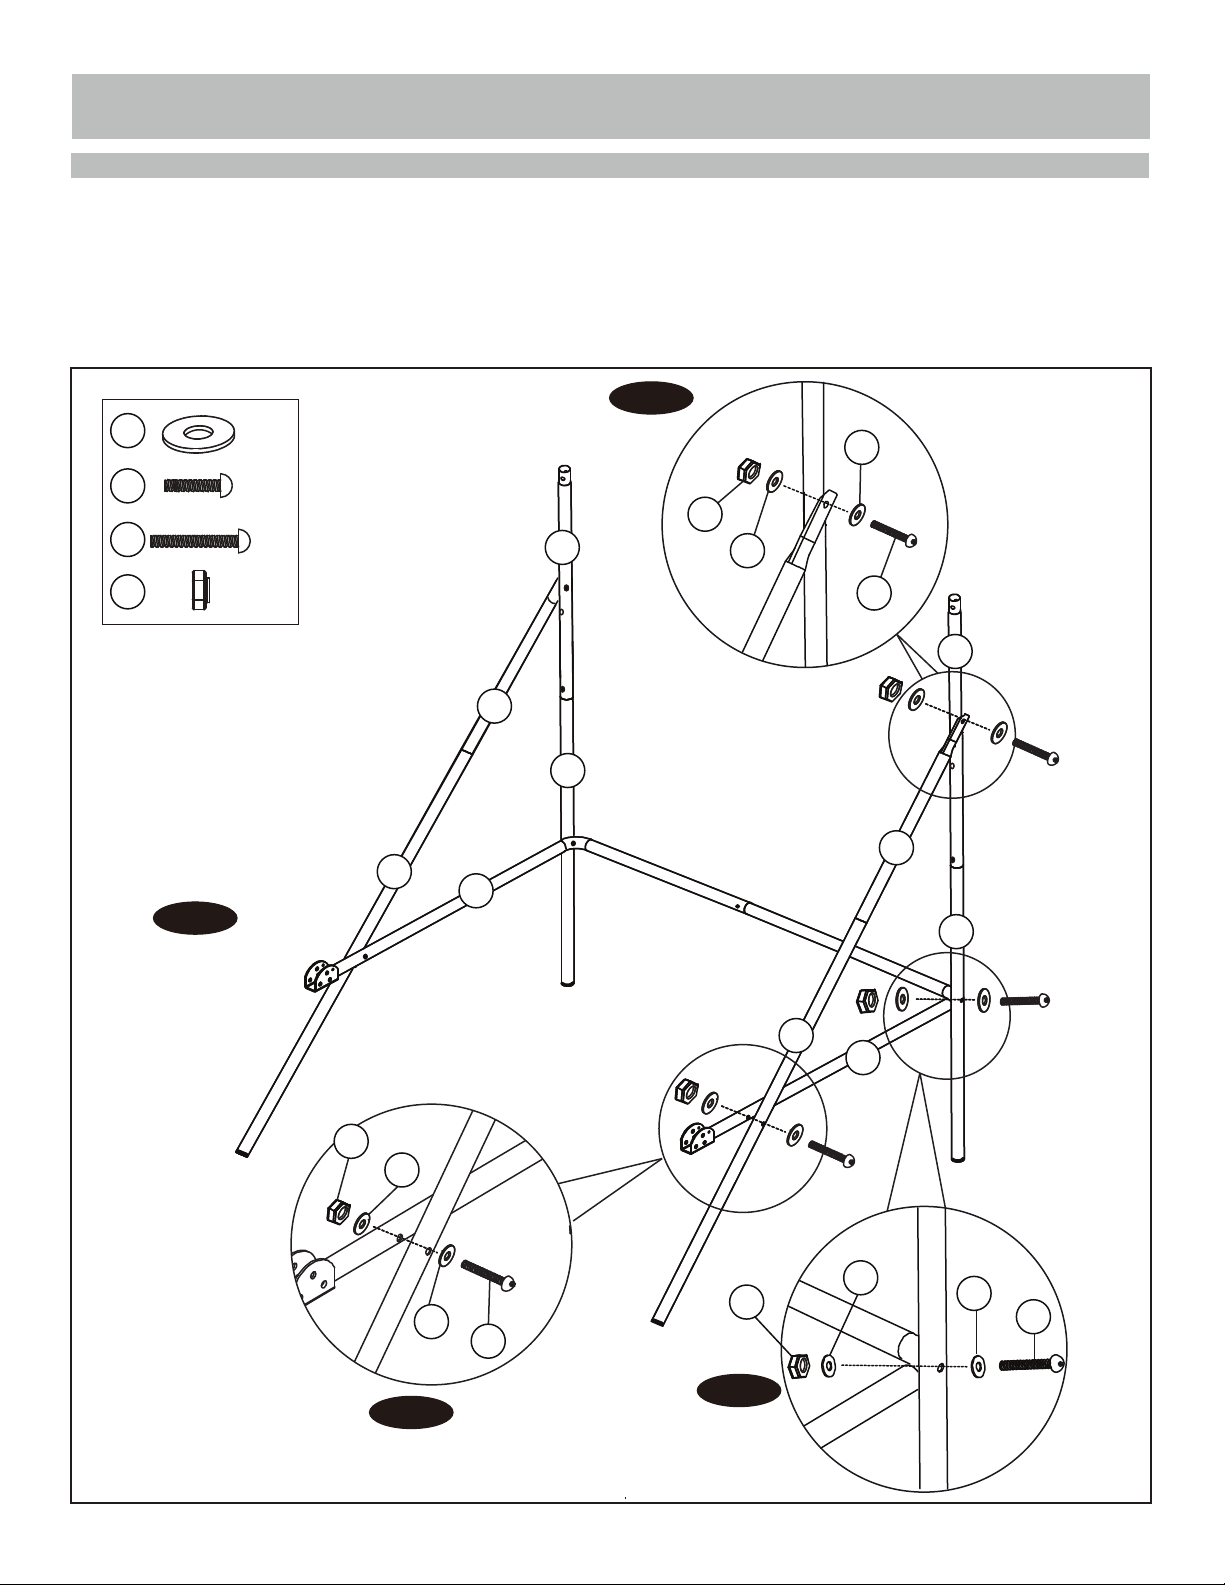
4. Attach Tube 5 and Tube 6 (#5 & #6) to Tube 3 and Tube 4 (#3 & #4) using Bolts (#26), Washers (#22) and Nuts (#28),
and then attach Tube 5 and Tube 6 (#5 & #6) to Tubes 8 (#8) using Bolts (#26), Washers (#22) and Nuts (#28) as shown
in FIG. 4, 4A and 4B.
5. Attach Tubes 7 and Tubes 8 (#7 & #8) to Tube 2 (#2) using Bolt (#24), Washers (#22) and Nuts (#28) as shown in
FIG. 4C, repeat this step for other side. NOTE: Make sure the spring lock is facing down.
FIG. 4C
22
24
26
28
FIG. 4
X 12
X 2
X 4
X 6
22
28
2
22
24
2
7
3
7
8
5
4
28
22
22
FIG. 4B
26
28
FIG. 4A
8
6
22
22
26
7
Page 8
ASSEMBLY INSTRUCTIONS (CONT.)
1
1
9
12
22
24
27
28
28
22
X 2
X 2
X 1
X 8
X 2
X 2
X 4
2
22
12
24
A3
FIG. 5
1
1
2
2
12
5
FIG. 5A
9
9
FIG. 5
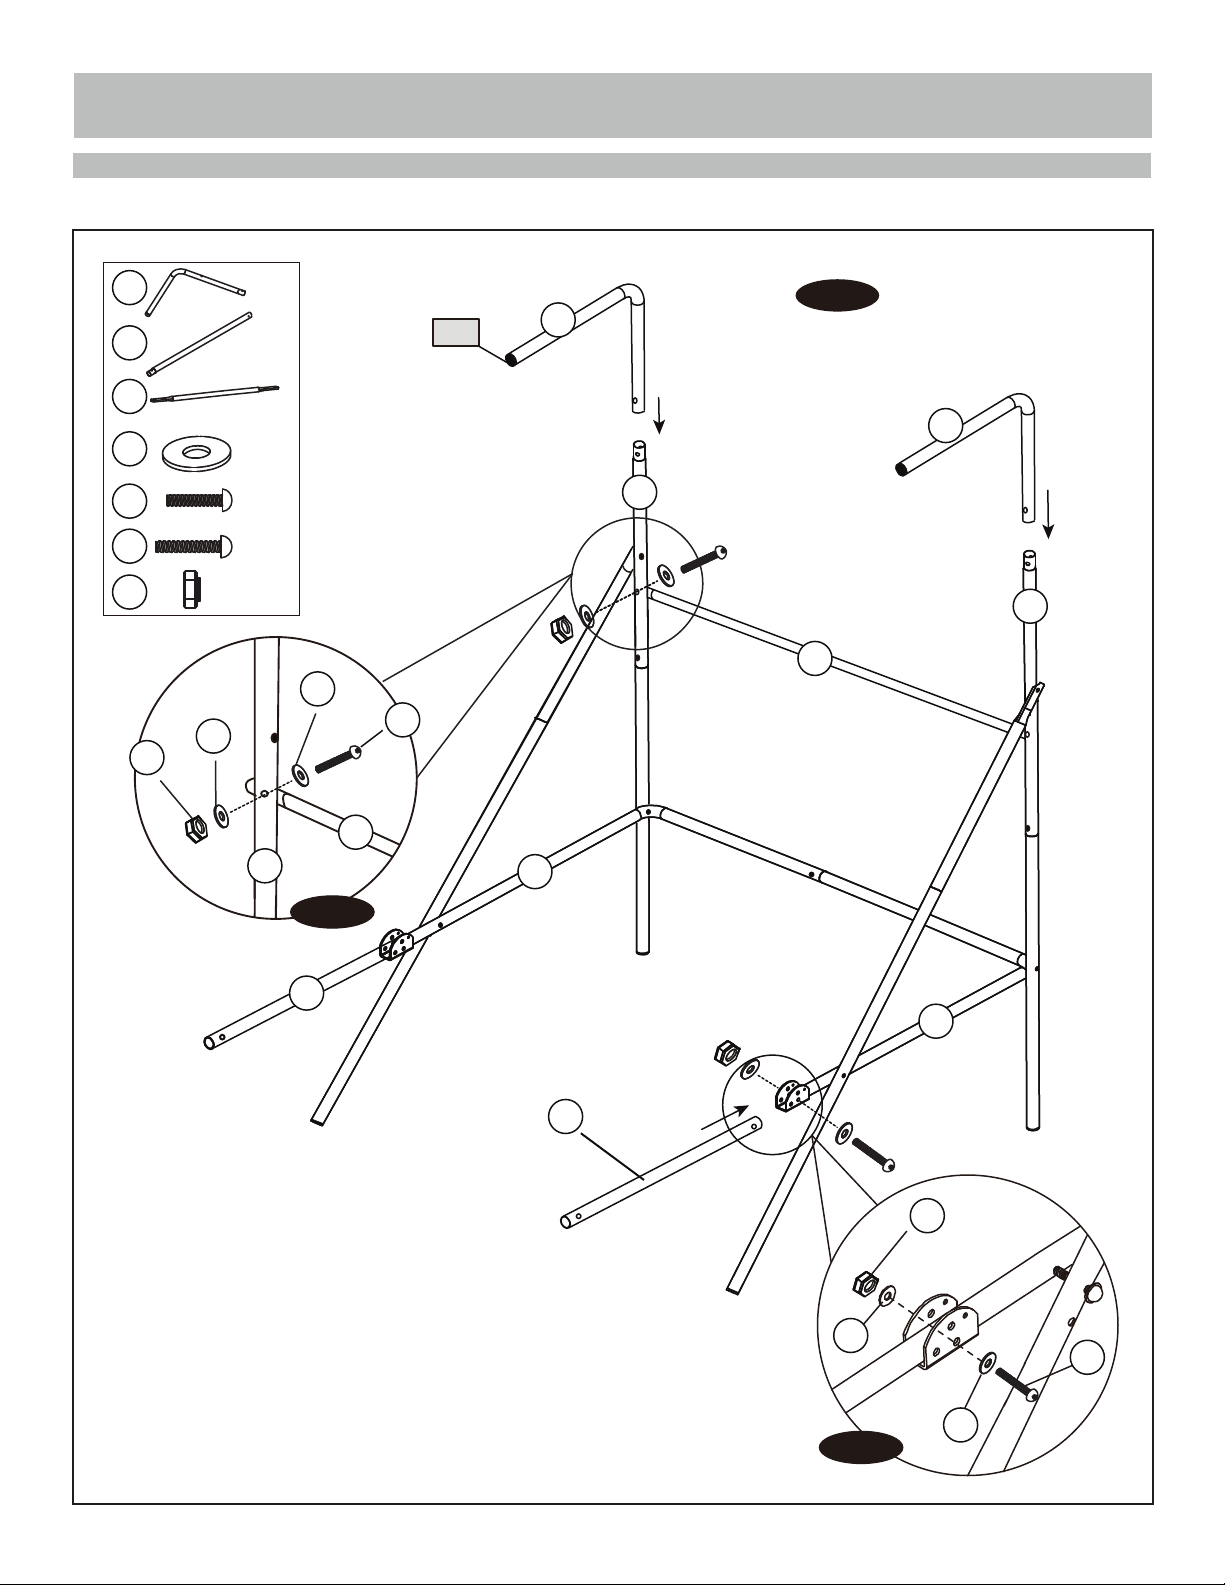
6. Attach Tube 12 (#12) to Tubes 2 (#2) using Bolts (#24), Washers
(#22) and Nuts (#28) as shown in Fig. 5A, and then insert Tubes 1
(#1) onto Tubes 2 (#2) as shown in FIG. 5.
7. Attach Tubes 9 (#9) to Tube 5 and Tube 6 (#5 & #6) using Bolt (#27),
Washers (#22) and Nuts (#28) as shown in FIG. 5 and 5B
22
FIG. 5B
6
28
27
22
8
Page 9
ASSEMBLY INSTRUCTIONS (CONT.)
10
11
Spring Lock
X 2
X 1
FIG. 6
11
A2
10
11
9
Short
10
Long
10
FIG. 6
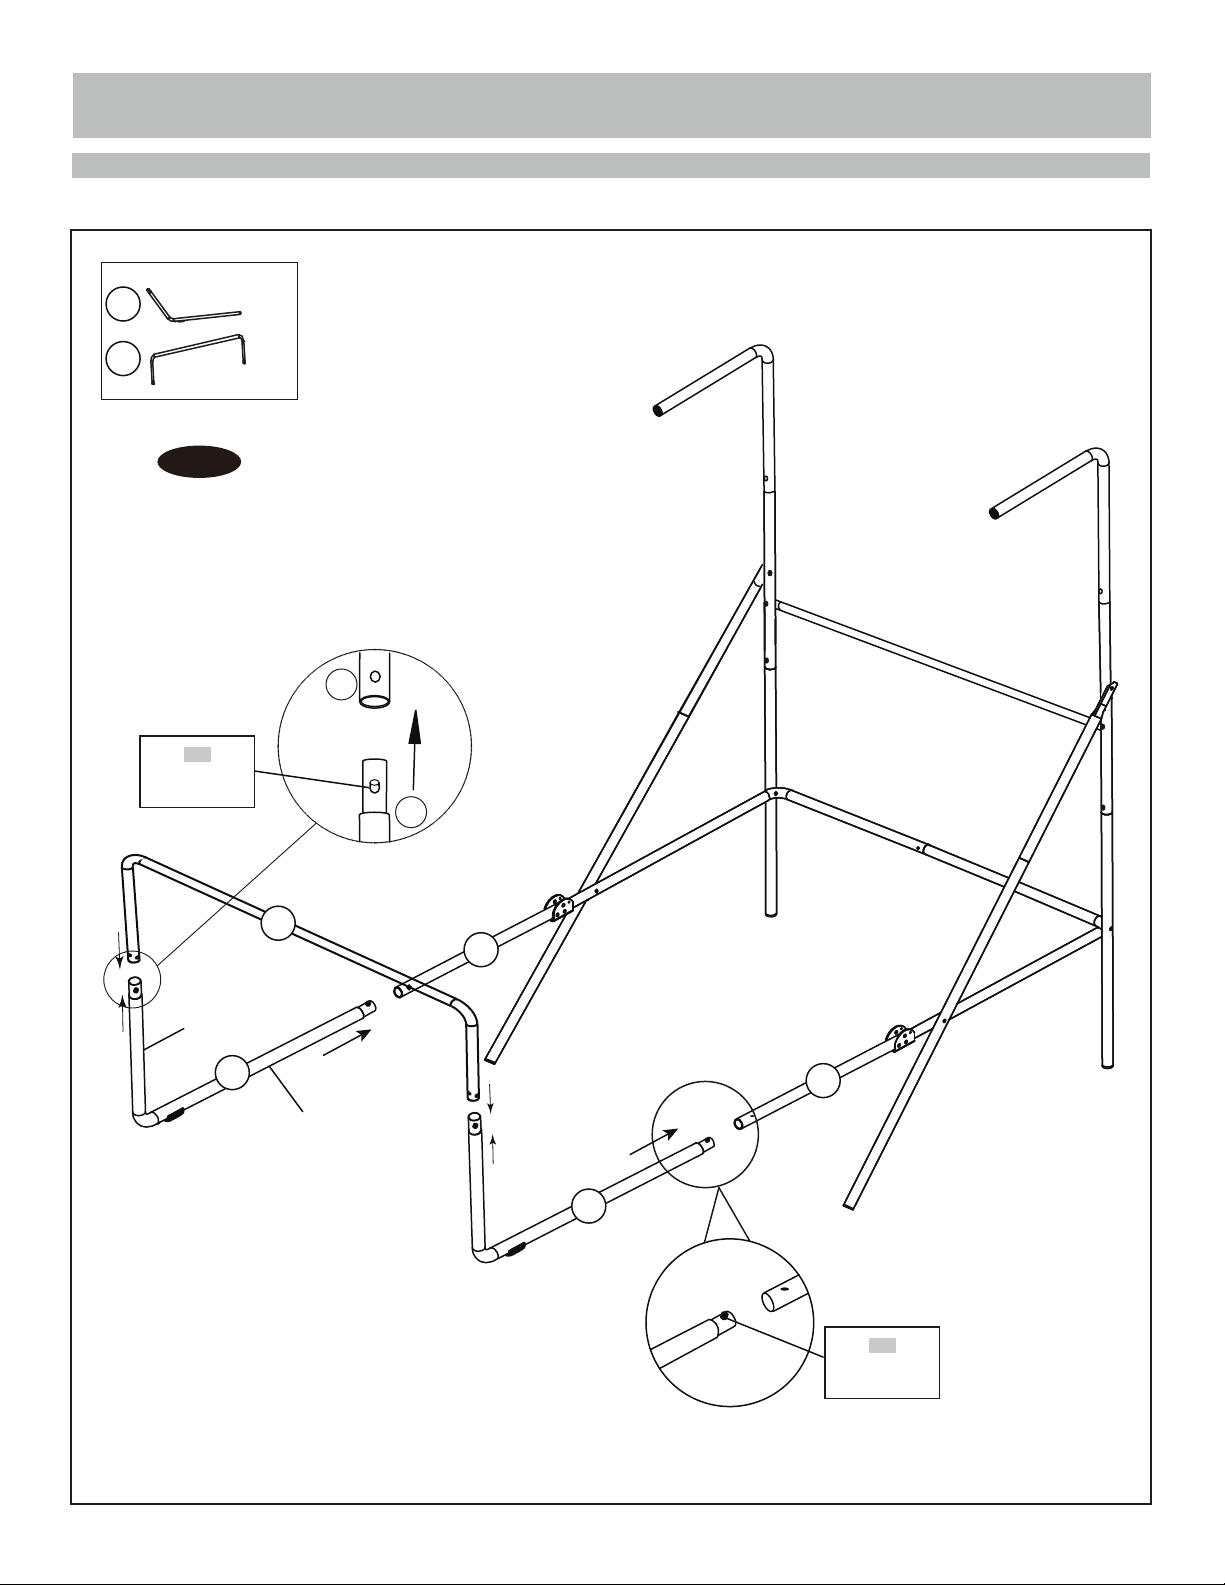
8. Attach Tubes 10 (#10) to Tubes 9 (#9) using
spring locks (pre-installed), and then insert Tube 11 (#11)
onto Tubes 10 (#10) using spring locks (pre-installed) as shown in FIG. 6.
9
A2
Spring Lock
9
Page 10
THANK YOU!
ASSEMBLY INSTRUCTIONS (CONT.)
FIG. 7
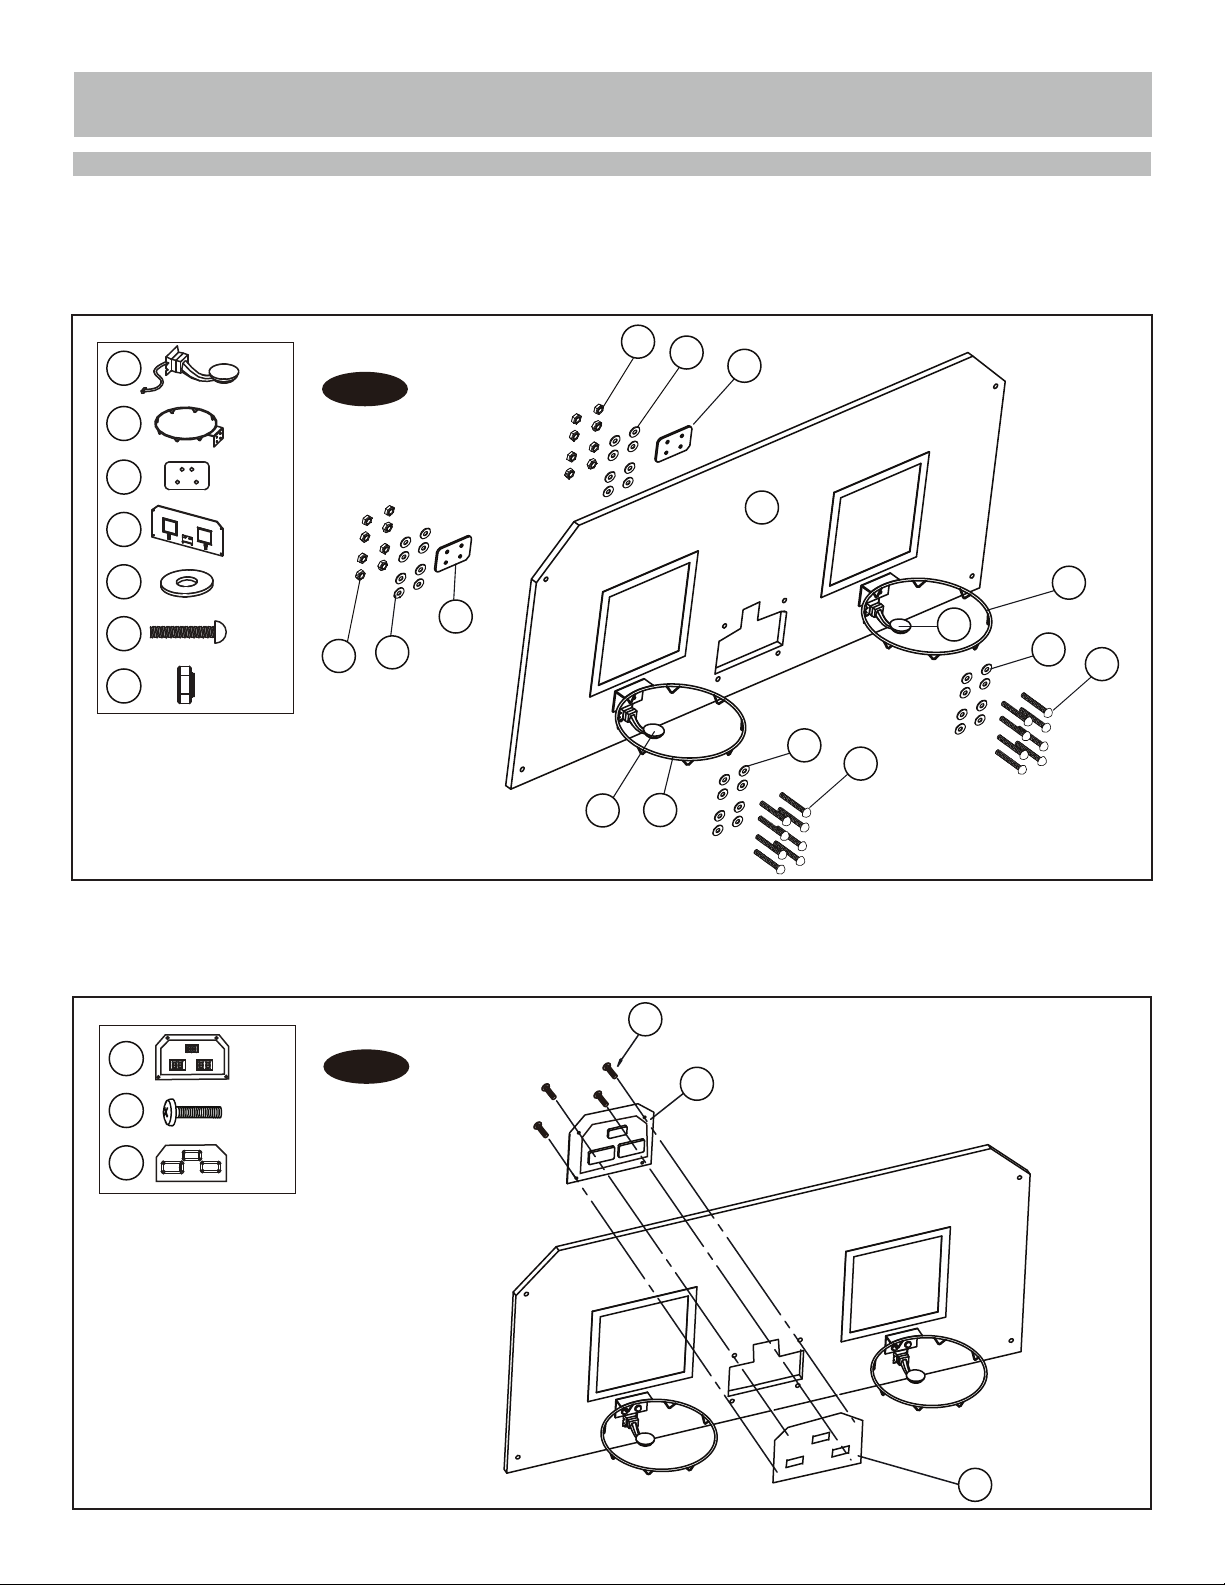
9. Attach Rims (#17) and Rim Support Plates (#18) to the Backboard (#21) using the Bolts (#23), Washers (#22) and
Nuts (#28). Attach the Switch Sensors (#15) to the Backboard (#21) using the Bolts (#23), Washers (#22) and Nuts (#28).
NOTE: Make sure that you use washer on both sides of the backboard as shown in FIG. 7.
28
22
15
X 2
FIG. 7
18
17
18
X 2
X 2
21
21
22
23
28
X 1
X 32
X 16
X 16
28
22
18
15
22
17
23
22
23
17
15
FIG. 8
10. Attach the Electronic Scorer Face Plate (#31) to the front of Backboard and connect with the Electronic Scorer (#14)
using Bolts (#29) as shown in FIG. 8.
14
29
31
29
X 1
FIG. 8
14
X 4
TIME
HOME
VISITOR
X 1
TIME
VISITOR
HOME
31
10
Page 11
ASSEMBLY INSTRUCTIONS (CONT.)
FIG. 9
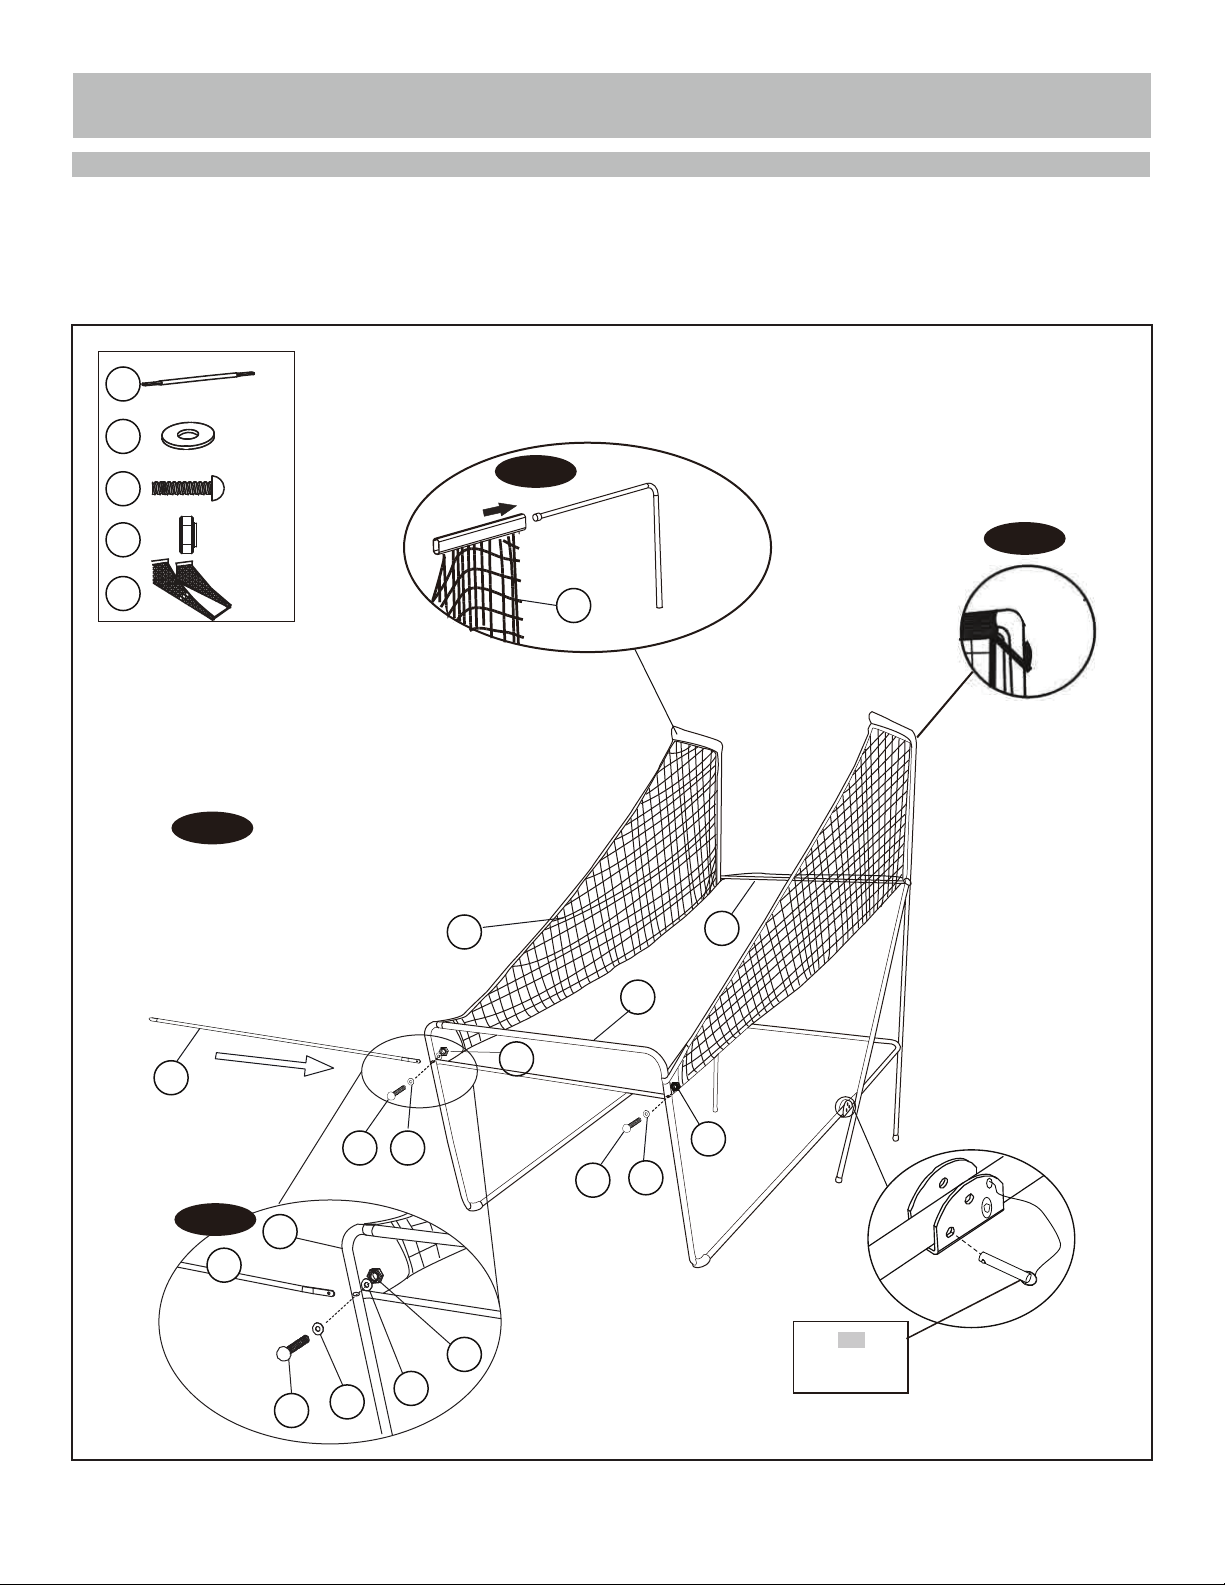
11. Slide elastic straps and sleeve of Ball Return Net (#35) onto Top Tubes 1 (#1) as shown in FIG. 9A & 9B.
12. Slide Tube 12 (#12) through the sleeve on the front of the Ball Return Net (#35), attach the left side first using
Bolts (#24), Washers (#22) and Nuts (#28) as shown in FIG. 9C. Follow the same procedure on the right side.
12
X 1
22
24
28
35
FIG.9
X 4
X 2
X 2
X 1
35
FIG.9A
FIG.9B
35
12
11
12
FIG.9C
12
11
24
22
24
22
22
28
28
24
28
22
A4
Lock Pin
11
Page 12
ASSEMBLY INSTRUCTIONS (CONT.)
FIG. 10
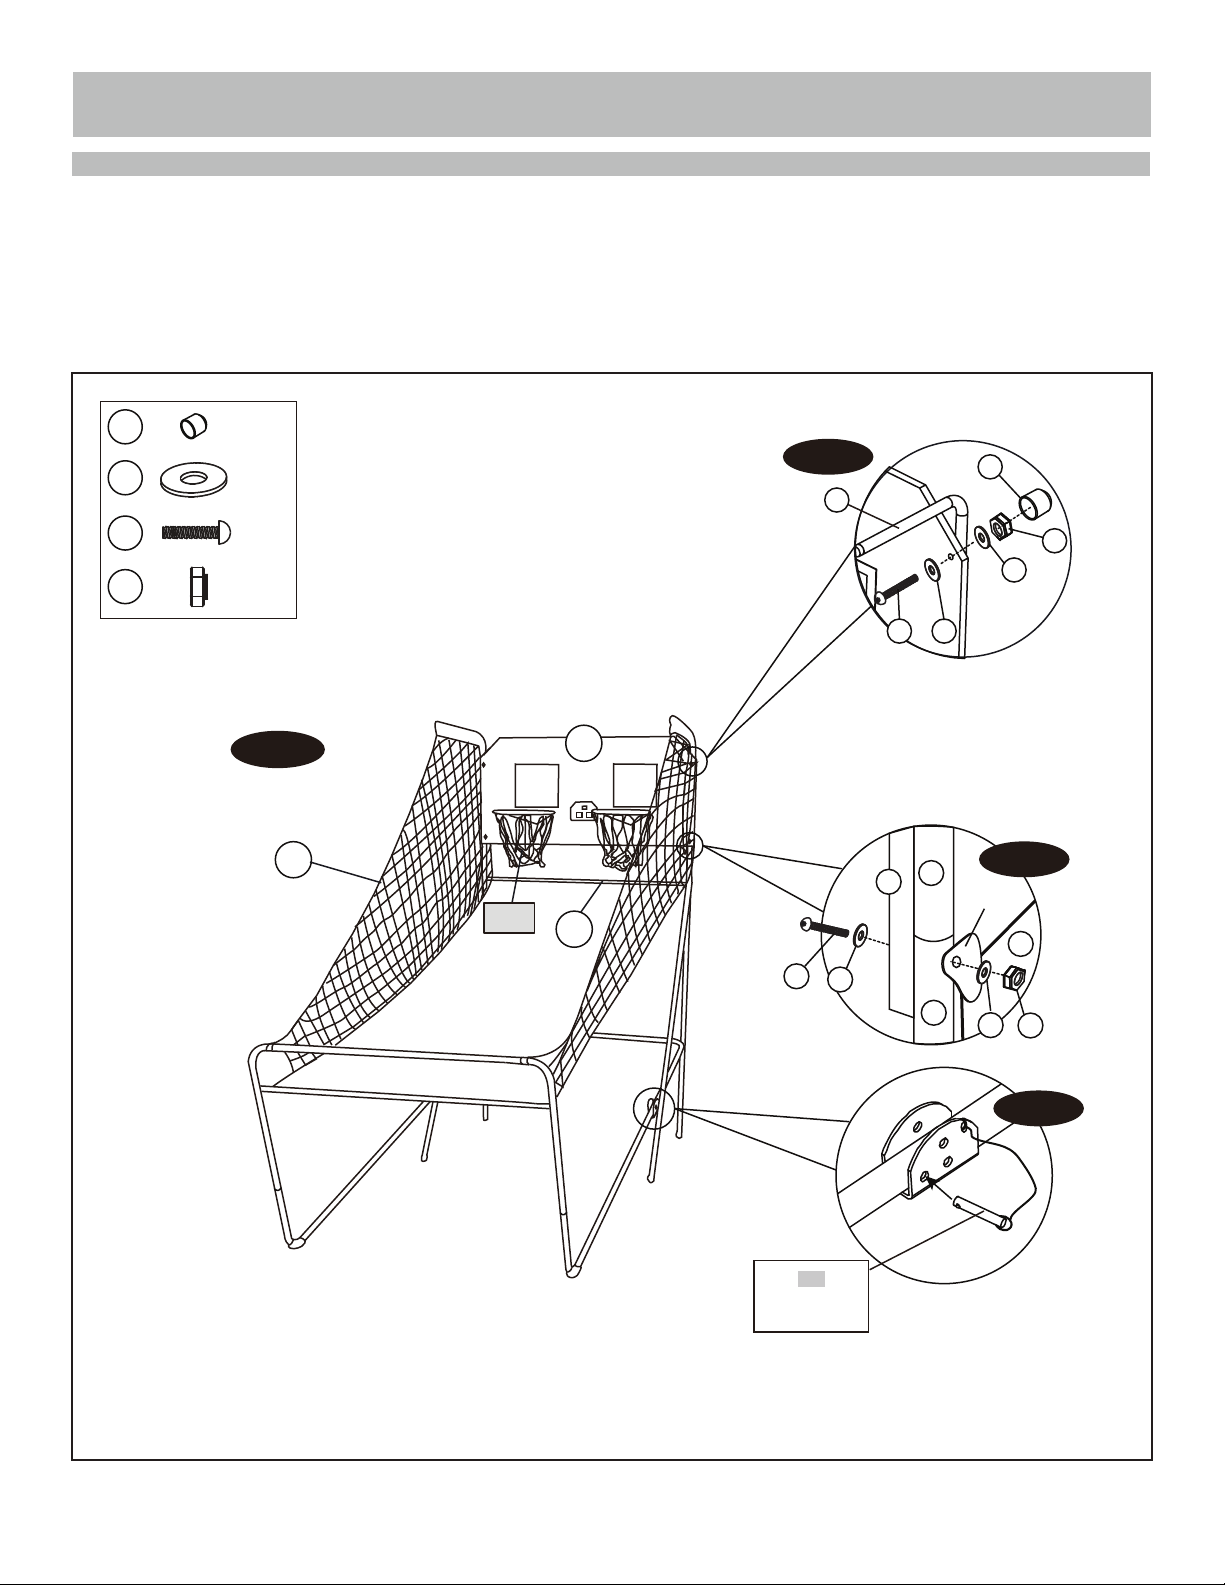
13. With the help of another adult, attach the Backboard (#21) to Top Tubes 1 (#1) using Bolts (#25), Washers (#22),
Nuts (#28) and End Caps (#20) as shown in FIG.10A. At each bottom hole of the backboard, attach the ramp tabs of
Ball Return Net (#35) using Bolts (#25), Washers (#22), Nuts (#28) as shown in FIG.10B.
14. Connect the Lock Pins (#A4) to Tube 5 andTube 6 (#5 & #6) and insert them into Tube 5 and Tube 6 (#5 & #6) as
shown in FIG.10C.
20
22
25
28
X 2
X 8
X 4
X 4
FIG. 10
35
A1
21
12
FIG. 10A
1
25
22
25 22
21
1
2
20
22
FIG. 10B
Ramp Tab
22
28
34
28
A4
Lock Pin
FIG. 10C
12
Page 13
ASSEMBLY INSTRUCTIONS (CONT.)
FIG. 11
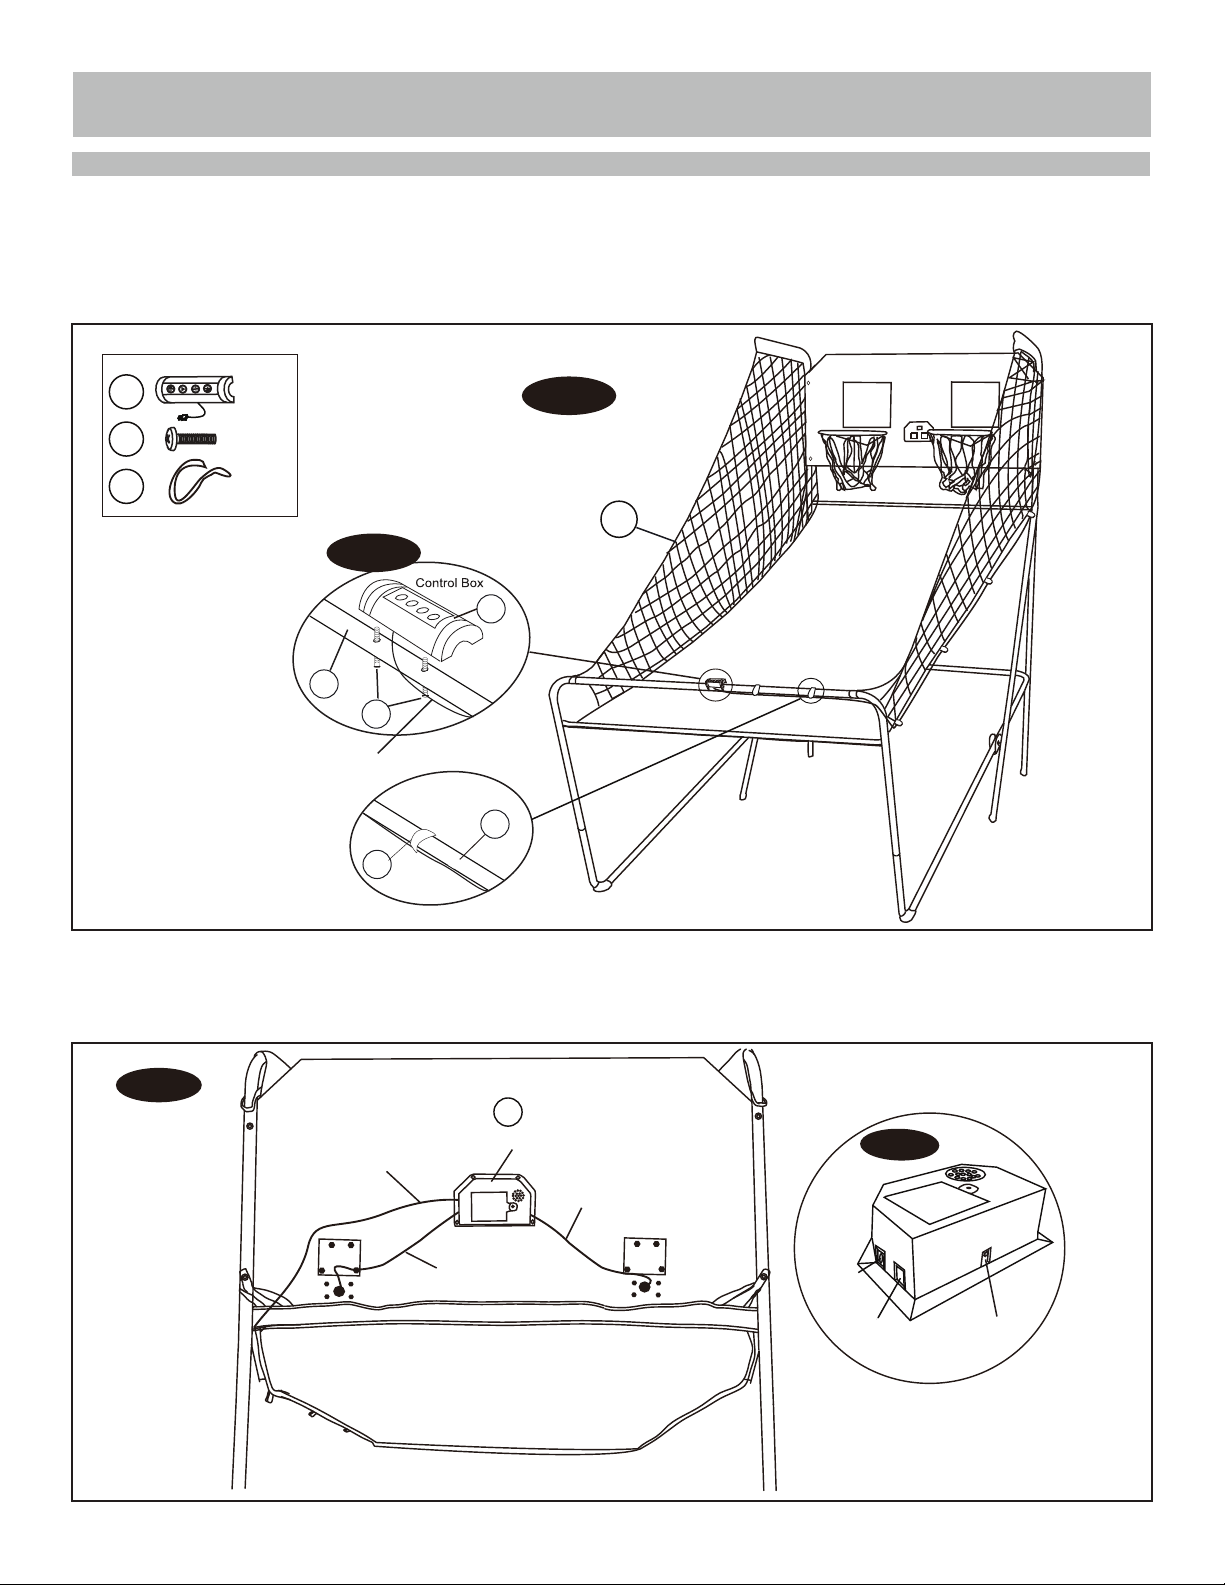
15. Attach the Control Box (#16) to the middle of Tube 11 (#11) using two Bolts (#30) as shown in FIG.11A.
16. Run the rest of the Control Wire through the loops on the bottom side of the Ball Return Net (#35). Hold the Control
Wire on Tube 11 (#11) using the Self-Stick Straps (#34) as shown in FIG.11.
16
30
34
X1
X2
X2
FIG.11
35
FIG.11A
16
11
30
Control Wire
11
34
FIG. 12
17. Connect the Sensor Wire from Switch Sensor (#15) to the Electronic Scorer (#14) as shown in FIG.12.
Connect the Control Wire to the Electronic Scorer (#14) as shown in FIG.12 and 12A.
FIG. 12
Control Wire
14
Electronic Scorer
Sensor Wire
Sensor Wire
CONTROL
WIRE /
CONTROL
CABLE
FIG. 12A
VISITOR
ON / OFF
13
Page 14
ASSEMBLY INSTRUCTIONS (CONT.)
FIG. 13
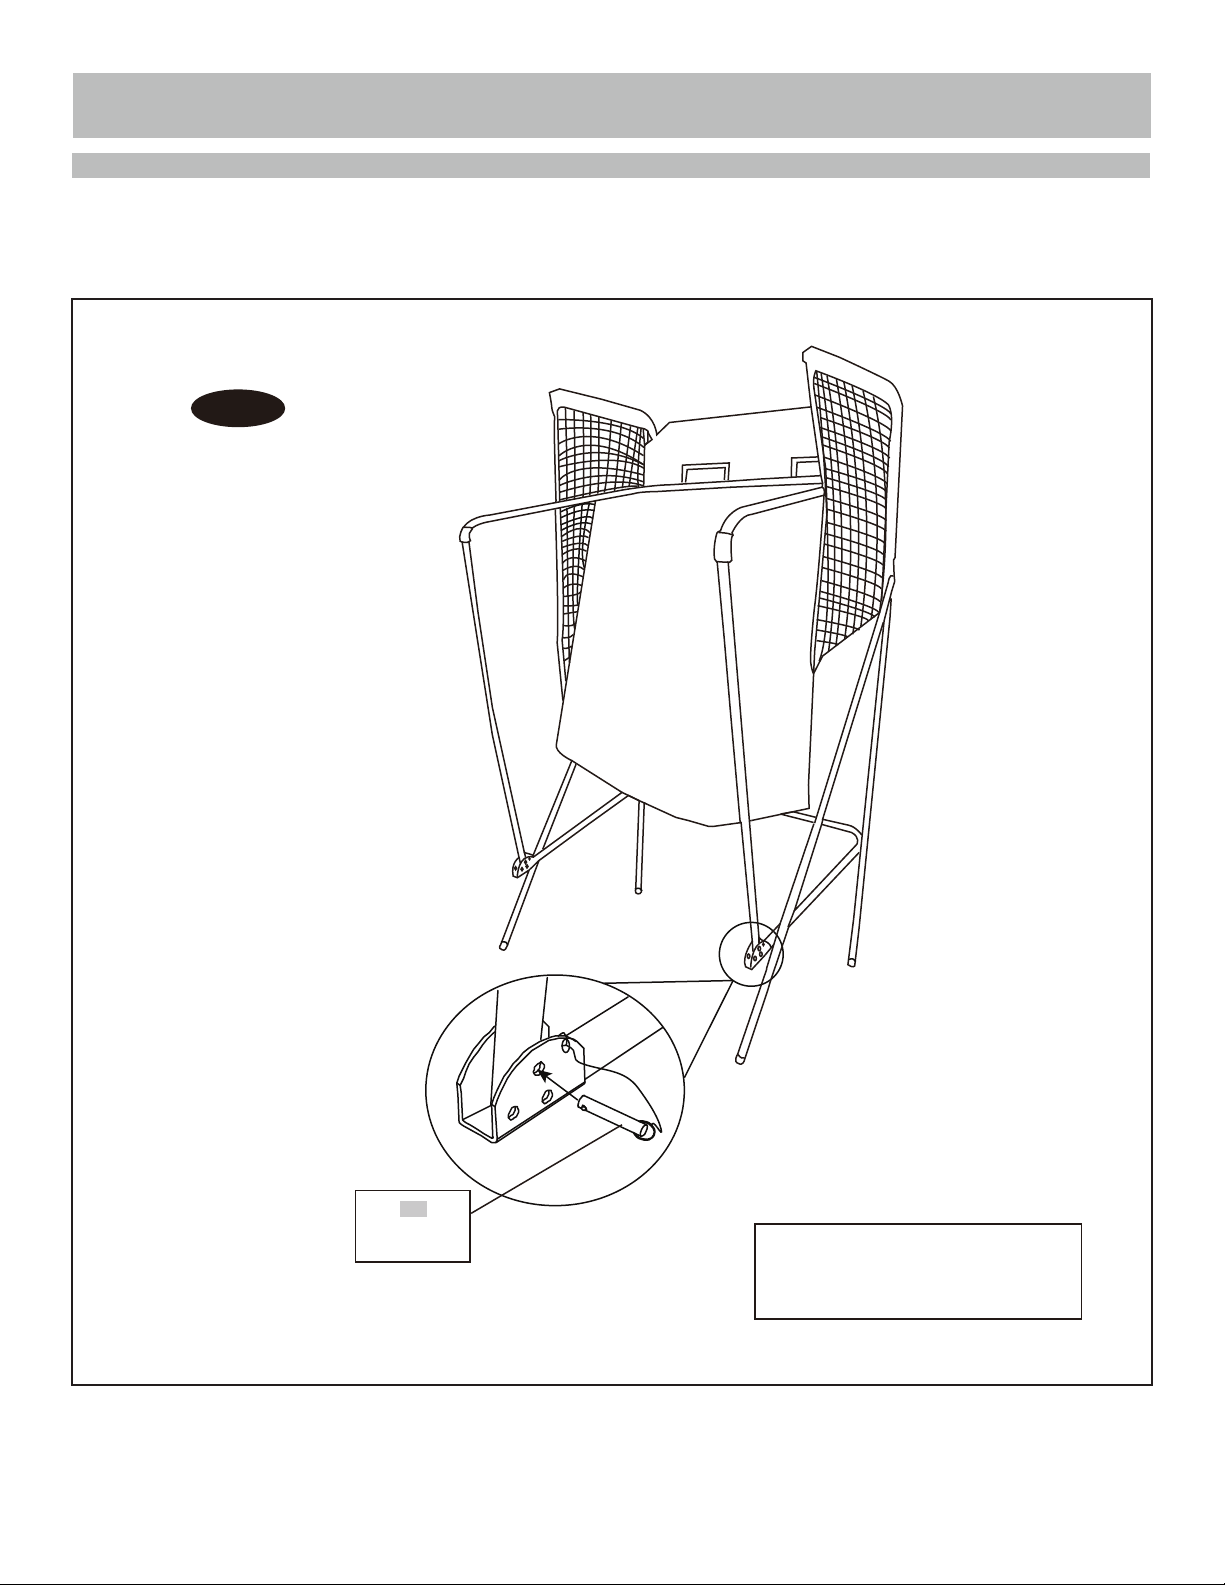
18. To fold game up when not in use, remove Lock Pins (#A4), fold the front of the basketball game up and re-insert
Lock Pins (#A4) as shown in FIG.13. Note: The Lock Pins need to be removed before folding closed or open.
FIG. 13
A4
Lock Pin
IMPORTANT!
Make sure to use the
Lock Pin (#A4) when folded.
14
Page 15
ASSEMBLY INSTRUCTIONS (CONT.)
ELECTRONIC SCORER OPERATION
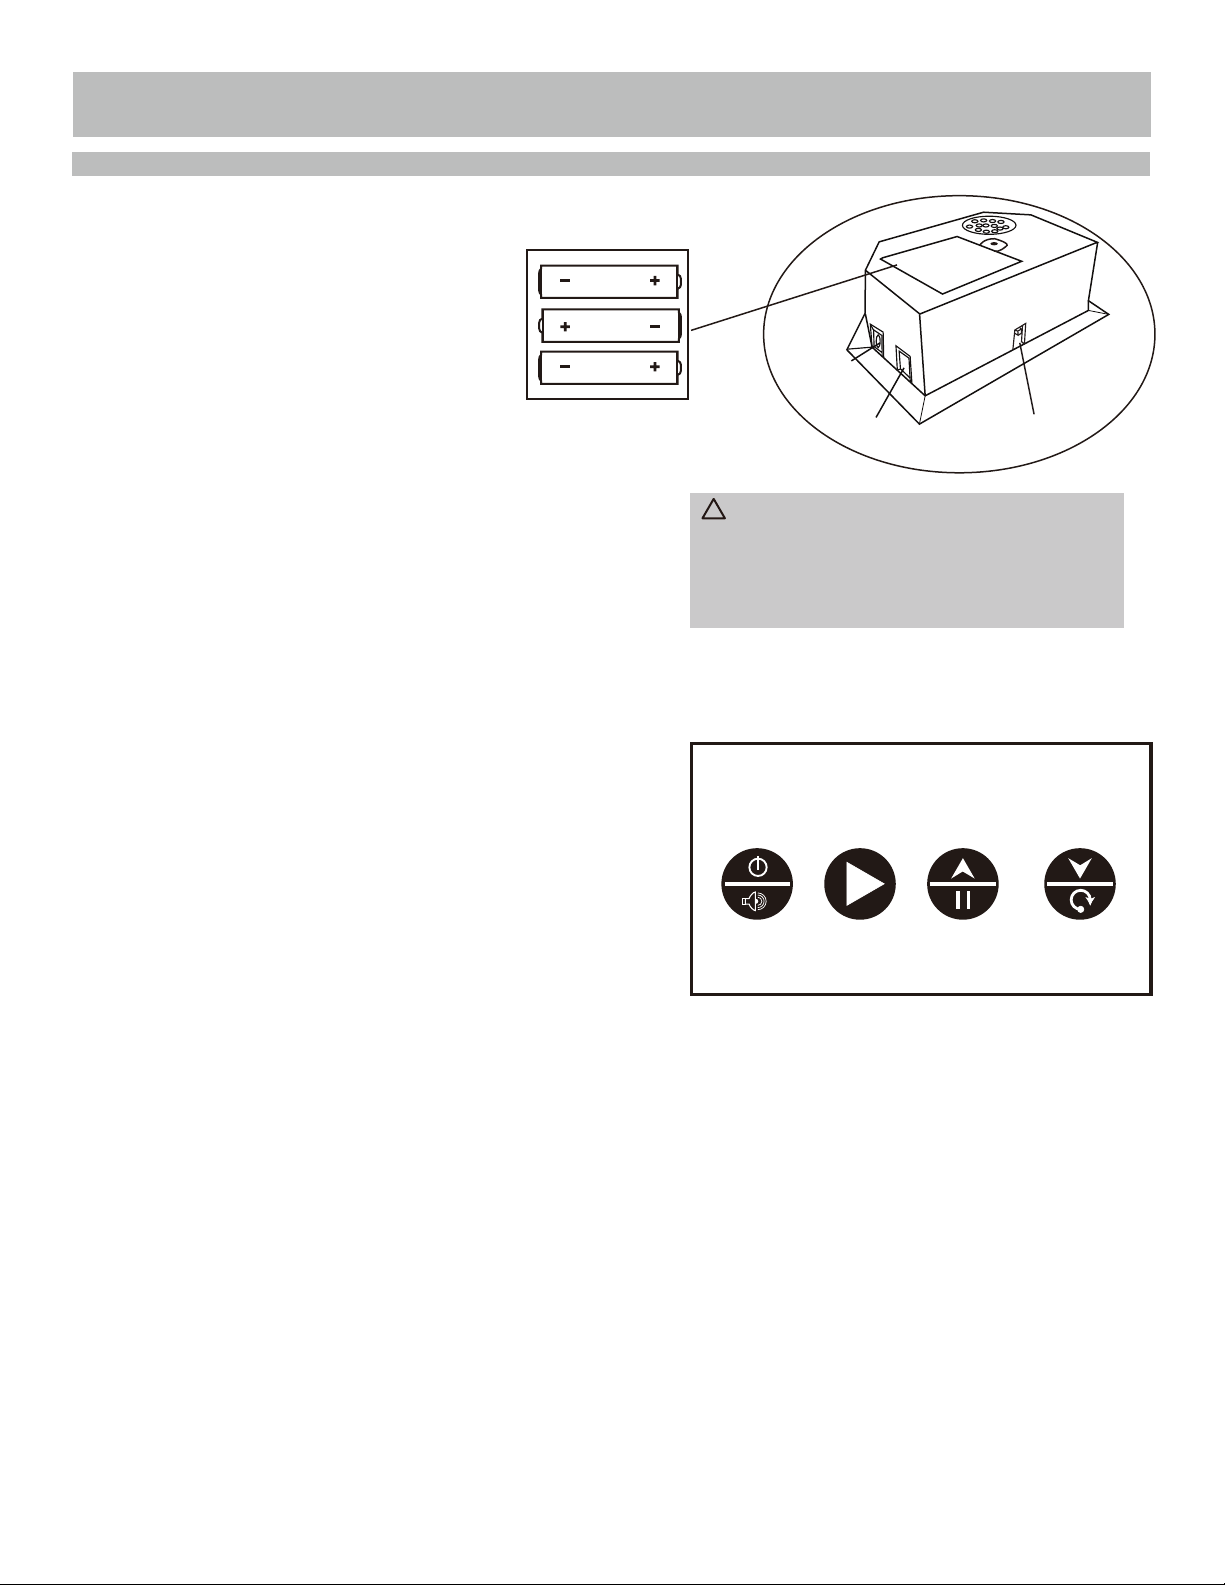
Installing Batteries:
Using a screwdriver, unscrew lid and open the
battery box. Insert 3 “AA” batteries ( not included)
in the order of polarity as shown on the inside
cover. Close the cover and tighten screw.
Turn the power ON using the ON/OFF switch.
Reminders:
• Batteries must be installed according to the
correct polarization (+ and -) requirement.
• Please clean the battery contacts, and also those
of the device, prior to battery installation.
• If the game will not be used for a long period of time,
we recommend that the batteries should be removed.
CONTROL BOX OPERATION
Press "ON/OFF" to activate the scorer.
Scoreboard "HOME" shows "01" (pre- set game 1).
Press "SELECT UP and DOWN" to select a game.
Press "PLAY" to enter selected game mode.
Press "SOUND" to switch sound ON/OFF while playing.
Press "PAUSE" to pause or start time counting.
Press and hold the button "ON/OFF" 3 seconds to turn off scorer.
Press and hold the button "RESET" 3 seconds to reset the games.
NOTE: If no shot is made or no button is pressed in 15 mins,
scorer will be turned off automatically.
CONTROL
WIRE /
CONTROL
CABLE
VISITOR
!
WARNING:
1) Requires 3 “AA” batteries (not included).
2) Do not mix old and new batteries.
3) Do not mix alkaline, standard (carbon zinc), or
rechangeable (nickel-cadmium) batteries.
ON / OFF
CONTROL PANEL
ON/OFF
SOUND
PLAY
SELECT
UP
PAUSE
SELECT
DOWN
RESET
15
Page 16

CHOOSE FROM 8 DIFFERENT GAME OPTIONS
1. Beat the Clock
Press "PLAY" to enter game 1.
Press "UP/Down" to select single/multiple players
(P1/P2/P3/P4).
Press "PLAY" after the number of players is selected.
Press "UP/Down" to select playing time, 30/45/60 seconds.
Press "PLAY" to begin the game.
Scoreboard "HOME" shows Player 1, 3;
Scoreboard "VISITOR" shows Player 2, 4.
All shots worth 2 points until last 10 seconds, then each
score counts 3 points. Countdown 5 seconds to next
player's turn when one player finishes game. Player with
most points scored wins ( LED will flash on player with
higher score).
Press "PLAY" to restart this game.
2. 3 Point Beat the Clock
Press "PLAY" to enter game 2.
Press "UP/Down" to select single/multiple players
(P1/P2/P3/P4).
Press "PLAY" after the number of players is selected.
Press "UP/Down" to select playing time, 30/45/60 seconds.
Press "PLAY" to begin the game.
Scoreboard "HOME" shows Player 1, 3;
Scoreboard "VISITOR" shows Player 2, 4.
All shots made count 3. Countdown 5 seconds to next
player's turn when one player finishes game. Player with
most points scored wins ( LED will flash on player with
higher score).
Press "PLAY" to restart this game.
3. Battle Back
Press "PLAY" after the number of players is selected.
Player has to make a shot in 2 seconds.
First player is allowed to shoot at any hoop (HOME or
VISITOR). If first player scores in 2 seconds, no letter is
given. Game continues for next player. Scoreboard will
display "next player (P2P3/P4)" and LED will flash twice
in a second. After flash, next player has to duplicate the
shot in the same hoop selected by first player.
If player can't score in 2 seconds, player receives the first
letter "H" which will display on scoreaboard. Game remains
for the same player untill the player scores. If player keeps
missing, player receives "O" followed by "R", "S", "E".
After the letter "E" is given, the player is out.
The first player to spell "horse" is out. Play continues until
last player to spell “horse” wins.
Press "PLAY" to restart this game.
5. Check Point
Press "PLAY" to enter game 5.
Press "UP/Down" to select single/multiple players
(P1/P2/P3/P4).
Press "PLAY" after the number of players is selected.
"HOME" displays "player", "VISITOR" displays "24" points,
pre-set 40 seconds playing time.
Points scored will display on scoreboard "HOME".
Before time is out, once 24/52/68/86 points is scored,
playing time increases 10/20/10/20 seconds respectively.
Countdown 5 seconds to next player's turn when one
player finishes game.
Player with most points scored wins ( LED will flash on
player with higher score).
Game is finished when a player scores 98 points.
Press "PLAY" to restart this game.
Press "PLAY" to enter game 3.
Press "UP/Down" to select multiple players (P2/P4).
Press "PLAY" to begin the game.
Shot made in "HOME" frame, +2 points scored display on
"HOME" board and -2 points for "VISITOR".
Shot made in "VISITOR" frame, +2 points scored display
on "VISITOR" board and -2 points for "HOME".
Once a player scores 10 points they win and game
is finished.
Press "PLAY" to restart this game.
4. Horse
Press "PLAY" to enter game 4.
Press "UP/Down" to select multiple players (P2/P3/P4).
6. Around the World
Use tape to mark shooting lines.
Press "PLAY" to enter game 6.
Press "UP/Down" to select single/multiple players
(P1/P2/P3/P4).
Press "PLAY" after the number of players is selected.
"HOME" scoreboard displays Player 1/2/3/4, "VISITOR"
displays points scored.
Once score reaches 10 points or time reaches 99 seconds,
5 second countdown, until next player’s turn, when one
player finishes game.
Player who finishes the game first wins (LED will flash
on winner).
Press "PLAY" to restart this game.
16
Page 17

CHOOSE FROM 8 DIFFERENT GAME OPTIONS
7. Left and Right Shoot
Press "PLAY" to enter game 7.
Press "UP/Down" to select single/multiple players
(P1/P2/P3/P4).
Press "PLAY" after the number of players is selected.
Press "UP/Down" to select playing time, 30/45/60 seconds.
Press "PLAY" to begin the game.
Scoreboard "HOME" displays Player,
"VISITOR" displays points
Make a shot in "HOME" frame when LED is flasing on
"HOME", 2 points scored display on “HOME”.
Make a shot in "VISITOR" frame when LED is flasing on
"VISITOR", 2 points scored display on “VISITOR”.
5 second countdown, until next player’s turn, when one
player finishes game.
Player with most points scored wins ( LED will flash on
player with higher score).
Press "PLAY" to restart this game.
8. One on One
Press "PLAY" to enter game 8.
Press "UP/Down" to select single/multiple players
(P1/P2/P3/P4).
Press "PLAY" after the number of players is selected.
Press "UP/Down" to select playing time, 30/45/60 seconds.
Press "PLAY" to begin the game.
Scoreboard "HOME" displays Players 1 and 3,
"VISITOR" displays Players 2 and 4.
All shots worth 2 points until last 10 seconds, then each
score counts 3 points. Countdown 5 seconds to next
player's turn when one player finishes game. Player with
most points scored wins ( LED will flash on player with
higher score).
Press "PLAY" to restart this game.
17
Page 18

CONGRATULATIONS!
You have now assembled your Basketball Game.
Please note the Care and Use instructions below to
ensure years of trouble free use of your game table.
CARE AND USE
1. This product is intended for INDOOR use only.
2. Do NOT sit, climb or lean on the table.
3. Do NOT drag the table when moving it as this will damage the legs.
18
Page 19
180-DAY LIMITED WARRANTY
This product is warranted to the original purchaser to be free from defects in material or workmanship
for a period of 180 days from the date of the original retail purchase.
This warranty does not cover defects or damage due to improper installation, alteration, accident or
any other event beyond the control of the manufacturer. Defects or damage resulting from misuse,
abuse or negligence will void this warranty. This warranty does not cover scratching or damage that
may result from normal usage.
This product is not intended for institutional or commercial use; the manufacturer does not assume
any liability for such use. Institutional or commercial use will void this warranty.
This warranty is nontransferable and is expressly limited to the repair or replacement of the defective
product. During the warranty period, the manufacturer shall repair or replace defective parts at no
cost to the purchaser. Shipping charges and insurance are not covered and are the responsibility of
the purchaser. Labor charges and related expenses for removal, installation or replacement of the
product or components are not covered under this warranty.
The manufacturer reserves the right to make substitutions to warranty claims if parts are unavailable
or obsolete.
The manufacturer shall not be liable for loss of use of the product or other consequential or incidental
costs, expenses or damages incurred by the consumer of any other use. The user assumes all risk of
injury resulting from the use of this product.
This warranty is expressly in lieu of all other warranties, expressed or implied, including warranties of
. Neither the manufac-
turer nor any of its representatives assumes any other liability in connection with this product.
All warranty claims must be made through the retailer where the product was originally
purchased. A purchase receipt or other proof of date of purchase will be required to process
all warranty claims. The model number and part numbers found within the assembly
instructions will be required when submitting any parts requests or warranty claims.
For further warranty information or inquiries, please call 800-759-0977
19
 Loading...