

Page 1

Pyxis MedStation™
4000 System
Console User Guide
May 2011
DME: 10000152350 Ver. 00
Matl Number: 133591-01
Page 2
CareFusion, Pyxis,
MedStation, CUBIE, P ARx,
and the CareFusion logo are
trademarks or registered
trademarks of CareFusion
Corporation or one of its
subsidiaries.
®
autoPharm
trademark of Integrated
Healthcare Systems, Inc.
All other trademarks are the
property of their respective
CareFusion Corporation
is a registered
dba Talyst.
owners.
San Diego, CA
United States
800.367.9947
858.617.2000
carefusion.com
Pyxis MedStation™ 4000 System Console User Guide
Changes in equipment, software, or procedures occur periodically; information
describing these changes will be included in future editions of the guide.
The information in this document is subject to change and does not represent a
commitment on the part of CareFusion to provide additional services or
enhancements.
Documentation provided with this product might reference product not present in
your facility or not yet available for sale in your area.
Information to User
Caution: Any changes or modifications not expressly approved by the party
responsible for compliance could void the user’s authority to operate the
equipment.
FCC Notice
This device complies with Part 18 of the FCC rules.
Canadian Notice (Avis Canadien)
© 2009–2011
CareFusion Corporation
or one of its subsidiaries
All rights reserved.
This ISM device complies with Canadian ICES-001.
Cet appareil ISM est conforme à la norme NMB-001 du Canada.
Information to User
Caution: Any changes or modifications not expressly approved by the party
responsible for compliance could void the user’s authority to operate the
equipment.
FCC
This device complies with Part 15 of the FCC Rules. Operation is subject to the
following two conditions: (1) this device may not cause harmful interference,
and (2) this device must accept any interference received, including
interference that may cause undesired operation.
Canadian Notice (Avis Canadien)
This Class A digital apparatus complies with Canadian ICES-003.
Cet appareil numérique de la classe A est conforme à la norme NMB-003 du
Canada.
Authorized European Representative
CareFusion
The Crescent, Jays Close
Basingstoke, Hampshire RG22 4BS
United Kingdom
Page 3

Content s
About this guide ...................................................................ix
Chapter 1—System overview
The total medication solution.................................................................................2
Unit-dose workflow................................................................................................3
Pyxis MedStation system components...................................................................4
Network information........................................................................................... ...6
Comprehensive reporting ...............................................................................6
System communication ..........................................................................................8
Interface options............................................................................................. 8
LIMITED RELEASE 1 DRAFT 5/4/11
Chapter 2—Console Basics
Getting started ......................................................................................................12
Navigating the standby screen............................ ..... .....................................12
Logging in ....................................................................................................12
Logging off...................................................................................................12
Changing your password..............................................................................13
Using the console .................................................................................................14
Menu bar.......................................................................................................14
Features and functions..................................................................................14
Quick key...........................................................................................14
Pyxis MedStation 4000 System Console User Guide iii
Page 4

Contents
Chapter 3—Setting Up the System
Devices.................................................................................................................18
Accessing the devices list.............................................................................18
Adding a station or other device...................................................................19
Beginning the process........................................................................19
Entering the general settings..............................................................20
Entering the communication settings.................................................24
Entering the settings for profile mode................................................25
Entering the hardware settings...........................................................27
LIMITED RELEASE 1 DRAFT 5/4/11
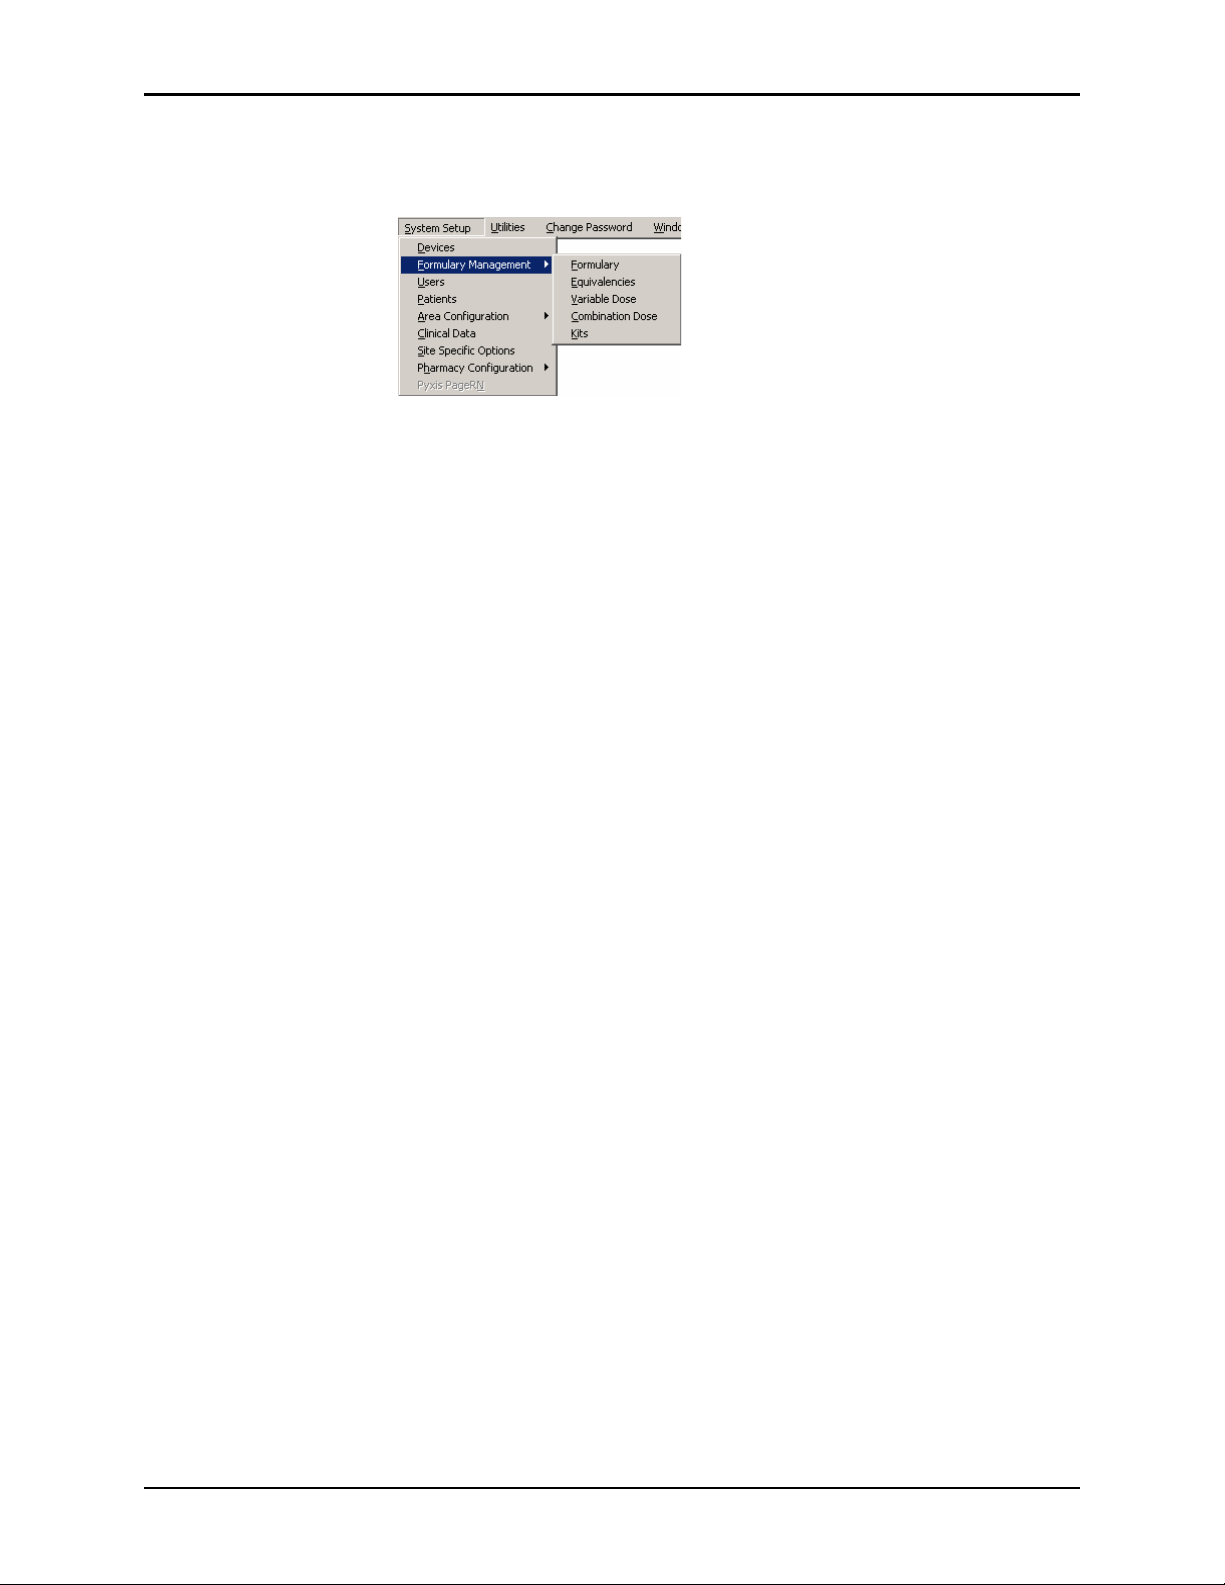
Formulary management........................................................................................38
Formulary equivalencies ......................................................................................50
Variable dose........................................................................................................54
Combination dose.................................................................................................58
Kits .......................................................................................................................63
Users.....................................................................................................................67
Completing the process......................................................................34
Editing a station or other device...................................................................35
Deleting a station or other device.................................................................35
Changing the device type .............................................................................36
Changing the name of a device ....................................................................36
Taking a device in or out of service .............................................................37
Remove Warning overview..........................................................................38
Editing a formulary item ..............................................................................44
Editing accessed inventory...........................................................................45
Enabling Scan on Load/Refill ......................................................................47
Enabling undocumented waste.....................................................................47
Configuring the multi-scan medication feature............................................48
Creating an equivalency...............................................................................50
Editing an equivalency.................................................................................52
Deleting an equivalency...............................................................................52
Expanding an equivalency............................................................................53
Adding a variable dose.................................................................................54
Editing a variable dose .................................................................................57
Deleting a variable dose ..................................................................... ..... .....57
Adding a combination dose..........................................................................58
Editing a combination dose..........................................................................61
Deleting a combination dose............................................ ............................62
Adding a kit..................................................................................................63
Editing a kit ..................................................................................................65
Deleting a kit ............................................................... .................................66
Creating templates for user privileges..........................................................67
Adding a user................................................................................................69
Beginning the process and assigning areas to a user ......................... 69
Assigning privileges from a template ................................................70
Assigning console privileges to a user...............................................71
Assigning station privileges to a user ................................................72
iv Pyxis MedStation 4000 System Console User Guide
Page 5

Contents
Assigning medication privileges to a user.........................................76
Filtering the users list ...................................................................................76
Updating information for an existing user or group of users .......................77
Updating information for one user.....................................................77
Updating a user-privilege template....................................................78
Deleting a user........................................... ..... .... ..........................................78
Patients .................................................................................................................80
Adding a patient file.....................................................................................80
Using the expanded allergies feature............................................................86
Multiple severities and reactions for one allergy...............................88
Using the enhanced pre-admit hold order ....................................................88
Editing a patient file .....................................................................................89
Discharging a patient....................................................................................89
Filtering the list of patients...........................................................................89
Patient billing reconciliation.......................................................... ..... ..... .....90
Using the reconcile feature ................................................................91
Areas.....................................................................................................................93
Adding a nursing unit...................................................................................93
Adding an area..............................................................................................95
Adding or removing a nursing unit to or from an area .................................95
Deleting an area.............................................. .... ..........................................96
Deleting a nursing unit .............................................................. .... ...............96
Clinical data..........................................................................................................97
Predefined Clinical Data Categories (CDCs)...............................................97
Using a CDC response................................................................................102
Adding a multiple-response list .......................................................104
Editing a multiple-response list........................................................105
Deleting a response from a multiple-response list...........................105
Site-specific options...........................................................................................107
Specifying demographic information.........................................................107
Specifying system options..........................................................................107
Configuring an attention notice (bulletin)..................................................109
Activating an optional type of attention notice................................109
Addressing an unsolicited attention notice ......................................111
Report and maintenance options ................................................................111
Selecting report options ...................................................................111
Specifying maintenance options ......................................................113
Running a maintenance task ............................................................115
Customizing the console name ........................................................115
Viewing or modifying a medication warning..................................116
Pharmacy configuration .....................................................................................118
Customizing a security group name...........................................................118
Adding or changing a medication-classification name ..............................120
Renaming a medication classification..............................................120
Adding a medication classification..................................................121
Deleting a medication classification................................... .............122
LIMITED RELEASE 1 DRAFT 5/4/11
Pyxis MedStation 4000 System Console User Guide v
Page 6

Contents
Adding or modifying a discrepancy-resolution reason ..............................122
Adding a discrepancy-resolution reason..........................................122
Editing a discrepancy-resolution reason..........................................123
Deleting a discrepancy-resolution reason........................................123
Adding, updating, or deleting a formulary or station list...........................124
Adding an item to a list....................................................................124
Editing a list.....................................................................................125
Deleting an item from a list..............................................................125
Maintaining scan codes......................................................................................126
LIMITED RELEASE 1 DRAFT 5/4/11
Adding a scan code.....................................................................................126
Editing a scan code.....................................................................................127
Deleting a scan code................................................ .... ...............................127
Using scan code for a quick search ............................................................127
Confirming items........................................................................................129
Communication status........................................................................................131
Viewing specific communication information...........................................131
Changing the refresh rate.................................................................... ..... ...135
Chapter 4—Utilities
Using virtual files edit to define communication ports......................................138
Adding a virtual file....................................................................................138
Editing a virtual file....................................................................................138
Deleting a virtual file.................... ...................................................... ..... ...139
Renaming a virtual file...............................................................................139
Copying a virtual file............................. .... ..... ............................................140
Updating information globally...........................................................................141
Updating the formulary globally................................................................141
Updating device information globally........................................................144
Updating user information globally............................................................148
Archiving transactions........................................................................................152
Viewing or deleting the list of archive files...............................................152
Selecting archive data.................................................................................153
Creating or editing archival data for pocket-access transactions.....153
Creating or editing archival data for user transactions ....................155
Creating or editing archival data for document-discrepancy
transactions.......................................................................................155
Creating or editing archival data for temperature-log transactions..156
Copying archive files to media...................................................................157
Scheduling archive maintenance................................................................157
Chapter 5—Inventory
Assigning a medication to a pocket....................................................................160
Select block loading on individual stations................................................165
Replacing or editing a loaded medication..........................................................167
Clearing a pending medication...........................................................................168
vi Pyxis MedStation 4000 System Console User Guide
Page 7

Contents
Chapter 6—Reports
Available reports ................................................................................................170
Report descriptions.............................................................................................171
Generating a report.............................................................................................175
Batch reports.......................................................................................................177
Adding a batch report.................................................................................177
Viewing the list of batch reports ................................................................178
Editing a batch report .................................................................................178
Deleting a batch report .................................................................. ..... ........179
Enabling or disabling a batch report...........................................................179
Printing a batch report................................................................................179
Appendix A—Troubleshooting
Attention notice (bulletin)...................................... .... ........................................182
Can’t communicate attention notice...........................................................182
Same station attention notice ...........................................................183
Different station attention notice......................................................184
Using brain transplant to restore a database.......................................................185
Checking the communication status of a station..............................185
Running a brain transplant...............................................................185
Communication problem with Pyxis Procar ......................................................187
ADT communication problems..........................................................................188
Patient or patient order not displayed at the console..................................188
Patient billing information problems........................... ..... .... ......................189
Report does not include correct data..................................................................190
Facility power outage.........................................................................................191
Console printer not working ...............................................................................192
Remote diagnostics..................................................... ........................................193
User cannot access a medication........................................................................194
LIMITED RELEASE 1 DRAFT 5/4/11
Appendix B—Pyxis® Advisor control panel
Accessing Pyxis Advisor in the console.............................................................196
Appendix C—Pyxis Nurse Link on the console
Pyxis Nurse Link overview................................................................................202
Waste process.............................................................................................202
Removed Meds ................................................................................202
All Meds...........................................................................................202
Undocumented Waste......................................................................202
Waste information......................................................................................202
Role-Based queuing....................................................................................203
Pyxis MedStation 4000 System Console User Guide vii
Page 8

Contents
Appendix D—Cerner
Cerner overview.................................................................................................206
Medication location and availability..........................................................206
Linking your accounts................................................................................208
Clinical and operational alerts............................................................................209
Alerts ..........................................................................................................209
Appendix E—Management and Monitoring
Recommendations
LIMITED RELEASE 1 DRAFT 5/4/11
Security recommendations.................................................................................212
General recommendations..........................................................................212
Controlled medications...............................................................................213
System configuration recommendations............................................................214
Drawer configuration and medication location..........................................214
Control the station formulary list ...............................................................214
Order entry and verification .......................................................................215
Medication distribution ..............................................................................215
Glossary ....................... ......................................................217
Index ..................................................... .............................. 227
®
viii Pyxis MedStation 4000 System Console User Guide
Page 9

About this guide
This guide provides information on how to set up, use, and maintain the Pyxis
MedStation
This guide does not cover service and repair procedures. It focuses on the daily
use, minor maintenance, and troubleshooting of the system.
For information about the product that is not covered in this document, call the
Technical Support Center (TSC) for Pyxis
858.617.2000.
TM
4000 system console.
®
products at 800.727.6102 or
Conventions
This guide uses the following conventions:
• The names of document titles, cross-references, and text that requires
emphasis are formatted in italics.
• The names of buttons, menu commands, options, icons, file names, and
folders are formatted in
• User input is formatted in
• Programming code is formatted in
CAUTION
Caution indicates a potentially hazardous situation which, if not avoided, could
result in minor or moderate injury. Caution is also used to alert against unsafe
practices that could result in unpredictable results or data loss.
bold.
Courier bold
Courier fixed width
.
.
Pyxis MedStation 4000 System Console User Guide ix
Page 10

About this guide
NOTE
Notes contain supplementary information or emphasize a point or procedure.
Overview of this guide
This guide includes the following information about the console.
• Chapter 1, System overview—Provides an overview of system features and
components, and the system’s network configuration.
• Chapter 2, Console Basics—Explains how to use the console and includes
procedures for logging on and off the system.
• Chapter 3, Setting Up the System—Describes how to set up system
information unique to your hospital, such as station names and options, users,
patients, and the formulary.
• Chapter 4, Utilities—Describes how to use system management functions at
the console.
• Chapter 5, Inventory—Describes how to use the Inventory feature to manage
your hospital’s inventory as it moves from the Pharmacy out to the patient.
• Chapter 6, Reports—Provides reports, report descriptions, procedures for
generating reports, and batch reports information that can help you to monitor
and manage your system.
• Appendix A, Troubleshooting—Provides remedies to potential problems
involving the console and its components.
• Appendix E, Management and Monitoring Recommendations—Provides
security recommendations, system configuration recommendations, and
examples of controlled substance procedures for operating rooms (ORs) and
anesthesiology in hospitals where Pyxis MedStation 4000 system is used.
• Glossary—Defines system terminology.
• Index
x Pyxis MedStation 4000 System Console User Guide
Page 11

LIMITED RELEASE 1 DRAFT 5/4/11
Chapter 1
System overview
The Pyxis MedStation system automates the distribution, management, and
control of medications. The Pyxis MedStation system includes a network of
secure storage stations located in patient-care areas throughout the facility. Each
station is controlled by its own microprocessor and functions similar to an
automated bank-teller machine. This section includes the following topics:
The total medication solution....................................................................2
Unit-dose workflow...................................................................................3
Pyxis MedStation system components.......................................................4
Network information .................................................................................6
System communication..............................................................................8
Pyxis MedStation 4000 System Console User Guide 1
Page 12

Chapter 1—System overview
The total medication solution
The Pyxis MedStation system allows a pharmacy to store and track a range of
medications and floor-stock items. Depending on your needs, the Pyxis
MedStation system can manage:
• Controlled medications
•Floor stock
• Pro re natas (PRNs) (profile mode recommended)
LIMITED RELEASE 1 DRAFT 5/4/11
• First doses (profile mode recommended)
• Some IV solutions and sets
• Up to 95% of all medications (profile mode only)
The actual amount of medication storage depends on your station configurations
and other factors. The Pyxis MedStation system is flexible and has many
configuration options to accommodate your needs and requirements.
2 Pyxis MedStation 4000 System Console User Guide
Page 13
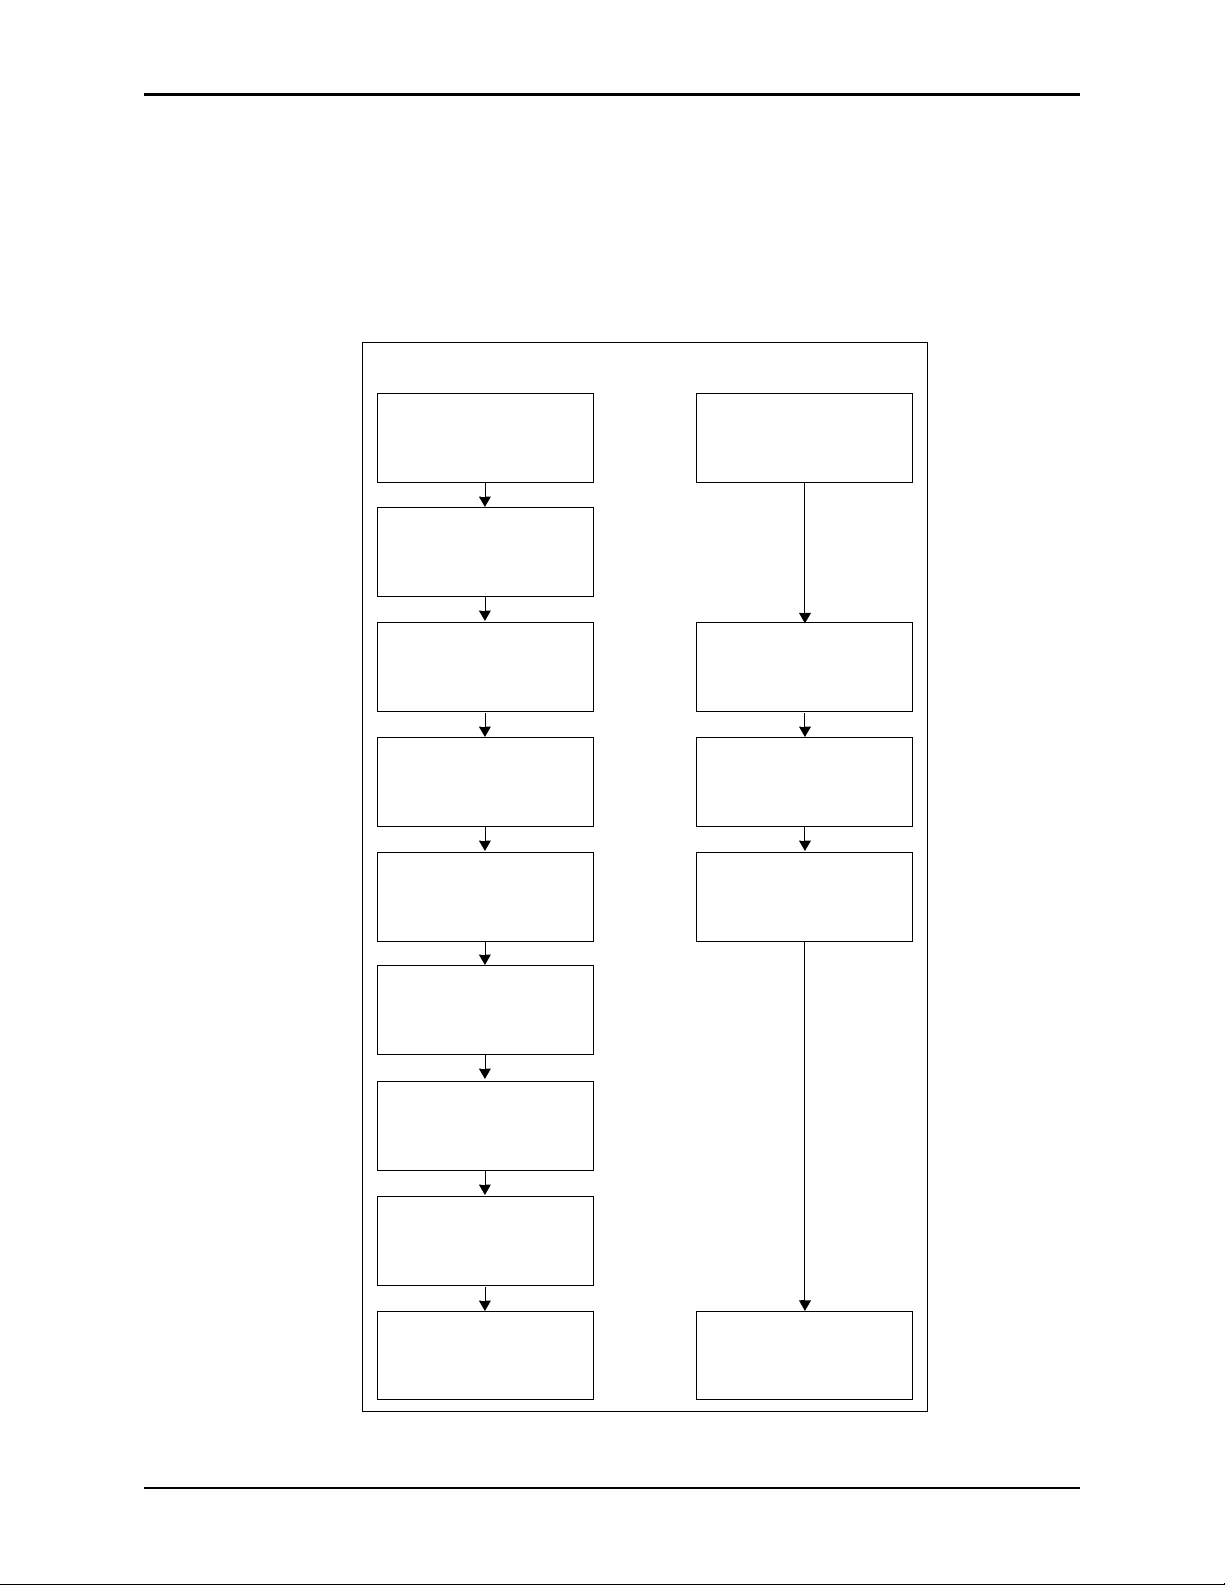
Unit-dose workflow
Unit-Dose
Order is written and
pulled from chart by clerk.
Prescription is delivered
to pharmacy.
Pharmacist reviews.
Orders are entered.
Technician
prepares order.
Pharmacist
checks order.
Order is delivered to
floor.
Order is put in
appropriate storage.
Nurse acquires and
administers medication.
Pyxis MedStation System
Order is automatically
transferred to
automated system.
Nurse acquires and
administers medication.
Prescription is written and
delivered to pharmacy.
Pharmacist reviews.
Orders are entered.
Unit-dose workflow
Most pharmacy and nursing managers understand the benefit of having
medications available at all times on the nursing unit. The following flowchart
represents the differences between the traditional unit-dose system and the Pyxis
MedStation system. The Pyxis MedStation system is able to reduce nine identified
points of potential time delays and errors down to a manageable five.
LIMITED RELEASE 1 DRAFT 5/4/11
Pyxis MedStation 4000 System Console User Guide 3
Page 14

Chapter 1—System overview
Pyxis MedStation system components
The Pyxis MedStation system is custom-configured for your facility’s needs and
for the way you do business. The Pyxis MedStation system components include
the following:
• Console (one or more)—The console is the central controller and
clearinghouse for all stations. Network connections provide the
communications path between the components. The console is usually located
in the pharmacy and stations are located throughout the facility .
LIMITED RELEASE 1 DRAFT 5/4/11
The console provides the management interface to enter and collect
information. It performs the following functions:
Communicates data to and updates activity information in all the stations.
°
Maintains copies of all patient, user, formulary, and activity information
°
used to generate pharmacy reports.
In some facilities, an additional computer, monitor, and keyboard can be
added in a second location as another console access point. This is also known
as a console workstation.
®
Procar, also a part of the console subsystem, is responsible for
Pyxis
interface communications, including the admissions, discharge, and transfer
(ADT) and billing information and, if you use profile mode, the pharmacy
software system link (patient orders and other pharmacy profile information).
CareFusion representatives configure and install the Pyxis MedStation system
for you.
NOTE
The Pyxis MedSt ation system communica tions hardware and sof tware interfaces
are proprietary.
• Stations (one or more)—The stations are the clients in the setup. They
provide secure and reliable storage for medications of all types. They
communicate with the console, receiving patient, order (profile mode only)
and inventory information, while continuously reporting all medication
transactions. Stations come in a variety of configurations, with a selection of
configurable drawers and doors to meet the needs of the various areas.
• Printer—The console includes a high-speed laser printer for printing reports.
• Optional Component (Pyxis
incorporates the Pyxis Connect product. The nurse-monitor station is a tool
used outside the pharmacy, on each unit where a scan station is placed, to
monitor the status of orders in the Pyxis Connect system. The nurse-monitor
station software is usually installed on computers in the nursing unit and used
by nurses to track orders that have been scanned from particular locations.
Nurses can check the status of an order at the same station from which they
attempted to remove a medication. If a nurse discovers that a new drug is not
yet on the patient’s profile, he or she can log on to Pyxis Connect from the
Pyxis MedStation system to check the status of the order.
®
Connect)—the Pyxis MedStation system
4 Pyxis MedStation 4000 System Console User Guide
Page 15

Pyxis MedStation system components
• Scanner—A scanner capable of reading linear and 2D barcode symbols is
standard equipment on both the station and the console.
LIMITED RELEASE 1 DRAFT 5/4/11
Pyxis MedStation 4000 System Console User Guide 5
Page 16

Chapter 1—System overview
Network information
Pyxis Procar translates patient information from the hospital’s host information
system into a usable format for the Pyxis MedStation system. It serves as a
connection between the console and the hospital’s ADT, billing, and clinical
(patient-profile) pharmacy systems.
NOTE
Some hospital or pharmacy vendors require addition al hard ware and software to
LIMITED RELEASE 1 DRAFT 5/4/11
accomplish this interface. Your CareFusion representative work s with yo u to
determine the requirements for your facility.
The communications link between the console and the stations is interactive. The
console receives patient information from the hospital’s information system
(ADT), correlates it with the correct nursing unit and area, and sends it to the
appropriate stations.
NOTE
CareFusion provides long-term data-archive and reporting systems to track
inventory and clinical data. For more information, contact your CareFusion
representative.
The console communicates with each station after a specified time interval
depending on setup and the amount of activity. Information is automatically
retrieved and subsequently stored when any change in status, such as medication
removal, occurs. The activities are then forwarded to the hospital’s billing system
through Pyxis Procar.
Comprehensive reporting
Many facilities have numerous stations located throughout a variety of patientcare areas, so comprehensive and accurate reporting is critical to the pharmacist
and system manager.
The console, located in the pharmacy, retains up to 31 days of transaction data for
all stations, including:
• Medication removals and returns
• Wasted medications
• Refill activities
• Discrepancy-resolution information
• Inventory verification
Reports on every aspect of the Pyxis MedStation system—including pocket
accesses, inventory, patient ADT, orders (profile mode only), and formulary—are
available from the console, located in the pharmacy. Data can be sorted and
printed in a variety of reports and kept as a permanent record of medication usage.
6 Pyxis MedStation 4000 System Console User Guide
Page 17

Network information
Each station can generate summary reports of all transactions for that station for
up to the most recent 32 hours.
T o store information electronically, or to generate custom reports, you can archive
the console data and import the data into various database and spreadsheet
programs. For specific information on archiving, see Utilities on page 137.
LIMITED RELEASE 1 DRAFT 5/4/11
Pyxis MedStation 4000 System Console User Guide 7
Page 18

Chapter 1—System overview
System communication
You can implement a communications system to fit your needs and the layout of
the facility . The configurable communications feature allows communications via
network methods. A CareFusion applications engineer works with you to
integrate the Pyxis MedStation system with your telecommunications system.
The required communications links in the Pyxis MedStation system installation
include:
LIMITED RELEASE 1 DRAFT 5/4/11
• A Pyxis Procar that interfaces the console to the hospital or pharmacy
computer for ADT, billing, and patient-profile information.
• A communications component that links the console to the network of
stations.
For station communications, network protocols are used. For interface
communications, the same options apply, depending on the system-interface
method supported by the hospital-system vendor. The preferred method of
network communications is Transmissions Control Protocol/Internet Protocol
(TCP/IP) over Ethernet.
Interface options
While the Pyxis MedStation system can be operated as a stand-alone turnkey
system, significant value and operating efficiencies are added by using various
interfaces with your hospital- and pharmacy-information systems. CareFusion
will collaborate with any hospital-information system vendor to complete these
interfaces.
There are five basic interface options:
• ADT interface—Although ADT information can be manually updated, the
volume of information necessitates the use of a real-time electronic interface.
The ADT interface between the console, located in the pharmacy, and the
hospital’s information system is typically a one-way source of information,
coming from one of several potential ADT sources. These sources include a
printer “splice” interface into an existing line from your information system to
your pharmacy printer, or any of the communications methods discussed in
System communication on page 8. The console receives ADT information,
routing it to the appropriate stations.
• Billing interface—A billing interface eliminates the need to enter individual
billing transactions manually into the billing system. CareFusion can create an
interface that allows you to format and send these transactions directly to your
billing system.
• Pharmacy-profile interface—the Pyxis MedStation system offers an
interface to the pharmacy computer system, which gives providers immediate
point-of-use access to patients’ medications via their medication profiles,
while saving a number of dispensing steps for the pharmacy . Upon medication
removal, information regarding usage and inventory is automatically routed
back to the pharmacy system. This interface can also include real-time
8 Pyxis MedStation 4000 System Console User Guide
Page 19

System communication
formulary and stock-location updates between the pharmacy system and the
Pyxis MedStation system.
• Medication-charting interface—As medications are withdrawn from
stations, all information routinely required for the medication-administration
record is passively collected. The Pyxis MedStation system has the ability to
pass this information electronically to automated nurse-charting systems.
Additional data fields in the Remove and Return processes collect
information such as injection sites, observations, and other medication- and
station-specific data. Configure the information to meet your nurse-charting
vendor specifications.
• Wholesaler interface—CareFusion has the ability to pass medication usage
information directly to your wholesaler. A separate computer connected to the
console interfaces with the wholesaler’s computer. More information
regarding the wholesaler interface is available from your CareFusion
representative and your wholesaler.
LIMITED RELEASE 1 DRAFT 5/4/11
Pyxis MedStation 4000 System Console User Guide 9
Page 20

Chapter 1—System overview
LIMITED RELEASE 1 DRAFT 5/4/11
10 Pyxis MedStation 4000 System Console User Guide
Page 21

Chapter 2
Console Basics
This section includes the following topics:
Getting started.........................................................................................12
Using the console....................................................................................14
Pyxis MedStation 4000 System Console User Guide 11
Page 22
Chapter 2—Console Basics
Getting started
This section provides an overview of how to access the console user interface.
NOTE
The examples used throughout this guide show screens with full access
privileges and most station options turned on. The screens you see on your
system might vary depending on your access privileges and option settings.
NOTE
If your facility decides to use the SHA1 password encryption, do not turn on this
flag until this feature is implemented on all devices connected to the console.
Navigating the standby screen
The standby screen box is the default console screen and is your entry point into
the console. After a predetermined time without keyb oard activity, the console
reverts to the standby screen even if you have not logged out. However, you
should always log off when you leave the console to ensure that transactions are
not performed by other users using your logon ID.
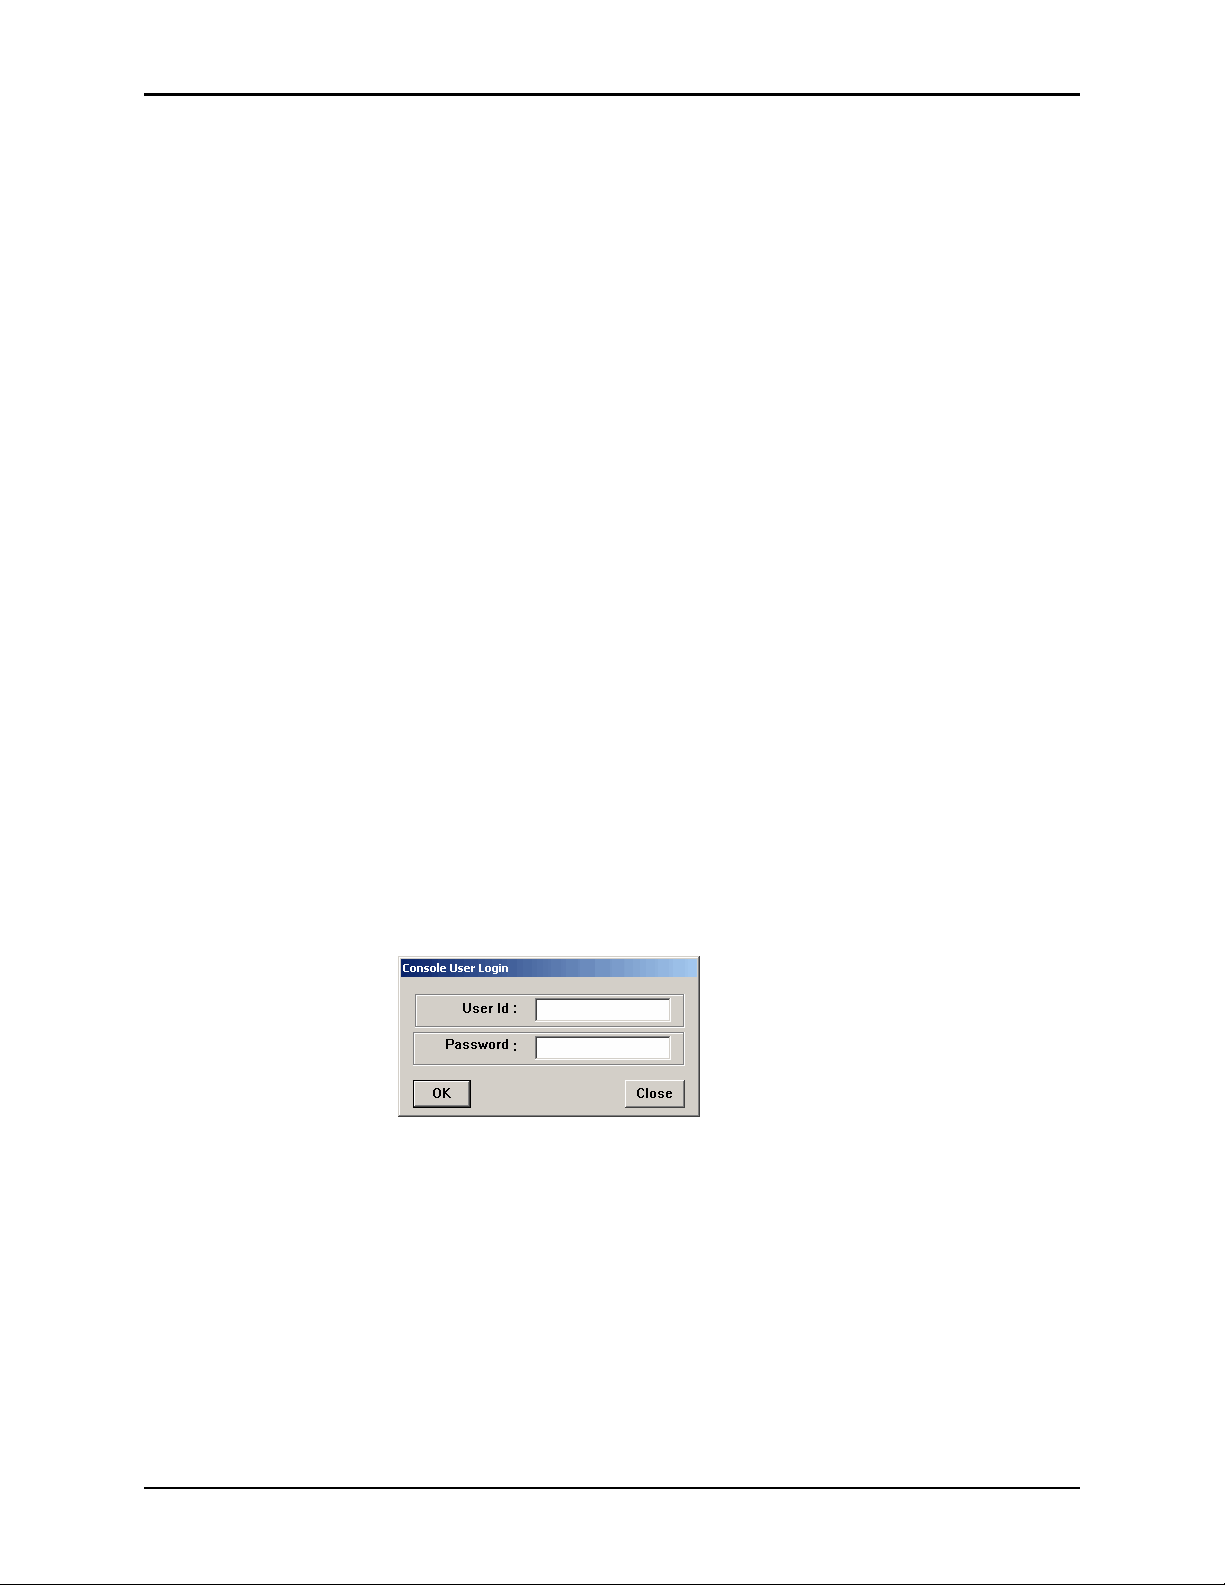
Logging in
When no one is logged in to the console, the standby screen displays the Login,
Window, CommStatus, and Help menu options. Your system administrator
provides you with a user ID and a first-time Password.
1. In the standby screen, click
2. In the Console User Login dialog box, enter your ID and password and click
OK.
The menu bar appears.
NOTE
The console should not allow ID scans.
Login, click on the screen, or press Enter.
Logging off
Log off before stepping away from the console.
12 Pyxis MedStation 4000 System Console User Guide
Page 23
Getting started
• In the menu bar, click Logoff.
The standby screen appears.
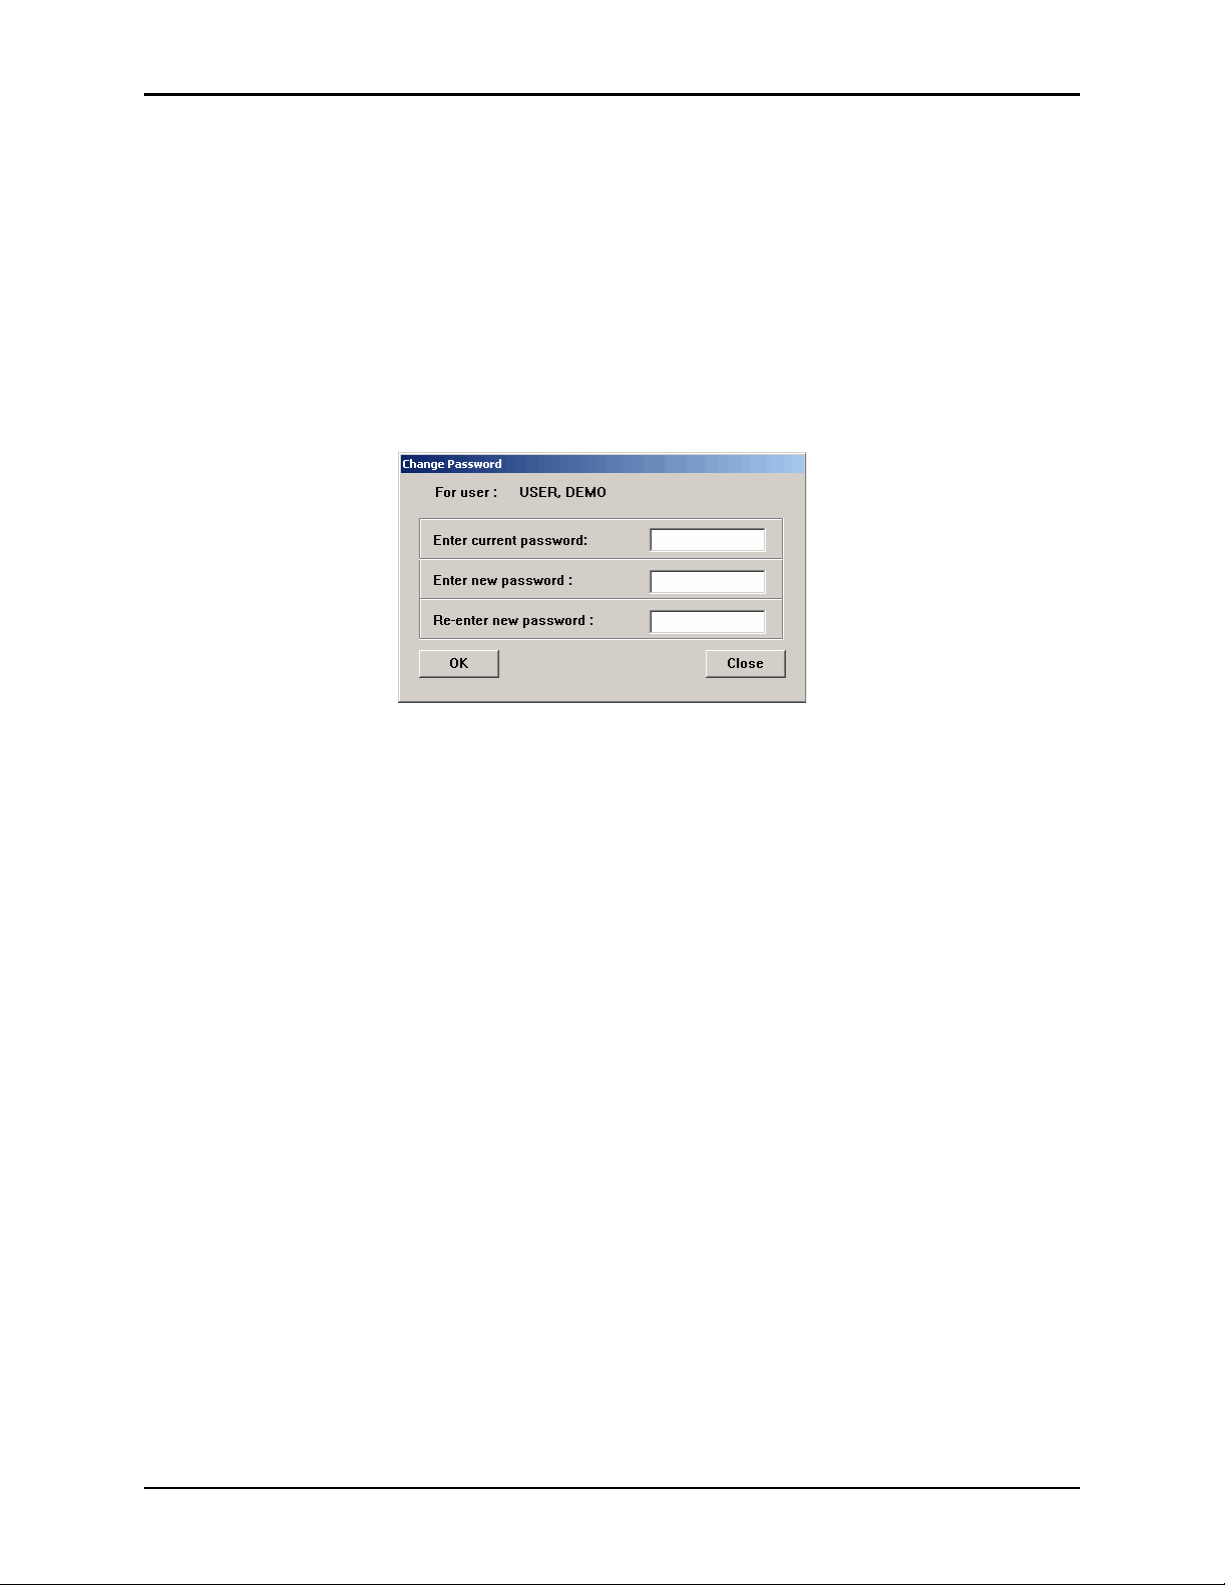
Changing your password
Before you can access the console, you must have a password. Your system
administrator assigns a temporary password to you.
1. In the menu bar, click
Change Password.
2. In the Change Password dialog box, enter your current password and your
new password.
3. In the
4. To save the new password, click
Re-enter new password box, enter your new password again.
OK.
Pyxis MedStation 4000 System Console User Guide 13
Page 24

Chapter 2—Console Basics
Using the console
This section includes information on the menu bar and features and functions.
NOTE
In some of the dialog boxes that you will encounter throughout the product,
yellow is used to highlight fields that you are required to complete.
Menu bar
After logging on to the console, a menu bar appears. The menu bar provides
access to all the functions available to you, based on your user access privilege
level. Functions are grouped into the following menu categories:
• Inventory—
medications to pocket, or make pockets unavailable.
more
• Reports—
and System reports. The Reports option also allows you to view the print queue
and to add to or edit the list of batch reports.
• System Setup—
define all system components such as devices, formulary, users, patients, and
areas.
• Utilities—
• Change Password—
• Window—
and off. Do not leave the XQ Viewer open—use only as a support tool.
• Help—
• CommStatus—
including stations and
• Logoff—
Logoff whenever you step away from the console.
Assign medications to station pockets, replace medications or assign
Access Inventory reports, Activity reports, System Activity reports,
Customize your system site information and selections lists, and
Globally edit your formulary, devices, and users, and archive data.
Change your password.
Turn display of the Attention Notices pane and XQ V iewer pane on
Access Online Help to get information about the console.
V iew the communication status between all non-console devices
Procar
s.
Log off the console. To prevent unauthorized use of the system, use
Features and functions
The console uses standard features and functions found on most devices.
However, you may not be familiar with Quick Keys. Those are explained below.
Quick key
In addition to accessing menus using the mouse, you can use quick keys to access
menus, menu options, and onscreen buttons. This involves using the Alt key, the
first letter of the menu name, followed by the first letter of the menu option (or
whichever letter in the name that is underlined).
To display quick keys
➤ To toggle the display of quick keys (that is, to hide or show the underlined
letters), press A
14 Pyxis MedStation 4000 System Console User Guide
LT.
Page 25
To use a quick key
Using the console
1. While holding down A
2. T o select an option from the open menu, release A
LT, enter the underlined letter of the applicable item.
LT, and enter the underlined
letter of the desired option.
NOTE
You can also activate on-screen buttons using quick keys in the same way. Hold
down A
activate a Save button, you would hold down A
LT and enter the on-screen button’s unde rlined character . For exam ple, to
LT and press S.
Pyxis MedStation 4000 System Console User Guide 15
Page 26

Chapter 2—Console Basics
16 Pyxis MedStation 4000 System Console User Guide
Page 27

Chapter 3
Setting Up the System
When you configure the Pyxis MedStation system, you enter information unique
to your facility, such as station names, users, patients, and formulary . This section
includes the following topics:
Devices....................................................................................................18
Formulary management..........................................................................38
Formulary equivalencies.........................................................................50
Variable dose...........................................................................................54
Combination dose ...................................................................................58
Kits .......................................................................................................... 63
Users .......................................................................................................67
Patients....................................................................................................80
Areas........................................................................................................93
Clinical data............................................................................................ 97
Site-specific options ..............................................................................107
Pharmacy configuration.........................................................................118
Maintaining scan codes.........................................................................126
Communication status...........................................................................131
Pyxis MedStation 4000 System Console User Guide 17
Page 28
Chapter 3—Setting Up the System
Devices
Devices are components that work as part of the Pyxis MedStation system and can
include the stations in your facility, Pyxis
®
Anesthesia System, and Pyxis Procar.
Because needs and processes might vary from one nursing unit to another, involve
the nursing staff for each nursing unit when setting device options.
NOTE
You can update information globally. For more information, see Updating
information globally on page 141.
Accessing the devices list
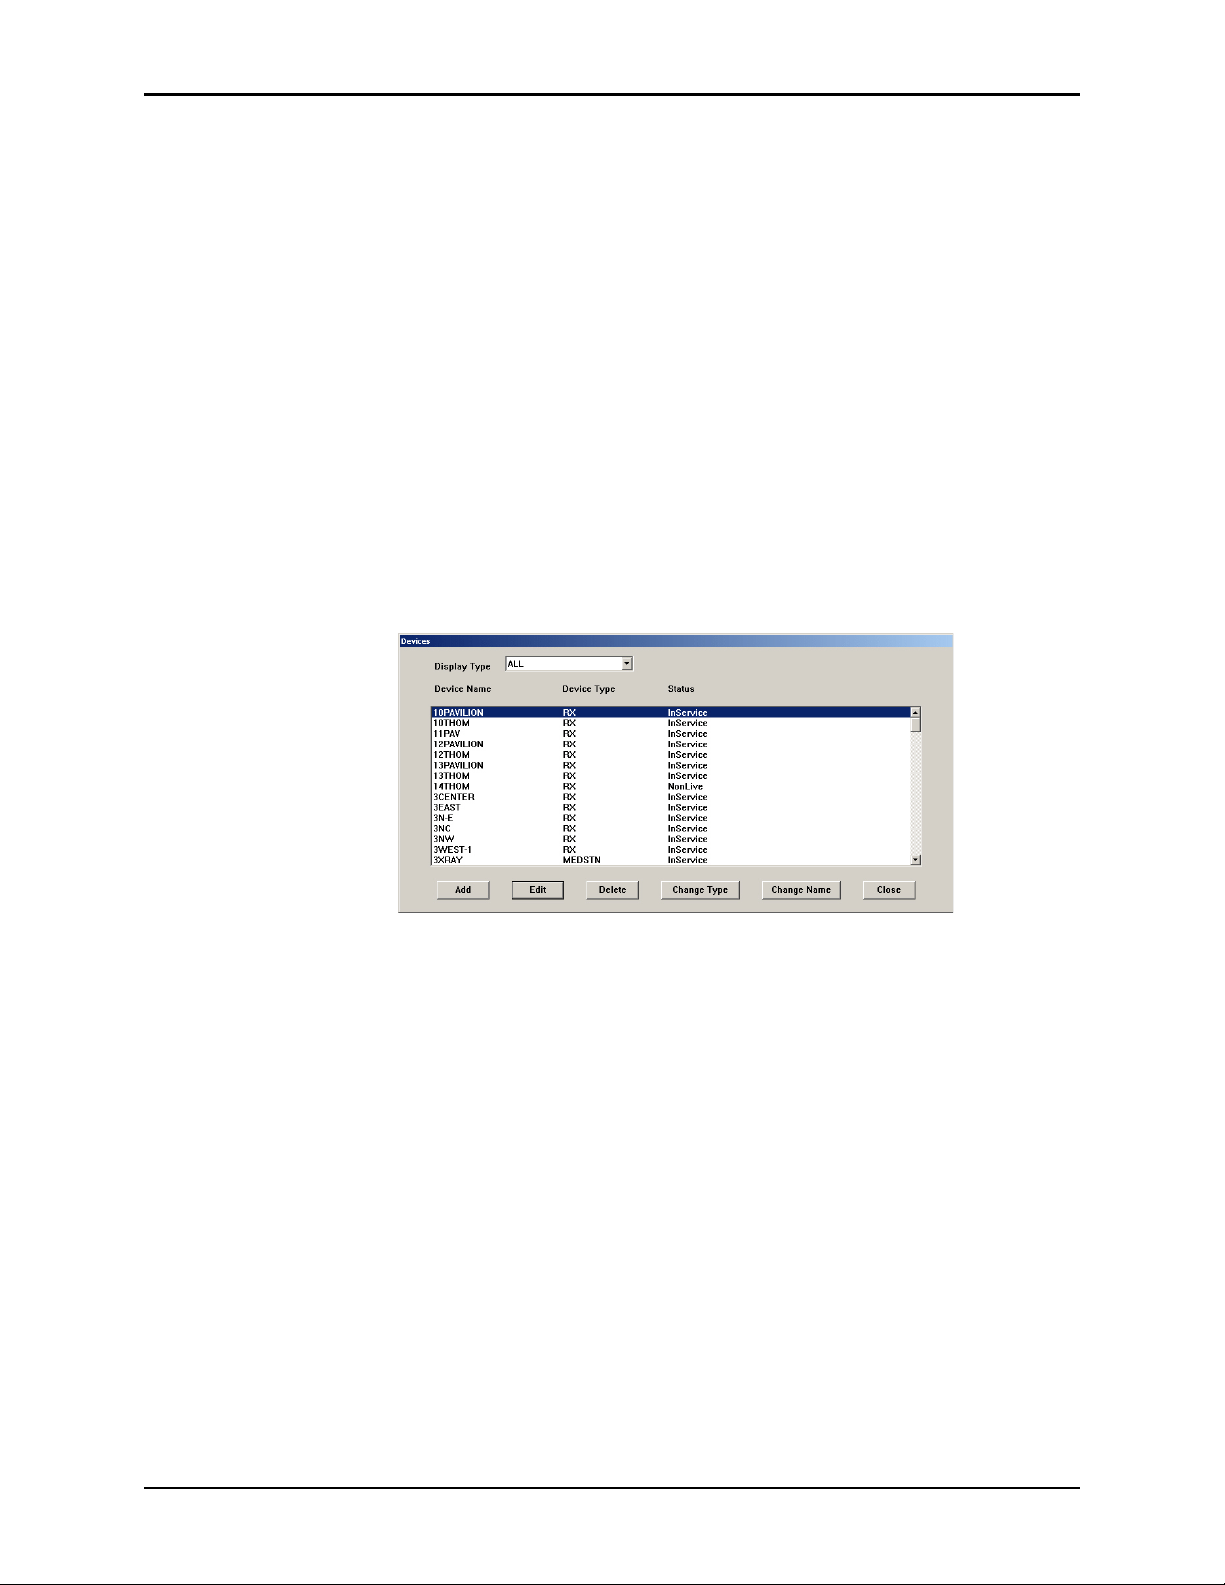
The following procedure explains how to view the list of devices in your facility.
1. Select
System Setup > Devices.
The Devices dialog box appears.
This dialog box includes the following options:
• Add—Adds a station (or other device) to the system.
• Edit—Updates an existing device.
• Delete—Deletes a device.
• Change Type—Changes the Device Type from non-profile to profile.
• Change Name—Changes the name of the device (use with caution).
CAUTION
Do not change the station name unless absolutely necessary. Changing the
name deletes unresolved discrepancies if you do not resolve them first.
• Close—Dismisses the dialog box.
2. To return to the starting page, cl ick
18 Pyxis MedStation 4000 System Console User Guide
Close.
Page 29
Devices
Adding a station or other device
To add a new station or other device to the system, complete the steps outlined in
the following topics.
Beginning the process
The following procedure explains how to start the process of adding a new station
or other device to the system.
1. Select
2. In the Devices dialog box, click
System Setup > Devices.
Add.
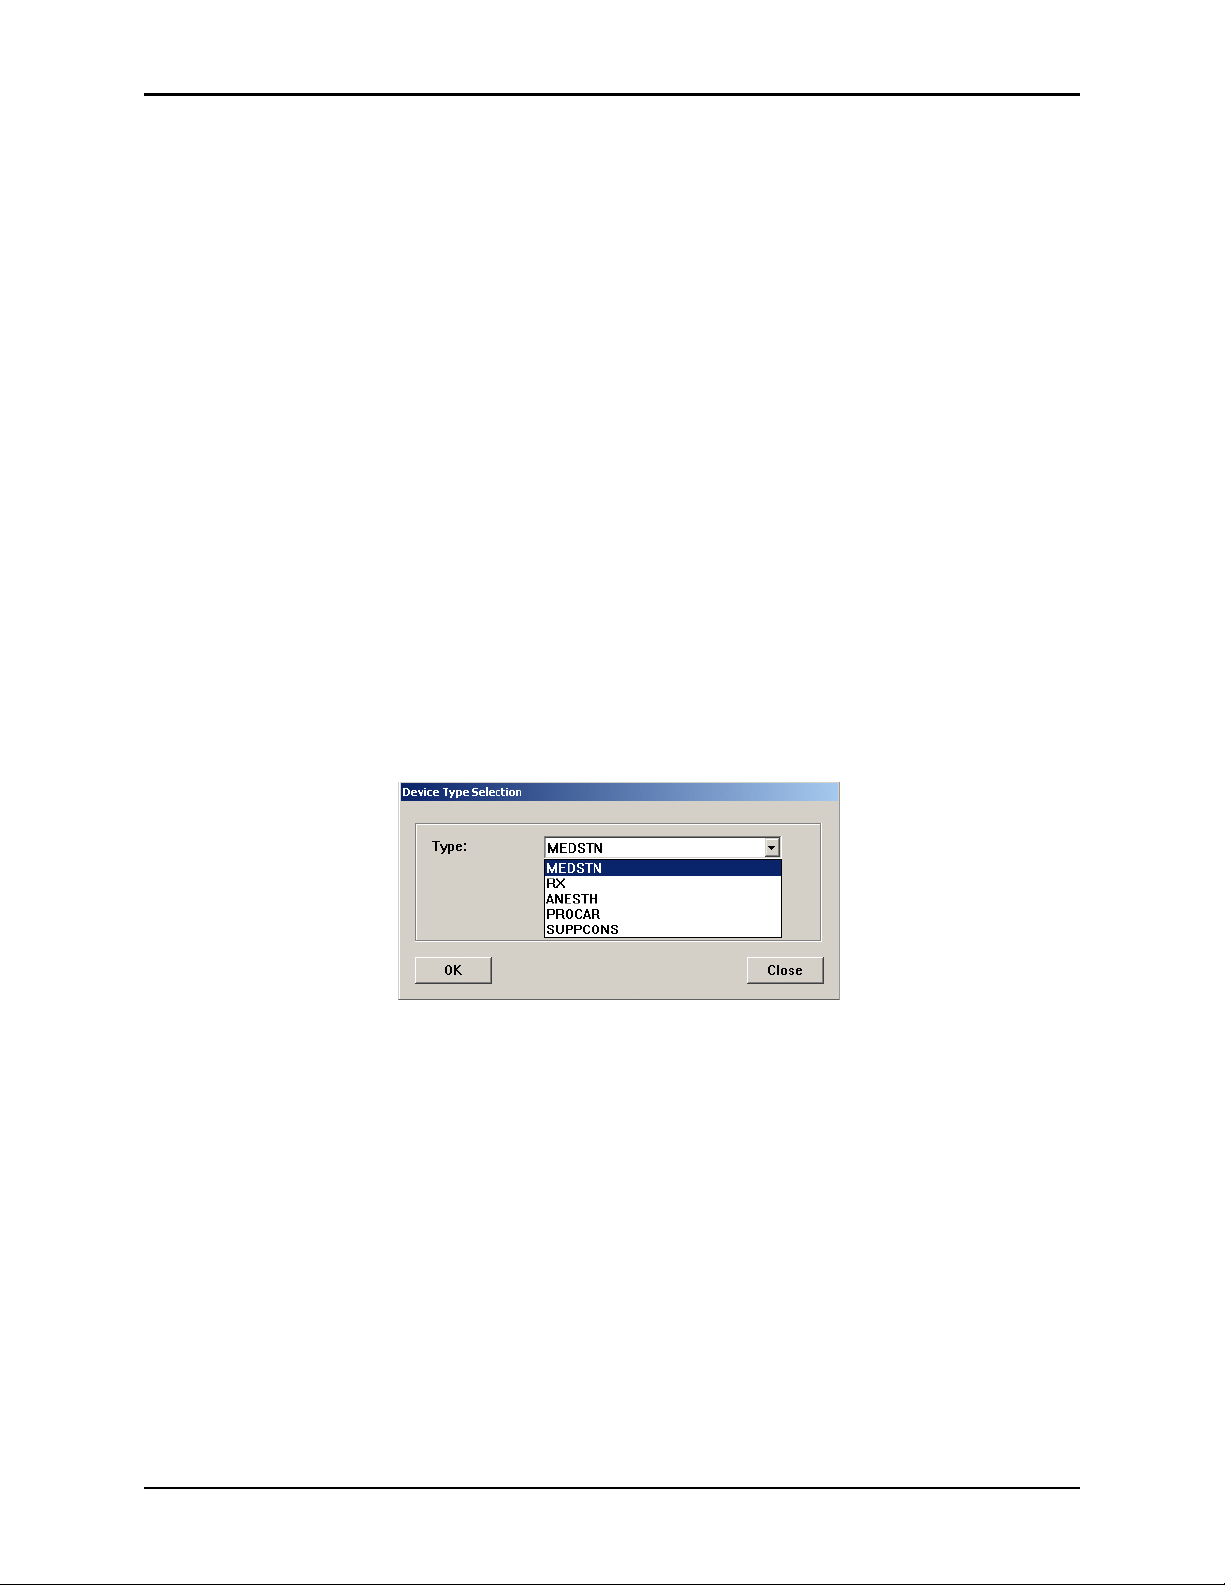
3. In the Device Type Selection dialog box, select the type.
The options are:
• MEDSTN—A station operating in non-profile mode.
• RX—A station operating in profile (Rx) mode.
• ANESTH—An Pyxis Anesthesia System station. Requires the assistance
of a CareFusion representative.
• PROCAR—A computer that facilitates communications between the
console and the facility’s information system for ADT, medication
inventory usage, and patient clinical orders (when in profile mode).
• SUPPCONS—A supply console. Customers with Duostation will need to
configure this device type to facilitate synchronization of users.
Pyxis MedStation 4000 System Console User Guide 19
Page 30
Chapter 3—Setting Up the System
4. Click OK.
The Adding New Device dialog box appears.
5. Complete the steps outlined in the next section, Entering the general settings.
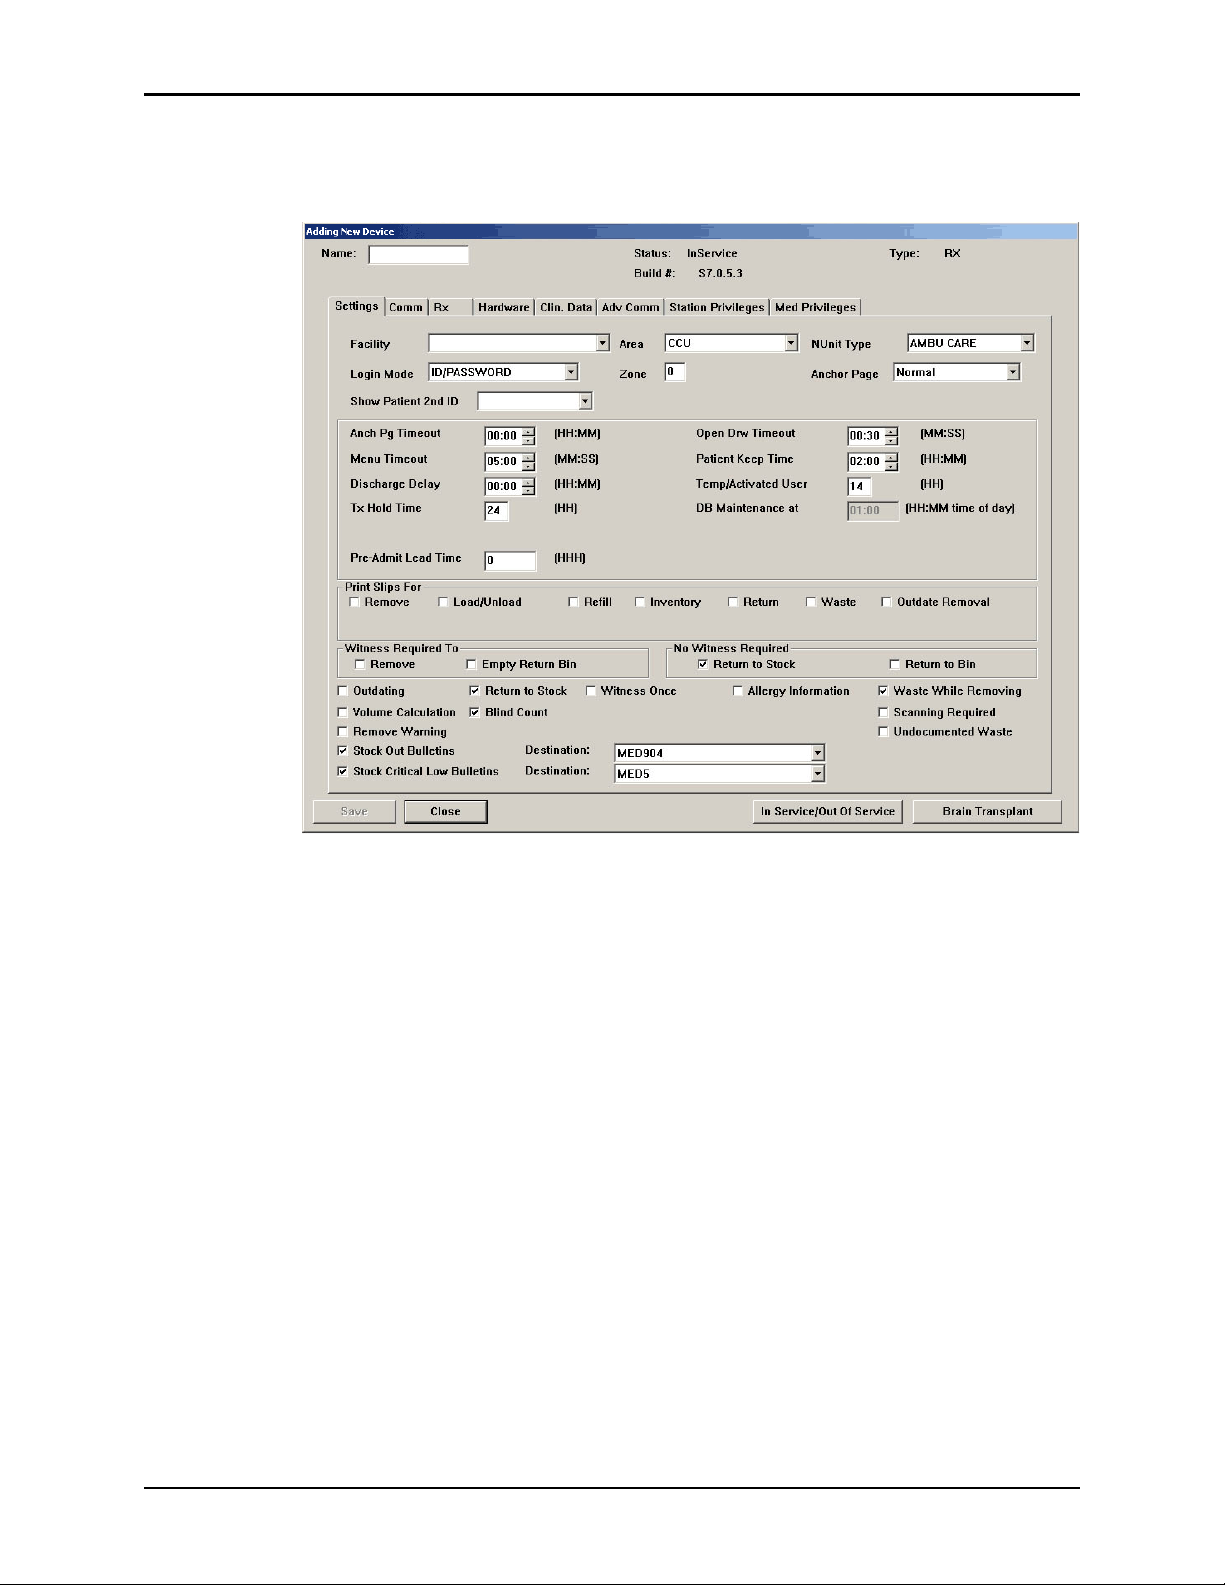
Entering the general settings
This section describes how to complete the information in the Settings tab.
1. These sections appear at the top of the dialog box but only the name
information can be entered:
• Name—Enter up to 10 alphanumeric characters for the name. The name
of the nursing unit is commonly used.
• Status—Displays the current status of the station, which might include
InService, OutofService, BrainTxPlant, Pending InService, Pending
OutofService, or NonLive.
• Build #—Displays the version number of the MedStation console
software. A CareFusion representative might ask for the build number
when assisting you with your system.
• Type—Displays the type of device.
2. Enter the following information in the top section of the settings tab:
• Facility—Select the facility with which the station is associated. This
field is used primarily by facilities with affiliations or those that have
merged and are made up of more than one hospital or nursing home.
20 Pyxis MedStation 4000 System Console User Guide
Page 31

Devices
• Area—Select the area to identify which users have access to this station
and which patients are displayed at this station.
• NUnit Type—Select the nursing unit where this station is to reside.
• Login Mode—Select the type of logon required for this station:
ID/PASSWORD—Requires users to log on with a user ID and
°
password.
ID/BIO—Requires users to log on with a user ID and biometric ID.
°
• Zone—Enter a code that relates to a specific region of the facility, such as
an entire floor, building, or wing. Stations within that region are assigned
the same zone to facilitate inventory tasks. Many console reports print
information sorted by zone.
• Anchor Page—Select the setting that controls how long the station
remains accessible from the Pick a Med or Pick a Patient dialog box
without going through a login process.
• Show Patient 2nd ID—Select from the drop-down list determined by
your facility.
• InService/OutofService—Allows you to change the service status of the
displayed station. (This option appears after you save the current
information.)
• Brain T ransplant—Restores a station’ s database from an error condition,
such as a corrupted file, which prevents the station from operating
correctly . (This option appears after you save the current information.)
3. Set the timeout options, as necessary:
• Anch Pg Timeout—In hours (0–99) and minutes (0–59), enter the time
after which the Anchor Page expires and you are logged off due to
keyboard inactivity. This option works in conjunction with the Anchor
Page option.
• Menu Timeout—In minutes (0–99) and seconds (0–59), enter the time
after which you are logged out due to lack of activity at the station.
Depending on the location, security , and intended use for this station, you
might want to make the timeout duration short (30 seconds) or long
(5 minutes).
• Discharge Delay—In hours (0–99) and minutes (0–59), enter the time to
keep a patient’s information accessible at the station after that patient is
discharged. This ensures that care providers can access a patient’s
medications for some time after the discharge is processed in the ADT
system.
• Tx Hold Time—Enter the number of hours (1–32) transaction
information is held at the station to appear on station reports. After the
specified period of time, transaction information is purged from the
station: all transaction information is always sent to and maintained by the
console for up to 31 days.
• Open Drw Timeout—In minutes (0–99) and seconds (0–59), enter the
time after which the station beeps and you are logged off because a
drawer is left open and there is no keyboard or monitor activity.
Pyxis MedStation 4000 System Console User Guide 21
Page 32

Chapter 3—Setting Up the System
• Patient Keep Time—In hours (1–99) and minutes (0–59), enter the time
to retain a temporary patient record that was manually added at the
station. (Does not apply to permanent patients.)
• Temp/Activated User—Enter the number of hours (0 to 99) temporary
users remain active after they created at the station. This feature is used
for users for areas other than their primary areas. To allow time for shift
changes, enter a value that is slightly longer than the longest shift on the
unit.
• DB Maintenance at—Checks for expired users and deletes them. Checks
for discharged patients and deletes them.This is set at Site Specific
Options at the Maintenance tab.
• Pre-Admit Lead Time—Allows Pyxis MedStation system transactions
for patients that are in the facility’s HIS system before they arrive at the
unit.
4. In the Print Slips For section, select the check boxes for the applicable
options:
• Remove—Prints slips when medications are removed.
• Load/Unload—Prints slips when medications are loaded or unloaded.
• Refill—Prints slips when medications are refilled, select this option.
• Inventory—Prints slips when medications are inventoried.
• Return—Prints slips when medications are returned.
• Waste—Prints slips when medications are wasted.
• Outdate Removal—Prints slips when medications are outdated upon
removal.
5. In the Witness Required To section, sele ct the check boxes for the applicable
options:
• Remove—Requires a witness for a medication removal.
• Empty Return Bin—Requires a witness when the bin is emptied.
6. In the No Witness Required section, select the check boxes for the applicable
options:
• Return to Stock—Eliminates the requirement for a witness when a
medication is returned to stock.
• Return to Bin—Eliminates the requirement for a witness when a
medication is returned to the Return Bin.
7. In the last section, select the check boxes for the applicable options:
• Outdating—Assists with managing the expiration time of the
medications stored in the specified station. Prompts you to enter the
appropriate expiration date for the pocket when refilling the medication.
Later, when you remove the medication, the station then determines
whether the outdate time for the pocket is within the current month. If so,
a message warns you to verify the expiration date on the medication being
administered, because the pocket might contain outdated medications.
During a Refill and Load, the medications being added to the station
22 Pyxis MedStation 4000 System Console User Guide
Page 33

Devices
affect the expiration date, the system prompts you to change the
expiration date.
• Return to Stock—Allows users to return unused medications in their
original, unopened packages to the drawer and pocket from which they
were removed. When disabled, return items to the Return Bin. Use the
Formulary menu at the console to assign individual medications the
Return to Stock option.
• Witness Once—Prompts only once for a witness for all the medications
on the list, rather than prompting for a witness on each medication.
• Allergy Information—Displays allergy information at the station. This
information displays only if your facility ADT interface provides allergy
information.
• Waste While Removing—Wastes during the remove process. Prompts
you to confirm whether to administer the full amount.
• Volume Calculation—Allows you to convert strength units to volume
units upon removal of a medication.
• Blind Count—Provides the option to have count verification require you
to enter the quantity blind instead of showing you the expected beginning
count and asking you to confirm or correct it.
• Receives All ADTs—Normally, only the ADT information for a station’s
area is sent to a station. If all ADT information is sent to this station,
select this option. Application of this feature might be limited to certain
areas, such as an OR or post-anesthesia care unit (PACU).
• Display Last Access—Transmits throughout the Pyxis MedStation
system to all stations where the patient name is listed. For best
performance, stations that receive all ADT should have Display Last
Access turned off.
• Remove Warning—Displays a dialog box advising you not to remove
the requested medication because it is too early or too late compared to
the order dose time, or too close compared to the previous removal.
• Scanning Required—Allows a facility to require scanning of a
medication scancode during the remove process.
• Undocumented Waste—Allows a facility to track any and all remove
transactions in which a user removes a quantity greater than the ordered
dose.
• Stock Out Bulletins—Allows you to select or deselect the Stock Out
Bulletin and configure the print destination as needed. The Stock Out
Bulletins option is selected by default when enabled in site options and
displays the default destination defined in Site Options. The dropdown
box allows a different printer destination to be chosen.
• Stock Critical Low Bulletins—Allows you to select or deselect the
Stock Critical Low Bulletin and configure the print destination as needed.
The Stock Critical Low Bulletins option is selected by default when
enabled in site options and displays the default destination defined in Site
Options. The dropdown box allows a different printer destination to be
chosen.
Pyxis MedStation 4000 System Console User Guide 23
Page 34

Chapter 3—Setting Up the System
8. Complete the steps outlined in the next section, Entering the communication
settings.
Entering the communication settings
This section describes how to complete the Comm tab.
1. Click the
2. In the
Comm tab.
Method box, type
XT
.
This indicates the method by which the device communicates with the
console.
3. In the token section, enter the applicable information:
• Token 1—Specify the IP address.
• Token 2—Specify a network number.
• Token 3—Reserved for user-defined (UA) methods.
4. If you want the console to poll each station for transactions or activities that
need to be reported, select the
Polling check box and indicate when the
following should occur:
• Poll Data—If the console sends or receives data for this station in a
previous session, specify how often it polls this station.
• Poll Fail—If polling fails, specify how soon the console retries polling.
• Poll No Data—If the console sends or receives no data to this station in
the previous session, specify how soon the console polls this station.
If this station has no transactions, the console passes information to the station
and continues querying the next station. This cycle of polling is continuous
until you turn it off. Generally, you would not turn off polling unless so
advised by a CareFusion representative.
24 Pyxis MedStation 4000 System Console User Guide
Page 35

Devices
5. To save the information that you have entered up to this point and ensure that
you can add drawers when you reach the section on entering hardware-related
information, do the following:
a. Click
b. After the confirmation message appears, cl ick
Save.
OK.
c. In the Devices dialog box, select the device that you created and click
Edit.
6. Do one of the following:
• If the selected station is being used in profile mode, complete the steps
outlined in the next section, Entering the settings for profile mode.
• If the selected station is not being used in profile mode, skip to Entering
the hardware settings on page 27.
Entering the settings for profile mode
This section describes how to complete the Rx tab, which appears only on stations
in profile mode.
1. Click the
Rx tab.
2. In the Critical Override section, select the check boxes for the applicable
options:
• Manual Enable—To allow users access to all medications loaded at this
station, select this option. If you are not using the Manual Enable on
Downtime or delay time feature, select this option as part of your backup
procedure in the event that the profile system is down or behind for an
extended period.This option automatically enables critical override
Pyxis MedStation 4000 System Console User Guide 25
Page 36

Chapter 3—Setting Up the System
immediately.The next option is not available until a predetermined time
has passed.
• Manual Enable on Downtime or delay time—To allow users access to
all medications loaded at this station when the station is unavailable,
select this option. Enter the number of hours and minutes after which the
profile interface is down or delayed that the station automatically goes
into critical override.
• Use Schedule—T o schedule a time during which a stat ion in profile mode
automatically goes into critical override mode, select this check box and
click
select the applicable options and click
station for critical override when the pharmacy is closed.
View/Edit Schedule. In the Critical Override Schedule dialog box,
OK. For example, schedule the
3. In the Override Groups section, select the check boxes for the applicable
options.
To override a patient’s profile at this station, select at least one of these
override groups. This group must match the override group of your formulary
item and pocket.
4. Update the lead and lag time, as necessary:
• Order Lead Time—Enter the number of hours (from 0–99) before the
start time that an order is made active at the station. (This applies to new
orders.)
• Order Lag Time—Enter the number of hours after the stop time that an
order remains active at the station. (This applies to discontinued orders.)
5. If you are planning to enable profile mode at the station in the near future, but
you currently want the station to receive orders but not display them, select
the
Enable check box in the Temporary Non-RX Mode section.
Until you clear this check box, the station behaves like a standard station (that
is, no profile feature), giving you access to all medications at the station.
6. Select the applicable options:
• Interface Status Banners—Select to display interface status banners if
the profile interface is down or delayed.
• Due Time On Remove—Select to display the message.
26 Pyxis MedStation 4000 System Console User Guide
Page 37

Devices
• Show Patient Summary—Select to display an overview of patient
information when using the Patients option at the station.
• Charting On Remove—Select to chart when medications are removed.
Removal time is the administration time.
• Meds Due Reminder—Select to be reminded when medications are due.
7. Complete the steps outlined in the next section, Entering the hardware
settings.
Entering the hardware settings
This section describes how to complete the Hardware tab.
1. Click the
2. Click
Hardware tab.
Add.
3. In the Add new Drawer for device dialog box, enter the applicable
information.
• Drawer #—Enter the drawer number.
Pyxis MedStation 4000 System Console User Guide 27
Page 38

Chapter 3—Setting Up the System
• Drawer Type—Select the drawer type from the drop-down list. Drawer
types include bin, matrix, mini, remote stock, and shelf. For more
information, see drawer descriptions in the Glossary.
• Address—Enter the drawer address (location).
• Status—This box displays the current status of the drawer.
• Subdrawer #—Enter the subdrawer number.
• Num of Pkts—Set the number of pockets for the drawer.
• MedCart#—This box is reserved for future use.
4. When you are finished, click
5. Complete the steps outlined in the next section, Activating a CDC.
Save.
28 Pyxis MedStation 4000 System Console User Guide
Page 39

Devices
Activating a CDC
The Clin. Data tab is where you activate or deactivate clinical data categories
(CDCs). You must set up CDCs at the Clini cal Data menu so they are available for
activation and deactivation at the station. For more information, see Clinical data
on page 97. You can activate up to 200 CDCs per station. However, a maximum
of four categories are allowed per Remove, Return, or Waste transaction for each
medication.
1. Click the
Clin. Data tab.
The Clin. Data tab appears, listing all CDCs that have been defined in Clinical
Data.
2. Select the CDC to activate and click
Activate/Deactivate Clinical Data.
When activated, the word Yes appears in the Selected column for the chosen
CDC. If deactivated, no information appears in the Selected column for the
chosen CDC.
3. When you are finished, click
Save.
4. Complete the steps outlined in the next section, Entering the advanced
communication settings.
Pyxis MedStation 4000 System Console User Guide 29
Page 40

Chapter 3—Setting Up the System
Entering the advanced communication settings
Changing the options on the Adv Communications tab affects station
communication and message processing.
CAUTION
Contact your CareFusion representative before making changes to these
settings. If your site requires more than one computer in your console
configuration, a representative might direct you to change the value of the Comm
Box field.
To continue the setup process
➤ Complete the steps outlined in the next section, Entering station privileges for
temporary users.
30 Pyxis MedStation 4000 System Console User Guide
Page 41

Devices
Entering station privileges for temporary users
This section describes how to complete the Station Privileges tab. Station
privileges are those associated with the temporary users that are added at the
station.
The following table provides examples of users and some of the privileges they
might need:
Enable This Privilege For
Station Login/Witness
Ability
Activate/Create Temporary
User
Admit/Edit/Discharge
Patients
Station Administrator Users who:
Users who can act as witnesses to the following procedures,
but who do not have the authority to perform them:
• W asting a medication.
• Returning an item.
• Completing an inventory.
• Documenting a discrepancy.
• Recovering a drawer.
• Emptying the Return Bin.
• Print reports of their own transactions.
Charge nurses or other users who can grant another user
temporary access to a station.
Users who:
• Reconcile patients at the station.
• Update patient information.
• Add patients to the census that are not usually entered
through the facility patient admitting system. (In most cases,
ADT information is managed through the hospital/Pyxis
MedStation system electronic interface between the
facility’s system and the Pyxis MedStation system.)
• Have completed the Pyxis MedStation system Manager
training.
• Are responsible for off-hours troubleshooting support of the
station, such as a third-shift pharmacist or nursing
supervisor.
Each station privilege has unique properties. All are mutually exclusive, with the
exception of the Station Login/Witness Ability privilege. If you are given any
privilege other than this one, you automatically gets the Station Login/Witness
Ability privilege. Otherwise, assign each privilege individually.
Pyxis MedStation 4000 System Console User Guide 31
Page 42

Chapter 3—Setting Up the System
To set the privileges for a station
1. Click the
Station Privileges tab.
2. Select the applicable options:
• Station Login/Witness Ability—Allows limited access to the station
with no ability to access drawers. Gives you this level of access to allow
you to act as witnesses. You can change your password and print your
activity transactions with this access.
• Station Report Access—Allows you run any report at the station. You
can run reports that are limited to your own activities and discrepancies at
that station with this privilege.
• Activate/Create Temporary User—Lets you activate the password of a
temporary user (typically a float nurse) on a station to which he or she
does not usually have access. A temporary user has access for up to 99
hours, depending on the time period defined on the Settings tab. For more
information, see Entering the general settings on page 20.
• Credit Patients—Lets you credit a patient when wasting a complete dose
of a medication. This situation might arise if a medication package is
damaged or contaminated. Give patients a starting credit of 0.
• Admit/Edit/Discharge Patients—Lets you admit, update, or discharge
patients at the station. You have a Patients button in the Main Menu at the
station that permits access to this feature with this privilege.
• Create Permanent Users—Lets you create permanent users at the
station. Differs from the Activate/Create Temporary User privilege in that
permanent users do not have a time limit. Permanent users are allowed to
assign any station or medication privilege that they themselves have to
users they create.
With this privilege, you automatically have both the
32 Pyxis MedStation 4000 System Console User Guide
Page 43

Devices
Station/Login Witness Ability and the Activate/Create Temporary User
privilege.
• Station Administrator—Lets you perform initial setup and ongoing
troubleshooting of the station. Allows you to add, modify, and delete
devices, which includes changing the drawer style and number of pockets,
shutting down the station, placing the station in or out of service, altering
communications, calibrating the touch dialog box, and transplanting data.
At stations running in profile mode, you can enable and disable critical
override.
• No Witness Required—Lets you waste, return, or inventory medication
without a witness even though the selected medication’s security group
requires a witness.
• Assign/Load Access—Lets you select a pocket for a medication and to
place the medication physically into that pocket. This option does not
apply to MiniDrawers.
• Add Temporary Patients—Lets you add temporary patients at the
station.
• Independent Inventory Count—Lets you inventory medications
without a witness. You can recover a failed drawer and conduct the
subsequent inventory of that drawer without a witness, assuming you
have access to all medication security groups of the medications in that
drawer.
• Independent Discrepancy Documentation—Lets you document
discrepancies at the station without a witness. Otherwise, all discrepancy
resolutions require a witness. You must have access to the discrepancy
medication’s security group to document the discrepancy.
• Independent Load—Lets you load a medication that requires Rx Check
without having an authorized user check the medication.
• Independent Refill—Lets you refill a medication that requires Rx Check
without having an authorized user check the medication.
• Unload Standard Stock—Shows which items are standard stock in the
Unload list. You must confirm before proceeding. You cannot unload
medications without this privilege unless you clear the Standard Stock
setting in Inventory.
3. When you are finished, click
Save.
4. Complete the steps outlined in the next section, Entering medication
privileges for temporary users.
Pyxis MedStation 4000 System Console User Guide 33
Page 44

Chapter 3—Setting Up the System
Entering medication privileges for temporary users
Medication privileges are associated with temporary users that are added at a
station. When you set up your formulary, you specified a security group for each
medication. T emporary user medication priv ileges are based on the security group
of the medication.
1. Click the
NOTE
The Pyxis MedStation system provides 10 default security group names (A-J).
Groups I and J are used with Pyxis Anesthesia System. To rename groups at the
console, select System Setup > Pharmacy Configuration > Security Group
Names.
Med Privileges tab.
2. In the Temporary Med User Privileges section, select the groups to which
temporary users can have access at the station.
Users can access override medications whose formulary items and pockets
have the same override group as you select here. If you do not activate any
override groups, temporary users are unable to access override medications.
• To select all groups, click
• To clear all security groups for a particular function, click
All.
None.
3. Complete the steps outlined in the next section, Completing the process.
Completing the process
The following procedure explains how to finish adding a station or other device.
1. After you are finished entering the information on the various tabs, click
2. In the confirmation message that appears, click
34 Pyxis MedStation 4000 System Console User Guide
OK.
Save.
Page 45

Devices
Editing a station or other device
This section describes how to update units by using the Editing Device dialog
box. The contents of this dialog box can vary based on the type of device you are
updating. For information about updating devices globally, see Updating device
information globally on page 144.
1. Select
2. In the Devices dialog box, select the applicable device and click
System Setup > Devices.
Edit.
The Editing Device dialog box for the selected device appears with the
Settings tab selected.
3. Update the applicable information on each tab.
For information on the tabs and their options, use the information provided in
Adding a station or other device on page 19.
4. Click
5. In the confirmation dialog box that appears, click
6. To return to the standby dialog box, click
Save.
OK to continue.
Close.
Deleting a station or other device
The following procedure explains how to delete a station or other device from the
system.
CAUTION
Use caution when deleting a device. You will lose all configuration information for
that device when it is deleted. This information cannot be recovered.
1. Make sure that you run all applicable reports for the device that you intend to
delete.
2. Select
3. In the Devices dialog box, select the device name and click
4. In the confirmation dialog box that appears, type
System Setup > Devices.
Delete.
yes
in the box and click OK
to continue.
5. After the confirmation message appears, click
6. In the Devices dialog box, click
Close.
OK.
Pyxis MedStation 4000 System Console User Guide 35
Page 46

Chapter 3—Setting Up the System
Changing the device type
The following procedure explains how to change the Device Type, which is
commonly used to change a station to profile (Rx) mode. The current Device Type
determines what options are available to you for changes (for example, if the type
is currently RX, the system displays MEDSTN and ANESTH as options).
1. Select
2. In the Devices dialog box, select the device and click
3. In the Device Type Selection dialog box, select the applicable
4. In the confirmation message, click
System Setup > Devices.
Change Type.
Type and click
OK.
YES to continue.
The Devices dialog box appears.
Changing the name of a device
The following procedure explains how to change the name of a station or other
device.
1. If you are changing the name of a station, resolve all discrepancies before
continuing.
CAUTION
Do not change the station name unless absolutely necessary. Changing the
name deletes unresolved discrepancies if you do not resolve them first.
2. Select
3. In the Devices dialog box, select the device and click
System Setup > Devices.
Change Name.
CAUTION
When changing the name of a device be sure there are no spaces in the name
(the name must be all one word) or the name change will fail and could lead to a
loss of data.
4. When the confirmation message appears, click
5. In the Devices dialog box, select the device name to change and click
.
Name
NOTE
The console does not support device names greater than 10 characters in
length. Therefore, enter a new name with 10 or less characters.
6. When the confirmation message appears, click
7. In the Device New Name dialog box, enter the new name and click
8. When the confirmation message appears, click
36 Pyxis MedStation 4000 System Console User Guide
Yes to continue.
Change
YES to continue.
Save.
OK.
Page 47

Devices
Taking a device in or out of service
The following procedure explains how to take a station out of service or put it
back in service. If you take a device out of service, all communication between the
console and the device is stopped after the device is out of service.
1. Select
System Setup > Devices.
2. In the Devices dialog box, select the device whose status you want to change
and click
NOTE
Take a stat ion in or out of service only under the direction of a CareFusion
representative.
3. In the lower-right corner of the Editing Device dialog box, click
of Service.
4. When the confirmation message appears, click
Edit.
In Service/Out
Yes to continue.
5. If the devices in service, a message appears asking “Are you sure you want to
change the device status to Out of Service?”
If the device is out of service, the popup message asks “Are you sure you want
to change the device status to In Service?”
6. Click
Yes to continue.
7. On the Devices dialog box, the Status column indicates a pending status and
then a final status within 10 seconds of clicking the
Service button.
In Service or Out of
If the device was in service, the Status changes to PendingOutOfSvs. If the
device was out of service, the Status changes to PendingInSvs.
8. When the confirmation message appears, click
OK.
Pyxis MedStation 4000 System Console User Guide 37
Page 48

Chapter 3—Setting Up the System
Formulary management
Use the Formulary option to enter and update your facility’s formulary. The
console also allows you to define degrees of control over the security and clinical
data associated with each formulary item.
There are two methods for adding formul ary ite ms: ma nua lly at the conso le (for a
small number of items) and downloaded via a computer interface from your
pharmacy computer system.
NOTE
You can update information globally. For more information, see Updating
information globally
Remove Warning overview
There are two device settings that affect Remove Warning. The first is the
Remove W arning check box on the Settings tab (this directly affects the Too Close
warning, which is for both profile and non-profile mode). The second is the Due
Time On Remove check box on the Rx tab. Due Time On Remove gives the
dosing times for profile orders.
on page 141.
The Too Early and Too Late warnings are then derived by comparing the
following:
• The current time.
• The three offsets in Default Remove/Admin. +/- Times.
• The list of eligible items in the list as determined by the rules that govern due
times.
If Remove Warning is turned on and Due Time On Remove is turned off, you get
the Too Close warning when the medica tion currently being removed has been
previously removed within the parameter set at the console. Likewise, if Remove
Warning is turned on and the device is in non-profile mode, you also get the Too
Close warning.
38 Pyxis MedStation 4000 System Console User Guide
Page 49

Formulary management
Accessing the formulary list
The following procedure explains how to view the list of formulary items.
1. Select
System Setup > Formulary Management > Formulary.
The Formulary dialog box appears, displaying all medications in the
formulary. The list is displayed in alphabetical order based on the generic
name.
2. To display the list in a different order or to search for a specific item, use the
applicable option:
• Generic Name—Click to display items by their generic names (the
default).
• Brand Name—Click to display items by their brand names.
• Med Generic Name—When viewing medications by Generic Name,
begin typing the generic name of the item for which you are searching. As
you type, the system attempts to match the item character by character to
your entry.
• Med Brand Name—When viewing medications by Brand Name, begin
typing the brand name of the item for which you are searching. As you
type, the system attempts to match the item character by character to your
entry.
• Med ID—Begin typing the medication ID (medication ID) of the item for
which you are searching. As you type, the system attempts to match the
item character by character to your entry.
• Refresh—Click to refresh the contents of the list.
3. To return to the standby dialog box, click
Close.
Pyxis MedStation 4000 System Console User Guide 39
Page 50

Chapter 3—Setting Up the System
Adding a formulary item
This section describes how to add a formulary item.
1. Select
2. In the Formulary dialog box, click
System Setup > Formulary Management > Formulary.
Add.
The New Formulary Setup dialog box appears with the Formulary Data tab
selected. The fields at the top of the dialog box remain visible regardless of
the current tab.
3. In the upper section of the dialog box, enter the following:
• Generic Name—Enter an alphanumeric generic name (up to 30
characters) for the formulary item.
• Brand Name—Enter an alphanumeric trade name (up to 30 characters)
for the formulary item.
• ID—Enter a unique alphanumeric medication ID (up to 15 characters).
• Alternate ID—If required by your site, enter a 15-character alternate ID
for the medication.
NOTE
Enter data on all tabs before saving unless you plan to edit your formu lary
globally after entering it. If you save before you are finished, use the Edit button
on the Formulary dialog box to continue entering information.
4. Complete the applicable fields:
• Strength—Describe the amount of the medication per unit. Y ou can enter
up to three decimal places (for example, 0.125).
• Strength Units—Select a unit of strength.
• Volume—Enter the fluid volume of the medication. This field is required
only when the medication is a fluid.
• Volume Units—Select a unit of volume.
• Dosage Form—Select the dosage form of the medication.
40 Pyxis MedStation 4000 System Console User Guide
Page 51

Formulary management
• Therapeutic Classification—Select the therapeutic classification, which
identifies the category of the medication according to use. One such
classification system has been published by the American Hospital
Formulary Service (AHFS).
• Med Class—Select the medication classification (medication class). The
class is used for sorting of medications in reports.
• Pick Area—Select the pharmacy location where the medication is stored
®
for station replenishment. Required for use with the Pyxis PAR
pharmacy auto-replenishment system. If using Pyxis PAR
x
x
, configure the
system so that medications must be scanned. You can scan for load and
refill processes only. Configure your device for scanning.
• Manufacturer—Select the manufacturer of the medication.
• Alternate ID 2—Enter a 22-character, alphanumeric medication ID that
functions as an additional identification for the medication.
• Security Group—Select the security group. The security group
determines if you can access this medication. For you to have access to a
medication, your security group must match the medication’s security
group.
• Verify count—Select ON if you want to require the user to count the
medications in the pocket each time the pocket is accessed. You can also
select With Blind Count ON, which asks how many medications are in the
pocket, or At/Below Min to require a medication count when the
inventory level reaches the minimum specified for the loaded.
Enable Blind Count at the device to use the Blind Count option when a
medication is removed. Quantities are not displayed, as recorded in the
database, when the user performs a count verification before removing
items.
• Override Group (profile mode only)—Enter the override group to which
this medication is assigned. Only users assigned the same override group
can access this medication.
• Cost—Enter the acquisition cost of this medication.
• Charge—Enter the amount charged to the patient.
• Units of Issue—Enter the number of units of medication per refilling
package.
• Units of Order—Enter the supplier’s package size used for ordering.
• Package Quantity—Enter the number in the supplier’s package.
Pyxis MedStation 4000 System Console User Guide 41
Page 52

Chapter 3—Setting Up the System
5. Click the Formulary Options tab.
6. Complete the applicable fields:
• Return to Stock—Allows users to return an unused medication still in its
original package to the pocket from which it was removed.
• Waste While Removing—Allows users to waste an unneeded portion of
this medication during the Remove process.
• Requires Rx Check—Activates a menu button that displays at the station
and indicates that another user must check this medication whenever it
has been loaded or refilled by an individual whose security group requires
a witness to check their work. This is a tool for auditing the refill and load
processes. An icon also appears to warn the nurse that a medication is
being removed before the pharmacist check takes place.
• Volume Calculation—Allows users to calculate the volume of a
medication needed for the ordered dose. Enter the strength and volume
units in the formulary data field to make this option available.
• Remove—Requires a witness to enter an ID and password during the
Remove process for designated medications.
• Override (profile mode only)—Requires a witness to enter an ID and
password when a user tries to remove this medication for a patient when
no order exists.
• Load Discrepancies—Indicates that users are not required to resolve
discrepancies that are created when loading this medication. The load
discrepancy appears on the Discrepancy report as closed (documented).
• All Except Load Discrepancies—Indicates that users are not required to
resolve discrepancies that are created for this medication during all station
activities, except when they are being loaded. The discrepancy appears on
the Discrepancy report as closed (documented).
42 Pyxis MedStation 4000 System Console User Guide
Page 53

Formulary management
• Display options (profile mode only)
Displays the medication in the medication profile list at the station
°
regardless of whether it is loaded, select
Always. (It is also eligible to
appear on the Ordered Meds Not Loaded report.)
To display the medication on the station profile list only when it is
°
loaded, select
Only When Loaded (This also renders the item ineligible
for display on the Ordered Meds Not Loaded report.)
• Print option—Prints the medication on Ordered Meds Not Loaded
bulletins and reports, as necessary. This eliminates the printing of
medications that are displayed in the patient profile, but not loaded in the
station. When selected, the medication is not printed on bulletins.
7. Select or deselect the
Stock Critical Low % check boxes as needed.
•
Stock Out Bulletins is selected by default when enabled in site options.
Stock Critical Low Bulletin is selected by default when enabled in site
•
options. When checked, the
•
Stock Critical Low % formulary item value supersedes the site’s Stock
Stock Out Bulletins, Stock Critical Low Bulletins, and
Stock Critical Low % field is also enabled.
Critical Low % value.
8. Enter the Remove/Admin +/- Times, in minutes, as necessary:
• Before scheduled dose time [Too Early]—Enter the number of minutes
ahead of the scheduled dose time during which it is okay to administer a
medication. If the medication is removed prior to this timeframe, the
system displays the Too Early warning at the station and hand-held
devices.
• After scheduled dose time [Too Late]—Enter the number of minutes
after the scheduled dose time during which it is okay to administer a
medication. If the medication is removed after this timeframe, the system
displays the Too Late warning at the station and hand-held devices.
• After remove/admin same Med, wait for [Too Close]—Enter the
number of minutes after the last time the medication was removed during
which the medication cannot be administered again. If the medication is
removed during this timeframe, the system displa ys the Too Close
warning at the station and hand-held devices.
9. Click the
Formulary Categories tab and select the Clinical Data Categories, as
needed.
• Remove Clinical Data—Select up to four categories for Remove
transactions.
• Waste Clinical Data—Select up to four categories for Waste
transactions.
• Return Clinical Data—Select up to four categories for Return
transactions.
Pyxis MedStation 4000 System Console User Guide 43
Page 54

Chapter 3—Setting Up the System
NOTE
The order in which you select the CDCs determines the order in which the clinical
data is requested at the station when the medication is removed, re turned, or
wasted.
10. Click Save and then click OK.
11. To return to the Formulary dialog box, click
Close.
Editing a formulary item
With appropriate user privileges, you can modify formulary items. For
information about updating the formulary globally, see Updating the formulary
globally on page 141.
1. Select
2. In the Formulary dialog box, select the applicable medication and click
3. In the View/Modify Formulary dialog box, update the applicable information
4. In the confirmation dialog box that appears, click
NOTE
For Pyxis Anesthesia System, all pended items must be loaded prior to
performing any edits/global edits on those pended items.
System Setup > Formulary Management > Formulary.
and click
Save.
Edit.
OK to continue.
44 Pyxis MedStation 4000 System Console User Guide
Page 55

Deleting a formulary item
This section describes how to delete a formulary item.
Formulary management
1. Select
System Setup > Formulary Management > Formulary.
2. In the Formulary dialog box, select the applicable medication and click
Delete.
3. In the confirmation message, click
4. In the second confirmation message that appears, click
YES.
OK.
Editing accessed inventory
This feature allows you to bypass inventory of those pockets with controlled
medications which have not been accessed since the last inventory was
performed.
1. Select
2. Select the appropriate Formulary item.
3. Select
4. Select Formulary Data tab and ensure that the Med Class is the same
5. Select
System Setup > Formulary Management > Formulary.
Edit.
classification chosen in the pharmacy configuration. See Addin g a medication
classification on page 121.
Save or Close as appropriate.
Pyxis MedStation 4000 System Console User Guide 45
Page 56

Chapter 3—Setting Up the System
Enabling Scan on Remove
This feature allows a facility to require scanning of a medication scancode during
the remove process. This feature is configured in the formulary section. In
addition, scancode maintenance must also be performed at the console to correlate
a scancode to a specific formulary.
1. Select
System Setup > Formulary Management > Formulary.
2. In the Formulary dialog box, highlight the medication.
3. Click
Edit.
The View/Modify Formulary dialog box appears.
4. Click the
Formulary Options tab.
5. Check the
NOTE
If processing multi-doses, check the
allows you to scan medications once regardless of the quantity being removed.
This makes it easier to work with multi-dose orders.
• When removing multiple instances of a formulary item, the station requires
one scan the first time the item is removed from the same pocket.
• When removing multiple instances of a formulary item in which the quantity
of items in one pocket is smaller than the quantity selected to remove, the
station requires that you scan the first item removed from each pocket from
which the item is removed.
• With Scan Once enabled, NDC values cannot be captured since each dose
is not scanned.
Scan on Remove check box.
Scan Once on Remove box. This option
46 Pyxis MedStation 4000 System Console User Guide
Page 57

Formulary management
NOTE
When enabling Scan Once, you are prompted to scan the item being removed
only once. Information will be provided in the system for the one item you
scanned. Scan Once is designed to capture only one scan during medication
removal that may involve multiple dosage forms within the same pocket.
6. Click Save.
7. Click
OK.
Enabling Scan on Load/Refill
This feature allows a facility to require scanning of a medication scancode during
the load/refill processes. This feature is configured in the formulary section. In
addition, scancode maintenance must also be performed at the console to correlate
a scancode to a specific formulary.
1. Select
2. In the Formulary dialog box, highlight the medication.
3. Click
4. Click the
System Setup > Formulary Management > Formulary.
Edit. The View/Modify Formulary dialog box appears.
Formulary Options tab.
5. Select the
6. Click
7. Click
Scan on Load/Refill check box.
Save.
OK.
Enabling undocumented waste
This feature allows a facility to track any and all remove transactions in which a
user removes a quantity greater than the ordered dose.
Pyxis MedStation 4000 System Console User Guide 47
Page 58

Chapter 3—Setting Up the System
In addition, a report detailing all open Undocumented Wastes is available. See
Undocumented Waste on page 172 for further information.
1. Select
System Setup > Formulary Management > Formulary.
2. In the Formulary dialog box, highlight the medication.
3. Click
4. Click the
5. Check the
6. Click
Edit. The View/Modify Formulary dialog box appears.
Formulary Options tab.
Undocumented Waste box.
Save.
7. Click
OK.
Configuring the multi-scan medication feature
The multi-scan medication feature must be configured at the console for this
feature to be available on the Pyxis PAR
on formulary items where all quantities of a particular item should be scanned for
the pick, check, and/or pick and check processes. The multi-scan feature checks
the status of the medication to determine if the functionality must be performed on
the item during the Pick or Check or both the Pick and Check process.
NOTE
The following configuration is performed by a CareFusion specialist: set the P AR
scan config flag to
1 for the PAR
options to enable in the Formulary Options tab.
x
How to set a multi-scan configuration
1. Log in on the console.
The main screen appears.
2. Select
System Setup> Formulary Management>Formulary on the main screen.
3. Select the drug from the list by double-clicking it.
The View/ Modify Formulary screen appears.
system. The multi-scan feature is used
x
x
48 Pyxis MedStation 4000 System Console User Guide
Page 59

4. Click the Formulary Options tab
View/Modify Formulary screen appears.
The
Formulary management
5. In the
PARx Scanning Configuration section, select During Pick, During Check, or
both check boxes to enable the multi-scan feature for each particular
formulary item.
6. Click
Save.
The Scanning Configuration is set for the selected drug.
Pyxis MedStation 4000 System Console User Guide 49
Page 60

Chapter 3—Setting Up the System
Formulary equivalencies
Formulary equivalencies allow a pharmacist to define a certain strength of a
formulary item as equivalent to multiples of another strength of the same generic
item. Equivalencies allow you to remove a dose for a patient even if the ordered
strength is not loaded at the station and eliminate the need to stock a rarely used
strength in a specific station or throughout the facility.
Creating an equivalency
The following rules apply when creating equivalencies:
• Equivalencies are defined as multiple units of the same formulary line item,
not as a combination of multiple formulary line items. For example, defining
one tablet each of Amitriptyline 25 milligrams (mg) and 50 mg as an
equivalency to one tablet of Amitriptyline 75 mg is not allowed. However,
three tablets of 25 mg are defined as equivalent to 75 mg.
• Equivalencies are established only between formulary items of the same
generic name defined in the console formulary. To define a combination of
generically different formulary items, define a combination dose instead of an
equivalency.
• Equivalencies might not contain variable-dose or combination-dose members.
50 Pyxis MedStation 4000 System Console User Guide
Page 61

To create an equivalency
Formulary equivalencies
1. Select
2. In the Equivalency Setup dialog box, click
System Setup > Formu lary Management > Equivalencies.
Create Equivalency.
3. In the Select med for equivalency creation dialog box, select a medication on
which to base your equivalency.
CareFusion suggests creating equivalencies for the medication with the
greatest strength to take advantage of the Expand feature.
An equivalency group is created for the item you selected. Candidates for the
equivalency (items with the same generic name and unit strength, mg, mEq,
and so on) and medication classification appear in the list at the bottom of the
dialog box. Generally, equivalent items must have a strength other than zero
defined in the formulary to appear as candidates.
4. Click
Select.
5. In the bottom section of the dialog box, select the medication.
6. Click
Setup Qty.
The Equivalency Verification message box appears, suggesting the
equivalency relationship. If the dosage forms, strengths, strength units, or
medication classes of the two formulary line items do not match, a warning
appears.
7. To continue, click
8. To save your equivalencies, click
Accept Equivalency.
Save.
After you have created equivalencies, you can view, edit, delete, or expand
them as needed.
Pyxis MedStation 4000 System Console User Guide 51
Page 62

Chapter 3—Setting Up the System
Viewing an equivalency
This section describes how to view an equivalency.
1. Select
System Setup > Formu lary Management > Equivalencies.
2. In the Equivalency Setup dialog box, click the plus sign for the group whose
details that you want to view.
NOTE
Modified items in the list are preceded by a > symbol and added items are
preceded by an * symbol for easy identification.
Editing an equivalency
This section describes how to update an equivalency.
NOTE
The Edit Equivalency button only shows when you click on the equivalency. It
does not appear when you click the group name or the individual medication.
1. Select
2. In the Equivalency Setup dialog box, select the equivalency that you want to
System Setup > Formu lary Management > Equivalencies.
update.
Click
Edit Equivalency. Equivalencies appear in the bottom section of the
dialog box.
3. Select a medication on which to base your equivalency.
4. To create an equivalency, select a medication from the lower listbox.
5. Click
Setup Qty.
The Equivalency Verification message box appears, suggesting the
equivalency relationship. If the dosage forms, strengths, strength units, or
medication classes of the two formulary line items do not match, a warning
appears.
6. To continue, click
7. Click
Save.
Accept Equivalency.
Deleting an equivalency
This section describes how to delete a specific equivalency, an equivalency group,
and a medication within an equivalency.
1. Select
2. In the Equivalency Setup dialog box, do one of the following:
System Setup > Formu lary Management > Equivalencies.
• To delete an individual equivalency, select the equivalency and click
Delete Equivalency.
• To delete an equivalency group, select the group and click
Equivalency Group
.
Delete
52 Pyxis MedStation 4000 System Console User Guide
Page 63

Formulary equivalencies
• To delete a medication within an equivalency, select the medication and
click
Delete Equivalent Med.
3. In the confirmation message, click
4. Click
Save.
Confirm.
Expanding an equivalency
The Expand Equivalency feature allows the system to create additional
equivalencies between selected items within the same equivalency automatically.
1. Select
System Setup > Formu lary Management > Equivalencies.
2. In the Equivalency Setup dialog box, click the plus sign for the applicable
equivalency group.
3. Click
Expand Equivalency.
An Expand Equivalency Confirmation dialog box appears. The Maximum
Expand Quantity Limit default is two.
4. If desired, change the maximum expand quantity limit.
5. Click
6. Click
Confirm.
Close.
Pyxis MedStation 4000 System Console User Guide 53
Page 64

Chapter 3—Setting Up the System
Variable dose
The Variable Dose feature allows the pharmacist to address the issue of range
dosing by defining dosage choices for the care provider based on a single order.
To accomplish this, create a formulary line item in both the pharmacy computer
system and the console. Using variable-formulary doses creates the formulary line
item.
Adding a variable dose
The following rules apply when creating a variable dose:
• The nurse can access the ordered dose if one or more members of the variable
dose are available at the station, whether or not all members are present. The
station displays a message if any individual members are not available.
• Variable doses cannot contain combination doses as members.
• Variable doses can contain formulary equivalencies if the variable dose
contains only one member and an equivalency has been set up for that
member.
• For best results, load all members of a variable dose in stations where that
medication is used.
To add a variable dose
1. Select
System Setup > Formulary Management > Variable Dose.
54 Pyxis MedStation 4000 System Console User Guide
Page 65

2. In the Variab le Dosage Meds dialog box, click Add.
The Variable Dosage Med Setup dialog box appears with the Data tab
selected.
Variable dose
3. Enter the details for the medication:
• Generic Name—Enter an alphanumeric generic name (up to 30
characters) for the variable dosage.
• Brand Name—Enter an alphanumeric trade name (up to 30 characters)
for the variable dosage.
• ID—Enter a unique alphanumeric medication ID (up to 15 characters).
• Alternate ID—If required by your site, enter a 15-character alternate ID
for the variable dose.
NOTE
The formulary ID is the same in the console as in the pharmacy system.
4. Enter the Range details:
• Minimum—Enter the minimum dosage range.
• Maximum—Enter the maximum dosage range.
5. Select the appropriate Units for the dosage:
• Strength Units—Select to measure the variable dose in Strength Units.
• Volume Units—Select to measure the variable dose in Volume Units.
6. Select the appropriate strength or volume unit from the associated list.
7. Complete the following:
• Dosage Form—Select the dosage form for the variable dose.
• Alternate ID 2—Enter an alphanumeric medication ID (up to 15
characters) that functions as an additional identification for the
medication.
Pyxis MedStation 4000 System Console User Guide 55
Page 66

Chapter 3—Setting Up the System
8. To select formulary items as choices for the variable dose, click the Members
tab.
9. Click
Select Candidates.
10. In the Variable Dose: Candidate Selection dialog box, select a formulary item
that is within the desired range from the formulary list and then click
Select.
56 Pyxis MedStation 4000 System Console User Guide
Page 67

Variable dose
11. In the Variable Dosage Med Setup dialog box, select a candidate to add to the
variable dose and click
Add.
12. To save the variable dose definition, click
Save.
The Variable Dosage Meds dialog box appears.
Editing a variable dose
The following procedure explains how to update a variable dose.
1. Select
System Setup > Formulary Management > Variable Dose.
2. In the Variable Dosage Me ds dialog box, select or search for the item you
want to change and then click
Edit.
3. In the Variable Dosage Med Setup dialog box, make the required changes to
the information on the Data and Members tabs, as necessary.
4. Click
Save.
The Variable Dosage Meds dialog box appears.
Deleting a variable dose
The following procedure explains how to delete a variable dose.
1. Select
2. In the Variable Dosage Me ds dialog box, select or search for the item you
3. In the confirmation message, click
System Setup > Formulary Management > Variable Dose.
want to remove and then click
Delete.
YES.
4. In the second confirmation message that appears, click
OK.
The Variable Dosage Meds dialog box appears.
5. To return to the standby dialog box, click
Pyxis MedStation 4000 System Console User Guide 57
Close.
Page 68

Chapter 3—Setting Up the System
Combination dose
Combination doses allow the pharmacist to define cases where more than one
item obtained from the station fulfills a single ordered dose. To accomplish this,
create a formulary line item in both the pharmacy computer system and the
console.
Adding a combination dose
The following rules apply when creating a combination dose:
• All members of a combination dose must be present and available in the
station for the nurse to access the dose. Therefore, do not define combination
doses that contain members that are not routinely stored in a station.
• Combination doses might not contain formulary equivalency or variable
doses as members. Do not use this method for adding formulary equivalencies
or variable doses.
To add a combination dose
1. Select
2. In the Combination Dosage Meds dialog box, click
3. In the New Combo Med Setup dialog box, enter the Generic Name and ID for
System Setup > Formulary Management > Combination Dose.
Add.
the combination dose.
58 Pyxis MedStation 4000 System Console User Guide
Page 69

Combination dose
NOTE
The Generic Name and unique ID are required. The Brand Name and Alternate
ID are optional.
4. Click Add Item.
The Select med for combo med selection dialog box appears.
5. Select or search for the medication to assign to the combination dose and then
click
Select.
Pyxis MedStation 4000 System Console User Guide 59
Page 70

Chapter 3—Setting Up the System
6. In the Enter Med Quantity dialog box, enter the quantity of the item needed as
part of the combination dose and click
The New Combo Med Setup dialog box appears with the members in the
Combo Dose Contents section.
7. If you need to change the quantity of a member, select the member and click
Edit Quantity.
OK.
8. Click
9. In the confirmation message, click
Save.
OK.
The Combination Dosage Meds dialog box appears.
60 Pyxis MedStation 4000 System Console User Guide
Page 71

Combination dose
Editing a combination dose
The following procedure explains how to update a combination dose.
1. Select
System Setup > Formulary Management > Combination Dose.
In the Combination Dosage Meds dialog box, select or search for the
combination dose to update and click
Edit.
2. In the View/Modify Combo Med dialog box, use the following, as applicable:
• Add Item—Add another item to the combination dose.
• Edit Quantity—Change the quantity of the selected item.
• Remove Item—Remove the item from the combination dose.
3. Click
4. In the confirmation message, click
Save.
OK.
The Combination Dosage Meds dialog box appears.
Pyxis MedStation 4000 System Console User Guide 61
Page 72

Chapter 3—Setting Up the System
Deleting a combination dose
The following procedure explains how to delete a combination dose.
1. Select
System Setup > Formulary Management > Combination Dose.
In the Combination Dosage Meds dialog box, select or search for the
combination dose and then click
2. In the confirmation message, click
3. In the second confirmation message, click
Delete.
YES.
OK.
The Combination Dosage Meds dialog box appears.
62 Pyxis MedStation 4000 System Console User Guide
Page 73

Kits
Kits
The Kits feature allows you to define a grouping of medication s to be removed
with a single selection and assign it to an area in your system. All stations in the
area to which you assign the kit display the kit.
Adding a kit
The following procedure explains how to add a kit.
1. Select
2. In the Kits dialog box, click
3. In the Add Kit dialog box, enter the
NOTE
Kit IDs are unique. When you enter a duplicate ID, the system prompts you to
change the ID.
System Setup > Formulary Management > Kits.
Add.
Kit Name and ID.
4. To add items to the kit, complete the following steps:
a. Click
Pyxis MedStation 4000 System Console User Guide 63
Add Item.
Page 74

Chapter 3—Setting Up the System
b. In the Select med to add to kit dialog box, select a formulary item to add
to the kit and click
The Enter Med Quantity dialog box appears, allowing you to confirm
your selection and enter the quantity to include in the kit. The quantity
defaults to one.
Select.
c. Enter the applicable
Quantity and click OK.
d. Repeat steps b and c until all applicable items have been added.
e. Click
Close to return to the Select med to add to kit dialog box.
5. To designate what areas the kit should be available in, do one of the
following:
• To add a specific area, select the area from the Area List and click
Area
.
Add
• To add all areas, click
Add All.
The names of the areas you selected move to the Kit Locations list. The kit is
available only to those areas.
6. Click
7. In the confirmation message, click
8. Click
64 Pyxis MedStation 4000 System Console User Guide
Save.
OK to return to the Add Kit dialog box.
Close to return to the Kits dialog box.
Page 75

Kits
Editing a kit
You can add or remove items from a kit, change the quantity of a formulary item
included in a kit, or change the areas where a kit is accessible.
1. Select
2. In the Kits dialog box, select the applicable kit and click
System Setup > Formulary Management > Kits.
Edit.
3. To add items to the kit, do the following:
a. In the View/Modify Kit dialog box, click
Add Item.
b. In the Select Med to Add to Kit dialog box, select a formulary item to add
to the kit and click
c. In the Enter Med Quantity dialog box, enter the applicable
OK.
click
Select.
Quantity and
d. To add additional items, repeat steps b and c.
e. Click
f. Click
Close to return to the Select Med to Add to Kit dialog box.
Close to return to the View/Modify Kit dialog box.
4. To change the quantity of an item in the kit, do the following:
a. In the View/Modify Kit dialog box, select the item in the Kit Contents list
and click
b. In the Enter Med Quantity dialog box, enter the applicable
click
Edit Quantity.
Quantity and
OK.
5. To remove an item from the contents of the kit, do the following:
a. Select the item to remove and click
b. In the confirmation message, click
c. In the second confirmation message, click
Remove Item.
Yes.
OK.
6. To change the areas associated with the kit, do any of the following:
• To add an area, select the area and click
• To add all areas, click
Pyxis MedStation 4000 System Console User Guide 65
Add All.
Add Area.
Page 76

Chapter 3—Setting Up the System
• To remove one area, select the area and click Remove Area.
• To remove all areas, click
Remove All.
7. Click
8. In the confirmation message, click
Save.
OK.
The Kits dialog box appears.
Deleting a kit
The following procedure explains how to delete a kit.
1. Select
2. In the Kits dialog box, select the applicable kit and click
3. In the confirmation message, click
4. In the second confirmation message, click
System Setup > Formulary Management > Kits.
YES.
OK.
Delete.
66 Pyxis MedStation 4000 System Console User Guide
Page 77

Users
Users
A user is anyone who has access to the console or the station (or both). If you have
system administrator console privileges, the Users option on the System Setup
menu lets you create or modify users and define or modify their privileges,
including the nursing unit areas to which they have access. You can also create
templates to simplify the process of creating users that have the same privileges.
NOTE
You can update information globally. For more information, see Updating
information globally
Creating templates for user privileges
If you have a group of users you would like to define as having the same
privileges, templates save you the time of reentering the same privileges for each
user in the group.
NOTE
Privilege templates do not contain area information. Enter area information
individually for each user.
on page 141.
To create a template
1. Select
System Setup > Users.
2. At the top of the Users dialog box, click
Privilege Templ ates.
Pyxis MedStation 4000 System Console User Guide 67
Page 78

Chapter 3—Setting Up the System
3. In the User Template Selection dialog box, click Add.
4. In the Add New Template dialog box, enter a name for the template.
5. On the Console Privileges tab, select the applicable options.
For more information about these options, see Assigning console privileges to
a user on page 71.
6. Click the
Station Privileges tab and select the applicable options.
For more information about these options, see Assigning station privileges to
a user on page 72.
7. Click the
Med Privileges tab and select the applicable options.
For more information about these options, see Assigning medication
privileges to a user on page 76.
8. Click
9. In the confirmation message, click
10. Click
Save.
OK.
Close to return to the User Template Selection dialog box.
Your new template appears in the dialog box.
11. To return to the standby dialog box, click
Close.
68 Pyxis MedStation 4000 System Console User Guide
Page 79

Users
Adding a user
This section describes how to add a user. The information for each tab is described
separately.
NOTE
When adding a user, you can assign only those privileges that have been
assigned to you.
Beginning the process and assigning areas to a user
This section describes how to initiate the addition of a user to the system.
1. Select
2. In the Users dialog box, click
System Setup > Users.
Add.
The Add New User dialog box appears with the Areas tab selected.
NOTE
You can now add unlimited access areas.
3. In the upper section of the dialog box, complete the following fields:
• User ID—Enter a unique user ID (up to 10 characters).
• First Name—Enter the user’s first name in this field (up to 20
characters).
• Last Name—Enter the user’s last name in this field (up to 20 characters).
NOTE
Although you can enter up to 20 characters in the First Name and Last Name
fields, the system limits the combined total to 20 characters. The result stored in
the database might include a truncated version of the first name.
Pyxis MedStation 4000 System Console User Guide 69
Page 80

Chapter 3—Setting Up the System
• Password—Enter a temporary password for the user. The characters you
type display as asterisks.
• Confirm Password—Enter the temporary password again.
• ID valid until—Select the date and time at which the account expires.
• Initials—Enter the user’s initials.
• Title—Select the user’s job title.
4. On the Areas tab, do one of the following:
• To provide access to all areas in the system (for example, for a pharmacy
employee that refills or loads medications at any station), click
• T o prevent a user from having permanent access to any area (for example,
for float nurses who will be activated at a specific station for a specific
area when they are on duty), click
• T o select access areas, click
list and click
• To select areas that the user cannot access (the user will be able to access
all remaining areas), click
list, and click
5. In the BioID section of the Areas tab, indicate whether the user must log on
with a user ID and biometric ID (click
password (click
6. Do one of the following:
• T o assign a predefined set of privileges, complete the steps outlined under
Assigning privileges from a template on page 70.
• To assign privileges on an individual basis, skip to Assigning console
privileges to a user on page 71.
All Areas.
No Areas.
Select Areas, select the areas in the Available
Add.
Exclude Areas, select the areas in the Available
Add.
Use BioID) or with a user ID and
Use Password).
Assigning privileges from a template
After you create a template based on user privileges, you can define a new user
and load the template privileges so that the privileges are automatically set up for
the new user.
1. In the lower section of the Add New User dialog box, click
2. In the User Template Selection dialog box, select the applicable template and
click
Select.
This loads all the privileges defined in the template into the fields for the new
user. The name of the applicable template appears above the Save and Cancel
buttons.
3. Click Save.
The user is added and a blank Add New User dialog box appears.
4. Click
70 Pyxis MedStation 4000 System Console User Guide
Cancel to return to the main Users dialog box.
Assign Template.
Page 81

Users
Assigning console privileges to a user
The console privileges are mutually exclusive, with the exception of Basic
Pharmacy Privileges, which allows you to log on. If any of the other console
privileges are given to you, Basic Pharmacy Privileges is automatically given.
The following table provides examples of users and some of the console
privileges that they might need:
Enable This Privilege For
Basic Pharmacy Privileges Most pharmacy users.
User Entry One pharmacist on each shift to assure 24-hour coverage.
Pharmacy Supervisor A user who manages the Pyxis MedStation system clinical
information including formulary, kits, pharmacy configuration,
clinical data categories, security groups, discrepancy
documentation reasons, override groups (profile mode only),
and formulary classifications.
System Administrator A user who is authorized to:
• Add, modify, and delete devices (including changing the
drawer style and number of pockets for a matrix drawer).
• Place a station in or out of service.
• Alter station-to-console communications.
• Transplant data.
To assign the privileges
1. Click the
Console Privileges tab.
2. Select the applicable options:
• Basic Pharmacy Privileges—Allows you to access the Inventory menu,
assign medications to pockets that are not granted through medication
privileges, add and modify formulary items, and access reports and the
archival feature.
Pyxis MedStation 4000 System Console User Guide 71
Page 82

Chapter 3—Setting Up the System
• User Entry—Allows you to add, edit, or delete user-access privileges
and user templates. Allows you to assign to others privileges that they
themselves have at the console.
• Add/Edit/Deactivate User Template—Allows you to create, modify, or
delete a template at the console. When disabled, you see the
button, which allows you to view the privileges associated with a
template prior to assigning that template to a user.
• Order Entry—Allows you to add, edit, and delete patient orders at the
console. Normally, with a profile interface, all order additions,
modifications, and deletions are done through the pharmacy information
system and are electronically transferred to the Pyxis MedStation system.
The Order Entry privilege is available on devices in profile mode.
• Pharmacy Supervisor—Allows you to manage all clinical information
at the console. It also allows you to perform global edits on the formulary
and run the autoload function at the console for all medications that have
security access. If running in profile mode, users with this privilege can
create equivalencies, combination doses, and variable-dose medications.
• System Administrator—Allows you to add, modify, and delete devices,
including changing the drawer style and number of pockets for a matrix
drawer, placing a station in or out of service, altering station-to-console
communications, and running brain transplants. You can add, edit, or
delete area information and identify users who can log on to each station,
modify attention notices, and set Site Specific Options.
3. Complete the steps outlined in the next section, Assigning station privileges to
a user.
Show Detail
Assigning station privileges to a user
Station privileges are those associated with only the station. Each privilege has
unique properties, which are mutually exclusive with the exception of Station
Login/Witness Ability. If you are given any privilege other than this one, you
automatically gets Station Login/Witness Ability. Assign remaining privileges on
an individual basis.
The following table provides examples of users and some of the privileges they
might need
:
72 Pyxis MedStation 4000 System Console User Guide
Page 83

Enable This Privilege For
Users
Station Login/Witness
Ability
Activate/Create Temporary
User
Admit/Edit/Discharge
Patients
Station Administrator Users who:
Users who can act as witnesses to the following procedures,
but who do not have the authority to perform them:
• W asting a medication.
• Returning an item.
• Completing an inventory.
• Documenting a discrepancy.
• Recovering a drawer.
• Emptying the Return Bin.
Charge nurses or other users who can give another user
temporary access to a station.
Users who:
• Reconcile patients at the station.
• Update patient information.
• Add patients to the census that are not usually entered
through the facility’s patient admitting system. (In most
cases, ADT information is managed through the electronic
interface between the facility’s system and the Pyxis
MedStation system.)
• Have completed the Pyxis MedStation system Manager
training.
• Are responsible for off-hours troubleshooting support of the
station, such as a third-shift pharmacist or nursing
supervisor.
To assign the privileges
1. Click the
Station Privileges tab.
2. Select the applicable options:
• Station Login/Witness Ability—Allows you to act as a witness and
provides limited access to the station with no ability to access drawers.
Pyxis MedStation 4000 System Console User Guide 73
Page 84

Chapter 3—Setting Up the System
You can change your password and print your activity transactions; all
other station functions are unavailable.
• Station Report Access—Allows you to run any report at the station.
Without this privilege, you can only run reports that are limited to your
own activities and discrepancies at that station.
• Activate/Create Temporary User—Allows you to activate another
user’s ID and password on a station to which that user does not normally
have access. Users would then use their own ID, password, and privileges
at the station for temporary access.
This privilege allows you to create a temporary ID and password for
someone who does not have access to the station system in the
facility.The temporary user has access for up to 32 hours, depending on
the time period defined on the Settings tab for the device.
• Credit Patients—Allows you to credit the patient when wasting a
complete dose of a medication. This situation might arise if a medication
package is damaged or contaminated. Patients are automatically credited
when medications are returned to the station through the Return feature—
either to the original pocket or to the Return Bin.
• Admit/Edit/Discharge Patients—Allows you to admit, edit, or
discharge patients at the station. Users with this privilege have a Patients
button in the Main Menu at the station.
• Create Permanent Users—Allows you to create permanent users at the
station. This privilege differs from the Activate/Create Temporary User
privilege described earlier in that permanent users do not have a time
limit. Users with this privilege can assign any station and medication
privilege that they themselves have to users they create.
You automatically have both the Station/Login Witness Ability and the
Activate/Create Temporary User privilege.
• Station Administrator—Allows you to modify device settings,
including changing the drawer style and number of pockets, shutting
down a station, placing a station in or out of service, altering
communications, calibrating a touch dialog box, and transplanting data. If
the system uses profile mode, you can also turn critical override on or off
for a station.
• No Witness Required—Allows you to waste, return, or inventory
medication without a witness even though the selected medication’s
security group requires a witness.
Exceptions to the No Witness Required privilege are:
A user with Independent Inventory Count privilege can inventory
°
without a witness.
When a station has the Witness Required To/Empty Return Bin
°
option enabled, all returns to the return bin require a witness.
A user with the Independent Discrepancy Documentation privilege
°
can perform discrepancy documentation without a witness.
74 Pyxis MedStation 4000 System Console User Guide
Page 85

When a medication has the Override option activated on the
°
Formulary Options tab, a witness is required (profile mode only).
• Assign/Load Access—Allows you to select a pocket for a medication and
to place the medication physically into that pocket. This option does not
apply to MiniDrawers.
• Add Temporary Patients—Allows you to process items for a patient
who is not in the station’ s patient database (typically occurs because ADT
is behind or if the patient is visiting from another unit).
• Independent Inventory Control—Allows an inventory count without a
witness. You can recover a failed drawer and conduct the subsequent
inventory of that drawer without a witness, assuming you have access to
all medication security groups of the medications in that drawer.
• Independent Discrepancy Documentation—Allows you to document
discrepancies at the station without a witness. Otherwise, all discrepancy
resolutions require a witness. You must have access to the discrepancy
medication’s security group to document the discrepancy.
• Independent Load—Allows you to load a medication that requires Rx
Check without having another user check the medication.
• Independent Refill—Allows you to refill a medication that requires Rx
Check without having another user check the medication.
• Unload Standard Stock—Standard functionality prohibits you from
unloading a standard stock item by filtering them out of the Unload list
unless another item is pending to replace it or you have this privilege.
• CD ROM Access—Allows access to the CD-ROM, which can also play
music CDs. You can connect head phones or small speakers directly to the
CD player. The CD stops when you log out of the system. (This option
applies to Pyxis Anesthesia System.)
• My Items—Allows you to maintain a virtual remote stock of items
necessary for administering medications to patients. You select items to
remove from the loaded items list and physically removes them. The My
Items list displays a list of items removed, along with the removed
quantity of each. The message type for Remove Items is SVU, which
represents “station vend to user” (unique to Pyxis Anesthesia System).
After an item is in the My Items list, it can be issued to a patient,
transferred to another user, returned, or wasted.
3. Complete the steps outlined in the next section, Assigning medication
privileges to a user.
Users
Pyxis MedStation 4000 System Console User Guide 75
Page 86

Chapter 3—Setting Up the System
Assigning medication privileges to a user
The following procedure explains how to assign medication privileges.
1. Click the
Med Privileges tab.
2. In the Security Groups section, select the applicable group for each function
listed.
• To select all groups for a particular function, click
• To clear all security groups for a particular function, click
All.
None.
NOTE
The Security Group Names legend indicates wh at each gro u p re pr es en ts. The
console provides you with eight default names (A-H). Groups I– J are reserved for
Pyxis Anesthesia System.
3. Select the override groups that you can access at the station.
4. After you have finished adding the medication privileges, click
Save.
The user is added and a blank Add New User dialog box is provided so that
you can continue adding users.
5. Click
Close to return to the main Users dialog box.
Filtering the users list
If many users are defined, you might find it useful to display only a subset of
them, such as only those in a particular area.
1. Select
2. In the Users dialog box, click
3. In the Users – Display users who meet the following criteria dialog box, do
System Setup > Users.
List by.
one of the following:
• To display users in a specific area, select the area from the
In area list.
76 Pyxis MedStation 4000 System Console User Guide
Page 87

Users
• To display all active users, click Show all active users.
• T o display all users whose logon expires within a specific number of days,
Show users invalid within and indicate the number of days.
click
• To search for a user by name, ID, or initials, enter the information in the
applicable box in the Search section.
4. To return to the Users dialog box, click
User List.
Updating information for an existing user or group of users
This section describes how to update information to use either individual
selections or by updating the applicable template. (Additional options might be
available for update via the Global Edits option. For information about updating
user information globally, see Updating user information globally on page 148.)
This section includes the following topics:
• Updating information for one user on page 77
• Updating a user-privilege template on page 78
NOTE
When modifying information for a user, you can assign only those privileges that
have been assigned to you. If you have User Entry privileges, you can assign
any privileges to a user as well as to a template.
Updating information for one user
The following procedure explains how to update the information for an existing
user.
1. Select
2. In the Users dialog box, select the applicable user and click
System Setup > Users.
Edit.
3. Update the applicable information on each tab.
4. Click
Pyxis MedStation 4000 System Console User Guide 77
Save.
Page 88

Chapter 3—Setting Up the System
5. To return to the standby dialog box, click Close.
Updating a user-privilege template
The following procedure explains how to update the information for an existing
template.
CAUTION
Modifying a template affects privileges for all users assigned to that template.
To update a template
1. Select
2. In the Users dialog box, click
System Setup > Users.
Privilege Templates.
3. In the User Template Selection dialog box, select the applicable template and
click
Edit.
NOTE
The Show Detail button provides a way to view the Privilege Template. You can
view the template but cannot make any changes.
4. In the Edit Template dialog box, update the applicable information on each
tab.
5. Click
Save.
6. You are returned to the User Template Selection dialog box.
Deleting a user
The following procedure explains how to delete a user.
1. Select
2. In the Users dialog box, select the applicable user and click
3. In the confirmation message, click
System Setup > Users.
Delete.
YES.
78 Pyxis MedStation 4000 System Console User Guide
Page 89

Deactivating a user-privilege template
The following procedure explains how to deactivate a privilege template.
Users
1. Select
2. In the Users dialog box, click
System Setup > Users.
Privilege Templates.
3. In the User Template Selection dialog box, select the applicable template and
click
Deactivate.
NOTE
The Show Detail button provides a way to view the Privilege Template.
NOTE
Privilege Templates cannot be deactivated if assigned to users.
4. In the confirmation message, click
YES to continue.
The User Template Selection dialog box appears.
Pyxis MedStation 4000 System Console User Guide 79
Page 90

Chapter 3—Setting Up the System
Patients
Usually, additional patient files and updates to existing files come via your
facility’s ADT computer interface or pharmacy profile interface (if the profile
option is activated). However, there are procedures that you can perform using
The Pyxis MedStation system to use existing files. Patient information is entered
by your facility. Information can be entered for temporary patients at the station,
not the console.
Adding a patient file
The following procedure explains how to create a patient’s record.
1. Select
2. In the Patients dialog box, click
System Setup > Patients.
Add.
The New Patient Setup dialog box appears with the Location tab selected.
3. In the upper section of the dialog box, enter the following:
• First Name—Enter the user’s first name in this field (up to 20
characters).
• Last Name—Enter the user’s last name in this field (up to 20 characters).
80 Pyxis MedStation 4000 System Console User Guide
Page 91

Patients
NOTE
Although you can enter up to 20 characters in the First Name and Last Name
fields, the system limits the combined total to 20 characters. The result stored in
the database might include a truncated version of the first name.
• I.D.—Enter the patient’s unique ID, usually the account number or
medical record number.
• Alt. ID 1—If your facility requires an alternate ID, enter it here.
• Alt. ID 2—If your facility requires a second alternate ID, enter it here.
4. On the
Location tab, enter the following:
• Facility—Select the facility with which the station and patient are
associated. This field is used primarily for facilities with affiliations or
those that have merged and are made up of more than one hospital or
nursing home.
• Nursing Unit—Select unit where the patient is located.
• Room—Enter the room number where the patient is located.
• Bed—Enter the bed where the patient is located.
• Visit Nurse Unit—Select the nursing unit where the patient is
temporarily located (for example, OR).
• Visit Discharge—Enter the date and time at which the patient visit to the
temporary location is expected to end.
• Admission Date—Enter the date and time that indicates when the patient
was admitted to the facility (the default is the current date and time).
• Auto-Discharge Date—Enter the date and time at which the patient is
expected to be discharged from the original room and board (usually
defaults to one year).
5. Click the
Comments tab.
Pyxis MedStation 4000 System Console User Guide 81
Page 92

Chapter 3—Setting Up the System
6. Enter the following:
• Patient comments—Enter any relevant comments regarding this patient
(for example, no visitors or hearing impaired).
• Admitting Dr.—Enter the name of the admitting physician.
• Attending Dr.—Enter the name of the attending physician.
• DRG Code—Enter the diagnosis-related group (DRG) code.
• Patient Scan Code—Enter this information by scanning it or typing it.
7. Click the
Clinical tab.
8. Enter the applicable information.
• Date of birth—Enter the date of birth in mm/dd/yyyy format.
• Sex—Select male (M), female (F), or unknown (U).
• Height—Enter the patient’s height and select the applicable measurement
unit (U/INCHES/FEET/CM/M).
• Weight—Enter the patient’s weight and select the applicable
measurement unit (M/OZ/LBS/G/KG).
• Estimate—If the height and weight are unverified, select this box.
• Diagnosis—Enter a text-based description of the patient’s condition.
82 Pyxis MedStation 4000 System Console User Guide
Page 93

9. Click the Order Data tab.
The items in the Order Data tab are populated by informatio n yo u enter in th e
New Order Setup dialog box.
Patients
10. To get to the New Order Setup dialog box, click
NOTE
You will be asked to save your patient data before editing/adding orders. Click
Yes to continue to the next dialog box.
Add.
11. Enter the order information for your patient in these areas:
• Order—Determined by your facility.
• Order Description—Enter the order description.
• Type (select one):
Pyxis MedStation 4000 System Console User Guide 83
Page 94

Chapter 3—Setting Up the System
°
°
°
• Flag (check boxes):
°
°
°
• Freq—Enter the dosing interval or frequency. If applicable, indicate PRN
as part of the interval text. If the order is for a large volume parenteral
(continuous IV drips), enter the rate of administration as the interval text
(for example, BID, Q6H PRN, QOD, 125ML/HR).
• Order Start—Enter the date and time that the order is to begin. The start
time is normally the date and time of the first scheduled dose for
scheduled medications, or the current time for PRN and statim (STAT)
medications. Highlight the value to change (month, day, or hour) and type
a new value. Optionally, you can use the up or down arrows to increase or
decrease the value, respectively.
• Order Stop—Enter the date and time that the order is to end.
For PRN orders, the stop time is often an automatic stop time based to
facility policy . For scheduled medicatio n orders, the stop time is normally
the date and time of the last scheduled dose as defined by the automatic
stop-time policy of the facility. If a specific duration is ordered for IV
drips, reflect this duration in the stop time. Highlight the value to change
(month, day, or hour) and type a new value. Optionally, you can use the
up or down arrows to increase or decrease the value, respectively.
Scheduled—Administer as scheduled.
PRN—Administer as needed.
STAT—An immediate order.
Allow Equivalency—If the order is temporarily on hold, clear this
box.
Hold Order—If the order is temporarily on hold, select this check
box. The order can still be viewed at the station but cannot be
removed. Clear this option to resume a hold order.
Give ONCE—If the order is administered to the patient only once,
not at regular intervals (for example, STAT, Now, Pre-Op, On Call),
select this check box.
• Interval Dosing—Another method to activate the Remove by Time
option is to use interval dosing. When enabled, the station can predict the
future dosing times for the medication.
• Scheduled Times—If applicable, you can click
Add to enter specific
dosing times for this order. Dosing times allow the use of the Remove by
Time feature at the station. To delete a dosing time, highlight it and click
Del.
• Give only on—If the order is given only on certain days of the week,
select the boxes for the appropriate days. This option is for documentati on
purposes only and the days you choose show up when the you click
Review Order on the Remove dialog box at the station. The order is
actually accessible on any day at the station.
• Every other day—Select this option for orders given on alternate days.
This option is for documentation purposes only and the days you choose
84 Pyxis MedStation 4000 System Console User Guide
Page 95

Patients
show up when the user clicks Review Order on the Remove dialog box at
the station. The order is actually accessible on any day at the station.
• Notes—Enter any other notes or comments related to this order.
• Dr. Name—Enter the name of the prescribing physician. This is
important for controlled-substance record keeping.
12. DEA Num.—Enter the Drug Enforcement Administration (DEA) number of
the prescribing physician.In the Med Info tab click
Add Med to select your
medication. The Add/Edit Patient Order - Select a Med dialog box appears.
13. Click
Generic Name or Brand Name. You can use the scroll bars to find your
medication or enter the name in the Search box.
14. Click the medication name.
15. Click
Select. The Add/Edit Med Dose in Order dialog box appears.
16. In the Add/Edit Med Dose in Order dialog box, enter the following
information:
• Ordered Qty—enter the prescribed quantity.
• Ordered Strength—enter the prescribed strength.
• Ordered Volume—enter the prescribed volume.
Pyxis MedStation 4000 System Console User Guide 85
Page 96

Chapter 3—Setting Up the System
17. Click OK. You are returned to the New Order Setup dialog box with the Med
Info tab populated by the information you provided.
18. Click
Save. You are returned to the New Patient Setup dialog box with the
Order Data tab populated by the information you provided.
19. Click the
Allergies tab.
20. In the Allergies box, enter any known allergies (the default messages indicates
that allergies are not known).
21. Click
22. In the confirmation message, click
Save.
OK.
Using the expanded allergies feature
The expanded allergies feature allows the console to display full patient allergy
information from your facility information system. It also can be manually
entered within the Pyxis MedStation system network. This feature also displays
multiple reactions and severities associated with a given allergy.
If multiple allergies with multiple fields are entered, the console sends a message
to the station. The message alerts your facility’s personnel to check the patient’s
chart.
NOTE
Once the expanded allergies feature is enabled, it must stay enabled or the
system will not synchronize.
1. T o manually enter information in the expanded allergies section, go to
> Patients.
Setup
2. In the Patients dialog box, you can access the expanded allergies tab when
adding a patient or editing a patient. Click
Add to add a patient.
or
System
Highlight a patient’s name and click
86 Pyxis MedStation 4000 System Console User Guide
Edit.
Page 97

Patients
3. In the V iew/ Modify dialog bo x or the New Patient Setup d ialog box , click the
Allergies tab.
4. Do one of the following:
• Click
• Highlight an allergy in the Allergies list box and click
Add to add new allergy information.
Edit to update
information for that allergy.
5. Enter information in the Add/Edit Patient Allergies dialog box.
• Description—must be filled in.
• Severity—select a blank entry, SV, MO, and MI from the drop-down list.
• Reaction—enter a description of the patient’s reaction to the allergen.
• Type—must be filled in. Select a blank entry, DA, FA, MA, and MC from
the drop-down list.
Pyxis MedStation 4000 System Console User Guide 87
Page 98

Chapter 3—Setting Up the System
• Code—must be filled in when added at the console through this dialog
box. There are times when the Code field will be blank due to entries
created when this feature is turned off or due to interface requirements.
6. Click
OK to save the information.
Multiple severities and reactions for one allergy
This feature allows you to display multiple severities and multiple reactions for a
single allergy.
When multiple severities exist for a single allergy , they are list ed in multiple rows,
each containing the same description, type, and code. When multiple reactions
exist for a single allergy, they are also listed in multiple rows containing the same
description, type, and code.
This information comes from your facility’s interface and requires NGPP v1.4 or
higher.
Using the enhanced pre-admit hold order
This feature allows Pyxis MedStation system transactions for patients who are in
the facility’s HIS system before they arrive at the unit.
1. Select
2. Select Device Name.
3. Select
4. Select the
5. Enter the desired hold time in the Pre-Admit Lead Time field.
6. Click
88 Pyxis MedStation 4000 System Console User Guide
System Setup > Devices.
Edit.
Settings tab.
Save.
Page 99

Editing a patient file
The following procedure explains how to edit a patient’s record.
Patients
1. Select
2. In the Patients dialog box, select the applicable patient and click
System Setup > Patients.
Edit.
3. In the View/Modify Patient dialog box, update the applicable information.
For information regarding the various tabs and fields, see Adding a patient file
on page 80.
4. Click
Save.
Discharging a patient
The following procedure explains how to discharge a patient.
1. Select
2. In the Patients dialog box, select the applicable patient and click
3. In the confirmation message, click
System Setup > Patients.
Discharge.
YES to continue.
Filtering the list of patients
Filtering provides a way to display only a subset of patients if you have many
patients.
1. Select
System Setup > Patients.
2. In the Patients dialog box, click
List by.
Pyxis MedStation 4000 System Console User Guide 89
Page 100

Chapter 3—Setting Up the System
3. In the Patients – Display Patients Who Meet the Following Criteria dialog
box, select the criteria by which you want to filter which patients appear.
The dialog box automatically refreshes to display the applicable patients as
you continue to select criteria.
4. To return to the complete list of patients, click
Patient List.
Patient billing reconciliation
This feature allows customers to associate temporary patient data with permanent
patient data. The feature:
• Requires users to have “System Administrator” privileges to associate
temporary and permanent patient records.
• Retains billing transactions for temporary patients for a configurable period of
time.
• Associates records of one or more temporary patients with a permanent
patient.
In addition, the console also provides a means of producing a report that contains
records of the financial transactions associated with patients whose records were
merged. See Reconciled Patients Charges and Credits on page 172.
90 Pyxis MedStation 4000 System Console User Guide
 Loading...