

Page 1

1
MicroLoop
Operating Manual –
English
Operating Manual –
CareFusion USA
Manuel d’utilisation -
Français
Betriebshandbuch -
Deutsch
Manual de funcionamiento –
Español
Manual de Operação -
Português
Gebruiksaanwijzing –
Nederlands
Bruksanvisning –
Svenska
Manuale operativo –
Italiano
Instrukcja obsługi –
Polska
Руководство пользователя -
Русский
Page 2

Page 3

1
Contents
I. Introduction – English........................................................ 6
Overview.......................................................................... 9
Getting started ................................................................10
Calibration Check .............................................................15
Customisation..................................................................17
Administration Mode.........................................................18
Printing...........................................................................19
PC connection using SPCS .................................................19
Cleaning the Transducer....................................................21
Servicing.........................................................................22
Consumables/ supporting products.....................................23
Specification of the MicroLoop............................................24
II. Introduction – CareFusion USA ..........................................28
Overview.........................................................................31
Getting started ................................................................32
Calibration Check .............................................................37
Customisation..................................................................39
Administration Mode.........................................................40
Printing...........................................................................41
PC connection using SPCS .................................................41
Cleaning the Transducer....................................................43
Servicing.........................................................................44
Consumables/ supporting products.....................................45
Specification of the MicroLoop............................................46
III. Introduction – Français .....................................................49
Vue d’ensemble ...............................................................52
Démarrage......................................................................53
Vérification d’étalonnage ...................................................58
Personnalisation...............................................................60
Page 4

2
Mode d’Administration ......................................................61
Impression externe ..........................................................62
Connexion au PC utilisant SPCS..........................................62
Nettoyage du capteur .......................................................64
Consommables ................................................................66
Spécifications du MicroLoop...............................................67
IV. Einführung – Deutsch .......................................................70
Überblick.........................................................................74
Startanleitung..................................................................75
Kalibrationsprüfung ..........................................................80
Individuelle Kon figuration.................................................82
Verwaltungsmodus ...........................................................83
Externes Drucken.............................................................84
Anschluss an einen PC mit SPCS Software ...........................85
Reinigen der Turbine ........................................................86
Wartung..........................................................................87
Verbrauchsmaterial/Zubehör .............................................88
Spezifikationen des MicroLoop ...........................................90
V. Introducción – Espanol......................................................93
General...........................................................................96
Instrucciones de Uso ........................................................97
Verificar la Calibración ....................................................102
Personalización ..............................................................104
Modo Administración ......................................................105
Impresión de resultados..................................................106
Conección a PC utilizando SPCS .......................................107
Limpieza del Transductor ................................................108
Servicio ........................................................................109
Desechables / Productos de Soporte .................................111
Especificaciones del MicroLoop .........................................112
Page 5

3
VI. Introdução – Português...................................................115
Visão Geral....................................................................118
Iniciando a operação ......................................................119
Verificação da Calibragem ...............................................124
Personalização ...............................................................126
Modo de administração ...................................................127
Impressão.....................................................................128
Conexão ao PC utilizando o SPCS......................................128
Limpeza do transdutor ....................................................130
Assistência técnica .........................................................131
Consumíveis / Produtos de apoio......................................132
Especificações do MicroLoop ............................................133
VII. Inleiding– Nederlands .....................................................136
Overzicht ......................................................................139
Starten .........................................................................140
Kalibratiecontrole ...........................................................145
Aanpassen aan de wensen van de klant ............................147
Administratie-modus ......................................................148
Extern printen................................................................149
PC-aansluiting met behulp van SPCS ................................150
Reinigen van de transducer .............................................151
Service .........................................................................152
Verbruiksartikelen / accessoires .......................................154
Specificatie van de MicroLoop ..........................................155
VIII.Inledning - Svenska........................................................158
Översikt........................................................................161
Komma igång ................................................................162
Kalibreringskontroll ........................................................167
Anpassning....................................................................168
Administreringsläge........................................................169
Extern utskrift................................................................171
Page 6

4
Inkoppling till PC med SPCS ............................................171
Rengöra flodesmatare.....................................................173
Underhåll ......................................................................174
Produkter / Tillbehör.......................................................175
Specifikation av MicroLoop ..............................................176
IX. Introduzione - Italiano ....................................................179
Presentazione ................................................................182
Avvio............................................................................183
Verifica calibrazione........................................................188
Configurazione...............................................................190
Modalità amministratore .................................................191
Stampa esterna .............................................................192
Connessione a PC con SPCS.............................................192
Pulizia trasduttore ..........................................................194
Assistenza tecnica ..........................................................195
Consumabili / Prodotti di supporto....................................196
Specifiche .....................................................................197
X. Wstęp – Polska ..............................................................200
Ogólny opis ...................................................................203
Rozpoczęcie pracy ..........................................................204
Kontrola Kalibracyjna......................................................209
Konfiguracja ..................................................................211
Tryb administracyjny ......................................................212
Podłączenie zewnętrznej drukarki.....................................213
Współpraca z komputerem Program SPCS .........................213
Mycie i dezynfekcja przetwornika .....................................214
Serwis ..........................................................................215
Materiały zuŜywalne .......................................................216
Parametry techniczne .....................................................217
Page 7

5
XI. Введение - Русский .......................................................220
Обзор...........................................................................223
Начало работы..............................................................224
Калибровка ..................................................................229
Установки пользователя ................................................231
Административный режим..............................................232
Печать через внешний принтер......................................233
Подключение к ПК при помощи SPCS..............................233
Очистка датчика............................................................235
Сервис..........................................................................236
Расходный материал / Дополнительные
принадлежности ...........................................................237
Спецификация..............................................................238
Customer Contact Information .........................................241
Page 8

Page 9

6
MicroLoop
Operating manual
I. Introduction - English
The MicroLoop is a mains/battery operated portable spirometer with
the unique combination of ease of use and sophistication. Ease of
use is assured through the use of context sensitive help screens,
accessed at a touch of a button, that explain every MicroLoop
feature. The MicroLoop is supplied with a cradle that may be
connected with the USB cables supplied, to either a PC or a printer.
The cradle also connects to the mains adapter so that the
MicroLoop’s batteries may be charged whilst it is placed in the
cradle. The blue lights on the cradle indicate that it is being
powered either by a PC connection or by the mains adapter. When
either of these sources of power is connected to the cradle, it is
ready to charge your MicroLoop.
Page 10

7
The MicroLoop uses the CareFusion Digital Volume Transducer, an
extremely stable form of volume transducer, which measures
expired air directly at B.T.P.S (Body Temperature and Pressure with
Saturated water vapour) thus avoiding the inaccuracies of
temperature corrections. The transducer is insensitive to the effects
of condensation and temperature and avoids the need for individual
calibration prior to performing a test.
Test results may be uploaded to a PC using Spirometry PC Software
and patient details may be downloaded to the MicroLoop.
Page 11
8
When the unit is turned on for the first
time the system customise menu is
displayed. Touch the name of the
required region with the stylus stored on
the left hand side of the unit and then
touch ‘Finish’. This will set the regional
defaults including language, if available.
If this screen is not displayed then touch
the ‘Customise’ icon on the main menu
followed by the ‘System’ icon.
Page 12
9
Overview
The MicroLoop uses a touch screen with
icons representing each function
available. A stylus, housed in the left
hand side of the unit, is provided for icon
screen activation and an optional mouse
is available.
Touch the displayed time to adjust time
and date.
Unused icons may be disabled by
touching the blue background and
selecting from the list displayed.
Touch the toolbox icon to adjust volume
and brightness.
Four levels of battery charge are
indicated by the segmented battery icon.
When this icon turns red the battery is
nearly exhausted and the batteries must
be charged – see Charging Procedure.
The complete functionality is described on
the help screen.
This is obtained by pressing the help
button (?).
Help text exists for every screen viewed
during the operation of the MicroLoop.
You are recommended to make full use of
the extensive Help screens provided.
Page 13
10
Getting Started
When performing a spirometry test the
recommended workflow is to enter the
patient’s details, or retrieve them from
memory, perform the required test and
then print and save the results.
Please ensure that the turbine transducer
is plugged in to either of the first two
sockets on the right hand side of the
instrument.
Page 14
11
Touch the ‘Patients’ icon to enter the
patient database. The required patient
may be selected from the stored patient
list. If the patient details have not been
previously stored then touch Add to enter
the new patient’s details. The patient
details may also be downloaded from the
optional SPCS software.
Once selected, the patient’s name will
appear at the bottom of the screen.
Use the help button to obtain further
information.
To add a patient to the database use the
on screen keyboard to type a unique
patient ID and then touch the enter key.
You will then be prompted for Last Name,
First Name, Sex, Ethnic Origin, Height,
Weight, date of Birth and Factor. A factor
can be applied when testing individuals of
other ethnic origins who would not
normally be tested against the countries
set of predicted values eg ECCS predicted
values are used but Non Caucasian
individuals tested. The factor alters the
predicted value set on volume indices by
the percentage applied.
Page 15

12
The following factors are recommended when using ECCS normal
values:
Hong Kong Chinese 100%
Japanese American 89%
Polynesians 90%
North Indians and Pakistanis 90%
South Indians and those of African descent 87%
Ref: Lung Volumes and Forced Ventilatory Flows. P.H.Quanjer et al.
Eur Respir J, 1993, 6, Suppl. 16p5-40
Once all the patient details are added the
patient is added to the database and the
main menu is displayed with the patient
name displayed at the bottom of the
screen. From the main menu select the
required test, by touching the icon with
the stylus. If the displayed patient is not
required for testing then touch the
patients name and options to change or
remove the current patient will become
available
Page 16

13
If Relaxed Spirometry is selected then a
volume/time graph will be displayed.
Note that the unit may be customised to
perform a relaxed Vital Capacity with tidal
breathing or from a single expiration or
single inspiration.
When a manoeuvre has been obtained
touch ‘Results’ to view the indices, ‘Again’
to repeat the manoeuvre, ‘Reject’ to
delete the manoeuvre or ‘Done’ to end
the test.
All the active indices are displayed for
any of the manoeuvres selected together
with an option to review the volume/ time
curves. The active indices listed can be
changed by using the customisation
option.
Select ‘Done’ to proceed to the
Spirometry Main Menu.
Page 17
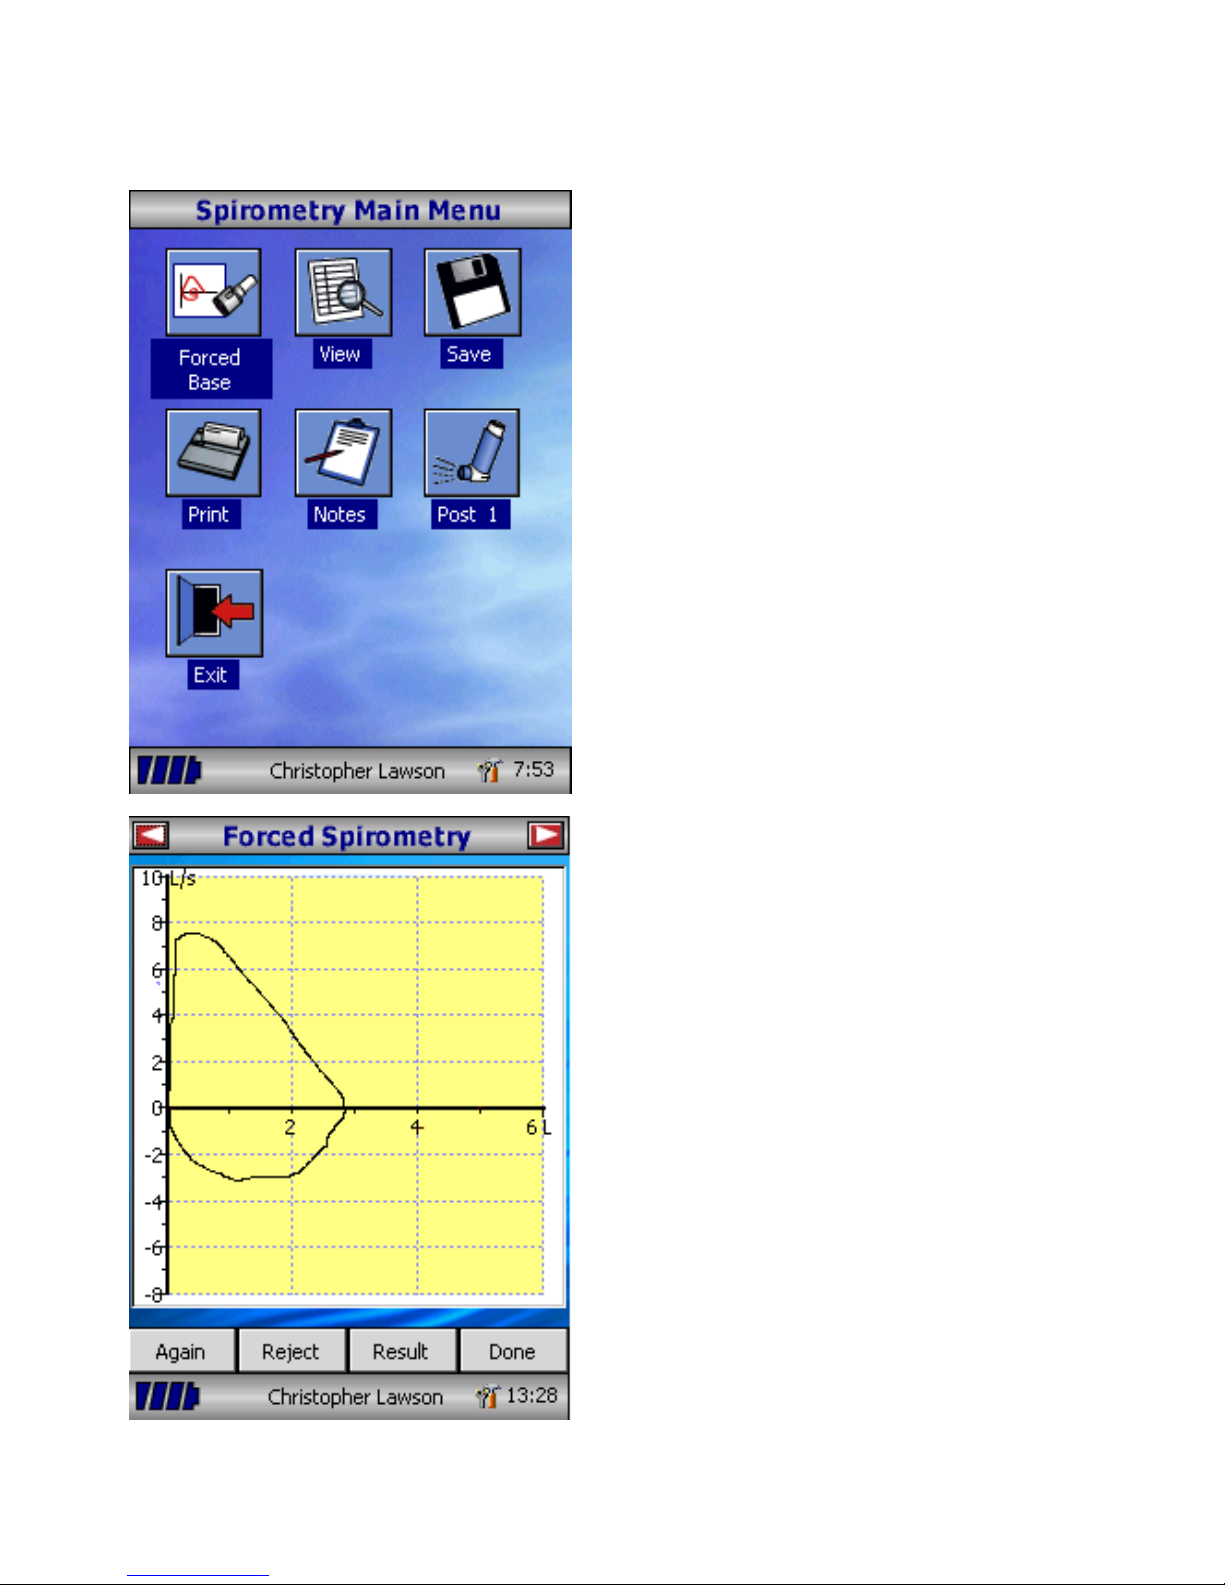
14
From this menu the results of the test
may be viewed, saved, or printed and
notes may be added.
It is also possible to proceed to a forced
baseline spirometry test, or a post
medication relaxed spirometry test.
Select ‘Exit’ when all the required
functions have been used.
If forced spirometry is selected the
default graph will be displayed. This may
be changed by touching the arrows at the
top of the screen. Flow/Volume,
Volume/time or child incentive default
displays may be selected using the
customise option from the main menu.
When the spirometry manoeuvre has
been completed options to repeat the
test, reject the test, and view results will
be available.
At the end of the test options to view
results, save results, print results, and to
add notes will be available from the
spirometry main menu.
Page 18
15
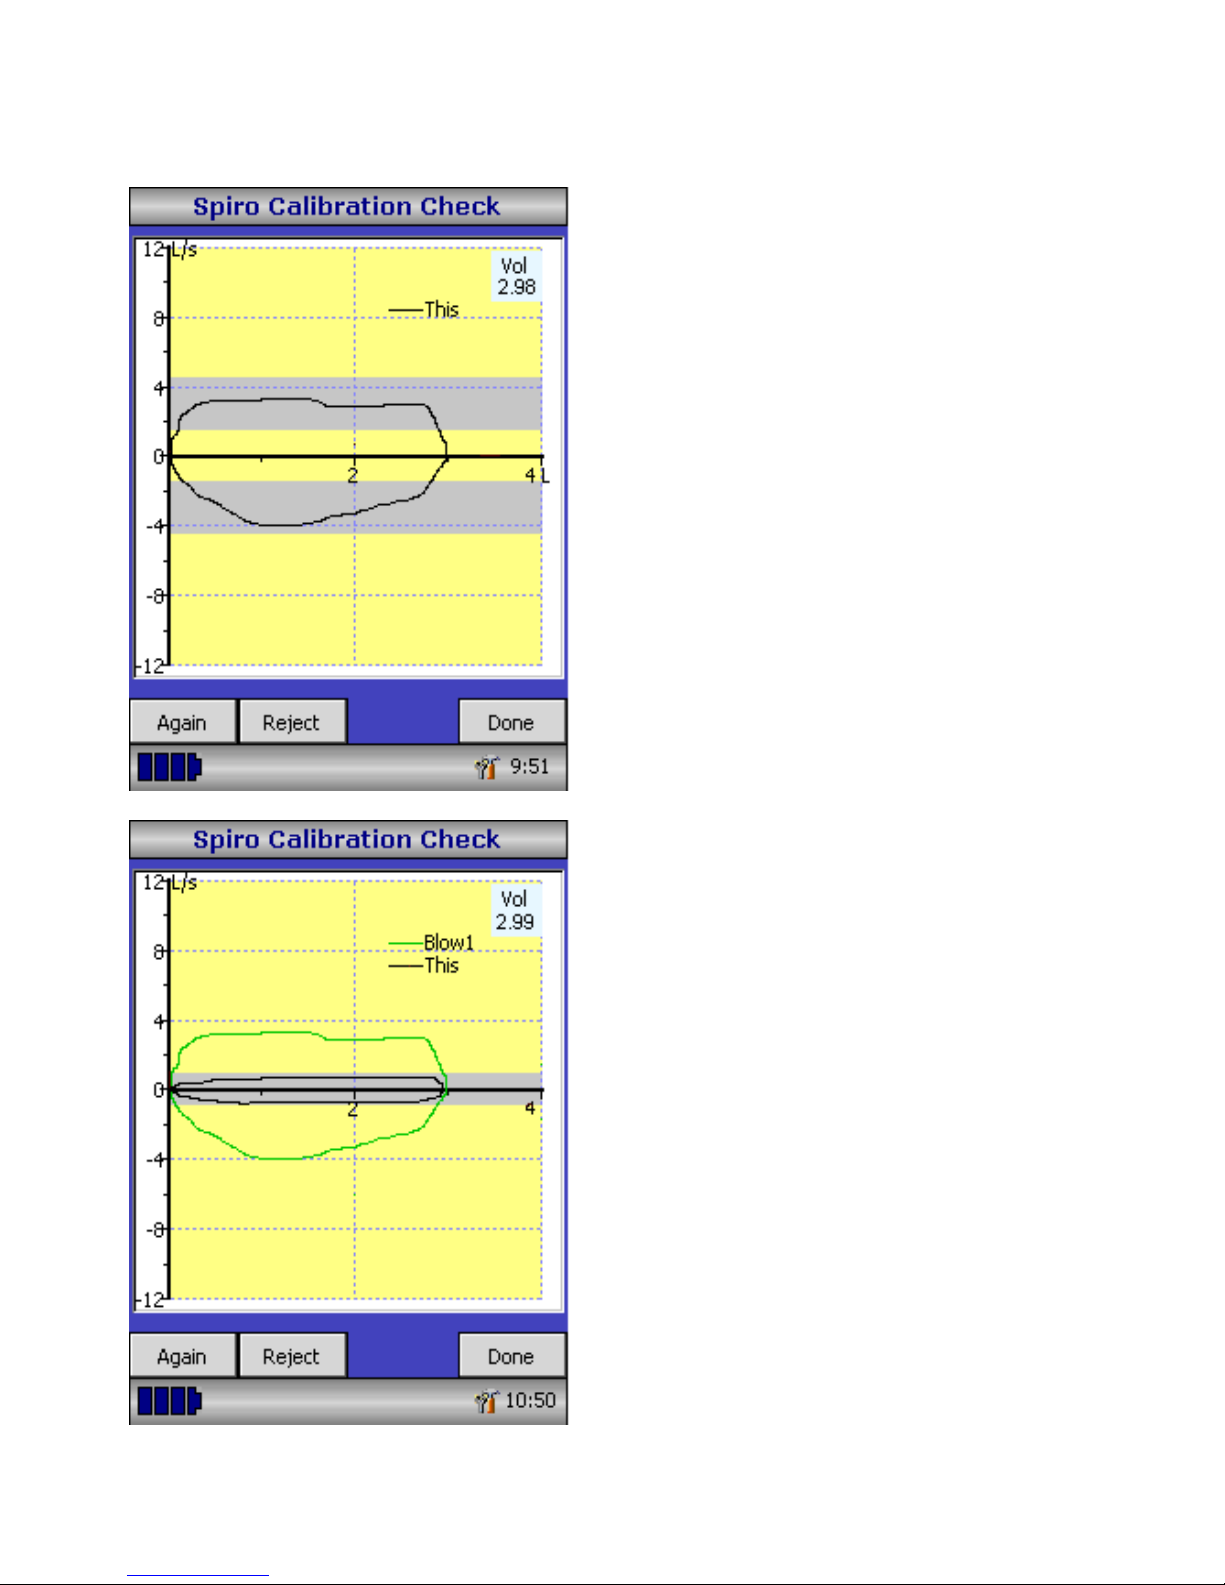
Calibration Check
Connect a 3 litre syringe to the
transducer with the adapter supplied and
empty by pushing the handle fully in.
Select ‘Calibration Check’ from the main
menu and then select ‘check Calibration’.
Fill the syringe by pulling the handle at a
constant rate until the end stop is
reached and then immediately empty the
syringe completely. Try to maintain a
flow rate that keeps the trace within the
grey bands on the display.
Press ‘Reject’ to retry the calibration
check at the required flow rate.
Press ‘Again’ to repeat the calibration
check at a low flow rate.
Press ‘Again’ to repeat the calibration
check at a high flow rate.
When a calibration check at all three flow
rates has been completed press ‘Done’ to
view the calibration check report screen.
Page 19

16
The calibration error for expiration and
inspiration at each flow rate are
displayed. The calibration error should
be less that 3%. If a greater error is
shown, repeat the procedure ensuring
that the syringe is emptied and filled in a
smooth manner without jerking the
handle. If an error greater than 3% is
still shown, inspect the turbine
transducer and clean if necessary.
Page 20

17
Customisation
The ‘Customise’ option from the main menu may be used to
configure many of the features of your MicroLoop and are divided
into system and spirometry options.
System options allow you to configure the following:
Language.
Height and weight units.
Date format.
Date separator.
Colour or monochrome printing (on external printer).
Personalised printout heading.
Spirometry options allow you to configure the following:
Relaxed spirometry mode (with or without tidal breathing).
Predicted value sets.
Predicted area or line display.
Display default.
Incentive display type.
Printed graphs.
Best test criteria
Interpretation and Lung Age indication.
Dyspnoea score and smoking status.
Daily calibration reminder.
Manual temperature adjustment.
Indices selection.
Note that when the language is selected, the height and weight
units, date format, and date separator will be automatically
changed. However this automatic selection may be overridden
manually.
Page 21
18
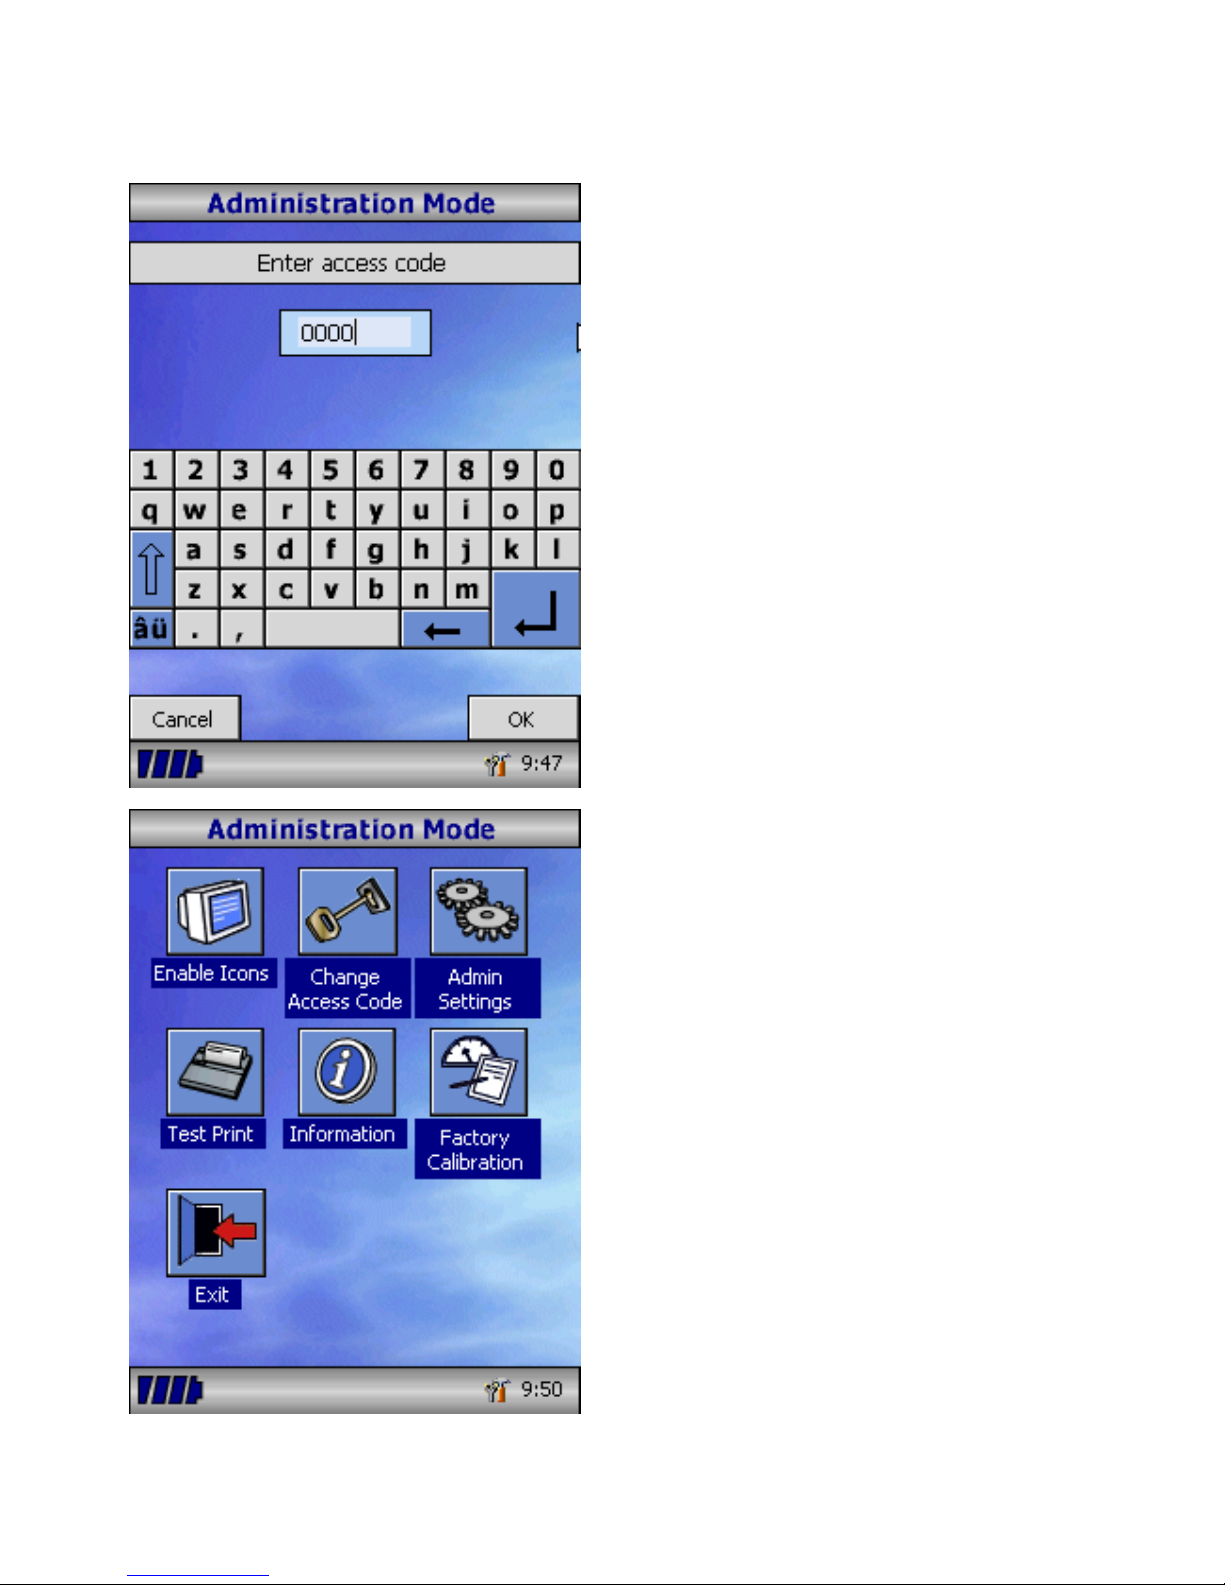
Administration Mode
Administration mode allows the
administrator to restrict the availability
of functions to the user by disabling
icons on the main menu. For example,
after the unit has been configured to
the administrator’s requirements,
disabling of the ‘Customise’ icon will
prevent any further adjustment by the
user. Similarly, disabling of the
‘Database Management’ icon will
prevent the user from deleting any
patient details or test results.
To enter administration mode turn the
unit on whilst holding down the help
key. The default access code is 0000.
Type this number in using the on-screen
keyboard. A number of functions are
now available.
Touch the ‘Change Access Code’ icon in
order to enter your personal access
code and thereby restrict the use of
administration to authorised personnel.
Press the help button to obtain a full
description of the functions.
Page 22

19
Printing
Using the cables provided connect the mini USB A/B socket on the
back of MicroLoop cradle to the input socket on the printer. For a list
of compatible printers refer to the web site or contact your local
dealer
It is recommended that during printing the batteries are placed on
charge with the cradle connected to the mains adapter.
NOTE: Keep the printer out of reach of the patient at all times.
Charging Procedure
The MicroLoop’s internal batteries are discharged when shipped from
the factory and should be fully charged on first use. Plug the AC
adapter into the mains supply and plug the adapter output plug into
the power input socket on the cradle. The orange charging light on
top of the unit will flash to indicate charging and will turn on
constantly to indicate full charge. The blue lights on the cradle will
also be illuminated.
The batteries will take approximately 4 hours to become fully
charged.
Note: Use only the AC adapter supplied. Use of any other type may
cause permanent damage to the MicroLoop and cause a fire or
electrical hazard. Do not plug in and remove the power lead from
the AC adapter repeatedly.
PC connection using SPCS
SPCS is an easy to use PC based windows application that interfaces
to the MicroLoop via a USB or serial port. It incorporates a database
into which patient details can be entered and downloaded to the
MicroLoop or test results may be uploaded from the MicroLoop to
the PC.
Page 23

20
Using SPCS and the MicroLoop, live blows can be performed with the
PC directly controlling the operation of the MicroLoop.
The results and graphs produced are displayed directly on the PC
screen.
The spirometer is connected from the serial or USB port on the PC,
to the USB port on the cradle using the USB cable provided with
SPCS.
Note: The MicroLoop should only be connected to a computer that is
manufactured in accordance with EN60950 1992/1993 – ‘Safety of
Information Technology Equipment including Electrical Business
Equipment’.
Keep the PC out of reach of the patient at all times.
It is recommended that whilst the unit is connected to a computer
the MicroLoop remains in the cradle.
Looking after your Spirometer
Please observe the following precautions:
• Do not touch the screen with fingers. Use only the stylus
provided.
• Use only a damp, lint free, cloth to clean the screen.
• Do not keep the spirometer in a damp place or expose it to
extremes of temperature.
• Do not direct the transducer holder towards a strong light
source whilst operating the spirometer.
• Check the AC charger for compatibility with local power rating.
Page 24

21
Cleaning the Transducer
The transducer requires no routine maintenance or servicing.
However, if you wish to disinfect or clean the transducer it may be
removed by means of the following procedure:
1. Rotating the turbine transducer anti-clockwise until the locating
pip lines up with the small rectangular cut-out in the housing as
shown below.
2. Gently pull the transducer away from the housing.
3. The transducer may now be immersed in warm soapy water for
routine cleaning or immersed in cold disinfecting solutions e.g.
Perasafe for a maximum of 10 minutes (Alcohol and chloride
solutions should be avoided). After cleaning/disinfecting, the
transducer should be rinsed briefly in distilled water and dried.
Perasafe is available from CareFusion in convenient 81g
containers, Cat No. 36-SSC5000A.
4. Re-assemble the mouthpiece holder.
Turbi
ne
transducer
Housing
Cut-out
Locating pip
Page 25

22
Servicing
There is no routine maintenance required for the MicroLoop and
there are no user serviceable parts in this instrument. Please return
the unit to CareFusion or an authorised agent if servicing is required.
Troubleshooting
In the unlikely event that the display ‘freezes’ and the unit does not
respond to any key presses, hold the on/off button down for 10
seconds until the unit switches off and then turn on again.
Symbols
Type B device
0086
In accordance with Directive 93/42/EEC
Disposal in compliance with WEEE
Environment
This instrument complies with directive EN60601-1-2
electromagnetic compatibility but can be affected by cellular phones
and by electromagnetic interference exceeding levels specified in
EN 50082-1:1992
This instrument is not for use with flammable anaesthetic gases or in
an oxygen enriched atmosphere
Electrical classification
Class I equipment.
Page 26

23
Consumables/supporting products
Cat. No. Description
36-PSA1000 Adult Disposable Mouthpieces (500 per box)
36-SST1000 One-way Safety Mouthpieces (500 per box)
36-SST1250 One-way Safety Mouthpieces (250 per box)
36-PSA1200 Paediatric Disposable Mouthpieces (250 per box)
36-PSA1100 Paediatric Adaptor
36-MGF1025 MicroGard Pulmonary Filters (25 per box)
36-MGF1100 MicroGard Pulmonary Filters (100 per box)
36-SSC5000A PeraSafe Sterilising Powder 81g
(to make up 5 litres of solution)
36-VOL2104 Nose Clips (pack of 5)
36-SM2125 3 Litre Calibration Syringe
36-SPC1000 Spirometry PC Software
Caution
• Pulmonary filters are single patient use. If used on more than one
patient there is a risk of cross-infection. Repeat use may increase
air resistance and lead to an incorrect measurement.”
• Mouthpieces are single patient use. If used on more than one
patient there is a risk of cross-infection. Repeat use may degrade
materials and lead to an incorrect measurement.”
Page 27

24
Training
CareFusion run spirometry training courses throughout the UK,
sessions include:
• Anatomy and Physiology of Respiratory System
• Lung Volume Terminology
• Objectives of Spirometry
• Setting up the test & performing a good manoeuvre
• Errors of technique
• Interpretation of results
• Using Spirometry as an aid to diagnosing airways disease
• Choosing a Spirometer
• Case Studies
Specification of the MicroLoop
General:
Storage: >2000 tests including Flow/Volume
loops and Volume/Time curves
Printer Output: Compatible Hewlett Packard USB
printers (Specified models only).
Display: Colour 1/4VGA LCD.
Power supply: Input 100 to 240V, 50 to 60Hz.
Output 5V 2.0A (Class 1)
Battery Pack: Rechargeable Lithium Polymer 3.7V
1600mA-hours.
Dimensions: 120x80x20 mm.
Transducer 50x60x90mm.
Weight: 630g.
Operating Temperature: 0 to +40 °C
Operating Humidity: 30% to 90% RH
Transport and Storage
Temperature:
-20 to + 70 °C
Transport and Storage
Humidity:
10% to 90% RH
Page 28

25
Spirometry Measurements:
Relaxed Expiratory Vital Capacity (VC)
Forced Expired Volume in 0.75 seconds (FEV.75)
Forced Expired Volume in 1 second (FEV1)
Forced Expired Volume in 3 second (FEV3)
Forced Expired Volume in 6 seconds (FEV6)
Forced Vital Capacity (FVC)
Peak Expiratory Flow Rate (PEF)
FEV
0.75
as a percentage of VC (FEV.75/VC)
FEV
0.75
as a percentage of FVC (FEV.75/FVC)
FEV
1
as a percentage of VC (FEV1/VC)
FEV
1
as a percentage of FVC (FEV1/FVC)
FEV
3
as a percentage of VC (FEV3/VC)
FEV
3
as a percentage of FVC (FEV3/FVC)
FEV
0.75
as a percentage of FEV6 (FEV.75/FEV6)
FEV
1
as a percentage of FEV6 (FEV1/FEV6)
Maximum Expired Flow at 75% of FVC remaining (MEF75)
Maximum Expired Flow at 50% of FVC remaining (MEF50)
Maximum Expired Flow at 25% of FVC remaining (MEF25)
Mean Mid-Expiratory Flow Rate (MMEF)
Forced expiratory flow at 50% of volume as a percentage of VC
(FEF50/VC)
Forced expiratory flow at 50% of volume as a percentage of FVC
(FEF50/FVC)
Maximal voluntary ventilation indicated (MVV
(ind)
)
Forced inspired volume in 1 second (FIV1)
Forced inspiratory Vital Capacity (FIVC)
Peak Inspiratory Flow Rate (PIF)
FIV
1
as a percentage of FIVC (FIV1/FIVC)
Forced inspiratory flow at 25% of inhaled volume (FIF25)
Forced inspiratory flow at 50% of inhaled volume (FIF50)
Forced inspiratory flow at 75% of inhaled volume (FIF75)
Page 29

26
Forced expiratory flow at 50% of volume as a percentage of FIF50
(FEF50/FIF50)
The time taken between 25% and 75% of the forced expired volume
(MET2575)
Forced Expiratory Time (FET)
Tidal Volume (TV)
Expiratory reserve volume (ERV)
Inspiratory reserve volume (IRV)
Inspiratory capacity (IC)
Expiratory Relaxed vital capapcity (EVC)
Inspiratory vital capacity (IVC)
Breathing frequency rate (FR)
Inspiratory time (Ti)
E
xpiratory time (Te)
Ti as a % of total breath time (Ti/Ttot)
Tidal volume as a % of Ti (TV/Ti)
Tests per subject: 5 VC manoeuvre
8 FVC manoeuvres
Predicted Values: Various – depends upon national
preference
Transducer: CareFusion Bi-Directional Digital Volume.
Resolution: 10ml volume 0.03l/s flow
Accuracy: +/-3%. To ATS recommendations –
Standardisation of spirometry 1994
update for flows and volumes.
Page 30

Page 31

27
MicroLoop
Operating manual
Federal (USA) law restricts this device to sale by or on the order of a
physician or licensed practitioner.
CareFusion,
22745 Savi Ranch Parkway,
Yorba Linda
CA 92887-4668
USA
Page 32

28
II. Introduction – CareFusion USA
The MicroLoop is mains/battery operated portable spirometer with
the unique combination of ease of use and sophistication. Ease of
use is assured through the use of context sensitive help screens,
accessed at a touch of a button, that explain every MicroLoop
feature. The MicroLoop is supplied with a cradle that may be
connected with the USB cables supplied, to either a PC or a printer.
The cradle also connects to the mains adapter so that the
MicroLoop’s batteries may be charged whilst it is placed in the
cradle. The blue lights on the cradle indicate that it is being
powered either by a PC connection or by the mains adapter. When
either of these sources of power is connected to the cradle, it is
ready to charge your MicroLoop.
The MicroLoop utilizes a single patient use disposable mouthpiece
that must be disposed of after use.
The MicroLoop provides a suggested interpretation that must be
supported by clinical judgement.
Page 33

29
The MicroLoop uses a Digital Volume Transducer, an extremely
stable form of volume transducer, which measures expired air
directly at B.T.P.S (Body Temperature and Pressure with Saturated
water vapour) thus avoiding the inaccuracies of temperature
corrections. The transducer is insensitive to the effects of
condensation and temperature and avoids the need for individual
calibration prior to performing a test.
Test results may be uploaded to a PC using the optional Spirometry
PC Software
and patient details may be downloaded to the
MicroLoop.
Page 34

30
When the unit is turned on for the first
time the system customise menu is
displayed. Touch the name of the
required region with the stylus stored on
the left hand side of the unit and then
touch ‘Finish’. This will set the regional
defaults including language, if available.
If this screen is not displayed then touch
the ‘Customise’ icon on the main menu
followed by the ‘System’ icon.
Page 35

31
Overview
The MicroLoop uses a touch screen with
icons representing each function
available. A stylus, housed in the left
hand side of the unit, is provided for icon
screen activation and an optional mouse
is available.
Touch the displayed time to adjust time
and date.
Unused icons may be disabled by
touching the blue background and
selecting from the list displayed.
Touch the toolbox icon to adjust volume
and brightness.
Four levels of battery charge are
indicated by the segmented battery icon.
When this icon turns red the battery is
nearly exhausted and the batteries must
be charged – see Charging Procedure.
The complete functionality is described on
the help screen.
This is obtained by pressing the help
button (?).
Help text exists for every screen viewed
during the operation of the MicroLoop.
You are recommended to make full use of
the extensive Help screens provided.
Page 36

32
Getting Started
When performing a spirometry test the
recommended workflow is to enter the
patient’s details, or retrieve them from
memory, perform the required test and
then print and save the results.
Please ensure that the turbine transducer
is plugged in to either of the two sockets
on the top of the instrument.
Page 37

33
Touch the ‘Patients’ icon to enter the
patient database. The required patient is
selected from the stored patient list. If
the patient details have not been
previously stored then touch Add to enter
the new details. The patient details may
also be downloaded from the optional
SPCS software.
Once selected patient’s name will appear
at the bottom of the screen.
Use the help button to obtain further
information.
To add a patient to the database use the
on screen keyboard to type a unique
patient ID and then touch the enter key.
You will then be prompted for Last Name,
First Name, Sex, Ethnic Origin, Height,
Weight, date of Birth and Factor. A factor
can be applied when testing individuals of
other ethnic origins who would not
normally be tested against the countries
set of predicted values e.g. ECCS
predicted values are used but Non
Caucasian individuals tested. The factor
alters the predicted value set on volume
indices by the percentage applied. If
NHANES predicted values are selected,
then the ethnic origin field should be
chosen but a factor correction is not
required.
Page 38

34
Once all the patient details are added the
patient is added to the database and the
main menu is displayed with the patient
name displayed at the bottom of the
screen. From the main menu select the
required test, by touching the icon with
the stylus. If the displayed patient is not
required for testing then touch the
patients name and options to change or
remove the current patient will become
available.
Page 39

35
If Relaxed Spirometry is selected then a
volume/time graph will be displayed.
Note that the unit may be customised to
perform a relaxed Vital Capacity with tidal
breathing or from a single expiration or
single inspiration.
When a manoeuvre has been obtained
touch ‘Results’ to view the indices, ‘Again’
to repeat the manoeuvre, ‘Reject’ to
delete the manoeuvre or ‘Done’ to end
the test.
All the active indices are displayed for
any of the manoeuvres selected together
with an option to review the volume/ time
curves. The active indices listed can be
changed by using the customisation
option.
Select ‘Done’ to proceed to the
Spirometry Main Menu.
Page 40

36
From this menu the results of the test
may be viewed, saved, or printed and
notes may be added.
It is also possible to proceed to a forced
baseline spirometry test, or a post
medication relaxed spirometry test.
Select ‘Exit’ when all the required
functions have been used.
If forced spirometry is selected the
default graph will be displayed. This may
be changed by touching the arrows at the
top of the screen. Flow/Volume,
Volume/time or child incentive default
displays may be selected using the
customise option from the main menu.
When the spirometry manoeuvre has
been completed options to repeat the
test, reject the test, and view results will
be available.
At the end of the test options to view
results, save results, print results, and to
add notes will be available from the
spirometry main menu.
Page 41

37
Calibration Check
Connect a 3 litre syringe to the
transducer with the adapter supplied and
empty by pushing the handle fully in.
Select ‘Calibration Check’ from the main
menu and then select ‘check Calibration’.
Fill the syringe by pulling the handle at a
constant rate until the end stop is
reached and then immediately empty the
syringe completely. Try to maintain a
flow rate that keeps the trace within the
grey bands on the display.
Press ‘Reject’ to retry the calibration
check at the required flow rate.
Press ‘Again’ to repeat the calibration
check at a low flow rate.
Press ‘Again’ to repeat the calibration
check at a high flow rate.
When a calibration check at all three flow
rates has been completed press ‘Done’ to
view the calibration check report screen.
Page 42

38
The calibration error for expiration and
inspiration at each flow rate are
displayed. The calibration error should
be less that 3%. If a greater error is
shown, repeat the procedure ensuring
that the syringe is emptied and filled in
a smooth manner without jerking the
handle. If an error greater than 3% is
still shown, inspect the turbine
transducer and clean if necessary.
Page 43

39
Customisation
The ‘Customise’ option from the main menu may be used to
configure many of the features of your MicroLoop and are divided
into system and spirometry options.
System options allow you to configure the following:
Language.
Height and weight units.
Date format.
Date separator.
Colour or monochrome printing (on external printer).
Personalised printout heading.
Spirometry options allow you to configure the following:
Relaxed spirometry mode (with or without tidal breathing).
Predicted value sets.
Predicted area or line display.
Display default.
Incentive display type.
Printed graphs.
Best test criteria
Interpretation and Lung Age indication.
Dyspnoea score and smoking status.
Calibration reminder and manual temperature adjustment.
Indices selection.
Note that when the language is selected, the height and weight
units, date format, and date separator will be automatically
changed. However this automatic selection may be overridden
manually.
Page 44

40
Administration Mode
Administration mode allows the
administrator to restrict the availability of
functions to the user by disabling icons
on the main menu. For example, after
the unit has been configured to the
administrator’s requirements, disabling of
the ‘Customise’ icon will prevent any
further adjustment by the user.
Similarly, disabling of the ‘Database
Management’ icon will prevent the user
from deleting any patient details or test
results.
To enter administration mode turn the
unit on whilst holding down the help key.
The default access code is 0000. Type
this number in using the on-screen
keyboard. A number of functions are now
available.
Touch the ‘Change Access Code’ icon in
order to enter your personal access code
and thereby restrict the use of
administration to authorised personnel.
Press the help button to obtain a full
description of the functions.
Page 45

41
Printing
Using the cables provided connect the mini USB A/B socket on the
back of MicroLoop cradle to the input socket on the printer. For a
list of compatible printers refer to the web site
www.carefusion.com/micro or contact your local dealer
It is recommended that during printing the batteries are placed on
charge with the cradle connected to the mains adapter.
NOTE: Keep the printer out of reach of the patient at all times.
Charging Procedure
The MicroLoop’s internal batteries are discharged when shipped from
the factory and should be fully charged on first use. Plug the AC
adapter into the mains supply and plug the adapter output plug into
the power input socket on the cradle. The orange charging light on
top of the unit will flash to indicate charging and will turn on
constantly to indicate full charge. The blue lights on the cradle will
also be illuminated.
The batteries will take approximately 4 hours to become fully
charged.
Note: Use only the AC adapter supplied. Use of any other type may
cause permanent damage to the MicroLoop and cause a fire or
electrical hazard. Do not plug in and remove the power lead from
the AC adapter repeatedly.
PC connection using SPCS
SPCS is an easy to use PC based windows application that interfaces
to the MicroLoop via a USB or serial port. It incorporates a database
into which patient details can be entered and downloaded to the
MicroLoop or test results may be uploaded from the MicroLoop to
the PC.
Page 46

42
Using SPCS and the MicroLoop, live blows can be performed with the
PC directly controlling the operation of the MicroLoop.
The results and graphs produced are displayed directly on the PC
screen.
The spirometer is connected from the serial or USB port on the PC,
to the USB port on the cradle using the USB cable provided with
SPCS.
Note: The MicroLoop should only be connected to a computer that is
manufactured in accordance with EN60950 1992/1993 – ‘Safety of
Information Technology Equipment including Electrical Business
Equipment’.
Keep the PC out of reach of the patient at all times.
It is recommended that whilst the unit is connected to a computer the
MicroLoop remains in the cradle.
Looking after your Spirometer
Please observe the following precautions:
• Do not touch the screen with fingers. Use only the stylus
provided.
• Use only a damp, lint free, cloth to clean the screen.
• Do not keep the spirometer in a damp place or expose it to
extremes of temperature.
• Do not direct the transducer holder towards a strong light source
whilst operating the spirometer.
• Check the AC charger for compatibility with local power rating.
Page 47

43
Turbine
transducer
Cut-out
Locating pip
Cleaning the Transducer
The transducer requires no routine maintenance or servicing.
However, if you wish to sterilise or clean the transducer it may be
removed by means of the following procedure:
1. Rotating the turbine transducer anti-clockwise until the locating
pip lines up with the small rectangular cut-out in the housing as
shown below.
2. Gently pull the transducer away from the housing.
3. The transducer may now be immersed in warm soapy water for
routine cleaning or immersed in cold sterilising solutions e.g.
Perasafe for a maximum of 10 minutes (Alcohol and chloride
solutions should be avoided). After cleaning/sterilising, the
transducer should be rinsed briefly in distilled water and dried.
Perasafe is available from CareFusion in convenient 81g
containers.
4. Re-assemble the mouthpiece holder.
Housing
Page 48

44
Servicing
There is no routine maintenance required for the MicroLoop and
there are no user serviceable parts in this instrument. Please return
the unit to CareFusion or an authorised agent if servicing is required.
Troubleshooting
In the unlikely event that the display ‘freezes’ and the unit does not
respond to any key presses, hold the on/off button down for 10
seconds until the unit switches off and then turn on again.
Symbols
Type B device
Environment
This instrument complies with directive EN60601-1-2
electromagnetic compatibility but can be affected by cellular phones
and by electromagnetic interference exceeding levels specified in EN
50082-1:1992
This instrument is not for use with flammable anaesthetic gases or in
an oxygen enriched atmosphere
Electrical classification
Class I equipment.
Page 49

45
Consumables / Supporting Products
Description
Adult Disposable Mouthpieces (500 per box)
One-way Safety Mouthpieces (500 per box)
One-way Safety Mouthpieces (250 per box)
Paediatric Disposable Mouthpieces (250 per box)
Paediatric Adaptor
MicroGard Pulmonary filter
MicroGard Pulmonary filter
PeraSafe Sterilising Powder 81g
(to make up 5 litres of solution)
Nose Clips (pack of 5)
3 Litre Calibration Syringe
SPCS Software
For further information or to place an order for Disposables/
Supporting products please contact CareFusion, your local
distributor or view our website
For US Customer Care: Toll Free 1-800-231-2466, phone 1-714283-2228
Caution
• Pulmonary filters are single patient use. If used on more than one
patient there is a risk of cross-infection. Repeat use may increase
air resistance and lead to an incorrect measurement.”
• Mouthpieces are single patient use. If used on more than one
patient there is a risk of cross-infection. Repeat use may degrade
materials and lead to an incorrect measurement.”
Page 50

46
Specification of the MicroLoop
General:
Storage: >2000 tests including Flow/Volume
loops and Volume/Time curves
Printer Output: Compatible Hewlett Packard USB
printers (Specified models only).
Display: Colour 1/4VGA LCD.
Power supply: Input 100 to 240V, 50 to 60Hz.
Output 5V 2.0A (Class 1)
Battery Pack: Rechargeable Lithium Polymer 3.7V
1600mA-hours.
Dimensions: 120x80x20 mm.
Transducer 50x60x90mm.
Weight: 630g.
Operating Temperature: 0 to +40 °C
Operating Humidity: 30% to 90% RH
Transport and Storage
Temperature:
-20 to + 70 °C
Transport and Storage
Humidity:
10% to 90% RH
Spirometry Measurements:
Relaxed Expiratory Vital Capacity (VC)
Forced Expired Volume in 0.75 seconds (FEV.75)
Forced Expired Volume in 1 second (FEV1)
Forced Expired Volume in 3 second (FEV3)
Forced Expired Volume in 6 seconds (FEV6)
Forced Vital Capacity (FVC)
Peak Expiratory Flow Rate (PEF)
FEV
0.75
as a percentage of VC (FEV.75/VC)
FEV
0.75
as a percentage of FVC (FEV.75/FVC)
FEV1 as a percentage of VC (FEV1/VC)
FEV1 as a percentage of FVC (FEV1/FVC)
Page 51

47
FEV3 as a percentage of VC (FEV3/VC)
FEV
3
as a percentage of FVC (FEV3/FVC)
FEV
0.75
as a percentage of FEV6 (FEV.75/FEV6)
FEV
1
as a percentage of FEV6 (FEV1/FEV6)
Maximum Expired Flow at 75% of FVC remaining (MEF75)
Maximum Expired Flow at 50% of FVC remaining (MEF50)
Maximum Expired Flow at 25% of FVC remaining (MEF25)
Mean Mid-Expiratory Flow Rate (MMEF)
Forced expiratory flow at 50% of volume as a percentage of VC
(FEF50/VC)
Forced expiratory flow at 50% of volume as a percentage of FVC
(FEF50/FVC)
Maximal voluntary ventilation indicated (MVV
(ind)
)
Forced inspired volume in 1 second (FIV1)
Forced inspiratory Vital Capacity (FIVC)
Peak Inspiratory Flow Rate (PIF)
FIV
1
as a percentage of FIVC (FIV1/FIVC)
Forced inspiratory flow at 25% of inhaled volume (FIF25)
Forced inspiratory flow at 50% of inhaled volume (FIF50)
Forced inspiratory flow at 75% of inhaled volume (FIF75)
Forced expiratory flow at 50% of volume as a percentage of FIF50
(FEF50/FIF50)
The time taken between 25% and 75% of the forced expired volume
(MET2575)
Forced Expiratory Time (FET)
Tidal Volume (TV)
Expiratory reserve volume (ERV)
Inspiratory reserve volume (IRV)
Inspiratory capacity (IC)
Expiratory Relaxed vital capapcity (EVC)
Inspiratory vital capacity (IVC)
Breathing frequency rate (FR)
Inspiratory time (Ti)
Page 52

48
E
xpiratory time (Te)
Ti as a % of total breath time (Ti/Ttot)
Tidal volume as a % of Ti (TV/Ti)
Tests per subject: 5 VC manoeuvre
8 FVC manoeuvres
Predicted Values: Various – depends upon national
preference
Transducer: CareFusion Bi-Directional Digital Volume.
Resolution: 10ml volume 0.03l/s flow
Accuracy: +/-3%. To ATS recommendations –
Standardisation of spirometry 1994
update for flows and volumes.
Page 53

49
MicroLoop
Manuel d’utilisation
III.Introduction - Français
Le MicroLoop est un spiromètre portable d’utilisation simple et
rapide, fonctionnant sur batterie ou sur secteur.
L’utilisation facile est assurée grâce aux écrans d’aide en ligne,
accessible en cliquant sur un bouton. Ainsi chaque écran sera
expliqué.
Le MicroLoop est fourni avec son socle, qui peut être connecté à
l’ordinateur ou à une imprimante grâce au câble USB. Le socle se
branche également au secteur afin de pouvoir charger la batterie du
MicroLoop, lorsqu’il est installé dessus. La lumière bleu indique que
le socle est sous tension : soit parce qu’il est connecté à l’ordinateur,
soit parce qu’il est connecté au secteur. Lorsqu’une de ces 2 sources
est connectée au socle, le MicroLoop peut être chargé.
Page 54

50
Le MicroLoop utilise la turbine digitale CareFusion, un capteur
extrêmement stable, qui mesure l’air expiré à B.T.P.S (Body
Temperature and Pressure with Saturated water vapour) évitant ainsi
toutes imprécisions de corrections de température. De plus, ce
capteur n’est pas affecté par la condensation ou les changements de
température, ce qui évite d’étalonner avant chaque test.
Les résultats des tests peuvent être téléchargés dans un ordinateur
grâce au logiciel Spirometry PC Software (SPCS) en option. Les
données du patient peuvent également être transférés au MicroLoop.
Page 55

51
Lorsque vous allumez votre MicroLoop
pour la première fois, le menu de
configuration - système s’affiche. Cliquez
sur le nom de votre pays grâce au stylet
sur la gauche de l’appareil et appuyez sur
‘Finish’. Vous sélectionnez ainsi
différentes caractéristiques par défaut y
compris la langue, si elle est disponible.
Si cet écran n’apparaît pas, cliquez sur
l’icône ‘Préférences’ du menu principal
puis sur l’icône ‘Système’.
Page 56

52
Vue d’ensemble
Le MicroLoop utilise un écran tactile sur
lequel les icônes représentent les
diverses fonctions. Un stylet, placé sur la
gauche de l’appareil, permettra d’activer
les icônes.
Cliquez sur l’affichage de l’heure afin
d’ajuster l’heure et la date (il faut au
préalable que l’option changement
d’heure soit activée dans le mode
d’administration).
Les icônes non utilisés peuvent être
cachés en cliquant sur le fond d’écran
bleu et les désélectionnant de la liste
affichée.
Cliquez sur l’icône outil afin d’ajuster le
volume et la clarté.
Quatre niveaux de charge de batteries
sont indiqués par l’icône batterie
segmenté.
Lorsque l’icône devient rouge, la batterie
est presque vide et elle doit être
rechargée – voir Procédure de
chargement de la batterie. Toutes les
fonctions sont décrites dans l’aide en
ligne, qui est obtenue en pressant le
bouton « ? ».
Chaque écran possède son texte d’aide
visible à tout moment de l’utilisation du
MicroLoop.
Nous recommandons d’utiliser ces fichiers
aides autant que nécessaire.
Page 57

53
Démarrage
Lorsqu’un test de spirométrie est
réalisé, la recommandation est
d’entrer tout d’abord les données du
patient ou de les retrouver dans
l’appareil, puis de réaliser le test
requis et enfin d’imprimer et de
sauvegarder les résultats.
Veuillez vous assurer que la turbine
est connectée dans un des 2 ports au
dessus de l’appareil.
Page 58

54
Cliquez sur l’icône ‘Patients’ afin d’entrer
dans la base de données. Choisissez le
patient désiré à partir de la liste de
patients enregistrés. Si les données du
patient n’ont pas encore été enregistrées,
cliquez sur Ajouter afin de les saisir. Ces
derniers peuvent également être
téléchargés depuis le logiciel SPCS en
option.
Une fois que le patient sera sélectionné,
son nom apparaîtra en bas de l’écran.
Utilisez le bouton d’aide afin d’obtenir
davantage de renseignements.
Pour ajouter un patient à la base de
données, utilisez le clavier de l’écran et
tapez l’ID du patient puis cliquez sur
Entrée. Vous devrez ensuite remplir les
champs suivants. Lorsque vous testez un
patient d’une origine différente de celle
sélectionnée pour les valeurs prédites,
vous pouvez appliquer un facteur. Ex:
vous utilisez les valeurs prédites ECCS
(CECA) mais vous testez un patient non
caucasien. Le facteur altèrera les valeurs
prédites (paramètres exprimés en
volume) par le pourcentage appliqué.
Page 59

55
Si vous utilisez les valeurs prédites ECCS (CECA), les facteurs
suivants sont recommandés:
Hong-Kong Chinois 100%
Japonais Américain 89%
Polynésiens 90%
Indiens du Nord et Pakistanais 90%
Indiens du Sud et de descendance Africaine 87%
Réf: Lung Volumes and Forced Ventilatory Flows. P.H.Quanjer et al.
Eur Respir J, 1993, 6, Suppl. 16p5-40
Une fois les données du patient saisies, il
est ajouté à la base de données et le
menu principal s’affiche. Le nom du
patient sélectionné s’inscrira en bas de
l’écran.
A présent, cliquez sur le test requis. Si le
nom du patient en bas d’écran n’est pas
le bon, cliquez dessus afin d’obtenir la
possibilité d’en changer.
Page 60

56
Si la CV lente est sélectionnée, un
graphique Volume/Temps sera affiché.
Notez que l’appareil peut être
personnalisé afin de réaliser des CV
lentes avec volume courant ou à partir
d’une simple expiration ou d’une simple
inspiration.
Lorsqu’un test satisfaisant est obtenu,
cliquez sur Résultats afin de voir les
paramètres, sur Autre afin de refaire un
test, sur Rejeter afin de refuser le test et
sur Fin pour terminer le test.
Tous les paramètres sélectionnés sont
affichés pour tous les souffles. Il est
possible d’en ajouter ou d’en enlever en
allant dans le menu de Personnalisation.
Cliquez sur Courbe afin d’en revoir la
courbe.
Sélectionnez Fin pour retourner au menu
principal de Spirométrie.
Page 61

57
A partir de ce menu, les résultats peuvent
être revus, sauvegardés ou imprimés et
des notes peuvent être ajoutées.
Il est également possible de réaliser un
test de spirométrie forcée ou un post BD
pour la CV lente.
Sélectionnez Fin lorsque toutes les
fonctions requises auront été utilisées.
Si la spirométrie forcée est sélectionnée,
le graphique par défaut apparaîtra.
Modifiez le en cliquant sur les flèches en
haut de l’écran. A partir du menu
principal puis Préférences, sélectionnez la
courbe par défaut : débit/volume,
volume/temps ou stimulation enfants.
Lorsque le test de spirométrie sera
achevé, les options : Autre, Rejeter et
Résultats apparaîtront.
A la fin du test, les résultats peuvent être
revus, sauvegardés ou imprimés et des
notes peuvent y être ajoutées.
Page 62

58
Vérification d’étalonnage
Connectez une seringue de 3 litres au
capteur grâce à l’adaptateur fourni. Videz
la entièrement en poussant la poignée.
Sélectionnez, à partir du menu principal,
Vérification étalonnage puis resélectionnez le de nouveau.
Remplissez la seringue en tirant sur la
poignée de façon constante jusqu'à la fin
et immédiatement après, videz la
complètement.
Essayez de maintenir le débit afin de
rester dans les zones grises affichées à
l’écran.
Cliquez sur ‘Rejeter’ afin de réessayer
pour être au niveau de débit requis.
Cliquez sur ‘Autre’ afin de répéter la
vérification d’étalonnage à un faible
niveau de débit.
Cliquez sur ‘Autre’ afin de répéter la
vérification d’étalonnage à un fort niveau
de débit.
Lorsque la vérification d’étalonnage aux 3
niveaux de débit a été réalisée, cliquez
sur ‘Fin’ pour obtenir le rapport.
Page 63

59
L’erreur d’étalonnage pour l’inspiration et
l’expiration à chaque niveau de débit est
affichée. Cette erreur doit être de moins
de 3%. Si une erreur plus importante
apparaît, répétez la manœuvre en vous
assurant que la seringue est vidée et
remplie de façon constante sans cogner
les extrémités. Si une erreur de plus de
3% persiste, inspectez la turbine et
nettoyez la si nécessaire.
Page 64

60
Personnalisation
L’option Personnalisation peut être utilisée afin de configurer les
différentes fonctions de votre MicroLoop, qui sont divisées entre
système et spirométrie.
L’option Système vous permet de configurer les fonctions suivantes:
Langue
Unité de taille et de poids
Format de la date
Séparateur de date
Impression couleur ou monochrome (sur imprimante externe)
En-tête personnalisée lors d’impression
L’option Spirométrie vous permet de configurer les fonctions
suivantes:
Mode CV lente (avec ou sans volume courant)
Valeurs prédites
Affichage des prédites (zone ou ligne)
Affichage par défaut
Type de stimulation enfant
Graphiques imprimés
Critère du meilleur test
Indications d’interprétation et d’âge pulmonaire
Score dyspnée et tabagisme
Rappel d’étalonnage et ajusteur manuel de température
Sélection de paramètres
Notez que lorsque la langue est choisie, l’unité de taille et de poids
ainsi que le format et le séparateur de date seront automatiquement
changés. Cependant cette sélection automatique peut être modifiée
manuellement.
Page 65

61
Mode d’Administration
Le mode d’administration permet à
l’administrateur de restreindre les
fonctions disponibles pour l’utilisateur en
désactivant certains icônes du menu
principal. Par ex : après configuration de
l’appareil par l’administrateur, désactiver
l’icône Préférences évitera que
l’utilisateur ne modifie la configuration. Il
en est de même pour la désactivation de
l’icône Gestion base de données, cela
évitera que l’utilisateur efface des
patients ou des résultats.
Pour enter dans le mode
d’administration, gardez votre doigt
appuyé sur le bouton « ? » tout en
allumant l’appareil. Le code d’accès par
défaut est 0000. Tapez ce nombre en
utilisant le clavier sur l’écran. Plusieurs
fonctions sont à présent disponibles.
Cliquez sur ‘Changer le code d’accès’ afin
de saisir votre propre code et ainsi
restreindre l’accès au mode
d’administration.
Appuyez sur le bouton « ? » afin d’avoir
la description complète des différentes
fonctions.
Page 66

62
Impression externe
Utilisant le câble fourni, connectez le mini port USB A/B à l’arrière du
socle du MicroLoop au port de l’imprimante. Pour obtenir la liste des
imprimantes compatibles referez-vous au site Internet
www.carefusion.com/micro ou à votre revendeur.
Durant l’impression, il est recommandé de connecter le socle au
secteur.
NOTEZ: gardez l’imprimante hors de portée du patient à tout
moment.
Procédure de chargement de la batterie
La batterie interne du MicroLoop est déchargée lorsque vous le
recevez. Elle doit être complètement chargée pour la première
utilisation. Branchez l’adaptateur AC au secteur et branchez la sortie
de l’adaptateur dans la prise d’entrée de courant du socle. Une
lumière orange sur le dessus de l’appareil clignotera afin d’indiquer
qu’il est en charge et restera allumée de façon constante pour
indiquer que l’appareil est complètement rechargé. La lumière bleue
du socle sera également allumée.
La batterie a besoin d’environ 4 heures pour se recharger
complètement.
Notez: Utiliser uniquement l’adaptateur AC fourni. L’utilisation
d’autres types d’adaptateurs pourrait créer des dommages
permanents au MicroLoop et causer un feu ou des dangers
électriques. Ne pas brancher et débrancher de façon répétée
l’adaptateur AC.
Connexion au PC utilisant SPCS
SPCS est une application basée sur ordinateur, interfacée au
MicroLoop par le port USB. Il comprend une base de données dans
laquelle les patients peuvent être saisis et téléchargés vers le
Page 67

63
MicroLoop ou les résultats des tests peuvent être transférés du
MicroLoop vers l’ordinateur.
En utilisant SPCS et le MicroLoop, des tests en temps réel peuvent
être directement réalisés sur l’ordinateur.
Les résultats et les graphiques sont affichés sur l’écran de
l’ordinateur.
Le spiromètre est connecté, grâce au câble fourni, du port USB de
l’ordinateur au port USB du socle.
Notez: le MicroLoop doit uniquement être connecté à un ordinateur
remplissant les caractéristiques de la directive EN60950 1992/1993
– ‘Safety of Information Technology Equipment including Electrical
Business Equipment’.
Garder l’ordinateur hors de portée du patient à tout instant.
Il est important que le MicroLoop reste dans son socle lorsqu’il est
connecté à l’ordinateur.
Prendre soin du MicroLoop
Veuillez prendre les précautions suivantes:
• Ne touchez pas l’écran avec les doigts. Utilisez seulement le
stylet fourni.
• Utilisez uniquement un chiffon humide (sans ouate) pour
nettoyer l’écran.
• Ne pas exposer le spiromètre à la chaleur ou dans des endroits
mouillés.
• N’exposez pas le capteur à une source de lumière intense
pendant son utilisation.
• Vérifiez la compatibilité du chargeur AC avec le courant au
secteur.
Page 68

64
Placement pour l’encoche
Encoche
Capteur
Logement pour
le capteur
Nettoyage du capteur
Ce capteur ne requiert aucun entretien particulier. Néanmoins si
vous souhaitez le stériliser ou simplement le nettoyer, vous devez le
démonter de la manière suivante:
1. sortez le capteur de son logement en tournant d’abord un demitour dans le sens inverse des aiguilles d’une montre.
2. Vous pouvez maintenant l’immerger dans un savon de lavage ou
dans un liquide de stérilisation à froid. Ex : PeraSafe pour un
maximum de 10 minutes (ne pas utiliser de solutions
chlorées ou alcoolisées)
PeraSafe est disponible en flacon de 81g, Cat No: 36-SSC5000A.
3. rincez-le bien de préférence à l’eau distillée.
4. remontez le capteur dans son logement en prenant bien soin de
respecter l’indexage de la baillonnette avec le logement prévu
dans le support.
Page 69

65
Entretien
Cet appareil ne requiert aucun entretien particulier et aucune pièce
de l’appareil ne nécessite de révision. Cependant, veuillez retourner
l’appareil à votre revendeur si vous désirez une révision de ce
dernier.
Diagnostic des pannes
Si l’écran se bloque et l’appareil ne réponde plus, veuillez presser le
bouton on/off pendant 10 secondes jusqu'à ce que l’appareil
s’éteigne, puis rallumez le.
Symboles
Appareil de type B
0086
En accord avec la directive 93/42/EEC
Disposition en accord avec WEEE
Environnement
Cet appareil est conforme à la directive EN60601-1-2 sur la
compatibilité électromagnétique mais peut toutefois être perturbé
par les téléphones cellulaires et interférences électromagnétiques
excédant les niveaux spécifiés par la norme EN 50082-1:1992
Cet instrument ne peut être utilisé avec des gaz anesthésiants
inflammables ou dans une atmosphère enrichie en oxygène.
Classification électrique
Équipement de Classe 1
Page 70

66
Consommables
Cat. No. Description
36-PSA1000 Embouts carton jetables pour adultes (500 par boite)
36-SST1000 Embouts carton unidirectionnels jetables (500 par boite)
36-SST1250 Embouts carton unidirectionnels jetables (250 par boite)
36-PSA1200 Embouts carton jetables pour enfants (250 par boite)
36-PSA1100 Adaptateur Pédiatrique
36-MGF1025 Filtres MicroGard
36-MGF1100 Filtres MicroGard
36-SSC5000A Poudre stérilisante PeraSafe 81g
(Pour réaliser jusqu'à 5 litres de solution)
36-VOL2104 Pinces nez (paquet de 5)
36-SM2125 Seringue d’étalonnage 3 Litres
36-SPC1000 Logiciel SPCS
Précautions d'emploi
• Les filtres pulmonaires sont à usage sur un seul patient.
L'utilisation sur plusieurs patients entraîne un risque de
surinfection. Une utilisation répétée peut entraîner une
augmentation de la résistance à l'air et fausser les mesures. »
• Les embouts buccaux sont à usage sur un seul patient.
L'utilisation sur plusieurs patients entraîne un risque de
surinfection. Une utilisation répétée peut entraîner une
détérioration des matériaux et fausser les mesures. »
Page 71

67
Spécifications du MicroLoop
Général
Stockage : >2000 tests incluant les courbes
Débit/Volume et Volume/Temps.
Sortie Imprimante: Compatible avec les imprimantes USB
Hewlett Packard (spécifiés
uniquement sur les modèles).
Ecran: Couleur 1/4VGA LCD.
Alimentation: Entrée 100 à 240V, 50 à 60Hz. Sortie
5V 2.0A (Classe 1)
Batterie: Rechargeable Lithium Polymère 3.7V
1600mA-heures.
Dimensions: 120x80x20 mm.
Capteur 50x60x90mm.
Poids: 630g
Température d’utilisation: 0 to +40 °C
Humidité d’utilisation: 30% to 90% RH
Température de Transport
et de stockage:
-20 to + 70 °C
Humidité de Transport et
de stockage:
10% to 90% RH
Spirométrie Paramètres:
Capacité Vitale (CV)
Volume Expiré Maximal dans la première 0.75 seconde (VEM.75)
Volume Expiré Maximal dans la première seconde (VEMS)
Volume Expiré Maximal dans les 3 premières secondes (VEM3)
Volume Expiré Maximal dans les 6 premières secondes (VEM6)
Capacité Vitale Forcée (CVF)
Débit Expiratoire de Pointe (DEP)
VEM
0.75
par rapport à la CV (VEM.75/CV)
VEM
0.75
par rapport à la CVF (VEM.75/CVF)
Page 72

68
VEM
S
par rapport à la CV (VEMS/CV)
VEM
S
par rapport à la CVF (VEMS/CVF)
VEM
3
par rapport à la CV (VEM3/CV)
VEM
3
par rapport à la CVF (VEM3/CVF)
VEM
0.75
par rapport au VEM6 (VEM.75/VEM6)
VEM
S
par rapport au VEM6 (VEMS/VEM6)
Débit Expiratoire Maximum à 75% de la CVF restante (DEM75)
Débit Expiratoire Maximum à 50% de la CVF restante (DEM50)
Débit Expiratoire Maximum à 25% de la CVF restante (DEM25)
Débit Expiratoire Médian Maximal (DEMM)
Débit Expiratoire Maximum à 50% de la CVF restante par rapport à
la CV (DEM50/CV)
Débit Expiratoire Maximum à 50% de la CVF restante par rapport à
la CVF (DEM50/FVC)
Ventilation Volontaire Maximum indiquée (VVM
(ind)
)
Volume Inspiré Forcé dans la première seconde (VIMS)
Capacité Vitale Inspiratoire Forcée (CVIF)
Débit Inspiratoire de Pointe (DIP)
VIM
S
par rapport à la CVIF (VIMS/CVIF)
Débit Inspiratoire Maximum à 25% du volume inhalé (DIM25)
Débit Inspiratoire Maximum à 50% du volume inhalé (DIM50)
Débit Inspiratoire Maximum à 75% du volume inhalé (DIM75)
Débit Expiratoire Maximum à 50% de la CVF restante par rapport au
DIM50 (DEM50/DIM50)
Le temps pris entre 25% et 75% du volume expiré forcé (TEM2575)
Temps Expiratoire Forcé (TEF)
Volume courant (Vt)
Volume de Réserve Expiratoire (VRE)
Volume de Réserve Inspiratoire (VRI)
Capacité Inspiratoire (CI)
Capacité Vitale Expiratoire (CVE)
Capacité Vitale Inspiratoire (CVI)
Fréquence respiratoire (FR)
Page 73

69
Temps Inspiratoire (Ti)
Temps Expiratoire (Te)
Ti en % du Temps total de respiration (Ti/Ttotal)
Volume courant en % de Ti (Vt/Ti)
Temps Expiratoire (Te)
Ti en % du Temps total de respiration (Ti/Ttotal)
Volume courant en % de Ti (Vt/Ti)
Tests par sujet: 5 VC manoeuvre
8 FVC manoeuvres
Valeurs Prédites: Plusieurs – dépend de la préférence
nationale
Capteur: Turbine digitale bidirectionnelle
CareFusion
Résolution: 10ml volume 0.03l/s débit
Précision: +/-3%. Recommandations ATS –
Standardisation of spirometry 1994
update for flows and volumes.
Page 74

247
CareFusion UK 232 Ltd.,
Quayside
Chatham Maritime
Kent ME4 4QY
U.K.
0086
JDE no. 36-MAN1274
Drg no. 105-39WW
Issue 1.0
February 2010
© CareFusion 2010
 Loading...