

Page 1

MicroDL
Operating Manual Bedienungsanleitung Руководство пользователя -
English
Deutsch
Русский
1
Page 2

Page 3

Contents
I. Introduction – English........................................................ 3
Package contents .............................................................. 4
Configuring the MicroDL ..................................................... 5
Configuring the MicroDL with SPCS.....................................27
Battery Management ........................................................28
Calibration Check .............................................................29
Cleaning the Transducer....................................................30
Consumables/ Supporting products ....................................31
Training ..........................................................................31
Specification of the MicroDL...............................................33
II. Introduction – CareFusion USA ..........................................35
Package contents .............................................................36
Configuring the MicroDL ....................................................38
Configuring the MicroDL with SPCS.....................................61
Battery Management ........................................................63
Calibration Check .............................................................63
Cleaning the Transducer....................................................65
Specification of the MicroDL...............................................66
III. Einleitung – Deutsch.........................................................68
Packungsinhalt.................................................................69
Konfigurierung des MicroDL ...............................................71
Konfigurierung des MicroDL mit SPCS .................................96
Batteriemanagement ........................................................97
Überprüfung der Kalibrierung.............................................98
Reinigung des Messwertwandlers .....................................100
Spezifikationen des MicroDL ............................................101
1
Page 4

IV. Введение - Русский.......................................................103
Принадлежности ...........................................................104
Конфигурация MicroDL ..................................................106
Конфигурация MicroDL с помощью программы SPCS ........129
Работа батареи .............................................................131
Проверка калибровки....................................................131
Очистка датчика ...........................................................132
Технические данные и спецификации ............................134
2
Page 5

MicroDL
Operating manual
I.Introduction - English
The MicroDL spirometer is a compact, battery operated, and fully
portable data recording spirometer designed to collect spirometry
data, expiratory Flow/Volume and Volume/Time curves.
The MicroDL can be configured for use with a single patient for
detailed monitoring over a period or for collecting spirometry data
from a number of patients.
Alternatively, the data may be uploaded to a PC running the fully
featured Spirometry PC Software (SPCS). Once uploaded, the data
may be viewed individually or as a trend graph and the Flow/Volume
loop of any individual point examined. SPCS may also be used to
perform live spirometry tests and show the expiratory Flow/Volume
loop, Volume/Time curve and child incentive displays.
In single patient mode the user can perform a spirometry test. After
each spirometry manoeuvre the results are displayed together with
a ‘traffic light’ indication of their performance as an aid to asthma
management. The levels that activate the red, amber and green
lights, as a percentage of the predicted value, can be selected when
the unit is configured. Alternatively, the activation may be based on
the patient’s personal best values when the unit is configured using
the SPCS software.
3
Page 6

In multiple patient mode spirometry results can be collected from up
to 200 patients. In this mode the ‘traffic light’ activation is based
upon the patient’s predicted values.
The spirometer uses the CareFusion Digital Volume Transducer, an
extremely stable form of volume transducer, which measures
expired air directly at B.T.P.S (Body Temperature and Pressure with
Saturated water vapour) thus avoiding the inaccuracies of
temperature corrections. This transducer is insensitive to the effects
of condensation and temperature and avoids the need for individual
calibration prior to performing a test.
Package contents
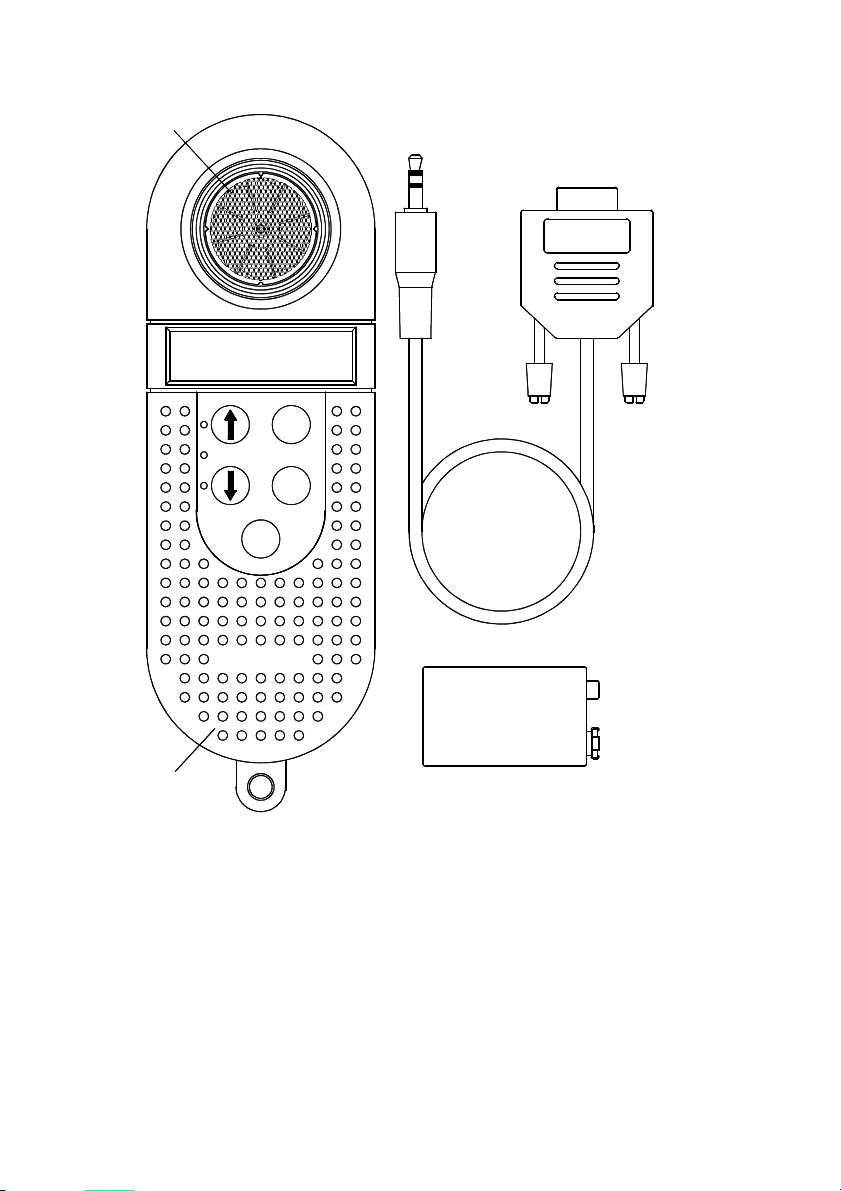
The MicroDL is packaged in a convenient carrying case and comes
complete with the following items (Fig.1):
1. MicroDL microcomputer unit
2. CareFusion Digital Volume Transducer
3. PP3 alkaline battery
4. Serial Cable together with disposable cardboard
mouthpieces.
4
Page 7
MicroDL
Fig.1
2
on
enter
of
4
3
1
Configuring the MicroDL
The MicroDL must be configured for single patient (asthma
management) or multiple patient use. Multiple patient use is
configured by hand on the instrument itself and single patient use
may be configured either by hand or more conveniently by the SPCS
software provided (see SPCS installation and operation).
5
Page 8
When configuring for single patient mode a patient identifier must
be entered. This number will be used to identify data when printing
or uploading results. The age, height and sex of the patient
together with any ethnic correction must also be entered. This data
is used to calculate the predicted values for FEV1, FVC, PEF, and
FEV1/FVC. The ethnic correction reduces the predicted values of the
volume measurements by the percentage entered. Finally, the
levels at which the amber and red warning lights are activated are
entered.
These levels are expressed as a percentage of the predicted values
when the unit is configured by hand but the patient’s personal best
values may be used when the unit is configured using SPCS.
When using the MicroDL in multiple patient mode the patient details
are entered each time the unit is turned on. Therefore, when
configuring the unit for multiple patient use, only the warning light
levels are entered.
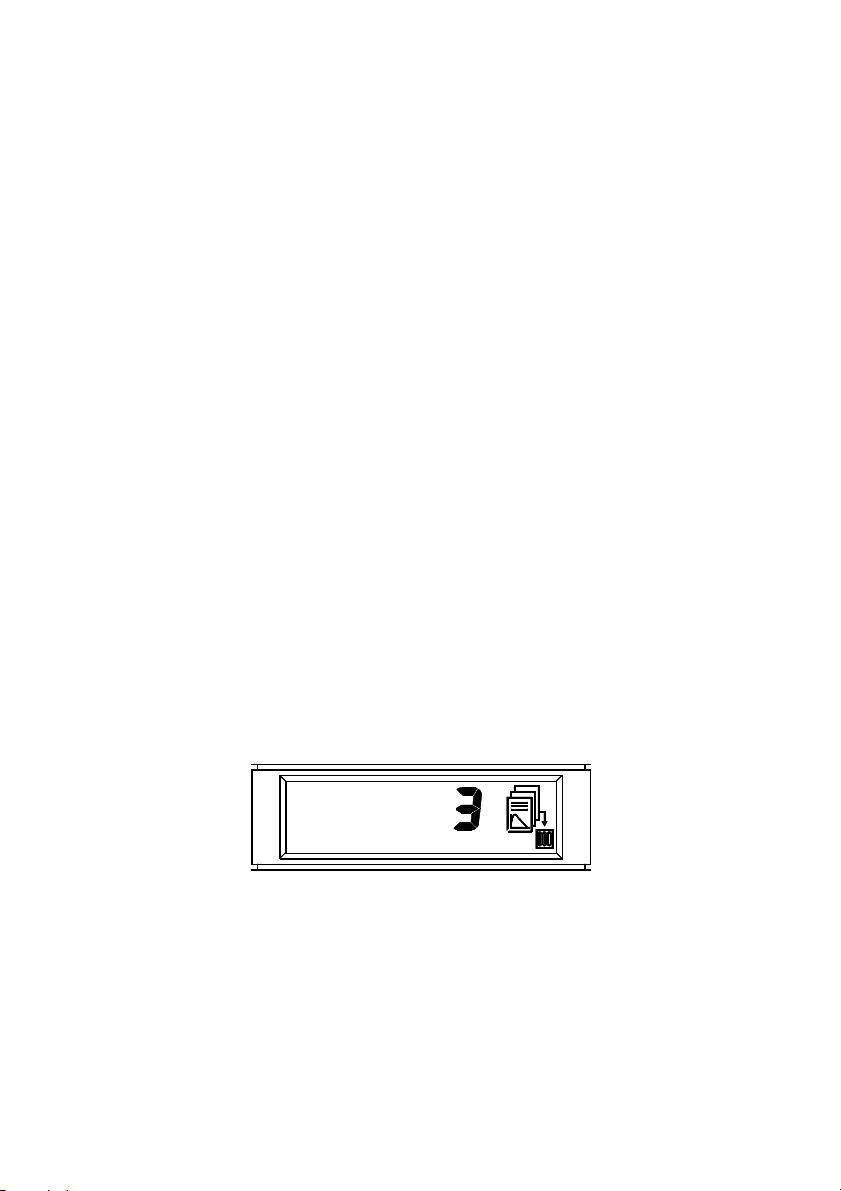
To configure the unit, depress the off key, turn the unit on and
release the off key. If there is data currently stored in the unit then
the number of records displayed:
Configuring the unit will delete these records so if the stored data is
required turn the unit off and print or upload the data using SPCS
(see Printing Stored Records and Uploading Results).
To continue with configuration and delete the data, press ‘enter’ and
the following will be displayed:
6
Page 9
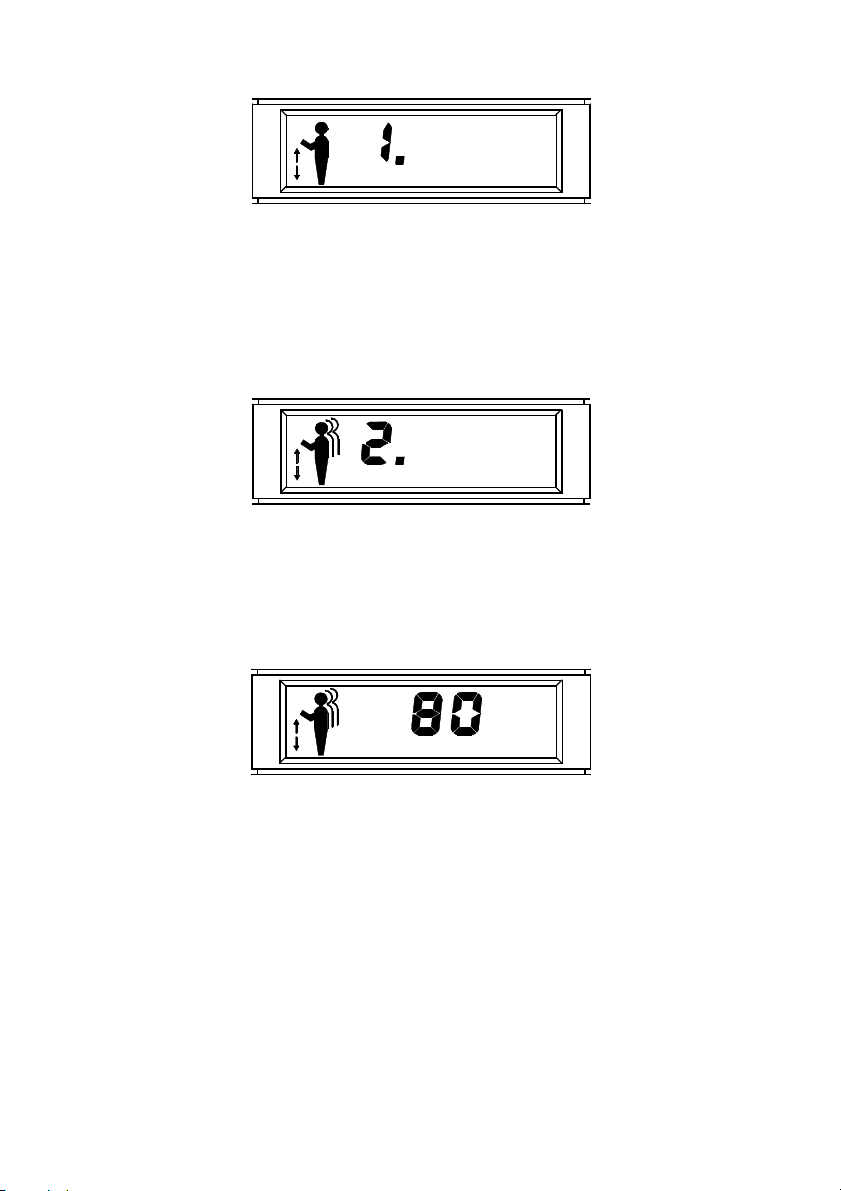
The 1 displayed indicates that the unit is set to single patient mode.
By using the up or down key, as indicated by the flashing arrows,
multiple patient mode may be selected when the display will change
to:
Once the required configuration is obtained, press ‘enter’.
If multiple patient mode has been selected the amber light will flash
and the display will change to:
%
Use the up and down keys to select the level of results below which
will produce an amber warning light when the user performs a
spirometry manoeuvre. This level is expressed as a percentage of
the predicted value. Please note that the default values displayed
may vary from those shown in this manual as the MicroDL will
automatically update the default values to the last actual values
used.
After pressing ‘enter’, the red light will flash and the display will
change to:
7
Page 10
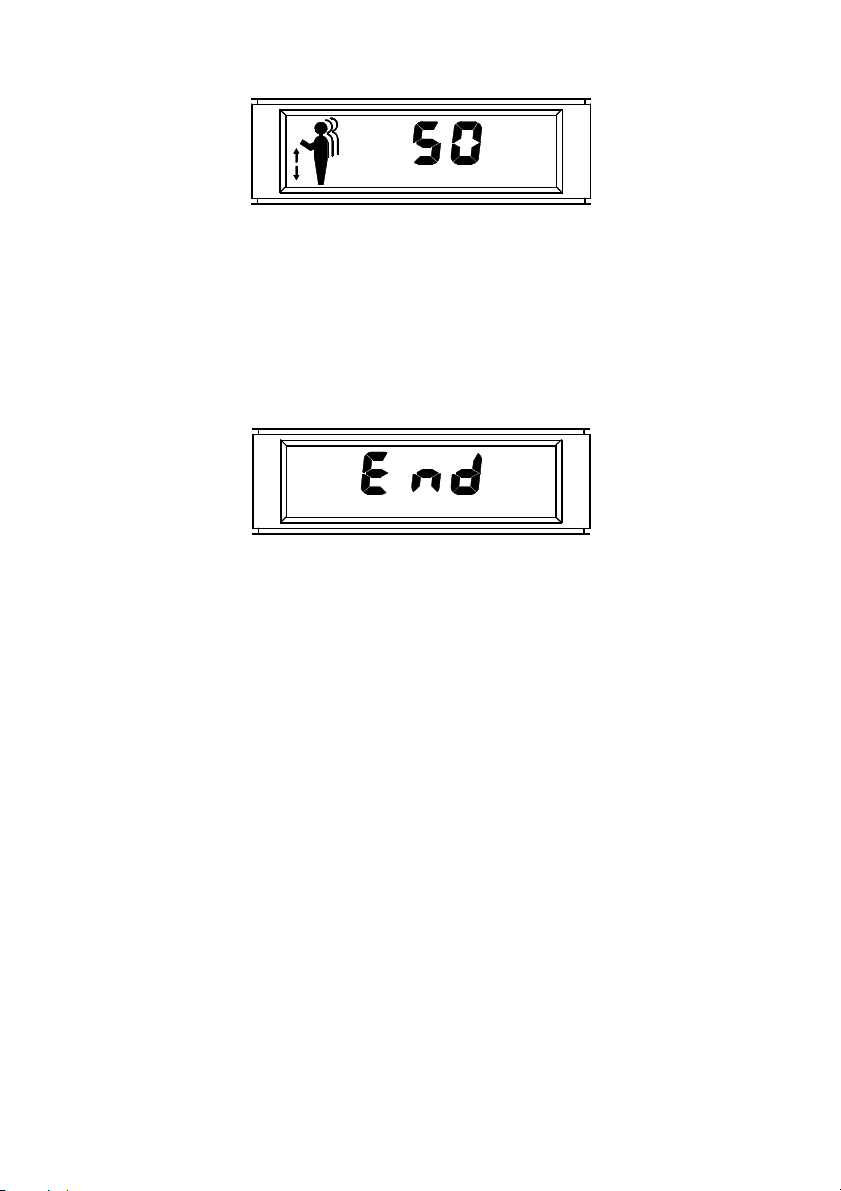
%
Use the up and down keys to select the required percentage of
predicted value which will produce a red warning light when the user
performs a spirometry manoeuvre less than the set value.
When the required level has been selected press ‘enter’ and the
display will change to:
The unit is now configured for multiple patient use and will
automatically turn off.
The most convenient way to configure the unit for a single patient is
to use the SPCS software provided. SPCS allows the user to
configure several options that are not available when the unit is
configured by hand.
These include:
Personal best values can be entered as a basis for the warning light
operation.
A simple operating procedure, for use by the patient, can be printed.
The results to be displayed can be selected.
However, the unit may be configured by hand in the following
manner.
8
Page 11

Turn the unit on with the ‘off’ key depressed as described above and
select single patient mode by pressing ‘enter’ when the display
shows:
The display will then change to:
Use the up and down keys to select a patient number.
This number can be set using the ‘up’ and ‘down’ keys anywhere in
the range 1 to 1999 and will be used to identify data when printing
or uploading results. When the required number is displayed press
‘enter’ and the display will change to:
The flashing symbol represents a male patient and using the up or
down key will change the display to indicate a female patient:
9
Page 12
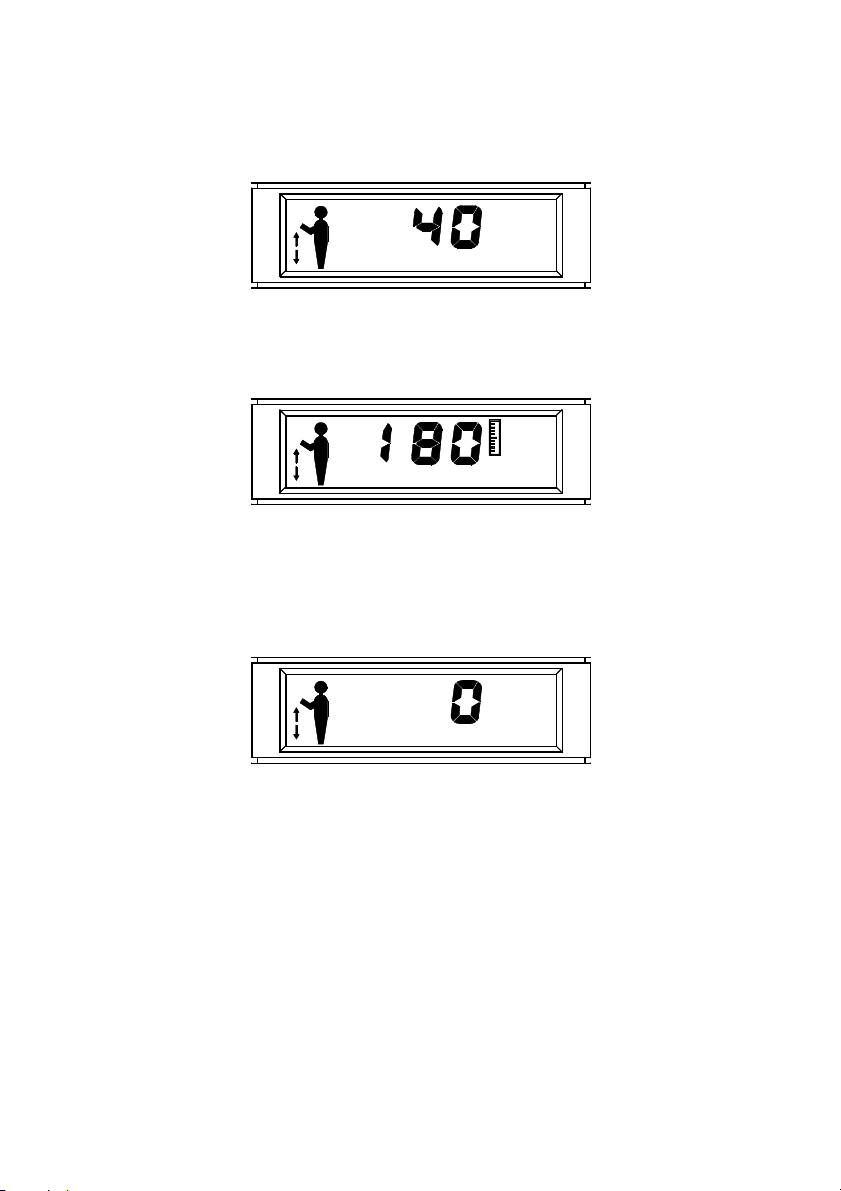
When the correct selection has been made press ‘enter’ and the
display will change to:
yr
Adjust the patients age using the up and down keys and press
‘enter’. The display will change to:
Enter the patients height, in centimetres, using the up and down
keys and press ‘enter’.
The display will change to:
%
Adjust the ethnic correction using the up and down keys. The
display shows the percentage reduction of volumetric predicted
values to be applied for the patient. Press ‘enter’ when the required
correction has been selected. The levels for the amber and red
warning lights should now be set as described above in the
description of multiple patient configuration.
10
Page 13
Spirometry Operation (Single patient use)
When performing a spirometry test the user should be instructed to
insert a disposable or clean reusable, mouthpiece into the
mouthpiece holder of the spirometer.
The unit is then turned on, the current time will be displayed briefly,
and the three lights will be illuminated before the display changes
to:
The patient should then inhale as deeply as possible, seal their lips
around the mouthpiece and exhale as hard and as fast as possible
until no more air can be exhaled. The spirometry results are then
displayed:
PEF
The first result shown is Peak Expiratory Flow (PEF). The arrows
indicate that the up and down keys may be used to scroll through
the other results of the test. These include FEV1, FVC, FEV1/FVC
(shown as FEV1 FVC), followed by the percentage of predicted value
for all of the above.
Note: when the unit is configured with SPCS software the displayed
results can be limited to only those that the patient can usefully
interpret, for example, the unit can be configured to display only PEF
and the percent predicted PEF. However, regardless of the
11
Page 14
measurements displayed, all measurements (including expiratory
Flow/Volume and Volume/Time data) will be recorded.
In addition, the MicroDL can be configured with PEF displayed in
units of Litres/min or Litres/sec.
As well as the spirometry results, warning lights will be displayed.
The lights are based on a percentage of the predicted value or
personal best values.
Note: personal best values can only be used when the unit is
configured using SPCS software.
The percentage level below which the warning lights illuminate can
be configured using SPCS software or when configuring the unit by
hand. The warnings lights will vary according to the spirometry
parameter displayed. However, if a lower level was present on one
of the other parameters then the lower level light will flash until the
display is scrolled to that parameter.
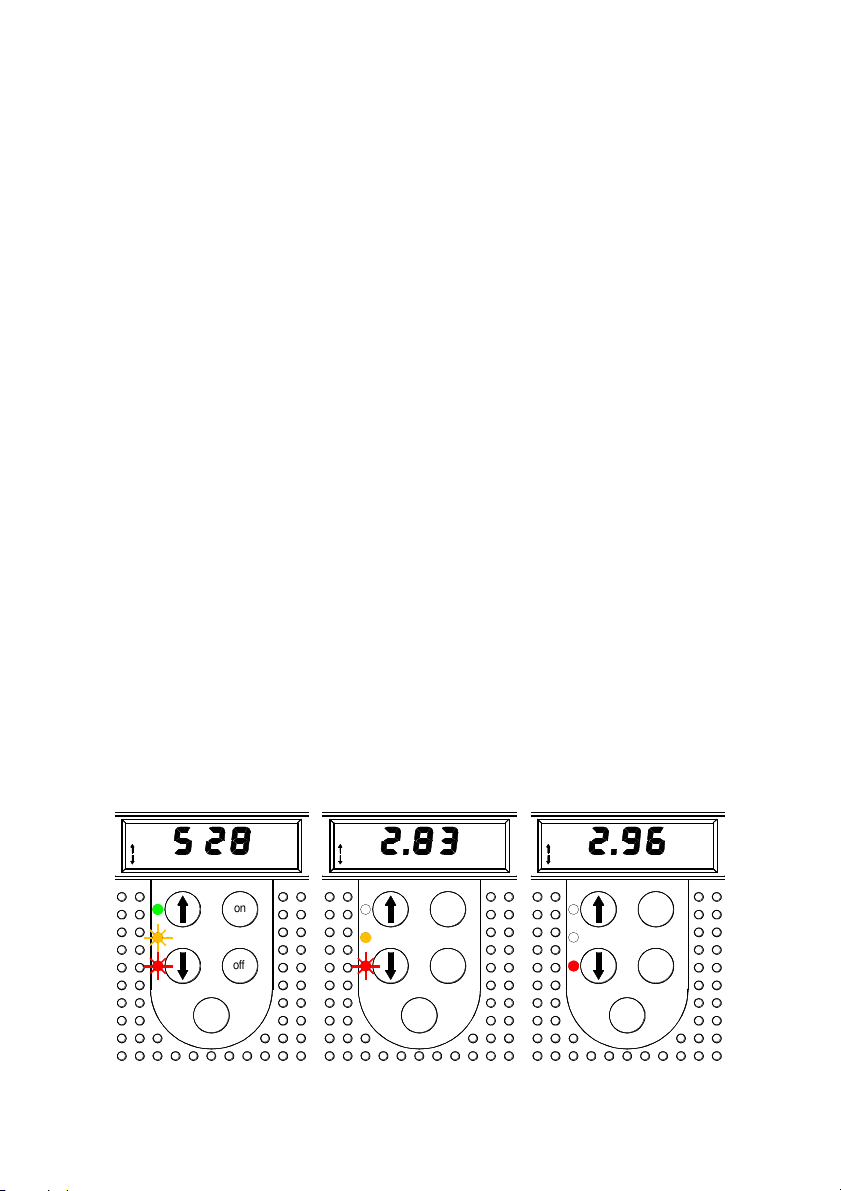
For example, if the unit is configured to display PEF, FEV1, and FVC,
then the patient will see the following displays when scrolling
through the results after a manoeuvre with good peak flow but a
poor FEV1 and very poor FVC:
PEF
on
off
enter
FE V
1
enter
FV C
on
off
on
off
enter
12
Page 15

After completing a spirometry manoeuvre the user may press ‘enter’
to repeat or off to finish testing. After completing a sequence of
tests, the best result will be stored. The definition of best is
selected using
best FEV1 +FVC. If the unit is turned off after performing a
manoeuvre, and then used again within five minutes, then only the
best result within the period will be saved.
SPCS and may be best FEV1, best FVC, best PEF, or
Spirometry Operation (Multiple patient use)
When performing a spirometry test the user should be instructed to
insert a disposable or clean reusable, mouthpiece into the
mouthpiece holder of the spirometer.
The unit is then turned on, the current time will be displayed briefly,
and the three lights will be illuminated before the display changes
to:
Use the up and down keys to select a patient number. This number
can be set, using the up and down keys, anywhere in the range 1 to
1999 and will be used to identify data when printing or uploading
results.
When the required number is displayed press ‘enter’ and the display
will change to:
13
Page 16

The flashing symbol represents a male patient and using the up key
will change the display to indicate a female patient:
Pressing the up key again will remove the patient symbol:
This indicates that predicted values are not required and the unit will
not request the patient’s details. Please note that if this option is
selected then the warning lights will not be operational.
If male or female predicted values have been selected then the
display will change to:
yr
Select the patients age using the up and down keys and press
‘enter’. The display will change to:
14
Page 17

Enter the patients height, in centimetres, using the up and down
keys and press ‘enter’. The display will change to:
%
Adjust the ethnic correction using the up and down keys. The
display shows the percentage drop of volumetric predicted values to
be applied for the patient. Press ‘enter’ when the required
correction has been selected.
Note: the initial patient number displayed and the default patient
details will be the same as the last one used. This is to facilitate
quick entry of details when performing a repeat test on the same
patient. If a new patient is to be tested then select a different
patient number.
After the patient details have been entered, the display will change
to:
Insert a disposable or clean reusable, mouthpiece into the
mouthpiece holder of the spirometer.
Instruct the patient to inhale as deeply as possible, seal their lips
around the mouthpiece and exhale as hard and as fast as possible
until no more air can be exhaled.
The spirometry results are then displayed:
15
Page 18

PEF
The first result shown is Peak Expiratory Flow (PEF). The arrows
indicate that the up and down keys may be used to scroll through
the other results of the test.
These include FEV1, FVC, FEV1/FVC (shown as FEV1 FVC), followed
by the percentage of predicted value for all of the above.
Note: if the unit has been previously configured with SPCS, the
displayed results will be limited to only those previously set.
However, regardless of the measurements displayed, all
measurements (including expiratory Flow/Volume and Volume/Time
data) will be recorded.
As well as the spirometry results, warning lights will also be
displayed as described in the section ’Spirometry Operation (Single
patient use)’. However, in the case of multiple patient use, the light
activation is based upon the percentage of the predicted value as
personal best values cannot be entered.
After completing a spirometry manoeuvre the user may press ‘enter’
to repeat or ‘off’ to finish testing. After completing a sequence of
tests, the best result will be stored. The definition of best is
selected using SPCS
best FEV1+FVC. When off is pressed, the user has the option to
obtain a printout of the results.
The display will change to:
and may be best FEV1, best FVC, best PEF, or
16
Page 19

If a printout is not required, press ‘off’ again and the unit stores the
results, date and time stamped, and turns off. If a printout is
required then connect the serial to parallel converter to the parallel
input socket on the printer. Connect the jack plug to the socket on
the side of the MicroDL and turn the printer on.
NOTE: Keep the printer out of reach of the patient when connected
to the MicroDL.
Press ‘enter’ on the MicroDL to obtain the following report:
MicroDL FULL REPORT
Patient Name:______________________________________
Test: 1 Date: 12/11/97 Time: 0802
ID: 6 Sex: Male Age: 19
Height: 190 cm Ethnic Correction: 0%
Parameter Result %Pred Pred Min Max Units
FEV1 3.71 74 4.95 4.11 5.79 L
FVC 4.61 77 5.95 4.95 6.95 L
PEF 9.67 90 10.74 8.75 12.73 L/S
FEV1%FVC 80 97 82 70 94 %
F50 4.15 68 6.07 3.90 8.24 L/S
F25 1.36 45 2.96 1.68 4.24 L/S
MEF 5.45 102 5.31 3.60 7.20 L/S
FET 4.66 S
17
Page 20
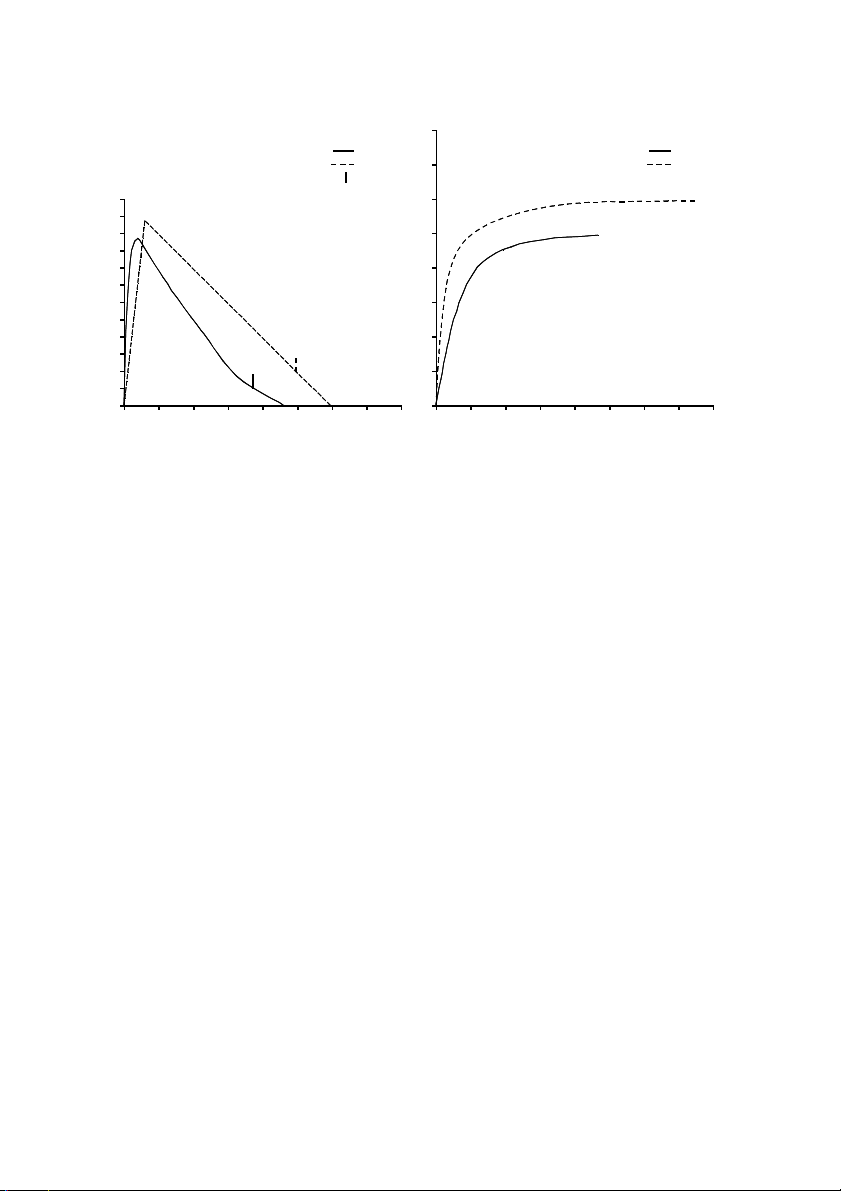
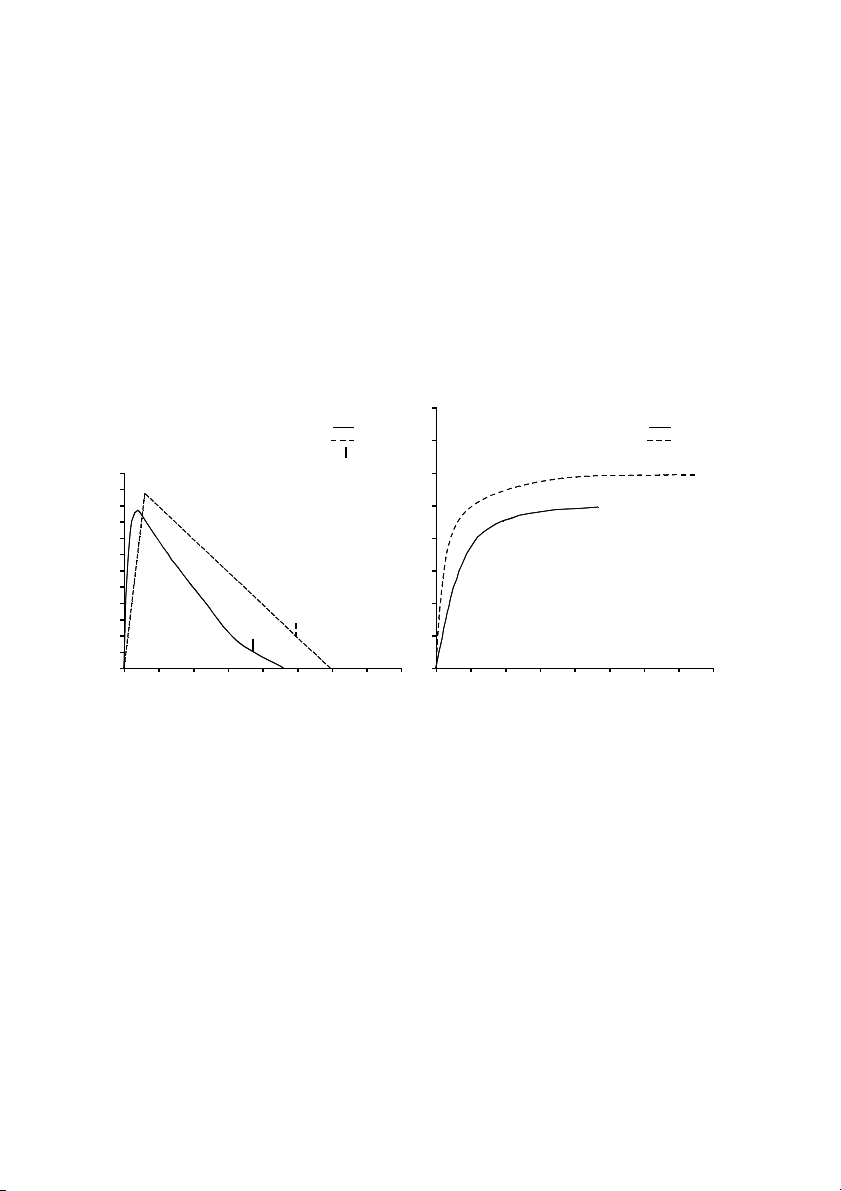
Flow/Volume Volume/Time
8L
RESULT
PREDICTED
FEV1
12
10
8
6
6
4
RESULT
PREDICTED
4
2
S
/
L
1
2 3 4
5 6 7 8
2
1
2 3 54 6 7 8
Normal Values: ECCS (adult); Zapletal, Solymar, Cogswell (child)
Results at BTPS
Technician: ______________ Physician: _______________
The first line gives the MicroDL version number and type of report (a
summary report of all data stored is also available – see Printing
Stored Results).
Subsequent lines give the test number (the tests are numbered
sequentially as they are stored), date and time of test, and patient
details.
This is followed by the test results presented with the percentage of
the predicted value, the predicted value, the predicted minimum and
maximum, and the unit of measurement.
The expiratory Flow/Volume and Volume/Time curves are also
shown overlaid with the predicted curves and FEV1 marker on the
Flow/Volume curve.
18
Page 21

To obtain subsequent copies of the report press ‘enter’. When all
Singlerecord
the required printouts have been obtained press ‘off’ and the unit
will turn off.
If the unit is turned off after performing a manoeuvre, and then used
again within five minutes, then only the best result within the period
will be saved.
Printing Stored Records
There are five printing options for the stored results. To assist the
selection of the required option a system of icons will appear on the
display when the unit is set to printing mode:
Summaryreport
Spirometryreport
Allrecords
Allrecordssincelastprintout
If one page appears, then a single record has been selected
If two pages appear, then only records since the last printout will be
printed.
If three pages appear, then all stored records will be printed.
If the front page shows only lines of text then a summary report has
been selected.
If the Flow/Volume symbol appears, then a spirometry report has
been selected.
19
.
Page 22
Depress the up key, turn the unit on and release the up key after a
few seconds. The display will indicate the type of report to be
printed and the number of pages that will be used.
Use the up key to select the type of printout required.
The following examples assume that the unit is configured in single
patient mode.
Option 1 – summary report of all records
After turning the MicroDL on with the up key depressed the following
will be displayed:
This display is indicating that a summary report of all stored results
has been selected and that the printout will use two sheets of paper.
If this option is required then press ‘enter’ and the display will
change to:
20
Page 23

The following printout of spirometry results will be obtained:
MicroDL SUMMARY REPORT
Test ID Date Time FEV1 FVC PEF
----------------------------------------------------------------------------
1 6 10/09/97 10:56 2.97(86%) 3.25(78%) 7.49(87%)
2 6 11/09/97 11:32 2.74(79%) 3.12(75%) 6.45(75%)
3 6 12/09/97 09:58 3.14(91%) 3.53(85%) 8.37(97%)
‘’ ‘’ ‘’ ‘’ ‘’ ‘’ ‘’
‘’ ‘’ ‘’ ‘’ ‘’ ‘’ ‘’
‘’ ‘’ ‘’ ‘’ ‘’ ‘’ ‘’
Values in brackets are percentage of best value.
Technician: ____________ Physician: ______________
The summary report gives the date, time, FEV1, FVC, and PEF
together with the percentage of best value in brackets. The tests
are sequentially numbered and this can be used to select a
particular test for more detailed investigation by selecting a full
report using printing option 2. At any time during printing pressing
‘off’ will terminate the printing. Should the printer fail to operate
correctly then turn off both the printer and the MicroDL unit, check
all connections, and try again.
Option 2 – full spirometry report of one record
After turning the MicroDL on with the up key depressed, use the up
key again to obtain printing option 2. The display will show:
21
Page 24
This option is used to select a full report, including Flow/Volume and
Volume/Time curves, on one stored result. The ‘1’ indicates that one
sheet of paper will be used.
Press ‘enter’ if this option is required and the display will change to:
The tests are numbered sequentially as they are stored and the
number displayed represents the last test recorded.
Use the down key to select the required test and then press ‘enter’.
The display will change to:
The following printout of spirometry results will be obtained:
MicroDL FULL REPORT
Patient Name:________________________________
Test: 1 Date: 12/11/97 Time: 0802
ID: 6 Sex: Male Age: 19
Height: 190 cm Ethnic Correction: 0%
22
Page 25
Parameter Result %Best Best %Pred Pred Min Max Units
FEV1 3.71 78 4.76 74 4.95 4.11 5.79 L
FVC 4.61 82 5.62 77 5.95 4.95 6.95 L
PEF 9.67 92 10.65 90 10.74 8.75 12.73 L/S
FEV1%FVC 80 97 82 97 82 70 94 %
F50 4.15 68 6.07 3.90 8.24 L/S
F25 1.36 45 2.96 1.68 4.24 L/S
MEF 5.45 102 5.31 3.60 7.20 L/S
FET 4.66 S
Flow/Volume Volume/Time
RESULT
PREDICTED
12
10
8
6
4
2
S
/
L
1
2 3 4
5 6 7 8
FEV1
8L
6
4
2
1
2 3 54 6 7 8
Normal Values: ECCS (adult); Zapletal,Solymar,Cogswell (child)
Results at BTPS
Technician:_______________ Physician:_______________
RESULT
PREDICTED
The first line gives the MicroDL version number and type of report.
Subsequent lines give the test number, date and time of test, and
patient details. This is followed by the test results presented with
the percentage of personal best value, the personal best value, the
percentage of predicted value, the predicted value, the predicted
minimum and maximum, and the unit of measurement.
The expiratory Flow/Volume and Volume/Time curves are also
shown overlaid with the predicted curves and FEV1 marker on the
23
Page 26

Flow/Volume curve. Please note that personal best values cannot be
entered in multiple patient mode.
To obtain subsequent copies of the report press ‘enter’. When all
the required printouts have been obtained press ‘off’ and the unit
will turn off.
Option 3 – full spirometry report of all records
After turning the MicroDL on with the up key depressed, use the up
key twice to obtain printing option 3. The display will show:
This option is used to print full spirometry reports, including
Flow/Volume and Volume/Time curves, on all the stored results.
The ‘65’ indicates that sixty-five sheets of paper will be used, as
there are currently sixty-five tests stored. Press ‘enter’ if this option
is required. The display will show:
The printouts obtained will be identical to the single report produced
with option 2.
At any time during printing pressing ‘off’ will terminate the printing.
Should the printer fail to operate correctly then turn off both the
printer and the MicroDL unit, check all connections, and try again.
24
Page 27
Option 4 – summary report of all records since last printout
After turning the MicroDL on with the up key depressed, use the up
key three times to obtain printing option 4.
The display will show the following:
This option is used to print a summary report of all the results that
have been recorded since the last summary report was printed.
Press ‘enter’ if this option is required. The display will show:
The printouts obtained will be identical to the summary report
produced with option 1, but with fewer entries if a summary report
has been previously obtained.
Option 5 – full spirometry report of all records since last
printout.
After turning the MicroDL on with the up key depressed, use the up
key four times to obtain printing option 4. The display will show:
25
Page 28

This option is used to print full spirometry reports of all the results
that have been recorded since the last time that printing option 3
was used.
Press ‘enter’ if this option is required. The display will show:
The printouts obtained will be identical to the single report produced
with option 3.
PC Based Spirometry
The MicroDL can be connected to a PC and interfaced to
CareFusion’s spirometry data management software SPCS.
SPCS enables you to record, manage, and display spirometry
information. Its main features are:
A fully featured spirometry database.
An interface, which enables the unit to be controlled from the PC and
provides live display of Flow/Volume, and Volume/Time graphs
together with a child incentive display.
Reporting facility including a full set of parameters, predicted values,
graphs and interpretations.
Trend analysis of spirometry data.
26
Page 29

Configuring the MicroDL with SPCS
The MicroDL can be set up using SPCS. First, ensure that the
MicroDL is connected to the PC using the cable supplied. Connect
the nine way ‘D’ connector to the serial port of the PC and the 3 pole
jack plug to the socket in the right hand side of the MicroDL.
To communicate with the PC the MicroDL must be turned on in PC
mode. Depress the ‘enter’ key, turn the unit on, and release the
‘enter’ key when the display shows:
Start SPCS on the PC. Ensure that SPCS is set up to use the COM
port on the computer that the MicroDL is connected to (refer to
online SPCS help). A patient record should then be set up
containing the details to be downloaded to the MicroDL (or an
existing patient selected). These details can then be used to
initialise the unit. Please refer to the online help included with SPCS
for the exact details for performing these operations.
NOTE: Keep the PC out of reach of the patient when connected to
the MicroDL. The MicroDL should only be connected to a computer
that is manufactured in accordance with EN60950 1992/1993 ‘Safety
of Information Technology Equipment including Electrical Business
Equipment’.
Uploading Results
To upload the results stored in the MicroDL, connect the unit to the
PC as described above and start SPCS. When the initial screen is
displayed, click on the ‘upload‘button. The data contained in the
27
Page 30

unit will then be uploaded into the SPCS database (refer to online
help for further information).
Please note that the patient details for any data uploaded into SPCS
from a unit that has been set-up by hand, should be entered into the
SPCS database. This will allow the uploaded spirometry records to
be displayed and trended.
The patient IDs used in the unit should match those in the SPCS
database.
NOTE: Keep the PC out of reach of the patient when connected to
the MicroDL.
To connect the unit to the PC; connect the cable to one of the PC’s
serial communications ports and turn the unit on with the ‘enter’ key
held down. The unit display should show ‘PC’ flashing. Now run
SPCS on your PC (for more information on SPCS, refer to online
help).
Battery Management
There are two sources of internal battery power in the MicroDL.
The recorded data is stored in a battery-backed memory, supplied
by a Lithium power source with an expected life of at least 10 years.
This battery also supplies the timekeeping clock.
The microcomputer circuitry is supplied by a 9 volt, alkaline PP3
battery. The battery life is approximately 24 hours of continuous
use.
The battery voltage is monitored continuously and the following
warning message is displayed when the battery starts to become
exhausted:
28
Page 31

The warning will flash for a few seconds and the unit will turn itself
off. Replace the battery by sliding off the battery cover at the back
of the unit, unclip the exhausted battery and replace with a new
battery of the correct type.
Note: if the battery is not to be used for long periods, the battery
should be removed to prevent damage to the instrument by possible
leakage.
Calibration Check
The MicroDL is calibrated to read in litres at body temperature,
barometric pressure, and saturated with water vapour (BTPS) for
FEV1 and FVC. The units of PEF are litres per second BTPS or litres
per minute BTPS depending upon the configuration in the PC
software.
The calibration should remain stable indefinitely, unless the
transducer is physically damaged, and the unit should not require
re-calibration.
However, as a check on the correct functioning of the unit we do
recommend that the calibration is checked periodically.
To check the calibration of the unit a large syringe should be used.
This should have a 30mm outlet and be of at least three litres in
capacity and preferably six litres.
A 3 Litre Syringe is available from CareFusion as Cat. No. 36SM2125. The MicroDL should be connected to this syringe with the
29
Page 32

minimum of adapters and the syringe volume should be injected into
the transducer evenly, without pausing.
If, after checking, the unit appears to require re-calibration then
please refer to your supplier for service.
Looking after your MicroDL Spirometer
Please observe the following precautions:
* Avoid exposing the MicroDL to direct sunlight.
* Avoid operating the spirometer in dusty conditions or near to
heating appliances or radiators.
* Do not keep the spirometer in a damp place or expose it to
extremes of temperature.
* Do not direct the transducer holder towards a strong light
source whilst operating the spirometer.
Cleaning the Transducer
The transducer requires no routine maintenance or servicing.
However, if you wish to sterilise or clean the transducer it may be
removed by means of the following procedure:
1. Remove the transducer by gently pulling from the main
body with a twisting action.
2. The transducer may now be immersed in warm soapy water for
routine cleaning or immersed in cold sterilising solutions e.g.
Perasafe, for a period not exceeding 10 minutes (Alcohol and
chloride solutions should be avoided). After cleaning/sterilising,
the transducer should be rinsed in distilled water and dried.
Perasafe is available from CareFusion in convenient 81g plastic
bottles, Cat No. 36-SSC5000A.
3. Re-assemble the transducer into the MicroDL.
30
Page 33

Consumables / Supporting Products
Cat. No. Description
36-PSA1000 Adult Disposable Mouthpieces (500 per box)
36-SST1000 One-way Safety Mouthpieces (500 per box)
36-PSA1200 Paediatric Disposable Mouthpieces (250 per box)
36-PSA1100 Paediatric Adaptor
36-MGF1025 MicroGard Pulmonary Filters (25 per box)
36-MGF1100 MicroGard Pulmonary Filters (100 per box)
36-SSC5000A PeraSafe Sterilising Powder 81g (to make up 5
litres of solution)
36-VOL2104 Nose Clips (pack of 5)
36-BAT1002 Alkaline PP3 Battery
36-SM2125 3 Litre Calibration Syringe
36-SPC1000 Spirometry PC Software
Caution
• Pulmonary filters are single patient use. If used on more than one
patient there is a risk of cross-infection. Repeat use may increase
air resistance and lead to an incorrect measurement.”
• Mouthpieces are single patient use. If used on more than one
patient there is a risk of cross-infection. Repeat use may degrade
materials and lead to an incorrect measurement.”
Training
CareFusion run spirometry training courses throughout the UK,
sessions include:
* Anatomy and Physiology of Respiratory System
31
Page 34

* Lung Volume Terminology
* Objectives of Spirometry
* Setting up the test & performing a good manoeuvre
* Errors of technique
* Interpretation of results
* Using Spirometry as an aid to diagnosing airways disease
* Choosing a Spirometer
* Case Studies
Symbols
0086
Type B device
In accordance with Directive 93/42/EEC
Disposal in compliance with WEEE
Environment
This instrument complies with directive EN60601-1-2
electromagnetic compatibility but can be affected by cellular phones
and by electromagnetic interference exceeding levels specified in EN
50082-1:1992
Servicing
A full service manual including circuit diagrams and parts list is
available upon request.
32
Page 35

Specification of the MicroDL
Displayed Measurements:
Forced Vital Capacity (FVC)
Forced Expired Volume in 1 second (FEV1)
Peak Expiratory Flow Rate (PEF),
Forced Expiratory Ratio (FEV1 FVC)
Recorded Measurements:
Forced Vital Capacity (FVC)
Forced Expired Volume in 1 second (FEV1)
Peak Expiratory Flow Rate (PEF),
Forced Expiratory Ratio (FEV1%FVC)
Flow at 50% of volume remaining (F50)
Flow at 25% of volume remaining (F25)
Mid Expiratory Flow (MEF)
Forced Expiratory Time (FET)
Storage Capacity: Typically > 1 year of data recording
Display: Custom LCD
Transducer Type: CareFusion Uni-Directional Digital
Volume
Accuracy: To ATS recommendations
Standardisation of spirometry
Power supply: 9 volt PP3 Alkaline cell
Backup battery life: >10 years
Main Battery Life: Approximately 24 hours of continuous
use
Dimensions: 170 X 70 X 60mm
Weight: 190g
Operating Temperature: 0 to +40° C
Operating Humidity: 30% to 90% RH
Storage Temperature: -20 to + 70° C
Storage Humidity: 10% to 90% RH
33
Page 36

Page 37

MicroDL
Operating manual
Federal (USA) law restricts this device to sale by or on the order of a
physician or licensed practitioner.
CareFusion,
22745 Savi Ranch Parkway,
Yorba Linda
CA 92887-4668
USA
For US Customer Care:
Toll Free 1-800-231-2466, phone 1-714-283-2228
www.carefusion.com
34
Page 38

II. Introduction – CareFusion USA
The MicroDL spirometer is a compact, battery operated, and fully
portable data recording spirometer designed to collect spirometry
data, expiratory Flow/Volume and Volume/Time curves, and
symptom scores.
The MicroDL can be configured for use with a single patient for
detailed monitoring over a period or for collecting spirometry data
from a number of patients.
Alternatively, the data may be uploaded to a PC running the fully
featured Spirometry PC Software (SPCS). Once uploaded, the data
may be viewed individually or as a trend graph with symptom scores
(in single patient mode) and the Flow/Volume loop of any individual
point examined. SPCS may also be used to perform live spirometry
tests and show the expiratory Flow/Volume loop, Volume/Time curve
and child incentive displays.
In single patient mode the user can perform a spirometry test and
enter symptom scores or event markers. After each spirometry
manoeuvre the results are displayed together with a ‘traffic light’
indication of their performance as an aid to asthma management.
The levels that activate the red, amber and green lights, as a
percentage of the predicted value, can be selected when the unit is
configured. Alternatively, the activation may be based on the
patient’s personal best values when the unit is configured using the
SPCS software.
In multiple patient mode spirometry results can be collected from up
to 200 patients. In this mode the ‘traffic light’ activation is based
upon the patient’s predicted values and symptom scores are not
used.
35
Page 39

The spirometer uses the CareFusion Digital Volume Transducer, an
extremely stable form of volume transducer, which measures
expired air directly at B.T.P.S (Body Temperature and Pressure with
Saturated water vapour) thus avoiding the inaccuracies of
temperature corrections. This transducer is insensitive to the effects
of condensation and temperature and avoids the need for individual
calibration prior to performing a test.
Package Contents
The MicroDL is packaged in a convenient carrying case and comes
complete with the following items (Fig.1):
1.MicroDL microcomputer unit
2.Digital Volume Transducer
3.PP3 alkaline battery
4.Serial Cable together with disposable cardboard mouthpieces.
36
Page 40

MicroDL
Fig.1
2
on
of
enter
1
37
4
3
Page 41

Configuring the MicroDL
The MicroDL must be configured for single patient (asthma
management) or multiple patient use. Multiple patient use is
configured by hand on the instrument itself and single patient use
may be configured either by hand or more conveniently by the SPCS
software provided (see SPCS installation and operation).
When configuring for single patient mode a patient identifier must
be entered. This number will be used to identify data when printing
or uploading results. The age, height and sex of the patient
together with any ethnic correction must also be entered. This data
is used to calculate the predicted values for FEV1, FVC, PEF, and
FEV1/FVC. The ethnic correction reduces the predicted values of the
volume measurements by the percentage entered. Finally, the
levels at which the amber and red warning lights are activated are
entered.
These levels are expressed as a percentage of the predicted values
when the unit is configured by hand but the patient’s personal best
values may be used when the unit is configured using SPCS.
When using the MicroDL in multiple patient mode the patient details
are entered each time the unit is turned on. Therefore, when
configuring the unit for multiple patient use, only the warning light
levels are entered.
To configure the unit, depress the off key, turn the unit on and
release the off key. If there is data currently stored in the unit then
the number of records displayed:
38
Page 42

Configuring the unit will delete these records so if the stored data is
required turn the unit off and print or upload the data using SPCS
(see Printing Stored Records and Uploading Results).
To continue with configuration and delete the data, press ‘enter’ and
the following will be displayed:
The 1 displayed indicates that the unit is set to single patient mode.
By using the up or down key, as indicated by the flashing arrows,
multiple patient modes may be selected when the display will
change to:
Once the required configuration is obtained, press ‘enter’.
If multiple patient modes has been selected the amber light will
flash and the display will change to:
%
Use the up and down keys to select the level of results below which
will produce an amber warning light when the user performs a
spirometry manoeuvre. This level is expressed as a percentage of
39
Page 43

the predicted value. Please note that the default values displayed
may vary from those shown in this manual as the MicroDL will
automatically update the default values to the last actual values
used.
After pressing ‘enter’, the red light will flash and the display will
change to:
%
Use the up and down keys to select the required percentage of
predicted value which will produce a red warning light when the user
performs a spirometry manoeuvre less than the set value.
When the required level has been selected press ‘enter’ and the
display will change to:
The unit is now configured for multiple patient use and will
automatically turn off.
The most convenient way to configure the unit for a single patient is
to use the SPCS software provided. SPCS allows the user to
configure several options that are not available when the unit is
configured by hand.
40
Page 44

These include:
Personal best values can be entered as a basis for the warning light
operation.
The unit may be configured to record symptom scores and events.
A simple operating procedure, for use by the patient, can be printed.
The results to be displayed can be selected.
However, the unit may be configured by hand in the following
manner.
Turn the unit on with the ‘off’ key depressed as described above and
select single patient mode by pressing ‘enter’ when the display
shows:
The display will then change to:
Use the up and down keys to select a patient number.
This number can be set using the ‘up’ and ‘down’ keys anywhere in
the range 1 to 1999 and will be used to identify data when printing
or uploading results. When the required number is displayed press
‘enter’ and the display will change to:
41
Page 45

The flashing symbol represents a male patient and using the up or
down key will change the display to indicate a female patient:
When the correct selection has been made press ‘enter’ and the
display will change to:
yr
Adjust the patient’s age using the up and down keys and press
‘enter’. The display will change to:
Enter the patient’s height, in centimetres, using the up and down
keys and press ‘enter’.
The display will change to:
%
Adjust the ethnic correction using the up and down keys. The
display shows the percentage reduction of volumetric predicted
values to be applied for the patient. Press ‘enter’ when the required
42
Page 46

correction has been selected. The levels for the amber and red
warning lights should now be set as described above in the
description of multiple patient configuration.
Spirometry Operation (Single patient use)
When performing a spirometry test the user should be instructed to
insert a disposable or clean reusable, mouthpiece into the
mouthpiece holder of the spirometer.
The unit is then turned on, the current time will be displayed briefly,
and the three lights will be illuminated before the display changes
to:
The patient should then inhale as deeply as possible, seal their lips
around the mouthpiece and exhale as hard and as fast as possible
until no more air can be exhaled. The spirometry results are then
displayed:
PEF
The first result shown is Peak Expiratory Flow (PEF). The arrows
indicate that the up and down keys may be used to scroll through
the other results of the test. These include FEV1, FVC, FEV1/FVC
(shown as FEV1 FVC), followed by the percentage of predicted value
for all of the above.
43
Page 47

Note: when the unit is configured with SPCS software the displayed
results can be limited to only those that the patient can usefully
interpret, for example, the unit can be configured to display only PEF
and the percent predicted PEF. However, regardless of the
measurements displayed, all measurements (including expiratory
Flow/Volume and Volume/Time data) will be recorded.
In addition, the MicroDL can be configured with PEF displayed in
units of Litres/min or Litres/sec.
As well as the spirometry results, warning lights will be displayed.
The lights are based on a percentage of the predicted value or
personal best values.
Note: personal best values can only be used when the unit is
configured using SPCS software.
The percentage level below which the warning lights illuminate can
be configured using SPCS software or when configuring the unit by
hand. The warnings lights will vary according to the spirometry
parameter displayed. However, if a lower level was present on one
of the other parameters then the lower level light will flash until the
display is scrolled to that parameter.
For example, if the unit is configured to display PEF, FEV1, and FVC,
then the patient will see the following displays when scrolling
through the results after a manoeuvre with good peak flow but a
poor FEV1 and very poor FVC:
44
Page 48

PEF
FE V
1
FV C
enter
on
off
on
off
enter
on
off
enter
After completing a spirometry manoeuvre the user may press ‘enter’
to repeat or off to finish testing. After completing a sequence of
tests, the best result will be stored. The definition of best is
selected using SPCS and may be best FEV1, best FVC, best PEF, or
best FEV1 +FVC. If the unit is turned off after performing a
manoeuvre, and then used again within five minutes, then only the
best result within the period will be saved
.
Symptom Score Entry (Single patient use only)
SPCS can be used to configure the unit to record symptom scores
and events. Symptom scores have a magnitude range of 1 to 10
and event markers have no magnitude. A total of four symptom
scores and event markers may be recorded. The scores may be
uploaded to SPCS or printed with the spirometry results.
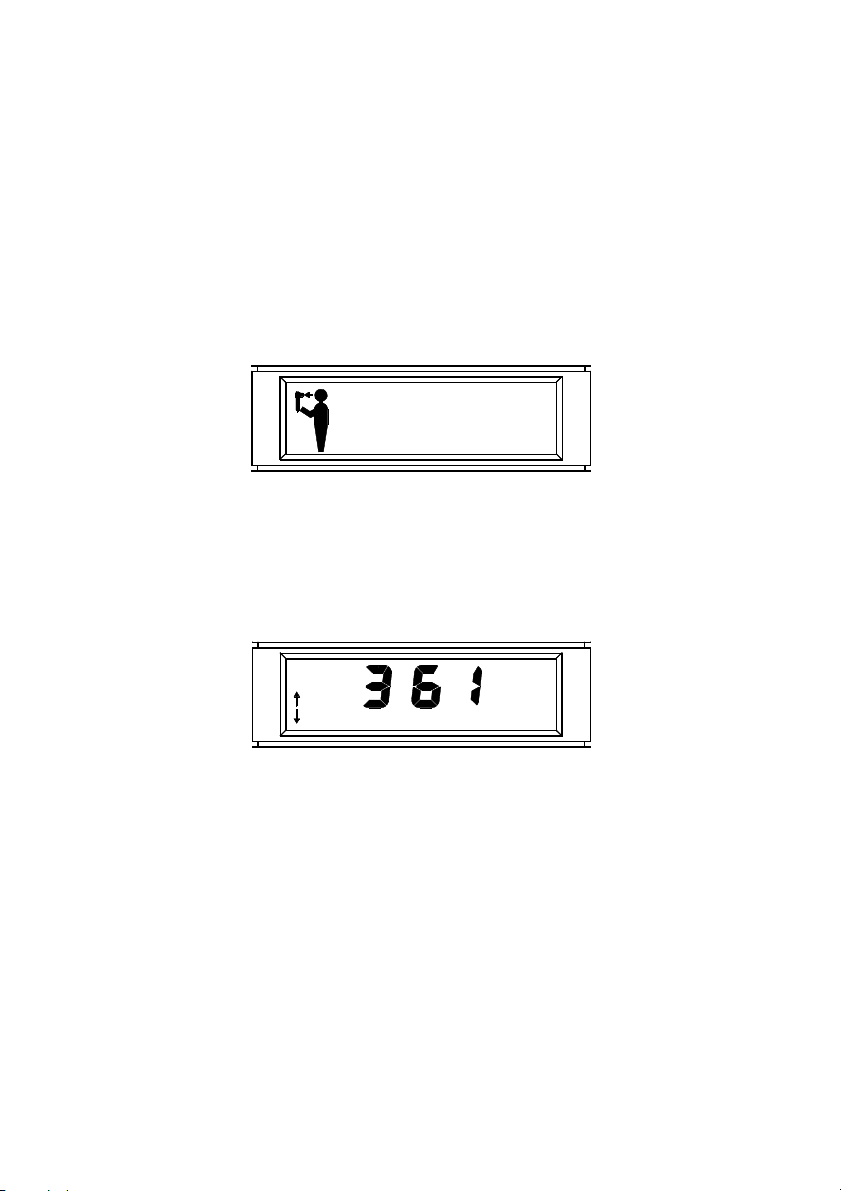
The symptom score or event markers are recorded by pressing
‘enter’ when the blow legend is displayed:
45
Page 49

The display will change to:
Note that pressing ‘enter’ when the E0 legend is displayed does not
record an event, but returns the display to the previous spirometry
screen.
Use the up and down keys to scroll to the required event number
(E1 to E4) e.g:
Press ‘enter’ when the required event is displayed. If the selected
event had no magnitude assigned to it, the event will be recorded
and the display will change to show E0 again. If another event is to
be recorded, then repeat the procedure above. Press ‘enter’ when
E0 is displayed to finish recording events.
If a selected event has magnitude assigned to it then the display will
change to:
The number before the decimal point (2) refers to the event number
and the number on the right hand side is the response.
46
Page 50

Use the up and down keys to adjust the response to the required
value. When ‘enter’ is pressed the magnitude of the event will be
recorded and display will show E0 again.
After all the required events have been entered the unit may be
turned off or a spirometry manoeuvre may be performed.
Spirometry Operation (Multiple patient use)
When performing a spirometry test the user should be instructed to
insert a disposable or clean reusable, mouthpiece into the
mouthpiece holder of the spirometer.
The unit is then turned on, the current time will be displayed briefly,
and the three lights will be illuminated before the display changes
to:
Use the up and down keys to select a patient number. This number
can be set, using the up and down keys, anywhere in the range 1 to
1999 and will be used to identify data when printing or uploading
results.
When the required number is displayed press ‘enter’ and the display
will change to:
47
Page 51

The flashing symbol represents a male patient and using the up key
will change the display to indicate a female patient:
Pressing the up key again will remove the patient symbol:
This indicates that predicted values are not required and the unit will
not request the patient’s details. Please note that if this option is
selected then the warning lights will not be operational.
If male or female predicted values have been selected then the
display will change to:
yr
Select the patients age using the up and down keys and press
‘enter’. The display will change to:
48
Page 52

Enter the patient’s height, in centimetres, using the up and down
keys and press ‘enter’.
The display will change to:
%
Adjust the ethnic correction using the up and down keys. The
display shows the percentage drop of volumetric predicted values to
be applied for the patient. Press ‘enter’ when the required
correction has been selected.
Note: the initial patient number displayed and the default patient
details will be the same as the last one used. This is to facilitate
quick entry of details when performing a repeat test on the same
patient. If a new patient is to be tested then select a different
patient number.
After the patient details have been entered, the display will change
to:
Insert a disposable or clean reusable, mouthpiece into the
mouthpiece holder of the spirometer.
Instruct the patient to inhale as deeply as possible, seal their lips
around the mouthpiece and exhale as hard and as fast as possible
until no more air can be exhaled.
The spirometry results are then displayed:
49
Page 53

PEF
The first result shown is Peak Expiratory Flow (PEF). The arrows
indicate that the up and down keys may be used to scroll through
the other results of the test.
These include FEV1, FVC, FEV1/FVC (shown as FEV1 FVC), followed
by the percentage of predicted value for all of the above.
Note: if the unit has been previously configured with SPCS, the
displayed results will be limited to only those previously set.
However, regardless of the measurements displayed, all
measurements (including expiratory Flow/Volume and Volume/Time
data) will be recorded.
As well as the spirometry results, warning lights will also be
displayed as described in the section ’Spirometry Operation (Single
patient use)’. However, in the case of multiple patient use, the light
activation is based upon the percentage of the predicted value as
personal best values cannot be entered.
After completing a spirometry manoeuvre the user may press ‘enter’
to repeat or ‘off’ to finish testing. After completing a sequence of
tests, the best result will be stored. The definition of best is
selected using SPCS and may be best FEV1, best FVC, best PEF, or
best FEV1+FVC. When off is pressed, the user has the option to
obtain a printout of the results.
The display will change to:
50
Page 54

If a printout is not required, press ‘off’ again and the unit stores the
results, date and time stamped, and turns off. If a printout is
required then connect the serial to parallel converter to the parallel
input socket on the printer. Connect the jack plug to the socket on
the side of the MicroDL and turn the printer on.
NOTE: Keep the printer out of reach of the patient when connected
to the MicroDL.
Press ‘enter’ on the MicroDL to obtain the following report:
MicroDL FULL REPORT
Patient Name:______________________________________
Test: 1 Date: 12/11/97 Time: 0802
ID: 6 Sex: Male Age: 19
Height: 190 cm Ethnic Correction: 0%
Parameter Result %Pred Pred Min Max Units
FEV1 3.71 74 4.95 4.11 5.79 L
FVC 4.61 77 5.95 4.95 6.95 L
PEF 9.67 90 10.74 8.75 12.73 L/S
FEV1%FVC 80 97 82 70 94 %
F50 4.15 68 6.07 3.90 8.24 L/S
F25 1.36 45 2.96 1.68 4.24 L/S
MEF 5.45 102 5.31 3.60 7.20 L/S
FET 4.66 S
51
Page 55

Flow/Volume Volume/Time
8L
RESULT
PREDICTED
FEV1
12
10
8
6
6
4
RESULT
PREDICTED
4
2
S
/
L
1
2 3 4
5 6 7 8
2
1
2 3 54 6 7 8
Normal Values: ECCS (adult); Zapletal,Solymar,Cogswell (child)
Results at BTPS
Technician:______________ Physician:_______________
The first line gives the MicroDL version number and type of report (a
summary report of all data stored is also available – see Printing
Stored Results).
Subsequent lines give the test number (the tests are numbered
sequentially as they are stored), date and time of test, and patient
details.
This is followed by the test results presented with the percentage of
the predicted value, the predicted value, the predicted minimum and
maximum, and the unit of measurement.
The expiratory Flow/Volume and Volume/Time curves are also
shown overlaid with the predicted curves and FEV1 marker on the
Flow/Volume curve.
52
Page 56

To obtain subsequent copies of the report press ‘enter’. When all
Singlerecord
the required printouts have been obtained press ‘off’ and the unit
will turn off.
If the unit is turned off after performing a manoeuvre, and then used
again within five minutes, then only the best result within the period
will be saved.
Printing Stored Records
There are five printing options for the stored results. To assist the
selection of the required option a system of icons will appear on the
display when the unit is set to printing mode:
Summaryreport
Spirometryreport
Allrecords
Allrecordssincelastprintout
If one page appears, then a single record has been selected.
If two pages appear, then only records since the last printout will be
printed.
If three pages appear, then all stored records will be printed.
If the front page shows only lines of text then a summary report has
been selected.
If the Flow/Volume symbol appears, then a spirometry report has
been selected.
Depress the up key, turn the unit on and release the up key after a
few seconds. The display will indicate the type of report to be
printed and the number of pages that will be used.
53
Page 57

Use the up key to select the type of printout required.
The following examples assume that the unit is configured in single
patient mode, and that symptom scores are recorded.
Option 1 – summary report of all records
After turning the MicroDL on with the up key depressed the following
will be displayed:
This display is indicating that a summary report of all stored results
has been selected and that the printout will use two sheets of paper.
If this option is required then press ‘enter’ and the display will
change to:
54
Page 58

The following printout of spirometry results will be obtained:
MicroDL SUMMARY REPORT
Test ID Date Time FEV1 FVC PEF
----------------------------------------------------------------------------
1 6 10/09/97 10:56 2.97(86%) 3.25(78%) 7.49(87%)
2 6 11/09/97 11:32 2.74(79%) 3.12(75%) 6.45(75%)
3 6 12/09/97 09:58 3.14(91%) 3.53(85%) 8.37(97%)
‘’ ‘’ ‘’ ‘’ ‘’ ‘’ ‘’
‘’ ‘’ ‘’ ‘’ ‘’ ‘’ ‘’
‘’ ‘’ ‘’ ‘’ ‘’ ‘’ ‘’
Values in brackets are percentage of best value.
Technician: ______________ Physician: _______________
This is followed by the symptom score entries, where
applicable:
MicroDL V1.15 EVENTS REPORT
# Date Time Event Value
----------------------------------------------------------------------------1 10/09/97 10:58 COUGH 8
2 11/09/97 11:34 CAT
‘’ ‘’ ‘’ ‘’ ‘’
‘’ ‘’ ‘’ ‘’ ‘’
‘’ ‘’ ‘’ ‘’ ‘’
The summary report gives the date, time, FEV1, FVC, and PEF
together with the percentage of best value in brackets. The tests
are sequentially numbered and this can be used to select a
particular test for more detailed investigation by selecting a full
report using printing option 2.
55
Page 59

Please note that symptom score entry is not possible in multiple
patient modes. At any time during printing pressing ‘off’ will
terminate the printing. Should the printer fail to operate correctly
then turn off both the printer and the MicroDL unit, check all
connections, and try again.
Option 2 – full spirometry report of one record
After turning the MicroDL on with the up key depressed, use the up
key again to obtain printing option 2. The display will show:
This option is used to select a full report, including Flow/Volume and
Volume/Time curves, on one stored result. The ‘1’ indicates that one
sheet of paper will be used.
Press ‘enter’ if this option is required and the display will change to:
The tests are numbered sequentially as they are stored and the
number displayed represents the last test recorded.
Use the down key to select the required test and then press ‘enter’.
The display will change to:
56
Page 60

The following printout of spirometry results will be obtained:
MicroDL FULL REPORT
Patient Name:________________________________
Test: 1 Date: 12/11/97 Time: 0802
ID: 6 Sex: Male Age: 19
Height: 190 cm Ethnic Correction: 0%
Parameter Result %Best Best %Pred Pred Min Max Units
FEV1 3.71 78 4.76 74 4.95 4.11 5.79 L
FVC 4.61 82 5.62 77 5.95 4.95 6.95 L
PEF 9.67 92 10.65 90 10.74 8.75 12.73 L/S
FEV1%FVC 80 97 82 97 82 70 94 %
F50 4.15 68 6.07 3.90 8.24 L/S
F25 1.36 45 2.96 1.68 4.24 L/S
MEF 5.45 102 5.31 3.60 7.20 L/S
FET 4.66 S
12
Flow/Volume Volume/Time
8L
RESULT
PREDICTED
FEV1
6
RESULT
PREDICTED
10
8
6
4
2
S
/
L
1
2 3 4
5 6 7 8
4
2
1
2 3 54 6 7 8
Normal Values: ECCS (adult); Zapletal,Solymar,Cogswell (child)
Results at BTPS
Technician:______________ Physician:_______________
57
Page 61

The first line gives the MicroDL version number and type of report.
Subsequent lines give the test number, date and time of test, and
patient details. This is followed by the test results presented with
the percentage of personal best value, the personal best value, the
percentage of predicted value, the predicted value, the predicted
minimum and maximum, and the unit of measurement.
The expiratory Flow/Volume and Volume/Time curves are also
shown overlaid with the predicted curves and FEV1 marker on the
Flow/Volume curve. Please note that personal best values cannot be
entered in multiple patient modes.
To obtain subsequent copies of the report press ‘enter’. When all
the required printouts have been obtained press ‘off’ and the unit
will turn off.
Option 3 – full spirometry report of all records
After turning the MicroDL on with the up key depressed, use the up
key twice to obtain printing option 3. The display will show:
This option is used to print full spirometry reports, including
Flow/Volume and Volume/Time curves, on all the stored results.
The ‘65’ indicates that sixty-five sheets of paper will be used, as
there are currently sixty-five tests stored. Press ‘enter’ if this option
is required. The display will show:
58
Page 62

The printouts obtained will be identical to the single report produced
with option 2.
At any time during printing pressing ‘off’ will terminate the printing.
Should the printer fail to operate correctly then turn off both the
printer and the MicroDL unit, check all connections, and try again.
Option 4 – summary report of all records since last printout.
After turning the MicroDL on with the up key depressed, use the up
key three times to obtain printing option 4.
The display will show the following:
This option is used to print a summary report of all the results that
have been recorded since the last summary report was printed.
Press ‘enter’ if this option is required. The display will show:
59
Page 63

The printouts obtained will be identical to the summary report
produced with option 1, but with fewer entries if a summary report
has been previously obtained.
Option 5 – full spirometry report of all records since last
printout.
After turning the MicroDL on with the up key depressed, use the up
key four times to obtain printing option 4.
The display will show:
This option is used to print full spirometry reports of all the results
that have been recorded since the last time that printing option 3
was used.
Press ‘enter’ if this option is required. The display will show:
The printouts obtained will be identical to the single report produced
with option 3.
PC Based Spirometry
The MicroDL can be connected to a PC and interfaced to CareFusion
spirometry data management software SPCS. SPCS enables you to
record, manage, and display spirometry information. Its main
features are:
60
Page 64

A fully featured spirometry database.
An interface, which enables the unit to be controlled from the PC and
provides live display of Flow/Volume, and Volume/Time graphs
together with a child incentive display.
Reporting facility including a full set of parameters, predicted values,
graphs and interpretations.
Trend analysis of spirometry data.
Configuring the MicroDL with SPCS
The MicroDL can be set up using SPCS. First, ensure that the
MicroDL is connected to the PC using the cable supplied. Connect
the nine way ‘D’ connector to the serial port of the PC and the 3 pole
jack plug to the socket in the right hand side of the MicroDL.
To communicate with the PC the MicroDL must be turned on in PC
mode. Depress the ‘enter’ key, turn the unit on, and release the
‘enter’ key when the display shows:
Start SPCS on the PC. Ensure that SPCS is set up to use the COM
port on the computer that the MicroDL is connected to (refer to
online SPCS help). A patient record should then be set up
containing the details to be downloaded to the MicroDL (or an
existing patient selected). These details can then be used to
initialise the unit. Please refer to the online help included with SPCS
for the exact details for performing these operations.
61
Page 65

NOTE: Keep the PC out of reach of the patient when connected to
the MicroDL. The MicroDL should only be connected to a computer
that is manufactured in accordance with EN60950 1992/1993 ‘Safety
of Information Technology Equipment including Electrical Business
Equipment’.
Uploading Results
To upload the results stored in the MicroDL, connect the unit to the
PC as described above and start SPCS. When the initial screen is
displayed, click on the ‘upload‘button. The data contained in the
unit will then be uploaded into the SPCS database (refer to online
help for further information).
Please note that the patient details for any data uploaded into SPCS
from a unit that has been set-up by hand, should be entered into the
SPCS database. This will allow the uploaded spirometry records to
be displayed and trended.
The patient IDs used in the unit should match those in the SPCS
database.
NOTE: Keep the PC out of reach of the patient when connected to
the MicroDL.
To connect the unit to the PC; connect the cable to one of the PC’s
serial communications ports and turn the unit on with the ‘enter’ key
held down. The unit display should show ‘PC’ flashing. Now run
SPCS on your PC (for more information on SPCS, refer to online
help).
62
Page 66

Battery Management
There are two sources of internal battery power in the MicroDL.
The recorded data is stored in a battery-backed memory, supplied
by a Lithium power source with an expected life of at least 10 years.
This battery also supplies the timekeeping clock.
The microcomputer circuitry is supplied by a 9 volt, alkaline PP3
battery. The battery life is approximately 24 hours of continuous
use.
The battery voltage is monitored continuously and the following
warning message is displayed when the battery starts to become
exhausted:
The warning will flash for a few seconds and the unit will turn itself
off. Replace the battery by sliding off the battery cover at the back
of the unit, unclip the exhausted battery and replace with a new
battery of the correct type.
Note: if the battery is not to be used for long periods, the battery
should be removed to prevent damage to the instrument by possible
leakage.
Calibration Check
The MicroDL is calibrated to read in litres at body temperature,
barometric pressure, and saturated with water vapour (BTPS) for
FEV1 and FVC. The units of PEF are litres per second BTPS or litres
63
Page 67

per minute BTPS depending upon the configuration in the PC
software.
The calibration should remain stable indefinitely, unless the
transducer is physically damaged, and the unit should not require
re-calibration.
However, as a check on the correct functioning of the unit we do
recommend that the calibration is checked periodically.
To check the calibration of the unit a large syringe should be used.
This should have a 30mm outlet and be of at least three litres in
capacity and preferably six litres.
A 3 Litre Syringe is available from CareFusion. The MicroDL should
be connected to this syringe with the minimum of adapters and the
syringe volume should be injected into the transducer evenly,
without pausing.
If, after checking, the unit appears to require re-calibration then
please refer to your supplier for service.
Looking after your MicroDL Spirometer
Please observe the following precautions:
* Avoid exposing the MicroDL to direct sunlight.
* Avoid operating the spirometer in dusty conditions or near to
heating appliances or radiators.
* Do not keep the spirometer in a damp place or expose it to
extremes of temperature.
* Do not direct the transducer holder towards a strong light
source whilst operating the spirometer.
64
Page 68

Cleaning the Transducer
The transducer requires no routine maintenance or servicing.
However, if you wish to sterilise or clean the transducer it may be
removed by means of the following procedure:
1. Remove the transducer by gently pulling from the main body
with a twisting action.
2. The transducer may now be immersed in warm soapy water
for routine cleaning or immersed in cold sterilising solutions
e.g. Perasafe, for a period not exceeding 10 minutes (Alcohol
and chloride solutions should be avoided). After
cleaning/sterilising, the transducer should be rinsed in distilled
water and dried.
Perasafe is available from CareFusion in convenient 81g
plastic bottles.
3. Re-assemble the transducer into the MicroDL.
Caution
• Pulmonary filters are single patient use. If used on more than one
patient there is a risk of cross-infection. Repeat use may increase
air resistance and lead to an incorrect measurement.”
• Mouthpieces are single patient use. If used on more than one
patient there is a risk of cross-infection. Repeat use may degrade
materials and lead to an incorrect measurement.”
65
Page 69

Symbols
Type B device
Environment
This instrument complies with directive EN60601-1-2
electromagnetic compatibility but can be affected by cellular phones
and by electromagnetic interference exceeding levels specified in EN
50082-1:1992
Servicing
A full service manual including circuit diagrams and parts list is
available upon request.
For US Customer Care: Toll Free 1-800-231-2466, phone 1-714283-2228
Specification of the MicroDL
Displayed Measurements:
Forced Vital Capacity (FVC)
Forced Expired Volume in 1 second (FEV1)
Peak Expiratory Flow Rate (PEF),
Forced Expiratory Ratio (FEV1 FVC)
Recorded Measurements:
Forced Vital Capacity (FVC)
Forced Expired Volume in 1 second (FEV1)
Peak Expiratory Flow Rate (PEF),
Forced Expiratory Ratio (FEV1%FVC)
Flow at 50% of volume remaining (F50)
Flow at 25% of volume remaining (F25)
66
Page 70

Mid Expiratory Flow (MEF)
Forced Expiratory Time (FET)
Storage Capacity: Typically > 1 year of data recording
Display: Custom LCD
Transducer Type: Uni-Directional Digital Volume
Accuracy: To ATS recommendations
Standardisation of spirometry
Data Entry: 4 event markers or symptom scores on
1 to 10 scale
Power supply: 9 volt PP3 Alkaline cell
Backup battery life: >10 years
Main Battery Life: Approximately 24 hours of continuous
use
Dimensions: 170 X 70 X 60mm
Weight: 190g
Operating Temperature: 0 to +40° C
Operating Humidity: 30% to 90% RH
Storage Temperature: -20 to + 70° C
Storage Humidity: 10% to 90% RH
67
Page 71

MicroDL
Bedienungsanleitung
III. Einleitung - Deutsch
Der Micro DL Spirometer ist ein kompakt gebauter,
batteriebetriebener, tragbarer Spirometer mit
Datenaufzeichnungsfunktion zur Erfassung spirometrischer Daten,
expiratorischer Strömungs/Volumen- und Volumen/Zeit-Kurven
sowie Symptom-Scores. Die Konfigurationsmöglichkeiten des Micro
DL erlauben sowohl den Einsatz bei einem einzelnen Patienten zur
detaillierten Überwachung über einen längeren Zeitraum als auch die
Erfassung der spirometrischen Daten mehrerer Patienten.
Alternativ können die Daten auf einen PC geladen werden, auf dem
die Spirometry PC Software (SPCS) läuft. Sobald die Daten geladen
sind, können sie individuell oder als Trendgraphik mit SymptomScores (im Modul Einzelpatient) und der Fluss/Volumen-Schleife
jedes einzelnen untersuchten Punktes am Bildschirm angezeigt
werden. Ist der Micro DL an einen PC angeschlossen, kann SPCS zur
Durchführung von spirometrischen live-Tests, Anzeige der
expiratorischen Fluss/Volumen-Schleife, der Volumen/Zeit-Kurve und
zum Aufrufen der kindgerechten Anzeigemodi benutzt werden.
Im Modus Einzelpatient kann der Benutzer einen spirometrischen
Test durchführen und Symptom-Scores oder Ereignismarker
eingeben. Nach jedem spirometrischen Manöver werden die
Ergebnisse zusammen mit einer 'Ampelanzeige' zur erzielten
68
Page 72

Leistung dargestellt. Dies dient zur Unterstützung beim AsthmaManagement. Das jeweilige Leistungsniveau zur Aktivierung des
roten, gelben oder grünen Lichts kann bei der Konfigurierung des
Geräts in Form eines Prozentsatzes des vorhergesagten Wertes
gewählt werden. Alternativ kann die Aktivierung auf den persönlichen
Bestwerten des Patienten basieren; auch dies wird bei der
Konfigurierung des Geräts mit der SPCS-Software festgelegt. Im
Modus für mehrere Patienten können spirometrische Testergebnisse
von bis zu 200 Patienten erfasst werden. In diesem Modus basiert
die Aktivierung der 'Ampel' auf den vorhergesagten Werten für den
jeweiligen Patienten; Symptom-Scores kommen nicht zum Einsatz.
Der Spirometer arbeitet mit dem digitalen VolumenMesswertwandler von CareFusion, einem extrem stabilen VolumenMesswertwandler, der die ausgeatmete Luft unmittelbar bei BTPSBedingungen misst (Body Temperature and Pressure with Saturated
water vapour, Körpertemperatur und Druck mit gesättigtem
Wasserdampf) und dadurch Ungenauigkeiten bei der
Temperaturkorrektur vermeidet. Dieser Messwertwandler ist
unempfindlich gegenüber möglichen Auswirkungen von Kondensation
und Temperatur und macht die individuelle Kalibrierung vor der
Durchführung eines Tests überflüssig.
Packungsinhalt
Der Micro DL ist in einem handlichen Koffer verpackt und wird
komplett mit folgenden Teilen geliefert (Abb. 1):
1. Micro DL Mikrocomputer
2. CareFusion Digitaler Volumen-Messwertwandler
3.
PP3 Stahl-Akku
4.
Serielles Kabel
Außerdem Einweg-Mundstücke aus Pappe und kostenlose SPCSSoftware.
69
Page 73

MicroDL
1
Fig.1
of
enter
3
4
on
2
70
Page 74

Konfigurierung des MicroDL
Der Micro DL muss für den Einsatz mit einem einzelnen Patienten
(Asthma-Management) oder mehreren Patienten eingerichtet werden.
Der Einsatz mit mehreren Patienten wird manuell am Gerät selber
konfiguriert, während der Einsatz für einen einzelnen Patienten
entweder manuell oder, noch bequemer, mit der mitgelieferten SPCSSoftware (siehe Installation und Bedienung von SPCS) konfiguriert
wird.
Bei der Konfigurierung für den Modus Einzelpatient muss eine
Patienten-ID eingegeben werden. Diese ID-Nummer dient zur
Identifizierung von Daten beim Ausdrucken oder Heraufladen von
Ergebnissen. Außerdem müssen Alter, Körpergröße und Geschlecht
des Patienten sowie eventuell ein Korrekturwert für die ethnische
Herkunft eingegeben werden. Diese Daten dienen zur Berechnung der
vorhergesagten Werte für ESK, FVC, PEF, und ESK/FVC. Mit der
Korrektur für ethnische Herkunft werden die vorhergesagten Werte für
die Volumenmessungen um den eingegebenen Prozentsatz verringert.
Zum Schluss werden die Werte eingegeben, bei den die gelben und
roten Warnlichter aktiviert werden.
Diese Werte werden bei der manuellen Konfigurierung des Geräts als
Prozentsatz der vorhergesagten Werte ausgedrückt, bei der
Konfigurierung des Geräts mit SPCS können aber auch die
persönlichen Bestwerte des Patienten benutzt werden.
Wird der Micro DL im Modus für mehrere Patienten benutzt, gibt man
die Patientendaten jedes Mal beim Einschalten des Geräts ein.
Deshalb werden bei der Konfigurierung des Geräts für den Einsatz mit
mehreren Patienten nur die Werte für die Warnanzeigen eingegeben.
Zur Konfigurierung des Geräts die Taste "off" drücken, das Gerät
einschalten und nun die Taste "off" loslassen. Sind im Gerät zur Zeit
Daten gespeichert, wird die Anzahl der Datensätze angezeigt:
71
Page 75

Durch die Konfigurierung des Geräts werden diese Datensätze
gelöscht. Wenn die gespeicherten Daten also benötigt werden,
schalten Sie das Gerät aus und drucken Sie die Daten aus oder laden
Sie sie mit SPCS (siehe 'Gespeicherte Aufzeichnungen drucken und
Ergebnisse laden') herauf.
Um mit der Konfigurierung fortzufahren und die Daten zu löschen,
drücken Sie 'enter'. Nun erscheint folgende Anzeige:
Die angezeigte 1 weist darauf hin, dass sich das Gerät im Modus
Einzelpatient befindet.
Mit Hilfe der Taste nach oben oder nach unten, dargestellt durch die
blinkenden Pfeile, kann der Modus für mehrere Patienten gewählt
werden. Nun wechselt die Anzeige auf:
Sobald die gewünschte Konfiguration erreicht ist, 'enter' drücken.
Wurde der Modus für mehrere Patienten gewählt, blinkt das gelbe
Lämpchen und die Anzeige wechselt auf:
72
Page 76

%
Wählen Sie mit Hilfe der Pfeiltasten das Ergebnisniveau, bei dessen
Nichterreichen im Verlauf eines spirometrischen Manövers ein gelbes
Warnlicht erscheinen soll. Dieses Niveau wird als Prozentsatz des
vorhergesagten Wertes ausgedrückt. Bitte beachten Sie, dass sich die
angezeigten Voreinstellwerte von den in diesem Handbuch gezeigten
Werten unterscheiden können, weil der Micro DL die Voreinstellwerte
automatisch mit den zuletzt benutzten tatsächlichen Werten
aktualisiert.
Sobald ‘enter’ gedrückt wurde, blinkt das rote Licht und die Anzeige
wechselt auf:
%
Wählen Sie mit Hilfe der Pfeiltasten den gewünschten Prozentsatz des
vorhergesagten Wertes, bei dessen Nichterreichen im Verlauf eines
spirometrischen Manövers ein rotes Warnlicht erscheinen soll.
Wenn das gewünschte Niveau gewählt wurde, drücken Sie ‘enter’. Die
Anzeige wechselt auf:
Das Gerät ist nun für den Einsatz mit mehreren Patienten konfiguriert
und schaltet automatisch ab.
73
Page 77

Die bequemste Möglichkeit zur Konfigurierung des Geräts für einen
einzelnen Patienten bietet die mitgelieferte SPCS-Software. SPCS
erlaubt die Einrichtung verschiedener Optionen, die bei der manuellen
Konfigurierung des Geräts nicht zur Verfügung stehen.
Diese sind u.a.:
Als Grundlage für die Auslösung der Warnlichter können persönliche
Bestwerte eingegeben werden.
Das Gerät kann für die Aufzeichnung von Symptom-Scores und
Ereignissen konfiguriert werden.
Man kann eine vereinfachte Bedienungsanleitung zur Benutzung durch
den Patienten ausdrucken.
Man kann die anzuzeigenden Ergebnisse auswählen.
Das Gerät kann aber auch wie unten beschrieben manuell konfiguriert
werden.
Schalten Sie das Gerät bei gedrückter ‘off’-Taste ein, wie oben
beschrieben. Wählen Sie den Modus Einzelpatient, indem Sie ‘enter’
drücken, wenn folgende Anzeige erscheint:
Die Anzeige wechselt nun auf:
74
Page 78

Wählen Sie mit Hilfe der Pfeiltasten eine Patientennummer.
Diese Nummer kann mit Hilfe der Pfeiltasten 'auf' und 'ab' im Bereich
von 1 bis 1999 beliebig gewählt werden. Sie dient zur Identifizierung
der Daten beim Ausdrucken oder Heraufladen von Ergebnissen.
Sobald die gewünschte Nummer erscheint, ‘enter’ drücken. Nun
wechselt die Anzeige auf:
Das blinkende Symbol stellt einen Mann dar. Mit Hilfe der Pfeiltaste
'auf' oder 'ab' wechselt die Anzeige auf eine Frau.
Sobald die richtige Auswahl getroffen wurde, ‘enter’ drücken. Die
Anzeige wechselt auf:
yr
Stellen Sie das Alter des Patienten mit Hilfe der Pfeiltasten 'auf' und
'ab' ein und drücken Sie enter’. Die Anzeige wechselt auf:
75
Page 79

Geben Sie mit Hilfe der Pfeiltasten 'auf' und 'ab' die Größe des
Patienten in Zentimetern ein und drücken Sie enter’.
Die Anzeige wechselt auf:
%
Passen Sie mit Hilfe der Pfeiltasten 'auf' und 'ab' den Korrekturwert für
ethnische Herkunft an. Auf der Anzeige erscheint der für den Patienten
anzuwendende Prozentsatz zur Reduzierung der vorhergesagten
volumetrischen Werte. Drücken Sie ‘enter’, sobald die gewünschte
Korrektur gewählt wurde. Stellen Sie Anschließend die Werte für das
gelbe und rote Warnlicht gemäß der oben für die Konfiguration
mehrerer Patienten gegebenen Beschreibung ein.
Bedienung des Spirometers (Einzelpatient)
Der Benutzer sollte angewiesen werden, für die Durchführung eines
spirometrischen Tests ein neues Einweg- oder ein sauberes
Mehrwegmundstück in den Mundstückhalter des Spirometers zu
stecken.
Anschließend wird das Gerät eingeschaltet. Die aktuelle Zeit wird kurz
angezeigt und die drei Lichter leuchten auf, bevor die Anzeige
wechselt auf:
Der Patient sollte nun so tief wie möglich einatmen, die Lippen dicht
um das Mundstück herum schließen und so stark und schnell wie
76
Page 80

möglich ausatmen, bis keine Luft mehr ausgeatmet werden kann. Die
Ergebnisse der Spirometrie werden nun angezeigt:
PEF
Der zuerst angezeigte Ergebnis ist der Peak Expiratory Flow (PEF,
maximaler expiratorischer Fluss). Die Pfeile zeigen an, dass man mit
Hilfe der Pfeiltasten 'auf' und 'ab' durch die anderen Testergebnisse
blättern kann. Diese sind u.a. ESK, FVC, ESK/FVC (angezeigt als ESK
FVC). Bei allen oben genannten Werten folgt jeweils der Prozentsatz
des vorhergesagten Wertes.
Hinweis: Wird das Gerät mit der SPCS-Software konfiguriert, können
die angezeigten Ergebnisse auf diejenigen Werte begrenzt werden, die
der Patient nutzbringend interpretieren kann; z.B. kann das Gerät so
konfiguriert werden, dass nur der PEF und die Prozent vom
vorhergesagten PEF angezeigt werden. Unabhängig von den jeweils
angezeigten Messungen werden aber alle Messungen (einschließlich
der Daten zu den Kurven für expiratorischen Fluss/Volumen und
Volumen/Zeit) aufgezeichnet.
Der Micro DL kann außerdem so eingerichtet werden, dass der PEF in
den Maßeinheiten Liter/Min. oder Liter/Sek. angezeigt wird.
Außer den spirometrischen Ergebnissen werden auch Warnlichter
angezeigt. Sie basieren auf einem Prozentsatz des vorhergesagten
Wertes oder des persönlichen Bestwertes.
Hinweis: Persönliche Bestwerte können nur benutzt werden, wenn das
Gerät mit der SPCS-Software konfiguriert wird.
77
Page 81

Der Prozentsatz, bei dessen Unterschreiten die Warnlichter
aufleuchten, kann mit Hilfe der SPCS-Software oder während der
manuellen Konfigurierung des Geräts festgesetzt werden. Die
Warnlichter variieren je nach angezeigtem spirometrischen Parameter.
Lag jedoch bei einem der anderen Parameter ein zu niedriger Wert
vor, dann blinkt die Anzeigelicht für diesen zu niedrigen Wert weiter,
bis man die Anzeige auf den betreffenden Parameter schaltet.
Wurde das Gerät zum Beispiel für die Anzeige von PEF, ESK, und FVC
eingerichtet, sieht der Patient nach einem Manöver mit einer guten
Spitzenströmung (PEF) aber einer schlechten ESK und einem sehr
schlechten FVC beim Durchblättern der Ergebnisse folgende Anzeigen:
PEF
on
off
enter
FE V
1
enter
FV C
on
off
on
off
enter
Nach Beendigung eines spirometrischen Manövers kann der Benutzer
‘enter’ drücken, um den Test zu wiederholen, oder 'off', um ihn zu
beenden. Nach Abschluss einer Testreihe wird das beste Ergebnis
gespeichert. Die Definition für das beste Ergebnis wird mit Hilfe von
SPCS festgelegt und kann die beste ESK (FEV1), die beste FVC, der
beste PEF, oder der beste ESK +FVC sein. Wird das Gerät nach der
Durchführung eines Manövers abgeschaltet und dann innerhalb von
fünf Minuten erneut benutzt, wird nur der innerhalb dieses Zeitraums
erzielte Bestwert gespeichert.
78
Page 82

Eingabe von Symptom-Scores (nur für
Einzelpatienten)
SPCS kann zur Konfigurierung des Geräts für die Aufzeichnung von
Symptom-Scores und Ereignissen benutzt werden. Für SymptomScores besteht ein Größenordnungsbereich von 1 bis 10, während es
für Ereignismarker keine Größenordnungen gibt. Es können insgesamt
vier Symptom-Scores und Ereignismarker aufgezeichnet werden. Die
Scores können in SPCS geladen oder gemeinsam mit den
spirometrischen Messergebnissen ausgedruckt werden.
Symptom-Scores oder Ereignismarker werden aufgezeichnet, indem
man ‘enter’ drückt, wenn das Symbol für Blasen erscheint:
Die Anzeige wechselt auf:
Beachten Sie, dass kein Ereignis aufgezeichnet wird, wenn man bei
Erscheinen des Symbols EO ‘enter’ drückt, sondern dass dann die
Anzeige auf den vorhergehenden Bildschirm für Spirometrie
zurückgesetzt wird.
Blättern Sie mit Hilfe der Pfeiltasten 'auf' und 'ab' zur gewünschten
Ereignisnummer (E1 bis E4), z.B.:
79
Page 83

Drücken Sie ‘enter’, wenn das gewünschte Ereignis angezeigt wird.
Wurde dem gewählten Ereignis keine Größenordnung zugeordnet,
wird das Ereignis aufgezeichnet und die Anzeige wechselt wieder auf
E0. Soll ein weiteres Ereignis aufgezeichnet werden, wiederholen Sie
den oben beschriebenen Vorgang. Zur Beendigung der Aufzeichnung
von Ereignissen ‘enter’ drücken, wenn in der Anzeige E0 steht.
Wurde einem gewählten Ereignis eine Größenordnung zugewiesen,
wechselt die Anzeige auf:
Die Zahl vor dem Punkt (2) bezieht sich auf die Ereignisnummer und
die Zahl rechts davon ist die Reaktion.
Stellen Sie die Reaktion mit Hilfe der Pfeiltasten 'auf' und 'ab' auf den
gewünschten Wert ein. Drückt man jetzt ‘enter’, wird die
Größenordnung des Ereignisses aufgezeichnet und auf der Anzeige
erscheint wieder E0.
Im Anschluss an die Eingabe aller gewünschten Ereignisse kann das
Gerät ausgeschaltet oder ein spirometrisches Manöver durchgeführt
werden.
80
Page 84

Bedienung des Spirometers (mehrere Patienten)
Der Benutzer sollte angewiesen werden, für die Durchführung eines
spirometrischen Tests ein neues Einweg- oder ein sauberes
Mehrwegmundstück in den Mundstückhalter des Spirometers zu
stecken.
Anschließend wird das Gerät eingeschaltet. Die aktuelle Zeit wird kurz
angezeigt und die drei Lichter leuchten auf, bevor die Anzeige
wechselt auf:
Wählen Sie mit Hilfe der Pfeiltasten eine Patientennummer.
Diese Nummer kann mit Hilfe der Pfeiltasten 'auf' und 'ab' im Bereich
von 1 bis 1999 beliebig gewählt werden. Sie dient zur Identifizierung
der Daten beim Ausdrucken oder Heraufladen von Ergebnissen.
Sobald die gewünschte Nummer erscheint, ‘enter’ drücken. Nun
wechselt die Anzeige auf:
Das blinkende Symbol stellt einen Mann dar. Mit Hilfe der Pfeiltaste
'auf' oder 'ab' wechselt die Anzeige auf eine Frau:
81
Page 85

Drückt man die Pfeiltaste 'auf' erneut, wird das Patientensymbol
gelöscht:
Dies zeigt an, dass keine vorhergesagten Werte erforderlich sind und
das Gerät keine Patientendaten anfordern wird. Beachten Sie, dass die
Warnlichter außer Betrieb sind, wenn diese Option gewählt wird.
Wurden die Vorhersagewerte für Männer oder Frauen gewählt,
wechselt die Anzeige auf:
yr
Wählen Sie das Alter des Patienten mit Hilfe der Pfeiltasten 'auf' und
'ab' und drücken Sie enter’. Die Anzeige wechselt auf:
Geben Sie mit Hilfe der Pfeiltasten 'auf' und 'ab' die Größe des
Patienten in Zentimetern ein und drücken Sie enter’.
Die Anzeige wechselt auf:
%
82
Page 86

Passen Sie mit Hilfe der Pfeiltasten 'auf' und 'ab' den Korrekturwert für
ethnische Herkunft an. Auf der Anzeige erscheint der für den Patienten
anzuwendende Prozentsatz zur Reduzierung der vorhergesagten
volumetrischen Werte. Drücken Sie ‘enter’, sobald die gewünschte
Korrektur gewählt wurde.
Hinweis: Die zuerst angezeigte Patientennummer und die
voreingestellten Patientendaten entsprechen den zuletzt verwendeten
Angaben. Damit soll die schnelle Eingabe von Daten bei der
Durchführung eines Wiederholungstests beim gleichen Patienten
erleichtert werden. Soll ein neuer Patient getestet werden, wählen Sie
eine andere Patientennummer.
Nach der Eingabe der Patientendaten wechselt die Anzeige auf:
Stecken Sie ein Einweg- oder sauberes Mehrweg-Mundstück in den
Mundstückhalter des Spirometers.
Weisen Sie den Patienten an, so tief wie möglich einzuatmen, die
Lippen dicht um das Mundstück herum zu schließen und so stark und
schnell wie möglich auszuatmen, bis keine Luft mehr ausgeatmet
werden kann.
Anschließend werden die Ergebnisse der Spirometrie angezeigt:
PEF
83
Page 87

Das zuerst angezeigte Ergebnis ist der Peak Expiratory Flow (PEF,
maximaler expiratorischer Fluss). Die Pfeile zeigen an, dass man mit
Hilfe der Pfeiltasten 'auf' und 'ab' durch die anderen Testergebnisse
blättern kann. Diese sind u.a. ESK (FEV1), FVC, ESK/FVC (angezeigt
als ESK FVC). Bei allen oben genannten Werten folgt jeweils der
Prozentsatz des vorhergesagten Wertes.
Hinweis: Wurde das Gerät vorher mit SPCS konfiguriert, ist die
Ergebnisanzeige auf die vorher festgelegten Ergebnisse begrenzt.
Unabhängig von den jeweils angezeigten Messungen werden aber alle
Messungen (einschließlich der Daten für expiratorischen
Fluss/Volumen und Volumen/Zeit) aufgezeichnet.
Neben spirometrischen Messergebnissen erscheinen auch Warnlichter.
Diese sind im Kapitel 'Bedienung des Spirometers (Einzelpatient)'
beschrieben. Beim Einsatz des Geräts für mehrere Patienten basiert
die Aktivierung der Lichter auf dem Prozentsatz des vorhergesagten
Wertes. Persönliche Bestwerte können hier nicht eingegeben werden.
Nach Beendigung eines spirometrischen Manövers kann der Benutzer
‘enter’ drücken, um den Test zu wiederholen, oder 'off', um ihn zu
beenden. Nach Abschluss einer Testreihe wird das beste Ergebnis
gespeichert. Die Definition für bestes Ergebnis wird mit Hilfe von SPCS
festgelegt und kann die beste ESK (FEV1), die beste FVC, der beste
PEF, oder der beste ESK +FVC sein. Wird die Taste 'off'
besteht die Möglichkeit zum Ausdrucken der Ergebnisse. Die Anzeige
wechselt auf:
gedrückt,
Wird kein Ausdruck benötigt, drücken Sie die Taste 'off' erneut. Das
Gerät speichert jetzt die Ergebnisse zusammen mit einem Datums-
84
Page 88

und Zeitstempel ab. Wird ein Ausdruck benötigt, schließen Sie den
Umsetzer von seriell auf parallel am parallelen Eingang des Druckers
an und stecken Sie das serielle Kabel mit Hilfe des mit dem Umsetzer
mitgelieferten Adapters (9 auf 21) ein. Stecken Sie den Klinkenstöpsel
in die Buchse an der Seite des Micro DL und schalten Sie den Drucker
ein.
HINWEIS: Wenn der Drucker an den Micro DL angeschlossen ist, muss
er außerhalb der Reichweite des Patienten stehen.
DrückenSieaufdemMicroDL‘enter’,umfolgendenBericht
abzurufen:
MicroDL FULL REPORT
Patient Name:______________________________________
Test: 1 Date: 12/11/97 Time: 0802
ID: 6 Sex: Male Age: 19
Height: 190 cm Ethnic Correction: 0%
Parameter Result %Pred Pred Min Max Units
FEV1 3.71 74 4.95 4.11 5.79 L
FVC 4.61 77 5.95 4.95 6.95 L
PEF 9.67 90 10.74 8.75 12.73 L/S
FEV1%FVC 80 97 82 70 94 %
F50 4.15 68 6.07 3.90 8.24 L/S
F25 1.36 45 2.96 1.68 4.24 L/S
MEF 5.45 102 5.31 3.60 7.20 L/S
FET 4.66 S
85
Page 89

12
10
8
6
Flow/Volume Volume/Time
8L
RESULT
PREDICTED
FEV1
6
4
RESULT
PREDICTED
4
2
S
/
L
1
2 3 4
5 6 7 8
2
1
2 3 54 6 7 8
Normal Values: ECCS (adult); Zapletal, Solymar, Cogswell (child)
Results at BTPS
Technician: ______________ Physician: _______________
Die erste Zeile gibt die Versionsnummer des Micro DL und den
Berichtstyp an (außerdem steht eine Zusammenfassung aller
gespeicherten Daten zur Verfügung - siehe dazu 'Gespeicherte
Ergebnisse ausdrucken'). In den nächsten Zeilen werden die
Testnummer (die Tests werden beim Speichern fortlaufend
nummeriert), Datum und Uhrzeit des Tests sowie die Patientendaten
angezeigt.
Daran anschließend erscheinen die Testergebnisse, dargestellt als
Prozentsatz des vorhergesagten Werts, vorhergesagter Wert,
vorhergesagtes Minimum und Maximum sowie Maßeinheit.
Außerdem werden die Kurven für expiratorischen Fluss/Volumen sowie
Volumen/Zeit angezeigt. Über diese Kurven sind die vorhergesagten
Kurven gelegt, auf der Strömungs-/Volumenkurve werden außerdem
die ESK-Marker angezeigt.
86
Page 90

AlleEinträgeseitdem
AlleEinträge
Um weitere Kopien des Berichts zu drucken, betätigen Sie ‘enter’.
Wenn alle benötigten Ausdrucke erstellt worden sind, drücken Sie auf
‘off’. Das Gerät schaltet sich aus.
Wird das Gerät nach der Durchführung eines Manövers abgeschaltet
und dann innerhalb von fünf Minuten erneut benutzt, wird nur der
innerhalb dieses Zeitraums erzielte Bestwert gespeichert.
Gespeicherte Berichte ausdrucken
Für gespeicherte Berichte bestehen fünf Druckoptionen. Zur
Unterstützung bei der Auswahl der erforderlichen Option erscheint auf
der Anzeige folgendes Iconsystem, sobald das Gerät in den
Druckmodus geschaltet wird
:
Spirometrie
letztenAusdruck
Einzeleintrag
Erscheint eine Seite, wurde eine Einzelaufzeichnung gewählt.
Erscheinen zwei Seiten, werden nur die Aufzeichnungen seit dem
letzten Ausdruck ausgedruckt.
Erscheinen drei Seiten, werden alle gespeicherten Aufzeichnungen
gedruckt.
Zeigt die vordere Seite nur Textzeilen, wurde die Option
Zusammenfassung gewählt.
Erscheint das Symbol für Fluss/Volumen, wurde ein spirometrischer
Bericht gewählt.
87
Page 91

Drücken Sie die Pfeiltaste 'auf', schalten Sie das Gerät ein und lassen
Sie die Taste 'auf' nach einigen Sekunden wieder los. Auf der Anzeige
werden der zum Druck anstehende Berichtstyp und die Anzahl der
Seiten, die verbraucht werden, angegeben.
Wählen Sie den gewünschten Berichtstyp mit Hilfe der Taste 'auf'.
In den folgenden Beispielen wird davon ausgegangen, dass das Gerät
im Einzelpatientenmodus konfiguriert wurde und Symptom-Scores
aufgezeichnet werden.
Option 1 – Zusammenfassung aller Aufzeichnungen
Nachdem der Micro DL bei gedrückter 'auf'-Taste eingeschaltet wurde,
erscheint folgende Anzeige:
Diese Anzeige sagt aus, dass eine Zusammenfassung aller
gespeicherten Ergebnisse gewählt wurde und dass für den Ausdruck
zwei Blatt Papier verbraucht werden.
Wird diese Option gewünscht, ‘enter’ drücken. Die Anzeige wechselt
auf:
88
Page 92

Nun erhält man folgenden Ausdruck spirometrischer
Testergebnisse:
MicroDL SUMMARY REPORT
Test ID Date Time FEV1 FVC PEF
----------------------------------------------------------------------------
1 6 10/09/97 10:56 2.97(86%) 3.25(78%) 7.49(87%)
2 6 11/09/97 11:32 2.74(79%) 3.12(75%) 6.45(75%)
3 6 12/09/97 09:58 3.14(91%) 3.53(85%) 8.37(97%)
‘’ ‘’ ‘’ ‘’ ‘’ ‘’ ‘’
‘’ ‘’ ‘’ ‘’ ‘’ ‘’ ‘’
‘’ ‘’ ‘’ ‘’ ‘’ ‘’ ‘’
Values in brackets are percentage of best value.
Technician: ______________ Physician: _______________
Daran schließen sich die Einträge der Symptom-Scores an,
sofern zutreffend:
MicroDL EVENTS REPORT
# Date Time Event Value
-----------------------------------------------------------------------------
1 10/09/97 10:58 COUGH 8
2 11/09/97 11:34 CAT
‘’ ‘’ ‘’ ‘’ ‘’
‘’ ‘’ ‘’ ‘’ ‘’
‘’ ‘’ ‘’ ‘’ ‘’
In der Zusammenfassung erscheinen Datum, Uhrzeit, ESK, FVC und
PEF, sowie in Klammern der Prozentsatz vom Bestwert. Die Tests sind
fortlaufend nummeriert. Diese Nummerierung kann zur Auswahl eines
bestimmten Tests für eine genauere Prüfung benutzt werden, indem
man mit Hilfe der Druckoption 2 hierfür einen vollständigen Bericht
ausdruckt.
Bitte beachten Sie, dass die Eingabe von Symptom-Scores im Modus
für mehrere Patienten nicht möglich ist.
89
Page 93

Der Druckvorgang kann jederzeit durch Druck auf die Taste 'off'
abgebrochen werden. Sollte der Drucker nicht korrekt arbeiten,
schalten Sie sowohl den Drucker als auch das Micro DL-Gerät aus,
überprüfen Sie sämtliche Verbindungen und versuchen Sie es erneut.
Option 2 – vollständiger spirometrischer Bericht über eine
Aufzeichnung
Wählen Sie nach dem Einschalten des Micro DL bei gedrückter Taste
'auf' durch erneutes Drücken der 'auf'-Taste die Druckoption 2. Auf
der Anzeige erscheint:
Diese Option dient zur Auswahl eines vollständigen Berichts,
einschließlich der Kurven für Fluss/Volumen und Volumen/Zeit. Die ‘1’
zeigt an, dass ein Blatt Papier verbraucht werden wird.
Drücken Sie ‘enter’, wenn diese Option gewünscht wird. Die Anzeige
wechselt auf:
Die Tests werden beim Abspeichern fortlaufend nummeriert und die
angezeigte Nummer steht für den zuletzt aufgezeichneten Test.
Wählen Sie den gewünschten Test mit der Taste 'ab' und drücken Sie
‘enter’. Die Anzeige wechselt auf:
90
Page 94

Man erhält folgenden Ausdruck spirometrischer
Testergebnisse:
MicroDL FULL REPORT
Patient Name:________________________________
Test: 1 Date: 12/11/97 Time: 0802
ID: 6 Sex: Male Age: 19
Height: 190 cm Ethnic Correction: 0%
Parameter Result %Best Best %Pred Pred Min Max Units
FEV1 3.71 78 4.76 74 4.95 4.11 5.79 L
FVC 4.61 82 5.62 77 5.95 4.95 6.95 L
PEF 9.67 92 10.65 90 10.74 8.75 12.73 L/S
FEV1%FVC 80 97 82 97 82 70 94 %
F50 4.15 68 6.07 3.90 8.24 L/S
F25 1.36 45 2.96 1.68 4.24 L/S
MEF 5.45 102 5.31 3.60 7.20 L/S
FET 4.66 S
12
Flow/Volume Volume/Time
8L
RESULT
PREDICTED
FEV1
6
RESULT
PREDICTED
10
8
6
4
2
S
/
L
1
2 3 4
5 6 7 8
4
2
1
2 3 54 6 7 8
91
Page 95

Normal Values: ECCS (adult); Zapletal,Solymar,Cogswell (child)
Results at BTPS
Technician:_____________ Physician:______________
In der ersten Zeile werden die Versionsnummer des Micro DL und der
Berichtstyp genannt. In den anschließenden Zeilen erscheinen
Testnummer, Datum und Uhrzeit des Tests sowie die Patientendaten.
Anschließend folgen die Testergebnisse, dargestellt als Prozentsatz
des persönlichen Bestwertes, persönlicher Bestwert, Prozentsatz des
vorhergesagten Wertes, vorhergesagter Wert, vorhergesagtes
Minimum und Maximum sowie Maßeinheit.
Außerdem werden die Kurven für expiratorischen Fluss/Volumen sowie
Volumen/Zeit angezeigt. Über diese Kurven sind die vorhergesagten
Kurven gelegt, auf der Fluss-/Volumenkurve werden außerdem die
ESK-Marker angezeigt.
Bitte beachten Sie, dass die Eingabe von persönlichen Bestwerten im
Modus für mehrere Patienten nicht möglich ist.
Um weitere Kopien des Berichts zu drucken, betätigen Sie ‘enter’.
Wenn alle benötigten Ausdrucke erstellt worden sind, drücken Sie auf
‘off’. Das Gerät schaltet sich aus.
Option 3 – vollständiger spirometrischer Bericht über
Aufzeichnungen
Wählen Sie nach dem Einschalten des Micro DL bei gedrückter Taste
'auf' durch zweimaliges Drücken der 'auf'-Taste die Druckoption 3. Auf
der Anzeige erscheint:
92
Page 96

Diese Option dient zum Ausdrucken vollständiger Spirometrie-Berichte
über alle gespeicherten Ergebnisse, einschließlich der Kurven für
Fluss/Volumen und Volumen/Zeit.
Die ‘65’ zeigt an, dass fünfundsechzig Blatt Papier verbraucht werden,
weil zur Zeit fünfundsechzig Berichte gespeichert sind. Drücken Sie
‘enter’, wenn diese Option gewünscht wird. Auf der Anzeige erscheint:
Die erstellten Ausdrucke sind identisch mit den Einzelberichten, die
mit Option 2 hergestellt werden.
Der Druckvorgang kann jederzeit durch Druck auf die Taste 'off'
abgebrochen werden. Sollte der Drucker nicht korrekt arbeiten,
schalten Sie sowohl den Drucker als auch das Micro DL-Gerät aus,
überprüfen Sie sämtliche Verbindungen und versuchen Sie es erneut.
Option 4 – Zusammenfassung aller Aufzeichnungen seit dem
letzten Ausdruck.
Wählen Sie nach dem Einschalten des Micro DL bei gedrückter Taste
'auf' durch dreimaliges Drücken der 'auf'-Taste die Druckoption 4.
Auf der Anzeige erscheint:
93
Page 97

Diese Option dient zum Drucken einer Zusammenfassung aller
Testergebnisse, die seit dem letzten Druck einer Zusammenfassung
aufgezeichnet wurden.
Drücken Sie ‘enter’, wenn diese Option gewünscht wird. Auf der
Anzeige erscheint:
Man erhält die gleichen Ausdrucke wie bei der mit Option 1 erstellten
Zusammenfassung, allerdings mit einer geringeren Zahl von
Einträgen, wenn früher schon einmal eine Zusammenfassung erstellt
wurde.
Option 5 – vollständiger spirometrischer Bericht über alle
Aufzeichnungen seit dem letzten Ausdruck.
Wählen Sie nach dem Einschalten des Micro DL bei gedrückter Taste
'auf' durch viermaliges Drücken der 'auf'-Taste die Druckoption 5.
Auf der Anzeige erscheint:
94
Page 98

Diese Option dient zum Drucken vollständiger spirometrischer
Berichte über alle Ergebnisse, die seit der letzten Nutzung von
Druckoption 3 aufgezeichnet wurden.
Drücken Sie ‘enter’, wenn diese Option gewünscht wird. Auf der
Anzeige erscheint:
Man erhält Ausdrucke, die identisch mit den in Option 3 erstellten
Einzelberichten sind.
Installation von SPCS
Zusammen mit Ihrem Gerät erhalten Sie einen Satz von drei
Disketten mit der für den PC ausgelegten Spirometrie-Software SPCS.
SPCS bietet Leistungsmerkmale für Management und Analyse
spirometrischer Daten. SPCS läuft unter Microsoft Windows (3.1, 95
und höher). Die Grundspezifikationen für einen PC zum Betrieb von
SPCS lauten: 486 DX2, 8 Megabyte RAM und mindestens 10 Megabyte
freier Platz auf der Festplatte.
Zur Installation der Software legen sie Diskette 1 in das Laufwerk ein
und rufen Sie die ablauffähige Datei install.exe auf. Wenn Sie mit
Windows 3.1 arbeiten, benutzen Sie den Befehl 'Ausführen' im
Programmmanager und geben Sie A:\INSTALL ein. Wenn Sie mit
Windows 95 arbeiten, klicken Sie auf die Schaltfläche ‘Start’, wählen
Sie 'Ausführen' und geben Sie A:\INSTALL ein. Befolgen Sie
anschließend die Anweisungen, die im Verlauf des
Installationsprozesses gegeben werden.
Nach der Installation können Sie mit der Online-Hilfe zusätzliche
Informationen abrufen.
95
Page 99

Ein Handbuch für SPCS ist erhältlich, außerdem steht ein SupportService zur Verfügung. Wegen näherer Einzelheiten wenden Sie sich
bitte an Ihren Händler oder CareFusion.
Konfigurierung des MicroDL mit SPCS
Der Micro DL kann mit Hilfe der SPCS-Software eingerichtet werden.
Stellen Sie zuerst sicher, dass der Micro DL mit dem mitgelieferten
Kabel an den PC angeschlossen ist. Schließen Sie den Neunwege-DStecker an den seriellen Port des PCs und den dreipoligen
Klinkenstecker an die Buchse in der rechten Seite des Micro DL an.
Um mit dem PC kommunizieren zu können, muss der Micro DL im PCModus eingeschaltet werden. Drücken Sie die Taste ‘enter’, schalten
Sie das Gerät ein und lassen Sie die Taste los, wenn auf der Anzeige
Folgendes erscheint:
Ergebnisse heraufladen
Zum Heraufladen der im Micro DL gespeicherten Ergebnisse schließen
Sie das Gerät wie oben beschrieben an den PC an und starten Sie
SPCS. Sobald der Startbildschirm erscheint, klicken Sie die
Schaltfläche ‘upload‘ an. Nun werden die im Messgerät enthaltenen
Daten in die SPCS-Datenbank geladen (weitere Informationen finden
Sie in der Online-Hilfe).
Bitte beachten Sie, dass bei Daten, die von einem manuell
eingerichteten Gerät in SPCS geladen werden, die zugehörigen
Patientenangaben in die SPCS-Datenbank eingegeben werden
müssen. Auf diese Weise wird ermöglicht, die heraufgeladenen
spirometrischen Aufzeichnungen anzuzeigen und Trends zu berechnen.
96
Page 100

Die im Gerät benutzten Patienten-IDs sollten denen in der SPCSDatenbank entsprechen.
HINWEIS: Wenn der Computer an den Micro DL angeschlossen ist,
muss dieser außerhalb der Reichweite des Patienten stehen.
Spirometrie auf PC-Basis
Der Micro DL kann an einen PC angeschlossen und über Schnittstelle
an CareFusion’s Software SPCS zur Verwaltung spirometrischer Daten
gekoppelt werden. SPCS ermöglicht Ihnen die Aufzeichnung,
Verwaltung und Anzeige spirometrischer Informationen. Die
Hauptmerkmale sind:
Eine Spirometrie-Datenbank mit umfassenden Leistungsmerkmalen.
Eine Schnittstelle, mit der das Gerät vom PC aus gesteuert werden
kann. Diese Schnittstelle liefert eine live Anzeige der Diagramme für
Fluss/Volumen und Volumen/Zeit sowie kindgerechte Anzeigemodi.
Eine Berichtsfunktion, die den vollen Parametersatz, vorhergesagte
Werte, Graphiken und Interpretationen umfasst.
Trendanalyse spirometrischer Daten.
Um das Gerät mit dem PC zu verbinden, schließen Sie das Kabel an
einen der seriellen COM-Ports des PCs an und schalten Sie das Gerät
bei gedrückter ‘enter’-Taste ein. Auf dem Display des Geräts sollte
‘PC’ blinken. Starten Sie nun SPCS auf Ihrem PC (weitere
Informationen finden Sie in der Online-Hilfe).
Batteriemanagement
Der Micro DL hat zwei interne, über Batterie gespeiste
Stromversorgungsquellen.
97
 Loading...