

Page 1
IVAC® Syringe Pumps
Models P7000, P6000, TIVA, TCI & TIVA
Technical Service Manual
Page 2

This manual has been prepared for use by qualified service personnel only.
Cardinal Health cannot accept any liability for any breakdown or deterioration in
performance of parts or equipment resulting from unauthorised repair or modification.
t Cardinal Health, 1180 Rolle, Switzerland
IVAC® and Alaris® are registered trademarks of
Cardinal Health, Inc. or one of its subsidiaries
All other trademarks belong to their respective owners.
© 1998-2006. Cardinal Health, Inc. or one of its susidiaries. All rights reserved.
P7000, P6000, TIVA, TCI & TIVA 2/105 1000SM00012 Issue 3
Page 3

Contents
Chapter 1 Introduction & Start Up 4
Chapter 2 Configuration & Calibration 13
Chapter 3 Routine Maintenance 27
Chapter 4 Troubleshooting 36
Chapter 5 Circuit Descriptions 40
Chapter 6 Spare Parts Replacement Procedures 44
Appendix A Specifications 73
Appendix B Spare Parts Listing 81
Appendix C Fitting and Replacement Guidelines 88
Appendix D Configuration & Drug Protocol Records 91
Appendix E Disposal 99
Appendix F Service Contacts 102
Appendix G Document History 104
Page 4

Introduction & Start Up
In this chapter
Introduction 5
Chapter 1
General Precautions 6
Front Panel, Controls and Indicators 7
Main Display 8
Loading a Syringe 9
Starting the Pump 10
Basic Features 11
Backoff Feature 12
Fast Start Feature (Model P7000 only) 12
Page 5

Introduction & Start Up
Introduction
The IVAC® Syringe Pumps are a range of syringe pumps with features dedicated for use in a variety of areas within a
hospital. The range includes these models:
The IVAC®
The IVAC®
applications
The IVAC®
The IVAC®
Two versions of this range of pumps have been manufactured which can be identified by the type of power on/off
switch:
Mark 1 includes a mechanical power on/off switch on the end of the pump
Mark 2 includes a soft power on/off button A on the front panel
Product Familiarity
Ensure that you are fully familiar with the syringe pump by carefully studying the Directions for Use (DFU) prior to operation
and prior to attempting any repairs or servicing. As part of continuous improvement, product enhancements and
changes are introduced from time to time.
P6000 Syringe Pump is a syringe pump suitable for critical care and general infusion applications
P7000 Syringe Pump is a variable pressure syringe pump suitable for critical care and general infusion
TIVA Syringe Pump is an anaesthesia syringe pump
TCI & TIVA Syringe Pump is an anaesthesia syringe pump incorporating Diprifusor
Purpose of this Manual
This Technical Service Manual describes how to set up, test and maintain the following IVAC® Syringe Pump models:
P6000
P7000
TIVA
TCI & TIVA
This manual is intended for use by personnel experienced in medical equipment testing and maintenance procedures .
Conventions Used in this Manual
BOLD
'Single quotes' Used to indicate cross-references made to another section of this manual. For example, see
Italics
Used for pump Display names, access codes, controls and indicators referenced in this manual,
for example, SERVICE ACCESS menu, access code 251, OK softkey.
Chapter 2, 'Configuration and Calibration'.
Used for other documents or manuals. For example, refer to the relevant Directions for Use (DFU) for
further information.
Wherever this symbol is shown a Hints & Tips note is found. These notes provide useful advice or
information that may help to perform the task more effectively.
Wherever this symbol is shown a Toolbox note is found. These notes highlight an aspect of test
or maintenance that is important to know about. A typical example is drawing attention to a
software upgrade that you should check has been installed.
P7000, P6000, TIVA, TCI & TIVA 5/105 1000SM00012 Issue 3
Page 6

General Precautions
Prior to using this pump, carefully read the Operating Precautions described in the Directions for Use
(DFU)
.
w
This pump contains static-sensitive components. Observe strict precautions for the protection of static
sensitive components when attempting to repair and service the pump.
V
An explosion hazard exists if the pump is used in the presence of flammable anaesthetics. Exercise care
to locate the pump away from any such hazardous sources.
B
Dangerous Voltage. An electrical shock hazard exists if the casing of the pump is opened or removed.
Refer all servicing to qualified service personnel.
A
This pump is protected against the effects of high energy radio frequency emissions and is designed
M
to be fail safe if extremely high levels of interference are encountered. Should false alarm conditions
be encountered, either remove the source of the interference or regulate the infusion by another
appropriate means.
If the pump is dropped, subjected to excessive moisture, humidity or high temperature, or otherwise
suspected to have been damaged, remove it from service for inspection by qualified service personnel.
Introduction & Start Up
When connected to an external power source, a three-wire (Live, Neutral, Earth) supply must be used. If
the integrity of the external protective conductor in the installation or its arrangement is in doubt, the
pump should be operated from the battery.
P7000, P6000, TIVA, TCI & TIVA 6/105 1000SM00012 Issue 3
Page 7
Introduction & Start Up
Front Panel, Controls and Indicators
Front Panel
Front Panel - Model P6000 example
Controls and Indicators
H
I
j
k
N
O
C
START
STOP
BATTERY
AC POWER
RATE KEYS/
CHEVRONS
BLANK
SOFTKEYS
Press to start the infusion. The
green LED will flash during
infusion.
Press to stop/hold the infusion.
The amber LED will be lit while on
hold.
When illuminated, indicates
that the pump is running on the
internal backup battery. When
flashing, indicates that the battery
power is low, with less than 30
minutes of use remaining.
When illuminated, indicates that
the pump is connected to an AC
power supply and the battery is
being charged.
Double or single for faster/slower,
increase or decrease of values
shown on main display.
Use in conjunction with the
prompts shown on the display.
G
D
E
F
A
J
PURGE/
BOLUS
OPTION
PRESSURE
PRESSURE
ON/OFF
24H LOG
Press to purge the extension
set during setup while the
pump is on hold, or to deliver
bolus at an increased rate
while an infusion is running.
See 'Basic Features' for further
information.
Press to access optional
features. See 'Basic Features'
for further information.
(Model P6000, Model TIVA,
Model TCI &TIVA). Press to
display the pumping pressure
and alarm level.
(Model P7000 only). Press to
display the pumping pressure
and alarm level.
Press once to switch the pump
ON. Press and hold down for
3 seconds to switch the pump
OFF.
Note: Mark I pumps have a
mechanical ON/OFF switch on
the side of the pump.
(Mark 1: Model P6000, Model
TIVA, Model P7000). Press to
display the 24 hour log of
volume infused.
P7000, P6000, TIVA, TCI & TIVA 7/105 1000SM00012 Issue 3
Page 8
Main Display
Introduction & Start Up
Model P6000
Infusion Rate
Infusion Status
Model P7000 (Dedicated mode)
Infusion Status
Infusion Rate
Dose Rate
Volume Infused
Syringe Type/Drug Name
IVAC 50
Volume Infused Option
Drug Name/Protocol
Current Time
Pressure Icon
VTBI Status
VTBI Option
Pumping Pressure
Model TIVA
Infusion Rate
Dose Rate
Model TCI & TIVA
Calculated
Concentration
Infusion Status
Infusion Status
Syringe Type or Drug Name/Protocol
Volume Infused
Volume Infused
Volume Infused
7.5ml
22.5mg
Review Option
Current Time
Review Information
Review Option
Effect Site Concentration
Decrement Time
Target
Concentration
Trend Graph
Note that the Cumulative Drug Mass Infused is also displayed (directly beneath Volume Infused) on pumps with software
version V3R2 and above.
P7000, P6000, TIVA, TCI & TIVA 8/105 1000SM00012 Issue 3
Page 9
Introduction & Start Up
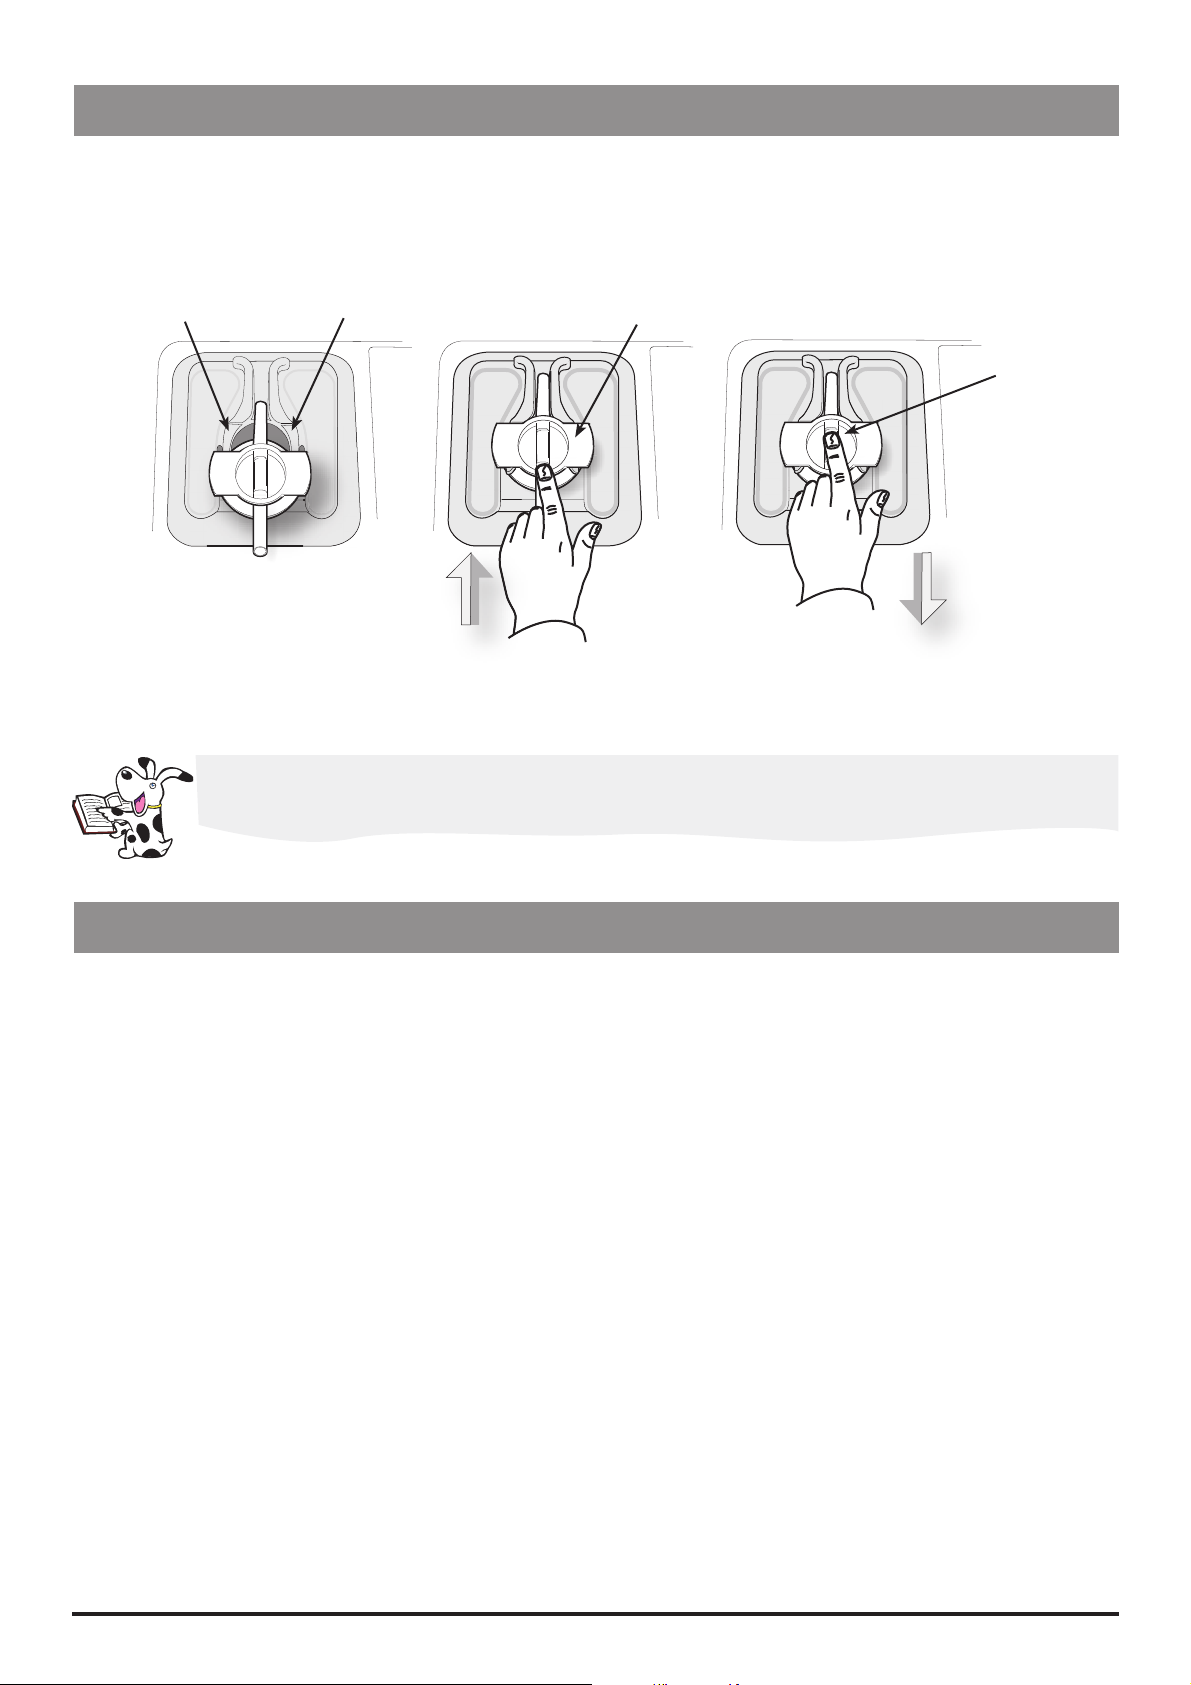
Loading a Syringe
1. Squeeze the finger grips together on the plunger holder and slide the mechanism to the left.
2. Lift the syringe clamp and rotate to the left.
3. Insert the syringe into the slots on the plunger holder (see Figure 1). For Model
Diprifusor tag is positioned towards the display to allow the prefilled syringe tag to be read.
4. Squeeze the finger grips on the plunger holder and slide the mechanism to the right until the syringe barrel flange
locates into the V slot (see Figure 2).
Ensure that the syringe is advanced until the syringe barrel flange touches the front of the V slot
closest to the syringe clamp. This is important to prevent delay at the start of the infusion.
5. Release the finger grips. Apply gentle pressure on the plunger holder to ensure that the drive is engaged.
6. Rotate the syringe clamp until it locks onto the syringe barrel (see Figure 2).
7. Check that the syringe plunger and syringe barrel flange are correctly located into their slots.
TCI & TIVA only - ensure that the
Syringe inserted
into plunger holder slots
Syringe barrel
Syringe clamp
Syringe barrel flange
Syringe plunger
Syringe clamp shown
locked onto syringe barrel
Plunger holder
Finger grips
V slot
Syringe barrel flange
Figure 1.
Figure 2.
P7000, P6000, TIVA, TCI & TIVA 9/105 1000SM00012 Issue 3
Page 10
Introduction & Start Up
Loading a Syringe (continued)
Guide to handling the pressure disc
1. Insert the pressure disc into pressure disc support slots as shown in Figure 1.
2. Push pressure disc securely home as shown in Figure 2.
Pressure disc support slots
Figure 1.
When removing the pressure disc pull it with your finger inside the disc recess as shown in Figure 3. above.
Figure 2. Figure 3.
Pressure disc
Disc recess
Starting the Pump
1. Connect pump to AC Mains.
2. Press the A button to switch pump ON (Mark II), or switch on power switch on side of pump (Mark I).
3. CLEAR DATA? NO retains previous data. YES clears previous infusion data.
4. Load syringe. See instructions in previous section.
5. Insert pressure disc into pressure transducer (Model P7000 only). See 'Guide to handling the pressure disc' above.
6. Confirm syringe.
7. Change the rate if necessary using the
8. Purge: Press the G button followed by the PURGE softkey.
9. Connect the pump to test equipment as required (see Chapter 2, 'Configuration & Calibration' and Chapter 3, 'Routine
Maintenance').
10. Press the
button to start operation.
H
NO keys.
P7000, P6000, TIVA, TCI & TIVA 10/105 1000SM00012 Issue 3
Page 11

Basic Features
Introduction & Start Up
Pressure Level
Purge/Bolus
24 Hour Log
Option Button
Press the
button (On Model P7000, press the F button). Line pressure occlusion alarm level
E
and current pressure level are shown on a graph. Use the M keys to adjust alarm level.
Press the
button. If required, use the M buttons to set bolus dose required then press
G
and hold down the two PURGE/BOLUS softkeys together to deliver.
During PURGE/BOLUS, the pressure limit alarms are temporarily increased to maximum levels.
Press the J button. The 24 hour log of volume infused is shown. 24 Hour Log is also available
via the D button.
Press the D button to display optional features:
DRUGS AND DOSING (or DRUG
NAME)
Allows the pump to be set up for use with a specific
drug and/or dosing protocol. Follow Drugs and Dosing
instructions as per relevant DFU.
SET VTBI*
Set a specific volume to be infused and set rate at end of
VTBI (not available on Model TCI & TIVA or Model TIVA).
SET VTBI OVER TIME*
Specify a VTBI and delivery time (not available on Model
TCI & TIVA or Model TIVA).
SET BY DOSERATE*
Set rate in doserate increments (mg/kg/h). The flow rate
will be calculated from the doserate.
SET BY ml/h*
Set rate in flow rate increments (ml/h). The doserate will be
calculated from the flow rate.
CLEAR VOLUME
INDUCTION*
MULTIDOSE*
RATE LOCK*
24H LOG
EVENT LOG*
Clear the displayed volume infused.
Set an induction volume (P7000 only).
Set multidose volumes (P7000 only).
Prevent rate being changed once infusion has started.
Shows volume infused over 24 hours.
Displays the event log. Holds up to 800 individual events.
* these options are not displayed/available when feature is disabled.
Note that option names may vary and the Model TCI & TIVA and Model TIVA pumps have
additional model-specific features. For additional information, refer to the relevant DFU.
P7000, P6000, TIVA, TCI & TIVA 11/105 1000SM00012 Issue 3
Page 12

Introduction & Start Up
Backoff Feature
BACKOFF is a configurable feature, enabled/disabled via the CONFIGURATION menu, access code 251. When enabled,
BACKOFF is automatically activated every time an occlusion occurs. The pump action reverses and pumps backwards to
release the pressure which has built up in the infusion system. This minimises the post occlusion bolus.
How BACKOFF works
When an occlusion occurs, the pump continues pumping until the pressure alarm level is reached and the pump stops.
Note that an occlusion can be due to a clamp or stopcock being left closed, kinked line, infiltration etc. During this time,
a bolus volume of fluid builds up and is stored between the occlusion and the syringe, because it is unable to be infused
into the patient. BACKOFF prevents the accumulated volume of fluid from being released into the patient as a post
occlusion bolus.
Following an occlusion alarm:
Pumping mechanism reverses, it pumps backwards
Accumulated volume of fluid (post occlusion volume) is ‘taken back’ into the syringe and not infused into the
patient
Post occlusion volume is deducted from the VOLUME (Volume Infused) value shown on the Display
Post occlusion volume is deducted from the infused value in the 24H LOG as this volume has not been infused into
the patient
BACKOFF time and date is recorded in the EVENT LOG
Clinical benefits of BACKOFF
Reduces the pressure in the extension set due to the plunger of the syringe moving backwards
Removes the post occlusion volume of fluid from the system, it is not delivered to the patient as a bolus on
removal of the occlusion. This prevents the patient from receiving an unintentional and unnecessary bolus
Fast Start Feature (Model P7000 only)
FAST START is a configurable feature of the Model P7000 syringe pump, enabled/disabled via the CONFIGURATION
menu, access code 251. When enabled, FAST START automatically reduces the 'mechanical slack' between the plunger
mechanism and syringe at the start of an infusion. The mechanical slack is a very small gap (barely visible) due to the type
of syringe and mechanics of the pump, between the back of the syringe plunger and the plunger drive mechanism at the
start of an infusion.
How FAST START works
At the start of an infusion, the pump starts at a faster rate for a short period of time. This action minimises the start up
delay but may not eliminate it completely.
Notes:
1) The pump can be heard to pump faster than the set infusion rate and can also be felt if a hand is rested on the pump
at the start of an infusion.
2) The faster rate is 50% of the maximum syringe rate, syringe rate ranges are listed in Appendix A, 'Specifications'.
Purge recommendation: Even with FAST START available, it is still recommended to perform a PURGE with the pump before
connecting the extension set to the patient and starting the infusion, especially at low flow rates i.e. below 5ml/h.
Clinical benefits of FAST START
The fluid is delivered to the patient much sooner than if fast start was not available
The delay in delivering the drugs following the changes of syringes is reduced greatly
P7000, P6000, TIVA, TCI & TIVA 12/105 1000SM00012 Issue 3
Page 13

Chapter 2
Configuration & Calibration
In this chapter
Access Codes 14
Entering an Access Code 14
Dedication Options (901/902) 15
Configuration Options (251) 15
Drug Setup (251) 16
General Options (251) 18
Calibration Procedures 21
Clearing Internal RAM (611) 26
Page 14

Configuration & Calibration
Access Codes
The syringe pump software contains a number of configuration and test routines that can be accessed using a technical
access code. The majority of routines are 'menu' driven and are accessed by entering a technical access code as shown in
the table below.
Code Title Description
123 SELF TEST Self test routine begins from the start. See Chapter 3, 'Routine Maintenance' for
further information
124 SELF TEST Self test routine begins at power supply measurement
125 SELF TEST Self test routine begins at declutch test
126 SELF TEST Self test routine begins at pressure disc test
127 SELF TEST Self test routine begins at beam test
128 SELF TEST Self test routine begins at nurse call test
167 COMMS LEARN MODE Configuration set via comms interface
168 COMMS TEACH MODE Configuration output to another device (pump)
176 LINEAR DIAGNOSTIC Linear potentiometer test
222 SELF TEST Self test routine begins at display test
223 SELF TEST Self test routine begins at keypad button test
243 SYRINGE SIZE CALIBRATION Syringe size measurement calibration. See 'Calibration Procedures' on the following
pages for instructions
251 CONFIGURATION MENU Configuration of drugs, options, syringes and real-time clock. See 'Configuration
Options (251)' on the following pages for further details
253 LINEAR POT CALIBRATION Linear potentiometer calibration. See 'Calibration Procedures' on the following
pages for instructions
263 PRESSURE CALIBRATION Line pressure calibration. See 'Calibration Procedures' on the following pages for
instructions
359 LANGUAGE Configure language
376 SERVICE ACCESS MENU Review service log, errors and hours of use. See 'Service Access Options' in Chapter
3 for further details
611 TOTAL MEMORY CLEAR Reset memory. Note that the pump will require full calibration
717 BEAM OCCLUSION CALIBRATION Beam occlusion calibration. See 'Calibration Procedures' on the following pages for
instructions
901 DEDICATION MODE Set pump to operate in fully dedicated mode. Model P7000 only, see 'Dedicated
Options (901/902)' below for further details
902 DEDICATION MODE Set pump to semi-dedicated mode. Model P7000 only, see 'Dedicated Options
(901/902)' below for further details
Entering an Access Code
Each menu (and certain individual options) has its own three-digit technical access code which is entered using the
following procedure:
1. Hold down the
2. Enter the required access code “xxx” using the M keys in conjunction with the NEXT softkey (to move through
the digits).
3. When the required code is shown on the display, press the OK softkey to confirm.
P7000, P6000, TIVA, TCI & TIVA 14/105 1000SM00012 Issue 3
H button and turn the pump ON. The main display shows 000.
Page 15
Configuration & Calibration
Dedication Options (901/902)
The Model P7000 pump can be operated in one of two modes:
Fully dedicated mode
Operating the pump in this mode will remind a user that a pressure disc must be fitted at the start of any infusion. In this
mode occlusion pressures are always displayed in mmHg. To set, enter access code 901.
Semi-dedicated mode
Operating the pump in this mode will require a user that a pressure disc must be fitted only when drugs and dosing
features are used. When a pressure disc is not in use, pressure levels L-0 to L-10 will be displayed. To set, enter access code
902.
Configuration Options (251)
Enter the access code 251 (see 'Entering an Access Code' on the previous page for instructions). The CONFIGURATION
menu is displayed:
CONFIGURATION MENU
Option* Description
DRUG SETUP Set drug names and protocols. See 'Drug Setup' on the following pages for instructions.
GENERAL OPTIONS See 'General Options' on the following pages for further details.
CLOCK SET Set the current date and time.
To set the clock, use M and NEXT softkey to adjust then OK to store.
HOSPITAL NAME Enables hospital/ward name to be displayed during the power-up sequence.
To set the hospital name, use M to toggle through characters, NEXT softkey to go to next
character then OK to store.
ENABLE SYRINGES Configure the type and size of syringes permitted for use.
To enable syringes:
1. Use M to select, MODIFY to enable/disable the selected syringe type then OK to store.
2. Turn the pump OFF and return to service or select the next CONFIGURATION option.
ENABLE UNITS Configure the dose units permitted for use (Model P7000 only).
To enable units:
1. Use M to select, MODIFY to enable/disable the selected dose then OK to store.
2. Turn the pump OFF and return to service or select the next CONFIGURATION option.
* Note: For software versions earlier than version V3R2, the options may vary, or will not be available. Refer to the
relevant IVAC® Syringe Pump DFU for comprehensive information.
P7000, P6000, TIVA, TCI & TIVA 15/105 1000SM00012 Issue 3
Page 16
Configuration & Calibration
Drug Setup (251)
Drug Setup (Model TCI & TIVA/Model TIVA)
1. Enter the access code 251 to display the CONFIGURATION menu.
2. Select
3. Select the drug name using the
DRUG SETUP using the M keys and press the OK softkey. The drug name list is displayed.
M keys and press the OK softkey. Alternatively, press QUIT to exit and return to
the CONFIGURATION menu.
4. To use a drug, it must be enabled by pressing the YES softkey at ENABLE DRUG. To return to the drug name list press
QUIT.
5. Step through each DRUG SETUP option (see table below) to setup or modify the drug name and protocol.
Press the OK softkey to confirm each option.
Press the BACK key at any time to go back to the previous option and make changes
DRUG SETUP option To adjust, use these keys...
DRUG NAME
CONCENTRATION UNITS
DEFAULT CONCENTRATION
MINIMUM CONCENTRATION
MAXIMUM CONCENTRATION
DOSE UNITS
INDUCTION DOSE
INDUCTION TIME
MAINTENANCE RATE
BOLUS DOSE
To toggle through characters use single chevrons and
To go to first/last character use double chevrons
NEXT to go to next drug name letter.
and .
.
M
M
M or OFF
M or OFF
Important: If the DEFAULT CONCENTRATION, the MINIMUM CONCENTRATION and the
MAXIMUM CONCENTRATION are equal, the TIVA mode start-up sequence will bypass the
CONCENTRATION option
M then OK to select and continue.
M
Note: If the setting is less than 0.01 the TIVA mode start-up sequence will bypass the
INDUCTION option
M
M
M
Note: If the setting is less than 0.01 the BOLUS setting is turned OFF. The Bolus feature is
disabled in TIVA mode.
6. At the CONFIRM option, review the drug setup data displayed then press the OK softkey to confirm. The DRUG SETUP
menu is redisplayed.
P7000, P6000, TIVA, TCI & TIVA 16/105 1000SM00012 Issue 3
Page 17
Configuration & Calibration
Drug Setup (251) (continued)
Drug Setup (Model P6000/Model P7000)
1. Enter the access code 251 to display the CONFIGURATION menu.
2. Select DRUG SETUP using the M keys and press the OK softkey. The drug name list is displayed.
3. Select the drug name using the M keys and press the OK softkey. Alternatively, press QUIT to exit and return to
the CONFIGURATION menu.
4. To use a drug, it must be enabled by pressing the YES softkey at ENABLE DRUG. To return to the drug name list press
QUIT.
5. Step through each DRUG SETUP option (see table below) to setup or modify the drug name and protocol.
Press the OK softkey to confirm each option.
Press the BACK key at any time to go back to the previous option and make changes
DRUG SETUP option To adjust, use these keys...
DRUG NAME
DOSE UNITS
DEFAULT DOSERATE
MINIMUM DOSERATE
MAXIMUM DOSERATE
CONCENTRATION UNITS
DEFAULT CONCENTRATION
MINIMUM CONCENTRATION
MAXIMUM CONCENTRATION
BOLUS RATE
MAXIMUM BOLUS
PRESSURE ALARM
To toggle through characters use single chevrons
To go to first/last character use double chevrons
NEXT to go to next drug name letter.
M
M
M or OFF
M or OFF
M
M
M
M
M
M
M
and
and .
.
6. At the CONFIRM option, review the drug setup data displayed then press the OK softkey to confirm. The DRUG SETUP
menu is redisplayed.
P7000, P6000, TIVA, TCI & TIVA 17/105 1000SM00012 Issue 3
Page 18

Configuration & Calibration
General Options (251)
1. Enter the access code 251 to display the CONFIGURATION MENU.
2. Select
Option Description
BACKOFF Enable/Disable Backoff feature (feature where pump action reverses to release infusion
AC FAIL ALARM Enable/disable AC Fail alarm (activated when AC power disconnected and pump
NEOI WARNING Set the Near End Of Infusion (NEOI) warning time between 1 min. and 15 mins. (NEOI
EOI POINT Enable/disable Keep Vein Open at End of Infusion (KVO at EOI). Enabled: Pump will
BEAM ALARM Set the default beam occlusion alarm level between level 0 (L0) and level 7 (L7).
WEIGHT Set a default patient weight between 0.1kg and 150kg. Factory default is 70kg.
PURGE RATE Set the purge rate volume between 100ml/h and 500ml/h. (Rate used during PURGE
HANDS FREE BOLUS Enable/disable Bolus function in a 'hands-free' way—no need to hold down buttons
DEFAULT BOLUS Set the default bolus value between 0.1ml and 25ml.
NURSE CALL Enable/disable the Nurse Call feature (hardware feature which allows the pump to
NURSE CALL INVERTED Enable/disable inversion of Nursecall hardware output. Enabled: Nurse Call hardware
COMMS PUMP ADDRESS Set the communications address of the pump.
COMMS MONITOR ONLY Enable/disable pump remote control via the comms link. Enabled: Control of pump
COMMS ODD PARITY Enable/disable odd communication parity bit generation.
COMMS ASCII Enable/Disable ASCII communications mode.
TCI Enable/disable TCI option. Enabled: TCI option is activated (TCI hardware must be
DISPLAY TCI DECREMENT
TIME
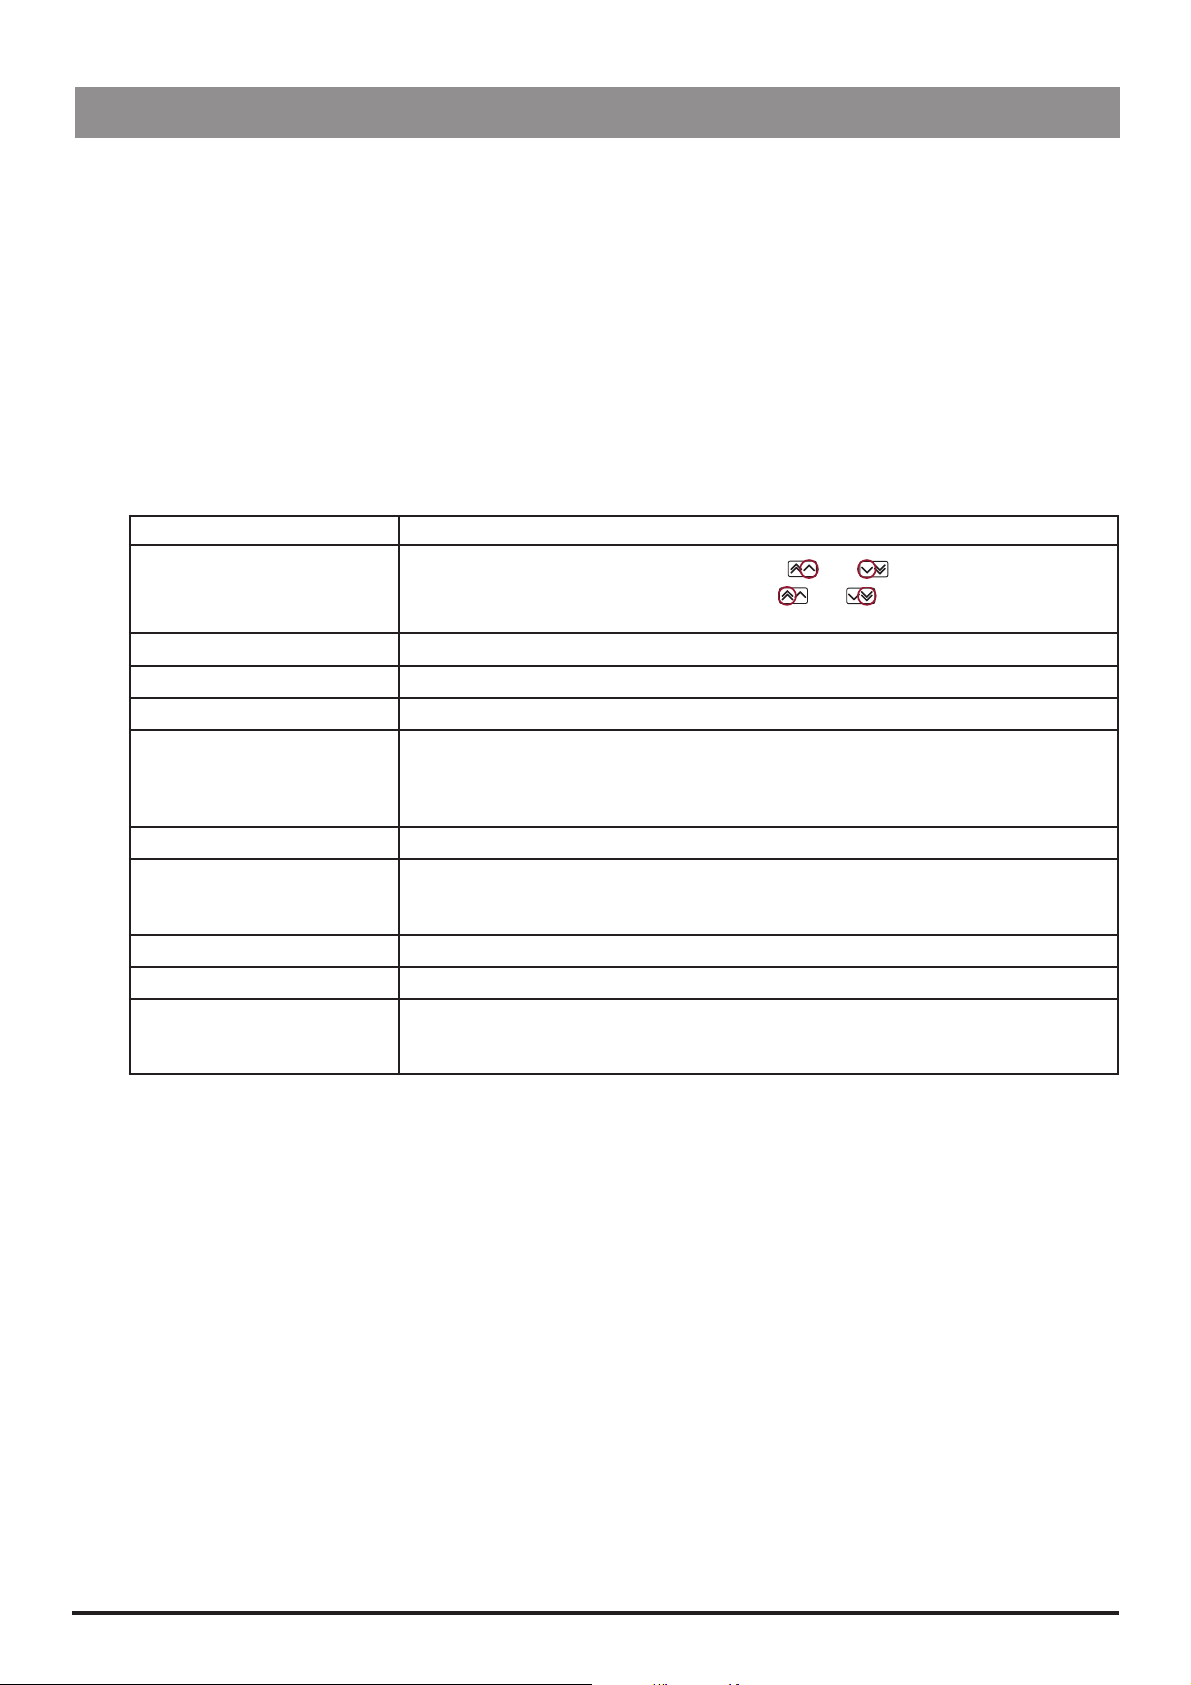
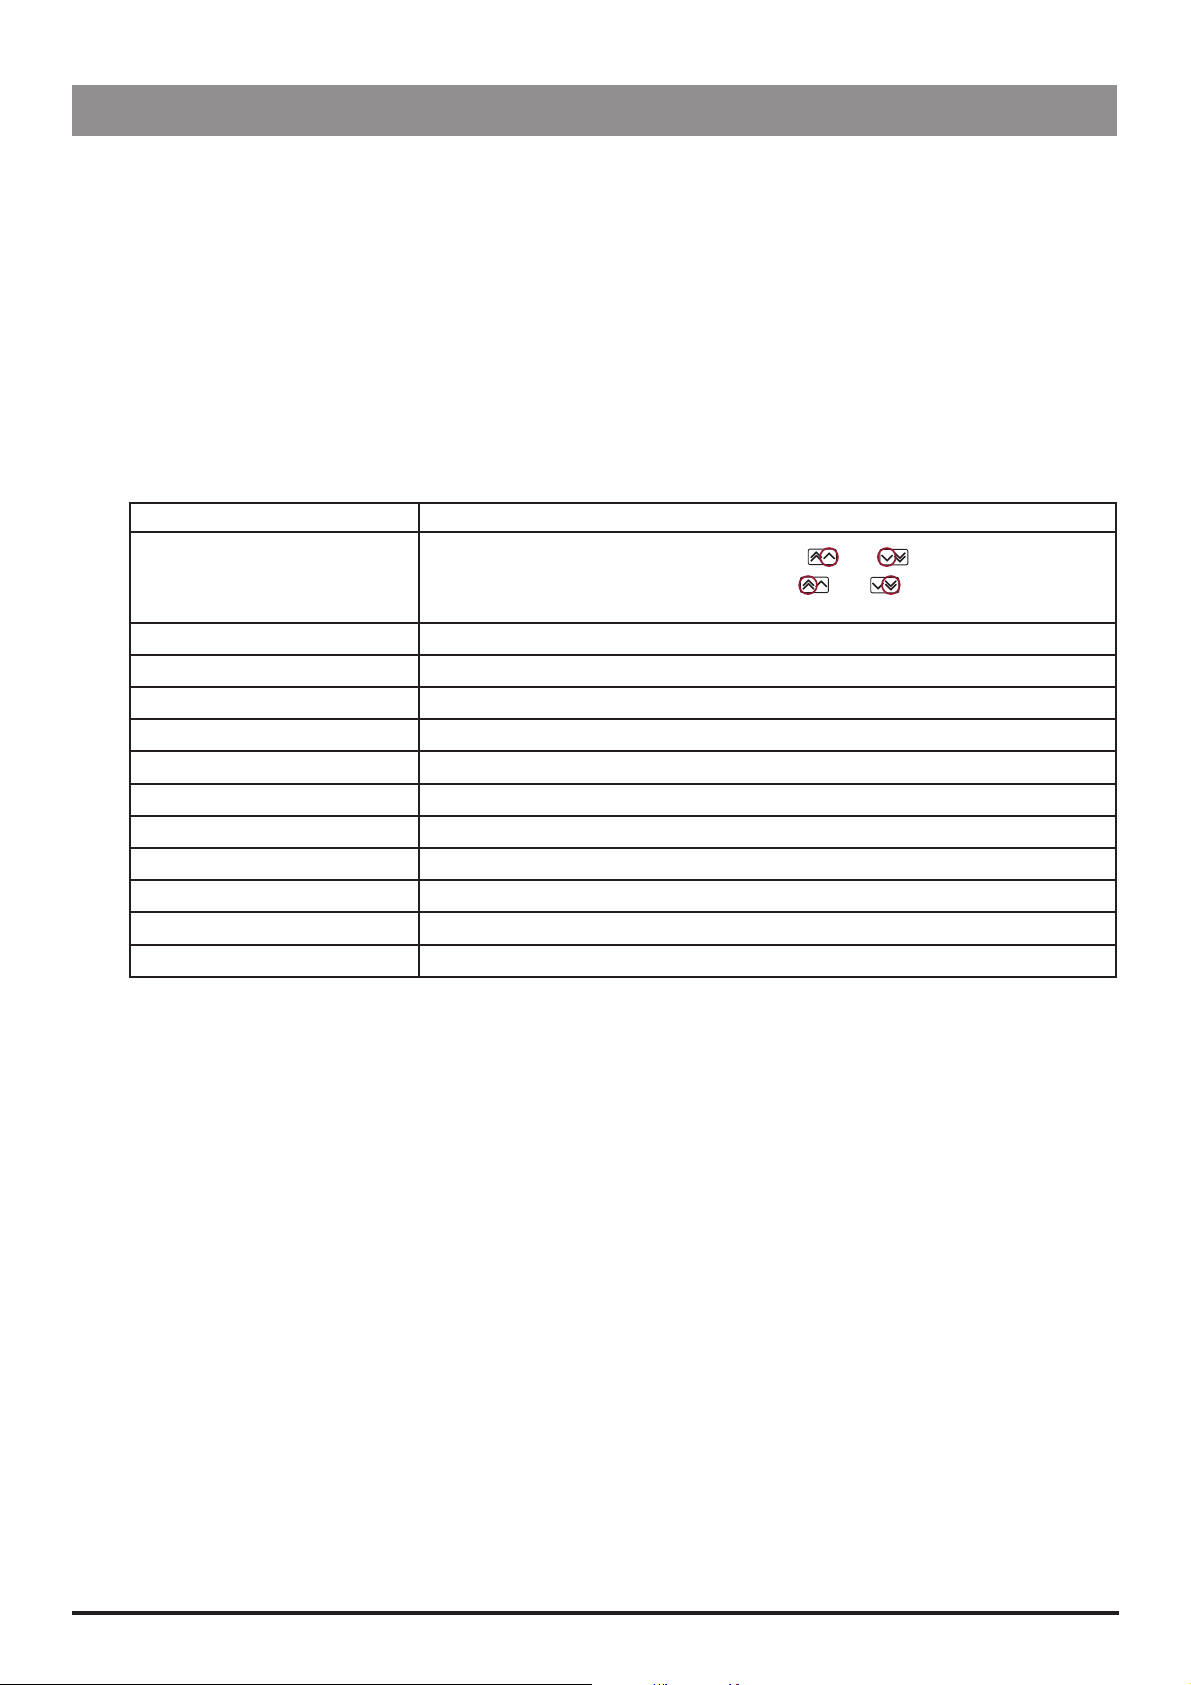
Key:
= available option
= unavailable option
GENERAL OPTIONS using the M keys and press the OK softkey. The GENERAL OPTIONS MENU is displayed:
GENERAL OPTIONS MENU (Model TIVA/Model TCI & TIVA)
Software version: V3R2
system pressure build-up and minimise post occlusion bolus following a pressure
alarm).
Enabled: Backoff feature ON (This does not apply when the pump is in TCI mode).
Disabled: Backoff feature OFF.
operating on battery power). Enabled: AC Fail alarm ON. Disabled: AC Fail alarm OFF.
warning signals the syringe is almost empty allowing time to change syringe).
switch to run at the KVO rate 1.0ml/h (or the current set rate if this is lower) at the EOI
point. Disabled: Pump will stop at the EOI point.
operation).
during bolus infusion. (Bolus is a function which administers a controlled volume
of fluid or drug at an increased rate). Enabled: Hands Free Bolus function allowed.
Disabled: Hands Free Bolus function not allowed.
communicate with the hospital's nurse call system, typically linked to central nurse's
station). Enabled: Nurse Call Hardware enabled. Disabled: Nurse Call hardware
disabled.
output is inverted. Disabled: Nurse Call hardware output normal.
via monitor only. Disabled: Remote control of pump via comms link allowed. Note that
monitor control is always possible.
fitted). Disabled: TCI option not activated.
If enabled, the display shows the TCI Decrement Time Icon (TCI hardware must be
fitted).
* For pumps with software versions earlier than version V3R2, the options may vary, or will not be
available. Refer to the relevant IVAC® Syringe Pump DFU for comprehensive information.
Note: For default settings, refer to Appendix D, 'Configured Options and Drug Protocol Records'.
TIVA* TCI
&TIVA*
P7000, P6000, TIVA, TCI & TIVA 18/105 1000SM00012 Issue 3
Page 19

Configuration & Calibration
General Options (251) (continued)
GENERAL OPTIONS MENU (Model P6000/Model P7000)
Software version: V3R2
Option Description
AUTOSAVE Enable/disable Autosave feature (option to retain previous settings when pump is
switched on). Enabled: Confirmation is requested at power up to clear or to use previous
patient data. Disabled: Patient information is cleared on power up.
BACKOFF Enable/disable Backoff feature (feature where pump action reverses to release infusion
system pressure build-up and minimise post occlusion bolus following a pressure alarm).
Enabled: Backoff feature ON. Disabled: Backoff feature OFF.
FAST START AND
BACKOFF
SET VTBI OVER TIME Enable/disable Volume to be Infused (VTBI) over time option (allows the setting of a
VTBI Enable/disable the Volume to be Infused (VTBI) option (allows the setting of a fixed
INDUCTION Enable/disable the INDUCTION option (option to set an induction volume to be
MULTIDOSE Enable/disable the MULTIDOSE option (feature allowing the delivery of a prescribed dose
RATE LOCK Enable/disable RATE LOCK option (anti-tamper feature preventing rate changes, bolus/
QUIET MODE Enable/disable Quiet Mode feature (keypress tones, low priority alarms and power down
PRESSURE ALARM Set pressure alarm value between 1mmHg and 750mmHg. Default is 300mmHg.
MAX. PRESSURE ALARM Set maximum pressure limit value between 1mmHg and 750mmHg. Default is
AUTO PRESSURE ALARM Enable/disable Auto Set Pressure (AUTO) option (option to adjust the pressure alarm
AC FAIL ALARM Enable/disable AC Fail alarm (activated when AC power disconnected and pump
RATE TITRATION Enable/disable ability to adjust (titrate) infusion while infusion is running. Enabled: rate
NEOI WARNING Set the Near End Of Infusion (NEOI) warning time between 1 min. and 15 mins. (NEOI
EOI POINT Set the End Of Infusion (EOI) volume as a percentage of the syringe volume between
KVI at EOI Enable/disable Keep Vein Open at End of Infusion (KVO at EOI). Enabled: Pump will
BEAM ALARM Set the default beam occlusion alarm level between level 0 (L0) and level 7 (L7).
WEIGHT Set a default patient weight between 0.1kg and 150kg. Factory default is 70kg.
PURGE RATE Set the purge rate volume between 100ml/h and 500ml/h. (Rate used during PURGE
BOLUS Enable/disable Bolus function. (Function which administers a controlled volume of fluid
Enable/disable Fast Start and Backoff features (Faststart feature - drive slack fast start
at start of an infusion, Backoff feature - see above). Enabled: Fast Start and Backoff ON.
Disabled: Fast Start and Backoff OFF.
fixed volume to be delivered over a fixed period of time). Enabled: VTBI OVER TIME
option available via the D button. Disabled: VTBI OVER TIME option not available.
volume to be delivered). Enabled: VTBI option available via the D button. Disabled: VTBI
option not available.
delivered). Enabled: INDUCTION option available via the D button. Disabled: INDUCTION
option not available.
to be repeated over a specific period). Enabled: MULTIDOSE option available via the D
button. Disabled: MULTIDOSE option not available.
purge operations and pump powerdown). Enabled: RATE LOCK option available via the
button. Disabled: RATE LOCK option not available.
D
sequence tones are muted). Enabled: Quiet mode feature ON. Disabled: Quiet Mode is
OFF.
750mmHg.
level by a set pressure value above the measured in-line pressure, 15 mins. after start of
infusion). Enabled: AUTO option available via the F button. Disabled: AUTO option not
available.
operating on battery power). Enabled: AC Fail alarm ON. Disabled: AC Fail alarm OFF.
can be changed while the pump is infusing, without putting pump on hold. Disabled:
START button must be pressed to confirm new rate when rate changes are made while
infusing using the rate adjust keys.
warning signals the syringe is almost empty allowing time to change syringe).
0.5% and 2.0%.
switch to run at the KVO rate 1.0ml/h (or the current set rate if this is lower) at the EOI
point. Disabled: Pump will stop at the EOI point.
operation).
or drug at an increased rate). Enabled: Bolus function allowed. Disabled: Bolus function
not allowed.
P6000* P7000*
P7000, P6000, TIVA, TCI & TIVA 19/105 1000SM00012 Issue 3
Page 20

Configuration & Calibration
General Options (251) (continued)
GENERAL OPTIONS MENU (Model P6000/Model P7000)
Software version: V3R2
Option Description
DEFAULT BOLUS Set the default bolus rate value between 10ml/h and 1200 ml/h.
CAP BOLUS RATE Set a maximum permissible bolus rate value between 10 ml/h and 1200ml/h.
CAP RATE Sets maximum permissible infusion rate value between 1ml/h and 1200ml/h.
DISPLAY EVENT LOG Enable/disable EVENT LOG option on OPTIONS menu. (Event Log shows record of timed
and dated pump events such as power on/off, alarms, rate changes).
Enabled: EVENT LOG option available via the OPTIONS menu (D button). EVENT LOG
option not available via the OPTIONS menu (D button). Note that the EVENT LOG
option is always available via the SERVICE ACCESS menu.
LOG LAST PATIENT ONLY Enable/disable display of all patient data in Event Log. Enabled: Event Log displays last
patient data only (since new patient selected). Disabled: Event Log shows all patient
data.
NURSE CALL Enable/disable the Nurse Call feature (hardware feature which allows the pump to
communicate with the hospital's nurse call system, typically linked to central nurse's
station). Enabled: Nurse Call Hardware enabled. Disabled: Nurse Call hardware disabled.
NURSE CALL INVERTED Enable/disable inversion of Nursecall hardware output. Enabled: Nurse Call hardware
output is inverted. Disabled: Nurse Call hardware output normal.
COMMS PUMP ADDRESS Set pump address for use in communications. Range is 1-254.
COMMS MONITOR ONLY Enable/disable pump remote control via the comms link. Enabled: Control of pump
via monitor only. Disabled: Remote control of pump via comms link allowed. Note that
monitor control is always possible.
COMMS ODD PARITY Enable/disable odd communication parity bit generation.
COMMS ASCII Enable/disable ASCII communications mode.
Key:
= available option
= unavailable option
* For pumps with software versions earlier than version V3R2, the options may vary, or will not be available.
Refer to the relevant IVAC® Syringe Pump DFU for comprehensive information.
Note: For default settings, refer to Appendix D, 'Configured Options and Drug Protocol Records'.
P6000* P7000*
P7000, P6000, TIVA, TCI & TIVA 20/105 1000SM00012 Issue 3
Page 21
Configuration & Calibration
Calibration Procedures
The calibration procedure for each of the four sensors within the pumps are described in this section. Calibration is only
necessary if in testing, the sensor performs outside of specification or if a full memory clear has been carried out (in
which case all calibration stages must be completed). Refer to Chapter 3, 'Routine Maintenance' for test procedures.
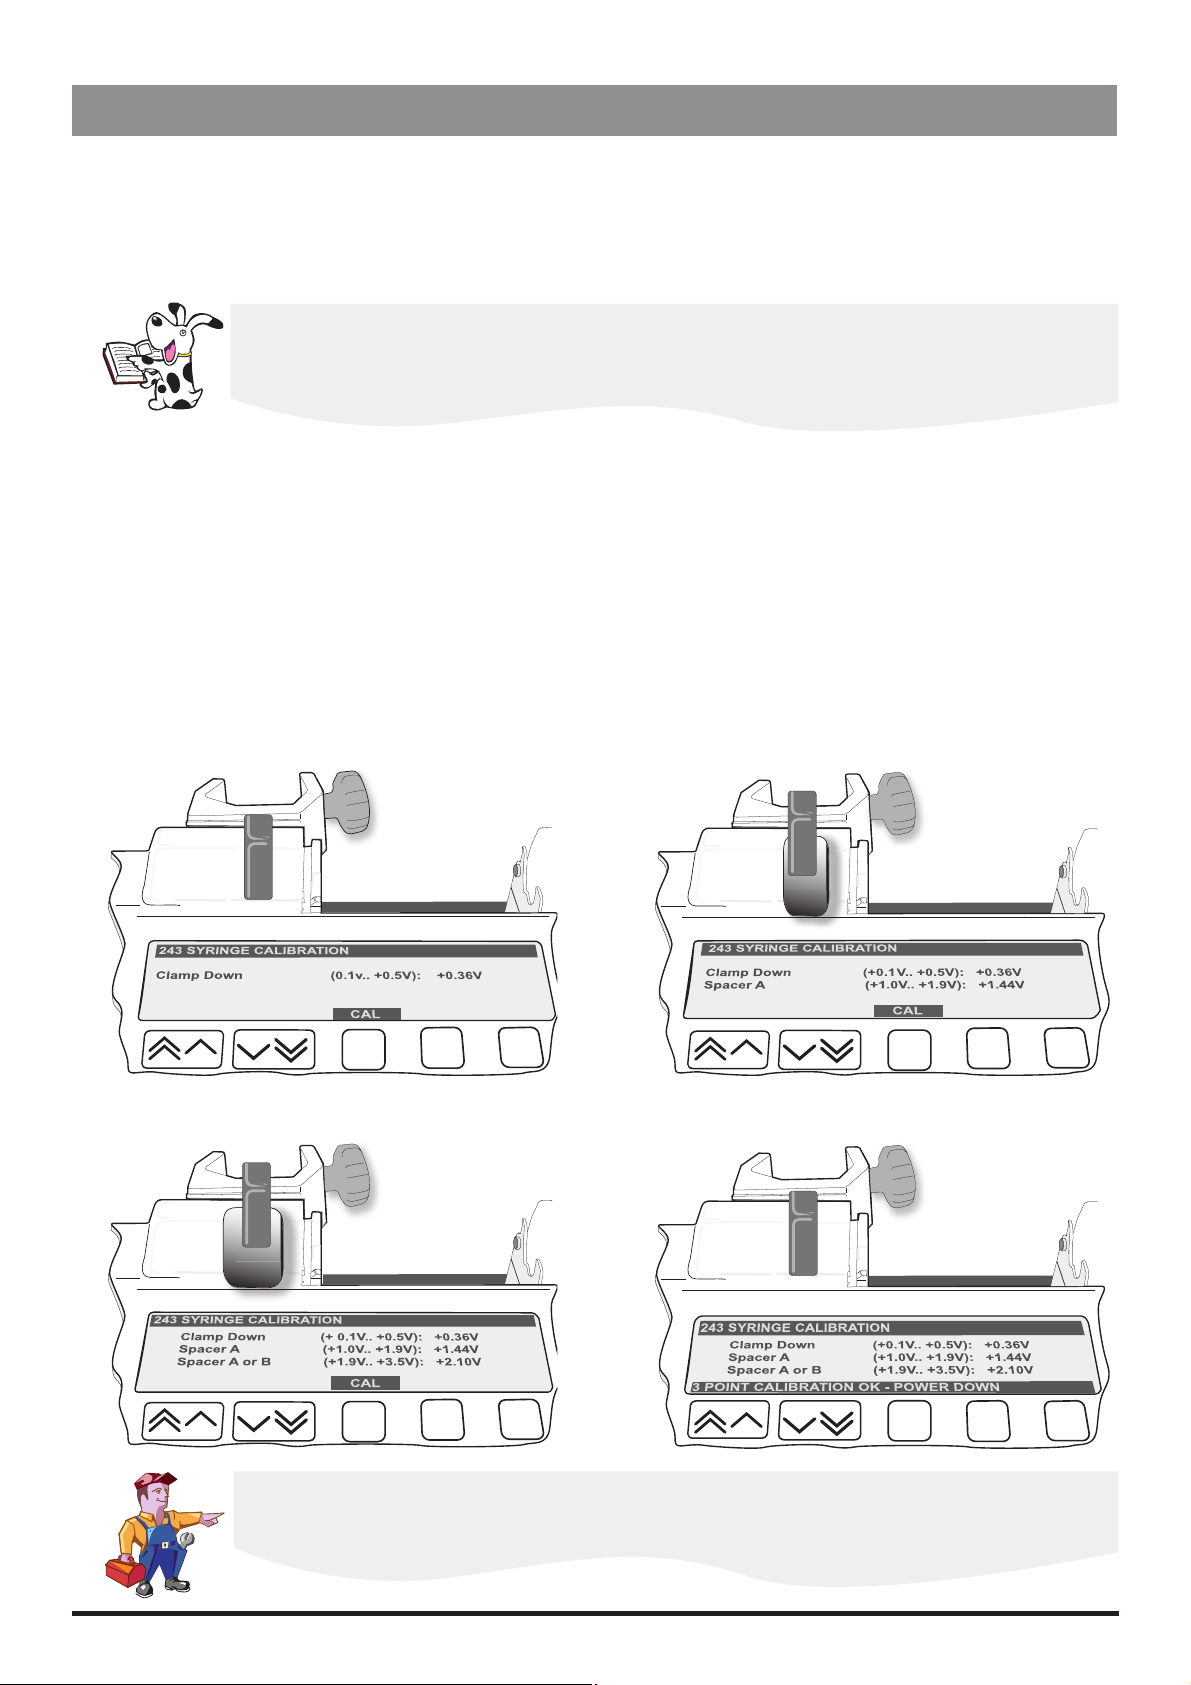
Syringe Size Calibration (243)
Calibration tools required: 1000TG00010 (50ml Spacer A) and 1000TG00011 (100ml Spacer B)
Analysis of process variation shows that a 2 point calibration system is not always sufficient to
define the syringe size detection system across the 5ml to 100ml range. The effect is only observed
when using 100ml syringes, which may not be recognised. If this occurs, the pump should be
recalibrated using a 3 point calibration.
Calibration procedure:
Enter the access code 243.
Fit calibration tool into position on pump as shown below in Steps 1-3 and close the clamp. At each step, CAL is
displayed if value is within tolerances.
Press CAL softkey to store calibration point.
Notes:
1) If CAL is not displayed, check for correct positioning of calibration tool. If calibration cannot be performed, repairs
to pump may be necessary.
2) The calibration values shown on the pump displays are for illustrative purposes only.
Power down to complete the calibration sequence (Step 4).
Step 1
Step 3
Step 2
Step 4
Confirmatory Check - To confirm that the syringe sizing calibration has been performed correctly,
select a syringe (preferably 50ml), load and confirm the correct syringe type. Check that the
correct syringe size is detected and displayed.
P7000, P6000, TIVA, TCI & TIVA 21/105 1000SM00012 Issue 3
Page 22
Configuration & Calibration
Calibration Procedures (continued)
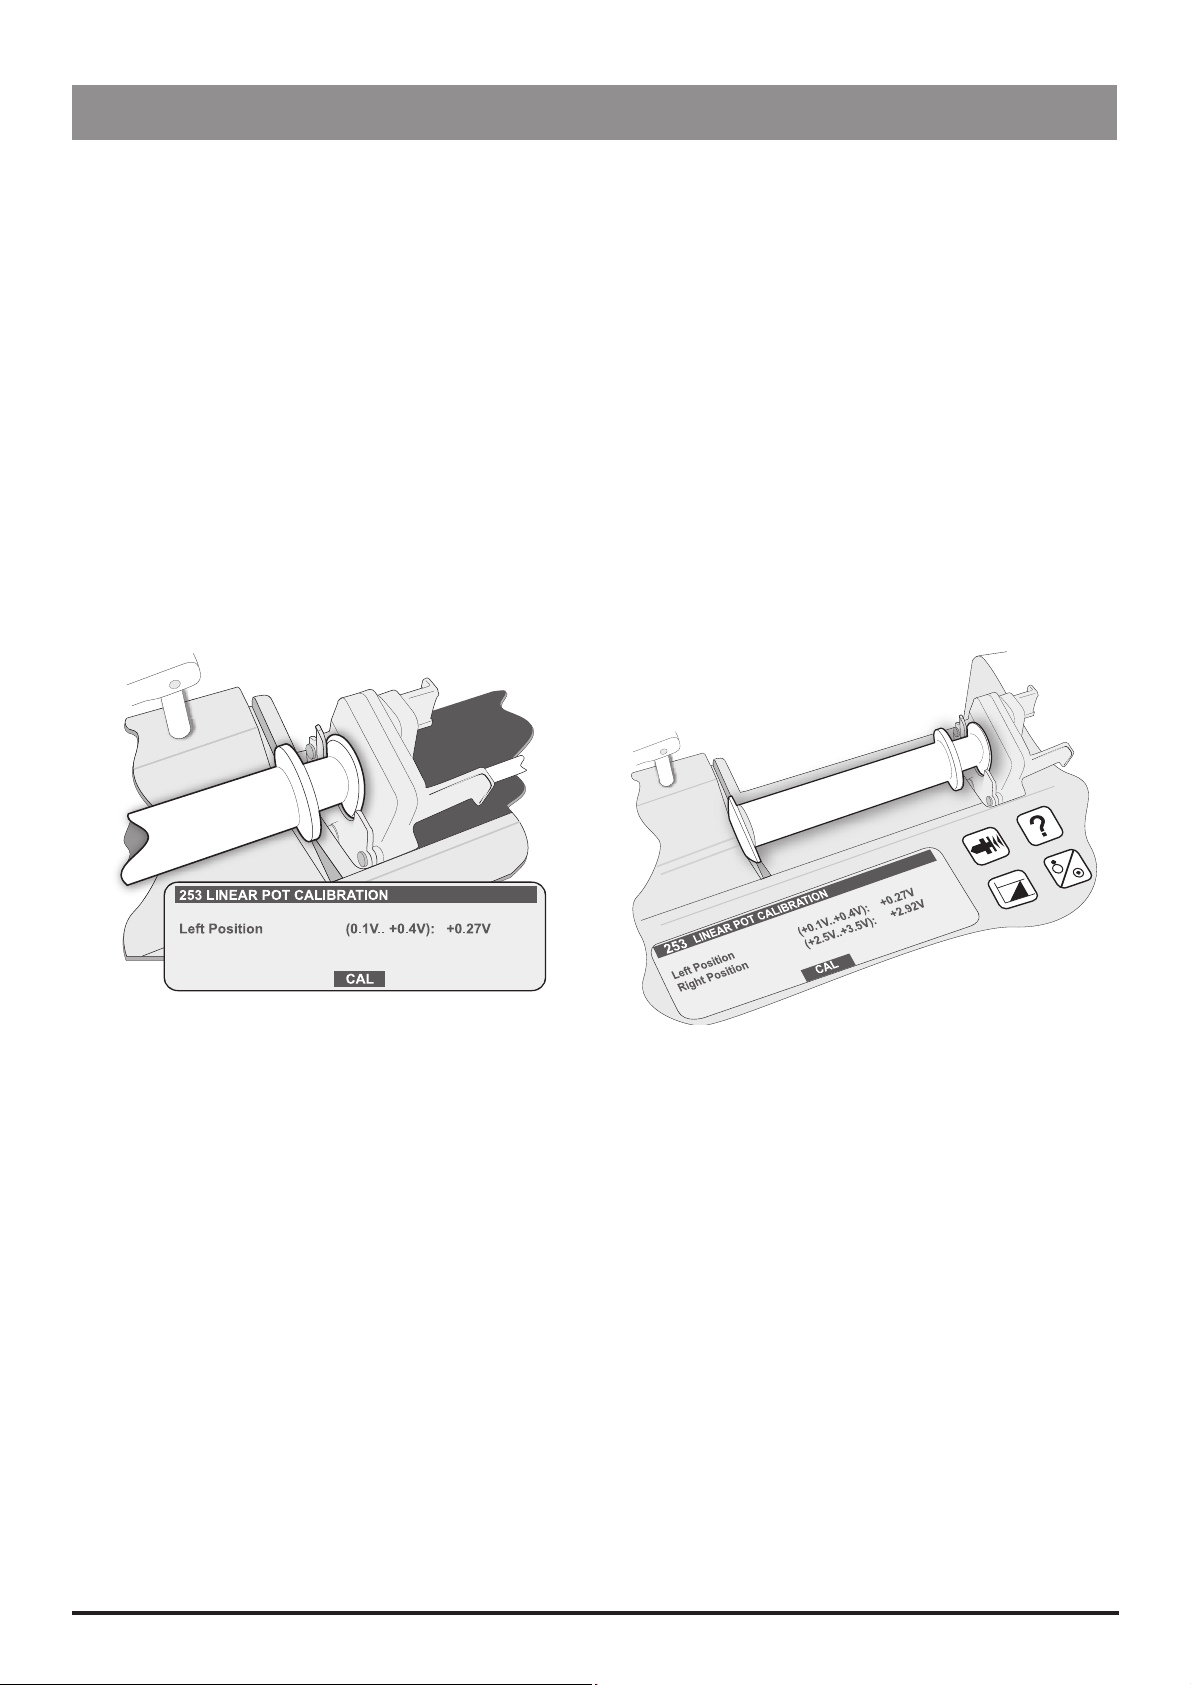
Linear Pot Calibration (253)
Calibration tools required: 0000TG00059 (105mm SPACER)
Calibration procedure:
Enter the access code 253.
Fit calibration tool in position on pump as shown in Steps 1-2 below. At each step CAL is displayed if value is within
tolerance.
Press CAL softkey to store calibration point.
Notes:
1) If CAL does not appear in the display, check for correct positioning of calibration tool. If calibration cannot be
performed, repairs to pump may be necessary.
2) The calibration values shown on the pump displays are for illustrative purposes only.
Power down to complete the calibration sequence.
Step 1
Step 2
P7000, P6000, TIVA, TCI & TIVA 22/105 1000SM00012 Issue 3
Page 23
Configuration & Calibration
Calibration Procedures (continued)
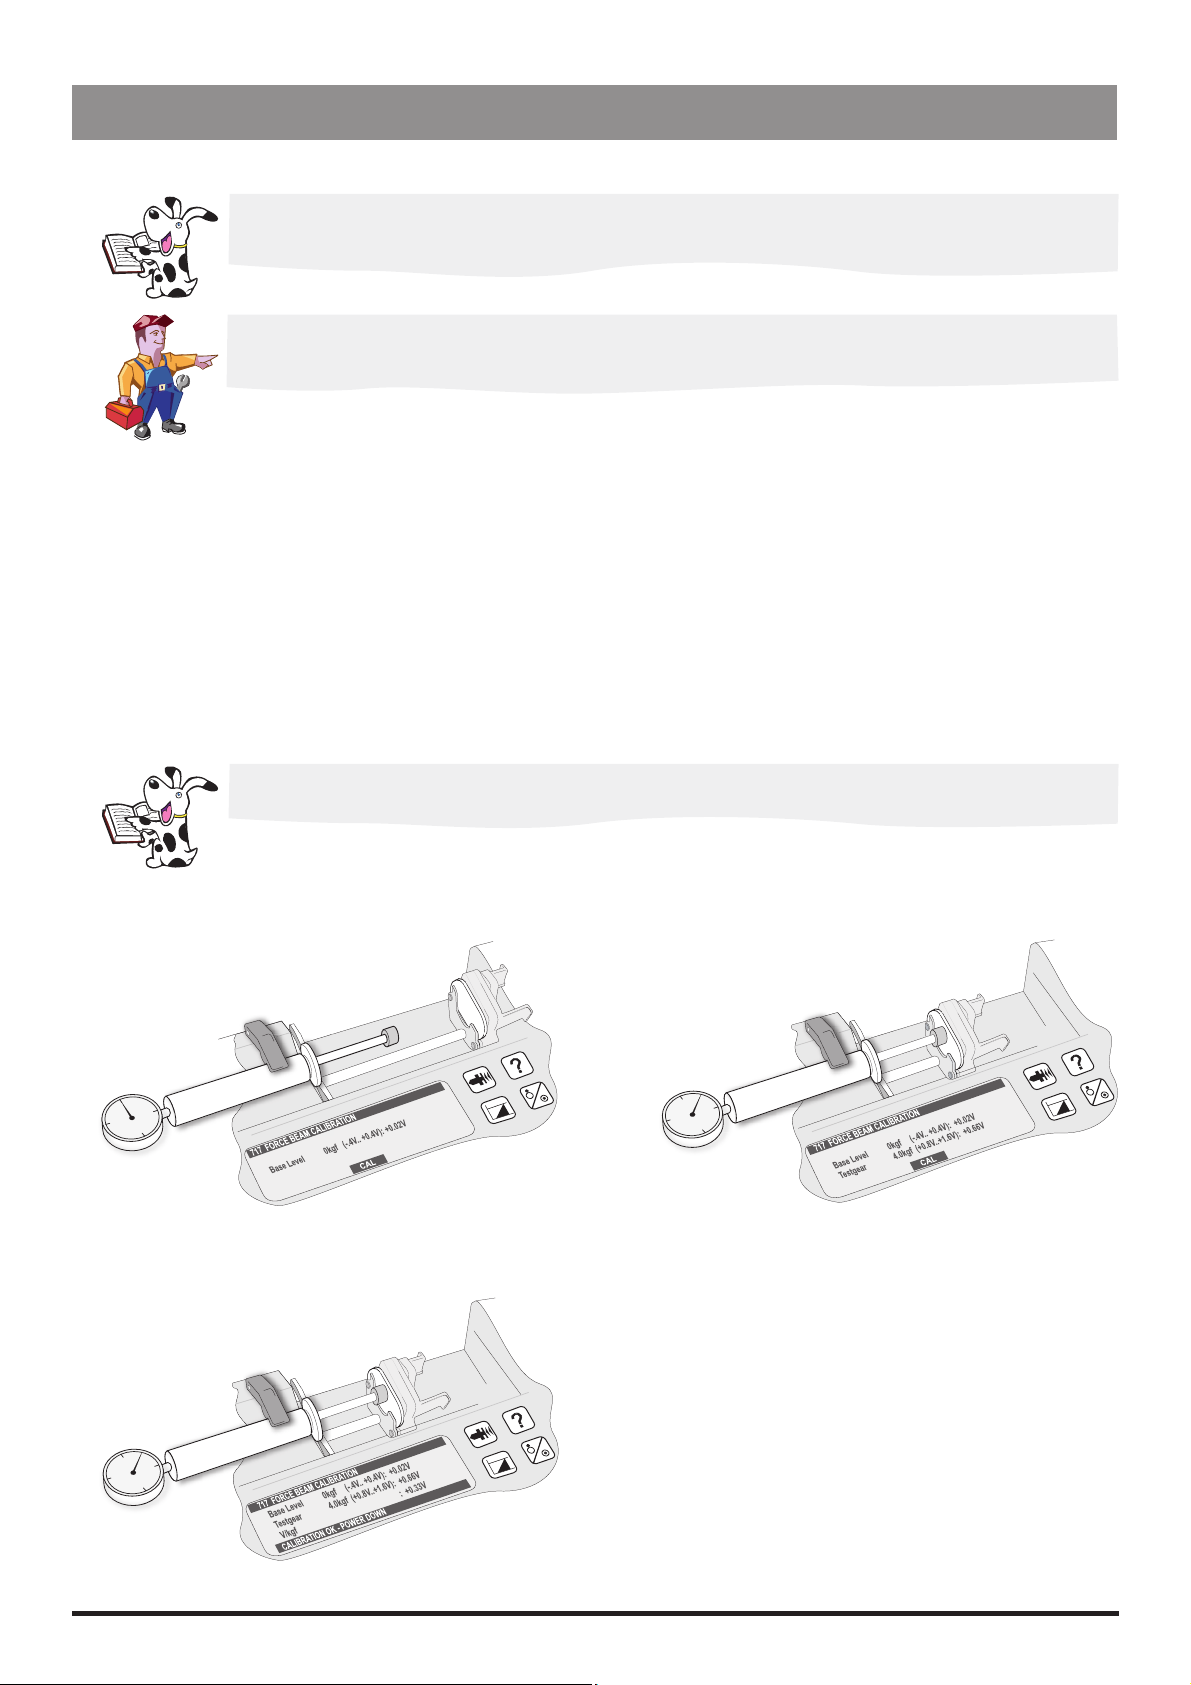
Beam Occlusion Calibration (717)
To convert Kilograms of Force (KgF) to Newtons (N) multiply by 9.806650. For example 10 KgF =
98.07N.
Excessive force will damage the plunger mechanism. Do not apply more than 10 KgF ±0.05
KgF to the plunger mechanism at any time.
Calibration tools required: 0000TG00020 (or 0000TG00200) and 0000JG00014
Calibration procedure:
Enter the access code 717.
Fit calibration tools and position plunger as shown in Steps 1-3 below, zero the gauge dial. At each step press CAL
softkey when required calibration force is reached.
Notes:
1) If CAL does not appear in display, check for correct positioning of tool. If calibration cannot be performed, repairs
to the pump may be necessary.
2) The calibration values shown on the pump displays are for illustrative purposes only.
Allow 30 seconds for pressure to stabilise before pressing CAL softkey.
For best results, before pressing CAL softkey, strive for mid-range force value.
Power down to complete the calibration sequence.
Step 1
0KgF
Step 3
Step 2
4KgF
P7000, P6000, TIVA, TCI & TIVA 23/105 1000SM00012 Issue 3
Page 24
Configuration & Calibration
Calibration Procedures (continued)
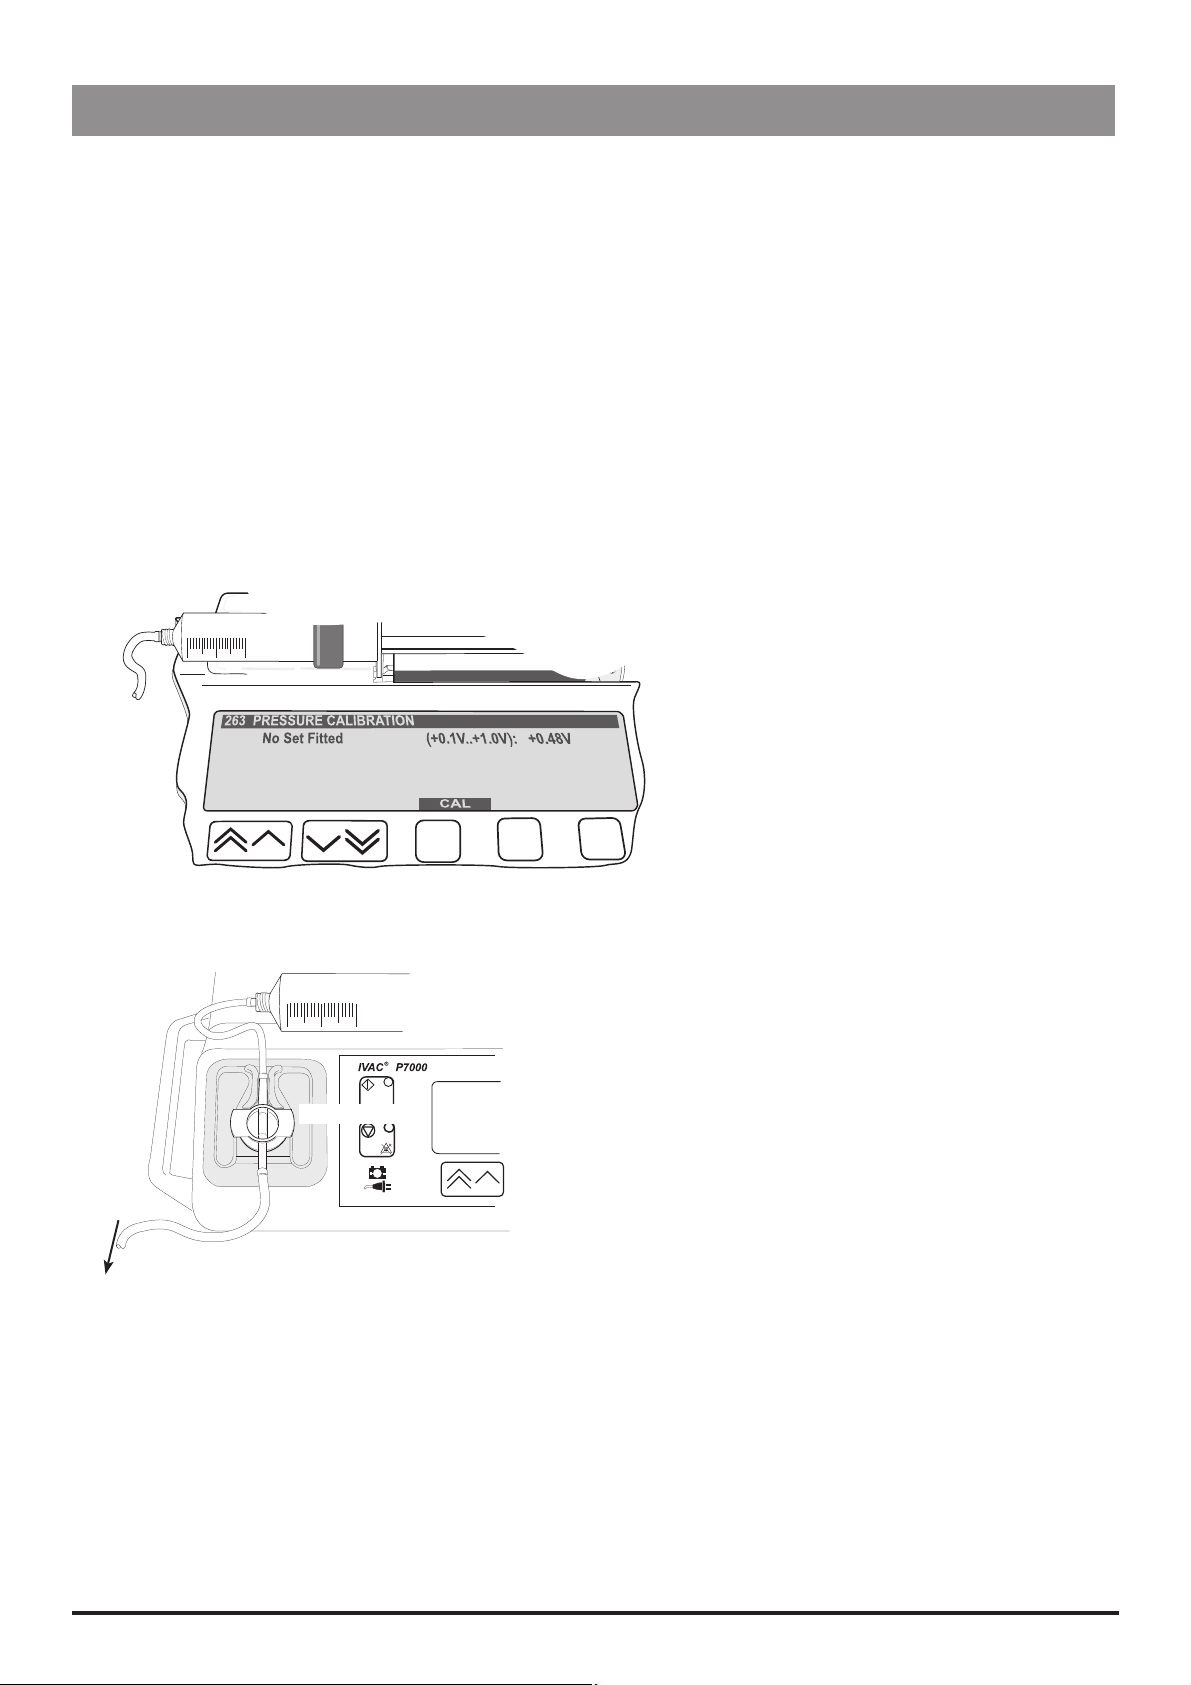
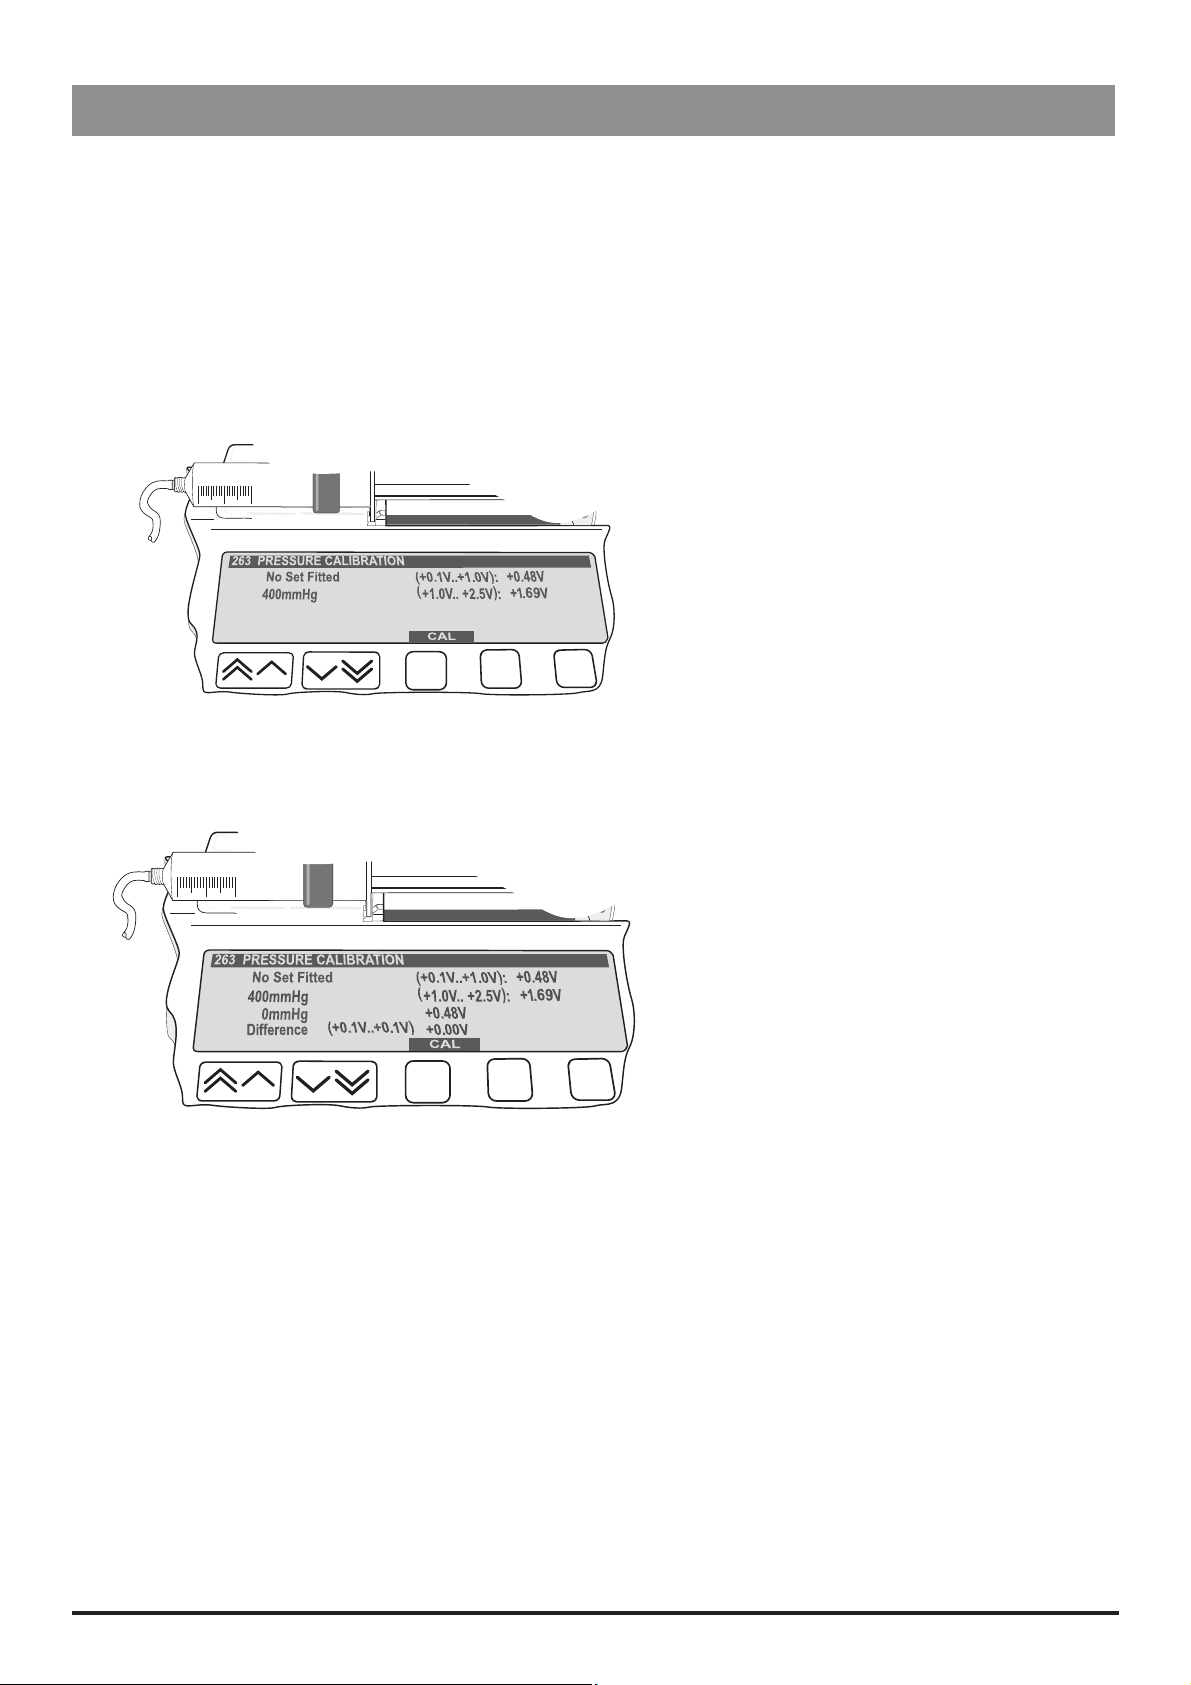
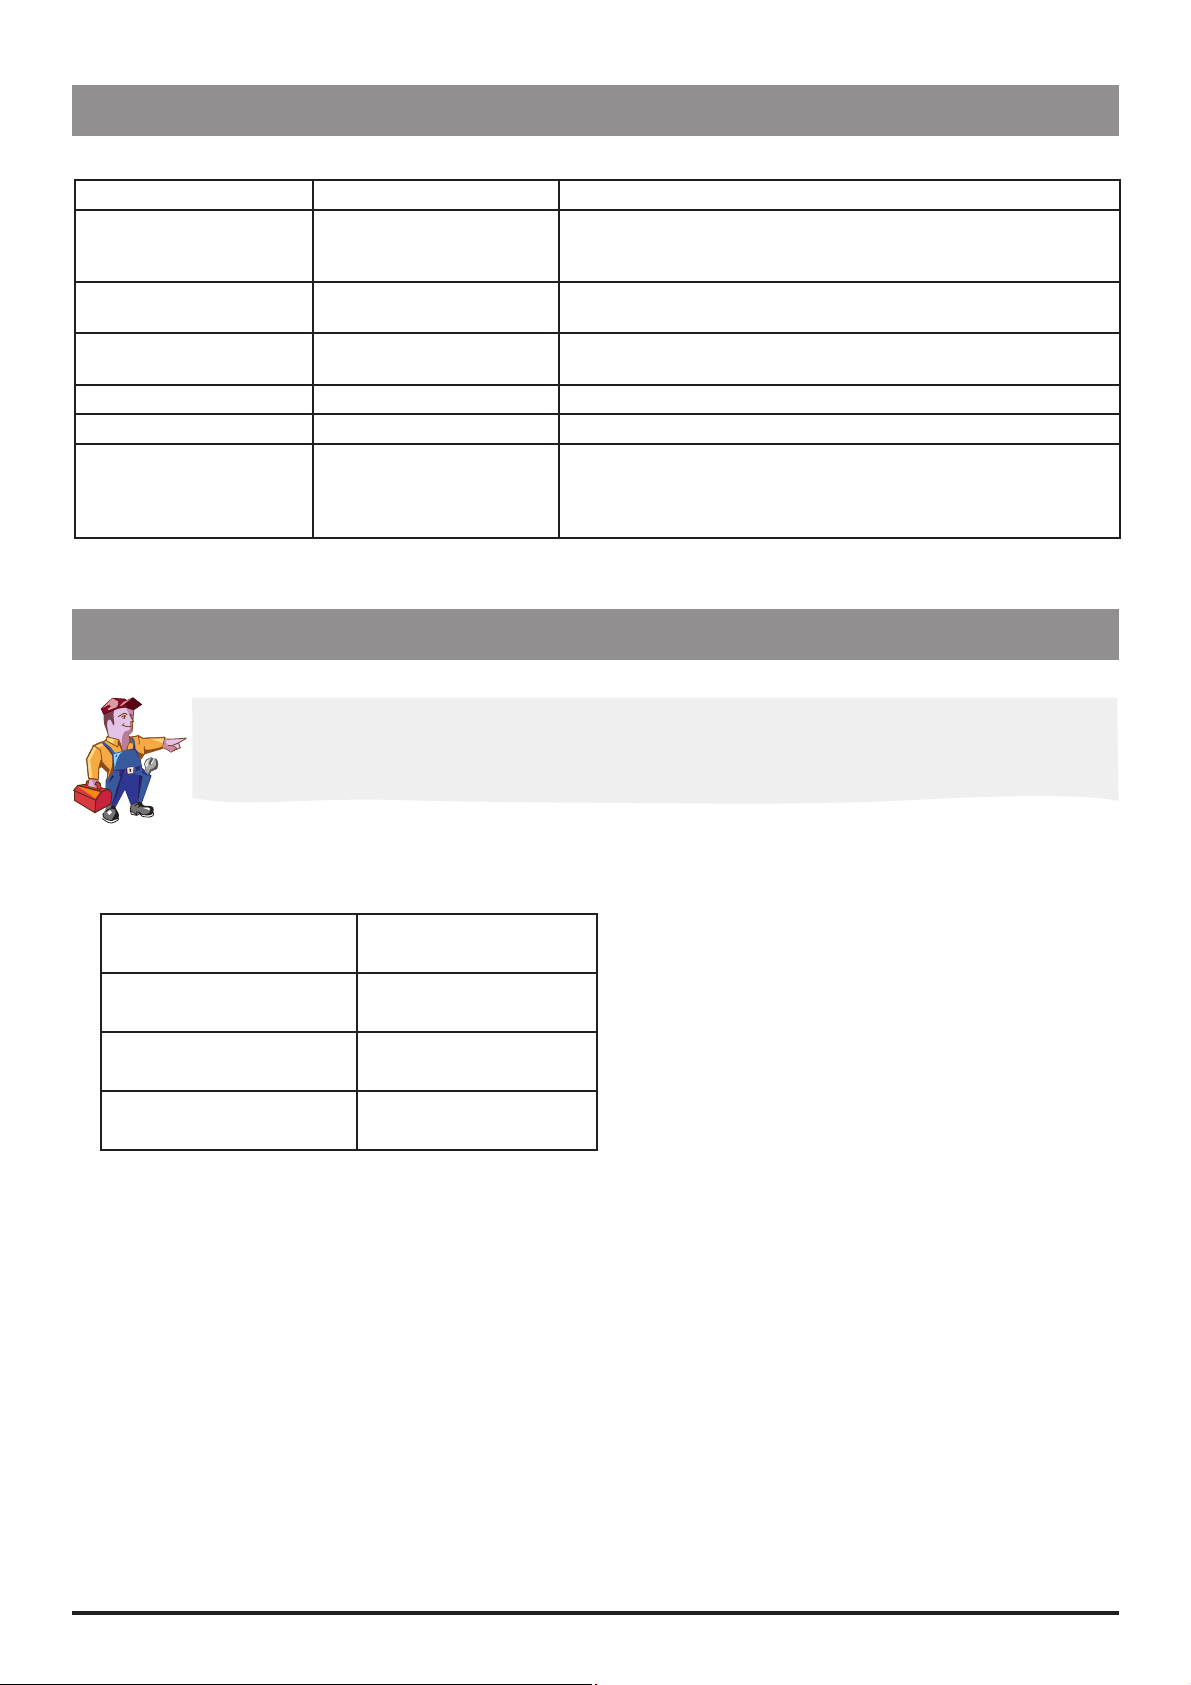
Line Pressure Calibration (263) P7000 only
Calibration tools required:
Pressure gauge (Range 0-1400 mmHg) (Tolerance +/- 2mmHg)
P7000 Dedicated pressure disc infusion set (for example, G30402)
50ml Luer-lock syringe
Calibration procedure:
1. Enter access code
2. Without a pressure disc infusion set fitted press
3. Load pressure disc infusion set into transducer (as shown in Step 2) then connect infusion set to syringe and gauge.
4. Using syringe, apply pressure required (as shown in Step 3 overleaf). Press CAL softkey when required calibration
pressure is displayed on pressure gauge (Step 3).
Step 1
0mmHg (Without set fitted)
263.
CAL softkey (Step 1).
Step 2
Load set
To pressure gauge
50ml Luer-lock syringe
Transducer
P7000, P6000, TIVA, TCI & TIVA 24/105 1000SM00012 Issue 3
Page 25
Configuration & Calibration
Calibration Procedures (continued)
Line Pressure Calibration (263) P7000 only continued
Calibration procedure (continued):
5. Release pressure but do not remove extension set as shown in Step 4.
6. Power down to complete the calibration sequence.
Step 3
400mmHg ± 2mmHg
Step 4
0mmHg (Set fitted, pressure released)
P7000, P6000, TIVA, TCI & TIVA 25/105 1000SM00012 Issue 3
Page 26

Configuration & Calibration
Clearing Internal RAM (611)
Warning: Do not clear the RAM unless absolutely necessary, because all calibration and
configuration in the pump will be cleared.
If the internal RAM or its associated battery is replaced on the Control PCB, or if the pump fails with an 'ER5 RAM' error it
will be necessary to do the following:
Clear the internal RAM:
1. Power up the pump holding down the H button.
2. Enter the access code 611.
3. Press ENTER and wait for the RAM to be cleared.
4. When the message RAM CLEARED appears, switch the pump off.
Fully calibrate pump. Perform each of the four calibration procedures, as described in this chapter.
Reconfigure the pump:
Set Configuration, drugs and protocol (it may be possible to use the Teach/Learn facility, see Chapter 3, 'Routine
Maintenance' for instructions).
Enter access code 251 and set time.
Enter access code 359 and set language.
Enter access code 376 and set service date.
Enter access code 901 to set to dedicated (Model P7000 only).
Carry out Performance Verification Procedure (PVP). See Chapter 3, 'Routine Maintenance' for instructions.
P7000, P6000, TIVA, TCI & TIVA 26/105 1000SM00012 Issue 3
Page 27

Routine Maintenance
In this chapter
Introduction 28
Chapter 3
Self-Test Procedure (123) 28
Upgrading Software 29
Event Log Download 30
Teach Learn 30
Linear Speed Test 31
Drive Occlusion Test 31
Line Pressure Test (Model P7000 only) 32
Potential Equalisation Terminal Resistance Test (PE Test) 32
Battery Maintenance Test 32
Linear Diagnostics Test 33
Physical Inspection and Clean 34
Service Access Options (376) 34
Performance Verification Procedure 35
Page 28

Routine Maintenance
Introduction
For routine maintenance, the following tests and performance verification procedures should be performed in addition
to the tasks described in the section 'Physical Inspection and Clean'.
Refer to the relevant
DFU for the recommended routine maintenance period.
Self-Test Procedure (123)
The self-test procedure is designed to allow confirmation of many of the pump functions, defaults and calibrations
without requiring internal inspection.
1. Enter the access code 123. See 'Entering an Access Code' in Chapter 2 for instructions.
2. The pump now proceeds through a series of tests. Press the NEXT button to move to the next test.
Refer to the table below for details of each test.
Important: If the pump fails the test sequence at any stage, it should be taken out of service and inspected by a qualified
service engineer.
Test Display Description/Action
Review software setup SOFTWARE REVISION
PROGRAM CRC
SERIAL NUMBER
LANGUAGE
TCI LANGUAGE (TCI & TIVA
only)
Review calibration data
setup
Internal PSU and mains
voltage
Audible Alarms AUDIO: ALARM Check loud alarm sound beeps.
Visual: Display DISPLAY TEST Check that the display displays an even graduated grey tone.
Visual: Backlight BACKLIGHT FULL / DIM / OFF The display starts the test on FULL backlight, goes DIM and then turns
Visual: LED Indicators LEDS: FLASHING Check that the STOP, START and BATTERY LED’S are flashing. Note: the
Touch panel buttons KEY TEST: 00 Press buttons in turn from START (01) to PURGE (13).
SYRINGE REVIEW Displays syringe, beam and linear calibration figures. Pressure
PSU VOLTS: _ . _ _ V
REG VOLTS: _ . _ _ V
AUDIO: WATCHDOG Check loud alarm sounds continuously.
AUDIO: KEYPAD Check soft alarm sounds continuously.
H 01 C 09
I 02 E or F 10
03, 04
N
O
05, 06
A or J 11
D 12
C 07 G 13
C 08
Declutch switch DECLUTCH: 1 Squeeze plunger holder finger grips and check that the display
Plunger detector SYRINGE PLUNGER: 0 Press plunger plate button and check display switches from 0 (No
Motor encoder MOTOR / ENCODER : 1 Motor is pulsed while encoders are tested. Motor moves forwards and
Linear potentiometer LINEAR POT : _ _ . _ _V Declutch the transmission and slide plunger holder to the far left, check
Syringe size detection SYRINGE POT : _ _ . _ _ V Lift the syringe clamp and check that the values displayed increase
Displays software version, program CRC, serial number and language.
calibration shown on P7000 only.
On battery supply typically: 5.50V - 6.50V
On mains supply: 6.50V - 7.50V.S
OFF. At the end of the test it turns back on to FULL.
AC LED does not flash, it remains constant.
alternates between 1 (engaged) and 0 (disengaged - finger grips
squeezed together).
syringe fitted) to 1 (Syringe plunger fitted).
backwards as encoders pass.
the value displayed (approx. 00.19V). Declutch and slide the plunger
holder to the far right and check the value displayed (approx. 03.00V).
within the normal range (approx. 0.05V and 3.00V).
P7000, P6000, TIVA, TCI & TIVA 28/105 1000SM00012 Issue 3
Page 29
Routine Maintenance
Self-Test Procedure (123) (continued)
Test Display Description/Action
Pumping pressure detection BEAM FORCE : _ . _ _ V Remove the syringe and confirm that the value displayed is within
normal range (± 0.05V). Gently press back on the plunger holder and
watch the value increase.
Pressure disc detection
(P7000 only)
Pressure sensor test (P7000
only)
Nursecall NURSECALL: ON Check for audible clicks of the relay.
Comms COMMS _ Self-test, transmit/receive link back check.
PRESSURE DISC: 0 With an extension set fitted the value should be 0. Without an
extension set the value should be 1.
PRESSURE: _._ _V Check the values displayed are in approximate range of +0.30V to
+0.60V.
DONE - SWITCH OFF The final screen displays DONE - SWITCH OFF. Providing the pump
passed all the tests it can be powered OFF and put back into service.
Note that if the pump fails the test sequence at any stage, it should be
taken out of service and inspected by a qualified service engineer.
Upgrading Software
Upgrade of the Models P7000, TCI & TIVA and TIVA Syringe Pumps software to V3R2 or greater is mandatory at the
next service.
Perform upgrades by acquiring the software upgrade kits specified in spare parts listings.
Equipment required: Software upgrade kit (includes EPROM fitting and removal instructions)
Software Upgrade Kits Available
Syringe Pump Model Part Number
Model P7000 1000SP00530
Model TIVA 1000SP00531
Model TCI & TIVA 1000SP00532
Note: The latest version of software for the Model P6000 syringe pump is 1000SP00529.
P7000, P6000, TIVA, TCI & TIVA 29/105 1000SM00012 Issue 3
Page 30

Routine Maintenance
Event Log Download
A PC application known as the Event Log Download Utility (ELDU) (part number 1000SP00209) is available to download
logs from IVAC® Syringe Pumps.
ELDU Operation
1. Click on ELDU icon on PC.
2. Click Accept to agree with Restrictions of Use and continue.
3. Select Configure from drop-down menu.
4. Select Setup Pump and choose IVAC® as pump type.
5. Select Settings to select log to be downloaded.
6. Select Communications then check options are set as follows:
- Required PC com port selected.
- Character mode and parity match IVAC® pump configuration.
- Delay mode is Normal.
- Pump address matches COMMS PUMP ADDRESS in GENERAL OPTIONS.
7. Click OK to confirm.
8. Connect the RS232 cable.
9. Power up pump.
10. Click
11. Press Close, when finished.
12. Select File from drop-down menu and save file. Log may be printed here as required.
Download Log from main PC screen.
Teach Learn
A pump can be configured/reconfigured by transferring data from one pump (Teacher pump) to another pump (Learner
pump) via the serial port.
Equipment required
Two pumps, of the same model (for example, two Model
version of software
RS232 cable. For Models
P6000/P7000/TIVA use part number 1000SP01008. For Model TCI & TIVA use part number
6000SP00012
Procedure
1. Connect the Teacher pump to the Learner pump using the RS232 cable.
2. Switch both pumps ON.
3 On the Teacher pump, enter the access code 168 and on the Learner pump, enter the access code 167.
The Teacher pump displays TEACHING and the Learner pump displays LEARNING.
4. When complete, select OK.
Possible reasons for Teach/Learn failure:
Pumps are different models
Software versions are different
Loose cable connection or faulty RS232 cable
Using Teach Learn to reconfigure a pump only transfers certain configuration settings. The
following settings are not transferred and must be reset manually: CLOCK SET (251), SET
LANGUAGE (359), SERVICE DATE (376), DEDICATED MODE (901/902), ENABLE UNITS (251) on
P7000 only.
P7000 pumps). Note that both pumps must have the same
Once Teach Learn is complete, all configuration settings on the Learner pump, including DRUG
SET UP, must be checked against the Teacher pump (original source).
P7000, P6000, TIVA, TCI & TIVA 30/105 1000SM00012 Issue 3
Page 31

Routine Maintenance
Linear Speed Test
The linear accuracy of the pump can be verified by measuring the time the plunger holder takes to travel a specified
distance. The distance travelled is measured using a dial indicator, mounted in place of the syringe, and the elapsed time
can be measured using a stop watch.
Equipment required: 1000TG00080 and 0000JG00014
1. Declutch the drive mechanism and move the plunger holder to the right.
2. Fit the linear test gear 1000TG00080 to the pump and move plunger holder towards the dial gauge until it is a about
3mm clear of the probe. Fit a plunger detect spatula 0000JG00014.
3. Set the pump to run at a rate of 100ml/h, confirm syringe type and start it. Allow the pump to run until the plunger
detect spatula touches the probe and then using a stop watch, time the travel over a distance of 15.00mm.
4. Using the values specified in table below, check that the pump is travelling at the correct speed. If the test values fall
outside the stated limits (or the movements of the dial are jerky) then the pump requires further investigation.
The table below provides data for a combination of syringe types and sizes.
Syringe Type Size (ml) Flow Rate (ml/h) Expected Time (min:sec)
BD Plastipak 50 100.0 4m 55s +/-3s
IVAC 50 100.0 4m 57s +/-3s
Terumo 50 100.0 5m 57s +/-4s
B.Braun Omnifix 50 100.0 5m 29s +/-4s
Monoject 50 100.0 4m 55s +/-3s
Nipro 50 100.0 5m 55s +/-4s
Fresenius Injectomat 50 100.0 5m 49s +/-4s
Braun Perfusor 50 100.0 5m 30s +/-3s
Once 50 100.0 5m 20s +/-4s
Zeneca 50 100.0 5m 02s +/-3s
BD Precise 50 100.0 5m 50s +/-4s
BD Perfusion 50 100.0 5m 28s +/-4s
Notes:
1) It is only necessary to perform the test using one syringe type, 'BD Plastipak' is recommended.
2) Not all syringe types listed are specified for use with every model of pump.
Drive Occlusion Test
Test gear required: 0000TG00020 (or 0000TG00200) and 0000JG00014
Method 1. Semi-dedicated pumps
1. Fit the test gear. (For Model P7000, set pump to semi-dedicated mode and remove pressure disc infusion set from
transducer). Confirm syringe type 'BD Plastipak 50ml'. Set the beam occlusion level to L-3. Set up a continuous rate of
100ml/h.
2. Run pump and check that the force at alarm is in the range of 2.2KgF to 3KgF. If it is out of range re-calibrate (see
'Beam Occlusion Calibration' in Chapter 2) and retest.
Method 2. Dedicated pumps (Model P7000 only)
1. Fit a pressure disc infusion set into the transducer. Set the line occlusion level to 220mmHg. Fit the test gear. Confirm
syringe type 'BD Plastipak 50ml' (configure if necessary). Set up a continuous rate of 100ml/h.
2. Run pump and check that the force at alarm is in the range 3.1KgF to 3.9KgF. If it is out of range re-calibrate (see
'Beam Occlusion Calibration' in Chapter 2) and retest.
P7000, P6000, TIVA, TCI & TIVA 31/105 1000SM00012 Issue 3
Page 32

Routine Maintenance
Line Pressure Test (Model P7000 only)
The pressure transducer is checked at a number of pressures as indicated in the table below. If the pressure readings
displayed appear consistently shifted and outside specification, the sensor may require calibration.
Equipment required: Pressure gauge (measuring accuracy +/-2mmHg), or pressure measuring instrument (measuring
accuracy +/-2mmHg) with pressure setting facility.
1. Connect a line with the pressure transducer fitted to the pump with one end of the line terminated in a tap and the
other connected to the measurement device.
2. Switch the pump on and observe the pressure display with the set fitted to the sensor housing. Set each pressure
shown below in turn, at each stage leave the pressure stable for a few seconds; check that the independent
measurement device reading is stable to verify that the set and line are sealed, before checking the displayed pressure
on the pump.
Set Pressure Displayed Pressure
0mmHg +/-2mmHg 0mmHg +/-20mmHg
50mmHg +/-2mmHg 50mmHg +/-23mmHg
100mmHg +/-2mmHg 100mmHg +/-25mmHg
300mmHg +/-2mmHg 300mmHg +/-35mmHg
500mmHg +/-2mmHg 500mmHg +/-45mmHg
750mmHg +/-2mmHg 750mmHg +/-58mmHg
Potential Equalisation Terminal Resistance Test (PE Test)
This is an optional test, applicable when a PE system is in use.
Note that this test is not relevant for Model TCI & TIVA.
Equipment required: DVM Resistance Meter (e.g. Fluke)
1. Connect one lead from the DVM resistance meter to the PE terminal on the pole clamp of the pump and the other to
the pump leadscrew. Check that the settled value of resistance is less than 20 MΩ.
2. Move the lead from the leadscrew and repeat the check with the lead to the outer tube. Check that the settled value is
less than 20 MΩ.
3. If the value of either of the two readings is greater than 20 MΩ, the pump fails this test and must be removed from
service for further investigation.
Battery Maintenance
Maintenance: To achieve optimum operation of the pump whilst being used on battery power, it is
recommended that a battery test (see 'Battery Test' below) is performed to ensure that the
pump will operate correctly on battery power. Where it is not possible to run a battery test, it is
recommended that the battery is replaced every 2 years.
Charging: Typically, a new battery will take approximately 24 hours from discharge to 100% charge.
New Batteries: Where a battery is not tested prior to installation, it is recommended where possible that a
battery test is performed.
Battery Test: Run the pump on battery power at the rate of 5 ml/h, for a minimum of 4 hours (2.8Ah battery)1
or 6 hours (3.4 Ah battery)2. This test should be performed annually, or more frequently as
required (e.g. where charge retention is critical to pump operation).
Storage: The pump should be fully recharged after discharge before storage, and at 3 month intervals
during storage.
Battery Life: The internal rechargeable sealed lead acid battery will retain charge if maintained correctly.
Charge retention will degrade over time. The internal battery should be replaced every 3 years,
or if the pump fails the battery test.
Recommended Manufacturer:
1
Yuasa
2
Panasonic
P7000, P6000, TIVA, TCI & TIVA 32/105 1000SM00012 Issue 3
Page 33

Routine Maintenance
Linear Diagnostics Test
This test does not represent the linear or volumetric accuracy of the syringe pump. For accurate testing
refer to ‘Linear Speed Test’ earlier in this chapter
This test should be used as a diagnostic tool only and can assist with the diagnosis of linear speed errors ER1 and ER2.
Procedure
1. Enter the access code 176.
2. The display will show ‘Linear Diagnosis xxx.xx mm' (xxx.xx mm represents the current position of the plunger holder).
3. Declutch the drive mechanism and move the plunger holder to the extreme right, past an indicated +105.00mm.
4. Re-engage the drive mechanism carefully . Sharp jolts on the transmission at this point can affect the results.
5. Over some minutes the screen will display a graph of linear error. Note: This is percentage deviation from linear path
between left and right calibration points.
6. Check that the plotted line remains within the ±1% lines (Unmarked), and that no sharp increases or decreases in
deviation occur.
Troubleshooting
Note that sharp jolts, or incorrect linear calibration may affect the result.
If test fails:
Perform the ‘Linear Pot Calibration’, see Chapter 2
Replace the Linear travel potentiometer
Test examples
Test example 1
Result: Pass
Trace is within ±1%.
Test example 2
Result: Fail
Small sharp decrease is outside ±1%.
Recommend check/replace Linear
potentiometer.
Test example 3
Result: Fail
Trace is outside ±1%. Motor speed error.
Recommend check/replace Motor
gearbox, Control PCB or Optics.
176 LINEAR DIAGNOSIS 000.00mm
+2%
0%
-2%
176 LINEAR DIAGNOSIS 000.00mm
+2%
0%
-2%
176 LINEAR DIAGNOSIS 000.00mm
+2%
0%
-2%
Test example 4
Result: Fail
Trace is outside ±1%.
176 LINEAR DIAGNOSIS 000.00mm
+2%
0%
Recommend check/replace Linear
potentiometer.
P7000, P6000, TIVA, TCI & TIVA 33/105 1000SM00012 Issue 3
-2%
Page 34

Routine Maintenance
Physical Inspection and Clean
To ensure the pump remains in good operating condition, it is important to keep it clean and carry out the routine
procedures described below. All servicing should only be performed by a qualified service engineer.
Thoroughly clean external surfaces of the pump, by wiping over with a cloth lightly dampened with warm water and a
standard disinfectant/detergent solution.
Do not use the following disinfectant types:
- NaDcc (such as PRESEPT)
- Hypochlorites (such as CHLORASOL)
- Aldehydes (such as CIDEX)
- Cationic Surfactants (such as Benzalkonium Chloride)
- Iodine (such as Betadine)
Recommended disinfectants are:
Brand Concentration
Hibiscrub 20% (v/v)
Before cleaning always switch OFF and disconnect from the AC power supply. Never allow fluid to enter the
casing and avoid excess fluid build up on the pump.
Do not use aggressive cleaning agents as these may damage the exterior surface of the pump.
Do not steam autoclave, ethylene oxide sterilise or immerse this pump in any fluid.
Virkon 1% (w/v)
Check that labels are flat, legible and fully adhered. Replace as necessary.
Inspect case components for damage and replace if necessary.
Inspect the pole clamp for damage and check that it functions correctly.
Inspect the AC power supply plug and cable for damage.
Service Access Options (376)
Information logs and additional service options are available from the SERVICE ACCESS menu.
Use access code 376 to display the SERVICE ACCESS menu. See 'Access Codes' at the beginning of Chapter 2, 'Configuration
and Calibration' for further information on access codes.
Option Description/Action
VIEW SERVICE LOG Displays the last 10 fault codes. The time and date of each fault is shown.
SERVICE DATE Set the date when ‘Service Due’ is required to be displayed on the pump.
SERVICE MESSAGE Enter (or amend) a message to be displayed on the SERVICE DATE.
USE LOG Displays the hours of use since cleared. Press CLEAR to reset hours to zero.
SERIAL NUMBER Record the serial number of the pump.
EVENT LOG Displays the event log (maximum 800 events). The time and date of each event is shown.
Note that pressing the D button on the pump at any time also allows access to the EVENT LOG option (if
enabled).
P7000, P6000, TIVA, TCI & TIVA 34/105 1000SM00012 Issue 3
Page 35

Routine Maintenance
Performance Verification Procedure
Model / Serial Number: Service Order / Inventory Number:
Hospital Name / Reference: Software Version:
INSPECTION Physical inspection and clean
Mandatory when serviced
Update P7000 with V3R2 software
UPDATE REF: Fitted Not fitted / Not
CH3
TSM
Applicable
UPDATES
SERVICE LOG
SELF TEST
INFUSING
VERIFICATION
TESTS
CH3
CH3
Update TIVA and TCI & TIVA with V3R2 software
Inspect and fit display spacers on pumps with serial numbers below:
TSM
TSM
CH3
CH6
6001-00001 to 6001-13816, 6002-00001 to 6002-11388, 6003-00001 to 6003-01126,
7001-00001 to 7001-13717
Recommended when serviced
Update P6000 with V3R2 software
Bond the syringe clamp assembly on pumps with serial numbers: 6001-00100 to
UPDATE REF: Fitted Not fitted / Not
CH3
TSM
CH6
TSM
6001-00972, 6002-00100 to 6002-00259, 7001-00106 to 7001-04432
CH3
Check/set serial number & set service date (optional) (376)
Check all functions in self-test (123)
Check and adjust time and date as required (251)
Alarms functionality check
DFU
Drive Disengaged, VTBI done, Syringe Location, Plunger Location, AC power fail, Set Removed (P7000), Near End of Syringe,
Syringe Empty, KVO
Ensure pump works on battery and AC mains
DFU
Linear speed test
Pump set to 100 ml/h, syringe type BD Plastipak 50, for a distance of 15 mm. 4 mins
52 secs to 4 mins 58 secs
______ mins ______ secs
Occlusion test
Pump set to 100 ml/h, syringe type BD Plastipak 50
Semi Dedicated, Occlusion alarm level L-3, 2.2 KgF to 3 KgF
OR Dedicated (P7000), alarm level 220 mmHg, 3.1 KgF to 3.9 KgF
Line pressure test (P7000)
Alarm set to 50 mmHg, pump alarms 27 mmHg to 73 mmHg
Alarm set to 500 mmHg, pump alarms 455 mmHg to 545 mmHg
TCI function test Fit TCI syringe (Diprivan 1%). Set TCI mode: age=40, wt=70 kg, TCI
target=4.0 μg/ml. Elapsed time to reach 4.0 μg/ml=24 ± 1 sec.
_____________ KgF
_____________ mmHg
_____________ mmHg
______ mins ______ secs
Applicable
SETUP Set rate to zero (or lowest value possible), Clear Volume Infused and VTBI
Clear Error / Alarm / Battery logs (as required)
Alternatively attach printed test results
_____________ MΩ
_____________ μA
_____________ Ω
_____________ μA
_____________ μA
ELECTRICAL SAFETY
TESTS
Class II Type CF - P7000, P6000, TIVA
Insulation Resistance > 50 Megohms
Enclosure Leakage Current <= 100 μA
Class I Type CF - TCI & TIVA
Earth Resistance Test <= 0.2 Ω
Earth Leakage Current <= 500 μA
Enclosure Leakage Current <= 100 μA
Verification
Performed
By ______________________________
Sign
CHX
indicates the chapter number in the Technical Service Manual (TSM) - 1000SM00012.
CH3
E.G.
= Refer to TSM Chapter 3.
P7000, P6000, TIVA, TCI & TIVA 35/105 1000SM00012 Issue 3
DFU
= Refer to the relevant DFU.
_____________________________
Print
_________________________
Date
Page 36

Troubleshooting
In this chapter
Introduction 37
Chapter 4
Error Codes 37
General Fault Diagnosis 39
Page 37

Troubleshooting
Introduction
Use this troubleshooting guide to help identify the cause of errors and faults which may occur as a result of damage to
the pump or failure of an internal component. The following table lists the error codes and describes what action to take
to resolve the problem. A general fault diagnosis checklist is also provided. For information on alarm procedures and
messages, refer to the relevant
Directions For Use (DFU).
If the nature of the problem is unclear, step through the SELF TEST routine to check that the main functions
of the pump are operating correctly. The SELF TEST routine exercises all the sensors in the pump to verify that
they are functioning accurately. See Chapter 3, 'Routine Maintenance' for details.
The ERROR LOG records the ten most recent malfunction codes. To review the ERROR LOG, go to the SERVICE
ACCESS menu by entering the access code 376, or press the D button.
Error Codes
Error Failure Action/Replace
ER1 LINEAR SPEED Excessive linear movement
detected
ER2 LINEAR SPEED Insufficient movement
detected
ER3 MOTOR Too many motor encoders Check mechanism is not slipping or opto flag loose.
ER5 RAM Failure of RAM Check backup battery and replace if necessary.
ER6 WATCHDOG Watchdog failure too slow Replace Control PCB
ER7 WATCHDOG Watchdog failure too fast
ER8 HARDWARE Power on/off fault On Mark II hardware only. Power off occurred within 3 second power
ER9 MOTOR Motor direction Check motor wires are connected correctly.
ER10 VREF VREF failure Replace PCB.
ER11 BEAM CURRENT
MONITORING
ER12 BEAM AMPLIFIER OFFSET Amp failure Replace Beam bond assembly.
ER13 MOTOR No motor rotation Check transistors TR6, TR10, TR11 on Control PCB and replace if faulty.
ER14 MOTOR Motor rotating when
Beam failure Replace Beam bond assembly.
switched off
Check for contamination or damage to the linear potentiometer.
Run the linear potentiometer self test using access code 176. If not
linear, replace.
Check motor and mechanism, replace as necessary.
Check connections between flexible circuit and control PCB.
Check flexible circuit, replace if faulty
Replace Control PCB.ER4 MOTOR Too few motor encoders
Check EPROM socket, display spacers and torsion spring upgrades in
'Spare Parts Replacement Procedures' in Chapter 6.
down cycle of soft power off.
Fault in the soft power on/off circuitry.
Check RL1 and TR3 on Control PCB and replace as necessary.
Replace motor gearbox or Control PCB.
Replace Control PCB.
Replace motor gearbox.
Replace Control PCB.
ER15 WATCHDOG Watchdog failure Check for radio frequency interference (RFI). replace Control PCB.
ER16 PLUNGER STUCK Plunger stuck at power up Check nothing is holding the plunger in and power on.
Replace flex circuit plunger optic.
Replace Control PCB.
ER17 HARDWARE Display fault Replace Display Board.
ER21 CRC FAILURE CRC failure Replace EPROM
Replace Control PCB.
ER22 STACK OVERFLOW Stack error Check for RFI.
Replace Control PCB.
ER23 OPTO FAILURE Opto failure Check optos in Self Test 123. replace if faulty
Check opto signals to Control PCB, replace Control PCB if unable to
track fault.
P7000, P6000, TIVA, TCI & TIVA 37/105 1000SM00012 Issue 3
Page 38

Troubleshooting
Error Codes (continued)
Error Failure Action/Replace
ER24 POWER SUPPLY VOLTAGE
MEASUREMENT FAILURE
ER25 DISPLAY VIDEO RAM Video RAM fault Reseat/replace Display PCB and/or Control PCB.
ER27 WATCHDOG Watchdog Replace Control PCB.
ER28 WATCHDOG
ER29 PRESSURE AMPLIFIER
OFFSET
ER30 REAL TIME CLOCK
FAILURE
ER32 SOFTWARE Software flow fault
ER33 SOFTWARE Software fault
ER34 SOFTWARE Software fault divide by zero
ER35 SOFTWARE Software fault invalid
ER36 SOFTWARE Software fault address error
ER37 SOFTWARE Software fault NMI
ER38 SOFTWARE Software fault trap function
ER39 SOFTWARE Software fault
ER41 TCI Diprifusor communication
ER42 TCI Diprifusor failure (TCI & TIVA
Power supply measurement
failure
Pressure Amplifier Replace Control PCB.
Real time clock failure Replace Control PCB.
fault
instruction
failure (TCI & TIVA only).
only).
Check voltage is between 1.5V and 13.5V on PL5-14 on Power PCB
and on PL6-14 to IC5 on Control PCB.
Replace Power or Control PCBs as necessary.
See also ER5 RAM.
Replace Control PCB.
See also ER5 RAM.
Check TCI module connections.
Where TCI hardware is not fitted, TCI option in GENERAL OPTIONS
must be set to disabled.
If inital TARGET concentration value is set to 0.0μg/ml, ER41 and
disabling of TCI module can occur. Re-enable TCI option in GENERAL
OPTIONS. Initial TARGET concentration value of 0.0μg/ml not
recommended.
View ERROR LOG to review ER42 subcodes, for example, ER42 (0.0.1)
- TCI watchdog timeout, communication failure.
Replace TCI module.
P7000, P6000, TIVA, TCI & TIVA 38/105 1000SM00012 Issue 3
Page 39

General Fault Diagnosis
Troubleshooting
Parts to Check/Test
Fault
Dropped or damaged
Exposed to fluids
No battery power
No AC mains power
Delivery rates out of
tolerance
Continuous alarm at power
up
Incorrect display contrast/
backlight
Keypad buttons stuck
Front Case
Rear Case
Labels & Keypads
Mechanism
Syringe Sizing
Potentiometer
Control PCB
Power PCB
Display PCB
Battery
Mains Lead
Fuses
Drive declutch alarm
Cannot confirm syringe
Troubleshooting Tip:
Keypad alarm failure
Upgrade the Control Board insulator on pumps with serial number below 7001-02757 and with Control
Board assemblies 7000EL00002 below Issue 10.
Perform upgrade by acquiring the control insulator upgrade kit 7000SP00015.
P7000, P6000, TIVA, TCI & TIVA 39/105 1000SM00012 Issue 3
Page 40

Circuit Descriptions
In this chapter
Functional Module Block Diagram 41
Chapter 5
Module Overview Functional Description 42
Page 41

Circuit Descriptions
Functional Module Block Diagram
®
IVAC P7000, P6000, TIVA and TCI & TIVA (Mark II)
Real-time
Clock
Control PCB
Interfaces
Transmission
Motor
Motor
Optics
Plunger
Detect
Declutch
Microswitch
PL12
PL5
Backup
Battery
Watchdog
Backup
Speaker
Motor Drive
Serial
Comms
Main Processor
PL7
PL8
RS232/Nurse
Call Connector
TCI Diprifusor
Module
(TCI & TIVA
only)
TCI Aerial
Battery
PL3
Power Supply PCB
Speaker
Mains
Inlet
PL1
Main
Bonded
Beam
Linear
Travel
Potentiometer
Syringe Sizing
Potentiometer
Pressure
Transducer
(P7000 only)
PL1
PL11
PL3
PL4
A/D
Converter
Display
PL6
PL2
PL9
PL5
Keypad
Display PCB
and Backlight
P7000, P6000, TIVA, TCI & TIVA 41/105 1000SM00012 Issue 3
Page 42

Circuit Descriptions
Module Overview Functional Description
The IVAC® Syringe Pumps are designed to be serviced generally to major assembly level.
The circuitry within the pump is contained on three printed circuit boards (PCBs): Control PCB, Display PCB and Power
Supply PCB. Mark I pump models also have an Interface PCB fitted. In addition, two flexible printed circuits are utilised to
hold the optical sensors and to provide the necessary interconnects to the moving parts of the pump.
Cardinal Health will make available, on request, circuit diagrams which will assist appropriately qualified technical
personnel to repair those parts of the device which are designated by the manufacturer as repairable.
Control PCB
Contains the main processor module which provides the control functions for almost all aspects of the pump. It drives
and monitors all other modules using the program code stored in the flash EPROM. The main processor runs the main
application program.
Power Supply Supervisor
The power supply voltage is monitored by IC6 which provides an active low reset signal to the microcontroller at
power up and if the regulated 5V input falls below a preset level. IC6 also switches battery backup power to the static
RAM IC4 and real time clock chip IC13.
Real Time Clock
The real time clock chip IC13 maintains time and date information.
Watchdog
The watchdog alarm will enable the audible alarm on the Power Supply PCB and disable the motor supply current.
Audible Alarm
The key beep/quiet alarm, SP1, is fitted to the Control PCB.
AC/DC Input
The AC/DC input level is a high or low signal from the Power Supply PCB. The signal from the Power Supply PCB is
high at PL6 when AC is connected and low when the unit is being operated from its internal battery.
Motor Drive and Speed Control
The motor speed is controlled by adjusting both the mark-space ratio of the drive signal and its repetition rate applied
to the DC motor. In normal operation if the watchdog fails power is prevented from reaching the motor.
The motor speed control algorithm uses three feedback signals from optical switches. The optical encoder signals are
all fed via schmitt trigger inverters in IC14. The direction of the motor is monitored during operation using the optical
encoder signals and linear position sensor.
Linear Position Sensor
The linear speed, position and direction of the transmission are monitored using a potentiometer that runs under
the carriage block. As the carriage moves over the potentiometer voltage is produced which is proportional to the
position of the syringe plunger. The software checks for linear movement and the direction every 0.5mm, and checks
the rate every 5mm.
Bonded Beam
The drive force of the pump is detected by measuring the deflection of a beam at the end of the lead screw on the
transmission by using a full bridge strain gauge. The output from the strain gauge is fed to a two stage differential
amplifier, IC1. The offset value of the amplifier i.e. with no pumping pressure applied, can be adjusted using
potentiometer RV1, and is set during calibration.
Pressure Transducer (Model P7000 only)
In-line pressure measurement is detected by a pressure transducer. When a force is applied to the pressure transducer
an output voltage proportional to the force is generated.
Disc Detect (Model
The pressure dis c is detected by a slotted optical switch. When the disc is not fitted the opto switch is off, when the
disc is fitted the opto switch is on. The signal is fed to IC9.
Plunger Detect
The syringe plunger button position is detected using a slotted optical switch. The signal from the optical switch
changes state when the syringe plunger is located correctly; this signal is fed to IC9.
Transmission Disengaged Detection
A micro switch is mounted on the transmission carriage to detect when the transmission drive has been disengaged.
The signal from the micro switch changes state when the declutch lever is activated. This signal is fed via IC14 to the
microcontroller.
Keypad
The membrane keypad is fitted to the upper case and connections are made via a flexible circuit that plugs into PL2.
P7000 only)
P7000, P6000, TIVA, TCI & TIVA 42/105 1000SM00012 Issue 3
Page 43

Circuit Descriptions
Module Overview Functional Description (continued)
Control PCB (continued)
LCD Display Drive
The LCD display is located on the Display PCB; data is passed using the data bus to a graphics controller located on
the Display PCB.
Visual Indicators
The AC battery, start and stop LEDs are mounted on stand-off's on the Control PCB. The AC LED is driven directly from
the Power Supply PCB via a connection at PL6. The battery, start and stop LEDs are driven by the microcontroller via
IC15.
Syringe Size Measurement
A linear potentiometer mounted in the upper case detects the movement of the syringe clamp shaft. The linear
potentiometer is configured as a potential divider and produces a signal relative to the syringe diameter. The signal
from the potentiometer is fed into one of the ADC inputs of the microcontroller.
Display PCB
The Display PCB is located in the upper case assembly of the pump. For the purposes of maintenance and repair the
Display PCB is supplied as a complete module.
Flexible Circuits
Two flexible circuits are used to connect the motor, opto switches and declutch micro switch on the transmission to the
Control PCB. The motor optos and power connections are made via PL12, the plunger detect opto and declutch micro
switch are connected via PL5.
Motor Optical Encoders
Two slotted optical switches are mounted on the back of the motor/gearbox assembly to detect the speed and
direction of rotation. The optical switches are activated by a flag mounted on the rear output shaft of the motor.
Declutch Microswitch
A microswitch, SW1, is mounted on the transmission carriage to detect when the transmission drive has been
disengaged.
Plunger Detect Optical Switch
A slotted optical switch is mounted inside the plunger holder. The optical switch detects when a syringe plunger is
correctly located in the plunger holder.
Interfaces
TCI Interface (Model TCI & TIVA only)
The interface PCB is located in the lower case and connects the TCI Diprifusor module into the RS232 communications
port. The TCI Diprifusor module aerial lead connects directly to the aerial coil and a screened cable passes up to the
TCI aerial mounted in the upper case.
RS232/Nursecall
These circuits are incorporated on the Control PCB. See also 'Mark I Hardware' below.
Power Supply PCB
WARNING: THE PUMP POWER SUPPLY HAS HIGH VOLTAGES ON THE EXPOSED SURFACES OF THE BOARD. THE PUMP MUST
ONLY BE SERVICED BY QUALIFIED PERSONNEL USING THE RECOMMENDED EQUIPMENT.
The switched mode PSU used in the pump accepts an input voltage from 93V to 264V AC and generates two DC outputs
that are used to power the system. The first output is rated at 7V 300mA and is used to charge the lead acid battery. The
second output is rated at 7V 1.5A and is used to power the Motor, Display PCB, Control PCB and Interface PCB.
Audible Alarm
The main audible alarm is located on the Power Supply PCB and can be enabled either by the audible alarm drive, or
the watchdog alarm signal.
Mark I Hardware
Mains On/Off Switch
Mechanical ON/OFF switch, located on the side of the pump.
RS232/Nursecall
Interface PCB, fitted with the isolated RS232 and Nurse Call circuits.
P7000, P6000, TIVA, TCI & TIVA 43/105 1000SM00012 Issue 3
Page 44

Chapter 6
Spare Parts Replacement
Procedures
In this chapter
Introduction 45
Accessing the Pump 45
Lower Case Assembly 46
Battery 47
PSU, Alarm, Mains Inlet 48
Mains On/Off Switch (Mark I) 49
RS232 Connector 50
RS232/Nursecall PCB (Mark I) 51
TCI Diprifusor PCB, PE Stud Connector 52
Pole Clamp Assembly 53
Upper Case Assembly 54
Control PCB, Display PCB 55
Transmission Assembly Removal 57
Transmission Assembly Breakdown 58
Syringe Size Pot, Syringe Clamp 66
Aerial Assembly (Model TCI & TIVA) 68
Pressure Disc Holder (Model P7000) 69
Pressure Transducer (Model P7000) 70
Window Display, Keypad 71
Labels 72
Page 45

Spare Part Replacement Procedures
Introduction
The information in this chapter is based on the Mark II pump unless otherwise stated.
Ensure the pump is disconnected from the AC power supply and switched off before attempting to service the
pump
The pump contains static-sensitive components. Observe strict ESD precautions at all times
Always protect the plunger holder and syringe clamp when the pump is upside down. For regular servicing,
the use of the case support cradle, part number 0000JG00004, is recommended
Ensure that no undue force is applied to the plunger holder and the leadscrew, when the unit is placed upside
down to remove the six case retaining screws on the base
Batteries should be disposed of as outlined by the local country regulations: do not send back to the
manufacturer
For fastener torque settings, refer to Appendix C, 'Fitting & Replacement Guidelines'
Only use Cardinal Health recommended spare parts
Following all spare part replacement and repair activities, testing must be performed in accordance with the
Performance Verification Procedure (PVP), see Chapter 3, 'Routine Maintenance'.
Accessing the Pump
Procedure
1. Remove the six case retaining screws and washers located on the base of the pump.
2. Carefully separate the upper and lower case halves and disconnect cables.
3. Reassemble in reverse order. Note that when closing the case halves, ensure the grey ribbon cable is stowed in front
of the PSU heatsink.
(F) Upper Case
(E) Lower Case
(D) Foot (x4)
(C) Washers (x4)
(A/B) Case screws (x6) / Washers (x2)
Spare Parts
Item Description Part Number
A SCREW M4 X 50 PAN POSI 0000ME00302
B WASHER M4 WAVEY SST 0000ME00045
C WASHER M4 PLAIN ZINC PLATED 0000ME00310
D SPARE UPGRADE MOULDED FOOT 1000SP01066
E KIT CASE LOWER TIVA/TCI 6000SP00047
E SPARE CASE LOWER P7000 MKI 7000SP00010
E SPARE CASE LOWER P7000 MKII 7000SP00027
F UPPER CASE 6000 6000ME00010
F SPARE CASE UPPER TCI 6000SP00045
F SPARE KIT UPPER P6000/TIVA 6000SP00046
F SPARE UPPER P7000 MKII 7000SP00033
* BLANK ON/OFF SWITCH LOWER (lower case side) 6000ME00006
* item not shown
P7000, P6000, TIVA, TCI & TIVA 45/105 1000SM00012 Issue 3
Page 46

Spare Part Replacement Procedures
Lower Case Assembly
Replacing the lower case
1. To replace a lower case, it will be necessary to fully strip down the old case and insert all the components into the new
lower case. This task requires a good knowledge of the pump, so be certain that you are fully conversant with all the
procedures in this chapter before undertaking this replacement.
2. To strip down each lower case subassembly, follow the instructions in the relevant section of this chapter. These
sections are:
Accessing the Pump
Battery
PSU, Alarm, Mains Inlet
Mains On/Off Switch (Mark I)
RS232 Connector
RS232/Nursecall PCB (Mark I)
TCI Diprifuser Module PCB, PE Stud Connector
Pole Clamp Assembly
3. To reassemble the components into the new lower case, simply reverse the order of disassembly.
P7000, P6000, TIVA, TCI & TIVA 46/105 1000SM00012 Issue 3
Page 47

Spare Part Replacement Procedures
Battery
Procedure
1. Disconnect the battery cable from the Power Supply Unit (PSU).
2. Remove the two screws and washers which secure the battery restraining plate. Disconnect earth cable (Model TCI &
TIVA only).
3. Remove the restraining plate and foam pad.
4. Lift out the battery.
5. Reassemble in reverse order.
(H) Earth cable
(I) Earth
cable
(D/E) Screws (x2) /Washers (x2)
(C) Restraint plate
(B) Foam pad
(A) Battery
(F) Label (part of label set)
(G) Battery cable
Model TCI & TIVA
Spare Parts
Item Description Part Number
A BATTERY 6V SLA RECHARGE 0000EL00004
B FOAM PAD BATTERY 1000ME01064
C PLATE BATTERY RESTRAINT PUNCHED 1000ME01123
D SCREW M3X6 PAN HD POSI ZP+P 0000ME00221
E WASHER M3 WAVEY SST 0000ME00015
F LABEL SET P7000 7000LB00009
F LABEL SET P6000/TIVA/P7000 MKII 6000LB00016
F LABEL SET TIVA TCI 6000LB00015
G ASSY CABLE BATTERY 1000SP00009
H EARTH CABLE PE TO BEAM 6000SP00006
I EARTH CABLE PE TO BATTERY PLATE 6000SP00005
P7000, P6000, TIVA, TCI & TIVA 47/105 1000SM00012 Issue 3
Page 48

Spare Part Replacement Procedures
PSU, Alarm, Mains Inlet
Procedure
1. Disconnect the grey ribbon cable, the mains inlet connector, the battery connector and the alarm speaker from the
PSU PCB.
2. Remove the two screws which secure the mains inlet to the lower case. Slide out the mains inlet assembly and gasket.
3. Remove the four mounting screws which hold in the PCB and remove the PSU board.
4. Remove the alarm speaker and seal ring from the PSU.
5. Peel off the insulator cover.
6. Reassemble in reverse order.
(C) PCB Screws (x4)
(B) Power Supply Unit (PSU) PCB
(A) Alarm speaker
Spare Parts
Item Description Part Number
A P7 FAMILY POOR SOUNDER MODE KIT 1000SP00235
B SPARE PSU MKII FUNCTIONAL EARTH 6000SP00026
B PSU UPGRADE MKII FUNCTIONAL EARTH 6000SP00021
* LINK FUSE 2A PICOFUSE 0000EL00284
* CONNECTOR PLUG 16 WAY HEADER 0000EL00011
* LINK FUSE 2A PICOFUSE 0000EL00284
* ASSY ALARM TUBE WITH RESISTOR 1000SP01169
C SCREW M3X12 POZI HD Z+C 0000ME00189
D ASSY INSULATOR PSU (P7000 MKII, TCI & TIVA) 6000SP00008
D ASSY INSULATOR PSU P7000 (MKI, P6000, TIVA) 7000SP00005
E GASKET MAINS INLET V4 1000ME01074
F SCREW M3X8 CSK HD POSI SS 0000ME00268
G ASSY MAINS INLET FUNCTIONAL EARTH 6000SP00020
G ASSY MAINS INLET EARTHED (TCI & TIVA) 6000SP00010
(D) Insulator cover
(E) Gasket
(F) Mains inlet screws (x2)
(G) Mains inlet
* item not shown
P7000, P6000, TIVA, TCI & TIVA 48/105 1000SM00012 Issue 3
Page 49

Spare Part Replacement Procedures
Mains On/Off Switch (Mark I)
Procedure
1. Disconnect the mains On/Off switch from the PSU board.
2. Lever out the On/Off switch assembly from the lower case.
3. Reassemble in reverse order.
(C) Nursecall connector
(B) Cover
(A) On/Off switch
When refitting, note that the mains On/Off switch assembly is
inserted with the OFF rocker topmost, and that the cover is fitted as
shown here.
Spare Parts
Item Description Part Number
A ASSEMBLY ON/OFF SWITCH 1000SP00007
B ON/OFF SPLASH COVER A4 1000ME01103
B SPARE FLUID SEALING UPGRADE KIT 1000SP01048
C ASSY NURSECALL CONN V4 1000SP01025
P7000, P6000, TIVA, TCI & TIVA 49/105 1000SM00012 Issue 3
Page 50

Spare Part Replacement Procedures
RS232 Connector
Procedure
1. Remove the four screws which secure the cover plate to the underside of the lower case. Hinge the cover plate open
and remove it.
2. Disconnect the RS232 ribbon cable from the Control PCB.
3. Remove the two screws which secure the RS232 connector to the lower case and slide out the connector assembly
and gasket.
4. Reassemble in reverse order.
(B) Base plate
(C) Cover plate screws (x4)
(A) Cord sealing
Spare Parts
Item Description Part Number
A CORD SEALING SILICONE ID 0.95 1000ME01087
B PLATE BASE P SERIES 6000ME00026
C SCREW M3X8 CSK HD POSI SS 0000ME00268
D SCREW MALE/FEMALE M3.4 BRASS & NICKEL 0000ME00279
E ASSY RS232/NC CONNECTOR INSULATED 6000SP00024
F GASKET RS232 MOULDED & CAP A4 1000ME01106
(D) Screws (x2)
(E) RS232 connector
(F) Gasket
P7000, P6000, TIVA, TCI & TIVA 50/105 1000SM00012 Issue 3
Page 51

Spare Part Replacement Procedures
RS232/Nursecall PCB (Mark I)
Procedure
1. Remove the four screws which secure the cover plate to the underside of the lower case. Hinge the cover plate open
and remove it.
2. Disconnect the RS232 ribbon cable from the Control PCB.
3. Disconnect cables from the RS232/Nursecall PCB. Remove the RS232 ribbon cable by pulling it through the slot in case
wall.
4. Remove the two nuts which secure the RS232 connector. Slide out the connector assembly and gasket.
5. Remove the three screws and washers which secure the RS232/Nursecall PCB and remove the board from the lower
case.
6. Reassemble in reverse order.
(A) Screws (x3), Washers (x3)
(A) RS232 Ribbon cable
(A) RS232/Nursecall PCB
(A) Gasket
Spare Parts
Item Description Part Number
A SPARES KIT RS232 OPTION 1000SP00210
(A) RS232 Connector
P7000, P6000, TIVA, TCI & TIVA 51/105 1000SM00012 Issue 3
Page 52

Spare Part Replacement Procedures
TCI Diprifusor PCB, PE Stud Connector
Procedure
1. Remove the five screws which secure the cover plate to the underside of the lower case. Note: Use star driver to
remove fifth screw. Hinge the cover plate open and remove it.
2. Disconnect ribbon cable from the TCI Diprifusor PCB.
3. Remove the two screws which secure the TCI Diprifusor PCB and remove the PCB from the lower case, carefully pulling
through the aerial lead.
4. Disconnect the earth cable from the PE stud connector, as shown in Figure 2. below.
5. Remove the PE stud washers, plates and spacer slide out connector assembly.
6. Reassemble in reverse order.
(B/C) Screws (x2) / Washers (x2)
(A) TCI Diprifusor PCB
Disconnect
earth cable from
the PE stud
Aerial lead
Ribbon cable
(D) PE stud connector
(E) Label
(F) Plate end chassis
Figure 1. TCI Diprifusor PCB Procedure
Figure 2. Earth cable
Spare Parts
Item Description Part Number
A ASSY PCB TIVA & TCI 6000EL00004
B SCREW M3X6 PAN HD POSI ZP+P 0000ME00221
C FLAT WASHER NYLON M3 TO ISO 7089 0000ME00044
D STUD PE CONNECTOR M6 THREAD x 15 0000ME00141
E LABEL SWITCH PANEL END TCI 6000LB00010 (see also 'Labels' section)
F PLATE END CHASSIS TCI 6000ME00020
P7000, P6000, TIVA, TCI & TIVA 52/105 1000SM00012 Issue 3
Page 53

Spare Part Replacement Procedures
Pole Clamp Assembly
This instruction applies to the adjustable pole clamp assembly.
Procedure
1. Ensure that the hinge is fully open (for access to hinge screws).
2. Remove the two pole clamp screws and washers.
3. Remove the two hinge screws and washers. Remove blanking plate.
4. Reassemble in reverse order.
(C) Pole Clamp
(D/E) Pole Clamp screws (x4) / Washers (x4)
(B) Hinge
(A) Blanking plate
(F) Cap (x2)
For information on pole clamp adjustment torque settings, refer to Appendix C, 'Fitting and
Replacement Guidelines'.
Spare Parts
Item Description Part Number
A PLATE BLANKING POLE CLAMP 1000ME00211
B ASSY POLE CLAMP ADJUSTABLE 7000SP00016
C SPARE POLE CLAMP 40MM 1000SP01015
* ASSY ADJUSTABLE POLE CLAMP QUICK TRANS 7000SP00011
D SCREW M4x16 DIN 7985 ZP+P 0000ME00227
E WASHER M4 SHAKEPROOF 0000ME00286
F CAP END CLAMP ADJUSTABLE 7000ME00052
* item not shown
P7000, P6000, TIVA, TCI & TIVA 53/105 1000SM00012 Issue 3
Page 54

Spare Part Replacement Procedures
Upper Case Assembly
Replacing the upper case
1. To replace an upper case, it will be necessary to fully strip down the old case and insert all the components into the
new upper case. This task requires a good knowledge of the pump, so be certain that you are fully conversant with all
the procedures in this chapter before undertaking this replacement.
2. To strip down each upper case subassembly, follow the instructions in the relevant section of this chapter. These
sections are:
Accessing the Pump
Control PCB, Display PCB
Transmission Assembly Removal
Transmission Assembly Breakdown
Syringe Size Pot, Syringe Clamp
Aerial Assembly (Model TCI & TIVA)
Pressure Disc Holder (Model P7000)
Pressure Transducer (Model P7000)
Display, Keypad
Labels
3. To reassemble the components into the new upper case, simply reverse the order of disassembly.
P7000, P6000, TIVA, TCI & TIVA 54/105 1000SM00012 Issue 3
Page 55

Spare Part Replacement Procedures
Control PCB, Display PCB
Procedure
1. Disconnect the earth cable from the transmission assembly.
2. Remove the five PCB fixing screws and withdraw the Control PCB and Display PCB together.
3. Pull out the four standoffs/pins to separate the Control PCB and the Display PCB.
4. Reassemble in reverse order.
Earth cable
(D) PCB Screws (x5)
(C) Control PCB
Grey ribbon cable
(B) Display PCB
(A) EPROM
The transmission is shown removed for
clarity—it is not necessary to remove
the transmission assembly in order to
remove/refit the Control PCB and the
Display PCB.
Mandatory when serviced
Inspect and fit display spacers on pumps if the serial number is within the ranges:
6001-00001 to 6001-13816
6002-00001 to 6002-11388
6003-00001 to 6003-01126
7001-00001 to 7001-13717
Procedure:
1) Visually inspect for the correct fit of the display pcb to the control pcb it is necessary to remove the control
pcb (with display pcb attached) from the upper case.
2) When removed, check that the display pcb is located on the four mounting spacers and is pressed as far as
possible onto the mounting spacer.
3) There shall be no gap between the spacer mounting face and either the control or display pcbs.
4) If a gap is present or the pcbs are not securely fitted the spacers are to be replaced with new spacer
(0000ME00387).
P7000, P6000, TIVA, TCI & TIVA 55/105 1000SM00012 Issue 3
Page 56

Spare Part Replacement Procedures
Control PCB, Display PCB (continued)
EPROM socket contact failure could lead to pumps exhibiting errors 5, 25, 35, 36 or 37.
Add a new socket if a pump exhibits one of these errors, has a control pcb 6000EL00001 and issues 1 through 12
and the serial number is within the ranges:
6001-12376 to 6001-14298
6002-10096 to 6002-11583
6003-00803 to 6003-01130
7001-11090 to 7001-14716
Procedure:
1) Remove the existing EPROM and fit the new socket (32 way Dual In Line (DIL) - 0000EL00450) into the
existing socket as shown below.
2) Refit the EPROM as shown.
3) Note that minimal clearance exists between the new EPROM height and the battery plate, hence ensure new
EPROM and socket are fully inserted.
On certain Model P7000 control boards a regulator circuit is fitted to the PCB at PL11 to
maintain linear position sensing regulation.
When upgrading to Version 2 software the regulator circuit should be removed if fitted.
Spare Parts
Item Description Part Number
A P6000 V3R2 S/W UPGRADE KIT 1000SP00529
A P7000 V3R2 S/W UPGRADE KIT 1000SP00530
A P6000 (TIVA) V3R2 S/W UPGRADE KIT 1000SP00531
A P6000 (TIVA TCI) V3R2 S/W UPGRADE KIT 1000SP00532
B SPARE DISPLAY BOARD P6/TIVA/P7 7000SP00020
* SPACER 4.8MM DOUBLE SELF 0000ME00387
C SPARE UPGRADE CONTROL P6/P7/TIVA 7000SP00030
C SPARES CONTROL PCB P6000 MKII 6000SP00018
C SPARE UPGRADE P6000 MkI-MkII 6000SP00016
C SPARE UPGRADE KIT P7000 MKI-MKII 7000SP00026
C SPARE UPGRADE TIVA MkI-MkII 6000SP00017
* ASSY CABLE 16 WAY RIBBON 1000EL00135
* ASSY CABLE TCI 6000SP00007
* IC SOCKET 32W-DIL TURNEDPIN 0000EL00450
* BATTERY NiCd 2.4V 40mAH 0000EL00208
* BUZZER PCB P7000 TMB-05 0000EL00442
D SCREW M3X12 POZI HD Z+C 0000ME00189
* item not shown
P7000, P6000, TIVA, TCI & TIVA 56/105 1000SM00012 Issue 3
Page 57

Spare Part Replacement Procedures
Transmission Assembly Removal
Procedure
1. Remove the four chassis screws and washers and two beam screws which secure the transmission assembly.
2. Disconnect cables and remove the transmission assembly from the upper case.
3. Reassemble in reverse order.
(A) Beam screws (x2)
(C) Screws (x2)
(B/C) Chassis screws (x3) Washers (x4)
(D) Transmission assembly
(D) Transmission Assembly
(E) Screws (x4)
(E) Chassis screw (x1)
Flexi circuit
When refitting the transmission assembly into the upper case, ensure that the flexi circuit is adjusted
so the flex does not catch or click when mechanism is declutched or moved manually.
Spare Parts
Item Description Part Number
A SCREW M4x20 CSK HD POSI SS 0000ME00255
B SCREW M4x8 PAN HD POSI 0000ME00246
C WASHER M4 WAVEY SST 0000ME00045
D SPARE TRANSMISSION P6000/TIVA/P7000 7000SP00022
D SPARE TRANSMISSION TCI 6000SP00027
E SCREW M4x40 PAN HD POSI 2 ZP+P 0000ME00225
P7000, P6000, TIVA, TCI & TIVA 57/105 1000SM00012 Issue 3
Page 58

Spare Part Replacement Procedures
Transmission Assembly Breakdown
Bonded Beam
1. Remove nut securing the bonded beam.
2. Reassemble in reverse order.
(C) Leadscrew seal ring
(B) Hex nut
(A) Beam
(D) Leadscrew seal
Item C (seal ring) is fitted over item D.
(E/F/G) Screw/Earth clip/Washer
(B) Hex nut
Model TCI & TIVA
Spare Parts
Item Description Part Number
A PSERIES BEAM ASSEMBLY 1000SP00247
B HEX NUT M3 STAINLESS STEEL A4 0000ME00292
C SEAL RING LEADSCREW 1000ME01048
D ASSY LEADSCREW SEAL 1000SP01063
E SCREW M2.5X6 CSK HEAD SKT A4 ST/ST 0000ME00288
F CLIP EARTH LEADSCREW TCI 6000ME00018
G WASHER M2.5 SHAKEPROOF 0000ME00287
H TCI BEAM ASSEMBLY 6000SP00011
(H) TCI Beam
Ensure earth clip sits squarely on end of leadscrew.
P7000, P6000, TIVA, TCI & TIVA 58/105 1000SM00012 Issue 3
Page 59

Spare Part Replacement Procedures
Transmission Assembly Breakdown (continued)
Leadscrew, Chassis Plate
1. Remove the pin securing the leadscrew gear. Declutch mechanism and pull out leadscrew.
2. Remove the four chassis plate assembly screws.
3. Reassemble in reverse order.
(D) Leadscrew
(B/C) Chassis screws (x2)
Washers (x2)
(A) Chassis plate assembly
(F/G) Chassis screws (x2) / Washers (x2)
Torsion Rod
1. Remove the securing screw, washer and circlip then slide
out torsion rod.
2. Reassemble in reverse order.
Spare Parts
Item Description Part Number
(H) Torsion rod
(I) Circlip
(J/K) Screw/Washer
Leadscrew gear
(E) Pin
A ASSY CHASSIS POTENTIOMETER 7000SP00018
B SCREW M3X6 PAN HD POSI ZP+P 0000ME00221
C WASHER M3 WAVEY SST 0000ME00015
D LEADSCREW V4 1000ME01011
E PIN TENSION DIA 2.0X10mm 0000ME00016
F SCREW M4X8 PAN HD POSI 0000ME00246
G WASHER M4 WAVEY SST 0000ME00045
H ROD TORSION P7000 7000ME00015
I CIRCLIP E TYPE SHAFT DIA 4.8 0000ME00002
J SCREW M3X6 PAN HD POSI ZP+P 0000ME00221
J SCREW M3X16 CSK HD POSI STAINLESS STE (TCI&TIVA) 0000ME00284
K WASHER M3 WAVEY SST 0000ME00015
K WASHER M3 SHAKEPROOF (TCI&TIVA) 0000ME00285
P7000, P6000, TIVA, TCI & TIVA 59/105 1000SM00012 Issue 3
Page 60

Spare Part Replacement Procedures
Transmission Assembly Breakdown (continued)
Motor
1. Remove the circlips and washers securing the two motor idler gears.
2. Disconnect (de-solder) the two motor wires from the flexible circuit.
3. Remove the three mounting plate fixing screws.
4. Reassemble in reverse order.
(D) Motor rotor
(C) Motor assembly
(B) Bush bearing
(A) Motor mounting plate
Ensure the motor rotor rotates freely and does not strike the motor opto switches when refitting
motor assembly.
Motor wires
Motor idler gears
(not shown, removed for clarity)
(E) Screws (x3)
Spare Parts
Item Description Part Number
A ASSY PLATE MOTOR MOUNTING P7000 7000ME00062
A ASSY MOTOR MOUNTING TCI 6000ME00025
B BUSH MOTOR BEARING MOULDED 1000ME01113
C MOTOR ASSEMBLY P7000 7000ME00068
D MOTOR ROTOR ENCODER 4 LINE MOULDED 7000ME00034
E SCREW M2X12 CSK HD SLOTTED 0000ME00084
P7000, P6000, TIVA, TCI & TIVA 60/105 1000SM00012 Issue 3
Page 61

Spare Part Replacement Procedures
Transmission Assembly Breakdown (continued)
Linear Potentiometer, Motor Flexi Circuit
1. Remove the two motor opto screws securing the motor flexi circuit assembly.
2. Prise the chassis plate cable clip open and remove the transmission flexi cable from the chassis underside.
3. Reassemble in reverse order.
(C) Motor opto screws (x2)
(E) Motor flexi circuit
(D) Washers (x2)
(F) Chassis plate/potentiometer assembly
Linear potentiometer
(B) Cable clip
(A) Foam pad
Ensure the correct positioning of the chassis plate/potentiometer assembly. Fit the motor mounting
plate into the holes on the chassis plate and line the linear potentiometer up with the edge of the
chassis plate and the edge of the motor mounting plate.
Spare Parts
Item Description Part Number
A FOAM PAD 1000ME01066
B CABLE CLIP ADHESIVE 0000EL00095
C SCREW M3X6 PAN HD POSI ZP+P 0000ME00221
D WASHER M3 WAVEY SST 0000ME00015
E ASSY FLEXI CIRCUIT MOTOR 7000SP00002
* CONNECTOR PLUG 14 WAY 0000EL00106
F ASSY CHASSIS POTENTIOMETER 7000SP00018
* item not shown
P7000, P6000, TIVA, TCI & TIVA 61/105 1000SM00012 Issue 3
Page 62

Spare Part Replacement Procedures
Transmission Assembly Breakdown (continued)
Carriage, Outer Tube and Plunger Assembly
1. To breakdown the carriage, outer tube and plunger assembly, refer to the diagrams on the following pages (Figures 1,
2, 3 and 4), removing components as required.
2. Reassemble in reverse order.
(E)
(I)
(F)
(J)
(G)
(H)
(D)
(C)
(B)
(A)
Desolder wires
from flexi circuit
Figure 1. Transmission Assembly Breakdown
Spare Parts
Item Description Part Number
A SCREW No4x1/2" PAN HD 0000ME00032
B WASHER M3 PLAIN Z+C 0000ME00048
C ASSY MICROSWITCH V4 1000SP01022
D SPACER DUAL TRANSMISSION 1000ME00177
E SCREW No3x3/8" PAN HD 0000ME00031
F PLATE CARRIAGE 7000ME00028
G WASHER 12X1.6X6.4 I/D NYLON 0000ME00391
H SPRING COMP OD 6.1 19 LONG 0000ME00003
I FLAT WASHER NYLON M3 TO ISO 7089 0000ME00044
J SCREW No4x1/4" CSK TRUNCATED POZI SS 0000ME00313
K SCREW No4x1/4" PAN HD 0000ME00011
Flexi circuit
(I)
(K)
P7000, P6000, TIVA, TCI & TIVA 62/105 1000SM00012 Issue 3
Page 63

Spare Part Replacement Procedures
Transmission Assembly Breakdown (continued)
Carriage, Outer Tube and Plunger Assembly (continued)
(A)
(E)
(F)
(B)
Figure 2. Transmission Assembly Breakdown
(C)
(D)
(H)
(G)
(I)
Spare Parts
Item Description Part Number
A O RING NITRILE 11.5X1.5 0000ME00277
B LEVER TUBE DECLUTCH 1000SP01084
C SCREW M3X8 TORX T6 SET PART DOG 1000ME01134
D PIN TENSION DIA 2.0X20mm 0000ME00018
E HALF NUT V4 1000ME00097
F CARRIAGE COMMON TRANS 7000ME00011
G SCREW M3X8 TORX T6 SET FULL DOG 1000ME01133
H SPRING COMP 8MMX6MM 0000ME00345
I ACTUATOR LINEAR POT DELRIN 7000ME00053
P7000, P6000, TIVA, TCI & TIVA 63/105 1000SM00012 Issue 3
Page 64

Spare Part Replacement Procedures
Transmission Assembly Breakdown (continued)
Carriage, Outer Tube and Plunger Assembly (continued)
(F)
(E)
(G)
(H/I)
(J)
(K)
(D)
Figure 3. Transmission Assembly Breakdown
(C)
(B)
(A)
(L)
(M)
N)
(
Spare Parts
Item Description Part Number
A ASSY FLEXI CIRCUIT MKII TRANSMISSION 7000SP00024
B NITRILE ORING 14.1 X 1.6 0000ME00448
C BUTTON PLUNGER HOLDER MOULDED 1000ME01114
D HOLDER PLUNGER V4 1000ME01059
E PIN PLUNGER PLATE 1000ME01027
F PLATE PLUNGER RESTRAINT 1000ME01305
G SPRING MUSIC WIRE 0000ME00386
H WASHER M3 PLAIN Z+C 0000ME00048
I SCREW M3X6 PAN HD POSI ZP+P 0000ME00221
J SPIROL PIN 1.5X10 MDP 0000ME00132
K HOLDER PLUNGER CRUCIFORM MKII 1000ME01353
L SPRING COMPRESSION 2.24 DIAX7.9mm 0000ME00133
M BACKPLATEPLUNGER HOLDER OVERMOL 1000ME01325
N SCREW M3X8 CSK HD POSI SS 0000ME00268
P7000, P6000, TIVA, TCI & TIVA 64/105 1000SM00012 Issue 3
Page 65

Spare Part Replacement Procedures
Transmission Assembly Breakdown (continued)
Carriage, Outer Tube and Plunger Assembly (continued)
(A)
(B)
(C)
(D)
Figure 4. Transmission Assembly Breakdown
(E)
Spare Parts
Item Description Part Number
A SEAL OUTER TUBE RECESSED 1000ME01121
B SEAL RING OUTER TUBE 1000ME01047
C PLATE OUTER TUBE SEAL V4 1000ME01022
D NITRILE ORING 14.1 X 1.6 0000ME00448
E TUBE OUTER 'O' RING GROOVE 1000ME01122
P7000, P6000, TIVA, TCI & TIVA 65/105 1000SM00012 Issue 3
Page 66

Spare Part Replacement Procedures
Syringe Size Pot, Syringe Clamp
Procedure
1. Remove the potentiometer mounting plate fixing screw, remove pin which locks the syringe sizing pot and syringe
clamp in place.
2. Slide actuator off the syringe clamp shaft and remove the syringe sizing pot.
3. Reassemble in reverse order. See important note on next page.
(C) Screw
(B) Potentiometer plate
(A) Spring
(D) Pin
(E) Circlip
(F) Actuator
(G) Assembly pot
(H) Screw
(I) Washer
(J) Syringe clamp shaft
(
K) Syringe clamp
(L/M) Pin/Adhesive loctite
When refitting, position the assembly pot so that actuator pot moves correctly when the syringe
clamp is moved up and down.
Spare Parts
Item Description Part Number
A SPRING 7.8 OD 44 LONG 0000ME00266
B PLATE POTENTIOMETER 50MM PUNCHED 7000ME00063
C SCREW M2X3 CSK HD SLOTTED 0000ME00164
D PIN TENSION DIA 3.0X16MM 0000ME00116
E CIRCLIP E TYPE SHAFT DIA 4.8 0000ME00002
F ACTUATOR POT MOULDED SYRINGE SIZING 7000ME00033
G ASSY POT P7000 7000SP00003
H SCREW M3X6 PAN HD POSI ZP+P 0000ME00221
I WASHER M3 WAVEY SST 0000ME00015
J SHAFT SYRINGE CLAMP 100ML SYRINGE SIZING 7000ME00060
K CLAMP SYRINGE MACH. V4 1000ME01006
L PIN TENSION 3.0x10.0 0000ME00257
M ADHESIVE LOCTITE 603 0000ME00107
P7000, P6000, TIVA, TCI & TIVA 66/105 1000SM00012 Issue 3
Page 67

Spare Part Replacement Procedures
Syringe Size Pot, Syringe Clamp (continued)
Recommended when serviced
Bond syringe clamp if the pump serial number is within the ranges
6001-00100 to 6001-00972
6002-00100 to 6002-00259
7001-00106 to 7001-04432
Procedure:
1) Remove the two circlips and spirol pin that secure the syringe clamp assembly in the upper case then slide the
syringe clamp assembly out through the bush in the upper case. The potentiometer assembly and actuator
can be left in place.
2) Carefully knock out the syringe shaft spirol pin, clean out the syringe shaft hole and apply Loctite (item J.4),
or equivalent adhesive around the edge of the hole.
3) Reassemble the syringe clamp assembly, re-inserting the pin through the hole in the clamp and shaft.
4) Wipe off excessive adhesive and allow to cure for a minimum of 3 hours before refitting the syringe clamp
assembly into the pump. Note: If cure time of 3 hours cannot be tolerated, activators may be used to reduce
the cure time.
P7000, P6000, TIVA, TCI & TIVA 67/105 1000SM00012 Issue 3
Page 68

Spare Part Replacement Procedures
Aerial Assembly (Model TCI & TIVA)
Procedure
1. Remove screw which secures aerial assembly.
2. Remove aerial, lift out PCB and aerial wires.
3. Reassemble in reverse order.
(B) Screw
(A) Aerial
When refitting, ensure aerial wires do not get trapped between PCB and upper case.
Spare Parts
Item Description Part Number
A SPARE AERIAL TIVA & TCI 6000SP00015
B SCREW No2 X 1/4" CSK POZD S/T "B" TYPE 0000ME00312
P7000, P6000, TIVA, TCI & TIVA 68/105 1000SM00012 Issue 3
Page 69

Spare Part Replacement Procedures
Pressure Disc Holder (Model P7000)
Procedure
1. Remove the two lapel labels from the outside of the upper case, as shown in Figure 1.
2. Remove the four assembly fixing screws which secure the pressure transducer holder.
3. Remove the retaining circlip, pressure disc arm spring and gasket.
4. Lift out the pressure disc flag and retaining springs from the underside of the upper case, as shown in Figure 2.
5. Reassemble in reverse order.
(D) Lapel labels
(E) Screws (x4)
Ensure one leg of the spring torsion
is refitted over the flag and the
other leg is fitted behind the step in
the upper case.
(C) Disc holder
(B) Arm spring
(A) Gasket
Figure 1. Pressure Disc Holder
(F) Circlip
(G) Flag
(H) Spring torsion
(I) Spring compression
Figure 2. Pressure Disc Holder
(G) Flag
The spring torsion of the pressure disk holder can short with
the terminal of the battery on the Control PCB, causing the
battery to discharge and therefore it is not backing up the
RAM resulting in Error 5.
For pumps with serial numbers 7001-13344 and below it is
4mm
necessary to remove 4mm of the Spring torsion with cutters
where shown in Figure 3.
Spare Parts
Item Description Part Number
(H) Spring torsion
Figure 3. Flag & Torsion Spring
A SPARE GASKET PRESSURE TRANSDUCER P7000 7000SP00007
B ARM SPRING PRESSURE DISC 7000ME00031
C HOLDER PRESSURE DISC P7000 7000ME00030
D LABEL LAPEL MOULDED 7000LB00008
E SCREW M3x8 CSK HS POSI Z+BLACK 0000ME00230
F CIRCLIP E TYPE SHAFT DIA 4.8 0000ME00002
G FLAG PRESSURE DISC MOULDED 7000ME00035
H SPRING TORSION P7000 0000ME00364
I SPRING COMPRESSION P7000 0000ME00243
P7000, P6000, TIVA, TCI & TIVA 69/105 1000SM00012 Issue 3
Page 70

Spare Part Replacement Procedures
Pressure Transducer (Model P7000)
Procedure
1. Remove the two screws and washers securing the pressure transducer.
2. Remove the pressure tranducer and cable connector.
3. Reassemble in reverse order.
(B/C) Screws (x2), Washers (x2)
(A) Pressure sensor connector
(D) Pressure transducer
Spare Parts
Item Description Part Number
A ASSY CONN PRESSURE SENSOR P7000 7000EL00014
B SCREW M4X8 PAN HD POSI 0000ME00246
C WASHER M4 WAVEY SST 0000ME00045
D TRANSDUCER PRESSURE 7000ME00025
P7000, P6000, TIVA, TCI & TIVA 70/105 1000SM00012 Issue 3
Page 71

Spare Part Replacement Procedures
Window Display, Keypad
Procedure
1. Remove keypad and discard. Keypads cannot be reused.
2. Clean surface where replacement keypad is to be fitted.
3. Fit replacement keypads after removing backing paper from underside.
Handle replacement keypads with care to avoid damage
Ensure all keypad membrane flexi tails are correctly routed into upper case slot
4. Lift out window display.
5. Reassemble in reverse order.
(A) Keypad
(B) Window Display
Ensure window display is refitted with the anti-glare surface upwards.
Spare Parts
Item Description Part Number
A LABEL SWITCH PANEL MEMBRANE P7000 MKI 7000LB00001
A LABEL SWITCH PANEL MEMBRANE P7000 MKII 7000LB00007
A LABEL SWITCH PANEL MEMBRANE P6000 MKI 6000LB00001
A LABEL FRONT PANEL P6000 MKII 6000LB00008
A LABEL SWITCH PANEL MEMBRANE TIVA MKI 6000LB00003
A LABEL FRONT PANEL TIVA MKII 6000LB00009
A LABEL FRONT PANEL TCI & TIVA 6000LB00017
B WINDOW DISPLAY P7000 MKII 7000ME00058
Flexi tail
P7000, P6000, TIVA, TCI & TIVA 71/105 1000SM00012 Issue 3
Page 72

Labels
Spare Part Replacement Procedures
Procedure
1. Remove label(s) from case as required.
2. Clean case where replacement label(s) are to be fitted.
3. Fit replacement label(s) as required.
Battery label (B4) not
shown above, see
'Battery' section
(B3)
(B2)
(B1)
(A)
(B3)
(C)
(
B4)
(B1)
SAMPLE
(B2)
Spare Parts
Item Description Part Number
A LABEL SET END 1000LB01015
A LABEL SWITCH PANEL END TCI 6000LB00010
B LABEL SET P6000/P7000/TIVA 7000LB00015
B LABEL SET P6000/TIVA/P7000 MKII 6000LB00016
B LABEL SET TIVA TCI 6000LB00015
C LABEL TCI DIPRIFUSOR 6000LB00004
* INSTRUMENT LABEL 1" X 1 1/2 1000LB00590
(B3)
* item not shown.
Item D is a roll of blank combined serial number and status label. Transfer information from old label. This label should be
used in conjuction with the clear protective cover from the universal label set.
P7000, P6000, TIVA, TCI & TIVA 72/105 1000SM00012 Issue 3
Page 73

Specifications
In this appendix
Infusion 74
Appendix A
Electrical 76
Physical 76
Environmental 76
Recycling 76
Electromagnetic Compatibility (Model P7000) 77
Page 74

Specifications
The following information is for reference purposes only. For more detailed specifications refer to relevant DFU. Specifications refer to
all models covered by this manual, unless otherwise stated.
Infusion
Infusion rate range
5ml syringes 0.1ml/h - 150ml/h
10ml syringes 0.1ml/h - 300ml/h
20ml syringes 0.1ml/h - 600ml/h
30ml syringes 0.1ml/h - 900ml/h
50ml + 100ml syringes 0.1ml/h - 1200ml/h
Note: Maximum infusion rate can be set as part of the configuration.
Volume infused 0.0ml - 9990ml
Bolus rates
5ml syringes 10 ml/h - 150 ml/h
10ml syringes 10 ml/h - 300 ml/h
20ml syringes 10 ml/h - 600 ml/h
30ml syringes 10 ml/h - 900 ml/h
50ml + 100ml syringes 10 ml/h - 1200 ml/h
Note: Maximum bolus rates can be set as part of the configuration. Bolus rates are
user adjustable.
Bolus Limit 25.0ml
Purge rate 100ml/h-500ml/h. Limited to maximum rate for syringe.
Purge limit 2.0ml
End Of Syringe, Keep Vein Open (KVO) rate
(P6000/P7000 only)
Volume To Be Infused (VTBI) rate (P6000/
P7000 only)
VTBI complete KVO rate (P6000/P7000 only) Stop, KVO (1.0ml/h, 2.0ml/h), set rate if lower than KVO, or continue at set rate.
Near End of Infusion (NEOI) Alarm 2.0% - 10.0% of syringe volume (TCI & TIVA/TIVA).
End Of Infusion (EOI) Alarm 0.5% - 5% of syringe volume.
Critical volume 0.5ml is the maximum-over infusion which can occur in the event of a single fault
Maximum Pumping Pressure Limit 280mmHg - nominal at L-3: factory preset (TCI & TIVA/P6000/P7000)
System Accuracy Drive Linearity +/- 1%
Stop, KVO (1.0ml/h), or set rate if lower than KVO.
0.1ml - 100ml, 1 min - 24 hours
1 - 15 mins (P6000/P7000).
condition.
465mmHg - nominal at L-5: factory preset (TIVA)
650mmHg - nominal at L-7: highest alarm level
Occlusion levels L-0 to L-7.
Volumetric Mean +/- 2% (nominal)
Important: System accuracy is +/-2% typical by volume as measured using the
trumpet curve test method defined in EN60601-2-24 at rates of 1.0ml/h and above
when the instrument is used with the recommended syringes. Differences in
factors such as size and plunger force in compatible syringes can cause variations
in accuracy and trumpet curves.) Also see trumpet curves section.
P7000, P6000, TIVA, TCI & TIVA 74/105 1000SM00012 Issue 3
Page 75

Specifications
Infusion (continued)
Occlusion Pressure Limits for IVAC® 50ml Syringes
The following tables show the worst case values for line pressure, time to alarm and bolus volume that can be expected in the event of
an occlusion when the IVAC®
50ml syringe is selected, G40020B administration set.
Alarm level Rate (ml/h) Maximum time
0*
1*
2*
3
4
5
6
7
0*
1*
2*
3
4
5
6
7
1.0
1.0
1.0
1.0
1.0
1.0
1.0
1.0
5.0
5.0
5.0
5.0
5.0
5.0
5.0
5.0
to occlusion alarm
(h:min)
0:02 0 +50 / -50 0.1
0:09 90 +50 / -90 0.2
0:22 190 +50 / -150 0.3
0:34 280 +100 / -100 0.5
0:56 370 +100 / -100 0.7
1:10 460 +100 / -100 0.9
1:30 560 +100 / -100 1
1:45 650 +100 / -100 1.3
0:01 0 +50 / -50 0.1
0:02 90 +50 / -90 0.2
0:06 190 + 50 /-150 0.4
0:08 280 +100 / -100 0.6
0:12 370 +100 / -100 0.8
0:14 460 +100 / -100 1
0:17 560 +100 / -100 1.2
0:19 650 +100 / -100 1.4
Nominal occlusion
alarm pressure
(mmHg)
Maximum bolus
volume (ml)
* Tests at these levels may alarm immediately - the force at these levels is commonly less than the friction in the syringe (with no
additional fluid pressure). The result is that the pressure relating to the low forces will be less than the nominal quoted occlusion
pressure.
Bolus volume following occlusion will be minimised by the back off feature if enabled. The back off will reduce the line pressure by
removing the volume stored in the occluded line and deducting this volume from volume infused.
P7000, P6000, TIVA, TCI & TIVA 75/105 1000SM00012 Issue 3
Page 76

Specifications
Electrical
Battery type Lead acid, rechargeable, sealed. Automatically charges when the pump is connected to AC power.
Battery life TCI & TIVA P6000/P7000/TIVA
4h @ 5.0ml/h (20 ºC) 6h @ 5.0ml/h (20 ºC)
Battery charging 10 hours from discharge to 80% charge and 24 hours to 100% charge.
AC power supply 115-230VAC, 50/60Hz, 20VA (nominal).
Memory retention The electronic memory of the unit will be retained for more than 6 months when not powered up.
Protection against electrical
shock hazards
TCI & TIVA P6000/P7000/TIVA
Class I, Type CF Class II, Type CF
Physical
Weight 3.5kg (excluding pole clamp and power cable)
Case material Noryl (with fire retardant to UL94V-0)
Latex The IVAC® Syringe Pump range does not contain any Latex.
Dimensions W H D
400mm 115mm 180mm
Environmental
IPX rating IPX4
Operating limits Temperature Relative humidity Atmospheric pressure
+5°C - +40°C 30% - 90% 700 - 1060hPa
Transport/Storage limits -20°C - +50°C 5% - 95% 600 - 1060hPa
Recycling
Disposal of device components
Caution: Follow local governing ordinances and recycling instructions regarding disposal or recycling of device components, including
batteries.
P7000, P6000, TIVA, TCI & TIVA 76/105 1000SM00012 Issue 3
Page 77

Specifications
Electromagnetic Compatibility (Model P7000)
Warning:
• The use of any accessory, transducer, or cable with the IVAC® P7000 Syringe Pump other than those specified may result in
increased emissions or decreased immunity of the pump.
• The IVAC® P7000 Syringe Pump should not be used adjacent to or stacked with other equipment, however if adjacent or stacked
use is necessary, the IVAC® P7000 Syringe Pump should be observed to verify normal operation in the configuration in which it will
be used.
Caution:
• The IVAC® P7000 Syringe Pump is a CISPR 11 Group 1 Class A Medical Equipment System and intended for use by healthcare
professionals only.
• Medical Electrical Equipment needs special precautions regarding EMC and needs to be installed, put into service and used
according to the EMC information provided in the accompanying documents.
• Portable and Mobile RF communications can affect Medical Electrical Equipment.
• Operating the pump near equipment which radiates high energy radio frequencies (electro surgical or cauterizing equipment,
portable radios, cellular telephones, etc.) may cause false alarm conditions. If this happens, reposition the pump away from the
source of interference or turn off the pump and manually regulate the flow.
Guidance and Manufacturer’s Declaration – Electromagnetic Emissions
The IVAC® P7000 Syringe Pump is intended for use in the electromagnetic environment specified below.
The customer or the user of the IVAC® P7000 Syringe Pump should assure that it is used in such an environment.
Emissions Test Compliance Electromagnetic Environment – Guidance
CISPR 11
RF Emissions
CISPR 11
RF Emissions
EN 61000-3-2
Harmonic Emissions
EN 61000-3-3
Voltage Fluctuations,
Flicker Emissions
Group 1
Class A
Class A
Complies
The pump uses RF energy only for its internal function in the normal product
offering. Therefore, its RF emissions are very low and are not likely to cause any
interface in nearby electronic equipment.
The pump is suitable for use in all establishments, other than domestic, and
those directly connected to the public low-voltage power supply network that
supplies buildings used for domestic purposes.
P7000, P6000, TIVA, TCI & TIVA 77/105 1000SM00012 Issue 3
Page 78

Specifications
Electromagnetic Compatibility (Model P7000) continued
Guidance and Manufacturer’s Declaration - Electromagnetic Immunity
The IVAC® P7000 Syringe Pump is intended for use in the electromagnetic environment specified below.
The customer or the user of IVAC® P7000 Syringe Pump should assure that it is used in such an environment.
Immunity Test
EN 61000-4-2 Electro-Static
Discharge (ESD)
EN 61000-4-4
Electrical Fast Transient, Burst
(EFT) (Note 3)
EN 61000-4-5
Power Line Surge
(Note 3)
EN 61000-4-8 Power
Frequency Magnetic Field
(50/60 Hz)
EN 61000-4-11
Voltage Dips, Short
Interruptions, and Voltage
Variations
(Note 3)
EN 60601-1-2
Test Level
±6 kV contact
±8 kV air
±2 kV for power
supply lines
±1 kV for input/
output lines
±1 kV Line(s) to
Line(s)
±2 kV Line(s) to
Earth
3 A/m 400 A/m 50 Hz (Note 2)Power frequency magnetic fields should be at
<5 % UT (Note 1)
(>95 % dip in UT)
for 0.5 cycle
40 % UT
(60 % dip in UT)
for 5 cycles
70 % UT
(30 % dip in UT)
for 25 cycles
Compliance Level Electromagnetic Environment – Guidance
±8 kV contact (Note
2)
±15 kV air (Note 2)
±2 kV for power
supply lines
N/A (Note 4)
±1 kV Line(s) to
Line(s)
±2 kV Line(s) to Earth
<5 % UT
(>95 % dip in UT)
for 0.5 cycle
40 % UT
(60 % dip in UT)
for 5 cycles
70 % UT
(30 % dip in UT)
for 25 cycles
Floors should be wood, concrete, or ceramic tile.
If floors are covered with synthetic material, the
relative humidity should be at least 30 %.
Mains power quality should be that of a typical
commercial or hospital environment.
Mains power quality should be that of a typical
commercial or hospital environment.
levels characteristic of a typical location in a typical
commercial or hospital environment.
Mains power quality should be that of a typical
commercial or hospital environment.
If the user of the pump requires continued
operation during power mains interruptions, it is
recommended that the pump be powered from an
uninterruptible power supply or a battery.
The pump does employ an internal short duration
battery.
<5 % UT
(>95 % dip in UT)
for 5 sec
Note 1—UT is the AC mains voltage prior to application of the test level.
Note 2—Compliance levels raised by EN 60601-2-24.
Note 3—Performed at the Minimum and Maximum Rated Input Voltage.
Note 4—Cardinal Health recommends using signal cables of less than 3 meters in length and this requirement is applicable only if signal cables are 3
meters or more in length. (EN 60601-1-2:2002, Clause 36.202.4)
<5 % UT
(>95 % dip in U
for 5 sec
T)
Recommended Separation Distances for LIFE SUPPORT Equipment between
portable and mobile RF communications equipment and the IVAC® P7000 Syringe Pump
P7000, P6000, TIVA, TCI & TIVA 78/105 1000SM00012 Issue 3
Page 79

Specifications
Electromagnetic Compatibility (Model P7000) continued
Guidance and Manufacturer’s Declaration—Electromagnetic Immunity
LIFE SUPPORT Equipment
The IVAC® P7000 Syringe Pump is intended for use in the electromagnetic environment specified below.
The customer or the user of the IVAC® P7000 Syringe Pump should ensure that it is used in such an environment.
Immunity Test
EN 61000-4-6
Conducted RF
EN 61000-4-3
Radiated RF
EN 60601-1-2
Test Level
3 V rms
150 kHz to 80
MHz
3 V/m
80 MHz to 2.5 GHz
Compliance
Level
10 V rms
(Note 3)
10 V/m
(Note 3)
Electromagnetic Environment – Guidance
Portable and mobile RF communications equipment should be used no
closer to any part of the pump, including cables, than the recommended
separation distance calculated from the equation applicable to the
frequency of the transmitter.
Recommended Separation Distance
3.5
d = [-----] √P
V
1
12
d = [-----] √P 80 MHz to 800 MHz
V
2
12
d = [-----] √P 80 MHz to 2.5 GHz
E
1
23
d = [-----] √P 800 MHz to 2.5 GHz
E
1
where P is the maximum output power rating of the transmitter in watts
(W) according to the transmitter manufacturer and d is the recommended
separation distance in meters (m).
a
Field strengths from fixed RF transmitters, as determined by an
electromagnetic site survey, b should be less than the compliance level in
each frequency range.
c
Interference may occur in the vicinity of equipment marked with the
following symbol:
Note 1—At 80 MHz and 800 MHz, the higher frequency range applies.
Note 2—These guidelines may not apply in all situations. Electromagnetic propagation is affected by absorption and reflection from structures, objects,
and people.
Note 3—Compliance levels raised by EN 60601-2-24.
a The compliance levels in the ISM frequency bands between 150 kHz and 80 MHz and in the frequency range 80 MHz to 2.5 GHz are intended to
decrease the likelihood that mobile/portable communications equipment could cause interference if it is inadvertently brought into patient areas. For
this reason, an additional factor of 10/3 is used in calculating the recommended separation distance for transmitters in these frequency ranges.
b Field strengths from fixed transmitters, such as base stations for radio (cellular/cordless) telephones and land mobile radios, amateur radio, AM and
FM radio broadcast, and TV broadcast cannot be predicted theoretically with accuracy. To assess the electromagnetic environment due to fixed RF
transmitters, an electromagnetic site survey should be considered. If the measured field strength in the location in which the pump is used exceeds
the applicable RF compliance level above, the pump should be observed to verify normal operation. If abnormal performance is observed, additional
measures may be necessary, such as re-orienting or relocating the pump.
c Over the frequency range 150 kHz to 80 MHz, field strengths should be less than 10 V/m.
P7000, P6000, TIVA, TCI & TIVA 79/105 1000SM00012 Issue 3
Page 80

Specifications
Electromagnetic Compatibility (Model P7000) continued
The IVAC® P7000 Syringe Pump is intended for use in an electromagnetic environment in which radiated RF disturbances
are controlled.
The user of the IVAC® P7000 Syringe Pump can help prevent electromagnetic interference by maintaining a minimum distance
between portable and mobile RF communications equipment (transmitters) and the IVAC® P7000 Syringe Pump as recommended
below, according to the maximum output power of the communications equipment.
Separation Distance According to Frequency of Transmitter
Rated Maximum Output
Power of Transmitter
W
150 kHz to 80 MHz
Outside ISM bands 3.5
d = [------] √P
V1
150 kHz to 80 MHz
In ISM bands
12
d = [------] √P
V2
m
80 MHz to 800 MHz
12
d = [ ------] √P
E1
800 MHz to 2.5 GHz
23
d = [------] √P
E1
0.01
0.1
1
10
100
For transmitters rated at a maximum output power not listed above, the recommended separation distance d in meters (m) can be determined using the
equation applicable to the frequency of the transmitter, where P is the maximum output power rating of the transmitter in watts (W) according to the
transmitter manufacturer.
Note 1—At 80 MHz and 800 MHz, the separation distance for the higher frequency range apply.
Note 2—The ISM (Industrial, Scientific, and Medical) bands between 150 kHz and 80 MHz are 6.765 MHz to 6.795 MHz; 13.553 MHz to 13.567 MHz; 26.957
MHz to 27.283 MHz; and 40.66 MHz to 40.70 MHz.
Note 3—An additional factor of 10/3 is used in calculating the recommended separation distance for transmitters in the ISM frequency bands between
150 kHz and 80 MHz and in the frequency range 80 MHz to 2.5 GHz to decrease the likelihood that mobile/portable communications equipment could
cause interference if it is inadvertently brought into patient areas.
Note 4—These guidelines may not apply in all situations. Electromagnetic propagation is affected by absorption and reflection from structures, objects,
and people.
0.03 0.12 0.12 0.23
0.11 0.38 0.38 0.73
0.35 1.20 1.20 2.30
1.11 3.80 3.80 7.28
3.50 12.00 12.00 23.00
P7000, P6000, TIVA, TCI & TIVA 80/105 1000SM00012 Issue 3
Page 81

Spare Parts Listing
In this appendix
Electrical Components 82
Appendix B
Upper Case Components 83
Lower Case Components 84
Keypad and Labels 85
Transmission Assembly Components 85
Software 87
Test Equipment 86
Page 82

Spare Parts Listing
Electrical Components
Part Number Description
0000EL00004 BATTERY 6V SLA RECHARGE
0000EL00011 CONNECTOR PLUG 16 WAY HEADER
0000EL00106 CONNECTOR PLUG 14 WAY
0000EL00208 BATTERY NiCd 2.4V 40mAH
0000EL00284 LINK FUSE 2A PICOFUSE
0000EL00442 BUZZER PCB P7000 TMB-05
0000EL00450 IC SOCKET 32W-DIL TURNEDPIN
1000EL00135 ASSY CABLE 16 WAY RIBBON
1000SP00007 ASSEMBLY ON/OFF SWITCH
1000SP00009 ASSY CABLE BATTERY
1000SP00210 SPARES KIT RS232 OPTION
1000SP00235 P7 FAMILY POOR SOUNDER MODE KIT
1000SP01022 ASSY MICROSWITCH V4
1000SP01169 ASSY ALARM TUBE WITH RESISTOR
6000EL00004 ASSEMBLY PCB TIVA & TCI
6000SP00005 EARTH CABLE PE TO BATTERY PLATE
6000SP00006 EARTH CABLE PE TO BEAM
6000SP00007 ASSY CABLE TCI
6000SP00010 ASSY MAINS INLET EARTHED
6000SP00015 SPARE AERIAL TIVA & TCI
6000SP00016 SPARE UPGRADE P6000 MkI-MkII
6000SP00017 SPARE UPGRADE TIVA MkI-MkII
6000SP00018 SPARES CONTROL PCB P6000 MKII
6000SP00020 ASSY MAINS INLET FUNCTIONAL EARTH
6000SP00021 PSU UPGRADE MKII FUNCTIONAL EARTH
6000SP00024 ASSY RS232/NC CONNECTOR INSULATED
6000SP00026 SPARE PSU MKII FUNCTIONAL EARTH
7000EL00014 ASSY CONN PRESSURE SENSOR P7000
7000SP00015 ASSY CONTROL INSULATOR UPGRADE P7000
7000ME00025 TRANSDUCER PRESSURE
7000SP00002 ASSY FLEXI CIRCUIT MOTOR
7000SP00020 SPARE DISPLAY BOARD P6/TIVA/P7
7000SP00026 SPARE UPGRADE KIT P7000 MKI-MKII
7000SP00030 SPARE UPGRADE CONTROL P6/P7/TIVA
P7000, P6000, TIVA, TCI & TIVA 82/105 1000SM00012 Issue 3
Page 83

Spare Parts Listing
Upper Case Components
Part Number Description
0000ME00002 CIRCLIP E TYPE SHAFT DIA 4.8
0000ME00015 WASHER M3 WAVEY SST
0000ME00045 WASHER M4 WAVEY SST
0000ME00107 ADHESIVE LOCTITE 603
0000ME00116 PIN TENSION DIA 3.0X16MM
0000ME00164 SCREW M2X3 CSK HD SLOTTED
0000ME00189 SCREW M3X12 POZI HD Z+C
0000ME00221 SCREW M3X6 PAN HD POSI ZP+P
0000ME00230 SCREW M3x8 CSK HS POSI Z+BLACK
0000ME00243 SPRING COMPRESSION P7000
0000ME00246 SCREW M4X8 PAN HD POSI
0000ME00257 PIN TENSION 3.0x10.0
0000ME00266 SPRING 7.8 OD 44 LONG
0000ME00268 SCREW M3X8 CSK HD POSI SS
0000ME00364 SPRING TORSION P7000
0000ME00387 SPACER 4.8MM DOUBLE SELF
0000ME00312 SCREW No2 X 1/4” CSK POZD S/T “B” TYPE
1000ME01006 CLAMP SYRINGE MACH. V4
6000ME00010 UPPER CASE 6000
6000SP00045 SPARE CASE UPPER TCI
6000SP00046 SPARE KIT UPPER P6000/TIVA
7000LB00008 LABEL LAPEL MOULDED
7000ME00030 HOLDER PRESSURE DISC P7000
7000ME00031 ARM SPRING PRESSURE DISC
7000ME00033 ACTUATOR POT MOULDED SYRINGE SIZING
7000ME00035 FLAG PRESSURE DISC MOULDED
7000ME00060 SHAFT SYRINGE CLAMP 100ML SYRINGE SIZING
7000ME00063 PLATE POTENTIOMETER 50MM PUNCHED
7000SP00003 ASSY POT P7000
7000SP00007 SPARE GASKET PRESSURE TRANSDUCER P7000
7000SP00033 SPARE UPPER P7000 MKII
P7000, P6000, TIVA, TCI & TIVA 83/105 1000SM00012 Issue 3
Page 84

Spare Parts Listing
Lower Case Components
Part Number Description
0000ME00015 WASHER M3 WAVEY SST
0000ME00044 FLAT WASHER NYLON M3 TO ISO 7089
0000ME00045 WASHER M4 WAVEY SST
0000ME00141 STUD PE CONNECTOR M6 THREAD x 15
0000ME00189 SCREW M3X12 POZI HD Z+C
0000ME00221 SCREW M3X6 PAN HD POSI ZP+P
0000ME00227 SCREW M4x16 DIN 7985 ZP+P
0000ME00268 SCREW M3X8 CSK HD POSI SS
0000ME00279 SCREW MALE/FEMALE M3.4 BRASS & NICKEL
0000ME00286 WASHER M4 SHAKEPROOF
0000ME00302 SCREW M4 X 50 PAN POSI
0000ME00310 WASHER M4 PLAIN ZINC PLATED
1000ME00211 PLATE BLANKING POLE CLAMP
1000ME01064 FOAM PAD BATTERY
1000ME01074 GASKET MAINS INLET V4
1000ME01087 CORD SEALING SILICONE ID 0.95
1000ME01103 ON/OFF SPLASH COVER A4
1000ME01106 GASKET RS232 MOULDED & CAP A4
1000ME01123 PLATE BATTERY RESTRAINT PUNCHED
1000SP01015 SPARE POLE CLAMP 40MM
1000SP01025 ASSY NURSECALL CONN V4
1000SP01048 SPARE FLUID SEALING UPGRADE KIT
1000SP01066 SPARE UPGRADE MOULDED FOOT
6000LB00010 LABEL SWITCH PANEL END TCI
6000ME00006 BLANK ON/OFF SWITCH LOWER
6000ME00020 PLATE END CHASSIS TCI
6000ME00026 PLATE BASE P SERIES
6000SP00008 ASSY INSULATOR PSU
6000SP00047 KIT CASE LOWER TIVA/TCI
7000SP00005 ASSY INSULATOR PSU P7000
7000SP00016 ASSY POLE CLAMP ADJUSTABLE
7000SP00010 SPARE CASE LOWER P7000 MKI
7000SP00011 ASSY ADJUSTABLE POLE CLAMP QUICK TRANS
7000SP00027 SPARE CASE LOWER P7000 MKII
7000ME00052 CAP END CLAMP ADJUSTABLE
P7000, P6000, TIVA, TCI & TIVA 84/105 1000SM00012 Issue 3
Page 85

Spare Parts Listing
Keypad and Labels
Part Number Description
1000LB00590 INSTRUMENT LABEL 1” X 1 1/2
1000LB01015 LABEL SET END
6000LB00001 LABEL SWITCH PANEL MEMBRANE P6000 MKI
6000LB00003 LABEL SWITCH PANEL MEMBRANE TIVA MKI
6000LB00004 LABEL TCI DIPRIFUSOR
6000LB00008 LABEL FRONT PANEL P6000 MKII
6000LB00009 LABEL FRONT PANEL TIVA MKII
6000LB00010 LABEL SWITCH PANEL END TCI
6000LB00015 LABEL SET TIVA TCI
6000LB00016 LABEL SET P6000/TIVA/P7000 MKII
6000LB00017 LABEL FRONT PANEL TCI & TIVA
7000LB00001 LABEL SWITCH PANEL MEMBRANE P7000 MKI
7000LB00007 LABEL SWITCH PANEL MEMBRANE P7000 MKII
7000LB00015 LABEL SET P6000/P7000/TIVA
7000ME00058 WINDOW DISPLAY MKII
Transmission Assembly Components
Part Number Description
0000EL00095 CABLE CLIP ADHESIVE
0000ME00002 CIRCLIP E TYPE SHAFT DIA 4.8
0000ME00003 SPRING COMP OD 6.1 19 LONG
0000ME00011 SCREW No4x1/4” PAN HD
0000ME00015 WASHER M3 WAVEY SST
0000ME00016 PIN TENSION DIA 2.0X10mm
0000ME00018 PIN TENSION DIA 2.0X20mm
0000ME00031 SCREW No3x3/8” PAN HD
0000ME00032 SCREW No4x1/2” PAN HD
0000ME00044 FLAT WASHER NYLON M3 TO ISO 7089
0000ME00045 WASHER M4 WAVEY SST
0000ME00048 WASHER M3 PLAIN Z+C
0000ME00084 SCREW M2X12 CSK HD SLOTTED
0000ME00132 SPIROL PIN 1.5X10 MDP
0000ME00133 SPRING COMPRESSION 2.24 DIAX7.9mm
0000ME00221 SCREW M3X6 PAN HD POSI ZP+P
0000ME00225 SCREW M4 X 40
0000ME00246 SCREW M4x8 PAN HD POSI
0000ME00255 SCREW M4x20 CSK HD POSI SS
0000ME00257 PIN TENSION 3.0x10.0
0000ME00268 SCREW M3X8 CSK HD POSI SS
0000ME00277 O RING NITRILE 11.5X1.5
0000ME00284 SCREW M3X16 CSK HD POSI STAINLESS STEEL
0000ME00285 WASHER M3 SHAKEPROOF
0000ME00287 WASHER M2.5 SHAKEPROOF
0000ME00288 SCREW M2.5X6 CSK HEAD SKT A4 ST/ST
P7000, P6000, TIVA, TCI & TIVA 85/105 1000SM00012 Issue 3
Page 86

Spare Parts Listing
Transmission Assembly Components (continued)
Part Number Description
0000ME00292 HEX NUT M3 STAINLESS STEEL A4
0000ME00313 SCREW No4x1/4” CSK TRUNCATED POZI SS
0000ME00345 SPRING COMP 8MMX6MM
0000ME00386 SPRING MUSIC WIRE
0000ME00391 WASHER 12X1.6X6.4 I/D NYLON
0000ME00448 NITRILE ORING 14.1 X 1.6
1000ME00097 HALF NUT V4
1000ME00177 SPACER DUAL TRANSMISSION
1000ME01011 LEADSCREW V4
1000ME01022 PLATE OUTER TUBE SEAL V4
1000ME01027 PIN PLUNGER PLATE
1000ME01047 SEAL RING OUTER TUBE
1000ME01048 SEAL RING LEADSCREW
1000ME01059 HOLDER PLUNGER V4
1000ME01066 FOAM PAD
1000ME01113 BUSH MOTOR BEARING MOULDED
1000ME01114 BUTTON PLUNGER HOLDER MOULDED
1000ME01121 SEAL OUTER TUBE RECESSED
1000ME01122 TUBE OUTER ‘O’ RING GROOVE
1000ME01133 SCREW M3X8 TORX T6 SET FULL DOG
1000ME01134 SCREW M3X8 TORX T6 SET PART DOG
1000ME01305 PLATE PLUNGER RESTRAINT
1000ME01325 BACKPLATEPLUNGER HOLDER OVERMOL
1000ME01353 HOLDER PLUNGER CRUCIFORM MKII
1000SP00247 PSERIES BEAM ASSEMBLY
1000SP01063 ASSY LEADSCREW SEAL
1000SP01084 LEVER TUBE DECLUTCH
6000ME00018 CLIP EARTH LEADSCREW TCI
6000SP00011 TCI BEAM ASSEMBLY
6000SP00027 SPARE TRANSMISSION TCI
6000ME00025 ASSY MOTOR MOUNTING TCI
7000ME00011 CARRIAGE COMMON TRANS
7000ME00015 ROD TORSION P7000
7000ME00028 PLATE CARRIAGE
7000ME00034 MOTOR ROTOR ENCODER 4 LINE MOULDED
7000ME00053 ACTUATOR LINEAR POT DELRIN
7000ME00062 ASSY PLATE MOTOR MOUNTING P7000
7000ME00068 MOTOR ASSEMBLY P7000
7000SP00018 ASSY CHASSIS POTENTIOMETER
7000SP00022 SPARE TRANSMISSION P6000/TIVA/P7000
7000SP00024 ASSY FLEXI CIRCUIT MKII TRANSMISSION
P7000, P6000, TIVA, TCI & TIVA 86/105 1000SM00012 Issue 3
Page 87

Spare Parts Listing
Software
Part Number Description
1000SP00209 ASENA SP,KIT,EVENT LOG DOWNLOAD UTILITY
1000SP00529 P6000 V3R2 S/W UPGRADE KIT
1000SP00530 P7000 V3R2 S/W UPGRADE KIT
1000SP00531 P6000 (TIVA) V3R2 S/W UPGRADE KIT
1000SP00532 P6000 (TIVA TCI) V3R2 S/W UPGRADE KIT
Test Equipment
Part Number Description
0000JG00004 JIG V4/P7 CASE UPPR ASSY
0000JG00014 ASENA SP & P SERIES,TEST,PLUNGER PROTECT
0000TG00200 DIGITAL OCCLUSION TEST GEAR (CAL)
1000SP00373 ALARIS CALIBRATION KIT
1000SP01008 ASSY CABLE RS232 (V4/PCAM)
1000TG00010 TEST GEAR SYRINGE SIZING 50ml SPACER
1000TG00011 SYRINGE SIZING 100ml SPACER CALIBRATED
1000TG00059 LINEAR SIZING SPACER BOM
1000TG00080 LINEAR SPEED TEST GEAR BOM
6000SP00012 ASSY CABLE RS232 P6000/V2
P7000, P6000, TIVA, TCI & TIVA 87/105 1000SM00012 Issue 3
Page 88

Appendix C
Fitting and Replacement
Guidelines
In this appendix
Torque Guide 89
Page 89

Fitting & Replacement Guidelines
Torque Guide
Always use the correct torque level when making an assembly stage.
Take care with the torque applied when re-assembling parts.
The head patterns of the fasteners are of the following types:
- Pozi Number 1 (smaller X head)
- Pozi Number 2 (larger X head)
- M3 (Hex head with 5.5mm across flats (AF) drivers)
Always select the correct tool and bit pattern for the fastener.
The following list outlines the torque levels established during product manufacture.
Torque levels selected apply throughout product life for the IVAC® Syringe Pumps.
Use the information below as a guide to the 'do not exceed' torque levels when servicing the pump. When servicing, it is recommended
that torque is applied gradually until the component is secure. In any process do not exceed the stated levels.
If a torque driver is available for servicing this will help control the applied torque; otherwise, be aware that excess force may cause the
component to fail. If torque level is not stated then fixing should be hand-tight.
Transmission Assembly
Established Process
Stage Description Component Description Qty
Plunger holder to outer tube Screw M3x8 Torx T6 Set Part Dog 2 45cNm
Carriage block to torsion rod Screw M3x8 SKT Set Full 2 25cNm
Bonded Beam to transmission shaft Hex Nut M3 Stainless Steel A4 1 25cNm
Earth leadscrew clip to transmission shaft
(Model TCI & TIVA)
Screw M2.5x8 CSK Head SKT A4 ST/ST 1 25cNm
Torque
Upper Case Assembly
Established Process
Stage Description Component Description Qty
Transmission assembly beam to Upper
Case
Transmission assembly to Upper Case Screw M4x8 Pan Hd Posi 3 1.0Nm
Screw M4x20 Csk Hd Posi SS 2 2.0Nm
Screw M4x40 Pan Hd Posi 2 ZP+P 1 1.0Nm
Torque
Lower Case Assembly
Established Process
Stage Description Component Description Qty
RS232 Connector to Lower Case Screw Male/Female M3.4 Brass & Nickel 2 25cNm
PSU to Lower Case Screw M3x12 Pozi Hd Z+C 4 Hand tight
Adjustable Pole Clamp to Lower Case Screw M4x16 Din 7985 ZP+P 2 20Nm
Torque
P7000, P6000, TIVA, TCI & TIVA 89/105 1000SM00012 Issue 3
Page 90

Fitting & Replacement Guidelines
Torque Guide (continued)
Pole Clamp Fitting - Setting Adjustable Clamp
Established Process
Stage Description Component Description Qty
Fully loosen locknut with clamp secured
to Lower Case
Close clamp
Fit and torque
Alternatively, secure clamp to pole
and apply torque until force to move
pump is at desired level
Set clamp movement force
Hold 5mm Allen headed bolt in exact
position set during previous stage
Simultaneously torque locknut to
ensure bolt maintains current level of
torque and position
10mm Nylok nut N/A N/A
5mm Allen headed bolt N/A 10Nm
Locknut N/A 20Nm
Final Pump Assembly
Stage Description Component Description Qty
Lower Case to Upper Case Screw M4x50 Pan Posi 4 Hand tight
Torque
Established Process
Torque
Pressure Disc Holder Assembly (Model P7000 only)
Established Process
Stage Description Component Description Qty
Disc holder to Upper Case Screw M3x8 Csk Hd Posi SS 4 20cNm
Torque
P7000, P6000, TIVA, TCI & TIVA 90/105 1000SM00012 Issue 3
Page 91

Appendix D
Configured Options & Drug
Protocol Records
In this appendix
Configured Options Record Sheet
IVAC® P7000 Syringe Pump 92
IVAC® P6000 Syringe Pump 93
IVAC® TIVA Syringe Pump 94
IVAC® TCI & TIVA Syringe Pump 95
Drug Protocol Setup
IVAC® P7000 Syringe Pump 96
IVAC® TIVA Syringe Pump 97
IVAC® TCI & TIVA Syringe Pump 98
Page 92

Configured Options & Drug Protocol Records
Configured Options Record Sheet
IVAC® P7000 Syringe Pump
Enter the pump-specific information for your records on a copy of this page.
Software Version: V3R2
Option Range Default Setting
FAST START & BACKOFF Disabled/Enabled Enabled
SET VTBI OVER TIME Disabled/Enabled Disabled
VTBI Disabled/Enabled Enabled
INDUCTION Disabled/Enabled Disabled
MULTIDOSE Disabled/Enabled Disabled
RATE LOCK Disabled/Enabled Disabled
QUIET MODE Disabled/Enabled Disabled
PRESSURE ALARM 1 - 750mmHg 300mmHg
MAXIMUM PRESSURE 1 - 750mmHg 750mmHg
AUTO PRESSURE Disabled/Enabled Disabled
AC FAIL Disabled/Enabled Enabled
RATE TITRATION Disabled/Enabled Disabled
NEOI WARNING 1 - 15 minutes 5 minutes
EOI POINT 0.5 - 5.0% 1%
KVO AT EOI Disabled/Enabled Enabled
BEAM (Occlusion) L0 - L7 L3
PATIENT WEIGHT 0.1kg - 150kg 70kg
PURGE RATE 100 - 500ml/h 500ml/h
BOLUS Disabled/Enabled Enabled
DEFAULT BOLUS 10 - 1200ml/h 200ml/h
CAP BOLUS RATE 10 - 1200ml/h 1200ml/h
CAP RATE 1 - 1200ml/h 1200ml/h
EVENT LOG DISPLAY Disabled/Enabled Enabled
LOG LAST PATIENT ONLY Disabled/Enabled Enabled
NURSE CALL Disabled/Enabled Disabled
NURSE CALL INVERTED Disabled/Enabled Disabled
COMMS PUMP ADDRESS 1 -254 1
COMMS MONITOR ONLY Disabled/Enabled Enabled
COMMS ODD PARITY Disabled/Enabled Disabled
COMMS ASCII Disabled/Enabled Enabled
Syringes Enabled
Make Size(s) Make Size(s)
Hospital Name:
Approved by:
Date:
P7000, P6000, TIVA, TCI & TIVA 92/105 1000SM00012 Issue 3
Serial No:
Configured by:
Date:
Software Version:
Page 93

Configured Options & Drug Protocol Records
Configured Options Record Sheet
IVAC® P6000 Syringe Pump
Enter the pump-specific information for your records on a copy of this page.
Software Version: V3R2
Option Range Default Setting
AUTOSAVE Disabled/Enabled Enabled
BACKOFF Disabled/Enabled Enabled
SET VTBI OVER TIME Disabled/Enabled Disabled
VTBI Disabled/Enabled Enabled
RATE LOCK Disabled/Enabled Disabled
QUIET MODE Disabled/Enabled Disabled
AC FAIL Disabled/Enabled Enabled
RATE TITRATION Disabled/Enabled Disabled
NEOI WARNING 1 - 15 minutes 5 minutes
EOI POINT 0.5 - 5.0% 1%
KVO AT EOI Disabled/Enabled Enabled
BEAM (Occlusion) L0 - L7 L3
PURGE RATE 100 - 500ml/h 500ml/h
BOLUS Disabled/Enabled Enabled
DEFAULT BOLUS 10 - 1200ml/h 200ml/h
CAP BOLUS RATE 10 - 1200ml/h 1200ml/h
CAP RATE 1 - 1200ml/h 1200ml/h
EVENT LOG DISPLAY Disabled/Enabled Enabled
LOG LAST PATIENT ONLY Disabled/Enabled Enabled
NURSE CALL Disabled/Enabled Disabled
NURSE CALL INVERTED Disabled/Enabled Disabled
COMMS PUMP ADDRESS 1 -254 1
COMMS MONITOR ONLY Disabled/Enabled Enabled
COMMS ODD PARITY Disabled/Enabled Disabled
COMMS ASCII Disabled/Enabled Enabled
Syringes Enabled
Make Size(s) Make Size(s)
Hospital Name:
Approved by:
Date:
P7000, P6000, TIVA, TCI & TIVA 93/105 1000SM00012 Issue 3
Serial No:
Configured by:
Date:
Software Version:
Page 94

Configured Options & Drug Protocol Records
Configured Options Record Sheet
IVAC® TIVA Syringe Pump
Enter the pump-specific information for your records on a copy of this page.
Software Version: V3R2
Option Range Default Setting
BACKOFF Disabled/Enabled Enabled
AC FAIL Disabled/Enabled Enabled
NEOI WARNING 2 - 10% 4%
EOI POINT 0.5 - 5.0% 1%
BEAM (Occlusion) L0 - L7 L5
WEIGHT 0.1 - 150kg 70kg
PURGE RATE 100 - 500ml/h 500ml/h
HANDS FREE BOLUS Disabled/Enabled Enabled
DEFAULT BOLUS 0.1 - 25ml 1ml
NURSE CALL Disabled/Enabled Disabled
NURSE CALL INVERTED Disabled/Enabled Disabled
COMMS PUMP ADDRESS 1 -254 1
COMMS MONITOR ONLY Disabled/Enabled Enabled
COMMS ODD PARITY Disabled/Enabled Disabled
COMMS ASCII Disabled/Enabled Enabled
Syringes Enabled
Make Size(s) Make Size(s)
Hospital Name:
Approved by:
Date:
P7000, P6000, TIVA, TCI & TIVA 94/105 1000SM00012 Issue 3
Serial No:
Configured by:
Date:
Software Version:
Page 95

Configured Options & Drug Protocol Records
Configured Options Record Sheet
IVAC® TCI & TIVA Syringe Pump
Enter the pump-specific information for your records on a copy of this page.
Software Version: V3R2
Option Range Default Setting
BACKOFF Disabled/Enabled Enabled
AC FAIL Disabled/Enabled Enabled
NEOI WARNING 2 - 10% 4%
EOI POINT 0.5 - 5.0% 1%
BEAM (Occlusion) L0 - L7 L5
WEIGHT 0.1 - 150kg 70kg
PURGE RATE 100 - 500ml/h 500ml/h
HANDS FREE BOLUS Disabled/Enabled Enabled
DEFAULT BOLUS 0.1 - 25ml 1ml
NURSE CALL Disabled/Enabled Disabled
NURSE CALL INVERTED Disabled/Enabled Disabled
COMMS PUMP ADDRESS 1 -254 1
COMMS MONITOR ONLY Disabled/Enabled Enabled
COMMS ODD PARITY Disabled/Enabled Disabled
COMMS ASCII Disabled/Enabled Enabled
TCI Disabled/Enabled Enabled
DISPLAY TCI DECREMENT TIME Disabled/Enabled Enabled
Syringes Enabled
Make Size(s) Make Size(s)
Hospital Name:
Approved by:
Date:
P7000, P6000, TIVA, TCI & TIVA 95/105 1000SM00012 Issue 3
Serial No:
Configured by:
Date:
Software Version:
Page 96

Configuration & Drug Protocol Records
Alarm
Pressure
Rate
(ml/hr)
Bolus
(ml)
Max
Max DefaultMinUnits
Concentration
Dose Rate
MinDefaultMax
Dose
Units
Software Version
DateDate
Configured by
Drug Name
(27 Chars max)
IVAC® P7000 Syringe Pump Drug Protocol Setup
P7000, P6000, TIVA, TCI & TIVA 96/105 1000SM00012 Issue 3
Hospital Ward/Unit
No.
(1-50)
Serial Number
Approved by
Page 97

Configuration & Drug Protocol Records
Concentration
Dose Units Induction Time Maintenance Bolus
Concentration
Default Min Max
Units
Software Version
DateDate
Configured by
Drug Name
(27 chars max)
IVAC® TIVA Syringe Pump Drug Protocol Setup
P7000, P6000, TIVA, TCI & TIVA 97/105 1000SM00012 Issue 3
Hospital Ward/Unit
No
(1-50
Serial Number
Approved by
Page 98

Configuration & Drug Protocol Records
Ward/Unit
Concentration
Dose Units Induction Time Maintenance Bolus
Concentration
Default Min Max
Units
Software Version
DateDate
Configured by
Drug Name
(27 chars max)
IVAC® TCI & TIVA Syringe Pump Drug Protocol Setup
IVAC® TCI & TIVA Syringe Pump Drug Protocol Setup
Hospital
P7000, P6000, TIVA, TCI & TIVA 98/105 1000SM00012 Issue 3
No
(1-50
Serial Number
Approved by
Page 99

Disposal
In this chapter
Disposal 100
Appendix E
Battery Removal 100
Page 100

Disposal
Ensure the Pump is disconnected from the AC power supply and switched off before attempting to
service.
VThe Pump contains static-sensitive components and therefore strict ESD precautions should be
observed at all times.
Only use Cardinal Health recommended spare parts.
Following all spare part replacement and repair activities, testing must be performed in accordance
with the Performance Verification Procedure (PVP), see Chapter 3, Routine Maintenance.
Disposal
Information on Disposal for Users of Waste Electrical & Electronic Equipment
This U symbol on the product and/or accompanying documents means that used electrical and electronic products should not be mixed
with municipal waste.
If you wish to discard electrical and electronic equipment, please contact your Cardinal Health affiliate office or distributor for further
information.
Disposing of this product correctly will help to save valuable resources and prevent any potential negative effects on human health and
the environment which could otherwise arise from inappropriate waste handling.
Information on Disposal in Countries outside the European Union
This symbol is only valid in the European Union. The product should be disposed of taking environmental factors into consideration.
To ensure no risk or hazard, remove the internal rechargeable battery and the Lithium battery from the control board and dispose of as
outlined by the local country regulations. All other components can be safely disposed of as per local regulations.
Battery Removal
Removal Procedure
1. Remove the six case retaining screws and washers located on the base of the pump.
2. Carefully separate the upper and lower case halves and disconnect cables.
3. Disconnect the battery cable from the Power Supply PCB.
4. Remove the two screws which secure the battery retaining plate.
5. Lift out the battery and retaining plate then disconnect the crimp terminals from the battery.
6. Detach the retaining plate from the battery.
Screws (x2) /Washers (x2)
Battery
P7000, P6000, TIVA, TCI & TIVA 100/105 1000SM00012 Issue 3
 Loading...