

Page 1

IVAC® Volumetric Pump
Models 597 & 598
Technical Service Manual
Page 2

This manual has been prepared for use by qualified service personnel only.
Cardinal Health, Alaris® Products cannot accept any liability for any breakdown or
deterioration in performance of parts or equipment resulting from unauthorised repair or
modification.
t Cardinal Health, 1180 Rolle, Switzerland
IVAC® is a registered trademark of
Cardinal Health, Inc. or one of its subsidiaries
All other trademarks belong to their respective owners.
© 1998-2006. Cardinal Health, Inc. or one of its subsidiaries All rights reserved.
IVAC® Volumetric Pump (Models 597 & 598) 2/76 1000SM00016 Issue 3
Page 3

Contents
Chapter 1 Introduction & Start Up 4
Chapter 2 Routine Maintenance & Calibration 12
Chapter 3 Troubleshooting 31
Chapter 4 Circuit Descriptions 37
Chapter 5 Spare Parts Replacement Procedures 41
Appendix A Specifications 57
Appendix B Spare Parts Listing 63
Appendix C Fitting & Replacement Guidelines 69
Appendix D Service Contacts 71
Appendix E Disposal 73
Appendix F Document History 75
Page 4

Introduction & Start Up
In this chapter
Chapter 1
Introduction 5
General Precautions 6
Views of the IVAC® 597/598 Volumetric Pump 7
Controls and Indicators 8
Flow Sensor 8
Loading the IV Infusion Set 9
Starting the Pump 9
Programming 9
Secondary Infusion (Model 597) 10
Page 5
Introduction & Start Up
Introduction
The IVAC® Volumetric Pump - Models 597 & 598 automatically regulates the infusion rate of IV solutions using a linear
peristaltic, volume displacement mechanism to regulate fluid flow at the prescribed rate. The pump can be operated with
a Flow Sensor and is lightweight, compact and robust enough for most patient situations.
The IVAC® 598 Volumetric Pump operates in primary infusion mode only.
The IVAC® 597 Volumetric Pump has a primary and secondary infusion feature.
Product Familiarity
Ensure that you are fully familiar with the pump by carefully studying the Directions for Use (DFU) prior to operation and
prior to attempting any repairs or servicing. As part of continuous improvement, product enhancements and changes are
introduced from time to time.
Purpose of this Manual
This Technical Service Manual describes how to set up, test and maintain the following volumetric pumps:
IVAC® 597 Volumetric Pump
IVAC® 598 Volumetric Pump
This manual is intended for use by personnel experienced in medical equipment testing and maintenance procedures .
Conventions Used in this Manual
BOLD
'Single quotes' Used to indicate cross-references made to another section of this manual. For example, see
underline Used to indicate a link to another section within this manual.
Italics
Used for Display names, self-test codes, controls and indicators referenced in this manual, for
example, VTBI indicator, test code 08, ON/OFF switch.
Chapter 2, 'Configuration and Calibration'.
Used to refer to other documents or manuals. For example, refer to the relevant Directions for Use
(DFU)
for further information. Also used for emphasis, for example, ...if the gap still measures less
than...
Wherever this symbol is shown a Hints & Tips note is found. These notes provide useful advice or
information that may help to perform the task more effectively.
Wherever this symbol is shown a Toolbox note is found. These notes highlight an aspect of test
or maintenance that is important to know about. A typical example is drawing attention to a
software upgrade that you should check has been installed.
IVAC® Volumetric Pump (Models 597 & 598) 5/76 1000SM00016 Issue 3
Page 6
General Precautions
Prior to using this pump, carefully read the Operating Precautions described in the Directions for Use
(DFU)
.
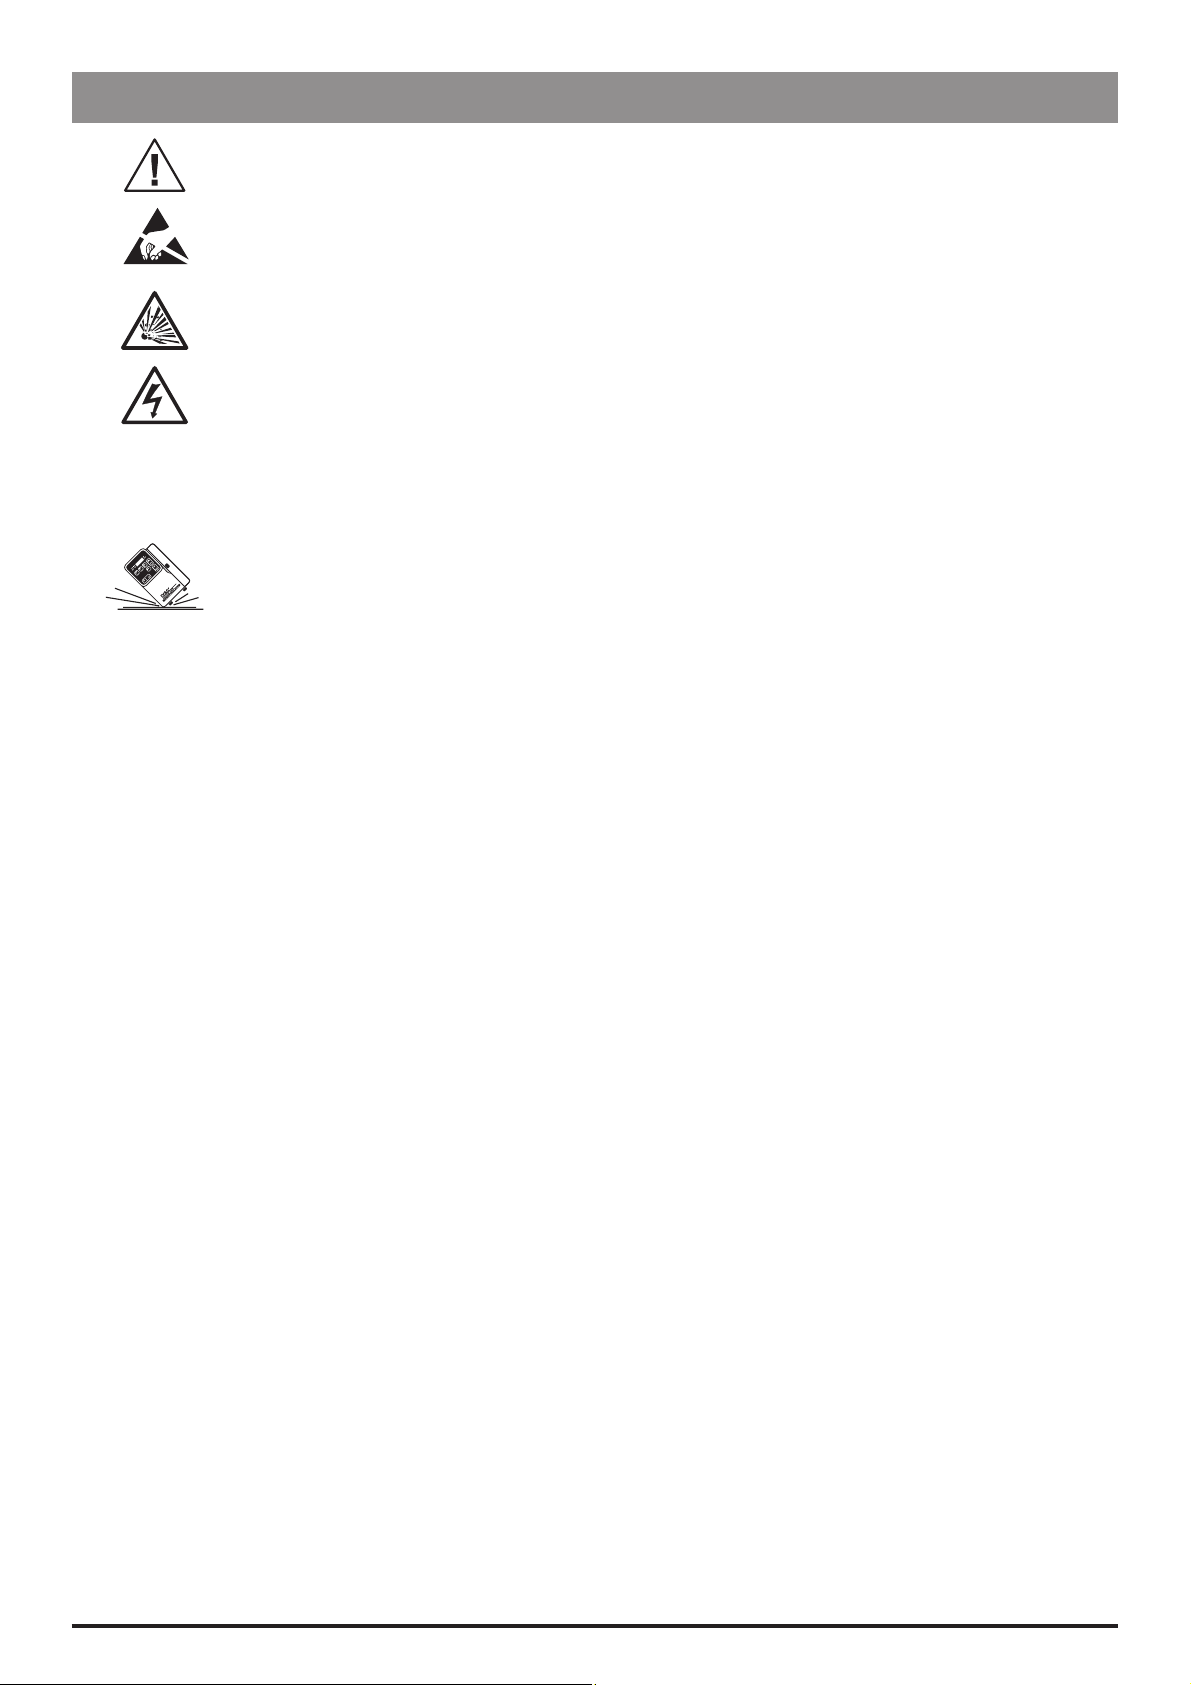
This pump contains static-sensitive components. Observe strict precautions for the protection of static
sensitive components when attempting to repair and service the pump.
An explosion hazard exists if the pump is used in the presence of flammable anaesthetics. Exercise care
to locate the pump away from any such hazardous sources.
Dangerous Voltage. An electrical shock hazard exists if the casing of the pump is opened or removed.
Refer all servicing to qualified service personnel.
This pump is protected against the effects of high energy radio frequency emissions and is designed
M
to be fail safe if extremely high levels of interference are encountered. Should false alarm conditions
be encountered, either remove the source of the interference or regulate the infusion by another
appropriate means.
If the pump is dropped, subjected to excessive moisture, humidity or high temperature, or otherwise
suspected to have been damaged, remove it from service for inspection by qualified service personnel.
Introduction & Start Up
When connected to an external power source, a three-wire (Live, Neutral, Earth) supply must be used. If
the integrity of the external protective conductor in the installation or its arrangement is in doubt, the
pump should be operated from the battery.
IVAC® Volumetric Pump (Models 597 & 598) 6/76 1000SM00016 Issue 3
Page 7
Introduction & Start Up
VOL
TO BE
INF
READ
VOL
CLEAR
VOL
VOL
ml
RATEKVO
VTBI
ON /
OFF
RUN/
HOLD
ml/hr
Model 598
Volumetric Pump
VOL
TO BE
INF
READ
VOL
CLEAR
VOL
PRI
ml
SECKVO
VTBI
ON /
OFF
RUN/
HOLD
PRI /
SEC
ml/hr
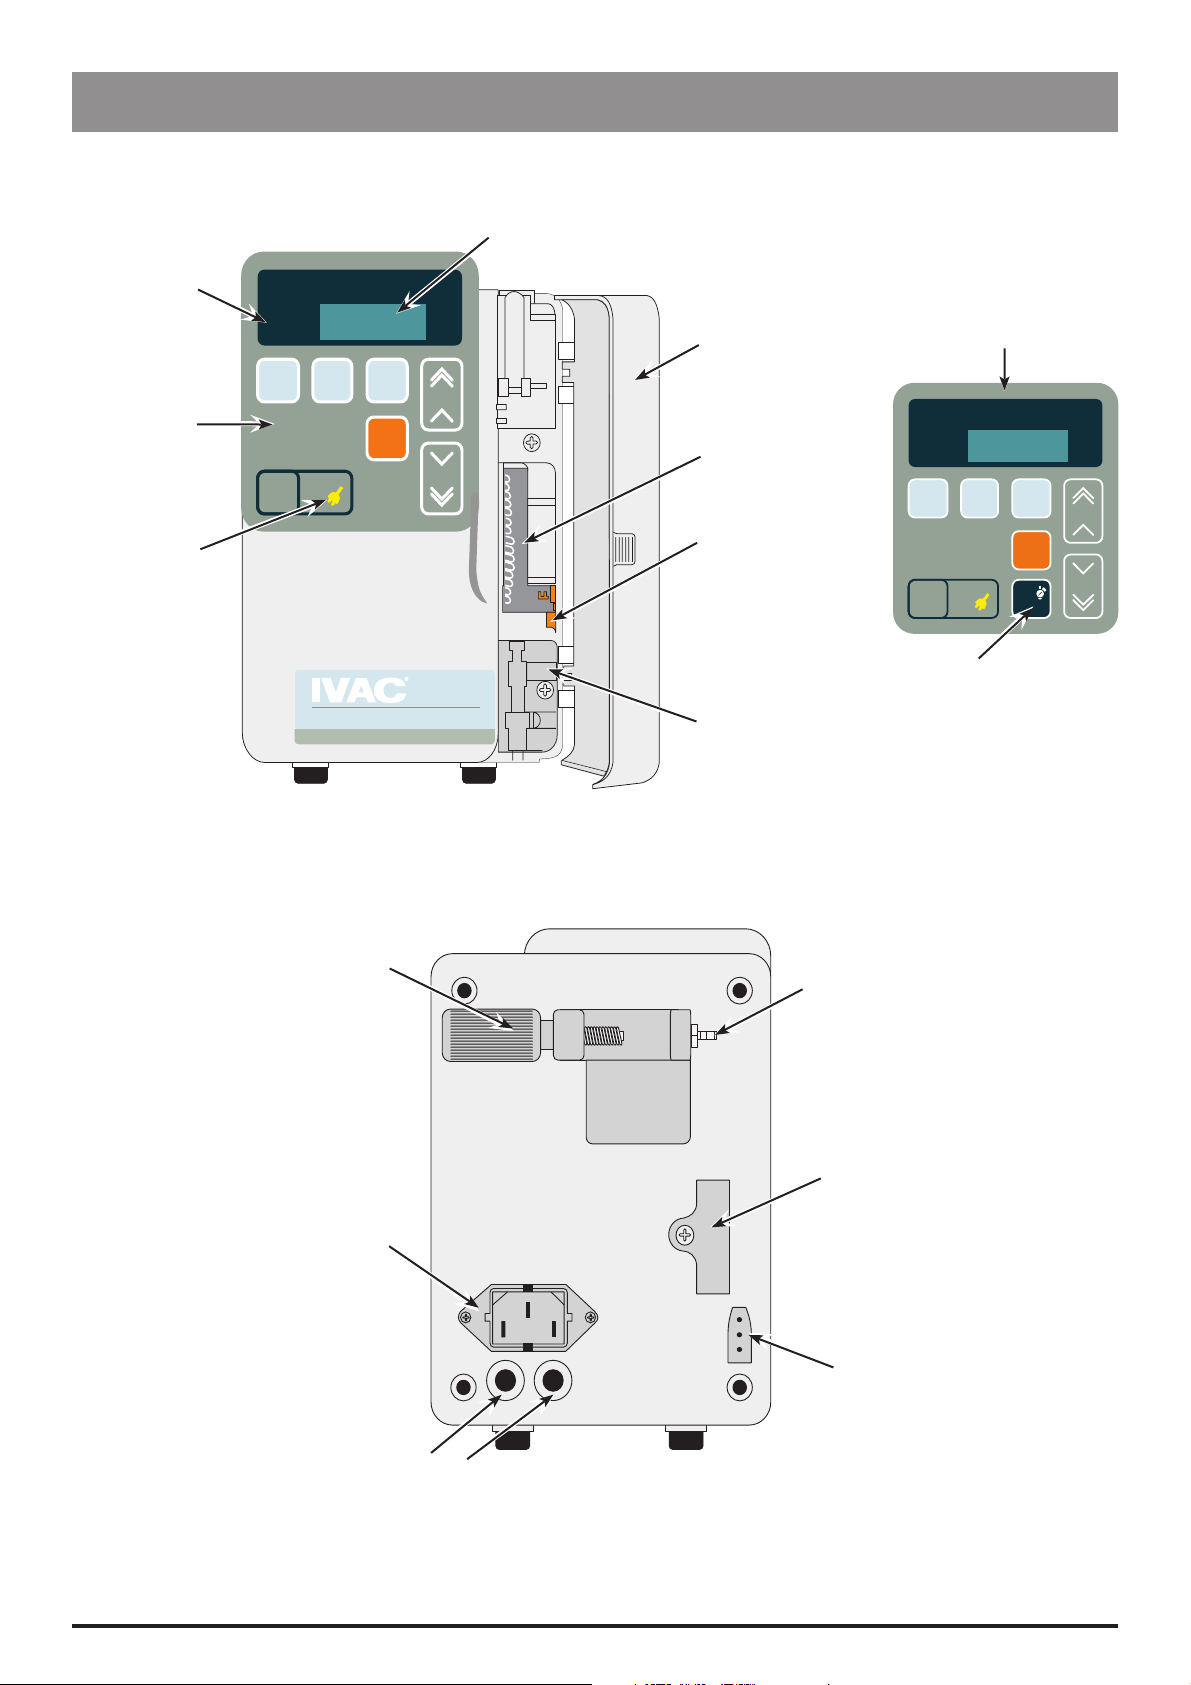
Views of the IVAC® Volumetric Pump (Models 597 & 598)
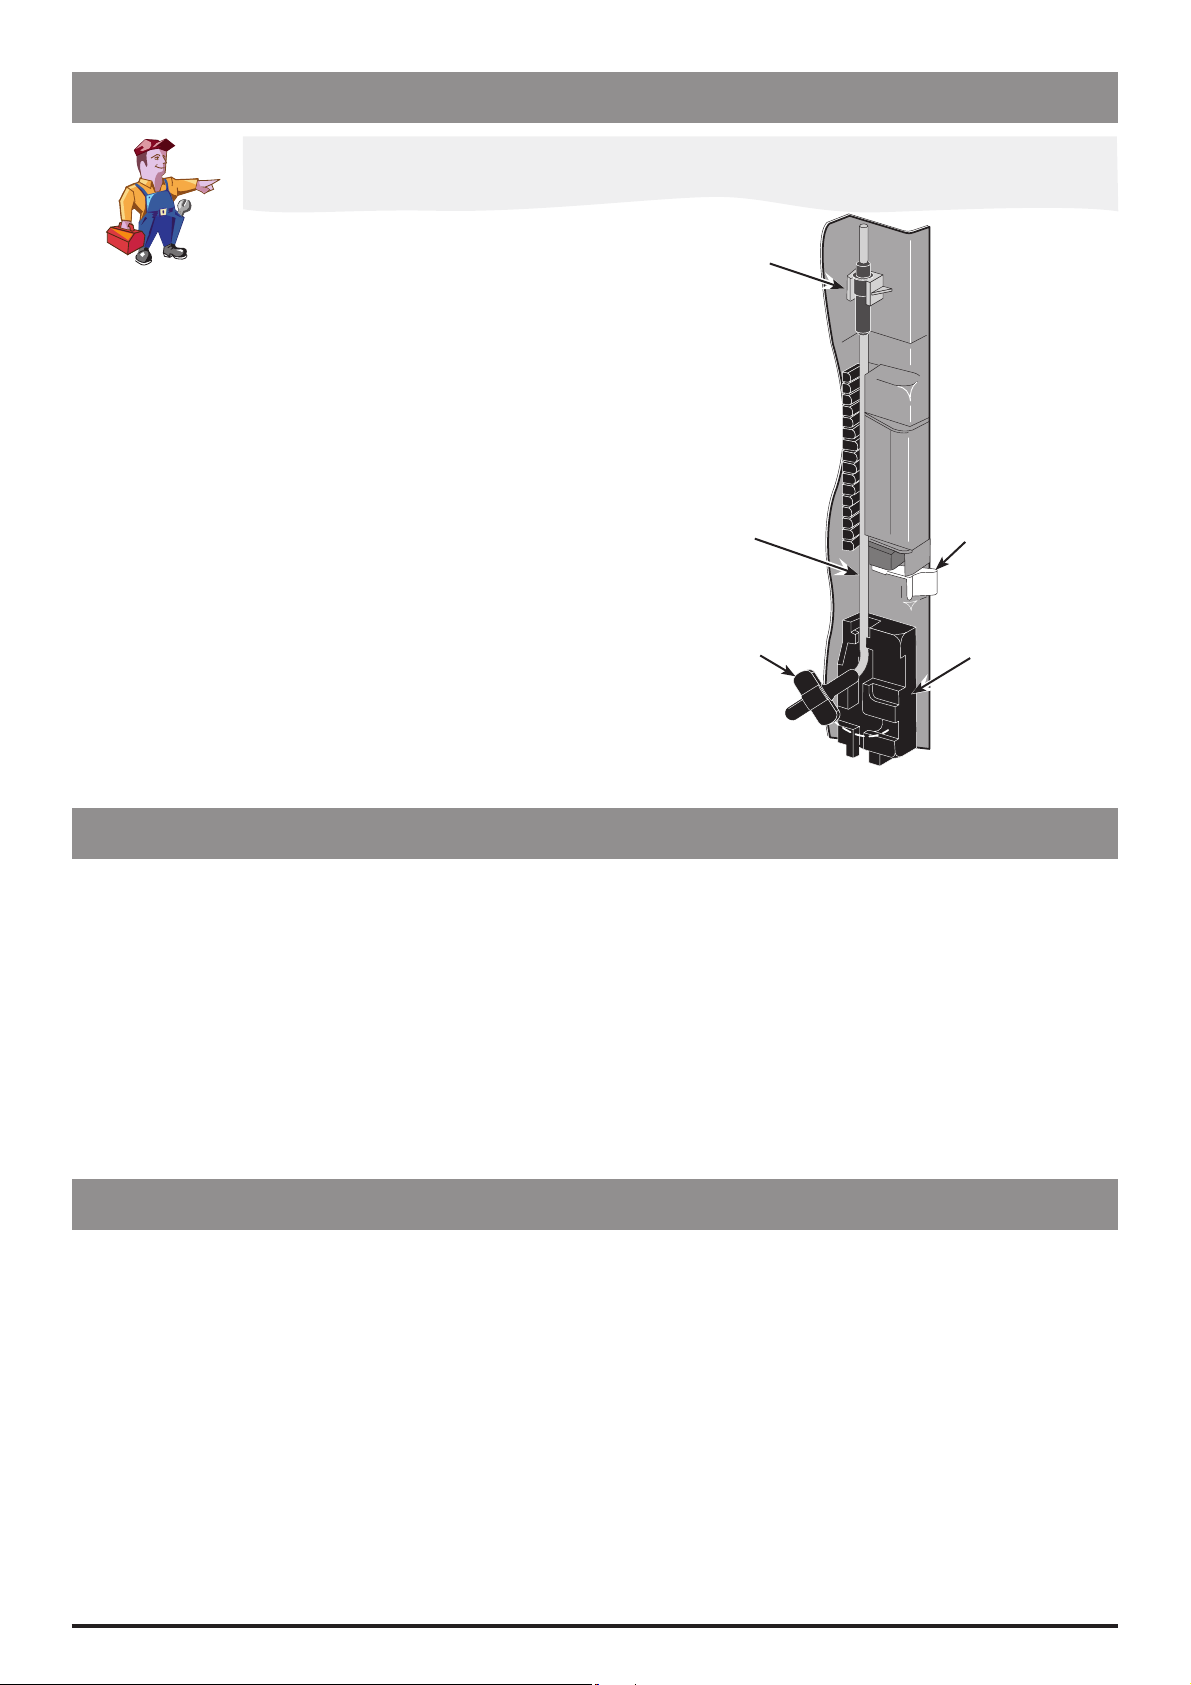
Front View
Main Display
Display
Indicators
Door
Keyboard
(Model 598)
CAM Follower
Assembly
Keyboard
(Model 597)
AC power
Indicator
Rear View
Pole Clamp
CAM Follower
Assembly Latch
Air-In-Line
Sensor
PE Connector
(not on XAX* model pumps)
Primary/
Secondary
Infusion Switch
Test Connector Cover
AC Power
Connector
Flow Sensor
Connector (on FSO** pumps)
* XAX refers to pumps with Serial numbers that include XAX, for example, 597XAX01AA.
** Flow Sensor Option.
IVAC® Volumetric Pump (Models 597 & 598) 7/76 1000SM00016 Issue 3
Fuse Holders
Page 8
Introduction & Start Up
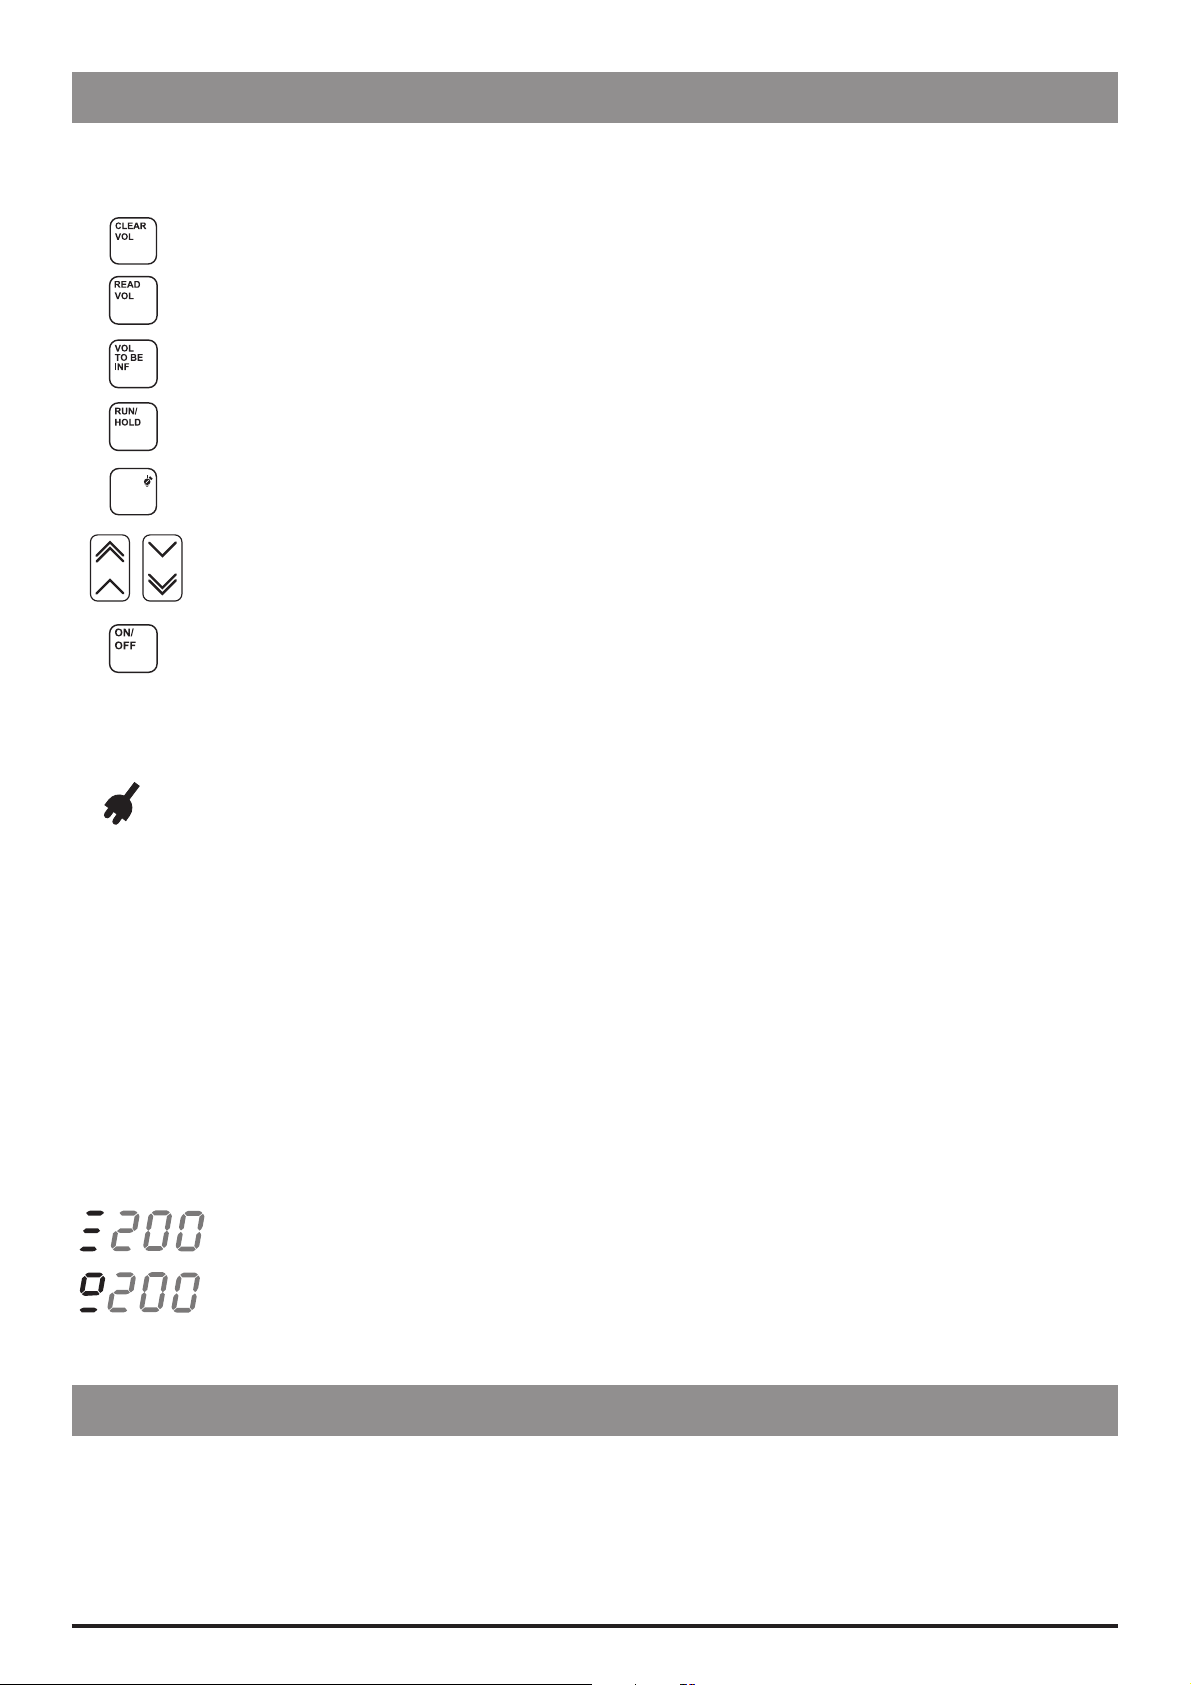
Controls and Indicators
The English keyboard controls and indicators are described below. For information on keyboards in other languages, refer
to the relevant DFU. See also Appendix B, 'Spare Parts Listing' for keyboard part numbers.
PRI /
SEC
CLEAR VOLUME
READ VOLUME
VOLUME TO BE
INFUSED (VTBI)
RUN/HOLD
PRIMARY/
SECONDARY
Resets volume infused value to zero.
Displays volume infused value.
Sets value of Volume To Be Infused.
Starts and stops pump infusions. Silences/cancels alarms.
(Model 597 only). Switches the pump between PRIMARY and SECONDARY infusion
modes.
Double chevrons/single chevrons for faster/slower increase or decrease of infusion rate
CHEVRONS
ON/OFF
When any of the following are illuminated:
AC POWER INDICATOR - The pump is connected to an AC power supply and the battery is being charged.
and volume values.
Adjusts user selectable options (in self-test mode).
Switches the pump on and off.
VTBI
KVO
VOL
RATE
PRI
SEC
ml
ml/hr
The value displayed is the Volume To Be Infused.
The pump is infusing at the Keep Vein Open (KVO) rate of 5ml/h (or current rate, whichever is less).
The value displayed is the volume infused.
The value displayed is the current infusion rate.
(Model 597 only). The pump is operating in PRIMARY mode.
(Model 597 only). The pump is operating in SECONDARY mode.
(Millilitres) The value displayed is the VTBI or volume infused value.
(Millilitres / hour) The value displayed is the infusion rate.
Infusion indicator. Three horizontal bars in the left-hand display position flash sequentially when the
pump is infusing.
Infusion indicator with Flow Sensor in use. Upper two horizontal bars convert to a square when a drop is
detected by the flow sensor in the drip chamber.
Flashing
Display
When the pump is operating on battery power, the Display flashes on/off.
Flow Sensor
A flow sensor is used to detect an empty fluid container. It is connected to the drip chamber and when a drop is detected
in the drip chamber the infusion indicator in the top left position of the Display converts to a square character (). See
above.
Notes:
1) Use part number 192.
2) A flow sensor can only be used on Flow Sensor Option (FSO) pumps.
IVAC® Volumetric Pump (Models 597 & 598) 8/76 1000SM00016 Issue 3
Page 9
Introduction & Start Up
Loading the IV Infusion Set
Follow the Directions for Use supplied with the individual IV infusion set
Only use IV infusion sets that are suitable for use with the IVAC® Volumetric Pumps (Models 597 & 598)
recommended by Cardinal Health
1. Prime the IV infusion set slowly and close the roller clamp.
2. Open the door.
3. Load the primed IV infusion set (see Figure 1):
Open the latch
Load the upper tubing segment into the top set retainer
Insert lower tubing segment into the Air-In-Line Sensor
Close the latch, ensuring the set is enclosed
4. Close the door.
5. Open the roller clamp.
6. Connect to test equipment as required.
Ensure no fluid flows.
Top set retainer
Primed IV
Infusion Set
Latch
(shown open)
Starting the Pump
Without Flow Sensor
1. Load the primed set.
2. Press the
3. Use the chevron switches (I,
ON/OFF switch to power on the pump.
J, L and K) to set
the rate.
4. Press
5. Use the chevron switches (I,
RUN/HOLD to confirm.
J, L and K) to set
VTBI.
6. Clear Volume Infused if required.
7. Press
RUN/HOLD to start infusion.
Programming
Lower Tubing Segment
With Flow Sensor
1. Load the primed set.
2. Connect the flow sensor to the drip chamber.
3. Press the
4. Use the chevron switches (I,
the rate.
5. Press
6. Use the chevron switches (I,
VTBI.
7. Clear Volume Infused if required.
8. Press
Air-In-Line Sensor
Figure 1. Loading the Set
ON/OFF switch to power on the pump.
J, L and K) to set
VOL TO BE INF if required.
J, L and K) to set
RUN/HOLD to start infusion.
Changing the infusion rate
1. Press the RUN/HOLD switch to place the pump on
hold.
2. Adjust rate by using the chevron switches.
3. Restart the pump by pressing the
Clearing total volume infused
RUN/HOLD keys.
1. Press the RUN/HOLD switch to place the pump on
hold.
2. Press and hold
CLEAR VOL for 2 seconds, until display
shows 0000.
Changing the Volume To Be Infused
1. Press the RUN/HOLD switch to place the pump on
hold.
2. Press the
VOL TO BE INF switch.
3. Set new volume by pressing the chevron switches.
OFF can also be selected when a flow sensor is in
use, see Notes below.
4. Restart the pump by pressing the
RUN/HOLD switch.
Notes:
1) Without a flow sensor in use, a VTBI value
must be
entered, otherwise, the pump displays VTBI when
the pump is restarted.
2) With a flow sensor in use, a VTBI value isn't required
and
OFF can be selected if required.
IVAC® Volumetric Pump (Models 597 & 598) 9/76 1000SM00016 Issue 3
Page 10

Introduction & Start Up
Secondary Infusion (Model 597)
Introduction
This mode of operation supports automatic secondary infusions ("piggybacking") in the same pump channel. When the
secondary VTBI reaches zero the pump will then automatically switch to the previously set primary rate. Secondary mode
can be used where a second, independent VTBI is required, and also when an automatic rate change is required.
When the pump is programmed and delivering in the secondary mode, the primary infusion is temporarily stopped and
fluid is drawn from the secondary container. Delivery from the primary container resumes when the fluid level in the
secondary line is level with the fluid in the primary container.
Note: The primary fluid container must hang lower than the secondary fluid container to allow the secondary infusion to
run. Primary infusion will restart on completion of the secondary infusion.
Starting the Pump with Secondary Infusion
1. Load the primed set. See 'Loading the IV Infusion Set' on the previous
page for instructions.
2. Prepare the secondary infusion using a secondary solution container
and the IVAC® "59" Series check valve primary set; lower the primary
container. See Figure 2.
Prime the secondary IV infusion set in accordance with the set
Directions for Use
Attach secondary IV infusion set to the upper Y-site of the primary IV
infusion set
Fully open the regulating clamp on the secondary IV infusion set.
3. Press the
PRIMARY mode.
4. Use the chevron switches to set the primary rate.
5. Press
6. Set primary VTBI if required.
7. Press and hold the
and high tone and switch to SECONDARY mode.
8. Use the chevron switches to set the secondary rate.
9. Press the
10. Set secondary VTBI by using the chevron switches.
11. Press
ON/OFF switch to power on the pump. Pump always starts up in
VOL TO BE INF if required.
PRI/SEC switch for one second. Pump will sound low
VOL TO BE INF switch.
RUN/HOLD to start secondary infusion.
Primary
container
Regulating
Y-Site
clamp
Back Check
valve
Line to patient
Figure 2.
Secondary Infusion Preparation
Secondary
container
WARNING:
Secondary infusion applications using a check valve set must have a VTBI setting equal to the
volume in the secondary container; this will require consideration of such variables as factory
overfill, medication additions, etc.
Underestimating the volume will cause remaining secondary solution to be infused at the primary
rate; overestimating will result in primary solution being infused at the secondary rate.
When using a flow sensor it must be on the primary IV infusion set. Correct placement of a
flow sensor is essential for proper operation.
IVAC® Volumetric Pump (Models 597 & 598) 10/76 1000SM00016 Issue 3
Page 11

Introduction & Start Up
Secondary Infusion (Model 597) continued
Viewing secondary settings when pump is running in
primary mode
Display secondary infusion rate - press and hold the PRI/SEC
switch. SEC indicator flashes and secondary infusion rate is
displayed as long as the switch is held.
Display secondary volume to be infused - press the PRI/SEC
and VOL TO BE INF switches together. SEC indicator flashes
and secondary volume to be infused is displayed while
switches are held.
Display secondary volume infused - press the PRI/SEC and
READ VOL switches together. SEC indicator flashes and
secondary volume infused is displayed while switches are
held.
Entering secondary mode when pump is running in
primary mode
Press the
RUN/HOLD switch to set pump on hold. Press and
hold the PRI/SEC switch for one second. Pump will sound
low and high tone and go into SECONDARY mode. SEC and
ml/hr indicators light.
Viewing primary settings when pump is running in
secondary mode
Display the primary infusion rate - press and hold the PRI/
SEC
switch. PRI indicator flashes and primary infusion rate
is displayed while switch is held.
Display the primary volume to be infused - press the PRI/
SEC
and VOL TO BE INF switches together. PRI indicator
flashes and primary volume to be infused is displayed
while switches are held.
Display the primary infused volume - press the PRI/SEC and
READ VOL switches together. PRI indicator flashes and
primary infused volume is displayed while switches are
held.
Exiting secondary mode before dose is complete
Press the
RUN/HOLD switch to set pump on hold. Press
and hold the PRI/SEC switch for one second; pump
sounds low and high tone and goes into PRIMARY mode.
OR, press the ON/OFF switch and close secondary set
roller clamp.
IVAC® Volumetric Pump (Models 597 & 598) 11/76 1000SM00016 Issue 3
Page 12

Routine Maintenance &
Calibration
In this chapter
Chapter 2
Routine Maintenance 13
Self-Test Mode 13
Test Codes 14
Test Connector 20
Upgrading Software 20
Cam Follower Gap Check 21
Functionality Checks 22
Occlusion Verification Test 23
Rate Accuracy Verification Test (Code 13) 23
Physical Inspection and Clean 24
Calibration Procedures 26
Performance Verification Procedure 30
Page 13

Routine Maintenance & Calibration
Routine Maintenance
For routine maintenance, the following tests and Performance Verification Procedures (PVP) should be performed in
addition to the tasks described in the section 'Physical Inspection and Clean'.
Refer to the relevant
DFU for the recommended routine maintenance period.
Self-Test Mode
Self-test mode is used to access a number of test routines which are designed to test and verify many of the pump
functions, defaults and calibrations without requiring internal inspection. Configuration settings are also enabled or
disabled via self-test mode.
Each test can be run in a single pass or in a continuous loop mode. See 'Test Execution' below for further details. Some
tests require a test jumper (part number 134646), see 'Test Connector' for further details.
Test Pass/Fail
The PRI & SEC (Model 597) or RATE & VOL (Model 598) indicator lights on the front panel of the pump are used to signal
whether the pump passes or fails a test as follows:
If the yellow PRI (Model 597) or VOL (Model 598) indicator light comes on, the pump has passed the test in progress.
If the red SEC (Model 597) or RATE (Model 598) indicator light comes on, the pump has failed the test in progress.
Most test procedures display data, such as numeric codes to indicate a test failure reason. See 'Test Procedure' table for
further details.
Entering Self-Test Mode
Press the CLEAR VOL and ON/OFF switches simultaneously until the display turns on. The pump then performs power-
on self-tests. Initially, the current software revision level is displayed, followed by the battery voltage.
When the battery voltage is displayed, press the RUN/HOLD switch to display t=00 which means the pump is ready to
start test 00.
Note: To bypass the display of the software revision level and the battery voltage and advance directly to t=00, hold
the CLEAR VOL switch until the power-on display test completes.
Use the chevron switches (I, J, L and K) to select the test code required.
To exit self-test mode, turn the pump off.
Test Execution
Single Pass Mode
After selecting the test number (see 'Entering Self-Test Mode' above), press the RUN/HOLD switch to start the test for one
pass. The display changes to show the test number for example, t=13. If there is data to display, it can be viewed after the
test by pressing the READ VOL switch.
Continuous Loop Mode
Certain tests can be run in a continuous loop mode (see tables below). After selecting the test number, press the RUN/
HOLD
switch twice within one second to enter the test loop. The display will change as in the single pass mode then the
test will be repeated continuously until the RUN/HOLD switch is pressed again.
To display the test data while the test continues, press the
To exit the loop, press the
Exiting Self-Test Mode
RUN/HOLD switch.
Self-mode can be exited at any time turning off the pump.
READ VOL switch.
IVAC® Volumetric Pump (Models 597 & 598) 13/76 1000SM00016 Issue 3
Page 14
Test Codes
Summary
Routine Maintenance & Calibration
Code Test Name
00 Self-Test (01 to 08)
01 Speaker and Speaker Drive Circuit Test
02 Motor and Drive Circuitry Test
03 Pressure Sensor Test
04 Air-in-line Test
05 Safety Switch and Driving Circuitry Test
06 Front Panel LED Test
07 External RAM Test
08 Tach/Volume Flag Test
09 Drop Discriminator Circuitry, Simulated Drop Test
Code Test Name
19 EEPROM Test
20 Rate Calibration Number Read
21 Total Pump Life "On" Time Read/Clear
22 Total Battery "On" Time Read/Clear
23 Error/Alarm Stack Read/Clear
Pressure Calibration Read/Set
24
See 'Pressure Calibration' section for details of test.
25 Language Code Read/Set
26 CRIS Configuration
27 Air Bubble Length Read
28 FLO Alarm Threshold Read
10 Drop Detector LED Drive Current Test
11 Door Sensor Test
12 Dried Spillage Alarm Parameters Read
Rate Accuracy Test
13
See 'Rate Accuracy Verification Test' section for details of test.
14 Switch Test
15 Burn-In Test
16 Battery Voltage Test
17 Seven-Segment Display Test
Factory Use Only
18
Door Calibration Read/Set
29
See 'Door Calibration' section for details of test.
30 Auxiliary Front Panel Display Enable/Disable
31 Secondary Mode Setting On/Off
Production/Quick Configuration Test
32
Factory Use Only. Test not available.
33 Pump Identification Number Read/Set
34 Hospital or Alternate Site Configuration Set
35 Secondary Mode Enable/Disable (Model 597 only)
36 Flow Sensor Optional/Mandatory
IVAC® Volumetric Pump (Models 597 & 598) 14/76 1000SM00016 Issue 3
Page 15

Routine Maintenance & Calibration
Test Codes (continued)
Test Procedures
Code Test Action/Data Displayed Loop
The pump cycles through tests 01 through 08 sequentially, displaying the test
00 Self-Test (01 to 08)
Speaker and Speaker
01
Drive Circuit Test
Motor and Drive
02
Circuitry Test
03 Pressure Sensor Test
04 Air-in-line Test
Safety Switch and
05
Driving Circuitry Test
06 Front Panel LED Test
07 External RAM Test
08 Tach/Volume Flag Test
Drop Discriminator
09
Circuitry, Simulated
Drop Test
number in progress, in the format t0.01 through t0.08.
If a test fails, the red SEC (or RATE) indicator lights, the current test stops and the
test number is displayed. Press the RUN/HOLD switch once to continue to the next
test (or twice to exit the test).
Test fail codes:
1=speaker senses as not turning on
2=speaker senses as not turning off
Test fail codes:
1=motor would not turn on (or shorted coil)
2=motor would not turn off
Data displayed: D/A trim level is displayed at end of test.
Test fail codes:
1 = amplifier output stuck high
2 = amplifier output stuck low
3 = amplifier cannot attain 4.6 volts
4 = amplifier cannot go below 0.2 volts
5 = bridge will not trim (D/A bits bad)
6 = trim/amplifier gain > 4.4 7 = trim/amplifier gain < 3.6
To run the test:
Load an air or fluid-filled IV infusion set.
Press the READ VOL switch to display the output code.
Test fail codes:
0 = fluid detected in IV infusion set
1 = air detected in IV infusion set
2 = output stuck high
3 = test line could not force air indication
Test fail codes:
1 = safety logic line would not go low
2 = safety logic line would not turn off
3 = safety switch would not turn on
4 = safety switch would not turn off
5 = both safety switch and motor drive stuck on
All front panel LEDs are lit until the
RUN/HOLD switch is pressed.
Inspect LEDs. Note that the AC charge LED only lights on AC power.
Test fail: display shows the first address failed, hexadecimal. Note that the highest
address is tested first.
Data displayed: tt.vv where tt equals the last two digits of the number of tach flags,
and vv equals the number of volume flags. Normal display is 20.28, and the tt may
vary by +/- one count.
This test is designed to assist in aligning the encoder disk optics and is intended to
be used in the loop mode.
When running test, if there is excessive noise, loosen retaining screws as required
and adjust the cam follower assembly as far as possible towards the bottom of the
pump. Tighten retaining screws then turn the pump off.
Note: The flow sensor must be connected to the pump.
Data displayed: output voltage in A/D counts. Ideal value is 205 counts = 4.00 volts
Test fail codes:
1 = no drop detected
2 = value too high, max = 4.257 V, 218 counts
3 = value too low, min = 3.750 V 192 counts
4 = simulated drop detected as multiple drops
5 = simulated drop detected as long or small drop
Loop
only
Ye s
Ye s
Ye s
Ye s
Ye s
Ye s
Ye s
Ye s
Ye s
IVAC® Volumetric Pump (Models 597 & 598) 15/76 1000SM00016 Issue 3
Page 16
Routine Maintenance & Calibration
Test Codes (continued)
Test Procedures (continued)
Code Test Action/Data Displayed Loop
Drop Detector LED
10
Drive Current Test
11 Door Sensor Test
Dried Spillage Alarm
12
Parameters Read
13 Rate Accuracy Test See 'Rate Accuracy Verification Test' section for details of test. -
Note: The flow sensor must be connected to the pump.
Data displayed: LED current, in mA
Test fails if the current exceeds 126 mA or falls below 2 mA.
OPEN = door sensed as open
CLOS = door sensed as closed
READ VOL switch to display the A/D value.
Press
See 'Door Calibration' for instructions on how to read and set door calibration value.
See 'Read Parameter/Values' table on the next page. -
Press each switch and check the corresponding code is displayed:
Ye s
Ye s
I 0 E 5
J 1 C 6
14 Switch Test
K 2
B 7
No
L 3 F 8 (hidden switch on Model 598)
D 4 Note: the ON/OFF switch does not have a code.
To exit this test, press both the RUN/HOLD switch and PRI/SEC (hidden switch on
Model 598) switch simultaneously, or turn the pump off.
All front panel LEDs light continuously (except for run indicator which behaves as if in
normal mode). Pump runs at 125 ml/h, all FLO, OCCL, and Air alarms are ignored.
15 Burn-In Test
16 Battery Voltage Test Data displayed: battery voltage, in volts. Test passes with value above 5.7 volts . Yes
Seven-Segment
17
Display Test
Data displayed: All detected errors. Door alarm is also active.
Note: It is not possible to run this test if any errors have been detected since entering
self-test mode.
Test fail codes (LED segment assembly number):
0 = far left, 1 = 2nd from left, 3 = 2nd from right, 4 = far right
No
No
18 Factory Use Only Factory Use Only -
19 EEPROM Test Data displayed: number of first registration to fail. No
Read Parameters/Values
Code Test Action/Data Displayed Loop
Read parameters by pressing the RUN/HOLD switch four times:
Dried Spillage
12
Alarm Parameters
Read
13 through 19 See 'Test Procedures' table on the previous page. -
Rate Calibration
20
Number Read
IVAC® Volumetric Pump (Models 597 & 598) 16/76 1000SM00016 Issue 3
1st press displays the dried spillage scan start volume flag number.
2nd press displays the scan stop volume flag number.
3rd press displays the alarm threshold value.
4th press exits the test.
Read the factory-set calibration number. If the Cam Follower Assembly is replaced and
the number is not "0033" change as follows:
Use the chevron switches until the display reads "0033"
Press the RUN/HOLD switch and verify "Cal Done" is displayed
No
No
Page 17
Routine Maintenance & Calibration
Test Codes (continued)
Read Parameters/Values (continued)
Code Test Action/Data Displayed Loop
Read the total pump "on" time, displayed in 10-hour increments. For example, 0037 =
Total Pump Life
21
"On" Time Read/
Clear
Total Battery "On"
22
Time Read/Clear
Error/Alarm Stack
23
Read and Clear
Pressure Calibration
24
Read/Set
Language Code
25
Read/Set
370 hours.
To clear the total pump "on" time:
Install a test jumper. See 'Test Connector' for instructions.
Press the CLEAR VOL and PRI/SEC (hidden switch on Model 598) switches until the
display shows 0000.
Read the total total time the pump has been running on battery power, displayed in
10-hour increments. For example. 0048 = 480 hours.
To clear the total battery "on" time:
Install a test jumper. See 'Test Connector' for instructions.
Press the CLEAR VOL and PRI/SEC (hidden switch on Model 598) switches until the
display shows 0000.
Read the last 16 error or alarm codes.
The most recent alarm or error is always displayed first. Pressing the K switch
displays the previous error/alarm and cycles through the error or alarm codes. ---denotes the end of the alarm stack.
Notes:
1) All error and alarm messages will be displayed in English regardless of the
Language Code setting (Test 25).
2) The stack of alarms/error codes will be lost if the battery is removed and the
information will be unreliable until filled with new alarm messages or cleared.
To clear the alarm stack:
Install a test jumper. See 'Test Connector' for instructions.
Press the CLEAR VOL and PRI/SEC (hidden switch on Model 598) switches until the
display reads ----.
See 'Pressure Calibration' section for details of test. -
See 'Configuration Settings' table on the next page. -
No
No
No
26 CRIS Configuration See 'Configuration Settings' table on the next page. -
Air Bubble Length
27
Read
Read the air-in-line alarm threshold value, displayed in microlitres. This value is the
nominal air bubble alarm threshold in microlitres used for air-in-line detection and is
originally set at the factory.
Read the FLO alarm threshold value in psi. This value is the upstream occlusion alarm
threshold pressure in psi and is originally set at the factory.
When upgrading software from V9.xx to V10.05, the flow alarm threshold
setting must be changed from 008 to 006. To do this:
FLO Alarm
28
Threshold Read
Install a test jumper. See 'Test Connector' for instructions.
Change the display to 006 by pressing the chevrons switches.
Press the RUN/HOLD switch. The pump should beep then display CAL
DONE followed by t=28.
Turn the pump off/on.
No
No
IVAC® Volumetric Pump (Models 597 & 598) 17/76 1000SM00016 Issue 3
Page 18
Routine Maintenance & Calibration
Test Codes (continued)
Configuration Settings
Code Setting Action Loop
Read and/or set how error and alarm messages are displayed.
Language Code
25
Read/Set
26 CRIS Configuration
27 Air Bubble Length Read See 'Read Parameter/Values' table on the previous page. -
FLO Alarm Threshold
28
Read
Door Calibration Read/
29
Set
Auxiliary Front Panel
30
Display
Enable/Disable
Secondary Mode Setting
31
On/Off
Pump Identification
33
Number Read/Set
E = English text, for example door, Err6.
C = Codes or International, for example, P1, E1. For non-English language users.
To change the setting, press the PRI/SEC (hidden switch on Model 598) switch
and any chevron switch simultaneously for two seconds.
Setting not in use. CRIS=CRIS enabled, OFF=CRIS disabled.
Ensure the setting is OFF.
See 'Read Parameter/Values' table on the previous page. -
See 'Door Calibration' section for details of test. -
Enable or disable Auxiliary Front Panel Display feature, used to display
calibration data.
on.05 = feature enabled, where 05 equals the number of times remaining that
the pump can be powered on/off with Auxiliary Front Panel Display enabled
(five maximum).
OFF = feature disabled.
To enable the feature:
Press the PRI/SEC (hidden switch on Model 598) switch and any chevron switch
simultaneously for two seconds. The display will read on.05.
Turn the pump off then on. The pump is now in normal operating mode with
this feature enabled.
To disable the feature:
Enter test 30 and press the CLEAR VOL switch. The display will show OFF.
Alternatively, turn the pump off/on five times.
Warning: Ensure that this feature is OFF before returning the pump into service.
Enable or disable the Secondary Mode setting (code 35).
SC.On = Secondary mode setting enabled (Model 597 only)
SC.OF = Secondary mode setting disabled (Model 598)
Defaults to
Model 598, the setting must be changed to
SC.On when the EPROM is first installed. If an EPROM is installed on a
SC.OF (secondary off).
To change the setting:
Install a test jumper. See 'Test Connector' for instructions.
Load a set segment into the cam follower assembly.
Press the PRI/SEC (hidden switch on Model 598) switch and any chevron switch
simultaneously for two seconds.
Read and/or set the pump identification number (ID).
To set a new ID, use the chevron switches to select a desired value, then hold
PRI/SEC switch and press the RUN/HOLD switch to exit the test. Press RUN/
the
HOLD
again to display and verify the new pump ID.
No
No
No
No
No
IVAC® Volumetric Pump (Models 597 & 598) 18/76 1000SM00016 Issue 3
Page 19

Routine Maintenance & Calibration
Test Codes (continued)
Configuration Settings (continued)
Code Setting Action Loop
HOSP = Hospital Configuration
ASC = Alternate Site Configuration See Note below.
To change the setting:
Press the PRI/SEC switch and any chevron switch for 2 seconds to toggle the
35
36
Hospital or Alternate Site
Configuration Set
34
Note: This setting is
unavailable on pumps
with software version
10.03 or below.
Secondary Mode
Enable/Disable
(Model 597 only)
Note: This setting is
unavailable on pumps
with software version
10.03 or below.
Flow Sensor
Optional/Mandatory
(FSO pumps only
*)
selection. The new configuration choice is displayed.
Turn off the pump to exit the test and set the new configuration in memory.
Note: when set to ASC, note the following:
1) These test codes are not available, and cannot be changed:
25-Language Code set to E=English
26-CRIS setting is OFF=Disabled
30-Auxiliary Front Panel Display feature is OFF=Disabled
31-Secondary Mode Setting is SC.OF = Disabled
2) While the pump is running, the AIL alarm value is 500 microlitres. See test 27.
3) Any previous HOSP configuration values are stored while set to ASC. HOSP
values are restored when the HOSP setting is selected again.
Read and/or enable or disable Secondary Mode on the Model 597 pump.
SC.ON = Secondary mode enabled
SC.OF = Secondary mode disabled
When software is first installed, this setting may not be enabled when pump is
powered on. Ensure the setting is enabled.
To change the setting:
Load a set segment into the cam follower assembly.
Enter self-test mode and select test code 35.
Press the RUN/HOLD switch to enter the test. Press the PRI/SEC switch and any
chevron switch simultaneously to toggle the selection and select the mode.
Press the RUN/HOLD switch, then turn the pump off.
Note: This setting must be enabled via test code 31.
Set Flow Sensor usage to optional or mandatory.
FS.OP = Use of a flow sensor is optional when running an infusion
FS.On = A flow sensor is mandatory (must be fitted) in order to run an infusion
To change the setting:
Install a test jumper. See 'Test Connector' for instructions.
Press the PRI/SEC switch (the hidden switch on the Model 598) and any
chevron switch simultaneously for two seconds.
Release the switches when the required setting is displayed.
* On non-FSO pumps, when replacing the Logic PCB (139046-
100), ensure this setting is changed to FS.OP (flow sensor
optional).
No
No
No
IVAC® Volumetric Pump (Models 597 & 598) 19/76 1000SM00016 Issue 3
Page 20

Routine Maintenance & Calibration
Test Connector
In order to perform certain tests and to change any pump settings, a test jumper or a low value resistor of 1K5Ω or less,
connecting test connector pin 9 to pin 23 must be installed.
Procedure:
1. With the pump off, remove the test connector cover from the back of the rear case.
2. Using a test jumper (part number 134646), a wire, or a low-value resistor (1k5Ω or less), connect pin 9 to pin 23 on the
external test connector. See Figure 2-1 below. Take care not to short any pins adjacent to pin 9 or 23 as this may result
in a blown fuse.
Pin 2
Figure 2-1 External Test Connector (J3)
3. Place the pump in self-test mode then select and carry out the test(s) as required.
4. When the test is complete, remove the test jumper from the test connector.
5. Refit the test connector cover.
Pin 1
Pin 9
Pin 23
Upgrading Software
Upgrade of Model 597/598 (FSO) volumetric pump software to V1.10 or greater is recommended
when serviced
Upgrade of Model 597/598 (non-FSO) volumetric pump software to V10.03 or greater is
recommended when serviced. See 'Notes (non-FSO pumps)' below.
Perform upgrades by acquiring the software upgrade kits specified in spare parts listings.
Equipment required: Software upgrade kit (includes EPROM fitting and removal instructions)
Software Upgrade Kits Available
Pump Model Part Number Software Version
597/598 (FSO) 143053 1.10
597/598 (non-FSO) 136814 10.05
Notes (non-FSO pumps):
1) The latest non-FSO software available is V10.05.
2) When upgrading software from V9.xx to V10.05, the flow alarm threshold setting must be changed from 008 to 006.
See test 28.
3) V10.05 software includes test
4) When replacing the Logic PCB (part number 139046-100) on a non-FSO pump, the latest software is fitted on the PCB.
Ensure that test
36 is set to FS.OP (flow sensor optional).
35 Seconday Mode Enable/Disable (Model 597).
IVAC® Volumetric Pump (Models 597 & 598) 20/76 1000SM00016 Issue 3
Page 21
Routine Maintenance & Calibration
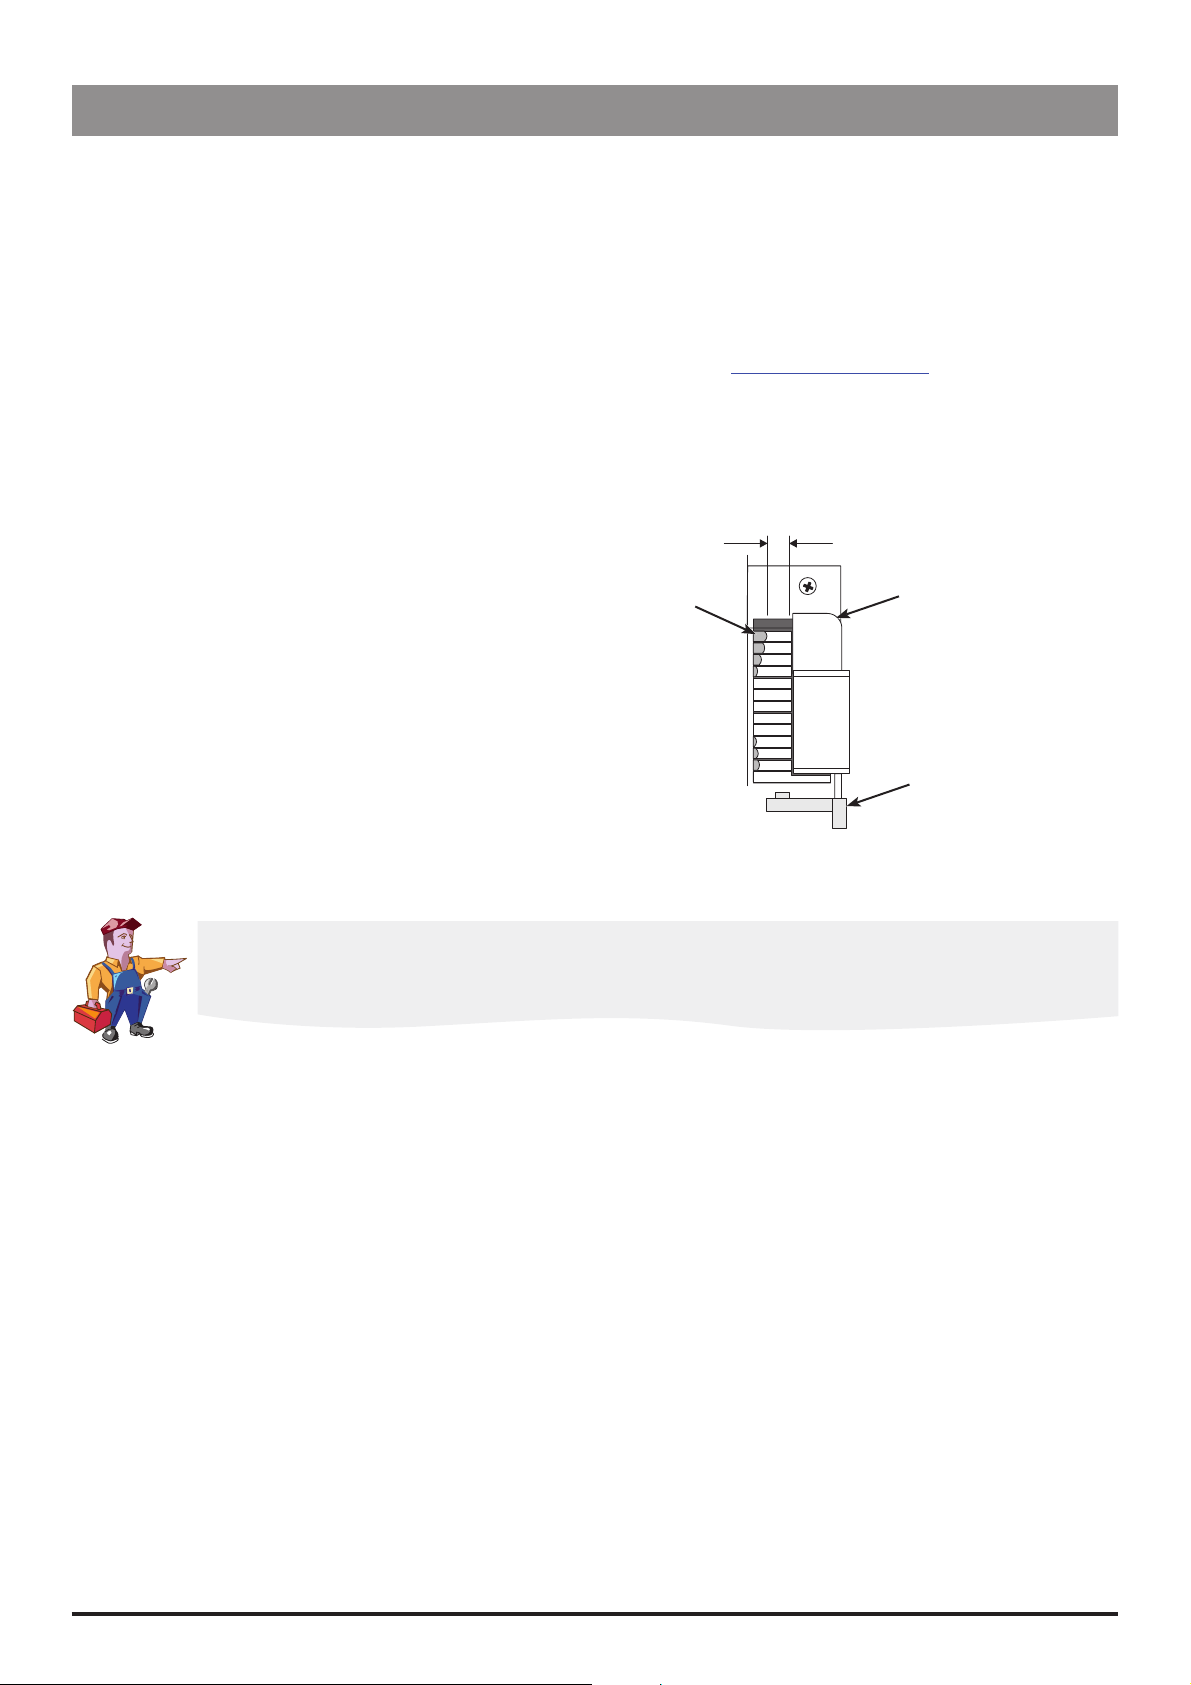
Cam Follower Gap Check
Equipment required:
0.160" pin gauge (part number 305601), 0.160" block gauge or calibrated calipers
Indelible marker
Procedure:
1. Open the orange cam follower assembly latch.
2. Position the topmost follower closer to the pressure pad than the other followers. To do this:
Enter self-test mode and select test
the RUN/HOLD switch twice within one second to enter the test in loop mode, then press RUN/HOLD switch again to
exit the loop. Repeat this step until the topmost follower is positioned closest to the pressure pad.
3. Using the pin gauge, check the gap between the pressure pad and the end of the followers (while it is still positioned
closest to the pad). See Figure 2-2 below.
4. If the gap measures less than 0.160", check that the Cam Housing Assembly and the Cam Follower Assembly are
correctly seated.
5. If the gap
replace the Cam Follower Assembly
OR, replace the Cam Housing Assembly
OR, replace the Front Case
still measures less than 0.160":
08 (alternatively, select test 02). See 'Entering Self-Test Mode' for instructions. Press
0.160" minimum
Top Follower
Pressure Pad
Orange
Cam Follower
Assembly Latch
Figure 2-2 Follower/Pressure Pad Gap
IMPORTANT: Failure to maintain the appropriate gap width may result in a set being incorrectly loaded
into the pump. If this situation arises, there is a risk that an undetected over-infusion may occur. Refer
to MHRA Hazard Notice 2002 (09) for more information.
IVAC® Volumetric Pump (Models 597 & 598) 21/76 1000SM00016 Issue 3
Page 22
Functionality Checks
Alarms
Alarm Action
Open the door at least ¼ inch. Verify that the pump stops running, an alarm sounds, and the
Door (P1)
FLO (P2)
Hold (P3)
Air (P5)
Reload ---- Air (P5)
Reload (P6)
OCCL (P7)
KVO
display shows door (P1). Close the door. Press the RUN/HOLD switch momentarily to verify that
the alarm stops and the display alternates between the set rate and hold (P3)
Set rate to 200 ml/h. Press the RUN/HOLD switch. Verify that the pump starts. Close the set
regulating clamp and verify that a FLO (P2) alarm occurs within approximately 15 seconds. Open
the set regulating clamp. Note: If you are not using a flow sensor and the pump fails to alarm,
perform the 'Pressure Calibration' procedure.
Press the RUN/HOLD switch. Verify that the pump starts. Press the RUN/HOLD switch to put pump
on hold. Verify audible bleep and hold (P3) alarm displayed after two minutes.
Load an air-filled IV infusion set (no fluid) into the pump. Press the ON/OFF switch to turn the
pump on. Set the rate and the VTBI. Press the RUN/HOLD switch to start the pump. Verify that the
pump alarms and displays Air (P5).
With pump displaying Air (P5)—see above—press RUN/HOLD to put pump on hold, then press
the RUN/HOLD switch again and verify that the pump alarms and displays Reload ---- Air (P5)
alternating with Air (P5).
Start pump without an IV infusion set loaded. Verify that the pump alarms and displays Reload
(P6).
Set rate to 200 ml/h. Press the RUN/HOLD switch. Verify that the pump starts. Occlude the set
at approximately 2.5 cm from the exit of the pump. Verify an OCCL (P7) alarm occurs within
approximately 15 seconds. If the pump fails to alarm, perform the 'Pressure Calibration'
procedure. Important: Run the 'Occlusion Verification Test' to verify that the pump occludes
between 5.5 and 11 psi (nominal 6 to 8 psi). See below for instructions.
Set rate to 200 ml/h. Press
switches. Press RUN/HOLD switch to start pump. Verify that a KVO alarm occurs within
approximately 18 seconds.
Routine Maintenance & Calibration
RUN/HOLD or VTBI. Set VTBI to 0001 ml by pressing the chevron
Verify Volume Infused and Rate Retention
1. Press the READ VOL switch and note the infused volume.
2. Press the
seconds, then press the
the pump on.
3. Verify the infused volume and the rate displayed are the
same as before.
ON/OFF switch to turn pump off. Wait 15
ON/OFF switch again to turn
Battery Power Check
1. Remove power cord from the AC power socket.
2. Press the
bleep.
3. Verify that the pump operates and the display
flashes on and off. Verify that the moving horizontal
bars in the left-hand display position are sequencing
as before.
4. Plug the power cord back in to AC power socket.
RUN/HOLD switch and verify an audible
Flow Sensor Check
See 'Physical Inspection and Clean' for instructions.
IVAC® Volumetric Pump (Models 597 & 598) 22/76 1000SM00016 Issue 3
Page 23
Routine Maintenance & Calibration
Occlusion Verification Test
Equipment Set Up:
Set up equipment as per ' Pressure Calibration Equipment Set Up', with the pressure gauge connected and three-way
stopcock closed.
Procedure:
1. Set rate to 200 ml/h.
2. Press the
RUN/HOLD switch. Verify that the pump starts.
3. Verify that an OCCL (P7) alarm between 5.5 and 11 psi (nominal 6 to 8 psi).
If the pump fails to alarm, perform the 'Pressure Calibration' procedure.
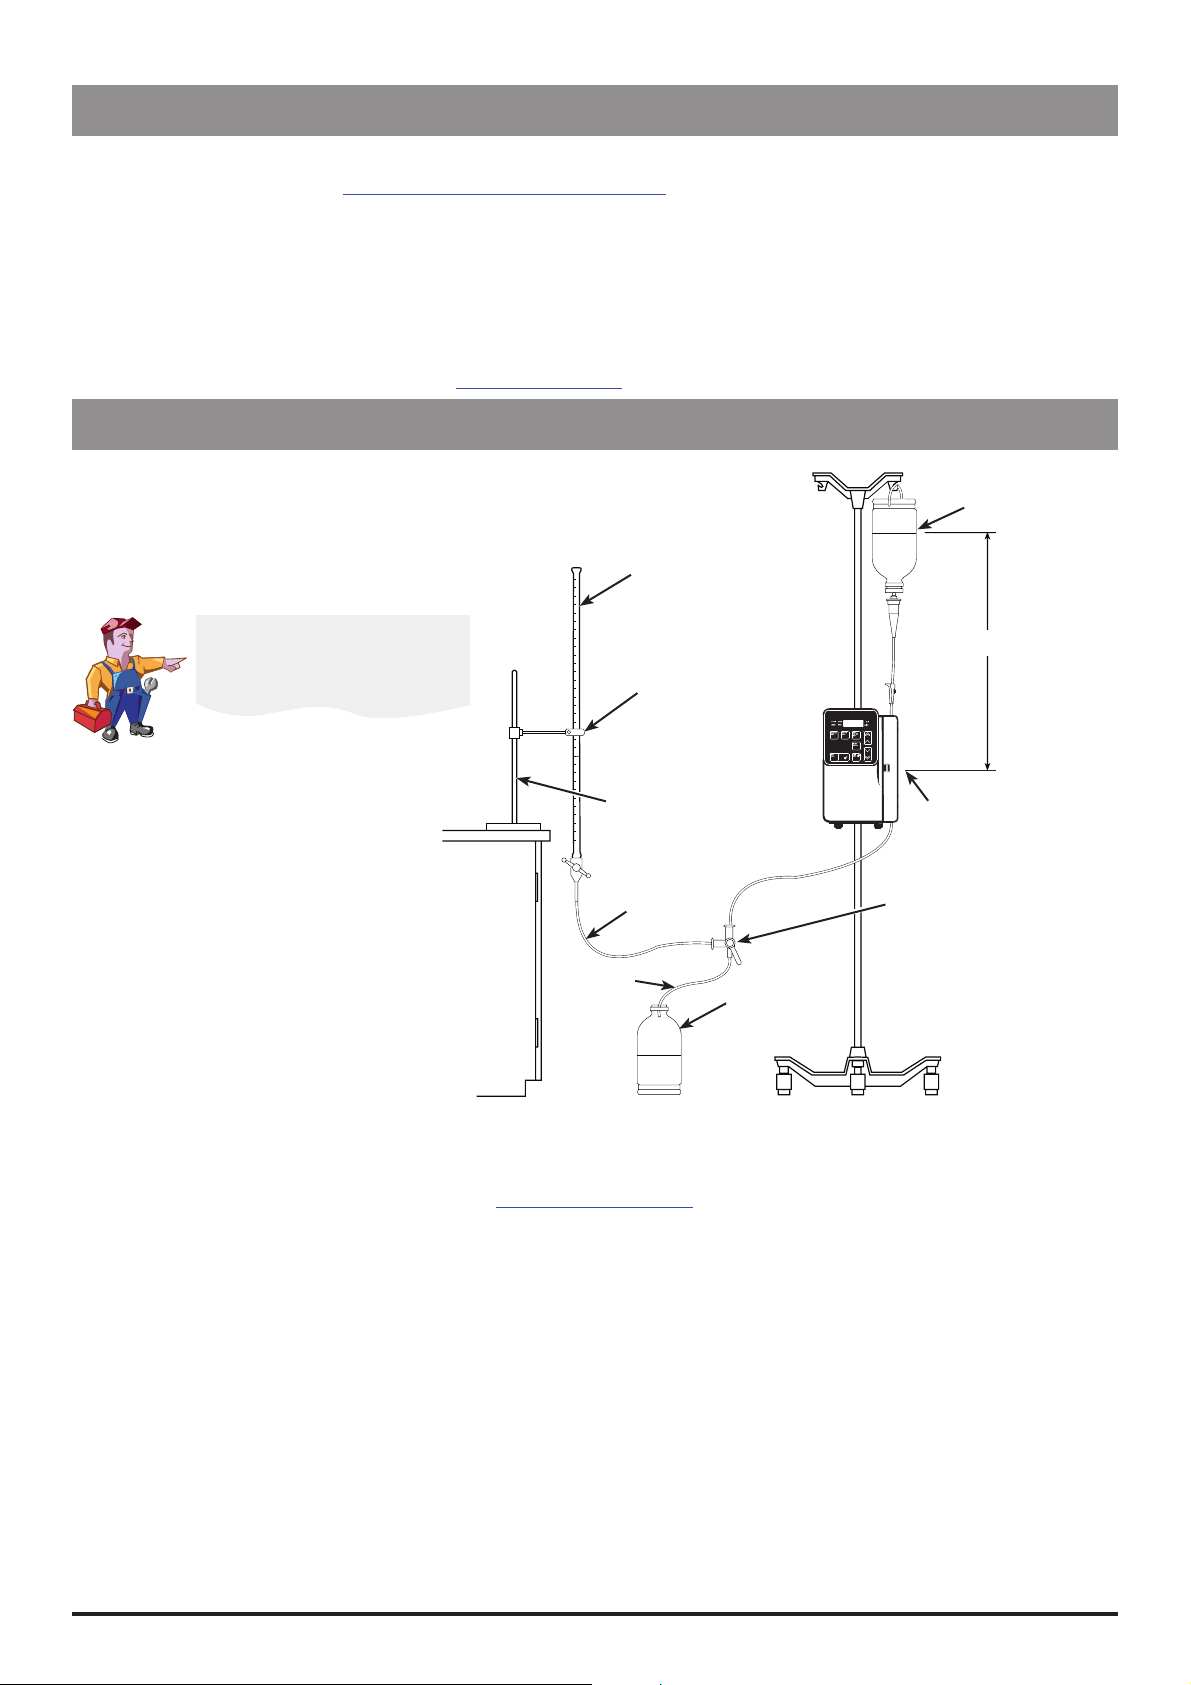
Rate Accuracy Verification Test (Code 13)
Equipment Set Up:
Set up the pump as shown in Figure 2-3 below.
Close the set roller clamp.
Plug the pump into AC mains.
Burette
Water Source
Ensure flow sensor is
removed.
±
30 2 inches (76 ± 5 cm)
Burette Clamp
Equipment Stand
Middle of Follower
Assembly/Door Latch
Table
Tubing
Three-way
Stopcock
or Bench
IV Tubing
Used Fluid
Figure 2-3 Rate Accuracy Verification
Receptacle
Test Equipment Set Up
Procedure:
1. Using a Class A burette, adjust the fluid level so that the meniscus is level with the zero mark.
2. Enter self-test mode and select test
13. See 'Entering Self-Test Mode' for instructions.
3. Press the RUN/HOLD switch; the default rate of 300 ml/h will be displayed.
4. Press the
RUN/HOLD switch; the default test time of 300 seconds (5 minutes) will be displayed.
5. Press the RUN/HOLD switch to start the test. The display will show the test time remaining in seconds. A click will
sound as each second is decremented.
6. When the display reaches zero seconds, the display shows
STOP to indicate the end of the test. The PRI indicator will
also be lit.
7. Press the
RUN/HOLD switch to display the volume infused and verify that the infused volume in the burette is 25 ±1.25
ml.
Due to variations between IV infusion sets, the reading may not fall within the stated parameters. If this occurs, retest
using another IV infusion set. If the variance still exceeds ±5% after retesting with another IV infusion set, replace the
Cam Follower Assembly.
Note: During the test run, operational alarms can be cleared by pressing the
RUN/HOLD switch. The test must be rerun.
Error alarms are cleared by turning the pump off and back on. The test must be rerun.
IVAC® Volumetric Pump (Models 597 & 598) 23/76 1000SM00016 Issue 3
Page 24

Routine Maintenance & Calibration
Physical Inspection and Clean
To ensure the pump remains in good operating condition, it is important to keep it clean and carry out the routine
procedures described below. All servicing should only be performed by a qualified service engineer.
Routinely clean the exterior surface of the pump, the door (including inside surfaces), the integral air-in-line detector,
and the cam follower assembly, especially if spillage has occurred.
Before cleaning always switch OFF and disconnect from the AC power supply. Never allow fluid to
enter the casing and avoid excess fluid build up on the pump.
Do not use aggressive cleaning agents as these may damage the exterior surface of the pump.
Do not steam autoclave, ethylene oxide sterilise or immerse this pump in any fluid.
Unplug the power cord from the AC wall outlet before cleaning. Do not allow fluids to enter the pump case.
Use a cloth dampened with warm water, or a mild, non-abrasive detergent (such as commercially available dish
cleaning liquid) mixed with water. After cleaning, pumps should be rinsed with a soft cloth soaked in water, followed
by a thorough drying. Then apply disinfecting solution with a soft cloth. Rinse using a soft cloth soaked in water after
the appropriate disinfecting time, and dry thoroughly. A cotton-tipped applicator is useful for cleaning in narrow
spaces.
The following cleaning/disinfecting solutions have been evaluated and found to be acceptable:
- Cidex - Glutarex
- Hydrogen Peroxide (3% in water) - Manu-Klenz
- T.B.Q - Insurance
- Vesphene
Note: Alcohol, ammonia, acetone, benzene, phosphoric acid, xylene, and similar solvents can erode (wear away pit)
or otherwise damage the cam followers and other surfaces of the pump. The cam followers must be kept clean using
a solution of warm water and a mild non-abrasive detergent, and inspected for possible erosion. The cam follower
assembly should be removed and cleaned according to the procedure outlined below, see 'Clean and Inspect the Cam
Follower Assembly'.
Check that labels are flat, legible and fully adhered. Replace as necessary.
Inspect case components for damage and replace if necessary.
Inspect the door for damage and check that it closes and latches correctly.
Check door magnet is in place. Replace if necessary.
Inspect the AC power supply plug and cable for damage.
IVAC® Volumetric Pump (Models 597 & 598) 24/76 1000SM00016 Issue 3
Page 25

Routine Maintenance & Calibration
Physical Inspection and Clean (continued)
Verify the cam follower assembly latch opens and closes properly.
It is important to clean the cam follower assembly after fluid spills and during routine inspections.
Spilled fluid left to dry may lead to FLO (P2), OCCL (P7) or Err n (En) alarms, or may cause a free-flow
condition. Do not use the pump under this condition. Remove the cam follower assembly and clean
as described below.
Inspect cam follower housing parts for fluid spill residue or foreign matter. If residue is noted in the cam follower
assembly, refer to the cleaning instructions for the appropriate method for removing and cleaning.
The Cam Follower Assembly
Inspect the Followers for Erosion
Shine a flashlight into the followers. The followers should be clean and shiny. A dull appearance may indicate
erosion. If the followers appear dirty or dull, remove and clean per the following procedure.
Remove the Cam Follower Assembly from the Pump
See 'Cam Follower Assembly' in Chapter 5, 'Spare Parts Replacement Procedures' for instructions.
Clean and Inspect the Cam Follower Assembly
1. Soak the cam follower assembly for 10 minutes in a warm, mild detergent solution. Commercially available dish
cleaning liquid is acceptable. Clean the surface of the followers using a cotton-tipped applicator.
2. Rinse the cam follower assembly well under running water.
3. Allow the cam follower assembly to dry thoroughly.
4. When dry, verify that the latch and all the followers of the cam follower assembly move freely, especially the
pressure-sensing follower.
5. If the followers do not move freely, repeat the soak, rinse, and dry process.
6. Check the cam followers for erosion. The followers should be clean and shiny. A dull appearance may indicate
erosion. If they are still dull after cleaning, replace the Cam Follower Assembly as described in Chapter 5, 'Spare
Parts Replacement Procedures'.
7. Examine the gasket on the front case. Clean or replace as needed.
Lubricate ends of
pressure pads
Follower
LUBRICATION NOT
REQUIRED
Pressure sensing follower
LUBRICATION NOT
REQUIRED
Lubricate ends of
pressure pads
Lubricate latch
Figure 2-4 Lubricating the Cam Follower Assembly
Lubricate the Cam Follower Assembly
1. Lubricate the cam follower assembly with a light consistency of silicone based lubricating grease (part number
0000ME00388), or equivalent.
IVAC® Volumetric Pump (Models 597 & 598) 25/76 1000SM00016 Issue 3
Page 26

Routine Maintenance & Calibration
Physical Inspection and Clean (continued)
2. Apply lubricant to both sides of both ends of the pressure pads, and both sides of the cam follower assembly latch,
as shown in Figure 2-4 below.
Re-fit the Cam Follower Assembly
Re-fit the cam follower assembly into the pump following the instructions in the section 'Cam Follower Assembly' in
Chapter 5, 'Spare Parts Replacement Procedures'.
The Cam Follower Assembly (continued)
Placement Check: Run Test 08
1. Enter self-test mode and select test
2. If there is excessive noise, loosen retaining screws as required and adjust the cam follower assembly as far as
possible towards the bottom of the pump.
3. Tighten retaining screws then press the
08. Press the RUN/HOLD switch twice to run the test in loop mode.
ON/OFF switch to turn the pump off.
Flow Sensor Check (FSO model only)
Wash the flow sensor with warm water to dissolve and remove any dried IV solution that may cloud the lenses or
prevent the sliding parts from operating smoothly.
Check that labels are flat, legible and fully adhered. Replace as necessary.
Check that lenses are clean and clear, and show no signs of cracks.
Inspect the body of the flow sensor for signs of physical damage.
Check that the sliding action of the flow sensor operates smoothly.
Calibration Procedures
Door Calibration (Code 29)
Perform this procedure whenever the Door Assembly, Magnet, Cam Housing Assembly, Optical
Sensor Board, Logic Board, or EEPROM have been replaced.
Equipment required: 0.125" (3.175mm) pin gauge
Procedure:
1. Install a test jumper. See 'Test Connector' for instructions.
2. Enter self-test mode and select test
3. Open the door and rest a 0.125" (3.175mm) pin gauge on
top of the door latch. See Figure 2-5. Close the door and
hold it closed at the location across from the latch.
4. Press the
RUN/HOLD switches simultaneously. The pump will beep
twice and display CAL DONE.
Note: To read the calibration number, press the
switch.
5. Open the door and remove the gauge.
6. Remove the test connector jumper and refit the test
connector cover.
PRI/SEC (hidden switch on the Model 598) and
To verify the door sensor is correctly calibrated, run test 11, Door Sensor Test.
29.
READ VOL
Place gauge here
Latch
Hold door
against gauge
Figure 2-5 Door Calibration
IVAC® Volumetric Pump (Models 597 & 598) 26/76 1000SM00016 Issue 3
Page 27

Routine Maintenance & Calibration
Calibration Procedures (continued)
Pressure Calibration
The following procedure describes how to calibrate the pressure sensor. Two pressure calibration values are read/set in
test 24, these are:
Pressure Slope is expressed in psi/volts, range is 9.0 to 51.0. Values can be changed in 0.1 increments, however, the
pump only retains values in 0.2 increments. The pressure slope value affects both upstream and downstream pressure
readings.
Pressure Offset is used to correct for a non-zero pressure reading when the actual downstream pressure is zero. This
calibration value is expressed in psi + 10.0 with a range of entered values from 5.0 to 15.0 which correspond to actual
offset values from -5.0 to +5.0. The pressure offset value affects the downstream pressure reading only.
Summary
Stage 1: Set up equipment
Stage 2: Read and compare downstream pressure values
Set up auxiliary front panel displays (test
Measure (read and record) downstream pressure with zero pressure, for example P0 = -0.8
Measure (read and record) downstream pressure with 8 psi, for example P8 = 4.8
Examine P0 and P8 readings. Continue to Stage 3 if readings are not within +/- 1.2 psi.
Stage 3: Measure initial pressure calibration values - pressure slope/pressure offset (code 24)
Stage 4: Calculate new pressure calibration values
Stage 5: Program pump with two new pressure calibration values (test
30)
24)
Stage 1: Set up equipment
Set up the equipment as shown in Figure 2-6 below.
The vertical distance (from the fluid level of the container to the centre of the cam follower assembly) of 30 ± 2 inches
must be maintained because the height of the solution container will affect the pressure readings
Ensure that the IV infusion set is completely primed with fluid (no air) before attaching to reservoir
Ensure that the IV infusion set loaded in the pump and any tubing used in the set up is not kinked
Ensure that fittings are secure and reservoir is airtight
DECV sets are not to be
used to perform pressure
calibration.
30 2 inches
±
±
(76 5 cm)
Three-way
Stopcock
Pressure Gauge
Reservoir
Table Top or bench
Figure 2-6 Pressure Calibration Equipment Set Up
IVAC® Volumetric Pump (Models 597 & 598) 27/76 1000SM00016 Issue 3
Page 28

Routine Maintenance & Calibration
Calibration Procedures (continued)
Pressure Calibration (continued)
Stage 2: Read and compare downstream pressure values
1. Enter self-test mode and select self-test 30 (set up auxiliary front panel displays). See 'Entering Self-Test Mode' for
instructions.
2. Press any chevron switch and the PRI/SEC (hidden switch on Model 598) switch simultaneously until on05 is displayed.
3. Turn pump off and on. Open the three-way stopcock.
4. Set the rate to 200 ml/h. Clear the volume infused, and set the volume to be infused to 500 ml.
5. Start the pump running.
6. Press the
Notes:
The display should read Pres 06 (indicating that the flow alarm threshold value is set to 006 in test 28).
Pressure Read mode will stay enabled until RUN/HOLD is pressed.
7. Press the I and L switches simultaneously to disable occlusion alarms OCCL and FLO. The pump will display FLO
OFF,
8. After 30 seconds, press the K switch to display the downstream pressure. Record this downstream pressure reading
as P0. Note that it may be a negative number. For example, P0 = -0.8.
9. Connect the pump to the pressure gauge by closing the three-way stopcock. When the pressure gauge reads 8 ± .25
psi record this downstream pressure reading as P8.
10. Examine the pressure readings recorded in Step 8 and Step 9. If they are P0 = 0 ± 1.2 psi and P8 = 8 + 1.2 psi, then the
pressure calibration is complete. If not, turn the pump off and then perform Steps 11 through 18.
READ VOL and I switches simultaneously to enable Pressure Read mode.
OCCL OFF, and will beep three times. Note: FLO and OCCL alarms are automatically enabled at the next power-up.
Stage 3: Measure initial pressure calibration values - pressure slope/pressure offset
11. Enter self-test mode and select test
12. Read and record the initial pressure slope value displayed on entering test
24. See 'Entering Self-Test Mode' for instructions.
24. Press RUN/HOLD to display the initial
pressure offset value. Record this value. These values will be used in the next stage (Stage 4) to calculate the new
pressure calibration values.
IVAC® Volumetric Pump (Models 597 & 598) 28/76 1000SM00016 Issue 3
Page 29

Routine Maintenance & Calibration
Calibration Procedures (continued)
13. Press
RUN/HOLD to exit the test.
Pressure Calibration (continued)
Stage 4: Calculate new pressure calibration values
14. Calculate the two new pressure calibration values as follows, rounding results to the nearest 0.1:
Calculation Formula
New pressure slope (psi/volts) = Initial pressure slope x 8
P8 - P0
New pressure offset (psi/volts) = Initial pressure offset - P0 x 8
P8 - P0
Example Formula
New pressure slope = 25 x 8 = 200 =
4.8 - (-0.8) 5.6
New pressure offset =
11
-0.8 x 8 = 11 - -6.4 = 11 - (-1.14) = 11 + 1.14 = 12.1
-
4.8 - (-0.8) 5.6
35.7
Where:
Initial pressure slope (Step 12) = 25.0
Initial pressure offset (Step 12) = 11.0
Measured P0 (Step 8) = -0.8
Measured P8 (Step 9) = 4.8
Stage 5: Program pump with two new pressure calibration values (code 24)
15. Install a test jumper. See 'Test Connector' for instructions.
16. Enter self-test mode and select test 24. See 'Entering Self-Test Mode' for instructions.
17. Enter the new pressure slope value calculated in Step 14. Press
HOLD
switches simultaneously. Verify a beep and a display of Cal done.
Now enter the new pressure offset value calculated in Step 14. Press
RUN/HOLD switches simultaneously. Verify a beep and a display of Cal done.
PRI/SEC (hidden switch on Model 598) and the RUN/
PRI/SEC (hidden switch on Model 598) and the
18. Repeat Steps 3 through Step 10.
If more than five power-on cycles are required during the procedure, repeat Steps 1 and 2 to re-
enable auxiliary front panel displays.
IVAC® Volumetric Pump (Models 597 & 598) 29/76 1000SM00016 Issue 3
Page 30

Routine Maintenance & Calibration
Performance Verification Procedure
IVAC 597® Volumetric Pump, IVAC® 598 Volumetric Pump
Model / Serial Number: Service Order / Inventory Number:
Hospital Name / Reference: Software Version:
INSPECTION Physical inspection and clean
CH2
Recommended when serviced
Non FSO pumps: Update software to v10.03 or greater (136814)
UPDATES
FSO pumps: Update software to v1.10 (143053)
Full length door label (141565 - English)
INSPECTION Check cam follower gap with pin gauge
Check all functions in self-test
SELF TEST
Check pressure calibration values
CH2
(re-calibrate as required - self-tests 30 and 24)
P0 = 0 psi ± 1.2
P8 = 8 psi ± 1.2
During standard infusion check the following:
Start up sequence
VTBI and rate retention
KVO operation
INFUSING
Flow Sensor option if FSO model
Alarms functionality check
CH2
Door (P1), FLO (P2), hold (P3), AIL (P5), RELOAD AIR (P5...P6), RELOAD (P6), OCCL (P7), KVO, Time Out.
Ensure pump works on battery and AC mains
CH2
UPDATE REF:
TSM CH2
TSM CH2
TSM CH5
Fitted
Not fitted / Not
Applicable
Rate accuracy test
(Automatic test in self-test 13)
VERIFICATION
CH2
TESTS
Pump set to 300 ml/h for 300 seconds, volume infused = 23.75 to 26.25
ml
Occlusion tests
Pump Infusing 200ml/h, OCCL is between 5.5 to 11 psi (nominal 6 to 8
_____________ ml
_____________ psi
psi)
SETUP Set rate to zero (or lowest value possible), Clear Volume Infused and VTBI
Clear Error / Alarm / Battery logs (as required)
Class I Type CF
Earth Resistance Test <= 0.2 Ω
ELECTRICAL
SAFETY TESTS
Earth Leakage Current <= 500 μA
Enclosure Leakage Current <= 100 μA
Verification
Performed
By
CHX
indicates the chapter number in the Technical Service Manual (TSM) - 1000SM00016.
E.G.
CH2
= Refer to TSM Chapter 2.
NOTE: The content of this Performance Verification Procedure is accurate at the time of issue of this TSM and is
based on PVP 100 Issue 2.
_______________________________
Sign
________________________________
Print
Alternatively attach printed test results
_____________ Ω
_____________ μA
_____________ μA
________________________
Date
IVAC® Volumetric Pump (Models 597 & 598) 30/76 1000SM00016 Issue 3
Page 31

Troubleshooting
In this chapter
Introduction 32
Chapter 3
Error Messages 32
General Fault Diagnosis 36
Page 32

Troubleshooting
Introduction
Use this troubleshooting guide to help identify the cause of errors and faults which may occur as a result of damage to
the pump or failure of an internal component. The following table lists the error messages (and corresponding codes) and
describes what action to take to resolve the problem. A general fault diagnosis checklist is also provided. For information
on alarm procedures and messages, refer to the relevant DFU.
Note: The configuration setting in test 25 determines whether messages are displayed as text or as codes.
If the nature of the problem is unclear, enter self-test mode and step through test 00 to check that
the main functions of the pump are operating correctly. See Chapter 2, 'Routine Maintenance &
Calibration' for details.
Test 23 ERROR/ALARM STACK READ/CLEAR displays the sixteen most recent malfunction codes. To run
test 23, enter self-test mode and select the test. See Chapter 2 for instructions.
Error Messages
Message Code Failure Action/Replace
Air P5 Air in tubing detected by air-in-line sensor.
IV infusion set adapter dislodged from air-inline sensor
Reload ---- Air
alternating with Air
Reload P6 Set adapter improperly loaded into air-in-
bat.
beeps 3 times every 2
minutes (alternating
with delivery rate;
pump continues to run)
P5 Air in tubing detected by air-in-line sensor.
IV infusion set adapter dislodged from air-inline sensor.
line sensor.
H2 Low battery alert. Battery has one hour or
less of usable charge remaining.
Purge air from infusion set. Check air-in-line sensor is
clean.
Check IV infusion set is properly installed in air-in-line
sensor.
Purge air from infusion set.
Reload IV infusion set into air-in-line sensor, pressing
firmly until adapter is flush.
Plug into AC mains. Note: Recharge time with pump off
is approximately 24 hours from discharge to 100%.
Batteries should be given a full
24 hour charge when replaced,
when pump is to be stored for an
batt.
audible alarm
bat. or batt.
persistent alarm after
charging
door P1 Door open.
FLO P2 Upstream occlusion.
FLO.1 P2 Too few or no drops detected Check for empty container, closed or partially closed
P4 Battery has insufficient charge to operate
pump.
H2/P4 Weak battery or battery charge circuit out of
adjustment/malfunctioning
Power Regulator Board circuitry problem
Magnet/door assembly out of calibration,
magnet broken, misaligned or missing.
Optical Sensor PCB malfunction/failure.
Wiring harness open or shorted.
Logic PCB failure.
Dried spillage in mechanism
Check mains outlet power, verify battery charge voltage
is 7.02 ± .0.05 VDC (see procedure below).
Replace Power Regulator PCB.
Check IV infusion set is properly installed. Close door
and restart pump. If error persists:
Verify door calibration and recalibrate as necessary.
Check door magnet. If loose, check polarization and
reinstall or replace.
Check Optical Sensor PCB. Move sensor toward magnet
if required. Replace Optical Sensor PCB.
See tests 11 and 29 and run as necessary.
Check cable wiring/connections and repair/replace.
Replace Logic PCB.
Check tubing, clamp and container.
Remove and clean mechanism.
clamp, clogged filter, occluded/kinked tubing.
extended period of more than 3
weeks and upon receipt of a new
pump.
IVAC® Volumetric Pump (Models 597 & 598) 32/76 1000SM00016 Issue 3
Page 33

Troubleshooting
Error Messages (continued)
Message Code Failure Action/Replace
FLO.2 P2 Abnormal drops detected. Fogging or
droplets on sidewalls of drip chamber.
Drip chamber overfilled or splashing of
fluid caused by excessive movement of drip
chamber (as in transport of patient).
Clamp not fully open.
Flow sensor not plugged in or disconnected
while operating; optical path obstructed.
Test 36 (Flow Sensor configuration setting)
is set to FS.On so pump expects to detect a
flow sensor.
Incorrect (non-FSO) rear case fitted.
FLO.3 P2 Flow detected in excess of set rate. Check tubing is completely installed in mechanism and
hold
alternating with
rate; no audible
alarm
hold
flashing display;
audible alarm
OCCL P7 Downstream occlusion.
Err.1 E1 Display Board PCB problem (Display
Err.2 E2 Logic PCB component malfunction (rate
Err.3 E3 Speaker disconnected or malfunctioning;
Err.4 E4 Watchdog malfunction. Logic PCB circuitry
Err.5 E5 Motor drive on Power Regulator PCB
Err.6 E6 EEPROM blank due to replacement,
H1 Pump has been placed on hold. Press the RUN/HOLD switch once to restart the pump.
P3 2 minutes has elapsed since pump put on
hold or since last switch was pressed in
start-up mode.
A switch has stuck or shorted for 2 minutes
while the pump was running.
Dried spillage in the mechanism.
segment error).
Open or shorted Display LED.
Display cable problem.
Logic PCB circuitry problem.
Pressure amp cable misaligned.
Short on Pressure Amp PCB.
error).
speaker driver malfunction.
malfunction.
disabled.
Interconnect cable problem.
Watchdog alarm failure on Logic PCB
(calibration error).
Shake drip chamber to clear sidewalls. If alarm persists,
replace IV infusion set.
Reduce level of fluid in drip chamber.
Check clamp is fully open.
Check flow sensor is plugged into back of pump, optical
path is not obstructed; verify position of flow sensor on
drip chamber.
Change configuration setting from FS.On (mandatory)
to FS.off (optional) via test 36.
Verify rear case.
that the mechanism pinches off the tubing.
Press the RUN/HOLD switch once to silence the alarm,
and again to restart pump.
To restart the 2-minute timer, press any front panel
switch or open the door. If alarm repeats in 2 minutes,
run test 14.
Note: If alarm occurs in start-up mode with pump on
battery power, pump will turn off if left in alarm for 3
minutes.
Check for kinked tubing, clogged filter.
Remove and clean mechanism.
If error persists, perform Pressure Calibration procedure.
Also run the 'Occlusion Verification Test'.
Replace Display Board PCB.
Run test 6, test 17 or test 3.
Replace Display cable harness.
Replace Logic PCB.
Check pressure amp cable connections.
Replace Follower Housing Assembly.
Replace Logic PCB.
Check speaker connections. Replace Speaker. Replace
Power Regulator PCB.
Replace Power Regulator PCB. Replace Logic PCB.
Replace Power Regulator PCB.
Replace cable connecting Power Regulator PCB and
Logic PCB.
Replace Logic PCB.
Recalibrate before returning for patient use.
Perform 'Door Calibration Procedure' and 'Pressure
Calibration Procedure'.
IVAC® Volumetric Pump (Models 597 & 598) 33/76 1000SM00016 Issue 3
Page 34

Troubleshooting
Error Messages (continued)
Message Code Failure Action/Replace
Err.7 E7 Logic PCB component failure (ROM data
error)
Err.8 E8 Logic PCB (RAM failure or low VRAM voltage) Replace Logic PCB.
Err.11 E11 Logic PCB component failure (calculation
error)
Err.a Ea Volume or tack flag error. Check that the encoder disk in the CAM Housing
Err.A EA Logic PCB component failure (software
Err.b Eb
Err.C EC Door sensor error.
Err.d Ed Logic PCB problem (CPU error). Replace Logic PCB.
Err.e Ee Motor too fast. Motor drive circuit failure. Run test 02 and test 05. Replace mechanism. Replace
Err.E EE Watchdog malfunction error.
Err.F EF Foreground overrun error.
Err.h Eh Motor too slow.
Err.H EH Motor stall at power- up.
Err.J EJ Air-in-line electronics.
Err.L EL Logic PCB circuitry or A/D converter
error).
Logic PCB signal malfunction.
Watchdog alarm (WDAL) does not activate.
Logic PCB component failure.
Mechanism sticking or have high friction.
Motor open or disconnected.
Air-in-line frequency (R22) on Power
Regulator Board misadjusted.
malfunction (ADC error).
Weak battery (if error only occurs on
switching to battery power).
Replace Logic PCB.
Replace Logic PCB.
Assembly is not loose.
Replace Optical Sensor PCB. Run test 08.
See also Err.h.
Replace Logic PCB.
Run test 11.
Replace Logic PCB.
Power Regulator PCB. Replace Logic PCB. See also Err.n.
Replace Logic PCB.
Run test 02 and test 05. Replace mechanism. Replace
Power Regulator PCB. Replace Logic PCB.
Run test 02 and test 05. Replace mechanism. Replace
Power Regulator PCB. Replace Logic PCB.
Run test 04.
Verify correct air-in-line frequency and adjust if
necessary. See procedure below.
Replace Power Regulator PCB.
Replace Logic PCB.
Charge battery. Note: Recharge time with pump off
is approximately 24 hours from discharge to 100%.
Measure battery voltage. If less than 6.0V replace
battery.
If error persists after charging then suspect weak
battery or battery charge circuit out of adjustment/
malfunction:
Check mains outlet power, verify battery charge voltage
is 7.02 ± .0.05 VDC (see procedure below). If error still
persists, replace battery, replace Power Regulator PCB.
Err.n En Dried spillage in mechanism. Misaligned
Follower Housing Assembly.
Induced electrical noise in pressure signal.
IVAC® Volumetric Pump (Models 597 & 598) 34/76 1000SM00016 Issue 3
Remove and clean mechanism.
Check Pressure amp cable connections. Check that
Pressure amp connector and Follower Housing
Assembly are free of moisture. Check for sources of
external EMI, RFI, ESD noise.
Page 35

Troubleshooting
Error Messages (continued)
Message Code Failure Action/Replace
Err.o Eo Start-up or CPU running tests failed.
Logic PCB failure.
Err.P EP EEPROM read/write error (calibration error). Run test 19. Replace EEPROM.
Err.u Eu Pressure sensor electronics error. Run test 03.
Err.U EU Pressure sensor software error. Check that the encoder disk in the CAM Housing
Err.Y EY Battery error. Battery charger circuit
malfunction/failure.
Replace Logic PCB.
Check cable into Follower Housing Assembly is
securely connected, is not pinched, cut or has solution
contamination.
Clean mechanism. If error persists, replace Follower
Housing Assembly.
Assembly is not loose. Replace Optical Sensor PCB. Run
test 08. See also Err.h.
Charge battery. Note: Recharge time with pump off
is approximately 24 hours from discharge to 100%.
Measure battery voltage. If less than 6.0V replace
battery.
Replace fuse(s). Replace fuse on Power Regulator PCB.
If error persists after charging then suspect weak
battery or battery charge circuit out of adjustment/
malfunction:
Check mains outlet power, verify battery charge voltage
is 7.02 ± .0.05 VDC (see procedure below). If error still
persists, replace battery, replace Power Regulator PCB.
Battery Charge Circuit Voltage Test (bat. batt. or Err Y)
Equipment required: Test cable (135740), Digital volt meter.
1. Connect the Test cable to the digital volt meter, red to (+) and black to (-). Ensure the meter is set to the DC voltage
setting. Set the meter to the 20 volt range.
2. Disconnect the battery from the pump.
3. Connect the Test cable to the battery connector (J3) on the Power Regulator PCB.
4. Connect the pump to AC mains. If the pump turns on, turn the pump off.
5. With the pump off, check that the voltage reading 7.02 ±00.05 VDC (6.97 to 7.07 volts). If not, adjust R53 accordingly
and reseal.
6. Disconnect the pump from AC mains. Disconnect the Test cable and reconnect the battery.
Air-in-line Frequency Test (Err J)
Equipment required: Frequency counter cable
1. Connect the frequency counter cable to the test connector (J6) on the Power Regulator PCB. Note: pin 2 is GND, pin 1
is signal.
2. Turn the pump on.
3. Check that the frequency value is 3.3 ±0.1MHz. If not, adjust R22 accordingly and reseal.
IVAC® Volumetric Pump (Models 597 & 598) 35/76 1000SM00016 Issue 3
Page 36

General Fault Diagnosis
Troubleshooting
Parts to Check/Test
Fault
Dropped or damaged
Exposed to fluids
No battery power
No AC mains power
Delivery rates out of
tolerance
Scrambled or frozen
Display
Front Case
Rear Case
Labels
Mechanism
CAM Follower
Assembly
Logic PCB
Power Regulator
Board
Display PCB
Battery
Mains Lead
Fuses
Transformer
No Display
Fuse(s) blown
Low audio problem
If the audio transducer installed is a sealed part, ensure that it has been installed with its lead
polarities opposite to that indicated on the Power Regulator Board assembly.
If the audio transducer installed is an unsealed part, ensure that it has been installed with its lead
polarities matching that indicated on the Power Regulator Board assembly.
IVAC® Volumetric Pump (Models 597 & 598) 36/76 1000SM00016 Issue 3
Page 37

Circuit Descriptions
In this chapter
Functional Module Block Diagram 38
Chapter 4
Module Overview Functional Description 39
Page 38

Circuit Descriptions
Functional Module Block Diagram
IVAC® Volumetric Pump (Models 597 & 598)
-PHJD1$#
%JTQMBZ1$#
+
,FZCPBSE
"TTFNCMZ
$".'PMMPXFS)PVTJOH
1SFTTVSF
"NQ1$#
+
,FZQBE
+
+
%JTQMBZ
%SJWFST
"%
$POWFSUFS
.BJO1SPDFTTPS
+
+
1PXFS3FHVMBUPS1$#
4FOTPS%SJWF
%JTDSJNJOBUPS
8BUDIEPH
+
+
&YUFSOBM5FTU$POOFDUPS
'40POMZ
'MPX4FOTPS
"JSJOMJOF
4FOTPS
0QUJDBM1$#
%PPS
4FOTPS
.PUPS
&ODPEFS
0QUJDT
.PUPS
$BN)PVTJOH
"TTFNCMZ
.BJOT
*OMFU
+
.BJO
4QFBLFS
+
+
1PXFS
3FHVMBUPS
+
.PUPS%SJWF
+
+
'VTFT
5SBOTGPSNFS
#BUUFSZ
IVAC® Volumetric Pump (Models 597 & 598) 38/76 1000SM00016 Issue 3
Page 39

Circuit Descriptions
Module Overview Functional Description
The IVAC® Volumetric Pumps (Models 597 & 598) are designed to be serviced generally to major assembly level.
The circuitry within the pump is contained on five printed circuit boards (PCBs): Logic PCB, Pressure Amplifier PCB, Display
PCB, Optical Sensor PCB and Power Regulator PCB.
Cardinal Health will make available, on request, circuit diagrams which will assist appropriately qualified technical
personnel to repair those parts of the device which are designated by the manufacturer as repairable.
Logic PCB
Contains the main processor module, watchdog circuitry and RAM which provide the control functions for almost all the
aspects of the pump. It drives and monitors all other modules using the program code stored in the EPROM.
On/Off Switch
The On/Off switch enables power to the system. It uses a single push button on the front panel to toggle the “D” type
flip flop (U16). Note U16 is always powered if a charged battery is connected to the pump.
Main Processor
Consists of an 8-bit microcontroller and internal A to D converter. The processor gets instructions from the program
memory (U5) and then executes them. The main processor controls almost all of the functions of the pump, such as
external communications, motor, flow sensor, read and write to the memory, all interrupts switches, air in line status,
front display and alarm tests.
Watchdog
The watchdog IC (U3) consists of a custom CMOS gate array which contains the watchdog CPU circuit, the audio signal
generator, the address decoding circuit, four output lines, the flow sensor control clock signals, and a 12-bit interrupt
timer. The purpose of the watchdog circuit is to generate a latched alarm signal and turn on the audio output if the
main processor does not reset the circuit within a defined time window from the previous circuit reset.
A/D Converter
The A to D converter digitises the pressure signal and the flow detector output, door latch sensor, battery and power
voltages and monitor’s the status of the mechanism circuit.
Flow Sensor
The drop sensor drive and discriminator circuits provide drop signal processing, ambient light rejection, and closed
loop gain for the drop sensor. The flow sensor LED emitter and photo detector are located in the pump’s optional flow
sensor.
Power Regulator PCB
The Power Regulator module provides system DC voltages, AC line and battery charging functions, air in line sensing
circuitry, mechanism drive and speaker drive.
Instrument Power Supplies
The system’s DC voltages are as follows;
+V Supply: when activated the +V supply provides power to the +2.5V and VREF signal lines.
+5V Supply: provides power to the system logic.
VRAM: the +5V supply provides the VRAM supply which keeps the logic RAM powered all the time.
VREF: the reference voltage circuit provide the A to D converter with a stable accurate voltage.
VB: low battery detection is accomplished by the main processor through the A to D converter.
AC Line and Battery Supply
The AC line and battery supply circuit provides regulated, current limited charging power to the battery using a linear
regulation technique. The current is limited to 700mA and the voltage is sustained at about 7.02V when attached to
the mains.
Audio Drive Circuit
Provides the interface between the main processor controlled AUDIO signal and a speaker, along with a means to
sense whether the speaker is operating.
IVAC® Volumetric Pump (Models 597 & 598) 39/76 1000SM00016 Issue 3
Page 40

Circuit Descriptions
Module Overview Functional Description (continued)
Power Regulator PCB (continued)
Mechanism Drive and Sense
The mechanism driver circuit provides the interface between the mechanism drive signal from the main processor and
flow control mechanism. The SAFETY signal is required to be HIGH and the MECH signal is required to be LOW for the
mechanism to work. If this is not the case the CAM followers will remain stationary.
Air-In-Line Detect Circuitry
The air-in-line circuitry drives the ultrasonic transducers (contained within the Follower Housing assembly) through
a range of frequencies to ensure that the transducers are driven at their resonant frequency. The range of ultrasonic
frequencies will travel through solid or liquid, but not air. The receiver signal goes through the signal processing
circuitry on the Power Regulator PCB, and if the signal is above the threshold of 845mV then a pulse is provided from
U3. Presence of air in the set will result in no pulse from U3. (i.e. below the threshold voltage)
Pressure Sense System and Amplifier PCB
The pressure sensing system detects upstream and downstream occlusions. Pressure is measured through the wall
of the silicon segment of the IV administration set by a non-pumping cam follower fitted with a strain gauge. The
pressure amplifier is used to condition the signal from the strain gauge for the A to D converter.
Display Assembly
Comprises a Display PCB and a switch matrix (keyboard). The Display PCB consists of seven-segment LEDs, bar LEDs
and FET drivers, as well as a connection interface for the switch matrix. The display assembly enables user interface
functionality and a display of the current pump status, for example, infusion volume and rate.
Optical Sensor PCB
Comprises two main elements:
Door Detect Sensor
The door detect sensor is a Hall effect sensor that detects the presence of the magnet contained within the door
assembly.
Motor Encoder Optics
The motor encoders consist of a transmitter and a receiver. The receiver passes the pulsed signal back to the Logic PCB
for processing.
Battery
The sealed Lead Acid battery pack consists of 3 cells, each with a potential between 1.8V to 2.4V per cell. The battery
pack is rated at 3.4Ah and 6VDC.
Transformer, Mains Inlet and Fuses
The mains inlet provides the transformer 240V AC (UK) to the primary winding of the transformer. The transformer
through a winding ratio steps down the voltage which is then rectified and filtered to provide an unregulated
VBRIDGE voltage of 7.5 volts to 17 volts dependent on AC line loading. Two fuses are in circuit to provide current
protection. A 1.5A fuse is also fitted to the Power Regulator PCB for additional protection.
IVAC® Volumetric Pump (Models 597 & 598) 40/76 1000SM00016 Issue 3
Page 41

Chapter 5
Spare Parts Replacement
Procedures
In this chapter
Separating the Front and Rear Cases 42
Front Case 44
Cam Follower Assembly, Air-In-Line Sensor 44
Door Assembly, Magnet 45
Cam Housing Assembly 46
Battery 47
Mounting Nut 47
Transformer 47
Door Strike Plate 47
Display Board, Keyboard Assembly 49
Rear Case 50
Logic Board, Power Regulator Board 50
Fuse Holders 52
Mains Inlet Assembly 52
Pole Clamp 53
Labels 54
Page 42

Spare Parts Replacement Procedures
Separating the Front and Rear Cases
Ensure the pump is disconnected from the AC power supply and switched off before attempting to service the
pump
The pump contains static-sensitive components. Observe strict ESD precautions at all times
Batteries should be disposed of as outlined by the local country regulations: do not send back to the
manufacturer
For fastener torque settings, refer to Appendix C, 'Fitting & Replacement Guidelines'
Only use Cardinal Health recommended spare parts
Following all spare part replacement and repair activities, testing must be performed in accordance with the
Performance Verification Procedure (PVP),
Replacement Procedure
1. Remove the four corner screws located on the back of the rear case.
2. Carefully separate the two sections of the case. Note: The door hinge pins may fall out at this time. Take care not to
lose them.
3. Unplug the battery connector from the Power Regulator Board (at J3).
Disconnecting the battery will erase operator settings and the alarm stack. Calibration settings will not be
affected
When reconnecting the battery, the pump may switch on. If so, press the ON/OFF switch on front panel
see Chapter 2, 'Routine Maintenance & Calibration'.
4. Detach harness connections as required:
Remove the two tie wraps securing wires near battery and at wire ends. Remove the two tie wraps (at top of front
housing and near wire ends) securing the black and brown transformer wires and the green/yellow ground cable.
Pull out the ground wire and transformer wires routed next to the battery and under the motor.
Remove the 7-pin ribbon cable from the Cam Follower Housing (connecting to the Power Regulator Board, at J8).
Remove the 10-pin ribbon cable connecting the Optical Sensor Board to the Power Regulator Board (at J5).
Unplug the 6-pin Air-In-Line Sensor connector from the Power Regulator Board (at J7).
Unplug the 2-pin Transformer connector from the Power Regulator Board (at J1).
Disconnect the 26-pin Display cable from the Logic Board (at J1).
Unplug the 8-pin motor connector cable from the Power Regulator Board (at J4).
5. Reassemble in reverse order.
Refitting notes:
1) The longest stand-off is sited into the bottom right corner of the front housing.
2) The lower left stand-off has loctite (414) applied and tubing fitted.
The block diagram in Chapter 4, 'Circuit Descriptions' shows the PCB connectors.
IVAC® Volumetric Pump (Models 597 & 598) 42/76 1000SM00016 Issue 3
Page 43

Spare Parts Replacement Procedures
Separating the Front and Rear Cases (continued)
(C) Rear Housing Assembly
(B) Seal
(A) Front Housing Assembly
D) Screw (x4)
(
(E) Test connector cover
(F) Screw (x1)
Pin (x2) - see Door Assembly
(G/H) Tubing / Loctite (lower left stand-off )
Spare Parts
Item Description Part Number
A KIT,FRT HSG ASSY,ENG 597 141840
A KIT,FRT HSG ASSY,ENG,597XA 141841
A KIT,FRT HSG ASSY,ENG/AUS,597XC 141842
A KIT,FRT HSG ASSY,ENG/AUS,597XA 141843
A KIT,FRT HSG ASSY,DUT,598XB 141845
A KIT,FRT HSG ASSY,ENG,598XB 141846
A KIT,FRT HSG ASSY,FREN,598XA 141847
A KIT,FRT HSG ASSY,FREN,598XB 141848
A KIT,FRT HSG ASSY,GER,598XA 141849
A KIT,FRT HSG ASSY,GER,598XB 141850
A KIT,FRT HSG ASSY,ITAL, 598XB 141851
A KIT,FRT HSG ASSY,SPAN,598XB 141852
A KIT,FRT HSG ASSY, SWED, 598XB 141853
B SEAL,HSG 130051
C KIT,HSG,REAR,597/598XA(BOM) 138050 (non-FSO)
C KIT,HSG REAR 597XC/8XB 139049 (non-FSO)
C KIT,REAR,HSG,597/8/9 FSO 141743 (FSO)
D INSERT MOLDED 133665
E COVER,TEST CONN,59X/599 130548
F SCREW,MACH 6-32X1/4 PNH PHH 300330
G TBG,#4,0.214 X .020 303423
H LOCTITE 414 20GM 0000ME00631
* TIE STRAP,CBL .062-1.25 MAX 301044
* CABLE,PRES AMP BD,599 134143
* HARN,AIL,597/8/9 133393
* ASSY,HARN,DSPL,80/90SER(BOM) 128140
* ASSY,HARN,OPT,58X/3080/59X/599 130038
* CBL,34 COND,FLAT,597/8/9 132327
* item not shown
IVAC® Volumetric Pump (Models 597 & 598) 43/76 1000SM00016 Issue 3
Page 44

Spare Parts Replacement Procedures
Front Case
Cam Follower Assembly, Air-In-Line Sensor
Replacement Procedure
1. Open the pump door.
2. Remove the Air-In-Line Sensor assembly retaining screw (
3. Gently pull the Air-In-Line Sensor assembly to the right to disconnect it from the front housing.
4. Open the orange cam follower assembly latch.
5. Remove the retaining screw from the top of the Cam Follower Assembly (
6. With the orange cam follower assembly latch open, gently pull the Cam Follower Assembly forward and to the right,
part way out of front case.
7. Disconnect the 6-pin flat pressure amplifier cable from the pressure amplifier circuit board (in the Cam Follower
Assembly).
8. Remove the Cam Follower Assembly.
9. Reassemble in reverse order.
10. Run Self-Test
instructions. If there is excessive noise, adjust the Cam Follower Assembly as far as possible towards the bottom of the
pump. Tighten retaining screw to secure in place.
08 in loop mode to align the encoder disk optics. See 'Entering Self-Test Mode' in Chapter 2 for
The mounting position of the Cam Follower Assembly is important. When refitting, first loosely fasten
the retaining screw then push the Cam Follower Assembly as far as possible towards the bottom of the
pump before tightening the screw to secure in place.
C).
A).
When replacing the Cam Follower Assembly, the Rate Calibration Number in Self Test Code 20 must be
33 otherwise change. Then the Rate Accuracy Verification and Pressure Calibration procedures must
be performed. See Chapter 2, 'Routine Maintenance & Calibration'.
Door
(A) Screw
(B) Cam Follower Assembly
Cam Follower Assembly Latch
(shown open)
(C) Screw
(D) Air-In-Line Sensor
Spare Parts
Item Description Part Number
A SCREW,MACH 6-32X3/8 PNH PHH 303351
B KIT,FLWR HSG,UNIVERSAL,598 146219-000
* GASKET,FLWR HSG,597/8/9 134191
C SCREW,MACH,4-40X5/8,PNH,PHH,SS 304322
D ASSY,AIL,597/8/9(BOM) 134164
* item not shown
IVAC® Volumetric Pump (Models 597 & 598) 44/76 1000SM00016 Issue 3
Page 45

Spare Parts Replacement Procedures
Front Case (continued)
Door Assembly, Magnet
Replacement Procedure
1. Open the door and remove steel hinge pins (if still in place) to free the door.
2. Reassemble in reverse order.
When replacing the door assembly, the Door Calibration procedure must be performed. See
'Calibration Procedures' in Chapter 2.
(A) Pins (x2)
B) Door
(
(C/D) Magnet / Loctite
Inside Door View
Important: Verify that the tubing position
label (shown above) is the correct full
length label with warning statement.
See 'Labels' for further details and part
numbers.
Spare Parts
Item Description Part Number
A PIN,DWL,.0625X.875,SS 303921
B ASSY,DOOR,RWK,598XG-K(BOM) 144393
B KIT,DOOR ASSY,ENG,597/8/9(BOM) 141605
B KIT,DR ASSY,DUT,598(BOM) 141679
B KIT,DOOR ASSY,GER,598 144677
B KIT,DOOR ASSY,SPAN,598 141676
B KIT,DR ASSY,ITAL,598(BOM) 141675
B KIT,DOOR ASSY,SWED,598 141674
C MAGNET,MAGNETIZED,CO 90C98A 302425
D LOCTITE 380 0000ME00528
Tubing
Position
IVAC® Volumetric Pump (Models 597 & 598) 45/76 1000SM00016 Issue 3
Page 46

Spare Parts Replacement Procedures
Front Case (continued)
Cam Housing Assembly
Replacement Procedure
1. Loosen the transformer mounting screws to allow clearance for Air-In-Line connector.
2. Remove the three screws and washers (and bracket, where fitted) which hold the Cam Housing Assembly onto the
front case.
3. Cut the two tie wraps joining the wires of the motor, the transformer, and the battery.
4. Gently pull the Cam Housing Assembly back and to the right out of front case.
5. Reassemble in reverse order.
The mounting positions of the Cam Housing Assembly are important. When refitting, first loosely
fasten the top, bottom then middle fixings then push the Cam Housing Assembly as far as possible
towards the top of the pump. Tighten the middle screw to secure in place then tighten the top and
bottom screws.
When replacing the Cam Housing Assembly, the Door Calibration procedure must be performed.
See Chapter 2, 'Routine Maintenance & Calibration'.
Top mounting
A/B/C) Screw (x1) / Washer (x1) / Washer (x1)
(
Middle mounting
(D/E/F/G) Screw (x1) / Washer (x1) / Washer (x1) /
Bracket
(H) Cam Housing assembly
Bottom mounting
A/B/C) Screw (x1) / Washer (x1) / Washer (x1)
(
Spare Parts
Item Description Part Number
A SCREW,MACH 6-32X5/16 PNH PHH 301708
B FLAT WASHER M3.5 DIN 433 ZINC PLATED 0000ME00652
C WSHR,INT TTH,.146X.283X.019,PS 300389
D SCREW,MACH 6-32X1/2 PNH PHH 301828
E WSHR,INT TTH,.146X.283X.019,PS 300389
F FLAT WASHER M3.5 DIN 433 ZINC PLATED 0000ME00652
G BRACKET CAM HOUSING 59X 142197
H CAM HOUSING ASSY , 597/8/9 142248
I KIT,MTR DRV 591 143859
(I) Motor
Transformer
mounting
screws
IVAC® Volumetric Pump (Models 597 & 598) 46/76 1000SM00016 Issue 3
Page 47

Front Case (continued)
Spare Parts Replacement Procedures
Battery
Replacement Procedure
1. Remove the two screws securing the battery to the
front case.
2. Pull the battery up and out of the front case.
3. Reassemble in reverse order.
Batteries should be given a full 24 hour
charge when replaced, when pump is to
be stored for an extended period of more
than 3 weeks and upon receipt of a new
pump.
Mounting Nut
Replacement Procedure
1. Lift the mounting nut from the cutout in the bottom of
the front case.
2. Reassemble in reverse order.
Note: When reassembling the mounting nut and cap,
apply loctite around the top rim of the mounting nut
before sliding the cap over the mounting nut.
Transformer
Replacement Procedure
1. Disconnect the transformer from the Power Regulator
Board, the Fuse Holders and the Power Cord
receptacle, desoldering wires as necessary.
2. Remove the kep nut from the side of the transformer
and remove the lug with the green earth wire.
3. Remove the two screws and internal tooth washers
securing the transformer to the front case.
4. Gently pull the transformer from the front case.
5. Reassemble in reverse order.
Door Strike Plate
Replacement Procedure
1. Remove the two screws securing the plate.
2. Lift out the plate.
3. Reassemble in reverse order, ensuring the front edge
is aligned with the front case edge and the screws are
secured with loctite.
(A) Battery
(B/C/D) Screw (x2) / Washer (x2) / Washer (x2)
(E/F/G) Door Strike Plate / Screw (x2) / Loctite
(H/I/J) Transformer / Kep Nut (x1) / Adaptor Plate
(K/L/M) Screw (x2) / Washer (x2) / Washer (x2)
(N/O/P) Mounting Nut / Cap / Loctite
IVAC® Volumetric Pump (Models 597 & 598) 47/76 1000SM00016 Issue 3
Page 48

Spare Parts Replacement Procedures
Front Case (continued)
Battery, Transformer, Door Strike Plate, Mounting Nut (continued)
Spare Parts
Item Description Part Number
A BATT PACK,80/90 SER 129471
B SCREW,MACH 6-32X5/16 PNH PHH 301708
C FLAT WASHER M3.5 DIN 433 ZINC PLATED 0000ME00652
D WSHR,INT TTH,.146X.283X.019,PS 300389
E PL,STRIKE,DOOR,2OP,59X/599BOM 132233
F SCREW,MACH 4-40X3/16 PNH PHH 301711
G ACTIVATOR LOCTITE 7455 0000ME00455
G LOCTITE 380 0000ME00528
H ASSY,XFMR,220V,80/90 SER 133614
H KIT,XFMR,581,591/7/8 143855
I NUT,KEP 6-32 S PL 300036
J PL,ADPT,XFMR,220V 133091
K SCREW,MACH 6-32X3/8 PNH PHH 300034
L WSHR,INT TTH,.146X.283X.019,PS 300389
M WSHR,FL,.4BA T2 ST/STA2 300510
N NUT,MTG 130048
O CAP,VINYL 0.875-5 303246
P LOCTITE 380 0000ME00528
IVAC® Volumetric Pump (Models 597 & 598) 48/76 1000SM00016 Issue 3
Page 49

Spare Parts Replacement Procedures
Front Case (continued)
Display Board, Keyboard Assembly
Replacement Procedure
1. Disconnect the ribbon connector (extending from Display Board) from the Logic Board.
2. Remove the two nuts and washers which secure the Display and Keyboard Assembly to the front case.
3. Gently push the Display Board outward from inside front case by pushing on the ends of the two screws.
4. Disconnect the Keyboard Assembly (if necessary) by lifting the Keyboard Assembly off until its two rear screws clear
the Display Board.
5. Disconnect the Keyboard Assembly flex cable from the Display Board.
6. Reassemble in reverse order, taking note of the following points:
Ensure the display seal is installed all along the inner recessed edge that goes around the sides of the Keyboard
Assembly as close to the outer elevated lip as possible.
Ensure the Keyboard Assembly flex cable does not get pinched.
Ensure the gasket is intact, and not pinched or rolled.
(A/B)
Nut (x2) / Washer (x2)
(C) Display Board
(C)(D)
Keyboard Assembly
Display Board
Spare Parts
Item Description Part Number
A NUT,KEP 4-40 S PL 300045
B LAT WASHER M3.5 DIN 433 ZINC PLATED 0000ME00652
C ASSY,DSPL BD,58X/90 SER(BOM) 140117-1
D KIT,KYBD/OVLY,ENG,599/597(BOM) 133295
D KIT,KYBD/OVLY,FREN,598(BOM) 138989
D KIT,KYBD/OVLY,GER,598(BOM) 135961
D KIT,KYBD/OVLY,DUT,598 135052
D KIT,KYBD/OVLY,ENG,598 139050
D KIT,KYBD/OVLY,ITAL,598 139054
D KIT,KYBD/OVLY,SPAN,598 139053
D KIT,KYBD/OVLY,SWED,598 139051
* FOAM,0.062TX0.125W GREY 302932
* item not shown
IVAC® Volumetric Pump (Models 597 & 598) 49/76 1000SM00016 Issue 3
Page 50

Spare Parts Replacement Procedures
Rear Case
Logic Board, Power Regulator Board
Replacement Procedure
1. Disconnect all cables connected to the Power Regulator Board except the flat ribbon cable connecting to the Logic
Board.
2. Disconnect the 26-pin cable connecting the Display Board to the Logic Board (at J1).
3. Remove the three screws and washers securing the boards to the rear case.
4. Remove both the Power Regulator and the Logic Board from the rear case. Remove ESD shield if required.
5. Disconnect the flat ribbon cable connecting the Logic Board and Power Regulator Board.
6. Reassemble in reverse order.
Refitting notes:
1) Check that the inside rear case is fitted with a stand off ESD shield (see Item G) and fit if necessary.
2) Ensure the PVC foam gasket is installed over the flow sensor pins onto the back of the Logic Board. If the gasket is
worn or deteriorated, install a new gasket onto the flow sensor pins before installing the boards into the rear case.
3) Peel off the speaker hole protective cover before connecting the boards with the flat ribbon cable.
4) The flat ribbon cable should be routed to the outside of both boards at the edge of the housing and should not be
between the boards.
5) Verify the alignment of the speaker hole with the bottom hole in the rear housing.
Important: When replacing the Logic Board (139046-100) on a non-FSO pump ensure that self-test 36
is set to FS.OP (Flow Sensor Optional).
A/B/C) Screw (x3) / Washer (x3) / Washer (x3)
(
Flat ribbon cable
(D) Logic Board
E) Power Regulator Board
(
(F) Bumper (x2)
(G) Stand Off ESD Shield
IVAC® Volumetric Pump (Models 597 & 598) 50/76 1000SM00016 Issue 3
Page 51

Spare Parts Replacement Procedures
Rear Case (continued)
Logic Board, Power Regulator Board (continued)
Spare Parts
Item Description Part Number
A SCREW,MACH 6-32X7/8 PNH PHHD 300361
B FLAT WASHER M3.5 DIN 433 ZINC PLATED 0000ME00652
C WSHR,INT TTH,.146X.283X.019,PS 300389
D** IT, LGC BD ASSY, NON FSO, 59X 139046-100 (non-FSO)
D ASSY,LGC BD,CAL,FSO/NRSCL,597/8/9 144702
E ASSY,PWR REG BD,CAL, 597/8/9 142085
F BUMPER,RBR,.50” X .14 303724
G STAND OFF SHIELD ESD 59X 1000ME00514
* GASKET,PVC FOAM,597/8/9 FSO 141096
* ESD SHIELD 59X 1000ME00452
* SERV,ASSY,MEM,1.10,597/8/9 FSO 143053
* KIT,REV 10.05,ENG,599XC/8/7 136814 (non-FSO)
* IC,WATCH DOG,GATE ARRAY 128048
* KIT,XDCR,AUD,590/1,2,597/8/9 140147
* XSTR,VN0610,MOSFET,N-CHAN 302422
* IC,RAM,2KX8,CMOS,24 DIP 302627
* IC,74HC373,H SP LTCH 20 DIP 302695
* XTAL,32.768KHZ 303141
* IC,80C31,MICROCONTROLLER,40DIP 303287 (non-FSO)
* FUSE,1.5A,250V,NORM-BLO 303910
* XSTR,3638A,PNP,AMP/SW,TO-92 300702
* XSTR,3569,NPN,AMP/SW,TO-92 301551
* XSTR,6109,PNP,PWR,TO-220AB 301553
* item not shown
** see Important note on previous page
IVAC® Volumetric Pump (Models 597 & 598) 51/76 1000SM00016 Issue 3
Page 52

Rear Case (continued)
Spare Parts Replacement Procedures
Fuse Holders
Replacement Procedure
1. Desolder the black transformer wire from the top tab of the
left fuse holder and the brown wire from the top tab on the
right fuse holder.
2. Loosen and remove the hex nut connecting the fuse holder
to the back of the rear case.
3. Gently remove fuse holder from inside rear case.
4. Reassemble in reverse order.
Inside View
(
A) Finger Gasket
(B) Earth screw (x1)
(C) PE Harness*
Mains Inlet Assembly
Replacement Procedure
1. Detach the two connectors inside the rear case, and
unsolder the green/yellow ground wire connection
at the mains inlet assembly.
2. Remove the one earth screw from inside the rear
case.
3. Remove the two screws securing the power cord
adapter to the back of rear case and remove the
power cord adapter and mains inlet assembly.
4. Reassemble in reverse order.
Refitting notes:
1) The finger gasket (A) must be orientated diagonally,
upper right to lower left.
2) Fingers of the clip-on gasket (
line filter.
3) Fit the mains inlet into the rear case with the single
pin uppermost. Note: The ground symbol label is
located on the uppermost side of mains assembly.
D) must contact the
(F) Shrink Tubing
(D) Clip-on Gasket (x2)
E) Wire
(
Items A, B C and D are not on XAX model
pumps. See also 'Views of the IVAC® 597/598
Volumetric Pump' in Chapter 1.
Back View
(G/H)
Mains Inlet / Power
Cord Adapter
(
J/K)
Fuse (x2) / Fuse Holder (x2)
(I) Screw (x2)
IVAC® Volumetric Pump (Models 597 & 598) 52/76 1000SM00016 Issue 3
Page 53

Spare Parts Replacement Procedures
Rear Case (continued)
Fuse Holders, Mains Inlet Assembly (continued)
Spare Parts
Item Description Part Number
A GASKET,FINGER,COPPER,TIN PLATE 304766
B SCREW,MACH,6-32X3/16,PNH,PHH 304209
C HARNESS,P.E.,597XC/8XB 137737
C ASSY,HARN,GND,80/90SER (BOM) 130210
D GASKET,CLIP-ON,T-LANCE,COPPER 304817
E WIRE,ELEC STRD,18 AWG,BLK 301073
F TBG,SHRK,CLEAR,.184,POLYOLEFIN 300609
G CONN,PWR/CD REC 3/P 6A 250V 303250
H ADPT,IEC PWR/CD CONN 303249
I SCREW,TPG #4-20X.500 PNH PHH 303501
J FUSE,63MA 250V TIME LAG 303489
K FUSE HLDR,PNL MNT,FEF 031.1085 303467
* ASSY,LINE EMI FLTR,597XC/8XB 139048
* KIT,ADAPT 132520
* LBL,GND SYM 123273
* TBG,SHRK,BLACK,.250,POLYOLEFIN 300610
* item not shown
Pole Clamp
Replacement Procedure
1. Remove the two screws from inside the rear case.
2. Reassemble in reverse order.
(A) Screw (x2)
(B) Pole Clamp
Inside View Outside View
Spare Parts
Item Description Part Number
A SCREW,MACH 6-32X1/2 PNH PHH 301828
B KIT,POLE CLAMP,597/8XA,599 138051
B SERV ASSY, POLE CLAMP, 597XC/8XB 139047
B ASSY,CLAMP,POLE,597XC/8XB(BOM) 137522
IVAC® Volumetric Pump (Models 597 & 598) 53/76 1000SM00016 Issue 3
Page 54

Labels
A
Spare Parts Replacement Procedures
C
Important: Verify that the tubing position label
(D) is the correct full length label with warning
statement. Check part number and replace
existing label if necessary.
B
Front View
D
E
F
(US build, see
also item J)
Rear View
I
G
J
H
(UK build, see also
item F)
Side Views
K
Underside View
IVAC® Volumetric Pump (Models 597 & 598) 54/76 1000SM00016 Issue 3
Page 55

Spare Parts Replacement Procedures
Labels (continued)
Spare Parts
Item Description Part Number
A OVLY,SW PANEL,ITAL,598(BOM) 138961
A OVLY,SW PANEL,SWED,598(BOM) 137603
A OVLY,SW PANEL,SPAN,599FSO/598 137605
A OVLY,SW PANEL,GER,598(BOM) 136013
A OVLY,SW PANEL,ENG,599FSO/598 138675
A OVLY,SW PANEL,DUT,598(BOM) 138593
A OVLY,SW PANEL,FREN,598(BOM) 138975
A OVLY,SW PANEL,ENG,597/9(BOM) 132335
B LBL VPVP ENG 597 (BOM) 135734
B LBL,SPACE*SAVER,AUST,597(BOM) 137281
B LBL,VPVP,DUT,598(BOM) 137619
B LBL VPVP ENG 598 (BOM 138668
B LBL VPVP FREN 598 (BOM) 135773
B LBL,VPVP,GER,598(BOM) 135737
B LBL VPVP ITAL 598 (BOM) 137589
B LBL,VPVP,SPAN,598(BOM) 137623
B LBL VPVP SWED 598 (BOM) 137621
C LBL,SET LOADING, ENG,59X 131866
C LBL,SET LOAD,GER,591/598 131738
C LBL,SET LOAD,DUT,591/598 131739
C LBL SET LOAD ITAL 591/598 131740
C LBL,SET LOAD,SPAN,591/598 131737
C LBL,SET LOAD,SWED,591/598 131735
C LBL,SET LOAD,FREN,590/1/8 144178
D LBL,TBG POSN,ENG,597/8/9 141565
D LBL,TBG POSN,FREN,598 143671
D LBL,TBG POSN,DUT,598 141686
D LBL,TBG POSN,ITAL,598 141682
D LBL,TBG POSN,GER,598 141684
D LBL,TBG POSN,SPAN,598 141683
D LBL,TBG POSN,SWED,598 141681
E LBL,FLOW SNSR,DUT,281/581/591 126118
E LBL,FLOW SNSR,GER,281/581/591 126105
E LBL,FLOW SNSR,SPAN,28X/58X/591 126124
E LBL,FLOW SNSR,ITAL,581/591 126152
E LBL,FLOW SNSR,FREN,80/90SER 126106
E LBL,FLOW SNSR,SWED,281/581/591 126119
E LBL,FLOW SNSR,ENG,80/90SER 128100
F LBL,NAME/RATING,ENG,597 136006
F LBL,NAME RATING,598 136007
G LBL,EQ POT CONN 133318
IVAC® Volumetric Pump (Models 597 & 598) 55/76 1000SM00016 Issue 3
Page 56

Spare Parts Replacement Procedures
Labels (continued)
Spare Parts
Item Description Part Number
H LBL,START-UP,ENG,597(BOM) 135708
H LBL,START-UP,DUT,598(BOM) 137607
H LBL START UP ENG 598 (BOM) 138671
H LBL START UP FREN 598(BOM) 135710
H LBL,START-UP,GER,598(BOM) 135712
H LBL START UP ITAL 598 (BOM) 137588
H LBL,START-UP,SPAN,598(BOM) 137611
H LBL START UP SPAN 598(BOM) 137609
H LBL,START-UP,DUT,598 FSO 141421
H LBL,START-UP,ENG,597XD 141333
H LBL,START-UP,ENG,598XC 141334
H LBL,START-UP,ITAL,598 FSO 141400
H LBL,START-UP,SWED,598 FSO 141404
H LBL,START-UP,SPAN,598 FSO 141408
H LBL,START-UP,FREN,598 FSO 141412
H LBL,START-UP,GER,598 FSO 141416
I LBL,ALARM MESS,DUT,598(BOM) 137613
I LBL,ALARM MESS,ENG,598(BOM) 140166
I LBL ALARM MESS FREN 598 (BOM) 135913
I LBL,ALARM MESS,GER,598(BOM) 138026
I LBL ALARM MESS ITAL 598 (BOM) 137587
I LBL,ALARM MESS,SPAN,598(BOM) 137617
I LBL ALARM MESS SWED 598(BOM) 137615
I LBL,MESS,ENG,598XC 141336
I LBL,ALARM MESS,ENG,597 FSO 141335
I LBL,ALARM,MESS,ITAL,598,FSO 141398
I LBL,ALARM MESS,SWED,598 FSO 141402
I LBL,ALARM MESS,SPAN,598 FSO 141406
I LBL,ALARM MESS,FREN,598 FSO 141410
I LBL,ALARM MESS,DUT,598 FSO 141419
I LBL,ALARM MESS,GER,598 FSO 141414
J LABEL NAME RATING 59X 1000LB00409
K LBL,PATENT NTC,597/598/599 137816
* LBL,GND SYM 123273
* LBL,BATT,TYPE 137779
* LBL CE MARK INST MDD 136933
*
item not shown
IVAC® Volumetric Pump (Models 597 & 598) 56/76 1000SM00016 Issue 3
Page 57

Specifications
In this chapter
Infusion 58
Appendix A
Electrical 58
Physical 58
Environmental 58
Recycling 58
Electromagnetic Compatibility 59
Page 58

Specifications
Infusion
Rate range 1 to 999 ml/h in 1 ml increments
Volume infused range Total: 0 to 9999 ml in 1 ml increments
Secondary: 1 to 9999 ml in 1 ml increments (Model 597 only)
Volume To Be Infused range Primary: 1 to 9999 ml in 1 ml increments
Secondary: 1 to 999 ml in 1 ml increments (Model 597 only)
KVO rate 5 ml/h or current set rate if less than 5 ml/h in primary operation
Air-in-line accuracy 100 μl ±50 μl
Maximum bolus volume At 1 ml/h: 0.5 ml
At 100 ml/h: 0.5 ml
Maximum time to alarm At 1 ml/h; 35 minutes
At 100 ml/h; 0.31 minutes
Occlusion pressure Maximum: 11 psi (569 mmHg); Nominal: 6 to 8 psi
System Accuracy ±5% with a 1.96 standard deviation under specified conditions.
Note: Accuracy specified under the following conditions: Head height: 30"/76.2cm, Test
solution: distilled water, Environmental: ambient temperature, Back pressure: 20 gauge needle,
IV set: Model 59073
Critical volume 25 ml at 999 ml/h is maximum incremental volume which can occur in case of single point
failure
IV administration set IVAC® "59" Series IV Infusion sets only
Electrical
Battery type Lead acid, sealed, rechargeable 6V/3.4Ah. Automatically charges when the pump is connected
to AC power
Battery life 6 hours @ 125 ml/h with a fully charged, new battery
Battery recharge time Approximately 24 hours from discharge to 100% charge
Power requirements 220 to 240V AC; 50/60 Hz; 0.07A; 3-wire grounded system
External fuses 2 x T63 mA 250V
Memory retention At 25°C, the electronic memory of the pump will be retained for at least 6 months when not
powered up
Ground current leakage Maximum 100μA rms (ungrounded) at 220V rms
Protection against
electrical shock hazards
Class I Type CF
Physical
Weight Approximately 2.7 kg
Case material Impact resistant ABS plastic
Dimensions W H D
13.3 cm 19.3 cm 18.4 cm
Environmental
IPX rating IPX1
Operating limits Temperature Relative humidity Atmostpheric pressure
+10°C to +40°C 30% to 75% non-condensing 700 - 1060 hPa
Transport/storage limits -40°C to +70°C 0% to 100% 500 - 1060 hPa
Recycling
Disposal of device components
Caution: Follow local governing ordinances and recycling instructions regarding disposal or recycling of device components, including
batteries.
IVAC® Volumetric Pump (Models 597 & 598) 58/76 1000SM00016 Issue 3
Page 59

Specifications
Electromagnetic Compatibility
Warning:
• The use of any accessory, transducer, or cable with the IVAC® Volumetric Pump (Models 597 & 598) other than those specified may
result in increased emissions or decreased immunity of the pump.
• The IVAC® Volumetric Pump (Models 597 & 598) should not be used adjacent to or stacked with other equipment, however if
adjacent or stacked use is necessary, the IVAC® Volumetric Pump (Models 597 & 598) should be observed to verify normal operation
in the configuration in which it will be used.
Caution:
• The IVAC® Volumetric Pump (Models 597 & 598) is a CISPR 11 Group 1 Class A Medical Equipment System and intended for use by
healthcare professionals only.
• Medical Electrical Equipment needs special precautions regarding EMC and needs to be installed, put into service and used
according to the EMC information provided in the accompanying documents.
• Portable and Mobile RF communications can affect Medical Electrical Equipment.
• Operating the pump near equipment which radiates high energy radio frequencies (electro surgical or cauterizing equipment,
portable radios, cellular telephones, etc.) may cause false alarm conditions. If this happens, reposition the pump away from the
source of interference or turn off the pump and manually regulate the flow.
Guidance and Manufacturer’s Declaration – Electromagnetic Emissions
The IVAC® Volumetric Pump (Models 597 & 598) is intended for use in the electromagnetic environment specified below.
The customer or the user of the IVAC® Volumetric Pump (Models 597 & 598) should assure that it is used in such an environment.
Emissions Test Compliance Electromagnetic Environment – Guidance
CISPR 11
RF Emissions
CISPR 11
RF Emissions
EN 61000-3-2
Harmonic Emissions
EN 61000-3-3
Voltage Fluctuations,
Flicker Emissions
Group 1
Class A
Class A
Complies
The pump uses RF energy only for its internal function in the normal product
offering. Therefore, its RF emissions are very low and are not likely to cause any
interface in nearby electronic equipment.
The pump is suitable for use in all establishments, other than domestic, and
those directly connected to the public low-voltage power supply network that
supplies buildings used for domestic purposes.
IVAC® Volumetric Pump (Models 597 & 598) 59/76 1000SM00016 Issue 3
Page 60

Specifications
Electromagnetic Compatibility (continued)
Guidance and Manufacturer’s Declaration - Electromagnetic Immunity
The IVAC® Volumetric Pump (Models 597 & 598) is intended for use in the electromagnetic environment specified below.
The customer or the user of IVAC® Volumetric Pump (Models 597 & 598) should assure that it is used in such an environment.
Immunity Test
EN 61000-4-2 Electro-Static
Discharge (ESD)
EN 61000-4-4
Electrical Fast Transient, Burst
(EFT) (Note 3)
EN 61000-4-5
Power Line Surge
(Note 3)
EN 61000-4-8 Power
Frequency Magnetic Field
(50/60 Hz)
EN 61000-4-11
Voltage Dips, Short
Interruptions, and Voltage
Variations
(Note 3)
EN 60601-1-2
Test Level
±6 kV contact
±8 kV air
±2 kV for power
supply lines
±1 kV for input/
output lines
±1 kV Line(s) to
Line(s)
±2 kV Line(s) to
Earth
3 A/m 400 A/m 50 Hz (Note 2)Power frequency magnetic fields should be at
<5 % UT (Note 1)
(>95 % dip in UT)
for 0.5 cycle
40 % UT
(60 % dip in UT)
for 5 cycles
70 % UT
(30 % dip in UT)
for 25 cycles
Compliance Level Electromagnetic Environment – Guidance
±8 kV contact (Note
2)
±15 kV air (Note 2)
±2 kV for power
supply lines
N/A (Note 4)
±1 kV Line(s) to
Line(s)
±2 kV Line(s) to Earth
<5 % UT
(>95 % dip in UT)
for 0.5 cycle
40 % UT
(60 % dip in UT)
for 5 cycles
70 % UT
(30 % dip in UT)
for 25 cycles
Floors should be wood, concrete, or ceramic tile.
If floors are covered with synthetic material, the
relative humidity should be at least 30 %.
Mains power quality should be that of a typical
commercial or hospital environment.
Mains power quality should be that of a typical
commercial or hospital environment.
levels characteristic of a typical location in a typical
commercial or hospital environment.
Mains power quality should be that of a typical
commercial or hospital environment.
If the user of the pump requires continued
operation during power mains interruptions, it is
recommended that the pump be powered from an
uninterruptible power supply or a battery.
The pump does employ an internal short duration
battery.
<5 % UT
(>95 % dip in UT)
for 5 sec
Note 1—UT is the AC mains voltage prior to application of the test level.
Note 2—Compliance levels raised by EN 60601-2-24.
Note 3—Performed at the Minimum and Maximum Rated Input Voltage.
Note 4—Cardinal Health recommends using signal cables of less than 3 meters in length and this requirement is applicable only if signal cables are 3
meters or more in length. (EN 60601-1-2:2002, Clause 36.202.4)
IVAC® Volumetric Pump (Models 597 & 598) 60/76 1000SM00016 Issue 3
<5 % UT
(>95 % dip in U
for 5 sec
T)
Page 61

Specifications
Electromagnetic Compatibility (continued)
Guidance and Manufacturer’s Declaration—Electromagnetic Immunity
LIFE SUPPORT Equipment
The IVAC® Volumetric Pump (Models 597 & 598) is intended for use in the electromagnetic environment specified below.
The customer or the user of the IVAC® Volumetric Pump (Models 597 & 598) should ensure that it is used in such an environment.
Immunity Test
EN 61000-4-6
Conducted RF
EN 61000-4-3
Radiated RF
EN 60601-1-2
Test Level
3 V rms
150 kHz to 80
MHz
3 V/m
80 MHz to 2.5 GHz
Compliance
Level
10 V rms
(Note 3)
10 V/m
(Note 3)
Electromagnetic Environment – Guidance
Portable and mobile RF communications equipment should be used no
closer to any part of the pump, including cables, than the recommended
separation distance calculated from the equation applicable to the
frequency of the transmitter.
Recommended Separation Distance
3.5
d = [-----] √P
V
1
12
d = [-----] √P 80 MHz to 800 MHz
V
2
12
d = [-----] √P 80 MHz to 2.5 GHz
E
1
23
d = [-----] √P 800 MHz to 2.5 GHz
E
1
where P is the maximum output power rating of the transmitter in watts
(W) according to the transmitter manufacturer and d is the recommended
separation distance in meters (m).
a
Field strengths from fixed RF transmitters, as determined by an
b
electromagnetic site survey,
each frequency range.
should be less than the compliance level in
c
Interference may occur in the vicinity of equipment marked with the
following symbol:
Note 1—At 80 MHz and 800 MHz, the higher frequency range applies.
Note 2—These guidelines may not apply in all situations. Electromagnetic propagation is affected by absorption and reflection from structures, objects,
and people.
Note 3—Compliance levels raised by EN 60601-2-24.
a The compliance levels in the ISM frequency bands between 150 kHz and 80 MHz and in the frequency range 80 MHz to 2.5 GHz are intended to
decrease the likelihood that mobile/portable communications equipment could cause interference if it is inadvertently brought into patient areas. For
this reason, an additional factor of 10/3 is used in calculating the recommended separation distance for transmitters in these frequency ranges.
b Field strengths from fixed transmitters, such as base stations for radio (cellular/cordless) telephones and land mobile radios, amateur radio, AM and
FM radio broadcast, and TV broadcast cannot be predicted theoretically with accuracy. To assess the electromagnetic environment due to fixed RF
transmitters, an electromagnetic site survey should be considered. If the measured field strength in the location in which the pump is used exceeds
the applicable RF compliance level above, the pump should be observed to verify normal operation. If abnormal performance is observed, additional
measures may be necessary, such as re-orienting or relocating the pump.
c Over the frequency range 150 kHz to 80 MHz, field strengths should be less than 10 V/m.
IVAC® Volumetric Pump (Models 597 & 598) 61/76 1000SM00016 Issue 3
Page 62

Specifications
Electromagnetic Compatibility (continued)
Recommended Separation Distances for LIFE SUPPORT Equipment between
portable and mobile RF communications equipment and the IVAC® Volumetric Pump (Models 597 & 598)
The IVAC® Volumetric Pump (Models 597 & 598) is intended for use in an electromagnetic environment in which radiated RF
disturbances
are controlled.
The user of the IVAC® Volumetric Pump (Models 597 & 598) can help prevent electromagnetic interference by maintaining a minimum
distance between portable and mobile RF communications equipment (transmitters) and the IVAC® Volumetric Pump (Models 597 &
598) as recommended below, according to the maximum output power of the communications equipment.
Separation Distance According to Frequency of Transmitter
Rated Maximum Output
Power of Transmitter
W
150 kHz to 80 MHz
Outside ISM bands 3.5
d = [------] √P
V
1
150 kHz to 80 MHz
In ISM bands
12
d = [------] √P
V2
m
80 MHz to 800 MHz
12
d = [ ------] √P
E1
800 MHz to 2.5 GHz
23
d = [------] √P
E1
0.01
0.1
1
10
100
For transmitters rated at a maximum output power not listed above, the recommended separation distance d in meters (m) can be determined using the
equation applicable to the frequency of the transmitter, where P is the maximum output power rating of the transmitter in watts (W) according to the
transmitter manufacturer.
Note 1—At 80 MHz and 800 MHz, the separation distance for the higher frequency range apply.
Note 2—The ISM (Industrial, Scientific, and Medical) bands between 150 kHz and 80 MHz are 6.765 MHz to 6.795 MHz; 13.553 MHz to 13.567 MHz; 26.957
MHz to 27.283 MHz; and 40.66 MHz to 40.70 MHz.
Note 3—An additional factor of 10/3 is used in calculating the recommended separation distance for transmitters in the ISM frequency bands between
150 kHz and 80 MHz and in the frequency range 80 MHz to 2.5 GHz to decrease the likelihood that mobile/portable communications equipment could
cause interference if it is inadvertently brought into patient areas.
Note 4—These guidelines may not apply in all situations. Electromagnetic propagation is affected by absorption and reflection from structures, objects,
and people.
0.03 0.12 0.12 0.23
0.11 0.38 0.38 0.73
0.35 1.20 1.20 2.30
1.11 3.80 3.80 7.28
3.50 12.00 12.00 23.00
IVAC® Volumetric Pump (Models 597 & 598) 62/76 1000SM00016 Issue 3
Page 63

Spare Parts Listing
In this chapter
Front Case Parts Listing 64
Appendix B
Rear Case Parts Listing 65
Electrical Parts Listing 66
Software 66
Labels 67
Test Equipment & Accessories 68
Page 64

Spare Parts Listing
Front Case Parts Listing
Part Number Description
141840 KIT,FRT HSG ASSY,ENG 597
141841 KIT,FRT HSG ASSY,ENG,597XA
141842 KIT,FRT HSG ASSY,ENG/AUS,597XC
141843 KIT,FRT HSG ASSY,ENG/AUS,597XA
141845 KIT,FRT HSG ASSY,DUT,598XB
141846 KIT,FRT HSG ASSY,ENG,598XB
141847 KIT,FRT HSG ASSY,FREN,598XA
141848 KIT,FRT HSG ASSY,FREN,598XB
141849 KIT,FRT HSG ASSY,GER,598XA
141850 KIT,FRT HSG ASSY,GER,598XB
141851 KIT,FRT HSG ASSY,ITAL, 598XB
141852 KIT,FRT HSG ASSY,SPAN,598XB
141853 KIT,FRT HSG ASSY, SWED, 598XB
146219-000 KIT,FLWR HSG,UNIVERSAL,598
134191 GASKET,FLWR HSG,597/8/9
134164 ASSY,AIL,597/8/9(BOM)
303351 SCREW,MACH 6-32X3/8 PNH PHH
304322 SCREW,MACH,4-40X5/8,PNH,PHH,SS
141605 KIT,DOOR ASSY,ENG,597/8/9(BOM)
141674 KIT,DOOR ASSY,SWED,598
141675 KIT,DR ASSY,ITAL,598(BOM)
141676 KIT,DOOR ASSY,SPAN,598
144677 KIT,DOOR ASSY,GER,598
141679 KIT,DR ASSY,DUT,598(BOM)
144393 ASSY,DOOR,RWK,598XG-K(BOM)
303921 PIN,DWL,.0625X.875,SS
302425 MAGNET,MAGNETIZED,CO 90C98A
142248 CAM HOUSING ASSY , 597/8/9
142197 BRACKET CAM HOUSING 59X
301708 SCREW,MACH 6-32X5/16 PNH PHH
301828 SCREW,MACH 6-32X1/2 PNH PHH
300389 WSHR,INT TTH,.146X.283X.019,PS
0000ME00652 FLAT WASHER M3.5 DIN 433 ZINC PLATED
143859 KIT,MTR DRV 591
132233 PL,STRIKE,DOOR,2OP,59X/599BOM
301711 SCREW,MACH 4-40X3/16 PNH PHH
300036 NUT,KEP 6-32 S PL
300034 SCREW,MACH 6-32X3/8 PNH PHH
300510 WSHR,FL,.4BA T2 ST/STA2
130048 NUT,MTG
303246 CAP,VINYL 0.875-5
133295 KIT,KYBD/OVLY,ENG,599/597(BOM)
135961 KIT,KYBD/OVLY,GER,598(BOM)
138989 KIT,KYBD/OVLY,FREN,598(BOM)
139050 KIT,KYBD/OVLY,ENG,598
IVAC® Volumetric Pump (Models 597 & 598) 64/76 1000SM00016 Issue 3
Page 65

Spare Parts Listing
Front Case Parts Listing (continued)
Part Number Description
139051 KIT,KYBD/OVLY,SWED,598
135052 KIT,KYBD/OVLY,DUT,598
139053 KIT,KYBD/OVLY,SPAN,598
139054 KIT,KYBD/OVLY,ITAL,598
302932 FOAM,0.062TX0.125W GREY
300045 NUT,KEP 4-40 S PL
303423 TBG,#4,0.214 X .020
0000ME00528 LOCTITE 380
0000ME00631 LOCTITE 414 20GM
0000ME00455 ACTIVATOR LOCTITE 7455
301044 TIE STRAP,CBL .062-1.25 MAX
Rear Case Parts Listing
Part Number Description
138050 KIT,HSG,REAR,597/598XA(BOM)
139049 KIT,HSG REAR 597XC/8XB
141743 KIT,REAR,HSG,597/8/9 FSO
130051 SEAL,HSG
130548 COVER,TEST CONN,59X/599
133665 INSERT MOLDED
300330 SCREW,MACH 6-32X1/4 PNH PHH
300361 SCREW,MACH 6-32X7/8 PNH PHHD
0000ME00652 FLAT WASHER M3.5 DIN 433 ZINC PLATED
300389 WSHR,INT TTH,.146X.283X.019,PS
303724 BUMPER,RBR,.50” X .14
141096 GASKET,PVC FOAM,597/8/9 FSO
304766 GASKET,FINGER,COPPER,TIN PLATE
304817 GASKET,CLIP-ON,T-LANCE,COPPER
304209 SCREW,MACH,6-32X3/16,PNH,PHH
303501 SCREW,TPG #4-20X.500 PNH PHH
300609 TBG,SHRK,CLEAR,.184,POLYOLEFIN
139048 ASSY,LINE EMI FLTR,597XC/8XB
132520 KIT,ADAPT
300610 TBG,SHRK,BLACK,.250,POLYOLEFIN
138051 KIT,POLE CLAMP,597/8XA,599
139047 SERV ASSY, POLE CLAMP, 597XC/8XB
137522 ASSY,CLAMP,POLE,597XC/8XB(BOM)
301828 SCREW,MACH 6-32X1/2 PNH PHH
IVAC® Volumetric Pump (Models 597 & 598) 65/76 1000SM00016 Issue 3
Page 66

Spare Parts Listing
Electrical Parts Listing
Part Number Description
128140 ASSY,HARN,DSPL,80/90SER(BOM)
130038 ASSY,HARN,OPT,58X/3080/59X/599
133393 HARN,AIL,597/8/9
132327 CBL,34 COND,FLAT,597/8/9
134143 CABLE,PRES AMP BD,599
136062-1 ASSY,SNSR BD,OPT,59X/597/8/9
129471 BATT PACK,80/90 SER
143855 KIT,XFMR,581,591/7/8
133614 ASSY,XFMR,220V,80/90 SER
133091 PL,ADPT,XFMR,220V
140117-1 ASSY,DSPL BD,58X/90 SER(BOM)
139046-100 IT, LGC BD ASSY, NON FSO, 59X
144702 ASSY,LGC BD,CAL,FSO/NRSCL,597/8/9
142085 ASSY,PWR REG BD,CAL, 597/8/9
137737 HARNESS,P.E.,597XC/8XB
130210 ASSY,HARN,GND,80/90SER (BOM)
1000ME00452 ESD SHIELD 59X
140147 KIT,XDCR,AUD,590/1,2,597/8/9
300702 XSTR,3638A,PNP,AMP/SW,TO-92
301551 XSTR,3569,NPN,AMP/SW,TO-92
301553 XSTR,6109,PNP,PWR,TO-220AB
302422 XSTR,VN0610,MOSFET,N-CHAN
303141 XTAL,32.768KHZ
128048 IC,WATCH DOG,GATE ARRAY
302627 IC,RAM,2KX8,CMOS,24 DIP
302695 IC,74HC373,H SP LTCH 20 DIP
303287 IC,80C31,MICROCONTROLLER,40DIP (non-FSO)
303910 FUSE,1.5A,250V,NORM-BLO
301073 WIRE,ELEC STRD,18 AWG,BLK
303249 ADPT,IEC PWR/CD CONN
303250 CONN,PWR/CD REC 3/P 6A 250V
303467 FUSE HLDR,PNL MNT,FEF 031.1085
303489 FUSE,63MA 250V TIME LAG
120546 CORD,PWR,DUTCH LOCK 220V
Software
Part Number Description
143053 SERV,ASSY,MEM,1.10,597/8/9 FSO
136814 KIT,REV 10.05,ENG,599XC/8/7 (non-FSO)
IVAC® Volumetric Pump (Models 597 & 598) 66/76 1000SM00016 Issue 3
Page 67

Spare Parts Listing
Labels
Part Number Description
138961 OVLY,SW PANEL,ITAL,598(BOM)
137603 OVLY,SW PANEL,SWED,598(BOM)
137605 OVLY,SW PANEL,SPAN,599FSO/598
136013 OVLY,SW PANEL,GER,598(BOM)
138675 OVLY,SW PANEL,ENG,599FSO/598
138593 OVLY,SW PANEL,DUT,598(BOM)
138975 OVLY,SW PANEL,FREN,598(BOM)
132335 OVLY,SW PANEL,ENG,597/9(BOM)
135734 LBL VPVP ENG 597 (BOM)
137281 LBL,SPACE*SAVER,AUST,597(BOM)
137619 LBL,VPVP,DUT,598(BOM)
138668 LBL VPVP ENG 598 (BOM
135773 LBL VPVP FREN 598 (BOM)
135737 LBL,VPVP,GER,598(BOM)
137589 LBL VPVP ITAL 598 (BOM)
137623 LBL,VPVP,SPAN,598(BOM)
137621 LBL VPVP SWED 598 (BOM)
131866 LBL,SET LOADING, ENG,59X
131738 LBL,SET LOAD,GER,591/598
131739 LBL,SET LOAD,DUT,591/598
131740 LBL SET LOAD ITAL 591/598
131737 LBL,SET LOAD,SPAN,591/598
131735 LBL,SET LOAD,SWED,591/598
144178 LBL,SET LOAD,FREN,590/1/8
141565 LBL,TBG POSN,ENG,597/8/9
143671 LBL,TBG POSN,FREN,598
141686 LBL,TBG POSN,DUT,598
141682 LBL,TBG POSN,ITAL,598
141684 LBL,TBG POSN,GER,598
141683 LBL,TBG POSN,SPAN,598
141681 LBL,TBG POSN,SWED,598
126118 LBL,FLOW SNSR,DUT,281/581/591
126105 LBL,FLOW SNSR,GER,281/581/591
126124 LBL,FLOW SNSR,SPAN,28X/58X/591
126152 LBL,FLOW SNSR,ITAL,581/591
126106 LBL,FLOW SNSR,FREN,80/90SER
126119 LBL,FLOW SNSR,SWED,281/581/591
128100 LBL,FLOW SNSR,ENG,80/90SER
136006 LBL,NAME/RATING,ENG,597
136007 LBL,NAME RATING,598
1000LB00409 LABEL NAME RATING 59X
135708 LBL,START-UP,ENG,597(BOM)
137607 LBL,START-UP,DUT,598(BOM)
138671 LBL START UP ENG 598 (BOM)
135710 LBL START UP FREN 598(BOM)
IVAC® Volumetric Pump (Models 597 & 598) 67/76 1000SM00016 Issue 3
Page 68

Spare Parts Listing
Labels (continued)
Part Number Description
135712 LBL,START-UP,GER,598(BOM)
137588 LBL START UP ITAL 598 (BOM)
137611 LBL,START-UP,SPAN,598(BOM)
137609 LBL START UP SPAN 598(BOM)
141421 LBL,START-UP,DUT,598 FSO
141333 LBL,START-UP,ENG,597XD
141334 LBL,START-UP,ENG,598XC
141400 LBL,START-UP,ITAL,598 FSO
141404 LBL,START-UP,SWED,598 FSO
141408 LBL,START-UP,SPAN,598 FSO
141412 LBL,START-UP,FREN,598 FSO
141416 LBL,START-UP,GER,598 FSO
137613 LBL,ALARM MESS,DUT,598(BOM)
140166 LBL,ALARM MESS,ENG,598(BOM)
135913 LBL ALARM MESS FREN 598 (BOM)
138026 LBL,ALARM MESS,GER,598(BOM)
137587 LBL ALARM MESS ITAL 598 (BOM)
137617 LBL,ALARM MESS,SPAN,598(BOM)
137615 LBL ALARM MESS SWED 598(BOM)
141336 LBL,MESS,ENG,598XC
141335 LBL,ALARM MESS,ENG,597 FSO
141398 LBL,ALARM,MESS,ITAL,598,FSO
141402 LBL,ALARM MESS,SWED,598 FSO
141406 LBL,ALARM MESS,SPAN,598 FSO
141410 LBL,ALARM MESS,FREN,598 FSO
141419 LBL,ALARM MESS,DUT,598 FSO
141414 LBL,ALARM MESS,GER,598 FSO
133318 LBL,EQ POT CONN
137816 LBL,PATENT NTC,597/598/599
123273 LBL,GND SYM
137779 LBL,BATT,TYPE
136933 LBL CE MARK INST MDD
Test Equipment & Accessories
Part Number Description
192 FLOW SENSOR
134646 ASSY,TEST JMPR,J3,590/99SER
305601 GAUGE,PIN,.160”” PLUS
135740 SERV ASSY,TF,ADPT,CHRG,59X/599
1000SP01144 GREASE CASTROL LMX KIT
IVAC® Volumetric Pump (Models 597 & 598) 68/76 1000SM00016 Issue 3
Page 69

Appendix C
Fitting & Replacement Guidelines
In this chapter
Torque Guide 70
Page 70

Fitting & Replacement Guidelines
Torque Guide
Always use the correct torque level when making an assembly stage.
Take care with the torque applied when re-assembling parts. Less torque is required, so a hand tool may be more appropriate.
The head patterns of the fasteners are of the following types:
- Phillips Number 1
- Phillips Number 2
- Torx Number T30
- 4BA nut
- 2BA nut
- 14mm A/F nut
Always select the correct tool and bit pattern for the fastener.
The following list outlines the torque levels established during product manufacture.
Torque levels selected apply throughout product life for the IVAC® Volumetric Pump (Models 597 & 598).
Use the information below as a guide to the 'do not exceed' torque levels when servicing the pump. When servicing, it is recommended
that torque is applied gradually until the component is secure. In any process do not exceed the stated levels.
If a torque driver is available for servicing this will help control the applied torque; otherwise, be aware that excess force may cause the
component to fail.
Note: If torque level is not stated then fixing should be hand-tight.
Front Case Assembly
Established Process
Stage Description Component Description Qty
Follower Housing Assembly to Front Case SCREW,MACH 6-32X3/8 PNH PHH 1 90cNm
Air-In-Line Assembly to Front Case SCREW,MACH,4-40X5/8,PNH,PHH,SS 1 45cNm
Cam Housing Assembly to Front Case
(Top/Bottom)
Cam Housing Assembly to Front Case
(Middle)
Battery to Front Case SCREW,MACH 6-32X5/16 PNH PHH 2 90cNm
Door Strike Plate to front Case SCREW,MACH 4-40X3/16 PNH PHH 2 45cNm
Transformer to Front Case SCREW,MACH 6-32X3/8 PNH PHH 2 90cNm
PE Harness to Transformer NUT,KEP 6-32 S PL 1 70cNm
Display Board and Keyboard Assembly to
Front Case
SCREW,MACH 6-32X5/16 PNH PHH 2 90cNm
SCREW,MACH 6-32X1/2 PNH PHH 1 90cNm
NUT,KEP 4-40 S PL 2 45cNm
Torque
Rear Case Assembly
Established Process
Stage Description Component Description Qty
Logic and Power Regulator Board to Rear
Case
Fuse Holders to Rear Case HEX NUT (integral part of fuse holders) 2 70cNm
PE Harness to Rear Case SCREW,MACH,6-32X3/16,PNH,PHH 1 90cNm
Power Cord Adapter/Mains Inlet to Rear
Case
Pole Clamp to Rear Case SCREW,MACH 6-32X1/2 PNH PHH 2 140cNm
SCREW,MACH 6-32X7/8 PNH PHHD 3 90cNm
SCREW,TPG #4-20X.500 PNH PHH 2 90cNm
Torque
Final Assembly
Established Process
Stage Description Component Description Qty
Front Case to Rear Case SCREW, INSERT MOLDED 4 80cNm
IVAC® Volumetric Pump (Models 597 & 598) 70/76 1000SM00016 Issue 3
Torque
Page 71

Service Contacts
Appendix D
Page 72

Service Contacts
Service Contacts
For service, contact your local Cardinal Health Affiliate Office or Distributor.
AE
Cardinal Health,
PO Box 5527,
Dubai, United Arab Emirates.
Tel: (971) 4 28 22 842
Fax: (971) 4 28 22 914
AU
Cardinal Health,
8/167 Prospect Highway,
Seven Hills, NSW 2147,
Australia.
Tel: (61) 2 9838 0255
Fax: (61) 2 9674 4444
Fax: (61) 2 9624 9030
BE
Cardinal Health,
Otto De Mentockplein 19,
1853 Strombeek - Bever,
Belgium.
Tel: (32) 2 267 38 99
Fax: (32) 2 267 99 21
CA
Cardinal Health,
235 Shields Court,
Markham,
Ontario L3R 8V2,
Canada.
Tel: (1) 905-752-3333
Fax: (1) 905-752-3343
CN
Cardinal Health,
Shanghai Representative
Office, Suite 9B,
Century Ba-Shi Building,
398 Huai Hai Rd(M.),
Shanghai 200020,
China.
Tel: (56) 8621-63844603
Tel: (56) 8621-63844493
Fax: (56) 8621-6384-4025
DE
Cardinal Health,
Pascalstr. 2,
52499 Baesweiler,
Deutschland.
Tel: (49) 2401 604 0
Fax: (49) 2401 604 121
ES
Cardinal Health,
Avenida Valdeparra 27,
28108 - Alcobendas,
Madrid, España.
Tel: (34) 91 657 20 31
Fax: (34) 91 657 20 42
FR
Cardinal Health,
Immeuble Antares Technoparc,
2, rue Charles-Edouard
Jeanneret.
78300 POISSY,
France.
Tél: (33) 1 30 06 74 60
Fax: (33) 1 39 11 48 34
GB
Cardinal Health,
The Crescent, Jays Close,
Basingstoke,
Hampshire, RG22 4BS,
United Kingdom.
Tel: (44) 0800 917 8776
Fax: (44) 1256 330860
HU
Cardinal Health,
Döbrentei tér 1,
H-1013 Budapest,
Magyarország.
Tel: (36) 14 88 0232
Tel: (36) 14 88 0233
Fax: (36) 12 01 5987
IT
Cardinal Health,
Via Ticino 4,
50019 Sesto Fiorentino,
Firenze, Italia.
Tél: (39) 055 30 33 93 00
Fax: (39) 055 34 00 24
NL
Cardinal Health,
Kantorenpand “Hoefse Wing”,
Printerweg, 11,
3821 AP Amersfoort,
Nederland.
Tel: (31) 33 455 51 00
Fax: (31) 33 455 51 01
NO
Cardinal Health
Solbråveien 10 A,
1383 ASKER,
Norge.
Tel: (47) 66 98 76 00
Fax: (47) 66 98 76 01
NZ
Cardinal Health,
14 George Bourke Drive
Mt Wellington, Auckland
PO Box 14234
Panmure, Auckland
Tel: 09 270 2420
Freephone: 0508 422734
Fax: 09 270 6285
SE
Cardinal Health,
Hammarbacken 4B,
191 46 Sollentuna,
Sverige.
Tel: (46) 8 544 43 200
Fax: (46) 8 544 43 225
US
Cardinal Health
10221 Wateridge Circle,
San Diego, CA 92121,
USA.
Tel: (1) 800 854 7128
Fax: (1) 858 458 6179
ZA
Cardinal Health,
Unit 2 Oude Molen Business
Park,
Oude Molen Road, Ndabeni,
Cape Town 7405, South
Africa.
Tel: (27) (0) 860 597 572
Tel: (27) 21 510 7562
Fax: (27) 21 5107567
IVAC® Volumetric Pump (Models 597 & 598) 72/76 1000SM00016 Issue 3
Page 73

Disposal
In this chapter
Disposal 74
Appendix E
Battery Removal 74
Page 74

Disposal
Ensure the Pump is disconnected from the AC power supply and switched off before attempting to
service.
VThe Pump contains static-sensitive components and therefore strict ESD precautions should be
observed at all times.
Only use Cardinal Health recommended spare parts.
Following all spare part replacement and repair activities, testing must be performed in accordance
with the Performance Verification Procedure (PVP), see Chapter 3, Routine Maintenance.
Disposal
Information on Disposal for Users of Waste Electrical & Electronic Equipment
This U symbol on the product and/or accompanying documents means that used electrical and electronic products should
not be mixed with municipal waste.
If you wish to discard electrical and electronic equipment, please contact your Cardinal Health affiliate office or distributor
for further information.
Disposing of this product correctly will help to save valuable resources and prevent any potential negative effects on human
health and the environment which could otherwise arise from inappropriate waste handling.
Information on Disposal in Countries outside the European Union
This symbol is only valid in the European Union. The product should be disposed of taking environmental factors into
consideration. To ensure no risk or hazard, remove the internal rechargeable battery and dispose of as outlined by the local
country regulations. All other components can be safely disposed of as per local regulations.
Battery Removal
Removal Procedure
1. Remove the four corner screws located on the
back of the rear case.
2. Carefully separate the two sections of the case.
Note: The door hinge pins may fall out at this time.
Take care not to lose them.
3. Unplug the battery connector from the Power
Regulator Board (at J3). Remove cable ties as
required.
4. Remove the two screws securing the battery to the
front case.
5. Pull the battery up and out of the front case.
Battery
Screw (x2) / Washer (x4)
IVAC® Volumetric Pump (Models 597 & 598) 74/76 1000SM00016 Issue 3
Page 75

Document History
Appendix F
Page 76

Document History
Issue Date CO No. Author Update Description
1 18/05/05 5571 Clare Coney Initial release - (Supersedes 141745 and 137879)
Moved Document History and Service Contacts to Appendixes
Corrected Pressure calibration in Chapter 2
2 4/11/05 6227 Ian Tyler
3 December 2006 7240 Ian Tyler
Added statement for test procedures after parts replacement in Chapter 5
Updated information on when replacing Cam Follower in Chapters 2 & 5
Rebranded from ALARIS Medical Systems to Cardinal Health
Correct Secondary operation.
Change Manufacturer address.
Add Disposal appendix.
IVAC® Volumetric Pump (Models 597 & 598) 76/76 1000SM00016 Issue 3
 Loading...