

Page 1

TECHNICAL MANUAL
FOR
INSTALLATION, OPERATION
Effective Date: 12-04
AND MAINTENANCE
OF
THE CAPTIVE-AIRE
MODEL "C-TPF" SERIES
POLLUTION CONTROL UNITS
WITH CFM-100 SERIES MONITORING STATION
W ARNING
Improper installation, adjustment, alteration service or maintenance can cause property damage, injury or death. Read
the installation, operation and maintenance instructions thoroughly before installing or servicing this equipment. Only
trained and qualified service personnel should install or service this equipment.
CAPTIVE-AIRE SYSTEMS, INC.CAPTIVE-AIRE SYSTEMS, INC.
CAPTIVE-AIRE SYSTEMS, INC.
CAPTIVE-AIRE SYSTEMS, INC.CAPTIVE-AIRE SYSTEMS, INC.
360 NORTHBROOK DRIVE • YOUNGSVILLE, NC 27596 USA
PHONE: 919-554-2414 • TOLL FREE: 866-784-6900 • FAX: 919-554-9374
email:webhome@captiveaire.com • www.captiveaire.com
Page 2

2
Page 3

TECHNICAL MANUAL
FOR
INSTALLATION, OPERATION
AND MAINTENANCE
OF
THE CAPTIVE-AIRE
MODEL “C-TPF” SERIES
POLLUTION CONTROL UNITS
WITH CFM-100 SERIES MONITORING STATION
Published by:
CAPTIVE-AIRE SYSTEMS, INC.
Y oungsville, North Carolina 27596
U.S.A.
First Printing: December, 2004
© Copyright 2004, Captive-Aire Systems, Inc.
ALL RIGHTS RESERVED. NO PART OF THIS BOOK MAY BE REPRODUCED, STORED IN A RETRIEVAL SYSTEM, OR TRANSMITTED IN ANY
FORM BY AN ELECTRONIC, MECHANICAL, PHOTOCOPYING, RECORDING MEANS OR OTHERWISE WITHOUT THE WRITTEN PERMISSION
OF CAPTIVE-AIRE SYSTEMS, INC. COPYRIGHT 2004.
The manufacturer reserves the right to modify the materials and specifications resulting from a continuing
program of product improvement or the availability of new materials.
The Captive-Aire Unit is designed and engineered by
CAPTIVE-AIRE SYSTEMS, INC.
360 Northbrook Drive, Y oungsville, North Carolina 27596.
3
Page 4

TABLE OF CONTENTS
INTRODUCTION ..........................................................................................5
SPECIFICATIONS ....................................................................................6-7
MODEL NUBER EXPLANA TION.................................................................8
TYPICAL INST ALLA TION .............................................................................9
SAMPLE C-TPF CONFIGURA TIONS ...................................................10-11
RECEIVING & INST ALLA TION ...................................................................12
EQUIPMENT LIFTING PROCEDURE ........................................................13
ASSEMBLING RSPC HOUSING ON UNITS SPLIT FOR SHIPMENT....14-15
CFM-100 MONITORING ST A TION (P ARTS)..........................................16-17
ODOR CONTROL SECTION ................................................................18-21
EXHAUST F AN SECTION ....................................................................22-23
NAMEPLATE DATA...................................................................................24
OPERA TING MA TRIX ................................................................................25
PRESSURE SWITCH TUBING DIAGRAM .................................................2 6
MAINTENANCE.........................................................................................27
CFM-100 TERMINAL VOL TAGES .............................................................28
WIRING DIAGRAM.....................................................................................29
PARTS-MISCELLANEOUS ......................................................................30
ST ART -UP INSTRUCTIONS.......................................................................31
C-TPF ST ART -UP INSPECTION REPORT ................................................32
WARRANTY........................................................................Inside back cover
4
Page 5

INTRODUCTION
ir quality is a major concern in many large cities world
A
wide, particularly in America. As a result, many commercial kitchens will require pollution control equipment in their
exhaust systems to comply with the increasing demands of
environmental control agencies. In addition, pollution control
equipment is being used for kitchens in high-rise buildings allowing the exhaust to discharge out the side of the structure
which saves the cost of running the duct up many floors to the
roof.
Smoke pollution control, in kitchen exhaust systems, has typically been accomplished by any one of the following methods:
gas fired incinerators, scrubbers, filtration units or electrostatic
precipitators (C-ESP). Incinerators and afterburners literally burn
the pollutants and, while effective, can be very costly and hazardous to operate. Scrubbers consist of a water bath and extraction baffles to remove the pollutants and, though quite effective on grease removal, they typically require the addition of
high efficiency filters to abate smoke below control agencies’
standards. Filtration units use a series of impingement filters to
remove the pollutants and if done properly can be quite effective
on both smoke and grease.
Captive-Aire offers two types of pollution control equipment:
the C-TPF Series (triple pass filter) detailed in this manual
and the C-ESP Series (electrostatic precipitator) detailed in
the C-ESP Series brochure. When initial cost is a greater
concern, the C-TPF unit is a sound alternative.
The C-TPF unit is available in several configurations, as illustrated on the following pages, ranging in capacity from
1000 to 32,000 CFM (472 to 15,102 L/s). Most models can
include an exhaust fan and odor abatement equipment as
an option.
Basic Facts About Smoke
Smoke particles are extremely small and not visible to the
human eye unless thousands of them are grouped together
to form what we see as smoke. Individual particles are measured in units called microns and one micron equals 1/25,400
of an inch (1/64,516 of a cm).
Smoke generated by commercial cooking equipment has a
particulate size of between 0.3 and 0.8 microns and it is
these very small particles that smoke abatement equipment
must remove from the airstream. The amount of smoke being discharged from a kitchen exhaust duct is measured in
terms of its density, referred to as opacity - the degree to
which emissions block light. A 100% opacity level would be
solid black and 0% would be perfectly clear. Control agencies that have adopted smoke pollution ordinances are requiring an opacity level of no more than 20%, which is a very
light blue smoke.
Typically, heavy smoke producing cooking such as charbroiling, creates an opacity level of 60% to 70%. Opacity
readings are taken by the human eye by viewing the smoke
being discharged and then assigning a percentage of opacity to what is seen. Though this method is quite subjective,
it is the method practiced by control agency inspectors who
are trained and certified in determining opacity percentages.
Other more technical methods of determining opacity or par-
ticulate density are achieved through the use of opacity meters
and cascade impactors. This level of analysis is usually referred to as source testing. Control agencies occasionally
require this type of analysis and if so, the testing is conducted by state certified contractors which can be quite costly
and time-consuming. The efficiency of a C-TPF is based on
how well it reduces the opacity level of a given airstream.The
Captive-Aire unit will reduce the opacity level below 20%,
thereby meeting the requirements of environmental control
agencies.
Basic Facts About Odor
Cooking odors (molecules) generated by the combustion of
animal and vegetable matter result in an extremely complex
mixture of reactive organic gases (ROG’s). A small percentage of
these odors may be absorbed by the grease particles but the
vast majority exist separately in the airstream. The ROG molecules are much too small to be removed by any type of filter and
therefore, other methods must be used. There are several methods with which to manage the odor. One method is to use a
media bed. The two most popular types of media bed are activated charcoal, which absorbs and retains the odor molecules,
and the use of an odor-oxidant media (potassium permanganate) which oxidizes the molecules to solids and then retains them.
The other method involves the use of a liquid delivered with a finely
atomized spray. This spray performs a similar function to potassium permanganate in that it adsorbs or chemically neutralizes
odors. This process has the benefit of the end user being able to
adjust the amount of spray and thus the effectiveness and cost of
the odor control.
The life of the media bed type of odor control is dependent
upon several factors such as how much media is used, type
of odor, amount of odor molecules, grease loading and air
temperature. Typically, any of the above mentioned types of
media can remove 85% - 90% of the molecules. Determining
the efficiency of odor control can be very subjective, as testing
is usually conducted by the human nose. More scientific testing is available through ROG analysis, but this involves considerable costs.
Grease Removal - The Important First Step
Grease particles are also measured in terms of microns and
grease generated by commercial cooking equipment has a
particulate size of 10 microns and up. Pollution control equipment is not limited to removing smoke particles, but will also
remove a majority of the grease particles remaining in the
airstream. Therefore, the grease extraction efficiency of the
exhaust hood plays an important role in the operation and
performance of pollution control equipment.
Removal of grease particles before they reach smoke and
odor control equipment will significantly increase the smoke
abatement efficiency and the life of the odor abatement media. It is highly recommended that a Captive-Aire Ventilator be
used with the C-TPF unit as it has a grease extraction efficiency of 95%. Other high efficiency exhaust hoods and standard filter type hoods may be used with the unit. Contact Captive-Aire Systems for details.
5
Page 6

SPECIFICATIONS
General
Furnish one (1) Captive-Aire Pollution Control Unit model CTPF series as manufactured by Captive-Aire Systems, Inc. of
Y oungsville, North Carolina in accordance with the following:
The pollution control unit shall consist of a smoke control
section, odor control section (optional) and an exhaust fan
section (optional) all built on a common base as an integral
unit. Smoke control shall be accomplished by a three stage
high efficiency filter section (C-TPF). The unit shall be ETL
listed and labeled.
Smoke Control Section
The smoke control section shall have three phases of filters
The filters shall consist of replaceable 30% pre-filter, 95%
bag filter and a replaceable 99% final filter. Replaceable filters shall be mounted in filter slide tracks to prevent air bypass around the ends of the installed filter bank. Filters shall
be accessed through removable side access panels with lift
and turn latches.
Phase one filters shall have an average efficiency of 25 to
30% and an average arrestance of 90 to 92% in accordance
with ASHRAE test standard 52.1-1992. Media support grid
shall be on 1" centers with an open area 96%. Filter enclosing frame shall be a rigid, high wet strength beverage board,
with diagonal support members 4" deep.
Phase two filters shall have an average efficiency of 90 to
95% in accordance with ASHRAE test standard 52.1-1992.
Sealing surface and pocket retainers shall be configured to
provide 84% open area. Seams in bag filters shall be sealed
with foamseal adhesive to completely eliminate air leakage
through stitch holes.
Phase three filters shall be 95% efficient on .03 micron particles (DOP smoke test), 97% efficient on nebulized staphylococcus aerosols, 99+% efficient on atmospheric test dust
(ASHRAE standard 52.1-92). The casing shall be 16 gauge
steel with corrugated aluminum separators to insure media
stability. Media shall be fine-fiber, high strength
microfiberglass paper. Media end cut s shall be encapsulated
in urethane potting adhesive.
Fire Detection
A thermostat, set at 250o F, shall also be located in the filter
section to shut down the exhaust fan in the event of a fire.
Optional Fire Damper for use in Canada
The unit shall include a UL listed fire damper, with a 280o F
fusible link, located downstream of the filters to prevent passage of fire to the duct downstream of the unit
Filter Monitoring Panel
A monitor panel, for remote location, shall be supplied for the
operation and monitoring of the unit. The panel shall be constructed of 18 gauge stainless steel, number 4 finish, and be
suitable for surface or recessed mounting. The panel face
shall be a hinged door with a lift and turn flush latch. The
panel shall include an air proving time delay , relays and indicator lights to continuously monitor the unit. Indicator lights
shall be “Fan On”, “Normal Air”, “Low Air”, “Replace Pre-Filters”, “Replace Bag Filters”, “Replace Final Filter”, “Missing
Filter”, and “Fire In Unit”. An audible alarm, with an alarm
cancel button, shall be included and shall activate whenever
the unit status is low air, replace filters, missing filters or fire
in the unit. Status other than “Fire In The Unit” shall not shut
down the exhaust fan.
Specifier Note: If the C-TPF unit is used in conjunction with a
water wash ventilator, the monitor p anel is built into the main
water wash control cabinet model CGPC-6000 series.
Odor Control Options
Media bed of 50/50 Blend Potassium Permanganate and
Carbon Blend
The unit shall be provided with odor control utilizing a media
bed of 50% potassium permanganate 50% carbon blend. The
odor removal media shall be housed in slide out reusable steel
modules. There shall be a 30% pleated media after filter located immediately downstream of the odor control media. Replaceable filters shall be mounted in filter slide tracks to prevent air bypass around the ends of the installed filter bank. The
odor control media and after filters shall be removable through
side access doors with lift and turn latches.
Spray Odor Control
The unit shall be provided with a spray odor control system
utilizing an odor neutralizer chemical. The odor spray control cabinet shall be mounted on the side of the unit and
shall contain a liquid spray compressor piped to the spray
nozzle in the fan plenum, adjustable delay timers with fuse
protected circuitry factory wired to the unit electrical panel.
The cabinet shall include one 5 gallon container of Formula
GS-710 Odor Neutralizer. The cabinet shall cont ain a heater
to prevent freezing of the odor neutralizer.
Exhaust Fan Options
Exhaust Fan (Standard Centrifugal Fan)
The unit shall include a centrifugal exhaust fan. The exhaust
fan shall be an SWSI upblast arrangement #9 or #10 with a
non-overloading BI or AF wheel. The motor, drives, bearings
and fan mounting base shall be located out of the exhaust
air stream as required by the IMC (International Mechanical
Code) and NFP A-96. The fan shall be AMCA certified and
bear the AMCA seal for performance. The fan housing shall
be constructed of heavy gauge steel. The fan bearings shall
be heavy duty self-aligning pillow block type rigidly mounted
on heavy structural steel supports. The motor shall be ODP
three phase mounted on a common base with the fan and
shall be pre-wired to the electrical cabinet located on the
unit. The electrical cabinet shall include a disconnect switch,
motor starter, overloads and fuses. The factory provided drive
assembly shall be adjustable pitch on 5 HP and smaller,
fixed pitch on 7.5 HP and larger . It shall also be sized for a
minimum 1.5 service factor. After final system balancing,
fixed pitch sheaves shall be provided and installed by the air
balancing contractor to provide proper flow at actual installed
conditions.
Exhaust Fan (Optional Tubular Fan)
The unit shall include a tubular centrifugal exhaust fan. The
exhaust fan shall be an arrangement #10 with a non-overloading BI, AF wheel. The motor, drives, bearings and fan mounting
6
Page 7

SPECIFICATIONS
base shall be located out of the exhaust air stream as required
by the IMC (International Mechanical Code) and NFPA-96. The
fan shall be AMCA certified and bear the AMCA seal for performance. The fan housing shall be constructed of heavy gauge
steel. The fan bearings shall be heavy duty rigidly mounted on
heavy structural steel supports. The motor shall be ODP three
phase mounted on a common base with the fan and shall be
pre-wired to the electrical cabinet located on the unit. The electrical cabinet shall include a disconnect switch, motor starter, overloads and fuses. The factory provided drive assembly shall be
adjustable pitch on 5 HP and smaller and fixed pitch on 7.5 HP
and larger. It shall also be sized for a minimum 1.5 service factor.
After final system balancing, fixed pitch sheaves shall be provided and installed by the air balancing contractor to provide
proper flow at actual installed conditions.
Exhaust Fan Housing
The exhaust fan section of the unit shall be enclosed with the
same material as the smoke control section. There shall be
a removable panel for access to the fan.
Unit Construction
The unit housing shall be constructed of a minimum of 16
gauge G90 bright galvanized steel. The perimeter base shall
be 12 gauge formed channel with lifting lugs at each corner
and along the length as required. The internal housing shall
be externally welded liquid tight for compliance to the International Mechanical Code and NFPA-96 grease duct construction requirements.
Fire Extinguishing System Options
Specifier Note: NFPA-96 requires a fire extinguishing system for protection of the smoke and odor control sections
and protection of the duct down stream of any filters or dampers. Not all authorities having jurisdiction require protection.
Check with your AHJ. If required, specify one of the following
systems.
Wet chemical system
Provide a complete factory mounted Ansul wet chemical fire
extinguishing system, including nozzles piping and detection runs. Pipe penetrating the unit cabinet shall use a UL
listed fitting. System shall be installed in accordance with
the systems listing and NFP A-96. The Ansul Automan cabinet shall be mounted on the side of the unit for easy access,
certification and service.
Water spray sprinkler fire system
Specifier Note: Units that are located indoors may be factory
pre-piped for a wet pipe building sprinkler system.
Check Out and Demonstration
Upon completion of installation, the entire pollution control
system, including the kitchen exhaust hoods, shall be commissioned by a factory certified service technician. Start-up
shall include checking all filters, filter monitoring station, odor
control and exhaust fan. The appropriate maintenance personnel shall be given a technical manual and a complete
demonstration of the system, including operation and maintenance procedures. Upon completion of the commissioning, a detailed start-up report shall be made available to the
architect and owner certifying proper system operation.
Changes required in fan drive components shall be performed
by the air balancing contractor under the direction of the factory certified person(s) performing the start-up.
FIL TER MONITORING ST A TION
CFM-100
Green
Green
Clear
Clear
Clear
Clear
Red
Red
Red
Provide a pre-piped water spray fire system installed in accordance with NFP A-96. The unit shall be piped with one pendent type sprinkler nozzle located in the smoke control section, one in the odor control section, if equipped with 50/50
media bed, and one in the exhaust fan section for interconnection to the building sprinkler system by the appropriate trades.
Pipe penetrating the unit cabinet shall use a UL listed fitting.
Nozzles shall be the bulb type rated at 325o F.
7
Page 8
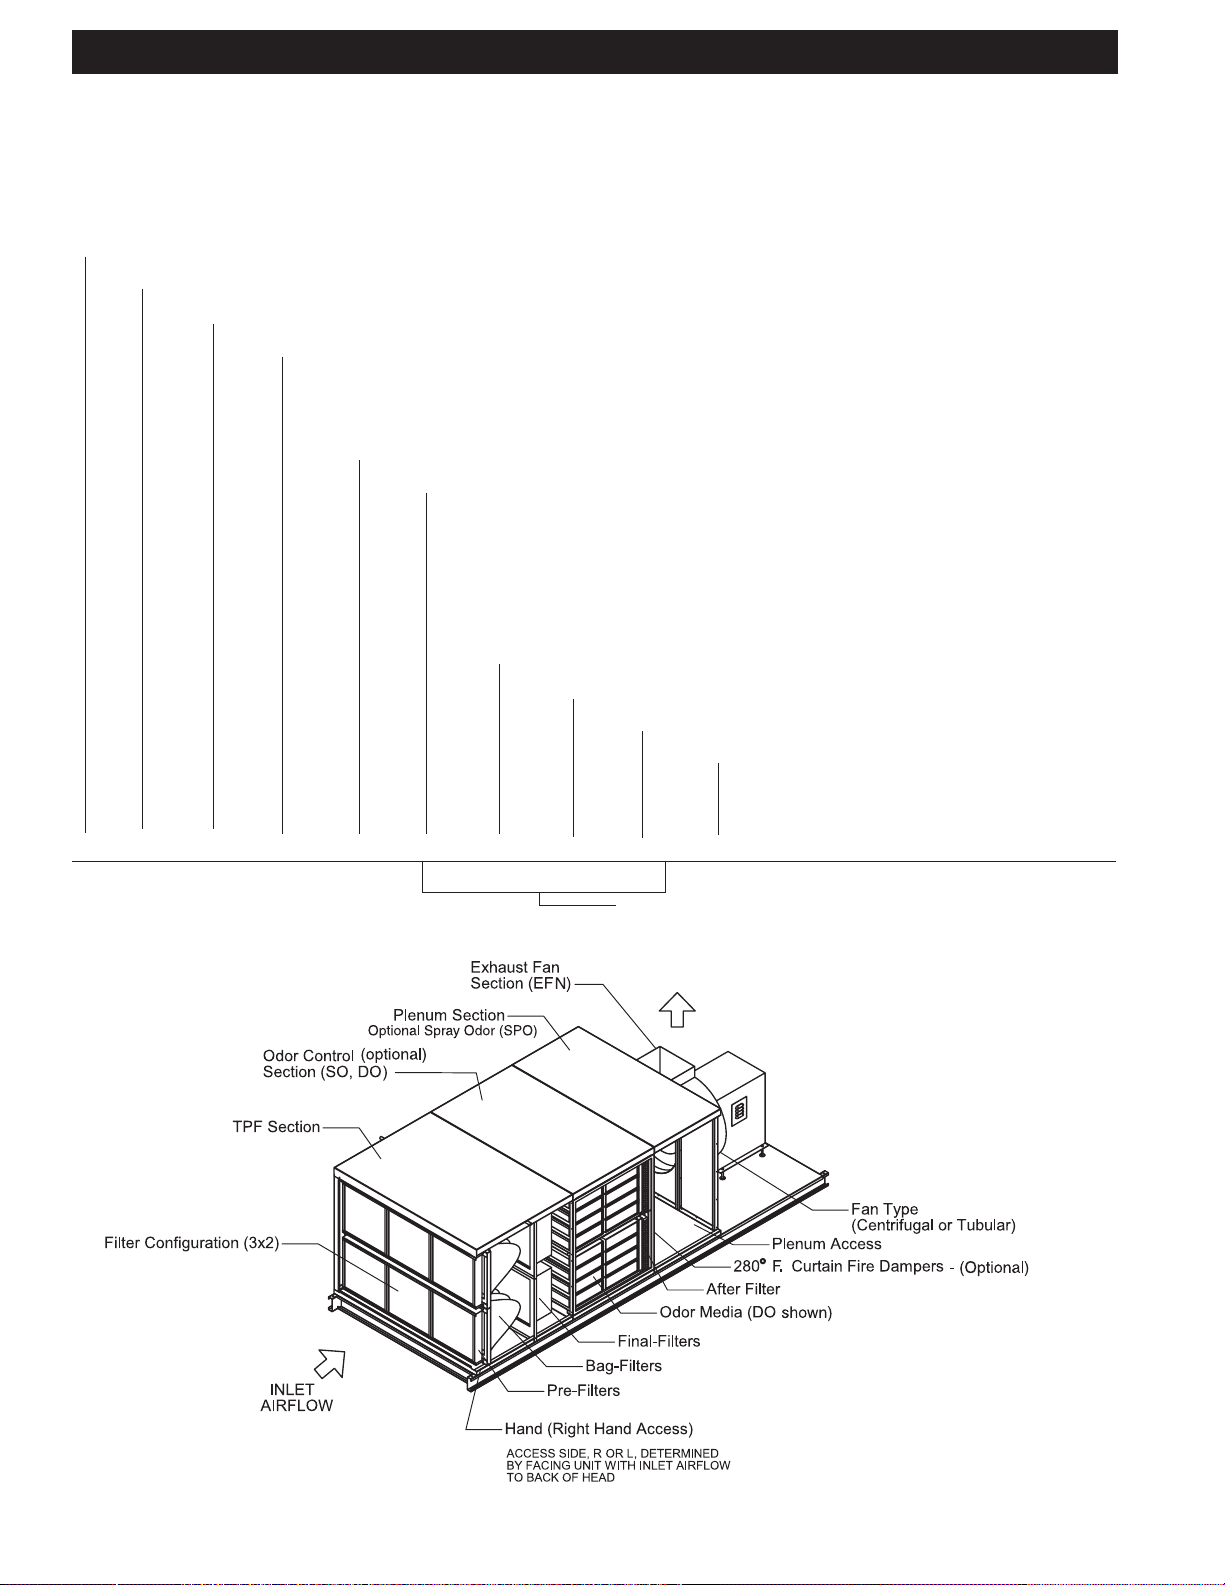
MODEL NUMBER EXPLANATION
The assigned model number of a C-TPF unit will indicate the number of Filter Banks and if it has spray odor control, single or
double pass odor control, if it has an exhaust fan plus other data. The following example shows the make-up of a model number .
The model number of your unit along with other data can be found on the nameplate which is attached to the electrical
control panel on the unit. Refer to page 24.
Standard Prefix Series of ClearAirTM System (Remote Smoke Pollution Control)
Triple Pass Filter
Filter Configuration (W x H) - 1x1, 2x1, 3x1, 2x2, 3x2, 4x2, 3x3, 4x3, 3x4, 4x4
Odor Control Option:
SO = Single Pass Odor Control
DO = Double Pass Odor Control
SPO = Spray Odor
T otal CFM (1000 - 32,000)
Exhaust Fan Option:
EFS = Exhaust Fan, unhoused, spring isolated
EFN = Exhaust Fan, unhoused, not spring isolated
EFHS = Exhaust Fan, housed, spring isolated
EFHN = Exhaust Fan, housed, not spring isolated
(BLANK) = No Exhaust Fan
Fan T ype = C (Centrifugal), T (T ubular)
Fan Size (ie. 100 - 490)
Fan Motor H.P. (ie. 1 - 75)
Hand - R = Right Hand
L = Left Hand
C - TPF - 3x2 - DO - CFM - EFN - C - 300 - 15 - R
BLOCK 1 2 3 4 5 6 7 8 9
All Blank, if no exhaust fan
8
Page 9
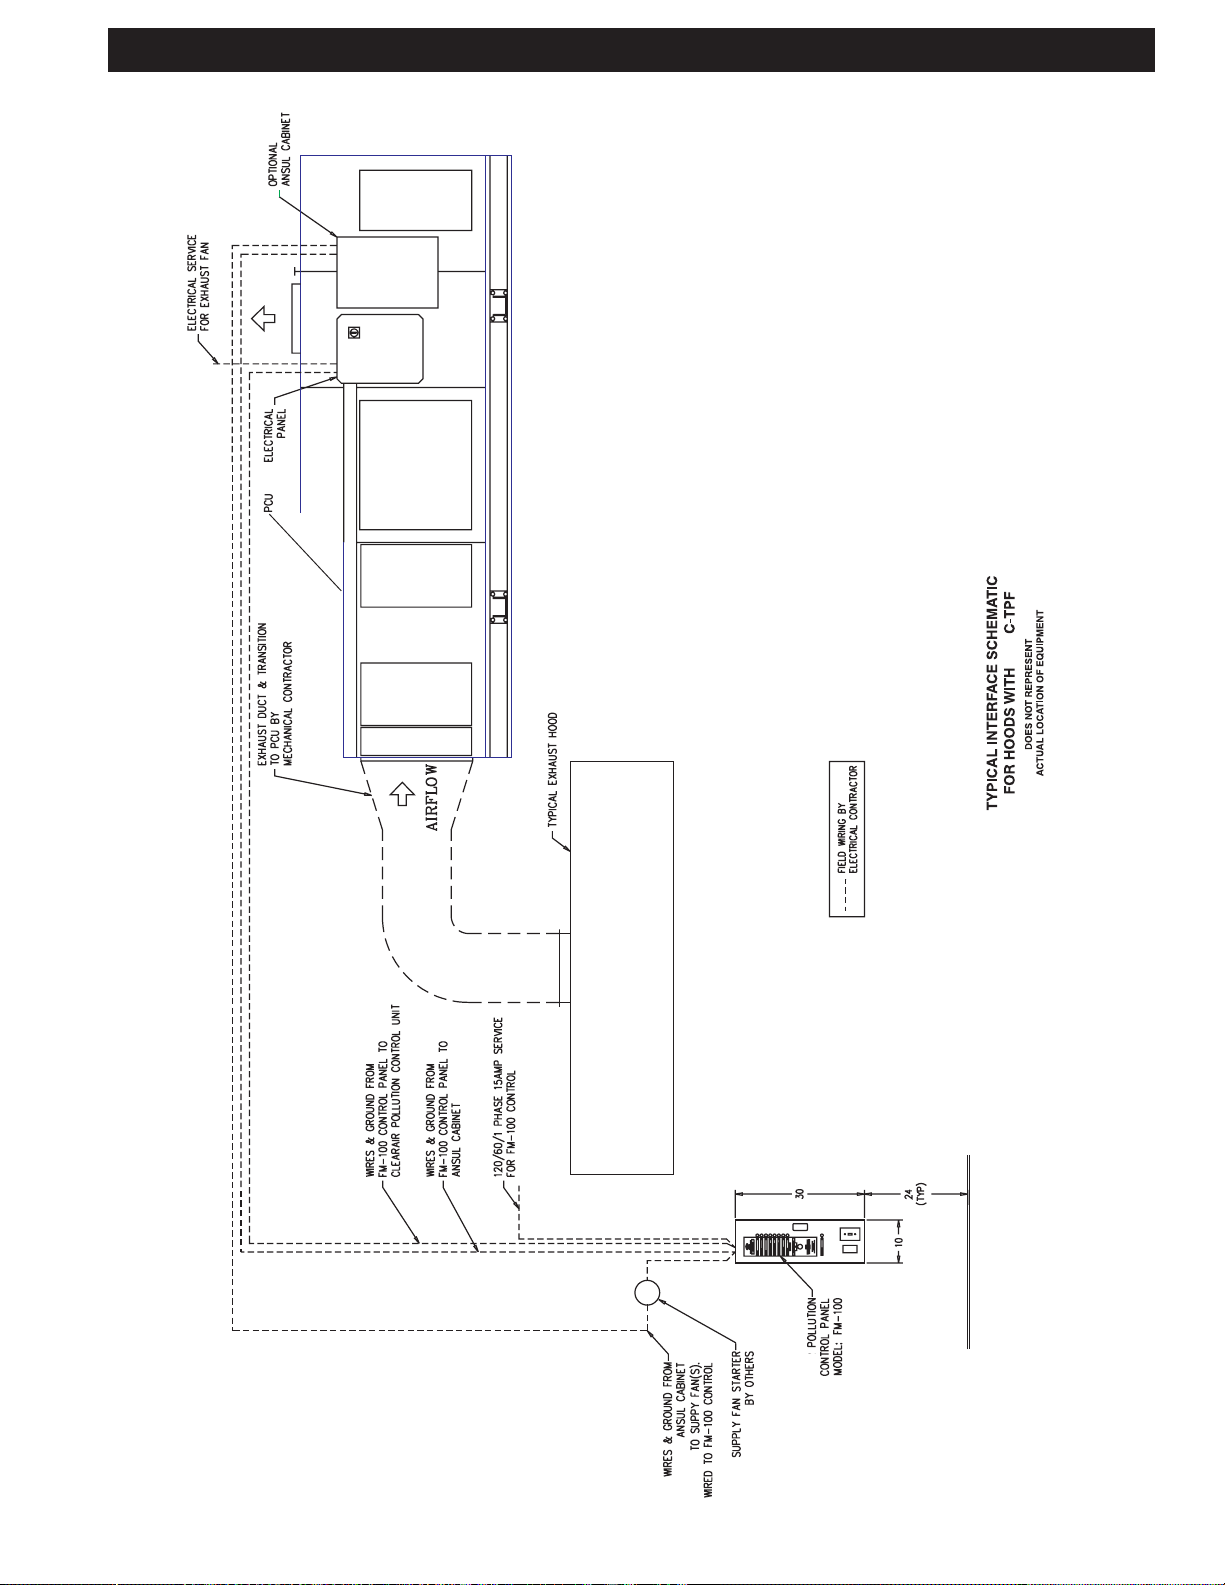
TYPICAL INSTALLATION
9
Page 10
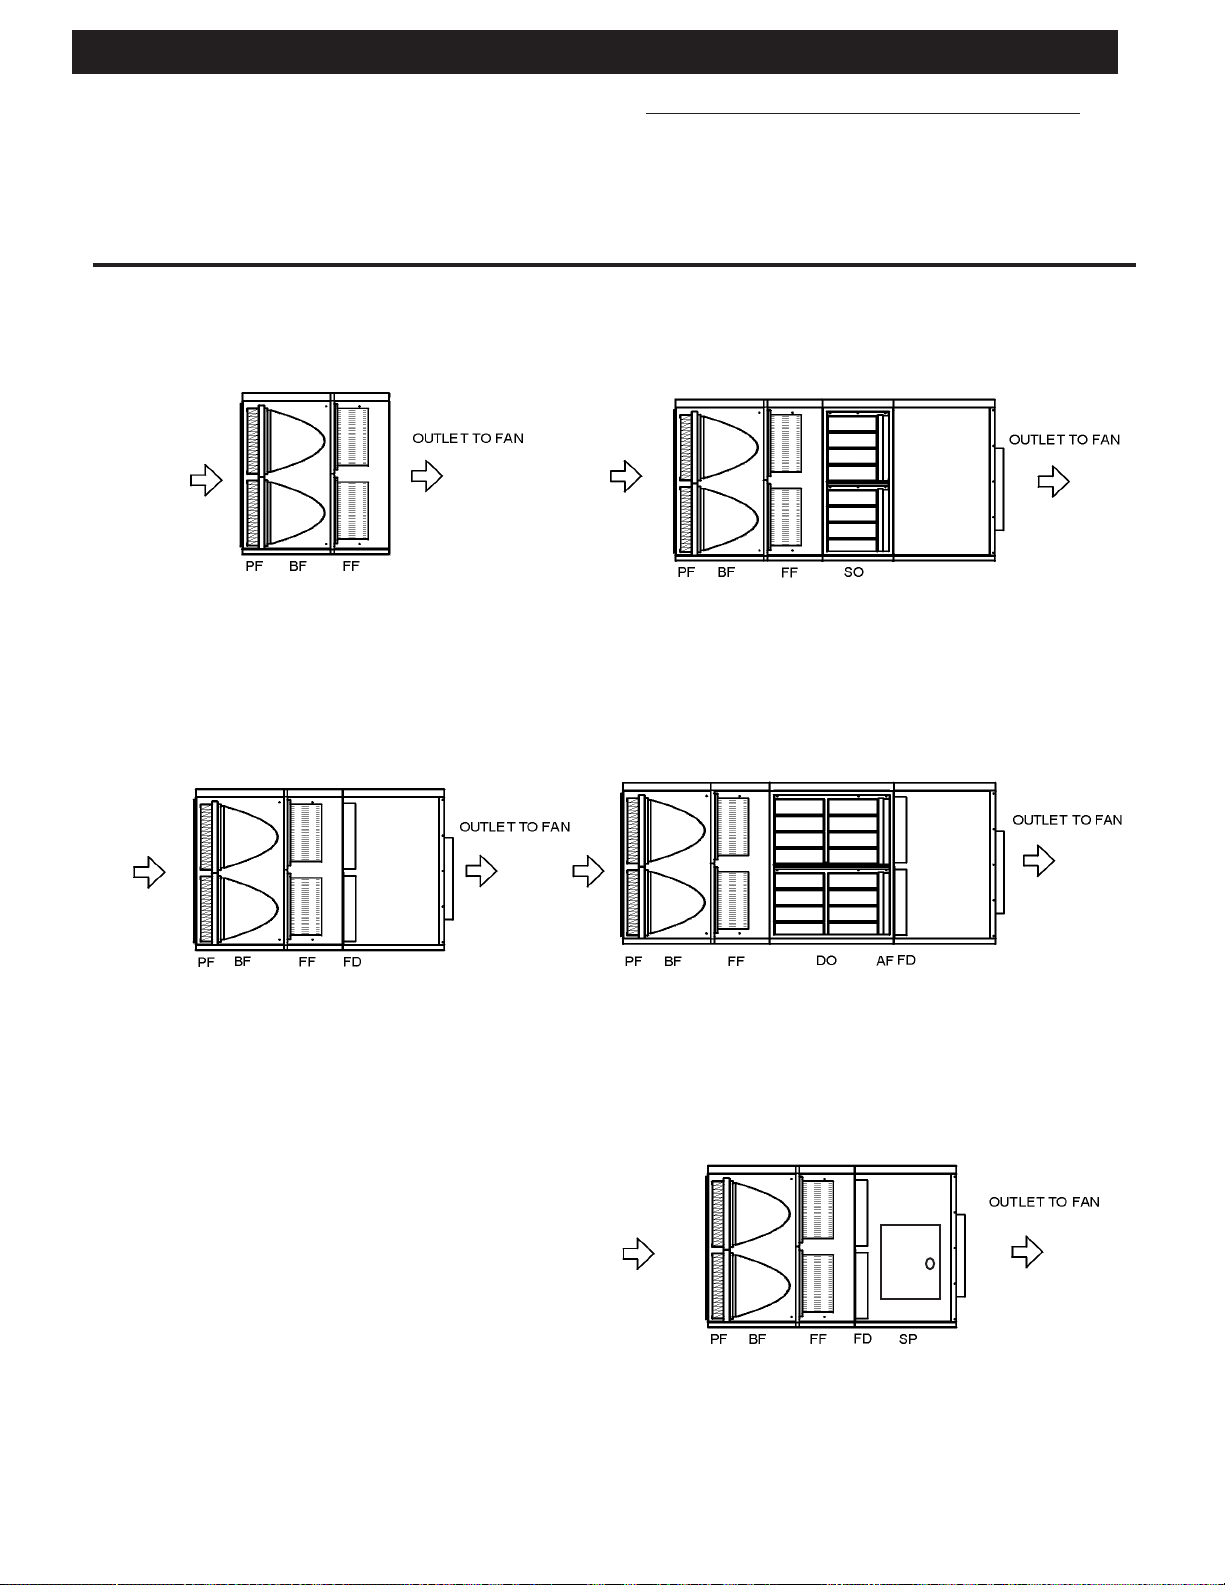
SAMPLE C-TPF CONFIGURATIONS
The C-TPF unit is available in sizes ranging in capacity
from 1000 to 32,000 CFM (472 to 15,102 L/s). Each unit
is equipped with Three Phase Filters for smoke control,
and may include an exhaust fan, odor abatement equipment and Quencher System, or Ansul System as an option. The following illustrations are examples of the most
common configurations.
C-TPF
SMOKE CONTROL ONL Y
KEY
AF = 30% After Filter
BF = 95% Bag Filter
DO = Double Pass Odor
Kor48/Carbon blend
EF = Exhaust Fan–un-housed
EFH = Exhaust Fan–housed
FD = Optional Curtain Fire
Damper
FF = 99% Final Filter
PF = 30% Pre-Filter
SO = Single Pass Odor
Kor48/Carbon blend
SPO = Spray Odor Cabinet
AF
C-TPF-SO
SMOKE CONTROL
WITH SINGLE PASS MEDIA BED ODOR CONTROL
C-TPF
SMOKE CONTROL
WITH PLENUM
C-TPF-DO
SMOKE CONTROL
WITH DOUBLE P ASS MEDIA BED ODOR CONTROL AND
OPTIONAL FIRE DAMPER
O
C-TPF-SPO
SMOKE CONTROL WITH SPRA Y ODOR CONTROL
AND OPTIONAL FIRE DAMPER
(Remote Fan)
10
Page 11
C-TPF-EF
C-TPF-SO-EF
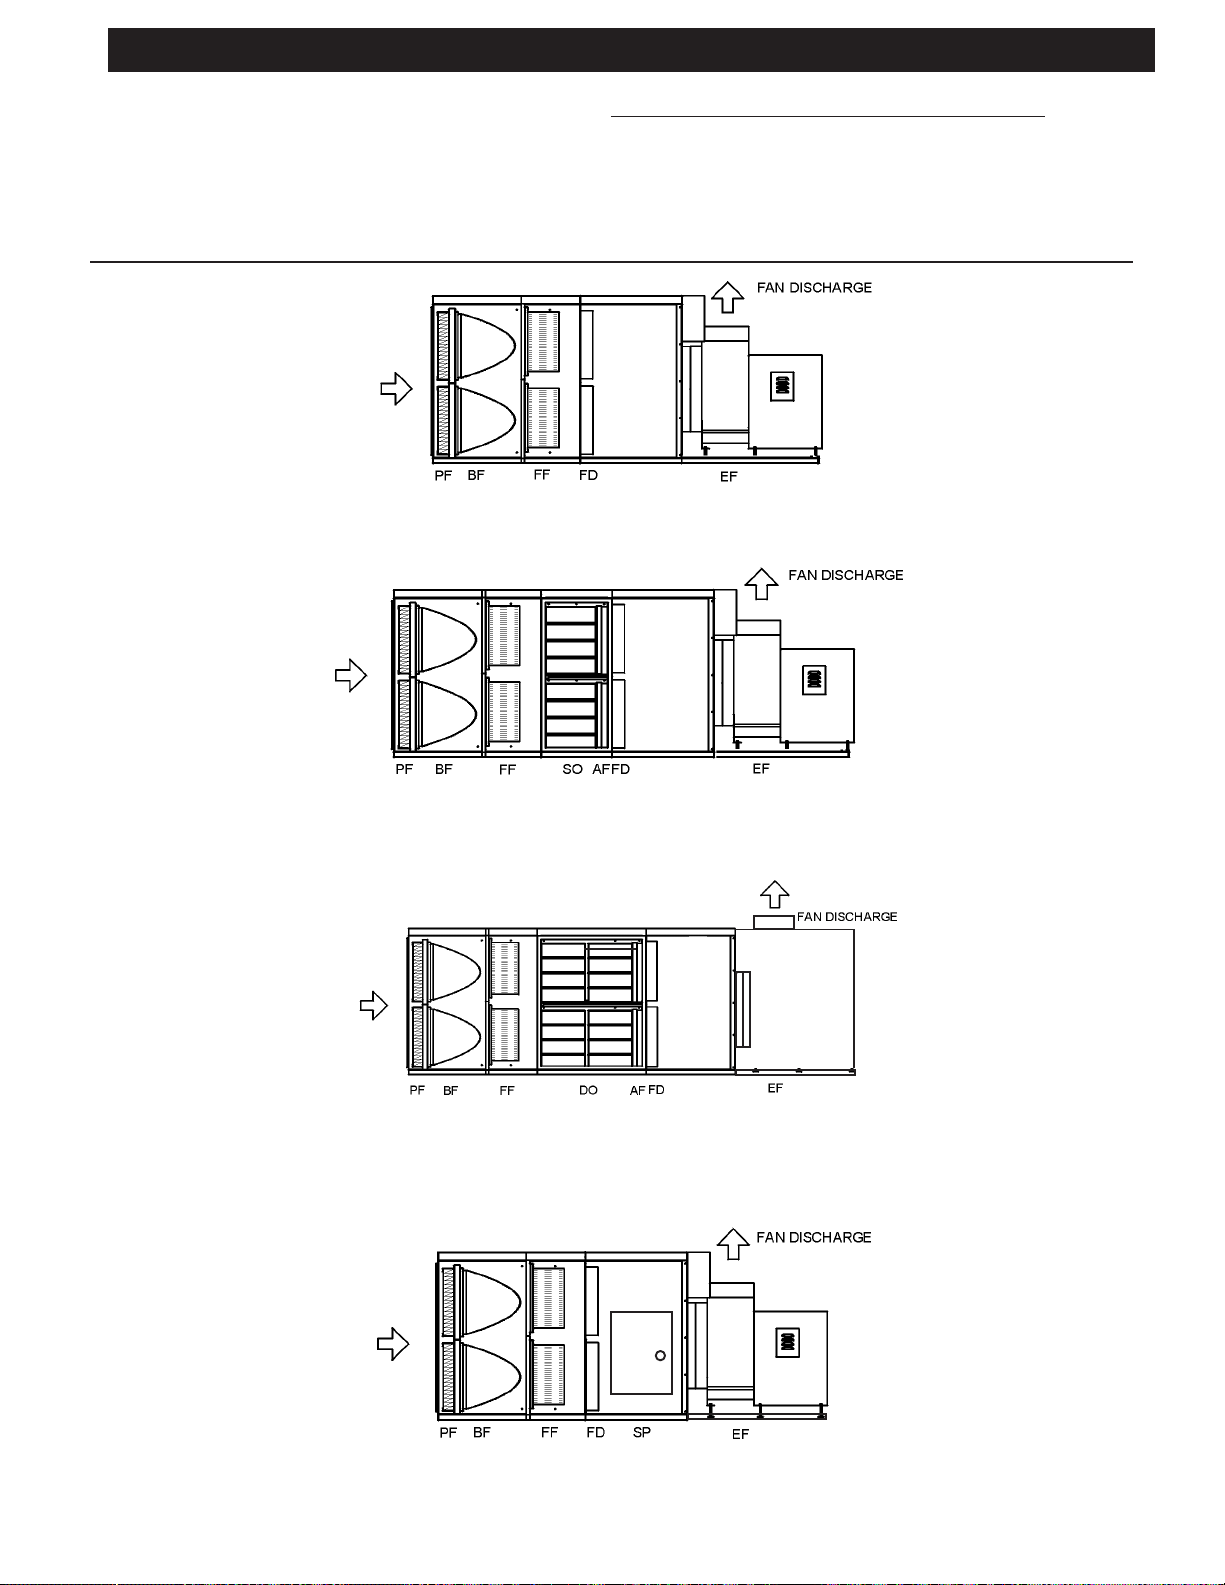
SAMPLE C-TPF CONFIGURATIONS
KEY
AF = 30% After Filter
BF = 95% Bag Filter
DO = Double Pass Odor
Kor48/Carbon blend
EF = Exhaust Fan—un-housed
EFH = Exhaust Fan—housed
SMOKE CONTROL WITH EXHAUST F AN
AND OPTIONAL FIRE DAMPER
FD = Optional Curtain Fire
Damper
FF = 99% Final Filter
PF = 30% Pre-Filter
SO = Single Pass Odor
Kor48/Carbon blend
SPO = Spray Odor Cabinet
C-TPF-DO-EFH
C-TPF-SPO-EF
SMOKE CONTROL WITH SINGLE P ASS MEDIA
BED ODOR CONTROL, EXHAUST FAN
AND OPTIONAL FIRE DAMPER
H
SMOKE CONTROL WITH DOUBLE P ASS MEDIA BED
ODOR CONTROL, EXHAUST FAN
AND OPTIONAL FIRE DAMPER
O
SMOKE CONTROL WITH SPRA Y ODOR CONTROL, EXHAUST
FAN AND OPTIONAL FIRE DAMPER
11
Page 12

RECEIVING & INSTALLATION
RECEIVING
Most C-TPF units are shipped in one piece. However , some
units, because of size or special jobsite conditions, may be
shipped in multiple sections. Follow the instructions provided with the unit to join sections back together. If the unit
includes media bed odor control, the KOR48/carbon odor control media is packaged separately. Verify against the shipping documents that you have received all items and note
any shipping damage, obvious or hidden, to your carrier and
on your Bill of Lading. If damage is found, immediately file a
claim with the transport company. All units are thoroughly
inspected and fully operation tested at the factory prior to
shipment.
Verify that the electrical and air flow ratings on the unit name
plate agrees with jobsite requirements. If a contradiction arises
notify the factory prior to proceeding with installation.
SAFETY CONSIDERA TIONS
Installing and servicing the unit can be hazardous due to the
presence of electrical components. Only trained and qualified service personnel should install or service this equipment.
Untrained personnel can perform basic maintenance, such
as cleaning and replacing filters. All other operations should
be performed by trained service personnel. When installing or
servicing, observe precautions in literature and on tags and
labels attached to unit.
Follow all safety codes. Wear safety glasses and work gloves.
Use quenching cloth for brazing operations. Have fire extinguisher available. Read these instructions thoroughly .
WARNING
Before installing or servicing system, always turn off main
power to system. There may be more than one disconnect
switch. Electrical shock can cause personal injury or death.
RIGGING
All units are provided with a minimum of four (4) lifting points
for rigging attachment. WARNING: Use all lifting points provided. (Refer to Page 13) Spreader bars are mandatory to
prevent contact and damage to the unit by lifting hooks, straps,
cables, or chains. Consult the mechanical or structural engineer before moving the unit across the roof deck.
INSTALLA TION CODES
This unit requires external plumbing and electrical connections
to be made in the field. It is recommended that the Authority
Having Jurisdiction (AHJ) be consulted regarding local codes
and installation procedures. Captive-Aire Systems is not responsible for obtaining necessary approvals and permits which
may be required for installation, nor is it responsible for verifying
that the unit has been installed in accordance with national,
state, and local codes. In the absence of locally adopted codes
use the latest editions of the national electrical code and the
uniform mechanical code. Connections of the exhaust duct to
the inlet and outlet of the C-TPF unit must be fully welded to
comply with NFP A-96.
INSTALLA TION PRECAUTIONS
1. The services of qualified contractors are essential for safe
and proper installation of this equipment.
2. The air volumes and external static pressures that are
listed on the unit are for the middle of the operating range of
the filters. The initial air volume should be at least 10% higher
than the listed CFM. As the filters load up the air volume will
drop. This is inherent to this type of unit. If the unit is set up
at or below the design CFM, as the filters load up, the kitchen
hood may experience smoke loss problems. Please consult
the factory if you have questions.
3. The unit is designed for installation on a level surface.
4. When installed in an enclosed space a fire rated enclosure may be required for the unit and associated duct work.
Consult the Authority Having Jurisdiction.
5. Consult the Authority Having Jurisdiction regarding requirements covering the point of termination of the exhaust
outlet of this unit. Minimum distances must usually be
maintained between the exhaust outlet and any outside air
intakes and/or adjacent structures or property lines.
6. Do not apply power to the unit until all electrical connections have been made and a pre-start-up preliminary inspection has been completed.
7. Allow a minimum of 36 inches clearance in front of the
filter access door and electrical compartment door for service and routine maintenance.
SHORT TERM STORAGE
Units that include media bed odor control are provided with
KOR48/carbon media which is shipped separate from the
unit. KOR48/carbon media must be stored in a dry place
with less than 95% relative humidity .
LONG TERM STORAGE (OVER ONE MONTH)
If the unit is equipped with an exhaust fan it must be relubricated as soon as it arrives. T o prevent corrosion all bearings should receive grease and be rotated the first of every
month. Turn the wheel by hand while greasing bearings. A
clean 1/16" bead of grease must appear on each side of each
bearing. Refer to specific bearing lubricating instructions on
the fan. Also, refer to bearing lubricating instructions found in
the exhaust fan section of this manual.
Bearings which are to be stored or idle for an extended period of time should be wrapped in a neutral grease-proof paper, foil, or plastic film. Compounds can be ecommended by
the bearing manufacturer to provide protection for several
months to several years.
After long-term storage, grease should be purged from the
12
Page 13

EQUIPMENT LIFTING PROCEDURE
SPREADER
BAR
LIFTING
LUGS
1 .All units are provided with a minimum of four lifting points for rigging attachment. All lifting
points must be used.
2 .Spreader bars are mandatory to prevent contact and damage to the unit by lifting hooks,
straps, cables or chains.
13
Page 14

HOUSING ASSEMBLY INSTRUCTIONS
1. Attach “TPF Section” to “Media Bed Odor Control
Section”:
Bolt “TPF Section” and “Media Bed Odor Control Section”
bases together on outside of unit, using 3/4" holes. Tek
screw walls and roofs together, using 3/16" holes. Continuously weld: floor, wall, and roof seams from inside of unit.
2. Attach “Media Bed Odor Control Section” to “Plenum Section” (if applicable):
Bolt “Media Bed Odor Control Section” and “Plenum Section” bases together on outside, using 3/4" holes. From
inside plenum, tek screw walls and roofs together, using
3
/16" holes. Continuously weld: floor, wall, and roof seams
from inside of unit.
3.Attach Fan Inlet to “Plenum Section” outlet:
Push “Exhaust Fan Section” about 7" from “Plenum Section”. Tek screw & caulk fan duradyne to plenum interconnect ring, at 5" intervals (minimum). Duradyne is preattached to fan inlet side.
4. Attach “Plenum Section” to “Exhaust Fan Section”:
Bolt “Plenum Section” and “Exhaust Fan Section” bases
together on outside, using 3/4" holes. From inside of plenum, tek screw walls and roofs together, using 3/16" holes.
Continuously weld floor seam from inside plenum. “Exhaust Fan Section” walls and roof to remain removable for
exhaust fan replacement, tek screw and bolt only .
5. Assemble “Media Bed Odor Control Section” (if applicable):
Refer to “Media Bed Odor Control Section assembly instructions” drawing”.
6. Attach “TPF Chase”
Bolt “TPF Chase” to rest of assembled unit. Connect Pressure tubing from sensors 1-4 to Pressure Switches 1-4 in
the “Electrical Panel”, refer to Pressure Switch Tubing Diagram on page 26. Connect Thermostat wires from Thermostat to Electrical Panel, refer to Wiring Diagram on page 29.
14
Page 15

MEDIA BED ODOR CONTROL SECTION ASSEMBLY INSTRUCTIONS
NOTE: Assemble this section, only after the rest of the
unit has been assembled.
1. Slide Odor Rack into unit through door opening. T ek screw
rack to floor rails, using 3/16" holes.
2. Tek screw upper rack to both sides of roof rails.
3. Tek screw first 3 sides to mounting rails from outside of
the unit.
4. Attach fourth side by entering odor rack to reach screw
holes.
5. Att ach Odor Section Inner Door , flip latches to secure.
15
Page 16

CFM-100 FILTER MONITORING STATION
17
16
1
2
14
15
3
18
4
5
6
7
19
8
9
20
21
10
11
22
23
24
25
26
12
27
13
28
FILTER MONITORING ST ATION
MODEL CFM-100
16
Page 17

PARTS – CFM-100 MONITOR PANEL
A
p
p
FM-100 Com
Item No.
Wiring
Tag
1 ClearAir FM-100 Control Label 19038
2 LT1 Indicator Light - Green 120 VAC 30526
3 LT1 Indicator Light - Green 120 VAC 30526
4 LT3 Indicator Light - Clear 120 VAC 18178
5 LT3 Indicator Light - Clear 120 VAC 18178
6 LT3 Indicator Light - Clear 120 VAC 18178
7 LT3 Indicator Light - Clear 120 VAC 18178
8 LT2 Indicator Light - Red 120 VAC 30527
9 LT2 Indicator Light - Red 120 VAC 30527
10 Lift & Turn Compression Latch 11119
11 SW2 FM-100 Cancel Switch 19076
12 C-150 Switch Label 18644
13 C-150 C-150 Start/Stop Switch SPST 18314
tional - Spray Odor Low Chemical Light
O
14 Low Odor Control Chem. Label 19154
15 LT2 Indicator Light - Red 120 VAC 30527
16 FU2 Fuse - Main 6.3 Amps 17061
17 FU3 Fuse - Spray Odor 6.3 Amps 17061
18
19
20
21
22
23
24
25
26
27
28
Control Relay TPDT 11403
CR1
Socket TPDT 11418
Control Relay TPDT 11403
CR2
Socket TPDT 11418
Control Relay DPDT 10283
CR3
Socket DPDT 10295
Control Relay SPDT 11399
CR4
Socket SPDT 11413
Control Relay SPDT 11399
CR5
Socket SPDT 11413
Control Relay TPDT 11403
CR6
Socket TPDT 11418
Control Relay TPDT 11403
CR7
Socket TPDT 11418
Control Relay SPDT 11399
CR8
Socket SPDT 11413
Timing Relay - On Delay DPDT 30375
TR1
Socket 8-pin 30376
Timing Relay - On Delay DPDT 30375
TR2
Socket 8-pin 30376
L1 Sonalert 120 VAC 30528
Description Size
Mounted on FM-100 Door
Mounted on FM-100 Back board
onent Schedule
Gaylord
Part No.
17
Page 18

ODOR CONTROL SECTION – MEDIA BED TYPE
General Description
C-TPF units that include media bed odor control have an
“SO” suffix for single pass and “DO” suffix for double pass
odor control in the model number. Refer to the nameplate on
the unit (see page 24 for sample). As shown in the illustration
below, the odor control section consists of two major components: Odor control media and 30% after filters.
Odor Control Media (bed type)
The odor control media furnished with your C-TPF unit is
either a product trade named KOR48/Carbon Blend manufactured by Cameron/Great Lakes, Inc. of Portland, Oregon.
KOR48/Carbon Blend is made from a unique 50% aluminosilicate compound impregnated with 6% potassium permanganate and 50% activated carbon or 100% activated carbon.
The granules are approximately .10 inch in diameter and are
poured into metal modules (see page 19) which slide into racks
in the odor control section of the unit. As the air is drawn
through the modules, the KOR48 the media oxidizes the
lighter odor molecules and chemically changes them into
harmless solids which remain in the media and the carbon
absorbs the heavier odor molecules. This combination provides very effective odor control. The 100% carbon is lower
cost alternative that must have fire suppression system installed to protect it as it is flammable. This material absorbs
odor and will gradually decrease in effectiveness until it starts
to release the odors it has absorbed.
The life of the odor control media is dependent upon several factors such as the type of odor, amount of odor molecules, grease loading and air temperature. KOR48 media
has a flat efficiency curve - meaning that the efficiency, or
effectiveness, stays constant until the media has expended
and then the efficiency drops off rapidly . The carbon portion
of the media’s efficiency drops continually during its life. Thus
a regular schedule of change out needs to be established
and followed.
Filters
Smoke control filters in the odor control section of the system requires the replacement prior to them becoming loaded.
It is recommended that the filters be inspected in accordance
with the “Odor Control Media Inspection Frequency Chart”
on this page, and replaced if necessary . The following chart
provides data for ordering filters.
Service and Maintenance
The KOR48/ carbon media is deep purple in color when new,
turning to a dark brown during use and light tan when expended. Carbon media is black at the time of delivery. It is
recommended that both medias be checked in accordance
with the table below .
The C-TPF unit incorporates an “Odor Control Media Monitoring Tube” to facilitate inspection (refer to page 19 ). Using
an open end wrench, turn the tube nut counter clockwise
and remove the monitoring tube assembly. If the KOR48/
Carbon media is dark brown, break a granule open and if the
inside is light tan there is very little life left and it should be
replaced. If the outside of the granules are light tan the media is completely expended and must be replaced. If you are
unable to determine the status send a small sample, one
teaspoon, to Cameron Great Lakes noting the date of installation. They will conduct a life test and advise the results by
fax or phone within 2 days of receipt. For further details contact Cameron Great Lakes .
Cameron Great Lakes
2335 NW 29th
Portland, OR 97210
800-777-4044
630-377-071 1
The label next to the monitoring tube includes an area where
the date of initial fill and the date of inspection can be filled in
with a grease pencil.
TYPE OF COOKING FREQUENCY
EQUIPMENT IN DAYS
LIGHT DUTY ........................................... 120
Ovens, steamers, and kettles
MEDIUM DUTY ....................................... 90
Braising pans/Tilting skillets, fryers,
griddles, grooved griddles, open burner
ranges, hot top ranges, and conveyor ovens
HEAVY DUTY .......................................... 60
Gas and electric char broilers, upright
broilers, woks and conveyor broilers
EXTRA HEAVY DUTY ............................ 30
Solid fuel broilers
TRAHCYCNEUQERFNOITCEPSNIAIDEMLORTNOCRODO
ODOR CONTROL
MEDIA MONITORING
TUBE
(USE GREASE PENCIL)
LAST REFILL
DATE INITIAL
LAST INSPECTION
FORM NO. OCMM 797
18
DATE INITIAL
Page 19

ODOR CONTROL SECTION – MEDIA BED TYPE
Replacing the Media
There are two methods of replacing the media, the “Advancing Program” or Site Refill.
Advancing Program - This is a program offered by
Cameron/Great Lakes, Inc. where they will ship recycled
pre-filled modules in exchange for used modules. The prefilled modules are shipped two to a box, box size 25" x 25"
x 13", which weigh approximately 90 lbs. The boxes are
palletized, 36 to a pallet, and are shrink wrapped. Three
primary advantages of the “Advancing Program” are: 1) virtually no requirement for storage except for the short period
of time needed to switch the new modules for the expended
ones 2) minimizes unit down time and 3) avoids filling on
site.
T o particip ate in the “Advancing Program” proceed as follows:
1. Contact the local Cameron/Great Lakes distributor and
order the number of modules required.
2. Upon receipt, remove the depleted modules and replace
with the new modules.
3. Empty the media from the depleted modules into containers for disposal.
4. Pack the empty used modules into the boxes the new
ones came in and ship back to the distributor.
5. Fill the media monitoring tube with new media and mark
the date on the monitoring tube label.
Site Refill - Site refill involves the purchase and storage of
new media, emptying and refilling the modules and disposing of the spent media. New media may be purchased
from your local Cameron Great Lakes distributor. For the
name and phone number of the local distributor call Cameron/
Great Lakes.
Step 3. Place the filling jig over opening.
Step 4. Pour the media into the module.
Step 5. To eliminate voids, shake or vibrate the module to
ensure that the media settles.
Step 6. Continue adding media until module is full.
Caution: Do not overfill as it may cause the sides
to bulge.
Step 7. Replace cover plate and
install securing screw .
Step 8. Optional - some dusting
may occur on initial start
up of the unit. To minimize this, vacuum or
blow out the modules.
New media comes in standard five gallon buckets which weigh
40 lbs each. One bucket will refill approximately 1.33 modules. It is recommended that new media is purchased no
more than 2 weeks in advance of its use. The buckets should
be protected against physical damage as KOR48/carbon will
begin to oxidize any odor molecule when exposed to atmosphere. The buckets should be stored in a cool dry area.
Removing the Modules
Caution - each module weighs approximately 30 lbs. and
may be awkward to handle particularly in the upper racks.
It is highly recommended that a heavy duty steel wheeled
ladder be used when removing the upper modules.
Caution - Exhaust fan must be off before opening the odor
control media access door.
Refilling the modules is a relatively simple task not requiring
any special tools. Follow steps 1-11:
Step 1. Set the module on end so the securing screw is
on top.
Step 2. Remove the securing screw and slide the cover
plate off.
Step 9. Slide the modules back into the rack be-
ing cautious that the airflow label is matching the
airflow of the unit.
Step 10. Close the odor control media access door .
Step 1 1.Pour new media into the media monitoring tube
and re-install. Record the date on the label.
MEDIA MONITORING TUBE
19
Page 20

ODOR CONTROL SECTION – CHEMICAL SPRAY TYPE
The Spray Odor Unit operates on spray-on and spray-off timed
cycles while the C-TPF unit is in the “Fan On” mode.
The Spray Odor Control includes two (2) timers, one (1) for
the “Cycle Timer” (this is the spray ”OFF” timer) and one (1)
for the “Spray Timer” (this is the spray “ON” timer). Both
timers are calibrated and can be set between 5 and 600
seconds. The factory/setting is always 15 seconds “ON” and
15 seconds “OFF”.
CYCLE TIMER
To set the “Off” period, turn the dial to the desired off time
interval.
SPRA Y TIMER
To set the “On” period, turn the dial to the desired on time
interval.
AIR PRESSURE
Factory set to 20 PSIG
Electrical Controls
To adjust the spray odor cycle and timers, open the Spray
Odor Cabinet, and remove the screwed-in-place timer control cover plate. Adjust as necessary for satisfactory odor
control.
CAUTION: Always de-energize the C-TPF before opening the Electrical and Timer Control Panel inside the
Odor Spray Cabinet.
SPRA Y ODOR CHEMICAL
In order for the spray odor system to work correctly the system must be supplied with a chemical solution. This solution in conjunction with the delivery nozzle system that finely
atomizes the spray is what makes the system work. We
recommend the use of FORMULA GS-710. This material
has been effective at removing between 80% and 90% of
the odors from the kitchen exhaust in many applications.
For the contact information of the nearest distributor of FOR-
MULA GS-710:
Captive-Aire Systems, Inc.
360 Northbrook Drive
Y oungsville, NC 27596
Phone: (866) 784-6900
Fax: (919) 554-9374
Website www.captiveaire.com
SPRA Y ODOR CONTROL SPRA Y NOZZLE ASSEMBL Y
NOZZLE MAINTENANCE
To obtain the best performance from your nozzle, it may
become necessary to clean it periodically .
The nozzle may become clogged and cease spraying due
to factors such as dust, foreign particles accumulated in the
orifice, and/or leakage in the air or liquid section of the nozzle.
The following procedure should be done to maintain the
nozzle’s performance:
1. Check the air line, which is connected from the compressor unit to the compression fitting and threaded into
the air inlet side of the nozzle, for any leakage.
2. Check the liquid suction line, which is connected to the
liquid inlet side of the nozzle, and ensure that it is immersed in the odor control solution.
3. If it appears that the nozzle is only blowing air and does
not lift up the odor control solution out of the container ,
do the following:
Remove the cleanout plug from the nozzle body and, using
a very thin pin or wire, clean the hole in the fluid cap (orifice)
and replace the cleanout plug. Remove the foot valve from
the liquid container and inspect screen for clogging. Brush
clean if clogged.
20
Page 21

ODOR CONTROL SECTION – CHEMICAL SPRAY TYPE
pray
CYCLE AND SPRA Y TIMER RELA Y
6
5
4
3
7
8
9
10
S
Item No. Description
1 Spray Odor Cabinet Assembly (25" x 25") 19119
2 1/4" I.D. Flexible Suction Tube 10272
3 Spray Nozzle Assembly 19065
4 3/8" Copper Tubing 11000
5 Electrical Box N/A
6 Cycle and Spray Timer Relay 19073
7 Pressure Gauge 10276
8 Needle Valve 19070
9 Air Compressor 19072
10 Heater 19075
11 5 Gallon (18.9 Liter) Container of GS-710 19097
12 Level Sensor for Spray Odor Chemical (In Tank) 19071
13 1/4" Foot Valve (In Tank) 10269
11
Odor Component Schedule
12
13
2
1
Gaylord
Part No.
21
Page 22

EXHAUST F AN SECTION
GENERAL
The exhaust fan in the C-TPF Unit is a heavy duty type. The
size of the fan, motor, and drives have been chosen for the
most efficient operation.
INITIAL SET-UP
For shipping purposes the spring isolators under the fan have
been bolted down to prevent movement. T o un-bolt and set
up the springs properly proceed as follows:
EQUIPMENT FOOT
OR ISOLATOR
MOUNTING
BRACKET
1 . Locate the red shipping hold down brackets. These are
attached to the fan base and the unit floor .
2 . Remove the T ech screws.
3 . Check the fan for free movement, making sure that
none of the springs is grounded out against a bolt or
the unit floor.
SMALL CAP
SCREW
LEVELING BOLT
ISOLATOR TOP
CAP OR STEEL
LOAD PLATE
COLOR CODED
COIL SPRING
NEOPRENE BOTTOM
SPRING CAP OR
STEEL LOAD PLATE
22
Page 23

EXHAUST F AN SECTION (Continued)
IPRE-OPERA TIONAL MAINTENANCE
Before starting the exhaust fan perform the following pre-
operational maintenance:
1. Set screws & Belts:
a. Rotate fan impeller to check for shifting that may
have occured during shipment. If necessary, shift
wheel position and re-tighten.
b. Check belt and pulley alignment.
c. Check tightness of setscrews in blower wheel hub.
d. Check tightness of set screws in bearing locking
collar.
e. Check tightness of set screws in motor and fan
pulleys.
f. Check tightness of all frame bolts and base bolts.
g. Check tightness of bearing mounting bolts.
2. Belt tension. T ake up or relieve tension in belts so that
there is approximately ¾” to 1" deflection under 3 pounds
pressure based on 2½ to 3 foot centers on drive. Adjustment of belt tension is accomplished by use of adjustable
motor base.
INITIAL F AN LUBRICATION
T o prevent corrosion bearings should receive grease and be
rotated. Turn the wheel by hand while greasing bearings. A
clean 1/16" bead of grease must appear on each side of
each bearing. Refer to specific bearing lubricating instructions on the fan.
4. Motors generally used are of the sleeve bearing type
and require periodic oiling. A good grade of ASE No. 10
lubricating oil should be inserted into the oiler connections on each end of the motor about every two months.
Not more than a teaspoonful should be used; over-oiling
will result in oil drip.
TROUBLESHOOTING
1. Reduced Airflow:
a. Blower impellers operating in wrong direction.
b. Belt slippage or belts broken.
c. Overload, starter cutout.
2. Noise in Blower:
a. Bad bearings.
b. Loose tie rods or blades.
c. Blower wheels loose on shaft, wheels rubbing on
housing.
d. Drive pulley loose on shaft.
e. Foreign object located in blower wheel or blower
housing.
Necessary Action - Correct situation found immediately,
as continued operation can shorten life of component parts
and result in poor airflow and eventual general shut-down of
system until needed repair is made.
Bearings which are to be stored or idle for an extended period of time should be wrapped in a neutral grease-proof
paper , foil, or plastic film.
After long-term storage, grease should be purged from the
bearings and fresh grease injected prior to start-up.
INITIAL OPERA TION
After pre-operational checks, unit is ready for operation:
1. Start up blower . Check rot ation.
2. If blower impeller is turning in the wrong direction, reverse rotation per instructions furnished by motor manufacturer.
FAN PREVENTIVE MAINTENANCE
Every six months conduct the following maintenance:
1. Check for condition and tension of belts. Replace
cracked, glazed or frayed belts. Re-check tension after
48 hours and re-tension if necessary . Do not over-tighten
belts or bearing damage may result. Belt should depress its width when pressed firmly inward at midway
point between the pulleys and belt should be tight enough
to prevent slippage. When replacing worn belt, replace
motor pulley if “shoulder” has a worn-in groove.
2. Check fan and motor bearings for possible binding, noise
or overheating. Lubricate fan in accordance with instructions on fan housing.
23
Page 24

NAMEPLATE DATA
The C-TPF nameplate is located on the electrical compartment access door of the unit. If inquiring on service or ordering
parts, please have model number and serial number available.
ENGINEERING DATA
FILTER SECTION
CFM
SMOKE POLLUTION CONTROL UNIT
MODEL NUMBER
INT. STATIC PRESSURE
"W.G.
C -TPF -
SERIAL NUMBER
SUITABLE FOR USE WITH CONTROL
MODEL NO.
FOR EITHER INDOOR OR
OUTDOOR INSTALLATION
CAPTIVE-AIRE SYSTEMS
360 NORTHBROOK DRIVE
YOUNGSVILLE, NORTH CAROLINA 27596
FOR NAME OF THE NEAREST SERVICE AGENCY CALL:
866-784-6900
Or Visit www.captiveaire.com
The Captive-Aire unit Model C-TPF Series is
ETL Listed under the category Air Filtering
Device, Report #3028598-1
FORM NO. CATPFNP 902/19039
42106
U.S.
VOLTS PHASE HERTZ AMPS WATTS
1
MAX. FUSE SIZE AMPS
MAX. BREAKER SIZE AMPS
OPTIONAL FAN SECTION
CFM
TOTAL STATIC PRESSURE "W.G.
EXHAUST FAN POWER CIRCUIT:
VOLTS PHASE HERTZ AMPS
FLAFLA
FLA
FLAFLA
MIN. CIRCUIT AMPACITY
MAX. FUSE SIZE AMPS
MAX. BREAKER SIZE AMPS
--
CAUTIONCAUTION
-
CAUTION
--
THE FILTER INDICATOR LIGHTS SHOULD BE INSPECTED
FREQUENTLY TO ENSURE THAT COLLECTED GREASE IS BEING
REMOVED BY THE FILTER. REFER TO THE TECHNICAL MANUAL FOR
SPECIFIC INSTRUCTIONS.
CAUTIONCAUTION
--
-
--
C-TPF NAMEPLATE
24
Page 25

C-TPF SERIES OPERATING MATRIX
(
(
)
EXPLANATION OF FILTER MONIT ORING STATION
"REPLACE
LIGHT ON
(RED)
PRE FILTERS"
LIGHT ON
(CLEAR)
NORMAL OPERATION
PRE FILTERS DIRTY
BAG FILTERS DIRTY
FINAL FILTERS DIRTY
MISSING FILTER
FIRE IN UNIT
THERMOSTAT ABOVE 250°F
LOW ODOR CONTROL CHEMICAL
RSPC-TPF MODES
(OPTIONAL)
"FAN ON"
"NORMAL AIR"
LIGHT ON
(GREEN)
LIGHT ON
(GREEN)
XX
XXX XX
XX X XX
XX X XX
XX X
"LOW AIR"
XXXX
Normal Operation: All filters are in place and the static
pressure across all of the filters is within normal operating
parameters.
The following lights are on:
“Fan On” – green
“Normal Air” – green
Pre Filters Dirty: The Pre Filters are dirty and need to be
replaced, the static pressure across the Pre Filters is above
normal. An audible alarm will sound. Pressing the red “Cancel Alarm Button” will silence the audible alarm. Please
note that the audible alarm will sound each time the Exhaust Fan is started, until the Pre Filters are replaced.
The following lights are on:
“Fan On” – green
“Low Air” – clear
“Replace Pre Filters” – clear
“Cancel Alarm Button”– red
"REPLACE
BAG FILTERS"
LIGHT ON
(CLEAR)
"REPLACE
FINAL FILTERS"
LIGHT ON
(CLEAR)
"MISSING
FILTER"
LIGHT ON
(RED)
FM-100) LIGHTS
"CANCEL AL A RM
"FIRE IN UNIT"
LIGHT ON
(RED)
XX
BUTTON"
LIGHT ON
(RED)
"LOW ODOR CONTROL
AUDIBLE
LIGHT ON (OPTIONAL)
ALARM
SOUNDS
Missing Filter: One of the filters (Pre, Bag, or Final) is miss-
ing and needs to be returned in the unit to ensure all of the
air is being filtered. The static pressure across all of the
filters is below normal. An audible alarm will sound. Pressing the red “Cancel Alarm Button” will silence the audible
alarm. Please note that the audible alarm will sound each
time the Exhaust Fan is started, until all of the filters are in
place.
The following lights are on:
“Fan On” – green
“Missing Filter” – red
“Cancel Alarm Button”– red
Fire in Unit: The thermostat installed in the airflow is above
250°F. The Exhaust Fan shuts off. An audible alarm will
sound. The audible alarm cannot be silenced when there is
a “Fire in Unit”. The audible alarm will continue to sound
until the thermostat cools below 250°F.
The following light is on:
CHEMICAL
(RED)
Bag Filters Dirty: The Bag Filters are dirty and need to be
replaced, the static pressure across the Bag Filters is above
normal. An audible alarm will sound. Pressing the red “Cancel Alarm Button” will silence the audible alarm. Please
note that the audible alarm will sound each time the Exhaust Fan is started, until the Bag Filters are replaced.
The following lights are on:
“Fan On” – green
“Low Air” – clear
“Replace Bag Filters” – clear
“Cancel Alarm Button”– red
Final Filters Dirty: The Final Filters are dirty and need to be
replaced, the static pressure across the Final Filters is above
normal. An audible alarm will sound. Pressing the red “Cancel Alarm Button” will silence the audible alarm. Please
note that the audible alarm will sound each time the Exhaust Fan is started, until the Final Filters are replaced.
The following lights are on:
“Fan On” – green
“Low Air” – clear
“Replace Final Filters” – clear
“Cancel Alarm Button”– red
"Fire In Unit” – red
Low Odor Control Chemical (Optional): The Spray Odor
chemical is low, if unit is equipped with Spray Odor. The
Spray Odor Chemical needs be filled. The unit will continue
to run normally . There is not an audible alarm for Low Odor
Control Chemical.
The following lights are on:
“Low Odor Control Chemical” – red
"Fan On" – green
"Normal Air" – green
25
Page 26

C – TPF PRESSURE SWITCH TUBING DIAGRAM
26
Page 27

MAINTENANCE
Daily maintenance
The CFM-100 Filter Monitor Station should be checked to
see if there are dirty filters. If the indicator lights show a dirty
filter ( too high of a pressure drop across the filter) they should
be replaced. A schedule should be developed based on the
operation of this kitchen to replace the filters. See Filter
Replacement chart below.
Six Months
Remove the filters and inspect the unit for grease build up. If
needed the unit should be cleaned the to the same standards as the grease duct as described in NFP A 96.
Annually
The exhaust fan belts should be checked for wear and tension. If the belt is cracked, frayed, or other wise displaying
signs of damage it should be replaced. The fusible links, if
the unit has the optional fire dampers, need to be replaced
annually per NFP A 96. See Fire Damper across.
Filter Replacement
T o achieve maximum smoke removal it is necessary to have
clean filters. The indicator lights on the monitor panel will
indicate when the filter(s) need to be changed. If the filters
are not changed when the monitor indicates, a dirty filter and
a lower exhaust air flow rate is occurring at the ventilator.
This may result in lower grease extraction efficiency and
smoke loss at the ventilator.
The life span of the filters varies greatly based on the amount
and type of cooking. The chart below is a starting point and
is not to be considered as accurate for cost purposes. Your
results will vary .
Approximate numbe r of filter changes per year
Light Duty Medium Heavy E xtra Heavy
Pre Filt er 17 26 52 122
Bag Filter 2 3 6 8
Final Filter 1.5 2 4 6
Odor Control Media bed ty pe 3 4 6 12
Total Filters c hanged per year 23.5 35 68 148
Filter Replacement
T o replace the filters perform the following.
1. Shut off the fan
2. Open the filter access doors
3. Look at how the filters are installed to prevent air bypassing the filters.
4. Remove the clamps on the final filters
5. Remove all filters by sliding out along the lower filter rack
6. Insert the new filters by sliding in along the lower filter
rack. Seat properly along the filter bypass gasket. Replace all filters in this way . Lock the final filters in place
with the filter clamp.
Fire Damper
The C-TPF unit may be equipped with a fire damper on the
outlet side of the final filter. There are fusible links on the dampers that will sense a fire. Replace with a 280°F (138°C) link of
the same type if they break and the damper closes.
Fuse Link Replacement
1. Open the plenum access door.
2. Remove the defective link.
3. Replace with a new link by wrapping the link support
across the blades and securing at the clip on the other
side of the frame.
4. Replace the plenum access doors
5. Start the fan.
Pressure Switch Adjustments
The pressure switches have been set at the factory , except
missing filter which needs to be field adjusted.
1. Remove the electrical chase and the front cover of the
switch.
2. Turn the adjusting screw as needed to set the switch.
3. Replace the cover and the electrical chase cover.
Pressure Switch Settings
1. “Pre Filter” (PS1) .50” W.G. (.124 KPA)
2. “Bag Filter” (PS2) 1.25 W.G. (.310 KPA)
3. “Final Filter” (PS3) 2.00 W.G. (.497 KPA)
4. “Missing filter” (PS4) turn overall pressure switch fully
clockwise. Start fan and turn adjusting screw counter
clockwise until fan shuts off, Adjust set screw clockwise ½ turn.
Missing Filter Test
To test the filter missing monitor
1. Open the filter access and remove 1 final filter.
2. Close the access and restart the units
3. Start fan.
4. The audible alarm will sound, the "Missing Filter" light
and the "Cancel Alarm Button" light will illuminate. To
silence audible alarm, press the "Cancel Alarm Button".
Both lights will stay lit.
5. Replace the final filter and restart unit. The audible alarm
should stop,and the "Missing Filter" and "Cancel Alarm
Button" lights will turn off.
7. Make sure that the filter pressure switch air tubes connections have not been disturbed by opening the electrical chase and inspecting.
8. Close all access doors and lock all latches.
9. Start fan.
27
Page 28

CFM-100 TERMINAL VOLTAGES
TERMINAL DESCRIPTION FAN OFF FAN ON INT. FIRE
L1 Main Power Connection : Hot 120 VAC 120 VAC 120 VAC
L2 Main Power Connection : Neutral
31 Output to Supply Fan Motor Starter 0 VAC 120 VAC 0 VAC
33 Thermostat Return 0 VAC 0 VAC 120 VAC
34 Fused Supply to Press. Sw. & T-Stat. 120 VAC 120 VAC 120 VAC
35 120 VAC Neutral Leg
36 Spray Odor Power 0 VAC 120 VAC 0 VAC
38 Output to Exhaust Fan Motor Starter 0 VAC 120 VAC 0 VAC
P1 Pressure Switch #1 - Pre-Filters 0 VAC See Note 1 0 VAC
P2 Pressure Switch #2 - Bag Filters 0 VAC See Note 2 0 VAC
P3 Pressure Switch #3 - Final Filters 0 VAC See Note 3 0 VAC
P4 Pressure Switch #4 - Missing Filter 0 VAC See Note 4 0 VAC
RF1
RF2
SF3
SF4
EF3
EF4
A11
A12
Q11
Q12
LC Low Chemical (if unit has Spray Odor) See Note 5 See Note 5 See Note 5
Remote On/Off Switch Terminals for
RSPC-TPF
N.O. Dry Contacts for Supply Fan
Remote Control Center
N.O. Dry Contacts for Exhaust Fan
Remote Control Center
N.O. Dry Contacts for Interface to
Building Fire Alarm / Monitor System
N.C. Dry Contacts for Interface to
Fire System Fuel Shutoff Control
N/A N/A N/A
Open Closed Open
Open Closed Open
Open Open Closed
Closed Closed Open
Common
High Voltage Common
Notes
(1)
(2)
(3)
(4)
(5)
Measures HIGH Pressure, when Filters are Dirty - 120 VAC when Pressure is HIGH & Fan is On
Measures HIGH Pressure, when Filters are Dirty - 120 VAC when Pressure is HIGH & Fan is On
Measures HIGH Pressure, when Filters are Dirty - 120 VAC when Pressure is HIGH & Fan is On
Measures LOW Pressure, when a Filter is Missing - 120 VAC when Pressure is LOW & Fan is On
Measures LOW Chemical - 120 VAC when Chemical is LOW (anytime)
28
Page 29

WIRING DIAGRAM
29
Page 30

PARTS - MISCELLANEOUS
DESCRIPTION PART NUMBER ILLUSTRATION
Lift And Turn Latch
Thermostat
12" Length
250°F N.O.
30% Pre Filter
90% Bag Filter
95% Final Fil t er
11118
18781
30074
30515
30514
30% After Filter
Media Tester
Pressure Switch
30072
30644
30524
30
Page 31

C - TPF STARTUP INSTRUCTIONS
Start up Procedure for RSCP-TPF
Check duct work for proper connection to unit. All incoming
duct work should be minimum 18 GA SS or 16 GA BI and
fully welded or joined per NFP A 96 requirement s
Check the fan section and remove shipping braces if supplied per the instructions on pages 22 and 23
If the unit was shipped in sections. Check for proper assembly of the unit on pages 14 and 15. All field joints must be
welded grease and water tight.
Check for proper and complete installation of all filters. If
some are missing locate them and install per the instructions on page 27.
If a media bed odor control system was provided make sure
that it was installed per the instructions on pages 18 and
19.
If a spray odor system was provided, locate the 5 gallon pail
of GS-710 provided in the spray odor control cabinet. Remove the lid and install the pick up tube and level sensor.
For field adjustments refer to pages 20 and 21.
Check for proper air flow at the kitchen hood. Make sure that
all access panels have been installed in the duct work and
all filters or cartridges are in place in the hood. Check for
proper air volume per hood manufacturers instructions. Minimum flow should be the design volume. However, flows of up
to 15% high are acceptable. The air flow will drop as the
filters become dirty . Starting high will assure smoke capture
even with filter loading.
Air volumes of 30 to 50% of design or a strong vibration may
indicate that the fan is rotating backwards. V erify Fan rotation. If air flow still low or excessive vibration check fan for
loose components, duct discharge may be blocked, or access panels open. Excessive vibration may be caused by
shipping braces still in place.
Once the proper air flow is set. The missing filter switch
needs to be set per the instructions under “Pressure Switch
Adjustments” Item 4 on page 27. Perform the Filter Removal T est to verify operation.
31
Page 32

__________________________________________
Date of Inspection: ___________________________
Inspection Witnessed By:
Name: _____________________________________
Title: ______________________________________
Signature: __________________________________
Inspection Performed By:
Name: _____________________________________
Company: __________________________________
Model No _________________________________________________
Serial No _________________________________________________
CFM _________________________________________________
Yes No
Yes No
__________________________________________
Comments
NAMEPLATE DA T A:
__________________________________________
__________________________________________
__________________________________________
__________________________________________
__________________________________________
__________________________________________
__________________________________________
__________________________________________
__________________________________________
__________________________________________
__________________________________________
__________________________________________
__________________________________________
__________________________________________
__________________________________________
__________________________________________
__________________________________________
__________________________________________
__________________________________________
__________________________________________
Distribution: Captive-Aire Systems / Customer / Sales Rep
__________________________________________
One Report Must Be Completed For Each Unit
This start-up Report Used For C-TPF Pollution Control Units
Captive-Aire C-TPF Start-Up Inspection Report
OPERATIONAL CHECKLIST
is supplied to the C-TPF .
position.
Verify that all circuit breakers are on and power
TPF SECTION
1. Close and latch all access doors & panels.
2.
Yes No
cabinet on to energize the exhaust fan:
Place the door disconnect switch in the “On”
Turn the “Start Fan” switch on the CFM-100
a. Exhaust Fan start?
3.
4.
_________________________________________________
PRELIMINARY CHECKLIST
disconnect panel.
shipping, handling or installation damages and, if any,
note under comments.
Complete a thorough inspection of the unit for any
UNIT EQUIPPED WITH EXHAUST F AN? Yes No
ALL UNITS:
1. Open all removable access panels including electrical
File Number _________________________________________________
Job Name _________________________________________________
Address _________________________________________________
UNIT EQUIPPED WITH ODOR CONTROL?
2.
volume is at design or as much as 15% high.
a. Balancer adjust sheaves on 5 HP and smaller
motors
b. Have balancer change sheaves on 7.5 HP and
b. "Fan On" light on?
FAN SECTION
2. Check air flow at kitchen hood and verify air
If not have:
IF UNIT EQUIPPED WITH EXHAUST FAN:
Verify all Pre Filters are in place.
3.
CFM-100.
Verify all Bag Filers are in place.
Verify all Final Filters are in place.
Verify that the spare fuses are provided inside the
4.
5.
6.
larger motors
ELECTRICAL P ANEL AND FM-100
Once the air flow is correct the missing filter switch
needs to be set
has not loosened in shipment if a housed fan.
have been removed from exhaust fan spring isolators.
Verify that the optional wall insulation is secure and
Verify that all shipping tiedowns, bolts and braces
7.
8.
and the fan wheel turns freely by rotating the pulleys.
Verify that the fan floats freely on the spring isolators
Verify that all bearing set collars are tight.
9.
10.
until the missing filter light comes on.
Turn the set screw on the #4 pressure switch
Back off ¼ turn
1.
2.
directed toward any structure.
Verify the exhaust discharge is not obstructed or
11.
fan housing.
Verify that the spare fan belts are provided inside the
12.
Place GS-710 container in the spray odor cabinet
SPRAY ODOR (If equipped with)
1. Locate container of GS-710
2.
media.
IF UNIT IS EQUIPPED WITH MEDIA BED ODOR CONTROL:
14. Verify all modules are in place and full of odor control
This may need to be adjusted to maximize the
spray odor effectiveness decreasing the delay or
increasing the spraying time will improve the
effecti veness of the spray odor. Increasing the
delay or decreasing the spray time will reduce the
switch in container
Verify that both timers are set to 15 seconds
Remove cap and install pickup tube and level
3.
4.
yes No
Sprinkler Wet Chemical
potassium permanaganate
Type of odor control media bed carbon
15.
16. Unit equipped with a fire protection system?
If so, what type?
effectiveness of the spray odor system.
CAPTIVE-AIRE SYSTEMS, INC., 360 NORTHBROOK DRIVE Youngsville, NC 27596 • 1-866-784-6900 • FAX: 919-554-2414 • email:
webhome@captiveaire.com
Page 33

LIMITED W ARRANTY
THE CAPTIVE-AIRE C-TPF POLLUTION CONTROL UNIT
LIMITED WARRANTY
The Captive-Aire C-TPFM Pollution Control Unit is warranted by CAPTIVE-AIRE SYSTEMS, INC., to be free from defects of material and workmanship under normal use
when installed, operated and serviced in accordance with factory recommendations.
CAPTIVE-AIRE SYSTEMS, INC.’s obligation under this warranty shall be limited to
repairing or replacing at its option any part of said equipment which CAPTIVE-AIRE
SYSTEMS, INC.’s examination shall disclose to its satisfaction to be thus defective, for
a period of one (1) year from the date of installation provided proper and acceptable
evidence of such installation is recorded at the factory , or 18 months from date of shipment whichever occurs first.
CAPTIVE-AIRE SYSTEMS, INC. SHALL NOT BE RESPONSIBLE FOR INCIDENT AL
OR CONSEQUENTIAL DAMAGES RESUL TING FROM A BREACH OF THIS W ARRANTY.
All replacement parts furnished under this warranty shall be F.O.B. Captive-Aire Systems, Inc., Y oungsville, North Carolina. The owner shall p ay the necessary freight delivery charges, and necessary labor for removal and installation of parts, and any federal,
state or local taxes.
SPECIFIC ITEMS NOT COVERED BY THIS WARRANTY :
1. Fan belts if equipped with an exhaust fan.
2. Pre filters, bag filters, final filters, after filters, and KOR48/carbon media if equipped
with odor control.
3. Routine maintenance and cleaning as spelled out in The Captive-Aire Model C-TPF
Series Unit T echnical Manual.
4. Malfunction or improper operation caused by fluctuating electrical or power surges
or improper installation.
This is the sole warranty with respect to the aforesaid items. NEITHER CAPTIVE-AIRE
SYSTEMS, INC. NOR ANY OTHER PARTY MAKES ANY OTHER WARRANTY OF
ANY KIND WHA TSOEVER, EXPRESSED OR IMPLIED, AND ALL IMPLIED WARRANTIES OF MERCHANT ABILITY AND FITNESS FOR A P ARTICULAR PURPOSE WHICH
EXCEED THE AFORESAID OBLIGATIONS ARE HEREBY DISCLAIMED AND EXCLUDED FROM THIS AGREEMENT.
Page 34

WORLDWIDE SALES, MANUFACTURING AND SERVICE
FOR THE NAME AND LOCATION OF THE NEAREST
CERTIFIED SERVICE AGENCY, VISIT OUR WEB SITE:
WWW .CAPTIVEAIRE.COM
OR CONT ACT US AT:
CAPTIVE-AIRE SYSTEMS, INC.
360 NORTHBROOK DRIVE
YOUNGSVILLE, NORTH CAROLINA 27596 U.S.A
Phone: 919-554-2414
1-866-784-6900
Fax: 919-554-9374
email: webhome@captiveaire.com
LOCAL SERVICE AGENCY
FORM NO. TM CATPF 903/30679 © COPYRIGHT 2004, CAPTIVE-AIRE SYSTEMS, INC. LITHO USA
 Loading...