

Page 1
CH1 User Manual
1
CH1 User Manual
11/13/19
Page 2

CH1 User Manual
2
Index
1. Product Overview ............................................................................. 3
2. Configuring the router ................................................................... 3
3. Login ..................................................................................................... 3
4. WEB UI Settings ................................................................................ 4
4.1 HOME ...................................................................................................... 4
4.2 CONNECTED DEVICES ............................................................................ 4
4.3 SETTINGS ................................................................................................ 5
4.3.1 Wi-Fi Settings ........................................................................................................... 6
4.3.2 Backup and Restore .................................................................................................. 8
4.3.3 Mobile Network........................................................................................................ 9
4.4 Advanced................................................................................................. 10
4.4.1 Firewall ................................................................................................................... 11
4.4.2 MAC Filter ............................................................................................................. 11
4.4.3 LAN ........................................................................................................................ 13
4.4.4 Port Filtering ........................................................................................................... 14
4.4.5 Port Forwarding ...................................................................................................... 15
5. LED definition ................................................................................. 16
5.1 Signal ........................................................................................................... 16
5.2 Connect ........................................................................................................ 16
5.3 WIFI ............................................................................................................ 16
5.4 Power ........................................................................................................... 17
6. Reset/SIM-Switching Key ........................................................... 17
7. FCC Information ............................................................................ 17
8. Revision History ............................................................................ 18
11/13/19
Page 3
CH1 User Manual
3
1. Product Overview
This MiFi supports LTE Band 2/4/5/12/13/14/66/71 and it supports popular
operating systems like Windows, Linux and Mac.
2. Configuring the router
NDIS
Connect the PC to MiFi with a USB cable.
Power on the device and wait for about 40 seconds until the device finishes
initializing.
Input http://192.168.5.1 to login to the web page
WIFI
You can also connect the PC to MiFi by WiFi, choose the correct WiFi SSID and
input the accurate password. The default WiFi SSID is “CaptionCall2 -xxxxxx”.
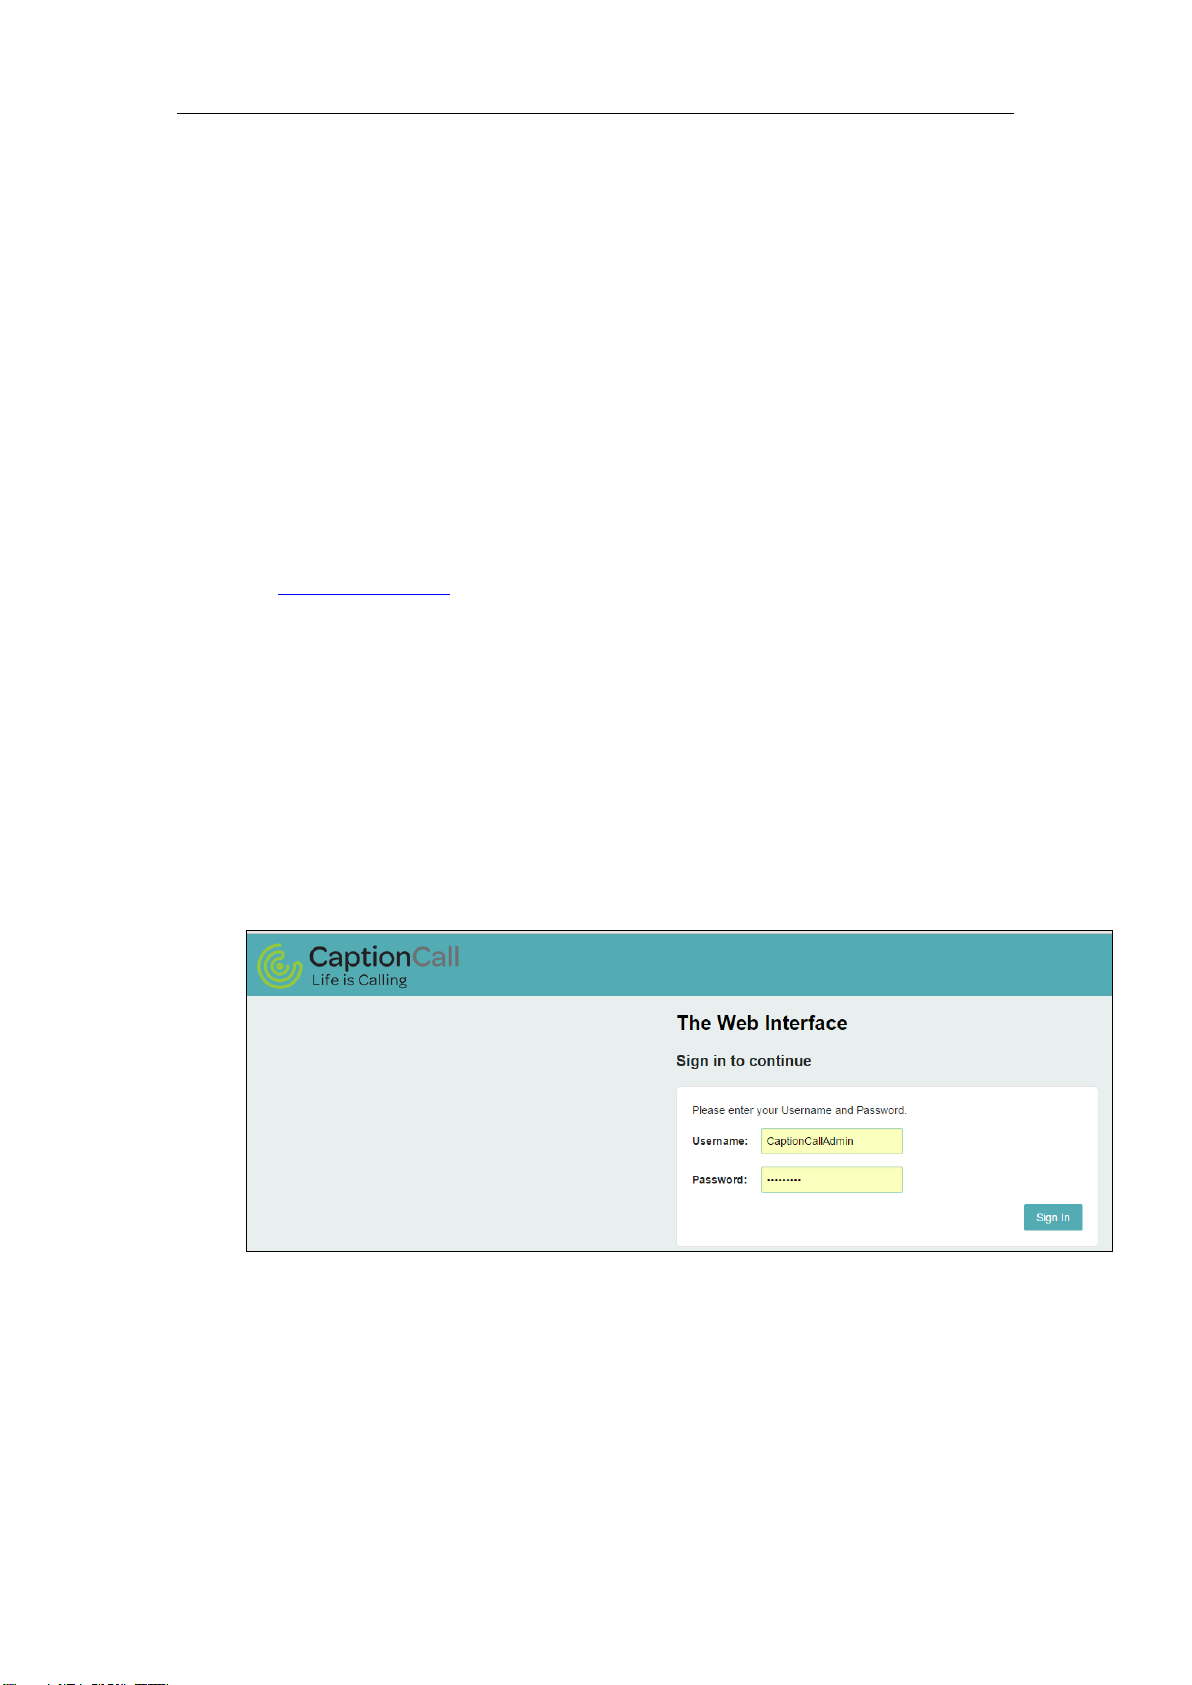
3. Login
Launch your Web browser and enter http://192.168.5.1 in the address bar;
Click Log In and Enter the username and password to log into the WEBUI
main page. The default Username is
CaptionCallAdmin.
The basic settings in WebUI consist of four main parts named HOME,
CONNECTED DEVICES, SETTINGS and ADVANCED.
11/13/19
Page 4
CH1 User Manual
4
4. WEB UI Settings
4.1 HOME
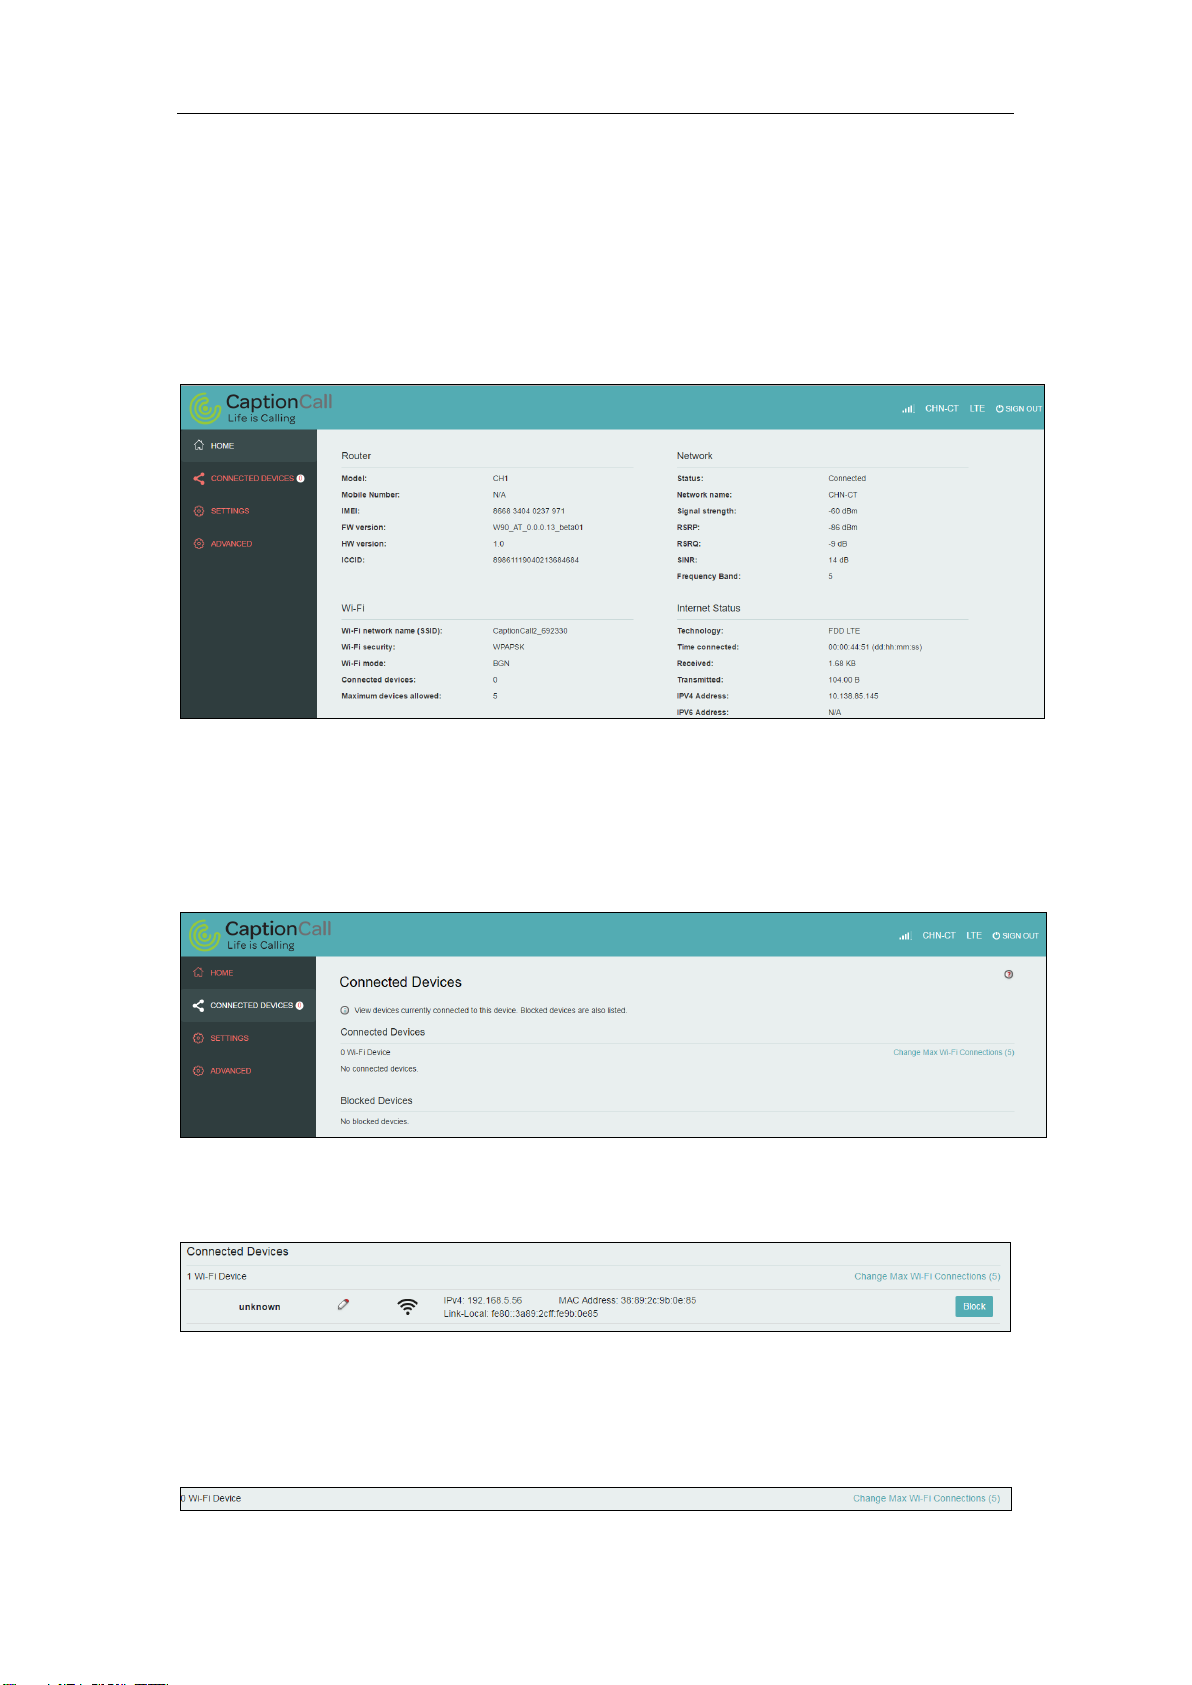
From this page, you can check Router, Network , Wi-Fi and Internet Status;
4.2 CONNECTED DEVICES
On this page, you can see Connected Devices, Blocked Devices and change max
connections.
Connected Devices: This field lists the clients that connect to the device,
include by Wi-Fi.
Change Max Connections: The default max connection is 5, click this button,
it will access Wi-Fi Hotspot page, you can change max connections in the Max
Wi-Fi connections field.
11/13/19
Page 5
CH1 User Manual
5
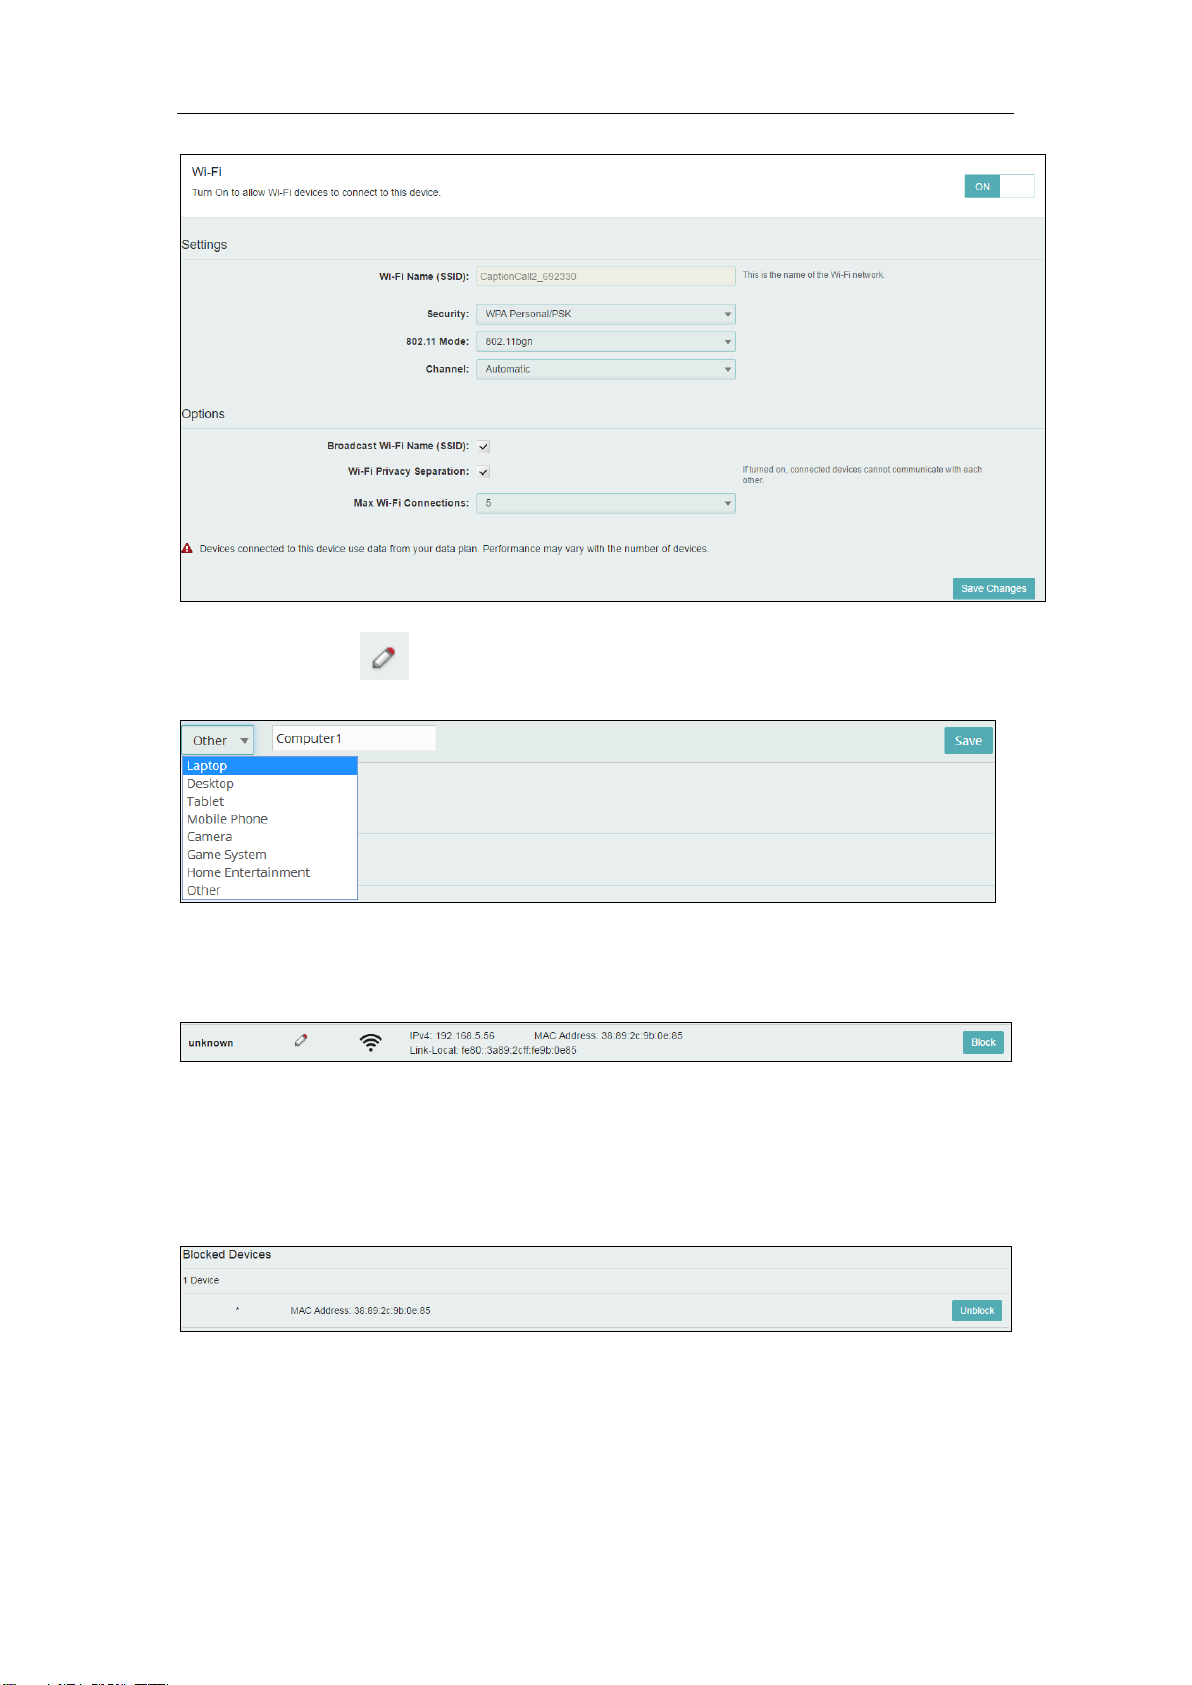
Click Edit button to edit the type and hostname of the client.
Choose a WiFi client and click Block button, this client will display in the
Blocked Devices and disconnect the device.
Blocked Devices shows the clients that are blocked. Choose a blocked client
and click Unblock button, this client will disappear from the “Blocked
Devices” list, it will show in the “Connected Devices” again after it connects to
the device.
4.3 SETTINGS
On this page, you can see Wi-Fi Settings, Backup and Restore, Mobile Network
and Remote Update.
11/13/19
Page 6
CH1 User Manual
6
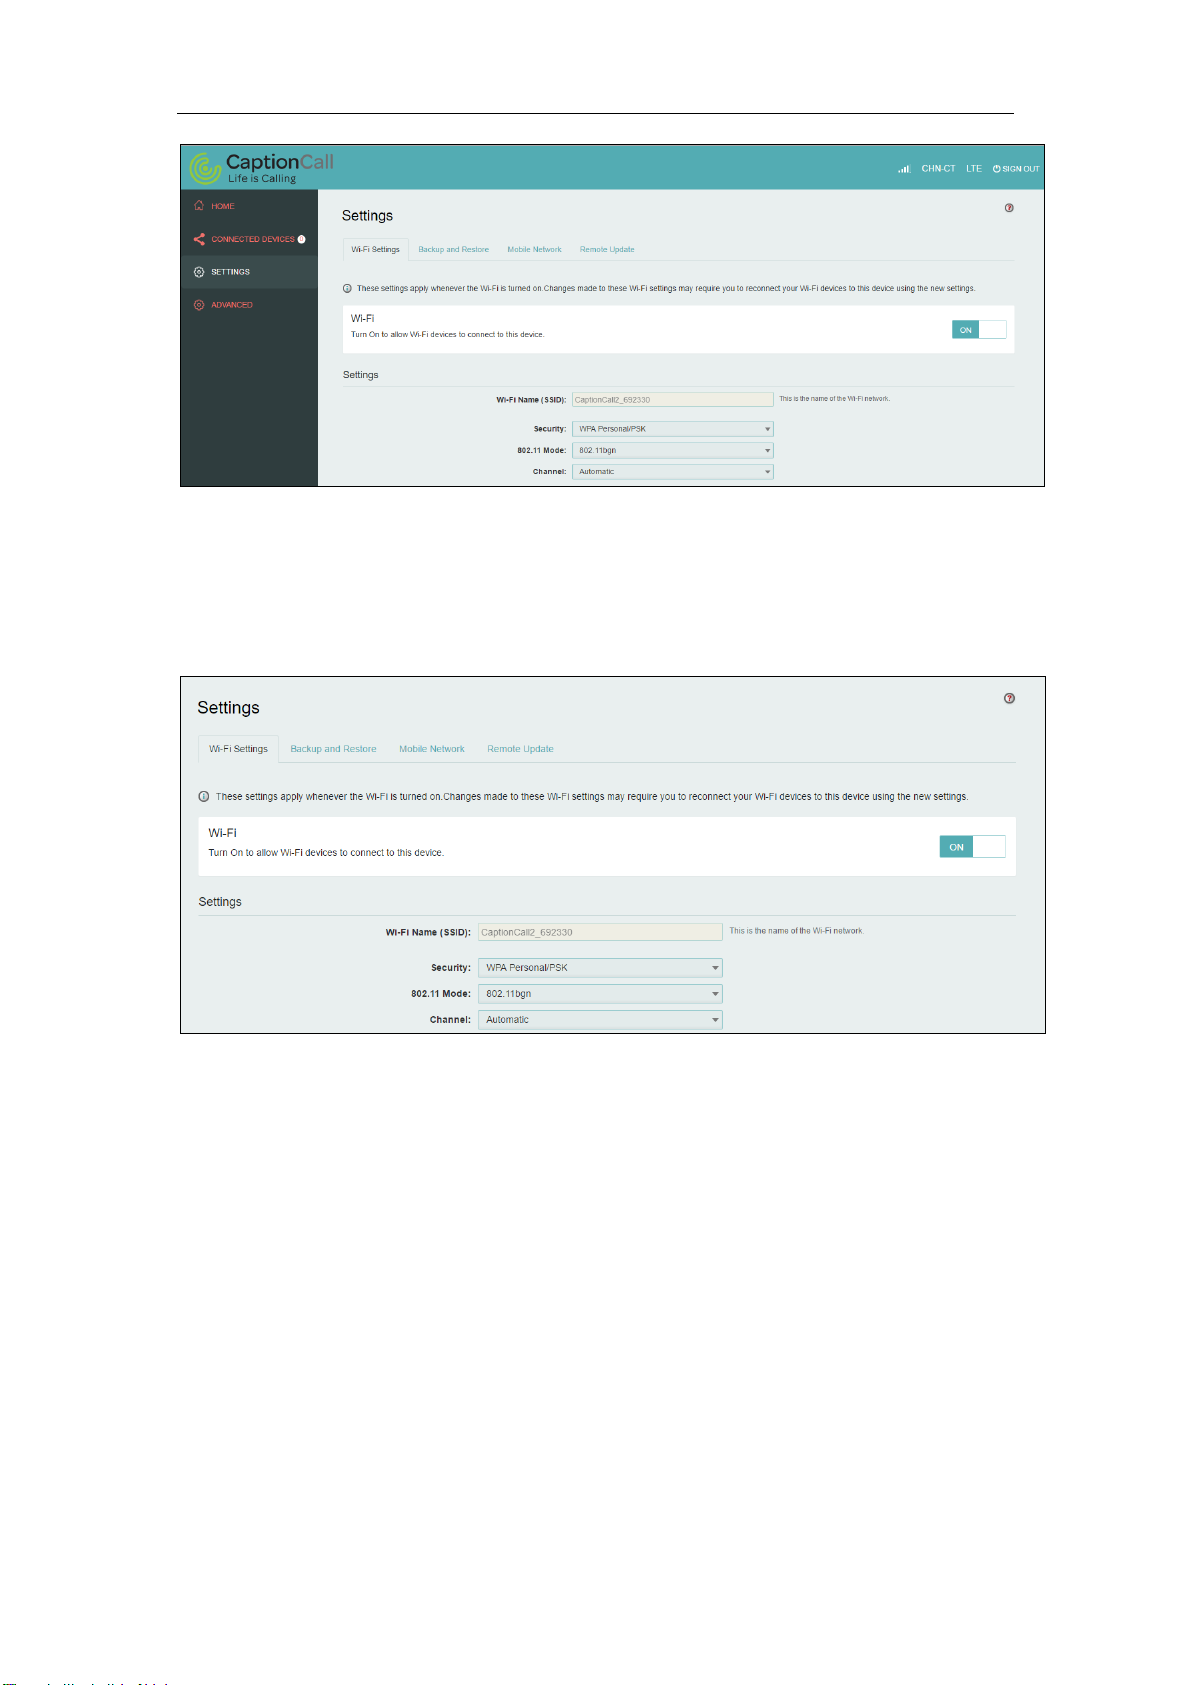
4.3.1 Wi-Fi Settings
Clicking on the Wi-Fi Hotspot tab if will take you to the Wi-Fi Hotspot page. On
this page, the settings about Wi-Fi can be viewed and changed.
Wi-Fi ON/OFF
Turn on to allow Wi-Fi devices to connect to this device. Wi-Fi devices will not
connect to this device after it is turned off.
Wi-Fi name(SSID)
To identify your wireless network, a name called the SSID (Service Set Identifier)
is used. You can set it to anything you like and you should make sure that your
SSID is unique if there are other wireless networks operating in your area.
Security
You can set the wireless security and encryption to prevent the router from
unauthorized access and monitoring. The default security is WPA Personal/PSK.
You can also set Security as “WPA2 Personal/PSK(AES)”, “WPA/WPA2
Mixed Mode”.
11/13/19
Page 7

CH1 User Manual
7
Max Wi-Fi connections
The default max Wi-Fi connection is 5, you can set it as 1~5.
802.11 Mode: The default is“802.11 bgn”. You can also set it as “802.11bgn and
11a/an/ac mixed mode”
Channel: The default “Channel” is “Automatic”. You can set it from channel 1 to
channel 9.
Wi-Fi Options
Wi-Fi Options include Broadcast Wi-Fi name (SSID), Wi-Fi Multimedia Wi-Fi
privacy separation and Max Wi-Fi Connections.
11/13/19
Page 8
CH1 User Manual
8
Broadcast Wi-Fi name (SSID): The wireless client can search and connect to the
SSID after turning on “Broadcast Wi-Fi name (SSID)”. The wireless client must
input SSID manually to connect to the SSID after turning off “Broadcast Wi-Fi
name (SSID)”.
Wi-Fi privacy separation: If turned on, connected devices cannot communicate
with each other.
Max Wi-Fi Connections: The default max Wi-Fi connection is 5, you can set it
as 1~5.
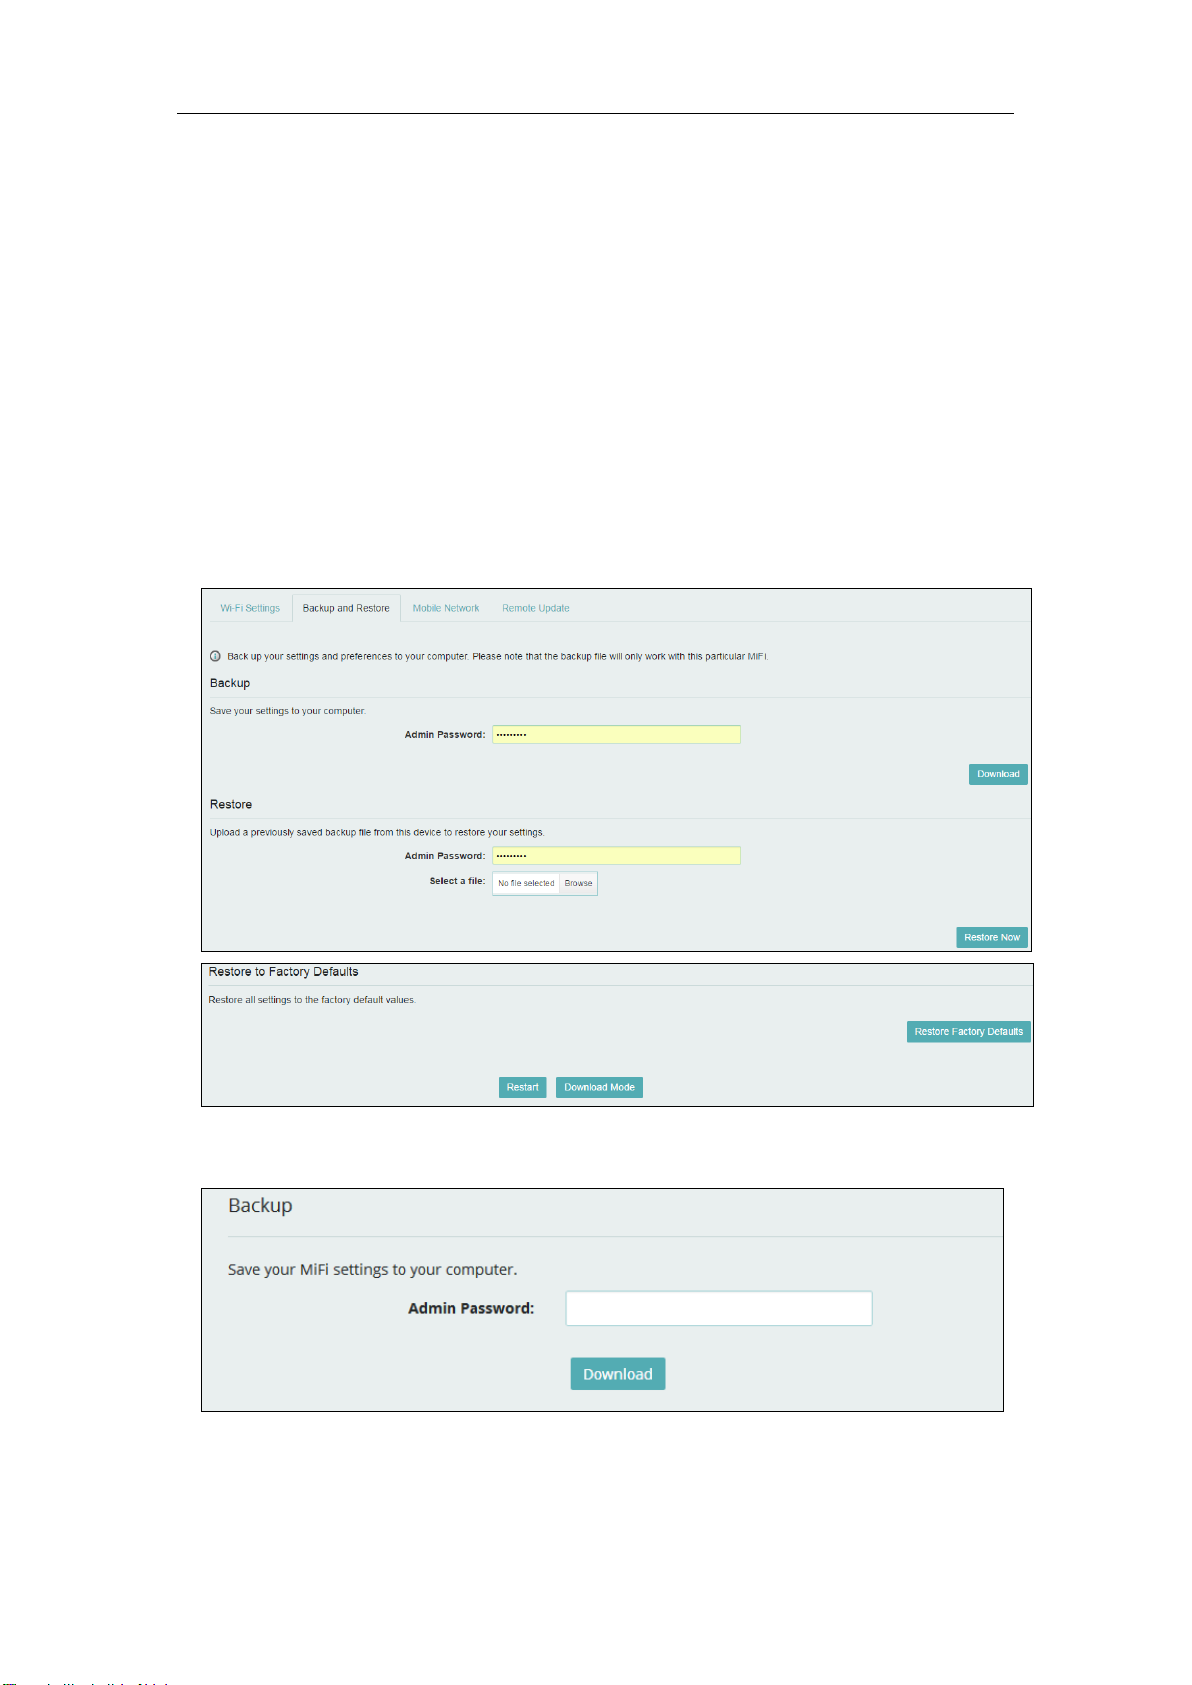
4.3.2 Backup and Restore
On this page, you can operate Backup, Restore, Restore to Factory Defaults,
Restart and Download Mode.
Backup
Backup your MiFi settings and preferences to your computer.
Note:
1) The backup file will only work with this particular MiFi;
2) You will be locked out if an incorrect password is used too many times.
11/13/19
Page 9

CH1 User Manual
9
Restore
Upload a previously saved backup file from this device to restore your settings.
Note:
1) You will be locked out if an incorrect password is used too many times.
Restore to Factory Defaults
Restore all settings to the factory default values. You can also restart MiFi and
Change to MiFi download mode.
4.3.3 Mobile Network
From this page, you can see two menus: Mobile Settings and SIM Lock.
4.3.3.1 Mobile settings
On this page, you can manage your mobile broadband data connection, including
Cellular Data.
Cellular Data
11/13/19
Page 10

CH1 User Manual
10
Turn off cellular data to prevent all internet traffic from using the mobile broadband
connection.
4.3.3.2 SIM Lock
For additional security, the SIM card inside your MiFi may be locked with a PIN
code. When locked, the PIN code must be entered before the MiFi will connect to the
internet. The default PIN is available from your service provider.
If the PIN Lock feature is ON, you will need to enter the SIM PIN every time the
MiFi is powered on.
When you enter the right PIN code, the status of SIM will change to ready, and you
can connect to the internet.
Note:
Entering an incorrect PIN more than 3 times will permanently lock your SIM and
you need enter PUK code to unlock. You need to ask Service provider to get the PUK
code.
4.3.3.3 Remote Update
On this page, Update FOTA URL address, be ready for new software and
campaigns at red bend server get the good signal and connect to network.
In the local area at 2:00 a. m., the device has no data transfer, and the version
upgrade is checked.
4.4 Advanced
On this page, you can see five menus: Firewall, MAC Filter, LAN, Port Filtering
and Port Forwarding.
11/13/19
Page 11

CH1 User Manual
11
4.4.1 Firewall
This page contains Firewall-related settings:
VPN Passthrough
After turned on, VPN Passthrough allows connected devices to establish a VPN
tunnel.
DMZ(IPv4)
Enter the IP address of the connected device in the Destination IP address input
field to become the DMZ destination.
After enabling DMZ feature, all the applications of the connected device will be
visited.
4.4.2 MAC Filter
11/13/19
Page 12

CH1 User Manual
12
Included in
Block List
Included in
MAC Filter List
Connection
No
Yes
Allowed
No
No
Not allowed
Yes
Yes
Not allowed
Yes
No
Not allowed
The default “MAC Filter” status is “OFF”, and is a Whitelist, all the clients can
connect to the MiFi.
For any given device, the interaction of the MAC Filter with the “Block” feature on
the Connected Devices screen is shown on the following table.
The “Block” (Blacklist) feature is always available. After blocked, the blocked
devices will disconnect from MiFi.
Because enabling the MAC Filter could potentially disconnect all devices, the user
needs to populate the “MAC Address Filter” list first while the MAC Filter is OFF.
Otherwise while you click “ON/OFF” button, it will prompt warning information as
follows:
After changing the “MAC Filter” to “ON”, only the local “MAC Address Filter”
listed devices can connect to MiFi, other devices will disconnect from MiFi.
You can click “Add Device” button to add the devices, the added devices can
connect MiFi.
11/13/19
Page 13

13
4.4.3 LAN
CH1 User Manual
IPv4
IP Address - Enter the IP address of your router (factory default: 192.168.1.1).
Subnet Mask - An address code that determines the size of the network. Normally
use 255.255.255.0 as the subnet mask.
MAC Address - It needs to be written to the device while producing.
Turn on DHCP server - Enable or Disable the DHCP server. If you disable the
Server, you must have another DHCP server within your network or else you must
configure the address of your PC manually.
Start DHCP address range at - Specify an IP address for the DHCP server to start
with when assigning IP address. The default start address is 192.168.1.10.
DHCP lease time - The Lease Time is the amount of time a network user will be
allowed connection to the router with their current dynamic IP address. Enter the
amount of time in minutes and the user will be "leased" this dynamic IP address. After
the time is up, the user will be assigned a new dynamic IP address automatically.
IPv6
When on, connected devices can make IPv6 connections to the Internet.
11/13/19
Page 14

14
4.4.4 Port Filtering
CH1 User Manual
Applications
The default applications have “Email (POP3, IMAP, SMTP)”, “FTP”, “HTTP”,
“HTTPS” and “Telnet”. If port filtering is on, only traffic from selected applications
can access the Internet. Note that DNS is always allowed.
Custom Applications
Click “Add a Custom Application” to define your own applications, and then turn
them on or off as needed. To define an application, you need to know the outgoing
ports used by application.
11/13/19
Page 15

15
4.4.5 Port Forwarding
CH1 User Manual
Figure 3-5-4-5-1 Port Forwarding
Default Application
The default applications have “DNS”, “FTP”, “HTTP”, “POP3”, “SMTP”,
“SNMP”, “Telnet” and “TFTP”. Port forwarding sends specific incoming traffic to a
connected device. The connected device is specified using IP address.
Custom Application
Click “Add a Custom Application” to define your own applications, and then turn
them on or off as needed. To define an application, you need to know the incoming
ports used by the application.
11/13/19
Page 16

CH1 User Manual
16
LED
Color
Action
Function Description
Remark
Signal
Green(G)
On
-95 <= RSRP <= -44
Blue(B)
On
-105 <= RSRP < -95
Cyan(B+G)
On
-115 <= RSRP < -105
Purple(R+B)
On
-125 <= RSRP < -105
Yellow(R+B)
On
-140 <= RSRP < -125
Red(R)
Flash slowly
SIM error, no SIM
Off
No LTE Signal and Dialing
LED
Color
Action
Function Description
Remark
Connect
Off
LTE unable to connect
Green
Flash fast
LTE is connecting
Green
Flash slowly
LTE connection succeeded
LED
Color
Action
Function Description
Remark
Connect
Off
LTE unable to connect
Green
Flash fast
LTE is connecting
Green
On
LTE connection succeeded
LED
Color
Action
Function Description
Remark
WIFI
Green
ON
WIFI connected with a WIFI Client
Off
WIFI not connected
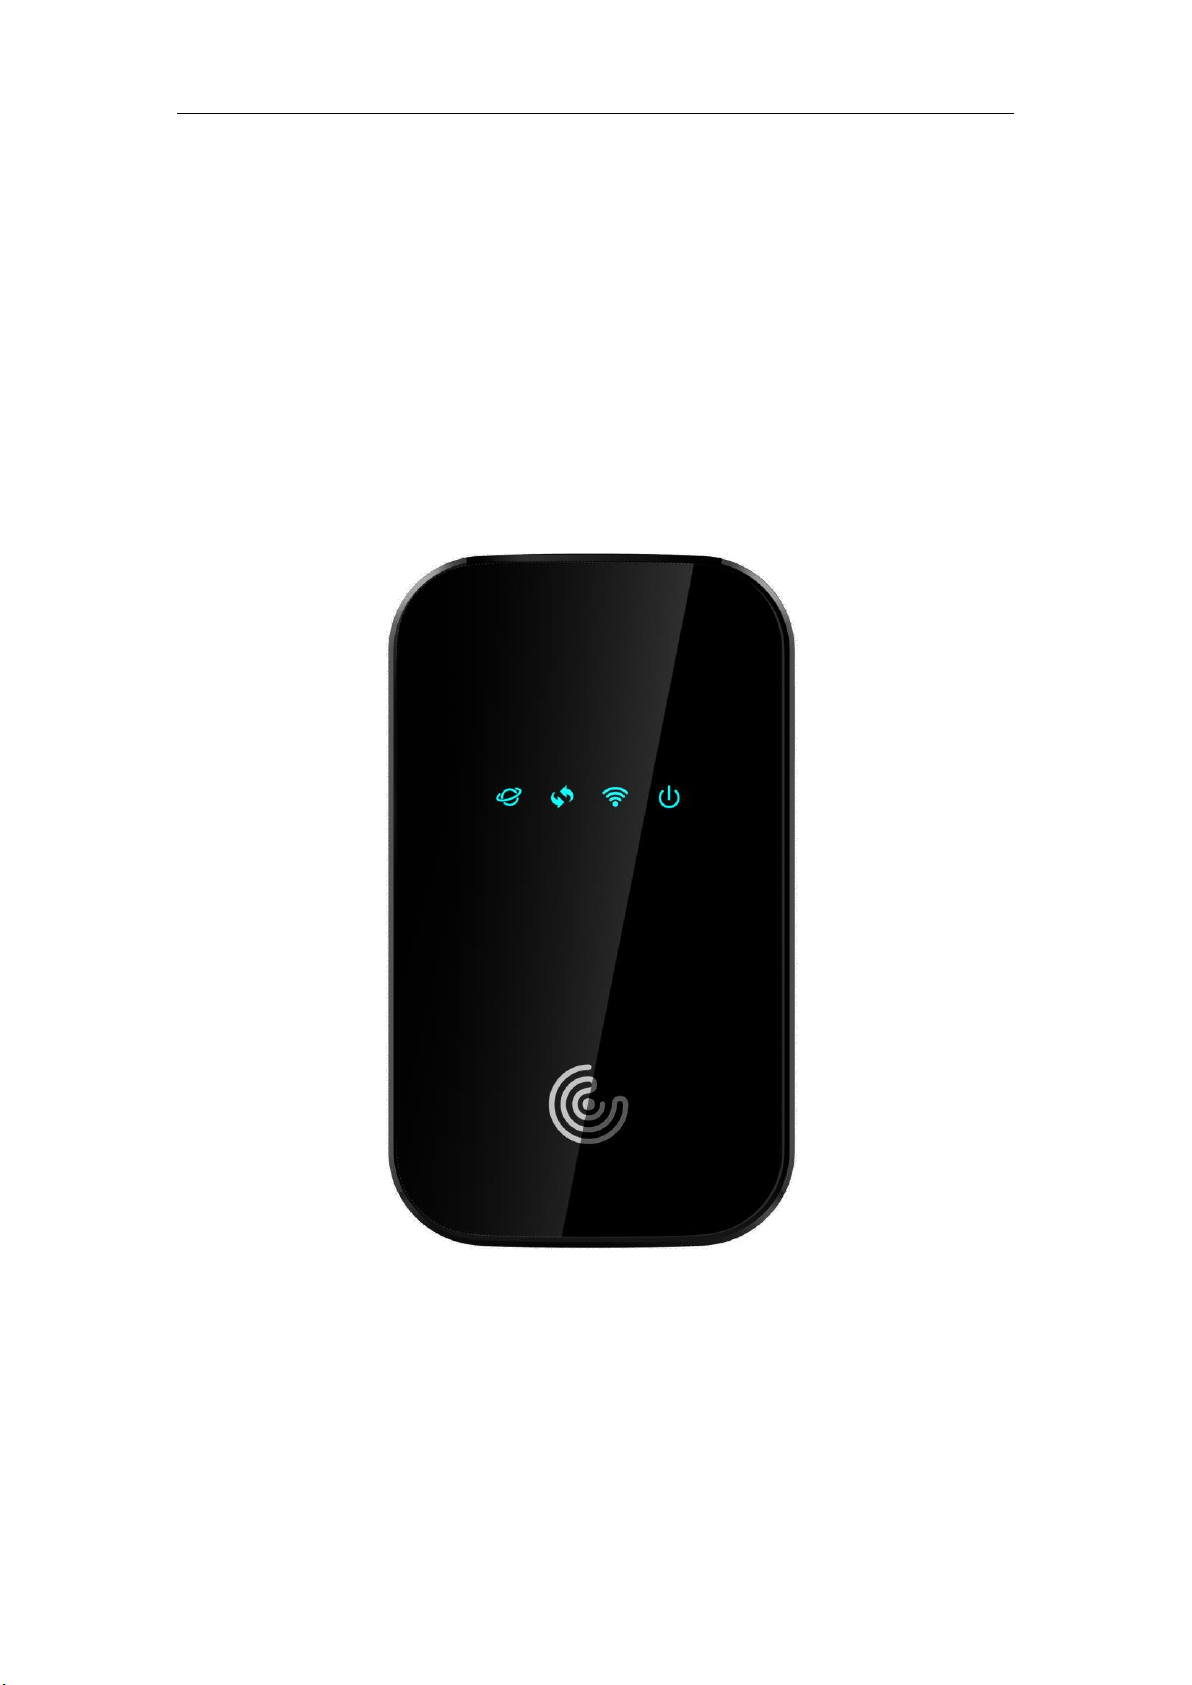
5. LED definition
The front of this device has four LED icons, a Signal lamp, a Connect lamp, a WIFI lamp, and a
Power Supply lamp. Here are the detailed LED definitions;
5.1 Signal
5.2 Connect
Flash fast: LED on 300ms, and LED off 300ms
Flash slowly: LED on 2s, and LED off 500ms
Using Usim:
Using Esim:
5.3 WIFI
11/13/19
Page 17

CH1 User Manual
17
LED
Color
Action
Function Description
Remark
Power
Green
ON
Power on
Off
Power off
5.4 Power
6. Reset/SIM-Switching Key
Reset key
On the upper-right corner on the back of device is a RST button.
Short press(Less than 2s): Switch SIM card between external SIM card and internal ESIM, default
SIM is external SIM.
Long press(>3s): Load default setting.
7. FCC Information
IMPORTANT! This device does not contain any customer-serviceable components. Any
changes or modifications not expressly approved by the party responsible for compliance
could void the user’s authority to operate this equipment.
This device complies with Part 15 of the FCC rules. Operation is subject to the following two
conditions: (1) This device may not cause harmful interference, and (2) this device must
accept any interference received, including interference that may cause undesired operation.
Any changes or modifications not expressly approved by the manufacturer could void the
user’s authority to operate the equipment.
NOTE: This equipment has been tested and found to comply with the limits for a Class B
digital device, pursuant to Part 15 of the FCC rules. These limits are designed to provide
reasonable protection against harmful interference in a residential installation. This equipment
generates, uses and can radiate radio frequency energy and, if not installed and used in
accordance with the instructions, may cause harmful interference to radio communications.
However, there is no guarantee that interference will not occur in a particular installation. If
this equipment does cause harmful interference to radio or television reception, which can be
determined by turning the equipment off and on, the user is encouraged to try to correct the
interference by one or more of the following measures:
• Reorient or relocate the receiving antenna.
• Increase the separation between the equipment and receiver.
• Connect the equipment into an outlet on a circuit different from that to which the receiver
is connected.
11/13/19
Page 18

CH1 User Manual
18
Author
Revision
Changes
Date
TTLIU
V1.0
Initial Draft
2019-10-29
TTLIU
V1.1
Update customer requirement
2019-11-05
TTLIU
V1.2
Update page logo
2019-11-13
TTLIU
V1.3
Add LED definition and key definition
2019-11-18
1. Any Changes or modifications not expressly approved by the party responsible for
compliance could void the user's authority to operate the equipment.
2. This Transmitter must not be co-located or operating in conjunction with any other antenna
or transmitter.
3. This equipment complies with RF radiation exposure limits set forth for an uncontrolled
environment.
4. This equipment should be installed and operated with minimum distance 20cm between the
radiator& your body.
8. Revision History
11/13/19
 Loading...