

Page 1

Impressa
Z5/Z6
Quick
Reference
Guide
This Guide does not replace the Operating Instructions.
For details and cautions you must read all instructions.
Watch the DVD instructions!
Traces of Coffee Grounds in New Machine?
This is normal! Grinder was tested during assembly with
beans. Despite cleaning, traces of ground coffee may
be found.
RED TEXT represents display text. Illustration numbers
on next page correspond with Operating Instructions.
A) First Time Ever Preparation
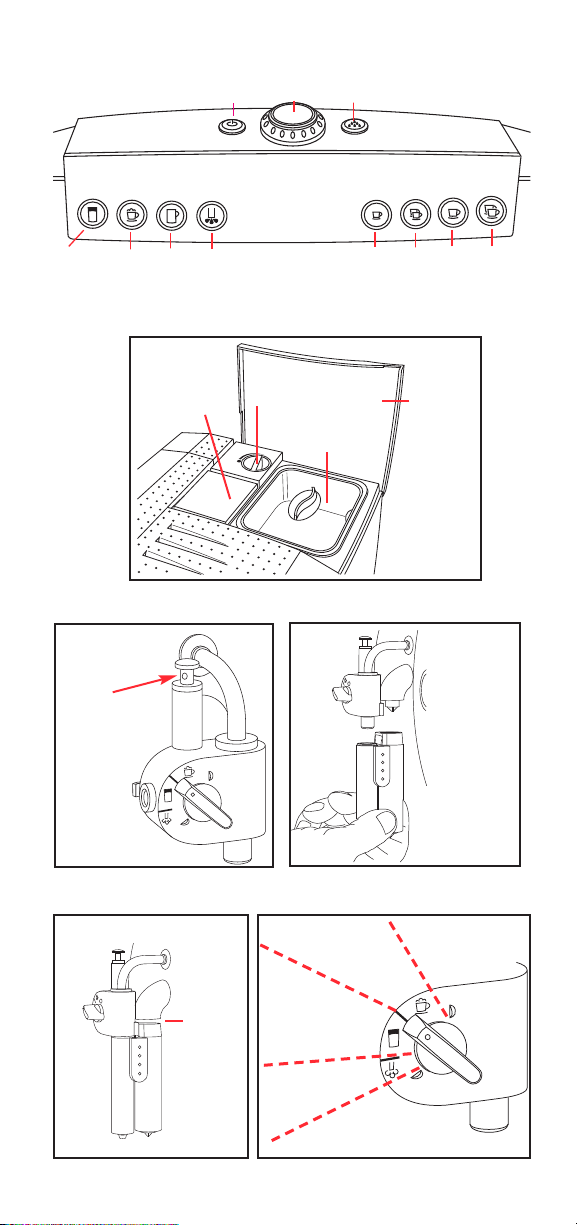
1. Fill water in tank, open Cover Lid (spring activated!),
remove Bean Container Safety Lid and add beans.
Only regular beans, no flavor
Replace Bean Container Safety Lid (Fig. 4).
2. DO NOT install the Clearyl Filter Cartridge now!
3. Turn the Main Power Switch on (bottom left by cord).
4. Push On/Off button on top (Fig. 3). Place a large cup
under the Hot Water Spout / Coffee Spouts and one
under the Auto Cappuccino System (ACS) (Fig. 5e).
PRESS RINSE. Push the Rinse button. SYSTEM
FILLS, then WELCOME TO JURA then UNIT IS
HEATING
Button. COFFEE READY.
5. Leave the cup under the coffee spouts and push the
1-cup Espresso Button. FILL BEANS. Push the
1-cup Espresso Button again. Wait until the Z5/Z6
displays
6. Your next cup will be perfect.
then PRESS RINSE. Press the Rinse
COFFEE READY. Discard the coffee.
ed or coated beans
!!!
B) Daily Preparation
• Fill fresh water in tank and check bean container.
• Push On/Off button (Fig. 3).
then RINSE. Place a cup under the coffee spouts
and press the Rinse Button.
C) Installing the Auto Cappuccino System (ACS)
• Attach the Dial Component to the Dual Fixed Spouts.
(Fig. 5c)
MACHINE IS HEATING
COFFEE READY.
65351R2
Page 2
Rotary
On/Off
Dial
COFFEE READY
R
inse
C
appuccino
Milk
Fig. 5c
Venting tip
Bean
container
1
-Cup 2-Cup 1-Cup 2-Cup
Espresso Coffee
Fig. 4
Cover
lid
S
pecial
H
C
offee
Lid for
ground
coffee
ot
W
ater
Fig. 3
Grind
selector
L
atte
safety lid
Fig. 5d
ACS
Milk
Nozzle
Fig. 5e
Gap
Coffee
Nozzle
Milk & Froth
(Cappuccino)
Milk only
(Latte)
Steam only
(Rinsing)
Fig. 5f
Page 3

• Then attach the long Dual Nozzle System to the
Dial component (Fig. 5d). Please note: The milk nozzle
should sit tight. The coffee nozzle must have a gap
(Fig. 5e). Make sure the dial points to the cup with
saucer for cappuccino (Fig. 5f).
• Attach the long hose to the dial component and
insert the other end into a milk carton.
Thermal Milk Container: If you use the thermal milk
container, attach the straight rod to the lid with the
tapered end pointing to the bottom. Then insert the elbow
rod through the top of the lid into the straight rod. Slip the
open end of the short flexible hose over the elbow rod.
Fill the thermal container with cold milk and assemble lid,
thermal container and dial component.
Important: Cold
milk will stay cold for about 8 hours in the thermal milk
container. Then the milk must be returned to the refrigerator
or discarded. Remove lid when refrigerating. Rinse hoses
and thermal container with hot water.
D) Eight Beverage Buttons
The Milk, Cappuccino and Special Coffee button brew
through the ACS System (Fig. 5e). The Hot Water button
brews through the hot water spout.
The beverage buttons are pre-set as follows:
Button Function Milk Volume Strength
Milk 20 sec – –
Cappuccino/Latte * 15 sec 3.0 oz NORMAL
Special Coffee * – 3.0 oz. XSTRONG
Hot Water – 6.0 oz. –
1 Espresso * – 1.5 oz. STRONG
2 Espresso * – 3.0 oz. STRONG
1 Coffee * – 5.0 oz. NORMAL
2 Coffee * – 10.0 oz. NORMAL
Coffee Coffee
* Temperature for coffee is set at HIGH.
• You can override Coffee Strengths just before brewing.
• You can override Cup Size during brewing.
• Overriding (chapter M) will not change above pre-sets.
• All pre-sets can be changed to new pre-sets (chapter N)
Important: You can always stop any brewing by pushing
the Rotary Dial or any beverage button.
tant:
Impor
Z5/Z6 is br
Never tr
ewing or discar
is completed and the display shows
y to pull out the drawer while the
ding. Always wait until the cycle
COFFEE READY.
Page 4

E) Cappuccino and Latte
COFFEE READY
Place a cup under the ACS. The dial points to the cappuccino setting and the hose connects to the dial component
and is inserted into cold milk. Push the Cappuccino Button.
CAPPUCCINO then MILK 15 SEC then 3 OZ. NORMAL.
For 15 seconds hot frothed milk is produced, coffee is
ground, tamped and 3 oz. of high pressure coffee is added.
After the used coffee is discarded the display returns to
COFFEE READY. For Latte (steamed milk without froth) turn
the dial to the tall glass (Fig. 5f) and use the same button.
F) Hot Chocolate / Hot Milk
COFFEE READY Proceed as under E. Start with cold
chocolate milk or dissolve chocolate syrup in cold milk.
Push the Milk Button.
G) Cappuccino Rinsing CAPPU RINSE
Ten minutes after last using milk the display shows CAPPU
. You can still make coffee. Place a cup under the
RINSE
ACS system. Push the Rinse Button.
ING. COFFEE READY.
Daily ACS Cleaning with Cappuccino Cleaner Liquid.
Remove all frother parts (dial component, nozzles, venting
tip, hoses and lids that come in contact with milk).
Place in a cup with fresh water. Add 15ml of the Cappu
Cleaner Liquid. Within an our all parts are clean.
Rinse with fresh water.
MILK 20 SEC then COFFEE READY.
CAPPUCCINO RINS-
H) Special Coffee
COFFEE READY.
Push the Special Coffee Button. Coffee will be brewed
through the coffee nozzle of the ACS system. Now you can
add milk with the milk button without moving the cup.
I) Hot Water / Pre-warming your cup / Tea
COFFEE READY
Spout (to the right of the Dual Coffee Spout). Push the Hot
Water Button. Hot water will be released. This is ideal for
pre-warming your cup.
J) Espresso and Coffee
The four buttons on the right side deliver coffee through the
height adjustable Dual Coffee Spouts in the middle.
COFFEE READY.
Place cup(s) underneath the spouts in the middle and push
one of those four buttons, e.g. the 1-cup Espr
1 ESPRESSO STRONG. After the used coffee grounds are
discarded internally:
Place a cup under the ACS system.
. Place a cup underneath the Hot Water
esso Button.
COFFEE READY.
Page 5

K) Adjusting the Grinder
Important: You can only adjust the fineness during the
actual grinding process.
For darker, oily beans, grind somewhat coarser.
•
For lighter beans, grind somewhat finer.
• Open the Cover Lid and turn the Grind Selector while
grinding (Fig. 4).
Coarser: turn the dial towards the bean symbol;
Finer: turn away from the bean symbol.
L) Using Pre-Ground Coffee
COFFEE READY
ground coffee (Fig. 4). PRE-GROUND FILL POWDER.
Add one or two scoops of coffee and close Lid for ground
coffee.
under the coffee spouts or the ACS system and choose
the coffee button with which you want to brew coffee.
COFFEE READY.
M) Overriding Pre-Set Values
Strength Settings: Just before pushing one of the coffee
buttons turn the Rotary Dial and select from XMILD,
MILD, NORMAL, STRONG, XSTRONG. Push one of the
coffee buttons within three seconds and the selected
strength setting shows while the Z5/Z6 grinds.
Coffee Volume: During grinding, turn the Rotary dial and
select any volume from 1 oz. to 8 oz.
Important: If you use the 2-cup buttons the cup size
shown in the display is per cup!
Overriding the Milk Volume for the Cappuccino Button:
First select the Strength Setting (above). Then push the
Cappuccino Button. When the display shows MILK 15
SEC turn the Rotary Dial to change the seconds. (You can
always stop the frothing by pushing the Rotary Dial). When
the milk stops and the coffee brewing starts turn the
Rotary Dial again to change the coffee volume.
Please Note: Overriding does not change the pre-set
values (see chapter D).
PRE-GROUND / SELECT PRODUCT. Place a cup
. Open the Cover Lid. Open the Lid for
N) Re-programming Pre-set values
COFFEE READY
Volume (cup size) can be permanently re-set as follows:
esponding spout.
Place a cup under
Then push and hold the beverage button you want to
change per
ENOUGH? PRESS BUTTON.
When you have enough cof
cup, press the same beverage button again. From now on,
this volume is stored in the Z5/Z6.
neath the cor
manently until the display shows
r
fee or milk or water in your
Page 6

Example: Push and hold the 1-cup Coffee Button
until ENOUGH? PRESS BUTTON When the
desired amount of coffee is in your cup, push the
1-cup Coffee Button again.
Example: Push and hold the Cappuccino Button
until ENOUGH MILK PRESS BUTTON. When
enough frothed milk is in your cup, press the
Cappuccino Button. Then the Z5/Z6 starts brewing
coffee.
enough coffee is added press the Cappuccino
button again.
Please note: To re-program temperature and
coffee strength see chapter T.
O) Installing and Activating the Clearyl
Cartridge. (watch DVD for details)
Rinse cartridge under running water.
Attach extension rod.
Remove water tank (empty), pull up cartridge holder
lid and install the cartridge to fit snugly inside the
fins. Close cartridge holder lid and fill tank with
water and replace.
You MUST ACTIVATE the filter NOW!
COFFEE READY. Push and hold the Rotary Dial
until you hear a beep. FILTER NO
Push the Rotary Dial and then turn until the Display
shows FILTER YES. Push the Rotary Dial to con-
firm. INSERT FILTER PRESS BUTTON. Rinse
button illuminates. Filter is already inserted. Place
a 20 oz. container under the ACS system. Push
and hold the Rinse Button until the display shows
FILTER RINS. Do not interrupt. After 90 seconds
the display shows
COFFEE READY. The water might show a slight
discoloration. This is normal.
Important: Do not let the filter dry-out. Filter needs
to be submersed in water (see page 20 Operating
Instructions).
ENOUGH? PRESS BUTTON. When
CONFIRMED 4.
UNIT IS HEATING then
CONFIRMED 4
P) Replacing the Clearyl Cartridge
After using 75 liters (2,500 oz.) of water the display
will remind you to change the filter: COFFEE
READY / FILTER-CHANGE. You can still make
coffee but you should renew the filter within the
next few days.
Remove the old filter
Install new filter as explained above.
TE as follows:
A
ACTIV
Place a 20 oz. container under the ACS system.
Push and hold the Rinse Button until the display
. Keep the extension rod!
Page 7

shows FILTER RINS. Do not interrupt. After 90
seconds the display shows UNIT IS HEATING then
COFFEE READY.
Q) Messages
Immediate Action Messages
FILL WATER TANK
FILL BEANS: add beans to the bean container.
RINSE: push the Rinse Button. Hot water will come
out of the Coffee Spouts and / or the ACS.
EMPTY GROUNDS or EMPTY TRAY: remove the
drawer, empty the used coffee container (ground
coffee) and the drawer (water). Replace all parts.
IMPORTANT: If you pull out the drawer at any other
time, you must empty the used coffee container and
drawer. Otherwise you will create an overflow of
used coffee. Never pull out the drawer during any
operation.
TRAY MISSING: replace the complete drawer
assembly.
BIN MISSING: The tray, which holds the used cof-
fee container, is missing. Make sure all four parts of
the drawer system (drawer, tray, used coffee container and stainless steel grid) are inserted.
BEANCOVER MISSING: replace bean container lid.
Always wait for COFFEE READY.
: add water to the water tank.
Delayed Action Messages: In addition to COFFEE
READY the Z5/Z6 will display another message. You
can still brew beverages but you need to perform
these functions as soon as possible:
COFFEE READY plus…
... CAPPU RINSE: (see chapter G)
... CLEAN: run a 15 minutes tablet cleaning cycle
within the next few days. (see chapter R)
FILTER CHANGE: (see chapter P)
...
... DESCALE: (see chapter S).
R) Tablet Cleaning Cycle
The message COFFEE READY CLEAN will appear
after approx. 200 cups of coffee. This cleaning cycle
removes coffee oils inside the machine. Takes less
than 15 minutes.
Important: Only use special round cleaning tablet.
ogram once started!
tant:
Impor
Fill water tank. Push and hold the Rinse Button.
TRAY GROUNDS EMPTY. You must remove the
drawer system for 20 seconds, even if it is empty.
After emptying replace all parts.
Do not inter
upt pr
r
PRESS BUTTON.
Page 8

Place a 12 oz. container under the coffee spouts and an
8 oz. container under the nozzles of the auto-cappuccino
system and push the Rinse Button.
CLEANING
open the Cover Lid, then the Ground Coffee Lid
(Fig. 4) and drop one cleaning tablet into the funnel.
Close the Ground Coffee Lid.
the Rinse Button.
minutes:
Empty used coffee container and drawer and replace all
parts. COFFEE READY. The Z5/Z6 will automatically
remind you when it’s time to run this cycle again.
S) Decalcifying Cycle
If you do not use the Clearyl water filter, the Z5/Z6 will
remind you when to decalcify. For water hardness
setting see Operating Instructions, chapter 24.
COFFEE READY DESCALE.
Important: If you use the Clearyl Cartridge and this
message appears you did not activate the cartridge
properly (no activation, see chapter O).
Important: Only use our special decalcifying tablet,
# 61848 (see chapter U). Immediately remove any
splashes or drops of the decalc mixture from sensitive
surfaces, such as natural wood or stone.
Important: Do not interrupt program once started!
Push and hold the Rinse Button until TRAY GROUNDS
EMPTY. You must remove the complete drawer for 20
seconds, even if it is empty. Replace complete after
emptying all parts.
empty water tank. Dissolve 3 of the large square decalc
tablets in a separate container with 20 oz. of water and
pour the solution into the water tank. Replace water tank.
SOLVENT IN TANK PRESS BUTTON.
Remove the Dual Nozzle System and the Dial
Component and place one container underneath the
spouts on the left side. Place another container under
the Hot Water Spout. Each container should have at
least an 8 oz. capacity. Push the Rinse Button.
MACHINE IS DECALCIFYING. After approx. 35 minutes
TRAY GROUNDS EMPTY. Remove the containers.
Remove and empty the drawer system and replace.
WATER TANK FILL. Thoroughly rinse and fill the water
tank with fr
BUTTON. Place the two containers again under
the spouts (see above) and push the Rinse Button.
MACHINE IS DECALCIFYING. After a few minutes
MACHINE IS HEATING. RINSING. Then TRAY
GROUNDS EMPTY
COFFEE READY.
. When the message ADD TABLET appears,
MACHINE IS CLEANING. After a few
TRAY GROUNDS EMPTY. Remove drawer.
SOLVENT IN TANK. Remove and
esh cold water
, then r
oceed as above.
. Pr
MACHINE IS
PRESS BUTTON. Push
eplace.
PRESS
neath
Page 9

T) Programming
The Z5/Z6 provides programming, maintenance and look-up
functions. For details see chapter 26 in the Operating
Instructions.
COFFEE READY
Push and hold the Rotary Dial until the Display shows
FILTER. Turning the dial clockwise lets you access the func-
tions listed below. To get back to
the display shows
EXIT and push the Rotary Dial. If you want
COFFEE READY turn until
to get into a function, push the Rotary Dial again, and subfunctions will appear. Turning the Dial will show you different
options within the sub-functions.
Function
• Sub-functions Comment
FILTER NO
• FILTER YES Install and activate the Clearyl Filter
• FILTER NO
HARDNESS 10º DH When not using the Clearyl cartridge,
• Not active or set the hardness to your water.,
• Six hardness levels See chapter 24 Operating Instructions.
MAINTENANCE
• RINSE UNIT Allows you to run extra cleaning
• CAPPUCCINO cycles, even if the Z5/Z6 does not
CLEANING prompt you to do so.
• CHANGE FILTER
• CLEAN UNIT
• CAPPUCCINO
RINSING
• DECALCIFY UNIT
TEMPERATURE
• LOW Change the temperature for each
• NORMAL coffee button, see chapter 26.2
• HIGH Operating Instructions
AROMA
• XMILD Change the coffee strength for
• MILD each coffee button. The amount of
• NORMAL ground coffee varies between approx.
• STRONG 5 and 16 grams.
• XSTRONG
CAPPUCCINO Change the pre-sets without brewing.
MILK Change the pre-sets without brewing
ENERGY
• SAVE NO NO: Z5/Z6 is always ready
• SAVE LEVEL 1 Level 1: heats up for steam
• SAVE LEVEL 2 Level 2: heats up for water and steam
TIME Set actual time
Page 10

Function
• Sub-functions Comment
UNIT ON Set an auto-on time
OFF AFTER Change from 2 hours auto-off to many
INFORMATION Shows how many cups were
RENAME Rename all eight beverage buttons,
LANGUAGE Select from English, Spanish, German,
DISPLAY Select the time format AM/PM or
EXIT Push Dial to get to COFFEE READY
other options
brewed with each button. Also,
shows pre-sets for all buttons
and how often maintenance
programs were performed.
the welcome and end message. You
can reset back to the factory setting.
French, Dutch
24 hours and volume in oz. or ml.
U) Supplies
Order additional supplies using:
• Enclosed Mail Order Form
• www.capresso.com
• Customer Service
• Your local store.
• Clearyl Water Filter Cartridge.....#64553 (one included)
• Cleaning Tablets.........................#62205 (two included)
• Decalcifying Tablets...................#61848
• Auto Cappuccino Cleaner............#63801 (one included).
CUSTOMER SERVICE
1-800-220-5701
Monday through Thursday 9AM – 9PM
Friday 9AM – 8PM
Saturday 9AM-5PM EST
FAX: 201-767-9684; email: contact@capresso.com
www.capresso.com
 Loading...