

Page 1
Operating Instructions
“ULTIMA”
Model #121
Semi-Automatic Coffee Maker and
Espresso/Cappuccino Machine
• Warranty
• Mail-in product registration
US Patent Number 5,622,099
17055
Page 2

IMPORTANT SAFEGUARDS
When using electrical appliances, basic safety precautions should always be followed, including the following:
• Read all instructions.
• Do not touch hot surfaces. Use handles or knobs.
• To protect against fire, electric shock and personal injury do not immerse
cord, plugs, or appliance in water or other liquid.
• Close supervision is necessary when any appliance is used by or near children.
• Unplug from outlet when not in use and before cleaning. Allow to cool before
putting on or taking off parts, and before cleaning the appliance.
• Do not operate any appliance with a damaged cord or plug or after the
appliance malfunctions, or has been damaged in any manner. Return
appliance to the nearest authorized service facility for examination, repair
or adjustment.
• The use of accessory attachments not recommended by the appliance
manufacturer may result in fire, electric shock or personal injury.
• Do not use outdoors.
• Do not let cord hang over edge of table or counter, or touch any hot surfaces.
• Do not place on or near a hot gas or electric burner, or in a heated oven.
• Always attach plug to appliance first, then plug cord into the wall outlet.
To disconnect, turn any control "off", then remove plug from wall outlet.
• Do not use appliance for other than intended use.
• Use extreme caution when disposing hot steam.
• Appliances with Glass Containers.
A. The container is designed for use with this appliance. It must
never be used on a range top.
B. Do not set a hot container on a wet or cold surface.
C. Do not use a cracked container or a container having a loose or
weakened handle.
D. Do not clean container with cleansers, steel wool pads, or other
abrasive material.
SAVE THESE INSTRUCTIONS
Page 3

SPECIAL CORD SET
INSTRUCTIONS
Regarding your Cord Set:
A. A short power-supply cord (or detachable power-supply cord) is
to be provided to reduce risks resulting from becoming entangled
in or tripping over a longer cord.
B. Longer detachable power-supply cords or extension cords are
available and may be used if care is exercised in their use.
C. If a long detachable power-supply cord or extension cord is used,
(1) the marked electrical rating of the detachable power-supply
cord or extension cord should be at least as great as the electrical
rating of the appliance, (2) if the appliance is of the grounded
type, the extension cord should be a grounding type 3-wire cord,
and (3) the longer cord should be arranged so that it will not drape
over the counter top or table top where it can be pulled on by
children or tripped over.
D. This appliance has a polarized plug (one blade is wider than the
other). As a safety feature, this plug will fit in a polarized outlet
only one way. If the plug does not fit fully in the outlet, reverse the
plug. If it still does not fit, contact a qualified electrician. Do not
attempt to defeat this safety feature.
CAUTION:
This appliance is for household use. Any servicing other than cleaning
and user maintenance should be performed by an authorized
service representative.
• Do not immerse base in water or try to disassemble.
• To reduce the risk of fire or electric shock, do not remove the base.
No user serviceable parts inside. Repair should be done by
authorized service personnel only.
• Check voltage to be sure that the voltage indicated on the name
plate agrees with your voltage.
• Never use warm or hot water to fill the water container! Use cold
water only!
• Keep your hands and the cord away from hot parts of the appliance
during operation.
• Never clean with scouring powders or hard implements.
Page 4

fig. 1
1
2
3
4
5
6
16
15
14
fig. 1.1
6a
6b
6c
6d
7
8a
8b
9
10
11
fig. 2
13
12
10b
fig. 1.2
7c
7b
7a
fig. 1.3
10b
10c
10a
fig. 1
1 Knob
2 Handle Bar
3 LEVER
4 Carousel (removable)
5 Funnel for coffee (removable)
6 Operating Panel
fig 1.1
6a Main On/Off Switch (illuminated)
6b Pump On/Off Switch
6c Red Indicator Light (empty coffee
container / tray missing)
6d Thermostat Light (yellow)
7 Selector Switch
fig 1.2
7a Coffee Position (spout)
7b Hot Water Position
7c Steam/Frothing Position
8 Frother
8a Cylinder (movable)
8b Frother Tip (removable)
9 Grid (removable)
10 Tray (removable)
fig 1.3
10a Tray Base
10b Overflow Indicator
10c Used Coffee Container
11 Measuring Scoop
12 Dual Coffee Spout (height-adjustable)
13 Tab to move spout up and down
14 Water Tank (removable)
15 Lid for Water Tank
16 Lid for Coffee Funnel
Page 5
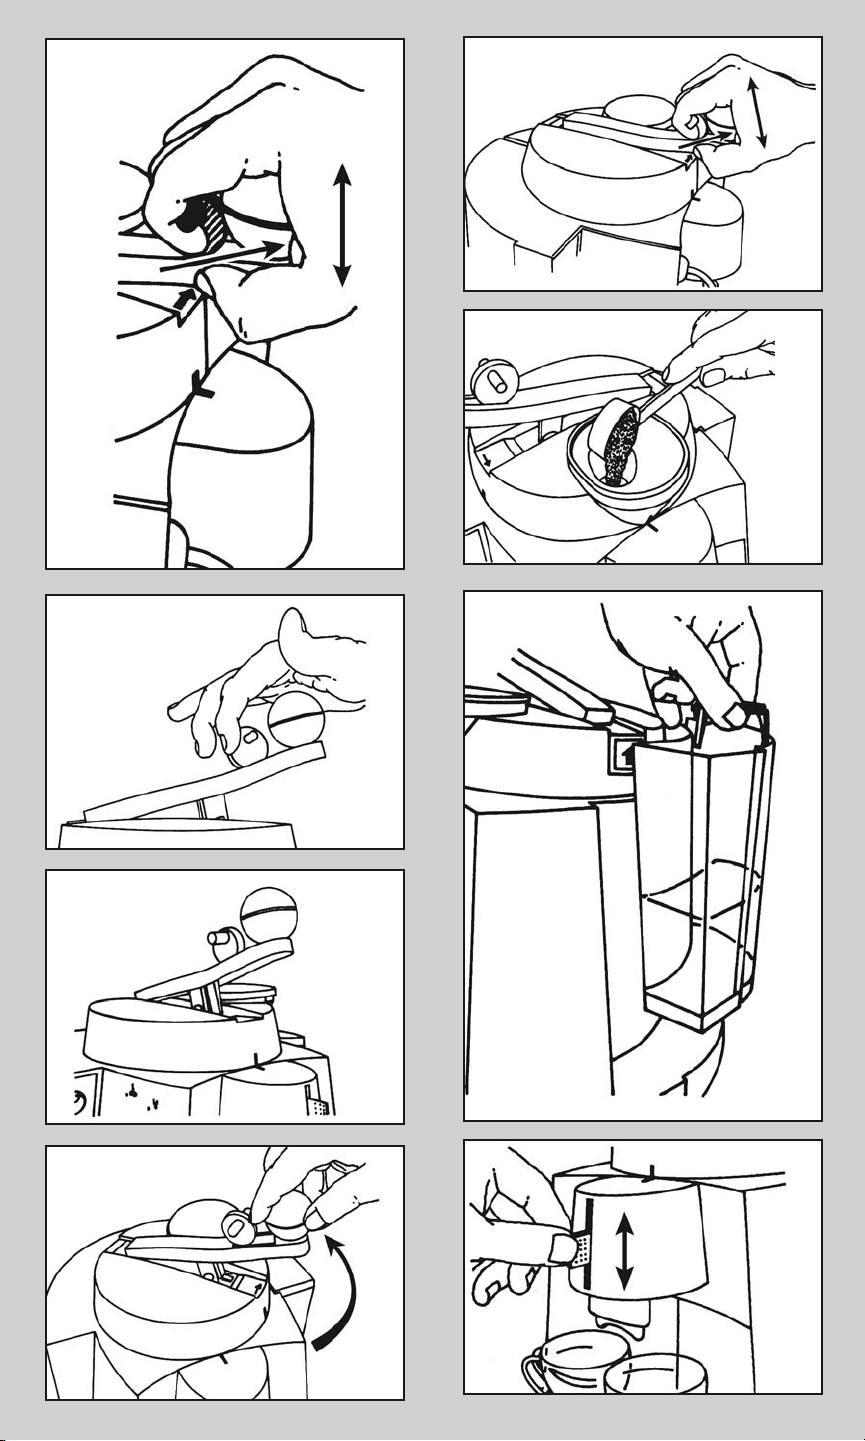
¨ First squeeze
≠ Then raise
or lower
¨ First squeeze
≠ Then raise or lower
¨
≠
¨
fig. 3
fig. 4
fig. 5
fig. 8
fig. 8a
rotate counter
clockwise only
fig. 6
fig. 9
Page 6
Steam
Froth
fig. 10
fig. 13b
fig. 10a
fig. 12 fig. 12a
fig. 10b
fig. 11
fig. 12b
fig. 15
fig. 13
fig. 14
fig. 16
fig. 17
Page 7

“ULTIMA”
Semi-Automatic Coffee Maker and
Espresso/Cappuccino Machine
Page 8

WHO IS CAPRESSO?
With more than 20 years experience in coffee equipment for consumers
in the US, I founded Capresso Inc. in 1994. My goal is to provide coffee
makers and espresso/cappuccino machines for the customer who wants
a better product. Safety, reliability, performance, and convenience are the
cornerstones of Capresso quality. Our products are available through
selected retailers who can give you expert advice and will treat you as a
valued customer. I hope you will enjoy your new Capresso product and
will recommend it to your friends.
Michael Kramm, President
A WORD ABOUT PRESSURE BREWED COFFEE ("Crema Coffee")
Grinding, tamping and brewing coffee under high pressure is considered the
ideal process to extract its maximum flavor and aroma by the majority of coffee
experts. Your Capresso "Ultima"will always produce espresso or coffee with a
thick, foamy layer called "crema". The "crema" traps the fine aromatics and the
light gaseous flavors that register on the palate. It keeps the flavors, which
would otherwise escape, locked in. The high pressure and the short brewing
time prevent the extraction of bitter oils and release less caffeine than other
brewing methods. You will always make the absolute freshest and most
aromatic cup of coffee. This is also the reason why many fine European
restaurants and hotels will serve you "crema coffee" only. Use the Capresso
"Ultima" to make a cup or two of "crema coffee".
factoid - caffeine
Caffeine is tasteless. A "strong" coffee or espresso is mostly the result of the
amount of coffee in relation to the amount of water. The longer a bean is
roasted, the less caffeine it has. "Arabica" beans have less caffeine than
"Robusta" beans. "Arabica" beans have more flavor than "Robusta" beans,
which are mostly used in high-volume coffees and instant coffees.
factoid - espresso
Espresso is the way the bean is roasted, not the bean itself. You can use many
different roasts to produce espresso coffee. You can also use the espresso
roasted coffee to make a larger cup of coffee. In the US, espresso roasting
results mostly in a darker roast than espresso roasting in Europe.
Page 9

Contents
Chapters Page
1. EQUIPMENT .....................................................................................................4
2. PLEASE DO NOT ..............................................................................................4
3. CAPRESSO Plus Service™...............................................................................4
4. AFTER UNPACKING .........................................................................................4
5. WORKING WITH THE CAROUSEL................................................................4-5
6. INITIAL PREPARATION .....................................................................................5
7. HOW THE THERMOSTAT LIGHT WORKS........................................................5
8. WHICH COFFEE GRIND?..............................................................................5-6
9. BEVERAGES... BEVERAGES. ...........................................................................6
10. MAKING ESPRESSO ......................................................................................6
11. MAKING CAPPUCCINO (frothing milk)...........................................................7
12. MAKING CAFE LATTE (steaming milk) ........................................................7-8
13. CLEANING THE FROTHER IMMEDIATELY .....................................................8
14. HOT WATER SETTING....................................................................................8
15. CARE AND MAINTENANCE............................................................................8
15.1 REMOVING USED COFFEE..........................................................................8
15.2 OVERFLOW WATER INDICATOR..................................................................9
15.3 REMOVING THE CAROUSEL .......................................................................9
15.4 CLEARING THE THERMOCOIL ....................................................................9
15.5 DECALCIFYING.............................................................................................9
16. WHAT IF... ......................................................................................................10
17. FREQUENTLY ASKED QUESTIONS........................................................10-11
18. LIMITED WARRANTY / Capresso Customer Service ...................................12
PRODUCT REGISTRATION ...........................................................................13-14
Page 10

1. EQUIPMENT
The CAPRESSO "Ultima" (#121)
comes with the following parts:
• Coffee Scoop
• Removable tray with grid, internal
used coffee container and overflow
indicator
• Removable water container with lid
• Removable coffee funnel insert with lid
• Mail Order Insert
2. PLEASE DO NOT
• Do not try to rotate the carousel
(fig. 1; #4) clockwise
• Do not try to rotate the carousel
with the lever (fig. 1; #3) down
• Do not try to push the lever down
unless the lever points to the front
• Do not fill more than two scoops of
coffee into the coffee funnel
• Do not fill coffee into the coffee
funnel if the funnel is not pointing
towards the front of the machine
• Do not fill anything else but ground
coffee into the coffee funnel
• Do not operate the machine without
the complete tray, with all its com ponents, properly inserted into the
machine
• Do not clean or decalcify the brew ing chamber with any highly reactive
cleaning solutions
• Do not lift the machine by the lever
3. CAPRESSO Plus Service™
• HELP CALL 1-800-767-3554
(Monday - Friday 9 AM to 4 PM
Eastern Standard Time)
• E-Mail address:
contact@capresso.com
• Fax: 201-767-9684
• Website: www.capresso.com
We want you to be completely satisfied with your Capresso "Ultima". If
you need any assistance, call the
above number. Call anytime you want.
If you get a voice mail message leave
your phone number and say "model
#121" or "Capresso Ultima" and tell us
a good time to call you back. You can
also e-mail or fax us any time.
Our unique CAPRESSO "Ultima" Plus
Service" offers you the following within
the first 12 months (within the United
States of America):
• Free repair or free replacement if
your Capresso Ultima malfunctions,
including shipping both ways and
convenient UPS call tag pick-up
(UPS will come to you to pick up
your machine, so you don't have to
go to UPS or the post office).
• Free replacement of any defective
part including free shipping.
For limitations and restrictions see
chapter 18, WARRANTY.
4. AFTER UNPACKING
• When unpacking your Capresso
"Ultima" the lever (fig. 1; #3) is in the
locked position (see fig. 2). To un-
lock and raise the lever
the handle bar
towards the knob
first squeeze
(see fig. 3), then lift the lever upwards
and release the handle bar (see fig. 4)
Now you can rotate the carousel
counter clockwise (see fig. 6).
• After unpacking your machine, clean
the loose parts (water container, tray
with components) with a mild deter-
gent and warm water, then rinse
thoroughly.
5. WORKING WITH THE CAROUSEL
a. The carousel only turns when the
lever is in the raised position (see
fig. 5)
b. The carousel only turns counter
clock wise (see fig. 6)
c. The lever can only be pushed down
when it points to the front of the
machine (see fig. 5 and 7)
d. To move the lever up or down you
must always first squeeze and hold
the handle bar then pull the lever
up or push it down (see fig. 7).
Then release the handle bar. The
best way to work the handle bar is
to place the palm of your hand on
top of the knob and then squeeze
the handle bar with two fingers
towards the knob (see fig. 4 and fig. 3)
4.
Page 11

e. When the lever is raised you can
turn the carousel counter clockwise
indefinitely. Just hold the knob and
turn the carousel (see fig. 6)
f. The carousel has two positions
with an audible "click":
• lever in front of machine (see fig. 5)
• coffee funnel in front of machine
(see fig. 8) = coffee filling position
Please practice the operation of the
lever and the carousel a few times.
6. INITIAL PREPARATION
This procedure is necessary before
first use and after you have cleared the
machine (see CLEARING THE THERMOCOIL, chapter 15.4).
a. Plug in the machine. (The machine
has an internal cord storage. Just
pull out as much cord as you need.
You can push the unwanted part of
the cord back into the machine).
b. Remove the water tank lid, lift
out the water tank, and fill with cold,
fresh water. Replace the water tank
and make sure it sits properly in its
receptacle (see fig. 8a). The water
tank holds approx. 53 oz. You can
also use another container and fill
the water tank without removing it
from the machine.
c. Make sure the selector switch
points
to the coffee spout symbol
(see fig. 12)
d. Make sure the tray is inserted prop erly (see fig. 2).
e. Make sure the lever points to the
front (see fig. 5)
f. Close the lever as follows: First
squeeze and hold the handle bar
then push the lever down (see fig. 7).
Now release the handle bar.
g. Switch on the Main On/Off Button
(see fig. 1.1; #6a). The red light
within the On/Off button will illumi nate. At the same time the yellow
Thermostat Light
will light up indi cating that the machine is heating
up the internal ThermoCoil unit.
h. Place a cup underneath the coffee
spout.
i. Turn the Pump Button on (see fig. 1.1;
#6b). You will hear a pump noise.
Initially it will take about 30 to 40
seconds before any water will
come out of the spout. As soon as
some water comes out of the
spout, turn the pump button off.
j. Raise the lever (see fig. 7) and
slowly turn the carousel counter
clockwise (see fig. 6) until the coffee
funnel points to the front of the
machine (see fig. 8)
You are now ready to prepare your favorite coffee beverage.
7. HOW THE THERMOSTAT LIGHT
WORKS
• As long as the yellow Thermostat
light (fig. 1.1; #6d) is on, the
ThermoCoil inside the machine is
heating up. When the selector
switch is in the spout position (fig.
12) or in the hot water position (fig.
12a) the thermostat light will turn off
when the maximum temperature is
reached. While brewing coffee, the
thermostat light might come on,
indicating that the ThermoCoil is
heating up again .
For hottest coffee: When you turn
on the pump just after the thermo stat light turned off, you will get the
highest possible coffee temperature.
• When the selector switch is in the
steam position (fig. 12b), the therm-
ostat light will stay on, indicating
that the internal temperature is now
higher to transform hot water into
steam.
8. WHICH COFFEE GRIND?
The Capresso Ultima works with a
variety of grinds. It is much less sensitive to the coffee grind than most
other pump espresso machines. You
can even grind with a regular blade
grinder and still get crema espresso
coffee. The coarser the coffee, the
faster the water will run through,
resulting in a weaker taste. The finer
the coffee is ground, the slower the
coffee will pump through, resulting in
a stronger, hotter cup of espresso. If
5.
Page 12

no or hardly any coffee comes out of
the spout, then your coffee is ground
too fine.
9. BEVERAGES... BEVERAGES...
The Capresso "Ultima" lets you produce the following beverages:
• Espresso (coffee spout)
1 to 1 1/2 oz. per cup; make one or
two cups at a time. Some people
make the espresso a bit larger.
Serve with or without sugar. Use
one or two scoops of coffee to your
liking. Espresso is the foundation for
Cappuccino, Cafe Latte and Cafe
Americano.
• Crema Coffee (coffee spout)
4 to 6 oz. per cup; make one or
two cups at a time. Use one or two
scoops of coffee to your liking.
Essentially "Crema Coffee" is a
longer brewed espresso with slightly
more extraction. In Europe more
and more people switch from drip
coffee to crema coffee.
• Cappuccino (coffee spout + frother
in frothing position)
Espresso plus hot milk plus milk
froth. Normally you add two to three
parts of milk and milk froth to one
part of espresso. Serve with choco late shaving, cinnamon, sugar... any way you like it. Some people use
less milk to taste more coffee.
• Cafe Latte (coffee spout + frother in
steaming position)
Espresso plus steamed milk with no
or very little milk froth. Add steamed
milk ( 3 to 5 oz.) to one espresso.
• Cafe Americano ("Cafe Lungo")
(coffee spout + frother)
Espresso plus hot water. Add 3 to 5
oz. of hot water to your espresso
(use the hot water setting of the
frother). The difference between
Crema Coffee and Cafe Americano
is the shorter extraction time for the
coffee, resulting in a somewhat dif ferent taste.
• Tea (frother)
Insert tea bag into a tea cup and
add hot water with the frother in the
hot water setting.
• Hot Chocolate (frother)
Instant: Pour powder into a glass
and add hot water with the frother.
Regular (with milk): Steam the milk
with the frother, add powder and stir.
10. MAKING ESPRESSO
a. Make sure the coffee funnel points
to the front of the machine (fig. 8)
b. Remove the funnel lid, if it still sits
on top of the coffee funnel (fig. 1;
#16)
c. Fill one or two level scoops of
ground espresso coffee into the
funnel (fig. 8)
Attention: If you fill more than two
scoops of coffee into the funnel,
the carousel will automatically dis card the excess coffee into the
internal used coffee container. If
you fill less than one level scoop of
coffee into the funnel, the coffee
will not be tamped properly resulting
in a poor cup of espresso.
d. Turn the lever a quarter turn until it
points to the front of the machine
(fig. 5)
e. Close the lever (see fig. 7). When
you feel resistance, release the
handle bar. The lever will automati cally tamp and lock in place.
Important: With two scoops of cof fee in the brewing chamber, the
lever will not go down as far as it
does with no coffee in the chamber.
Do not force the lever down
beyond the point of resistance.
f. Place one or two cups underneath
the coffee spout and adjust the spout
so that it is as close as possible to
the rim of the cup(s) (see fig. 9).
g. Make sure the selector switch
points to the coffee spout symbol
(see fig. 12)
h. Turn the pump button on.
i. When you have enough espresso in
your cup(s), turn the pump off.
j. Serve with or without sugar. (If you
fill sugar into your espresso cups
before brewing, it will dissolve as
the espresso brews into the cups.)
6.
Page 13

k. Raise the lever and turn the knob
counter clockwise until the funnel is
in front of the machine again (fig 8).
You are now ready to make more
espresso. (While turning the caro usel the used coffee is automatically
thrown into the internal used coffee
container).
11. MAKING CAPPUCCINO
(frothing milk)
Attention: When using the frother in
the steam position, never turn on the
pump.
Which kind of MILK? Always start
with cold milk. Skim milk
(0% fat) will
produce the most froth and will let you
taste "more" of the espresso. 1% or
2% milk will give you almost as much
froth as skim milk. Regular milk (3%
fat) will produce half the froth of skim
milk and will taste very rich.
Frothing
Tip: For a novice it is easier to froth
with a bit more milk. You will not waste
any milk since you can re-use it again
later. With practice you will be able to
froth small amounts of milk.
a. Use a 12 oz. or 16 oz. pitcher.
b. Fill the pitcher with 6 to 8 oz. of
cold milk (this will yield enough hot
milk and froth for two to three cups
of cappuccino).
c. Place the pitcher next to the frother.
d. Prepare your espresso as
described above (you might want
to brew the espresso directly into
your cappuccino cups.) Turn the
pump switch off and wait until the
yellow thermostat light turns off.
e. Now immerse the frother into the
pitcher (with the cylinder pushed
down) (see fig. 10) with the tip of
the frother completely immersed
in the milk (see fig. 11). The frother
should not touch the bottom of the
pitcher.
f. Now turn the selector switch to the
steam symbol (fig. 12b). Frothing
will start within 10 seconds. After
40 to 60 seconds you should have
plenty of froth and hot milk. To stop
frothing, turn the selector switch
back to the spout symbol, then
remove the pitcher and set it aside
for a few seconds for the froth to
settle.
Tip: If you like your milk extra hot, first
steam the milk for about 10 to 15 seconds by pulling the cylinder of the
frother up (see fig. 10), then push it
down and frothing starts immediately.
Caution: If the milk starts boiling, immediately stop frothing by turning the
selector switch back to the spout symbol (fig 12.) Boiling milk will not produce any froth. Next time use more
cold milk to avoid boiling.
Not enough steam?
The steam output will stop abruptly
after 80 to 90 seconds. If you need
more steam at this time proceed as
follows:
• Make sure the lever is in the closed
position.
• Turn the selector switch to the spout
symbol and turn the pump on.
• As soon as some water comes out
of the spout, turn the pump switch
off again. This will take only 15 to 20
seconds.
• When you then turn the selector
switch to the steam symbol, you will
have 80 to 90 seconds of uninter-
rupted steam again.
12. MAKING CAFE LATTE
(steaming milk)
Attention: When using the frother in
the steam position, never turn on the
pump.
Follow the steps for espresso and
cappuccino above. Since you do not
want to froth the milk, just make sure
that the cylinder of the frother is
moved up (see fig. 10).
Attention: The steaming noise will
increase as the milk gets hotter. Stop
steaming before the milk starts boiling. Always remember to turn the
7.
Page 14

selector switch back to the spout
symbol.
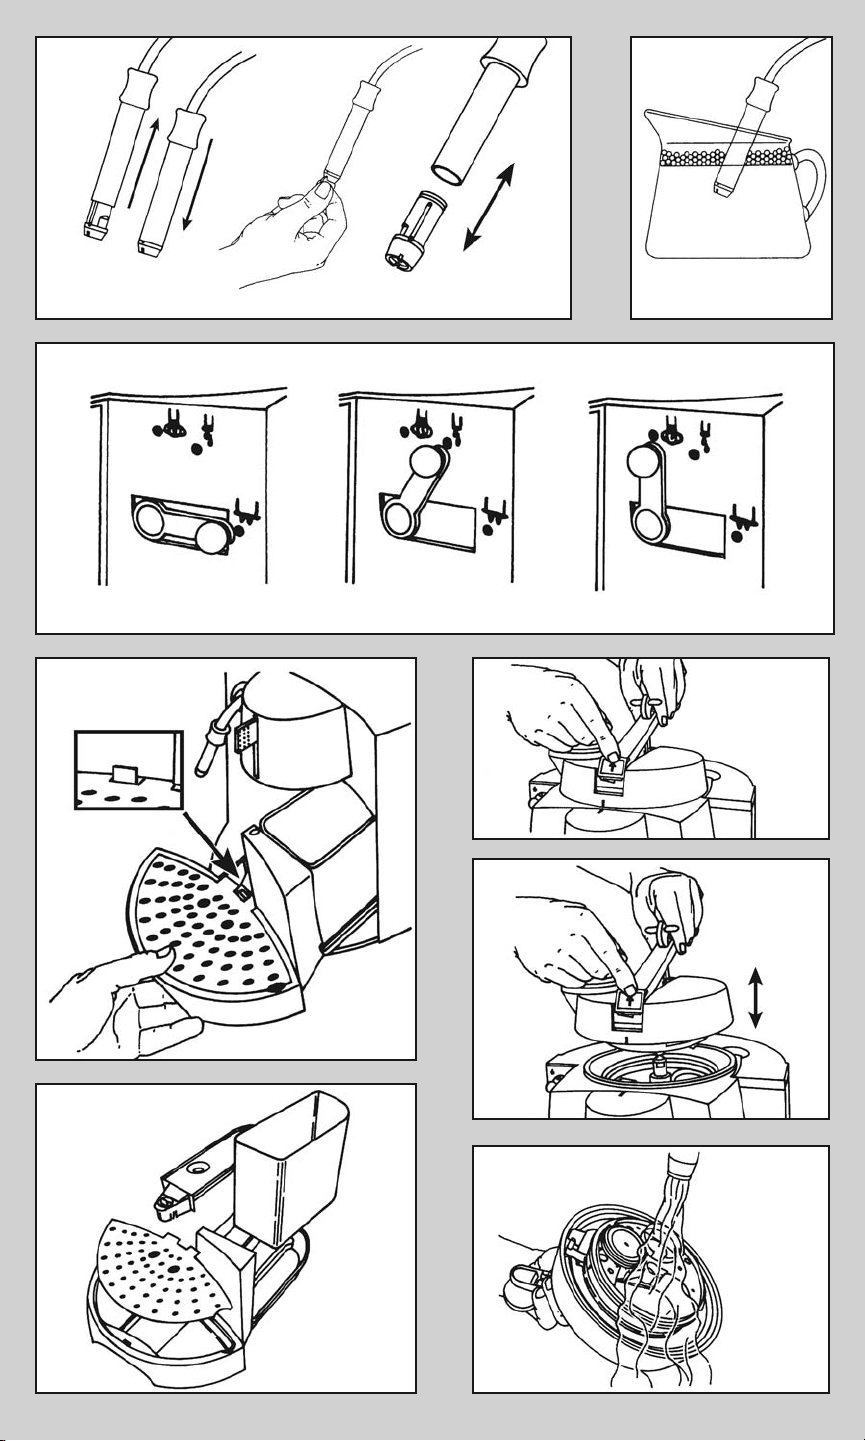
13. CLEANING THE FROTHER
IMMEDIATELY
If you clean the frother immediately
after frothing, it will be faster and easier than at a later time, when the milk
has hardened around the tip.
a. Immediately after you stop steam ing or frothing, set the milk pitcher
aside and hold the bottom of the
coffee scoop against the tip of the
frother.
b. Turn the selector switch to the
steam symbol for two seconds.
Steam will come out of the small
side holes.
c. Turn the selector switch back to the
spout symbol. Repeat once or twice.
This will push out any milk which
might have accumulated in the
frother.
d. Now move the cylinder up and
wipe it clean with a small sponge or
wet cloth.
Taking The Frother Apart
Periodically take the frother apart and
clean thoroughly.
• Loosen the tip of the frother with a
coin and then unscrew the tip (see
fig. 10a).
• Pull the tip out of the cylinder (see
fig. 10b).
instant hot chocolate, cafe americano
or simply get some hot water. When
finished, turn off of the pump button
first. Then turn the selector switch
back to the spout symbol (fig. 12).
15. CARE AND MAINTENANCE
Your Capresso "Ultima" requires less
care than most traditional espresso
pump machines. If you follow the instructions below you will prolong the
life of the machine for many years.
15.1 REMOVING USED COFFEE
The red indicator light (see fig. 1.1;
#6c) will come on in the following situations:
• When it is time to empty the used
coffee container (fig. 1.3; #10c) or
• Whenever the tray is pulled out or
not inserted properly.
a. Remove the tray (fig. 13) and
remove the three loose parts (over
flow indicator, grid and used coffee
container).
b. Now empty and clean the used
coffee container.
c. Remove any water from the tray
and clean the tray.
d. Place all the parts back into the
tray and insert tray back into the
machine.
Now the red indicator light will turn off.
• Clean the steam hole and the two
side holes. Make sure all holes are
free of milk deposits. If hardened
milk sits in these holes, use a tooth
pick or a paper clip to push out the
milk deposits.
• Replace the frother and screw on
finger tight.
14. HOT WATER SETTING
When you turn the selector switch
the hot water setting (see fig. 12 a)
and turn the pump button on, hot
water will be released through the
frother immediately. This feature can
be used to make a quick cup of tea,
to
Caution: The red indicator light will
not interrupt any operations of the machine. Therefore, if you do not empty
the used coffee container and continue to make coffee beverages, used
coffee will spill into the inner parts of
the machine eventually blocking the
carousel. Also, if the tray is not inserted and you make coffee, water
and used coffee will be discarded into
the open area inside the machine
creating a big mess!
Attention: The tray can only be pulled
out when the coffee spout is moved all
the way up (see fig. 13).
8.
Page 15

15.2 OVERFLOW WATER
INDICATOR (fig. 13b)
After brewing coffee, the machine automatically releases the pressure of
the brewing chamber together with
some water into the tray. If too much
water collects in the tray the little red
indicator will pop up. Pull out the tray,
remove the used coffee container and
the water level indicator. Then empty
tray and the used coffee container,
place all the parts back into the tray,
and insert tray back into the machine.
15.3 REMOVING THE CAROUSEL
For proper cleaning you can remove
the carousel as follows:
a. The lever
should be in the raised
position.
b. Turn the lever to the back of the
machine so that the carousel
release button points to the front
(see fig. 15).
c. Push the button and lift the
carousel (see fig. 16).
d. Hold the carousel upside down and
clean under running water
(see fig. 17).
e. Replace the carousel in reverse
order. Make sure that the release
button points to the front of the
machine. Make sure that the lever
is in the raised position before
placing the carousel back onto the
machine.
DO NOT PLACE THE CAROUSEL IN
THE DISHWASHER!
15.4 CLEAR
ING THE THERMOCOIL
The internal ThermoCoil system holds
a small amount of water. If you do not
use the machine for a prolonged time
(a week or longer) or if you plan to
move the machine or send it to another place the ThermoCoil should be
empty. This procedure takes approximately 90 seconds.
a. Turn the machine on.
b. Fill a large pitcher with cold water
and immerse frother into pitcher.
c. Turn the selector switch
to the
steam symbol. Steam will be
released for about 80 seconds.
When the steam stops, the
ThermoCoil system is cleared.
d. Turn the selector switch back the
spout symbol and turn machine off.
Important: The next time you use the
machine, follow the instructions under
chapter 6 first.
15.5 DECALCIFYING
CAUTION: DO NOT USE ANY
COMMERCIAL DECALCIFYING AGENT.
Any highly re-active cleaning solution
might destroy the internal brewing
chamber. Use a water/vinegar solution
only.
If you use your machine daily we
recommend decalcifying every 4 to 6
weeks as follows. This procedure will
take about 15 minutes.
a. Fill the water tank with 20 oz. of
water and approx. 10 oz. of vinegar.
b. Turn the machine on and place a
large cup or container underneath
the coffee spout.
c. Pump approx. 5 oz. of the solution
through the coffee spout.
d. Stop the pump, wait for one minute.
e. Repeat three of four times.
f. Then place a large container under-
neath the frother.
g. Turn the selector switch to the hot
water symbol and turn on the pump.
h. Pump approx. 3 oz. of the solution
through the frother.
i. Stop the pump, wait for one minute.
j. Repeat twice.
k. Now empty the water container and
clean it thoroughly so that there is
no vinegar residue left in the water
container.
l. Fill the water container half full with
fresh cold water.
m.Pump half of the water through the
coffee spout and the other half
through the frother using the hot
water setting.
n. Turn off the machine. Remove tray
and clean all parts of the tray.
9.
Page 16

16. WHAT IF
a. No water comes through the
coffee spout
• Make sure the water tank is inserted
properly and water is in the water
tank.
• Make sure the lever points towards
the front of the machine and is in
the closed position.
• Make sure the selector switch
points to the spout symbol.
• Coffee is ground too fine; use coarser
ground coffee.
g. When I use the frother I cannot
get sufficient froth
• Make sure you follow the instruc tions in chapter 11.
• If the frother worked before, the
frother is probably clogged. Clean
frother, see chapter 13.
• Make sure that the pump is turned
off, when the selector switch is
pointed to the steam symbol.
• Try a different kind of milk.
b. My coffee is not hot enough
• Pre-warm your cups.
• Pump some hot water through the
coffee spout (see chapter 6).
• Turn on the pump just after the
thermostat light turns off.
• Use finer ground coffee.
• Drink your coffee right away.
c. Coffee does not flow into both
cups at the same rate
You should get at least a 40%/60%
distribution.
• Pump hot water without coffee
through the coffee spout (see
chapter 6).
• Remove carousel and clean thor-
oughly (chapter 15.3).
• Make sure you fill enough coffee
into the coffee funnel.
d. Coffee trickles very slowly into
the cups
• Your coffee is ground too fine. Use
a somewhat coarser grind.
e. Coffee runs very fast into the
cups with very little crema
• Your coffee is ground too coarse.
Use a finer grind.
• Use a bit more coffee.
f. There is some coffee residue in
the bottom of my cup
• With pressure brewed coffee you
will always have some fine coffee
powder in the bottom of your cup.
17. FREQUENTLY ASKED
QUESTIONS
a. Can I use flavored coffee?
Very often flavored coffee has natural
or artificial sugar additives.
Hardened sugar deposits can clog
and damage the internal brewing
chamber. You can still use flavored
coffee provided you run a hot water
cycle through the coffee spout
within half an hour after your pre pared your flavored coffee drink.
Proceed as described in chapter 6
and let approx. 4 to 5 oz. of hot
water run through the coffee spout.
b. Can I fill anything else into the
coffee funnel, e.g. sugar, cinna mon, chocolate shavings?
No!
c. Can I fill anything else into the
water tank instead of water, e.g.
milk, sweetened water?
No, you will destroy the pump and
the ThermoCoil system. Exception:
see chapter 15.5 Decalcifying.
d. Can I use the same coffee for
espresso and for "crema coffee"?
Yes, when you brew longer ("crema
coffee") the taste will be less intense.
e. Can I use coffee which is not
labeled "espresso"?
Yes.
10.
Page 17

f. Can I use the machine overseas
with a converter?
No. The machine is designed for
120 volts / 60 Hz. Other voltage
and Hz levels might damage the
machine.
g. Can I send a machine to another
country with 120 volt / 60 Hz
configuration.
Yes, but in case the machine needs
service the transportation costs have
to be paid by you. Our warranty is
limited to the United States of
America.
h. I have a small grinder with a
blade. Can I use this grinder to
grind my coffee for this machine?
Yes. We have tested several "blade
grinders". The results are satisfac-
tory. However with a burr grinder
you will get better results; the
crema will be thicker.
i. How long can I leave the
machine on?
When you are finished using the
machine, it should be turned off. If
you need the machine again within
an hour or so, the heat-up time will
be less than 50 seconds.
11.
Page 18

18. LIMITED WARRANTY
This warrant
y covers your CAPRESSO machine, model #121. This
warranty is in effect for one year from the date of the first consumer purchase and is limited to the United States of America. This warranty
covers all defects in materials or workmanship (parts and labor) including UPS ground transportation for both ways, if necessary.
The warranty does not cover:
• Any machine not distributed by CAPRESSO within the United States.
• Any machine not purchased from an Authorized CAPRESSO Dealer.
• Commercial use of the machine.
• Damage caused by accident, abuse, negligence, misuse, improper
operation or failure to follow instructions contained in this manual.
• Any service or alteration performed by an unauthorized person,
company or association.
Other limitations and exclusions:
Any implied warranties including fitness for use and merchantability are
limited in duration to the period of the express warranty set forth above
and no person is authorized to assume for CAPRESSO any other liability
in connection with the sale of the machine.
CAPRESSO expressly disclaims liability for incidental and consequential
damages caused by the machine. The terms "incidental damages"
refers to the loss of the original purchasers time, loss of the use of the
machine or other costs relating to the care and custody of the machine.
The term "consequential damages" refers to the cost of repairing or replacing other property which is damaged when this machine does not
work properly. The remedies provided under this warranty are exclusive
and in lieu of all others.
This warranty gives you specific legal rights, and you may also have
other rights which vary from state to state.
CAPRESSO CUSTOMER SERVICE
231 Herbert Avenue
CLOSTER, NJ 07624
HELP CALL: 1-800-767-3554; Fax: 201-767-9684
email address: contact@capresso.com
Website: www.capresso.com
12.
Page 19

PRODUCT REGISTRATION
MODEL#121
Please complete this Product Registration after you have used
your CAPRESSO “ULTIMA” for a few days. Your information will
help us to better serve you in the future. Thank you for buying
from CAPRESSO.
Last Name_________________________________________________
First Name______________________________ q Male q Female
Address____________________________________________________
City________________________________________________________
State____________________ Zip______________________________
Purchased from: q Specialty store q Mail order
q Received as gift q Other_______________
Name of store:_______________________________________________
Purchase Date_______________ Purchase Price $_____________
Please answer the following questions:
Why did you buy this product?
q Store recommendation q Design / styling / concept
q Recommended by a friend q Features
q Print advertising
How often do you use this machine?
q More than twice a day
q Twice a day
q Once a day
q Not every day
Which beverage do you prefer?
q Espresso q Cappuccino q Cafe Latte q Crema Coffee
13.
Page 20

CAPRESSO PRODUCT REGISTRATION (continued)
Your annual household income?
q Under $50,000 q $100,000 – $250,000
q $50,000 – $100,000 q $250,000 +
Your age group?
q Under 25 q 25–40 q 41–55 q 56-65 q 65+
What espresso machine did you use before?
q None q DeLonghi q Gaggia q Krups Other__________________________
Any comments or suggestions on how we can improve this product?
__________________________________________________________________
__________________________________________________________________
__________________________________________________________________
__________________________________________________________________
Please fax completed card (both sides) to: 201-767-9684
or mail to:
CAPRESSO, Inc.
231 Herbert Avenue
CLOSTER, NJ 07624
14.
 Loading...