

Canyon CNP-WF518N1 User Manual

CNP-WF518N1
Wireless USB Adapter
User Manual

Table of Contents
Introduction ................................................................................................ 1
Safety Precautions ..................................................................................... 1
Package Contents ....................................................................................... 2
Hardware Overview ................................................................................... 3
Getting Started .......................................................................................... 4
Connecting to Device ................................................................................ 4
Installing Device Driver .......................................................................... 4
Connecting to Wireless Network .................................................... 7
Using Ralink Utility .................................................................................... 8
Scan for Other Wireless Devices ................................................ 9
Connect to an Access Point ......................................................... 13
Add an Access Point to Profile .................................................. 16
Using Windows Zero Configuration ............................................... 22
Profile Management ............................................................................. 27
Add a profile ................................................................................................. 28
Edit an existing profile ........................................................................... 29
Delete an existing profile ..................................................................... 30
Activate a profile ....................................................................................... 31
Advanced Settings ................................................................................. 32
View Network Statistics ..................................................................... 35
WMM Setting ............................................................................................. 36
WPS Configuration ................................................................................ 38
WPS Setup - PBC (Push-Button Configuration) ...................... 39
WPS Setup - PIN ........................................................................................ 42
Radio ON/OFF .......................................................................................... 44
About ............................................................................................................. 45
Online Help ................................................................................................. 46
Soft-AP Function ..................................................................................... 47
Switch to AP Mode and Basic Configuration ............................. 47
Security Setting.......................................................................................... 50
Access Control............................................................................................. 52
Connection Table ....................................................................................... 53
Event Log ....................................................................................................... 54
Statistics ......................................................................................................... 55
About ................................................................................................................ 55

Appendix ...................................................................................................... 57
Specification ................................................................................................. 57
Troubleshooting ......................................................................................... 57
Glossary .......................................................................................................... 59

1
Thank you for purchasing CANYON CNP-WF518N1. We sincerely wish you to
enjoy the 802.11b/g wireless network adapter. It is an easy-to-install device that
connects to PC (Ad-Hoc mode for peer-to-peer file sharing) or connects to a wireless
router/access point (for internet connection). To fully utilize the functions and
features of CANYON CNP-WF518N1, please read through the user manual before
you get started.
Introduction
Safety Precautions
Please observe all safety precautions before using the device. Please follow all
procedures outlined in this manual to properly operate the device.
z Do NOT attempt to disassemble or alter any part of the device that is not
described in this guide.
z Do NOT place the device in contact with water or any other li quids. The device
is NOT designed to be liquid proof of any sort.
z In the event of liquid entry into device interior, immediately disconnect the
device from the computer. Continuing us e of the device may result in fire or
electrical shock. Please consult your product distributor or the closest support
center.
z To avoid risk of electrical shock, do not connect or disconnect the device with
wet hands.
z Do NOT place the device near a heat source or directly expose it to flame.
z Never place the device in vicinity of equipments generating strong
electromagnetic fields. Exposure to strong magnetic fields may cause
malfunctions or data corruption and loss.
z All images in the user manual are for user reference only. Actual products
might differ slightly than images shown here.
2
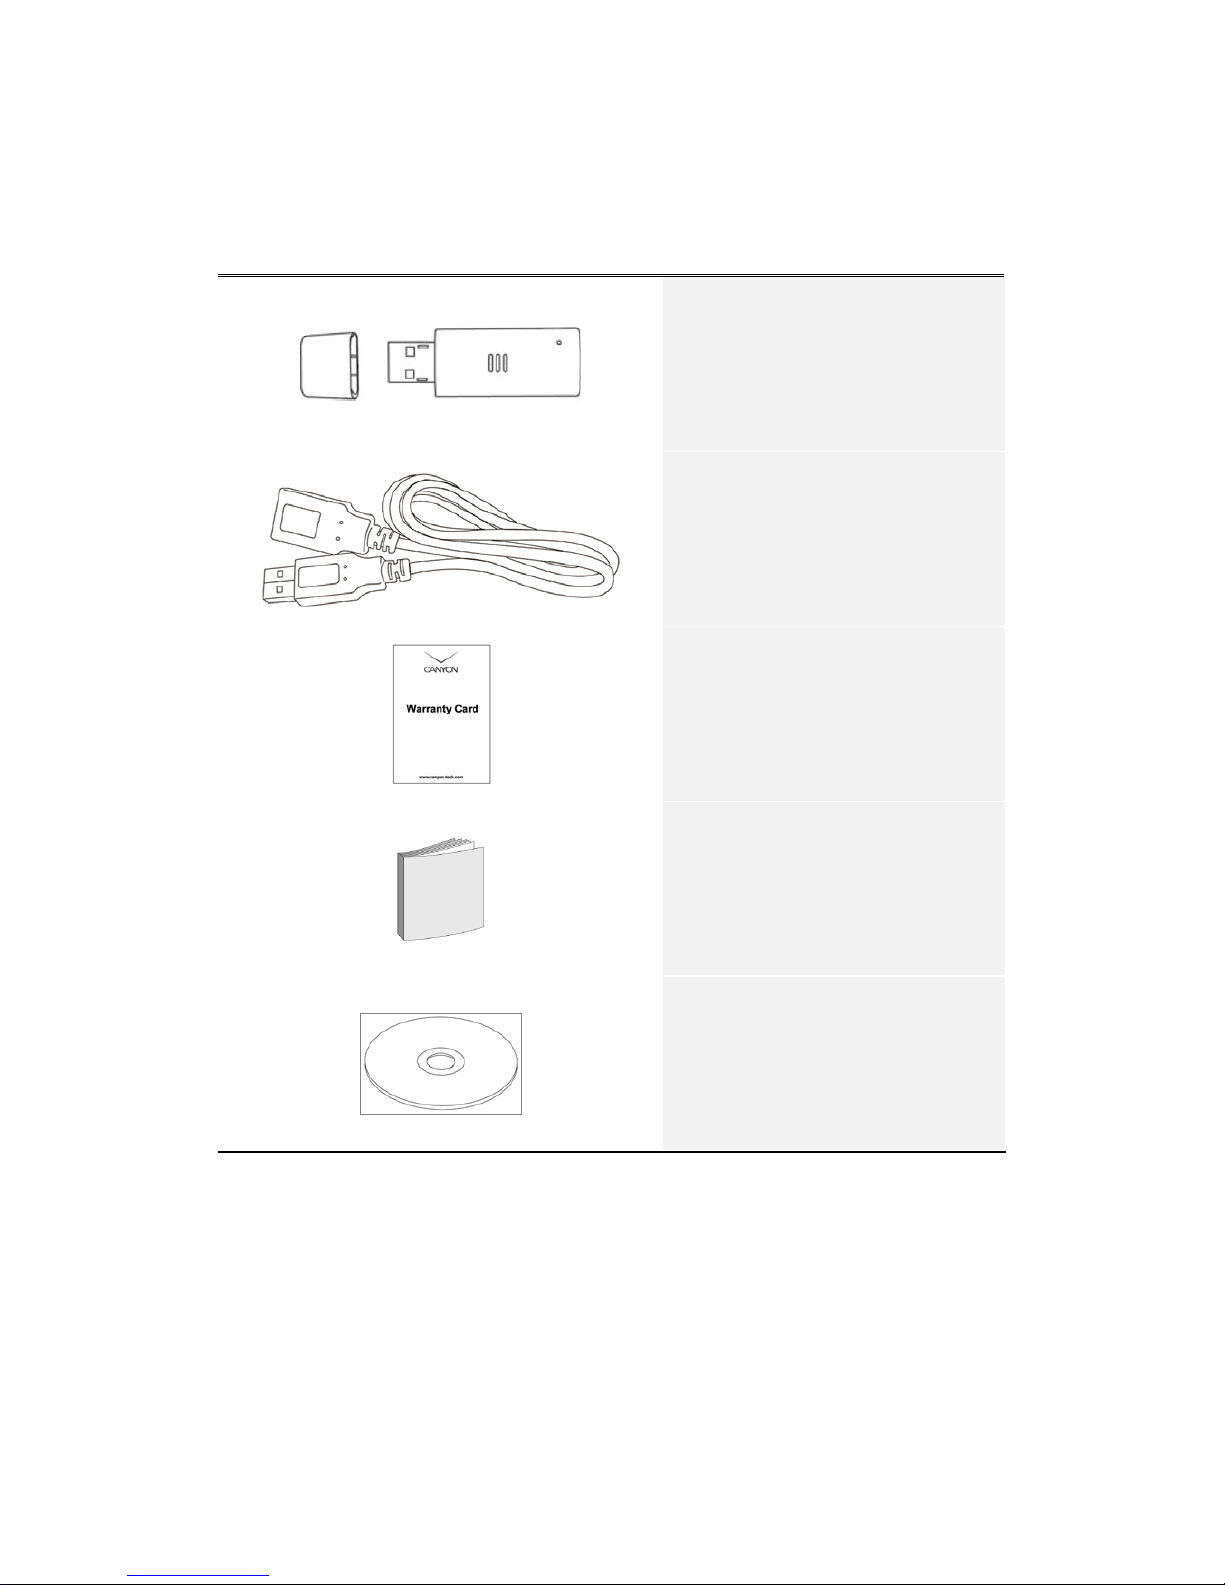
Package Contents
Product Image Item Name
CNP-WF518N1 Main Unit
USB Extension Cable
Warranty Card
Quick Guide
Driver and Documentation CD
3
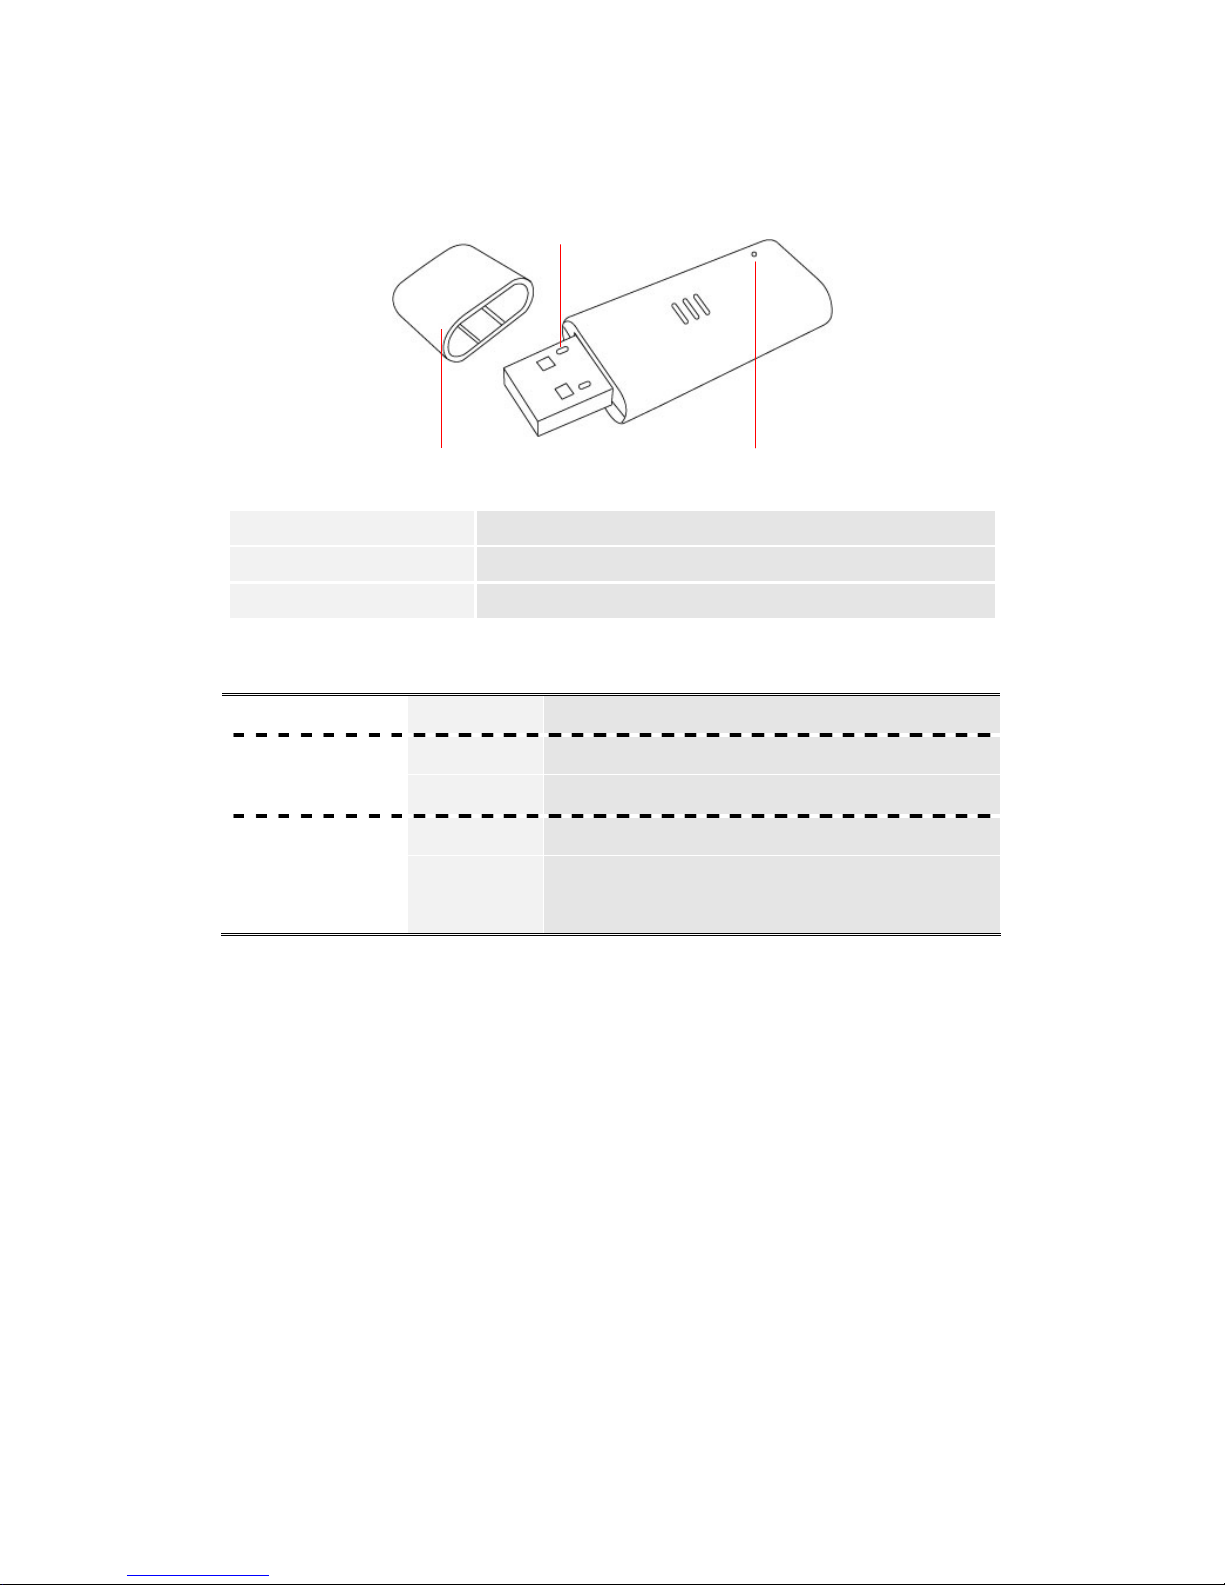
Hardware Overview
USB Connector Connects to PC
Device Cap Protects USB connector
Status LED Indicator Indicates link/activity status
Radio Status LED Status Device Activity
Radio Off Off Wireless LAN function is disabled.
Radio On (No
Connection)
Off No link to wireless AP or Router
Flashing Transmitting management information.
Radio On
(Connecting to
AP or Router)
On Link to wireless AP or Router
Flashing
Transmitting data or management
information.
Status LED Indicator Device Cap
USB Connector
4
Getting Started
Before using CANYON CNP-WF518N1, please make sure that the PC and the
device are within range of an access point (802.11b, 802.11g, or 802.11b/g).
Connecting to Device
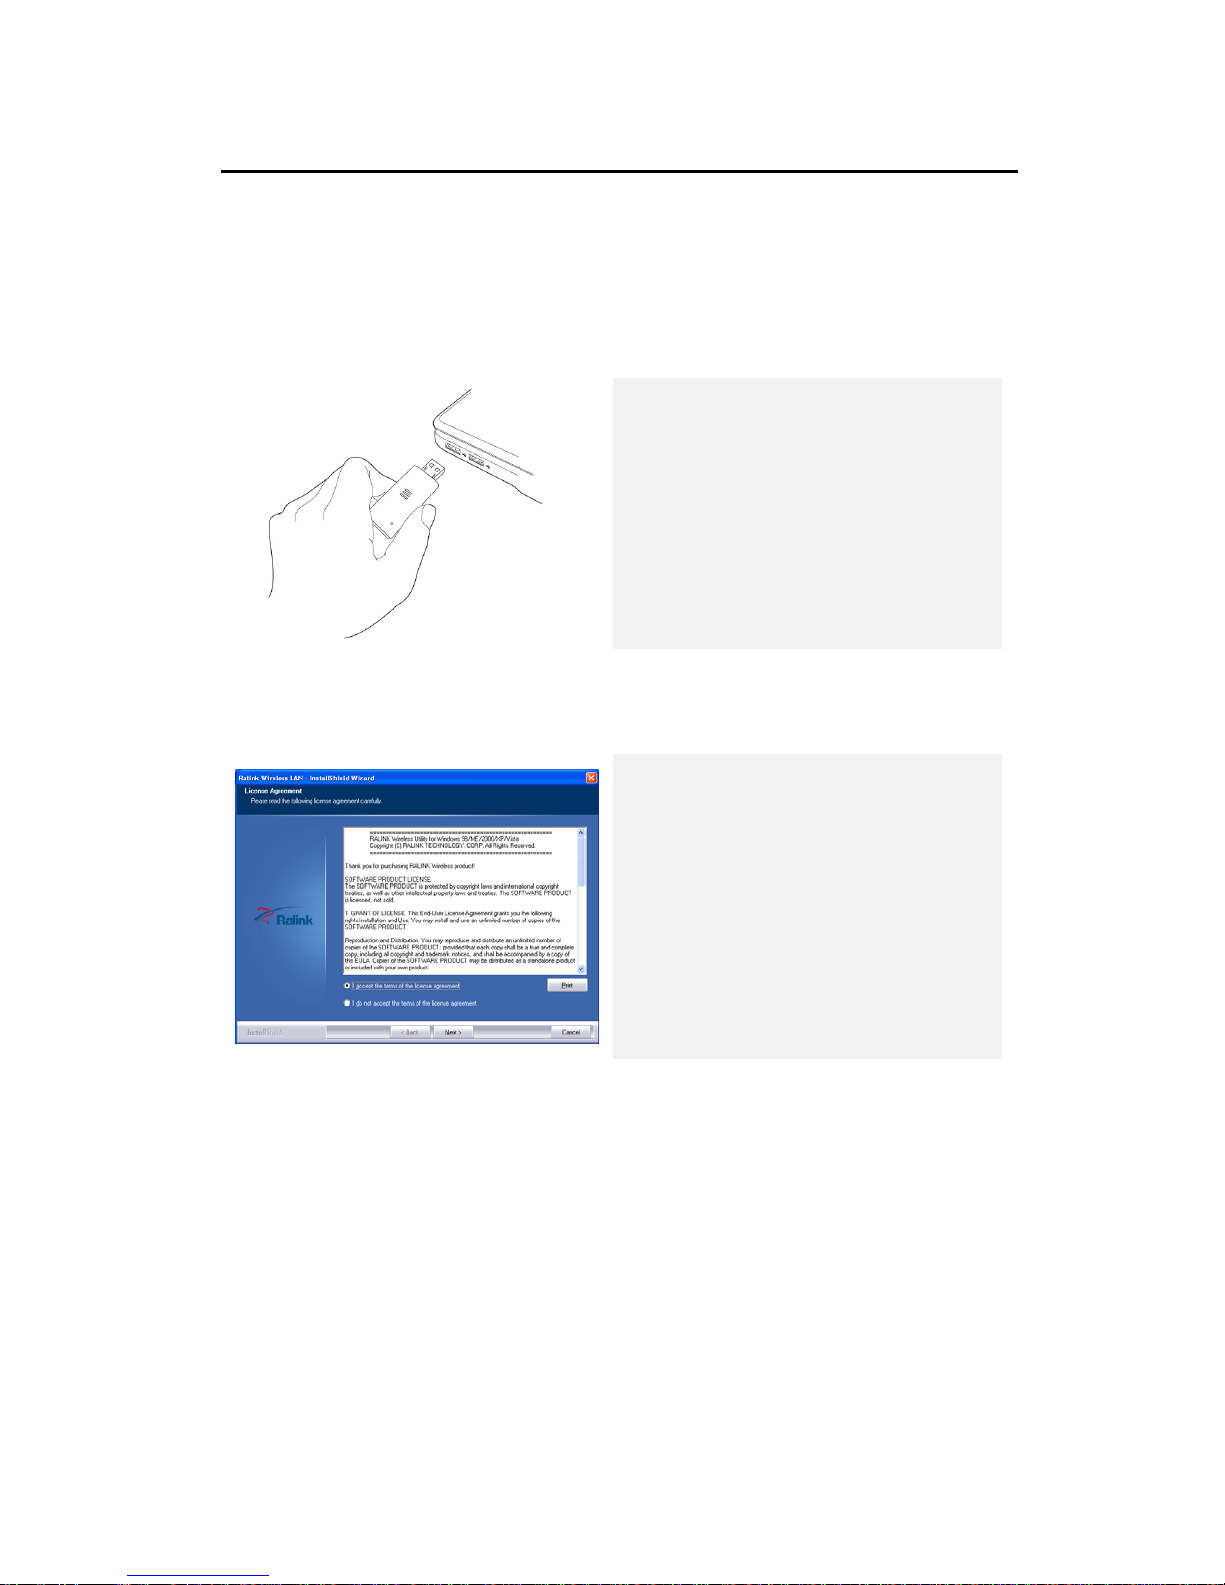
1. Power on PC.
2. Insert the device into an USB 2.0
slot.
3. Insert Driver CD into CD-ROM to
start driver installation.
NOTE:
It is recommended to install driver from
Driver CD for full functionalities.
Installing Device Driver
1. After inserting Driver CD, click on
Setup.exe to start driver
installation process.
2. Click on the option “I accept the
terms of the license agreement”
and click on Next to continue
driver installation.
NOTE:
Please click on Ok when prompted to install Unsigned Driver. This is a Windows
system warning that indicates the specific driver program is not certified by
Windows.

5
3. Select installation type:
z Driver and Ralink WLAN Utility:
Install device driver and Ralink
WLAN Utility software designed
specifically for the device.
z Driver only: Install device driver
only.
4. Click on Next to continue driver
installation process.
NOTE:
Installing both driver and Ralink WLAN
Utility is recommended.
5. Select WLAN configuration
interface to set up wireless
network:
z Ralink Configuration Tool:
Software specifically designed to
set up wireless network with
device.
z Microsoft Zero Configuration Tool:
Configure device using Microsoft
Window embedded function.
6. Click on Next to continue driver
installation process.
NOTE:
It is recommended to set up wireless
network using Ralink Configuration Tool
for it fully enhances all device
functionalities.
7. The driver and/or preferred
network configuration utility will
be installed.
8. Click on Finish to complete
installation process.

6
9. After successful installation, a
desktop shortcut will be created
and an icon will be also created at
Notification Area.
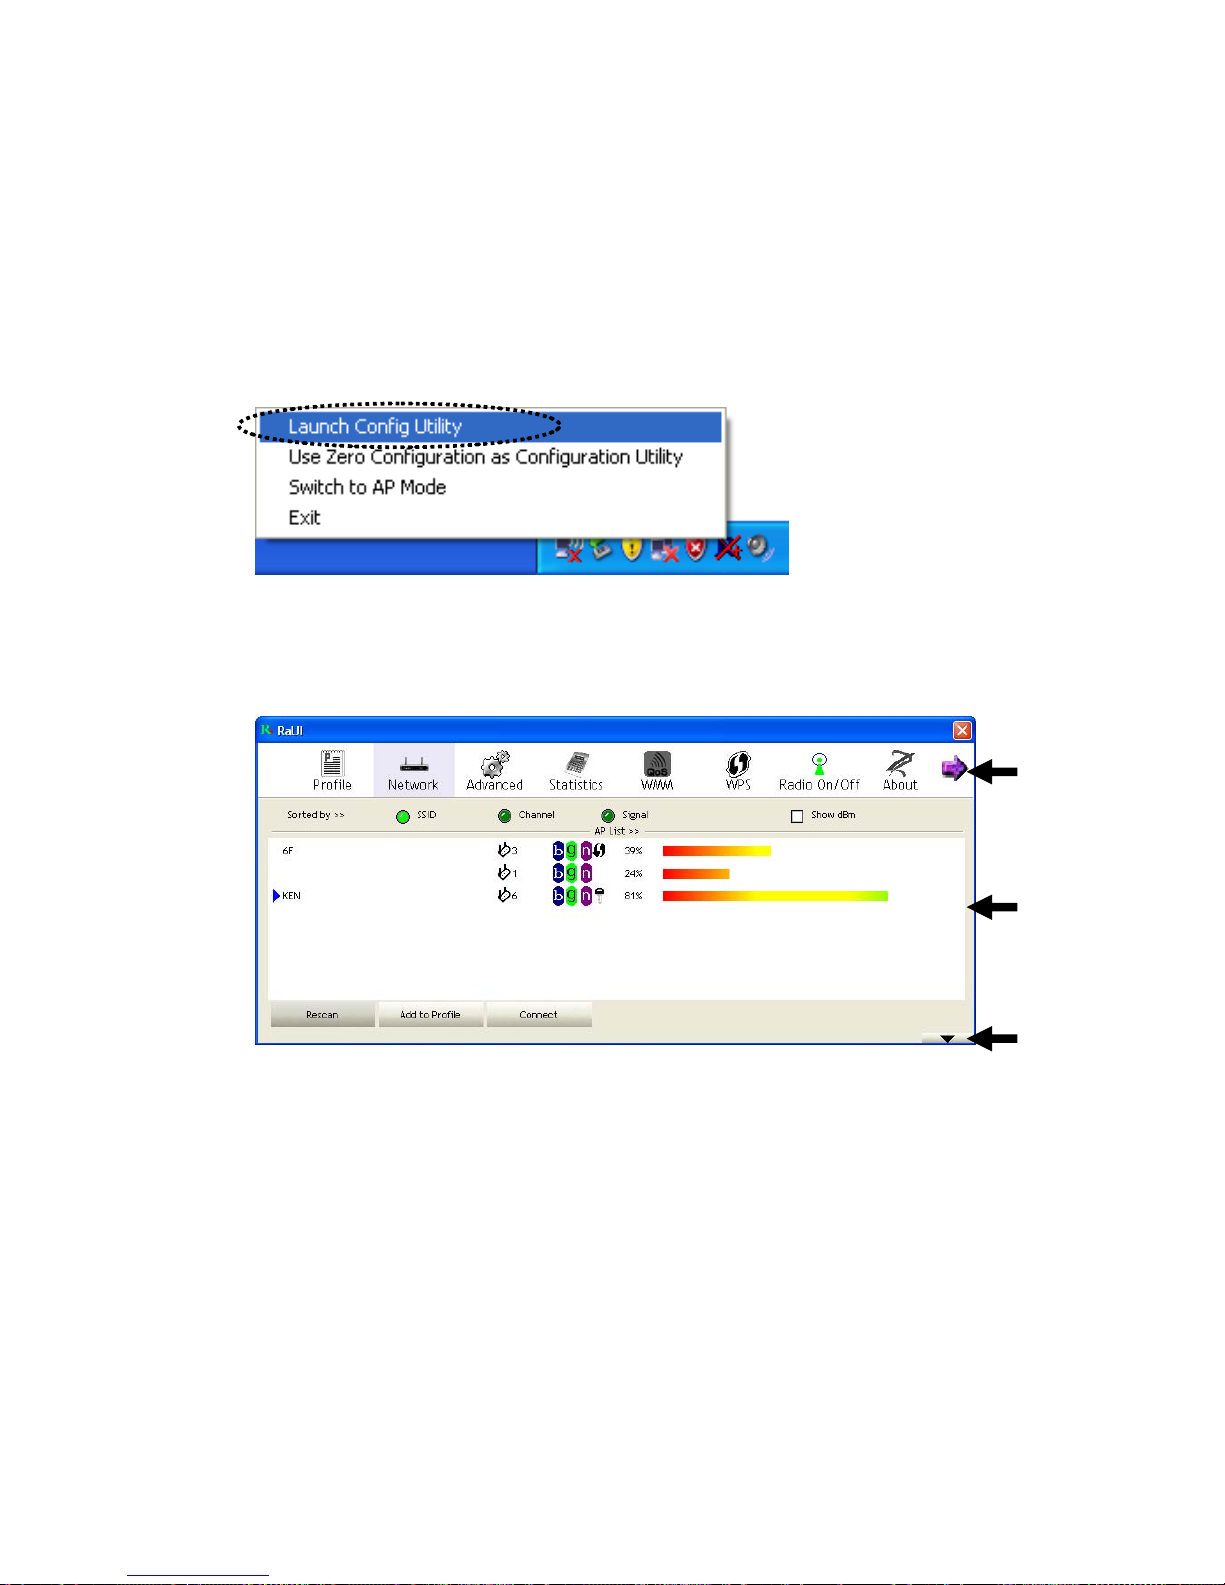
10. Right click on the icon and click on
Launch Config Utility to launch
Ralink Configuration Tool or click
on Exit to stop wireless network
connection.
NOTE:
Click on Start Æ All Programs Æ Ralink
Wireless Æ Ralink Wireless Utility to
re-launch utility.

7
Connecting to Wireless Network
After the driver is correctly installed, it will try to connect to any unencrypted
wireless access point automatically. If you want to connect to a specific wireless
access point, or the access point you wish to connect uses encrypti on, you ha v e to
configure the wireless network card and input required parameters, to get
connected to the wireless access point you wish to connect.
The current status of wireless connection will be displayed by Ralink configuration
utility icon:
Wireless connection is established, good signal reception.
Wireless connection is established, normal signal reception.
Wireless connection is established, weak signal reception.
Connection is not established yet.
Wireless network card is not detected.
There are two ways you can configure your wireless network card to connect to
wireless access point: using the Ralink configuration utility and using built-in
windows zero configuration utility.
NOTE: In Vista, the network card will not connect to any unencrypted
wireless access point automatically.
8
Using Ralink Utility
Please follow the following instructions to use Ralink configuration utility to connect
to wireless access point.
1. Right-click the Ralink configuration utility icon located at lower-right corner of
computer desktop and then clicks ‘Launch Config Utility’.
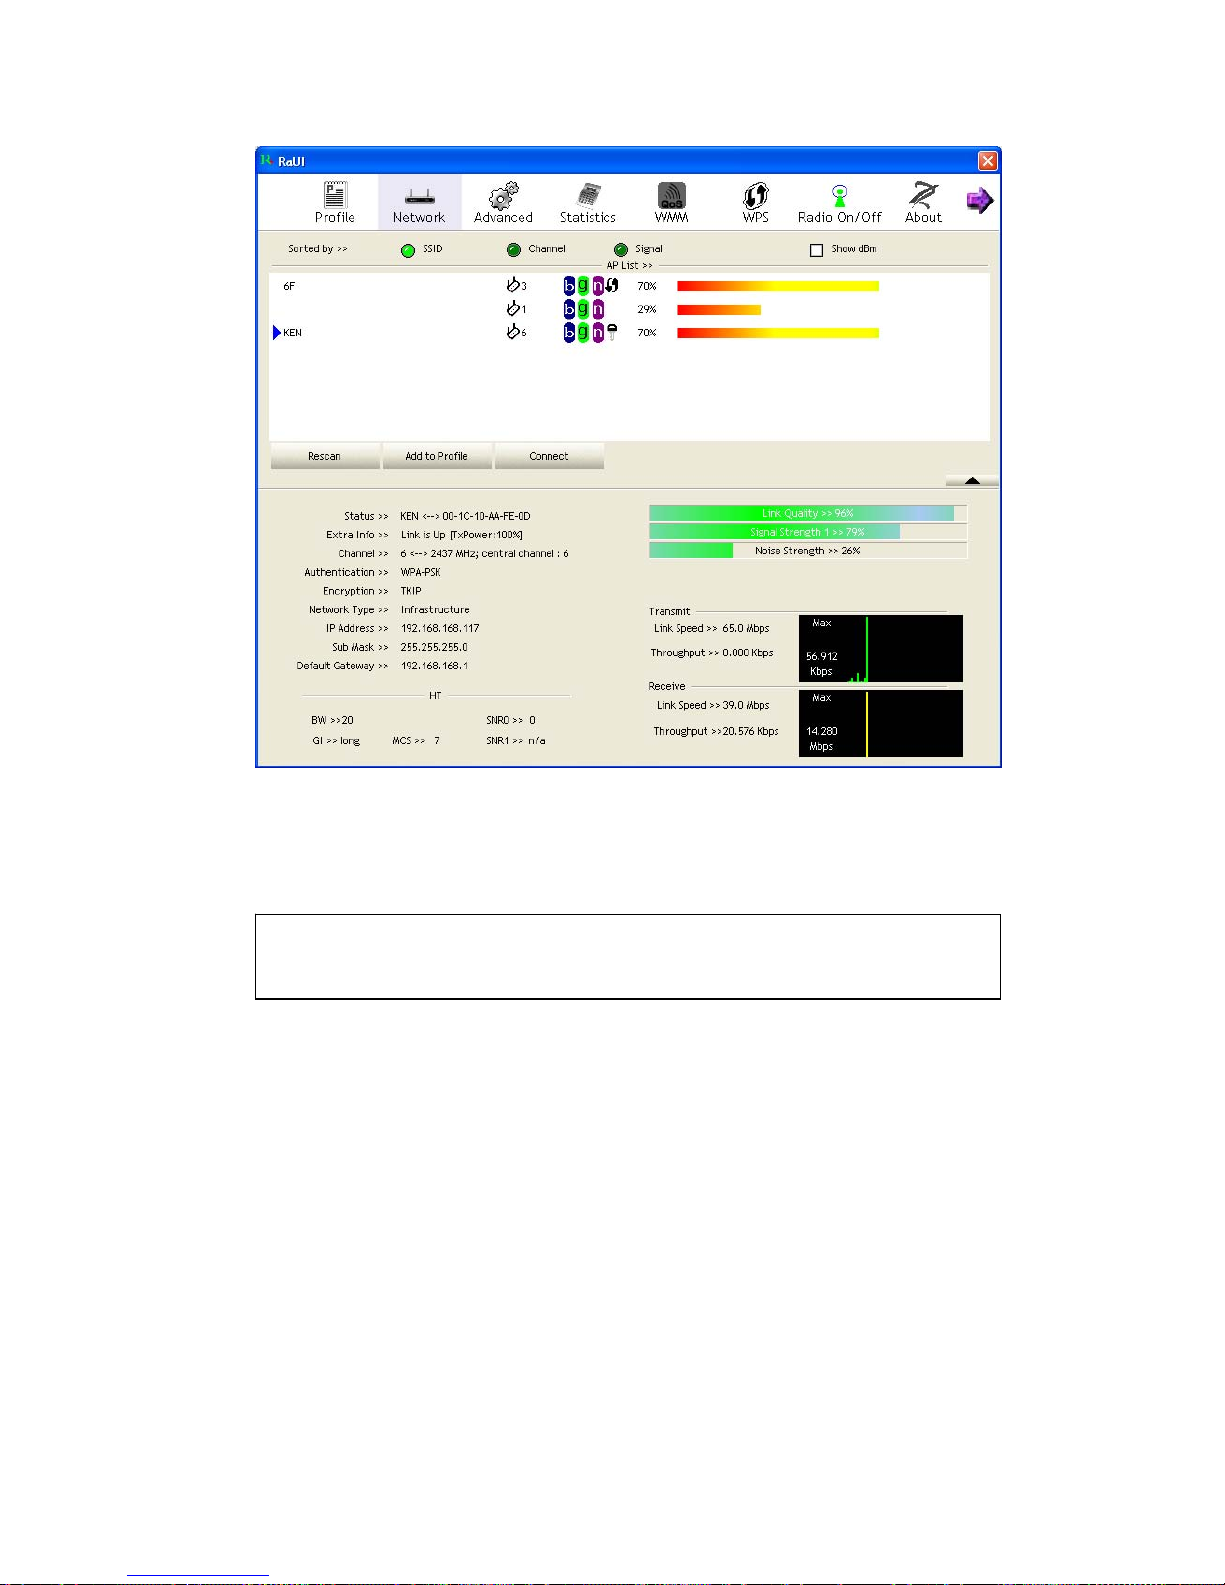
Ralink setup utility (RaUI) will launch, and begin to scan for all wireless access
points automatically.
RaUI consists two parts: Menu and setup area. You can select a setup function
(Profile, Network, etc.) from menu, and corresponding setup items will be
displayed at setup area.
Some function includes more information, and can not be fitted in setup area. In
this case, you can click ‘More / less’ button to expand the setup utility window,
to display more information:
Menu
Setup
Area
More / Less
button
9
You can click ‘More / Less’ button again, and setup utility window will resume to
its original size.
Scan for Other Wireless Devices
There are two kinds of wireless connection mode: Infrastructure and Ad-Hoc.
Infrastructure mode is used by wireless access points, which is able to establish
wireless connection for you and other wireless / wired network clients.
Ad-Hoc mode is also know as ‘point-to-point’ mode, and in this mode, wireless
devices such as computer or PDA will not be capable to establish wireless
connection with more than one wireless device, and is suitable for establishing a
one-to-one wireless connection between two wireless devices.
Tip: If a setup item requires more information to complete the setup
procedure, the setup utility window will expand automatically.
10
Before you can connect to any wireless access point or device by infrastructure
or Ad-Hoc mode, there two things you must know:
a. Wireless device’s ‘SSID’ (Service Set IDentifier, someone will call it ‘access
point’s name’).
You can s can for the SSID of other wireless devices nearby , but if the SSID of
the wireless device you wish to connect is hidden, you must know exact SSID
before you can establish connection with it.
b. If the wireless device you wish to connect uses encryption, you must know
its encryption key.
Please launch Ralink setup utility and it will scan for wireless access points near
by:
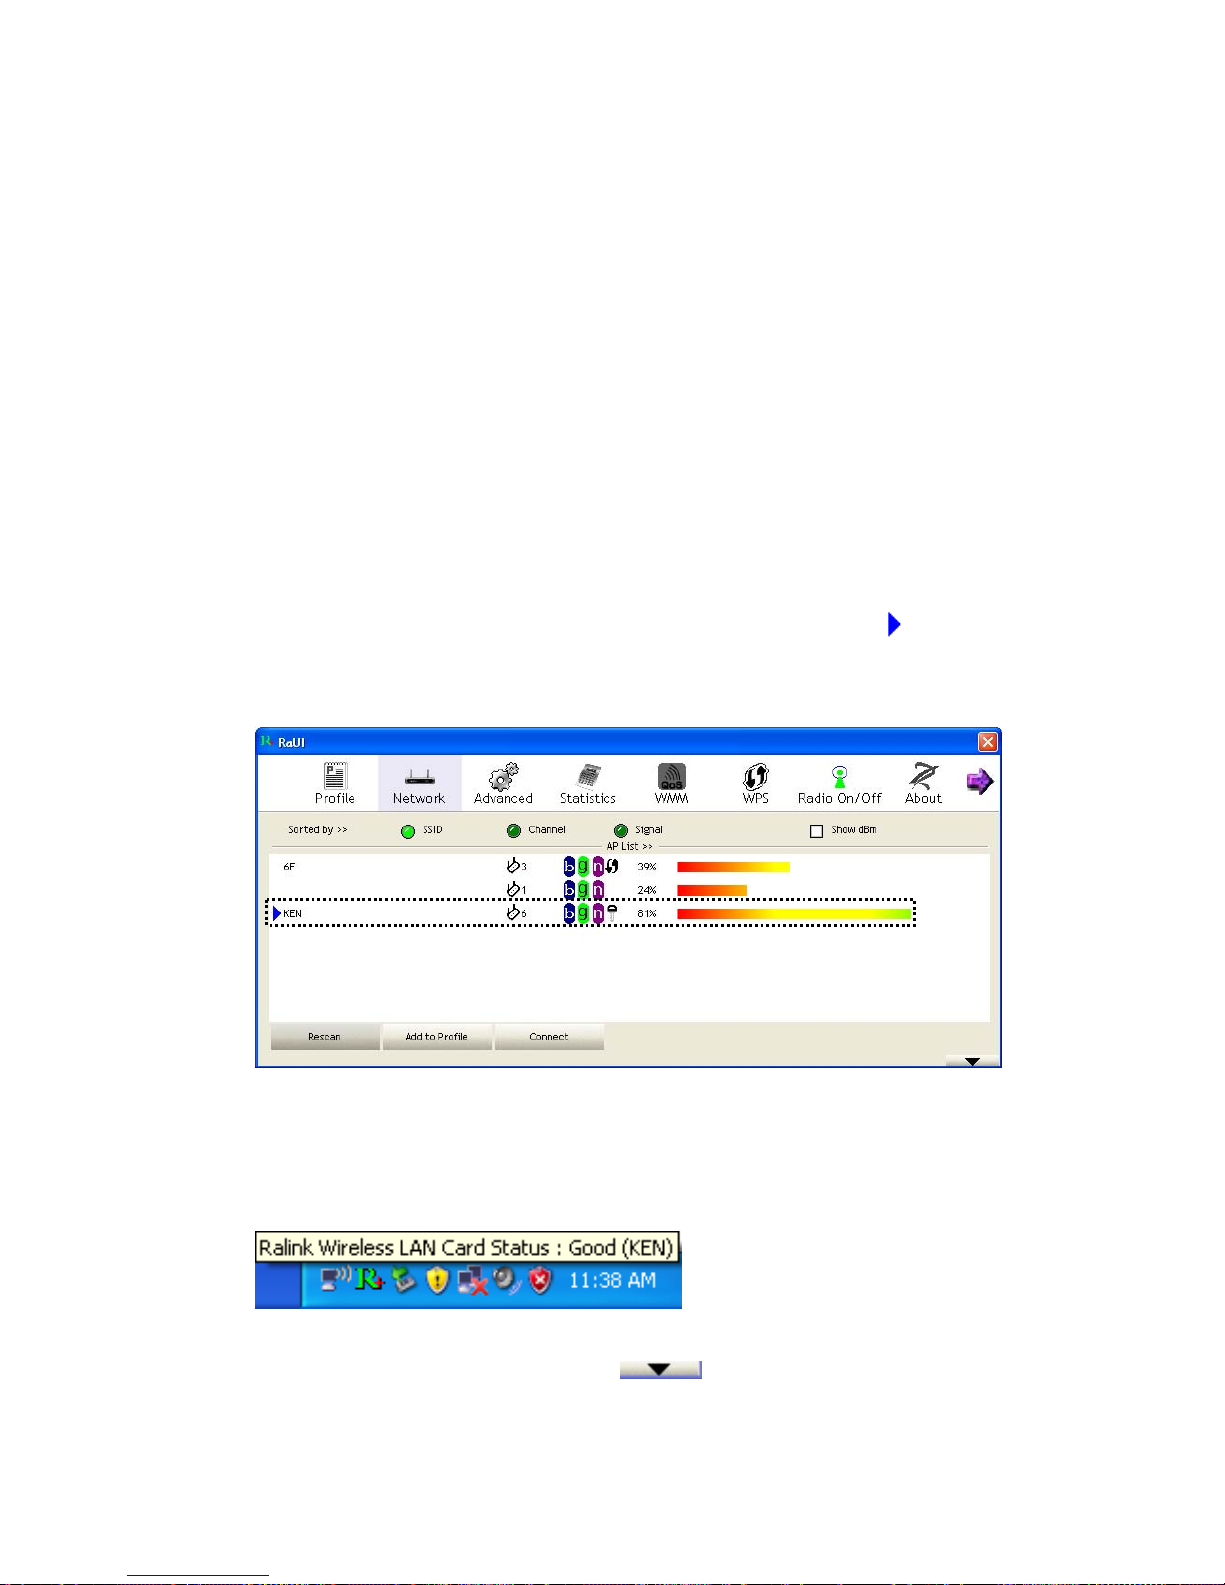
Scan results will be displayed here, please check if the wireless device (access
point or another computer) with the SSID you wish to connect is shown here.
Scan result includes 6 types of information, they are:
A B C D E

11
A The SSID (Service Set Identifier) of wireless device. If nothing is displayed
here, it means the SSID of this wireless device is hidden.
If a
symbol appears in front of the name of wireless device, means you’ve
established connected with that wireless device.
B The type of this wireless device and the channel number of this wireless
device.
Means this wireless device is an access point
Means this wireless device is a computer (Ad-Hoc mode, point-to-point
connection)
C The wireless standard supported by this access point is displayed here.
‘n’ for 802.11n
, ‘g; for 802.11g , and ‘b’ for 802.11b .
WPS icon
will appear when the access point supports WPS. If the access
point uses encryption, a key icon
will appear.
Note: When the access point supports WPS and WPS icon
is appeared, you
will not see the key icon
here even through the access point uses encryption.
D Shows the signal strength of access point by percentage.
E Shows the bar graph of the signal strength.
If you can not see the access point you wish to connect here, please click
‘Rescan’ button to scan for access point again, until the one you preferred is
displayed. You may have to click ‘Rescan’ for more than two times before you
can see the access point you wish to use here.
If you still can not see the access point you wish to use after clicking ‘Rescan’ for
more than five times, please move your computer closer to the location where
the wireless access point is, or see instructions in Chapter 4-2 ‘Troubleshooting’.
If you wish to see detailed information for a specific access point, please
double-click on it, and you’ll be provided with its detailed inf o rmation.

12
There are 4 types of technical information:
General: Displays basic information about this access point, such as SS ID, MAC
Address, authentication / encryption type, channel etc.
WPS: If this access point supports WPS (Wi-Fi Protected Setup), related
information will be displayed here.
CCX: If this access point supports CCX (Cisco Compatible eXtension), related
information will be displayed here.
802.11n: If this access point complies with 802.11n draft, related information
will be displayed here.
13
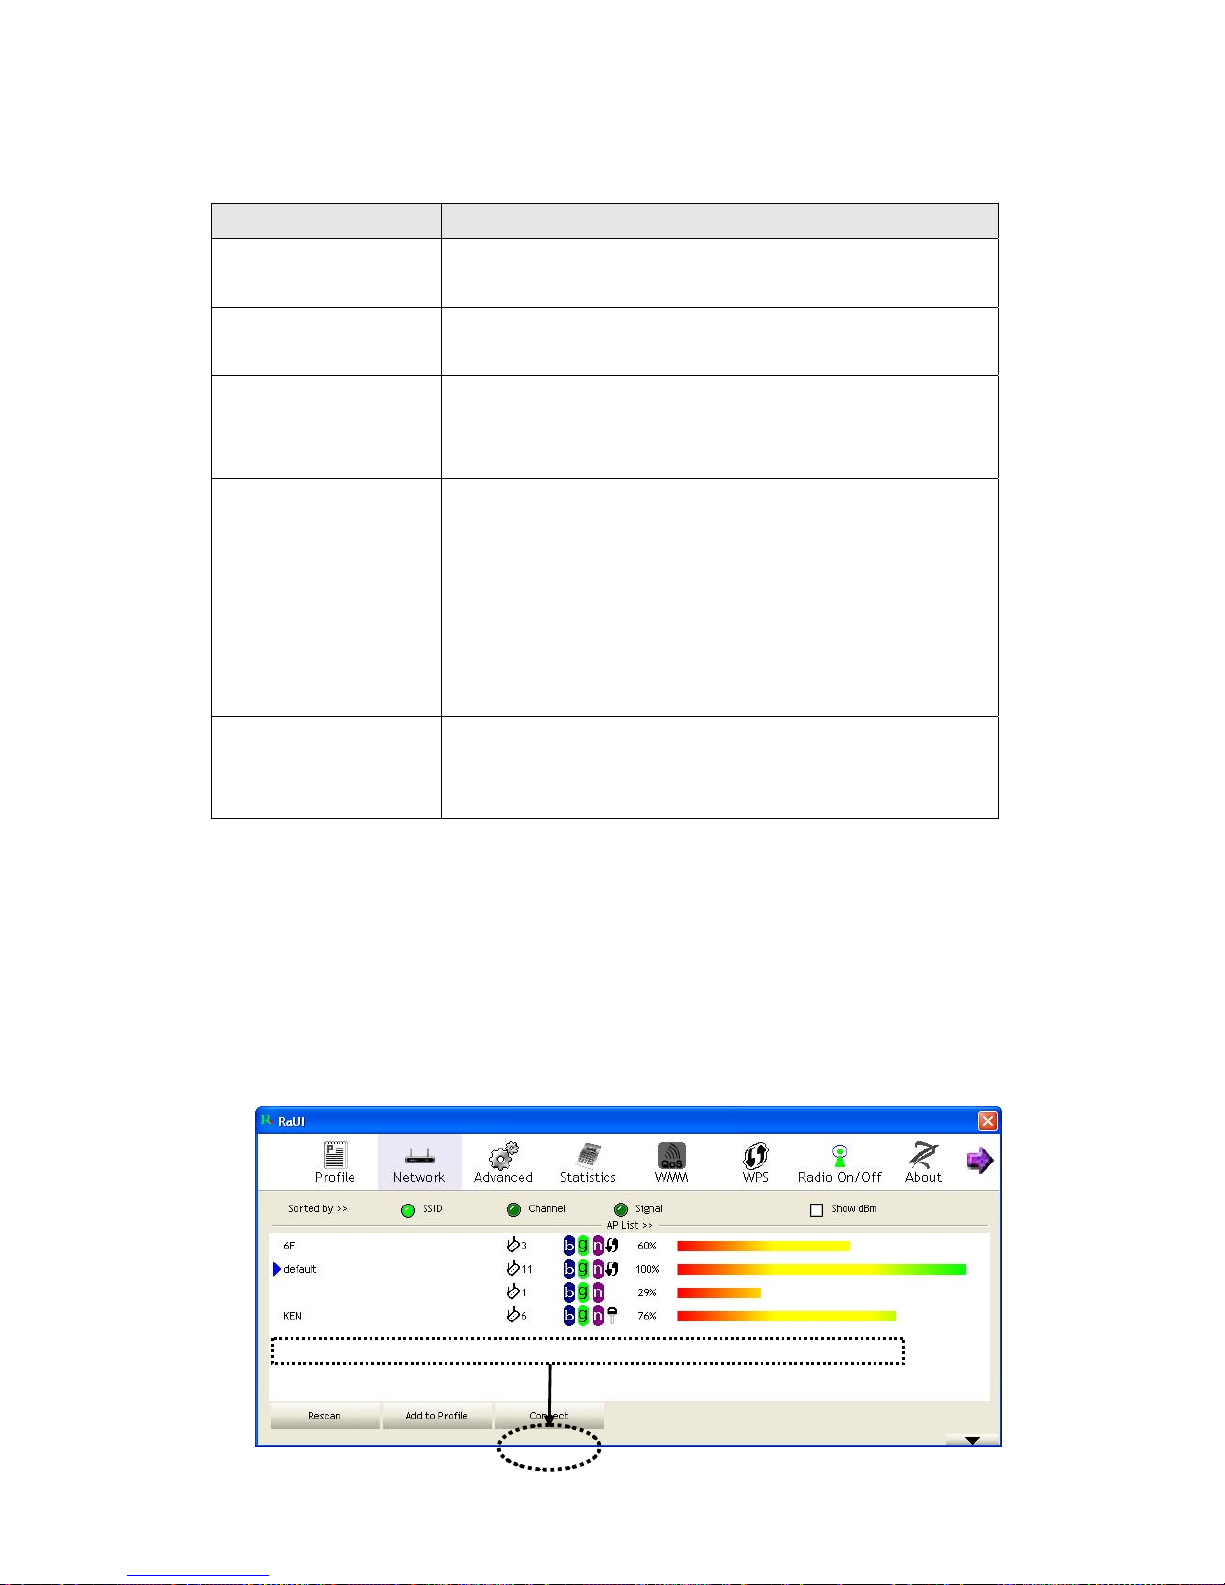
And here are descriptions of every setup item in setup area:
Item Name Description
Sorted by >> You can decide how to sort all listed access point by
‘SSID’, ‘Channel’, or ‘Signal’ (signal strength).
Show dBm Check this box to show the signal strength of access
point, instead of percentage.
Rescan Click this button to rescan access points. You can click
this button for several times, if the access point you wish
to use does not show in the list.
Add to Profile You can store a specific access point to profile, so you can
link to that access point directly next time, without
inputting authentication key again.
To add an access point to profile, you have to select an
access point from the list first, then click ‘Add to Profile’
button. Detailed instructions will be given below.
Connect Connect to a selected access point. Y ou have to select an
access point from the list first and then click ‘Connect’ to
connect to the selected access point.
Connect to an Access Point
If the wireless access point you wish to connect is found, you can establish
connection with it by clicking ‘Connect’ button. Instructions will be given as follow:
1. Click the wireless access point or network device you wish to connect, it will be
highlighted, then click ‘Connect’.
14
If the access point you selected does not use encryption, you’ll be connected to
this wireless access point within one minute. If the access point you selected
uses encryption, please proceed to step 3.
2. If the wireless access point does not have SSID, you’ll be prompted to input it
now. Please ask the owner of wireless access point for the exact SSID and input
it here, then click ‘OK’ when ready. If the SSID you provided here is wrong, you’ll
not be able to connect to this access point.
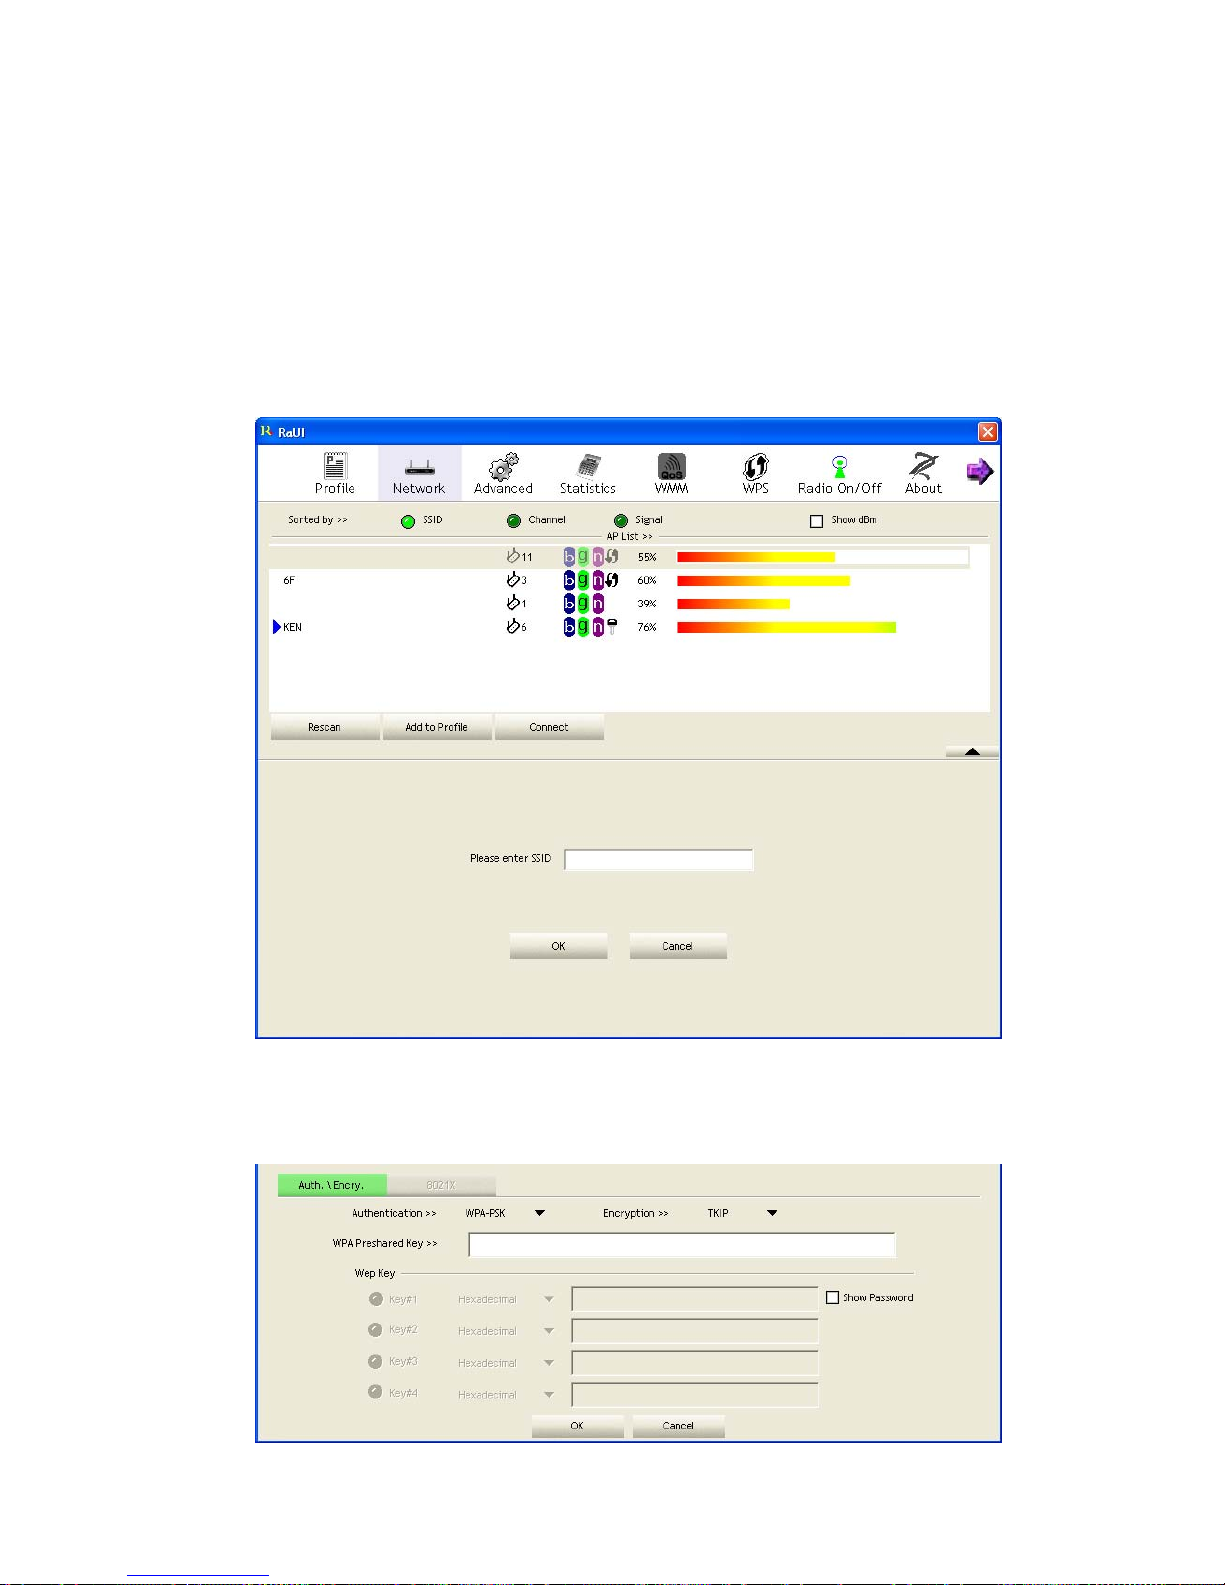
3. If the wireless access point uses encryption, you will be prompted to input its
WEP key or WPA preshared key.
15
4. Please ask the owner of the wireless access point you want to connect, and input
the correct key here and then click ‘OK’. By checking ‘Show Password’ box, the
encryption key you inputted here will be displayed.
If the value you inputted here is wrong, you will not be able to connect to this
wireless access point.
Authentication type will be selected by the authentication type of the
access point automatically, please don’t change it.
However , if you’re connecting to an access point uses 802.1x authentica tion, you
have to check ‘802.1x’ box and input related information. Instructions for
802.1x authentication will be given later.
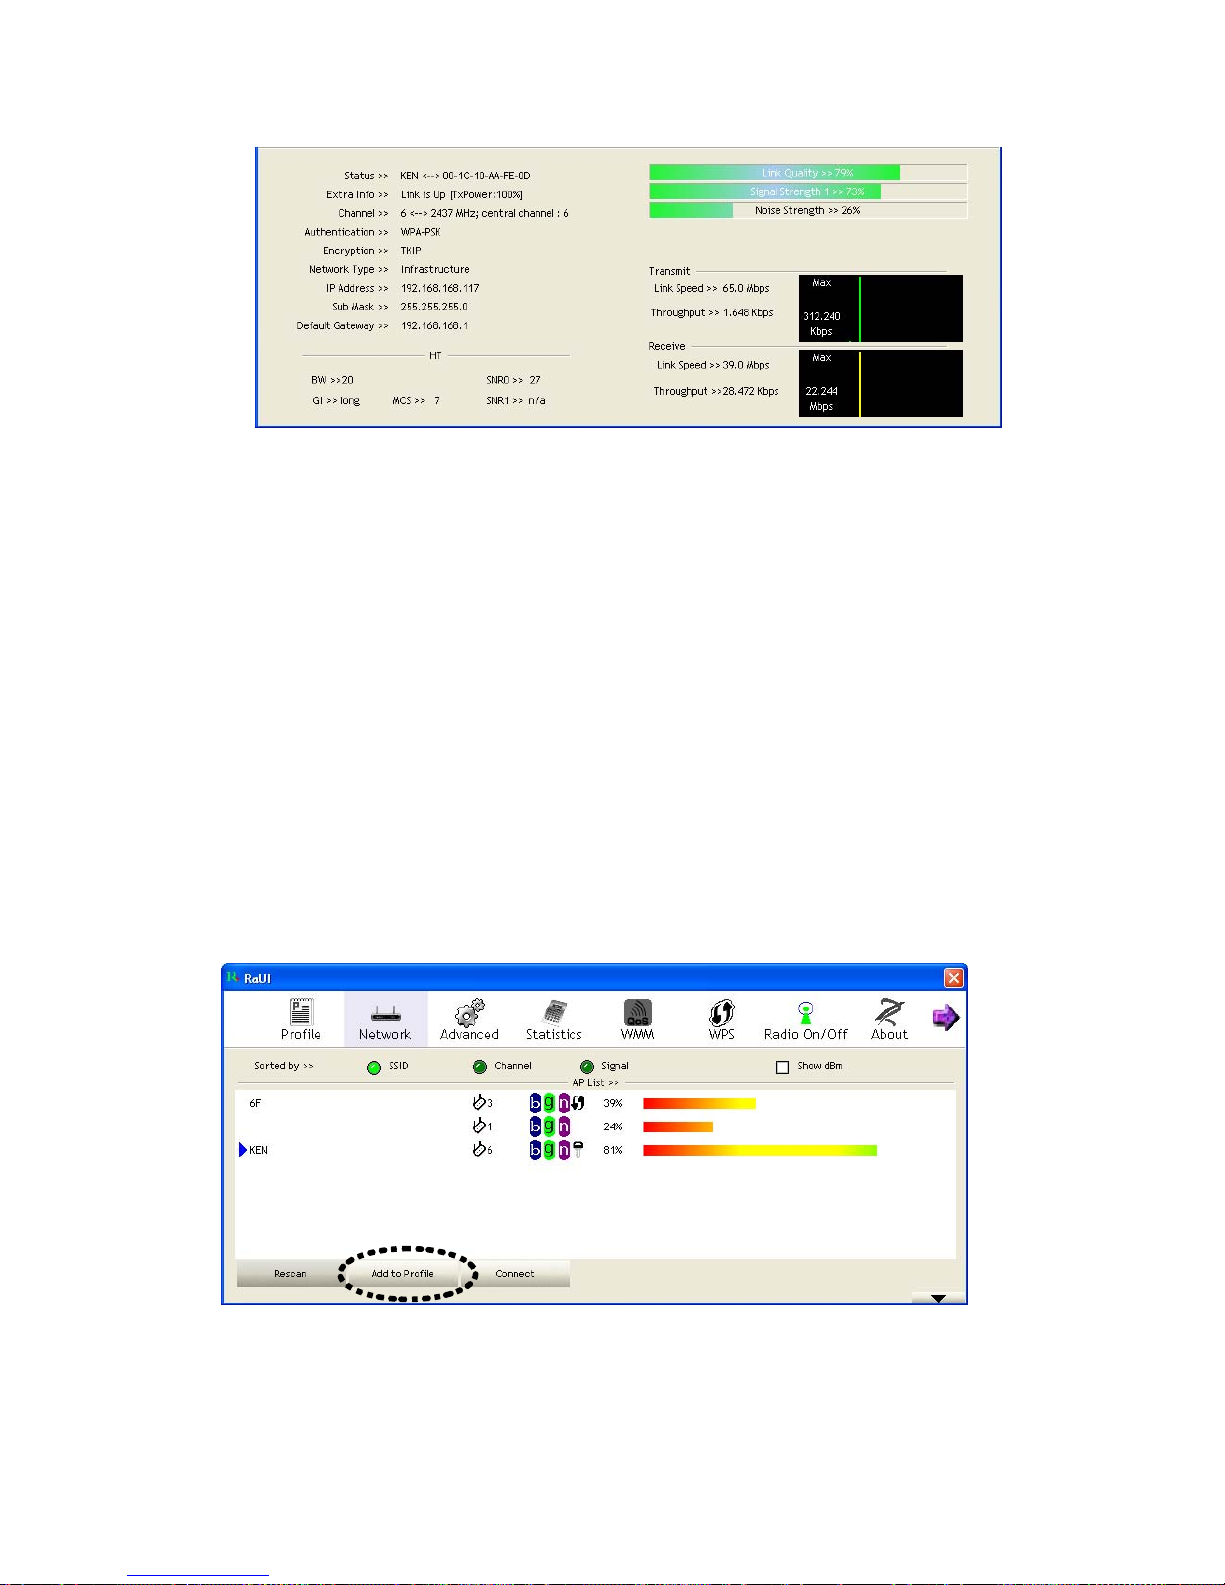
5. If the wireless access point is successfully connected, you’ll see a
symbol
appears in front of the name of wireless device.
You can put the mouse cursor over the Ralink configuration utility icon, and the
brief information about link status and signal strength of current wireless
connection will be shown as a popup balloon.
You can also click More / Less button (
) to see detailed information of
connected access point:
16
Add an Access Point to Profile
If you will connect to some specific wireless access point frequently, you can add
their information to the profile. Just like the telephone directory , the profile saves all
information of access points, and you can recall them anytime you wish to establish
connection.
You can add a found access point to profile, or input all information of an access
point by yourself.
To add a found access point to profile, please select a found access point first (to
make it highlighted), then click ‘Add to Profile’ button; to input the information of
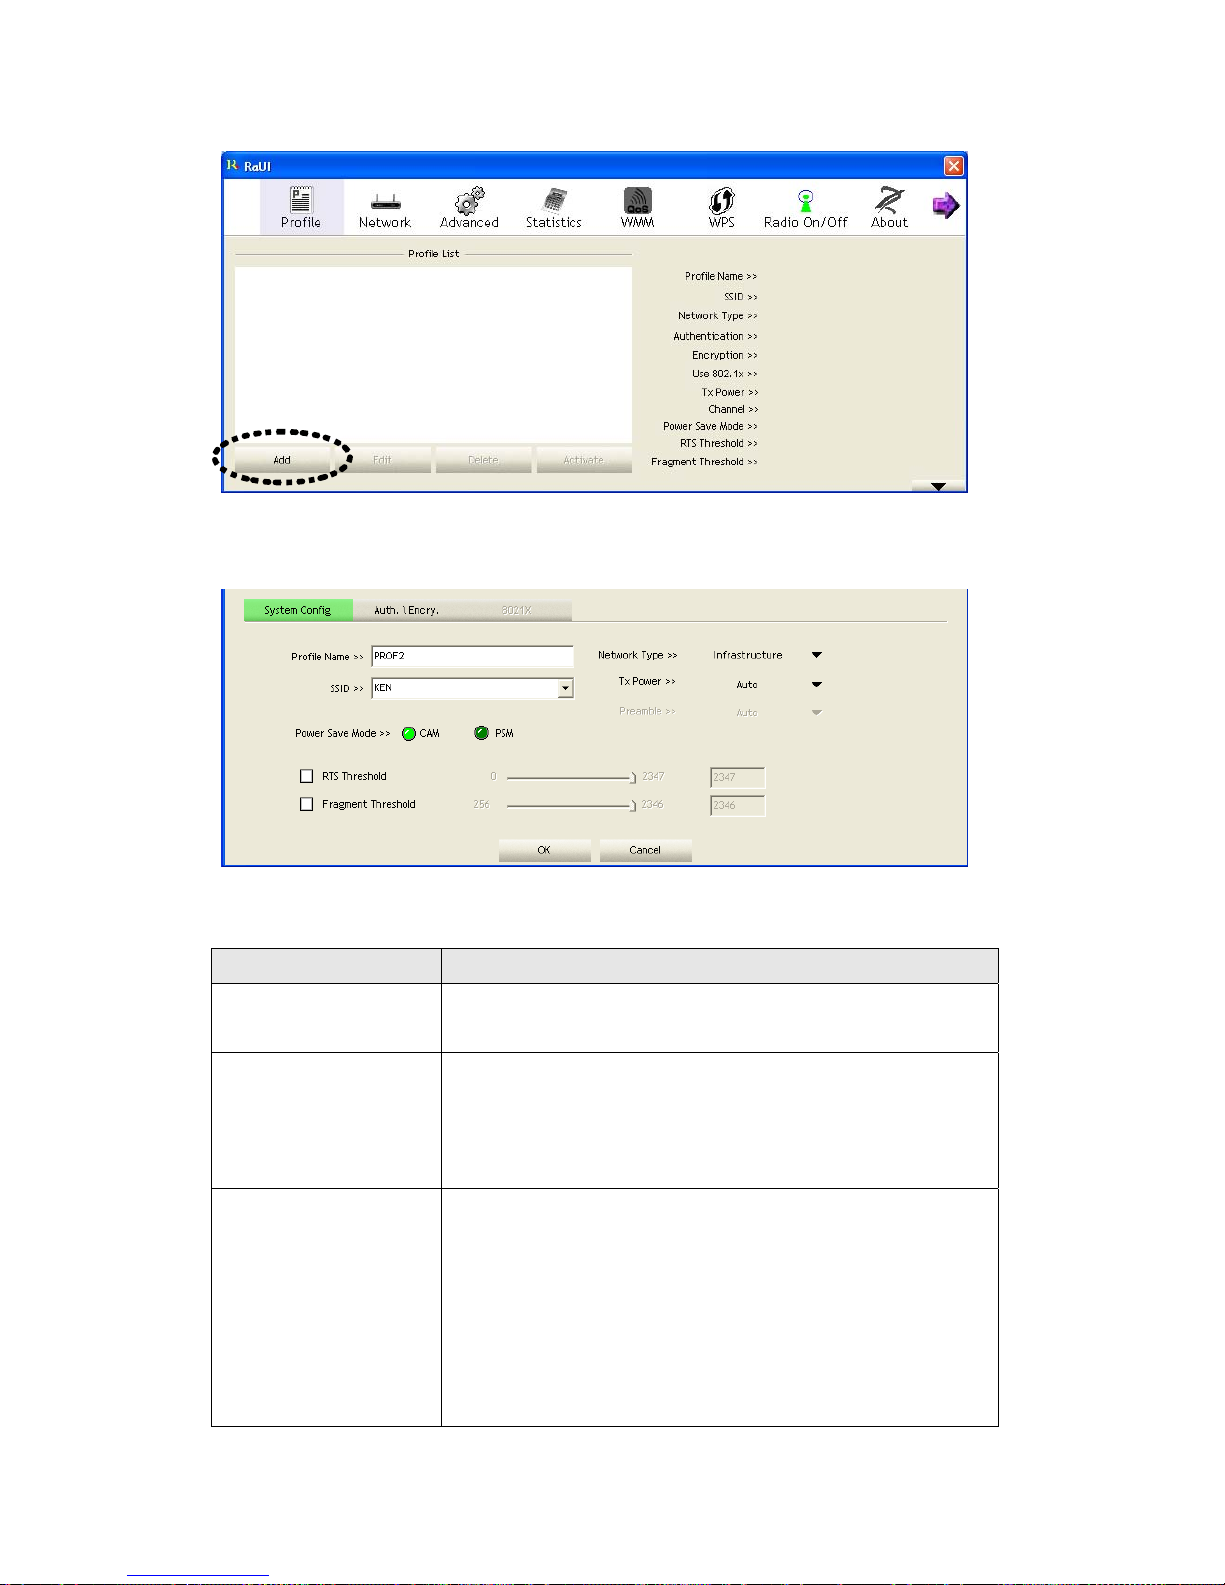
access point by yourself, please go to ‘Profile’ menu and click ‘Add’ button.
17
The setup utility will expand:
Here are descriptions of every setup item:
Item Name Description
Profile Name You can give this profile a name. Every profile needs a
unique name.
SSID Please input the SSID of this access point. If you selected
an access point from the list, and its SSID is not hidden,
the SSID will be filled automatically; however, you can
modify the SSID by yourself.
Network T ype Please select the network type: Ad hoc or Infrastructure.
If you’re connecting to an access point, please select
‘Infrastructure’; for point-to-point wireless connection
(i.e. connecting to another computer using Ad Hoc
mode), please select Ad hoc here.
If you selected an access point from the list above, please
 Loading...