

Canyon CNP-WF514, CNP-BR1 User Manual

1
CNP-WF514
Wireless Broadband Router
User Manual

2
Table of Contents
INTRODUCTION..............................................................................................................................4
SAFETY PRECAUTIONS ...................................................................................................................4
PACKAGE CONTENTS.......................................................................................................................5
HARDWARE OVERVIEW..................................................................................................................6
GETTING STARTED........................................................................................................................7
CONNECTING TO DEVICE ...............................................................................................................7
WINDOWS XP SETUP.....................................................................................................................7
WINDOWS VISTA SETUP...............................................................................................................8
WINDOWS 2000 SETUP ...............................................................................................................8
WINDOWS 98/ME SETUP............................................................................................................8
DEVICE CONFIGURATION.......................................................................................................10
INTERNET CONNECTION WIZARD .............................................................................................11
STATUS.............................................................................................................................................17
WAN SETUP...................................................................................................................................19
Dynamic IP Setting...........................................................................................................19
PPPoE Setting.......................................................................................................................20
Static IP Setting..................................................................................................................21
PPTP Setting .........................................................................................................................21
L2TP Setting..........................................................................................................................22
LAN SETUP.....................................................................................................................................23
WIRELESS .......................................................................................................................................25
Basic Setting.........................................................................................................................25
Security Setting...................................................................................................................26
Filter List Setting................................................................................................................28
WDS Setting..........................................................................................................................29
WDS Setting..........................................................................................................................29
Association Table...............................................................................................................30
ROUTING .........................................................................................................................................30
NAT..................................................................................................................................................31
DMZ Host Setup...................................................................................................................31
FTP Private Port..................................................................................................................31
Virtual Server Setup.........................................................................................................31
Port Triggering ....................................................................................................................32
FIREWALL........................................................................................................................................33

3
MAC Filtering Configuration.........................................................................................33
Connection Filtering Configuration..........................................................................34
URL Filtering Configuration..........................................................................................35
Ping Filtering Configuration.........................................................................................35
SPI FIREWALL...............................................................................................................................35
DDNS..............................................................................................................................................36
MISC ...............................................................................................................................................37
Login ID & Password Setup.........................................................................................37
Remote Management.......................................................................................................37
UPnP Setup............................................................................................................................38
System Time Setup ...........................................................................................................38
WAN Link Status & Setup..............................................................................................38
Restore Default/Restart System...............................................................................39
Firmware Upgrade.............................................................................................................39
TROUBLESHOOTING...................................................................................................................40
APPENDIX ........................................................................................................................................41
TECHNICAL SPECIFICATIONS .....................................................................................................41

4
Thank you for purchasing CANYON CNP-WF514. We sincerely wish you to enjoy
the wireless broadband router. It provides user an easy and stable high speed
internet connection. It is also equipped with built-in NAT technology that acts as a
firewall to protect the network from outside intrusions. Ultimately, the device is
implemented with an IEEE 802.11b/g access point which is capable of wireless LAN
network. To fully utilize the functions and features of CANYON CNP-WF514,
please read through the user manual before you get started.
Introduction
Safety Precautions
Please observe all safety precautions before using the device. Please follow all
procedures outlined in this manual to properly operate the device.
z Do NOT attempt to disassemble or alter any part of the device that is not
described in this guide.
z Do NOT place the device in contact with water or any other li quids. The device
is NOT designed to be liquid proof of any sort.
z In the event of liquid entry into device interior, immediately disconnect the
device from the computer. Continuing use of the device may result in fire or
electrical shock. Please consult your product distributor or the closest support
center.
z To avoid risk of electrical shock, do not connect or disconnect the device with
wet hands.
z Do NOT place the device near a heat source or directly expose it to flame.
z Never place the device in vicinity of equipments generating strong
electromagnetic fields. Exposure to strong magnetic fields may cause
malfunctions or data corruption and loss.
z All images in the user manual are for user reference only. Actual products
might differ slightly than images shown here.

5
Package Contents
Product Image Item Name
CNP-WF514 Main Unit
Standing Base
Power Adapter
Warranty Card
Quick Guide
Documentation CD
6
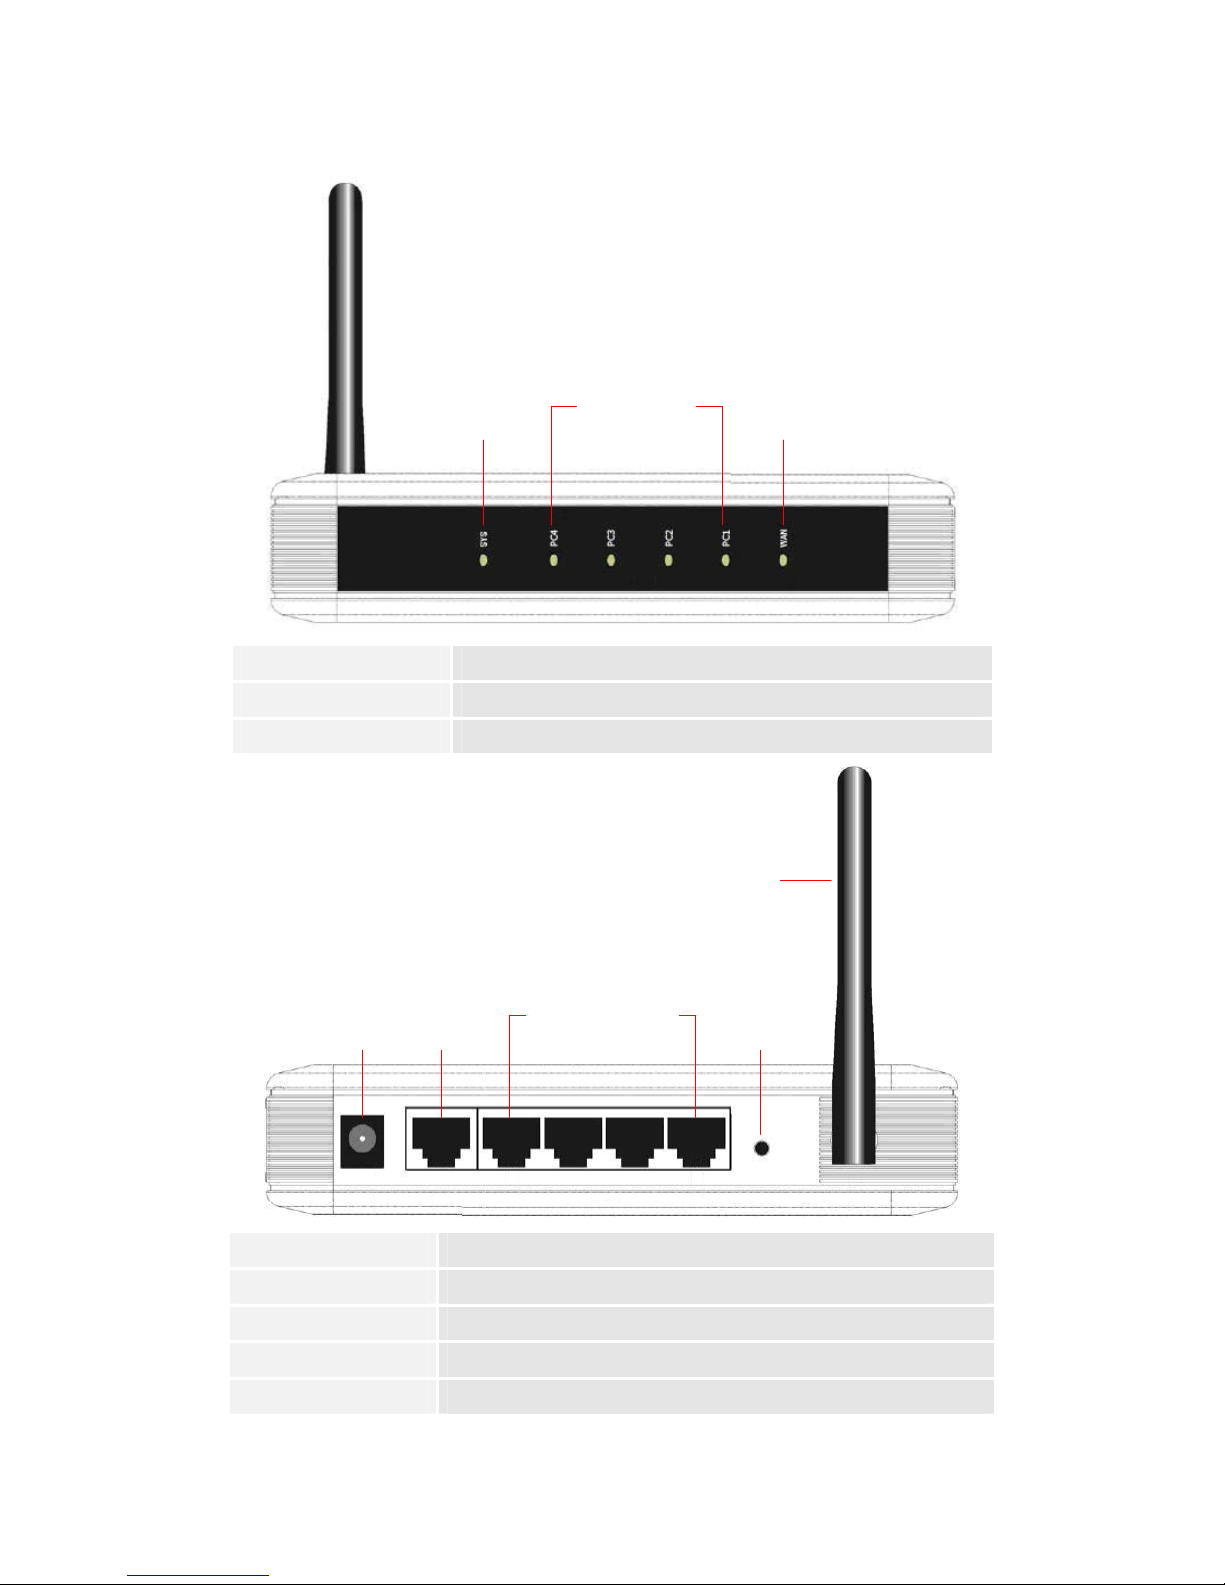
Hardware Overview
SYS Power status indicator
WAN WAN interface status indicator
PC1/PC2/PC3/PC4 LAN interface status indicator
DC Jack Connects to power adapter
WAN Connects to cable/DSL modem or other Ethernet devices
PC1/PC2/PC3/PC4 Connects to LAN port on PC or other Ethernet devices
Default Reset device to factory default settings
Antenna Transmits signals
PC1/PC2/
PC3/PC4
SYS WAN
PC1/PC2/
PC3/PC4
WAN Default
Antenna
DC Jack

7
Getting Started
Connecting to Device
Please follow the steps below to connect the modem and PC(s) with CANYON
CNP-WF514:
1. Begin by searching for an appropriate location to setup device. Please keep
in mind to keep the device in the center of working area as the signal
strength and data transfer rate falls off with distance.
2. It is also recommended to place device at a higher position to ensure
minimum obstacle interference.
3. Make sure that all network devices are powered off, including the device
itself, PCs, switches, cable or DSL modem, and other peripherals.
4. Connect the modem to WAN port of the device by one CAT 5 Ethernet
cable.
5. Connect PC(s) with the LAN ports (P C1/PC2/PC3/PC4) of the device by CA T
5 Ethernet cables. One PC connects to only one port using one cable.
6. Power on the cable or DSL modem.
7. Plug in the power of the device. The Power status indicator at the front
panel of device will light up as soon as the power adapter is connected
properly.
8. Power on PC(s).
Windows XP Setup
1. Click on Start Æ Settings Æ Control Panel.
2. Click on Network and Internet Connections icon.
3. Click on Network Connections
4. Right click on Local Area Connection icon and click on Properties.
5. Select TCP/IP option and click on Properties. The Properties dialog box will
be displayed.
6. Check “Obtain an IP address automatically” and “Obtain DNS server
address automatically” options.
7. Click Ok to confirm modifications.

8
Windows Vista Setup
1. Click on Start Æ Settings Æ Network Connections.
2. Right click on Local Area Connection icon and click on Properties.
3. Click on Continue in User Account Control dialog box.
4. Select TCP/IPv4 option and click on Properties. The Properties dialog box
will be displayed.
5. Check “Obtain an IP address automatically” and “Obtain DNS server
address automatically” options.
6. Click Ok to confirm modifications.
Windows 2000 Setup
1. Click on Start Æ Settings Æ Control Panel.
2. Double click on Network and Dial-up Connections icon. The Network dialog
box will be displayed.
3. Right click on Local Area Connection icon and click on Properties.
4. Select TCP/IP option and click on Properties. The Properties dialog box will
be displayed.
5. Check “Obtain an IP address automatically” and “Obtain DNS server
address automatically” options.
6. Click Ok to confirm modifications.
Windows 98/ME Setup
1. Click on Start Æ Settings Æ Control Panel.
2. Double click on Network icon. The Network dialog box will be displayed.
3. Please make sure that appropriate network card is installed before
proceeding. Click on the Configuration label.
4. Select TCP/IP option and click on Properties. The Properties dialog box will
be displayed.
NOTE:
Select the TCP/IP item with an arrow “Æ” pointing to the network card if more
than one TCP/IP options is present.
5. Make sure that the option “Obtain IP address automatically” is checked.
6. Make sure that the “WINS Resolution” option is checked under WINS
Configuration dialog box.
7. From Gateway dialog box, remove all entries from the Installed gateways

9
by selecting them and clicking on Remove.
8. From DNS Configuration dialog box, remove all entries from DNS server
search order box and Domain suffix search order box by selecting them
and clicking on Remove. Click on Disable DNS.
9. Click Ok to confirm modifications.
NOTE:
To access the device via a wireless connection, PC must be equipped with
802.11b or 802.11g wireless adapter/PCI card. The configuration should be set
as below:
z Operation Mode: Infrastructure
z SSID: Default
z Authentication: Disabled
z Encryption: Off
10
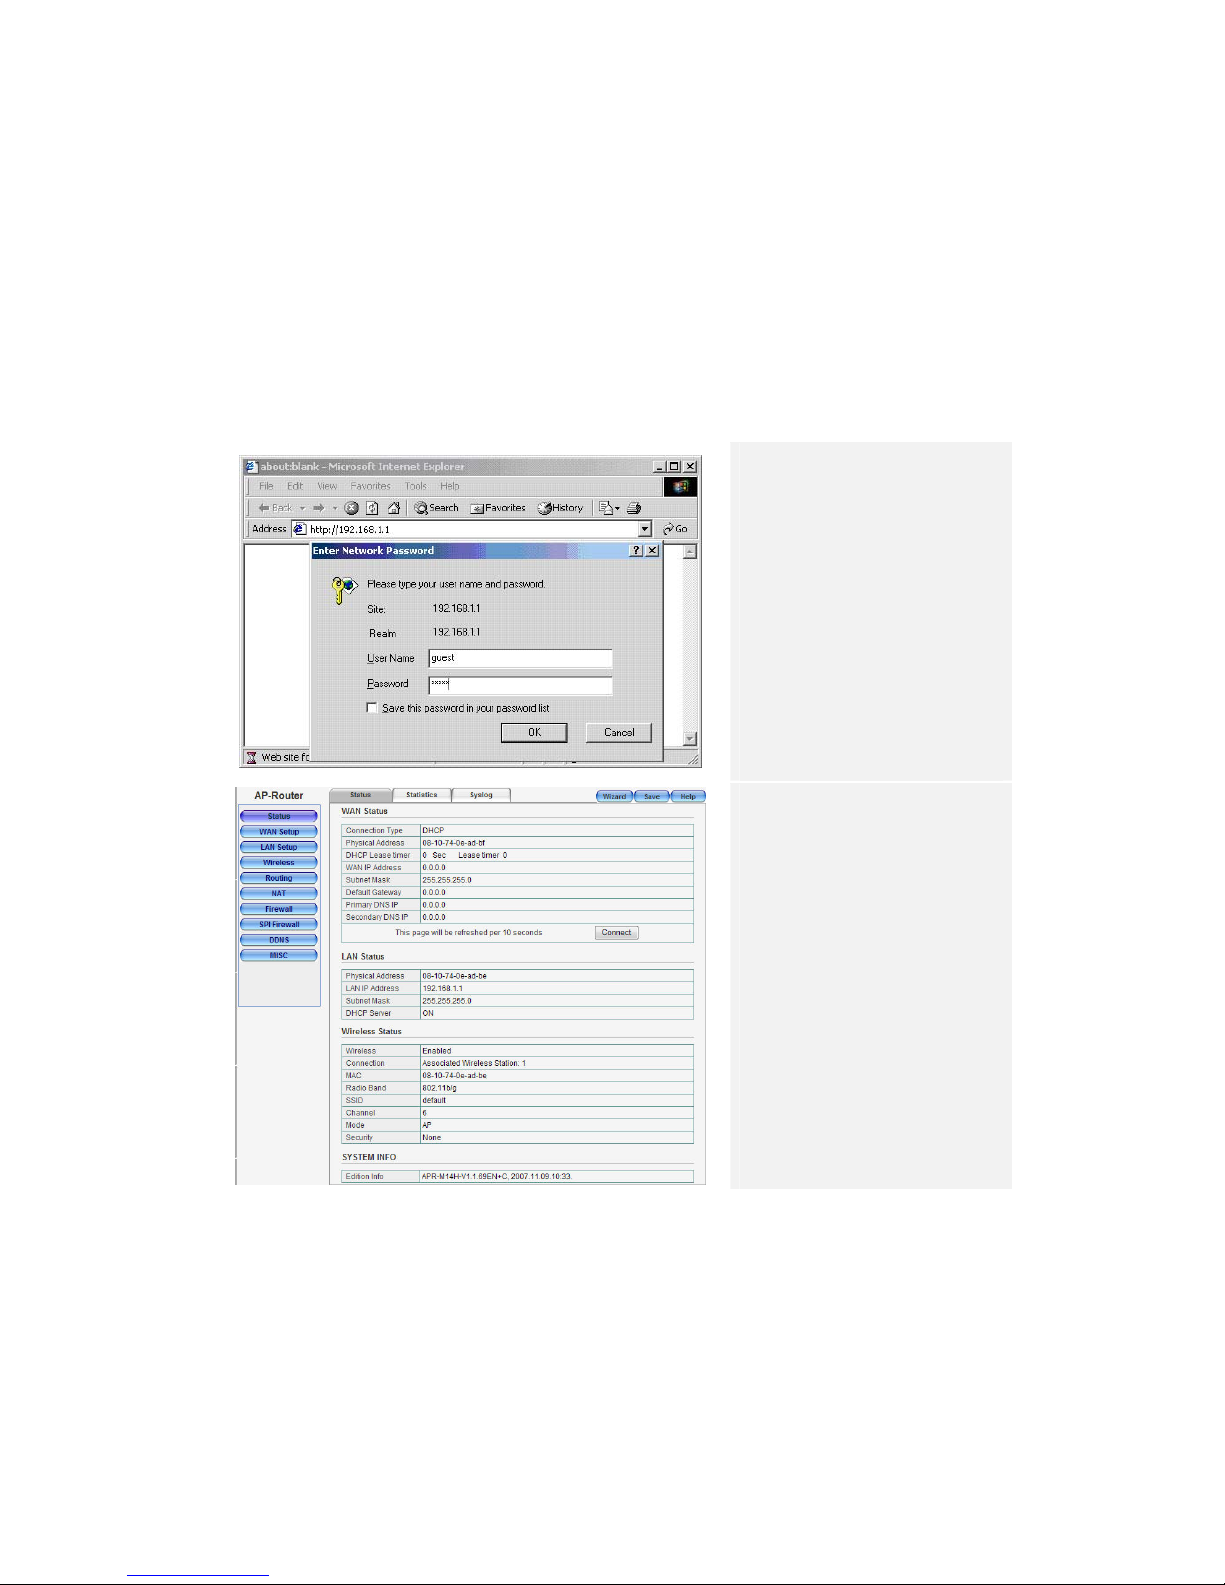
Device Configuration
Before setting up the device, please make sure that the h ost P C(s ) i s set on the IP
sub-network accessible by CANYON CNP-WF514 device. The default network
address of the device is set as 192.168.1.1. Please configure IP address of host PC
at 192.168.1.XXX where XXX is a number between 002 and 254. The subnet mask
should be 255.255.255.0. Please follow below steps to enter web browser
management mode.
1. Open a browser
(Internet Explorer
browser only) and
type in “192.168.1.1”
at the address bar and
press Enter.
2. Type “guest” at the
user name text box
and “guest” again at
the password text box.
3. Th e ho me page of web
browser management
mode will be displayed.
4. Click on 8 different
functions on the main
router menu on the
left. The corresponding
information will be
displayed at right.
5. Click on Help at any
time to bring up help
menu.
NOTE:
The factory settings of user name and the password are by default “guest”. It is
recommended that user change that information to better maintain network
security.
11
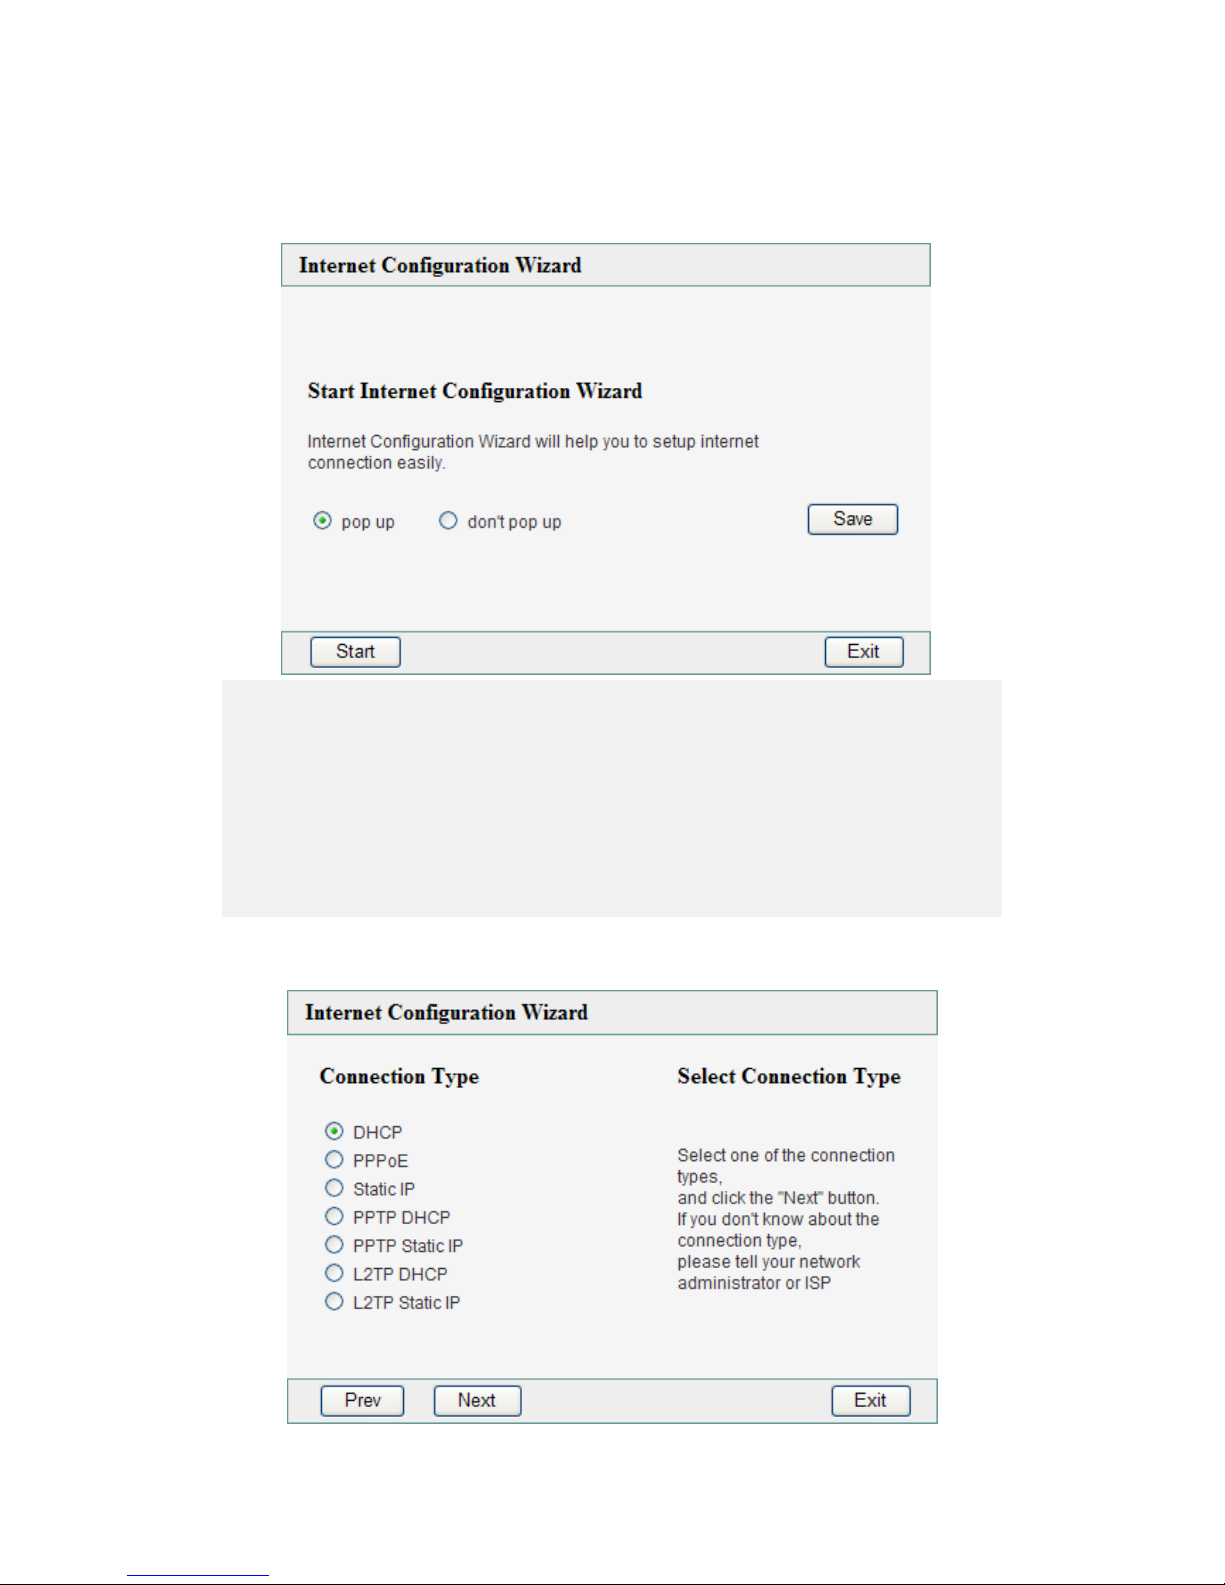
Internet Connection Wizard
1. Start Internet Configuration Wizard
z Internet Configuration Wizard will pop up upon successful login.
NOTE:
In order to enter Wizard mode, temporarily disable popup window blocking
option if necessary or click on Wizard to start.
z Select pop up to enable automatic Internet Configuration Wizard prompt
window. Click on Save to save this setting.
z Click on Start to continue or Click on Exit to exit.
2. Select Connection Type
12
z Select 1 of 7 connection types instructed by ISP or network administrator.
z Click on Next to continue or Prev to go back to previous page.
z Click on Exit to exit.
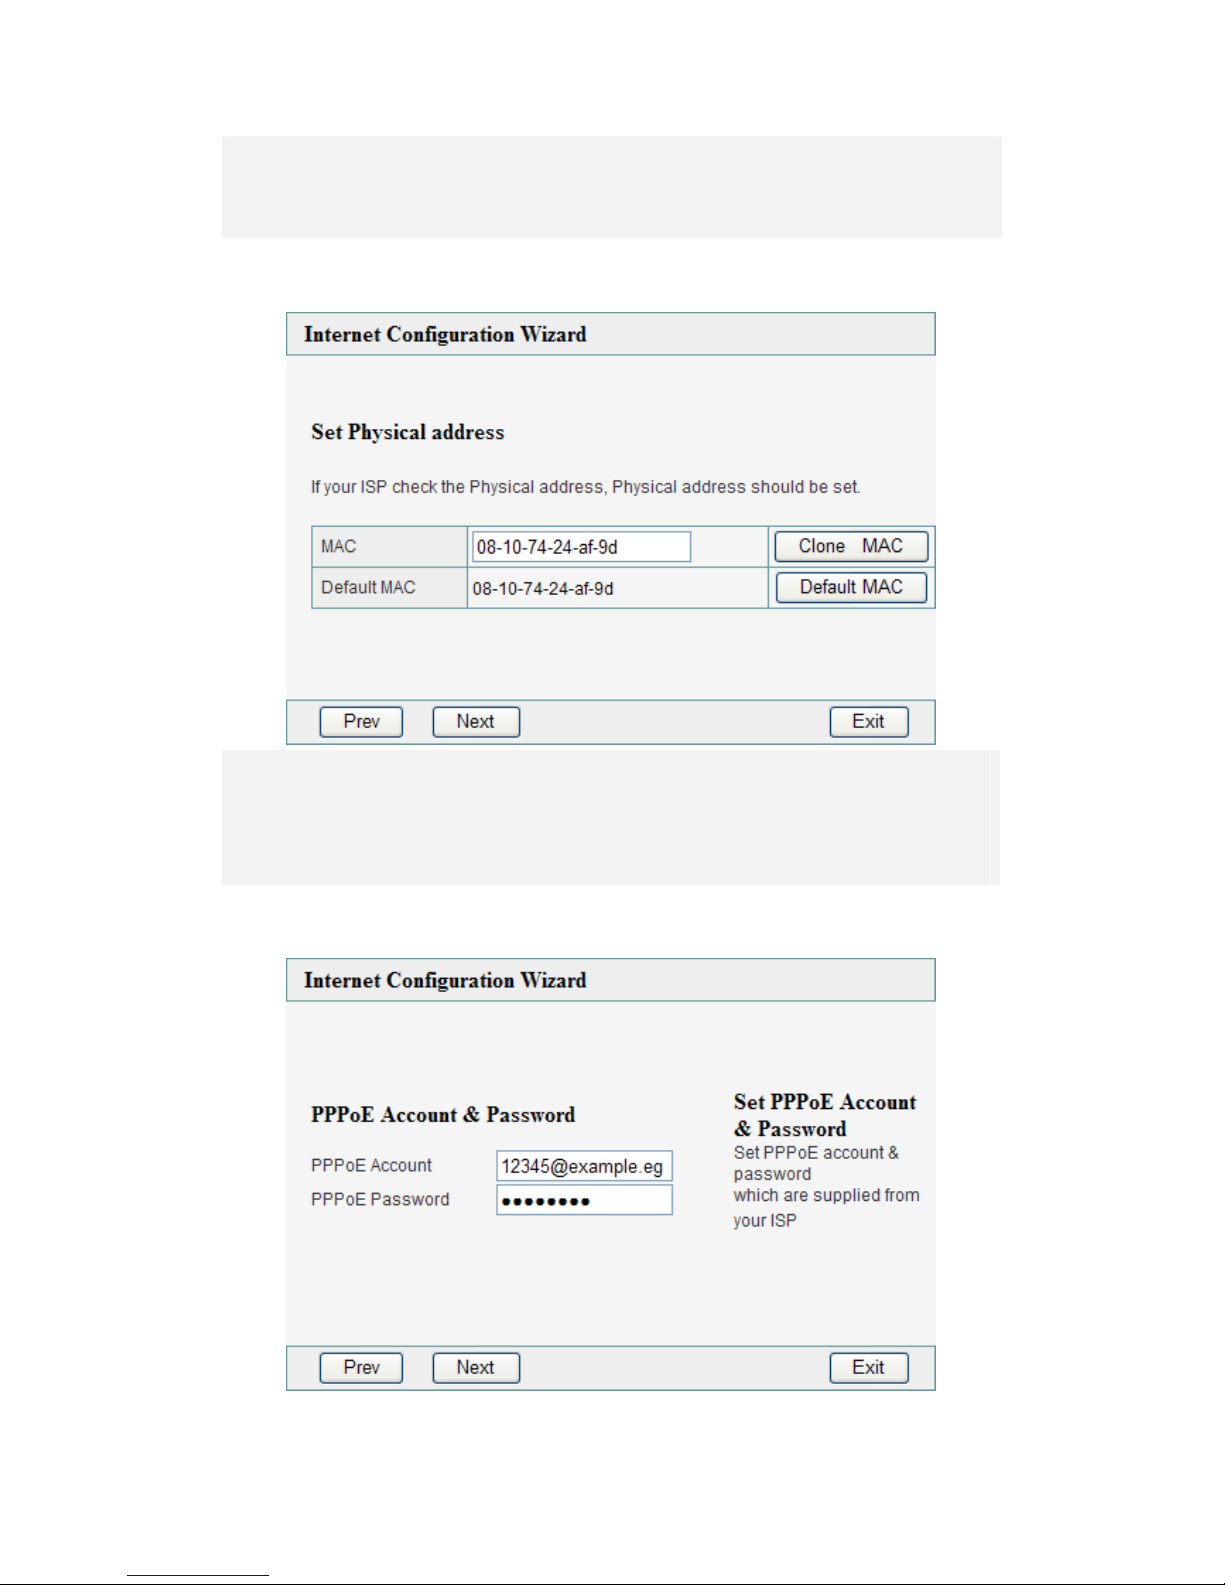
2.1 DHCP Connection
z Click on Clone MAC or type in MAC address if required by ISP.
z Click on Default MAC to restore to default MAC address.
z Click on Next to continue or Prev to go back to previous page.
z Click on Exit to exit.
2.2 PPPoE Connection
13
z Type in PPPoE Account and PPPoE Password provided from ISP.
z Click on Next to continue or Prev to go back to previous page.
z Click on Exit to exit.
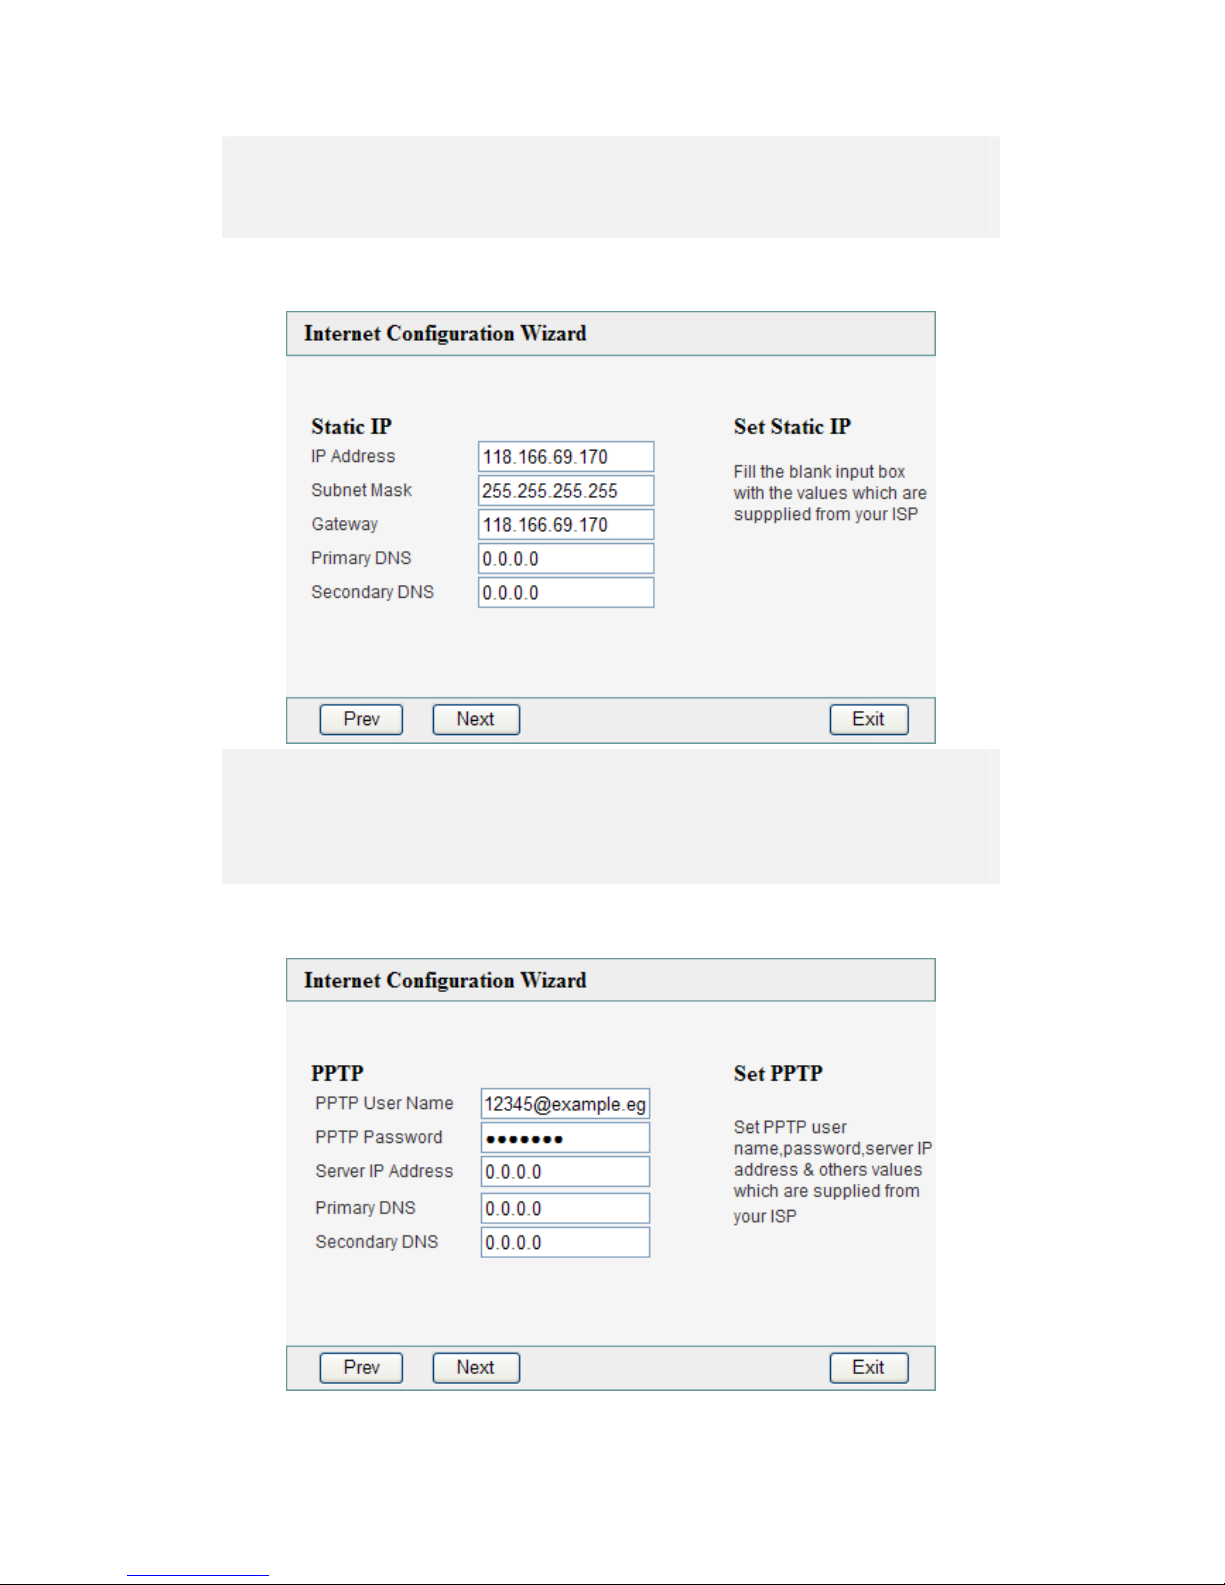
2.3 Static IP Connection
z Type in IP Address, Subnet Mask, Gateway, Primary DNS, and
Secondary DNS provided from ISP.
z Click on Next to continue or Prev to go back to previous page.
z Click on Exit to exit.
2.4 PPTP DHCP Connection
 Loading...