

ENG
DEU
BeDieNuNgSANleituNg
OPeRAtiNg iNStRuCtiONS
Digital Movie 90.3
1
DeutschDeutsch
Willkommen in der Welt der pure music
Wir freuen uns, dass Sie sich für ein Produkt aus dem Hause Canton entschieden haben. Es vereint
hochwertige Bauteile mit unserer langjährigen Entwicklungserfahrung und der sorgfältigen Produktion.
Damit es Ihnen einen unbeschwerten Klanggenuss bietet, haben Sie nur wenige Dinge zu beachten.
Diese Bedienungsanleitung erklärt die Grundfunktionen und die umfangreichen Sonderfunktionen
Ihres DM Systems.
Wir wünschen Ihnen viel Klangvergnügen!
Inhalt
Sicherheitshinweise ..................................... Seite 3
Auspacken ................................................... Seite 8
Aufstellen .................................................... Seite 8
Einspielen .................................................... Seite 8
Inbetriebnahme der Fernbedienung ............ Seite 9
Anschluss-Terminal ...................................... Seite 9
Anschluss .................................................. Seite 10
Bedienung ................................................. Seite 12
Wiedergabe via Bluetooth
®
Technologie ... Seite 13
Displayanzeigen ........................................ Seite 14
Erweiterte Sound-Funktionen ................... Seite 16
Ein- bzw. Ausschaltautomatik (AUT) ......... Seite 18
Gerätesteuerung (CEC) ............................. Seite 19
ECO Standby (ECO) .................................. Seite 20
Automatische Wahl des BT Eingangs (SEL) .. Seite 21
2
Werkseinstellungen
wiederherstellen/Reset (RES) .................... Seite 22
Konfiguration der Eingänge (INP) .............. Seite 23
IR-Lernfunktion ......................................... Seite 24
IR-Löschfunktion ....................................... Seite 25
Fehlersuche ............................................... Seite 26
Technische Daten ...................................... Seite 30
Konformitätserklärung .............................. Seite 31
Weitere wichtige Informationen ................ Seite 32
Garantie .................................................... Seite 66
Lizenzhinweise .......................................... Seite 67
Die sachgemäße Handhabung des Lautsprechers
fällt in die Verantwortung des Anwenders. Canton
kann keine Verantwortung für Schäden oder Unfälle
übernehmen, die durch unsachgemäße Aufstellung oder unsachgemäßen Anschluss verursacht
werden.
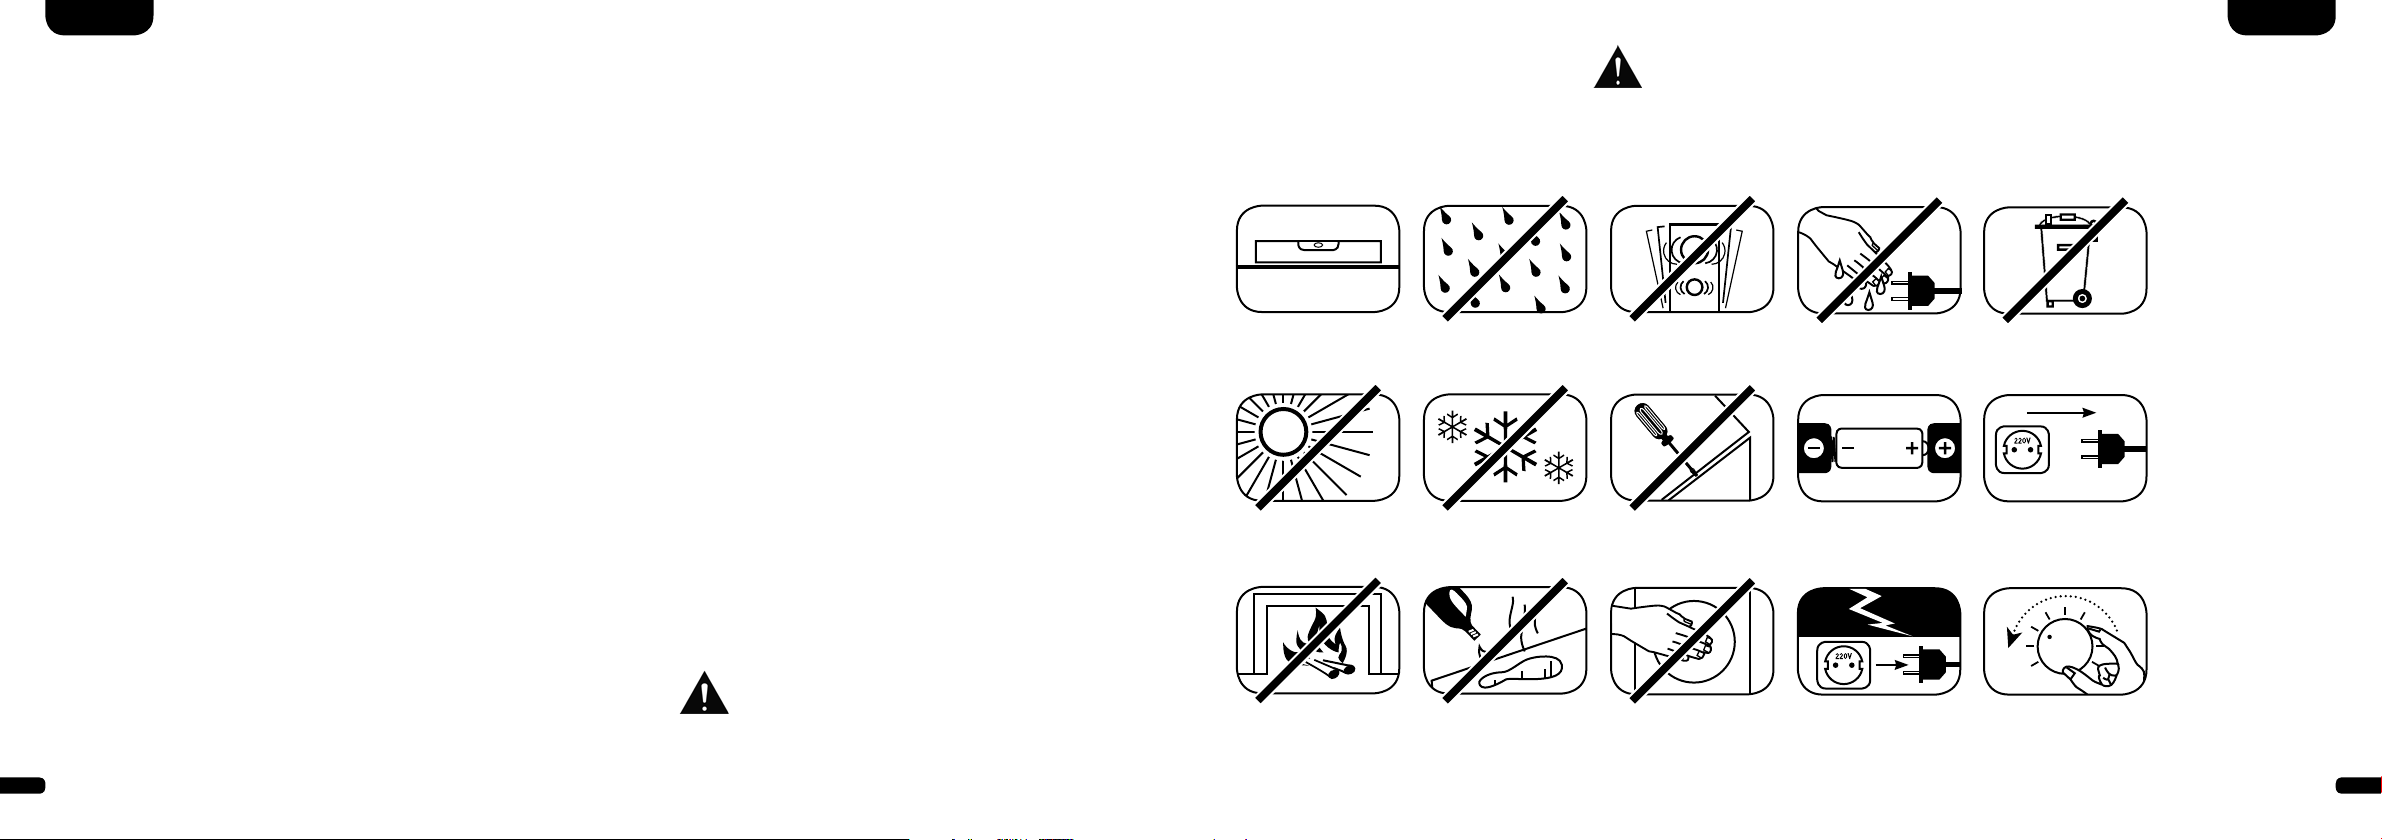
Sicherheitshinweise
Bitte beachten Sie die Sicherheitshinweise bei der Wahl des richtigen
Platzes für Ihr DM System und bei dessen Pflege und Bedienung!
Wählen Sie einen
ebenen Untergrund
Direkte
Sonneneinstrahlung
vermeiden
Abstand zu
Wärmequellen
Feuchtigkeit
vermeiden
Vor extremer Kälte
schützen
Zur Reinigung
keine aggressiven,
alkoholhaltigen oder
scheuernden Mittel
einsetzen
Erschütterungen
vermeiden
Gehäuse nicht öffnen
Nicht in die
Gehäuseöffnung greifen
Netzkabel nicht mit
nassen Händen anfassen
Bei Batterie und
Fernbedienung auf
richtige Polung achten
Netzstecker bei
Gewitter ziehen
Nicht in den
Hausmüll werfen
Freien Zugang zum
Netzstecker gewährleisten
Bei Überlastung
System leiser drehen
3
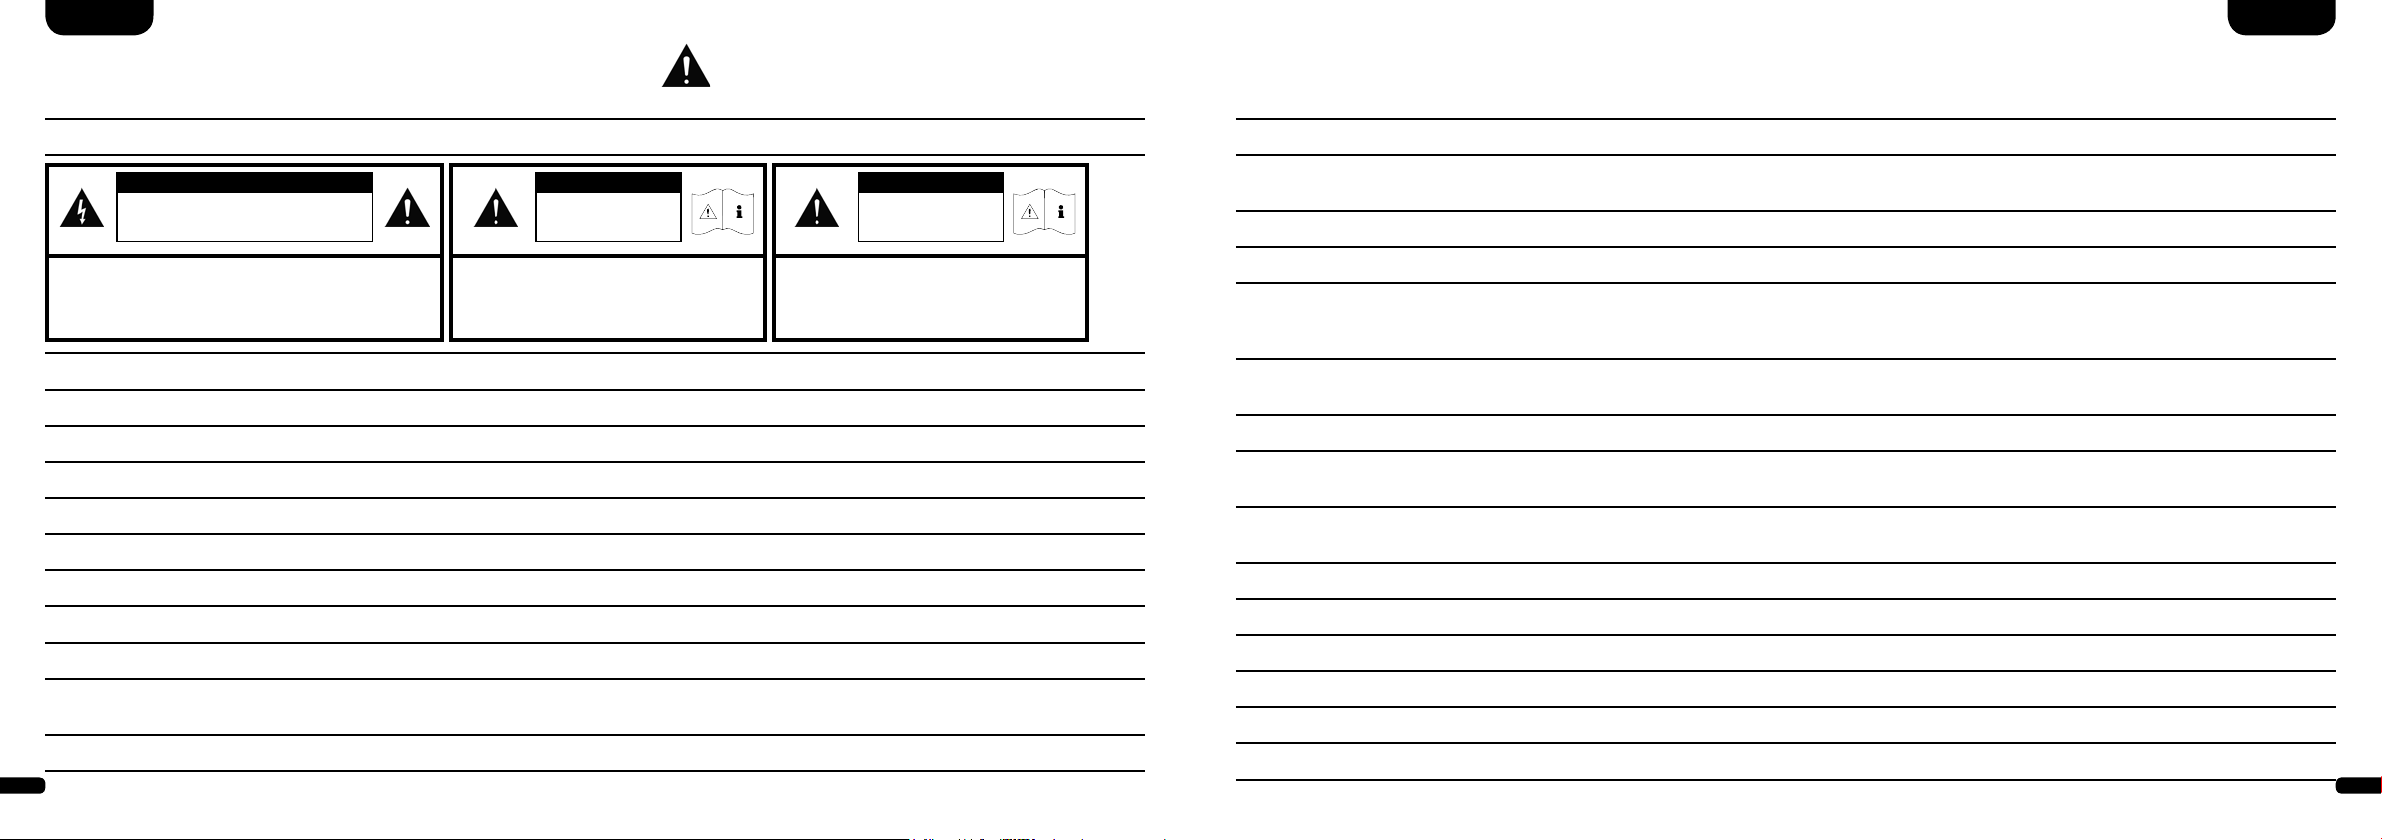
Wichtige Sicherheitsunterweisung
DeutschDeutsch
Hinweis
ACHTUNG
Gefahr eines elektrischen Schlages.
Zur Vermeidung eines Brandes oder eines elektrischen Schlages
das Ge rät nic ht öff nen. Da s Gerät e nthält keine vo m Benutzer zu
wartenden Teile. Lassen Sie Wartungs- und Reparaturarbeiten
nur von qua liz ierten Fachk räft en (Ser vice perso nal) dur chfüh ren.
Nicht öffnen!
ACHTUNG:
ACHTUNG
Explosionsgefahr!
Auswechselbare Lithium-Batterien!
Achtung: Bei unsachgemäßem Austausch
besteht Explosions gefahr. Batterien nur durch
den selben oder einen Vergleichs-Typ ersetzen.
ACHTUNG:
Knopf zell e (Batt erie) ni cht vers chluc ken.
Gefahr innerer chemischer Verbrennungen.
ACHTUNG
Lebensgefahr!
ACHTUNG:
Es besteht Lebensgefahr!
Lesen und befolgen Sie alle Anweisungen.
Bewahren Sie diese Anweisungen auf.
Beachten Sie alle Warn- und Sicherheitshinweise.
Betreiben Sie dieses Gerät nur in gemäßigtem Klima (nicht in tropischem Klima).
Betreiben Sie dieses Gerät nicht in Höhen von über 2000 m über dem Meeresspiegel.
Betreiben Sie dieses Gerät nur im Innenbereich, nicht im Außenbereich oder in Feuchträumen.
Um die Gefahr eines Brandes oder Stromschlages zu vermeiden, darf das Gerät weder Regen noch Nässe ausgesetzt werden.
Betreiben Sie dieses Gerät nicht in der Nähe von Wasser.
Setzen Sie dieses Gerät keinem Tropf- oder Spritzwasser aus.
Starke Temperaturschwankungen führen zu Kondensniederschlag (Wassertröpfchen) im Gerät. Warten Sie mit der Inbetrieb nahme,
bis sich die entstandene Feuchtigkeit verflüchtigt hat (mind. drei Stunden).
Stellen Sie keine Gegenstände auf das Gerät, die mit Flüssigkeiten gefüllt sind (wie z. B. Vasen).
4
Stellen Sie kein offenes Feuer, wie z. B. brennende Kerzen, auf oder in die Nähe des Gerätes.
Stellen Sie das Gerät nicht in die Nähe von Wärmequellen wie z. B. Heizkörpern, Wärmespeichern, Öfen oder sonstigen Geräten
(auch Verstärkern), die Wärme erzeugen.
Verhindern Sie direkte Sonneneinstrahlung.
Halten Sie einen Freiraum von wenigstens 5 cm um das Gerät herum ein.
Verhindern Sie in keinem Fall die Schutzfunktion von gepolten oder geerdeten Steckern: Ein gepolter Stecker hat zwei Stifte, von denen
einer breiter ist als der andere. Ein geerdeter Stecker hat einen dritten Erdungsstift. Der breite bzw. dritte Stift dient Ihrer Sicherheit. Falls
der Stecker nicht in Ihre Steckdose passt, wenden Sie sich an einen qualifizierten Elektriker, um die veraltete Steckdose auszutauschen.
Zur Vermeidung eines elektrischen Schlages, verbinden Sie den Netzstecker nur mit Steckdosen oder Verlängerungen,
bei denen die Kontaktstifte vollständig eingesteckt werden können, um freiliegende Kontaktstifte zu unterbinden.
Berühren Sie niemals Signal- und Netzkabel mit nassen Händen.
Treten Sie nicht auf das Netzkabel und klemmen Sie es nicht ein, insbesondere nicht im Bereich der Stecker, Steckdosen und an der Stelle,
an der das Kabel aus dem Gerät geführt wird.
Bei Geräten ohne Netzschalter, bei denen der Netzstecker bzw. die Geräte-Netzbuchse als Trenneinrichtung dient, muss der Stecker des
Netzkabels bzw. die Geräte-Netzbuchse jederzeit frei zugänglich sein.
Trennen Sie bei Gewittern oder längerem Nichtgebrauch das Gerät vom Stromnetz.
Um das Gerät komplett vom Stromnetz zu trennen, ziehen Sie das Netzkabel aus der Steckdose.
Schalten Sie das Gerät vor dem Anschließen oder Abziehen von Anschlussleitungen immer aus.
Immer an den Steckern und nicht an den Leitungen ziehen.
Stellen Sie das Gerät gemäß den Herstellerhinweisen auf.
Wählen Sie immer einen ebenen Untergrund. Das Gerät muss lotrecht stehen.
5
Deutsch Deutsch
Wichtige Sicherheitsunterweisung
Hinweis
Üben Sie keine Gewalt auf Bedienelemente, Anschlüsse und Leitungen aus.
Das Gerät darf nur mit der auf dem Gerät oder dem Typenschild spezifizierten Spannung und Frequenz betrieben werden.
Stecken Sie keine Gegenstände oder Körperteile in die Öffnungen des Gerätes. Stromführende Teile im Innern des Gehäuses könnten
berührt und/oder beschädigt werden. Dies kann zu Kurzschlüssen, elektrischen Schlägen und Feuerentwicklung führen.
Verwenden Sie nur Befestigungsmaterial und Zubehör, welches vom Hersteller zugelassen ist und/oder mit dem Gerät mitgeliefert wird.
Verwenden Sie nur Rollwagen, Ständer, Stative, Halter oder Tische, die vom Hersteller spezifiziert oder mit dem Gerät verkauft
werden. Wenn Sie einen Rollwagen verwenden, bewegen Sie den Rollwagen/Geräte-Verbund nur vorsichtig, um Schäden und
Verletzungen durch Umkippen zu vermeiden.
Reinigen Sie dieses Gerät nur mit einem sauberen, trockenen Tuch.
Verwenden Sie zur Reinigung keine aggressiven, alkoholhaltigen oder scheuernden Mittel.
Zur Vermeidung eines elektrischen Schlages das Gehäuse nicht öffnen! Das Gerät enthält keine vom Benutzer zu wartenden Teile.
Wenden Sie sich bei allen Reparatur- und Wartungsarbeiten an qualifizierte Fachkräfte. Dies ist dann erforderlich, wenn das Gerät in
irgendeiner Weise beschädigt ist, wie z. B. bei Beschädigungen von Netzkabeln oder Steckern, wenn Flüssigkeiten oder Gegenstände in
das Gerät gelangt sind, dieses Regen oder Feuchtigkeit ausgesetzt wurde, nicht ordnungsgemäß funktioniert oder fallen gelassen wurde.
Nehmen Sie keine Veränderungen am Gerät oder Zubehör vor. Nicht autorisierte Veränderungen können die Sicherheit, die Einhaltung
von Gesetzen oder die Systemleistung beeinträchtigen. In diesem Fall kann die Betriebserlaubnis /Garantie erlöschen.
Falls bei der Wiedergabe Tonverzerrungen wie z. B. unnatürliches Klopfen, Pochen oder hochfrequentes Klicken auftreten,
ist der Lautstärkepegel umgehend zu reduzieren.
Um mögliche Gehörschäden zu vermeiden, hören Sie nicht über einen längeren Zeitraum bei hohen Pegeln. Unterbrechen Sie die
Wiedergabe, falls Sie Klingel- oder Pfeifgeräusche in den Ohren hören oder den Eindruck haben, hohe Töne (auch kurzzeitig)
nicht mehr wahrnehmen zu können.
Neue sowie gebrauchte Batterien sind von Kindern fernzuhalten. Geräte, bei denen das Batteriefach nicht sicher geschlossen werden
kann, dürfen nicht weiter verwendet werden und sind von Kindern fernzuhalten.
Die mit diesem Gerät gelieferte Fernbedienung enthält eine Knopfzelle als Batterie. Ein Verschlucken der Knopfzelle kann in nur 2 Stunden
zu ernsthaften inneren Verbrennungen und damit zum Tod führen!
Bei Verdacht auf verschluckte oder in sonstige Körperöffnungen eingeführte Knopfzellen ist umgehend ein Arzt aufzusuchen.
Achten Sie bei der Batterie-Entsorgung auf Ihre Umwelt. Batterien müssen bei einer Batterie-Sammelstelle entsorgt werden.
Batterien dürfen keinen hohen Temperaturen ausgesetzt werden, wie z. B. direkter Sonneneinstrahlung, Feuer oder Ähnlichem.
Batterien müssen entsprechend dem Polaritätsaufdruck korrekt eingelegt werden. Falsches Einsetzen kann zu Beschädigungen führen.
Verwenden Sie ausschließlich die für das Gerät spezifizierten Batterien oder Akkus.
Bei den mitgelieferten Batterien handelt es sich nicht um Akkus, d. h. diese Batterien dürfen nicht wieder aufgeladen werden.
Das Gerät und/oder der Beipack kann Kleinteile enthalten, die verschluckt werden können. Daher nicht geeignet für Kinder
unter drei Jahren.
Dieses Symbol weist Sie auf nicht isolierte, gefährliche Spannungen im Inneren des Gehäuses hin, die eine ausreichende Stärke
(Amplitude) haben um einen Brand oder elektrischen Schlag zu verursachen.
Dieses Symbol weist Sie auf wichtige Bedienungs- und Instandhaltungsanweisungen in den mitgelieferten Begleitunterlagen
(Anleitung) hin.
Dieses Symbol kennzeichnet Schutzklasse II – Geräte, bei denen der Schutz vor einem elektrischen Schlag während
des bestimmungsgemäßen Betriebs durch eine doppelte oder verstärkte Isolation gewährleistet wird und daher kein
Schutzleiteranschluss erforderlich ist.
6
7
DeutschDeutsch
Auspacken
Packen Sie den Karton vorsichtig aus und überprüfen Sie,
ob alle hier aufgeführten Teile enthalten sind:
• 1x Canton DM Soundbar
• 1x Fernbedienung inkl. Batterie
• 1x Netzkabel
• 1x High-Speed-HDMI
®
-Kabel
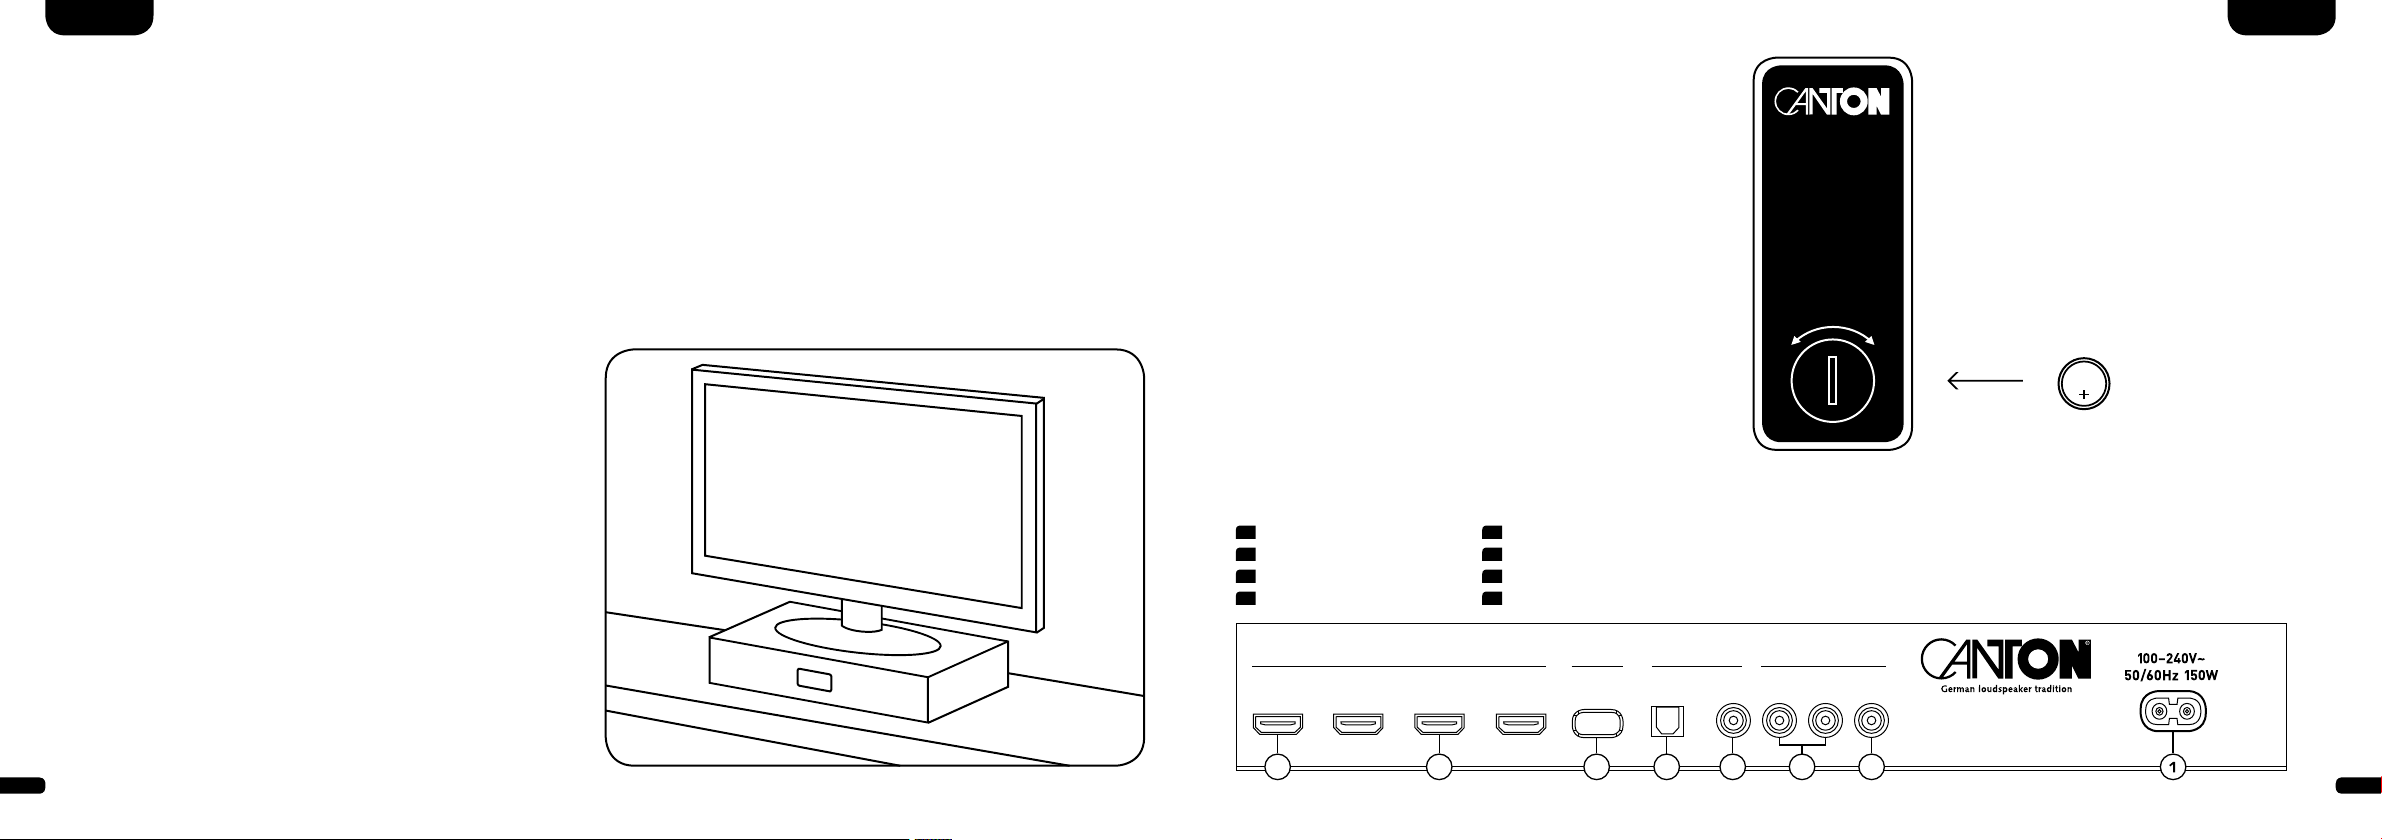
Aufstellen
Das Canton Digital Movie sollte unterhalb des Bildschirms auf einer
ebenen Fläche platziert werden. Belastbarkeit bis 40 kg.
Einspielen
Einspielphase bis zur Entfaltung der maximalen
Klang eigen schaften: 15 – 20 Betriebsstunden.
• Bitte in dieser Zeit in normaler Lautstärke hören
• Extrem hohe Pegel vermeiden
• Unterschiedlichstes Tonmaterial hören
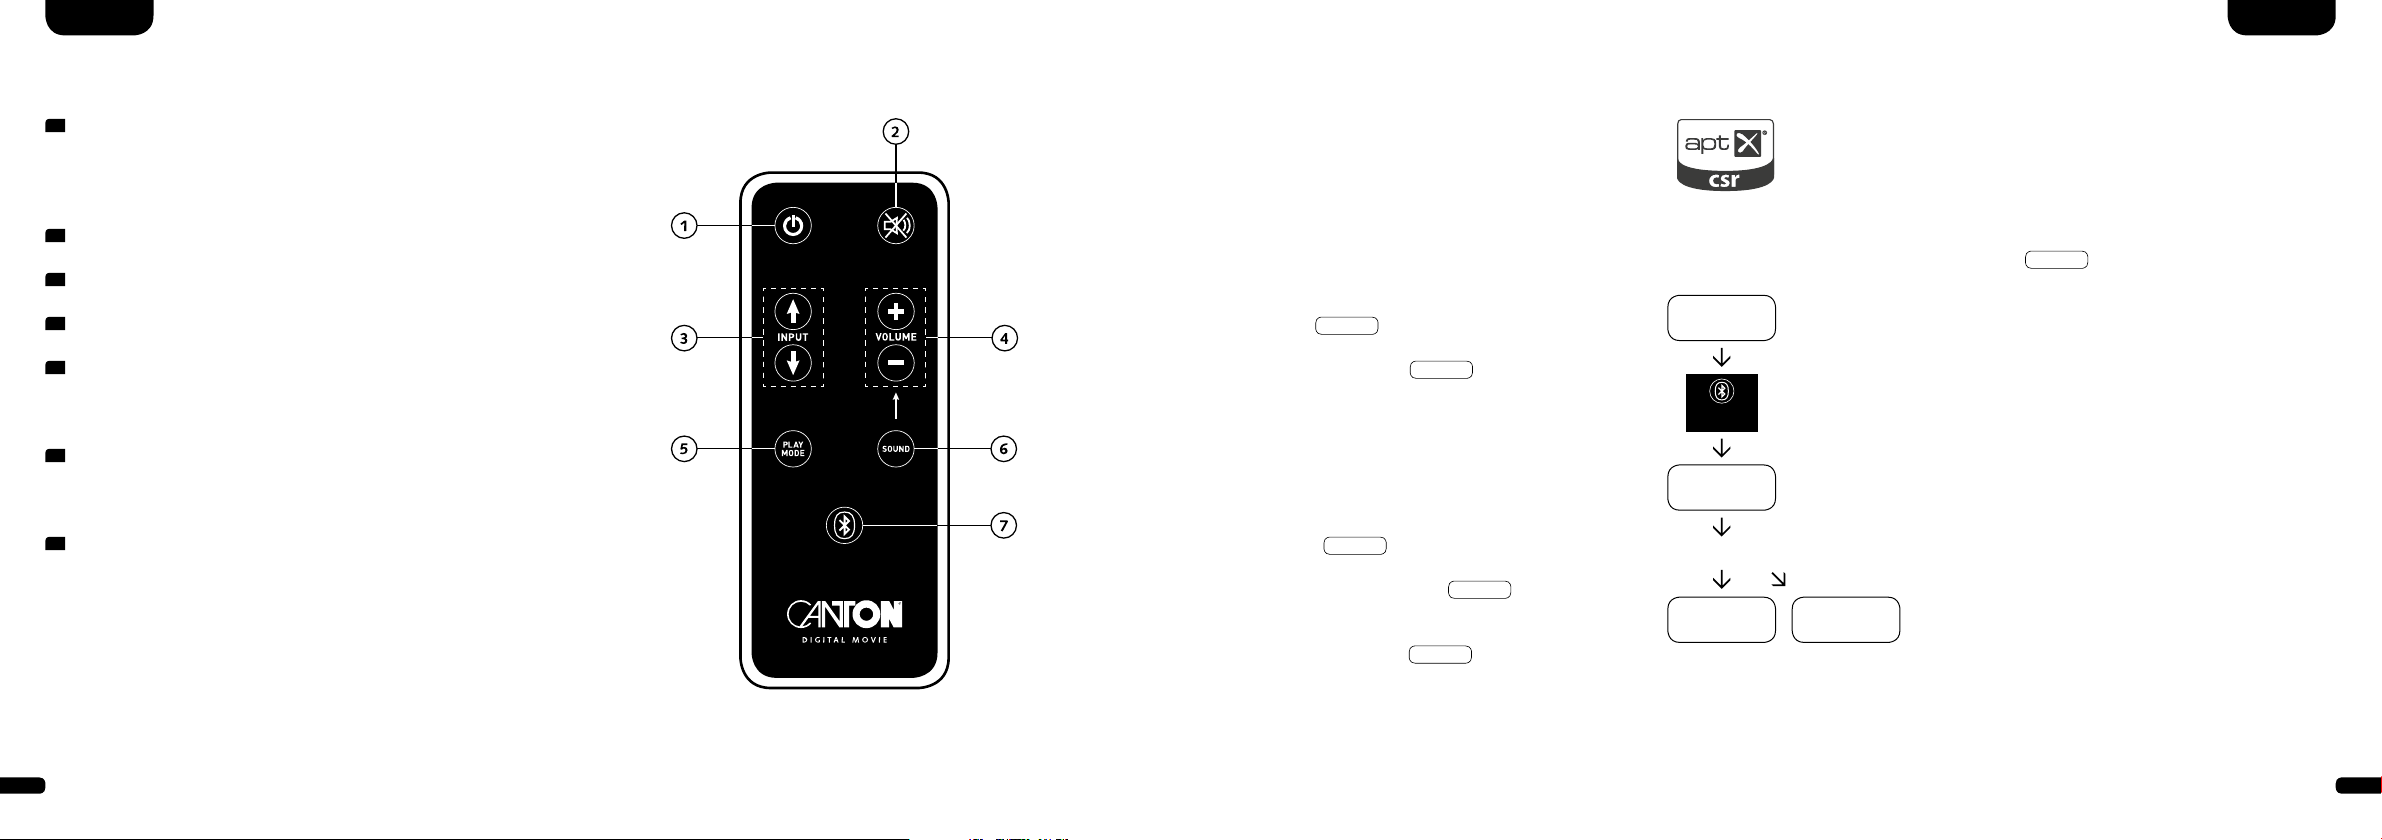
Inbetriebnahme
der Fernbedienung
Die mitgelieferte Batterie ist bereits in die Fernbedienung
eingelegt. Zur Inbetriebnahme enfernen Sie lediglich die
Schutzfolie. Achten Sie bei einer Ersatzbatterie darauf, dass
diese entsprechend den Polaritätsmarkierungen (+/–) korrekt
eingelegt wird. Verwenden Sie ausschließlich die für dieses
System spezifizierte Batterie (CR 2032).
Hinweis
Die mitgelieferte Batterie ist für den Probegebrauch vorgesehen und hat daher eventuell eine geringere Lebensdauer.
Anschluss-Terminal
1
Buchse Stromversorgung
2
Ausgang – Ext. Subwoofer
3
Eingang – AUX (analog)
4
Eingang – COX (koaxial)
OUTPUT
[ARC]
HDMI SERVICE ANALOG
INPU T 1
[HD1]
INPU T 2
[HD2]
5
Eingang – OPT (optisch)
6
Buchse Service (Canton)
7
Eingänge HD1 – HD3 (HDMI®-Eingang)
8
Ausgang – ARC (HDMI®-Ausgang)
DIGITA L [S /PDIF]
INPU T 3
[HD3]
OPTICAL
[OPT ]
IN
COAXIAL
[COX]
DM Soundbar
AUF ZU
Fernbedienung
L INPUT R
[AUX]
SUB
OUT
CR 2032
DIGITAL MOVIE
8
DM 90.3
25678 4 3
9

Anschluss
DeutschDeutsch
Bitte achten Sie darauf, dass vor dem Anschließen alle elektrischen Komponenten ausgeschaltet sind. Ihr Digital Movie System verfügt über 6
frei wählbare Eingänge, sowie einen Ausgang mit Audio Rückkanal (ARC Funktion). Je nach Art und Ausstattung der verwendeten Quelle kann
zwischen folgenden Möglichkeiten gewählt werden:
Bemerkung: Die physikalischen Eingänge besitzen folgende Bezeichnungen (diese können Sie jederzeit, wie auf Seite 23 beschrieben, anpassen):
ARC = TV; HD1 = BDP; HD2 = SAT; HD3 = PS; COX = DVD; OPT = C D; AUX = VCR; BT = B luetooth
®
.
HDMI® High-Definition Multimedia Interface – Eingänge (HD1, HD2, HD3)
Moderne Zuspielgeräte wie Blu-Ray-Player, Sat Receiver oder Spielkonsolen verfügen über einen HDMI
®
-Ausgang. Für eine bestmögliche
Tonqualität verbinden Sie Ihre Quellgeräte mit einem dieser Eingänge.
®
HDMI
High-Definition Multimedia Interface – Ausgang mit Audio Return Channel ARC (Ausgang mit Audio Rückkanal)
Verbinden Sie Ihr Fernsehgerät mit diesem Ausgang. Sollte Ihr Fernsehgerät die Audio Rückkanal Funktion (ARC) unterstützen, verbinden
Sie diesen Ausgang des DM Systems mit dem mit „ARC“ gekennzeichneten HDMI
®
-Eingang Ihres Fernsehgerätes. Dies ermöglicht die
Wiedergabe des Fernsehtones über das DM System bei Nutzung eines im Fernsehgerät integrierten Empfangsteils.
Hinweis: Die ARC Funktion ist beim DM System jederzeit nutzbar und muss nicht aktiviert oder deaktiviert werden. Damit Ihr Fernsehgerät
die ARC Funktion unterstützen kann, muss es min. über einen HDMI
®
-Eingang mit Audio Return Channel ARC verfügen. Weiterhin muss die
CEC Funktion zwingend aktiviert sein. Für weitere Informationen schauen Sie bitte in der Anleitung Ihres TV-Gerätes nach.
Optischer Digitaleingang (OPT)
Verfügt Ihr Zuspielgerät nicht über einen HDMI
®
-Ausgang, verbinden Sie dieses nach Möglichkeit mit dem durch „OPT“ gekennzeichneten
Eingang des DM Systems. Zur Übertragung des Bildsignals muss Ihr Zuspielgerät zusätzlich mit dem TV-Gerät verbunden werden.
Koaxialer Digitaleingang (COX)
Verfügt Ihr Zuspielgerät weder über einen HDMI
®
-Ausgang noch einen optischen Digitalausgang, verbinden Sie dieses mit dem durch
„COX“ gekennzeichneten Eingang des DM Systems. Zur Übertragung des Bildsignals muss Ihr Zuspielgerät zusätzlich mit dem TV-Gerät
verbunden werden. Dieser Eingang kann alternativ zum optischen Eingang genutzt werden.
Analogeingang (AUX)
Sollte Ihr TV-Gerät nur mit einem als „Pre Out“ bezeichneten analogen Audio-Ausgang ausgestattet sein, dann verbinden Sie diesen
mittels abgeschirmtem Stereo-Cinch Kabel mit dem mit „AUX“ gekennzeichneten analogen Eingang des DM Systems. Ansonsten dient
dieser Eingang zur Verbindung mit Videorecordern oder Spielkonsolen.
Subwoofer-Ausgang (SUB OUT)
Diesen Ausgang verwenden Sie, wenn ein externer aktiver Subwoofer angeschlossen werden soll. SUB OUT ist in der Grundeinstellung
nicht aktiv und muss über die Fernbedienung freigeschaltet werden. Siehe Seite 16 Erweiterte Sound-Funktionen.
10
11
DeutschDeutsch
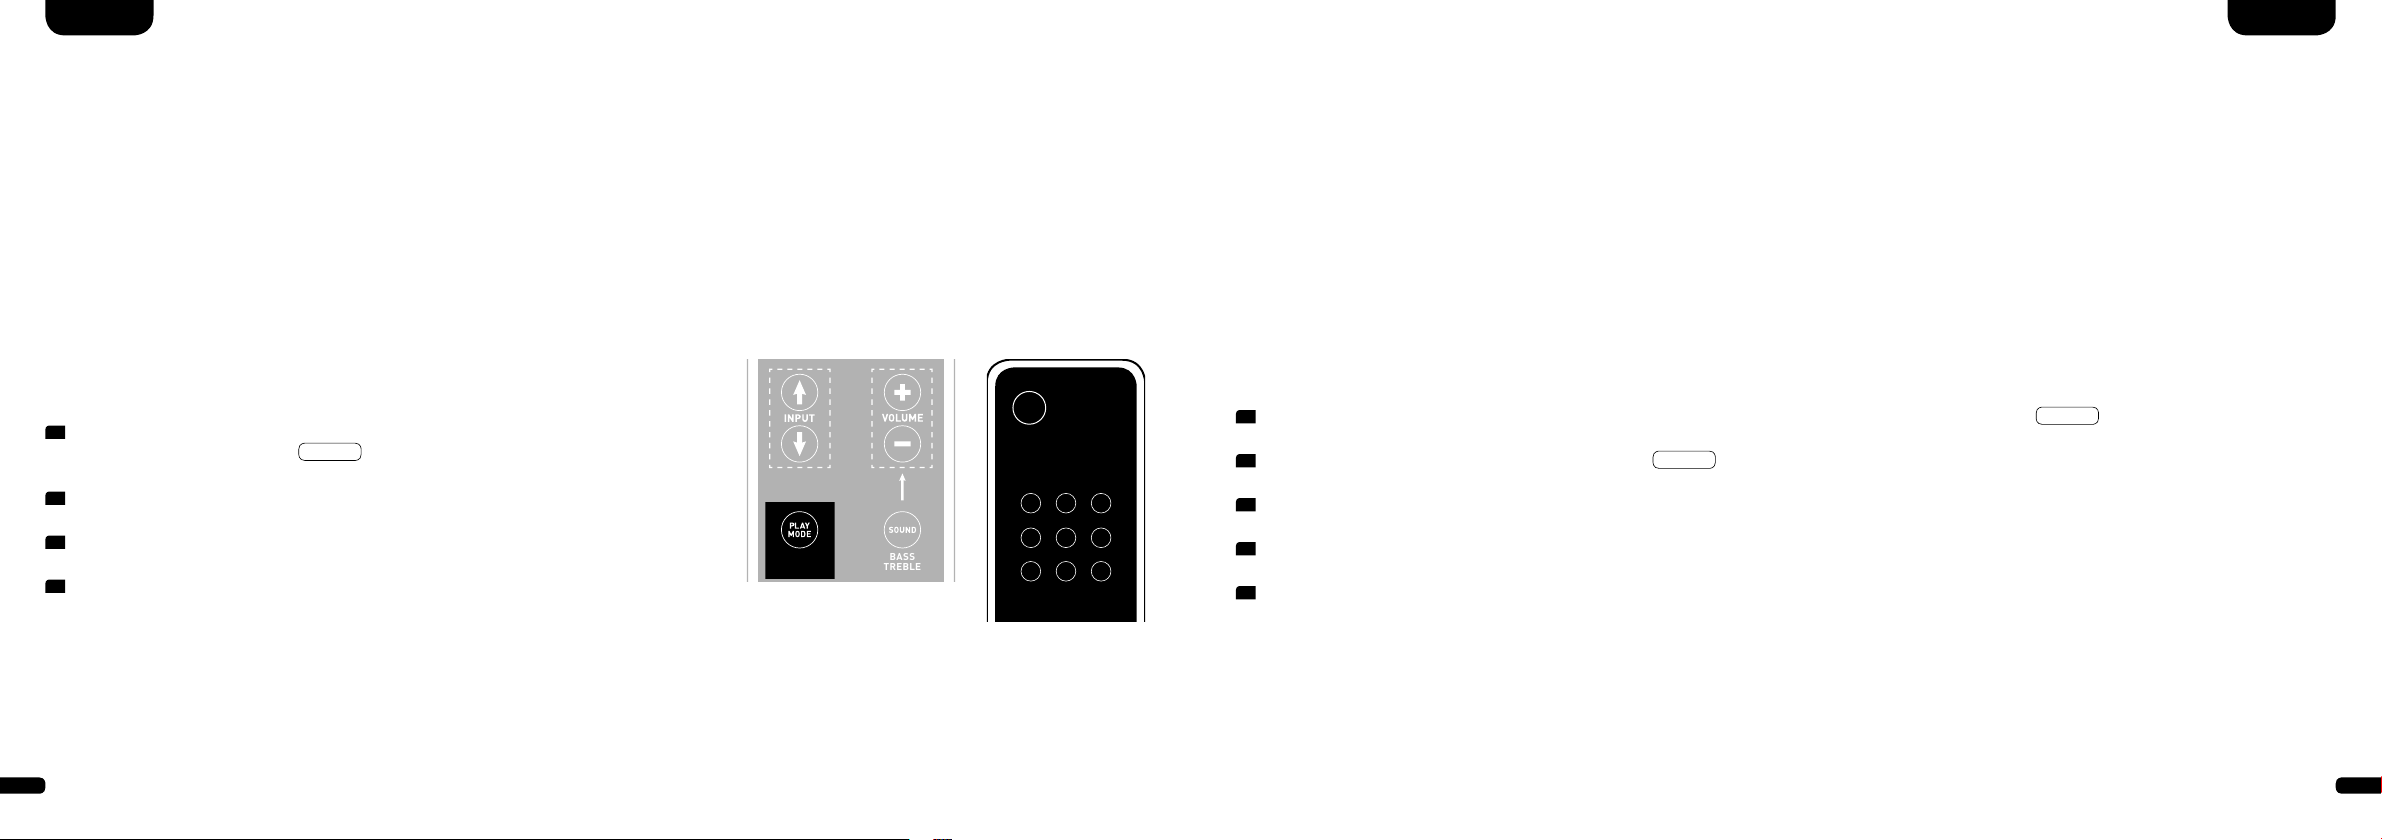
Bedienung
1
Power
ON – LED leuchtet grün (Ein)
Standby – LED leuchtet rot (Bereitschaft)
DM vom Stromnetz getrennt – LED leuchtet nicht (Aus)
2
Mute (Stummschaltung)
3
Input (Tonquellenauswahl)
4
Volume (Lautstärkeeinstellung)
5
Play Mode (Wiedergabemodus)
Stereo – für Musikwiedergabe
Surround – virtueller Raumklang für Heimkino-Wiedergabe
6
Sound (Klangeinstellung)
Bass – Anpassung über Volume (+6... –6 dB)
Treble – Anpassung über Volume (+6... –6 dB)
7
Bluetooth®-Pairing
Verbindung mit einer Bluetooth
Memory-Funktion
Nach einer vorübergehenden Trennung vom Stromnetz schaltet sich
das DM System automatisch in den zuletzt gewählten Zustand. Alle
Einstellungen (z. B. An/Aus, Lautstärke) bleiben bestehen.
®
-Funktechnologie-fähigen Quelle
ON
STANDBY
STEREO
SURROUND
BLUETOOTH
PAIR ING
Fernbedienung
MUTE
BASS
TREBLE
Wiedergabe via Bluetooth® Technologie
Voraussetzung für die Anmeldung
- Die Bluetooth
Endgerät aktiviert sein
- Das mobile Endgerät muss mindestens den
Bluetooth
- Das mobile Endgerät muss sich in Reichweite
des DM Systems befinden (max. 10 m)
Anmeldevorgang
- Eingang
- Taste „Bluetooth
- Im Display erscheint
- Sie haben nun 30 Sekunden Zeit
zur Anmeldung Ihres mobilen Endgerätes
- Starten Sie den Suchlauf an Ihrem
mobilen Endgerät
- Wählen Sie „DM 90.3“ als Wieder gabegerät
- Die Verbindung stellt sich, nach Bestätigung,
automatisch her und wird Ihnen mit der
Meldung
- Sollte die Verbindung fehlgeschlagen sein,
erhalten Sie die Meldung
- Sollte das mobile Endgerät einen Zugangscode
verlangen, geben sie 0000 ein
- Erscheint im Display
Endgerät außer Reichweite oder abgemeldet
®
Funktion muss am mobilen
®
Standard 2.0 unterstützen
BT
wählen
®
Pairing“ betätigen
BTP
Con
im Display angezeigt
FAI
DIS
ist Ihr mobiles
BT
BLUETOOTH
PAIR ING
BTP
- Canton DM 90.3 -
Con Fai
Betrieb eines mobilen Endgerätes
- Das jeweils zuletzt mit dem DM System verbundene Gerät stellt automatisch die Verbindung
her, sofern die Bluetooth
und der Eingang für die Bluetooth
®
Funktion aktiviert
®
-Wiedergabe
gewählt ist. Sie erhalten in diesem Fall die
Meldung
Con
.
- Starten Sie die Wiedergabe eines Titels auf Ihrem
mobilen Endgerät, und der Ton wird automatisch
über das DM System ausgegeben.
Hinweis: Das DM System kann bis zu drei
Bluetooth
®
Geräte verwalten.
Siehe auch Kapitel ,,Automatische Wahl des BT
Eingangs“ auf Seite 21.
12
13
Displayanzeigen
DeutschDeutsch
Erweiterte Sound-Funktionen
Das DM System verfügt über ein Multifunktions-Display, das bei einem von der Fernbedienung gesendeten Befehl für
ca. fünf Sekunden aufleuchtet. Die wichtigsten Anzeigen und ihre Bedeutung sind hier aufgeführt. Der Standby-Zustand des
DM Systems wird durch eine rot leuchtende LED angezeigt. Ist Ihr DM System in Betrieb, leuchtet diese LED grün.
Input (Tonquellenauswahl, beispielhaft)
TV
HDMI®-Ausgang (ARC)
Sound
V30
Volumen (0 – 9 9)
Playmode
ST
Stereo
Bluetooth
®
BDP
HDMI®-Eingang 1 (HD1)
---
Stumm (Mute)
SUR
Surround
VCR
Analoger Eingang (AUX)
B 6
Bassregelung (+/–6)
BT
Bluetooth
®
T 6
Höhenregelung (+/– 6)
Lip
Verzögerung Ton-
wiedergabe (LipSync)
Setup-Funktionen
AUT
Akt./Deakt. Einschalt-
automatik für optischen
und coaxialen Eingang
Eingangskonfiguration
INP
Vergabe Eingangs-
bezeichnung
Format des Eingangssignals (Datenstrom)
SUB
Akt./Deakt.
SUB OUT
CEC
Akt./Deakt.
CEC Steuerfunktion
IR-Lernfunktion
IRL
Erlernen
Infrarot-Codes
EQ
Auswahl
Aufstellungsweise
ECO
Akt./Deakt.
ECO Standby
DRC
Akt./Deakt. Dolby Dynamic
Range Compression
SEL
Akt./Deakt. automatische
Auswahl BT Eingang
RES
Wiederherstellen
Werkseinstellungen
BTP
14
Pairing Mode
CON
Verbindung hergestellt
DIS
Verbindung unterbrochen
FAI
Fehlermeldung
DTS
DTS Signal
DD5
Dolby Digital 5.1
Mehrkanalsignal
DD2
Dolby Digital 2.0
Stereosignal
PCM
Digitales Stereosignal
(PCM)
15
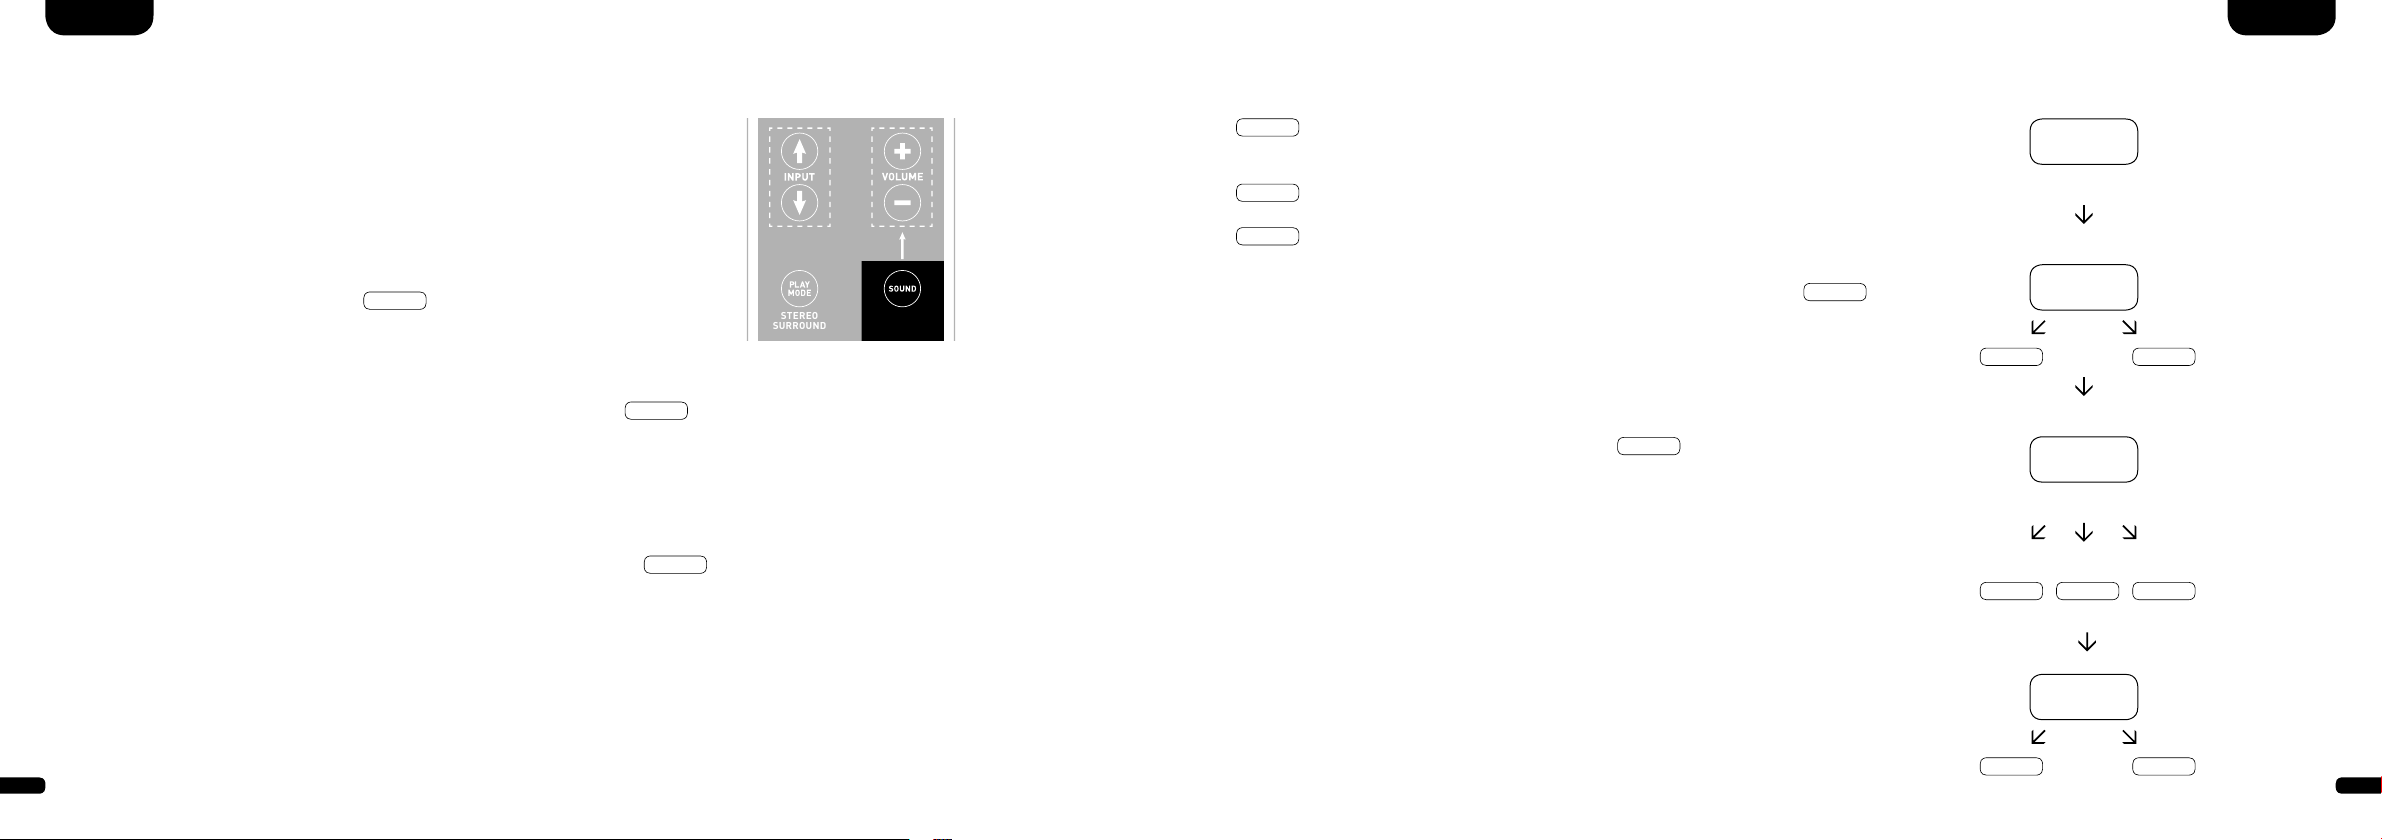
Erweiterte Sound-Funktionen
STEREO
SURROUND
BASS
TREBLE
ON
STANDBY
MUTE
MUTE
DeutschDeutsch
Das Menü für erweiterte Sound-Funktionen bietet Ihnen die Möglichkeit, bei nicht
lippen synchroner Tonwiedergabe korrigierend einzu greifen, den Ausgang für einen
kabelgebundenen externen Subwoofer zu aktivieren, die Tonwiedergabe an den
gewählten Aufstellungsort anzupassen, sowie die Dolby-Funktion „Dynamic Range
Compression“ ein- bzw. auszuschalten.
Halten Sie die mit „Sound“ gekennzeichnete Taste auf der Fernbedienung für länger
als 3 Sekunden gedrückt, gelangen Sie in das Menü „Erweiterte Sound-Funktionen“
und das Display im Soundbar springt auf
LIP
.
Mit den „Volume +/–“ Tasten kann jetzt die Tonwiedergabe in Schritten von jeweils
10 ms verzögert werden, um den Ton an das ,,verspätete“ Bild anzupassen.
Nach erneutem kurzen Drücken der „Sound“ Taste springt das Display auf
sub
Mit den „Volume +/–“ Tasten kann der Ausgang für einen externen Subwoofer einbzw. ausgeschaltet werden. Achtung, bei aktiviertem SUB OUT wird die Tonwiedergabe
der Soundbar bei 80 Hz begrenzt. Frequenzen unterhalb von 80 Hz werden an den
externen Subwoofer geleitet.
Drücken Sie ein weiteres Mal kurz die „Sound“ Taste, springt das Display auf
Mit den „Volume +/–“ Tasten kann jetzt zwischen drei voreingestellten Equalizer-
eq
Presets gewählt und die Wiedergabe an den Aufstellungsort angepasst werden.
EQ1
BASS
TREBLE
für ein frei aufgestelltes DM System z. B. auf einem Sideboard mit Flat-TV
an der Wand (Werkseinstellung).
EQ2
für eine Aufstellung mit Flat-TV auf dem DM System stehend.
EQ3
für eine Aufstellung des DM Systems in einem Rack oder Regal.
Nach einem weiteren Drücken der „Sound“ Taste springt das Display auf
DRC
„Dynamic Range Compression“ ist eine Einstelloption von Dolby Laboratories. Bei
aktivierter Funktion kann bei Dolby-codierten Datenströmen der Dynamikbereich
.
on off
Lip
sub
automatisch verringert werden, was Lautstärkeunterschiede reduziert. Leise Töne
.
werden dabei angehoben und laute abgesenkt.
Mit den „Volume +/–“ Tasten kann die Funktion
werden.
DRC
ein- bzw. ausgeschaltet
EQ
Menü verlassen
Durch erneutes Drücken der „Sound“ Taste für länger als 3 Sekunden können Sie das
.
Menü „Erweiterte Sound-Funktionen“ wieder verlassen.
EQ1 EQ2 EQ3
Erhält die Soundbar für länger als 30 Sekunden keinen Eingabebefehl von der Fernbedienung springt die Menüführung automatisch in den Normalmodus zurück.
DRC
16
on off
17
STEREO
SURROUND
BASS
TREBLE
ON
STANDBY
MUTE
BASS
TREBLE
ON
STANDBY
MUTE
Setup-Funktionen Gerätesteuerung (CEC)
DeutschDeutsch
Ein- bzw. Abschaltautomatik (AUT)
Ist diese Funktion aktiviert (ON), erkennt das Gerät ein am optischen oder coaxialen Eingang anliegendes Signal. Wird ein Signal detektiert (z. B. Einschalten des Quellgerätes), schaltet das DM System selbsttätig ein. Befindet sich kein Signal am gewählten Eingang (z. B. nach
Abschalten des Quellgerätes), wird das DM System nach 30 Sekunden automatisch in den AUT Standby-Zustand versetzt. Ist diese Funktion
deaktiviert (OFF), muss das DM System manuell ein- bzw. abgeschaltet werden.
Im Auslieferzustand ist diese Funktion deaktiviert (OFF).
Zur Aktivierung/Deaktivierung dieser Funktion gehen Sie wie folgt vor:
1
Halten Sie bei eingeschaltetem Gerät die „Play Mode“ Taste für mehr
als 3 Sekunden gedrückt, bis
2
Durch Drücken der „Volume +“ Taste aktivieren Sie die Funktion (ON).
3
Durch Drücken der „Volume –“ Taste deaktivieren Sie die Funktion (OFF).
4
Verlassen Sie das Menü, indem Sie abermals die „Play Mode“ Taste für mehr
als 3 Sekunden gedrückt halten. Erfolgt innerhalb von 10 Sekunden keine
Eingabe, verlässt das Gerät das Konfigurationsmenü automatisch.
Bemerkung: Die Ein-/Abschaltautomatik funktioniert ausschließlich beim optischen und coaxialen Digitaleingang. Wird das Gerät über die
„ON/Standby“ Taste der Fernbedienung in den Standby-Zustand versetzt, ist ein automatisches Einschalten nicht möglich.
Das Gerät erkennt ein Signal ausschließlich an dem gewählten Digitaleingang. Ein Signal, welches sich an einem anderen als dem gewählten
Digitaleingang befindet, kann nicht detektiert werden.
18
AUT
im Display erscheint.
STEREO
SURROUND
TV-Fernbedienung
Bei CEC (Consumer Electronics Control) handelt es sich um ein markenübergreifendes, standardisiertes Protokoll zur Steuerung der an
den HDMI
®
-Eingängen/-Ausgängen angeschlossenen Endgeräte. Im Auslieferzustand ist diese Funktion deaktiviert (OFF).
Die vom DM System unterstützten CEC Funktionen sind:
- One touch Play: Durch Drücken der „Play“ Taste des Blu-Ray-Players schaltet sich das DM System automatisch ein und wechselt auf
den entsprechenden HDMI
®
-Eingang.
- System Standby: Schalten Sie bei eingeschaltetem TV diesen durch Drücken der „Power“ Taste in den Standby-Zustand, wird auch das
DM System automatisch in den Standby-Zustand geschaltet.
Hinweis: Je nach Programmierung des TV-Gerätes kann das DM System mit dem TV auch wieder automatisch aktiviert werden.
- Lautstärke/Mute: Bedienung der Lautstärke des DM Systems über die Mute- und Lautstärketasten der Fernbedienung des Fernsehgerätes.
Zur Aktivierung/Deaktivierung dieser Funktion gehen Sie wie folgt vor:
1
Halten Sie bei eingeschaltetem Gerät die „Play Mode“ Taste für mehr als 3 Sekunden gedrückt, bis
2
Drücken Sie erneut kurz die „Play Mode“ Taste, bis
3
Durch Drücken der „Volume +“ Taste aktivieren Sie die Funktion (ON).
4
Durch Drücken der „Volume –“ Taste deaktivieren Sie die Funktion (OFF).
5
Verlassen Sie das Menü, indem Sie abermals die „Play Mode“ Taste für mehr als 3 Sekunden gedrückt halten. Erfolgt innerhalb von
CEC
im Display erscheint.
AUT
im Display erscheint.
10 Sekunden keine Eingabe, verlässt das Gerät das Konfigurationsmenü automatisch.
Bemerkung: Eine Vielzahl der Gerätehersteller entwickeln basierend auf dem CEC Standard eigene Protokolle zur Steuerung ihrer Geräte.
Dies kann dazu führen, dass die o.g. Funktionen nur teilweise oder überhaupt nicht funktionieren.
Achtung: Um Konflikte bei der Ansteuerung des DM Systems zu vermeiden, dürfen bei Verwendung der CEC Funktion die Tasten
„Volume +/–“, „Mute“ sowie „Power“ der TV-Fernbedienung nicht über die IR-Lernfunktion auf dem DM System angelernt worden sein.
Bitte löschen Sie ggf. die Codes auf dem DM System (siehe Seite 25).
19

DeutschDeutsch
Eco Standby (ECO)
Ist diese Funktion aktiviert (ON), wird das Gerät automatisch in den ECO Standby-Zustand versetzt, wenn es für eine Stunde kein Signal
am gewählten Eingang detektiert. Ist diese Funktion deaktiviert (OFF), muss das DM System manuell abgeschaltet werden.
Im Auslieferzustand ist diese Funktion aktiviert (ON).
Zur Aktivierung/Deaktivierung dieser Funktion gehen Sie wie folgt vor:
1
Halten Sie bei eingeschaltetem Gerät die „Play Mode“ Taste für mehr
als 3 Sekunden gedrückt, bis
2
Drücken Sie erneut kurz die „Play Mode“ Taste, bis
erscheint.
3
Durch Drücken der „Volume +“ Taste aktivieren Sie die Funktion (ON).
4
Durch Drücken der „Volume –“ Taste deaktivieren Sie die Funktion (OFF).
5
Verlassen Sie das Menü, indem Sie abermals die „Play Mode“ Taste für mehr
als 3 Sekunden gedrückt halten. Erfolgt innerhalb von 10 Sekunden keine
Eingabe, verlässt das Gerät das Konfigurationsmenü automatisch.
Bemerkung: Diese Funktion wird automatisch deaktiviert, wenn die Funktion AUT oder CEC aktiviert wird.
AUT
im Display erscheint.
ECO
im Display
Automatische Wahl des BT Eingangs (SEL)
Ist diese Funktion aktiviert (AUT), wechselt das DM System automatisch auf den Eingang BT, sobald es vom Mobilgerät ein Audiosignal
detektiert. Ist diese Funktion deaktiviert (MAN), muss der Eingang manuell gewählt werden.
Im Auslieferzustand ist diese Funktion deaktiviert (MAN).
Zur Aktivierung/Deaktivierung dieser Funktion gehen Sie wie folgt vor:
1
Halten Sie bei eingeschaltetem Gerät die „Play Mode“ Taste für mehr
als 3 Sekunden gedrückt, bis
2
Drücken Sie erneut kurz die „Play Mode“ Taste, bis
erscheint.
3
Durch Drücken der „Volume +“ Taste aktivieren Sie die Funktion (AUT).
4
Durch Drücken der „Volume –“ Taste deaktivieren Sie die Funktion (MAN).
5
Verlassen Sie das Menü, indem Sie abermals die „Play Mode“ Taste für mehr
als 3 Sekunden gedrückt halten. Erfolgt innerhalb von 10 Sekunden keine
Eingabe, verlässt das Gerät das Konfigurationsmenü automatisch.
Bemerkung: Abhängig vom verwendeten Mobilgerät kann bei aktivierter Automatik das DM System auch beim Tippen einer Nachricht oder
bei anderen Systemtönen auf den BT Eingang schalten.
Wenn die SEL Funktion aktiviert (AUT) ist, kann der BT Eingang nicht mehr über die „Input“ Taste gewählt werden. In diesem Modus kann
das DM System, unabhängig vom gewählten Signaleingang, mit dem Mobilgerät gekoppelt werden.
AUT
im Display erscheint.
SEL
im Display
20
21

DeutschDeutsch
ON
STANDBY
MUTE
ON
STANDBY
MUTE
Werkseinstellungen wiederherstellen/Reset (RES)
Mit dieser Funktion (RES) können Sie das DM System in den Auslieferzustand (Werkseinstellungen) zurücksetzen.
Zur Durchführung des Reset gehen Sie wie folgt vor:
Achtung: ALLE von Ihnen vorgenommen Einstellungen und gelernten IR Codes werden dabei gelöscht.
1
Halten Sie bei eingeschaltetem Gerät die „Play Mode“ Taste für mehr als 3 Sekunden gedrückt, bis
2
Drücken Sie erneut kurz die „Play Mode“ Taste, bis
3
Nach dem Drücken der „Volume +“ Taste erscheint im Display die Bestätigungsanzeige
RES
im Display erscheint.
YES
warten Sie nun 10 Sekunden. Danach werden alle Einstellungen zurückgesetzt und das DM System springt in den Standby-Zustand.
4
Möchten Sie den Vorgang abbrechen, drücken Sie die „Volume –“ Taste innerhalb von 10 Sekunden, nachdem Sie die „Volume +“ Taste
gedrückt haben. Im Display erscheint die Abbruchanzeige
NO
. 10 Sekunden nach Drücken der „Volume –“ Taste springt das DM
System ohne Löschen der Einstellungen in den vorherigen Betriebszustand zurück.
5
Um das Menü ohne Aktion zu verlassen, halten Sie abermals die „Play Mode“ Taste für mehr als 3 Sekunden gedrückt. Erfolgt innerhalb
von 10 Sekunden keine Eingabe, verlässt das Gerät das Reset-Menü automatisch.
AUT
im Display erscheint.
. Um den Löschvorgang abzuschließen,
Konfiguration der Eingänge (INP)
Im Auslieferzustand sind bereits alle physikalisch vorhandenen Eingänge mit einer Quellenbezeichnungen versehen. Diese sind wie folgt:
ARC = TV; HD1 = BDP; HD2 = SAT; HD3 = PS; COX = DVD; OPT = C D; AUX = VCR; BT = B luetooth
können Sie auf Wunsch Ihrem Quellgerät anpassen.
Zur Zuordnung der Bezeichnung gehen Sie wie folgt vor:
1
Halten Sie bei eingeschaltetem Gerät eine der beiden „Input“ Tasten für
mehr als 3 Sekunden gedrückt, bis
2
Wählen Sie nun durch kurzes Drücken einer der beiden „Input“ Tasten den
INP
im Display erscheint.
gewünschten physikalischen Eingang aus (ARC, HD1, HD2, etc.).
3
Wählen Sie nun durch kurzes Drücken auf eine der „Volume“ Tasten die
gewünschte Bezeichnung aus. Sie können aus folgenden vordefinierten
Bezeichnungen wählen: „---“ (Eingang deaktiviert), TV, BDB, SAT, CD, DVD,
CAM, REC, PAD, POD, TAB, TUN, DAB, PS, VCR.
4
Um einem weiteren Eingang eine Bezeichnung zu geben, wiederholen Sie die
Schritte 2. und 3.
5
Verlassen Sie das Menü, indem Sie abermals eine der beiden „Input“ Tasten
für mehr als 3 Sekunden gedrückt halten. Erfolgt innerhalb von 10 Sekunden
keine Eingabe, verlässt das Gerät das Konfigurationsmenü automatisch.
Hinweis: Eingänge, die deaktiviert worden sind „---“, werden bei Durchschalten
der Eingänge (Input-Taste) nicht mehr angezeigt. Dies vereinfacht die Auswahl
des gewünschten Eingangs.
Bemerkung: Die Bezeichnung für den Eingang BT kann nicht geändert werden. Falls Sie alle Eingänge deaktiviert haben
sollten, ist BT (Bluetooth
®
) fest als Eingang ausgewählt.
®
. Den einem Eingang zugewiesenen Namen
TV-Fernbedienung
22
23

IR-Lernfunktion
ON
STANDBY
MUTE
MUTE
DeutschDeutsch
Das DM System kann den Infrarotcode Ihrer TV-Fernbedienung lernen und ermöglicht es so die Funktionen von Soundbar und TV-Gerät mit
einer Fernbedienung zu steuern. Dabei kann jede beliebige Taste der TV-Fernbedienung mit den Befehlen für die Soundbar belegt werden.
Achten Sie bei der Tastenwahl darauf, dass Befehl für Soundbar und TV-Gerät dabei nicht im Konflikt stehen. So empfiehlt es sich die internen Lautsprecher des TV-Gerätes nach Anschluss der Soundbar zu deaktivieren.
1
Halten Sie die Fernbedienung Ihres TV-Gerätes bereit.
2
Schalten Sie die Soundbar ein.
ON
3
Drücken Sie die „ON/Standby“ Taste der Soundbar-
STANDBY
Fernbedienung für ca. 5 Sekunden.
4
Im Display blinkt
5
Drücken Sie auf der Canton-Fernbedienung
IRL
.
die gewünschte Funktion, z. B. „Volume +“.
6
Im Display blinkt jetzt die gewählte Funktion, z. B.
7
Drücken Sie innerhalb 20 Sekunden die zu belegende
Taste auf der TV-Fernbedienung.
v
.
TV-Fernbedienung
Menü verlassen
Durch erneutes Drücken der „ON/Standby“ Taste
8
Bei erfolgreicher Übertragung leuchtet im Display
OK
und
Sie können mit der Programmierung der nächsten Tastenfunktion
für länger als 5 Sekunden können Sie das Menü
„IR-Lernfunktion“ wieder verlassen.
z. B. „Volume –“ fortfahren.
9
Erscheint im Display
FAI
ist die Übertragung fehlgeschlagen
und Sie müssen die Schritte 5 bis 8 noch einmal wiederholen.
Erhält die Soundbar für länger als 60 Sekunden
keinen Eingabebefehl von der Fernbedienung
springt die Menüführung automatisch in den
Normalmodus zurück.
24
Hinweis: Die rote „ON/Standby“ Taste der DM-Fernbedienung ist doppelt belegt. Durch einmaliges Drücken, im Display
erscheint dann
Fernbedienung zweimal kurz hintereinander, erscheint im Display
ON
, kann die Einschaltfunktion gelernt werden. Drückt man die rote „ON/Standby“ Taste der DM-
STB
und die Standby- bzw. Ausschaltfunktion kann
gelernt werden. Sollte Ihre TV-Fernbedienung nur über eine Taste für den Befehl „Ein-“ und „Ausschalten“ verfügen,
müssen beide Funktionen, „ON“ und „Standby“, mit diesem Befehl belegt werden.
Hinweis: Aufgrund der Vielzahl von Infrarot-Codes kann nicht garantiert werden, dass jede Fernbedienung vom
DM System gelernt werden kann.
IR-Löschfunktion
Um die vom DM System gelernten Funkbefehle der TV-Fernbedienung wieder zu löschen, gehen Sie bitte wie folgt vor:
1
Schalten Sie die Soundbar ein.
2
Drücken Sie die „ON/Standby“ Taste der Soundbar-
Fernbedienung für ca. 5 Sekunden.
3
Im Display blinkt
4
Drücken Sie die „Mute“ Taste der Soundbar-
Fernbedienung für ca. 5 Sekunden.
5
Im Display erscheint
wechselt danach automatisch in den Normalbetrieb.
IRL
.
CLR
für ca. 5 Sekunden. Die Soundbar
25

Fehlersuche
DeutschDeutsch
Anbei finden Sie eine Übersicht der am häufigsten auftretenden Probleme. Sollten Sie weiterführende Fragen haben, wenden Sie sich
bitte an Ihren Canton Fachhändler, kontaktieren Sie unsere Service-Hotline unter Tel. +49 (0) 60 83 28 70 oder senden Sie uns eine
E-Mail an info@canton.de.
Problem Mögliche Ursache Lösung
DM System schaltet
nicht ein.
DM System reagiert
nicht auf Fernbedienung.
Keine Ton wiedergabe
oder zu leise.
Netzkabel nicht mit Steckdose und /oder
Verbindung herstellen.
DM System verbunden.
1. Die Batterie ist leer. 1. Batterie auswechseln, beim Einlegen auf die richtige
Polung achten.
2. Schutzfolie nicht entfernt. 2. Schutzfolie an der Fernbedienung entfernen.
1. Zuspieler gibt kein Signal aus. (Ausgang am
Quellgerät ist nicht freigeschaltet oder Laut-
1. Ausgang freischalten und/oder Lautstärke erhöhen (bitte
Anleitung des Gerätes zur Hand nehmen).
stärke ist zu niedrig eingestellt).
2. Kabel nicht korrekt verbunden / defektes
Kabel.
2.1. Überprüfen Sie die Verbindung des Zuspielers zum DM
System und wechseln Sie gegebenenfalls das Kabel aus.
2.2. Überprüfen Sie, ob die Schutzkappen am Stecker des
optischen Kabels entfernt sind.
Kein Fernsehton über
®
den HDMI
-Ausgang
(ARC) hörbar.
1. Ihr Fernsehgerät unterstützt die ARC Funktion
nicht.
2. Sie nutzen den falschen HDMI
®
-Eingang an
Ihrem Fernsehgerät.
1. Unterstützt Ihr Fernsehgerät nicht die Funktion HDMI
mit Audio Return Channel (ARC), so nutzen Sie einen der
Digitaleingänge (OPT oder COX) des DM Systems.
2. Nutzen Sie ausschließlich den mit ARC gekennzeichneten
®
HDMI
-Eingang Ihres Fernsehgerätes.
Problem Mögliche Ursache Lösung
DM System brummt. 1. Signalleitungen vom Quellgerät zum
1. Kürzere Signalleitungen verwenden.
DM System zu lang (AUX).
2. Verwendete Signalleitung nicht abgeschirmt
2. Leitung gegen eine geschirmte Leitung austauschen.
oder die Abschirmung an der verwendeten
Leitung unterbrochen (defekt).
3. Erdungsschleife (Brummschleife) „erzeugt“. 3. Eine Erdungsschleife kann entstehen, wenn mind. zwei mit
Signalleitungen (Cinch) verbundene Geräte mit Schutzkontaktstecker (z. B. Verstärker und Computer) an örtlich
getrennten Steckdosen angeschlossen sind. Alle mit dem
DM System verbundenen Geräte mit Schutzkontaktstecker
an einer Steckdosenleiste (Vielfachsteckdose) anschließen.
4. Ein nicht entstörter Verbraucher (z. B. Kühlschrank) am Netz.
4. Mögliche Störquellen zum Testen ausschalten; betreffendes Gerät entstören lassen, falls das Brummgeräusch
verschwindet, oder zunächst die Störquelle an einer
anderen Netzphase (L1, L2 oder L3) anschließen (falls
erforderlich, einen Fachmann zu Rate ziehen); speziellen
„Mantelstromfilter“ (im Fachhandel erhältlich) zwischen
Quellgerät und DM System schalten, um das Brummen
®
zu eliminieren; Netzstecker drehen, um die so genannte
Brummspannung zu reduzieren (besonders wichtig, wenn
das Quellgerät nicht geerdet ist).
26
27

Deutsch
Deutsch
Problem Mögliche Ursache Lösung
Keine Wiedergabe
mittels Bluetooth
Funktechnologie.
®
1. Es besteht keine Verbindung zwischen dem
DM System und dem mobilen Endgerät.
2. Das mobile Endgerät ist gekoppelt, aber es
erfolgt keine Wiedergabe.
3. Sie befinden Sich außerhalb der Reichweite
(max. 10 m).
Das Gerät schaltet
beim optischen oder
coaxialen Eingang
nicht automatisch ein.
1. Die AUT Funktion ist werksseitig deaktiviert
(OFF).
2. Das Gerät wurde über die „Power“ Taste in
den Standby-Zustand geschaltet.
3. Das Gerät wurde auf den anderen Digitaleingang geschaltet auf dem kein Signal anliegt
28
und hat sich automatisch abgeschaltet.
1. Verbinden Sie Ihr mobiles Endgerät wie beschrieben.
(Seite 13)
2.1. Das mobile Endgerät muss erneut verbunden werden.
2.2. Stellen Sie die Lautstärke am mobilen Endgerät auf den
maximal möglichen Wert ein.
2.3. Erhöhen Sie die Lautstärke des DM Systems.
2.4. Stellen Sie sicher, dass Störquellen wie z. B. ein WLAN-
Router oder ein Laptop nicht in direkter Nähe zum
DM System aufgestellt sind.
®
2.5. Gleichzeitiger Betrieb über WLAN und Bluetooth
Verbindung von einem mobilen Endgerät ist in den meisten
Fällen nicht störungsfrei möglich (WLAN am Endgerät
deaktivieren).
3. Verringern Sie den Abstand zwischen DM System und
mobilem Endgerät.
1. Aktivieren Sie die AUT Funktion (ON). (Seite 18)
2. Schalten Sie das Gerät über die „Power“ Taste der Fernbedienung ein und warten Sie künftig bis es automatisch
in den Standby-Zustand schaltet.
3. Schalten Sie das Gerät über die „Power“ Taste der Fernbedienung ein und wählen Sie den Digitaleingang, an
dem sich das gewünschte Quellgerät befindet.
Problem Mögliche Ursache Lösung
Es ist nur der BT
Eingang wählbar.
Das DM System schaltet nicht automatisch
auf den BT Eingang.
Die (physikalischen) Eingänge wurden deaktiviert.
Vergeben Sie den verwendeten Eingängen die gewünschten
Bezeichnungen (nicht „---“). (Seite 23)
1. Die SEL Funktion ist deaktiviert (MAN). 1. Aktivieren Sie die SEL Funktion (AUT).
2. Bei Ihrem Mobiltelefon ist Bluetooth
®
2. Aktivieren Sie Bluetooth® an Ihrem Mobiltelefon.
deaktiviert.
Das DM System schaltet ungewollt auf den
BT Eingang.
Der BT Eingang ist
über die „Input“
Tasten nicht wählbar.
CEC Steuerung funktioniert nicht oder nur
zum Teil.
3. Das DM System ist mit einem anderen
Mobiltelefon verbunden.
4. Das Mobiltelefon ist nicht mit dem
DM System gekoppelt.
Dies kann passieren, wenn Ihr Mobilgerät
Systemtöne wie z. B. das Tippen der Tastatur
ausgibt.
Die SEL Funktion ist aktiviert (AUT). Die Umschaltung geschieht in diesem Falle automatisch,
1. Die CEC Funktion ist werksseitig deaktiviert
(OFF).
2. Das Quellgerät oder der TV unterstützen
kein CEC oder verwenden ein abweichendes
Protokoll.
3. Deaktivieren Sie Bluetooth
telefon.
4. Koppeln Sie Ihr Mobiltelefon mit dem DM System.
(Seite 13)
1. Deaktivieren Sie die SEL Funktion (MAN).
2. Deaktivieren Sie diese Systemtöne an Ihrem Mobilgerät.
sobald das DM System ein Audiosignal vom Mobilgerät
detektiert.
1. Aktivieren Sie die CEC Funktion (ON). (Seite 19)
2. Nutzen Sie ausschließlich Geräte, die das CEC Protokoll
in einer nicht modifizierten Version unterstützen. Ansonsten kann eine einwandfreie Funktion nicht gewährleistet
werden.
®
bei dem anderen Mobil-
29

Deutsch
Technische Daten
Spannungsversorgung
- Betriebsspannung 100–240 V~
- Betriebsfrequenz 50/60 Hz
- Leistungsaufnahme ECO Standby = 0,40 W (Werkeinstellung)
- Leistungsaufnahme AUT Standby ca. 3,5 W
- Leistungsaufnahme CEC Standby ca. 1,2 W…3,6 W
(abhängig von der Geräteanzahl)
- Leistungsaufnahme Leerlauf (kein Ausgangssignal) ca. 10,2 W
- Leistungsaufnahme maximal ca. 150 W
Ein-/Ausgangspegel Analog
- AUX = max. 2,0 V (effektiv)
- SUB OUT = max. 2,0 V (effektiv)
Decoder/Virtualizer
- DTS Digital Surround
- Dolby Digital
- PCM (32 kHz…96 kHz/8 Bit…24 Bit)
- DTS TruSurround
Betriebstemperaturbereich
- 5 ºC...35 ºC
Bluetooth
- Bluetooth® Standard 3.0 (A2DP)
- Unterstützt CSR aptX
- Reichweite bis zu 10 m
- Frequenzbereich 2400 – 2483,5 MHz (2,4 GHz ISM Band)
- Max. Sendeleistung 10 mW (+10 dBm)
HDMI
- HDMI® (mit Audio Return Channel, 3D, 4K)
- Unterstützte Videformate
640 x 480 px 60 Hz bis 3840 x 2160 px 30 Hz
- Unterstützte CEC Funktionen:
Lautstärke (Volume +/–, Mute)
System Standby
One-Touch-Play
Einstellbereiche
- Lautstärke: 0 = Mute, 1–99 = –98 dB…0 dB (Schrittweite = 1 dB)
- Bass/Hochton: –6 dB…+6 dB (Schrittweite = 1 dB)
- LipSync (Tonverzögerung): 0 ms…110 ms (Schrittweite = 10 ms)
®
®
Dekodierung
®
EU – Konformitätserklärung
Kennzeichnung
Wir, der Her steller / Impor teur
Canton Elektronik GmbH & Co. KG · Neugasse 21–23 · 61276 Weilrod / Niederlauken · Deutschland
bestätigen und erklären in alleiniger Verantwortung, dass sich das Produkt
DM 90.3
(Virtual-Surroundsound System mit drei Signaleingängen, einem Ausgang und Bluetooth®-Funktion,
internem Weitbereichs-Netzteil sowie Infrarot-Fernbedienung)
in Übereinstimmung befindet mit den Richtlinien des Europäischen Parlaments und des Rates
Richtlinie 1999/5/EG (Funkanlagen und Telekommunikationsendeinrichtungen)
Richtlinie 2004/108/EG (Elektromagnetische Verträglichkeit)
Richtlinie 2006/95/EG (Niederspannungsrichtlinie)
Richtlinie 2011/65/EU (Beschränkung der Verwendung bestimmter gefährlicher Stoffe)
Richtlinie 2012/19/EU (Elektro- und Elektronik-Altgeräte)
Richtlinie 2009/125/EG (Umweltgerechte Gestaltung energieverbrauchsrelevanter Produkte)
Der Betrieb ist zulässig in allen Ländern der Europäischen Union.
Eine vollständige Konformitätserklärung finden Sie unter: www.canton.de/de/doc.htm
Rechtsverbindliche Unterschrift: .......................................................................
30
Datum: 15. Januar 2015 Name: Günther Seitz Funktion: Geschäftsführer
31

DeutschDeutsch
Weitere wichtige Informationen
Informationen über den „bestimmungsgemäßen Betrieb“
Das Digital Movie System ist zur Verwendung in geschlossenen
Räumen konzipiert und darf nicht im Freien oder in nasser Umgebung verwendet werden. Das Gerät darf nicht umgebaut oder
verändert werden. Schließen Sie das DM System so an, wie in der
Anleitung beschrieben und beachten Sie die Sicherheitshinweise.
Betreiben Sie das Gerät ausschließlich mit der auf dem Typenschild
spezifizierten Netzspannung und -frequenz.
Informationen über einen umweltgerechten Betrieb
Schalten Sie zur Reduzierung der Leistungsaufnahme
das DM System bei Nichtgebrauch durch Drücken der Taste
„ON/Standby“ in den Bereitschafts-Modus (Standby).
Dies „spart Strom“ und senkt Ihre Stromrechnung.
Informationen zur CE-Kennzeichnung
Innerhalb der Europäischen Union in Verkehr gebrachte
Elektro- und Elektronikgeräte müssen mit einem CE-Kennzeichen versehen sein um anzuzeigen, dass das Gerät den
geltenden Anforderungen (z. B. zur elektromagnetischen
Verträglichkeit oder zur Gerätesicherheit) entspricht.
Entsorgungshinweise
Gemäß der EU-Richtlinie über Elektro- und Elektronik-Altgeräte dürfen mit diesem Symbol gekennzeichnete Geräte nicht
mit dem Siedlungsabfall (Hausmüll) entsorgt werden. Bitte
informieren Sie sich bei Bedarf bei Ihrem zuständigen Entsorgungsunternehmen oder der Gemein de-/Stadtverwaltung
über die für Sie kosten freie Entsorgung. Sie dient dem Umwelt- und Gesundheitsschutz als auch der Einsparung von
(seltenen) Rohstoffen durch Wiederverwertung (Recycling).
Batterien dürfen ebenfalls nicht mit dem allgemeinen
Haushaltsmüll entsorgt werden. Sie müssen getrennt
gesammelt und bei einer Batterie-Sammelstelle abgegeben
werden. Werfen Sie leere Batterien unentgeltlich in die
z. B. beim Handel aufgestellten Sammelbehälter. Nicht
ordnungsgemäß entsorgte Batterien können der Gesundheit von Menschen und Tieren und/oder der Umwelt
schaden.
English
Digital Movie 90.3
32

EnglishEnglish
Welcome to the world of pure music
We are delighted that you have chosen a Canton loudspeaker. Our products combine high quality
components with many years of development experience and meticulous production methods. In order
to get the best out of your loudspeaker you need to observe a few points, as detailed in the Operating
Instructions.
We hope you enjoy listening to pure music!
Contents
Safety advice ............................................. Page 35
Unpacking ................................................. Page 40
Installation ................................................Page 40
Breaking in ................................................Page 40
Setting up the remote control ................... Page 41
Connection Terminal ................................. Page 41
Connection ............................................... Page 42
Operation .................................................Page 44
Playback via Bluetooth
®
Technolog y .........Page 45
Display indications ....................................Page 46
Extended sound functions ......................... Page 48
Automatic on/off function (AUT) ............. Page 50
Consumer Electronics Control (CEC) ......... Page 51
ECO Standby (ECO) .................................. Page 52
Automatic selection of BT input (SEL) ......... Page 53
34
Restore Factory Settings /Reset (RES) ....... Page 54
Configurating the inputs (INP) .................. Page 55
IR learning function ................................... Page 56
IR delete function ...................................... Page 57
Troubleshooting ........................................Page 58
Technical Specifications ............................. Page 62
Declaration of conformity .........................Page 63
Further Information ................................... Page 64
FCC / IC advice ......................................... Page 65
Guarantee ................................................. Page 66
License information ................................... Page 67
The user is responsible for ensuring that
the loudspeaker is correctly positioned
and connected. Canton cannot accept any
responsibility for damages or accidents
caused by inappropriate positioning or
connection.
Safety advice
Please follow the safety advice when positioning and maintaining
your DM System.
Choose a level
surface
Avoid direct sunlight
Keep away from
heat sources
Avoid moisture Avoid vibrations
Protect against
extreme cold
Do not use aggressive,
alcohol-based or
abrasive cleaning agents
Do not open housing
Do not reach inside
the speaker
Never touch the power
cable with wet hands
Ensure correct polarity
for battery and remote
operation
Unplug the device during
thunderstorms
Do not discard in
household rubbish
Keep access to
socket clear
In case of overload
turn the volume down
35

Important Safety Instructions
EnglishEnglish
Notices
CAUTION
Risk of e lect ric sho ck. Do no t open!
To reduce th e risk of r e and elec tric shock, d o not open t he
devic e. There are no servic eable p art s insid e.
Refer all serv icing to qualied ser vice personnel only.
CAUTION:
CAUTION
Danger of explosion!
Replaceable Lithium batteries! Caution: Danger
of explosion if battery is incorrectly replaced.
Repla ce only w ith th e same or e quivalent type.
CAUTION:
Do not in gest ba tter y. Che mical b urn ha zard.
CAUTION
Dange r of life !
CAUTION:
Dange r of life !
Read and follow all instructions.
Keep these instructions.
Heed all warnings.
Use this apparatus only in moderate climates (not in tropical climates).
Do not operate this apparatus at altitudes in excess of 2000 m above sea level.
Indoor use only. Do not use outdoors or in humid rooms.
To reduce the risk of fire and electric shock, do not expose this apparatus to rain or moisture.
Do not use this apparatus near water.
The apparatus shall not be exposed to dripping or splashing.
Strong fluctuations in temperature lead to condensation (water droplets) forming inside the apparatus. Wait until the moisture has
evaporated before starting up the apparatus (min. 3 hours).
Objects filled with liquids (such as vases) shall not be placed on the apparatus.
36
No naked flame source, such as lighted candles, should be placed on or beside the apparatus.
Do not install the apparatus near any heat sources such as radiators, heat registers, stoves, or other apparatus (incl. amplifiers)
that produce heat.
Prevent exposure to direct sunlight.
Observe a free space of at least 5 cm around the apparatus.
Do never defeat the safety purpose of a polarized or ground plug: A polarized plug has two blades with one wider than the other. The
wide blade is provided for your safety. When the provided plug doesn’t fit into your outlet, consult an electrician for replacement of the
obsolete outlet.
To prevent electric shock, do not use the plug with an extension cord, receptacle, or other outlet unless the blades can be fully inserted
to prevent blade exposure.
Never touch signal- and power cords with wet hands.
Protect the power cord from being walked on or pinched particularly at plug, convenience receptacles,
and the point where they exit from the apparatus.
Where the mains plug or an appliance coupler is used as the disconnect device, the mains plug of the power cord or appliance coupler
shall be remain readily operable.
Unplug this apparatus during lightning storms or when unused for long periods of time.
To completely disconnect this apparatus from the mains, disconnect the supply cord plug from the receptacle.
Power down the apparatus before connecting or disconnecting any cable.
Always pull the plugs and not the cables.
Install this apparatus in accordance with the manufacturer’s instructions.
Always choose a level surface. The apparatus has to be in perfect vertical alignment.
37

Important Safety Instructions
EnglishEnglish
Notices
Do not use force on operating elements, connections and cables.
The apparatus may only be operated with the voltage and frequency specified on the apparatus or the name plate.
Do not insert any objects or body parts into the apparatus openings. Live components inside the enclosure could get touched and / or
damaged. This could lead to short circuiting, electric shock and fire.
Only use attachments and accessories specified by the manufacturer and / or provided with the apparatus.
Use only with a cart, stand, tripod, bracket, or table specified by the manufacturer, or sold with the apparatus.
When a cart is used, use caution when moving the cart/apparatus combination to avoid injury from tip-over.
Clean the apparatus only with a clean, dry cloth.
Do not use aggressive, alcohol-based or abrasive cleaning agents.
To reduce the risk of electric shock, do not open the housing! There are no serviceable parts inside.
Refer all servicing to qualified service personnel. Servicing is required when the apparatus has been damaged in any way, such as power
supply cord or plug is damaged, liquid has been spilled or objects have fallen into the apparatus, the apparatus has been exposed to rain
or moisture, does not operate normally, or has been dropped.
Do not make any modification to the apparatus or the accessory. Unauthorized alterations may affect the safety, regulatory compliance,
or the system performance. In this case, the operating licence/warranty can expire.
Turn down the volume level immediately if sound distortions, such as unnatural knocking, beating or
high-frequency clicking can be heard.
To prevent possible hearing damage, do not listen at high volume levels for long periods. Stop playback if you can hear ringing or
whistling sounds in your ear or if you have the impression (even for short times) that you can no longer hear high tones.
Keep new and used batteries away from children. If the battery compartment does not close securely, stop using the product and keep it
away from children.
The remote control supplied with this product contains a coin/button cell battery. If the coin/button cell battery is swallowed, it can
cause severe internal burns in just 2 hours and can lead to death!
If you think batteries might have been swallowed or placed inside any part of the body, seek immediate medical attention.
Batteries must be inserted correctly, as shown on the polarity imprint. Incorrectly replaced batteries might cause damage.
Please keep the environmental aspects of battery disposal in mind. Batteries must be disposed of at a battery collection point.
Batteries shall not be exposed to excessive heat such as sunshine, fire or the like.
Only use batteries or rechargeable batteries specified for this apparatus.
The batteries supplied are not rechargeable batteries and may therefore not be recharged.
The apparatus and/or the accessory bag may contain small parts that may be a choking hazard. Therefore not suitable
for children under age 3.
This symbol is intended to alert the user to the presence of uninsulated dangerous voltage within the product’s enclosure that
may be of sufficient magnitude to constitute risk of fire and electric shock.
This symbol is intended to alert the user to the presence of important operating and maintenance instructions in the literature
accompanying this product.
This symbol denotes equipment with Class II Protection Rating. These devices are deemed to be fully protected against the risk
of electric shock during normal use by means of double or reinforced insulation, and therefore require no earth conductor.
38
39

EnglishEnglish
Unpacking
Unpack the box carefully and check that all the following
parts are present:
• 1x Canton DM Soundbar
• 1x Remote control inc. battery
• 1x Mains cable
• 1x High-Speed-HDMI
®
-Cable
Installation
The Canton Digital Movie should be placed underneath the screen
on a flat surface. Capacity up to 40kg.
Breaking in
Maximum sound quality requires a breaking-in
time of 15 – 20 operating hours.
• During this time operate the loudspeaker at
normal volume
• Avoid high volume levels
• Listen to a variety of music
Setting up the
remote control
The remote control comes with a battery already installed.
Simply remove the protective film to activate. When replacing
the battery ensure that it is correctly inserted according to
the polarity markings (+/–). Only use the battery specified
for this system (CR 2032).
Note
The battery provided is intended for test use and may therefore have a shorter lifespan.
Connection Terminal
1
Power Inlet
2
Output – Ext. Subwoofer
3
Input – AUX (analogue)
4
Input – COX (koaxial)
OUTPUT
[ARC]
HDMI SERVICE ANALOG
INPU T 1
[HD1]
INPU T 2
[HD2]
5
Input – OPT (optisch)
6
Service jack (Canton)
7
Input HD1 – HD3 (HDMI®-Input)
8
Output – ARC (HDMI®-Output)
DIGITA L [S /PDIF]
INPU T 3
[HD3]
OPTICAL
[OPT ]
IN
COAXIAL
[COX]
DM Soundbar
open closed
Remote control
L INPUT R
[AUX]
SUB
OUT
CR 2032
DIGITAL MOVIE
40
DM 90.3
25678 4 3
41

Connection
EnglishEnglish
Please ensure that all electrical components are switched off before connecting. Your Digital Movie System has six optional inputs and an
output with Audio Return Channel (ARC function). The following options are possible, depending on the type and fittings of the source used:
Comment: The physical inputs have the following designations, (which you can adapt at any time, as explained on page 55): ARC = TV;
HD1 = BDP; HD2 = SAT; HD3 = PS; COX = DVD; OPT = CD; AUX = VCR; BT = Bluetooth
®
HDMI® High Definition Multiple Interface – inputs (HD1, HD2, HD3)
Modern media players such as Blu-Ray players, sat receivers or games consoles have an HDMI
®
output. For the best possible sound quality
connect your source device using one of these inputs.
®
HDMI
High Definition Multiple Interface – output with Audio Return Channel ARC
Connect your TV with this output. If your TV supports the Audio Return Channel function (ARC) connect this output of the DM system
with the HDMI
®
input of your TV, marked “ARC”. This will enable you to play the TV sound through your DM system using a receiver
built into the TV.
Note: The ARC function can be used with the DM system at any time and does not have to be activated or deactivated. For your TV
to support the ARC function it must have at least one HDMI
®
input with Audio Return Channel ARC. The CEC function must also be
activated. For more information please consult the operating manual for your TV.
Optical Digital Input (OPT)
If your media player does not have an HDMI
®
output, connect it where possible with the input on your DM system marked “OPT”.
To transmit the image signal your media player must also be connected to the TV.
Coaxial Digital Input (COX)
If your media player does not have an HDMI
®
output or an optical digital output, connect it using the DM system input marked “COX”. In
order to transmit the image signal, your media player must also be connected to the TV. This input can be used alternatively to the optical
input.
Analogeingang (AUX)
If your TV only has an analogue audio output marked “Pre Out”, connect it using a shielded stereo cinch cable via the analogue input on
the DM system marked “AUX”. Otherwise this input is only used to connect video recorders or games consoles.
Subwoofer Output (SUB OUT)
Use this output to connect an external active subwoofer. SUB OUT is not active in the factory setting and has to be activated using the remote control. See page 48 Extended sound functions.
42
43

EnglishEnglish
Operation
1
Power
ON – LED shines green
Standby – LED shines red
DM disconnected from the mains – LED not illuminated (OFF)
2
Mute (muting)
3
Input (signal source selection)
4
Volume (volume control up/down)
5
Play Mode (playback mode)
Stereo – for music
Surround – virtual surround sound for home cinema
6
Sound (tone control)
Bass – Adjustment via Volume control (+6 ... –6 dB)
Treble – Adjustment via Volume control (+6... –6 dB)
7
Bluetooth® Pairing
Connection with a Bluetooth
Memory Function
After the DM System has been temporarily disconnected from the mains
it automatically returns to the last mode selected. All settings (e. g. ON/
OFF, volume) remain in place.
®
Wireless Technology enabled source
ON
STANDBY
STEREO
SURROUND
BLUETOOTH
PAIR ING
Remote control
MUTE
BASS
TREBLE
Playback via Bluetooth® Technology
Registration requirements
- The Bluetooth
the mobile end device
- The mobile end device must support
Bluetooth
- The mobile end device must be within range of
the DM System (max. 10 m)
Registration process
- Select
- Press the “Bluetooth
BTP
-
- Now you have 30 seconds to pair your mobile
end device
- Start the search run on your mobile end device
- Select “DM 90.3” as the playback device
- Once confirmed, the connection will be made
automatically and will appear as
display
- If the connection fails the message
will appear
- If the mobile device requires an access code
enter 0000
DIS
- If
end device is out of range or logged out
®
function must be activated on
®
standard 2.0 at least
BT
input
®
Pairing“ button
appears on the display
Con
FAI
appears in the display, your mobile
in the
BT
BLUETOOTH
PAIR ING
BTP
- Canton DM 90.3 -
Con Fai
Operating a mobile end device
- The device most recently connected to the
DM System connects automatically when the
Bluetooth
for Bluetooth
this case the message
®
function is activated and the input
®
playback has been selected. In
Con
will appear.
- Start the playback of a track on your mobile end
device and the sound will be played back by the
DM System, automatically.
Note: The DM System can manage up to three
Bluetooth
®
devices.
See also chapter “Automatic selection of BT input
(SEL)” on page 53.
44
45

Display indications
EnglishEnglish
Extended sound functions
The DM System has a multifunctional display that lights up blue for approx. 5 seconds in response to a remote control
command. The most important readouts and their meanings are shown below. The standby mode of the DM System is
indicated by a red LED light. When your DM System is in operation this LED is green.
Input
TV
HDMI®-Output (ARC) HDMI®-Input 1 (HD1) AUX input (analogue) Bluetooth
Soundmode
V30
Volume (0 – 9 9)
Playmode
ST
Stereo
Bluetooth
®
DVD
---
Mute
SUR
Surround
AUX
B 6
Bass level (+/–6)
BT
®
T 6
Treble level (+/– 6)
Lip
LipSync
Setup functions
AUT
Act./Deact. automatic
ON/Standby for optical and
coaxial input
Input configuration
Act./Deact. CEC control
IR learn function
INP
Enter input designation
Format of input signal (data stream)
Learn infrared codes
SUB
Act./Deact.
SUB OUT
CEC
function
IRL
EQ
Select installation mode
ECO
Act./Deact. ECO standby
DRC
Act./Deact. Dolby Dynamic
Range Compression
SEL
Act./Deact. automatic BT
input selection
RES
Restore factory settings
BTP
46
Pairing Mode
CON
Connection established
DIS
Disconnected
FAI
Error message
DTS
DTS signal
DD5
Dolby Digital 5.1 multi-
channel signal
DD2
Dolby Digital 2.0 stereo
signal
PCM
Digital stereo signal
(PCM)
47

Extended sound functions
STEREO
SURROUND
BASS
TREBLE
ON
STANDBY
MUTE
MUTE
EnglishEnglish
The menu for extended sound functions offers you the chance to correct out-of-synch
playback, to activate the output for a wired external subwoofer, to adjust the playback
to suit the location and to switch the Dolby function “Dynamic Range Compression”
on or off.
If you press and hold the key marked “Sound” on the remote control for longer
than 3 seconds you will enter the “Extended sound functions” menu and the display
will appear on the Soundbar.
LIP
You can now use the “Volume +/–“ keys to delay the playback in 10 ms steps to
synchronise the sound with the “delayed” image.
Press the “Sound” key briefly once more and the display
sub
will appear.
The “Volume +/–” keys can also be used to switch the output for an external subwoofer on or off. Please note: when the SUB OUT is activated the playback of the Soundbar
will be limited to 80 Hz. Frequencies below 80 Hz are sent to the external subwoofer.
Press the “Sound” key again briefly one more time and the display
eq
will appear.
Now use the “Volume +/–” keys to choose between three pre-set equalizer settings to
adjust the playback to suit the location.
BASS
TREBLE
EQ1
for a free-standing DM System e. g. on a sideboard with a flat-screen TV on
the wall (factory setting).
EQ2
for a set-up where a flat-screen TV is positioned on top of the DM System.
EQ3
for a set-up where the DM System is in a rack or on a shelf.
DRC
When the “Sound” key is pressed again the display changes to
.
“Dynamic Range Compression” is a setting option created by Dolby Laboratories.
When activated, the dynamic range of Dolby encoded data streams can be automatically reduced, which also reduces differences in volume. This makes it possible
to enhance quiet tones and suppress loud ones.
The Volume +/– keys can be used to switch the
DRC
function on or off.
Exit menu
Press and hold the “Sound” key again for longer than 3 seconds to exit the “Extended
sound functions” menu.
If the Soundbar does not receive any input instruction from the remote control within
a period of 30 seconds the menu navigation returns automatically to normal mode.
Lip
sub
on off
EQ
EQ1 EQ2 EQ3
DRC
48
on off
49

EnglishEnglish
STEREO
SURROUND
BASS
TREBLE
ON
STANDBY
MUTE
BASS
TREBLE
ON
STANDBY
MUTE
Setup functions
Automatic ON/OFF function (AUT)
When this function is activated (ON) the device identifies a signal through the optical or coaxial input. When a signal is detected (e.g. by
switching on the source device) the DM system turns itself on. If no such signal is detected on the selected input (e.g. when the source
device has been switched off) the DM system will automatically go into AUT standby mode after 30 seconds. When the function is deactivated (OFF) the DM system needs to be switched on and off manually.
The device is supplied with the function deactivated (OFF).
To activate/deactivate this function proceed with the following steps:
1
With the device switched on, press and hold the “Play Mode” key for more
than 3 seconds, until
2
Press the “Volume +” key to activate the function (ON)
3
Press the “Volume –“ key to deactivate the function (OFF).
4
Exit the menu by again pressing and holding the “Play Mode” key for more
than 3 seconds. If no input has appeared within 10 seconds the device will
automatically exit the configuration menu.
Comment: The automatic switching on/off function only works for optical and coaxial digital input. If the device is set to standby mode
using the “ON/STANDBY” key on the remote control it is not possible for the device to switch on automatically.
The device only identifies a signal at the selected digital input. A signal that appears at any other than the selected digital input cannot be
detected.
50
AUT
appears on the display.
STEREO
SURROUND
TV remote control
Consumer Electronics Control (CEC)
Consumer Electronics Control (CEC) is a cross-market standardized protocol for controlling end devices connected to the HDMI®
inputs/outputs. The device is supplied with this function deactivated (OFF).
The CEC functions supported by the DM system are:
- One touch Play: By pressing the “Play” key of the Blu-Ray player the DM system switches on automatically and changes to the
corresponding HDMI
- System Standby: With the TV switched on, when you return it to standby mode by pressing the “Power” key the DM system also goes
automatically into standby mode.
Note: Depending on the programming of the TV the DM system can also be automatically activated with the TV.
- Volume/Mute: The volume of the DM system can be controlled using the Mute and Volume keys on the TV remote control.
To activate/deactivate this function proceed with the following steps:
1
With the device switched on, press and hold the “Play Mode” key for more than 3 seconds, until
2
Press the “Play Mode” key again briefly, until
3
Press the “Volume +” key to activate the function (ON).
4
Press the “Volume –“ key to deactivate the function (OFF).
5
Exit the menu by again pressing and holding the “Play Mode” key for more than 3 seconds. If no input has appeared within 10 seconds
the device will automatically exit the configuration menu.
Comment: Many device manufacturers have developed their own protocols for controlling their devices based on the CEC standard. This
can mean that the functions described above only function partially, or do not function at all.
Warning: To avoid conflicts when controlling the DM system using the CEC function, the “Volume +/–“, “Mute” and “Power” keys of the
TV remote control may not be learned by means of the IR learn function of the DM system. Please delete the IR codes on the DM system
where necessary (see page 57).
®
input.
CEC
appears on the display.
AUT
appears on the display.
51

EnglishEnglish
Eco Standby (ECO)
When this function is activated (ON), the device automatically goes into standby mode if no signal is detected on the selected input for one
hour. When this function is deactivated (OFF), the DM system has to be switched off manually.
The device is supplied with this function activated (ON).
To activate/deactivate this function proceed with the following steps:
1
With the device switched on, press and hold the “Play Mode” key for more
than 3 seconds, until
2
Press the “Play Mode” key again briefly, until
3
Press the “Volume +” key to activate the function (ON).
4
Press the “Volume –“ key to deactivate the function (OFF).
5
Exit the menu by again pressing and holding the “Play Mode” key for more
than 3 seconds. If no input has appeared within 10 seconds the device will
automatically exit the configuration menu.
Comment: This function is automatically deactivated if the AUT or CEC function is activated.
AUT
appears on the display.
ECO
appears on the display.
Automatic selection of BT input (SEL)
When this function is activated (AUT), the DM system automatically switches to the BT input when it detects an audio signal from a mobile
device. When this function is deactivated (MAN) the input must be selected manually.
The device is supplied with this function deactivated (MAN).
To activate/deactivate this function proceed with the following steps:
1
With the device switched on, press and hold the “Play Mode” key for more
than 3 seconds, until
2
Press the “Play Mode” key again briefly, until
3
Press the “Volume +” key to activate the function (AUT).
4
Press the “Volume –“ key to deactivate the function (MAN).
5
Exit the menu by again pressing and holding the “Play Mode” key for more
than 3 seconds. If no input has appeared within 10 seconds the device will
automatically exit the configuration menu.
Comment: Depending on the used mobile device the DM system can also be switched to the BT input by typing a message or by sound of
other system tones, if the SEL function is activated (AUT).
When the SEL function is activated (AUT) the BT input can no longer be selected using the “Input” key. In this mode the DM system can be
connected to the mobile device regardless of the selected signal input.
AUT
appears on the display.
SEL
appears on the display.
52
53

ON
STANDBY
MUTE
ON
STANDBY
MUTE
EnglishEnglish
Restore Factory Settings/Reset (RES)
With this function (RES) you can restore the DM system to its factory settings. To reset the device proceed with the following steps:
Warning: ALL of your personalised settings and learned IR codes will be deleted in the process.
1
With the device switched on, press and hold the “Play Mode” key for more than 3 seconds, until
2
Press the “Play Mode” key again briefly, until
3
After pressing the “Volume +” key the confirmation message
RES
appears on the display.
YES
appears on the display. To complete the deletion process wait
10 seconds. Then all settings will be restored and the DM system will switch into standby mode.
4
If you wish to cancel the process, press the “Volume –“ key within 10 seconds after pressing the “Volume +” key. The display will show
the interruption message
NO
. 10 seconds after pressing the “Volume –“ key the DM system will return to its previous operating mode
without deleting the settings.
5
To exit the menu without taking any action press and hold the “Play Mode” key again for more than 3 seconds. If no input is received
within 10 seconds the device will automatically leave the reset menu.
AUT
appears on the display.
Configurating the inputs (INP)
When the device is supplied all the physically existing inputs are provided with a source designation. These are as follows: ARC = TV; HD1 =
BDP; HD2 = SAT; HD3 = PS; COX = DVD; OPT = CD; AUX = VCR; BT = Bluetooth
inputs to suit your source device.
To configure the designation proceed with the following steps:
1
With the device switched on press and hold one of the two “Input” keys for
more than 3 seconds until
2
Now press one of the two “Input” keys briefly to select the desired physical
INP
appears on the display.
input (ARC, HD1, HD2, etc.).
3
Now press one of the “Volume” keys briefly to select the desired designation.
You can choose from the following predefined designations: “---” (Input
deactivated), TV, BDB, SAT, CD, DVD, CAM, REC, PAD, POD, TAB, TUN,
DAB, PS, VCR.
4
To allocate a designation to an additional input, repeat steps 2 and 3.
5
Exit the menu by pressing and holding one of the two “Input” keys again for
more than 3 seconds. If no input is received within 10 seconds the device will
automatically leave the configuration menu.
Note: Inputs that have been deactivated “---” will no longer be shown when
scrolling through the inputs (input key). This makes it easier to select the desired
input.
®
. You can configure the names allocated to the various
TV remote control
54
Comment: The designation for the BT input cannot be changed. If you would have deactivated all inputs, BT (Bluetooth
will remain as fixed input.
®
)
55

IR learning function
ON
STANDBY
MUTE
MUTE
EnglishEnglish
The DM System can learn the infrared code of your TV remote control and therefore allows you to control the functions of the Soundbar
and TV device via one remote control. You can allocate the instructions for the Soundbar to any key of the TV remote control. When
choosing a key make sure that the instructions for the Soundbar do not conflict with the TV device. We recommend that you deactivate
the internal loudspeaker of the TV device once the Soundbar is connected.
1
Hold the TV remote control in position.
2
Switch the Soundbar on.
ON
3
Press and hold the “ON/Standby” key of the Soundbar
STANDBY
remote control for approx. 5 seconds.
4
The display shows a flashing
5
Press the wanted function on the Canton
IRL
.
remote control e. g. “Volume +”.
6
Now the display shows the chosen function, e. g.
7
Within 20 seconds press the key you wish to allocate
to this function on the TV remote control.
v
.
TV remote control
Exit menu
Press and hold the “ON/Standby” key again for
8
Once this has been successfully allocated the display
will show
OK
and you can continue with the
longer than 5 seconds to exit the “IR learning
function” menu.
programming of the next key function, e. g. “Volume –“.
9
If the display shows
FAI
this means the allocation
has failed and you should repeat steps 5 to 8.
If the Soundbar does not receive any input instructions from the remote control within a period of
60 seconds the menu navigation returns to normal
mode automatically.
56
Note: The red “ON/Standby” key on the DM remote control has a dual function. Press it once and the display will show
ON
, which allows the switching on function to be programmed. If the red “ON/Standby” key on the DM remote
control is pressed twice in quick succession the display will show
STB
and the Standby resp. switching off function can
be programmed. If your TV remote control has only one key for the “ON” and “OFF” functions both the “ON” and
“Standby” functions must still be allocated with this command.
Note: Due to the variety of infrared codes it is not possible to guarantee that every IR remote control signal can be learned
by the DM system.
IR delete function
To delete the TV remote control commands learned by the DM System you need to follow these steps:
1
Switch the Soundbar on.
2
Press the “ON/Standby” key on the Soundbar remote
control for approx. 5 seconds.
3
The display will flash
4
Press the “Mute” key of the Soundbar remote control
for approx. 5 seconds.
5
The display will show
will then switch automatically back to normal operation.
IRL
.
CLR
for approx. 5 seconds. The Soundbar
57

Troubleshooting
EnglishEnglish
Here is an overview of the most common problems. If you have any further questions please contact your Canton dealer,
call our Service Hotline on +49 (0) 60 83 28 70 or send us an e-mail at info@canton.de.
Problem Possible cause Solution
DM System does not
turn on.
DM System does not
Power cable not connected to the power outlet
Check connection.
and /or DM System
1. The battery is empty. 1. Replace battery, observe correct polarity at insertion.
respond to remote
control.
No playback or too
low volume.
2. Protective foil has not been removed. 2. Remove the protective foil from remote control.
1. Media player is not providing a signal.
(Output on source device is not activated or
1. Activate output and/or increase volume (follow the instructions for the device).
volume is set too low).
2. Cable incorrectly connected/faulty cable. 2.1. Check the connection between the media player and the
DM system and change the cable if necessary.
2.2. Check that the protective caps have been removed from
the plugs of the optical cable.
No TV sound can be
heard via the HDMI
Output (ARC).
1. Your TV does not support the ARC function. 1. If your TV does not support the function HDMI
®
-
Audio Return Channel (ARC), please use one of the digital
inputs (OPT or COX) of the DM system.
2. You are using the wrong HDMI
®
connection
2. Only use the HDMI® connection of your TV marked ARC.
on your TV.
®
with
Problem Possible cause Solution
DM System hums. 1. Signal cable from source device to DM Sys-
1. Use shorter signal cable.
tem too long (AUX).
2. Signal cable is not shielded or shielding has
2. Exchange the signal cable by a shielded one.
been damaged (defective).
3. Ground loop (ripple pickup) generated. 3. A ground loop can be generated when two or more devices connected via a signal line (cinch) are plugged into
separate sockets (e. g. amplifier and computer). Plug all
safety class I devices (with a safety plug) connected to the
DM system into one multiple outlet stripe.
4. Another piece of equipment on the same
circuit has no interference suppression
(e. g. fridge ).
4. Switch off possible sources of interference to test; unplug
the device concerned to see if the humming noise disappears or connect the source of interference to a different
circuit (L1, L2 or L3). (Where necessary take advice from
your electrician.) Insert a special “sheath current filter”
(available from specialist retailers) between the amplifier
and the DM System to eliminate the humming. Turn the
power plug round to reduce the so-called ripple voltage
(particularly important if the source device is not earthed).
58
59

English English
Problem Possible cause Solution
No playback via
Bluetooth
®
Wireless
Technolog y.
1. There is no connection between the
DM System and the mobile end device.
2. The mobile end device is paired but
no playback takes place.
3. You are out of range. (max. 10 m) 3. Reduce the distance between the Soundbar and your
The device does not
switch on automatically from the optical
or coaxial input.
1. The preset (factory setting) for the AUT
function is OFF (disabled).
2. The device was set into standby mode using
the “Power” key.
3. The device was switched to the other digital
input which receives no signal and has switched itself off automatically.
60
1. Connect your mobile end device as described. (Page 45)
2.1. The mobile end device must be connected again.
2.2. Set the volume on the mobile end device to maximum.
2.3. Increase the volume of the DM System.
2.4. Ensure that interference sources like a WLAN router
or laptop are not set up in direct proximity of the DM
System.
®
2.5. Concurrent operation of WLAN and Bluetooth
connection from a mobile end device is not possible
without interferences in most cases. (Disable WLAN
at your mobile device.)
mobile end device.
1. Activate the AUT function (ON). (Page 50)
2. Switch the device on using the “Power” key on the re-
mote control and in future wait for it to switch itself into
standby mode.
3. Switch the device on using the “Power” key on the remo-
te control and select the digital input that is connected to
the desired source device.
Problem Possible cause Solution
Only the BT input can
be selected.
The DM system does
not switch automatically to the BT input.
The (physical) inputs have been deactivated. Allocate the wanted designation to the used input
(not “---”). (Page 55)
1. The SEL function is deactivated (MAN). 1. Activate the SEL function (AUT).
2. Bluetooth
®
has been deactivated on your
2. Activate Bluetooth® on your mobile end device.
mobile end device.
3. The DM system is connected to a different
3. Deactivate Bluetooth
mobile end device.
The DM system switches to the BT input
inadvertently.
The BT input cannot
be selected using the
“Input” keys.
CEC control does not
function fully or at all.
4. The mobile end device is not connected to
the DM system.
This can happen when your mobile device produces system tones e.g. typing on the keyboard.
The SEL function is activated (AUT). In this case the switching process happens automatically as
1. The factory setting for CEC is OFF
(deactivated).
2. The source device or TV do not support CEC
or use a different protocol.
4. Connect your mobile end device to the DM system. (Page
45)
1. Deactivate the SEL function (MAN).
2. Deactivate the system tones on your mobile end device.
soon as the DM system detects an audio signal from the
mobile end device.
1. Activate the CEC function (ON). (Page 51)
2. Only use devices that support the CEC protocol in an unmodified version. Otherwise it is not possible to guarantee
full function.
®
on the other mobile end device.
61

English
Technical Specifications
Power supply
- Operating voltage 100–240 V
- Operating frequency 50/60 Hz
- Power consumption ECO Standby = 0.40 W (factory setting)
- Power consumption AUT Standby ca. 3.5 W
- Power consumption CEC Standby ca. 1.2 W…3.6 W
(depending on the amount of connected devices)
- Power consumption in idle mode (no output signal) ca. 10.2 W
- Power consumption maximal ca. 150 W
In-/Outputlevel analogue
- AUX = max. 2.0 V (effective)
- SUB OUT = max. 2.0 V (effective)
Decoder/Virtualizer
- DTS Digital Surround
- Dolby Digital
- PCM (32 kHz…96 kHz/8 Bit…24 Bit)
- DTS TruSurround
Operating temperature range
- 5 ºC (41 ºF)...35 ºC (95 ºF)
Bluetooth
- Bluetooth® Standard 3.0 (A2DP)
- Supports CSR aptX
- Range up to 10 m
- Frequency range 2400–2483.5 MHz (2.4 GHz ISM Band)
- Max. emitted radiated power 10 mW (+10 dBm)
HDMI
- HDMI® (with Audio Return Channel, 3D, 4K)
- Supported video formats
640 x 480 px 60Hz bis 3840 x 2160 px 30 Hz
- Suported CEC functions:
Volume (Volume +/–, Mute)
System Standby
One-Touch-Play
Setting ranges
- Volume: 0 = Mute, 1–99 = –98 dB…0 dB (step width = 1 dB)
- Bass / Treble : –6 dB…+6 dB (step width = 1 dB)
- LipSync (audio signal delay): 0 ms…110 ms (step size = 10 ms)
®
®
decoding
®
EU – Declaration of Conformity
marking
We, Manufac turer / Importer
Canton Elektronik GmbH & Co. KG · Neugasse 21–23 · 61276 Weilrod / Niederlauken · Germany
confirm and declare under our sole responsibility that the product
DM 90.3
(Virtual-Surroundsound System with 3 Signal Inputs, one Output, and Bluetooth® functionality,
internal Universal Mains Power Supply and Infrared Remote Control)
is in conformity with the directives of the European Parliament and of the Council
Directive 1999/5/EC (Radio and Telecommunications Terminal Equipment)
Directive 2004/108/EC (Electromagnetic Compatibility)
Directive 2006/95/EC (Low Voltage Directive)
Directive 2011/65/EU (Restriction of the use of certain Hazardous Substances)
Directive 2012/19/EU (Waste of Electric and Electronic Equipment)
Directive 2009/125/EG (Ecodesign requirements for Energy-related Products)
Operation is permitted within all countries of the European Union.
A complete Declaration of Conformity is placed at : www.canton.de/en/doc.htm
Authorized Signature: .......................................................................
62
Date: January 15
th
2015 Name: Günther Seitz Function: CEO
63

DeutschEnglish
Further Information
English
Information for “normal use”
All Digital Movie Systems are designed for indoor use and must
not be used outdoors or in wet conditions. The devices must not
be modified or altered in any way. Connect the Digital Movie
System up as described in the instructions and pay attention
to the warning notices. Only operate the device with the mains
voltage and frequency specified on the rating plate.
Information about environmentally friendly operation
(Use the standby function to minimise electricity usage and
operating costs)
To reduce the electricity usage of the device when not in use
press the “On/Standby” button. This saves electricity.
Information about CE labelling
All electrical and electronic equipment sold in the European
Union must carry a CE mark to show that the device in
question complies with the legal requirements (e. g. electro-magnetic compatibility or safety requirements).
Disposal instructions
In accordance with the regulations governing the disposal of old electrical and electronic equipment, all devices
that carry this symbol may not be disposed of in general
household waste. If required, please contact your local
recycling centre or the local authorities to find out about
free disposal. This serves to protect the environment and
public health as well as saving (scarce) resources through
recycling.
Batteries should not be disposed of in general
household waste. They should be collected separately
and taken to a battery collection point. You can dispose
of empty batteries free of charge in collection containers at e.g. retail outlets. Batteries that are not properly
disposed of can be harmful to humans and animals
and/or the environment.
Caution
This device complies with Part 15 of the FCC Rules / Industry Canada
licence-exempt RSS standard(s). Operation is subject to the following
two conditions: (1) this device may not cause harmful interference,
and (2) this device must accept any interference received, including
interference that may cause undesired operation.
Changes or modifications not expressly approved by the party responsible for compliance could void the user‘s authority to operate
the equipment.
This equipment has been tested and found to comply with the limits
for a Class B digital device, pursuant to part 15 of the FCC Rules.
These limits are designed to provide reasonable protection against
harmful interference in a residential installation. This equipment
generates uses and can radiate radio frequency energy and, if not
installed and used in accordance with the instructions, may cause
harmful interference to radio communications. However, there is no
guarantee that interference will not occur in a particular installation.
If this equipment does cause harmful interference to radio or
television reception, which can be determined by turning the
equipment off and on, the user is encouraged to try to correct the
interference by one or more of the following measures:
- Reorient or relocate the receiving antenna.
- Increase the separation between the equipment and receiver.
- Connect the equipment into an outlet on a circuit different from
that to which the receiver is connected.
- Consult the dealer or an experienced radio/TV technician for help.
Under Industry Canada regulations, this radio transmitter may only
operate using an antenna of a type and maximum (or lesser) gain approved for the transmitter by Industry Canada. To reduce potential
radio interference to other users, the antenna type and its gain should
be so chosen that the equivalent isotropically radiated power (e.i.r.p.)
is not more than that necessary for successful communication.
MPE Reminding
To satisfy FCC / IC RF exposure requirements, a separation distance of 20 cm or more should be maintained between the antenna of this device and persons during device operation.
To ensure compliance, operations at closer than this distance is
not recommended.
64
65

Attention
Le présent appareil est conforme aux CNR d’Industrie Canada
applicables aux appareils radio exempts de licence. L’exploitation
est autorisée aux deux conditions suivantes: (1) l’appareil ne doit
pas produire de brouillage, et (2) l’utilisateur de l’appareil doit accepter tout brouillage radioélectrique subi, même si le brouillage
est susceptible d’en compromettre le fonctionnement. Conformément à la réglementation d’Industrie Canada, le présent émetteur
radio peutfonctionner avec une antenne d’un type et d’un gain
maximal (ou inférieur) approuvépour l’émetteur par Industrie
Canada. Dans le but de réduire les risques de brouillage radioélectrique à l’intention des autres utilisateurs, il faut choisir le type
d’antenne et son gain de sorte que la puissance isotrope rayonnée équivalente (p.i.r.e.) ne dépasse pas l’intensité nécessaire à
l’établissement d’une communication satisfaisante.
MPE Avis
Les antennes installées doivent être situées de facon à ce que la
population ne puisse y être exposée à une distance de moin de
20 cm. Installer les antennes de facon à ce que le personnel ne
puisse approcher à 20 cm ou moins de la position centrale de l’
antenne. La FCC des éltats-unis stipule que cet appareil doit être
en tout temps éloigné d’au moins 20 cm des personnes pendant
son functionnement.
CANTON Elektronik GmbH + Co. KG
Neugasse 21– 23 · D-61276 Weilrod · Deutschland/Germany
Tel. +49 (0) 60 83 28 70 · Fax +49 (0) 60 83 28 750
info@ canton.de · www.canton.de
Opening times
Monday to Thursday 8am to 4pm
Friday 8am to 1pm
DEU
GARANTIE
Über die gesetzlich vorgeschriebene Gewährleistung hinaus übernimmt Canton für alle Passivlautsprecher
eine Garantie von 5 Jahren. Für die DM Systeme und teilaktiven Boxen werden 2 Jahre Garantie gewährt.
Die Garantiezeit beginnt mit dem Kauf und gilt nur für den Erstkäufer. Ein Garantieanspruch besteht nur
bei Verwendung der Originalverpackung. Ausgeschlossen sind Transportschäden und Schäden, die durch
unsachgemäßen Gebrauch verursacht wurden. Der Anspruch verlängert sich nicht durch den Austausch
von Bauteilen innerhalb der Garantiezeit. Dies gilt für alle Lautsprecher, die bei einem autorisierten Canton
Fachhändler gekauft wurden. Wenden Sie sich im Schadensfall bitte an ihn oder direkt an den Canton
Service.
ENG
GUARANTEE
Above and beyond the legally prescribed warranty period Canton offers a guarantee of 5 years on all
its passive loudspeakers. A 2-year guarantee is offered for DM Systems and partially active boxes. The
guarantee period begins at the time of purchase and only applies to the purchaser. Guarantee claims
will only be accepted if accompanied by the original packaging. The guarantee does not cover damages incurred in transit or damages caused by improper use. The guarantee is not extended if parts are
exchanged within the period covered by the guarantee. This applies to all loudspeakers purchased from
an authorised Canton dealer. In the event of damage please contact your dealer or the Canton Service
department direct.
Manufactured under license from
Dolby Laboratories. Dolby and the
double-D symbol are registered
trademarks of Dolby Laboratories.
For DTS patents, see
http://patents.dts.com. Manufactured
under license from DTS Licensing
Limited. DTS, the Symbol, & DTS and
the Symbol together are registered
trademarks, and DTS TruSurround is
a trademark of DTS, Inc. © DTS, Inc.
All Rights Reserved.
For DTS patents, see
http://patents.dts.com. Manufactured
under license from DTS Licensing
Limited. DTS, the Symbol, & DTS and
the Symbol together are registered
trademarks, and DTS Digital Surround
is a trademark of DTS, Inc. © DTS, Inc.
All Rights Reserved.
Bluetooth®:
The Bluetooth word mark and logos are
registered trademarks owned by Bluetooth
SIG, Inc. and any use of such marks by
Canton is under license. Other trademarks
and trade names are those of their respective owners.
aptX:
The aptX software is copyright CSR plc or
its group companies. All rights reserved.
The aptX mark and the aptX logo are trade
marks of CSR plc or one of its group companies and may be registered in one or
more jurisdictions.
®
HDMI
®
:
The terms HDMI and HDMI High-Definition
Multimedia Interface, and the HDMI Logo
are trademarks or registered trademarks of
HDMI Licensing LLC in the United States
and other countries.
66
67

Art. Nr. 15318
Art. Nr. 19751
Garantie-Urkunde
Guarantee Certificate
Seriennummer / Serial Number
Händlerstempel / Dealer Stamp
Name und Adresse des Käufers / Name and Address of Purchaser
www.canton.de
 Loading...