

Cansonic UltraDuo Z1 Instruction Manual

Congratulations on your purchase of your new Cansonic UltraDuo Z1 camera!
We’d like to thank you for your purchase. We strive to bring you the highest
quality products, allowing you to capture every memory. We know you’ll love
using your Cansonic UltraDuo!
The following instructions are written for optimized use of your Cansonic
UltraDuo Z1 camera. Each of the default settings have been designed to
achieve the highest quality video while maintaining peace of mind when the
camera is on. It is not recommended you adjust the default settings.
With new technology readily available, the creators of Cansonic have
developed an easy to use camera for everyday use. The Cansonic UltraDuo Z1
allows its user to record files in 1, 3, or 5 minute lengths. These files are easy
to download to your home desktop or personal laptop. In most instances, the
video files are easily played on your mobile device. While most cameras
traditionally use the entire capacity of the Micro SD card until it is removed,
CANSONIC automatically deletes the oldest file to create space for the new
video.
Cansonic UltraDuo Z1 offers Four modes:
1. Video Mode: Video mode will set to default when camera is active.
2. Photo Mode: The UltraDuo Z1 setting takes still photographs.
3. Playback Mode: Users can view all previously recorded videos and
photos taken.
4. Setup Mode: Users can adjust settings in the setup menu.
EASY TO USE
Automatic Start/Stop Technology:
Maintain full focus on the road! The vehicles ignition will let the camera turn on
while connected to your vehicles cigarette lighter socket. When the vehicle is
turned off, the camera will automatically shut down, preserving camera power
for those moments you are not connected to a direct line of power.
The Cansonic UltraDuo Z1 lets users adjust camera settings to get the perfect
shot. For a great photo every time, here are a few tips from the designers:
1.Reduce the amount of sky in the picture. By adjusting the camera
towards the road, the automatic exposure compensation will be focused
on the road and not the light from the sky.
2.Position the camera in the center of the dash. If you place the camera
behind the rearview mirror, you will avoid all distractions from the road.
3.Remove any objects that will obstruct your shot such as the protective
lens cover. Clear vision will allow you to record everything in one shot.
FEATURES:

ADDITIONAL TIPS
Full optimization of memory card:
1. Before removal of the memory card from the UltraDuo Z1, be sure to
turn off the camera. Leaving the camera on while removing its memory
card may lead to eased or corrupt files.
2. Format memory card to UltraDuo Z1 settings by clicking MODE button
three times to Setup mode, then choosing the format option. You will
now be able to fully use all the memory power your Micro SD card is set
to hold.
3. By reformatting your memory card every 2-3 weeks, your memory card
will continue to be fully utilized. Only do this AFTER you've downloaded
any files from the card to your computer, as formatting the card will
remove all content.

The Cansonic UltraDuo Z1.....................................................................
Precautions...........................................................................................04
Product Specs....................................................................................... 06
Package Contents..................................................................................07
Product Feature
s................................................................................... 07
Suction Mount....................................................................................... 08
Camera Parts & Controls........................................................................ 09
In-Vehicle Installation............................................................................12
Video Mode........................................................................................... 15
Video Menu........................................................................................... 17
Photo Mode........................................................................................... 19
Photo Menu........................................................................................... 20
Playback Mode...................
................................................................... 21
Setup Mode........................................................................................... 26
USB Storage & PC Camera (Optional)..................................................... 29
Video & Audio Output............................................................................. 30
Troubleshooting............................................
......................................... 31
TABL E OF C ONTENTS
03
01

DO NOT expose UltraDuo Z1 to moisture under any circumstance. The
camera is NOT WATERPROOF and will become defective and may put
the user at risk of electric shock or fire exposure.
DO NOT use UltraDuo Z1 for any illegal purpose or to infringe on another
individual’s rights.
When audio is being recorded, we recommend you allow any and all
persons near the UltraDuo Z1 know that they are being recorded. You can
disable the microphone on the camera.
PRECAUTIONS
Please read the following instructions carefully. Proper Use of the Cansonic
UltraDuo Z1 is necessary in order to avoid operational problems that may
occur.
WARNING:
CAUTION:
Do not perform any activities or services with the device unless you are
qualified to control the object. Misuse of the Cansonic UltraDuo Z1 may
result in electric shock or fire exposure. AVOID ANY uses of the camera
that are not listed in the manual. If your UltraDuo Z1 needs service
repairs, please visit a qualified technician to perform the necessary
repairs:
Cansonic UltraDuo Z1 has had exposure to water (rain, all forms of
water, ETC.)
Cansonic UltraDuo Z1 operating system is not functioning properly
Cansonic UltraDuo Z1 does not turn on properly
Cansonic UltraDuo Z1 is equipped with an LCD screen for easy viewing. The
screen has a multi-layer complex component that contains nearly 600,000
pixels. The pixels the screen projects may fail as a result of: Defective
Problems or Prolonged Exposure to the sun. Product life may also be a cause
for screen failure. One pixel is equivalent to 0.0001% of total screen exposure.
One-pixel failure per year during the operational life of the UltraDuo Z1 is
standard and should not be cause for concern.
LIQUID CRYSTAL DISPLAY (LCD)
Cansonic UltraDuo Z1 contains a lithium-ion battery. Battery must be recycled
or disposed of properly according to state and federal laws.
RECYCLE
PROPER USE OF CANSONIC ULTRADUO Z1
The following instructions are listed for exclusive use of the UltraDuo Z1.
Please read all instructions to prolong camera use and effectiveness.
04

• Remove packaging and ensure the windshield is clear of dirt and debris
before you install your dash camera mount.
• Avoid any and all distractions in regards to technology, IT’S THE LAW. Any
obstruction of drivers’ view of the road may result in fines. Ensure the
Cansonic UltraDuo Z1 is placed clear of your view of the road, as well as out
of the way of airbags in the event of an accident.
• Disconnect the Cansonic UltraDuo Z1 adaptor when vehicle is not in use.
By doing so, you will avoid camera damage as well as hazards such as fires
and electrocution.
• Avoid viewing the camera playback feature while operating a vehicle. It is
illegal and may result in a fine or even death.
• Avoid adjusting the camera settings while driving. It is dangerous and illegal.
OBEY THE LAW!
CLEANING
Proper maintenance of the UltraDuo Z1 is essential to allow for full
optimization of the camera. Maintenance suggestions are:
• Clean the device with a soft dry cloth. For tough dirt, please use a small
quantity of water and a neutral detergent. Clean with a soft cloth.
• Avoid contact with the UltraDuo Z2 lens as damage may be caused.
• When necessary, clean the lens carefully by using lens cleaning fluid and
a soft cloth.
05

PRODUCT SPECS
Power Requirements
Power Supply
Recording Resolution
Screen Size
Screen Resolution
Screen Ratio
SD Card
(Recommended Type)
SD Card Recorded File
Capacity
(based on default settings)
Recording Format
Video / Audio Out
Internal Battery
Unit Dimensions
Unit Weight
Model Number / Name
UltraDash Z1
2.0”
960 (W) X 240 (H) pixels x RGB
4:3
MOV
2.5mm Jack (Video / Audio)
Lithium-ion 3.7V /700mAh
(up to 60mins recording time)
Battery design allows the 'Auto Power Off' feature to
function in event of power loss within the vehicle.
It is not intended as an alternative power source to
replace the supplied car adaptor.
0.2 pounds ( 95 g )
5V/1.5A, 12-24V DC
Input: 12-24V DC;
Output: 5V DC;
Fuse Type: 32mm/1.5A
Sensor Resolution
4M Pixel (4,000,000 Pixel)
5G/160°/F2.2
Wide-Angle Lens
Type/Angle/Aperture
Card Reader
Micro SD, Class 6-10, up to 128GB
64-128GB SDHC, Class 10 (48mb/s),
for best results use a recognized brand
8GB Micro SD = 6 0 min s of recording (45x 1 m inu te recordings)
16GB Micro S D = 120 m ins of recording (9 0x 1 mi nute recordings )
32GB Micro S D = 240 m ins of recording (1 80x 1 m inute recording s)
64GB Micro S D = 480 m ins of recording (3 60x 1 m inute recording s)
128GB Micr o SD = 96 0 mins of recording ( 720 x 1 minute recordin gs)
5.3 x 2 x 0.9 inches (13.5 x 5.2 x 2.4 cm )
06
Telephoto Lens
Type/Distance/Aperture
5G/164 ft/F2.0
(Car Power Cable)
1920 x 1080 @ 30fps (Including the black area)
1920 x 800 @ 30fps (Excluding the black area)
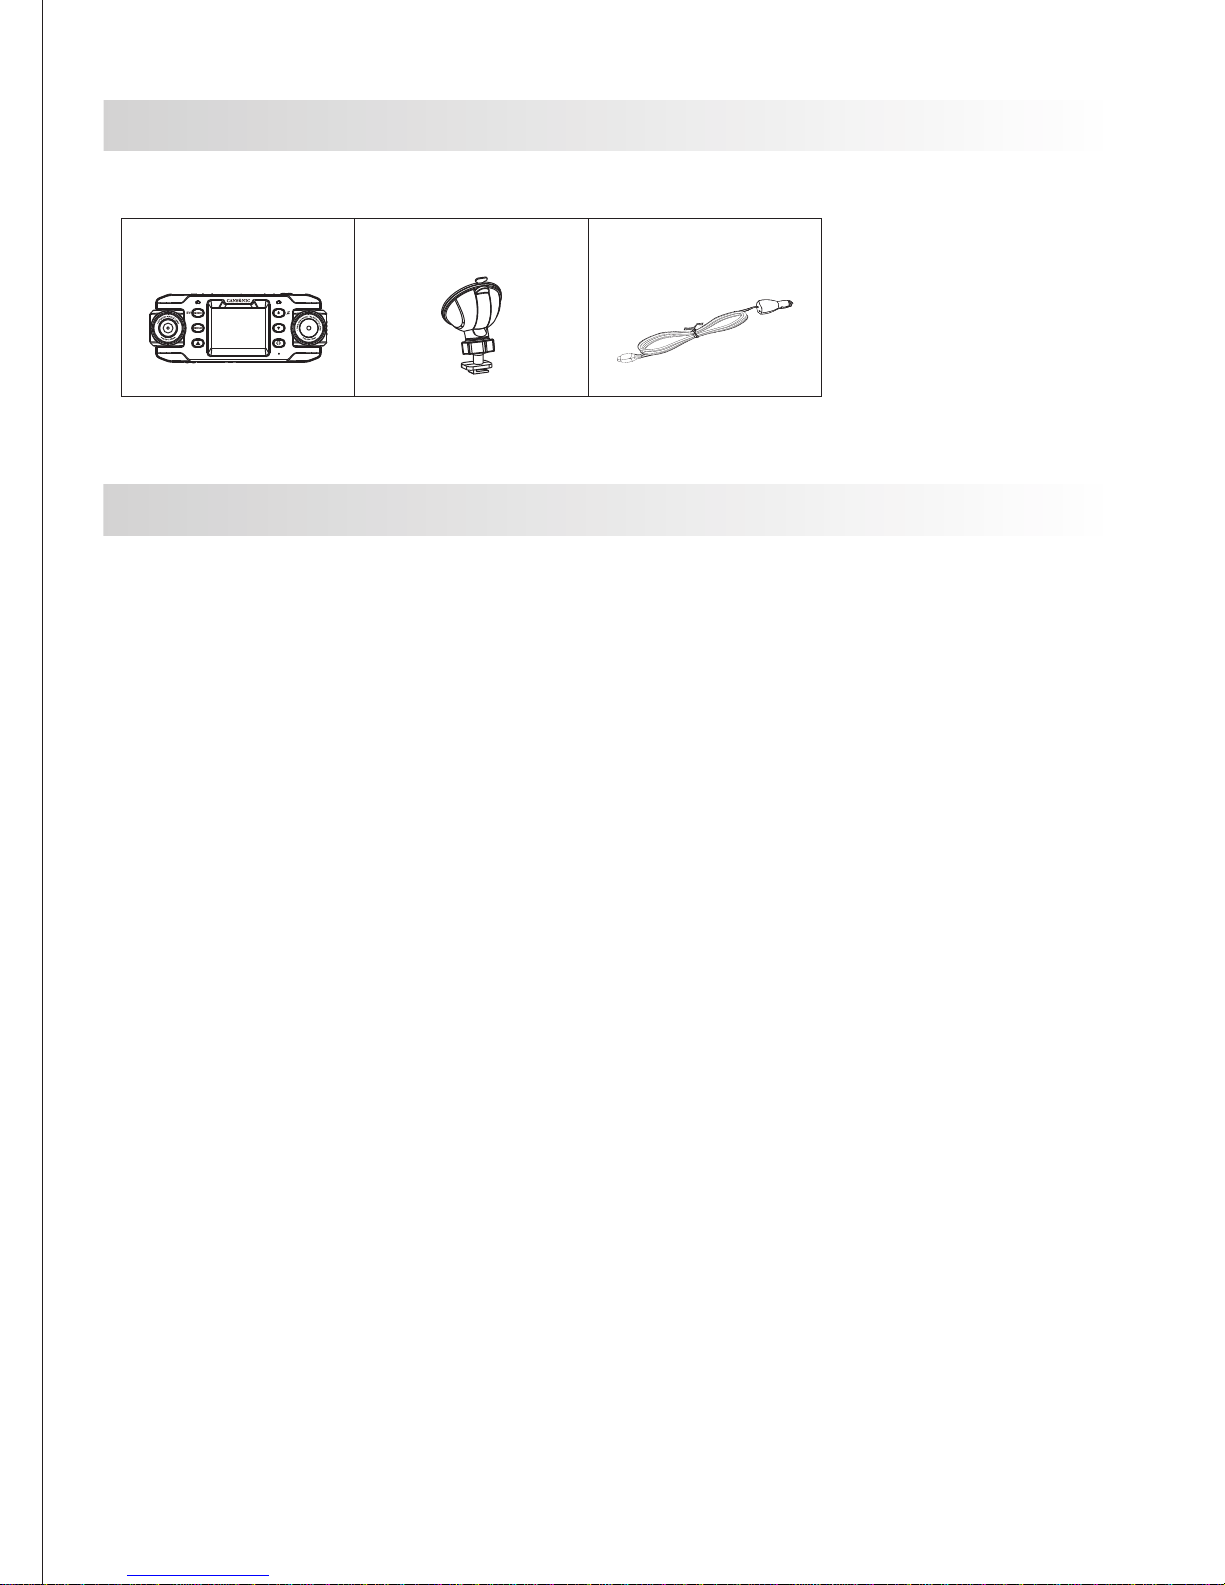
PACKAGE CONTENTS
Please check the contents of your UltraDuo product to ensure all pieces are included.
UltraDuo Z1
Suction mount Car Power Cable
* Product appearance may differ slightly from images shown above.
- 2” LCD Color Screen
We developed a screen that perfectly fits your camera, without any loss of
resolution. This design allows you to use the playback feature, instantly letting
you view the shot you just captured.
- SUCTION MOUNT
We know how difficult it is to maintain focus with movement. We developed a
mount that is uniquely designed to maintain the focus you need to capture the
perfect shot.
- G SENSOR/FILE PROTECTION
The UltraDuo Z1’s built-in sensor detects an outside force, forcing the camera
to save wha
t is has just shot. The file can also be manually saved. By pressing
our easy to access button around the screen, you are able to save an
individual file.
- PARKING MODE
The Cansonic UltraDuo Z1 has a sleep mode, but a unique feature enables the
camera to automatically record 30 seconds of video if there is any physical
movement of the vehicle.
- Automatic Start/Stop Tech
Cansonic UltraDuo Z1 comes with built-in sensors that automatically turn the
camera on and off with the vehicle.
- Built-In Microphone & Speaker
A built-in microphone and speaker come standard. The feature also w
orks
with the camera’s playback feature.
- GPS DATA (OPTIONAL)
UltraDuo Z1 is able to record your location and speed while filming with a GPS
logger (sold separately, please see Cansonic website for more detail).
PRODUCT FEATURES
07
1
2
4
3
08
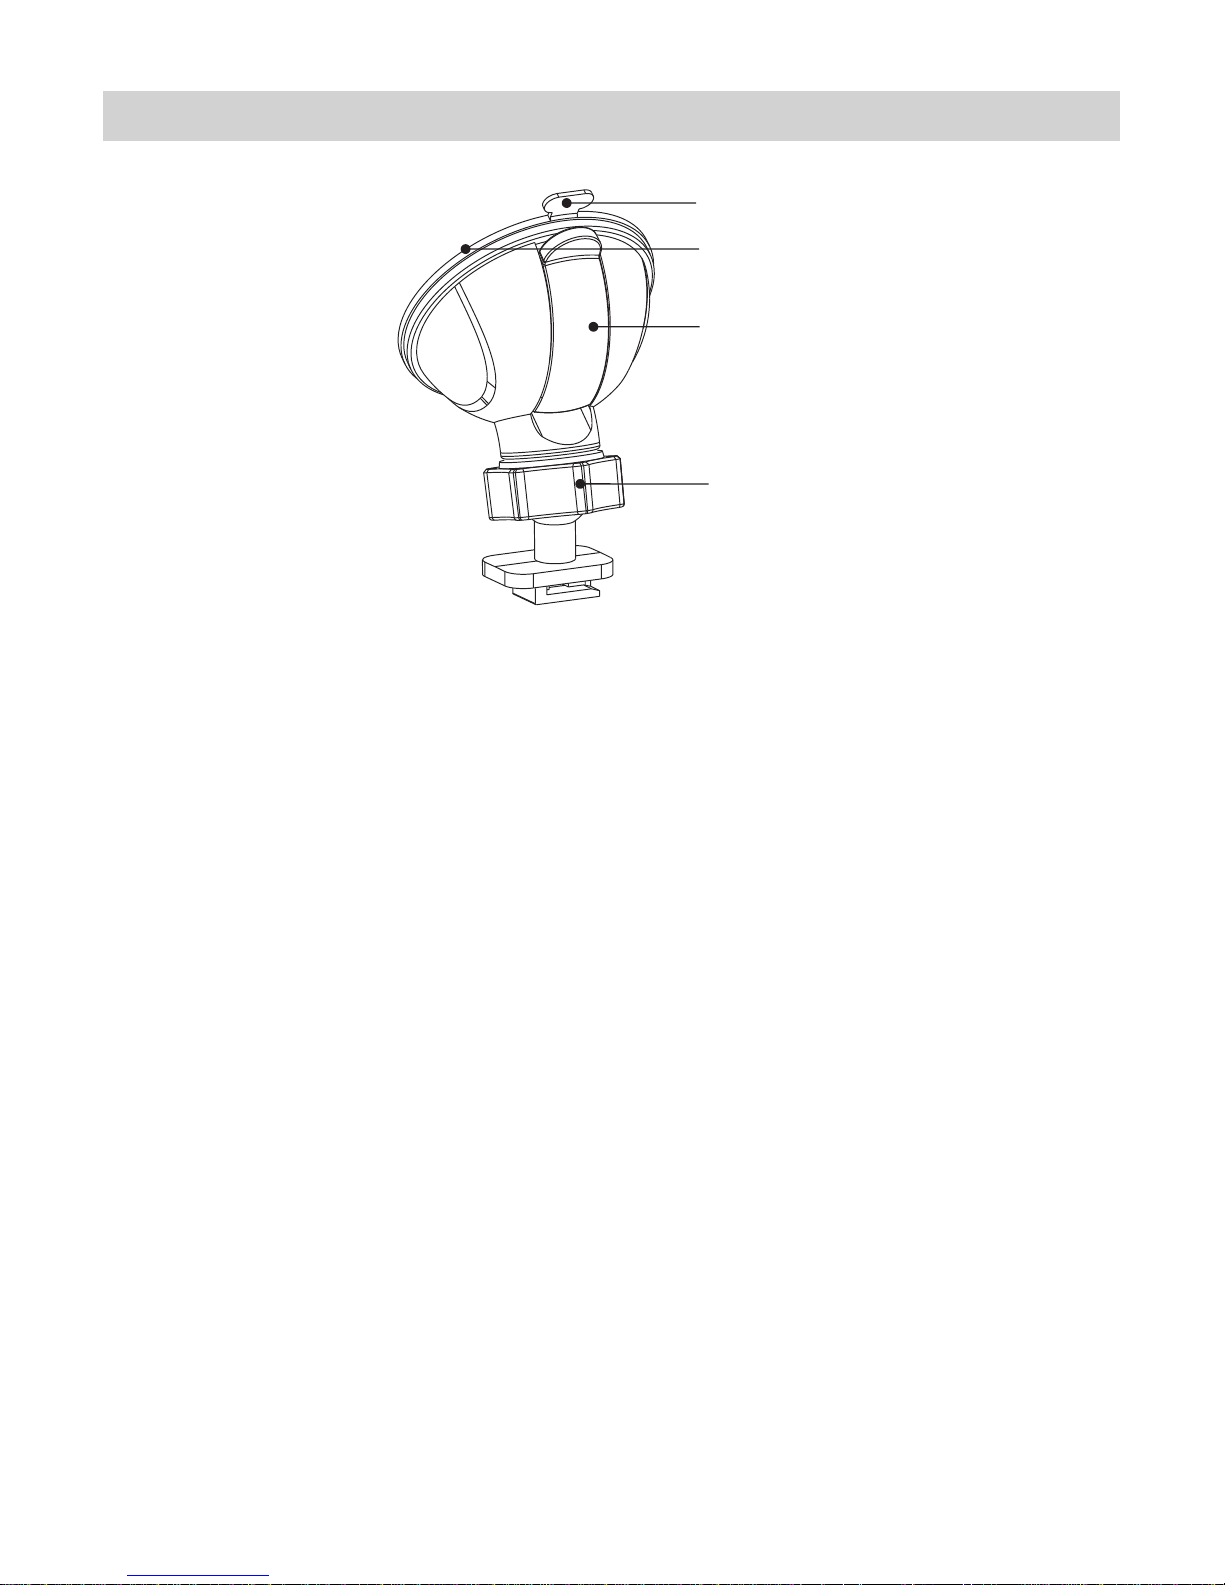
1. Suction Release Tab
The suction release tab allows you to release the cup from the window to
readjust your camera placement. Remember to have a clean surface,
and place it where it will not be a distraction to the drivers view.
2. Suction Cup
Clean the surface of the window, and add a small amount of moisture on
the suction cup to allow for a stronger bond between the glass and the
suction cup. Do not place where there is paint.
3. Locking Ring
Loosen the locking ring so you are able to adjust the Cansonic UltraDuo
Z1 to the perfect angle. Remember to tighten the lock before you use it.
4. Locking Lever
Choose a location to place the camera where it won’t distract you.
Pull down the lever, firmly press down the mount, and lock the lever to
place it securely.
SUCTION MOUNT
CAMERA PARTS & CONTROL
BACK
1 2 3 4
5
6
7
8 9 10
11 12
09
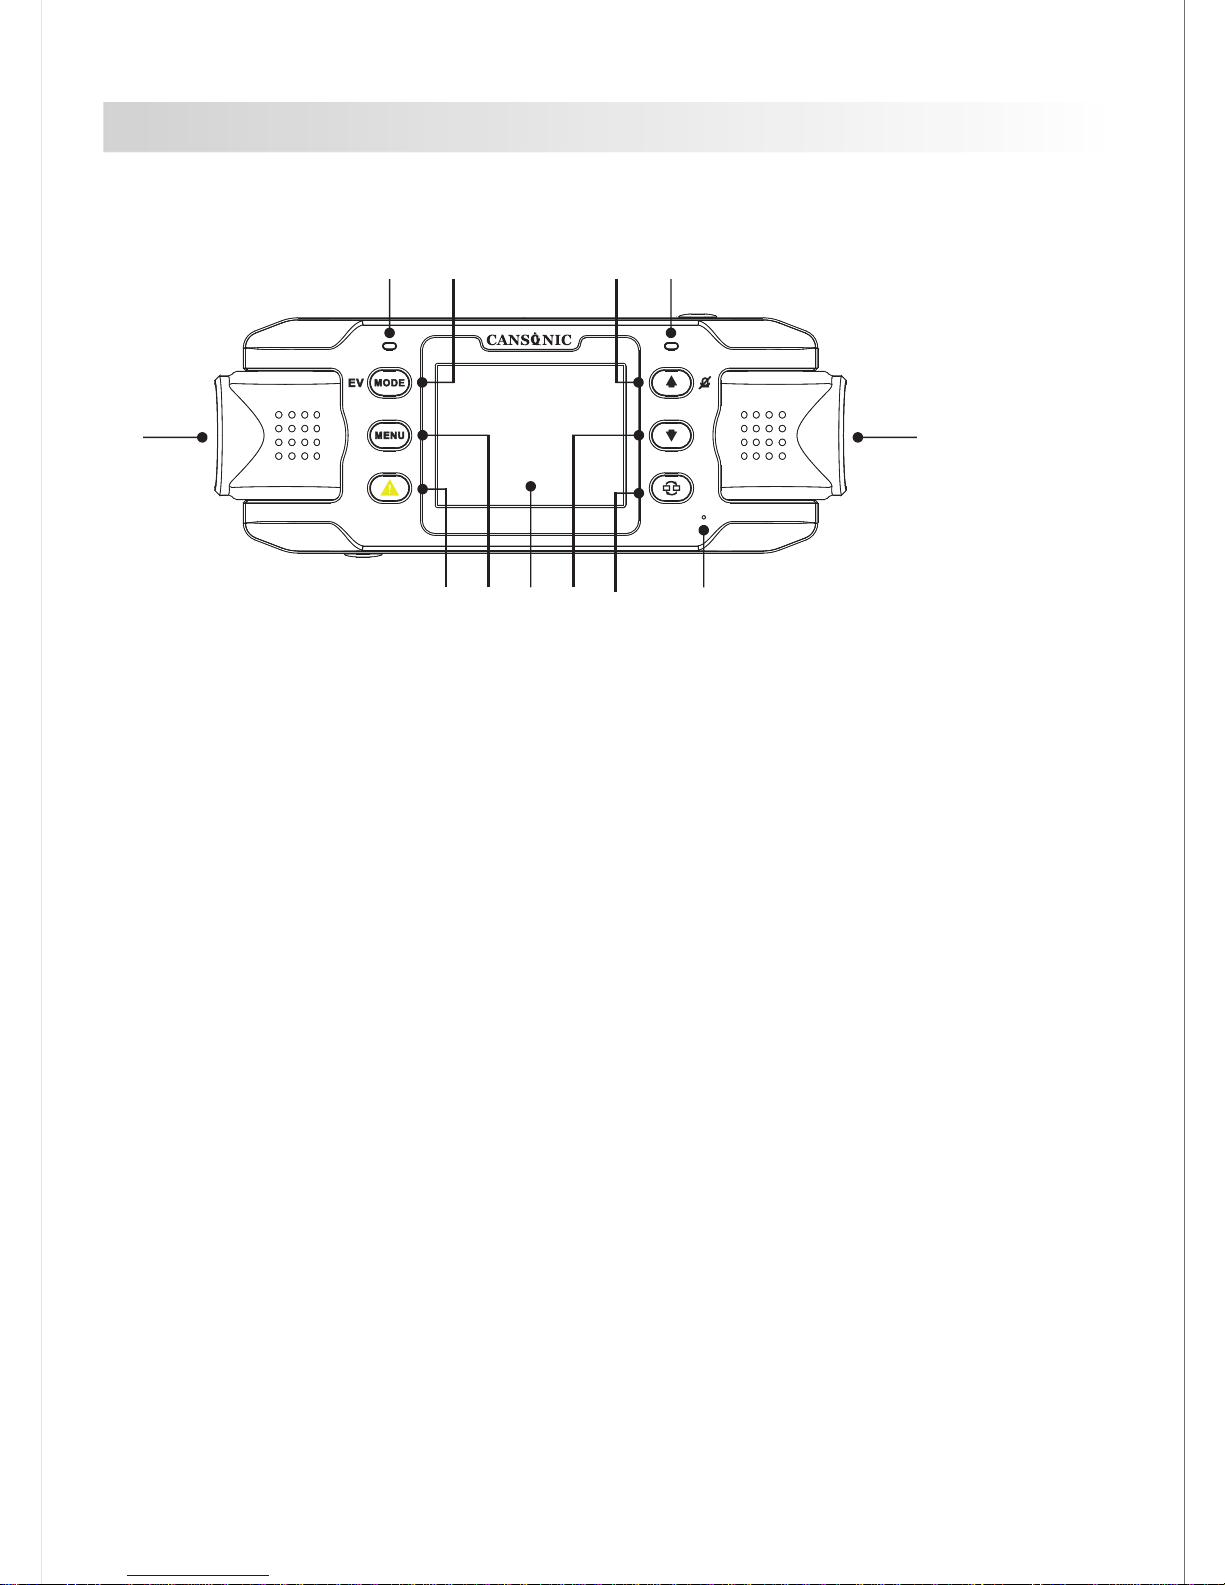
1. GPS LED Indicator
The LED will flash while UltraDuo Z1 locates satellites. -Once a stable signal
is received, the LED light will be constant.
2. Mode/EV Button
Mode
This button allows you to navigate between video, photo and playback modes.
EV
When the camera is recording, press EV to change the exposure level.
3. Up/Mute Button
Up
Navigate up within menus or go to the previous file in playback mode.
Mute
Turn on or off the audio recording function while in video mode.
4. Status LED Indicator
Red: Power On
Red (Flashing): Recording
Blue: Battery charging
5. Left Lens
Left lens is a wide-angle lens designed to record everything through the front
windshield.
6. Right Lens
Right lens is a telephoto lens designed to capture all the details for you, or
you can record the rear traffic by point this lens backward.

BACK (CONT.)
10
7. File Protect/Left Button
File Protect
Simply press the button and to protect the current video file from overwriting.
Note:
- If the button is pressed within the first third of a video clip, the previous
clip will also be protected.
- If the button is pressed within the final third of a video clip, the next clip
will also be protected (if recording continues).
Left
Adjust the sounds/time and date menu settings
8. Menu/Screen Shot Button
Menu
Press this button to open the menu of current mode.
Screen Shot
While you are recording in video mode, press down on the button and you will
be able to take a screenshot of the current frame.
9. Screen
UltraDuo Z1 is equipped with a standard 2.0” LCD color screen to let you view
your files with its playback feature.
10. Down/Screen Off Button
Down
Navigate down within menus or go to the next file in playback mode.
Screen Off
Turn on/off the LCD screen.
11. Screen Select/Right Button
Screen Select
Switch the main camera to display on PIP screen.
Right
Adjust the setting in sounds/time and date menu.
12. Microphone
Built-in microphone for audio recording.
 Loading...