

Page 1

User Manual
January 6, 2004
Part No: F157312111
Copyright© 2004 Canopus Co., Ltd. All rights reserved.
Page 2

2
Copyright RegulationsCopyright Regulations
Copyright RegulationsCopyright Regulations
Copyright Regulations
It is illegal for anyone to violate any of the rights provided by the copyright laws to the owner of
copyright, except for fair use (mainly private noncommercial use). Also, in certain cases copying is
prohibited with no exceptions. In no event shall Canopus Co., Ltd. be liable for any direct or indirect
damages whatsoever arising from the use of both converted and captured materials.
WW
WW
W
arrantyarranty
arrantyarranty
arranty
Your ADVC-55 options are covered by a limited warranty when you register your Canopus unit. This
warranty is for a period of three years from the date of purchase from Canopus or an authorized
Canopus agent. This warranty applies only to the original purchaser of the Canopus unit and is not
transferable. Canopus Co., Ltd. warrants that for this period the unit will be in good working order.
Should our unit fail to be in good working order, Canopus will, at its option, repair or replace it at no
additional charge, provided that the unit has not been subjected to misuse, abuse or non-Canopus
authorized alterations, modifications and/or repair. Proof of purchase is required to validate your warranty.
Canopus Co., Ltd. is not responsible for any lost profits, lost savings or other incidental or consequential
damages arising out of the use of, or inability to use, this unit. This includes damage to property and, to
the extent permitted by law, damages for personal injury. This warranty is in lieu of all other warranties
of merchantability and fitness for a particular purpose.
REPLACEMENT OF DAMAGED PARTS (NOT THOSE DUE TO MANUFACTURING DEFECTS) WILL BE
CHARGED AT ACTUAL COST PLUS HANDLING FEES.
Page 3

3
Safety and Regulatory NoticeSafety and Regulatory Notice
Safety and Regulatory NoticeSafety and Regulatory Notice
Safety and Regulatory Notice
Please observe the followings when using this unit. If you have any questions regarding the descriptions herein, or any other concerns, please contact your local Canopus office or distributor.
WARNING
The following conditions indicate the potential for serious bodily injury or loss of life.
Do not disassemble
Do not remove the cover or modify this unit. Fire, electric shock or malfunction may result. For internal
inspection or repair, please contact your local Canopus office or distributor.
Do not use in a dusty or wet environment
It may cause a short-circuit or a build-up of heat, resulting in fire or electric shock.
Do not use in environments requiring a high degree of reliability and safety
This unit is not to be used in medical devices or life support systems. The characteristics of this unit are
not suited for use with such systems.
Do not place the unit close to heat sources
Do not place in an area exposed to direct sunlight or near a heating apparatus. The heat can accumulate,
causing burns, fire or damage. Also, the unit may become deformed or change color.
Stop using when the unit is smoking
Do not use this unit in an abnormal condition like when it is smoking or emitting an odor. It may result
in fire or malfunction. If any anomaly is found, turn off the power of computer and disconnect the cable
from the unit.
Do not drop this unit nor use this unit in a damaged condition
Do not drop this unit nor use this unit with its cover broken. It may result in fire or malfunction. In case
this unit is damaged, turn off the power of computer, disconnect the cable from the unit, and contact
your local Canopus office or distributor.
Health precautions
In rare cases, flashing lights or stimulation from the bright light of a computer monitor display may
trigger temporary epileptic seizures or loss of consciousness. It is believed that even individuals whom
have never experienced such symptoms may be susceptible. If you or your close relatives have
experienced any of these symptoms, consult a doctor before using this unit.
Page 4

4
CAUTION
The following conditions indicate the potential for bodily harm, damage to hardware or loss of data.
Do not place on an unstable place
Do not place this unit on an unstable table or slanted surface. This unit may fall from it, resulting in
injuries or malfunction.
Do not use other than the described method
Do not use in a manner other than described. Do not use while wrapped in cloth or plastic. Heat can
accumulate, causing burns, fire or damage.
FCC Notice
This unit has been tested and found to comply with the limits for the class B digital device, pursuant to
part 15 of the FCC Rules. These limits are designed to provide reasonable protection against interference in a residential installation.
This unit generates, uses, and can radiate radio frequency energy and if not installed and used in
accordance with the instructions, may cause harmful interference to radio communications. However,
there is no guarantee that interference will not occur in a particular installation. If this equipment does
cause harmful interference to radio or television reception, which can be determined by turning the
equipment off and on, the user is encouraged to try and correct the interference by one or more of the
following measures:
•Reorient or relocate the receiving antenna.
•Increase the separation between the equipment and receiver.
•Connect the equipment into an outlet on a circuit different from that to which the receiver is connected.
•Consult the dealer or an experienced radio/TV technician for help.
Declaration of conformity
According to FCC Part 15
Responsible Party Name: Canopus Co., Ltd.
Address: 1-2-2 Murotani Nishi-ku, Kobe-city Hyogo 651-2241 Japan
Telephone: +81-78-992-5846
Declares that unit model: ADVC-55
Complies with Part 15 of the FCC Rules.
Page 5

5
Product NotesProduct Notes
Product NotesProduct Notes
Product Notes
(1) Unauthorized copying of a portion or the entirety of this unit is prohibited.
(2) The description and specifications of this unit are subject to future change without notice.
(3) The description of this unit has been prepared to be as complete as possible. If the purchaser is
aware of any questionable points, errors or omissions, please contact Canopus Co., Ltd.
(4) Canopus Co., Ltd. assumes no liability for the results of practical application, regardless of item (3)
above.
(5) Regardless of whether negligence occurs during usage, Canopus Co., Ltd. assumes no liability,
even if there is a claim for extraordinary, incidental or derivative loss, including the loss of profits,
that arise during practical application of this unit.
(6) The analysis, reverse engineering, recompiling and disassembling of the software, hardware or
manuals that accompany this unit, and all other related units including miscellaneous supplemental items, are prohibited.
(7) Canopus, as written in both English and Japanese, and its logo are registered trademarks of
Canopus Co., Ltd.
(8) ADVC is a trademark of Canopus Co., Ltd.
(9) i.LINK is a trademark of Sony Corporation, and FireWire is a trademark of Apple Computer Inc. In
this document, both i.LINK and FireWire are referred to as "IEEE1394".
(10) Other product names and related items are trademarks or registered trademarks of their respec-
tive companies.
About the DocumentationAbout the Documentation
About the DocumentationAbout the Documentation
About the Documentation
This document is for ADVC-55. Information not listed in this document may be listed elsewhere. In
cases where there is a difference between a description in this document and an actual operation
method, the actual operation method takes precedence.
To simplify the descriptions, the actual unit may differ from the illustrations.
Page 6

6
Page 7

IntroductionIntroduction
IntroductionIntroduction
Introduction
Page 8

Introduction
8
KK
KK
K
ey Benefits of ADVC-55ey Benefits of ADVC-55
ey Benefits of ADVC-55ey Benefits of ADVC-55
ey Benefits of ADVC-55
Realtime Analog to DV Converter
Canopus's proprietary DV technologies provide the best picture quality preservation. With our proven
hardware DV codec, the ADVC-55 is the easiest solution for converting your S-VHS and Hi8 analog
tapes to DV in realtime. There is no need for any driver installation or difficult settings.
NTSC, PAL, and SECAM Compatible*
There are 3 main television standards in use throughout the world. The system used in America and
Canada is called "NTSC". Western Europe and Australia use a system called "PAL", and Eastern Europe
and France use "SECAM". ADVC-55 allows to convert video data recorded in any environments.
* : ADVC-55 can not perform cross conversion (NTSC to PAL or vise versa, for instance).
Bus-Powered IEEE1394
This plug-and-play unit works with a small amount of electrical power supplied from 6-pin IEEE1394
bus connector of your computer through IEEE1394 cable. No external power supply is needed.*
Compact design without AC adapter makes this unit handy and portable.
* : Bus-Powered IEEE1394 functions only when your computer has 6-pin IEEE1394 port and has capability of providing power.
Audio Input Gain
While monitoring converted video data, you may feel audio level is rather lower than expected. If so,
the ADVC-55's Audio Input Gain function may solve the problem. There is however, a possibility that
the sound may be distorted when the audio signal is over a certain level.
Page 9

Introduction
9
PP
PP
P
ackack
ackack
ack
age Contentsage Contents
age Contentsage Contents
age Contents
The product package includes the following accessories.
[ ] 1 x ADVC-55 unit
[ ] 1 x IEEE1394 cable* (6-pin - 6-pin)
[ ] 1 x User Manual (This document)
* : When your computer has only 4-pin IEEE1394 port, the 6-pin - 4-pin IEEE1394 cable is required (included with the
optional AC adapter).
TT
TT
T
echnical Specificationsechnical Specifications
echnical Specificationsechnical Specifications
echnical Specifications
Primary Function
Power Supply
* Option
Power Usage
DV Output
Analog Input
Video Formats (TV System)
Audio Formats
Unit Dimensions
Ambient Temperature
Realtime analog to DV conversion
5V to 40V / 80mA to 620mA (Supplied from IEEE1394 bus connector**)
Approx. 3.1W
6-pin i.LINK connector
S-Video In: 4-pin miniDIN
Video In: RCA Pin jack (Yellow)
Audio In (R): RCA Pin jack (Red)
Audio In (L): RCA Pin jack (White)
NTCS / PAL / SECAM***
2-channel 48kHz 16-bit
W 126 x D 76 x H 23 mm / 5 x 3 x 1 inch (Protrusions excluded)
Celsius: 0 to 40 / Fahrenheit: 32 to 104 (No condensation)
** : Optional AC adapter is also available. (See Page 16.)
*** : ADVC-55 also accepts SECAM video (input only).
01000101011001010110101
0100010101100101011010101000101
Analog
Digital
Page 10

Introduction
10
Page 11

Installation and OperationInstallation and Operation
Installation and OperationInstallation and Operation
Installation and Operation
Page 12

Installation and Operation
12
Connection PConnection P
Connection PConnection P
Connection P
ortsorts
ortsorts
orts
Front/Right-Side
(1) Status Indicator
(2) DIP Switches*
(3) Power Input Jack**
(4) IEEE1394 OUT Port (6-pin)
* : Refer to "Setting DIP Switches" on Page 13.
** : AC adapter is optionally available. (Do not operate with AC adapter other than the provided.)
Left-Side
(5) S-Video IN Port
(6) Video IN Port
(7) Audio (L) IN Port
(8) Audio (R) IN Port
NOTE:
ADVC-55 first detects S-Video input if both S-Video IN and Video IN port are connected
and used at the same time.
(1)
(2)
(4)
(3)
(5)
(6)
(7)
(8)
Status Indicator
Status indicator shows the present condition of conversion. When it illuminates green, DV stream
output from IEEE1394 port is detected. When it illuminates red;
- ADVC-55 is supplied power from computer.
- ADVC-55 ceases DV stream output receiving a deck-halt command from computer.
- ADVC-55 can not produce normal DV stream output because of excess fluctuations of synchronization signals.
- ADVC-55 detects macrovision signals from video deck.
Page 13
Installation and Operation
13
Setting DIP SwitchesSetting DIP Switches
Setting DIP SwitchesSetting DIP Switches
Setting DIP Switches
**
**
*
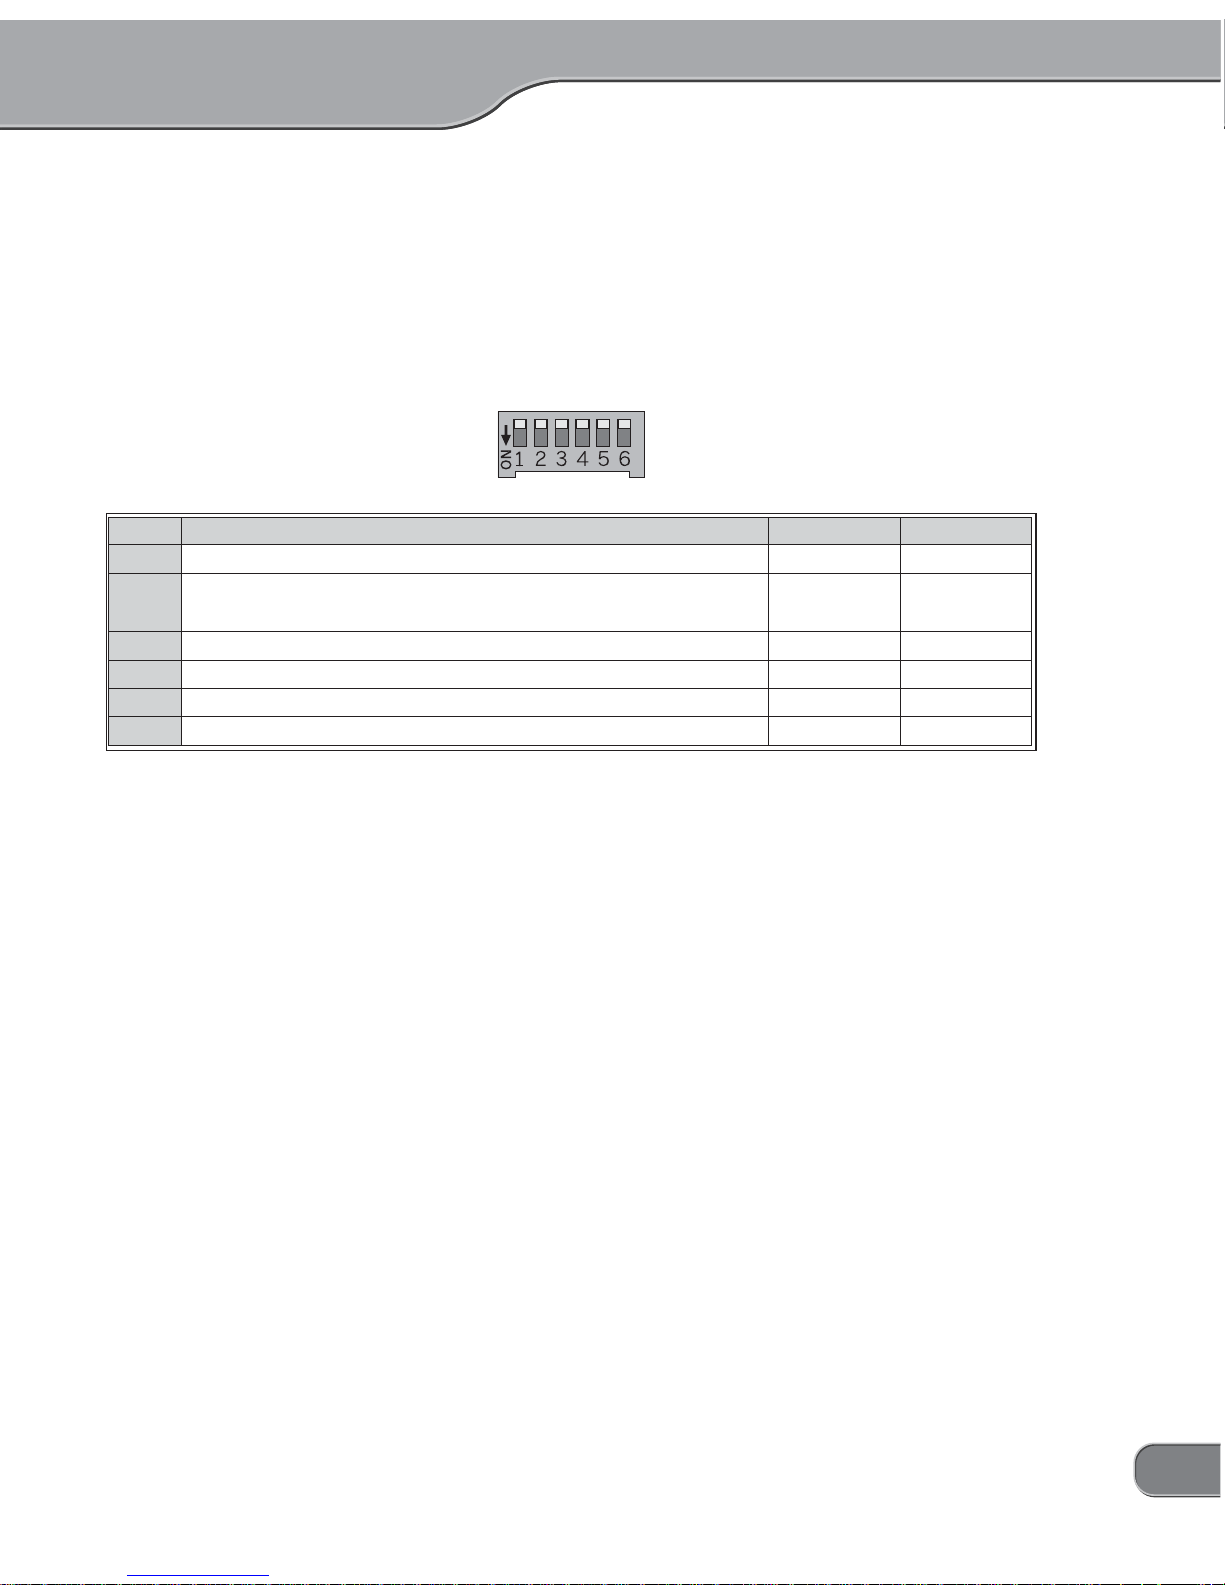
Use the DIP switches on the right side of the unit to modify the ADVC-55's functionality. Each setting
should be set before this unit is turned on. Setting of Audio Input Level can be switched during
operation.
* : All the switches have been set to OFF at the time of shipment. No.1 and No.2 may differ depending on your point of
purchase.
No
1
2
3
4
5
6
OFF
NTSC
0 IRE
PA L
0dB
ON
PA L
7.5 IRE
SECAM
+15dB
MODE
Video Format
NTSC Setup Level (No.1 = OFF)
PAL/SECAM (No.1 = ON)
Audio Input Level
Reserved
Reserved
Reserved
Video Format:
Toggles between capturing NTSC and PAL video format. When you convert video data recorded under
SECAM system, set No.1 switch to the ON (PAL) position and set No.2 switch to ON as well.
NTSC Setup Level:
Toggles between 0 IRE and 7.5 IRE when No.1 switch is set to the OFF position. NTSC Setup (output
black level) setting is available only for NTSC.
Audio Input Level:
When you feel converted sound is rather lower (smaller) than expected, set No.3 switch to the ON
position. It may make the sound larger. There is however, a possibility that the sound may be distorted
when the audio signal is over a certain level.
Page 14

Installation and Operation
14
Converting Analog Video to Digital VideoConverting Analog Video to Digital Video
Converting Analog Video to Digital VideoConverting Analog Video to Digital Video
Converting Analog Video to Digital Video
Capturing analog video data with computer
To capture analog video data with computer, connect the video deck to your computer as follows.
When your computer has only 4-pin IEEE1394 port, you will need a 6-pin-4-pin IEEE1394 cable (included with the optional AC adapter package).
Connect to VIDEO OUT
1 Press deck PLAY button to play images you want to capture.
PLAY
2 Begin capturing with an editing application on your computer (click on RECORD
or Capture button).
Refer to manual attached with the application on detail instructions of how to capture images.
REC
NOTE:
Do not unplug the IEEE1394 cable while capturing or previewing with the editing application, or images will not be displayed on screen.
Page 15

Installation and Operation
15
Dubbing analog video data on DV Camcorder
To copy analog video data on DV Camcorder, video deck and DV Camcorder are connected as follows.
For copying analog data to digital data with DV Camcorder, you are required to use the optional AC
adapter for power. (Please use the AC adapter provided as an option. See Page 16.)
Connect to VIDEO OUT
Plug AC adapter to
power outlet
DV
CAMCORDER
1 Press RECORD and PAUSE button in order on your DV Camcorder.
REC&
PAUSE
DV
CAMCORDER
2 Press deck PLAY button to play images you want to copy.
PLAY
3 Press PAUSE button on your DV Camcorder to release the pause state.
Analog video data is being dubbed onto your DV Camcorder.
REC
DV
CAMCORDER
Page 16

Installation and Operation
16
Optional AC Adapter ConnectionOptional AC Adapter Connection
Optional AC Adapter ConnectionOptional AC Adapter Connection
Optional AC Adapter Connection
An optionally available AC adapter is connected as follows. The AC adapter includes a 6-pin - 4-pin
IEEE1394 cable. You may use this IEEE1394 cable only when your computer does not have any 6-pin
IEEE1394 ports or when the Bus-Powered IEEE1394 does not function.
ADVC-55
6-pin
4-pin
IEEE1394 cable
Adaptor unit
AC plug cable
 Loading...